Hacking Ubuntu (2007)
Part II: Working with Compatibility
Chapter 5: Communicating Online
The default Ubuntu desktop installation includes a web browser, e-mail reader, instant messaging and chat-room client, and even a VoIP system. Although anyone can use them as is, you can get much more out of them by performing a few tweaks and tuning a couple of parameters. Whether you want speed, security, or fancier graphics and cooler features, you are going to want to modify the default applications. In this chapter, you will see how to adjust the web browser settings, secure your web traffic using Secure Shell, access your mail on a variety of systems, and chat online.
Hacking the Firefox Web Brower
The default web browser for Ubuntu is Mozilla Firefox. This browser is fast and supports HTTP 1.0 and 1.1 protocols, as well as HTML and DHTML (dynamic HTML). Although you can immediately use the browser for accessing web sites, some of the default settings could use a little modification.
Tuning Preferences
Firefox has a set of common preferences that can be adjusted to fit your needs. Open the main preferences menu by starting the browser and choosing Edit ![]() Preferences from the Firefox menu. The preferences menu is divided in to categories, denoted by icons on the top of the window (see Figure 5-1). I change my preferences for security, speed, and convenience. Whenever I use a new browser, I immediately change the home page, Java and JavaScript settings, and cache options. If I plan to repeatedly use the browser (instead of a one-time install on a temporary system), then I also adjust the connection and privacy settings.
Preferences from the Firefox menu. The preferences menu is divided in to categories, denoted by icons on the top of the window (see Figure 5-1). I change my preferences for security, speed, and convenience. Whenever I use a new browser, I immediately change the home page, Java and JavaScript settings, and cache options. If I plan to repeatedly use the browser (instead of a one-time install on a temporary system), then I also adjust the connection and privacy settings.
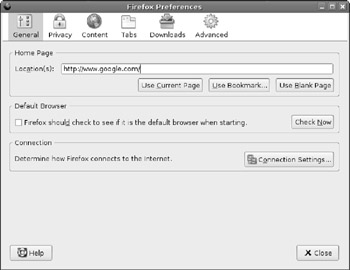
Figure 5-1: The Firefox Preferences window
Tuning the General Preferences
The General category provides basic settings for the browser.
§ Change the default location. I usually use a search engine or a blank page. If there is a particular site you usually go to first, put the URL here. But specifying a blank page gives you a faster startup time since the browser isn't busy accessing the network.
§ Make sure the default browser check box is not set. If you only have one browser, this is not an issue. Ubuntu is not like Windows, where various Windows applications can (and frequently do) hijack the default browser settings.
§ If you use a proxy instead of directly connecting to the Internet, Ubuntu gives you two choices. You can configure a system-wide proxy that will work for all network services (see Chapter 12), or you can give Firefox a special proxy setting through the Connection Settings button.
Tuning the Privacy Preferences
The Privacy category provides settings for managing cached information.
§ I usually reduce the history from the default nine days to one day. If I need to visit a site often, then I bookmark the URL. Keeping nine days of history just clutters the list of sites I have visited. But there are some reasons to keep a large history. For example, if you use the browser for researching a project, then a large history can allow you to quickly find places you visited days or weeks ago. Consider changing this value to match your needs.
|
Tip |
Anyone using your browser can see the sites you have visited. If you have privacy concerns, consider lowering the history or disabling it completely by setting the number of days to zero and then clearing the history once. |
§ I usually disable saved forms and saved passwords. This is mainly for privacy. On the other hand, enabling these options can really speed up some web access. If you don't have privacy concerns and frequently visit the same sites that require forms or passwords, then you can enable these options.
§ Firefox keeps a history of downloaded files. The default setting enables you to manually clean up the list of files. I usually enable automatic removal of entries after downloads. This way, my list only shows failed downloads and ones in progress.
§ As much as privacy advocates complain about tracking people, cookies have become a way of life on the web. Yet, there are some safer ways to handle cookies. I suggest enabling cookies for only the originating site and blocking cookies that I have intentionally removed (see Figure 5-2). Unless you have a need for maintaining cookies long after you close the browser, I suggest the Keeping cookies: Until I close Firefox setting. When you close the browser, all cookies are removed.
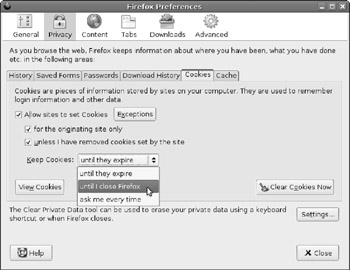
Figure 5-2: Changing the Firefox cookie preferences
|
Note |
Firefox uses shared memory. You must close all Firefox browsers and windows to clear out the cookies. Closing one browser does not do it since the shared memory is not released. |
§ Cache files are stored on your hard drive for quick access to sites you commonly visit. The default is 50 MB of cache. I usually reduce it to 20 MB. Most sites that I visit have dynamic content that changes hourly (active web forums, news sites, and so on). Despite what advertisers may think, I usually don't need to cache 50 MB of banner ads on my system.
|
Tip |
If a web page does not show current information, then it is likely cached. Hold down the Ctrl key when you click on the Reload icon in order to forcefully refresh the page. You can also use Ctrl+F5 or Ctrl+Shift+R. |
Cache and Privacy
The browser cache can lead to privacy concerns. Everything from web pages of online bank accounts to porn that you accidentally stumbled across gets stored in the cache. If your system is compromised or accessed by someone else, then everything in your cache becomes fair game.
Keeping a small cache does remove the data from a typical user, but it won't stop the professionals. Even through a file is deleted, it can still be recovered through tools such as e2undel and recover(for ext2 file systems), or more complicated tools such as The Coroner's Toolkit (tct), Sleuthkit, and Autopsy. Although these are not easy- to-use programs, they can recover most deleted files.
The best way to stay very safe is to completely disable caching, but that will lead to slow web pages. Every icon-regardless how small-must be downloaded from the network every single time. In general, adjusting the cache size is done more for speed and disk space than for privacy since anything saved to disk could potentially be recovered.
Tuning the Content Preferences
The Content category provides settings for handling HTML content.
§ I always enable popup blocking. If a specific site wants to create a popup, Firefox will inform me with a bar at the top of the page. Then I can explicitly permit popups for that page.
|
Note |
Blocking popups does not stop all popups. JavaScript can also be used to spawn popup windows without being caught by this setting. However, enabling popup blocking does stop a lot of the annoyances. |
§ Enable warnings about new extensions and themes. Although this does not stop a web page from trying to install something cool, it does give you the option to stop it. This is really essential when you consider that the same auto-install mechanism for loading extensions can also be used to load a virus.
§ Disable Java. There are very few web sites that require it and there are security risks. I used to recommend that people disable JavaScript, but today there are too many web sites using JavaScript for making active web pages. If you do leave it enabled, be sure to look at the Advanced settings for JavaScript. Turn off anything you do not require. (And if you don't know, turn it off until you do know-usually you will not notice a difference.)
Tuning the Tabs Preferences
Tabs enable you to open new pages in the same window rather than opening a new browser. I find this to be the most useful feature of Firefox. I always have tabs shown (disable the Hide the tab bar option). This way, if I want to open a new tab, I can either press Ctrl+T or double- click on an empty part of the tab bar. Also, always having tabs displayed means the screen will not resize when I open a new tab bar.
Tuning the Downloads Preferences
The Downloads category determines how and where files are saved.
§ For downloaded files, I make a directory on my desktop called Downloads and set it as the default download directory. This way, I can easily find things I just downloaded. If you stick with the default, then files are saved to your desktop. If you have a cluttered desktop, then finding a new item could take some hunting.
§ Personally, I like to see the Download Manager, but I also like it to close when it finishes (the Close the Download Manager when all downloads are complete option). If you don't like seeing the download manager when a download finishes, this is where you can disable showing it. At any time you can always go to Tools ![]() Downloads to see the Download Manager.
Downloads to see the Download Manager.
Tuning the Advanced Preferences
The Advanced category is a catchall for other Firefox options. The available options under Ubuntu are different than the Firefox settings under Windows. For example, you do not have the option to check for Firefox updates. This is because the Synaptic's update manager will tell you if new updates are available. You could choose to disable update checks for Installed Extensions and Themes and for Search Engines-neither of these change often enough to require periodic update checks, but leaving the options enabled does not hurt either.
The Advanced category contains three tabs: General, Update, and Security. The General tab covers accessibility and language support; the Update tab manages automatic software updates; and the Security tab manages SSL certificates. Unless you have special needs, you probably do not need to change anything under these tabs.
Fine-Tuning the Firefox Advanced Preferences
The Firefox Preferences menu shows you the most common things to tune, but those are not the only configurable items. There is a hidden configuration screen that you can access by entering about:config in the address bar (see Figure 5-3).
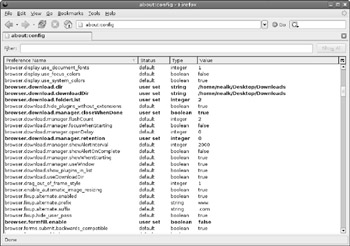
Figure 5-3: The advanced configuration menu
This configuration menu shows all of the configuration settings and their values. Default values are shown in regular text, whereas bold text denotes modified settings. In this case, you can see that when I changed my default download directory on the Preferences menu, it changed the settings in the advanced configuration. All items from the Preferences menu can also be modified here. To change a preference, double-click the item to change and enter a new value. Alternately, you can right-click the line to bring up a small menu. Selecting the Modify menu option is the same as double-clicking. For example, to completely disable saving files web pages and images to the disk cache, set the browser.cache.disk.enable option to false.
Beyond the common preferences, about:config gives you access to other configurable items. Some configuration items affect how the browser looks or how it displays items. For example, browser.blink_allowed controls whether the HTML <blink>…</blink> tags will make text flash. Setting this to false turns off blinking text.
|
Note |
Modifying how HTML is displayed, such as turning off blinking text, only affects new web pages. You will need to reload pages that are currently being displayed in other browser windows or tabs. |
Other items manage performance. For example, the Hypertext Transport Protocol (HTTP) uses TCP for transferring data. TCP is not the fastest protocol and takes time to create and tear down network connections. To speed things up, HTTP allows you to make multiple requests over an established TCP connection. This way, when you need to request multiple pages or images from one server, you don't have the added delay from managing new connections. After a connection sits idle for a while, it is disconnected. You can adjust this timeout value using the network.http.keep-alive.timeoutsetting. The default value is 300 seconds (five minutes). If you use a home firewall (you have a home firewall, right?) then the timeout value on the firewall may be less than five minutes. For best performance, consider adjusting the Firefox timeout to match your firewall. Mine is set to 120 seconds (two minutes).
Since one TCP connection can transfer one piece of data at a time, the browser uses multiple connections for parallel downloads. You can also control the number of simultaneous connections by adjusting the network.http.max-connections and network.http.max- connections-per-server settings. The default settings, 24 total connections and 8 per server, are good for a cable modem or DSL users. But, if you have a faster network connection, you might want to increase these values (for example, 32 and 10) and if you are using a slow connection, such as a dialup modem or 802.11b wireless network, then you might want to lower these values to 8 and 4 for dialup, and 12 and 4 for wireless. The reason is based on bottlenecks: if you try to download too much data at once, it will all arrive at the same time. The resulting traffic will be interlaced and the network protocol may send flow-control packets back to the server, or the server may resend unacknowledged packets. As a result, lots of parallel downloads will be slower than if you download the data one file at a time.
|
Tip |
If you can see the browser slowly loading many images, and frequently get broken or partially loaded images, then you probably have a slow connection. Lower the number of simultaneous connections and see if performance improves. In general, the total number of concurrent connections should be two to three times larger than the number of connections per server. |
Fortunately, there is nothing in this advanced configuration menu that is dangerous-changing a setting will not corrupt anything (but may slow down performance) and can always be reset to the default value but right clicking on the item and selecting Reset from the item's menu.
Managing Profiles
Firefox stores all settings in a profile. You don't need to use the same Firefox settings every time; you can create different profiles. For example, I use Ubuntu on a laptop that I carry between home and work. I have one profile configured to use a proxy for work, and another to connect directly to the Internet for home.
|
Note |
You can also use profiles if you are using a shared machine. Ideally, everyone should have different user accounts on the system. This gives all users independent profiles. But sometimes it is easier for family members to just use the same account. You can easily give everyone (including your dog) different profiles. |
To bring up the profile manager, you will need to run Firefox at a command prompt:
firefox -ProfileManager
This brings up the Profile Manager, where you can add, edit, or remove profiles (see Figure 5-4). The main profile is called default-don't delete this unless you want to lose all of your settings. After you create your new profile, you can select it and click the Start Firefox button. All preferences that you change now will only impact your new profile. Later, you can start Firefox with your new profile by specifying it on the command line. For example, in Figure 5-4, I created a profile called SOCKS Proxy. I can use this proxy by running: firefox -P "SOCKS Proxy". Alternately, I can specify the default proxy by using -P default, or I can just use -ProxyManager to see the menu again.
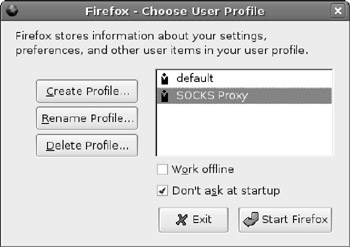
Figure 5-4: The Profile Manager window
Extreme Firefox Tweaks with File Configurations
The settings from the Edit ![]() Preferences menu are minimalist, and the about:config menu allows you to control a lot of functionality, but not everything. If you really want to tweak Firefox, you'll need to edit some configuration files.
Preferences menu are minimalist, and the about:config menu allows you to control a lot of functionality, but not everything. If you really want to tweak Firefox, you'll need to edit some configuration files.
Firefox stores all files in the $HOME/.mozilla/firefox/ directory. In this directory are sub- directories for each profile you created. These directories have a random eight-character string followed by the profile's name. In each profile directory are all of the configuration files. For example, the file prefs.js contains all of your modified configuration settings from the about:config menu.
Another cool directory is the chrome subdirectory (for example, ˜/.mozilla/firefox/ *.default/chrome/). This is where you can define what Firefox should actually look like. There are two example files in this directory: userChrome and userContent. The former controls the display of Firefox and the latter controls the default rendering options.
1. At a command prompt, go into the chrome directory. In this example, you'll use the default profile, but you can really choose any profile.
2. cd ~/.mozilla/firefox/*.default/chrome
3. If you have not already created customized files, then copy over the examples.
4. cp userChrome-example.css userChrome.css
5. cp userContent-example.css userContent.css
6. Edit userChrome.css. This allows you to alter what the browser looks like. The other file, userContent.css, is for customizing the default web page settings.
7. After modifying these files, save your changes. You will need to close all open browsers and then open Firefox to see the changes.
Here are some examples of cool things you can do with these configuration files:
§ Stop scrolling text! While scrolling marquee text at the bottom of the browser's window can be informative, most web sites are just annoying. Besides, I like to see the URL when I hold the mouse over a link. To disable marquee text, add the following to the userContent.css file:
§ marquee {
§ -moz-binding : none !important;
§ display : block;
§ height : auto !important;
§ }
§ While you can turn off blinking text in the about:config menu and pref.js file (set browser.blink_allowed to false), you can also set it in the userContent.css file.
§ blink {
§ text-decoration: none ! important;
§ }
§ By default, all tabs have a dull gray background color. If you use lots of tabs then you might find it convenient to highlight the active tab. In this case, I modified the userChrome.css file to change the active tab to a light green and the inactive tabs are set to dark red.
§ /* Change tab colors */
§ tab{
§ -moz-appearance: none !important;
§ }
§ tab[selected="true"] {
§ background-color: lightgreen !important;
§ color: black !important;
§ }
§ /* Change color of normal tabs */
§ tab:not([selected="true"]) {
§ background-color: darkred !important;
§ color: white !important;
§ }
§ You can specify any web color by name (for example, lightgreen or white) or by specifying the RGB values. For example, rgb(128,255,128) is a puke green color.
You will need to close all open browsers and then re-open Firefox to see the changes made to the userChrome.css and userContent.css files.
|
Tip |
The sample userChrome and userContent files contain few examples. They are mainly used to show formatting and offer a few simple examples. You can find larger lists of tunable items at http://www.mozilla.org/unix/customizing.html and http://www.mozilla.org/support/firefox/tips. |
Adding Search Engines
When Firefox first starts, the top left corner has a text entry field for doing searches on Google, Yahoo!, eBay, and a few other sites. There is no reason why you cannot add your own search engine. For example, if you work for a large corporation, then your company probably has its own search engine for the internal network. You can create your own search entry for performing these searches. As another example, you might want to add the search engines for SourceForge (http://sourceforge.net) or Google Linux (http://www.google.com/linux) to the menu so you can quickly look for open source software.
1. Open a command prompt and go to the /usr/lib/firefox/searchplugins directory. This is where the search engine plug-ins are defined.
2. Create a new search engine.
3. sudo gedit sourceforge.src
|
Tip |
The /usr/lib/firefox directory contains all of the system-wide default settings. All changes you make here will impact all users on the system. You can create a search engine that is only accessible to your default profile by using the $HOME/.mozilla/firefox/*.default/ searchplugins/ directory instead. Initially you will need to create this directory, but you do not need root access to create any files in your home directory. |
4. Edit the src file for your needs. For example, I created an engine to search SourceForge for open source projects. I found the query values by typing anything into the search bar. What I saw was a search URL that said:
5. http://sourceforge.net/search/?type_of_search=soft&words=anything
This has a URL with two query fields (listed after the "?"). The first field is static and defined by SourceForge for software searches: type_of_search=soft. The second field is the user field and it holds the query. So, my sourceforge.src file becomes:
<search
name="SourceForge"
description="SourceForge Search"
method="GET"
action="http://sourceforge.net/search/"
queryCharset="utf-8"
>
<input name="type_of_search" value="soft">
<input name="words" user>
</search>
6. (Optional) Create an icon for your search engine. This can be a 16x16 GIF or PNG file. Give it the same name as your engine (sourceforge.gif or sourceforge.tif). If you do not create an icon, then it will be assigned the default spyglass icon.
7. Save the file, close all browsers, and restart Firefox. You should see your plug-in (for example, SourceForge Search) added to the list of search engines.
There are other options for the search plug-in file, but most are not needed. If your search engine uses a POST instead of a GET (you'll know because the search term will not appear in the URL), then you will need to find out the parameters. You can do this by viewing the source of the search engine's web page and seeing what fields get sent with the form (or jump to Chapter 11 and learn how to capture packets and see what is really being sent).
Playing with Plug-ins and Extensions
Plug-ins and extensions are small programs for Firefox that provide additional functionality. For example, the default Firefox installation cannot play SWF (Macromedia Flash) files. By adding in the Flash plug-in (see Chapter 4), you can add in an SWF player. To see the list of installed plug-ins, enter about:plugins in the address bar. While you cannot add, edit, or remove plug-ins from here, you can see what is installed.
Adding Plug-ins
When Firefox does not know how to handle a particular file type, it gives you a couple of options. First, it can save the file to disk. Although this doesn't run any programs, at least it can save it for you.
Another option is to search for an available plug-in. Firefox searches for plug-ins at https://addons.mozilla.org/plugins/. You can also proactively go to this URL and browse the list of available plug-ins. Another site that hosts plug-ins for Linux is at http://plugindoc.mozdev.org/linux.html, but Firefox does not normally search this site.
A final option requires you to know the plug-in's name and install it using apt-get.Some plug-in packages include mozilla-helix-player, totem-gstreamer-firefox-plugin, and totem-xine-firefox-plugin.
Removing Plug-ins
In the event that you add in a plug-in and it turns out not to be what you wanted, you need some way to remove it. Unfortunately, the Firefox menus offer no solution here. If you installed the plug-in using apt-get, then you can remove it (for example, sudo apt-get remove totem-xine-firefox-plugin). But if Firefox installed the plug-in, then you need to delete it by hand.
Plug-ins are stored in one of two directories. The $HOME/.mozilla/plugins/ directory stores plug-ins owned by you and that are only available to you; it is created when you install a plug- in without being root. The other directory, /usr/lib/firefox/plugins/, stores system- wide plug-ins. Deleting files from these directories removes unwanted plug-ins from FireFox.
|
Note |
Some plug-ins create multiple files in the plug-in directory. For example, the Helix plug-in creates nphelix.so and nphelix.xpt. Be sure to delete all the files associated with the plug-in. |
Helping Handlers
When a file is downloaded, it can be displayed in the browser window, saved to disk, or passed to another application. Web browsers have two ways to determine how to handle a downloaded file. The first method uses MIME types. For example, HTML pages are text/html, plain text is text/plain, and an image could be image/gif or image/jpeg. Each MIME type contains a general category (for example, text or image) and a specific format identifier (for example, gif or jpeg). The second method uses file name extensions. For example, a file named ch05.doc is a word processor document file, and 05-03.tif is a PNG image.
|
Note |
Many Unix and Linux applications use a third method to determine file content. Called a magic number file, this method looks at the file's contents for identifying features. The file /usr/share/file/magic under Ubuntu lists the common magic values. Firefox uses this method when no mime-type is available, but not to identify unknown mime-types. |
When you access data on a web site, the information is returned with a mime-type. The file name may be specified in the HTTP header, but is usually taken from the end of the URL. If the browser sees something it knows, such as text/html or image/gif, then it renders the file. However, if the browser does not recognize the MIME type (for example, application/binary- octet or video/x-ogm+ogg), then the options are limited: save the file or search for a plug-in. Although other web browsers allow you to associate helper applications to MIME types or file extensions, Firefox does not allow you to create your own helpers.
The solution to this limitation is a plug-in called mozplugger.
sudo apt-get install mozplugger
This plug-in creates a configuration file called /etc/mozpluggerrc that allows you to associate a MIME type or file extension with a program on the computer. For example, if you want PostScript (ps and eps) files to open using Ghostview (gv), follow these steps:
1. Install the Ghostview Postscript viewer (if you have not already installed it).
2. sudo apt-get install gv
3. As root, add the following lines to /etc/mozpluggerrc:
4. application/postscript:ps,eps:Postscript
5. : gv $file
The first line specifies the MIME type, extensions, and a description. Multiple extensions can be placed in a comma-separated list. The second line identifies the handler. The documentation for mozplugger (man mozplugger) explains many more options for this control file, including conditionals and special handling.
6. Remove the cached plug-in list generated by Firefox. Without this step, new handlers will not be recognized.
7. rm $HOME/.mozilla/firefox/pluginreg.dat
8. Enter about:plugins in the address bar. Your new handler will be listed in the moz- plugger section.
When using mozplugger, you do not need to close your browser for changes to take effect.
Opening Remote Browsers
Firefox is an intelligent program. It knows how to communicate with other running instances in order to save memory. If you open two browsers and look at the process list for Firefox (ps -ef | grep firefox) you will see only one running process. This is because the second process detected the first and told it to open a new window rather than actually running a new, independent browser.
While reusing code is great for reducing memory requirements, it does have one undesirable side effect: you cannot run a browser remotely if you have one open locally. This situation happens often to system administrators. For example, you will log in to a remote host with X-Windows enabled, and want to run Firefox on that remote host, but want the browser's display shown on your local system. This is different than running the browser on your system because all web-network requests will originate from the remote system. Unfortunately, just running firefox on the remote host will tell your local browser to spawn a new window. Instead, use firefox –no-xshm. This tells Firefox not to communicate through the X-Windows system in order to identify any running browsers. The result is that the remote browser will not see your local browser, it will start running on the remote system, and it will send its display over to your system.
Using Other Web Browsers
Although Firefox is the default web browser, it is not the only one available. Many other browser packages can be installed, including mozilla, epiphany-browser, amaya, konqueror, and lynx.
§ Mozilla-The Mozilla browser is similar to the Mozilla Firefox browser because they stem from the same source. But Mozilla provides slightly different options compared to Firefox.
§ Konquerer-Konquerer is the default browser for the KDE environment. If you choose to install Konquerer, you will need to install the entire KDE run-time environment.
§ Lynx-Although Lynx is a text-based browser, I strongly recommend installing it and knowing how to use it. When you crash X-Windows, lose the graphical display, or are simply using an Ubuntu server installation, you cannot use Firefox to search the web for help-no graphics means no Firefox. As primitive as Lynx may appear, it will allow you to search for help and download patches.
Why Use Different Browsers?
Although some web browsers are suited to different purposes, others just provide alternatives. Many web developers install an assortment of browsers in order to test their web pages. A page you design may look nice under one browser, but have serious problems with a different browser.
I sometimes use different web browsers in place of different Firefox profiles. Even if I give each profile a distinct color scheme, they can still look too familiar. For example, I use one browser for direct Internet use and a different browser for connections through a public proxy. The last thing I want to do is use the direct browser for things that should be done via proxy. If I use two different Firefox profiles at the same time, then I risk mistaking the two windows. But, if I use Firefox for direct access and Mozilla for proxy access, then the browsers look completely different-I won't mistakenly use Firefox thinking it is using the proxy. (See the next section, "Securing Web Access with SSH," to understand why I'd want to use a proxy.)
Mitigating Crashes
Firefox is a pretty stable browser, but it has crashed on me during rare instances. When it crashes, all Firefox windows vanish. Even if you connect with multiple profiles and one window crashes, all Firefox windows close-regardless of the profile. This can seriously impact productivity if you're like me and you heavily depend on web access for your work. A browser crash at an inopportune moment can cost me hours of searching that will need to be redone.
If you're going to access sites that occasionally crash your browsers (in 2006, http://www.cnn.com comes to mind), you can limit the risk from a crash by running a different type of browser. For example, one browser can be used to look at news and entertainment sites and another can be used for work-related web access. Besides making a distinction between work and play, this also prevents a crash due to a fun web site from impacting the work browser. (This is something your boss may care about, even if you don't.)
Securing Web Access with SSH
When you use the network from the comfort of your own home or small office, there is a degree of security because you are not sharing the Internet connection. You can access your favorite web sites or manage your bank account with relatively little risk of someone watching you. Although an evil hacker on the network between you and your bank can see your connection, the odds are very slim that someone is actually on the exact network route between you and your bank.
Unfortunately, the same sense of security cannot be said for remote locations. Coffee shops, airports, bookstores, libraries, hotels, and other places that offer network access for free (or a fee) not only cannot protect you from eavesdropping, but they will happily offer the same free (or fee) connection to anyone-even an attacker. I've been in enough crowded coffee shops to realize that the chances of someone eavesdropping could be as high as 25 percent (and that's assuming that I'm not in the coffee shop with my laptop). Some people do it for fun or curiosity, but other people can be malicious-playing with connections or stealing passwords and accounts. Even using SSL and HTTPS cannot offer you much protection against an active attacker.
Since you don't know who might be listening, it is best to play it safe. If you want to access the network securely and want the freedom of browsing from anywhere, then consider using a Secure Shell (SSH) tunnel. SSH provides an encrypted connection between two computers, and can forward network traffic across the tunnel. To do this, you will need:
§ Two computers. One will be your server at home (or at your trusted location), and the other will be your laptop that you will take with you to the coffee shop.
§ A SOCKS server proxy running on the server. This is how you will relay your traffic from the coffee shop, over the SSH connection to your home, and proxy out to the network.
The goal is to use SSH to create a secure tunnel from your laptop at the coffee shop to your home. You will send all web traffic through the tunnel and relay the web requests through your own SOCKS server. This way, all your web traffic is encrypted as it passes through the coffee shop.
Although this approach is not foolproof, it is about as safe as accessing the network from your home. The basic steps are:
1. Install a SSH server at your home.
2. Open your home SSH server to the Internet. This way, you can access it from the coffee shop, library, or any other public location.
3. Install and configure a SOCKS server that can be accessed only from your home.
4. Test the configuration before going to the public location.
5. Establish the full end-to-end tunnel and start relaying your web traffic.
6. Configure your SSH connection based on your speed requirements.
Installing the SSH Server
The first thing you will need to do is install the SSH server. The Ubuntu installation gives you an SSH client, but not a server. To get the server, install the openssh-server package.
sudo apt-get install openssh-server
Besides installing the server, this package will also generate cryptographic keys, add itself to /etc/init.d for automatically starting at boot, and starts the daemon. I usually check the default server's configuration found in /etc/ssh/sshd_config:
§ Make sure X11 forwarding is enabled (X11Forwarding yes). This way, if your laptop supports X-Windows, then you can run graphical applications from the remote system. For the SSH client (/etc/ssh/ssh_config), you will also want to enable X11Forwarding. If either the client or server does not support this option, then you cannot run graphical applications across the tunnel.
§ Check to make sure KeepAlive yes is set. This prevents an idle SSH connection from being disconnected by an overzealous firewall.
§ I like to enable a banner message (Banner /etc/issue.net). This way, people see a friendly greeting when they connect to the SSH server. This message is displayed before the user is prompted for a password. You will also want to edit the /etc/issue.net file. The default banner gives the operating system version and that could be a security risk. I changed mine so it displays this happy message (see Figure 5.5):
§ All connections and packets are being recorded.
§ Unauthorized access attempts can and will be viewed as a network
§ attack. Where unauthorized access is enforceable by law, it will
§ be prosecuted.
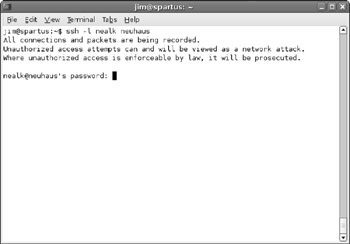
Figure 5-5: A SSH connection showing the /etc/issue.net message
After making any changes to the server's configuration, you will need to restart the daemon.
sudo /etc/init.d/ssh restart
Opening Ports
Since you will be accessing the SSH server from the Internet, you will need to open the SSH port to the world. If you have a firewall, it will need to allow traffic to enter on TCP port 22.
|
Tip |
For the cautious user, consider changing the SSH server to a different port (/etc/ssh/sshd_ config, Port option). This way, worms and kiddies scanning for active SSH servers will be unlikely to find your server. Although this is security-by-obscurity, it is very effective against automated attacks. |
Every firewall is different, so you will need to check how to open a port. If you are using a small home firewall and NAT system, then look for a setting for incoming connections. At minimum, you will need to supply the port (22) and the SSH server's IP address. Depending on your firewall, you may also need to supply the protocol (TCP).
After you have the port opened, test it. Using the ssh command, connect to the server using your laptop. This will do two things: first, it will validate that the port is open and the SSH server is running properly. Second, it will transfer over the server's key to the laptop. This way, when you go to the coffee shop nobody will be able to hijack your SSH connection.
Starting a Proxy
The second key component for creating a secured relay system is to install the proxy on your home system. There are two packages that provide this functionality: socks4-server and dante-server. Both servers provide SOCKS proxies and both are basically equivalent, although socks4-server does require a little more configuration. In any case, you will only need to install one SOCKS server-do not install both. Since both servers use the same port (1080/tcp), only one can run at a time.
Using Socks4-Server
The socks4-server package provides a basic SOCKS version 4 proxy that is intended for use through inetd. To use this, you will need an inetd agent, such as xinetd. You will also need to edit /etc/sockd.conf to allow network traffic.
1. Install both server packages:
2. sudo apt-get install xinetd socks4-server
3. As root, create a socks service for xinetd. The contents of /etc/xinetd.d/socks should look like:
4. service socks
5. {
6. disable = no
7. socket_type = stream
8. protocol = tcp
9. wait = no
10. user = daemon
11. group = sys
12. server = /usr/sbin/sockd
13. }
14. Restart xinetd: sudo /etc/init.d/xinetd restart. At this point, the SOCKS server is accessible from the network, but not configured.
15. Configure the SOCKS server to allow traffic relaying. The default configuration file, /etc/sockd.conf, forbids all connections. At bare minimum, you will want to remove the "deny all" command and replace it with permissions for the local host. If you want other systems to use this proxy, then you will need to permit additional hosts or subnets.
16. # deny ALL 0.0.0.0 .my.domain 0.0.0.0
17. permit localhost 255.255.255.255 ALL 0.0.0.0
|
Warning |
Permitting all network traffic to relay through your box is a huge security risk for machines accessible from the Internet. If this computer is directly connected to the Internet, then spammers will likely use your open SOCKS server to relay e-mail. The time between making a public SOCKS server and relaying spam could be as little as a few hours. For this secure tunnel, we only allow the local host to use the SOCKS server, and the SOCKS server is not accessible from outside the firewall. As long as you only permit access to the SOCKS server from the local host (and not the entire Internet), you should be secure enough. |
In case the SOCKS server does not appear to work right, look in the /var/log/syslog file for error messages. Both sockd and xinetd log their status to this file.
Using Dante-Server
The Dante server supports both SOCKS version 4 and version 5. Although Dante can run from xinetd, it is usually used as a standalone server.
1. Install the Dante server. When you install this, it will try to start the server and it will immediately fail since it is not configured:
2. sudo apt-get install dante-server
3. Configure the server by editing the /etc/dante.conf file. You will need to enable a port as well as connection rules. For example:
4. # log results to /var/log/syslog (for debugging)
5. logoutput: syslog stderr
6. # use 'ifconfig -a' to determine your
7. # in this case, lo is the loopback port so it only allows localhost
8. internal: lo port = 1080 # where to listen
9. external: eth0 # where to relay
10. # enable SOCKS connection methods
11. method: username none #rfc931
12. clientmethod: none
13. # configure which clients to relay; this only allows localhost
14. client pass {
15. from: 127.0.0.1/32 to: 0.0.0.0/0
16. }
17. pass {
18. from: 127.0.0.1/32 to: 0.0.0.0/0
19. protocol: tcp udp
20. log: connect error
21. }
22. # log all failed connections
23. block {
24. from: 0.0.0.0/0 to: 0.0.0.0/0
25. log: connect error
26. }
27. Restart the Dante server. Look at /var/log/syslog for any error messages:
28. sudo /etc/init.d/dante start
Testing the SOCKS Server
Regardless of which SOCKS server you installed, you will need to test it before you head to the coffee shop.
1. Open Firefox on the same host that has the SOCKS server.
2. Open the connection preferences: Edit ![]() Preferences
Preferences ![]() General
General ![]() Connection Settings.
Connection Settings.
|
Tip |
If you do not want to modify your default Firefox settings, then create a new profile for this test. |
3. Enable the SOCKS server. The server should be running on localhost port 1080 (see Figure 5-6). If you are using socks4-server, then specify SOCKS v4 as the protocol. If you are using Dante, then either SOCKS v4 or SOCKS v5 will work.
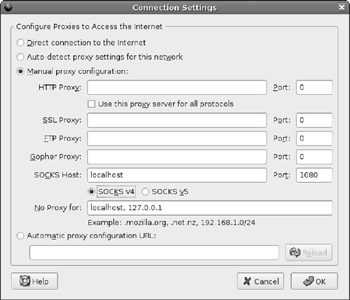
Figure 5-6: Configuring Firefox to use the proxy
4. Use the browser to connect to a web site, for example, http://www.google.com.
If the connection works, you should see log entries in /var/log/syslog and the web page should be displayed. If the connection fails, look in /var/log/syslog for error messages or the reason for the failure.
Establishing the Tunnel
Now that you have working SSH and SOCKS servers, you can create a secure tunnel.
1. Find out your server's IP address. If you are doing this from home, then your ISP assigned you an IP address. If you have a stand-alone firewall, then connect to it and find out what its external (WAN) IP address is. On the other hand, if your computer is directly connected to the Internet, then you can run ifconfig -a to list your IP address (it is probably in the eth0 record). Without knowing your IP address, you will be unable to connect from the outside.
If the IP address starts with 10., 192.168., 172.16. to 172.31. or 169.254., then you are looking at a private network address. You will need to identify the public address before you can access the server from outside your local network.
2. On your laptop, use SSH to create a tunnel to the server. The tunnel should forward the local port 8080 to port 1080 on the server. For example, if your IP address is 1.2.3.4, then you would use:
3. ssh 1.2.3.4 -L 8080:localhost:1080
This command says to relay local connections to port 8080 to the host and port localhost:1080 on the server. The host name localhost will be resolved by the server.
4. On your laptop, configure your browser to use a proxy. In this case, you want to use local- host and port 8080 (not port 1080).
5. Test the connection by accessing a website.
If all goes well, you should see a web page. This means that all web connections go from your laptop to your local port 8080, where SSH securely tunnels all requests to the server, and the server sends it to the local SOCKS server, which in turn sends the request to the Internet.
Although this path does not remove the risk from someone sniffing the network connection between your home and the Internet, it does prevent anyone at the coffee shop from spying on your bank accounts.
Changing Ciphers for Speed
SSH uses cryptographic ciphers for protecting data, but not all ciphers are equal. By default, SSH uses AES. While AES is a very strong algorithm, it is not as fast as others. If you plan to use the Web over a secure tunnel, consider using a different algorithm, such as Blowfish. This cipher is strong enough for everyday use and is much faster. As a result, you will see a speed enhancement for requests sent over this secure tunnel:
ssh -c blowfish 1.2.3.4 -L 8080:localhost:1080
|
Note |
As cryptography goes, AES is considered to be a very strong algorithm. However, it isn't the fastest cryptographic algorithm. The Blowfish algorithm isn't necessarily as strong, but it is much faster. |
Depending on the type of network traffic, you may always want to enable or disable compression. For example, X-Windows traffic can be heavily compressed, while images (for example, GIF and JPEG) and multimedia files such as MP3 and MOV cannot. If you are browsing the Web or streaming audio, then do not use compression-this is the default setting. But, if you are doing remote administration over X-Windows, then enable compression with the -C parameter:
ssh -C -c blowfish 1.2.3.4 -L 8080:localhost:1080
Managing E-mail with Evolution
The default e-mail reader for Dapper Drake is called Evolution. This program is an open source clone of Microsoft Outlook. Besides viewing and composing e- mail, it also manages your calendar, task list, and contacts (see Figure 5-7). Evolution also enables you to manage multiple e-mail accounts. While it natively supports many different mail server configurations, it does have a couple of quirks.
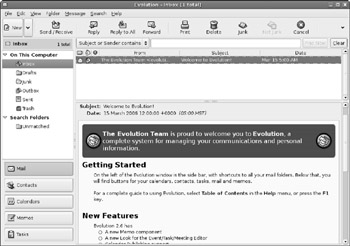
Figure 5-7: Evolution mailer
Configuring an Account
The most powerful part of Evolution is its list of supported mail protocols. It natively supports the Post Office Protocol (POP, also called POP3) and Instant Message Access Protocol (IMAP), as well as Microsoft Exchange and Novell GroupWise. This means that you should be able to use Evolution at home and in most corporate and small office environments.
When you first run Evolution (by clicking the mail icon in the default top panel or by selecting Applications ![]() Internet
Internet ![]() Evolution Mail), it asks you to set up an account. You can later add or edit accounts by running Evolution and selecting Edit
Evolution Mail), it asks you to set up an account. You can later add or edit accounts by running Evolution and selecting Edit ![]() Preferences
Preferences ![]() Mail Accounts. You will be asked to provide three main types of information.
Mail Accounts. You will be asked to provide three main types of information.
§ Identity-This specifies the e-mail address and the name of the person on the address.
§ Receiving options-This identifies how you retrieve your e-mail. For example, if you use a POP mail server, then you will specify the server's address and your account name.
§ Sending options-The way you receive mail is not necessarily the same as the way you send mail. For example, you may receive mail using POP, but send using SMTP.
|
Note |
Your specific configuration will depend on your mail server. Most ISPs provide some type of mail server and instructions for configuring mail readers. Although they are unlikely to specify the configuration for Evolution, they should list the server's host name, protocol (for example, POP3 or IMAP), and any required security steps such as using SSL (or TLS) for encryption. |
There are other options you can configure after creating a new account (select the Edit option under Mail Accounts). For example, you can specify how often to check for new mail and whether to save a copy of every out-going e-mail message.
Besides using e-mail from your local ISP, you will probably want to manage your free e-mail accounts. Some of the most common free e-mail accounts are Google Gmail, Yahoo! Mail, and Microsoft MSN Hotmail. Knowing how to configure e-mail for these free mail services will help you configure mail for most other mail services.
Retrieving E-mail from Gmail
Of all the free e-mail account systems, Google's Gmail is the simplest to configure. Gmail offers a standard POP3 server that uses SSL for security. Google provides a detailed list of supported POP3 configurations at http://mail.google.com/support/bin/topic.py?topic=1555. The mail configuration, including server, protocol, and security, is detailed at http://mail.google.com/support/bin/answer.py?answer=13287.
Getting a Gmail Account
Gmail is an invitation-only mail system. To get an account, you need an invitation sent to you by someone who already has a Gmail account. There used to be web sites where you could donate invites and use donated invites, but most of those services have been disabled or replaced by spam sites. If you need a Gmail account, ask a friend (but please don't ask me).
In August 2005, Gmail added an option to request an invite by sending a text message from your cell phone. Details are available at http://www.gmail.com. If you have a cell phone, then you don't need a friend (ironic, isn't it?).
Preparing Your Gmail Account
After you have your account, you will need to configure it for use with POP.
1. Open a web browser and connect to http://www.gmail.com. Log in using your Gmail account.
2. Select the Settings option in the top left corner.
3. Select the Forwarding and POP tab.
4. Enable POP support (see Figure 5-8). You can either turn it on for all e-mail, or only for future e-mail.
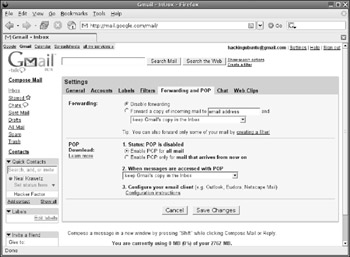
Figure 5-8: The Gmail settings for enabling POP support
5. Save your settings.
Adding a Gmail Account
To add your Gmail account to Evolution:
1. Open the account manager by selecting Edit ![]() Preferences
Preferences ![]() Mail Accounts and click on the Add button. This brings up the Mail Configuration helper.
Mail Accounts and click on the Add button. This brings up the Mail Configuration helper.
2. The first information requested is your identity. Put in your name and Gmail e-mail address (your_login@gmail.com).
3. The second required information is for receiving e-mail. Gmail uses the POP protocol. The mail server is pop.gmail.com on port 995, so you should enter pop.gmail.com:995. It also uses SSL. Figure 5-9 shows an example configuration. Although a password is needed to access the account, you will be prompted for the password when you first try to send or receive e-mail. Selecting the Remember password option will save the password for you.
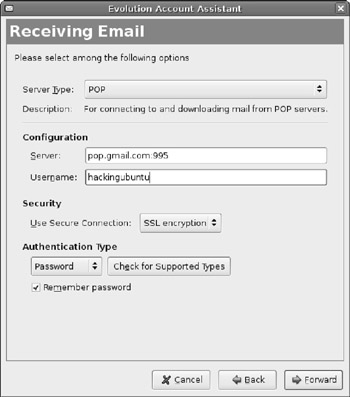
Figure 5-9: Configuring Evolution for receiving e-mail from Gmail
4. On the Receiving Options page, I usually choose to leave messages on the server. This way, I always have a backup.
5. For the sending options, Gmail uses SMTP and server is smtp.gmail.com. You need to specify a security protocol. Gmail supports SSL on port 465 (smtp.gmail.com:465) and TLS on port 587 (smtp.gmail.com:587).
6. Set the account name for Evolution. It defaults to the e-mail address.
7. Apply the new account. This completes the account creation.
8. Click the Send/Receive button. You will see a prompt for your password and a notice about the Gmail SSL/TLS certificate.
o You must approve the certificate. If you don't, then you cannot access your Gmail account. You will only see this prompt once.
o If you select the Remember password option, then you will not be prompted for your password again.
9. After entering your password, you should see the system checking your e-mail and retrieving any messages.
Fetching Mail
The command-line program fetchmail (sudo apt-get install fetchmail) is a standard component of most Unix mail systems. This program enables you to retrieve e-mail from a remote mail server using POP2, POP3, or IMAP. While fetchmail cannot be used to send e-mail, it can be used to collect e-mail from multiple accounts.
|
Note |
To use fetchmail, you will also need to install a local mail delivery system. Chapter 12 shows how to install the Postfix mail system. The default Postifx installation (sudo apt-get install postfix and select any of the default configuration settings) is enough for fetchmail to work. |
The fetchmail program looks for the configuration file $HOME/.fetchmailrc. Each line in this file specifies a different account. For example, to retrieve e-mail from account@gmail.com, you would have a line that says:
poll pop.gmail.com port 995 protocol POP3 username account password password ssl
Running fetchmail retrieves the e-mail and sends it to your local mail system. This should place it in your mail spool. If you configure Evolution to retrieve e-mail from a mail spool, you can read your e-mail from the /var/mail/ directory.
|
Tip |
The mail spool stores e-mail under your account name. If your account on the Ubuntu system is billh, e-mail will be stored in /var/mail/billh. The file is first created when you receive mail. |
Harvesting e-mail with fetchmail can come in very handy if you are not always running Evolution. I have fetchmail configured to check for new mail every 10 minutes. This way, if Evolution is not running, new e-mail will be retrieved. Even though Evolution has an account setting to periodically check for new e-mail, this only happens after you start Evolution. If you reboot your computer then new e-mail will not be checked until you start the mail reader.
Retrieving E-mail from Yahoo!
Unlike Gmail, Yahoo! Mail only provides POP access for paid accounts; free accounts do not have POP access. If you want to use Evolution with your free Yahoo! Mail account then you have two options: harvest or proxy.
Harvesting E-mail from Yahoo! Mail
Although fetchmail does not support Yahoo! Mail, there is a script that does. The fetchyahoo program (sudo apt-get install fetchyahoo) is designed to access e-mail from a Yahoo! Mail account and store it in a mail folder. You will need to create a $HOME/.fetchyahoo configuration file. An example file can be obtained with the following command:
zcat /usr/share/doc/fetchyahoo/examples/fetchyahoorc.gz > $HOME/.fetchyahoorc
Before you can use the example file, you will need to edit it. You will need to replace the yahoo-user-name, yahoo-password, and local-user-name variables to match your configuration. The rest of the options are well documented and should work for most environments. When you are all done, you can run fetchyahoo to retrieve your e-mail.
|
Warning |
Yahoo! periodically changes their login process. This can make fetchyahoo incompatible with them. You may need to download and install a newer version of fetchyahoo from http://fetchyahoo.twizzler.org/ if the version found in the Ubuntu repository is not up to date. If you see errors from fetchyahoo, check what version is installed using fetchyahoo -V, and compare it with the latest version available from the web site. |
Relaying Yahoo! Mail
While harvesting mail with fetchyahoo is good for retrieval, it does not allow you to send and it won't work with Evolution's Send/Receive button. For a more complete interface, consider YPOPs (http://www.ypopsemail.com). This program creates a POP3 interface for Yahoo! Mail.
1. Go to http://www.ypopsemail.com and download the latest code. The source code is available in a ZIP file. I recommend downloading the source code instead of the Linux executable since the pre-compiled executable may not include the latest source.
|
Note |
YPOPs is not in the Ubuntu repositories. You will need to download, compile, and install it without using APT. |
2. Unzip the source code. This should create a ypops/src directory containing all of the source.
3. Follow the steps in README.unix-linux to compile and install YPOPs.
4. Create a ypopsrc file as described in the README. There should be a sample file (ypops_samplerc) containing configuration options.
When YPOPs is running, it creates a POP3 server on the local system and translates POP3 requests into commands for Yahoo! Mail. The default YPOPs port is 110 (POP3), but you might want to change this if you are already running a POP3 server. This is not the fastest server, but it gets the job done. Using YPOPs, you can send and receive Yahoo! Mail using Evolution, fetchmail, and other mail programs.
|
Tip |
If you like using YPOPs, consider adding it to /etc/init.d/ and the /etc/rc*.d/ directories. This way, it will run whenever the computer boots. |
To use YPOPs with Evolution, configure the Evolution e-mail account to use the POP3 server on localhost:110. Evolution should use your Yahoo! Mail address and password for accessing the YPOPs POP3 server. You do not need any encryption since the POP3 traffic never leaves the local computer. Instead, YPOPs translates the requests into HTTPS for accessing Yahoo! Mail.
Retrieving E-mail with FreePOPs
Many providers use the Web for accessing e-mail. Although some providers, such as Yahoo! Mail and Microsoft MSN Hotmail provide POP3 access for paid accounts, free accounts can only use the Web. Also, although YPOPs is available for Yahoo! Mail, it does not work with MSN Hotmail, AOL, Juno, Lycos, or even free web mail systems such as SquirrelMail.
Fortunately, there is a solution for web mail users. FreePOPs provides a generic POP3 system for accessing MSN Hotmail, AOL, Yahoo! Mail, and many other web-based mail systems. Just as YPOPs creates a translation between Yahoo! Mail and POP3, FreePOPs provides a POP3 translation system. It works by using screen scrapings to read e-mail from the web pages.
The really neat thing about FreePOPs is that it comes with a bunch of already configured files for screen scraping different mail systems. Each of these configuration files are found in /usr/share/freepops/lua/.
To use FreePOPs with Evolution:
1. Install FreePOPs. This will install the server (freepopsd) and create /etc/init.d/freepops:
2. sudo apt-get install freepops
3. Start the FreePOPs service:
4. sudo /etc/init.d/freepops start
5. Configure your Evolution e-mail settings: Edit ![]() Preferences
Preferences ![]() Mail Accounts. The important values you will need are:
Mail Accounts. The important values you will need are:
o Server-The POP server is on localhost:2000. This is used for sending and receiving e-mail. No SSL or TLS is needed since the POP3 server is local.
o Account name-Your account name must include your full domain. For example, account@yahoo.com or account@hotmail.com. FreePOPs uses the domain name (e.g., @yahoo.com or @hotmail.com) to identify to correct configuration script.
o Password-This will be the password that matches your e-mail account.
A Cheap Hack
POP3 and IMAP are two of the most supported mail protocols. If your server supports either protocol, then retrieving e-mail is simple. Unfortunately, some mail systems only provide web interfaces, or charge for POP3 or IMAP support. Although tools like YPOPs and FreePOPs allow you to access web-only e-mail sites, there is another option.
Most mail servers allow you to forward e-mail to another address. You can forward your web-only e-mail to a service like Gmail, where free accounts have POP3 access. By forwarding your AOL, Yahoo! Mail, and MSN Hotmail accounts to you Gmail account, you can retrieve all e-mail using POP3. Gmail also allows you to invite other people to join Gmail. You can send these invitations to yourself and open one Gmail account for your AOL mail, one for Yahoo! Mail, and so on. This way, the e-mail does not get all mixed up in one mailbox, and you can download the entire e-mail (headers and all) without resorting to screen scrapings.
The downside of this cheap hack (for people too cheap to pay for POP3 access) is that all of your e-mail gets relayed one more time and stored at Gmail. This might be a problem for some business needs, but then again, if you have security concerns about e-mail storage then you probably should not be using a free mail account.
Addressing with LDAP
One of Evolution's biggest strengths is its integration with Lightweight Directory Access Protocol (LDAP) systems. In many large office environments, LDAP provides directory support, listing employee names, e-mail addresses, and other contact information. To enable LDAP support, simply add a new address book, File ![]() New
New ![]() Address Book, and change the type to On LDAP Servers (see Figure 5-10). After you enter your LDAP server's information, you can access the directory when composing an e-mail.
Address Book, and change the type to On LDAP Servers (see Figure 5-10). After you enter your LDAP server's information, you can access the directory when composing an e-mail.
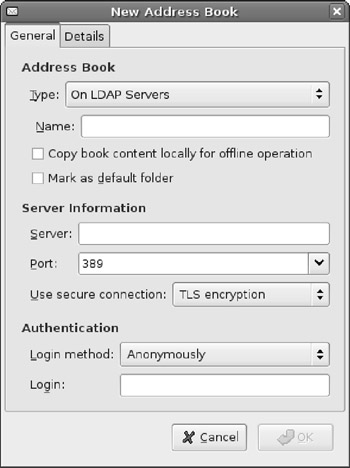
Figure 5-10: Adding an LDAP server
Crashing and Recovering Evolution
Although Evolution has the makings of a very nice mail system, it still has some stability and usability problems. For example, when configuring an account you can test the SSL/TLS connection. Unfortunately, if you select the wrong security protocol (for example, SSL instead of TLS, or TLS instead of none) then it will sit indefinitely-until you click Cancel.
Evolution has other minor annoyances. For example, pop-ups that alert you to an upcoming appointment may appear behind windows. This may not seem critical until you realize that you forgot to pick up flowers for your anniversary. Evolution also has trouble importing meeting invitations from some Microsoft Outlook clients. For example, it may forget to apply any time zone differences-so that 11:00 meeting was actually at 9:00. In some cases, Evolution will just refuse to add meetings to your calendar.
Evolution can also crash. I usually see this happen with using LDAP for looking up name or modifying recipient e-mail addresses while composing an e-mail. (Even though it crashes, the default version of Evolution under Dapper is still a huge improvement over previous versions.)
Unfortunately, when Evolution crashes or closes, it does not kill all running processes. Instead, you will need to kill any running processes that became detached. To do this, use:
killall -r ‘evolution*‘
This command will kill every running process from Evolution.
If you forget to kill all the old processes and just restart Evolution, you can expect to miss appointments, not retrieve e-mail, and to crash more often. This is because the dependent processes, such as GNOME_Evolution_Calendar_AlarmNotify_Factory are no longer connected to the main Evolution process.
With each new release, Evolution lives up to its name-evolving to become better. Unfortunately, at times it can still appear prehistoric.
|
Note |
At the time of this writing, many of these problems were fixed by the next version of Evolution and included in Edgy Eft. However, the fixes had not been back-ported to Dapper Drake. Edgy contains many fixes, but also many experimental and bleeding edge components. Edgy is also not an LTS, so its support will expire before Dapper's. It is unclear when or if Dapper will receive the fixed version of Evolution. |
Using E-mail with Thunderbird Mail
The Evolution mailer provides a full set of office services including e-mail management, calendar scheduling, and task lists. While it does each of these tasks, it still has some stability and usability problems. If you only need e-mail access, you might want to consider Mozilla Thunderbird:
sudo apt-get install mozilla-thunderbird
This installation enables you to run mozilla-thunderbird from the command line or select it from the menu: Applications ![]() Internet
Internet ![]() Thunderbird Mail. Unlike Evolution, this only runs one application and starts up a little faster.
Thunderbird Mail. Unlike Evolution, this only runs one application and starts up a little faster.
In my opinion, Thunderbird is much more refined than Evolution, but not as full featured. Table 5-1 shows a functionality comparison. Generally speaking, both systems are nearly equivalent when it comes to e-mail-only requirements. Although Evolution does support more protocols and non–e-mail features, Thunderbird currently offers more stability.
|
Table 5-1: Comparison of Evolution and Thunderbird |
||
|
Feature |
Evolution 2.6 |
Thunderbird 1.5.0.5 |
|
Protocols |
POP, IMAP, Exchange, Hula, Files |
POP, IMAP, Files |
|
Security |
SSL and TLS |
SSL and TLS; only available by Edit |
|
LDAP |
Yes |
Yes |
|
E-mail Security Options |
||
|
Load Images |
Can be disabled, enabled for all, or enabled for known contacts; default: enabled |
Can be disabled, enabled for all, or enabled for known contacts; default: enabled |
|
JavaScript |
No |
No |
|
E-mail Scam Detection |
No |
Yes |
|
Antivirus Support |
No |
Yes; default: disabled |
|
Additional Functionality |
||
|
Address Book |
Yes |
Yes |
|
Calendar |
Yes |
No; available as plug-in |
|
Task List |
Yes |
No |
|
Memos |
Yes |
No |
Instant Messaging with Gaim
The Web is great for one-way communications: someone posts a web page and someone else views it. Even in online forums, discussions may span days. E-mail is a faster communication method, and is bi-directional, but is not instant. Instant messaging (IM) systems allow realtime communications with groups of people.
Internet Relay Chat (IRC) was one of the first IM protocols. (IRC predates most IM protocols by more than a decade.) There are plenty of IRC clients for Dapper, including the graphical xchat and text-based irssi. But IRC is only one type of IM protocol available today. Yahoo!, AOL, MSN, and Napster all have their own IM protocols. Beyond proprietary systems, the open-source Jabber protocol is growing in popularity; Jabber is essentially IRC over an encrypted channel.
Although you could download a specific IM client for every protocol, it is much more convenient to have one client that supports them all. Gaim in an IM client that ships with Ubuntu and supports eight of the most common IM protocols. To run Gaim, go to Applications ![]() Internet
Internet ![]() Gaim Instant Messanger. When Gaim first starts, you will need to add an account. Accounts specify IM servers and your identities on each server (see Figure 5-11). Each server protocol has different requirements that you will need to specify.
Gaim Instant Messanger. When Gaim first starts, you will need to add an account. Accounts specify IM servers and your identities on each server (see Figure 5-11). Each server protocol has different requirements that you will need to specify.
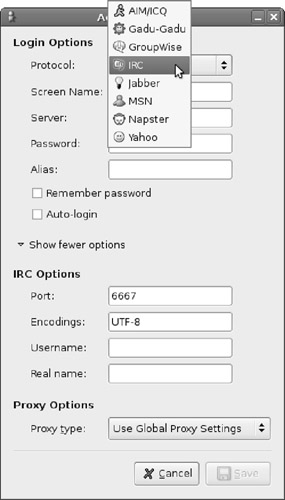
Figure 5-11: Adding an IM account to Gaim
After creating an account, you can log in to the account-this connects to the server. From there, you can join chat rooms and communicate in real-time. Although Gaim does not allow you to bridge between IM connections, it does allow you to connect to many different servers at the same time.
|
Tip |
Gaim uses many different windows and there is no central text menu for opening a specific window. To see the list of windows, right-click on the yellow Gaim icon that appears in the top panel. This will pull up the main menu and allow you to see accounts, chat windows, and even exit the application. |
Talking with VoIP
Ubuntu users are not restricted to the world of text and graphics. There are three different VoIP packages available for Dapper. The default Dapper desktop includes Ekiga-formerly called GnomeMeeting. This is an open source VoIP system that supports SIP and H.323 protocols. This means you can use Ekiga to talk to other Ekiga users, as well as Microsoft NetMeeting, Skype, and WengoPhone users. Skype and WengoPhone are also available for Ubuntu (see Figure 5-12). Unlike Ekiga, Skype and WengoPhone provide VoIP to landline services. For a small fee, you can use your computer to dial a real telephone number.

Figure 5-12: The Ekiga, Skype, and WengoPhone VoIP systems
Each of these VoIP choices offers similar functionality. Each supports audio, video, and text messaging, each can call directly or use a centralize registration and directory system, and each can handle multiple calls at once. The main differences are in licensing and landline access: Ekiga and WengoPhone are open source, whereas Skype is not, and only Skype and WengoPhone allow you to call a real telephone number (for a nominal fee). Although each of these systems can chat with a Microsoft NetMeeting user, none of them can view a shared NetMeeting desktop.
|
Note |
As I mentioned in Chapter 3, Ubuntu does not support all video devices. But if Ubuntu supports the device, then Ekiga and WengoPhone can probably use it for video conferencing. Unfortunately, Skype (for Linux) does not support video conferencing. |
Summary
Ubuntu supports a variety of configurations. Although Ubuntu server is ideal for a standalone server, Ubuntu desktop enables you to reach out and communicate with other people. There are plenty of options for accessing the Web, e-mail, IM and VoIP networks. While the default tools (Firefox, Evolution, Gaim, and Ekiga) are very powerful, there are plenty of readily available alternatives such as Mozilla, Lynx, Thunderbird, xchat, irssi, WengoPhone, and Skype. In the case of e-mail, there are even options for extending support to non-standard and web-based mail systems.
With online communications come risks related to network security. There are options for securing web browsers, e-mail, and even off-site communications, but the topics listed in this chapter, such as tuning applications and using SSH tunnels, are just the tip of the iceberg. If you are interested in more information about network security, consider some of these other resources:
§ Steal This Computer Book, by Wallace Wang, discusses threats from online forums.
§ Hacking Exposed: Network Security Secrets & Solutions, by Stuart McCluer, Joel Scambray, and George Kurtz, covers many different network threats. Although this resource focuses on Windows, many of the threats are similar for Linux users.
§ Introduction to Network Security, by Neal Krawetz, delves into many of the threats from online communications, regardless of the operating system.
All materials on the site are licensed Creative Commons Attribution-Sharealike 3.0 Unported CC BY-SA 3.0 & GNU Free Documentation License (GFDL)
If you are the copyright holder of any material contained on our site and intend to remove it, please contact our site administrator for approval.
© 2016-2026 All site design rights belong to S.Y.A.