Hacking Ubuntu (2007)
Part II: Working with Compatibility
Chapter 6: Collaborating
In today's always connected world, few people work in isolation. In office environments, files and folders are shared with coworkers. In research groups, documents are passed back and forth. Even the hard-core hacker working along in a dark basement isn't really alone-he's sharing files and projects with other people online. Teams of people collaborate on projects in real time while members can be physically located around the world. Incompatible operating systems do not work. Collaboration includes working with people who don't run Ubuntu (let's call them "Windows users"). The default install of the Ubuntu desktop includes a wide variety of collaboration tools, and additional tools available in the standard repositories offer many more options.
Collaboration begins with sharing and compatibility. If you cannot share documents, then you cannot collaborate. And if your system and software cannot handle the files you need, then you won't be able to work with other people.
Unfortunately, some file formats lack strong support, and many applications demand specific operating systems. In order to work with others, you may need to share desktops or actually run a different operating system. Fortunately, Ubuntu has many options for supporting both of these needs.
Synchronizing the Clock
With the need to share files, file systems, desktops, and tools, where do you begin? You begin with the system clock. This may sound like a trivial piece of information, but if your clock is off by more than a little, then it can actually hamper collaboration efforts. e-mails won't be sorted in the right order, files won't have consistent timestamps, and some applications are time sensitive. For developers, timestamps are used to determine what files to compile-if your clock is way off, then source code may not compile correctly.
When you first installed Ubuntu (see Chapter 1), it asked you to set your time zone and to choose whether the hardware clock should be in UTC. Everything else about the clock has been silently done behind the scenes.
Ubuntu sets the clock automatically each time the network interface is brought up. This happens in the script /etc/network/if-up.d/ntpdate. Ubuntu checks to see if the file /etc/default/ntpdate exists. This file should contain one line-the host name of the network time protocol (NTP) server. By default, this file does not exist and the operating system falls back to using the server ntp.ubuntu.com. Here are some tips to make sure your clock is set correctly:
§ If you cannot access the default server (ntp.ubuntu.com) from your network, then your clock will not be set at boot time and will likely drift. Use /etc/default/ntpdate to specify an alternate NTP server.
|
Warning |
NTP uses UDP packets. If you use a proxy or outbound firewall that blocks UDP, then you will need to change the default NTP server, or configure an alternate network route. |
§ If your computer never reboots (and uptimes of over 100 days is common), then your clock can drift-usually by a few seconds per month. Consider adding ntpdate to your root's Cron entry so it runs weekly.
§ sudo crontab -e
And add this line to run ntpdate every Sunday at two minutes after midnight. (Cron is detailed in Chapter 7.)
2 0 * * 0 /etc/network/if-up.d/ntpdate
§ For Ubuntu systems that operate as network router, tying the clock to a network interface can be a problem-particularly if the network connection continually bounces up and down. (Do you really need to synchronize the clock a few times each hour?) In these situations, you might consider removing /etc/network/if-up.d/ntpdate and creating an /etc/init.d/ntpdate command.
|
Note |
The boot scripts found in /etc/init.d/ are discussed in Chapter 3. Actual sample scripts are in Chapters 10 and 11. |
NTP is just one protocol for setting the date. Another option is to use rdate (sudo apt-get install rdate). By default, rdate uses TCP to query the network daytime service (port 13/ tcp) of the timeserver. You will still need to create /etc/init.d/rdate, /etc/network/ if-up.d/rdate, and Cron entries, but this command will work through a proxy.
|
Tip |
The server ntp.ubuntu.com only supports the NTP protocol; rdate won't work with this server. If you want to use rdate and need a time server, consider one of the official atomic clock sites like time.nist.gov. |
Plays Well With Others
There is always a small, fanatical group who thinks collaboration means everyone should run the same operating system. Whether this is Linux people criticizing Windows users, BSD users criticizing Linux users, or Windows users trying to convert the world, the fringe groups are always shouting to be heard. In real life, a homogeneous network is neither realistic nor desirable. Although one operating system for everyone will ease collaboration, it can lead to many other issues.
Some of the issues involve security. If everyone runs the same operating system, then everyone is vulnerable to the same weaknesses. Whether the risk comes from viruses, overflows, or unstable software, all computers running the same configuration are vulnerable. (Windows may have more viruses today, but if everyone used Ubuntu then the virus writers would focus on Ubuntu instead. The lack of viruses for Linux is not due to a lack of opportunity, but rather the lack of effort from virus writers.) Darwin called this "survival of the fittest"; there is safety in diversity.
Usability is another issue. Many programs create log files and time-tracked reports. If your clock is off, then these files can be really difficult to map to real time. For example, was that spike in web traffic really at 2:00 A.M.? Or did it happen after 9:00 A.M. when you released a new document on the Web? Clocks usually appear off by a few minutes (or an hour for daylight savings time). Each time you reboot, it may drift a few more minutes. If you don't occasionally reset the system's time, then the drift can become hours or longer.
Other issues concern use models. An operating system is a tool-and nothing more. You should select the right tool for the right job. Windows offers excellent hardware support and many high-quality applications, but lacks collaboration support for non-Windows systems. BSD offers security from the ground up and a proven track record for stability, but has minimal support from the community (compared to Windows and Linux). Linux has a wide variety of software (although quality varies dramatically) and excellent collaboration efforts. If you need an operating system that plays well with an assortment of other systems, then Linux is a terrific option and Ubuntu's long-term support commitments make it an ideal choice.
Sharing Files
When you collaborate on a project, you need some way to pass files between group members. The direct approach is to send the file as an e-mail attachment. Although this does give them a copy, it does not provide updates-people may pass around very old copies of files. This approach also does not incorporate changes. In most cases, there will need to be an owner whose responsibility is to collect changes and incorporate them into a single document. This may work well with a few people, but it does not scale well to a dozen people working concurrently.
|
Note |
Other downsides to using e-mail for sharing files concerns disk space and convenience. Most corporations and service providers limit the mail queue size. If the queue fills, then no more e-mail can be received. Also, transferring large attachments can be time consuming and searching for a specific attachment is usually inconvenient. |
Another option is to place files on an FTP or web server. This gives a central source for distribution, allowing people to view recent changes to files, but web servers don't readily allow feedback and active collaboration, and FTP servers are not known for security.
The best option is to share a file system's directory among computers. This way, everyone can see all files in one common location. Everyone can also see all changes and everyone can make changes as needed. For Unix and Linux systems, there is NFS for file sharing, but for compatibility with Windows users, you'll probably want SAMBA.
Enabling NFS
Under Linux and most Unix operating systems, the network file system (NFS) is the common way to share directories. With other Unix and Linux operating systems, NFS is part of the core installation. But with Ubuntu, you need to install it as a package. There are three main components required by NFS:
§ portmap-This package provides support for remote procedure calls (RPC) and is used by NFS. You don't need to install portmap by itself-the apt-get commands for the other two components will install portmap as a requirement.
§ nfs-common-Although portmap provides support for RPC function, this package actually provides the RPC functions for NFS. This package is required for NFS clients and servers. It provides basic RPC functions like file locking and status. If you only need to install an NFS client (meaning you will mount a directory exported by some other server), then you can use: sudo apt-get install nfs-common.
|
Note |
Installing nfs-common will generate an error message, "Not starting NFS kernel daemon: No exports." This is expected since it is not configured. To configure it, see the section titled "Acting as an NFS Server." |
§ nfs-kernel-server-This package adds kernel modules so you can actually export a directory for use by a remote host; with this package, you get a server. You can install it using: sudo apt-get install nfs-kernel-server. This brings in portmap and nfs-common as required packages.
NFS is a great collaboration tool because entire file systems can be shared transparently. Everyone sees the same files and file changes are immediately accessible by everyone. The main limitation is operating system support. Although NFS exists for Linux, BSD, HP-UX, AIX, Solaris, BeOS, Mac OS X, and even OS/2, Windows does not natively include it. If you need to share files with Windows users, skip to the next section on SAMBA.
|
Tip |
If you want to use NFS with Windows, consider installing the Windows Services for UNIX (http://www.microsoft.com/technet/interopmigration/unix/sfu/). This free product from Microsoft includes NFS server and client support. |
Acting as an NFS Client
Mounting a remote file system with NFS is really easy. Just as the mount command can be used to access a hard drive, CD-ROM, or other block device, it can be used to mount a remote file system. You just need three items: the server's name, the directory name on the server that is being exported, and the mount point on your local system (a directory) for the connection. For example, to mount the directory /home/project from the server sysprj1 and place it at /mnt/project on your local computer, you would use:
sudo mkdir /mnt/project # to make sure it exists
sudo mount -t nfs sysprj1:/home/project /mnt/project
Now, all the files under /home/project on the host sysprj1 are accessible from the local directory /mnt/project. The access is completely transparent-anything you can do on your local file system can be done over this NFS mount.
|
Tip |
Access restrictions are set by the NFS server and follow the Unix permissions. If you find that you cannot access the directory after mounting it, check the permissions with ls -l. If you do not have permission, then talk to the administrator for the NFS server. |
If you don't know the name of the exported directory, NFS enables you to browse the list of exported partitions using the showmount -e command. This lists the directories and list of clients that can access it. The client list returned from the server can be an entire domain (for example, *.local.net) or a list of clients.
$ showmount -e sysprj1
/home/projects *.local.net
/media/cdrom *.local.net
When you are done with the mounted partition, you can remove it using sudo umount /mnt/project.
For short-term access, you will probably want to use mount and umount to access the directory as needed. For long-term collaboration, you can add the entry in /etc/fstab. For example:
sysprj1:/home/project /mnt/project nfs defaults 0 0
Having the entry in /etc/fstab will make sure the directory is mounted every time you reboot. You can also use sudo mount /mnt/project (specifying only the mount point) as a shortcut since mount consults /etc/fstab when determining devices.
|
Warning |
NFS has one huge limitation. If the server goes down then all file accesses to the network partition will hang-up to hours-before failing. The hang-up is due to network timeouts and retries. If your connection to the server is unstable, then don't use NFS. |
Acting as an NFS Server
NFS servers export directories for use by NFS clients. This is a two-step process. First, you need to create a file called /etc/exports. This file contains a list of directories to export and clients that are permitted to access the directories. Special access permissions can also be specified such as ro for read-only, rw for read-write, and sync for synchronous writes. An example /etc/exports file is given in Listing 6-1.
|
Tip |
There are many more options besides ro, rw, and sync. See the man page for exports (man 5 exports) for the full list of options. |
Listing 6-1: Example of a /etc/exports File
/home/project *.local.net(rw,sync)
/home/solo_project host.local.net(rw,sync)
/media/cdrom *.local.net(ro,async)
|
Note |
The NFS server will not start if /etc/exports is missing or contains no exported directories. The default file contains only a few comments, so the server will not start. After you create your first entries, you will need to start the server. The easy way to start it is with the command sudo /etc/init.d/nfs-kernel-server start. |
|
After modifying the /etc/exports file, you need to tell the NFS server to actually export the entries.
sudo exportfs -r # re-export all entries in /etc/exports
The exportfs command can also be used for other tasks:
§ List the current export table-Run exportfs without any parameters.
§ Export a specific directory once-This is useful if the export is not intended to be permanent (/etc/exports is really for permanent mounts). You will need to specify options, and the list of clients is specified before the directory. For example:
§ sudo exportfs -o ro,async '*.local.net:/media/cdrom'
§ Un-export directory-If the entry is still listed in /etc/exports, then the removal is temporary; the mount will be re-exported the next time you reboot or restart the NFS server.
§ sudo exportfs -u '*.local.net:/media/cdrom'
|
Tip |
Add -v to any of the exportfs commands (for example, exportfs -v -r) to verbosely list additional information. |
You can export anything that is mounted. This includes CD-ROM drives, USB thumb drives, and even mounted NFS partitions from other servers! Although you cannot export single files or block devices, you can export the entire /dev directory (not that you would want to).
|
Warning |
NFS offers no security, encryption, or authentication. Furthermore, established NFS connections can be easily hijacked. NFS is fine for most internal, corporate networks and for use within your home, but don't use it to share files across the Internet. |
Exchanging Files with SAMBA
Although NFS is useful for collaborating with Unix and Linux systems, it is not ideal for sharing directories with Windows users. As mentioned in Chapter 3, SAMBA allows Linux to use the SMB protocol and communicate with Windows systems. Chapter 3 showed how to share printers, but SAMBA can also be used to share directories. First, if you have not done it already, install the SAMBA server: sudo apt-get install samba. You will need to edit /etc/samba/smb.conf and configure your workgroup. This configuration file contains many other options that you will probably want to review. For example, you can bind the SAMBA server to a specific network interface, control client logging, and configure alternate login credentials-these are documented with comments found in the file. After configuring the server, you should restart it: sudo /etc/init.d/samba restart.
There are two ways to use SAMBA for collaboration. It can be a server that shares directories with Windows users, or a client that receives directories exported from Windows servers.
Sharing a Directory with Windows
The /etc/samba/smb.conf file comes with an entry that allows you to share every user's home directory. Search the configuration file for the "[homes]" section and uncomment it (remove the ; before each line). The section should look like:
[homes]
comment = Home Directories
browseable = no
This defines a Windows service (called a share) that can be accessed using \\server\username, where server is the name of your Ubuntu system and username is an account found under /home/username. There are other options that can be uncommented in order to restrict access (valid users = %S and writable = no) and set file permissions.
If you want to export a specific directory then you will need to create your own section in /etc/samba/smb.conf. Listing 6-2 gives an example for exporting the CD-ROM and a projects directory.
Listing 6-2: Sample Export Directories for /etc/samba/smb.conf
# Export the CD-ROM.
# The Windows system will use \\server\cdrom\ to access it.
[cdrom]
comment = CD-ROM drive
path = /media/cdrom
# Export a group project directory.
# The Windows system will use \\server\groupproject\ to access it.
[groupproject]
comment = Group Project directory
path = /home/project
read only = no
valid users = nealk, @team # nealk and group "team" have access
|
Tip |
Although the default Windows installation cannot access NFS partitions, SAMBA can export a mounted NFS partition to Windows users. |
|
Learning to SAMBA
Although SAMBA is very powerful, it is not very easy to manage if you are new to it. If SAMBA does not immediately share partitions, then be prepared to devote an hour or more to debugging. Common problems that I usually check (in order) before going into "Search the web for solutions" mode:
§ Is the smb.conf file correct? Use the testparms program to check for problems. Not all problems are critical, but big problems will be identified. (Some warnings come from default settings in the configuration file.)
§ Is the share name spelled correctly? I have spent hours chasing down problems only to find typos in the smb.conf share name or on the Windows side.
§ If you are using a "valid user" option for the share, you may need to use smbpasswd to create a user account. SAMBA does not consult /etc/passwd. Instead, it uses its own password database found in /var/lib/samba. The command sudo smbpasswd -a username adds a new user to the database, and smbpasswd (as the user) changes the password.
§ Older versions of Windows (for example, Windows 95, 98, and NT) use plain- text passwords. Later versions use encrypted passwords. Check the "encrypted password" value in smb.conf and make sure it matches the system you are supporting. Unfortunately, SAMBA cannot support old and new systems at the same time unless they all use the same encrypted (or unencrypted) password system.
§ If the Windows system can read the partition but not write, then check the permissions on the directory. The SAMBA account may not have write-access.
If all else fails, refer to the FAQ list HOWTO guides at http://www.samba.org and the Ubuntu Guide at http://ubuntuguide.org/.
Accessing a Windows Directory
There are many different ways for SAMBA to access a Windows directory. The main things you need are the Windows system name and the share. The command smbclient -L can be used to list the public shares on a system:
$ smbclient -L wserver
Password: [hit enter with no password]
Domain=[WSERVER] OS=[Windows 5.1] Server=[Windows 2000 LAN Manager]
Sharename Type Comment
--------- ---- -------
IPC$ IPC Remote IPC
print$ Disk Printer Drivers
Big Disk
Printer Printer Brother HL-1850/70N BR-Script3
ADMIN$ Disk Remote Admin
The smbclient command can be used as an FTP-like client for accessing the Windows share. In this example, smblcient //wserver/big will open an FTP client for accessing the Big share.
For remote backups, I prefer to use smbtar. This command enables you to use remotely archive (or restore) files in a share. The backup is saved to a TAR file. For example, to back up the Big share from host Wserver, you can use either:
smbtar -t archive.tar -s wserver -x big # regular archive
smbtar -t - -s wserver -x big | gzip -9 > archive.tgz # compressed archive
For restores, add in the -r parameter:
smbtar -r -t archive.tar -s wserver -x big # regular archive zcat archive.tgz | smbtar -r -t - -s wserver -x big # compressed archive
|
Warning |
This is good for backing up user files, but it is not necessarily a full system backup. For example, Windows XP and Me will not allow SMB access to the system directory or registry. |
Although smbclient and smbtar enable you to access files, they do not allow you to actually mount the share. For this, the smbfs package is needed.
sudo apt-get install smbfs
The smbfs package provides an SMB file system driver and the smbmount command. This allows you to transparently mount a share and use files concurrently with other people.
sudo mkdir /mnt/smb
sudo smbmount //wserver/big /mnt/smb
|
Tip |
The smbmount command is actually a wrapper around the mount command. You can also use sudo mount -t smb. |
As with other mounted directories, sudo umount /mnt/smb will remove the mount.
Working with Open Office
In nearly every corporate environment, you will need to read and write Microsoft Word, PowerPoint, and Excel files. Although only Microsoft Office can handle all of these formats perfectly, Ubuntu includes http://www.OpenOffice.org 2.0-a set of open source tools that can read, write, and modify Microsoft Office documents. The http://www.OpenOffice.org main tools consist of a word processor, presentation system, and spreadsheet application. Each of these are available under the Applications ![]() Office menu.
Office menu.
Using the Word Processor
The http://www.OpenOffice.org word processor (oowriter) is an open source alternative to Microsoft Word (see Figure 6-1). Using this program, you can access most DOC files. This word processor has a number of benefits over Microsoft Word.
§ PDF-Under Microsoft Word, an additional plug-in is required to save documents as PDF files. Normally this wouldn't be too big of a hassle, but the official PDF plug-in from Adobe is a resource-intensive application that can take a while to start up and frequently checks for updates. In contrast, every document in http://www.OpenOffice.org can be immediately exported to PDF by selecting File ![]() Export as PDF from the menu. This same menu option is available under all http://www.OpenOffice.org tools.
Export as PDF from the menu. This same menu option is available under all http://www.OpenOffice.org tools.
§ Security-Microsoft Word embeds lots of unnecessary information in documents. This includes information about the author as well as deleted or edited text. The simple act of adding a character, deleting the character, and resaving the document can make the file larger. http://www.OpenOffice.org enables you to remove personal information and deleted text from saved documents. You can configure this option under the Tools ![]() Options
Options ![]() http://www.OpenOffice.org
http://www.OpenOffice.org ![]() Security settings (see Figure 6-2). The option is labeled Remove personal information on saving.
Security settings (see Figure 6-2). The option is labeled Remove personal information on saving.
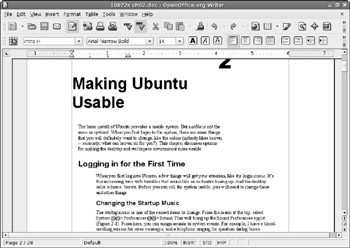
Figure 6-1: http://www.OpenOffice.org word processor
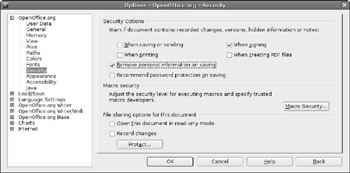
Figure 6-2: http://www.OpenOffice.org Options for security
|
Note |
With Microsoft Office 2003 and later, you do have the option to exclude personal information- on a file-by-file basis. Under http://www.OpenOffice.org, this option is a default configuration that impacts all documents. |
§ OpenDocument Standard-Microsoft uses a proprietary format for storing documents. In contrast, http://www.OpenOffice.org defaults to the OpenDocument standard. On the one hand, OpenDocument is much more portable. On the other hand, it is not supported by most versions of Microsoft Office. For compatibility, you will need to explicitly export the document for Microsoft Office. Alternatively, you can go to Tools ![]() Options
Options ![]() Load/Save
Load/Save ![]() General and change the default file format.
General and change the default file format.
As powerful as http://www.OpenOffice.org's word processor is, there are still some limitations.
§ Formatting-Although it can view most Microsoft Office documents, the proprietary file format was reverse-engineered. As a result, complex formatting may look odd and may not save correctly. If the document has extremely complex formatting, it can actually crash the word processor.
§ Bullets, Numbers, and Headings-This is a weakness in http://www.OpenOffice.org. If you just want a bulleted list, numbered list, or section heading, it can do it. If you want special formatting or characters, then you are better off initially creating the formats in Microsoft Office. http://www.OpenOffice.org can use formats included in a document, but cannot be easily used to create them. Although I expect this to change in later revisions, this is what you have to use today.
§ Macros-As with formatting, http://www.OpenOffice.org does not handle Microsoft Word macros very well.
§ Annoying Pop-ups-Whenever you go to save a document in the Microsoft Word format, http://www.OpenOffice.org may generate a pop-up warning you about the potential to lose formatting information. This would not be so bad if it did not appear every fifteen minutes due to the auto-save setting.
Making Presentations
Either you love Microsoft Office PowerPoint or you hate it. Personally, it is one of my favorite presentation tools. The http://www.OpenOffice.org equivalent is called Impress (ooimpress). This presentation tool can read and write PowerPoint (PPT) documents. While the general look and feel of Impress is similar to PowerPoint (see Figure 6-3), there are some distinct differences.
§ Complexity-As with the http://www.OpenOffice.org word processor, Impress may not display formatting correctly and can even crash if the PPT file is too complicated.
§ Animation-Animated graphics, slides, and slide transitions do not always display properly.
§ Connectors-These are my favorite drawing items; they consists of a line with anchors that can attach to objects so they move as you move objects. If you reflow a connector (by moving the red square that appears in the middle of the line), Impress will forget the reflowed direction.
§ Compatibility-Some PPT files exported from Impress do not load under PowerPoint. I have not seen this happen consistently, but it always happens when you need it most.
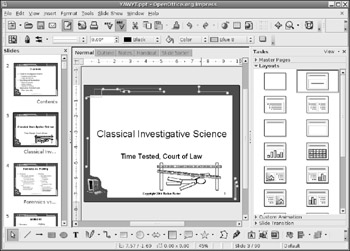
Figure 6-3: http://www.OpenOffice.org Impress-a presentation tool similar to Microsoft PowerPoint
My general rule of thumb when working on presentations is to not change presentation tools. If the talk will be given using PowerPoint, then stick with real PowerPoint. If the talk will use Impress, then stick with Impress. Although Impress from http://www.OpenOffice.org 2.0 is useful for viewing PPT files, the compatibility with PowerPoint is not complete enough for real collaboration.
Accessing Spreadsheets
Although ooimpress is an acceptable presentation tool and oowriter is a good word processor, Calc (oocalc) is an excellent spreadsheet application. Calc has a very similar look to Microsoft Excel and supports all of the standard functions and layouts (see Figure 6-4). There is virtually no learning curve between Excel and Calc. The only limitation I could find was in macro support; Calc won't run most Excel macros and does not support programmed shortcuts. For example, I have a large Excel spreadsheet where I mapped Ctrl+G to a specific macro. Under Calc, Ctrl+G does nothing and running the macro (Tools ![]() Macros
Macros ![]() Run Macros) generates errors about a missing parenthesis that is not missing.
Run Macros) generates errors about a missing parenthesis that is not missing.
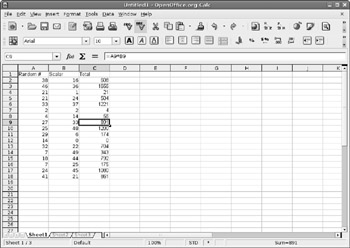
Figure 6-4: The http://www.OpenOffice.org Calc spreadsheet application
Selecting Alternate Office Tools
http://www.OpenOffice.org 2.0 includes many other useful tools. For example, oobase is the Open Office version of Microsoft Access, oomath is a powerful equation editor and oodraw is a very simple drawing tool for when you do not need the complexities of Gimp. http://www.OpenOffice.org even includes a database connection application for managing remote databases. These tools will help you be productive, even if they are not fully compatible with Microsoft equivalent applications. Unlike word processors, spreadsheets, and presentation tools, lacking perfect compatibility between database interface front-ends, equation editors, and drawing tools usually does not impact collaboration efforts.
Although http://www.OpenOffice.org provides the flagship office tools for Ubuntu, they are not the only office tools available to Ubuntu. I believe that the best tool should be used for the task at hand, and that does not mean always using a word processor for viewing a Word document.
Alternate Document Viewers
One tool that I frequently use is antiword (sudo apt-get install antiword). This program converts a Microsoft Word document to plain text. This is so much easier than loading up a document and using File ![]() Save As to convert the format. It also comes in handy when you don't have a graphical login-you can use antiword to quickly see the text inside a Word file, even if fonts and graphics are excluded.
Save As to convert the format. It also comes in handy when you don't have a graphical login-you can use antiword to quickly see the text inside a Word file, even if fonts and graphics are excluded.
There is one other useful feature in antiword. As mentioned earlier, Microsoft Word documents can include hidden comments. Using antiword -s, you can see the hidden text. If you ever wondered what information you were leaking, or what might be hidden inside a document, this tool will show you. To see what text was hidden in a document (for example, file.doc), I use these commands:
antiword file.doc > plain.text
antiword -s file.doc > hidden.text
sdiff plain.text hidden.text
The sdiff command shows the line-by-line, side-by-side differences between two files. Every line with a difference is flagged so you can immediately see where changes occur.
Another powerful tool is wv (formerly called WordView-sudo apt-get install wv). This program includes a suite of conversion tools like wvPDF to convert Word documents to PDF and wvRTF to convert to RTF. This suite also contains forensic tools like wvVersion and wvMime for displaying a document's version and metadata information.
Other alternatives, such as catdoc, are also available for converting Word documents to text. In general, if you want to convert a Word document to any other format-especially text-you do not need the overhead of a full word processor.
If you need a full word processor and not a file converter, consider Abiword (sudo apt-get install abiword). This program can read and write Microsoft Word documents including style formats and embedded images. It does have a few limitations, including display problems with embedded math equations, custom bullet formats, and no support for Word macros. However, Abiword offers similar functionality to OpenOffice without the massive overhead and slow startup time of oowriter.
Alternate Presentation Viewers
Although there are not many alternatives for presentation tools, there is ppthtml (sudo apt-get install ppthtml). This is a primitive program for extracting text from PPT slides and displaying them as HTML.
Alternate Spreadsheet Viewers
Besides http://www.OpenOffice.org's Calc, there is Gnumeric (sudo apt-get install gnumeric). At first glance, Gnumeric looks just like Calc and Excel. The difference is in the functionality: Gnumeric has many numerical analysis settings under the Tools ![]() Statistical Analysis menu (see Figure 6-5). If you need a spreadsheet that makes numerical analysis easy, Gnumeric is a good choice. It is not that Gnumeric has functionality that is missing from Calc and Excel, but rather Gnumeric makes it easy to access. Gnumeric also has a much faster startup time- Calc and Excel usually takes seconds to start up, and large spreadsheets can take a noticeably long time; Gnumeric usually starts up instantly, and large XLS files only take a few seconds.
Statistical Analysis menu (see Figure 6-5). If you need a spreadsheet that makes numerical analysis easy, Gnumeric is a good choice. It is not that Gnumeric has functionality that is missing from Calc and Excel, but rather Gnumeric makes it easy to access. Gnumeric also has a much faster startup time- Calc and Excel usually takes seconds to start up, and large spreadsheets can take a noticeably long time; Gnumeric usually starts up instantly, and large XLS files only take a few seconds.

Figure 6-5: The Gnumeric spreadsheet application
Gnumeric is not perfect-it completely lacks programmable macro support, and cannot display images and diagrams. But for spreadsheets that don't require these features, I find Gnumeric a better option than Calc or Excel.
Collaborating Over the Network
While sharing files allows people to work on different parts of large projects concurrently, everyone still works on independent pieces. For real productivity, nothing beats an occasional meeting. This allows people to identify problems, understand issues, and address details. Meetings can also be used as a teaching forum and used to spread knowledge.
|
Note |
Too many meetings can impede productivity. Lots of companies (and projects) get into situations where they spend more time talking than actually doing work. |
In today's online world, physically getting people together is not always practical. Some people work at home, some are in other countries, and some people are too lazy to walk across the hallway. VoIP and IM can provide real-time communication, but they don't let you see what is really going on. This is where sharing desktops comes in. It's one thing to describe a problem in an e-mail or over the phone; it's another to actually show it. When working together, a shared desktop allows everyone to actually see what is going on. Under Ubuntu, Virtual Network Computing (VNC) is the best option for sharing desktops.
VNC is supported on Unix, Linux, Mac OS X, and Windows operating systems. Rather than struggling with almost-compatible software, VNC provides access to remote desktops where you can use software on its native platform. For example, I frequently find myself in phone conferences where Microsoft NetMeeting or LiveMeeting is used to shares slides. This is convenient for Windows users, but not for Linux users. To get around this problem, VNC is started on one of the Windows clients. This way, Linux users can use VNC to watch the shared presentation.
VNC consists of two parts: a server and one or more clients (called viewers). The server shares the desktop, while the client creates a window to display the server's desktop.
|
Warning |
Under Microsoft NetMeeting, the server can choose which windows to share. Under VNC it is all or nothing; either the entire desktop is shared or nothing is shared. If you are sharing your desktop, don't forget that everyone can see you checking your e-mail. |
Remote Desktops
There are a couple of different ways to share desktops between Windows and other systems. Although VNC is very common and accessible, other options exist. For example, Microsoft offers the Remote Desktop Protocol (RDP) for sharing the desktop with a remote host. RDP is included by default on Windows 2003 and XP systems, and is available from Microsoft for other Windows versions (http://msdn.microsoft.com/library/en-us/termserv/termserv/remote_desktop_protocol.asp). On the Linux and Unix side, tools such as rdesktop (part of the default Ubuntu desktop) allow access to the shared Windows desktop from non-Windows systems. To use this program, you just need to provide the name of the windows server-for example:
rdesktop winserver
Other RDP client packages for Ubuntu include gnome-rdp and tsclient. For the KDE desktop, there is also krdc.
Although using a native Microsoft protocol is useful for accessing a Windows desktop, there are two significant limitations. First, the RDP server (shared desktop) is not available for all versions of Windows; second, only Windows can be a server. Currently, you cannot use any of these Ubuntu RDP tools to share your Ubuntu desktop with a Windows system.
Using the VNC Viewer
The VNC client for Ubuntu is provided by the xvncviewer package and is installed as part of the Ubuntu desktop. To use it, run: vncviewer. This pops up a small window that asks for the server's name.
|
Tip |
I usually add the VNC viewer as a launcher on the top panel. This way, you can click on an icon and immediately get prompted for the server's name. If you include the server's name on the command-line, then vncviewer will immediately connect to the server. |
VNC servers can be configured to require password. If one is needed, you will be prompted to enter it. Then the viewer's window will appear, showing you the shared desktop (see Figure 6-6). While your mouse is over the viewer, your cursor will become a small square. If the server allows you to interact (and not just "view only"), then the server's cursor will follow you. Every keystroke and every mouse click will be transmitted from your system to the server.
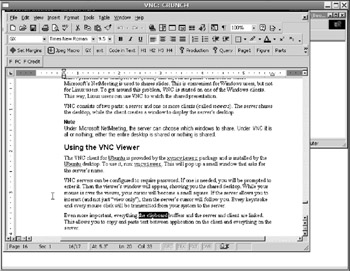
Figure 6-6: Using VNC to access a remote server. The remote VNC server's desktop is displayed within the VNC window.
Even more importantly, the clipboard buffers on the server and client are linked. This enables you to copy and paste text between applications on the client and everything on the server.
|
Note |
If the server's desktop resolution is larger than the client's window, then the viewer's window will have scrollbars. This can be inconvenient. Also, if the server's color palette differs from the client's, then colors may look wrong. |
Sharing Your Desktop
For an Ubuntu VNC server, there are two options. First, you can share your own desktop. In this setup, every client sees everything you have. Although this is usually not a problem, it can sometimes hinder your own productivity. For example, you can't search the web or check e-mail in privacy if everyone can see your desktop. The second option is to share a virtual desktop, where clients only see what you want them to see.
Sharing Your Complete Desktop
To share your complete desktop, you will need to install the server, x11vnc.
sudo apt-get install x11vnc
To start the server, simply run x11vnc. The basic server uses no passwords, allows one client to fully interact with the server, and exits when the client disconnects. There are many other options for x11vnc. Table 6-1 shows some of the more useful ones. These options can be combined. I usually use something like x11vnc -forever -passwd SeCrEt.
|
Table 6-1: Command-line options for X11vnc |
||
|
Option |
Example |
Purpose |
|
passwd |
x11vnc -passwd SeCrEt |
Assign a password to the server. It's not very secure, but it does keep the riff-raff out. |
|
viewonly |
x11vnc -viewonly |
All clients can watch but cannot interact. This is useful for presentations. |
|
forever |
x11vnc -forever |
The server continues running after the last client disconnects. The default setting is -once. |
|
clip |
x11vnc -clip 600x400+25+0 |
Restrict the desktop region. In this case, it is 600x400 pixels offset vertically 25 pixels- this is a region just below the top panel. Only items within this region are shared. |
Sharing Independent Desktops
Although sharing your full desktop is useful, sometimes it is better to have a clean slate for sharing. X-Windows supports virtual desktops. These are desktops that exist in memory and do not conflict with your real desktop. The tightvncserver package provides a virtual desktop for sharing over VNC.
1. Install the Tight VNC server.
2. sudo apt-get install tightvncserver
3. Start the server. Be sure to specify the screen resolution (e.g., 800x600), color depth (e.g. 8, 16, or 32 bit), and the display number. Your normal desktop runs on display ":0", so you will need to choose an alternative display.
4. vncserver -geometry 800x600 -depth 16 :9
|
Tip |
Although you can specify a desktop space that is larger than your real desktop and uses a higher resolution, don't. In most cases, it is more convenient to choose a geometry that is smaller than your desktop and has the same color depth (or less) to avoid scrollbars and ugly colors. |
5. When you first start vncserver, it will ask you for a password. Clients will need to provide this when connecting to the server. If you restart the server, you won't need to specify the password. If you want to change the password later, use vncpasswd.
6. Use xvncviewer to connect to the server. For the server's name, include the display. For example, if the server's hostname is vserver then type in vserver:9.
The virtual desktop starts up in the background. To stop it from running, use the -kill option. For example, vncserver -kill :9.
The basic virtual desktop has a very simple configuration: it has one terminal window open. There are no menus, no icons, and no background beyond the default X11 "gray". The desktop is defined in the $HOME/.vnc/xstartup script. You can change this in order to give it a real desktop. For example, Listing 6-3 shows my xstartup. It has options for many different desktops, but currently starts up myGnome desktop without showing any of the actual applications I have open (see Figure 6-7).
Listing 6-3: Sample $HOME/.vnc/xstartup with Different Desktops
#!/bin/sh
###################################################
# Select your desktop (only uncomment one window manager)
###################################################
#########################################
### For *your* Gnome Desktop
gnome-session --sm-disable &
#########################################
### For KDE (after: sudo apt-get install kubuntu-desktop) #startkde &
#########################################
### For Tab Window Manager (after: sudo apt-get install twm)
#twm &
#########################################
### For plain X-Windows with a terminal
#xrdb $HOME/.Xresources
#xsetroot -solid grey
#x-terminal-emulator -geometry 80x24+10+10 -ls -title "$VNCDESKTOP Desktop"
&
#x-window-manager &
###################################################
### Add your own applications here.
### Be sure to background them using "&"
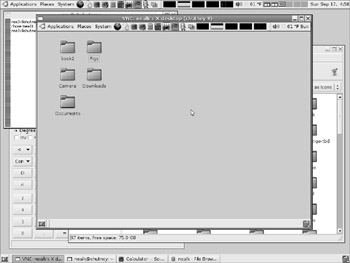
Figure 6-7: Tight VNC server running the Gnome desktop. The real Gnome desktop has applications running that do not appear in the VNC server.
|
Tip |
When using Firefox on the VNC virtual desktop, you may see errors about Firefox already running or the profile being in use. Consider using firefox –no-xshm or an alternate profile to overcome this problem. See Chapter 5 for tuning Firefox. |
Securing VNC Connections
The VNC password provides a basic level of security, but should not be trusted for safety over the Internet. Instead, you can tunnel VNC over an SSH connection. By default, the VNC server uses port 5900/tcp. Each VNC display increments this value. For example, if you are using Tight VNC and specify display :9, then the port is 5909/tcp. Then, using SSH port forwarding, you can tunnel the VNC port. For example, to tunnel the local VNC port to the server's VNC server running on :9, use:
1. On the remote server, start the Tight VNC server on display :9. For example:
2. vncserver :9
3. On your local system, use SSH to connect to the server and forward the local port 5900/tcp to the server's port 5909/tcp.
4. ssh -L5900:localhost:5909 server
5. In a different window on your local system, start the VNC client with:
6. xvncviewer localhost
This command tells the viewer to connect to the VNC server located on localhost:5900. However, 5900/tcp is actually tunneled through the SSH connection to the remote server. The connection is tunneled to the server's port 5909/tcp where the VNC server is running.
By tunneling VNC over SSH, you prevent attackers from seeing your desktop and, more importantly, you do not need to have the VNC server and its weak password system accessible to the world.
Seeing a Speed Difference
VNC transmits a lot of graphics and can be a bandwidth hog. If a dozen clients connect to a single server, then network traffic leaving the server can become a bottleneck and result in really slow updates for everyone.
If you need to have lots of viewers, consider farming out the load. The main server should only share the desktop with a few clients (for example, one server shares to four clients). Each of the clients also runs a server and shares with more clients. You can continue spreading the network load among computers until everyone has access. It only takes three levels of this "one server to four clients" for over 200 people to see the same thing. Although the people at the end of this chain may need to wait a second before seeing updates, this is much faster than having 200 clients access the same VNC server.
|
Tip |
Tunneling VNC over SSH is not always fast. For better speed performance, enable compression (-C) and change the encryption selection to use the Blowfish algorithm: ssh -C -c blowfish -L5900:localhost:5909 server. |
Running Software in Emulators
Although nearly compatible software helps collaborators bridge a communication gap, nothing beats running the exact same application. For example, if you need to edit Word documents, then nothing does a better job than Microsoft Word. In the days of old, this true compatibility was accomplished with dual-boot systems. A single computer would have multiple operating systems installed and the user would reboot the computer into whatever operating system they needed. Although Ubuntu does support dual-boot environments (see Chapter 1), this is not as effective as being able to run applications from multiple operating systems at the same time. Today, people either run two separate computers with different operating systems and network connectivity (hardware is cheap), or they use hardware emulators.
A hardware emulator is an application that pretends to be an entire computer. Emulators replicate a computer in a virtual machine (VM): CPU, memory, devices (for example, hard drives), and even BIOS. A perfect emulator can run any operating system, and the operating system should not be able to tell that it is running in an emulator. For example, operating systems like Ubuntu and Windows expect standardized hardware. If the emulator mirrors the hardware, then either operating system will run without a problem. Most OSs do not need to know that the hardware is emulated.
There are many reasons to run an emulator, such as playing with hostile viruses, opening suspicious e-mails, or installing software without screwing up your main system. A true emulator is a perfect sandbox, where software can run without hurting the host operating system. But one of the main reasons to use an emulator is compatibility. Not all software can be used natively under Ubuntu, but an emulator running under Ubuntu can be installed with a non-Ubuntu operating system and used to run native applications. For example, if I really need to use Microsoft NetMeeting, then I can start a VM running Windows and use NetMeeting from within the emulation.
Choosing an Emulator
Emulators have three main components. The host operating system is where the emulator is running and the guest operating system runs in the emulator. For example, an Ubuntu host can run Windows 2000 as a guest within an emulator. The final component is a virtual hard drive. This is usually a file on the host system. I frequently install a guest operating system to a virtual hard drive (file), configure it just the way I like it, and make a backup of the file. Later, after playing with software in the guest system, I can copy back the image in order to reset the system. This is faster and cleaner than trying to remove undesirable software or perform a restore from a backup system.
|
Tip |
If you want to see if a patch will make your system unstable, first install it in a VM. I have a VM installed with the same software as some of my critical computers. Before patching the real thing, I make sure the VM works after being patched. |
There are three main emulators for Ubuntu: Qemu, VMware, and Xen. Although each provides solid emulation, they are all different. Table 6-2 shows some of the differences. All three emulators offer the same basic features. They all support multiple drives, offer solid i386 emulation, and support network access. The main differences come from licensing, architecture support, and speed. Qemu is the slowest of the emulators, but offers the widest hardware support. Xen 3.0 is arguably the fastest, but only supports Linux or BSD systems. VMware offers a commercial quality, fast emulation, and refined interface, but is proprietary and limited to Linux and Windows host systems.
|
Table 6-2: Comparison of Hardware Emulators |
|||
|
Feature |
Qemu 0.8.1 |
VMware 1.0.2 |
Xen 3.0.2 |
|
Licensing |
GPL |
Commercial |
GPL |
|
Open Source |
Yes |
No |
Yes |
|
VM Type |
Emulator |
Emulator |
Virtualizer |
|
Host Architectures |
i386, PowerPC, Sparc; Linux, BSD, Windows, Solaris, MacOS X; portable to other host systems |
i386; Linux and Windows |
i386; Linux and BSD[4] |
|
Guest Platforms |
i386, PowerPC[1], ARM, MIPS, Sparc, and more |
i386 |
i386[5] |
|
Kernel Boost Module |
Yes[2] |
Yes |
Yes |
|
Ubuntu Support |
Universe repository[3] |
Generic Linux binary |
Download source or Debian binary |
|
Installation and Removal |
apt-get for install and remove |
Install script; manual removal |
Manual install and removal |
|
[4]Xen 2.0 supported FreeBSD, but Xen 3.0 broke that support. Check with the Xen homepage for updates on BSD support. [1]Qemu 0.8.1 only supports Linux as a guest OS on a PowerPC. [5]Xen virtualizes hardware, so it can only run multiple instances of the host's hardware. [2]Qemu 0.8.1 includes a kernel boot module, but it does not work consistently under Ubuntu. [3]The Ubuntu universe repository may not have the latest version of Qemu available. |
|||
There are two types of virtual machine: emulators and virtualizers. An emulator uses software to represent a computer system. A true emulator, such as Qemu and VMware, provide virtual hardware, BIOS, and even multiple CPUs. The benefit is that any operating system that is supported on the real hardware will work within an emulator. For example, if the emulator acts as an SMP Pentium Pro PC with 512 MB RAM, then it will support Windows, Linux, BSD, OS/2, E/OS, and any other PC operating system.
The biggest limitations with emulators are system resources and speed. If you configure an emulator to have 512 MB RAM but you actually have 128 MB RAM, then you can expect to spend time swapping RAM to disk. As speed goes, emulators interpret running opcodes. This means, the guest operating system runs slower than if it was on a dedicated computer. The speed can be less than 25 percent of the actual operating system's clock speed. For example, a 2.8 GHz host system may have a guest that appears to run at 300 MHz. Systems can run even slower if they are performing hardware-intensive commands. For example, when installing any guest operating system, the detection of attached peripherals may take a very long time. To overcome some of the speed limitations, kernel modules are available for boosting performance. These modules allow the emulator to directly link some functions into the host operating system. Drive, memory, and video access can all be performed faster with a kernel module. In the best cases, a kernel module can give you a nearly 1-to-1 performance ratio.
In contrast to emulators, virtualizers do not emulate hardware. Instead, they manage the existing host hardware and allow different guest systems to share the same resources. Xen is an example of a virtualizer. Xen allows multiple guest operating systems to run independently on the same hardware. Although Xen won't allow you to run different applications for collaboration, it can assist in dividing workloads, testing networked applications, and even benchmarking software. Xen is often used for security. Each independent operating system performs a specific task. If one Xen VM is compromised, it will not impact other VMs.
Understanding Virtual Disks
In general, there are a few types of virtual drives you can use with emulators. The first is a disk image of an actual hard drive. After installing the guest OS, this image will contain a partition table, boot loader, and the guest OS-similar to the block device /dev/hda. This is the most flexible option. Unfortunately, this option is not always desirable since you cannot easily copy files off of the disk image. (Linux does not allow you to mount a file containing a partition table.)
The second option is a plain disk partition. This is a file (or device) missing the partition table and boot loader-similar to the block devices /dev/hda1 and /dev/hda2, which are partitions under /dev/hda. This option allows you to mount the file as a loop-back device. If you want to share files between the guest and host OSs, you can mount the partition image. For example, if the partition-file is called disk.img, then you can use:
sudo mkdir /mnt/img # make sure the mount point exists
sudo mount -o loop disk.img /mnt/img # mount the disk
By mounting the partition, you can copy any files you need to and from the VM.
A third option is to use an existing directory. The directory is used by the VM and treated as a disk partition. While not supported by all emulators, this does make it easier to copy files between the host and guest systems.
Differences Between VNC and VM
All of these emulators have the ability to grab the mouse. This means that the mouse's input is completely used by the VM. This is different from VNC, where the remote mouse is separate from the local mouse, and moving the mouse outside the window allows you to leave the remote window. To release the mouse from the emulator, press Control and Alt at the same time.
|
Note |
For Qemu, only the Ctrl+Alt keys on the left side of the keyboard release the mouse. The ones on the right are sent to the guest operating system. With VMware, any combination of Ctrl and Alt keys will release the mouse. |
The other big difference concerns the clipboard. Under VNC, you can cut and paste between the remote (guest) and local (host) operating systems. Qemu 0.8.1 does not support this feature-the host and guest do not share a clipboard. Xen 3.0 and VMware do offer shared clip- boards if the guest OS kernel is modified.
Emulating with VNC
The coolest feature provided by all three emulators is the ability to use VNC as the display. Normally when a VM is started, a window appears that acts as the display for the operating system. Qemu, VMware, and Xen allow you to specify a VNC display instead of a normal window. For example, under Qemu you would use qemu -vnc 2 to start the display on the VNC server localhost:2. Now, if you want to collaborate, you can use any application on any supported guest operating system-you are not limited to sharing your Ubuntu desktop.
Using Qemu (Open Source)
The Q-Emulator (Qemu; http://fabrice.bellard.free.fr/qemu/) is the most flexible emulator option. Qemu supports a wide variety of host and guest architectures. Generally, if a pre-built Qemu binary is unavailable, you can download the source code and compile it. For Ubuntu, you can install Qemu from the universe repository; Qemu is the only emulator that offers Dapper-specific binaries.
sudo apt-get install qemu
You may want to compile Qemu from scratch since the Ubuntu package does not always contain the most recent code release.
|
Note |
You will need to have a developer's environment installed. See Chapter 4 for Programming with C. |
1. Download the latest source code from http://fabrice.bellard.free.fr/qemu/.
2. Follow the installation instructions. They should be as simple as:
o Extract the source code and cd into the source code directory.
o Configure the build files with ./configure.
o Compile Qemu using make clean ; make.
o Install it using sudo make install.
3. You will need to do one manual configuration step to specify the keyboard mapping for the Qemu VNC server:
4. sudo ln -s /usr/share/rdesktop/keymaps /usr/local/share/qemu/keymaps
Installing a Qemu VM
To get started using Qemu, you first need a virtual disk. There are a bunch of options for doing this:
§ Use qemu-img-The program qemu-img creates a blank file that will act as a disk image. To create a two-gigabyte file called disk.img, use:
§ qemu-img create disk.img 2G
§ Create a blank disk-You can use dd to create a blank disk. For example, dd if=/dev/zero of=big1 bs=512 count=4194304. This will do the same thing as using qemu-img (but not as fast).
§ Copy a working drive-Use dd to make a copy of a working hard drive. This is much faster than installing a guest OS within the VM. If the disk is located at /dev/hdb, then you can copy it to disk.img using:
§ dd if=/dev/hdb of=disk.img
§ Use a real hard drive-If the disk is installed as /dev/hdb, then you will just need read/write access to /dev/hdb.
|
Warning |
Do not use the same boot device as your host system! If your host OS is using /dev/had, do not tell the VM to use /dev/hda. The drive may become corrupted if two operating systems use it at the same time. |
If you have configured a blank disk, then you will need to install an operating system on it. This is usually done using a CD-ROM drive or ISO image. For example, if you downloaded the Ubuntu server ISO, then you can burn it to a CD-ROM or install directly from the ISO:
qemu -hda disk.img -cdrom /dev/cdrom -boot d
qemu -hda disk.img -cdrom ubuntu-6.06-server-i386.iso -boot d
Both of these commands will start the Qemu i386 VM and begin installing Dapper Drake. The main options for Qemu specify the images for hard drives (-hda and -hdb for the primary and secondary IDE drives), CD-ROM (-cdrom), and floppy drives (-fda and -fdb). By default, Qemu boots from the first hard drive (-boot c). If you want, you can specify booting from the floppy (-boot a) or CD-ROM (-boot d). There are other options for supporting USB devices, network cards, and video.
|
Tip |
Qemu 0.8.1 does not support emulating DVD drives. If you need to access a DVD image, mount it to your local file system (for example, sudo mount /dev/dvd /mnt/dvd) and access it as a directory by using qemu -hdb fat:/mnt/dvd. |
Installing Ubuntu under Qemu can take a very long time. Although a real Ubuntu installation may complete in under a half-hour, a Qemu-based installation may take two hours or longer. You can usually speed up VMs by increasing the amount of emulated RAM. Qemu defaults to 128 MB for each VM. With this default setting, I do not recommend booting off the Ubuntu desktop Live CD-ROM-you may grow old and die before the desktop loads (in can take over four hours). If you increase the VM's RAM to 256 MB (-m 256), then it should come up fully in a few minutes.
Running a Qemu VM
Although installations usually take a long time, installed operating systems are fast enough for real-time use. After you have installed the operating system, you can boot off the image drive using:
qemu -hda disk.img
The only limits to the number of operating systems you can run simultaneously are the speed of the host system and the amount of shared memory. Although you can increase the shared memory size (see Chapter 7), you cannot increase your computer's speed. On a dual 2.8 GHz computer with 1 GB RAM, I would not recommend running more than two graphical operating systems (or four text systems) at one time. Since the boot sequence for most guest systems consumes the most resources, I would also recommend booting them one at a time. After booting, it is very easy to run two emulators at once. Figure 6-8 shows two Qemu sessions running. One VM is running E/OS (a BeOS clone) with a VNC display. The other is running Windows 98 with the Firefox web browser. The host operating system is Ubuntu's Dapper Drake.
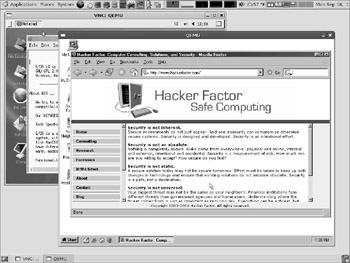
Figure 6-8: Running two Qemu sessions
Creating Partitions
Although having a disk partition for a file is great for loop-back mounts, Qemu and VMware cannot use a disk image as a drive unless it has a partition table. The challenge becomes: How do you create a partition table when all you have is a partition? The answer involves the dd and fdisk commands.
Let's assume you have a disk partition in a file (for example, part.img created from /dev/hda1) and you want to turn it into a disk image for Qemu (disk.img). First, you need to allocate space for the partition table. The partition table consumes the first 63 sectors of the drive. Using dd, you can replace your partition file (part.img) with a disk image (disk.img):
dd if=part.img of=disk.img bs=512 seek=63
Your disk file (disk.img) is 32,256 bytes larger than the partition image and has space for a partition table.
The next step is more complicated. Disks have sectors, heads, and cylinders. While old drives had a direct correlation between heads and physical read-write heads, newer drives simply use it as a numerical offset. Groups of sectors are grouped into cylinders. There are a maximum sizes are 63 sectors per cylinder, 255 heads, and 16,383 cylinders. For disks larger than 125 Gigs, sector sizes greater than 512 bytes are used.
Take a look at the size of your disk.img file and compute the number of cylinders. For example, let's say the size of disk.img is 1,073,774,080 bytes (a 1 GB partition plus partition table). Qemu prefers 16 heads and 63 sectors: 1,073,774,080 bytes ÷ (512 bytes per sector · 63 sectors · 16 heads) = 2080.5704 cylinders. Since you cannot have a fractional cylinder, round up to 2081. Now you can use fdiskto create the partition table:
fdisk -C 2081 -H 16 -S 63 disk.img
|
Tip |
The fdisk command works on both block devices and files. You don't need to be root to modify a file, but fdisk will still try to synchronize disks. If you see errors about ioctl(), don't worry-only root has permission to call it and your changes are still saved. |
Create one partition that spans the entire disk, from cylinder 1 to 2081. The final partition table should look like:
Device Boot Start End Blocks Id System
disk.img1 1 2081 1048823+ 83 Linux
|
Note |
Based on the type of partition, you may need to change the system identifier in the partition table. If you plan to boot from this drive, you will also need to make the partition "active". |
Your saved disk image is now usable as a disk by Qemu. Even though it may not be bootable (since there is no boot manager for Linux), you can boot from a live CD-ROM and setup a boot manager.
Using VMware (Commercial)
VMware is a commercial emulator. Although it has a more professional feel than Qemu and offers more configuration options, installing VMware is not as painless as Qemu.
|
Note |
Before you begin, check your system requirements. VMware only runs under Ubuntu on an i386. If you are using an IA64 or PowerPC system, then you cannot use VMware. |
1. Go to http://www.vmware.com. VMware offers three different types of emulators. The VMware Player is free, but cannot be used to create a new image. In contrast, the VMware server and workstation are not free, but can create new images and make it easy to configure emulated hardware. Download the type of VMware system you plan to use. Be sure to download the Linux TAR image.
|
Tip |
If you plan to install the VMware server, get your serial number code first! While you can re-run the installer, the server will not run until you enter your serial number. The VMware workstation offers a short trial period, but then must be registered to use. |
2. Extract the TAR file. For example, if you downloaded VMware-server-1.0.1- 29996.tar.gz, then you would extract the contents-this creates a directory called vmware-server-distrib. Similarly, the VMware-player will create a directory called vmware-player-distrib.
3. tar -xvf VMware-server-1.0.1-29996.tar.gz
4. For the VMware kernel module, you will need to install the headers for your kernel.
5. sudo apt-get install linux-headers-`uname -r`
6. Now you can install VMware. Go into the VMware directory and run the install script.
7. cd vmware-server-distrib # or vmware-player-distrib
8. sudo ./vmware-install.pl
The install script will ask you a bunch of questions. Unless you have special needs, the default values should work fine.
|
Warning |
Unlike Qemu's apt-get package, VMware does not have an uninstall option. Once you install it, it is installed. And VMware scatters files all over the system. |
Unlike Qemu, VMware provides lots of options for networking virtual machines. You can easily create a virtual subnet with lots of virtual machines. This is really useful for testing network software.
Creating a VMware Disk
If you purchased the VMware server or workstation, then you already have the ability to create a VM. But if you are cheap, then you installed the VMware player. The player can only run existing images, it cannot create new images. Fortunately, you can still create a boot image for use with the VMware player; the secret is to use Qemu. In this example, we'll install Dapper onto a 2 GB drive.
1. Install Qemu. (You will need qemu-img.)
2. You will need to create a VMware disk image (VMDK). You can do this with qemu-img.
3. qemu-img create -f vmdk disk.vmdk 2G
4. Every VMware disk image also includes a configuration file. Listing 6-4 shows the configuration for booting off the Ubuntu server ISO. (Configurable portions appear in bold.) Call this file disk.vmx. If you plan to customize this example, then be sure to change the disk names.
Listing 6-4: Sample VMX Configuration File: disk.vmx
#!/usr/local/bin/vmware
config.version = "8"
virtualHW.version = "3"
memsize = "128"
nvram = "ubuntu.nvram"
ide0:0.present = "TRUE"
ide0:0.fileName = "disk.vmdk"
ide0:0.redo = ""
ide1:0.present = "TRUE"
ide1:0.fileName = "ubuntu-6.06-server-i386.iso"
ide1:0.deviceType = "cdrom-image"
ide1:0.autodetect = "TRUE"
floppy0.fileName = "/dev/fd0"
scsi0:0.redo = ""
usb.present = "TRUE"
sound.present = "TRUE"
sound.virtualDev = "es1371"
displayName = "Ubuntu"
guestOS = "other24xlinux"
uuid.location = "56 4d ad 0d c5 c8 b9 88-d2 f8 c0 01 12 5e 26 c4"
uuid.bios = "56 4d f3 a5 03 8c cb b9-ed bb 8f 10 a3 de b0 10"
ethernet0.addressType = "generated"
ethernet0.present = "TRUE"
ethernet0.connectionType = "nat"
ethernet0.generatedAddress = "00:0c:29:de:b0:10"
ethernet0.generatedAddressOffset = "0"
checkpoint.vmState = ""
tools.remindInstall = "TRUE"
5. Run the program vmplayer. This will ask you to select an image.
6. Select your disk.vmx file. Don't worry if some configuration items are not correct; vmplayer will correct them for you.
VMware is noticeably faster than Qemu, but installing Ubuntu still takes a very long time. After installing the operating system, you can boot the system off the virtual hard drive.
|
Note |
This hack enables you to test VMware, but is not intended for long-term use. For full support, consider purchasing the VMware server or workstation. |
Converting Partitions
VMware and Qemu use different disk image formats. Qemu supports a variety of formats, but is usually used with either a copy-on-write disk (cow or qcow) or a raw disk image. In contrast, VMware uses the vmdk format that includes metadata along with the disk. Fortunately, you can easily convert between formats using qemu-img. To convert a raw Qemu image (for example, disk.img) to VMware disk (disk.vmdk), use:
qemu-img convert disk.img -O vmdk disk.vmdk
Similarly, you can convert a VMware disk to a Qemu disk using:
qemu-img convert -f vmdk disk.vmdk disk.img
Using this approach, you can use any Qemu disk under VMware and vice versa. Even though VMplayer cannot be used to create a virtual disk, Qemu can! And the Qemu disk can be quickly converted for use with VMware.
Using Xen (Open Source)
Xen is an operating system virtualizer designed for speed. This application replaces the host operating systems. At the time of this writing, Xen was not available from the Ubuntu repositories and only supported Linux and BSD guest operating systems.
|
Warning |
Installing Xen requires you to change your kernel and boot loader (Grub) configuration. If you screw up the installation then you can really hose your system. If you are not comfortable with a lot of manual configuration and troubleshooting, then don't try Xen. You might want to wait until the project matures a little more and you can use apt-get to install it. |
|
Note |
Before you begin, check your system requirements. Xen only supports i386 and IA64, architectures with optional SMP support. If you are using a PowerPC system, then you cannot use Xen. |
While there are many different ways to install Xen, I believe that the instructions at http://www.howtoforge.com/xen_3.0_ubuntu_dapper_drake are very helpful and detailed.
You will also receive instructions when you download the Xen source code-follow those instructions closely.
1. Install necessary packages. Xen uses these for installation and when it runs.
2. sudo apt-get install python-twisted bridge-utils debootstrap
3. Edit /etc/mkinitramfs/modules and increase the number of loop-back devices.
4. sudo bash -c 'echo "loop max_loop=64" >> /etc/mkinitramfs/modules'
5. Download Xen from http://www.xensource.com/xen/downloads/. You should download the pre-build installations (listed as tarballs). To download the code, you may need to provide an e-mail address where you will receive download installation instructions. Wait for the e-mail and follow the instructions. Be sure to check the prerequisites and follow the post-install steps! This should allow you to install Xen.
|
Tip |
When downloading Xen, look for the open source downloads, not the commercial software. |
|
Note |
Why are the instructions not in this book? Xen is undergoing a lot of development and the installation instructions frequently change. It is likely that any instructions listed here would become outdated quickly. The best instructions are found in the README file for the Xen installer. |
After you install Xen and reboot your system to use the Xen kernel, you can use the xm command to create a new VM, launch a VM, and remove a running VM.
Wine or Vinegar?
When people talk about emulators, the topic almost always turns to Wine. (Wine is a recursive acronym: Wine Is Not an Emulator.) Wine was created before most hardware emulators. It provides converted Windows libraries, enabling Windows applications to run under Linux. This is different than an emulator: emulators provide an entire system, while Wine provides support for Windows applications under Linux. Wine's support is very good for most Windows programs. In fact, it is so complete that it even permitted some Windows viruses to spread! (In http://os.newsforge.com/print.pl?sid=05/01/25/1430222, Matt Moen reported that Klez, Sobig, and a few other viruses worked under Wine.)
While many applications can be used with Wine (for example, Microsoft PowerPoint and Word), other applications are hit-and-miss. Even newer versions of supported programs do not always work because of changes in the Microsoft libraries. Wine is also a mostly unsupported application-it had no updates between August 2005 and August 2006. Even though it was created in 1993, it is still listed as beta code 13 years later.
Although Wine was an acceptable solution a few years ago, true emulators and virtualizers such as Qemu, VMware, and Xen provide better compatibility.
Sharing Files with Emulators
Regardless of your choice of emulator, you will need some way to exchange files between the guest and host systems. There are a variety of choices-you should choose the one(s) that best fit your needs.
§ FTP-You can run an FTP server on the host OS and use the guest to connect and transfer files. This can also be done using Secure Shell's scp command. This option is almost universally supported by all guest operating systems.
§ NFS-The host OS can export a partition to the guest OS. This works well if the guest is running a version of Linux or Unix.
§ SAMBA-For a Windows guest OS, you can export a partition from the host OS using SAMBA.
§ Port forwarding-Qemu and VMware allow you to forward ports between the host and guest operating systems. For example, the Qemu parameter -redir tcp:10022:22 will redirect port 10022/tcp on the host to the SSH server (22/tcp) on the guest. Port forwarding allows the host to communicate with the guest OS using whatever server is you require.
|
Note |
All of these options require network access. Although network access is supported by each of these hardware emulators, you may want to disable the emulator's network access if you are evaluating viruses, performing disk forensics, or installing questionable software. If the network is disabled then there is no easy way to get data off of the virtual system. |
Other Collaboration Tools
There are other collaboration tools beyond office applications, shared desktops, and virtual machines. Most common file formats, like PDF and PostScript have plenty of support under Ubuntu. Tools like xpdf, Ghostscript, and Ghostview can show you the contents of these common file types. With regards to networking, there are plenty of peer-to-peer applications. Packages like amule and peercast are available from the Ubuntu repositories.
Developers also have options for collaboration. The Concurrent Versioning System (cvs) and SubVersion (svn) file management systems are readily available and not too difficult to configure. Both svn and cvs support sharing source code across the network and are secure enough to use over the Internet (especially when they are tunneled over SSH).
Summary
Ubuntu offers plenty of options for collaboration. The available tools enable you to work with other people, regardless of operating system configuration. If you can't find a compatible tool, you can access a remote system where the tool is supported or run a virtual machine where the needed application runs natively.
All materials on the site are licensed Creative Commons Attribution-Sharealike 3.0 Unported CC BY-SA 3.0 & GNU Free Documentation License (GFDL)
If you are the copyright holder of any material contained on our site and intend to remove it, please contact our site administrator for approval.
© 2016-2026 All site design rights belong to S.Y.A.