Hacking Ubuntu (2007)
Part III: Improving Performance
Chapter 8: Multitasking Applications
Twenty years ago, computers did one thing at a time. You either used a word processor or used a spreadsheet or printed a document-but not all at once. Today, people rarely use computers for just one thing. While using a spreadsheet, you may be modifying a document in a word processor, watching the stock market, reading news, and checking the weather-all at the same time! In my experience, the only times a computer does one dedicated task today is when (a) it is an embedded system, (b) it is devoted to a game that consumes all resources, (c) it is solving some computationally complex formula (for example, cracking passwords, modeling, or data mining) and needs all of the system's computing power, or (d) it's a really old computer.
Multitasking does not just mean running two programs at once. The definition encompasses your ability to switch between programs, communicate between applications, and find running programs. In the corporate world, it also means accountability: you need to be able to say how much time was spent on each project. Fortunately, Ubuntu has many options for addressing these needs.
Switching Applications
Starting up an application on the Ubuntu desktop can be as easy as clicking an icon or choosing from a menu. However, after you have a few dozen programs running, it can be a challenge to find the right program again. Without a good application management scheme, I frequently find myself clicking through windows before finding the right one. The worst is when I select text from one application, and cannot find the right window to paste into; and after finding the right destination, discovering that I had lost the selection buffer. After a couple of times, this becomes frustrating.
Fortunately, Ubuntu has many options for finding the right application. These include the Window List, Window Selector, and keyboard for switching between applications.
Using the Window List and Window Selector
The two most common window management tools are the Window List and the Window Selector (see Figure 8-1). By default, the Window List appears in the display's bottom panel. It opens a new button every time you start a new application window. To switch between applications, simply click on the button. You can also right-click a button in the Window List to see a menu for maximizing, minimizing, moving, or closing the window.
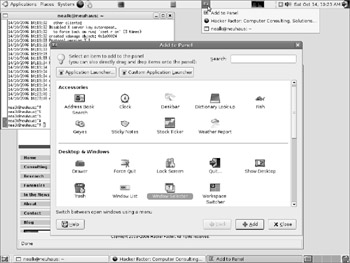
Figure 8-1: The Window List is visible on the bottom panel. The Window Selector has been added to the top panel and is open, showing three processes.
The Window Selector provides a drop-down menu of all windows on the desktop. To set up the Window Selector, you will need to add it to the panel.
1. On an empty space on the top (or bottom) panel, right-click to bring up the panel menu.
2. Select Add to Panel… from the menu. This will bring up the Add to Panel applet.
3. The default applets are divided into sections. In the second section, titled Desktop and Windows, is the Window Selector applet. Select this applet and drag it to the top panel. Releasing the mouse button will place the applet on the panel.
|
Note |
Earlier versions of Ubuntu installed the Window Selector in the top right corner of the panel. If you upgraded from Hoary or Breezy to Dapper, then you probably have the Window Selector already on the top panel. However, if you did a clean install of Dapper, then you will need to add it to the top panel. |
Although the Window Selector and Window List show the same information, I find that they have different use models. The Window List is very useful if you have fewer than eight open windows. However, if you have more open windows, then the text in the buttons becomes truncated down to almost nothing and the buttons become indistinct. When I have many open windows, I rely on the Window Selector to help me locate the windows I need.
Using Alt+Tab
|
Tip |
Another method to switch between applications uses Alt+Tab. When you press the Alt and Tab keys at the same time, a small window manager appears in the middle of the screen (see Figure 8-2). This window manager shows the icons for each open window. As long as you hold down the Alt key, this window manager will remain up. By holding down the Alt key and repeatedly pressing Tab, you can select different windows. Releasing the Alt key selects the window. |
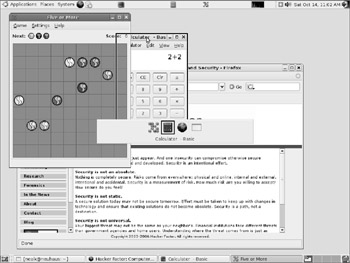
Figure 8-2: The Alt+Tab window manager. The calculator is selected but partially covered by another application.
|
Tip |
Each selected window shows the window title in the window manager and highlights the window on the screen using a black rectangle. If the window is partially covered, then you can see where it will appear. |
The icons in this window manager are ordered from left to right by usage; the left-most icon represents the window that was just used. If you switch between two windows, then the two icons on the left will represent them. An infrequently used window will be shuffled to the right. Pressing Alt+Tab moves the selector from left to right; pressing Alt+Shift+Tab moves the selector from right to left.
Using Ctrl+Alt+Tab
Although Alt+Tab allows you to quickly switch between applications, it does not allow you to select different panels. Pressing Ctrl+Alt+Tab brings up a window manager that is similar to Alt+Tab, but it lists the different panels and the desktop rather than individual applications (see Figure 8-3).
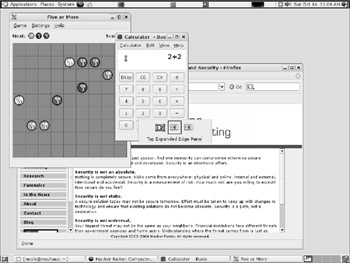
Figure 8-3: Using Ctrl+Alt+Tab to select between the desktop and panels
|
Tip |
Using Ctrl+Alt+Tab can be very handy if your mouse ever stops working (or was not working when the computer started up). Using the keyboard, you can select the top panel and logout or shutdown. You can also open a terminal window for fixing the problem. |
Switching Between Firefox Tabs
Some applications also enable you to have multiple windows within the application and then switch between the windows. Firefox, for example, can open web pages in different windows or in different tabs within one browser. If you use multiple windows, then Alt+Tab can be used to switch between them. However, if you use tabs within one Firefox window, then you need some other way to switch between web pages. Pressing Ctrl+Tab in Firefox allows you to select the next tabbed web page. Similarly, Ctrl+Shift-Tab allows you to select the previous tabbed web page.
The tab management in Firefox (Ctrl+Tab and Ctrl+Shift-Tab) has two big differences from the desktop's Alt+Tab and Ctrl+Alt+Tab. First, Firefox does not display a dialog in the middle of the screen. Instead, watch the Firefox tabs to see which one is highlighted. Second, the tabs are ordered from left to right, not based on last usage. If you want to change the order of the tabs, grab a Firefox tab by right-clicking it and drag it left or right to reposition it.
Tweaking the Workplace Switcher
It does not take long before you have a desktop with dozens of open windows. When this happens, no amount of Alt+Tab combinations will help you become organized. Fortunately, there is the Workplace Switcher. This applet gives you multiple desktops-you can put all work windows on one workplace, games on another, short projects on a third, and so on. By default, the Workplace Switcher is placed in the right corner of the bottom panel-I usually move mine to the top right so the Window List has more room. If you don't have the Workplace Switcher, you can add it by opening the Add to Panel… menu and dragging the applet to your panel.
Switching Workspaces with Ctrl+Alt+Arrows
The Workplace Switcher gives you a tiny view of each desktop (see Figure 8-4). Although you cannot see icons or window titles, you can see the general layout-there are gray boxes that represent each window on each desktop. To switch between desktops, you can either click on the Workspace Switcher or use the Ctrl+Alt+Arrow keys. For example, Ctrl+Alt+LeftArrow switches the workspace to the left; Ctrl+Alt+RightArrow moves to the workspace on the right.
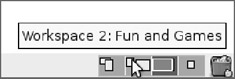
Figure 8-4: The Workspace Switcher, showing four distinct desktops
|
Tip |
If you open the Workspace Switcher's Preferences, then you can add more desktops and change their layout. The default uses four desktops arranged in one row. If you add more rows, then you can use Ctrl+Alt+UpArrow and Ctrl+Alt+DownArrow to navigate between them. |
Managing Workspaces
By default, there are four workspaces available. You can add additional workspaces by right- clicking the Workspace Switching and selecting Preferences (see Figure 8-5). From here, you can name workspaces, adjust the layout, or add more workspaces (you can also remove work- spaces, but who would want to do that?). For example, I usually name my middle workspace Games-I can always go to this workspace when the boss is not around. (And if he suddenly shows up, I can use Ctrl+Alt+LeftArrow to quickly hide my games and show real work-in- progress.)
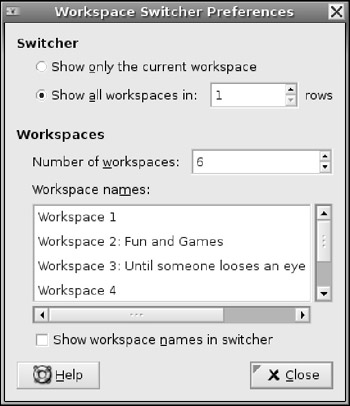
Figure 8-5: The Workspace Switcher preferences window
Windows do not need to stay in one workspace. Your active window appears highlighted in the Workspace Switcher. You can drag an application's window onto any other desktop in the Workplace Switcher. I usually do this when one window becomes cluttered, or when popup windows come from a different application. For example, when the Evolution mailer pops up a To Do list alert, I'll drop it in the appropriate window. (There is no reason to have "Write Status Report" appear in the middle of my Games workspace.)
Some application windows are small and may be hard to grab in the Workspace Switcher. Another way to move windows is to click on the top right corner of any window. This will open a menu that displays options such as Move to Workspace Right and Move to Another Workspace ![]() Workspace 1. You can also pull up this menu by right-clicking any of the buttons in the Workspace List.
Workspace 1. You can also pull up this menu by right-clicking any of the buttons in the Workspace List.
Finally, some application windows may be very important. These are ones that you will want to appear on every workspace, and not just one workspace. In the window's top-left corner menu is an option titled, Always on Visible Workspace. If you select this, then the window will be visible regardless of the selected workspace. I find this option to be very handy for important online conversations (for example, IRC and Jabber), and when using xawtv (watching TV while working-see Chapter 3). This way, I won't miss any communications when I switch workspaces. Without this option, something may happen in a window and I won't notice it until I switch back to that workspace.
Customizing Application Windows
When graphical applications start up, the X-Windows system sets elements such as the placement and dimensions (geometry), whether the window is visible or hidden, maximized or minimized, and always on top or bottom. Usually the application defaults are fine, but sometimes they need to be tweaked. For example, xawtv (discussed in Chapter 3) always seems to get buried under other windows-that makes it hard to watch Myth Busters. If I want it to always start on top, I either need to press t (an interactive command to the program) to tell xawtv to always be on top, create an X-resource file to specify properties, or use a program like Devil's Pie (see the section on this tool) to automatically set the graphical properties.
Creating X-resources
Many X-Windows applications support a set of externally configurable parameters. These resources enable you to customize everything from a program's startup position to its size, fonts, and colors. The type of resource depends on the type of executable. There are Gnome Toolkit (Gtk) resources, used by most applications that start with a g like gedit and gnobots2. There is the Qt library, used by many KDE applications, and there is the X Toolkit (Xt), which is used by most applications that start with an x (for example, xedit, xman, and xterm).
Most Gtk and KDE applications get their resource configurations from application-specific configuration files. For example, gedit uses $HOME/.gnome2/gedit-2, $HOME/.gnome2/ gedit-metadata.xml, and $HOME/.gnome2/accels/gedit. Unfortunately, the location, name, format, and contents of these configuration files are application specific (if they exist at all).
In contrast to Gtk and Qt, most Xt applications follow a standard configuration format: application*resource: value. For example, xterm*scrollBar: true sets the scrollBar resource for the xterm application to true (the default is false). This way, all new xterm windows will start with a scrollbar. To create a set of Xt X-resources:
1. Identify the application name. If you run the program from the command line, then this is the program's name. If you click an icon or menu item to run the program, then xprop to identify the name of the program. The xprop program will turn your cursor into a crosshair. By clicking the window, you will see the running application's name in the WM_CLASS string.
2. xprop | grep WM_CLASS
|
Tip |
There may be multiple class strings for an application. Some are specific, while others are general. Any will work as a resource name. However, if you choose a specific string, then keep in mind that the resource must match the specific string. This can be very useful if you want one set of properties for Xterm"and another for xterm (remote via TELNET). |
3. Identify the name of the resource. Unfortunately, there are few standards here. Sometimes you can find the resource names and properties in the man pages for your particular application, but not always. For example, man xterm and man xman lists lots of X-resources, while man xeyes provides no information. The few almost-universal resources include:
o geometry-Specifies the dimension and location for an application. For example, 80x42+150+180 creates a window that is 80x42, located at the screen coordinates 150x180.
|
Note |
The dimensions are application specific. 80x42 for xterm means 80 columns wide and 42 characters tall, while 80x42 for xeyes specifies 80 pixels wide and 42 pixels tall. |
o font-Specifies the font name to use. This can be a short name, such as serif or a long name that describes the exact font, such as -*-serif-medium-r-normal -iso9241-*-*-75-75-p-*-iso8859-1 for a regular serif font at 75 dpi. You can use the program xfontsel to browse the available fonts and determine the exact font name.
o background-Specifies the background color. This can be a standard color name (for example, yellow or black) or a set of three hex values representing the red, green, and blue components (for example, #ff0010 for red with a little bit of blue).
o foreground-Specifies the foreground color.
4. Add your resource to the X-resource file. By default, the resource file is $HOME/ .Xdefaults (create it if it does not exist). For example, my $HOME/.Xdefaults specifies the dimensions of the default xterm window and turns on the scrollbars:
5. xterm*VT100*geometry: 80x42+150+180
6. ! this line is a comment (! denotes a comment)
7. !xterm*scrollBar: false
8. *scrollBar: true
9. Load the resource file. The command xrdb is used to load the X-resources. There are many options for this, but I usually use: xrdb -merge $HOME/.Xdefaults. This says that all values should be lexically sorted and then loaded into memory. Existing values are replaced and new values are added. Alternately, you can use xrdb $HOME/.Xdefaults, which will load the file in order (unsorted) and replace existing values.
|
Tip |
Under other window managers, changes to .Xdefaults are loaded automatically. Under Gnome, you will need to explicitly run xrdb. To automatically load your defaults, add xrdb -merge $HOME/.Xdefaults to your $HOME/.profile script. This way, it will run every time you log in. |
While individual users can have a $HOME/.Xdefaults file for personalizing applications, there are also system-wide configurations. The directory /etc/X11/app-defaults/ contains a file for every application and the default X-resource values. Changing these defaults will impact the entire system. Also, you don't need to use xrdb for the system-wide defaults- changes take affect immediately because applications know to look here for default configuration information.
Using Devil's Pie
Some applications don't use X-resources, and configuring other applications can be inconvenient. An alternative configuration method is to use a tool called Devil's Pie (sudo apt-get install devilspie). This program watches for new X-Windows applications and configures them as they appear. Unlike the Xt X-resources, Devil's Pie works with all X-Windows applications (Xt, Gtk, and Qt).
Devil's Pie uses a configuration file that describes what to look for and how to modify the X- resources.
1. Make a $HOME/.devilspie/ directory. Any file in this directory will become a resource for Devil's Pie.
2. Create a resource file. For example, I have a file called $HOME/.devilspie/games.ds that opens all games on workspace #4:
3. (begin
4. (if (is (application_name) "gnobots2") (begin (set_workspace 4)) )
5. (if (is (application_name) "iagno") (begin (set_workspace 4)) )
6. (if (is (application_name) "same-gnome") (begin (set_workspace 4)) )
7. )
Similarly, I have an xawtv.ds configuration file that says:
(if (is (application_name) "xawtv") (above) )
8. Run devilspie. As long as it is running, it will monitor new windows and adjust their X-resources as needed.
|
Tip |
If you like Devil's Pie, consider adding it to your startup: System |
Each clause in the configuration file contains a condition (is, contains, or matches), item to match against (window_name, window_role, window_class, or application_name), and one or more actions. Table 8-1 lists the set of available actions and associated values (if any).
|
Table 8-1: List of common actions for Devil's Pie |
|||
|
Action |
Value |
Example |
Purpose |
|
geometry |
width×height+xpos+ypos |
geometry 80×42+100+20 |
Start the application with the specified dimensions |
|
fullscreen |
n/a |
fullscreen |
Make full-screen |
|
focus |
n/a |
focus |
Give the application focus |
|
center |
n/a |
center |
Center the application on the desktop |
|
maximize |
n/a |
maximize |
Maximize the window |
|
minimize |
n/a |
minimize |
Start the window minimized |
|
above |
n/a |
above |
The window should always be on top of other windows |
|
below |
n/a |
below |
The window should always be below other windows |
|
set_workspace |
workspace number |
set_workspace 4 |
Place the window on a specific workspace |
Devil's Pie can match an X-Windows application based on the window's name, role, or class. To identify these values, use:
xprop | grep -E "^(WM_NAME)|(WM_WINDOW_ROLE)|(WM_CLASS)"
This will list any or all of the available values for any given window. Using Devil's Pie, you can automatically make windows appear in the right place on the right workspace and with the right settings. You can even handle dynamic popup windows like those created by Firefox, Gaim, and Evolution. For example, to have Gaim's chat window start maximized in a different workspace, you can use:
(if
(and
(contains (application_name) "gaim")
(contains (window_role) "conversation")
)
(begin (set_workspace 3) (maximize))
)
Buffering Buffers
I don't think there is anybody who uses a graphical interface without periodically cutting and pasting information between windows. Under some operating systems (for example, Microsoft Windows), there is only one commonly used clipboard. This clipboard can be used to share information between applications. Under Ubuntu, X-Windows and the Gnome Desktop provide two clipboards for common use. The first is the selection clipboard. Whenever you highlight any text, it gets placed in this buffer. Using the middle mouse button, you can paste the contents.
The second clipboard (called the primary clipboard) is used when you use Ctrl+C to copy, Ctrl+X to cut, and Ctrl+V to paste. Word processors (for example, OpenOffice) and graphic editors (for example, Gimp) usually use this buffer. Also, some text applications, like gnometerminal, change cut-and-paste to use Shift+Ctrl instead of Ctrl (for example, Shift+Ctrl+C to copy).
|
Note |
X-Windows actually provides a couple of different clipboard buffers. Clipboard is used for selection, primary is used by Ctrl+C and Ctrl+V, and secondary is usually unused. |
I usually come across two problems with the default clipboards. First, the selection clipboard loses information too quickly. Simply clicking in a window to bring it forward could accidentally select a space or other character, wiping out the current selection. Although you could click the title bar to bring the window forward and prevent clipboard changes, other windows usually cover my title bars. Second, when doing a lot of development or editing, I sometimes need more than just two clipboards. I usually end up pasting text into a temporary file and then grabbing the temporary data when I need it.
Fortunately, there is a better way to manage clipboards. The program xclip (sudo apt-get install xclip) enables you to manipulate the clipboard contents. You can dump the clipboard contents to a file or load a file into the clipboard. Using xclip, you can easily give yourself one or more additional clipboards. You can even save clipboard contents between system reboots! Think of it like a calculator with a memory button-do you want one storage area, or many? Do you want to lose the memory when the calculator shuts off, or retain the memory?
The basic xclip usage specifies whether you want to write out (-o) or read in (-i) clipboard data, and which clipboard (p for primary, s for secondary, and c for the selection clipboard). For example:
§ To store the primary clipboard to a file, use:
§ xclip -o -selection p > buff
§ To load a file into the secondary clipboard, use:
§ xclip -i -selection s < buff
§ To copy the selection clipboard into the primary clipboard, use:
§ xclip -o -selection c | xclip -i -selection p
These commands can be mapped to keys. For example, Listing 8-1 creates three additional clipboards. Ctrl+F1 copies the primary clipboard into the first storage area, Ctrl+F2 uses the second storage area, and Ctrl+F3 creates the third storage area. To recall these buffers, use Ctrl+Shift+F1, Ctrl+Shift+F2, or Ctrl+Shift+F3. Using this hack, you can copy text into the primary clipboard (Ctrl+C) and then move it into the second storage area (Ctrl+F2). Later, you can recall this buffer using Ctrl+Shift-F2 and paste it using Ctrl+V.
|
Tip |
This hack also enables you to inspect and easily replace the contents of the clipboard. The storage buffers from the hack (see Listing 8-1) are in $HOME/.xclip/. You can view, edit, or replace the contents and then use the Ctrl+Shift keys (for example, Ctrl+Shift+F1) to load them into the clipboard buffer. |
A similar hack can be used to exchange the contents of the selection and primary buffers (Listing 8-1, mapped to Ctrl+F4). This way, if you press Ctrl+C to copy a buffer and then use Ctrl+F4 to swap clipboards, allowing the middle mouse button to paste the contents rather than using Ctrl+V.
|
Tip |
Swapping the clipboards may sound overly complicated or unnecessary, but some applications use specific clipboards. For example, xterm only uses the primary buffer. Anything copied into the clipboard buffer (e.g., using Ctrl+C in a word processor) cannot be pasted into an xterm window. Using Ctrl+F4, you can now paste the content. |
Listing 8-1: Using xclip to Create Three Additional Clipboards
mkdir ~/.xclip # create space for the clipboard buffers
# Map commands to actions
## Map the save commands
gconftool-2 -t str --set /apps/metacity/keybinding_commands/command_1 \
'bash -c "xclip -o -selection p > ~/.xclip/clip.1"'
gconftool-2 -t str --set /apps/metacity/keybinding_commands/command_2 \
'bash -c "xclip -o -selection p > ~/.xclip/clip.2"'
gconftool-2 -t str --set /apps/metacity/keybinding_commands/command_3 \
'bash -c "xclip -o -selection p > ~/.xclip/clip.3"'
## Map the recall commands
gconftool-2 -t str --set /apps/metacity/keybinding_commands/command_4 \
'bash -c "xclip -i -selection p < ~/.xclip/clip.1"'
gconftool-2 -t str --set /apps/metacity/keybinding_commands/command_5 \
'bash -c "xclip -i -selection p < ~/.xclip/clip.2"'
gconftool-2 -t str --set /apps/metacity/keybinding_commands/command_6 \
'bash -c "xclip -i -selection p < ~/.xclip/clip.3"'
# Map keys to commands
gconftool-2 -t str --set /apps/metacity/global_keybindings/run_command_1 \
'<Control>F1'
gconftool-2 -t str --set /apps/metacity/global_keybindings/run_command_2 \
'<Control>F2'
gconftool-2 -t str --set /apps/metacity/global_keybindings/run_command_3 \
'<Control>F3'
gconftool-2 -t str --set /apps/metacity/global_keybindings/run_command_4 \
'<Control><Shift>F1'
gconftool-2 -t str --set /apps/metacity/global_keybindings/run_command_5 \
'<Control><Shift>F2'
gconftool-2 -t str --set /apps/metacity/global_keybindings/run_command_6 \
'<Control><Shift>F3'
# Make Control-F4 swap the primary and selection clipboards
# Do this by using the secondary clipboard as a temporary buffer
gconftool-2 -t str --set /apps/metacity/keybinding_commands/command_10 \
'bash -c "xclip -o -selection p | xclip -i -selection s ;
xclip -o -selection c | xclip -i -selection p ;
xclip -o -selection s | xclip -i -selection c"'
gconftool-2 -t str --set /apps/metacity/global_keybindings/run_command_10 \
'<Control>F4'
Automating Tasks
There are some tasks that we end up doing over and over by hand. For example, I frequently convert DOC and PDF files to text. Rather than opening a command prompt and running pdftotext or antiword every time I need to convert a file, I created an automated conversion directory.
The dnotify program watches a specified directory for any change. A change may be a file creation, update, renaming, deletion, permission modification, or all of the above. When a change happens, dnotify can run a script. I have a script that converts DOC and PDF files to text, and the directory being monitored is on my desktop. Using dnotify, I can convert files by simply dropping them into a directory on my desktop.
1. Install dnotify as well as any conversion tools you need. In this example, pdftotext and antiword will perform text conversions.
|
Tip |
For graphic conversion, consider installing the netpbm package. This provides programs such as giftopnm, jpegtopnm, pnmtopng, pnmtogif, and pnmtojpeg. |
2. sudo apt-get install dnotify
3. sudo apt-get install xpdf-utils # provides pdftotext
4. sudo apt-get install antiword
5. Create a small script to convert all files in a directory. Listing 8-2 shows my convert2text script. This script takes a directory name on the command-line and scans the directory for all DOC and PDF files. Any file not already available as text is converted.
Listing 8-2: Simple convert2text Script to Convert Files to Text
#!/bin/sh
# Be sure to make this executable: chmod a+x convert2text
# Be sure to place it in your $PATH (e.g., sudo cp convert2text /usr/local/bin/)
if [ "$1" = "" ] ; then
echo "Usage: $0 directory"
exit
fi
# Get list of files in the directory
find "$1" -type f |
while read Name ; do
# Based on the file name, perform the conversion
case "$Name" in
(*.pdf) # convert pdf to text
NameTxt="${Name%.pdf}.txt"
if [ ! -f "${NameTxt}" ] ; then pdftotext "${Name}" "${NameTxt}"; fi
;;
(*.doc) # convert doc to text
NameTxt="${Name%.doc}.txt"
if [ ! -f "${NameTxt}" ] ; then antiword "${Name}" > "${NameTxt}"; fi
;;
esac
done
6. Create a directory to monitor.
7. mkdir $HOME/Desktop/convert2text
8. Run the dnotify program. Specify the convert2text script and the directory to monitor. In this case, the action to watch for is file creation (-C). The dnotify program changes the ‘{}’string to the directory name.
9. dnotify -C $HOME/Desktop/convert2text -e convert2text '{}'
Now, dragging or pasting any PDF or DOC file into this folder will create a text file. The text file will have the same name as the original document, but will end with the .txt extension. For example, ch08.doc will generate ch08.txt. If you are using the command line then you can copy (cp) or move (mv) files into $HOME/Desktop/convert2text/ for automatic conversion. Figure 8-6 shows a sample conversion directory.
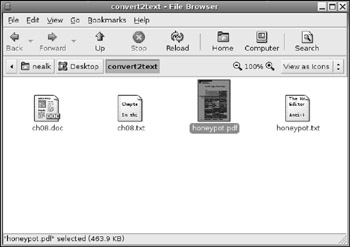
Figure 8-6: Automatic file conversion using dnotify and the convert2text directory
|
Tip |
If you are like me and frequently use the convert2text directory, then you can add the dnotify command to your Gnome startup (System |
Tracking Projects
Many corporate and government environments require employees to keep track of their time. For example, when consulting, I track my time in 15-minute intervals. I once had a job where the employer required accountability down to every 6-minute interval. With today's operating systems, multitasking becomes a blessing and a problem. The good news is that you can do many things at once. The bad news is: tracking billable time on projects can get very confusing when you're multitasking (and double-billing clients is a definite no-no). If the accounting people require you to track your work, then Ubuntu is definitely what you want.
Tracking Time on Projects
There are a variety of packages that enable you to track your time on projects. Some examples include gnotime, gtimer, gtimelog, wmwork, and worklog. Each of these packages allows you to create a project, start and stop a work-time clock, and easily switch between projects. They also allow you set the accumulation interval (from one minute to hourly) and display total time spent summaries.
My personal preference is the Gnotime Time Tracker (sudo apt-get install gnotime). After installing it, you can run the Gnotime Time Tracker from Applications ![]() Office
Office ![]() GnoTime Tracking Tool. Besides being able to add projects and diary entries, it allows you to specify billable rates on a per-project basis. You can also mark projects with a priority and urgency. Figure 8-7 shows the main window for gnotime. Simply double-click any task to start the clock. Diary entries can be added to help track what work was being done.
GnoTime Tracking Tool. Besides being able to add projects and diary entries, it allows you to specify billable rates on a per-project basis. You can also mark projects with a priority and urgency. Figure 8-7 shows the main window for gnotime. Simply double-click any task to start the clock. Diary entries can be added to help track what work was being done.
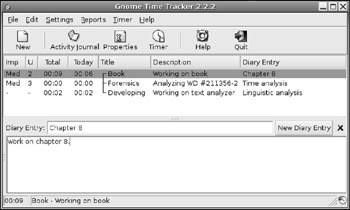
Figure 8-7: The Gnotime Time Tracker
Gnotime can generate a variety of reports including a journal of time spent (see Figure 8-8) and a billing list (see Figure 8-9). Each report includes clickable items with menus so you can add more diaries, annotations, adjust times, change rates, and so on. Reports can be saved as HTML or exported to a web server, FTP site, or e-mailed.
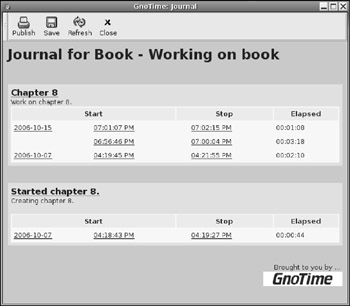
Figure 8-8: The work journal

Figure 8-9: Invoice report showing billable hours. (Wow! $1.18 in just 7 minutes!)
Gnotime isn't perfect. It cannot merge times from multiple people or export to a spreadsheet. However, it is more than enough for tracking the work from a single individual. For group tracking, consider a collaborative project tracking system such as gforge.
Tracking CPU Usage
In some cases, projects need to be tracked by the resources they consume. The two most common billable resources are CPU time and disk space. Unfortunately, there are no nice GUI applications for tracking a project's CPU consumption. Instead, this is done using the time command. This keeps track of the real elapsed time, time spent in user-space, and system time (time spent in the kernel). For example, time bash monitors the command bash (a shell) and every process created by bash. When the shell finally exists, a run-time summary is displayed:
$ time bash
# run some commands
$ exit
real 1m12.428s
user 0m0.292s
sys 0m0.588s
The example summary shows that the shell was running for a little more than a minute, but most of the time was spent idling-0.588 seconds were spent in the kernel and 0.292 seconds were spent in user-space. If you need to know how long a process was running, preface the command with time. When the process exists, you will know how much time was spent.
|
Warning |
The time command has trouble monitoring spawned processes. If the program being timed kicks off a CPU intensive process, then time will only see the total duration, not the kernel or user-space times. Also, if a process is separated from its parent (for example, scheduled to run using at) then time will not measure the spawned application. |
Tracking Disk Usage and Quotas
Disk space is much easier to compute. The df command (discussed in Chapter 7) shows you the current disk usage, but this is usually inadequate for billing. Another way to track disk usage is to install the quota package. Enabling quotas is not the easiest system, but the command line tools allow you to specify how much disk space a user can have on a specific file system.
|
Note |
When using df to determine disk space, be aware that this is only a snapshot. There may have been a time between snapshots when the disk space exceeded the current allotment. |
Although quotas may seem unnecessary for the average home user, they can be very useful for project tracking. Quotas enable you to track disk use, bill by the megabyte, and identify when a project dramatically increases in size. Quotas can also stop runaway processes from filling your hard drive. For example, the default installation for Ubuntu places all files in one partition. If you are running a mail server then you might want to enable quotas for the e-mail system. This prevents a massive e-mail (or flood of small e-mails) from filling your disk.
Understanding Your Limits
Under Ubuntu, the quota system enables you to specify limits for files, links, and disk space per user. There are soft limits and hard limits, and an allotted grace period. These limits can be set for users or groups. This way, a group can share files within a given quota.
§ Hard limits-A hard limit specifies the maximum allocation for a user or group. For example, if you are allotted 10,000 files, then you cannot create any new files if you are over your quota. The only way to get under your quota is to either delete files, or have the administrator increase your limit.
§ Soft limits-Soft limits are used to provide a warning to users. If they go over their soft limit quota, then the grace time kicks in. The grace time says how long they have to remove files and get under their quota. If the grace time is set to seven days, then users have seven days to get under their quota. After the grace period, the soft limit is treated as a hard limit and the user is blocked from creating or updating new files. Soft limits are really useful since sometimes you might go a little over your quota for a short duration.
§ Disk limits-Soft and hard limits can be set based on disk space. For example, a user may be allocated a 100 MB soft limit at 110 MB hard limit. Small systems may have limits set in the megabyte range, while large systems may use gigabyte quotas.
§ File limits. This limit allows you to specify how many files a user (or group) can have. Files are anything that consumes an inode-this includes real files, device files, and links to other files. Small systems, such as local e-mail servers, may be limited to a few hundred or a few thousand files. In contrast, large file repositories may be allowed hundreds of thousands of files, or have no limit at all.
|
Note |
The file system uses inodes to store meta-data information about files. This includes the actual file name (since it is not found inside the file contents), permissions, timestamps, and directory information. |
Enabling Quotas
1. Install the quota package.
2. sudo apt-get install quota
3. Quotas are set on a per-file-system basis. Edit /etc/fstab and add the mount options usrquota and grpquota to your file system. In my case, I have added user quotas to my Ubuntu file system (/dev/hda1), and both user and group quota to second hard drive (/dev/hdb4). My /etc/fstab file looks like:
4. # /etc/fstab: static file system information.
5. # device mount fs options dump pass
6. proc /proc proc defaults 0 0
7. /dev/hda1 / ext3 defaults,errors=remount-o,usrquota 0 1
8. /dev/hda5 none swap sw 0 0
9. /dev/hdc /media/cdrom0 udf,iso9660 user,noauto 0 0
10. /dev/hdb4 /mnt/disk ext3 defaults,usrquota,grpquota 0 0
|
Tip |
Don't enable quotas on read-only devices such as CD-ROM drives. Since a user has no way to add or remove files, quota information provides no value. Similarly, removable devices such as floppy disks and USB thumb drivers usually should not have quotas enabled. |
11. Since the partitions are already mounted, you will need to remount each of the quota- enabled file systems in order to load the new mount flags. Since the changes are in /etc/fstab, you won't need to do this after a reboot. Since I added quotas to / and /mnt/disk, I can remount using:
12. $ sudo mount -o remount /
13. $ sudo mount -o remount /mnt/disk
14. $ mount | grep quota # check results
15. /dev/hda1 on / type ext3 (rw,errors=remount-ro,usrquota)
16. /dev/hdb4 on /mnt/disk type ext3 (rw,usrquota,grpquota)
17. Before quotas can be enabled, you need to check for existing problems (even through there shouldn't be any problems). This is done using the quotacheck command. The parameters -augmvmeans all file systems, all user and group quotas, and don't remount the partitions. For large disks, this check might take a few minutes. If you don't have user quotas, then you do not need -u, and -g is only used when group quotas are enabled. Specifying the -g without the grpquota mount option will generate a warning, but won't cause problems.
18. $ sudo quotacheck -augmv
19. quotacheck: Scanning /dev/hdb4 [/mnt/disk] quotacheck: Cannot stat old
20. user quota file: No such file or directory
21. quotacheck: Cannot stat old group quota file: No such file or directory
22. quotacheck: Cannot stat old user quota file: No such file or directory
23. quotacheck: Cannot stat old group quota file: No such file or directory
24. done
25. quotacheck: Checked 10254 directories and 228748 files
26. quotacheck: Old file not found.
27. quotacheck: Old file not found.
The first time you run quotacheck -augmv, you will see a bunch of warnings about files not existing. This is because the system has not been checked before. After it is checked, the quota version 2 files /mnt/disk/aquota.user and /mnt/disk/ aquota.group (or quota.user and quota.group if you are using the older quota version 1 system) will be created and these errors should not appear again.
|
Note |
Even if you are not enabling both user and group quotas on a file system, you should create both files. Otherwise some quota commands may generate warnings. |
28. Now quotas can be turned on.
29. sudo quotaon -augv
|
Tip |
Running sudo /etc/init.d/quota start will perform the quota check (Step 4) and turn on quotas (step #5). |
Editing Quotas
After quotas are enabled you can edit them using edquota. Using edquota -u, you can edit the quota for any particular user. Similarly, edquota -g edits group quotas.
sudo edquota -u bill
sudo edquota -g users
The edquota command opens an editor that allows you to specify the soft and hard limits for disk space (blocks) and files (inodes). Each partition where quotas are enabled is listed. The current values are also displayed. For example, my quota settings look like:
Filesystem blocks soft hard inodes soft hard
/dev/hda1 68866148 0 0 247947 0 0
/dev/hdb4 31153944 0 0 238603 0 0
This says that I am currently using about 65 GB on /dev/hda1, and using 247,947 inodes. On /dev/hdb4 I am using about 30 GB and 238,603 inodes. This also says that I have no quota limits. Changing and saving the soft and hard values will immediately enable quotas. If I am over quota, then the soft and hard limits are immediately enforced.
The grace times default to seven days, but can be edited using sudo edquota -t. This brings up an editor that displays the current settings per device and allows you to change the values.
Grace period before enforcing soft limits for users:
Time units may be: days, hours, minutes, or seconds
Filesystem Block grace period Inode grace period
/dev/hda1 7days 7days
/dev/hdb4 7days 7days
|
Tip |
Don't worry about maintaining the correct column spacing when editing with edquota. The system only checks the number of columns separated by spaces, not the actual number of spaces. Saving changes and then running edquota again will reformat the columns. |
Reporting Quotas
After enabling quotas, you can generate periodic reports using the repquota command. These can either be in the raw system format or in a human-readable form (-s).
$ sudo repquota -a
*** Report for user quotas on device /dev/hda1
Block grace time: 7days; Inode grace time: 7days
Block limits File limits
User used soft hard grace used soft hard grace
----------------------------------------------------------------------
root -- 3953944 0 0 189921 0 0
nealk -- 68866148 0 0 247947 0 0
postfix -- 56 0 0 41 0 0
test -- 28 0 0 8 0 0
*** Report for user quotas on device /dev/hdb4
Block grace time: 7days; Inode grace time: 7days
Block limits File limits
User used soft hard grace used soft hard grace
----------------------------------------------------------------------
root -- 36628 0 0 192 0 0
nealk -- 31153944 41153944 51153944 238603 59153944 61153944
postfix -- 4 0 0 1 0 0
test -- 32472 0 0 207 0 0
$ sudo repquota -as
*** Report for user quotas on device /dev/hda1
Block grace time: 7days; Inode grace time: 7days
Block limits File limits
User used soft hard grace used soft hard grace
----------------------------------------------------------------------
root -- 3862M 0 0 190k 0 0
nealk -- 67253M 0 0 248k 0 0
postfix -- 56 0 0 41 0 0
test -- 28 0 0 8 0 0
*** Report for user quotas on device /dev/hdb4
Block grace time: 7days; Inode grace time: 7days
Block limits File limits
User used soft hard grace used soft hard grace
----------------------------------------------------------------------
root -- 36628 0 0 192 0 0
nealk -- 30424M 40190M 49956M 239k 59154k 61154k
postfix -- 4 0 0 1 0 0
test -- 32472 0 0 207 0 0
You can also generate quota e-mails using warnquota. By default, e-mails are sent to each user when they are over quota, and root also receives a copy of each e-mail. You can change the e-mail sender's information by editing /etc/warnquota.conf.
When I need to track projects by disk space, I usually create a user account just for the project and enable a cron job to generate a nightly (or hourly) report for the project's user (sudo repquota -a | grep projectusername).
Summary
Ubuntu provides many different options for managing concurrent applications. Whether your needs are for task switching, window management, or project tracking, there are plenty of options available. Using simple scripts, you can enhance clipboard usage and create directories that automate tasks. And best of all, you can literally budget your time.
All materials on the site are licensed Creative Commons Attribution-Sharealike 3.0 Unported CC BY-SA 3.0 & GNU Free Documentation License (GFDL)
If you are the copyright holder of any material contained on our site and intend to remove it, please contact our site administrator for approval.
© 2016-2026 All site design rights belong to S.Y.A.