UNIX: The Complete Reference (2007)
Part I: Basic
Chapter 5: Text Editing
Overview
Most computer users spend more time creating and modifying text than anything else. Writing memoranda, letters, books, and programs, and creating text files of many kinds, takes a lot of effort. All of the popular UNIX variants (e.g., Linux, Solaris, HP-UX, AIX, Mac OS) separate this effort into two activities. Creating and modifying text is done by editors, while formatting the text for display and final presentation is done by formatters. The rationale behind this is one of having flexible programs that focus on doing one thing well. When you are creating text, it’s helpful to focus on getting the substance of what you want to say into a computer file. Once you have some material, then you can concentrate on how that material will be formatted. Most UNIX users depend on one of two screen editors: vi (visual editor) and emacs. vi is a part of most flavors of UNIX. emacs is included in many UNIX variants, including the most popular Linux distributions, and is available as a separate add-on program for almost all the other variants of UNIX. Note that because of the popularity of these two editors, command editing under the Korn shell can be done with either vi or emacs commands. Linux users also may use the vim or the pico editor. While there are a number of other UNIX-based text editors, these four are the most popular ones. vi has been available to UNIX System users for years and was enhanced to support international time and date formats and to work with multibyte characters needed for representation of non-English alphabets. vim is a superset of vi and includes not only the complete vi environment but additional features such as editing in colors and autocompletion of commands. pico is used primarily in the academic world, but really anyone who has access to the PINE e-mail system can have access to pico as well.
In this chapter you will learn:
§ The basic capabilities and commands of the vi and emacs editors
§ Advanced features of vi and emacs
§ How to customize vi to your working style, making it even easier to work with
§ How to write combinations of simple commands into vi macros
§ Comparisons between the vim editor and the vi editor
§ About the pico editor and its uses, both stand-alone and as an editor in PINE e-mail
Editing with vi
A good screen editor would have all of the simplicity and features of the basic UNIX line editor, ed: its little language, its use of regular expressions, and its sophisticated search and substitute capabilities. But a good editor would take better advantage of CRT displays on both terminals and PC screens. Looking at 23 or more lines of text provides context and allows the writer to think in terms of the content of paragraphs and sentences instead of lines and words.
vi has been designed to address these requirements for a better editor; vi has all of these features. vi is a superset of ed; it contains all of ed’s features and syntax. In addition, vi provides extensions of its own that enable customizing and programming the editor.
The need for an extension to the UNIX System ed editor was the reason vi was first developed. In the late 1970s, Bill Joy, then a graduate student at the University of California at Berkeley, wrote an editor called ex. ex was an enhanced version of ed that retained all of ed’s features and added many more, including the ability to see a screenful of text under the visual option. ex became a popular editor. People used its display editing feature so much that the ability to call up the editor directly in visual mode was added.
Setting Your Terminal Display Type for vi
Instead of displaying a few lines of text, vi shows a full screen. vi shows you as many lines of text as your screen can display Twenty-three lines of 80 characters is standard for most terminals, but workstation displays can hold many more; for example, an SGI workstation can comfortably display 65 lines of 155 characters of small type.
Because the characteristics of terminals differ, the first thing you must do before using vi with a terminal display is specify the terminal type by setting a shell environment variable. For example, the VT-100 is an early model of a DEC terminal. Most current terminals and terminal emulation programs on PCs support a vt100 mode. If you use such a terminal, or wish to emulate it, typing
$ TERM=vt100
$ export TERM
sets the terminal variable to the DEC VT-100 terminal and makes that information available to programs that need it. Rather than type in the terminal information every time you log in, you can include the lines
#
# Set terminal type to vt100 and
# export variable to other programs
#
TERM=vt100
export TERM
in your .profile to have your terminal type automatically set to vt100 (replace vt100 with whichever terminal you use) whenever you log in. If you use different terminals, the following script placed in your .profilewill help set TERM correctly each time:
#
# Ask for terminal type, set and export
# terminal variable to other programs
#
echo Terminal Type?\c
read a
TERM=$a
export TERM
Starting vi
Users who are familiar with ed will find it easy to use vi because of the many basic similarities. vi, like ed, is an editor with two modes. When the editor is in input mode, characters you type are entered as text in the buffer. When the editor is in command mode, characters you type are commands that navigate around the screen or change the contents of the buffer. Figure 5–1 shows the two modes in vi, the input mode and the command mode. When you are in input mode, ESC (escape) places you in command mode; anything else you type is entered into your document.
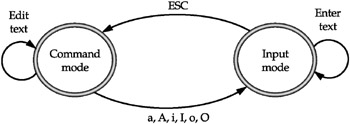
Figure 5–1: Command and input modes in vi
When you are in command mode, several commands (a, A, i, I, o, and O, described next) will place you in input mode; anything else you type is interpreted as a command.
To edit a file, the command vi dog will have vi copy your file into a temporary storage area called an editing buffer and show you the first screenful of that buffer, as in Figure 5–2.
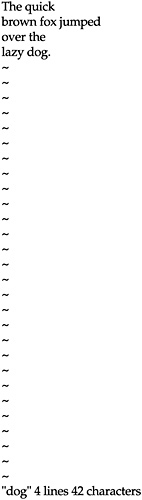
Figure 5–2: A sample vi screen
In newer versions of UNIX, vi reshapes the screen and refreshes the window if you change the size of the windows.
If you do not have a file dog, vi will create it. vi puts the cursor at the first position in the first line. The position of the cursor marks your current position in the buffer. To position the cursor on the last line, type vi + dog and you will be shown the end of the file, and the cursor will be positioned on the last line. To put the cursor on line 67, type vi + 67 dog and the cursor will be put on line number 67, if it exists. If there are fewer than 67 lines in the file, as in this example, vi will tell you that there are not that many lines in the file, and it will position the cursor at the beginning of the last line.
vi is a subset of the ex editor, which includes most of ed’s functions. If you type a : (colon) when in command mode, the cursor will drop to the last line of the screen and wait for a command. Because vi includes the ed commands, you can issue most ed commands while in vi. For example, if your terminal type isn’t set correctly, vi will behave weirdly
The command : (colon) will place the cursor at the bottom of the screen, and the command: q will quit the editor, just as it does in ed.
Entering Input Mode
vi starts up in command mode. To enter text, you need to switch to input mode. vi provides several ways to do this. For example, the command a puts vi in input mode and begins appending typed text into the buffer immediately after the position of the cursor. (Note that it appends text after the character pointed to by the cursor, not after the line pointed to, as in ed.) The command i puts vi in input mode and begins inserting typed text immediately before the position of the cursor. The command A puts vi in input mode and appends material at the end of the current line. The command I puts vi in input mode and insertsmaterial at the beginning of the current line. The command O (uppercase O) Opens up a line above the current line, places the cursor there, and puts vi in input mode. The command o (lowercase o) opens up a line below the current line, places the cursor there, and puts vi in input mode.
All further typing that you do is entered into the buffer. Whenever you are in input mode, existing text moves as new text is entered. The new text you type in does not overwrite the old.
Leaving Input Mode
Because vi is a two-mode editor, the most important commands for a beginner to remember are the ones that are needed to change modes. The commands a and A, i and I, and o and O place you in input mode.
When you are done creating text, you can leave input mode and go into command mode by pressing ESC (the escape key is usually at the upper-left of the keyboard). Anytime you press ESC, even in the middle of a line, you will be put back in command mode. The only way to stop appending or inserting text and return to command mode is to press ESC. This gets vi out of input mode and back into command mode.
To automatically keep track of where you are (command or input mode), it is a good idea to press ESC as soon as you are done entering a portion of text. This puts you back into command mode.
Exiting vi
When you have finished typing in your text, you need to exit the editor. Remember, if you make serious errors, you can always exit and start again. First get out of input mode by hitting ESC. Typing : (colon) puts you in a mode in which ed commands work. The cursor drops to the bottom of the screen, prints a : (colon), and waits. The command : w will write the contents of the editing buffer into the file. It is at this point that the original file is replaced with the new, edited version. The combined commands : wq will write and quit. Since : wq is a common command sequence in every editing session, the abbreviation ZZ, which represents “last command,” is equivalent to : wq. The command : x stands for exit and is also equivalent to : wq. If you have made some changes you regret, you can cancel all the changes you’ve made by quitting the editor without writing the buffer to a file. To do this, use the : q! command. This means “quit, and I really mean it.”
Moving Within a Window
The main benefit of a screen editor is that you can see a portion of your file and use context to move around and decide on changes. In vi’s command mode, you have several ways to move around a window. One set of commands enables you to move around by lines or characters, as shown in Table 5–1.
|
Table 5–1: Moving Around by Lines or Characters in vi |
|
|
Command |
What It Does |
|
l or SPACEBAR or → |
Moves right one character |
|
h or CTRL-H or BACKSPACE or ← |
Moves left one character |
|
j or CTRL-J or CTRL-N or ↓ |
Moves down one line |
|
k or CTRL-P or ↑ |
Moves up one line |
|
0 |
Moves to the beginning of the line |
|
$ |
Moves to the end of the current line |
|
+ or ENTER |
Moves to the beginning of the next line |
|
− |
Moves to the beginning of the previous line |
You don’t need to think only in terms of characters and lines; vi also lets you move in other units. In normal text entry, a word is a sequence of letters delimited by spaces or by punctuation; and a sentence ends with a period (.), question mark (?), or exclamation point (!) and is separated from the previous sentence by two spaces, or by a ENTER. With these definitions, the commands shown in Table 5–2 enable you to move across larger sections of text when you are in input mode.
|
Table 5–2: Moving Across a Section of Text in vi |
|
|
Command |
What It Does |
|
w |
Moves to the next word or punctuation mark |
|
W |
Moves to the next word |
|
e |
Moves to the end of this word or punctuation mark |
|
E |
Moves to the next end of word |
|
b |
Moves back to the beginning of word or punctuation |
|
B |
Moves back to the beginning of the word |
|
) |
Moves to the start of the next sentence |
|
( |
Moves back to the start of the sentence |
|
} |
Moves to the start of the next paragraph |
|
{ |
Moves back to the last start of paragraph |
|
]] |
Moves to the start of the next section |
|
[[ |
Moves back to the last start of section |
These commands can take a numerical prefix: 5w means move ahead five words; 9e means move the cursor to the end of the ninth word ahead.
The {and} and the [[and]] commands move by paragraphs or sections of your text and use the text formatting commands in the mm macros discussed on the companion web site. For example, the command, {} (move to the next paragraph) will move you to the next .P in your file.
Moving the Window in the Buffer
vi shows you the text file, one window at a time. Normally, you edit by moving the cursor around on the screen, making changes and additions, and by displaying different portions of the text on the screen. The commands in the previous section showed you how to move the cursor in the text. You can also move the window that displays the text with the following five commands:
|
CTRL-F (Forward) |
Moves forward one full screen |
|
CTRL-D (Down) |
Moves forward one half screen |
|
CTRL-B (Back) |
Moves back one full screen |
|
CTRL-U (Up) |
Moves back one half screen |
|
G (Go) |
Moves to end of file |
These commands also take numeric prefixes to move further ahead in the file. The command 3CTRL-F (hitting the number 3 key, then the CTRL and F keys simultaneously) will move ahead three full screens, whereas the command 4CTRL-B will move back four screens. The G command goes to a specific line number or goes to the end if no line number is specified. Therefore, the command 23G positions the cursor at line 23; the command 1G (number 1 and letter G) positions it at the first line in the file, whereas the command G goes to the last line.
Modifying Text
vi provides simple commands for changing and deleting parts of your text. The command rn means replace the current character (where the cursor is located) with the character n. You can also replace multiple characters; for example, the command 3rn replaces three characters with n.
The command RstringESC replaces the current characters with the string you type in. Characters are overwritten until you press ESC (the escape key, usually in the upper left-hand of the keyboard).
The c (change) command enables you to make larger-scale modifications to words or lines. For example, the command cwstringESC changes the current word by replacing it (that is, overwriting it) with whatever string you type. The change continues until you press ESC. When you make such a change, vi puts a $ over the last character of the word to be changed. The $ disappears when you press ESC.
The command c$stringESC will change everything from the current cursor position to the end of the line ($) by replacing the text with the string you type in. ESC takes you out of input mode.
The change commands also can take numerical arguments, so the command 4cw will change the next four words, and the command 3c$ will change the next three lines.
DeletingText
vi provides two delete commands that let you delete small or large chunks of text. To delete single letters, use the command x. x deletes the current character. As with other vi commands, x takes a numerical argument. This means that the command 7x deletes seven characters-the character under the cursor and the six to the right of it. The d (delete) command works on larger units of text. Table 5–3 shows some examples of the delete command.
|
Table 5–3: Examples of the delete Command |
|
|
Command |
What It Does |
|
dw |
Deletes from the cursor to the end of the word |
|
3dw |
Deletes three words |
|
d$ |
Deletes to the end of the line |
|
D |
Deletes to the end of the line (a synonym for d$) |
|
3d$ |
Deletes to the end of the third line ahead |
|
d) |
Deletes to the beginning of the next line |
|
d} |
Deletes to the beginning of the next paragraph |
|
d]] |
Deletes to the beginning of the next section |
|
dd |
Deletes the current line |
|
2dd |
Deletes two lines |
|
dENTER |
Deletes two lines |
|
dG |
Deletes from the cursor to the end of the file |
Undoing Changes and Deletions
You have several ways to restore text after you have changed it. This section covers three of the simplest ways to restore text. Other useful ways of recovering changed text are discussed later in this chapter.
To undo the most recent change or deletion, use the command u. u (lowercase u) undoes the most recent change. If you change a word, u will change it back. If you delete a section, u will restore it. u onlyworks on the last change or deletion, and it does not work on single-character changes.
If you use the command U (uppercase U), all of the changes made in a line since you last moved to that line will be undone, including single-character changes. U restores the current line to what it looked like before you issued any of the commands that changed it. If you make changes, move away from the line, and then move back, U will not work as it is intended to.
When vi deletes some material, it places the text in a separate buffer. If you delete more material, this buffer is overwritten, so that it always contains the most recently deleted material. Using the command p, you can restore the deleted text. The p (lowercase p) command puts the contents of the buffer to the right of the cursor position. If you have deleted whole lines, p will put them on a new line immediately below the current line. The command P (uppercase P) will put the contents of the buffer to the left of the cursor. If you have deleted whole lines, P will put them above the current line. Notice that you can move text by deleting into the buffer with the d command, moving the cursor, and putting the text someplace else.
If you notice that you have made some horrible mistake, you can partially recover with the command :e!-the colon (:) causes the cursor to drop to the bottom line, and the e! command means “edit again.” This command throws away all changes you made since the last time you wrote (saved) the file. This command restarts your session by reading in the file from disk again. Note that you cannot undo this command.
The Ten-Minute vi Tutorial
vi is a complex program. It will be useful for you to have a list of vi commands handy; however, simply reading a command summary will not teach you how to use the editor.
The most effective way to learn vi is to try out the commands to see how they work and what effect they have on the file. To make this easy for you to do, this ten-minute tutorial is provided. It will quickly teach you enough of the features and commands of vi to begin using it productively for text editing and command editing in the shell. Before you begin, you should be logged into UNIX with your terminal (TERM)variable set. Next, follow these steps:
1. Type vi mydog.
vi will start and show you an almost-blank screen. Your cursor will be at the first position of the first line, and all other lines will be marked by the ~ character.
2. Type the command i (lowercase I).
vi goes into input mode.
3. Type the following text:
The quick brown fox jumped over the lazy dog. Through half-shut eyes, the dog watched the fox jump, and then wrote down his name. The dog drifted back to sleep and dreamed of biting the fox. What a foolish, sleepy dog.
4. Press ESC. The ESC key puts you back in command mode. vi does not signal that you are in command mode, but if you hit ESC a second time, your terminal bell will ring. Hitting ESC multiple times is an easy way to confirm that you are back in command mode.
5. Go to the beginning of the last line in the file by typing the command G.
6. Write the contents of the buffer to a new file named dog by typing : w dog.
7. Read in the contents of this file by typing : r dog.
8. Go to the first line in the file by typing 1G.
9. Go to the sixth line by typing 6G.
10. The h, j, k, and l commands move the cursor by one position as follows: h moves the cursor one character to the left and l moves one character to the right, while j moves the cursor down one line and k moves it up one line.
11. Using these commands, position the cursor at the word “fox” in the next line and delete three characters by typing 3x.
12. Insert the word “cat” by typing i catESC.
13. Your terminal bell should ring, indicating you are in command mode.
14. Pressing ENTER takes you to the beginning of the next line, and-(minus) takes you to the beginning of the preceding line. Press-(minus) until the cursor is at the / in “lazy dog.”
15. Typing w will advance one word, and b will back up one word. Advance to “dog” by pressing w, and then go back to “lazy” by pressing b. Delete the word by typing dw.
16. Undo this deletion by typing u.
17. Scroll through the file by pressing CTRL-D to advance one half screen; then press CTRL-U to back up one half screen. Scroll to the end of the file, and then back up once by pressing CTRL-D CTRL-D CTRL-D CTRL-U.
18. Your cursor will be at “down his name.” If it isn’t, move it there using the h, j, k, and l commands.
19. Change the word “his” to “my” by using the cw command like this: cwmyESC.
20. Move back to the first line of the file by typing 1G.
21. Delete three lines into a buffer with the command 3dd.
22. Move to the end of the file by typing G.
23. Put the deleted material here by typing p.
24. Move back one-half screenful with CTRL-U.
25. Delete the line by typing dd.
26. Write the file and quit using the command ZZ.
Advanced Editing with vi
At this point, you have read enough about vi to be able to enter some text and begin to edit it by making additions, changes, and deletions. In this section, you will learn about some features of vi that make it easier for you to edit documents.
Searching for Text
With vi you use the same commands for searching in your file as in ed. To search forward in your document, use the command /string. For example, typing /lazy will cause the cursor to drop to the status line (the last line on the screen), print the string “/lazy” and then refresh the screen, positioning the cursor at the next occurrence of “lazy” in the file. As in ed, the command // will search for the next occurrence of the search string “lazy,” as will /ENTER.
To search backward in the file for the string “lazy,” use the command ? lazy. This will cause the cursor to drop to the status line, print the string “?lazy,” and then refresh the screen, positioning the cursor at the previous occurrence of “lazy” in the file.
To repeat the last search, regardless of whether it is a forward (/) or backward (?) search, use the command n.
The command n is a synonym for either / / or ? ?. The command N will reverse the direction of the search. If you use /word to search forward for “word,” the command N will search backward for the same search term.
Copying and MovingText
Rearranging portions of text using vi involves three steps:
1. You yank or delete the material.
2. You move the cursor to where the material is to go.
3. You place the yanked or deleted material there.
The command y (for yank) copies the characters starting at the cursor into a storage area (the buffer). yank has the same command syntax as delete. A numeric prefix specifies the number of objects to be yanked, and a suffix after y defines the objects to be yanked. Some examples of the y command are shown in Table 5–4.
|
Table 5–4: Some Examples of Yanking |
|
|
Command |
What It Does |
|
yw |
Yanks a word |
|
3yw |
Yanks three words |
|
y$ |
Yanks to the end of the line |
|
y) |
Yanks to the end of the sentence |
|
y} |
Yanks to the end of the paragraph |
|
y]] |
Yanks to the end of the section |
|
yy or Y |
Yanks the current line |
|
3Y |
Yanks three lines, starting at the current line |
|
Y} |
Yanks lines to the end of the paragraph |
To move yanked text, put the cursor where you wish to place the yanked material, and use the p command to put the text there. The command p (lowercase p) puts the yanked text to the right of the cursor. If an entire line was yanked (Y), the text is placed below the current line. The command P (uppercase P) puts the yanked text to the left of the cursor. If an entire line was yanked, the text is placed above the current line.
Working Buffers
In addition to its editing buffer, vi maintains several other temporary storage areas called working buffers that you have access to.
There is one unnamed buffer. vi automatically saves the material you last yanked, deleted, or changed in this unnamed buffer. Anytime you yank, delete, or change something, the contents of this buffer are overwritten; that is, the contents are replaced with the new material. You can place the contents of this buffer wherever you wish with the p or P command, as shown previously
vi also maintains 26 named buffers, named a, b,c,d,…z. vi does not automatically save material to these buffers. If you wish to put text into them, you precede a command (Y, d, c) with a double quotation mark (") and the name of the buffer you wish to use. For example, "a3 Y yanks three lines into buffer a, and "g5dd deletes five lines of text beginning with the current line and places them in buffer g.
Although the material in the unnamed buffer is always overwritten, you can append text to the named buffers. If you use the command "b5Y to yank five lines into buffer b, the command "B5Y will yank five lines and append them to buffer b. This is especially useful if you are making many rearrangements of a passage. You can append several lines or sentences into a buffer, in the order you wish, and then move them together.
To put the contents of the buffer back into the text, use the p or P (put) commands, preceded by a double quotation mark (") and the buffer name. For example, "bp will put the contents of buffer b to the right of the cursor, or below the current line if the entire line was yanked. The command "bP will put the contents of the b buffer to the left of the cursor position, or above the current line if the entire line was yanked.
vi also maintains nine numbered buffers that it uses automatically Whenever you use the d command to delete more than a portion of one line, the deleted material is placed in the numbered buffers. Buffer number 1 contains your most recently deleted material, buffer number 2 contains your second most recently deleted material, and so forth.
To recover material that was deleted, use the p or P command preceded by a double quotation mark (") and the number of the buffer. For example, "1p (number 1 and p) will put the most recently deleted material below the line where the cursor is positioned. The command "6P will take the material deleted six delete commands ago (the contents of buffer 6) and put it above the current line.
Editing Multiple Files
vi allows you to work on several files in one editing session. This is especially handy if you want to move text from one file to another. If you invoke vi with multiple filenames, for example: vi dog cat letter, vi will edit them sequentially When you have finished editing dog, the commands :w and :n will write the contents of the editing buffer to the file dog and begin editing the file cat. When cat is finished, you can write that editing buffer to its file and begin working on letter.
The benefit of editing several files in one editing session rather than issuing three vi commands (vi dog; vi cat; vi letter) is that named buffers retain their contents within an editing session, even across files. You can move text between files in this way For example, first issue the command vi dog cat letter. Then, you can yank material from the dog file using "a9Y to yank nine lines into buffer a. The command : n then starts to edit the next file, cat. You can yank text from this file; for example, "b2Y will yank two lines into buffer b. Then you can move to the third file, letter, with the command : n.
Once in the letter file, you can put the material in buffers a and b into letter. The commands "ap and "bp will put the contents of buffer a (from the first file, dog) below this line, and put the contents of buffer b(from the second file, cat) below that line.
Inserting Output from Shell Commands
It is often useful to be able to insert the output of shell commands into a file that you are editing. For example, you might want to time-stamp an entry that you make in a file that acts as a daily journal. vi provides the capability to execute a command within vi and replace the current line with its output. For example, to create a time stamp, the command : r !date will read the output of the date command into the buffer, after the current line, so that it appears in the following format: Thu Aug 3 16:24:04 EDT 2006.
Setting vi Options
vi can be customized easily. Because it supports many options, setting the values of these options is a simple way to have vi behave the way you wish. There are three ways to set options in vi, and each has advantages. If you wish to set or change options during a vi editing session, simply type the : (colon) command while in command mode and issue the set command. For example, the command : set wrapmargin=15 or, alternatively, : set wm=15 will set the value of the wrapmargin option to 15 for the rest of the session (that is, lines will automatically be split 15 spaces before the edge of the screen). Any of the options can be set in this way during your current editing session.
Using an .exrc File You can have your options set automatically before you invoke vi by placing all of your set commands in a file called .exrc (for ex run command) in your login directory These set commands will be executed automatically when you invoke vi.
Normally, the .exrc file in the current directory is not checked. If you wish vi to check for .exrc in the working directory, put the line set exrc in the $HOME/.exrc file.
An advantage of using .exrc files to define your options is that you can place different .exrc files in different directories. An .exrc file in a subdirectory will override the .exrc in your login directory as long as you are working in that subdirectory If you do different kinds of editing, this feature is especially useful. If you write computer programs in a Prog directory, for instance, you can customize Prog/.exrc to use options that make sense in program editing. For example, adding the line set ai noic nomagic sets the autoindent option, which makes each line start in the same column as the preceding line; that is, it automatically sets blocks of program text. It also sets the noignorecase option, which treats uppercase and lowercase characters as different letters in a search. This is important in programming because many languages treat uppercase and lowercase as totally different characters. The example also sets the option nomagic; that is, it ignores the special meanings of regular expression characters such as {,}, and *. Because these characters have literal meanings in programs, they should be searched for as characters, not as regular expressions.
If you write memos in a Memos directory, you can customize Memos/.exrc to set these options and make writing prose easier. For example, the entry : set noai ic magic wm=15 nu does not set an autoindent option (noai); consequently, all columns begin in the leftmost column, as they should for text. It sets the ignorecase option (ic) in searches, so you can find a search string regardless of how it is capitalized. It sets magic, so that you can use special characters in regular expression searches, and it sets the wrapmargin option to 15; that is, lines are automatically broken at the space to the left of the fifteenth column from the right of the screen. It also sets the number option, which causes each line of the file to be displayed with its line number offset to the left of the line.
Using an EXINIT Variable You can have your vi options defined when you log in by setting options in an EXINIT variable in your .profile or .login file. For example, for the Korn shell, put lines like the following in your .profile file: the line EXINIT="set noautoindent ignorecase magic wrapmargin=15 number" followed by the line entry export EXINIT. If you use the C shell (csh), put lines like the following in your .login file: the line setenv EXINIT "set noautoindent ignorecase magic wrapmargin=15 number" followed by the line entry export EXINIT.
If you define an EXINIT variable in .profile or .login, the settings apply every time you use vi during that login session. An advantage of using EXINIT is that vi will start up faster, because settings are defined once when you log in, rather than each time you start using vi. A second advantage is that vi will always work the same way in every directory.
Table 5–5 lists some useful vi options.
|
Table 5–5: Some Useful vi Options |
|||
|
Option |
Type |
Default |
Description |
|
autoindent, ai |
On/Off |
noai |
(Do not) Start each line at the same column as the preceding line. |
|
autowrite, aw |
On/Off |
noaw |
(Do not) Automatically write any changes in buffer before executing certain vi commands. |
|
flash |
On/Off |
flash |
Flash/blink screen instead of ringing terminal bell. |
|
ignorecase, ic |
On/Off |
noic |
Uppercase and lowercase are (not) equivalent in searches. |
|
magic |
On/Off |
magic |
nomagic ignores the special meanings of regular expressions except ^, ., and $. |
|
number, nu |
On/Off |
nonu |
(Do not) Number each line. |
|
report |
Numeric |
5 |
Displays number of lines changed (changed, deleted, or yanked) by the last command. |
|
shell, sh |
String |
login shell |
Shell executed by vi commands, :!, or !. |
|
showmode, smd |
On/Off |
nosmd |
(Do not) Print “INPUT MODE" at bottom right of screen when in input mode. |
|
terse |
On/Off |
noterse |
terse provides short error messages. |
|
timeout |
On/Off |
timeout |
With timeout, you must enter a macro name in less than one second. |
|
wrapmargin, wm |
Numeric |
0 (Off) |
Automatically break lines before right margin. wm=20 defines a right margin 20 spaces to the right of the edge of the screen. |
Displaying Current Option Settings
You have three ways to view your current option settings. Each of them involves issuing an ex command.
To see the value of any specific option, type :set optionname? The editor will return the value of that option. The ? at the end of the command is required if you are inquiring about a specific option setting. For example, in the command :set nu?, nu is the option to display the line number for each line in the buffer. If this option is not set, vi returns the message “nonumber.” To see the values of all options that you have changed, type :set. To see the values of all the options in vi, type :set all.
vi Options
You can set three kinds of options in vi: those that are on or off, those that take a numeric argument, and those that take a string argument. In all three cases, several options can be set with a single :setcommand.
On/Off Options For those options that are turned on or off, you issue a set command such as :set terse or : set noterse. terse is an option that provides short error messages. : set terse says you want the shorter version of error messages, : set noterse means you want this option off-you want longer error messages.
showmode is another useful option that can be set on or off. showmode tells you when you are in input mode by displaying the words “INPUT MODE" in the lower-right corner of your screen. For example, : set showmode sets this option.
The number option precedes each line that is displayed with its line number in the file with the command : set number.
Numeric Options You set options that take a numeric argument by specifying a number value. For example, : set wm=21 applies to the wrapmargin (wm) option, which causes vi to automatically break lines by inserting a carriage return between words. The line break is made as close as possible to the margin specified by the wm option. wm=21 defines a margin 21 spaces away from the right edge of the screen.
Another useful numeric option is report. vi will show you, at the bottom of your screen, the number of lines changed, deleted, or yanked. Normally, this is displayed only if five or more lines have been modified. If you want feedback when more or fewer lines are affected, set report appropriately, such as the command : set report=1. This command will have vi tell you every time you have modified one or more lines.
String Options Certain options take a string as an argument. You set these by specifying the string in the set command. For example, to specify which shell you wish to use to execute shell commands (those that begin with :! or !) use a command such as :set shell=/usr/ bin/sh. This particular command sets the shell to the Korn shell.
Writing vi Macros
vi provides a map capability that enables you to combine a sequence of editing commands into one command called a macro. You use map to associate any keystrokes with a sequence of up to 100 vi commands.
How to Enter Macros
Macro definitions are nothing more than the string of commands that you would enter from the keyboard. Before you can actually make up your own definitions, you need to know how to enter the macros into vi. vi macros include some special characters you need to know about. The ESC (^[) and return (^M) characters are part of the macro definition. You need to include these characters to be able to leave input mode and to terminate a command. If you type the macro exactly as you would enter the command string, it won’t work. When you press ESC, you leave input mode-you do not put an ESC character in the line. When you press ENTER, you move to the next line (or end a command)-you do not put a CTRL-M (^M) in the line. To put these commands into a definition, you need the CTRL-V command. CTRL-V says to vi, “put the next literal character in the line.” To put an ESC into the command, you press CTRL-V ESC and you see ^[ on the screen. (Remember, ^[ is the way vi displays the ESC character on the screen.) Similarly, to put a return in the command, press CTRL-V ENTER and you will see ^M. Remember, ^M is the way vi represents the return character.
You can define macros that work in command mode, in input mode, or in both. For example, in command mode you can define a new command Q, which will quit vi without writing changes to a file, by typing : map Q : q! ^M. This command says to map the uppercase letter Q to the command sequence :q!. The macro ends with a return, which in vi is represented as ^M (CTRL-M). The general format for any macro definition is map macroname commands ENTER.
When you define a macro in this way, it applies to command mode only. That is, the uppercase letter Q is still interpreted as Q in input mode, but as :q! in command mode. To undo a macro, use the unmapcommand; for example unmap macroname.
Macros are especially useful when you have many repetitive editing changes to make. In editing a long memo, or a manuscript, you may find that you need to change the font that you use. You may need to put all product names in bold type, for example. If you use a UNIX/Linux System text formatter, such as troff or groff, you do this by adding a command to change the font-\fB (font bold), \fI (font italic), and \fP (font previous) are commonly used. A detailed discussion of text formatting with troff is on the companion web site.
If you type the word “example,” it is printed in roman type and looks like “example.” If you type ‘\fBexample\fP,” troff prints the word in bold and then switches back to the previous font; thus, it looks like “example.” To change a word from roman font to bold, you need to add the string \fB to the beginning of the word and the string \fP to the end. Or you could define a vi macro that would do it automatically For example, the macro definition : map v i\fB^[ea\fP^[ ^M maps the υ (lowercase v) into the command sequence that goes into input mode (i), adds the string for bold font (\fB), leaves input mode (the ^[is how vi represents the ESC character on the screen), goes to the end of the word (e), appends (a) the string for previous font (\fP), and leaves input mode (the ^[represents the ESC character). The ^M represents the ENTER at the end of the macro. When you type v in command mode, all letters from the position of your cursor to the end of the word will be surrounded by the \fB, \fP pair and will be made bold when you format your document.
Defining Macros in Input Mode
You can also define macros that work only when vi is in input mode. The command :map! indicates the macro is to work in input mode, so that the general form of such a macro def inition is :map! macronamestring ENTER. For example, :map ! ZZ ^[:wq ^M defines an input macro, called ZZ, that is equivalent to hitting the ESC key (^[) and typing : wq followed by a carriage return (^M is how vi represents a carriage return). By defining this macro, we can have the ZZ command write and quit in input mode, as well as in command mode (as it normally does).
Macros in .exrc or EXINIT You can use the map command to define a macro in the same way that you can set vi options. You can type : map Q : q! ENTER from the keyboard while in vi, you can add the map command to your .exrc file, or you can add it to your EXINIT variable in .profile or .login.
The name of the macro should be short, only a few characters at most. When you use it, the entire macro name must be typed in less than one second. For example, with the ZZ macro defined in input mode, you must type both Zs within one second. If you don’t, the Zs will be entered in the file.
Useful Text Processing Macros
Following is a discussion of two useful vi macros, vispell and search. These macros illustrate how vi macros can be written to provide powerful command combinations in vi that are useful in everyday text processing.
Checking Spelling in Your File
Writers need to check spelling as they work. Most UNIX systems include a spelling checker called spell. Normally, you execute spell from the shell, giving it a filename, for example, $ spell mydog. spell lists on your display all the words in the file that are not in its dictionary You can capture this output to another file by typing $ spell mydog > errors. You can then invoke the vi editor and go to the end of the file mydog by typing $ vi + mydog.
Then you can read the errors file into the vi buffer by typing : r errors and search for each error in the file mydog.
The vispell Macro
You can check and correct spelling from within vi with the vispell macro. Define the following macro in your .exrc file or EXINIT: map # 1 1G!Gvi spell^M^[.
The name of this macro is #1, which refers to Function Key 1 or the PF1 key on your terminal. When you press PF1, the right-hand side of the macro is invoked. This says, “Go to line 1 (1G), invoke a shell (!), take the text from the current line (1) to the end (G), and send it as input to the command (vispell)” The ^M represents the carriage return needed to end the command, and the ^[represents the ESC needed to return to command mode.
Place the following shell script in your directory:
#!/bin/sh
#
# vispell-The first half of an interactive
# spelling checker for vi
#
tee ./vis$$
echo SpellingList
trap '/bin/rm −f ./vis$$;exit' 0 1 2 3 15
/usr/bin/spell vis$$| comm −23-$HOME/lib/spelldict|tee −a
$HOME/lib/spell.errors
Shell scripts are discussed in Chapter 20. The end result of this macro is that a list of misspelled words, one per line, is appended to your file while you are in vi. For example,
and this finally is the end of this memo.
reddendent
finalty
wrod
The search Macro
At this point vispell is useful. You could go to the end of the file (G), and type /wrod to search for an occurrence of this misspelled word. The n command will find the next occurrence, and so forth. Consider an enhancement of the normal search (/ and ?) capabilities of ed and vi. In a normal search, vi searches for strings; that is, if you search for “the,” you will also find “theater,” “another,” and “thelma.” In vi, the expression \<string matches “string” when it appears at the beginning of a word, and the expression \>string matches “string” at the end of a word. To search for “the” at the beginning of a word, you need to use /\<the; to search for “the” at the end of a word, you need to use /the\>. To search for a word that contains only “the” (the same beginning and end), you need to use /\<the\>, which searches for the word “the” rather than the string “the.” We can create a search macro that provides an efficient way to search for misspellings found by vispell. The search macro is defined in .exrc or in EXINIT by adding the following line: map #2 Gi / \ <^[A\ >^["adda.
The preceding macro maps the macro name Function Key 2 or PF2 (#2) to the right-hand side of the macro. The right-hand side says go to the beginning of the last line (G), go into input mode (i), insert the character for “search” (/) and the characters for “beginning of a word” (\<), and issue an ESC (^[) to leave input mode. It appends to the end of the line (A) the characters for “end of a word” (\>), and issues an ESC (^[) to leave input mode. It identifies a register ("a) and deletes the line into it (dd); then it invokes the contents of that register as a macro (a).
After all the additions and deletions, the a register contains the command /\<wrod\ > where “wrod” is the misspelled word found by vispell. The search macro provides a way to search for the misspelling as a word rather than as a string. Using this macro will find the first occurrence of an error in your file. To search for the next occurrence, use the n command. vi will display the message “Pattern not found” if no more errors of this type exist. You can then press PF2 to search for the next error, and so forth. Note that if you are using the UNIX formatting macros, this search macro might not find all misspellings. For example, \fBwrod\fP would not be found.
A Final Note on vi
With all of the special character use in vi, and movement back and forth and left to right on your display, your screen may occasionally not respond correctly, and you may end up looking at a bunch of nonsense on your screen. One of the best features of vi is the ability to clear and redraw the screen by using the CTRL-L key sequence. Since the editor remembers what the correct display should be, vi will return to a readable screen with the up-to-date content on it.
Editing with emacs
emacs is another screen editor that is popular among UNIX users. emacs differs from vi and ed in that it is a single-mode editor-that is, emacs does not have separate input and command modes. In a way, emacs allows you to be in both command and input modes at the same time. Normal alphanumeric characters are taken as text, and control and metacharacters (those preceded by an ESC) are taken as commands to the editor.
Several editors are called emacs. The first emacs was written by Richard Stallman at MIT as a set of editing macros for the teco editor for the ITS System. The second was also written at MIT for the MULTICS System by Bernie Greenberg. A version of emacs was developed by James Gosling at Carnegie Mellon University to run on UNIX Systems. Another version of emacs (with a different user interface) was written by Warren Montgomery of Bell Labs. Stallman’s version has become predominant with the birth of the Free Software Foundation (FSF) and GNU (GNU is Not UNIX). The GNU project’s aim is to provide public domain software tools, distributed without the usual licensing restrictions. GNU Emacs is included with several LINUX distributions, including Red Hat and Slackware. Since GNU Emacs is the most common version of emacs, the examples used in this chapter are based on it. Although different versions of emacs use different keystroke commands, the command sets among different forms of emacs are, for the most part, similar.
emacs is supported as one of the editor options used for command-line editing in the Korn shell. On systems that allow you access to both the emacs and vi features, you can use either as a shell command line editor or as a text editor.
If you are not already a vi or emacs user, you can decide which one you might like to use by trying the ten-minute tutorial for each in this chapter.
Setting Your Terminal Display Type for emacs
As with the vi editor, the first thing you must do if you are planning to use emacs is to specify the type of terminal that you are using or emulating on the PC. You do this by setting a shell environment variable. Refer to the previous section “Setting Your Terminal Display Type for vi.” The three methods for setting your display are identical for emacs.
Remember, unlike ed and vi, emacs is a single-mode editor. As Figure 5–3 shows, in emacs you can enter commands or text at any time.
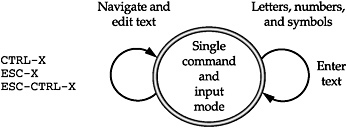
Figure 5–3: Emacs commands and input
Each character you type is interpreted as an emacs command. Regular (alphanumeric and symbolic) characters are interpreted as commands to insert the character into the text. Combinations, including nonprinting characters, are interpreted as commands to operate on the file. emacs offers several distinct types of commands. For example, there are commands that use the control characters, such as CTRL-B. CTRL-B will move the cursor left one character-hold the CTRL key down, while simultaneously pressing the B key Some commands use the ESC character as part of the command name. The command ESC-B will move the cursor left one word. Press the ESC key, release it, and then press B.
Some commands are combination commands that begin with CTRL-X. For example, the command CTRL-X CTRL-S saves your work by writing the buffer to the file being edited.
Although the number of control and escape characters is large, there are still many more emacs commands than there are characters. Many of these commands have names but are not bound to (associated with) specific key presses. You invoke these commands by using the ESC-X commandname combination, for instance, ESC-X isearch- complete.
The preceding command invokes the command called isearch-complete, which is not bound to any set of keystrokes. You can make up new associations for key presses and command names to customize emacs to your liking. For example, if you don’t like the fact that the BACKSPACE key invokes help, you can change that. Putting the following lines in your .emacs file makes BACKSPACE move the cursor left one space and CTRL-X-? invoke the help facility:
(global-set-key "\C-x?" 'help-command)
(global-set-key "\C-h" 'backward-char)
Starting emacs
You can begin editing a file in emacs with the command in the form emacs filename. Using the example filename mydog, the command emacs mydog reads in the file mydog and displays a window with several lines, as shown in Figure 5–4.

Figure 5–4: A sample emacs window
A buffer is associated with each window, and a mode line at the bottom of the window has information about the material being edited. In this example, the name of the buffer is mydog, and the full pathname of the file is /home/rrr/mydog. On some versions of emacs, the mode line will also tell you where you are in the file and what special features of emacs are being used.
Creating Text with emacs
There is no separate input mode in emacs. Because emacs is always in input mode, any normal characters typed will be inserted into the buffer.
Exiting emacs
When you are done entering text, the command CTRL-X CTRL-C will exit from the editor. If you have made changes to the file, you are prompted to decide whether you want the changes saved. If you respond with a y, then emacs saves the file and exits. If you respond with an n, then emacs asks you to confirm by typing yes or no in full.
Moving Within a Window
A screen editor shows you the file you are editing one window at a time. You move the cursor within the window, making changes and additions, and moving the text that is displayed in the window. One set of commands enables you to move by characters or lines:
|
CTRL-F |
Moves forward (right) one character |
|
CTRL-B |
Moves back (left) one character |
|
CTRL-N |
Moves to the next line (down) |
|
CTRL-P |
Moves to the previous line (up) |
|
CTRL-A |
Moves to the beginning of the current line |
|
CTRL-E |
Moves to the end of the current line |
To move in larger units within the window, use the following set of commands:
|
ESC-F |
Moves forward to the end of a word |
|
ESC-B |
Moves back to the beginning of the previous word |
|
ESC-> |
Moves the cursor to after the last character in the buffer |
|
ESC-< |
Moves the cursor to before the first character in the buffer |
Moving the Window in the Buffer
emacs shows you a file one window at a time. You can move the window within the text file to go back one screen or forward one screen by using the following commands:
|
CTRL-V |
Moves ahead one screen |
|
ESC-V |
Moves back one screen |
|
CTRL-L |
Redraws the screen with the current line in the center |
DeletingText
emacs provides several commands for deleting text:
|
DELETE |
Deletes the previous character |
|
CTRL-D |
Deletes the character under the cursor |
|
ESC-DELETE |
Deletes the previous word |
|
ESC-D |
Deletes the word the cursor is on |
|
CTRL-K |
Kills (deletes) the text to the end of the line |
|
CTRL-W |
Deletes from the mark to the cursor |
|
CTRL-@ |
Sets the mark |
|
CTRL-X CTRL-X |
Exchanges the position of the cursor and mark |
|
CTRL-Y |
Yanks deleted text |
emacs Help
emacs has several help facilities. If you issue the command CTRL-H, you’ll be put into the help facility. You can ask for help by typing CTRL-H CTRL-H. This will give you a list of all the help commands in the mini-buffer. If you type CTRL-H t, emacs will run a short tutorial on basic editing. The command CTRL-H i will provide information through the documentation reader, a hypertext-like viewer that enables you to browse emacs info. Typing h will give you a tutorial, and typing CTRL-H will give you help on the info mode.
Another type of help is called apropos, and is invoked with the command CTRL-H a. When you issue this command, emacs will prompt you for a keyword and display a list of commands whose names contain that keyword. For example, if you reply with the word “search,” you will see a list of all the emacs commands that have something to do with searching:
isearch-*-char (not bound to any keys)
Function: Handle * and ? specially in regexps.
isearch-abort (not bound to any keys)
Function: Abort incremental search mode if searching is successful, signalling
quit.
isearch-backward CTRL-r
Function: Do incremental search backward.
isearch-backward-regexp ESC CTRL-r
Function: Do incremental search backward for regular expression.
isearch-complete (not bound to any keys)
Function: Complete the search string from the strings on the search ring.
This listing is only the beginning of all the items relevant to “search.” You type ESC CTRL-V to scroll the help window to see the other entries.
The Ten-Minute emacs Tutorial
emacs, like vi, is a complex program. A list of the commands and what they mean, such as the one presented in the preceding pages, is important to have available and to know. But simply reading a command summary will not teach you how to use the editor.
The easiest way to learn emacs is to have a friend sit down with you and teach you its operation. The next best way is to try out the commands and see how they work and what effect they have on a file. To make it easy for you to do this, we provide a ten-minute tutorial for you to use. This tutorial quickly teaches you enough of the features and commands of emacs for you to begin using it for text editing and command editing in the shell. Before you begin, you should be logged into the UNIX System with your terminal (TERM) variable set. Once you’re ready, follow these steps:
1. Type emacs mydog.
emacs will start and show you an almost-blank screen. Your cursor will be at the first position of the first line.
2. Since emacs is always ready to accept input, you can begin typing the following text:
The quick brown fox jumped over the lazy dog. Through half-shut eyes, the dog watched the fox jump, and then wrote down his name. The dog drifted back to sleep and dreamed of biting the fox. What a foolish, sleepy dog.
3. emacs does not have separate input and command modes. Regular alphanumeric characters are interpreted as input; control characters (CTRL-X) or metacharacters (ESC-X) are interpreted as commands.
4. Go to the last line in the file by typing ESC->
5. You can write the buffer to a file named dog by typing CTRL-X CTRL-S dog.
6. Insert the contents of the file dog back into the current buffer by typing CTRL-X i dog.
7. GO TO THE BEGINNING OF THE FILE BY TYPING ESC-<.
The following keys move the cursor by one position:
|
Operation |
Move |
Delete |
||
|
Direction |
Left |
Right |
Left |
Right |
|
Characters |
CTRL-B |
CTRL-F |
DELETE |
CTRL-D |
|
Word |
ESC-B |
ESC-F |
ESC-DELETE |
ESC-D |
|
Intraline |
CTRL-A |
CTRL-E |
CTRL-K |
|
|
Interline |
CTRL-P |
CTRL-N |
CTRL-W |
|
1. Using these keys, position the cursor at “fox” and delete three characters by typing CTRL-D CTRL-D CTRL-D.
2. Insert the word “cat” by typing cat.
3. You can move to the next line with CTRL-N (Next) or to the previous line with CTRL-P (Previous). Press CTRL-N until the cursor is at “lazy dog.”
4. Pressing ESC-F (Forward) will advance one word; ESC-B will back up one word. Back up to “lazy” by pressing ESC-B; go forward to “dog” by pressing ESC-F. Delete the word “dog” by typing ESC-D (for delete word). Undo this deletion by typing CTRL-X u (for undo).
5. Scroll through the file by pressing CTRL-V to advance one screen, then press ESC-B to back up one half screen. Scroll to the end of the file, and then back up once by typing CTRL-V ESC-V.
Your cursor should be at “the dog watched.” If it isn’t, move it there.
6. Change the word “the” to “my” by typing ESC-Dmy (delete word, enter “my”).
7. Move back to the first line of the file by typing ESC-<.
8. Delete two lines into a buffer with CTRL-K CTRL-K CTRL-K CTRL-K.
9. Move them to the end of the file with ESC->.
10. Put the deleted material there by typing CTRL-Y.
11. Move back one half screenful with ESC-V.
12. Move to the end of the line with CTRL-E.
13. Move to the beginning of the line with CTRL-A.
14. Delete to the end of the line with CTRL-K.
15. Write the file and quit with CTRL-X CTRL-C.
Advanced Editing with emacs
So far you have seen how to use emacs to add text to a file, how to move around a window, and how to do some simple editing. In this section, you will learn about some advanced features of emacs that make it easy to edit documents.
Searching for Text
Several methods are used to search for text while in emacs. We will describe incremental searches and regular expression searches here.
Incremental Searches An incremental search searches for the string as you type it. That is, as you type the first letter of the search string, emacs finds the first word that starts with that letter, then the first word that starts with the first two letters you typed, and so on. To execute an incremental search for a string within the file, use these commands:
|
CTRL-S |
Searches forward for a string |
|
CTRL-R |
Reverses search for a string |
When you use the search commands, emacs prompts you with the words “I-Search:” at the bottom (message) line of the window and waits for you to type in a search string. When you have finished the search string, press ENTER. The characters in a search string have no special meaning in simple searches. To repeat a previous search, use the CTRL-S or CTRL-R command with an empty search string.
Regular Expression Searches emacs also supports regular expression searches. Regular expression syntax of the kind used by ed, vi, grep, diff, and so forth is supported. In addition, some new regular expression semantics is supported with new expressions (such as \<, meaning “before cursor position in buffer”) defined for use in emacs.
Regular expression searches are not available with the simple search commands. They are available in the re-search (for regular expression search) commands such as re- search-forward, re-search-reverse, re-query-replace-string, and re-replace-string.
These commands are not bound to (associated with) a simple combination of keystrokes; they are invoked using the ESC-X command prefix, as in the ESC-X re- search- forward command. If you enter the string RE search:, it prompts for a search string that can contain a regular expression.
Modifying Text with emacs
You can do a global search and replacement in emacs using the replace-string command. replace-string is similar in operation to the ed command g/string/s//newstring/g, in that it replaces every instance of a string with a different string, except that emacs prompts you for the old and new strings. The command ESC-X replace-string prompts you with “Replace string:” Enter the word you want changed (“cat” for instance) and press ENTER, and you’ll be prompted with “Replace string cat with:”, at which point you can enter the replacement string (for instance “dog”).
If you wish to search for and interactively replace instances of a specific string of characters, you use the query-replace-string command, which is bound to the ESC-% keys. If you issue the command ESC-%, emacs will prompt you (at the bottom of the window) for the old string to be replaced and the new string to be used as the replacement. At each occurrence of the old string, emacs will position the cursor after the string and wait for you to tell it what to do. The options are
|
spacebar |
Changes this one and goes on to the next |
|
y |
Changes this one and goes on to the next |
|
n |
Doesn’t change this one, goes on to the next |
|
! |
Changes this and all others without comment |
|
. |
Changes this one and quits |
|
ESC |
Exits query-replace |
Copying and MovingText
emacs allows you to mark a particular region of your text and manipulate that region. You place a mark at the current position with the set-mark command CTRL-@. Setting a mark erases an old mark, if there is one. The position of this mark and the position of the cursor define a region. You move from end to end in the region by using the command CTRL-X CTRL-X, which exchanges the position of the dot (cursor) and the mark. You can move text around by marking a region, deleting it into a special buffer called the killbuffer, moving the cursor, and putting the contents of the killbuffer at a new place. The command CTRL-W is the command delete-to-killbuffer, which deletes the entire region.
To put the deleted or copied region at another place in your text, move your cursor to the new position and use the yank commands. For example, the command CTRL-Y is the command yank-from-killbuffer. It inserts the contents of the killbuffer at the cursor. After the yank, the cursor is positioned to the right of the insertion.
Editing with Multiple Windows
The preceding examples have used one window on the screen, with one file being edited. One of the advantages of emacs over vi is its ability to use several windows and edit several files. This is useful even if you are editing a single file. For example, you can use the split-current-window command CTRL-X 2 to put two windows on your screen, each associated with the same buffer. You can arrange to have text at the beginning of the file visible in one window, while viewing some other part of the file in the other window. You can work in one window, move the cursor around, define a region, and then switch to the other window and work there. You work in only one window at a time (only one has a cursor in it), but you can see different parts of the file at the same time.
You can switch between windows with the command CTRL-X o (lowercase letter O, for “other window”).
You can yank a region into the killbuffer, move to the other window, and put it at that point in the buffer.
You can split these windows into smaller ones and have several windows looking into the same buffer. (With the normal-sized screen, these windows start to get small when you split them, so it is usually not effective to use more than two to four windows at a time, unless you have a big screen.)
When you are done working in multiple windows, the command CTRL-X 1 will delete all the windows except the one your cursor is in. The command CTRL-X 0 (number 0) will delete only the window your cursor is in and give its space to a neighboring window.
When you use the command CTRL-X 2 to split the screen into two windows, both windows are associated with the same buffer. You can edit two files in two different windows by using the find-file command sequence CTRL-X CTRL-F, which will prompt you for the name of a file and put a buffer containing that file in the window. This gives you two files in two different windows. You work in one window at a time and switch between them.
|
emacs Window Command |
Action |
|
CTRL-X 2 |
Divides the current window into two |
|
CTRL-X o |
Moves to the other window |
|
CTRL-X O |
Deletes the current window |
|
CTRL-X 1 |
Deletes all other windows except the current one |
emacs Environments
The vi editor allows you to define macros, which are sequences of commands that execute when you use the macro name. A single-letter command can be translated into a command sequence several commands long.
emacs has a much richer facility Instead of simply allowing the execution of command sequences, emacs has built into it a full programming language: the Mlisp dialect of the lisp programming language. emacs users can write programs that are invoked as emacs commands. In some ways, this programming facility means that as a user, you can do most UNIX tasks with emacs. An experienced user would hardly ever have to leave emacs.
Using emacs to Issue Shell Commands
emacs has a shell mode that enables you to run a normal interactive UNIX shell from a window. While in emacs, give the command ESC-X shell and you’ll get a window that acts just like the normal UNIX shell interface, except that you can use emacs to edit the commands.
Using emacs to Edit Directories
You can also use emacs to edit directories. When you use Directory Edit (dired), you affect the files that are there. Using emacs, you can copy delete, or rename files within the editor. To start, you invoke emacs with the directory as an argument, for example $ emacs /u1/ home/rrr. emacs starts up and shows you a screen that looks like the output of the ls −l command:
/u1/home/rrr: total 34
drwx------ 7 rrr user 512 Jul 3 16:20 .
drwxr-xr-x 188 root user 3584 Jul 2 18:53 ..
rw------ 1 rrr user 1089 May 18 20:00 .cshrc
drwx------ 2 rrr user 512 May 18 20:00 .elm
-rw------ 1 rrr user 52 May 18 20:00 .history
-rw------ 1 rrr user 209 May 18 20:00 .login
-rw------ 1 rrr user 126 May 18 20:00 .mailrc
-rw------ 1 rrr user 423 Jul 3 11:31 .newsrc
-rw------ 1 rrr user 5494 Jun 30 17:11 .pinerc
-rw------ 1 rrr user 1835 May 18 20:00 .profile
drwx----- 2 rrr user 512 Jun 22 13:37 Mail
drwx----- 2 rrr user 512 Jun 13 21:37 News
D -rw------ 1 rrr user 356 Jul 3 11:27 dog
--%%-Dired: ~ (Dired by name)--Top------
You move from file to file using the CTRL-N and CTRL-P commands to navigate. You can see the contents of a file by putting the cursor on the file and pressing v (view). You return to the directory listing by typing CTRL-C, or simply q.
To delete a file, you move the cursor to that file and mark it by pressing d. An uppercase D will appear to the left of the file entry In the preceding example, the file dog has been marked. You can move around the directory and mark as many files as you wish. When you are ready to have the files deleted, type x, and emacs will show you all the files marked for deletion, and ask you if you want them deleted. Some versions of emacs allow you to make other changes as well, but they are not part of the standard emacs program.
|
dired Command |
Action |
|
r |
Renames file |
|
e |
Edits file |
|
c |
Copies file |
|
d |
Marks file for deletion |
|
X |
Deletes marked files |
|
u |
Undeletes |
|
V |
Views file contents |
|
CTRL-N |
Next file |
|
CTRL-P |
Previous file |
How to Get emacs
Because emacs is not part of all UNIX distributions, it may not be available initially on your system. The first thing to check is whether it exists on your system. Ask a local expert or call your system administrator to find out. If you don’t have a system administrator (or if you are your own administrator) use the find command described in Chapter 3 to see if you already have it.
If it’s not available on your system, emacs is easy to obtain via the Internet using the File Transfer Protocol (FTP). You should ftp to the site ftp.gnu.org or go to the web site http://ftp.gnu.org/pub/gnu/emacs/.The emacs files are in the directory pub/gnu/emacs. The latest version is currently named emacs-21.3.tar.gz. This is a gzipped tape archive (tar) file that contains a version of the program. Download this file using the get command, unzip it, and run the tar command. This will create several hundred files on your system. The ones called INSTALL and README tell you how to build and install emacs on your system. Note that emacs can also be compiled for Windows systems, so you can have the same editor on your UNIX and Windows machines.
Editing with vim
Linux users may prefer to use an enhanced version of the vi editor called vim. vim (for vi improved) works in text mode on all terminals, but it also has a GUI (graphical user interface) with menus and mouse support. Bram Moolenaar (e-mail bram@vim.org) is the author of vim. Bram wanted to develop an open-source editor that was useful on many different platforms. Vim is currently available on a number of operating systems, including UNIX, Linux, FreeBSD, and Mac OS. It is also available on Windows platforms (Windows 98/2000/XP).
Starting vim
If you have used vi, starting vim is very easy To do so, type vim filename. If filename exists, it will be opened; otherwise, it will be created for you. Similar to the way you can use ed commands only in a visession, once you are in a vim editing session, you can use vi commands only, or use some of the advanced features of vim.
Some Advanced Features of vim
There are many more features in vim than we will attempt to describe here. If you are interested in an exhaustive list, consult the online user documentation created by Bram Moolenaar at http://υimdoc.sourceforge.net/htmldoc/usr_toc.html.
Exiting vim
To exit from vim, simply enter the ZZ command, just as you exit the vi editor.
Other Variants of vim
In addition to vim, there is another version called gvim. gvim includes a graphical user interface that contains X Window System support as well as support for PCs running DOS/ Windows. You can obtain both vim and gvim at http://www.vim.org/download.php. Figure 5–5 is a picture of the online help screen of gvim, showing the GUI.
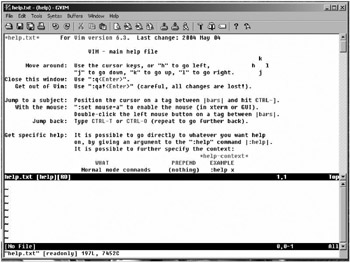
Figure 5–5: The gvim online help screen
Editing with pico
pico (Pine’s message composition editor) is a very simple, easy-to-use text editor with a screen interface that provides basic text editing capabilities along with features such as paragraph justification, cut-and-paste capability, and spell checking. Initially developed at the University of Washington as a tool to create and modify e-mail text for the PINE e-mail environment (see Chapter 8), pico has evolved into a stand-alone text editing application for Linux users in the academic community.
Starting pico
To begin editing with pico, simply type the command pico filename at the shell prompt. A screen display appears, with the version number appearing at the top of the display, and a list of control key commands at the bottom. If filename exists, pico opens it for you; otherwise, it creates it. Navigating through files consists of CTRL key commands, similar to movement in emacs. Rather than discuss all of the commands and their usage, it is better to point the user to a very useful tutorial for pico at http://www.usd.edu/trio/tut/pico/index.html.
Exiting pico
To exit pico, enter CTRL-X (the CTRL key and the x key at the same time). This will return you to the shell prompt.
How to Get pico
pico is freeware, as long as the appropriate legal acknowledgments are given to University of Washington. In fact, if you are a PINE user, pico comes with PINE. If you are not able to access pico at your shell prompt, consult your system administrator. pico can be obtained for Linux at the following web site: http://www.washington.edu/pine/getpine/linux.html. It can be obtained for other UNIX variants at: http://www.washington.edu/pine/getpine/unix.html. Figure 5–6 is a picture of the startup screen for pico.
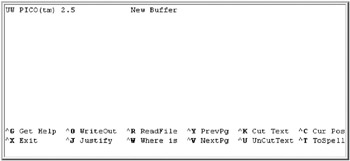
Figure 5–6: The startup screen for pico
Summary
A good screen editor would have the simplicity and features of the basic UNIX system line editor, ed. It would support its use of regular expression and its sophisticated search and substitute capabilities-but with a screenful of text that provides context and allows the writer to think in terms of the content of paragraphs and sentences instead of lines and words. All of the editors covered in this chapter have been designed to address these requirements for a better editor.
vi, emacs, and vim are flexible, high-powered editors; they provide for sophisticated entering, modifying, and deleting of text. They have sophisticated search and replace capabilities, and they enable you to customize the editor’s operation by creating new commands.
vi is a superset of ed, and it contains all of ed’s features and syntax. In addition, vi provides extensions of its own that provide for customizing the editor. Users who are familiar with ed will find it easy to use vibecause there are many basic similarities. vi, like ed, is an editor with two modes. When the editor is in command mode, characters you type are commands that navigate around the screen or change the contents of the buffer. When you are in input mode, everything you type is entered into the text.
emacs is a screen editor that is popular among UNIX System users. Although not always available as part of a particular variant of UNIX, it is a widely available add-on package. emacs is a single-mode editor-that is, it does not have separate input and command modes. Normal alphanumeric characters are taken as text, and control and metacharacters (those preceded by an ESC) are taken as commands to the editor.
vim is a superset of vi, and it contains all of vi’s features and syntax. In addition, vim provides extensions of its own to provide a more robust editing environment. This environment includes color syntax highlighting of text, the ability to develop and compile programming code and track it, and the ability to perform multiple “undo”s, as well as other scripting tools such as spell checking.
pico is a simpler model of a visual text editor that uses control-key functions to create and modify content. It is useful as a stand-alone editor, but is more useful to PINE e-mail users as a method of composing messages. The standard method of access to pico is to connect to a centralized-host system that supports both it and PINE, using server-side versions of the software. This is one reason that it is very popular with academicians that have access to university computers linked to other universities.
If you are not already a vi, emacs, vim, or pico user, you can decide which one you prefer by comparing the features of each one to see which ones you are most likely to use.
How to Find Out More
One good way to start finding out more about the topics in this chapter is to read the Internet newsgroup comp.editors; it provides hundreds of messages of interest. You should also consult one of the many vieditor FAQs, available on the web at these-and other-sites:
· http://www.faqs.org/faqs/editor-faq/vi/
· http://www.roxanne.org/vi.html
· http://unlser1.unl.csi.cuny.edu/faqs/vi-faq/
There are several good printed references for the vi editor. Among the best (but most difficult to obtain) short reference manuals for the vi editor is:
· Bolsky, M.I. The VI User’s Handbook. Piscataway, NJ: AT&T Bell Laboratories, 1985.
A more accessible treatment can be found in these two books:
· Lamb, L., and A. Robbins. Learning the VI Editor. 6th ed. Sebastopol, CA: O’Reilly & Associates, 1998.
· Robbins, A. VI Editor Pocket Reference. Sebastopol, CA: O’Reilly & Associates, 1998.
You have several ways to find out more about emacs. The Internet newsgroup comp. emacs provides hundreds of articles focused on emacs. This newsgroup regularly has an updated Frequently Asked Questions (FAQ) list covering questions and answers having to do with GNU emacs. If you have a recent emacs distribution, the FAQs are distributed as etc/FAQ. The emacs FAQs are also available on the web at:
· http://www.faqs.org/faqs/GNU-Emacs-FAQ/
The GNU Emacs Manual, 15th ed., published in 1998 (for Emacs version 21) is available on the web at many sites, including:
· http://www.delorie.com/gnu/docs/emacs/emacs_1html
This manual is available as a book that can be purchased from the FSF (see the file etc/ORDERS for details) or purchased from the usual sources of computer books as this title:
· Stallman, R.M. GNU Emacs Manual for Version 21. 15th ed. Free Software Foundation, 2002.
· You may also want to consult these other worthwhile references for emacs:
· Cameron, D., E. Raymond, and B. Rosenblatt. Learning GNU Emacs. 2nd ed. Sebastopol, CA: O’Reilly & Associates, 1996.
· Schoonover, M.A., J.S. Bowie, and W.R. Arnold. GNU Emacs: UNIX Text Editing and Programming. Reading, MA: Addison-Wesley, 1992.
There are quite a few ways to find out more about vim. The Internet newsgroup comp.editors contains a number of messages and useful information. In addition, many books on vi are beginning to contain chapters covering vim.
· There is currently only one good book in publication on vim, but more are being planned.
· Oualline, Steve. Vi iMproved-VIM. 1st ed. Indianapolis, IN: SAMS Publishing, 2001.
· Some useful web sites to consider for vim are:
· http://www.vim.org/ You can download the most recent version from this site
· http://υimdoc.sourceforge.net/contains FAQs, How-to’s, and online documentation
· http://u.webring.com/hub?ring=vim is the vim webring, which you can join
· There are also a few ways to find out more about pico.
· Sarwar, K., R. Koretsky, and S. Sarwar. UNIX: the Textbook. MA: Addison Wesley, 2004.
· This textbook includes a section on the pico editor as well as other editors. Some of the more useful web sites devoted to pico include:
· http://www.washington.edu/pine/faq/whatis.html#2.2, which provides a short definition
· http://www.indiana.edu/~ucspubs/bl03/, which provides detailed information on pico
· http://www.usd.edu/trio/tut/pico/index.html, which provides a pico tutorial
· http://www.sfu.ca/acs/howtos/e/e-2.htm, which is a helpful how-to-use page for pico
· http://www.itd.umich.edu/itdoc/r/r1168/, which describes how to use pico for UNIX as well as Windows systems.
All materials on the site are licensed Creative Commons Attribution-Sharealike 3.0 Unported CC BY-SA 3.0 & GNU Free Documentation License (GFDL)
If you are the copyright holder of any material contained on our site and intend to remove it, please contact our site administrator for approval.
© 2016-2026 All site design rights belong to S.Y.A.