UNIX: The Complete Reference (2007)
Part II: User Networking
Chapter List
Chapter 8: Electronic Mail
Chapter 9: Networking with TCP/IP
Chapter 10: The Internet
Chapter 8: Electronic Mail
Electronic mail has been an important part of the UNIX System from the beginning. UNIX was developed by AT&T, and an important goal was to make electronic communication as simple, transparent, and universal as telephony.
The UNIX System includes a rich set of tools for getting, sending, and managing mail. This chapter provides basic information on how to use e-mail effectively on your UNIX or Linux system. It describes the options you have for sending and receiving mail, explains how to use the most common mail programs, and has instructions on configuring these programs to match your specific needs.
E-Mail on the UNIX System
There are two types of mail software. The first type includes the programs that handle the interactions between users and the mail system. These are the programs you use to read, send, and manage mail. This type of program is sometimes called a mail user agent (MUA), or a mail client.
The second type of mail software consists of the programs that take care of routing and moving messages between systems, and getting messages to the recipient’s mailbox. These are referred to as mail transport agents (MTAs).
This chapter is concerned with mail clients. Some mail clients have MTAs built in, so that they can communicate directly with the Internet. This allows them to send and receive remote mail. Other MTAs, such as sendmail, are discussed in Chapter 17.
Local Mail, Remote Mail, and Webmail
In Chapter 2, you saw how to use mailx to view your mail. That was local mail, the mail that was sent to you on the system you were logged in to. Every UNIX system allows users to send and receive local mail. Your address for local mail is your username. Depending on how your system is connected to the Internet, you may have an e-mail address like corwin@amber.university.edu (where amber.university.edu is the hostname of your system) that allows you to exchange mail with people who are not on your system.
Remote mail is mail that is sent to an address on some other system. e.g., you may have an account with an ISP such as Comcast, AT&T, or Earthlink. In this case, your e-mail address would look something like gandalf@duckpond.net (where duckpond.net is the address for your ISP). Some UNIX mail programs allow you to download your mail from a remote server.
Webmail accounts allow you to access your e-mail over the web. This allows you to read your mail on any computer that has an Internet connection and a web browser. If you often use several different computers, webmail can be very convenient, since you can read your mail on any machine without setting up a mail client and without downloading all your messages. Popular webmail services include Google’s Gmail service, MSN Hotmail, and Yahoo! Mail
This chapter describes how to set up the UNIX mail programs to send and receive both local and remote mail. You do not need any special mail programs to view webmail on a UNIX system. Instead, see Chapter 10 for information about web browsers.
Types of UNIX Mail Clients
The UNIX mail programs can be classified by the type of user interface they provide.
§ Programs with command-line user interfaces These include the mail, mailx, and Mail commands. Because they lack important features like the ability to easily include attachments in e-mail, command-line mail programs are rarely chosen as a user’s primary mail client.
§ Screen-oriented programs The two primary screen-oriented mail clients are mutt and pine. Unlike the command-line programs, they allow you to move around in menus, compose mail with an editor, and include attachments in your e-mail. If you are not using a graphical interface like the X Window System, then you will probably want to use one of these programs for your mail. In addition, these programs are easier to configure for managing your local mail than the graphical applications described next.
§ Programs with graphical user interfaces (GUIs) These include a large number of third-party mail programs that run on X or other windowing systems. Currently, Thunderbird, KMail, and Evolution are some of the most popular graphical mail programs. If you are familiar with a program like Microsoft Outlook, you will find these applications fairly easy to use.
If you are using a graphical interface and you need to manage large amounts of e-mail, you will probably want to use one of these programs. They are also typically easier to configure for working with remote mail than the screen-oriented mail readers.
Common UNIX Mail Clients
There are many e-mail clients available for UNIX. (You can even use emacs as a mail client, although not many people do.) Table 8–1 lists the major UNIX mail programs.
|
Table 8–1: Common UNIX Mail Clients |
|
|
Command-Line Mail Clients |
|
|
Name |
Notes |
|
|
Most basic UNIX mail command. On some systems, mail is a link to one of the following two programs. |
|
mailx |
An enhanced version of the mail command. Standard on Solaris, HP-UX, and other SVR4-based systems. |
|
|
An enhanced version of mail. Standard on BSD and Linux systems. |
|
Screen-Oriented Mail Clients |
|
|
Name |
Notes |
|
elm |
Older screen-oriented mail client that has been largely replaced by mutt. |
|
pine |
Perhaps the most common screen-oriented mail client. Relatively easy to use. http://www.washington.edu/pine/ |
|
mutt |
Popular screen-oriented mail client. Unlike pine, mutt uses your preferred editor (vi or emacs) for composing mail by default. http://www.mutt.org/ |
|
Graphical Mail Clients |
|
|
Name |
Notes |
|
Thunderbird |
Currently the most popular graphical mail client for UNIX. Thunderbird is developed by Mozilla, along with the Firefox web browser. http://www.mozilla.com/thunderbird/ |
|
KMail |
The KDE mail client. http://kmail.kde.org/ |
|
Evolution |
The GNOME mail client. Includes a calendar and other organizational tools. http://www.gnome.org/projects/evolution/ |
|
Sylpheed |
A comparatively lightweight e-mail client. Can run on Windows and Mac OS X. http://sylpheed.good-day.net/en/ |
Command-Line Mail Programs
Although the mail commands can be useful in some situations (e.g., on a system where you get very little mail, or as programming tools) virtually all users will prefer a screen-oriented program such as pine or mutt. The command line programs were introduced in Chapter 2 and will not be described further in this chapter. For more information about mail, mailx, or Mail, see your system man page.
Screen-Oriented Mail Programs
There are a number of screen-oriented mail programs, including elm, pine, and mutt. They are a bit harder to learn than the graphical programs, but they run on virtually any type of UNIX system (including over a remote connection). They are excellent tools for sending and receiving local mail, and they usually work without any configuration changes. They typically work best when sending plain, unformatted text, but the newer versions have gotten better at handling attachments and encoded messages. The section “Tools for Managing E-Mail,” later in this chapter, describes tools that can extend the capabilities of the screen-oriented mail programs.
elm, along with pine, used to be one of the two standard screen-oriented mail readers for UNIX. However, unlike pine, it lacks important features such as the ability to easily send attachments, and it has largely been replaced by newer programs such as mutt. This chapter describes how to use and customize both pine and mutt.
pine
pine (program for internet news and e-mail) provides a simple, screen-oriented user interface for sending and receiving mail. pine was developed as an easy-to-use mailer at the University of Washington in the early 1990s. It quickly became one of the standard screen-oriented mail readers and is still one of the most popular.
The first versions of pine were based on the elm source code, but the program has evolved extensively and now contains almost no elm code. (In fact, some people joke that pine stands for pine is no-longer elm.) pine contains an integrated text editor, called pico, which vaguely resembles a simplified emacs. The editor guides you through creating a message header and provides a simple interface to the UNIX spell command, for spell checking.
pine is in fact a very powerful mail program. It has dozens of sophisticated features, but all of them are provided as options for experienced users. Leaving these options off provides a user interface even novices can feel comfortable with. pine supports a wide range of mail protocols, including SMTP (Simplified Mail Transfer Protocol), NNTP (Network News Transport Protocol), MIME (Multimedia Internet Mail Extensions), and IMAP (Internet Message Access Protocol). These protocols allow you to send mail across the Internet, read Usenet newsgroups from the pine interface (see Chapter 10), attach multimedia files to your messages, and even access remote mailboxes as if they were on your local machine.
Getting pine
Many UNIX systems come with pine installed by default. You can also download pine for free from the Pine Information Center at http://www.washington.edu/pine/. A version of pine for Windows is also available from that site.
Reading Mail with pine
To read your mail, simply enter the pine command:
$ pine
The first screen has a self-explanatory menu (shown in Figure 8–1) in which one item will be highlighted. You can move the position of the highlighted area with the arrow keys, and hit ENTER to select an item. Alternatively, just type the letter corresponding to your selection.
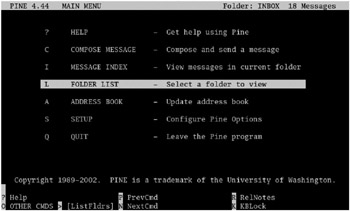
Figure 8–1: The pine menu
If you select L (for FOLDER LIST), pine will display your current mail folders, including INBOX, sent-mail, saved-messages, and postponed-messages. INBOX is a special folder that contains your new mail messages. The other folders are subdirectories of ~/mail that you can use to save messages that you send, receive, or compose.
Use the arrow keys to select a folder, and press ENTER. You will see a list of the messages in that folder. The list shows the message number, date, sender, file size, and subject for each message. If you highlight one of the messages and press ENTER, it will be displayed.
The menu bar at the bottom of each screen lists the available commands. For example, entering < will often let you go back to the previous screen. When you are done reading a message, you can use < to go back to the message list, or press the SPACEBAR to view the next message. To reply to a message, use R (if there were multiple recipients, pine will ask if you want to reply to all). To forward a message, use F. You can flag a message for deletion with D (it will be deleted when you exit pine), and you can save a message with S.
When you are done reading mail, you can use < repeatedly to return to the main menu screen. To exit pine, select QUIT from the main menu.
Sending Mail with pine
To send mail, you can either select C (COMPOSE MESSAGE) from the main menu, or you can run pine from the command line with an address list:
$ pine rlf@library.edu
or
$ pine dbp etch a-liu
In either case, pine will display the Compose Message screen. This screen allows you to enter the recipient’s address and other header information, and then puts you into the part of the screen where you type message text. pine uses its own editor, pico, for composing mail, although you can set an option to make it use an editor of your choice.
The menu at the bottom of the screen will change to reflect the options available while composing mail. When you use pico to compose a message, the menu at the bottom of the screen changes to this:
^G Get Help ^X Send ^R Read File ^Y Prev Pg ^K Cut Text ^0 Postpone
^C Cancel ^J Justify ^W Where is ^V Next Pg ^U UnCut Text^T To Spell
In each of these entries, the ^ character stands for CTRL. So, for example, you can use CTRL-K to cut a line of text, and CTRL-U to paste it. CTRL-T will check the spelling in your message. To include an attachment in your message, go to the Attchmnt field in the header, and either enter the full pathname of the file to attach or use CTRL-T to browse through your file system.
When you’ve finished entering your message, press CTRL-X to send it. The menu at the bottom of the screen changes to this:
Send message ?
Y [Yes]
^C Cancel N No
If you type Y or press ENTER, your message will be sent, and a copy will be stored in the “sent-mail” folder.
To exit from a mail message without sending it, use CTRL-O to save the draft for later, and CTRL-C to abandon it entirely
The pine Address Book
The pine program allows you to create an address book of the people you frequently send e-mail to. You can use these address book entries when creating and sending mail. To add entries to your address book, select the A (ADDRESS BOOK) option from the main menu.
pine brings up a screen showing you the entries in your address book. You can use @ to add new entries. Each entry has a nickname that you will use to include the address when you compose mail. It also has the e-mail address, or list of addresses. The other fields are optional.
Once you have created a list of entries in your address book, you can use the nicknames instead of typing full e-mail addresses when you compose mail. You can also use CTRL-T in the Compose Mail screen to select an entry from your address book.
Configuring pine
To view or to set options in pine go to the main menu and select S (SETUP). The next screen will display a long list of ways to customize pine (e.g., if you have a color display, you can change the colors pineuses). The most useful option here is C (Config), which will display the value of all the pine options.
There are many, many options. The list may seem overwhelming, but if you use pine often, it is probably worth skimming through all of them just to get a sense of the different options that are available to you. To view information about an option, highlight it and press ? (you can exit the help screen with E). To change an option (toggle it on or off, or add a value), highlight it and press ENTER.
Here are a few of the particularly useful options pine provides:
§ The option personal-name allows you to set your name as you would like it to appear in the address when you compose messages. For example,
personal-name = Jonathan (brg@turing.ca.edu)
§ To use your own editor, such as vi or emacs, when composing messages, turn on this option:
[X] enable-alternate-editor-implicitly
and set the editor option to your preferred text editor, as in
editor = vi
§ To cause CTRL-K to cut the part of the line after the cursor rather than the whole line, set compose-cut-from-cursor.
§ The option delete-skips-deleted causes the next message to be selected when you delete the current message.
§ Turning on enable-view-attachments makes it a bit simpler to open attached files in the e-mail you receive.
§ Often, you will receive formatted e-mail, which is more difficult to read in pine than plain text. If you turn on prefer-plain-text, pine will attempt to show you a plain text version of your mail whenever possible.
§ The option enable-exit-via-lessthan-command will cause the < command to work on screens that usually use E to go back.
§ To prevent pine from asking for confirmation when you quit, set quit-without-confirm.
§ You can assign a list of keystrokes to the option initial-keystroke-list. These keystrokes will be automatically executed by pine whenever you start the program. For example, to go directly to your message list rather than starting from the main menu, set the option like this:
initial-keystroke-list = L, CR
or
initial-keystroke-list = I
§ When you compose a message in the default editor, it breaks your lines automatically at a certain length. To change the width of your messages, set the value of composer-wrap-column. For example,
composer-wrap-column = 70
§ Another option that you might want to consider changing is sort-key, which controls the order in which your messages are sorted. For example, you could have pine display your most recently received messages at the top of the list by selecting Reverse Arrival for the value of sort-key:
§ sort-key =
§ Set Sort Options
§ --- ----------------------
§ () Arrival
§ () From
§ () Subject
§ (*) Reverse Arrival
§ () Reverse From
() Reverse Subject
Remote Mail with pine
Although it is configured for local mail by default, you can also use pine to receive and send your remote mail. To download your remote mail, set the option inbox-path as shown:
inbox-path = {pop3.duckpond.net/user=gandalf/pop3}INBOX
where pop3.duckpond.net is the POP3 server provided by your ISP, and gandalf is your username. If the remote server uses IMAP instead of POP3, try
inbox-path = {imap.duckpond.net/user=gandalf}INBOX
where imap.duckpond.net is the remote address.
You can also configure pine to send your outgoing mail through a remote server:
smtp-server = smtp.duckpond.net/user=gandalf
|
Caution |
If you get the message “Unable to negotiate TLS with this server” and then enter your password, pine will send your password to the server without any encryption. This is a major security risk. |
To protect your password, try enabling SSL encryption, like this:
inbox-path = {imap.duckpond.net/user=gandalf/ssl}INBOX
smtp-server = smtp.duckpond.net/user=gandalf/ssl
For more details about securing your password when getting remote mail with pine, see http://www.madboa.com/geek/pine-ssl/.
mutt
mutt is another widely used screen-oriented mail reader. It has many of the same features as pine, plus the ability to view your mail by threads, which has become a very popular feature. mutt may be less intuitive than pine for new users, but it is equally easy to use once you become accustomed to it. If you have used elm, then mutt may seem very familiar.
Like pine, mutt supports color displays. Unlike pine, it uses a standard text editor by default. mutt allows you to search through mail with regular expressions. It is extremely customizable, and quite fast.
Getting mutt
Many UNIX systems come with mutt installed by default. You can also download mutt (including a Windows version) for free from http://www.mutt.org/download.html.
Reading Mail with mutt
To read your mail with mutt, simply run it from the command line:
$ mutt
When it starts, mutt will display a list of your current mail messages, as shown in Figure 8–2. The list shows the message number, status, date, sender, file size, and subject for each message. You can view a message by selecting it with the arrow keys and pressing ENTER.
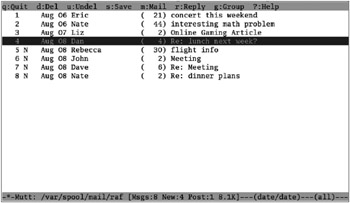
Figure 8–2: The mutt mail list
The menu at the top of each screen lists a few of the available commands. Pressing ? will often print a more complete list. When you are done reading a message, you can press i to go back to the message list, or press j to view the next message. To reply to a message, use r (you can use g to reply to all recipients). To forward a message, use f. You can flag a message for deletion with d (it will be deleted when you exit mutt), and you can save a message with s. You can change the folder you are viewing by pressing c, followed by ? to browser for the mailbox file. (You can also use mutt -f on the command line to open a specific mail file.)
Entering q will often return you to the previous screen. You can exit mutt by entering q at the message list.
Sending Mail with mutt
To compose new mail, you can either use the command m, or you can run mutt from the command line with an address list:
$ mutt rlf@library.edu
or
$ mutt dbp etch a-liu
In either case, mutt will prompt you for an address and then a subject. It will then open a copy of your preferred text editor (from the shell environment variable EDITOR) for composing the mail. After entering the message, save your changes and exit the editor.
You will now see the mutt Compose message screen, which allows you to modify the header information. To edit the message again, type e. To check the spelling in your file, use i (for ispell, which is a spell checker). To attach a file to your mail, type a at this screen. If you press TAB, you will be able to browse through your file system to select the attachment.
When you’ve finished editing your message, press y to send it. To abandon the message without sending it, use q. You will be given the chance to save the draft for later. To resume a draft, just start to compose another message with m.
The mutt Address Book
You can create an address book of the e-mail addresses you most frequently need. To add an entry, just type a while you are at the message list. mutt will prompt you before adding the address on the current message to your address book. You can change the alias, address, and name on the entry before accepting it.
Once you have created an address book, you can use the aliases instead of typing full e-mail addresses when you compose mail. You can also use the TAB key to look up entries when mutt prompts you for an address.
Configuring mutt
Unlike pine, mutt does not have a built-in editor for its configuration settings. Instead, you can create a file called ~/.muttrc and edit the settings by hand, just as you would do with your shell configuration files. On the other hand, mutt lets you customize more than pine does; for example, you can change the default key bindings (so that you use different buttons for each action).
This sample .muttrc file shows some of the most common and useful settings:
# Sample ~/.muttrc file.
# Configuration Settings for mutt
# Set your real name, to use when sending mail
set realname = "Jonathan B"
# Sort messages by threads, a very popular feature
set sort = threads
# Change a few of the color settings
color status black white
color indicator white blue # On a non-color terminal: mono indicator bold
# Use vi (or emacs) as the default editor
set editor=vi # or set editor=emacs
# Use an external pager, such as less
set pager=less
# Force mutt to always prompt for bcc: addresses when sending mail
set askbcc
# Force mutt to never ask for confirmation before deleting messages
set noaskdelete # Or unset askdelete
# Go to the next message after modifying (for example, deleting) the current one
set resolve
# Mutt normally cancels a message if you exit from the editor without
# saving any changes-turning that off allows you to send blank messages
set noabort_unmodified
# By default, mutt saves address book entries in your .muttrc, along
# with all these configuration settings, but this will save aliases
# in ~/.muttalias instead. You have to explicitly read in the new file:
set alias_file=~/.muttalias
source ~/.muttalias
# Address book entries look like
# alias aliasname addresslist
# So you can add new aliases like this:
alias copyme mymainacct (My Main Account), myotheracct (My Other Account)
# When receiving mail from an address that's in your address book,
# display the alias instead of the full address
set reverse-alias
# Configure all mail files to go in the folder muttmail by default
set folder=-/muttmail
# Keep a record of all sent messages
# The plus is a shortcut for the value of folder, above
set record="+sent-msgs"
# Change where your read messages are saved
set mbox "+mbox" # Same as set mbox ~/muttmail/mbox
For more configuration settings, see http://www.mutt.org/doc/manual/.
Remote Mail with mutt
mutt does not have any built-in features for working with remote mail. If you want to download your messages from a remote server and open them in mutt, see the fetchmail command in the section “Tools for Managing E-Mail.” If you need to send mail through a remote server, you will have to ask your system administrator about the sendmail configuration.
Graphical Interfaces for E-Mail
Mail programs with graphical user interfaces (GUIs) can make it easier to manage large amounts of mail. The graphical mail programs also allow you to easily view and compose formatted messages, and send and receive attachments. They typically have built-in spell-checking and address books, and some have calendars for keeping track of your schedule. If you are familiar with Outlook or a similar program, you should find the applications described here easy to learn.
The graphical mail programs are also much easier to configure for remote mail access than the screen-oriented mail clients. They can also be configured to send and receive local mail. If you want to read both local and remote mail with your GUI, it might be easiest to set up a .forward file to automatically forward your local mail to your remote address. See the section “Forwarding Mail,” later in this chapter, for details on creating a .forward file.
The next sections summarize how to configure three popular graphical e-mail clients for both remote and local mail. For further details, consult your system administrator or ISP.
Thunderbird
Thunderbird, as shown in Fig. 8–3, has recently become a very popular mail reader. It can be freely downloaded for Linux, Mac OS X, and Windows from http://www.mozilla.com/thunderbird/. A Solaris build for version 1.5 is available from http://ftp.mozilla.org/pub/mozilla.org/thunderbird/releases/1.5.0.4/contrib/ (see also the release notes for the latest version of Thunderbird). A build for HP-UX can be downloaded from http://www.hp.com/products1/unix/java/firefox/index.html/.
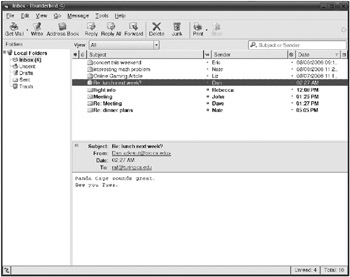
Figure 8–3: Thunderbird
To configure Thunderbird to send and receive your mail,
1. Go to the File menu. Select New and then Account.
2. If you are using an ISP for remote mail, select Email Account.
If you want to send and receive local mail, select Unix Mailspool (Movemail) instead.
3. Enter your full name and your e-mail address.
If you are configuring Thunderbird for local mail, add @localhost to the end of your username (as in “gandalf@localhost”).
4. For remote mail, select POP or IMAP, whichever your ISP supports. Enter the hostnames for your ISP’s mail servers. For example, “pop3.duckpond.net” for the incoming server, and “smtp.duckpond.net” for the outgoing server.
For local mail, just enter localhost for the server.
Depending on how your system is configured, you may get an error about locking the mailspool when you try to check your local mail with Thunderbird. The only way to fix this is to make the mailspool directory (often /var/spool/mail) world-readable (i.e., with chmod 777 /var/spool/mail). If you cannot do this, you may not be able to read your local mail with Thunderbird. In this case, KMail or Evolution may be a better choice.
For more information about using Thunderbird, see the support pages at http://www.mozilla.org/support/thunderbird/.
KMail
KMail, as shown in Fig. 8–4, is the mail reader in the KDE Kontact suite. Kontact also includes a calendar program called KOrganizer, and applications for managing your address book, reading newsgroups, getting news headlines, and so on. If you are using KDE, you should already have KMail on your system. The KMail homepage, at http://kmail.kde.org/, has information about KMail features and utilities. See Chapter 7 for more information about KDE, KMail, and the Kontact suite.
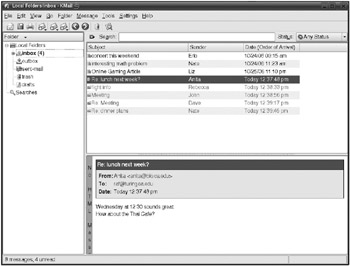
Figure 8–4: KMail
The following instructions may help you configure KMail to send and receive mail:
1. Go to the Settings menu, and select Configure KMail.
2. Modify the default identity Enter your full name and your e-mail address.
If you are configuring KMail to send and receive local mail, your e-mail address is your username.
3. From the sidebar, select Accounts. Add a new incoming account.
To receive Internet mail, select POP3 or IMAP, whichever your ISP supports. Enter a name (such as “ISP incoming”), your login name, and the hostname for your ISP’s incoming mail server (such as “pop3.duckpond.net”). Under the Extras tab, try the Check What Server Supports button to help find the right encryption option for your password.
To receive local mail, select Local Mailbox. Depending on your system configuration, you may have to change the Locking method to None. This does mean that you risk overwriting your local mail file under certain circumstances. If you get a lot of mail on your system and are worried about loosing mail, you should ask your system administrator which locking method to use.
4. Now select the Sending tab, and Add a new outgoing account.
To send mail through an ISP, select SMTP. Enter a name (such as “ISP outgoing”) and the hostname for your ISP’s outgoing mail server (such as “smtp.duckpond.net”).
You may also need to check the box for Server Requires Authentication and add your login name (the first part of your e-mail address). If so, then select the Security tab and try the Check What Server Supports button to determine which encryption options are available to protect your password.
5. To send local e-mail, select Sendmail. If that doesn’t work, try selecting SMTP and entering localhost for the hostname.
For more information about using KMail, see the documentation at http://docs.kde.org/development/en/kdepim/kmail/.
Evolution
Evolution, as shown in Fig. 8–5, is the mail client for the GNOME desktop environment. Unlike Thunderbird and KMail, GNOME has a built-in calendar. In this respect, it is more like Microsoft Outlook than the other two mail readers. If you are used to using Outlook for both mail and scheduling, you may find that Evolution feels very natural. See http://www.gnome.org/projects/evolution/ for screenshots of the calendar and other features of Evolution. Chapter 6 has more information about GNOME and Evolution.
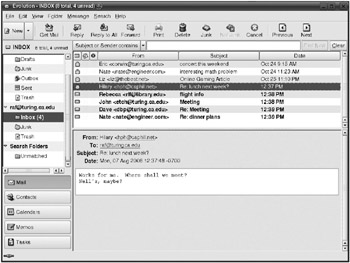
Figure 8–5: Evolution
To send and receive your mail with Evolution,
1. Go to the Edit menu and select Preferences. (Or on older versions of Evolution, Tools | Settings.)
2. Add a new mail account. Enter your full name and your e-mail address. If you are setting up Evolution to read and send local mail, add @localhost to the end of your username (as in “gandalf@localhost”).
3. If you will be using remote mail with an ISP, set the Server Type for receiving mail to POP or IMAP, whichever your ISP supports. Enter the hostname for the incoming mail server (e.g., “pop3.duckpond.net”) and your username. You should probably set Use Secure Connection to Whenever Possible. The Authentication Type is usually Password.
If you will be using this account for local mail, select Standard Unix mbox spool as the Server Type. You may have to enter the path where your new mail is located. This is often /var/spool/mail/username.
4. For remote mail, set the sending mail Server Type to SMTP, and enter the hostname for the outgoing mail server (e.g., “smtp.duckpond.net”). You may have to check the box for Server requires authentication. As for incoming mail, it is a good idea to set Use Secure Connection to Whenever Possible. Login is a common Authentication Type.
For local mail, choose Sendmail for the Server Type. If that doesn’t work, try choosing SMTP and enter localhost for the hostname.
Detailed documentation for Evolution can be found on the web at http://www.gnome.org/projects/evolution/documentation.shtml.
Tools for Managing E-Mail
The UNIX system includes several useful tools for managing your e-mail. You can forward mail to another account, automatically reply to e-mail, get notification of new mail, and download remote e-mail directly. These tools are most useful if you read your mail with a screen-oriented client, since the graphical mail programs have most of these features built-in.
Forwarding Mail
If you have multiple e-mail accounts, you may want to forward your mail so that it all ends up in one place. The easiest way to forward your local mail is to create a file in your home directory called .forward. It should contain the e-mail address to which your mail will be sent. For example,
$ cat > -/.forward
gandalf@duckpond.net
$ chmod 640 -/.forward
will create a forward to send all of your local mail to gandalf@duckpond.net. This example also sets the permissions on the file correctly.
You can forward your mail to more than one account by listing multiple addresses:
$ cat .forward
gandalf@duckpond.net, kili@puppy.com
To save a copy of your mail on your local account, add your username to the .forward file. You must put a backslash in front of your username to prevent the mail from being repeatedly forwarded. For example, if your username is jrrt, then
$ cat .forward
gandalf@duckpond.net, \jrrt
will keep a copy of your mail on the server in addition to forwarding it.
The method just described should work on almost all UNIX systems. If it doesn’t seem to work, check that you have set the file permissions correctly on your .forward. If you still have trouble, check with your system administrator to see if the .forward file is supported on your system.
The vacation Command
Some versions of UNIX (including many of the BSD variants, as well as Solaris, HP-UX, and AIX) have a command called vacation that causes the system to automatically reply when someone sends you mail. vacation keeps track of all the people who send you e-mail, saves each message sent to you, and sends each originator a predetermined message. To check if your system has the command, and to learn how to use it, you can try
$ man vacation
Notification of New Mail
When a message addressed to you is received, the mail system puts it in your mailbox, but it does not notify you that new mail has arrived. In Chapter 4, you learned how to use an environment variable to configure your shell to alert you when you have new mail. In addition, there are a number of command-line tools for mail notification.
On some UNIX systems, the command
$ f rom
will display header information for each of your new messages. You still have to run from when you want to know if you have new mail, however.
The biff command displays the header and first few lines of each new message whenever a new message arrives. You can turn notification on with
$ biff y
To turn if off, use biff n. Running biff with no arguments tells you whether or not notification is turned on.
The X Window System has a similar command called xbiff, which uses a small window to indicate new mail. You can launch it from a terminal window with
$ xbiff &
Remote Access with fetchmail
The fetchmail command (available from http://fetchmail.berlios.de/) allows you to download e-mail from a remote mailbox and send it to your mailbox on the local system. You can then read your e-mail with the mail client of your choice.
To run fetchmail, you will need to know the hostname of the server, in addition to your username and password. For example, the following command gets messages from the mailbox of gandalf, on the server pop3.duckpond.net.
$ fetchmail -u gandalf pop3.duckpond.net
fetchmail will prompt you to enter your password on the remote server.
|
Caution |
Although fetchmail will try to encrypt your password, if your server does not support the encryption, fetchmail sends your password unencrypted over the network. This is a major security risk. |
You can use the --ssl flag to tell fetchmail to use SSL encryption, although your server may not support it.
If you know which protocol the remote server is running (e.g., POP3 or IMAP), you can also include that in the call to fetchmail:
$ fetchmail -u gandalf -p POP3 pop3.duckpond.net --ssl
The -k (keep) option prevents fetchmail from deleting messages off the server when it downloads them. You can use -a to download all messages, even those that have previously been read. The option -c tells fetchmail to check for mail without downloading anything. So
$ fetchmail pop3.duckpond.net -u gandalf --ssl -ak
will download copies of all the messages on the server, without deleting any
You can save the arguments for fetchmail in a configuration file. For example,
$ chmod 710 .fetchmailrc
$ cat .fetchmailrc
pol1 pop3.duckpond.net
username "gandalf"
password "mellon"
with ssl fetchall keep
$ fetchmail
will do the same thing as the previous command line, except that it includes the password so that fetchmail will not prompt for it.
fetchmail supports many more options. For full details, consult the man page.
Summary
E-mail is one of the most important features of networking and the Internet. This chapter has introduced the most popular programs for reading and sending e-mail in a UNIX environment. It has explained how you can use pine or mutt for working with mail, and how you would configure a graphical mail program. It also listed some useful tools for managing your email on a UNIX system.
How to Find Out More
To find out more about mail, mailx, and Mail, see Chapter 2 or consult your system man pages.
Chapter 17 of this book covers sendmail and other advanced e-mail topics.
There is a lot of information about using e-mail available on the web. In particular, you can find out more about the primary e-mail clients discussed in this chapter at these sites:
§ Pine Information Center, http://www.washington.edu/pine/
§ Gopi Sundaram’s comp.mail.pine FAQ, http://www.zrox.net/Mail/Pine/
§ The Mutt E-Mail Client, http://www.mutt.org/
§ The Mutt FAQ, http://www.fefe.de/muttfaq/faq.html
§ Thunderbird, http://www.mozilla.com/thunderbird/
§ KMail, http://kmail.kde.org/
§ The KMail Handbook, http://docs.kde.org/development/en/kdepim/kmail/
§ Evolution, http://www.gnome.org/projects/evolution/
All materials on the site are licensed Creative Commons Attribution-Sharealike 3.0 Unported CC BY-SA 3.0 & GNU Free Documentation License (GFDL)
If you are the copyright holder of any material contained on our site and intend to remove it, please contact our site administrator for approval.
© 2016-2026 All site design rights belong to S.Y.A.