Getting Started with ASP.NET 5 for OS X, Linux, and Windows (2015)
6. ASP.NET 5 RESTful and AngularJS
In this chapter I'm going to explain how to work with ASP.NET 5 RESTful and AngularJS
6.1 Getting Started
In this section, we develop a simple app to work with ASP.NET RESTful and AngularJS.
AngularJS is an open-source JavaScript framework, maintained by Google, that assists with running single-page applications. Further information about AngularJS, you can visit official website on http://angularjs.org/ .
To integrate your application with AngularJS, you can download AngularJS on http://code.angularjs.org/. Choose AngularJS version you want to use. To use AngularJS on your web application, you just put it on your web page:
<script src="lib/angular.min.js"></script>
This means AngularJS file will be downloaded from your local. You also can put AngularJS as follows.
<script src="https://ajax.googleapis.com/ajax/libs/angularjs/1.2.15/angular.min.js"></script>
The following is our scenario:
· User click a button
· Program will request data from server via RESTful
Let's start to develop.
6.2 Creating Project
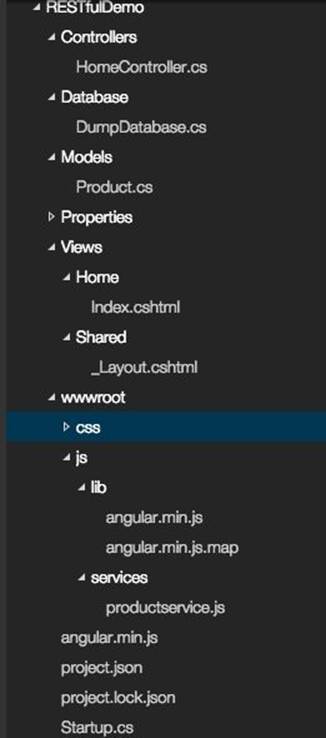
Firstly, we create a project by creating a folder, called RESTfuldemo. After that, you can create the following folder:
· Controllers
· Database
· Models
· Properties
· Views
· wwwroot
The following is project structure.
We need project config file, called project.json, on the project root folder. It consists of required libraries. Please write this script for project.json file.
{
"version": "1.0.0-*",
"webroot": "wwwroot",
"exclude": [
"wwwroot"
],
"packExclude": [
"**.kproj",
"**.user",
"**.vspscc"
],
"dependencies": {
"Kestrel": "1.0.0-*",
"Microsoft.AspNet.Diagnostics": "1.0.0-*",
"Microsoft.AspNet.Mvc": "6.0.0-*",
"Microsoft.AspNet.Server.IIS": "1.0.0-*",
"Microsoft.AspNet.Server.WebListener": "1.0.0-*",
"Microsoft.AspNet.StaticFiles": "1.0.0-*"
},
"commands": {
"web": "Microsoft.AspNet.Hosting --server Microsoft.AspNet.Server.WebListener --server.urls http://localhost:5001",
"kestrel": "Microsoft.AspNet.Hosting --server Kestrel --server.urls http://localhost:5004"
},
"frameworks": {
"dnx451": { },
"dnxcore50": { }
}
}
We also add launchSettings.json to configure how to execute the program. Store it on Properties folder. Write this script for launchSettings.json file.
{
"profiles": {
"IIS Express": {
"commandName": "IISExpress",
"launchBrowser": true,
"environmentVariables": {
"ASPNET_ENV": "Development"
}
},
"kestrel": {
"commandName": "kestrel",
"launchBrowser": true,
"launchUrl": "http://localhost:5004"
},
"web": {
"commandName": "web",
"launchBrowser": true,
"launchUrl": "http://localhost:5001"
}
}
}
App will start by executing Startup.cs file. Create this file and write this code.
using Microsoft.AspNet.Builder;
using Microsoft.Framework.DependencyInjection;
namespace WebDemo
{
public class Startup
{
public void ConfigureServices(IServiceCollection services)
{
services.AddMvc();
}
public void Configure(IApplicationBuilder app)
{
// handle error page
app.UseErrorPage();
// handle static file requests
app.UseStaticFiles();
// aspnet routing
app.UseMvc(routes =>
{
routes.MapRoute("default", "{controller=Home}/{action=Index}/{id?}");
});
}
}
}
6.3 Writing Program
In this section, we write our ASP.NET 5 MVC program.
6.3.1 Creating Model
Firstly, we create a model, called Product. The following is code implementation.
using System.ComponentModel.DataAnnotations;
namespace WebDemo.Web.Models
{
public class Product
{
[Required]
[MinLength(4)]
[Display( Name = "Name" )]
public string Name { get; set; }
[Display( Name = "Product Code" )]
public string ProductCode { get; set; }
[Display( Name = "Quantity" )]
public int Quantity { get; set; }
[Display( Name = "Price" )]
public double Price { get; set; }
}
}
Save this code into a file, called Product.cs and store it into Models folder.
6.3.2 Dummy Database
In this case, we don't access database directly so we create a dummy database which generates product data. Create a file, called DumpDatabase.cs and write this code.
using System;
using System.Collections.Generic;
using WebDemo.Web.Models;
namespace WebDemo.Web.Database
{
public class DumpDatabase
{
private DumpDatabase(){}
public static List<Product> GetAllProducts()
{
// generate data
List<Product> list = new List<Product>();
for(int i=0;i<10;i++){
var item = new Product();
item.Name = String.Format("Product {0}", i+1);
item.ProductCode = String.Format("K0{0}", i+1);
item.Quantity = 4 + i;
item.Price = 1.43 * (i+1);
list.Add(item);
}
return list;
}
}
}
Save this file into Database folder.
6.3.3 Creating Controller
Furthermore, we build a controller, called Home by creating a file, called HomeController.cs. Write this code.
using System;
using System.Collections.Generic;
using Microsoft.AspNet.Mvc;
using WebDemo.Web.Models;
using WebDemo.Web.Database;
namespace WebDemo.Web.Controllers
{
public class HomeController : Controller
{
public IActionResult Index()
{
return View();
}
[HttpPost]
public JsonResult GetAllProducts()
{
List<Product> list = DumpDatabase.GetAllProducts();
return Json(list);
}
}
}
Save this file into Controllers folder.
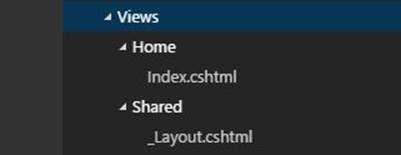
6.3.4 Creating View
We create a page, Index.cshtml. We also create a layout, called _Shared.cshtml. Write this script.
<!DOCTYPE html>
<html>
<head>
<meta charset="utf-8" />
<meta name="viewport" content="width=device-width, initial-scale=1.0">
<title>@ViewBag.Title - My ASP.NET Application</title>
<link rel="stylesheet" href="//netdna.bootstrapcdn.com/bootstrap/3.0.3/css/bootstrap.min.css" />
<link href="~/css/simple.css" rel="stylesheet" type="text/css" />
</head>
<body>
<div class="navbar navbar-inverse navbar-fixed-top">
<div class="container">
<div class="navbar-header">
<button type="button" class="navbar-toggle" data-toggle="collapse" data-target=".navbar-collapse">
<span class="icon-bar"></span>
<span class="icon-bar"></span>
<span class="icon-bar"></span>
</button>
</div>
<div class="navbar-collapse collapse">
<ul class="nav navbar-nav">
<li><a href="/">Home</a></li>
</ul>
</div>
</div>
</div>
<div class="container body-content">
@RenderBody()
<footer>
<p>© @DateTime.Now.Year - My ASP.NET Application</p>
</footer>
</div>
</body>
</html>
The following is a script for Index.cshtml file.
@{
Layout = "/Views/Shared/_Layout.cshtml";
ViewBag.Title = "Home Page";
}
<script src="~/js/lib/angular.min.js"></script>
<script src="~/js/services/productservice.js"></script>
<div class="jumbotron">
<h1>ASP.NET 5 MVC, ASP.NET RESTful, and AngularJS</h1>
<p class="lead"> This is demo to illustrate how to use ASP.NET 5 MVC, ASP.NET 5 RESTful and AngularJS.</p>
</div>
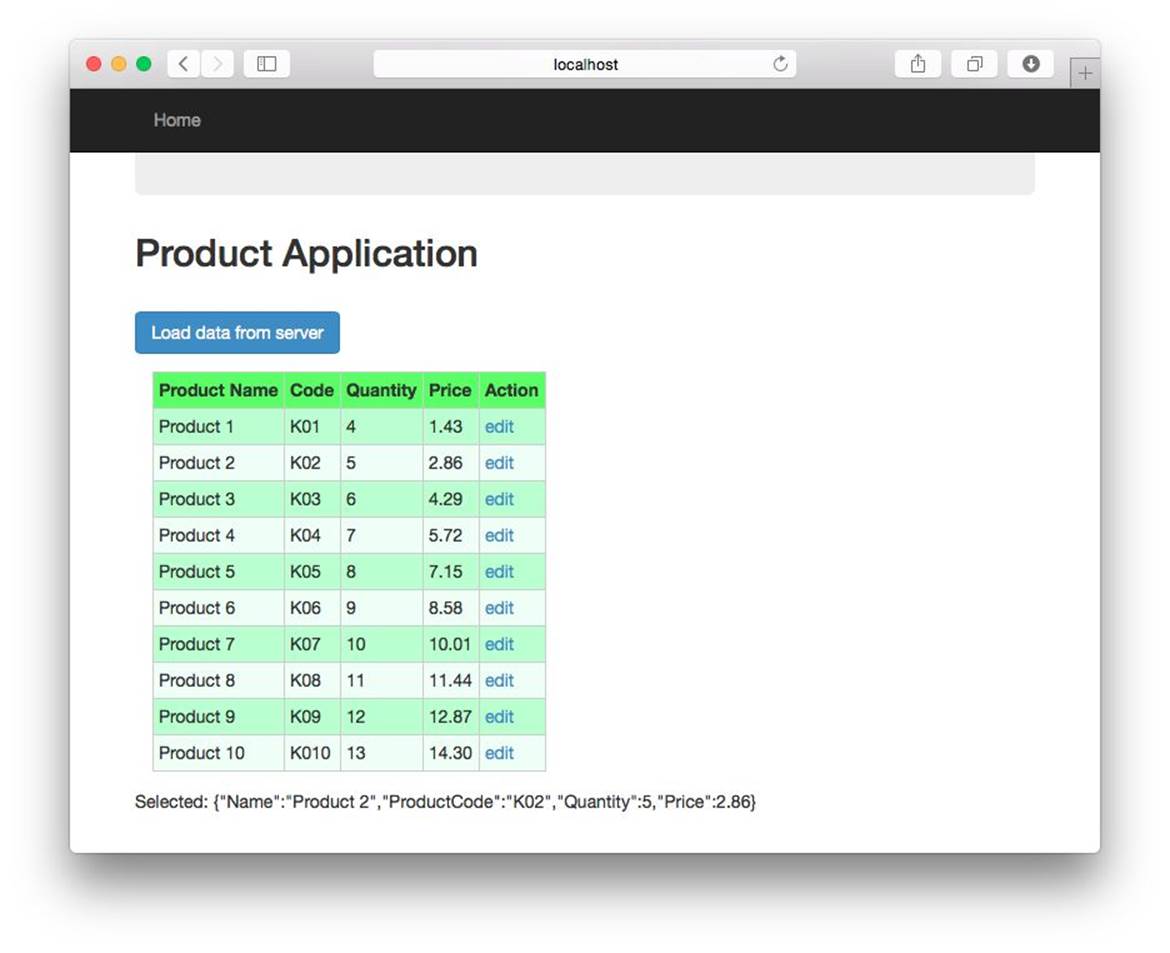
<h2>Product Application</h2>
<br />
<div ng-app="ProductService" ng-controller="MyControlller" >
<p>
<button class="btn btn-primary btn-large" ng-click="getAllData()">Load data from server</button>
</p>
<table>
<thead>
<tr>
<th>Product Name</th>
<th>Code</th>
<th>Quantity</th>
<th>Price</th>
<th>Action</th>
</tr>
</thead>
<tbody ng-repeat="product in products">
<tr ng-class="{even: $even, odd: $odd}">
<td>{{ product.Name }}</td>
<td>{{ product.ProductCode}}</td>
<td>{{ product.Quantity}}</td>
<td>{{ product.Price | number:2}}</td>
<td>
<a href="javascript:void(0)" ng-click="select(product)">edit</a>
</td>
</tr>
</tbody>
</table>
<p>Selected: {{ selected }}</p>
</div>
<p><br></p>
This file loads AngularJS files. We write them on next section.
Save all files. The following is our View structure.
6.3.5 AngularJS Program
Firstly, download AngularJS on http://code.angularjs.org/. Put those files into /js/lib folder.
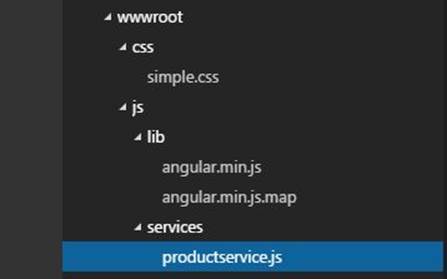
The next step is to write AngularJS program. Create a file, called productservice.js, and write this script.
var myApp = angular.module('ProductService', []);
myApp.service('DataService', function ($http) {
this.read = function (callback) {
$http({
method: 'POST',
url: 'Home/GetAllProducts/',
headers: {
'Content-type': 'application/json'
}
}).success(function (resp) {
callback(resp);
}).error(function () {
callback(undefined);
});
};
});
myApp.controller('MyControlller', function ($scope, DataService) {
$scope.products = [];
$scope.selected = {};
$scope.getAllData = function () {
DataService.read(function (data) {
$scope.products = data;
});
};
$scope.select = function (selected) {
$scope.selected = selected;
};
});
The following is a script for simple.css file.
table { margin: 1em; border-collapse: collapse; }
td, th { padding: .3em; border: 1px #ccc solid; }
thead { background: #70ff45; }
.even{
background-color: #beffca;
}
.odd{
background-color: #f0fff6;
}
6.4 Testing
Now you are ready to execute. Type these command to load required libraries and execute the program.
dnu restore
dnx . kestrel
Open a browser and navigate to http://localhost:5004 .
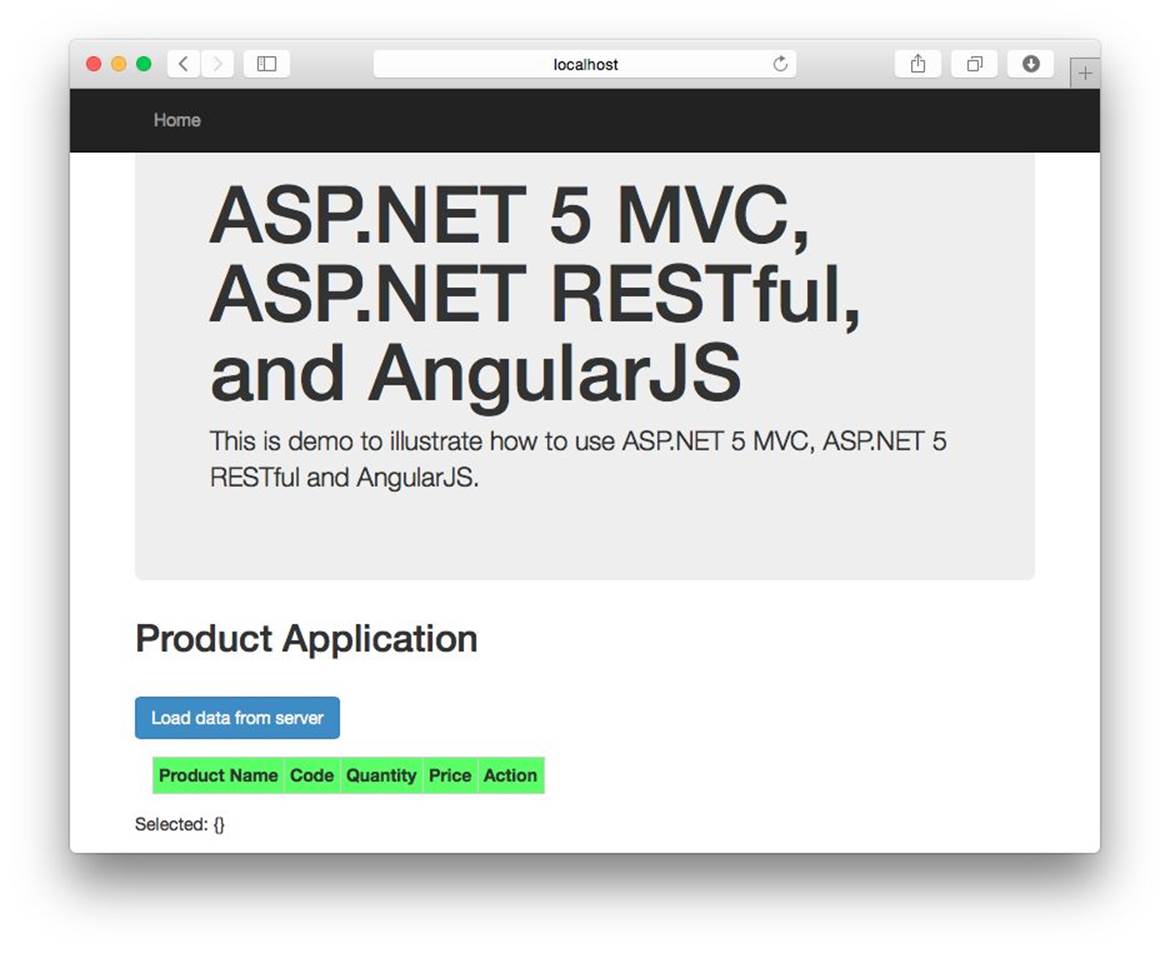
Click Load data from server button. It should show data which come from a server.

Try to click edit menu on table row. Then, selected item will show on the bottom.
6.5 What's The Next?
You can do more practices for AngularJS by reading several tutorial in Internet or books. I also wrote a book about AngularJS Programming by Example. This book helps you to learn about AngularJS programming. Please visit my blog, http://blog.aguskurniawan.net/post/AngularJS.aspx .
All materials on the site are licensed Creative Commons Attribution-Sharealike 3.0 Unported CC BY-SA 3.0 & GNU Free Documentation License (GFDL)
If you are the copyright holder of any material contained on our site and intend to remove it, please contact our site administrator for approval.
© 2016-2026 All site design rights belong to S.Y.A.