Microsoft Azure Machine Learning
Chapter 11. Publishing a Model as a Web Service
So far, you have explored how to build different predictive models as experiments. Now, you might be wondering how that would be of use in real-life scenarios. One use of it is after you build and test your model, you can take a dataset and make a prediction straightaway inside the experiment, but in most of the cases, the result or the predictions of a model need to be used elsewhere and probably by some other people. Consider you have built a recommender model and it recommends items that a buyer might be interested in. So, these predictions require that the e-commerce site display the recommended product items to the prospective buyers. Consider one more scenario, where you have built a model for market segmentation using clustering. The marketing executive of your company should use this model for analysis by integrating the results in their software or simply by using the familiar Microsoft Excel.
Basically, you have to make the predictive model you have built available in an environment, so that people inside or outside your organization can use it. Traditionally, it used to be a cumbersome job, where a bunch of code had to be written and tested. Then, infrastructure had to be made ready as required.
Now, Azure ML takes all the pain out. In this chapter, you will explore, how easily you can publish a model in an experiment and make it available as a web service API for others to consume.
In a nutshell, you can publish your model in the following simple steps:
1. Prepare your model to be published as a web service.
2. Prepare a scoring experiment.
3. Specify the input and output for the web service.
4. Publish and test it as a web service.
Preparing an experiment to be published
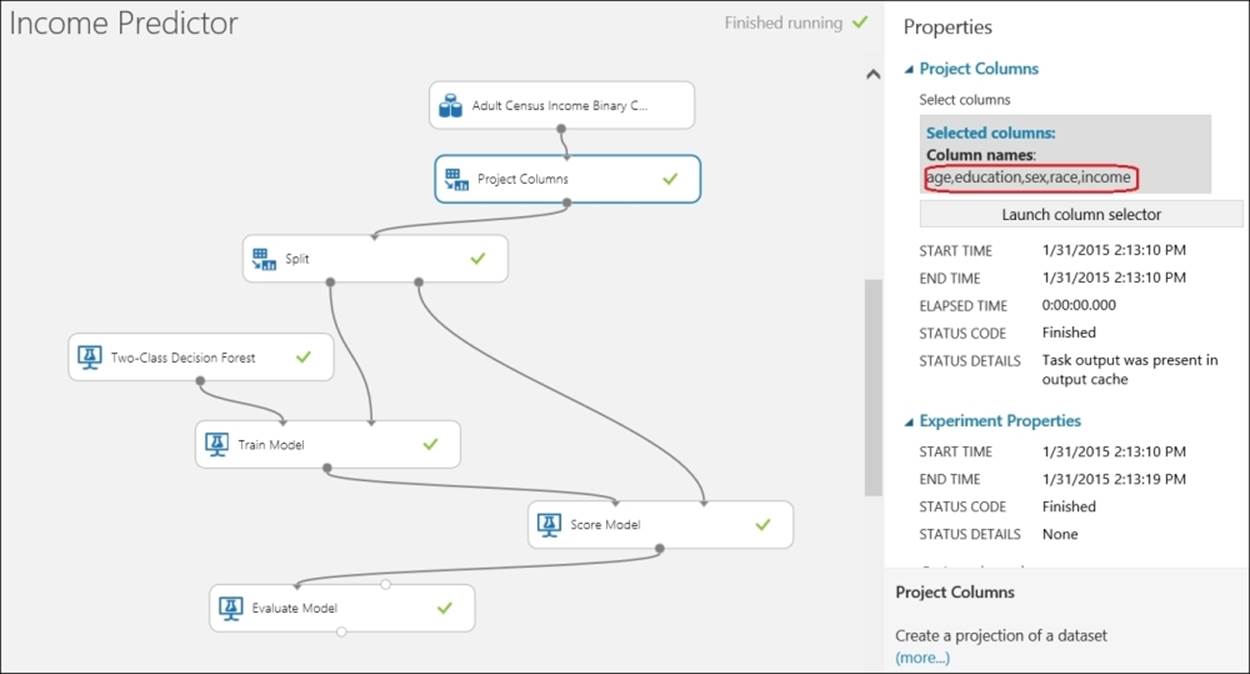
You need to get your experiment ready before you start deploying it. To do this you need to complete your experiments, run them successfully, and evaluate and identify the trained model to be used. For illustration, we have a simple model here that predicts the income of adults based on age, education, sex, and race. The model uses the Two-Class Decision Forest module to predict whether a person has an income of more than 50K or not. The details to build the experiment can be found in Chapter 7, Classification Models.
Saving a trained model
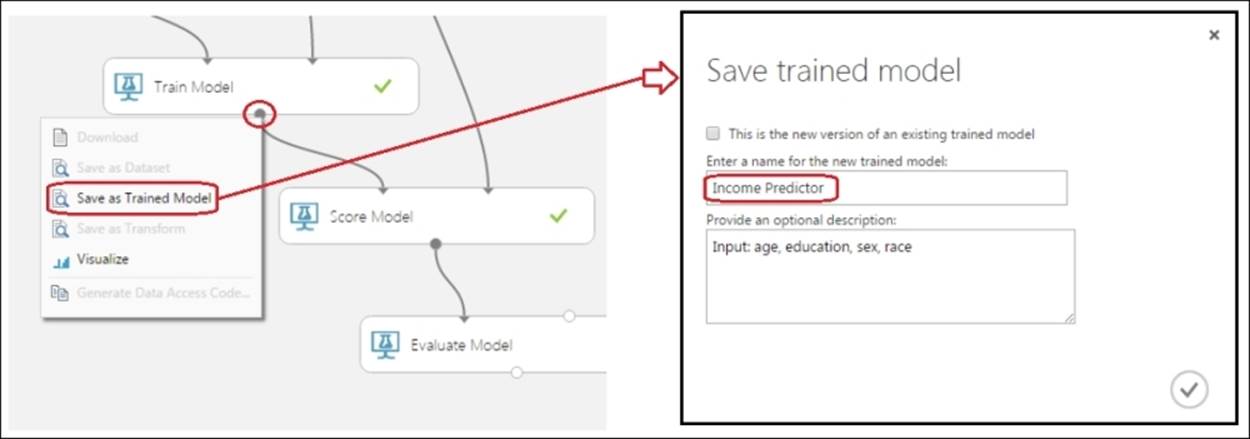
Once you are sure about your model, you can save it as a trained model. To do this, right-click on the output port of the Train Model module on the canvas and then click on the Save as Trained Model option to save the trained model, which can be used later. You have to specify a name and the optional description text as the Save trained model popup appears. Then, click on the tick mark button to the right of the screen to save the trained model, as shown in the following screenshot:
The saved model will be like a predictor module, which can be used by a Score Model module to score with a given feature set. It will appear as a module on the left-hand side of the screen in the module palette under the Trained Models group.
If you have made any changes to the model say, you've changed the parameters to the algorithm, and so on, then you have to save the trained model again, and as the popup appears, tick the This is the new version of an existing trained model option at the top of the screen and choose the name of the previously saved model.
Creating a scoring experiment
A scoring experiment is one where you use a trained model module to make a prediction (scoring). You can create a new experiment, use a Trained Model module, and make a prediction with a dataset. ML Studio makes it really easy for you with a single button, as you can see in the following screenshot:

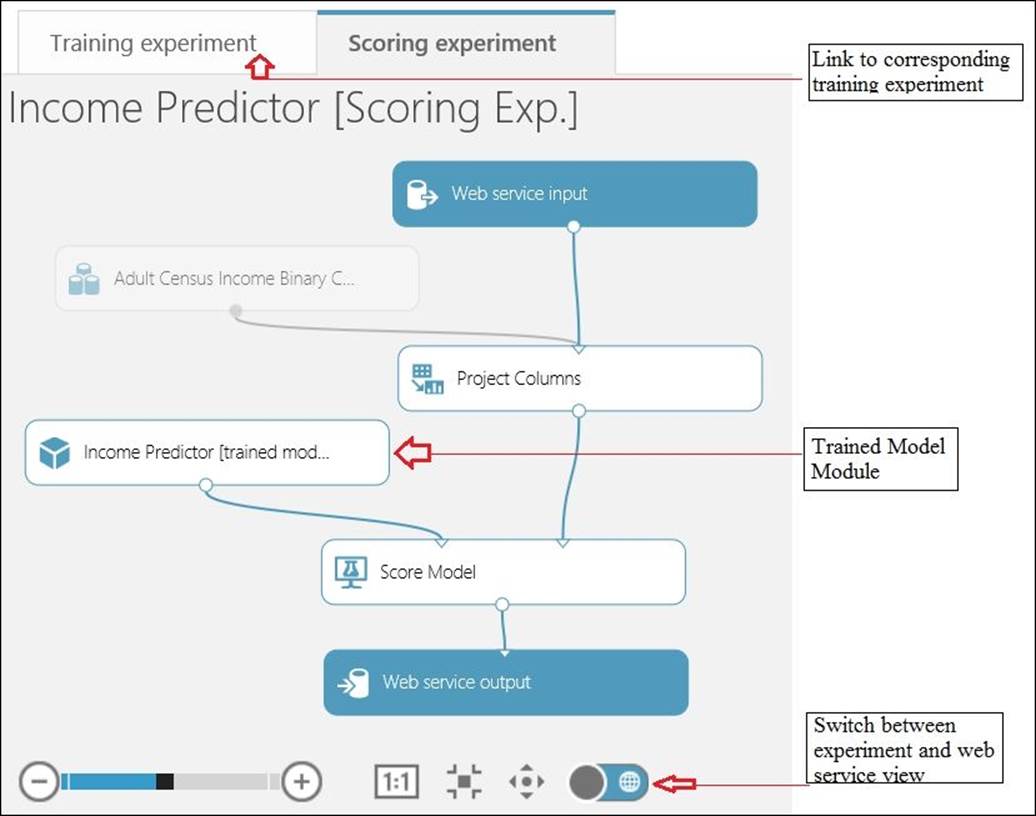
The button becomes active when the training experiment is run successfully. Run your Income Predictor experiment successfully and then click on the CREATE SCORING EXPERIMENT button to create a scoring experiment corresponding to the existing one. After this is done, you will see the following screenshot:
Behind the scenes, ML Studio has done the following tasks for you:
1. It saved your trained model as a module in the Trained Models section of the module palette to the left of the screen.
2. It created a copy of the existing training experiment then replaced the machine learning algorithm module and the Train Model module with the saved trained model.
3. It removed the modules that were clearly not needed in a scoring experiment—the Split and Evaluate Model modules in this case.
4. It added the Web service input and Web service output modules and connected them to the default locations in the experiment.
You can also do these steps by yourself manually and create a scoring experiment. However, by creating the experiment this way, ML Studio links up the training and scoring experiment. When you open any one link, the other will be present as a tab so that you can switch between training and scoring your experiment easily.
The Web service input and the Web service output modules specify where the input goes into and where the output comes from when the model is published as a web service. Now that these modules are connected to the default position, you need to plan and connect these to the right modules.
Specifying the input and output of the web service
Before publishing a web service, you need to specify what the web service will take as an input and which output you are interested in. Assume that for our illustration, we need to predict a level of someone's income (that is, less than or equal to 50K or greater than or equal to 50K) from the input: age, education, sex, and race. You can achieve this using the Project Columns module.
In your web service, the input should go to the Score Model module. So, connect the Web service input module to the Score Model module. Add a Project Columns module and connect its input port to the output of the Score Model module. In the properties panel of the module, select the Scored Labels option only. Let's take a look at the following screenshot:
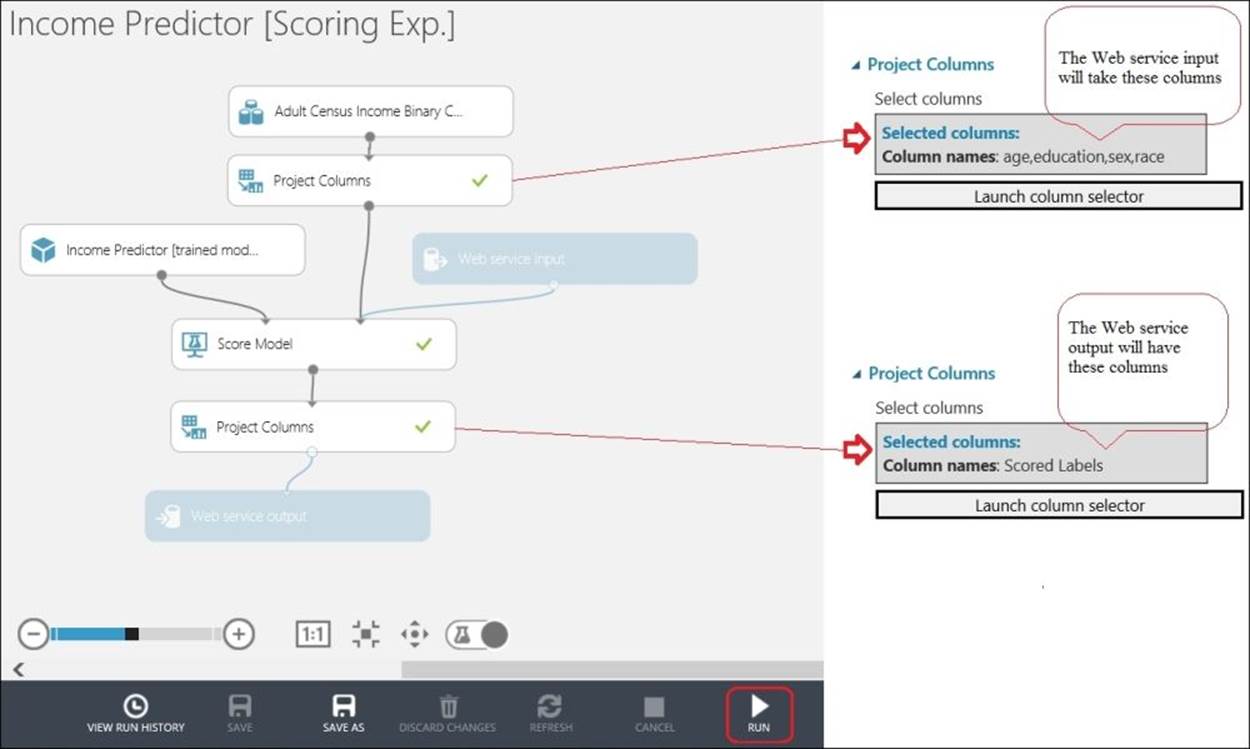
After running the experiment successfully, you can check the output of the two Project Columns modules in your scoring experiment; the output of which are as expected. Now, this experiment is ready to be published as a web service.
Publishing a model as a web service
Publishing a model as a web service is very easy. To publish the model, click on the PUBLISH WEB SERVICE button and click on YES when it asks for confirmation, as shown in the following screenshot:

It may take a while and once this is done, it would take you to the published web service dashboard page. You can get back to the parent scoring experiment by clicking on the link, which is the View latest option (refer to 2 in the following figure). The View snapshot link also takes you to the same parent scoring experiment, but it shows the experiment in a locked view.
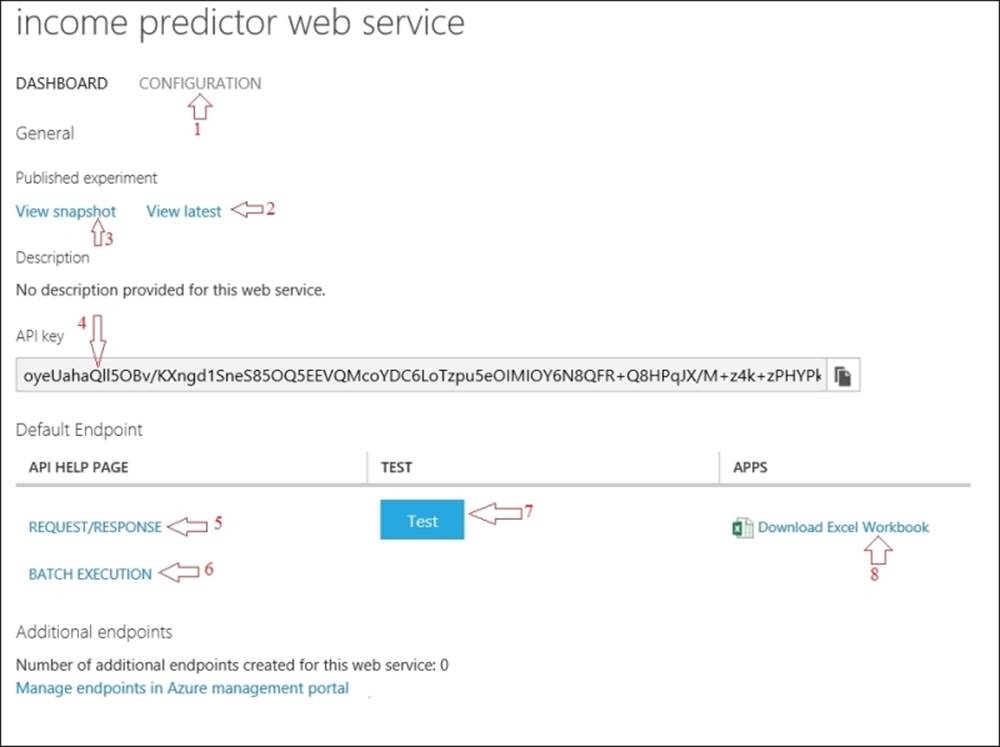
The default endpoint or the published web service API suggests how the web service would be called or consumed. The Request/Response option (refer to 5 in the preceding figure) specifies that you would call the web service with one feature set and get a response as a prediction based on how you defined the output. The Batch Execution option (refer to 6 in the preceding figure) requires that you pass a dataset (a feature matrix) as a file and get the output prediction also as a dataset.
Visually testing a web service
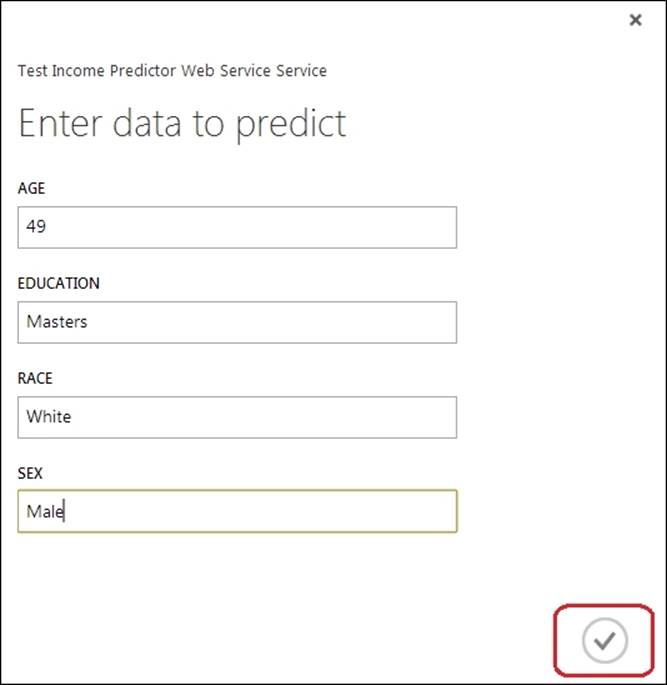
You can visually test the published web service by clicking on the Test button (refer to 7 in the preceding figure). Click on the button and a popup form appears. Fill up the different features to make a prediction. Fill the form and click on the button with the tick mark in the bottom-right corner of the screen, as shown in the following screenshot:
After it gets a response from the web service, you would see a message, as shown in the following figure:

As you can see in the preceding figure, it returned the predicted label ">50K". You can also test the web service by downloading the Excel file (refer to 8), which is already configured to get connected with the web service. Just fill the fields to see the result.
Consuming a published web service
Now that the web service has been published and is available as an API, you can write a program in the language of your choice and consume the API to get a prediction or the result of the API. The API needs an API key, which you can find on the published web service dashboard page (refer to 4). Without the API key, you won't be able to connect to the web service. On the API help page, you will find the detailed documentation on the published API, including the sample code in C#.Net, Python, and R, which include the necessary inline comments. You can find the links to the API help page from the same web service dashboard page (refer to 5 and 6).
Web service configuration
After you publish a model, the web service name will be available on the web services page with a link to the dashboard page of the web service, as shown in the following figure:

Click on the name of the web service and on the dashboard page, click on the CONFIGURATION option (refer to 1). On the configuration page, you can customize the information related to the web service, for example, Display Name, Description, Input Schema, Output Schema, and so on.
Updating the web service
You might need to update your published web service under the following two scenarios:
· Your original model changed, for example, you modified the model parameters to improve performance and so on
· You need to make changes to the input or output of the web service
For the first case, you need to go back to your original training experiment, make the changes, run it, and then click on the UPDATE SCORING EXPERIMENT link to update the scoring experiment. For both the scenarios, you have to go to the scoring experiment and publish it again, so it would overwrite the previously published experiment.
Summary
In this chapter, you explored the complete steps to publish a model as a web service, so that others can use the API and consume the web service. You prepared an experiment to make it ready to be published and saved a trained model. You then created a scoring experiment and prepared it to set the input and output for the web service. You published the scoring experiment as a web service and tested it visually. You also explored ways to consume the web service API and how it can be maintained over a period of time by making configuration changes and updates.
In the next chapter, you will learn to build your own model with a case study exercise by solving a regression problem.
All materials on the site are licensed Creative Commons Attribution-Sharealike 3.0 Unported CC BY-SA 3.0 & GNU Free Documentation License (GFDL)
If you are the copyright holder of any material contained on our site and intend to remove it, please contact our site administrator for approval.
© 2016-2026 All site design rights belong to S.Y.A.