Microsoft Azure Machine Learning
Chapter 4. Getting Data in and out of ML Studio
For any data analysis, you need data as input. Data analysis generates results as a dataset, which needs to be stored for future use. ML Studio allows you to import and export data in a variety of different formats. You can use the Reader module to import a dataset in ML Studio from external sources and you can use the Writer module to export a dataset. You can also download and upload datasets to and from your PC respectively for different data formats.
ML Studio supports a number of data formats. The internal data format, data table (DotNetTable), is primarily used to move data between modules inside an experiment. When you import data from external sources to ML Studio, the formats supported as of now are ARFF, CSV, Hive Table, SVMLight, Text, and TSV. Let's take a look at the following term list:
· ARFF: This is the machine learning data format defined by Weka. An Attribute-Relation File Format (ARFF) file is an ASCII text file that describes a list of instances that share a set of attributes.
· CSV: This is a text file where data is contained in a tabular format with different record separated by a line and values (columns) separated by a comma.
· TSV: This is a text file similar to CSV where data is contained in a tabular format with different records separated by a line and values (columns) separated by a tab stop character.
· Hive Table: This is the data table from Hadoop that is accessible via Hive*.
· SVMLight: This contains the file format training examples of the SVMLight* software.
· Text: This is a plain text file.
Getting data in ML Studio
ML Studio lets you import data from different sources. You can either upload a file from your PC or import data from external sources through the Data Reader module.
Uploading data from a PC
You can follow the given steps to upload a dataset from your PC to ML Studio:
1. Go to ML Studio and create an experiment or go to an existing experiment.
2. Click on the +NEW icon at the bottom-left corner of the page, then on DATASET, and then on FROM LOCAL FILE.
3. The Upload a new dataset dialog box is displayed after you click on the icon.
4. Click on Browse to select the file that you want to upload.
5. Don't select the tick box for This is the new version of an existing dataset unless you are uploading a new version of an existing dataset.
6. Specify a name for the dataset. This will help you identify your dataset when you build your experiment. The dataset name must be unique—you should not have two datasets that have the same name in the saved Dataset option. If you are uploading a new version of an existing dataset, then you need to choose the name of the dataset for which you are uploading a new version.
7. Specify the type of data that you are trying to upload.
8. You can optionally provide a description for your data.
9. Then, click on the OK button (checkmark) at the bottom-right corner of the popup to start uploading.
During upload, you will see a message that your file is being uploaded. The upload time will depend on the size of your data and the speed of your connection to the service.
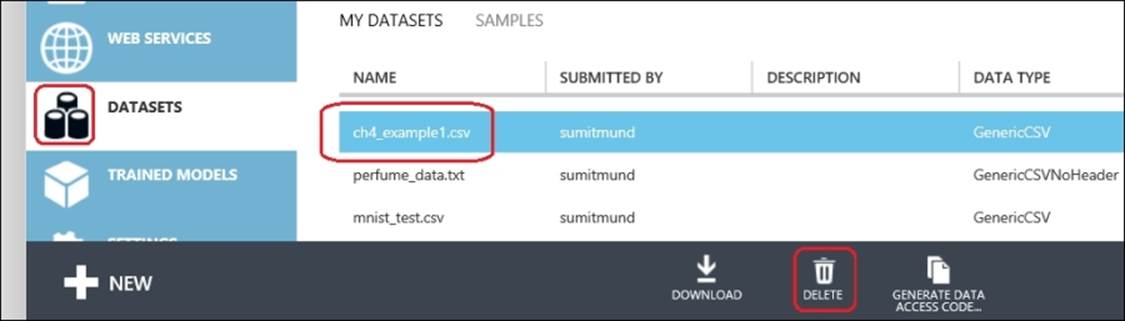
After a successful upload, the dataset will appear as a module, like any sample dataset, under Saved Datasets | My Datasets in the left-hand side of the module's palette. You can use it inside your experiment and view it by dragging it to the experiment canvas.

You can also click on the DATASETS link on the left-hand side below the WEB SERVICES option to find all the uploaded datasets. If you wish to delete any dataset, then select it by clicking on it and click on DELETE in the bottom panel of the web page.
The Enter Data module
ML Studio comes with the Enter Data module, which lets you enter a small set of data manually by typing into it, and lets you construct a dataset quickly and easily. It can be useful to test something quickly.
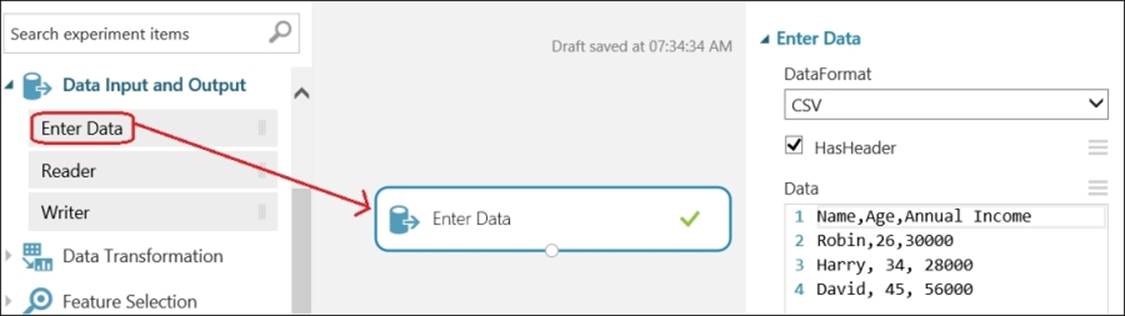
In the preceding example, data is entered using the CSV format and the dataset is marked by ticking the HasHeader option, so that it has a header. After running the experiment successfully, you can view the entered dataset by right-clicking on the output port of the module and choosingVisualize.
The Data Reader module
Often, you need to import data from external sources. You can do so using the Reader module available under the Data Input and Output option. The Reader module loads CSV, TSV, and ARFF data files from sources, such as the Web, Azure SQL database, Azure table, Hive Table, or Windows Azure Blob storage. The output port of the module returns the result dataset downloaded from the given data source, which the other connected module can consume.
Getting data from the Web
You can import a dataset from a web URL in ML Studio through HTTP/HTTPS/FTP/FTPS, although you need to choose the data source for the Reader module as HTTP. The following section walks you through the process of how to import a public dataset to ML Studio.
Fetching a public dataset – do it yourself
The UCI machine learning repository contains different datasets and makes them available for free for anyone who is interested. This URL contains a CSV file that includes the forest fire dataset: http://archive.ics.uci.edu/ml/machine-learning-databases/forest-fires/forestfires.csv.
To import the file to ML Studio, follow these steps:
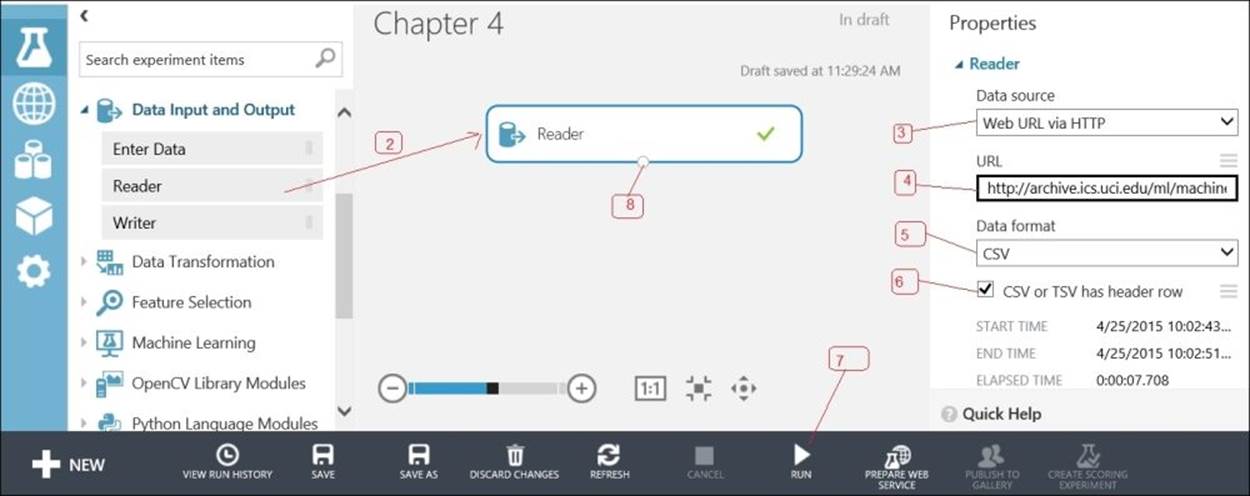
1. Go to ML Studio. Click on the +NEW button and choose EXPERIMENT.
2. From the modules palette, find the Reader module and drag it to the experiment canvas.
3. The module properties pane is displayed on the screen. Choose the data source as HTTP.
4. Specify a complete URL: http://archive.ics.uci.edu/ml/machine-learning-databases/forest-fires/forestfires.csv.
5. Specify the data format as CSV.
6. Indicate that the file contains the column headings by ticking the checkbox CSV or TSV has header row. This means that the first row of the file will be considered as a heading row.
7. Run the experiment. After it has been successfully executed, you can find a green tick mark on the module.
8. To view the output data, right-click on the Reader module's output port and choose Visualize. This opens the results in a new browser window:
Getting data from Azure
ML Studio lets you transfer data from the following Azure services:
· Windows Azure BLOB Storage: This enables you to read the BLOBs (files) from Windows Azure BLOB storage. If you use the ARFF format for storage, columns are mapped using the header metadata. If you use TSV or CSV formats, mappings are inferred by sampling column data.
· Windows Azure Table Storage: This enables you to read data from the flexible NoSQL storage. Built-in and declared data attribute types are mapped directly to metadata (timestamp, integer, and so on).
· SQL Azure Tables: This enables you to read selected table data from an SQL Azure database. As this is structured data, metadata mapping is automatic.
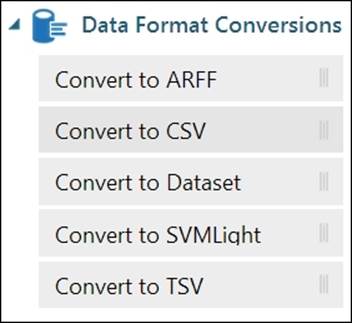
Data format conversion
Sometimes, you may need to convert a dataset to a format that ML Studio supports. There are five data format conversion modules available. All these modules accept a dataset as input, through their input ports and convert the dataset to their respective format. The following are all the modules, and their names are self-explanatory:
Getting data from ML Studio
You can also export data from ML Studio to another data destination, you can export it to your PC, or save it to ML Studio itself as a saved dataset item.
Saving a dataset on a PC
If you want to download a dataset from a module output in ML Studio to your PC, follow the given steps:
1. Right-click on the output port of the module that you want to save as a dataset. Note that you can't download a dataset that is an output in the data table format. In such a case, you have to convert it to the CSV or TSV format to download it. Refer to the following screenshot to see this:
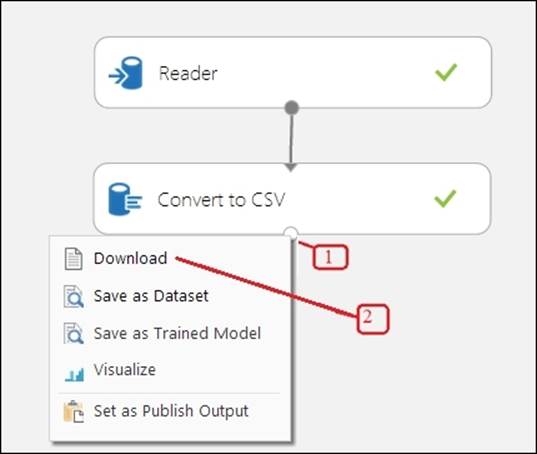
2. Click on Download and the file will be downloaded to your PC.
Saving results in ML Studio
There will be times when you would want to take a result from an experiment and would want to save it in ML Studio for later use. To do this:
1. Right-click on the output port of the module that you want to save as a dataset.
2. Click on the Save as Dataset option:
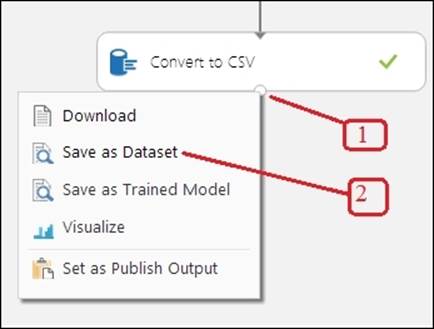
3. When prompted, enter a name that would allow you to identify the dataset easily.
4. Click on the checkbox (this is the new version of an existing dataset) if you want to override an existing one and want to select the name of the existing dataset, otherwise leave it unchecked.
When you have saved, the dataset will be available for use within an experiment and will appear in the dataset list.
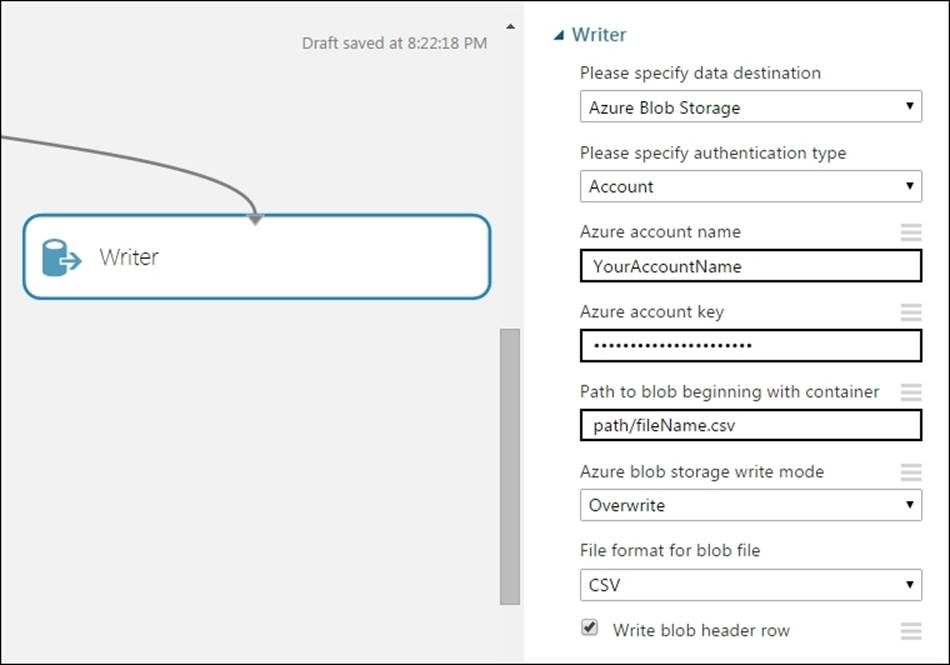
The Writer module
You can use the Writer module to write a dataset to Windows Azure BLOB storage, Azure table, Azure SQL Database, or HDFS (which is a Hadoop cluster deployed anywhere, but is accessible) as Hive Query. This module accepts data destination as the first parameter and then other required parameters based on the chosen destination. A Writer module that writes a dataset to Azure Blog Storage may look like the following:
Summary
We started with exploring the different data formats supported by ML Studio. Then we explored how to import data from external sources and how to export a dataset to external sources. We used the Reader module to import and the Writer module to export data. You also learned about theEnter Data module, which lets you build a small dataset by entering data manually.
After you import data from a source to ML Studio, it often needs some kind of preparation before you apply machine learning algorithms to it. Also, certain machine learning algorithms require certain preprocessing of the data. In the next chapter, we will explore the different data preparation options available with ML Studio.
All materials on the site are licensed Creative Commons Attribution-Sharealike 3.0 Unported CC BY-SA 3.0 & GNU Free Documentation License (GFDL)
If you are the copyright holder of any material contained on our site and intend to remove it, please contact our site administrator for approval.
© 2016-2026 All site design rights belong to S.Y.A.