Microsoft Azure SQL Database Step by Step
Chapter 10. Building cloud solutions
—Leonard Lobel
At the very beginning of this book, back in Chapter 1, we introduced you to the concept of cloud computing. We began by describing the Infrastructure as a Service (IaaS), Platform as a Service (PaaS), and Software as a Service (SaaS) acronyms. We also explained that Microsoft Azure SQL Database in particular, is delivered as a platform—that is, it is a PaaS offering. With each successive chapter, you then explored different focus areas of the SQL Database platform. And now that you have arrived at the last chapter of the book, we present you with an end-to-end treatment for building a cloud solution on top of SQL Database. By “end-to-end,” we mean a stack of layered components, where each layer is concerned with its own area of responsibility, and collectively, they work together to furnish a feature-complete application.
In this chapter, we show you how to combine SQL Database with other components to produce your own complete SaaS solution. In other words, you will learn how to build layers on top of SQL Database to deliver a ready-to-use application that runs completely in the cloud on Microsoft Azure. The solution you will create in this chapter builds on the sample WineCloudDb database we’ve been using to demonstrate throughout this book, and it includes a website that allows users to place orders through their browser, and a mobile app that allows users to manage the wines in the database from their Microsoft Windows Phone device.
You will build the application layer by layer, from the bottom up, starting from the database level and working your way up to the user interface (UI). The complete solution stack is shown in Figure 10-1.

FIGURE 10-1 The complete solution is composed of these distinct application layers.
Here is a high-level overview of the tasks you will perform in this chapter:
![]() Start with an existing Microsoft Azure SQL Database.
Start with an existing Microsoft Azure SQL Database.
• Create a WineCloudDb database with Wine and Customer data.
![]() Create a new SQL Server Database project.
Create a new SQL Server Database project.
• Import the database schema from WineCloudDb into a new SQL Server database project. This will enable you to use SQL Server Data Tools (SSDT) to work in offline mode, disconnected from SQL Database.
![]() Extend the database design in the database project.
Extend the database design in the database project.
• Add a new column to the Wine table.
• Create a new Order table.
• Create stored procedures to control how data in the Order table can be inserted, updated, or deleted.
• Deploy the offline database project changes back to Microsoft Azure SQL Database.
![]() Create a data access layer (DAL).
Create a data access layer (DAL).
• Use the Entity Framework (EF) to manage all database connections and commands.
• Design an Entity Data Model (EDM) to configure how EF interacts with the tables and stored procedures in the database.
![]() Create an ASP.NET website:
Create an ASP.NET website:
• Build a Model-View-Controller (MVC) Web application, which users can access with any browser to place orders.
• Create a Web API to expose create, retrieve, update, and delete (CRUD) operations for wines in the database.
![]() Create a Windows Phone 8 app with the Windows Phone Software Development Kit (SDK).
Create a Windows Phone 8 app with the Windows Phone Software Development Kit (SDK).
• Build a mobile app that communicates with the Web API to implement a wine catalog, which users can use to view, add, modify, and delete wines with their Windows Phone 8 device.
You will build all of these pieces as separate but related projects inside a single Microsoft Visual Studio solution.
So many choices
This chapter presents a complete, multitiered cloud solution, using SQL Database on the back end. Several Microsoft technologies are readily available to achieve this—it is by no means necessary to implement your cloud solution using the particular technologies we chose to use here.
You will create a data access layer using the Entity Framework, but another .NET data-access technology (such as traditional ADO.NET) might be a perfectly suitable alternative, depending on the scenario. Although you will create the website with the ASP.NET Model-View-Controller (MVC) framework, you can certainly choose to do so using standard ASP.NET web forms with .aspx pages. And for the web service, you will use the increasingly popular ASP.NET Web API to implement Representational State Transfer (REST) protocol services, although other service platforms such as Simple Object Access Protocol (SOAP) with Windows Communication Foundation (WCF), WCF Data Services (which also offers quick and easy REST services over EF), or WCF RIA (Rich Internet Application) Services, and others can be used as well.
The reason we chose these particular technologies is to keep a potentially overwhelming scenario as simple as possible. Our goal with this single chapter is for you to learn the basic layered architecture of a finished solution, using technologies that can be leveraged as quickly and easily as possible. The Entity Framework manages all database connections, commands, and readers for you automatically, and it provides ready-to-use data-access objects instantaneously. For the website, ASP.NET MVC can help you build more maintainable and testable applications than traditional web forms development with .aspx pages. And with Web API, Visual Studio scaffolding features make it virtually effortless to expose a REST-based web service over EF with full CRUD support.
That said, we strongly encourage you to explore alternatives for creating your own cloud solutions over SQL Database. The MVC framework has emerged as an extremely popular platform for building websites, but traditional ASP.NET web forms (using .aspx files) is by no means obsolete, and still carries several notable advantages over MVC that should not be overlooked. Likewise, the Web API has been rapidly gaining popularity for creating lightweight REST-based web services, but you can also consider building your own Microsoft Azure cloud service to host full-fledged WCF, WCF Data Services, or WCF RIA Services. To create your own cloud service in Visual Studio, you need to download and install the Microsoft Azure SDK for .NET from http://www.windowsazure.com/en-us/downloads.
Regardless of which particular technologies you choose, however, the core concepts of multiple tiers and layered design presented in this chapter are the same.
Creating the SQL Database
To get started, you will use SSDT inside Visual Studio to quickly create a WineCloudDb database similar to the one you’ve used throughout this book. As shown in Listing 10-1, the database will just contain a Wine and Customer table and a few rows of data, but you will soon extend this design with additional columns, tables, and stored procedures to fully support the solution.
LISTING 10-1 Script to create the WineCloudDb database
CREATE TABLE Wine(
WineId int IDENTITY PRIMARY KEY,
Name nvarchar(50) NOT NULL,
Category nvarchar(15) NOT NULL,
Year int);
CREATE TABLE Customer(
CustomerId int IDENTITY PRIMARY KEY,
FirstName nvarchar(50) NOT NULL,
LastName nvarchar(50) NOT NULL,
FavoriteWineId int,
CONSTRAINT FK_Customer_Wine FOREIGN KEY (FavoriteWineId) REFERENCES Wine(WineId));
SET IDENTITY_INSERT Wine ON;
INSERT Wine (WineId, Name, Category, Year) VALUES
(1, 'Chateau Penin', 'Bordeaux', 2008),
(2, 'McLaren Valley', 'Cabernet', 2005),
(3, 'Mendoza', 'Merlot', 2010),
(4, 'Valle Central', 'Merlot', 2009);
SET IDENTITY_INSERT Wine OFF;
SET IDENTITY_INSERT Customer ON;
INSERT Customer (CustomerId, FirstName, LastName, FavoriteWineId) VALUES
(1, 'Jeff', 'Hay', 4),
(2, 'Mark', 'Hanson', 3),
(3, 'Jeff', 'Phillips', 2);
SET IDENTITY_INSERT Customer OFF;
To create the WineCloudDb database, follow these steps:
1. Start Visual Studio 2013.
2. If the SQL Server Object Explorer is not visible, click the VIEW menu and choose SQL Server Object Explorer.
3. In the SQL Server Object Explorer, right-click SQL Server and choose Add SQL Server to display the familiar Connect To Server dialog.
4. In the Connect To Server dialog, do the following:
a. For Server Name, type <servername>.database.windows.net. This is the fully qualified name to the SQL Database server, where <servername> should be replaced by the name assigned to your server.
b. For Authentication, select SQL Server Authentication from the drop-down list. (SQL Database does not support Windows Authentication.)
c. For Login and Password, type the user name and password you assigned the server when you created it.
d. Click the Connect button. The server now appears as a collapsed node in the SQL Server Object Explorer.
5. Expand the server node in the SQL Server Object Explorer.
6. Expand the server’s Databases node.
7. If a previous version of WineCloudDb is present from work you did in an earlier chapter, delete it now by doing the following:
a. Right-click the existing WineCloudDb database, and choose Delete.
b. Click OK to confirm.
9. Right-click the Databases node, and choose Add New Database.
10. Type WineCloudDb, and press Enter. The new database now appears in the SQL Server Object Explorer.
11. Right-click the WineCloudDb database, and choose New Query to open a new query window.
12. Type the code shown in Listing 10-1 into the query window (or paste it in from the listing file downloaded from the book’s companion website).
13. Press Ctrl+Shift+E to execute the script (or press the play button icon in the query window’s toolbar).
14. Close the query window. (It isn’t necessary to save the changes.)
Extending the SQL Database
Until now, you’ve used SQL Server Data Tools (SSDT) inside of Visual Studio 2013 to work with SQL Database in a connected fashion. Using SSDT for connected development is similar to using SQL Server Management Studio (SSMS), and working connected certainly carries a convenience factor when all you need to do is query or tweak something quickly on a live server. However, this is not the preferred way to develop databases using SSDT. The proper way to build databases with SSDT is by working offline in a disconnected fashion, using SQL Server Database projects. With this approach, you can rely on the definition of the database living inside of a Visual Studio project (rather than the database itself) where it can be preserved, protected, and versioned using source code control (SCC).
In this chapter, you will start with the pre-existing SQL Database in the cloud that you just created using connected SSDT, and import its schema definition into a new SQL Server database project. Then you will continue developing the database using disconnected SSDT—that is, by working with the offline project and deploying changes incrementally to the live SQL Database.
Creating a new solution
Visual Studio projects are contained inside a Visual Studio solution, so you’ll start by creating an empty solution. Then you’ll import the database design from SQL Database into a new SQL Server Database project, the first of several projects that you will create for the solution. Once the project is created, you will extend the WineCloudDb database design it by adding more columns, tables, and stored procedures. Then you will deploy the updated design by publishing the project back SQL Database in the cloud.
To create the new solution, follow these steps:
1. In Visual Studio 2013, click the FILE menu, then choose New | Project to display the New Project dialog.
2. On the left of the New Project dialog, expand Templates, Other Project Types, and choose Visual Studio Solutions.
3. Select the Blank Solution template, name the solution WineCloudSolution, and choose any desired location for the solution as shown in Figure 10-2.

FIGURE 10-2 Creating a new blank solution
4. Click OK to create the solution.
The Solution Explorer now shows the new WineCloudSolution. (If the Solution Explorer is not visible, click the VIEW menu and choose Solution Explorer.) Now that you have an empty solution, you’re ready to create a new SQL Server Database project.
Creating a SQL Server Database project
With a SQL Server Database project, you can develop your database with no connection whatsoever to SQL Server, SQL Database, or the Internet. A SQL Server Database project is a Visual Studio project that contains individual declarative Transact SQL (T-SQL) source-code files that collectively define the complete structure of a database. Because the database definition is maintained this way inside a Visual Studio project, it can be preserved and protected with a source-code control (SCC) system (such as Team Foundation Server or Git), just like the artifacts in any other type of Visual Studio project. Furthermore, SSDT provides the (localdb) SQL Server instance that can be used to test your database project before deploying it back to a live server.
There are several ways to create a SQL Server Database project. You can start with an empty project, design a database structure from the ground up inside the project, and then publish the entire structure to a new SQL Database. Or, if you already have an existing SQL Database (such as the WineCloudDb database in our scenario), you can import the database into the project. In the next several procedures, you will create a new project and then import the WineCloudDb database structure into the project.
To create the SQL Server Database project, follow these steps:
1. Right-click WineCloudSolution in Solution Explorer, and choose Add | New Project to display the Add New Project dialog.
2. On the left side of the New Project dialog, expand Installed and choose SQL Server.
3. Select the SQL Server Database Project template, and name the project WineCloudDb (it’s usually a good idea to name the project after the database), as shown in Figure 10-3.
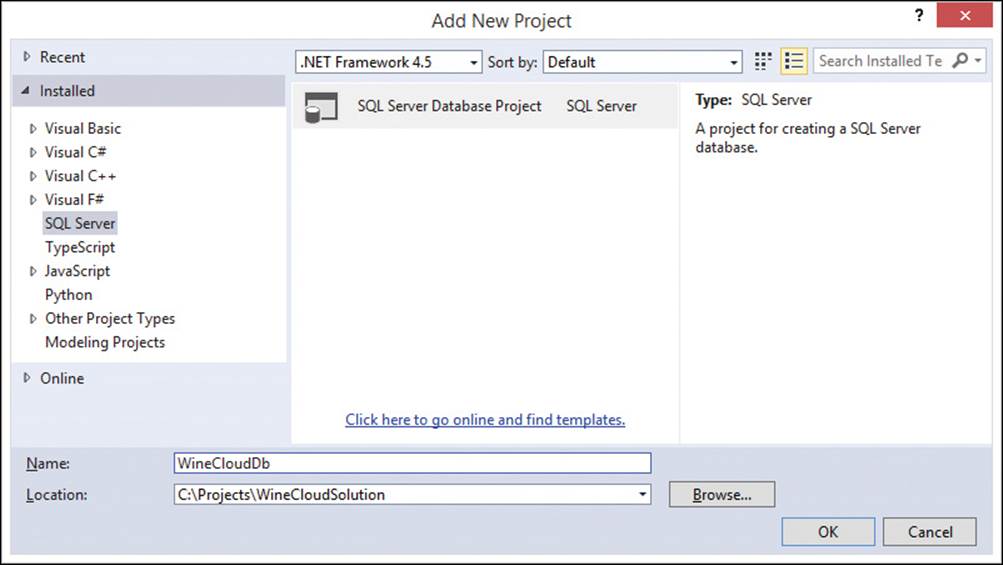
FIGURE 10-3 Creating a new SQL Server Database project
4. Click OK to create the project and add it to the solution.
Your solution now has a single database project, but there are no items defined in the project yet.
Setting the target platform
One of the advantages of SQL Server Database Projects is that you can design databases that work with different versions of SQL Server (including SQL Server 2005, 2008, 2008 R2, and 2012) and Microsoft Azure SQL Database. In the project properties, you can set the target platform to specify the particular version of SQL Server you intend to deploy the project to.
By choosing a target platform, you are directing Visual Studio to validate the project and verify that the database design is compatible with that particular version. The validation occurs in real time—as you modify the project, Visual Studio constantly checks your design in the background and raises errors if you attempt to do something that is not supported by the specified target platform. (Chapter 3 discusses important differences between Microsoft Azure SQL Database and on-premises versions of SQL Server.)
When you create a new SQL Server Database project, the target platform is set to SQL Server 2012 by default. So before making any changes to the database project, it is a good idea to set the target platform to let Visual Studio know that you intend to deploy the project to Microsoft Azure SQL Database rather than on-premises SQL Server 2012.
To set the project’s target platform switch to SQL Database, follow these steps:
1. Right-click the WineCloudDb project in Solution Explorer, and choose Properties. At the top of the Project Settings tab, notice that the Target Platform is set to SQL Server 2012.
2. Click the Target Platform drop-down list, and choose Windows Azure SQL Database, as shown in Figure 10-4. (Note that this is the old name for what has since been rebranded as Microsoft Azure SQL Database.)
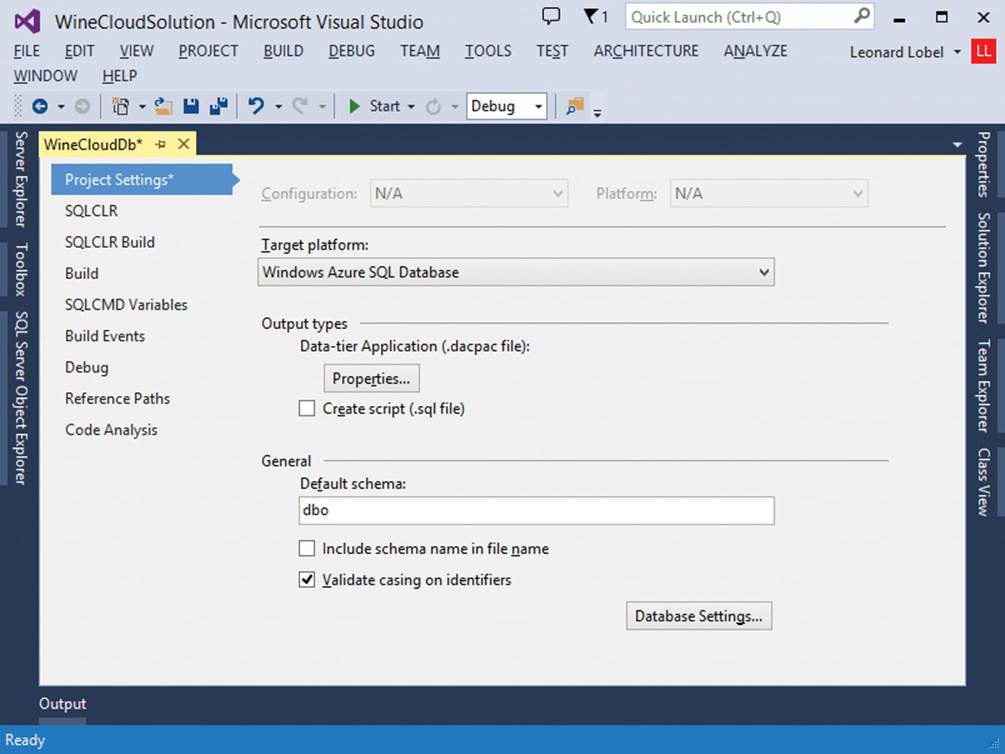
FIGURE 10-4 Changing the database project’s target platform
3. Click the FILE menu, and choose Save Selected Items (or press Ctrl+S).
With this setting in place, you can work with the project secure in the knowledge that Visual Studio will alert you if you attempt to do something that is not compatible with SQL Database specifically. Now it’s time to import the WineCloudDb database into the project.
Importing from SQL Database into the project
Importing the database populates the project with all the T-SQL source files that completely define the existing WineCloudDb database structure—in this case, the Wine and Customer tables you created with the code in Listing 10-1. It’s easy to do this with the Import Database dialog.
To import the WineCloudDb database from SQL Database into the project, follow these steps:
1. Right-click the WineCloudDb project in Solution Explorer, and choose Import | Database to display the Import Database dialog, as shown in Figure 10-5.
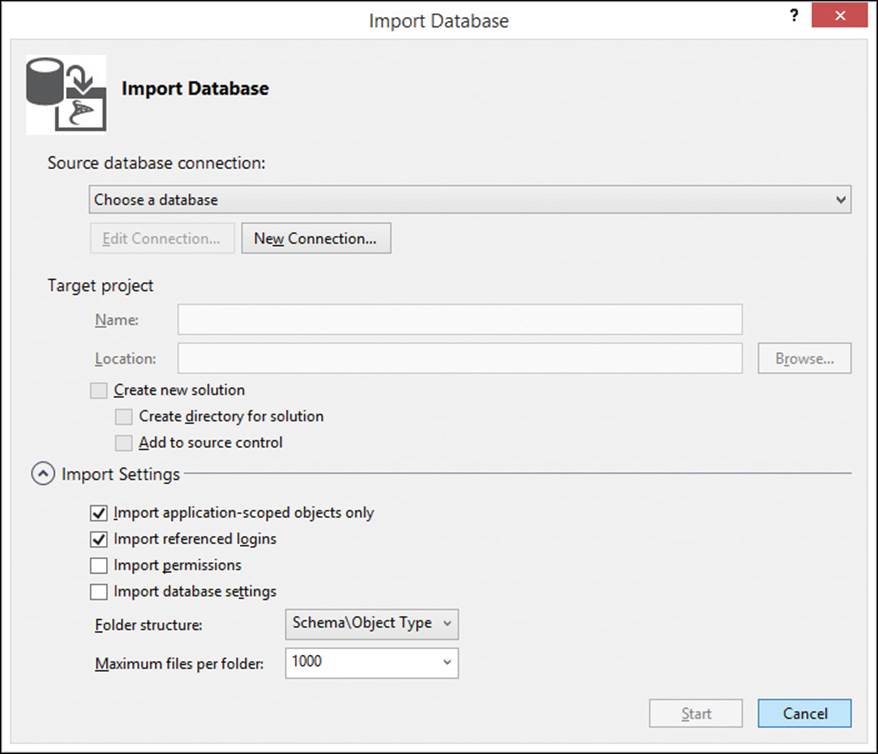
FIGURE 10-5 The Import Database dialog
2. Beneath Source Database Connection, click the New Connection button to display the Connection Properties dialog.
3. For Server Name, type the complete host name for the SQL Database server. As usual, this is the server name randomly assigned when you created the server, followed by .database.windows.net.
4. Choose Use SQL Server Authentication, and type the user name and password you previously assigned to the server.
5. Click the drop-down list beneath the Select Or Enter A Database Name radio button, and select the WineCloudDb database. The Connection Properties dialog should now appear as shown in Figure 10-6.
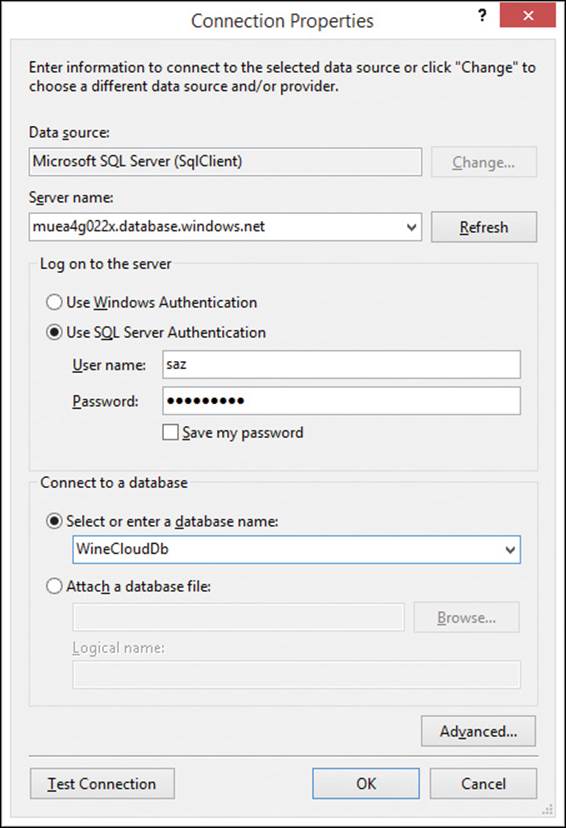
FIGURE 10-6 The Connection Properties dialog
6. Click OK to close the Connection Properties dialog and return to the Import Database dialog.
7. Click Start. It takes just a few moments for Visual Studio to examine the database and discover all the objects it contains, as shown in Figure 10-7.
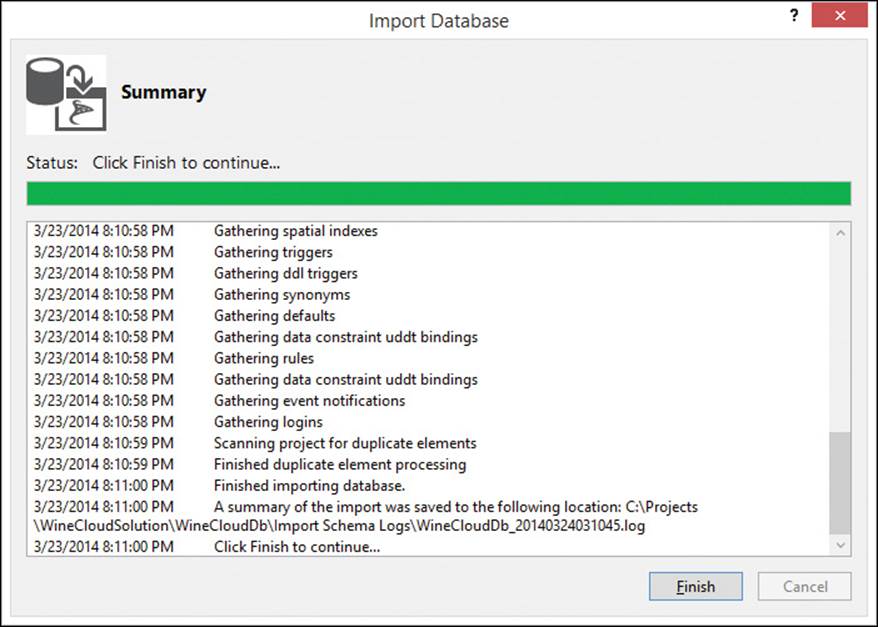
FIGURE 10-7 Importing the WineCloudDb SQL Database into the WineCloudDb SQL Server Database project
8. Click Finish.
In the Solution Explorer, notice that the project now has a dbo folder, which is the schema under which the imported objects are contained. If you expand the dbo folder, you will find a Tables folder, and beneath that folder, you will find one .sql file for each table imported from the database. (You should see a Customer.sql and Wine.sql files in the Tables folder.) You can now edit these files, which essentially means that you can continue designing the database completely offline. Then, whenever you wish, you can deploy the revised design back to SQL Database in the cloud.
Adding a new column to the Wine table
In the next procedure, you will use the SSDT table designer to create an additional column in the Wine table. The Wine table already has WineId, Name, Category, and Year columns, but to use it as a catalog for placing orders, it will also need to have a Price column.
To create the new Price column in the Wine table, follow these steps:
1. In Solution Explorer, expand the dbo folder, and then expand the Tables folder beneath dbo.
2. Right-click the Wine.sql file, and choose View Designer (or just double-click the Wine.sql file). This opens the designer in a split-screen view; the top half of the designer displays a grid that shows all the columns, and the bottom half displays the T-SQL code that creates the table with those columns.
3. In the grid at the top of the designer, click in the Name cell in the empty row at the bottom of the grid.
4. Type Price in the Name cell, and then press Tab to advance to the Data Type cell.
5. Type money in the Data Type cell, and then press Tab.
6. Clear the Allow Nulls check box, and then press Tab. This means that SQL Database will not permit null values when storing rows in the table; each wine will have to have a price.
7. Type 0 in the Default cell. This is necessary because the Wine table already contains rows of data. Because null values are not permitted in the Price column, this default value will assign a price of 0 to each existing row in the table when you deploy the new design back to SQL Database.
8. Click the FILE menu, and choose Save Wine.sql (or press Ctrl+S).
The table designer should now appear as shown in Figure 10-8.
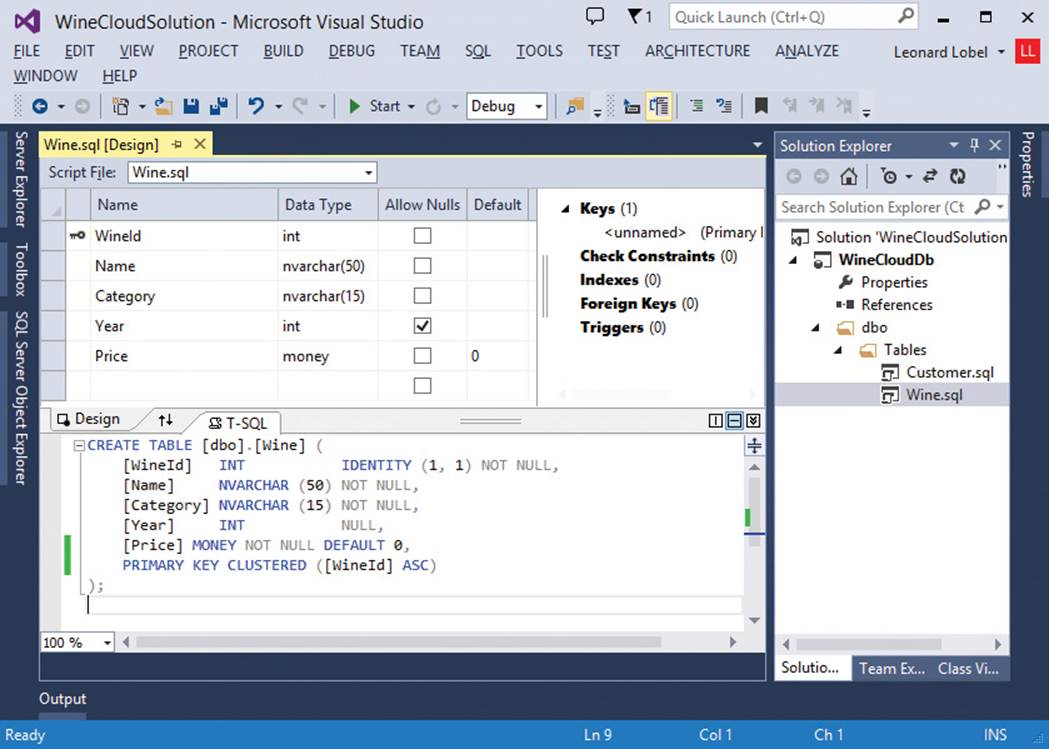
FIGURE 10-8 Adding new columns to the Wine table using the table designer
![]() Tip
Tip
In this procedure, you applied a change to the design grid on top, and Visual Studio automatically updated the T-SQL code on the bottom. However, the table designer supports bi-directional editing. So you can also apply your changes by editing the T-SQL code directly on the bottom, and Visual Studio will automatically update the design grid on the top. You will use this technique shortly when you add the Order table to the database in an upcoming procedure.
You had to assign default values for the Price column because the Wine table already contains data, and the table has been designed not to permit null values in this new column. Thus, a default must be established at this point because some value needs to be assigned to the Price column in the existing rows. However, once the new table is deployed and the existing rows are updated with the default values, you might want to remove the default value assignment from the table design so that new rows added in the future would be required to supply non-NULL values forPrice.
Deploying the project to Microsoft Azure SQL Database
The Publish Database dialog lets you deploy a SQL Server Database project to a real database. The publish process invokes a schema compare operation, which examines the structure of both the source project and target database and generates a change script—a set of T-SQL statements that modifies the database to match the project.
In the next procedure, you will use the Publish Database dialog to deploy the change you made to the project (adding the new Price column in the Wine table) back to SQL Database in the cloud.
To deploy the project, follow these steps:
1. Right-click the WineCloudDb project in Solution Explorer, and choose Publish to display the Publish Database dialog, as shown in Figure 10-9.
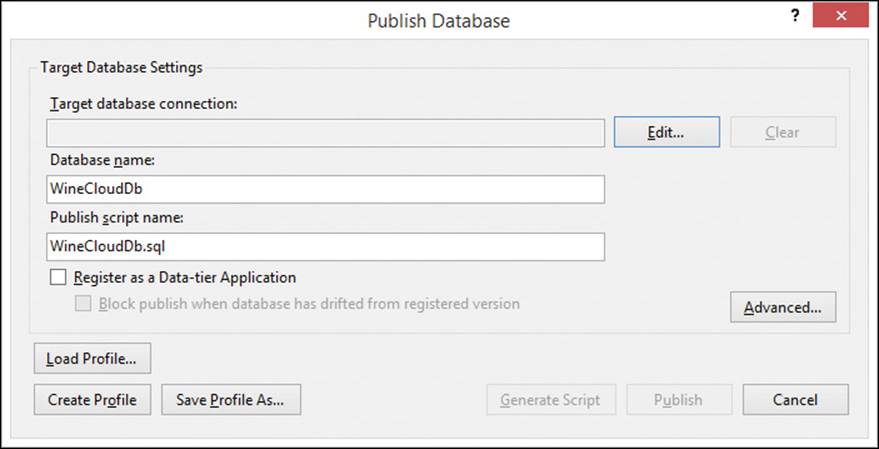
FIGURE 10-9 The Publish Database dialog
2. Click the Edit button to the right of the Target Database Connection to display the familiar Connection Properties dialog. Supply the connection information to the WineCloudDb database as you’ve done before:
a. For Server Name, type the complete host name for the SQL Database server (the server name followed by database.windows.net).
b. Choose Use SQL Server Authentication.
c. Type the user name and password you previously assigned to the server.
d. Click the drop-down list beneath the Select Or Enter A Database Name radio button, and select the WineCloudDb database (if not already selected by default).
3. Click OK to close the Connection Properties dialog. The Publish Database dialog should now appear as shown in Figure 10-10.
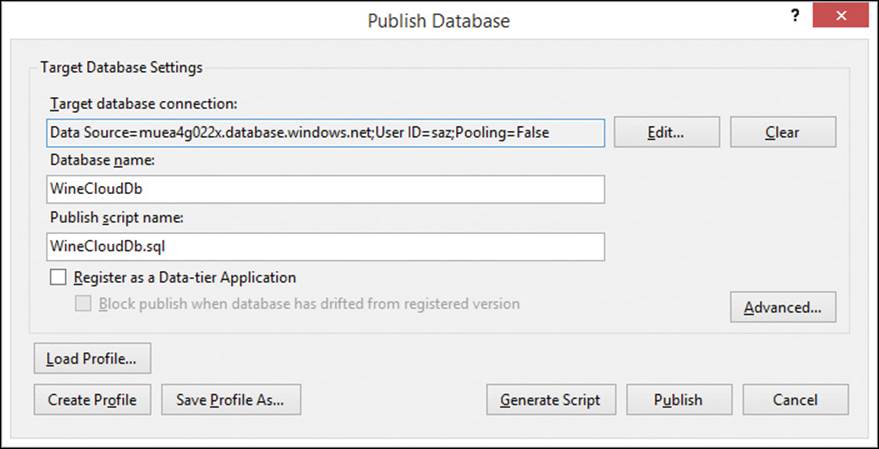
FIGURE 10-10 The Publish Database dialog after supplying target database connection information
4. Click the Save Profile As button, type WineCloudDb, and click Save. This saves the connection information you just entered to a file named WineCloudDb.publish.xml so that you won’t need to reenter it every time you deploy again in the future.
5. Click the Publish button to start the deployment process.
![]() Tip
Tip
You can click the Generate Script button instead of clicking Publish. This will also invoke the schema compare operation and generate the change script for the deployment. But rather than executing the change script, Visual Studio will open it in a new query window. This gives you the opportunity to view the script so that you can see exactly what actions will be taken. Then you can choose to execute the script as-is, edit it, or save it to be executed later.
During the deployment process, Visual Studio displays the progress and status in the Data Tools Operations window. Figure 10-11 shows the Data Tools Operations window once the deployment completes successfully.
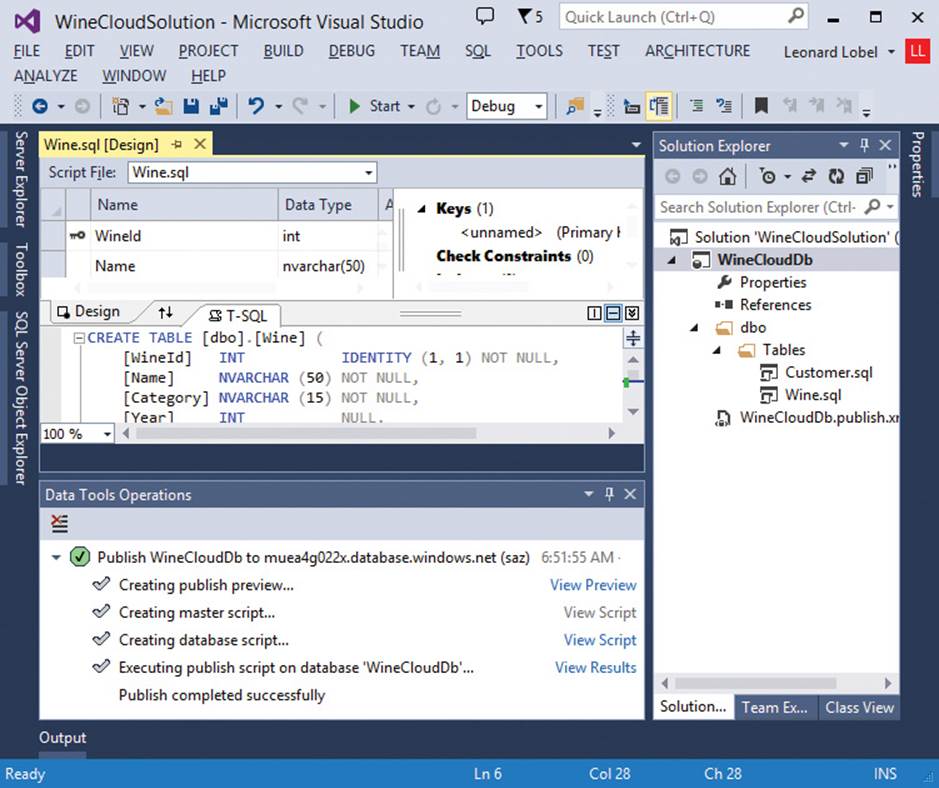
FIGURE 10-11 Deployment status is displayed in the Data Tools Operations pane
The Wine table in the database now includes the new Price column, but all the wine prices are 0 because you established a default value of 0 on the Price column in the project. In the next procedure, you will use the SQL Server Object Explorer to update the Wine table and assign prices in each row.
To set the wine prices, follow these steps:
1. If the SQL Server Object Explorer is not visible, click the VIEW menu and choose SQL Server Object Explorer.
2. In the SQL Server Object Explorer, expand the SQL Server node.
3. Beneath the SQL Server node, expand the server node for the SQL Database (the one with your server name followed by .database.windows.net).
4. Expand the Database node.
5. Expand the WineCloudDb database node.
6. Expand the Tables node.
7. Right-click the dbo.Wine table node, and choose View Data. This opens a new window to four rows for the wines added in Listing 10-1, all of which have a price of 0 because of the default value you assigned to the Price column when you added it to the table.
8. Click in the Price cell on the first row, and change the value from 0 to 34.90 (or just make up any price).
9. Repeat the previous step for each of the three remaining rows, changing the Price column in those rows from 0 to 48.50, 42.00, and 52.00 (or, again, assign any fictitious values). Your screen should appear similar to the one shown in Figure 10-12.
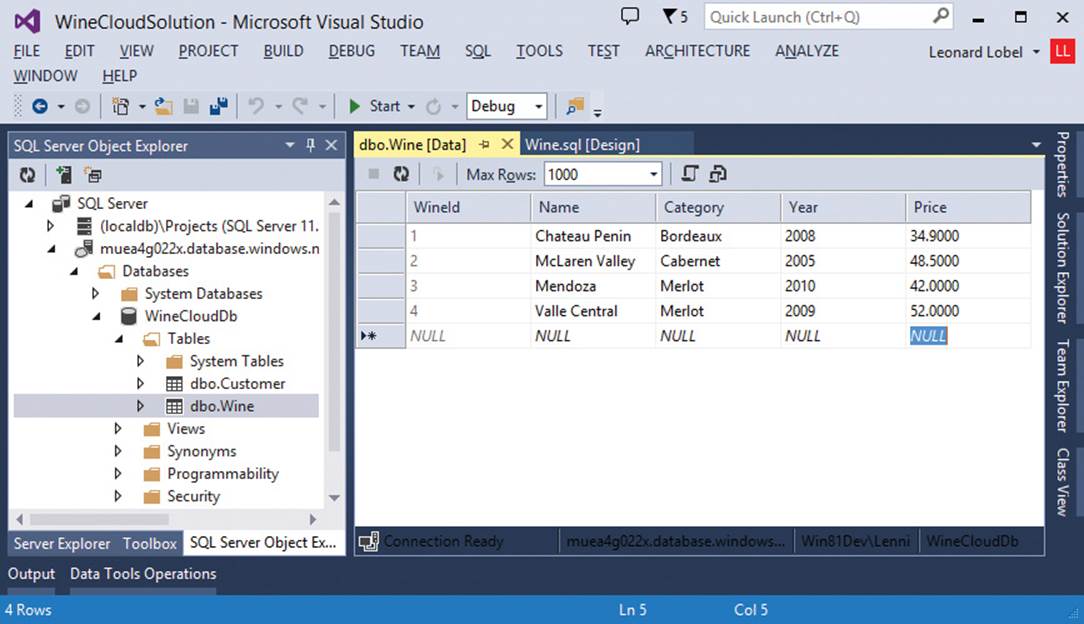
FIGURE 10-12 Using the SQL Server Object Explorer to edit prices in the Wine table
Creating the Order table
The next thing to do is create an Order table so that users can place orders to purchase wine. Typically, you would also have an order detail table so that a single order can be placed for multiple wines. However, you will stop with the Order table to keep the scenario as simple as possible; in this application, only one type of wine (in any quantity) can be purchased with each order.
In the next procedure, you will return to the database project to create the Order table, and then deploy the project once again to SQL Database. This demonstrates the iterative development cycle you follow when designing databases with a SQL Server Database project in Visual Studio:
![]() Make the database changes offline in a SQL Server Database project.
Make the database changes offline in a SQL Server Database project.
![]() Deploy the changes to SQL Database via a publish process. This generates and executes a change script based on a schema compare operation between the project and the database.
Deploy the changes to SQL Database via a publish process. This generates and executes a change script based on a schema compare operation between the project and the database.
To create the Order table, follow these steps:
1. In Solution Explorer, expand the dbo folder.
2. Beneath the dbo folder, right-click the Tables folder and choose Add | Table.
3. Name the table Order.sql, and click Add to open the table designer. The designer starts with a single integer column named Id that is already defined as the table’s primary key.
4. Add the OrderId column:
a. Click in the Name cell, and change the Id column to OrderId.
b. In the Properties window, expand Identity Specification and change the (Is Identity) property from False to True. (If the Properties window is not visible, click the VIEW menu and choose Properties Window.) When you insert new orders into the table, this tells SQL Database to automatically assign incrementing integer values for this column in each new row.
5. Add the OrderedOn column by doing the following:
a. Type OrderedOn in the Name cell beneath OrderId, and press Tab to advance to the Data Type cell.
b. Type datetime2(7) in the Data Type cell.
c. Deselect Allow Nulls.
6. Add the remaining columns using the code window instead of the table schema grid by completing the following steps:
a. Click in the code window beneath the table schema grid to place the text cursor immediately before the closing parenthesis character.
b. Type the following code for the remaining columns (and notice how the designer updates the table schema grid as you type):
,CustomerId int NOT NULL
,WineId int NOT NULL
,Quantity int NOT NULL
,UnitPrice money NOT NULL
,Price money NOT NULL
,AddedOn datetime2 NOT NULL DEFAULT SYSDATETIME()
,UpdatedOn datetime2 NULL
The CustomerId and WineId columns are foreign keys to the Customer and Wine tables, respectively, so the last step in designing the Order table is to establish foreign-key relationships on these columns. Doing so will ensure that an order cannot be placed for customers or wines that don’t actually exist.
To create the foreign-key relationship between the Order and Customer tables, follow these steps:
1. In the upper right area of the table designer, right-click Foreign Keys and choose Add New Foreign Key.
2. Name the new foreign key FK_Order_Customer. (It is best practice to assign foreign-key names that indicate which tables participate in the relationship.) This generates an incomplete FOREIGN KEY clause in the T-SQL code window at the bottom of the designer.
3. Edit the FOREIGN KEY clause in the T-SQL code window to read FOREIGN KEY (CustomerId) REFERENCES Customer(CustomerId).
Next, repeat the same steps to create the foreign-key relationship between the Order and Wine tables:
1. In the upper right area of the table designer, right-click Foreign Keys and choose Add New Foreign Key.
2. Name the new foreign key FK_Order_Wine.
3. Edit the second FOREIGN KEY clause added in the T-SQL code window at the bottom of the designer to read FOREIGN KEY (WineId) REFERENCES Wine(WineId).
4. Click the FILE menu, and choose Save Order.sql (or press Ctrl+S).
The completed design for the Order table should now appear as shown in Figure 10-13.
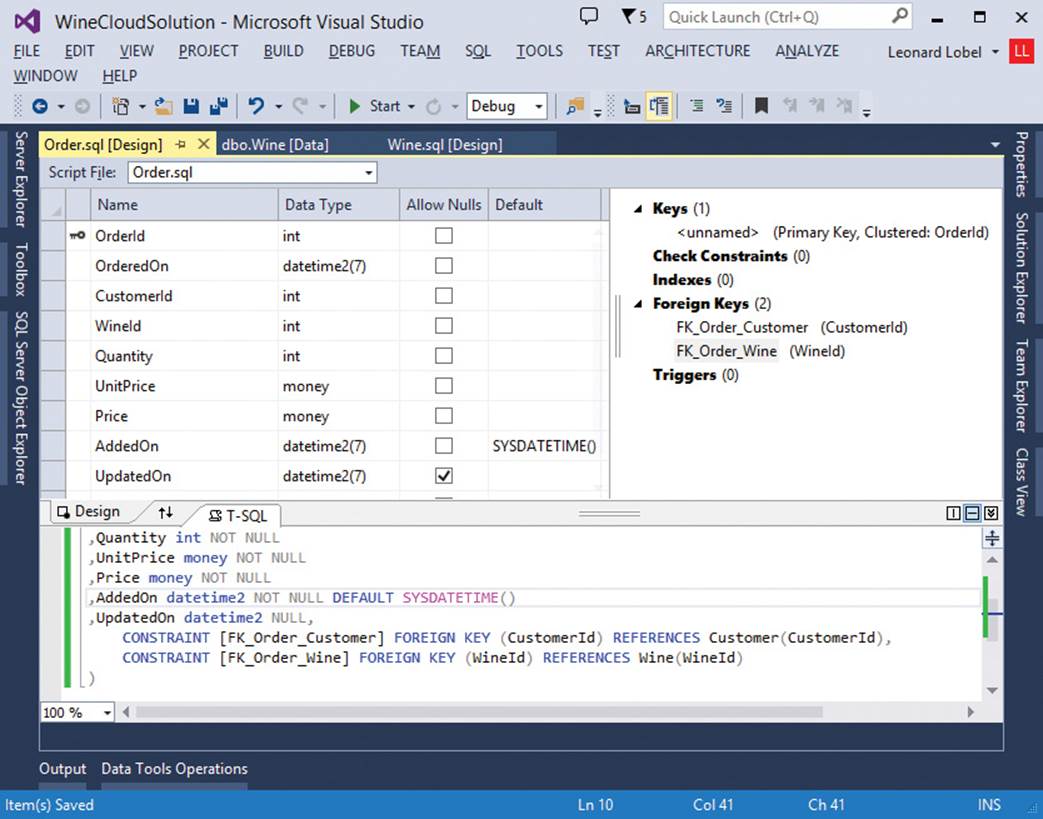
FIGURE 10-13 The completed Order table design
Creating stored procedures for the Order table
The Order table design is complete. But you won’t want to allow applications to insert, update, or delete rows directly in the table. Instead, you will want to create stored procedures to control access to the table. This approach lets you protect the table against storing data that is invalid according to custom business rules. For example, there is nothing preventing a row in this table from storing a negative number in the Quantity column or an invalid amount in the UnitPrice and Price columns. Nor is there any assurance that new rows added to the table will be assigned the current date and time in the AddedOn column, or that existing rows updated in the table will be assigned the current date and time in the UpdatedOn column.
Creating stored procedures to facilitate access to the table protects the database against storing invalid data and ensures that critical business calculations and validation rules cannot be bypassed. So rather than allowing direct access to the table, client applications will be given indirect access to the tables via stored procedures that apply whatever rules you choose to enforce. In a sense, this establishes a “service layer” over the tables in the database. In the next several procedures, you will create three stored procedures for the Order table to ensure that the following rules are in place:
![]() The Quantity column in every row is always assigned a positive number greater than zero.
The Quantity column in every row is always assigned a positive number greater than zero.
![]() The UnitPrice column in every row is always derived from the current price of the wine specified by the WineId column.
The UnitPrice column in every row is always derived from the current price of the wine specified by the WineId column.
![]() The Price column in every row is always calculated as the result of multiplying Quantity and Price.
The Price column in every row is always calculated as the result of multiplying Quantity and Price.
![]() For new rows, the AddedOn column is always assigned the current date and time on the database server.
For new rows, the AddedOn column is always assigned the current date and time on the database server.
![]() For updated rows, the UpdatedOn column is always assigned the current date and time on the database server, and the original AddedOn column is never overwritten.
For updated rows, the UpdatedOn column is always assigned the current date and time on the database server, and the original AddedOn column is never overwritten.
![]() Orders less than one year old cannot be deleted.
Orders less than one year old cannot be deleted.
The stored procedures that enforce these rules are shown in Listing 10-2 (insert), Listing 10-3 (update), and Listing 10-4 (delete):
LISTING 10-2 The InsertOrder stored procedure
CREATE PROCEDURE InsertOrder
@OrderedOn datetime2,
@CustomerId int,
@WineId int,
@Quantity int
AS
-- Don't permit zero or negative numbers for Quantity
IF @Quantity < 1
THROW 50000, 'Quantity must be 1 or more', 1;
-- Derive unit price from Wine table
DECLARE @UnitPrice money = (SELECT Price FROM Wine WHERE WineId = @WineId);
-- Ensure the specified Wine ID exists
IF @@ROWCOUNT = 0
THROW 50000, 'The specified wine was not found', 1;
-- Calculate total price
DECLARE @Price money = @Quantity * @UnitPrice;
-- Use the current date and time for AddedOn
DECLARE @AddedOn datetime2 = SYSDATETIME();
INSERT INTO [Order]
(OrderedOn, CustomerId, WineId, Quantity, UnitPrice, Price, AddedOn)
VALUES
(@OrderedOn, @CustomerId, @WineId, @Quantity, @UnitPrice, @Price, @AddedOn);
-- Return the new OrderId
SELECT OrderId = SCOPE_IDENTITY();
LISTING 10-3 The UpdateOrder stored procedure
CREATE PROCEDURE UpdateOrder
@OrderId int,
@OrderedOn datetime2,
@CustomerId int,
@WineId int,
@Quantity int
AS
-- Don't permit zero or negative numbers for Quantity
IF @Quantity < 1
THROW 50000, 'Quantity must be 1 or more', 1;
-- Derive unit price from Wine table
DECLARE @UnitPrice money = (SELECT Price FROM Wine WHERE WineId = @WineId);
-- Ensure the specified Wine ID exists
IF @@ROWCOUNT = 0
THROW 50000, 'The specified wine was not found', 1;
-- Calculate total price
DECLARE @Price money = @Quantity * @UnitPrice;
-- Use the current date and time for UpdatedOn
DECLARE @UpdatedOn datetime2 = SYSDATETIME();
-- Update the row
UPDATE [Order]
SET
OrderedOn = @OrderedOn,
WineId = @WineId,
Quantity = @Quantity,
UnitPrice = @UnitPrice,
Price = @Price,
UpdatedOn = @UpdatedOn
WHERE
OrderId = @OrderId;
LISTING 10-4 The DeleteOrder stored procedure
CREATE PROCEDURE DeleteOrder
@OrderId int
AS
-- Don't permit orders less than one year old to be deleted
DECLARE @DaysOld int =
(SELECT DATEDIFF(DAY, OrderedOn, SYSDATETIME()) FROM [Order] WHERE OrderId = @OrderId);
-- Ensure the specified Order ID exists
IF @@ROWCOUNT = 0
THROW 50000, 'The specified order was not found', 1;
-- Ensure orders less than one year old are never deleted
IF @DaysOld < 365
THROW 50000, 'Orders less than one year old cannot be deleted', 1;
-- Delete the row
DELETE FROM [Order]
WHERE OrderId = @OrderId;
In the InsertOrder stored procedure, the incoming @Quantity parameter is validated to ensure that a number greater than zero is supplied. The @UnitPrice variable is then assigned the unit price of the specified wine by querying the Wine table against the @WineId parameter. After testing @@ROWCOUNT to ensure that the specified wine exists, the @Price variable is calculated by multiplying @Quantity with @UnitPrice. The @AddedOn variable is then declared and assigned the current date and time by the SYSDATETIME function. An INSERT statement then inserts the new row with a combination of values supplied by input parameters and established by logic in the stored procedure. Finally, a SELECT statement returns the new primary key value assigned for the OrderId of the new row, which is obtained with the SCOPE_IDENTITY function.
The UpdateOrder stored procedure performs the same validation on the incoming @Quantity parameter to ensure that an existing order’s quantity is not changed to a zero or negative number. It also repeats the same pricing logic to recalculate @UnitPrice and @Price if an existing order’s quantity or wine selection is changed. (Certainly, the common pricing code can be maintained in a single user-defined function that is shared by both the InsertOrder and UpdateOrder stored procedures.) The @UpdatedOn variable is then declared and assigned the current date and time by the SYSDATETIME function. An UPDATE statement then updates the row (using the current date and time in @UpdatedOn for the UpdatedOn column). Notice that the AddedOn column is not affected by the UPDATE statement, which ensures that the date and time stored inAddedOn at the time the row was created can never be modified.
In the DeleteOrder stored procedure, the number of elapsed days since OrderDate is calculated and stored in the @DaysOld variable. The @@ROWCOUNT function is then tested to verify that the specified order actually exists, and then the @DaysOld variable is tested to ensure that the date of the existing order is at least one year (365 days) ago. Finally, a DELETE statement deletes the specified order from the table.
![]() More Info
More Info
There are other techniques besides stored procedures that can protect tables from invalid data. For example, you can define a check constraint on the Quantity column to ensure that negative numbers are not permitted, instead of testing for that condition in a stored procedure. You can also create a trigger to check that an order is at least one year old before permitting its row to be deleted. In general however, triggers are best avoided, because they introduce nondeterministic behavior. (That is, when multiple triggers are defined, the order in which they fire is not guaranteed, which can lead to subtle bugs that are difficult to troubleshoot.) Using stored procedures is often the best approach, because they provide a clean layer over tables in which you can consolidate all your custom logic (such as calculating prices, and controlling the date and time values assigned to the AddedOn and UpdatedOn columns, as shown here).
To create the three stored procedures, follow these steps:
1. In Solution Explorer, right-click the dbo folder and choose Add | New Folder.
2. Name the new folder Stored Procedures, and press Enter.
 Note
Note
This folder would have been created automatically earlier just like the Tables folder was, if there had been at least one stored procedure in the database at the time you imported it into the project.
3. Right-click the Stored Procedures folder, and choose Add | Stored Procedure.
4. Name the new file for the stored procedure InsertOrder.sql, and click Add.
5. Replace the template code generated automatically by Visual Studio with the code shown earlier in Listing 10-2. Your screen should appear similar to Figure 10-14.
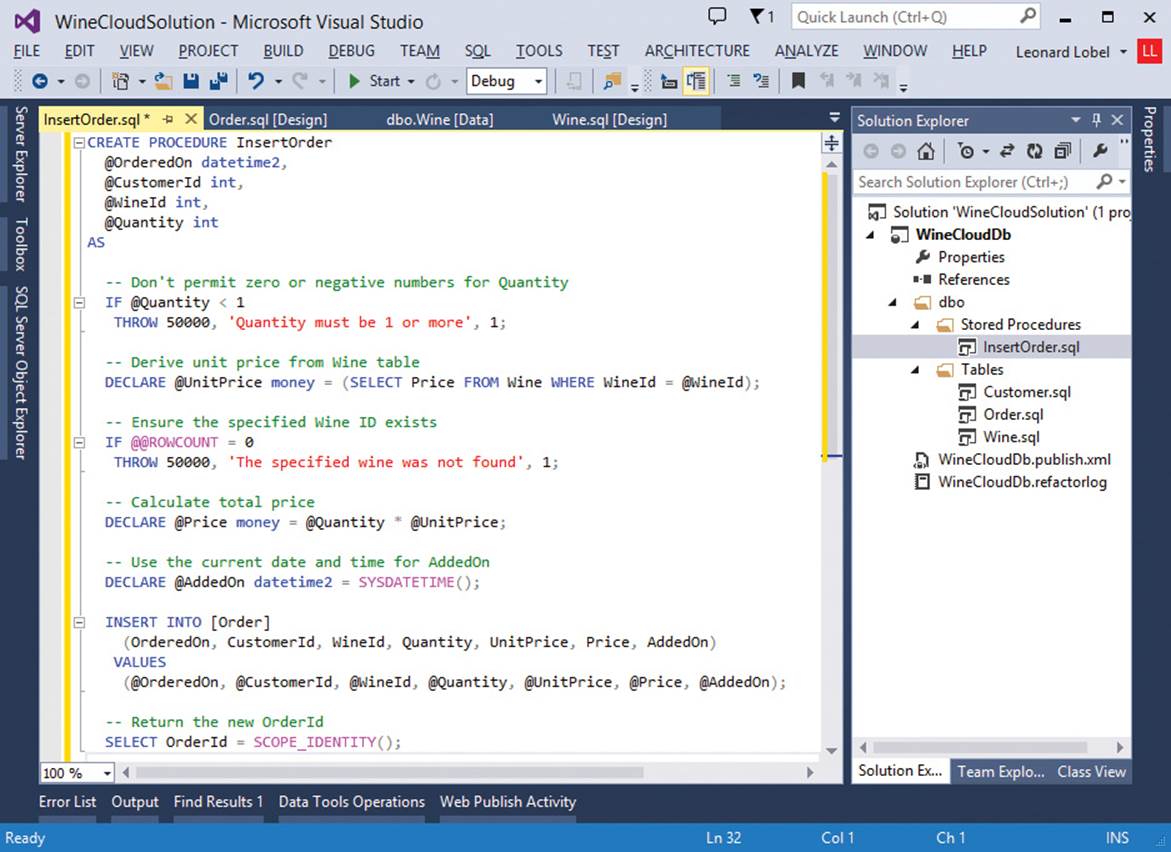
FIGURE 10-14 Adding a new stored procedure to the SQL Server Database project
6. Right-click the Stored Procedures folder, and choose Add | Stored Procedure.
7. Name the new file for the stored procedure UpdateOrder.sql, click Add, and replace the template code with the code shown earlier in Listing 10-3.
8. Right-click the Stored Procedures folder, and choose Add | Stored Procedure.
9. Name the new file for the stored procedure DeleteOrder.sql, click Add, and replace the template code with the code shown earlier in Listing 10-4.
10. Click the FILE menu, and choose Save All (or press Ctrl+Shift+S).
Now that you have added a new table and three new stored procedures in the project, you are ready to deploy those changes back to SQL Database in the cloud. You will do this using the same publish procedure you followed for the previous deployment. This time, however, you won’t need to re-enter all the connection information, because you saved that information to a profile when you deployed the last time.
To redeploy the project, follow these steps:
1. Right-click the WineCloudDb project in Solution Explorer, and choose Publish to display the Publish Database dialog. (See Figure 10-10 earlier in the chapter.)
2. Click the Load Profile button toward the bottom of the dialog.
3. Double-click the WineCloudDb.publish XML file to load the connection information that you saved during the previous deployment.
4. Click the Publish button to start the deployment process.
As when you deployed the first time, Visual Studio generates and executes the change script that updates the database in the cloud to match the database design in the project. This time, that means the WineCloudDb SQL Database is updated with the new Order table and its foreign-key relationships to the Customer and Wine tables, as well as the three new stored procedures for inserting, updating, and deleting rows in the Order table. Refresh the WineCloudDb database node in SQL Server Object Explorer to verify that the database now contains the new objects published from the project.
The database design is complete, and you are now ready to start working on the solution’s data access layer.
Creating the data access layer
The data access layer (DAL) is the component that serves as the interface between the back-end database and the rest of an application. You have many options for building a DAL, and in the upcoming sections, you will build a DAL using the Entity Framework (EF). Today, EF has emerged as Microsoft’s recommended technology for implementing a data access layer. EF, which was first released as part of .NET 3.5 SP1 in 2008, raises the level of abstraction far beyond that which is offered by ADO.NET. Entity Framework is an object relational mapper (ORM) that can dramatically boost your developer productivity in many scenarios, but it is by no means the only viable choice for a DAL.
Of course, the Microsoft .NET Framework includes ADO.NET, which provides a set of classes you can use to build a data access layer. Since the very first version of .NET released in 2002, developers have had two choices for working with ADO.NET. One option is to use the raw ADO.NET objects, which include connections, commands, and readers. This approach requires a lot of manual effort, because you need to write explicit code to connect to the database, issue commands to request data, transfer the requested data from readers into objects, track changes made to those objects, and then finally issue commands to send the modified objects back to the database. Although somewhat antiquated and primitive, this technique is by no means obsolete. Indeed, despite its power and popularity, Entity Framework does carry a substantial amount of overhead, which can result in degraded performance in large-scale scenarios, compared to the speed of direct database access with raw ADO.NET.
The second conventional ADO.NET choice is to use the Dataset object in conjunction with data adapters. Visual Studio provides a graphical Dataset designer that automatically generates a lot of code for you. The generated code configures the connection and command objects, and it maps individual data elements (tables and columns) between the database and the strongly typed in-memory Dataset object. Once populated, a Dataset can track its own changes, making it relatively easy for you to push updated data back to the database. This approach provides a layer of abstraction that relieves you from a great deal of the manual effort required to achieve the same result using the raw ADO.NET classes. However, the Dataset is not a true business object or entity. Today, therefore, you won’t find many scenarios where it makes sense to use the Datasetrather than EF when building the DAL in a new .NET application.
The overriding point is that it’s far more important that you have a properly implemented DAL in place than which approach you actually decide to take. Certainly, every case is different, but in many common line-of-business (LOB) scenarios, you will find EF more than well suited for the task. EF dramatically simplifies data access by abstracting away the underlying database connection, command, and reader objects and providing a robust set of object services capable of materializing objects retrieved from querying the database, tracking them in memory, and pushing their changes back to the database. EF can also dynamically generate SELECT statements to query the database and INSERT, UPDATE, and DELETE statements to update the database, or it can provide the same object services equally well by invoking stored procedures that let you maintain total control over how queries are executed and updates are processed. There are also many more advanced mapping possibilities in EF that are far beyond the scope of this chapter, such as the ability to model inheritance, entity-splitting, table-splitting, and many-to-many relationships.
Introducing the Entity Data Model
At the heart of the Entity Framework lies the Entity Data Model (EDM), and Visual Studio provides a rich graphical designer that makes it easy to manage and maintain the EDM. In Chapter 8, “Designing and tuning for scalability and high performance,” you built an application using the “code-first” approach. With code-first EF, the EDM is present, but not visible. Instead, the code-first approach infers the EDM from the entity classes that you write yourself in code, but the EDM is still there. In this section, you will use the database-first approach to create an .edmx file in Visual Studio from the WineCloudDb database. This will introduce you to the EDM designer in Visual Studio, which makes it easy to customize the model in many ways, particularly for mapping stored procedures.
The EDM consists of three parts. First there is the storage schema, which describes the physical structure of the database. Then there is the conceptual schema, which describes classes for the business entities used in the application. Finally, you have the mapping schema, which defines how the storage and conceptual schemas relate to one another. These three pieces (collectively called the model’s metadata) are self-contained in a single .edmx file inside your project.
Once you create the EDM, your applications and services concern themselves only with the conceptual schema, while EF handles all the data access for you dynamically at runtime. This means that when you need to retrieve data into objects, EF figures out and executes the appropriate T-SQL SELECT queries (or stored procedures) and populates ready-to-use objects from the results automatically. Then, when it comes time to save modified objects, EF similarly figures out and executes the appropriate T-SQL INSERT, UPDATE, and DELETE statements (or stored procedures) needed to persist the changes back to the database. EF is able to perform this magic because it knows how the conceptual business entities map to the physical database structure from the metadata in the EDM.
The EDM you will create in the next section defines a simple one-to-one mapping between the conceptual and storage schemas. However, you should be aware that much more complex mappings are possible. For example, a single entity in the conceptual schema might be mapped to multiple tables in the database, in which case EF will join the tables together at query time and split the updates across them when saving changes. Conversely, multiple entity types might be mapped to a single table in the database, in which case EF distinguishes each row in the table based on a designated column that identifies the entity type. This type of mapping can also be used to define inheritance in the conceptual schema.
Creating the Data Access Layer project
For quick-and-dirty prototyping, it’s quite common to create the EDM right inside of the application that consumes it. In production scenarios, however, the proper practice is to contain the EDM file in its own class library (DLL) project so that it can be easily shared by multiple applications. All you need to do is reference the DLL assembly containing the EDM and add the appropriate database connection string to the application’s configuration file (either web.config or app.config).
In this section, you will create the EDM in its own class library project for an easily shareable DAL. Then you will reference the DAL class library from a separate ASP.NET MVC project. As you will soon see, it is easy to copy the connection string from the class library’s app.config file into the MVC project’s web.config file to access the database.
![]() More Info
More Info
Another commonly recommended practice is to implement the repository pattern. The repository is another layer you can add to your solution that manages the DAL directly, while the entire rest of the application interacts only with the repository. In this manner, only the repository layer knows that you are using EF (or something else) as the DAL, and consequently, only the repository layer needs to be changed if you ever decided to switch between using EF, raw ADO.NET, or any other DAL option. Although you will not also be implementing a repository pattern in this solution, keep in mind that doing so in your production applications will make it extremely easy to switch between different DAL options with minimal disruption to the rest of the solution, if the need ever arises.
To create the DAL class library project, follow these steps:
1. Right-click WineSolution in Solution Explorer, and choose Add | New Project to display the Add New Project dialog.
2. On the left side of the New Project dialog, expand Installed and choose Visual C#.
3. Select the Class Library template, and name the project WineCloudModel.
4. Click OK to create the project and add it to the solution.
5. The Class1.cs file created automatically by Visual Studio can be deleted, so right-click it, choose Delete, and click OK.
You are now ready to create the Entity Data Model in the WineCloudModel project.
Creating an Entity Data Model
To create the Entity Data Model (EDM), follow these steps:
1. Right-click the WineCloudModel project in Solution Explorer, and choose Add | New Item to display the Add New Item dialog.
2. On the left side of the Add New Item dialog, expand Installed, Visual C#, and choose Data.
3. Click the ADO.NET Entity Data Model item, and name the file WineModel.edmx, as shown in Figure 10-15.
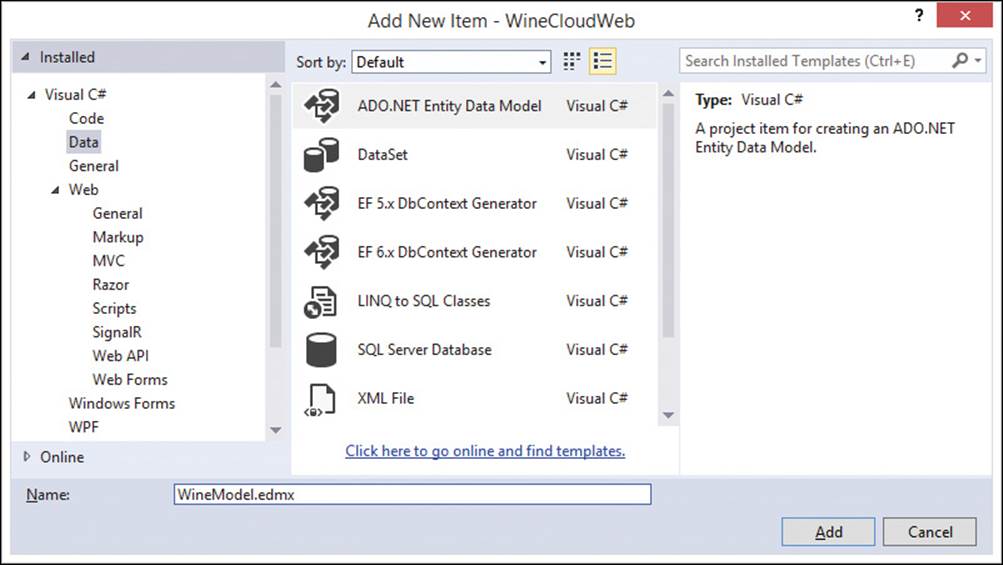
FIGURE 10-15 Creating a new Entity Data Model
4. Click Add to start the Entity Data Model Wizard.
5. On the Choose Model Contents page, the Generate From Database option is already selected by default, so just click Next.
6. On the Choose Your Data Connection page, click the New Connection button.
7. If the Choose Data Source dialog appears, click Microsoft SQL Server, and then click Continue.
8. In the familiar Connection Properties dialog, supply the same connection information to connect to the WineCloudDb database that you’ve used throughout this chapter:
a. For Server Name, type <servername>.database.windows.net (replacing <servername> with the server name that was assigned when you created your server).
b. Choose Use SQL Server Authentication, and type the user name and password you assigned to the server.
c. This time, be sure and select the Save My Password check box. Otherwise, the password will not be saved for the connection string at runtime in step 9.
d. In the drop-down list beneath the Select Or Enter A Database Name radio button, select the WineCloudDb database.
e. Click OK to close the Connection Properties dialog.
9. Choose Yes to include sensitive data (namely, the password) in the connection string. The Entity Data Model Wizard should now appear as shown in Figure 10-16.

FIGURE 10-16 Setting the data connection in the Entity Data Model Wizard
![]() Important
Important
In production applications, it is not acceptable to include the password in the connection string (which gets stored in the application’s configuration file). Instead, you should choose No and then assign the password in C# code at runtime.
10. Click Next to display the Choose Your Version page.
11. The desired version, Entity Framework 6.0 should already be selected by default, so just click Next to display the Choose Your Database Objects And Settings page.
12. Expand Tables, dbo, and then select the check boxes for the Customer, Order, and Wine tables. (Don’t include the _RefactorLog table in the model; this table was generated automatically and is used only by the refactoring features of the SQL Server Database Project.)
13. Expand Stored Procedures and Functions, dbo, and then select the dbo check box to select the InsertOrder, UpdateOrder, and DeleteOrder stored procedures in the database.
14. Deselect the last check box in the dialog, Import Selected Stored Procedures And Functions Into The Entity Data Model. The Entity Data Model Wizard should now appear as shown in Figure 10-17.
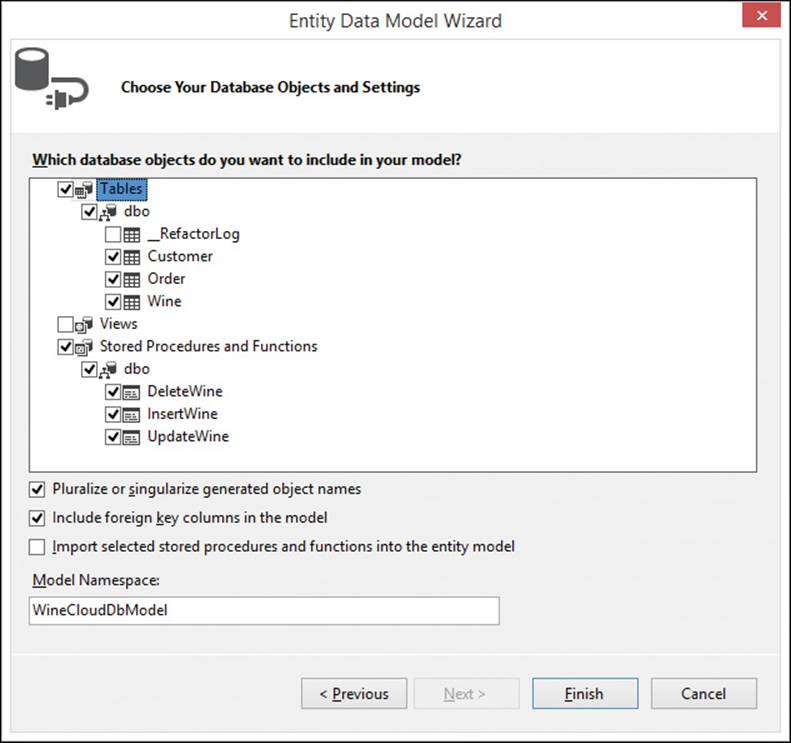
FIGURE 10-17 Selecting tables and stored procedures to be imported into the Entity Data Model
![]() More Info
More Info
This step isn’t strictly necessary, but it does prevent needless overhead in the EDM. Deselecting this check box means that you never intend to call the InsertOrder, UpdateOrder, and DeleteOrder stored procedures directly via EF, and it’s therefore not necessary for the wizard to create function imports and complex types (these are essentially strongly-typed wrappers around stored procedure calls and the schema results returned by those stored procedure calls). Instead, you will shortly map these stored procedures to the Order entity so that EF calls them automatically whenever it needs to save changes to the Order table in the database.
15. Click Finish.
Note
After clicking Finish, you might receive multiple Security Warning messages for running the template. (This refers to the special template used internally by the EDM designer to automatically generate code.) If you receive this warning, just click OK. (You can also select the check box to prevent the template security warning from appearing again repeatedly.)
Visual Studio adds the necessary EF references to the project, generates the Entity Data Model, and then displays it in the EDM designer as shown in Figure 10-18.
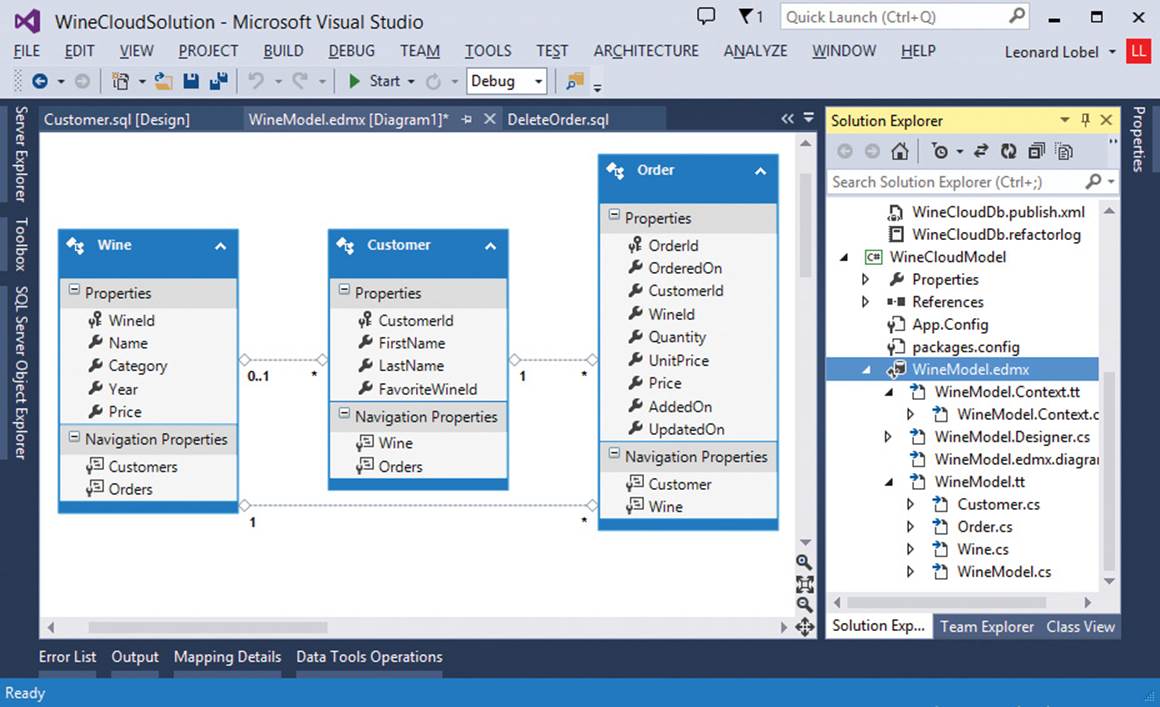
FIGURE 10-18 The generated Entity Data Model displayed in the EDM designer
The Wine, Customer, and Order entities displayed in the EDM designer represent classes that correspond to tables of the same name that were discovered in the database. Similarly, each of the entity classes has properties that are mapped to columns of the same name in each table. Furthermore, notice that each entity has navigation properties and associations that are based on foreign-key relationships discovered between the tables in the database:
![]() The Wine entity has the navigation properties Customers and Orders (both plural).
The Wine entity has the navigation properties Customers and Orders (both plural).
• In Listing 10-1, you established a foreign relationship between the Customer table’s FavoriteWineId column and the WineId primary-key column in the Wine table. You defined this column to allow nulls, meaning that some customers might not have a FavoriteWineId value. Thus, the association between the entities is displayed graphically in the designer by a connecting line, with a “0..1” appearing on the Wine side (which indicates zero or one favorite wines) and an asterisk (*) symbol (which indicates many) on the Customer side. The Customersnavigation property is on the “many” side of this relationship, so all the customers for a given favorite wine are accessible through that Wine entity’s Customers navigation property.
• Later, you established a foreign-key relationship between the Order table’s WineId column and the WineId primary-key column in the Wine table. You defined this column not to permit nulls, meaning that every Order row must have a WineId value identifying the wine that was ordered. Thus, the association between the entities is displayed graphically in the designer by a connecting line, with a “1” appearing on the Wine side (which indicates one and only one wine) and an asterisk (*) symbol (indicating many) on the Order side. The Orders navigation property is on the “many” side of this relationship, so all the orders for a given wine are accessible through that Wine entity’s Orders navigation property.
![]() The Customer entity has navigation properties Wine (singular) and Orders (plural).
The Customer entity has navigation properties Wine (singular) and Orders (plural).
• The Wine property is on the “zero or one” side of the customer’s favorite wine relationship, so each customer’s favorite wine (if that customer has one) can be accessed through the Customer entity’s Wine navigation property.
• You also established a foreign-key relationship between the Customer table’s OrderId column and the OrderId primary-key column in the Order table. You defined this column not to permit nulls, meaning that every Order row must have a CustomerId value identifying the customer that placed the order. Thus, the association between the entities is displayed graphically in the designer by a connecting line, with a “1” appearing on the Customer side and an asterisk (*) symbol (indicating many) on the Order side. The Orders navigation property is on the “many” side of this relationship, so all the orders for a given customer can be accessed through the Customer entity’s Orders navigation property.
![]() The Order entity has the navigation properties Customer and Order (both singular).
The Order entity has the navigation properties Customer and Order (both singular).
• The Customer property is on the “one” side of the order’s customer relationship, so each order’s customer can be accessed through the Order entity’s Customer navigation property.
• Similarly, the Wine property is on the “one” side of the order’s wine relationship, so each order’s wine can be accessed through the Order entity’s Wine navigation property.
The Entity Data Model Wizard imported both tables and stored procedures. But unlike the tables, which the wizard also maps to same-named entities in the conceptual model, stored procedures do not get mapped automatically. So it’s still your job to map the three stored procedures (InsertOrder, UpdateOrder, and DeleteOrder) to the Order entity in the model. By default (that is, if you don’t do this), EF will simply generate direct T-SQL INSERT, UPDATE, and DELETE statements when you save changes to the Wine table, and you won’t get the added functionality (such as custom validation and pricing logic) that is programmed into the stored procedures.
Recall that InsertOrder returns a single-row resultset with the new OrderId value assigned to the new Order row. (See the SELECT statement at the bottom of Listing 10-2.) When you map this stored procedure to the Order entity, you inform the EDM of the value it returns by definingresult bindings. This instructs EF to refresh new Order entity objects by “shoving” the return value back into the OrderId property of the memory-resident instance after performing an insert.
To map the InsertOrder, UpdateOrder, and DeleteOrder stored procedures to the Order table, follow these steps:
1. Right-click on the Order entity, and choose Stored Procedure Mapping. This displays the Mapping Details window.
2. In the Mapping Details window, click <Select Insert Function>, expand the drop-down list, and choose the InsertOrder stored procedure. The designer automatically maps the stored procedure input parameters to the same-named entity properties, but you need to map the OrderIdvalue returned by the stored procedure back into the entity manually in the next step.
3. Beneath Result Column Bindings, click <Add Result Binding>, type OrderId, and press Enter. The designer correctly maps this result column to the OrderId property.
4. Click <Select Update Function>, expand the drop-down list, and choose the UpdateOrder stored procedure. Again, the stored procedure parameters get mapped automatically to the same-named entity properties of the Order entity.
5. Click <Select Delete Function>, expand the drop-down list, and choose the DeleteOrder stored procedure.
6. Click the FILE menu, and choose Save All (or press Ctrl+Shift+S).
Note
Once again, click OK on any template Security Warning dialogs that appear.
After completing this procedure, the Mapping Details window should appear as shown in Figure 10-19.

FIGURE 10-19 The EDM designer Mapping Details window with stored procedures mapped to the Order entity
With the EDM design complete, the solution has a functioning EF-based data access layer. EF will automatically handle database connections, generate queries, materialize and track objects, and call stored procedures, and you don’t have to write any code to make it work!
Creating the website
With a functioning DAL in place, you’re ready to create the ASP.NET MVC website. This site will let users place orders over the web using any browser. After building and testing the site locally in an ASP.NET Web Application Project, you will deploy it to Microsoft Azure to run as a website in the cloud.
Note
This chapter presents a very simple application, which is just enough to demonstrate how multiple components in a layered solution interact. In real-world scenarios, authentication and authorization must also be implemented; however, those details lie beyond the scope of this chapter.
An MVC website works by examining the requested URL and determining which controller, and which action on that controller, the request should be directed to. A controller is really just a class, and an action is really just a method of that class. When the action method runs, it returns the view that gets rendered as Hypertext Markup Language (HTML) and JavaScript in the client browser. MVC binds the view to a model that defines the data that gets supplied to the view.
The rules that govern how a URL maps to specific controllers and actions are specified in the MVC application’s routing table. Default behavior (such as which controller and action is invoked when none is specified in the URL) is also configured in the routing table. The default routing table for a new MVC application specifies a default controller named Home with a default action named Index, which means that the Index method of the HomeController class will be invoked for a URL that does not specify a controller and action.
You will also use the “scaffolding” template feature in Visual Studio to create the HomeController class. This code-generation feature automatically creates several actions in the controller class, along with individual views that correspond to each action. When used with Entity Framework, these scaffolded actions and views fully implement standard select, insert, update, and delete functionality for any entity in the EDM.
Creating an ASP.NET web application project
To create the web application project, follow these steps:
1. Right-click WineSolution in Solution Explorer, and choose Add | New Project to display the Add New Project dialog.
2. On the left side of the New Project dialog, expand Installed, Visual C#, and choose Web.
3. Choose the ASP.NET Web Application template.
4. Name the project WineCloudWeb (as shown in Figure 10-20), and click OK.
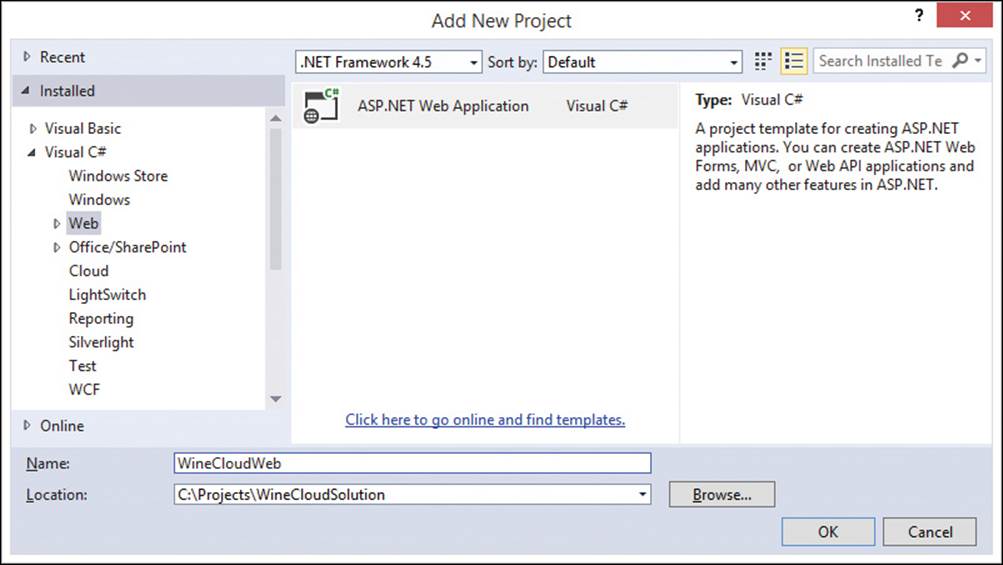
FIGURE 10-20 Creating a new ASP.NET web application project
5. In the New ASP.NET Project dialog, choose the Empty template.
6. Select the MVC and Web API check boxes, as shown in Figure 10-21. This adds project references to the MVC assemblies to support the website, as well as references to the Web API assemblies for the REST services you will add later to support the mobile Windows Phone 8 app.
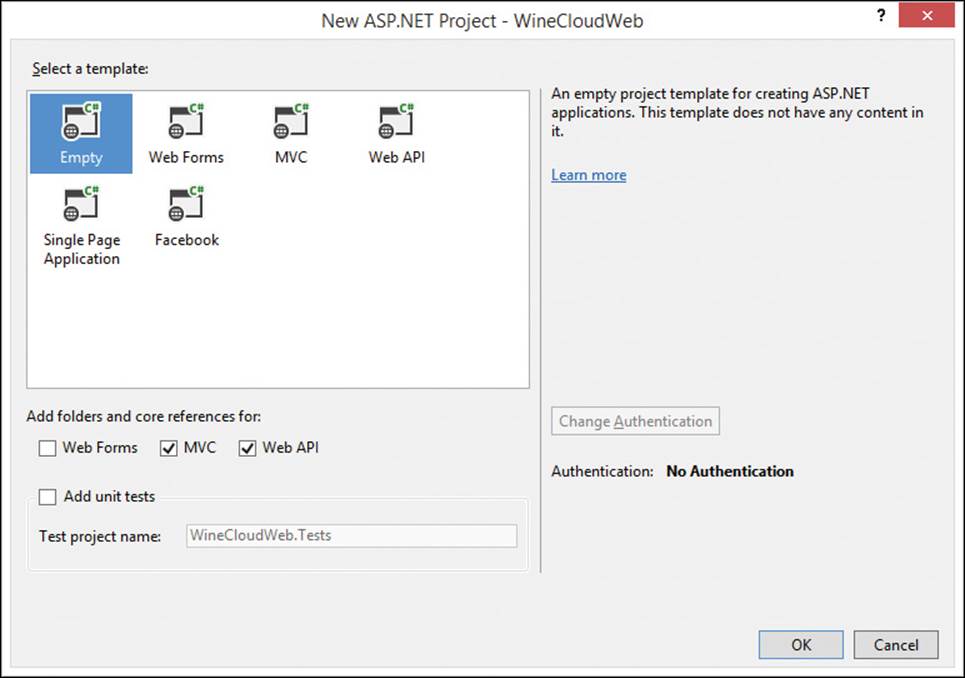
FIGURE 10-21 Selecting core references for MVC and Web API in a new empty ASP.NET web application project
7. Click OK.
By choosing a combination of the Empty template with core MVC and Web API references, you ensure the new project starts out completely fresh (without the extra sample-code baggage injected by the other templates), but still references all the necessary assemblies to support the building of the MVC website now and the Web API services (to support the Windows Phone 8 app) a bit later.
Referencing the data access layer
The “M” in MVC stands for model. In this particular solution, the EDM in the WineCloudModel project serves as the model for the MVC application. This means that the entity classes defined in the data access layer are equally suitable as model classes in the user interface (UI) layer, which is a huge convenience factor when using MVC together with EF because it basically means you don’t need to worry about the model at all. Instead, you can focus more on the “VC” in MVC—that is, on designing views and writing controller classes around the model.
Before the WineCloudWeb MVC application can use the EDM in the WineCloudModel project as the model for the UI, two things need to be done:
![]() The WineCloudWeb project must establish a reference to the WineCloudModel project.
The WineCloudWeb project must establish a reference to the WineCloudModel project.
![]() The entity connection string must be copied from the WineCloudModel project to the WineCloudWeb application.
The entity connection string must be copied from the WineCloudModel project to the WineCloudWeb application.
You will perform both these tasks in the next two procedures. First, to reference the WineCloudModel project from the WineCloudWeb project, follow these steps:
1. Expand the WineCloudWeb project in Solution Explorer to reveal its References node.
2. Right-click the References node, and choose Add Reference to display the Reference Manager dialog.
3. Expand the Solution item on the left, and click the Projects tab beneath Solution. This allows you to select from other projects in the solution to reference.
4. Select the WineCloudModel project check box, as shown in Figure 10-22.
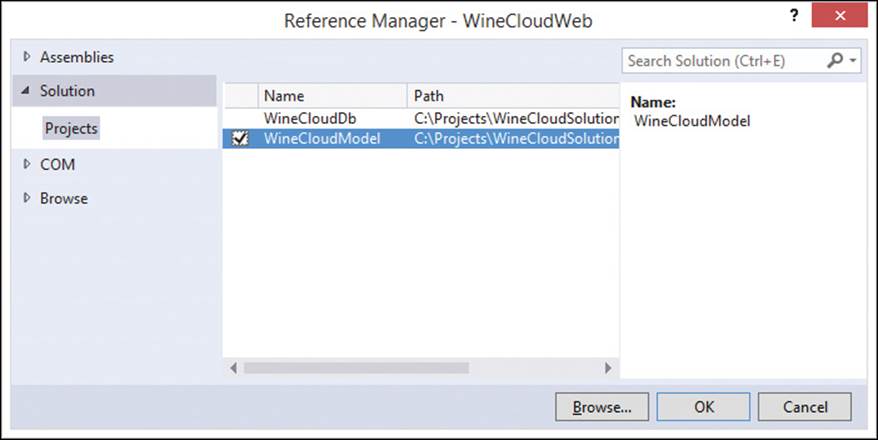
FIGURE 10-22 Adding a reference from the ASP.NET Web application project to the DAL project
5. Click OK.
Even though the EDM and DAL are in the WineCloudDb project, EF always looks in the configuration file of the launching executable application or website at runtime to find the entity connection string, which in turn, contains the actual database connection string. When the EDM is created in a class library project, as is the case here, the connection string is contained in the class library project’s App.Config file. However, the connection string in App.Config will never be found at runtime, because a class library is a DLL file with no entry point (that is, it can never be the launching executable application).
In this solution, WineCloudWeb is the launching application, so EF will look inside its Web.config file for the entity connection string whenever data access is required. If the connection string is not present in Web.config, EF won’t find it at runtime and will throw an exception as a result. So you need to perform a simple copy/paste operation to resolve the situation.
To copy the entity connection string and paste it into Web.config, follow these steps:
1. Copy the connection string from App.Config in the WineCloudModel project by doing the following:
a. Expand the WineCloudModel project in Solution Explorer to reveal its App.Config file.
b. Double-click the App.Config file to open it.
c. Select the entire <connectionStrings> section. This should contain a single connection named WineCloudDbEntities and include the surrounding <connectionStrings> and </connectionStrings> tags.
d. Press Ctrl+C to copy the selected code to the clipboard.
2. Paste the connection string to Web.config in the WineCloudWeb project by doing the following:
a. Expand the WineCloudWeb project in Solution Explorer to reveal its Web.config file.
b. Double-click the Web.config file to open it.
c. Click to position the text cursor just after the <configuration> element and just before the <appSettings> element at the top of the file.
d. Press Ctrl+V to paste the <connectionStrings> section copied to the clipboard.
3. Click FILE and choose Save Web.config (or press Ctrl+S) to save the changes.
The WineCloudWeb project is now all set up to use the EDM defined in the WineCloudModel project as the model in the MVC application.
Creating the user interface
In an MVC application, a user request gets routed to a particular action of a particular controller. The action then returns the appropriate view for the request, which is rendered by the browser. When you are building an MVC application together with Entity Framework, a special feature called scaffolding provides a big head start by generating a controller with actions and corresponding views to facilitate maintenance (select, insert, update, and delete) of any entity in the EDM.
In the next procedure, you will scaffold a new controller with views and actions for the Order entity. As we mentioned earlier, the Home controller is the default controller if one is not specified on the URL. Therefore, you will name the controller HomeController (even thoughOrderController is arguably a better name, given the controller’s purpose). By naming it HomeController, you won’t need to specify anything in the URL to get to the Home controller’s Index action, and the default MVC routing rules won’t need to be modified.
To create the scaffolding for a new Home MVC controller with actions and views for the Order entity, follow these steps:
1. Right-click the WineCloudModel project in Solution Explorer, and choose Build.
![]() Important
Important
This project must be built before it can be used by other projects that reference it. If you don’t first build this project, you will encounter errors when attempting to add the scaffolded views in this procedure, because they are based on the EDM in the WineCloudModel project.
2. Right-click the Controllers folder in the WineCloudWeb project in Solution Explorer, and choose Add | New Scaffolded Item.
3. In the Add Scaffold dialog, select MVC 5 Controller With Views, Using Entity Framework, as shown in Figure 10-23.
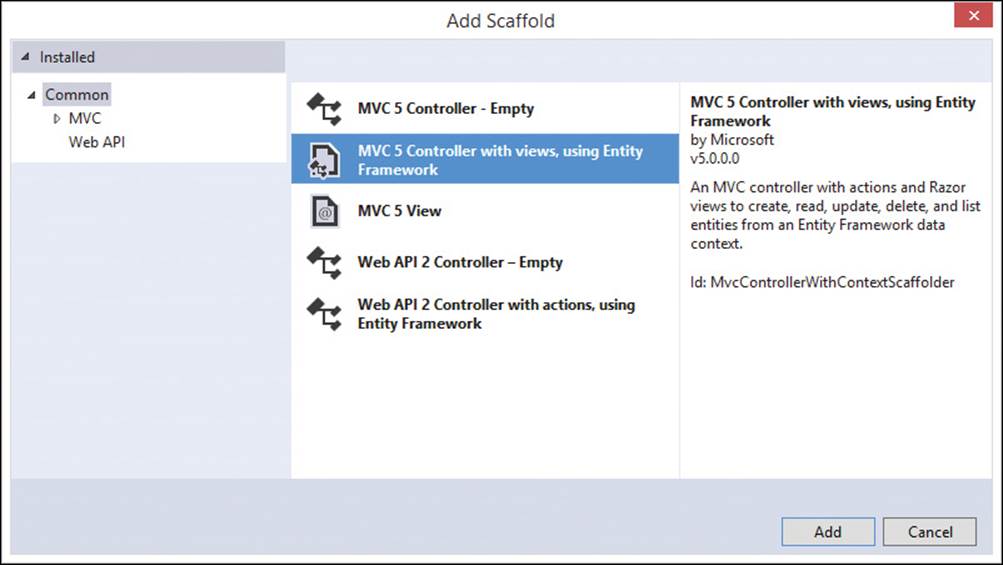
FIGURE 10-23 The Add Scaffold dialog has several choices for creating a new MVC controller class.
4. Click Add.
5. In the Add Controller dialog, do the following:
a. Change Default1 to Home so that the controller name is HomeController.
b. For Model Class, choose Order (WineCloudModel) from the drop-down list.
c. For Data Context Class, choose WineCloudDbEntities (WineCloudModel) from the drop-down list.
d. Deselect the Reference Script Libraries and Use A Layout Page check boxes. The Add Controller dialog should appear similar to Figure 10-24.
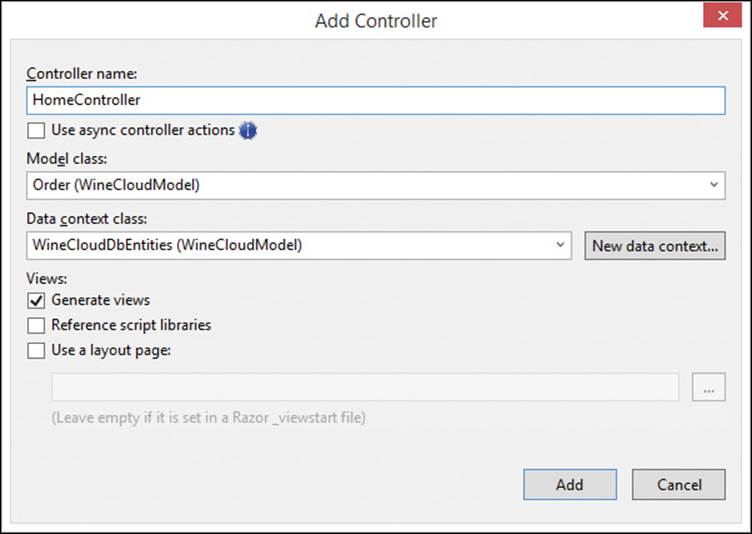
FIGURE 10-24 Adding an MVC 5 controller class, with automatically generated views for EF
e. Click Add.
Look at the WineCloudWeb project in the Solution Explorer, and take a moment to review what Visual Studio just created for you. First open the HomeController.cs class that was added to the Controllers folder. If you examine the code, you will notice several things:
![]() The class inherits from the System.Web.Mvc.Controller base class, which is what makes this an MVC controller class.
The class inherits from the System.Web.Mvc.Controller base class, which is what makes this an MVC controller class.
![]() Several public methods that return an ActionResult object have been created. These are the controller’s action methods. Based on a combination of the URL syntax of an incoming request and the HTTP method used to issue the request (GET or POST), one of these action methods will be called to handle the request.
Several public methods that return an ActionResult object have been created. These are the controller’s action methods. Based on a combination of the URL syntax of an incoming request and the HTTP method used to issue the request (GET or POST), one of these action methods will be called to handle the request.
![]() Each action method is preceded by a comment line that indicates the type of HTTP request (GET or POST) and URL syntax that the action method will handle:
Each action method is preceded by a comment line that indicates the type of HTTP request (GET or POST) and URL syntax that the action method will handle:
• A GET request responds by selecting an order or list of orders.
• A POST request responds by creating a new order, modifying an existing order, confirming the deletion of an existing order, or deleting an existing order.
![]() The action method signatures (their names and parameters) are expressed in a slash-delimited format on the URL, following the controller name.
The action method signatures (their names and parameters) are expressed in a slash-delimited format on the URL, following the controller name.
![]() Each action method returns a view to satisfy the request. The actual view that gets returned is based on the action and the model object returned in the action method’s ActionResult.
Each action method returns a view to satisfy the request. The actual view that gets returned is based on the action and the model object returned in the action method’s ActionResult.
![]() The first action method is named Index, which matches the default action of Index when no action is specified in the URL with a GET request. Because the Home controller is also the default controller, this Index method is the one that will be called if no controller and action is specified in the URL. This method retrieves all the orders in the database, along with each order’s related customer and wine objects. It then returns a view that matches the action name and a model object for the list of orders, which is the (same-named) Index view.
The first action method is named Index, which matches the default action of Index when no action is specified in the URL with a GET request. Because the Home controller is also the default controller, this Index method is the one that will be called if no controller and action is specified in the URL. This method retrieves all the orders in the database, along with each order’s related customer and wine objects. It then returns a view that matches the action name and a model object for the list of orders, which is the (same-named) Index view.
You can (and probably will) modify or extend the controller class to accommodate specific requirements of your application. For example, you can add and remove actions, or you can change their behavior. For this project, the scaffolding has generated all the actions needed to support viewing, adding, modifying, and deleting orders with the website, so the generated code is ready to be used.
Next have a look at the Views folder in Solution Explorer. Expand the Views folder, and notice that it now contains a Home subfolder. This is more of the convention-based approach that MVC takes: things are found by name. Thus, views that serve the actions of a specific controller are contained in a subfolder beneath Views that is named after the controller. Expand the Home subfolder and you will see several .cshtml files. These are the view files generated by the scaffolding, and there is one for each of the Home controller actions. Again, by MVC naming convention, the view files are named after the action method of the controller:
![]() Create.cshtml
Create.cshtml
![]() Delete.cshtml
Delete.cshtml
![]() Details.cshtml
Details.cshtml
![]() Edit.cshtml
Edit.cshtml
![]() Index.cshtml
Index.cshtml
With the model coming from the EDM in the WineCloudModel DAL project, and the views and controllers generated by scaffolding, there is just a small amount of manual work needed to get this MVC website up and running. Specifically, the generated Create and Edit views include HTML input controls for every property of the Order entity, including properties you actually don’t want the user to provide values for. Recall that logic in the InsertOrder (shown in Listing 10-2) and UpdateOrder (shown in Listing 10-3) stored procedures are responsible for setting theAddedOn and UpdatedOn properties to the current date and time, and that they calculate the UnitPrice and Price properties based on the particular wine and quantity being ordered. The scaffolding logic is smart, but it’s not smart enough to understand that you don’t want input fields for these four properties present in the Create and Edit views. So it’s up to you to remove them yourself.
To remove the undesired fields from the Create and Edit views, follow these steps:
1. Expand the Home folder beneath the Views folder of the WineCloudModel project in Solution Explorer.
2. Double-click the Create.cshtml file to open it.
3. Among the <div> elements for each Order property, find and delete the four <div> elements for the UnitPrice, Price, AddedOn, and UpdatedOn properties.
4. Double-click the Edit.cshtml file to open it.
5. Repeat the same edit you just performed for Create.cshtml to delete the <div> elements for UnitPrice, Price, AddedOn, and UpdatedOn.
6. Click the FILE menu, and choose Save All (or press Ctrl+Shift+S).
The MVC website is now ready for testing.
Testing the website locally
Get some satisfaction now, and try out the website. To run the application locally and enter a few test orders, follow these steps:
1. Right-click the WineCloudWeb project in Solution Explorer, and choose Set As Startup Project.
2. Press F5 (or click the Internet Explorer play button in the toolbar) to launch the website in Internet Explorer. As already explained, with no controller or action specified in the URL, this navigates to the Index view of the Home controller by default. This view displays a list of all the orders in the system, which is empty at this time. The view also provides a Create New link, which navigates to the Create view.
3. Click the Create New link to navigate to the Create view of the Home controller. The data entry screen appears as shown in Figure 10-25.
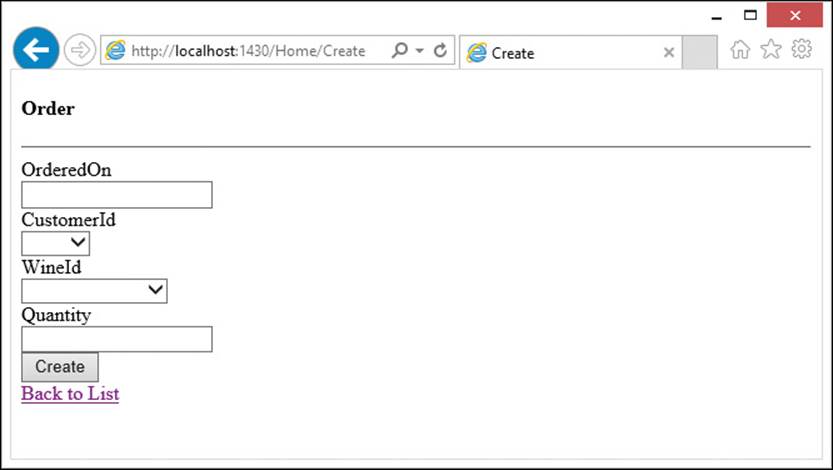
FIGURE 10-25 Placing an order on the website
4. Type any date in the OrderedOn text box.
5. Select any customer from the CustomerId drop-down list.
6. Select Mendoza from the WineId drop-down list.
7. In the Quantity text box, type 2.
8. Click the Create button.
9. After the order is saved to the database, the browser redirects to the Index action of the Home controller. This displays the list of orders, including the order you just placed, as shown in Figure 10-26.
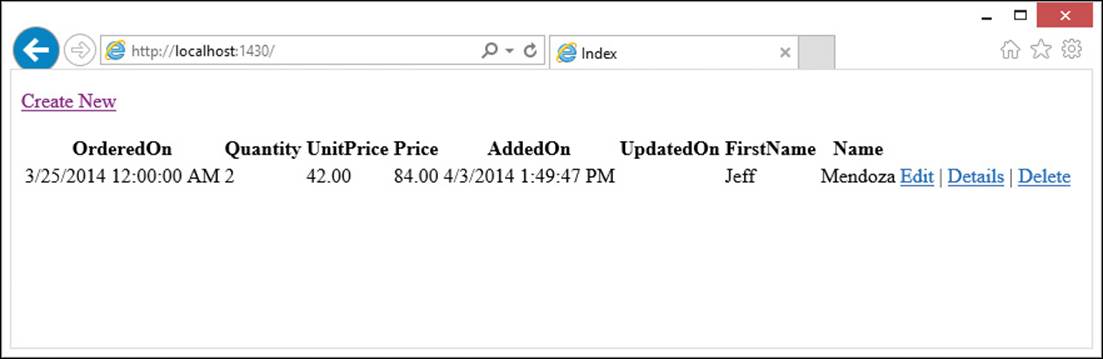
FIGURE 10-26 The confirmation page after placing the order
10. Just to get the feel for it, click Create New to enter another order or two. Also try out the Edit, Details, and Delete links.
11. Close the browser when you’re done testing.
To suit your needs in a production scenario, you surely need to take this project much further. Beyond obvious aesthetics, one of the many things you would still need to do on your own to customize this project for a production application is to implement proper exception handling. If an error occurs in SQL Database when you attempt to save an order, a DbUpdateException gets thrown on the EF call to the SaveChanges method in the HomeController class. Because you haven’t written any exception-handling code, Visual Studio will break on the error. When you press F5 to continue, the browser will display the default (and rather unfriendly) unhandled error page, because you haven’t designed a friendlier unhandled error page customized for your own application. The default error page shows the underlying SqlException that was thrown by SQL Database. If the SqlException was thrown because of a THROW statement in one of the validation checks inside the stored procedures, the error page also shows the message text of the validation rule.
With no exception handling or client-side validations in place, it’s easy to prove that the validations in the stored procedures embedded in the EDM are working as expected. You should simply encounter an unhandled exception if you attempt to enter an invalid order. Again, of course, for a production application, you need to implement a far more robust exception-handling strategy that can distinguish between different types of errors, determine whether an error message is safe or unsafe to display, and might also include additional logging, notification, and navigation logic. You would also implement client-side validations so that the error never gets the chance to occur in the first place. But right here and now, you can just try and “crash” the site to test the validations in the stored procedures.
For example, if you try to create or update an order with a quantity value lower than 1, the quantity validation in either the InsertOrder or UpdateOrder stored procedure will THROW an error. In turn, you will receive an error page as shown in Figure 10-27.
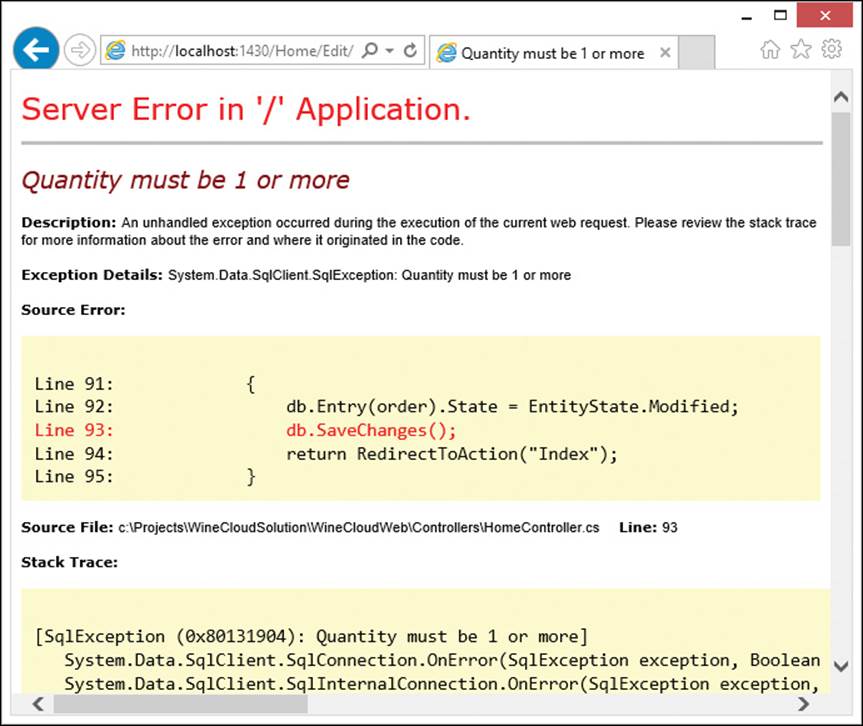
FIGURE 10-27 The unhandled exception page for an error thrown by the stored procedure’s quantity validation
You can also test the logic in the DeleteOrder stored procedure that protects orders less than a year old from being deleted. If you create a new order with an OrderedOn date more than one year old, you will have no problem deleting it. But if you try to delete an order less than a year old, you will receive an error page as shown in Figure 10-28.

FIGURE 10-28 The unhandled exception page for an error thrown by the stored procedure’s delete validation
Up to this point, you have been running the website locally, even though the local website has been interacting with the live Azure SQL Database in the cloud. In the next section, you will deploy the website to Microsoft Azure so that both the website and the database are running in the cloud.
Deploying the website to Microsoft Azure
After testing the website locally, you can deploy it to the cloud very easily. All you do is create a Website on Microsoft Azure using the Microsoft Azure management portal and download the new website’s publish settings. Then, any time and as often you wish, you can publish the project to the website from right inside Visual Studio.
To create the website, follow these steps:
1. Log in to the Microsoft Azure portal at https://manage.windowsazure.com. This brings you to the main portal page showing ALL ITEMS.
2. Click WEB SITES in the vertical navigation pane on the left.
3. Click the NEW button at the bottom of the page.
4. Click QUICK CREATE.
5. In the URL text box, type winecloudweb. This specifies that the website will be accessible at http://winecloudweb.azurewebsites.net.
Note
This must be a globally unique name. Although we released the name winecloudweb prior to publishing this book, there is still a good chance that someone else might be using it at the time you are following along with this procedure. In this case, just append something like your initials or choose some other name that nobody else has chosen.
6. In the REGION drop-down list, choose the same (or nearest) region you selected for the SQL Database. Keeping all the application components hosted in the same region maximizes performance and avoids billing fees. (See Chapter 2, “Configuration and pricing,” for more information on pricing.) Your screen should appear similar to Figure 10-29.
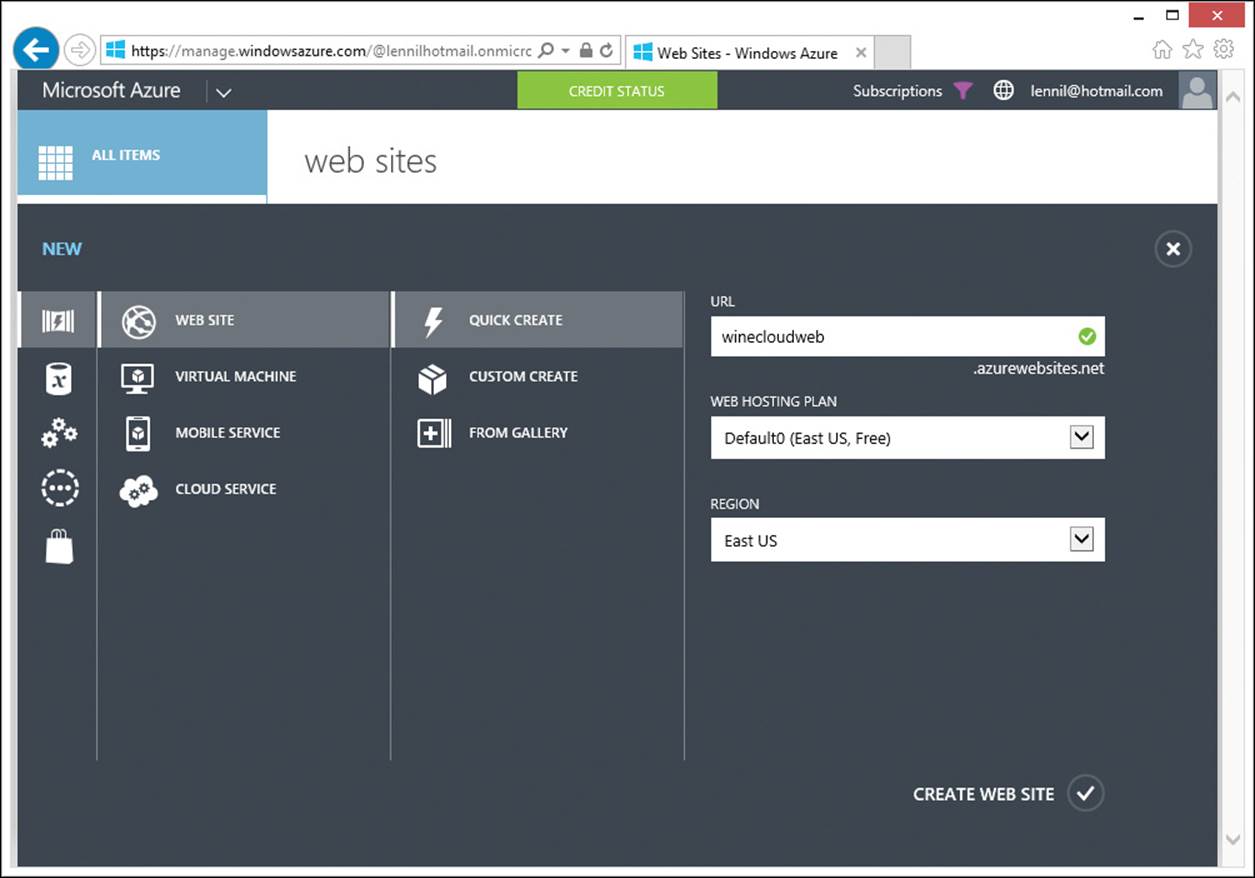
FIGURE 10-29 Creating a new website on Microsoft Azure
7. Click CREATE WEB SITE. It takes just a few moments to create the website, and the portal indicates that the website is running, as shown in Figure 10-30.
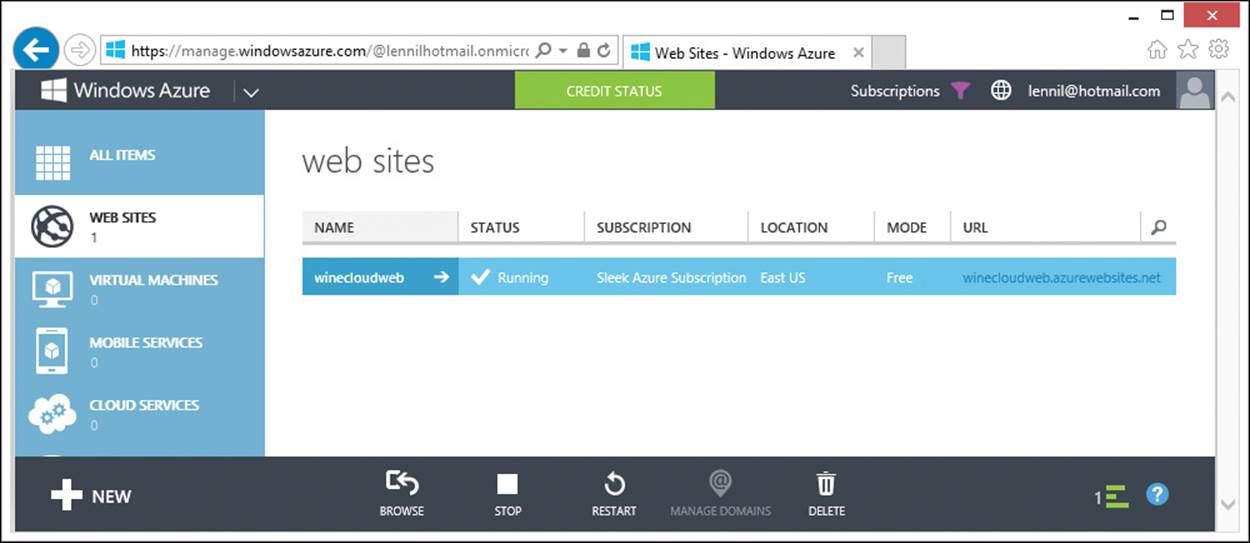
FIGURE 10-30 The Microsoft Azure portal shows that the winecloudweb website is up and running.
8. Click winecloudweb in the NAME column to display the dashboard page for the website.
9. Beneath Publish Your App, click the Download The Publish Profile link.
10. After a brief moment, the publish settings file is generated and you are prompted to open or save it, as shown in Figure 10-31.
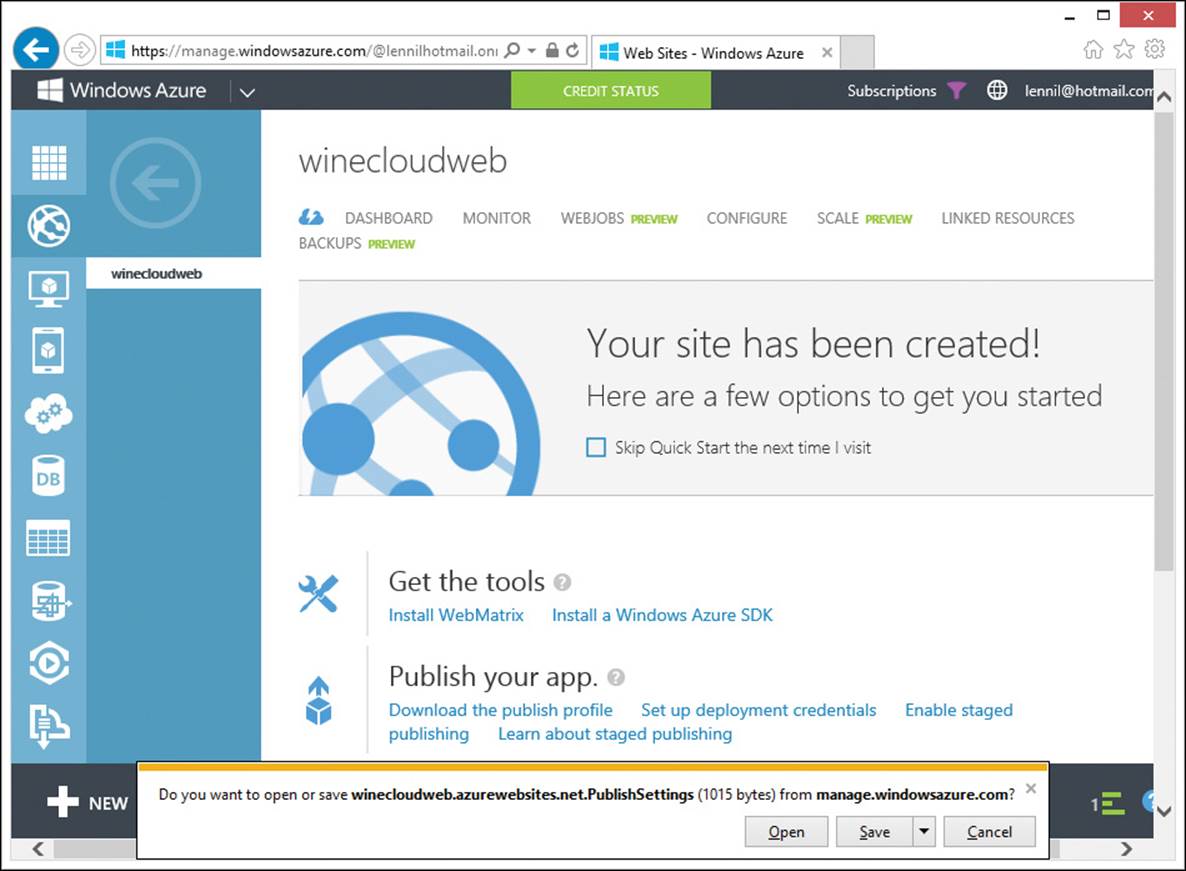
FIGURE 10-31 Generating a publish profile for deploying a Microsoft Azure website
11. Click the drop-down portion of the Save button, and choose Save As.
12. In the Save As dialog, navigate to the top-level folder of the WineCloudWeb project, and click Save.
Using the profile you just downloaded, you can now deploy the project to the website from Visual Studio. To do so, follow these steps:
1. Switch back to Visual Studio.
2. Right-click the WineCloudWeb project in Solution Explorer, and choose Publish to display the Publish Web dialog, as shown in Figure 10-32.

FIGURE 10-32 The Publish Web dialog
3. Click Import.
4. In the Import Publish Profile dialog, click Browse.
5. Navigate to the top-level folder of the WineCloudOrderWeb project where you saved the publish profile in the previous procedure.
6. Double-click the winecloudweb.azurewebsites.net.PublishSettings file.
7. Click OK. This advances to the Connection page, which gets populated automatically with information loaded from the profile, as shown in Figure 10-33.
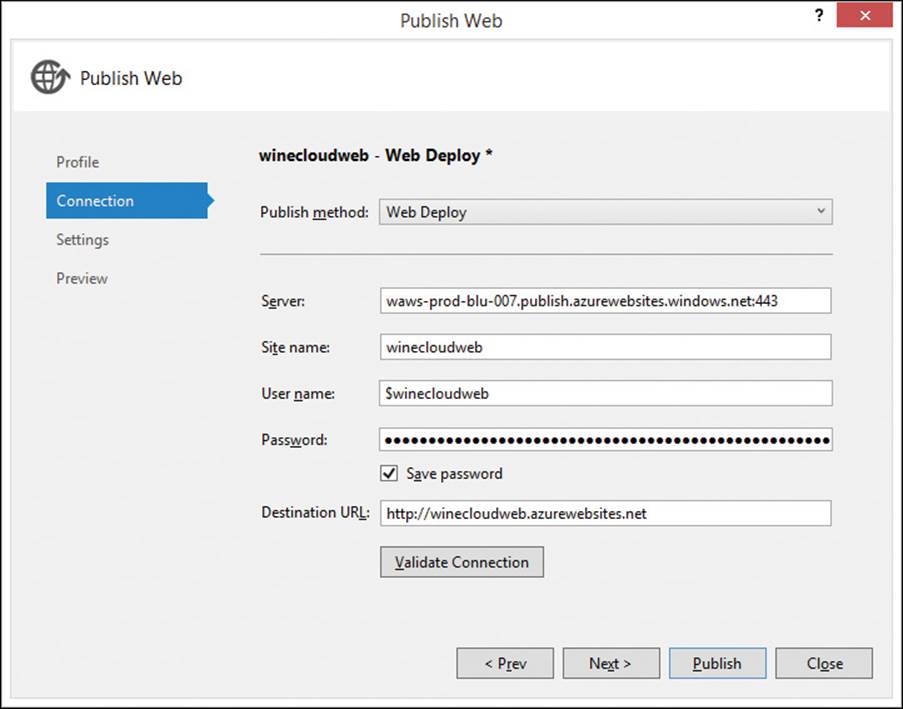
FIGURE 10-33 The Connection page is automatically populated with information from the profile.
8. Click Next to advance to the Settings page.
9. Click Next to advance to the Preview page.
10. Click Publish. Because of all the assemblies used by the project, it can take several minutes to deploy the first time. However, subsequent deployments will typically take only a few seconds.
Everything is now running in the cloud—not just the website, but the DAL, and SQL Database as well. All of that is running on hardware you never need to manage, worry about, touch, or see. Go and enjoy the benefits of having a complete multitiered solution hosted on Microsoft Azure. You can reach it from any browser, anywhere, anytime.
Once deployed, Visual Studio automatically launches the browser to the website. By default, it displays the Index view of the Home controller, which should show the same data you entered while testing the website locally. This is because the local website used the WineCloudDb SQL Database deployed on Microsoft Azure, and that’s the same database that the deployed website is now using.
To run the application from any browser on any machine, just navigate to http://winecloudweb.azurewebsites.net (of course, you need to adjust this URL for the name you supplied when you created the website, which will be different if the name winecloudweb has already been taken). Take some time now and use the website to enter a few more orders, as you did earlier when you were testing the site locally.
Creating the ASP.NET Web API services
With ASP.NET Web API, you can create web services that work very similarly to MVC web applications. Just like MVC, a Web API service has a controller class with actions, and a flexible routing engine that defines the rules and defaults to derive the specific controller action that is invoked in response to a URL request over HTTP.
Web API implements REST services, which are typically easier to create and more lightweight than other types of services, such as SOAP-based services using WCF. (See the “So many choices” sidebar at the beginning of this chapter.) To facilitate data access over HTTP, REST services are mapped to standard HTTP request verbs such that a GET request retrieves data, a POST request inserts data, a PUT request updates data, and a DELETE request deletes data. The URL of the request is parsed by the Web API runtime to determine which controller action to invoke.
For example, a GET request with a URL that ends with /api/Wine responds by returning all the wines in the database, while the same GET request with a URL that ends with /api/Wine/5 returns only a single wine with the WineId value of 5. The other HTTP verbs package additional information for the request in the HTTP request header. This is information that is either impractical or impossible to encode in the URL. For example, a PUT request with a URL that ends with /api/Wine/3 means that a single wine with the WineId value of 3 is to be updated, while the actual data for the updated wine (the updated name, category, year, and price) is embedded into the HTTP request header as a simple dictionary of key value pairs.
Data is returned by Web API services as a string in JavaScript Object Notation (JSON) format. Recall that when you create the project, you also chose to include the core assemblies for Web API. (See Figure 10-21.) One of those assemblies is Newtonsoft.Json, which is a popular library for serializing objects into JSON strings and deserializing JSON strings back into object instances. For a GET request, the Web API calls into this library to serialize objects into a JSON-formatted string to return to the client. The client, in turn, can also call into this library to deserialize the JSON-formatted string received from the GET request into a live object on the client.
Like MVC website applications, Web API services are defined inside an ASP.NET Web Application project, and you can certainly create another ASP.NET Web Application project to be used only for Web API services. For simplicity, however, you will add the Web API services to the same ASP.NET Web Application project you just created for the MVC website. The project already includes the core assemblies for Web API (as you can see in Figure 10-21), so it is all ready to host Web API services in addition to the MVC website; all you need to do is add a Web API controller class to the project.
Visual Studio provides a scaffolding feature similar to the one you used earlier to generate the MVC controller with actions and views. In the case of a new Web API controller, the scaffolding fully supports CRUD operations against any entity in the EDM. As you will see, the default routing engine rules maintain separation between MVC and Web API controllers based on the presence or absence of /api in the URL. Requests without /api in the URL are directed to MVC controllers, and those with /api in the URL are routed to Web API controllers.
Adding a Web API controller
In the next procedure, you will scaffold a new controller with CRUD actions for the Wine entity. Then, in the final section of the chapter, you will consume this controller’s Web API services from a Windows Phone 8 app.
Note
If you experience déjà vu as you create and test the Web API controller, it might be because you recently completed Chapter 8. You created and tested the very same Wine Web API controller in Chapter 8 while learning how to handle transient SQL Database errors with Entity Framework.
To create the scaffolding for a new Wine Web API controller with CRUD actions for the Wine entity, follow these steps:
1. Right-click the Controllers folder in the WineCloudWeb project in Solution Explorer, and choose Add | New Scaffolded Item.
2. In the Add Scaffold dialog, select Web API 2 Controller With Actions, Using Entity Framework, as shown in Figure 10-34.
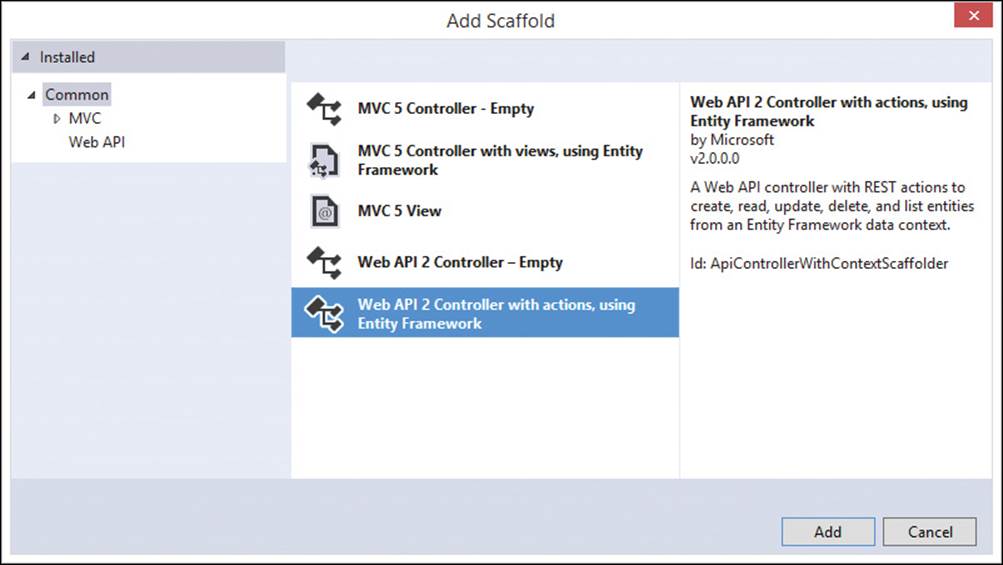
FIGURE 10-34 The Add Scaffold dialog has several choices for creating a new Web API controller class.
3. Click Add.
4. In the Add Controller dialog, do the following:
a. Change Default1 to Wine so that the controller name is WineController.
b. For Model Class, choose Wine (WineCloudModel) from the drop-down list.
c. For Data Context Class, choose WineCloudDbEntities (WineCloudModel) from the drop-down list. The Add Controller dialog should appear similar to Figure 10-35.
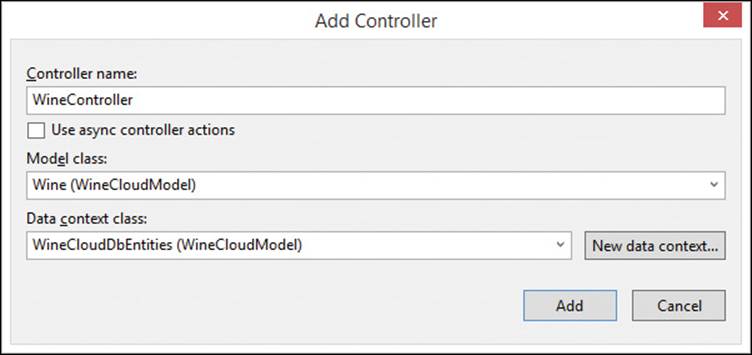
FIGURE 10-35 Adding a Web API 2 controller class, with automatically generated actions for EF
d. Click Add.
Now take a look at what has been created for you. Open the WineController.cs class, and examine the code that was generated. Notice the following:
![]() The class inherits from System.Web.Http.ApiController, which is what makes this a Web API controller class.
The class inherits from System.Web.Http.ApiController, which is what makes this a Web API controller class.
![]() Several public action methods have been created. Based on the URL of an incoming request, and the type of the incoming request, one of these action methods will be called.
Several public action methods have been created. Based on the URL of an incoming request, and the type of the incoming request, one of these action methods will be called.
![]() Each action method is preceded by a comment line that indicates the type of HTTP request and URL syntax that the action method will handle:
Each action method is preceded by a comment line that indicates the type of HTTP request and URL syntax that the action method will handle:
• A GET request responds by selecting a wine or list of wines.
• A POST request responds by inserting a new wine.
• A PUT request responds by updating an existing wine.
• A DELETE request responds by deleting an existing wine.
![]() The action method signatures (their names and parameters) are expressed in a slash-delimited format on the URL, following the controller name.
The action method signatures (their names and parameters) are expressed in a slash-delimited format on the URL, following the controller name.
![]() As indicated in the comment line above each method, the Web API routing engine prepends /api to the action name in the URL. As we mentioned, this ensures isolation between HTTP requests for an MVC controller (without /api in the URL) and HTTP requests for a Web API control (with /api present in the URL).
As indicated in the comment line above each method, the Web API routing engine prepends /api to the action name in the URL. As we mentioned, this ensures isolation between HTTP requests for an MVC controller (without /api in the URL) and HTTP requests for a Web API control (with /api present in the URL).
There is one small additional step you need to take before you can start using this new Web API controller. When the JSON result is received from the service, the JSON serializer attempts to serialize all related entities that it discovers, which can result in circular references that cause errors. To avoid this problem, the JSON serializer must be told to ignore circular references.
If you followed along with the procedures in Chapter 8, you might be wondering why this extra measure must be taken, because it wasn’t necessary in that chapter when you created a Wine controller just as you did now. The answer is the Order table, which is present in this chapter’sWineCloudDb database but was not present in the database for Chapter 8. With the Order table present and related to both the Wine and Customer tables, the possibility exists for Wine A to reference Order B, which references Customer C, which then in turn references Wine A as Customer C’s favorite wine. Following the references from that point results in an infinite loop that is short-circuited by telling the JSON serializer not to attempt serializing the same object instance more than once.
To instruct the JSON serializer that circular references should be ignored, follow these steps:
1. Expand the App_Start folder of the WineCloudWeb project in Solution Explorer to reveal the WebApiConfig.cs file.
2. Double-click the WebApiConfig.cs file to open it.
3. Add the following line of code to the bottom of the Register method:
config.Formatters.JsonFormatter.SerializerSettings.ReferenceLoopHandling =
Newtonsoft.Json.ReferenceLoopHandling.Ignore;
4. Click the FILE menu, and choose Save App_Start\WebApiConfig.cs (or press Ctrl+S).
The Web API controller is now ready for testing.
Testing the Web API
To test out a few Web API service calls, follow these steps:
1. Press F5 (or click the Internet Explorer play button in the toolbar) to launch the website in Internet Explorer. As usual, this displays the Index view of the Home controller.
2. Append the URL in the browser’s address bar with api/Wine, and press Enter. This executes the GetWines action method in the WineController class and responds with the list of wines from the WineCloudDb database. Internet Explorer’s default behavior asks if you would like to save or open the results from the Web API call, as shown in Figure 10-36.
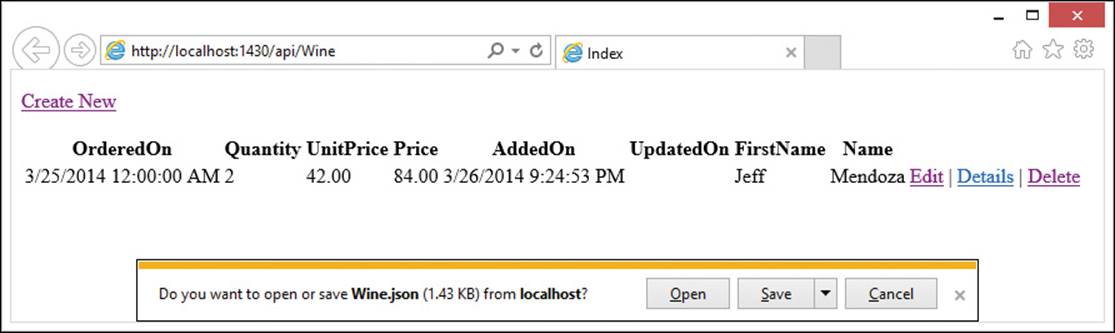
FIGURE 10-36 The browser prompts to open or save the Wine.json file returned by the Wine API
3. Click Open to view the list of wines returned in the JSON results, as shown in Figure 10-37. (If prompted for how to open this type of file, click More Options and choose Notepad.)
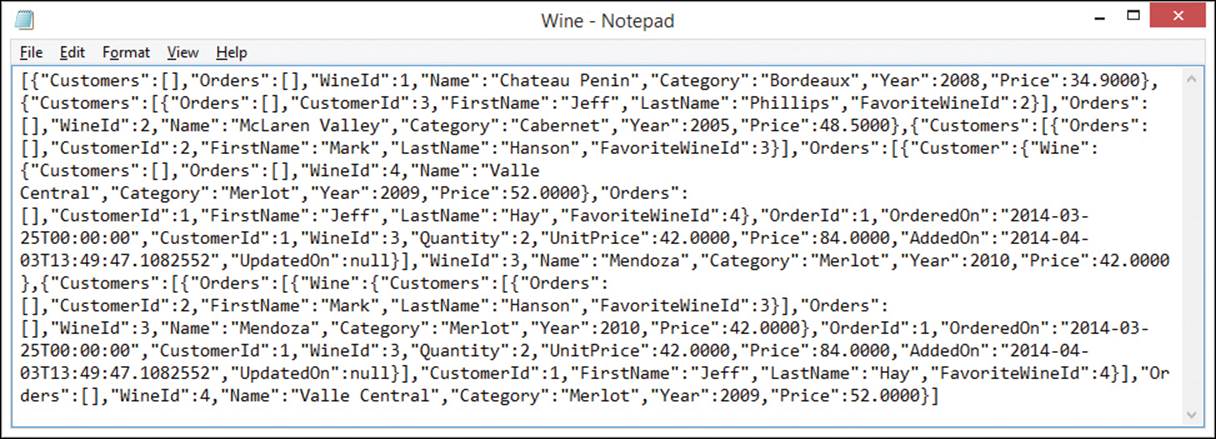
FIGURE 10-37 Viewing the Wine.json file returned by the Wine API in Notepad
4. Back in the browser, append the URL in the browser’s address bar with api/Wine/2, and press Enter. This executes the GetWine method on the WineController and responds with the record for WineId 2.
5. Click Open to view the JSON response in Notepad. This time, the response includes just the single requested wine.
At this point, you are running the Web API services locally, even though the local services are interacting with the live Azure SQL Database in the cloud. In the next section, you will deploy WineCloudWeb again so that the MVC website, Web API services, and the database are all running in the cloud.
Deploying the Web API
With the new Web API controller class added to the project and tested, you are ready to deploy the project to Microsoft Azure once again. Doing so will make the Web API accessible to the Windows Phone 8 app that you will be building next. This is the same procedure you already performed earlier in this chapter when you initially deployed the MVC website. But because the project has already been previously deployed, this deployment is relatively much quicker than it was the first time.
To deploy the updated project with the new Web API controller to Microsoft Azure, follow these steps:
1. Right-click the WineCloudWeb project in Solution Explorer, and choose Publish to display the Publish Web dialog. Because you already deployed this project earlier, the dialog opens directly to the Preview page, ready to publish using the previous settings, as shown in Figure 10-38.
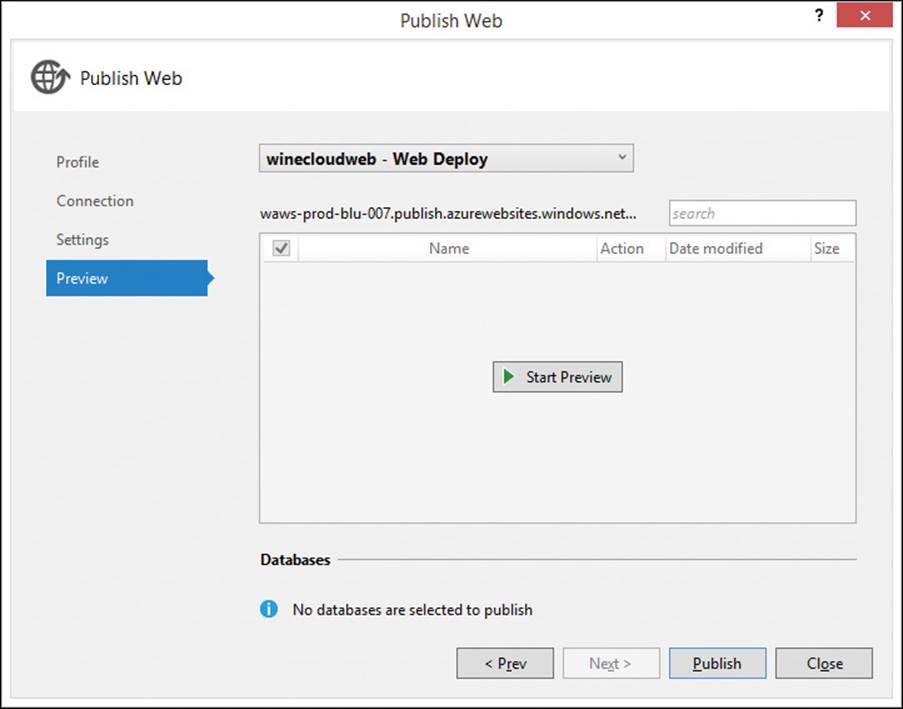
FIGURE 10-38 The Publish Web dialog
2. Click Publish. Within just a few moments, the project is deployed, and Visual Studio opens a new browser window to the site on Microsoft Azure.
3. Verify that the deployed Web API services work properly by testing them just as you did locally. Simply tweak the URL in the browser’s address bar with different /api/Wine requests, and ensure the correct JSON results are returned in response.
Everything is now in place to support the Windows Phone 8 app, which will call into the Web API services you just created.
Creating the Windows Phone application
The next and last piece of this solution is to build a native Windows Phone 8 app. This app will consume the Web API services you created in the previous section to provide a wine catalog that allows the user to view, create, edit, and delete wines in the database.
Installing the Windows Phone SDK 8.0
The first step before building any Windows Phone 8 app is to install the Windows Phone SDK, if you haven’t done so already.
The Windows Phone SDK contains everything you need to build Windows Phone 8 apps, including a number of Visual Studio project templates designed specifically for a Windows Phone device. The programming model is essentially Silverlight, meaning that if you have any Silverlight (or Windows Presentation Foundation [WPF]) experience, you already possess the essential skills needed to quickly build useful Windows Phone apps. (If not, worry not; we’ll explain all the important parts of the code.) The SDK also provides a phone emulator that integrates with Visual Studio to provide you with the standard debugging experience, allowing you to set breakpoints, watch values, and single-step through code running on the phone.
With the release of Visual Studio 2013, Microsoft made an important change in the way it ships this SDK. Previously, the SDK was not included with Visual Studio, and a separate download was always required. This remains true with earlier Visual Studio versions, but now Visual Studio 2013 includes the SDK. However, as shown in Figure 10-39, the option to install the SDK is deselected by default. So unless you have overridden this default at setup time by selecting the Windows Phone 8.0 SDK check box, you will need to re-run setup now and select that check box. This means you will need access to the original Visual Studio 2013 distribution media. You will also need to close Visual Studio before installing the SDK. When you re-run setup, you will be prompted with the choices Modify, Repair, and Uninstall. Choose Modify, select the Windows Phone 8.0 SDK check box, click UPDATE, and then click Yes when the User Account Control dialog appears. Be prepared to wait for a while; the SDK has a lengthy installation process.
FIGURE 10-39 By default, the Visual Studio 2013 Setup dialog does not select the Windows Phone 8.0 SDK
![]() Important
Important
If you are running Visual Studio 2013, it will not be sufficient to find and download the SDK from Microsoft’s website. Doing so will install the SDK, but only for Visual Studio 2012. If you don’t have Visual Studio 2012, the SDK will include the Visual Studio 2012 shell with project templates for Windows Phone, but you still won’t have Windows Phone templates in Visual Studio 2013. The only way to add the SDK to Visual Studio 2013 is to re-run setup and select the check box.
Creating the Windows Phone Project
With the SDK installed, you’re ready to create the Windows Phone project. As we mentioned already, this is essentially a Silverlight application designed to run on the phone.
To create the Windows Phone project, follow these steps:
1. If you closed Visual Studio 2013 to install the Windows Phone 8.0 SDK, restart it now and reopen WineCloudSolution.
2. Right-click WineCloudSolution in Solution Explorer, and choose Add | New Project to display the Add New Project dialog.
3. On the left of the New Project dialog, expand Installed, Visual C#, and choose Windows Phone.
4. Choose the Windows Phone App template, which is typically selected by default.
5. Name the project WineCloudPhone, and click OK, as shown in Figure 10-40.
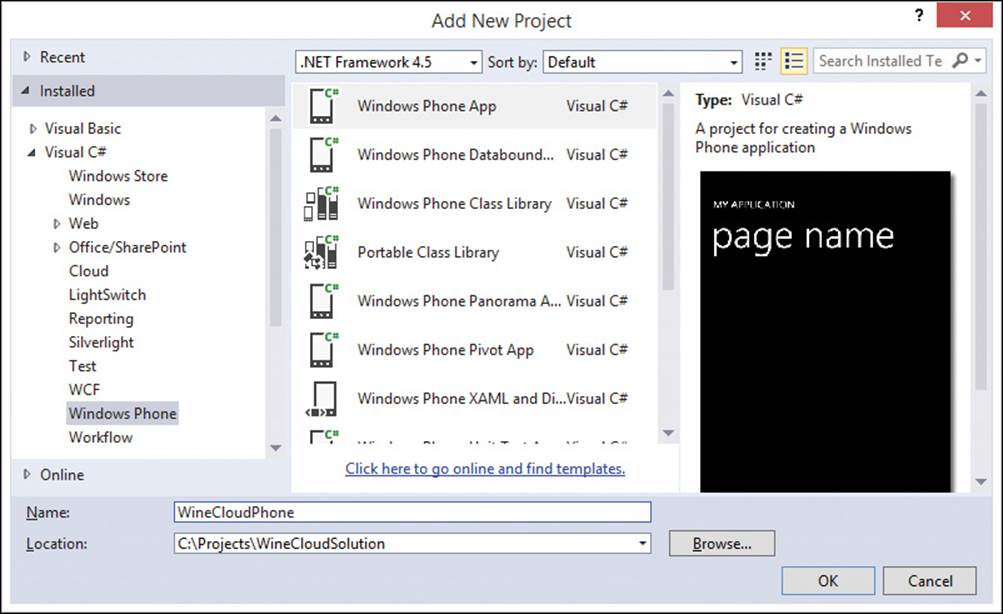
FIGURE 10-40 Creating a new Windows Phone application project
6. Click OK.
Visual Studio creates the project, and you’re ready to start building the phone app.
Adding Json.NET
As we began explaining, this phone app will call the Web API services you recently created in the WineCloudWeb ASP.NET Web Application project. Those services will return Wine entities on the server as JSON-formatted strings to the client, so you will want to be able to access Json.NET (the Newtonsoft.Json library) on the Windows Phone. This will let you easily deserialize the JSON responses received from the service into Wine object instances on the phone.
There is a special version of Json.NET available specifically for the Windows Phone. It can be downloaded and referenced by the phone app very easily by using the NuGet Package Manager in Visual Studio. To download and reference Json.NET, follow these steps:
1. Right-click the WineCloudPhone project in Solution Explorer, and choose Manage NuGet Packages.
2. On the left, expand the Online tab and select nuget.org.
3. In the Search Online text box in the upper-right, type json.net (as shown in Figure 10-41) and press Enter.
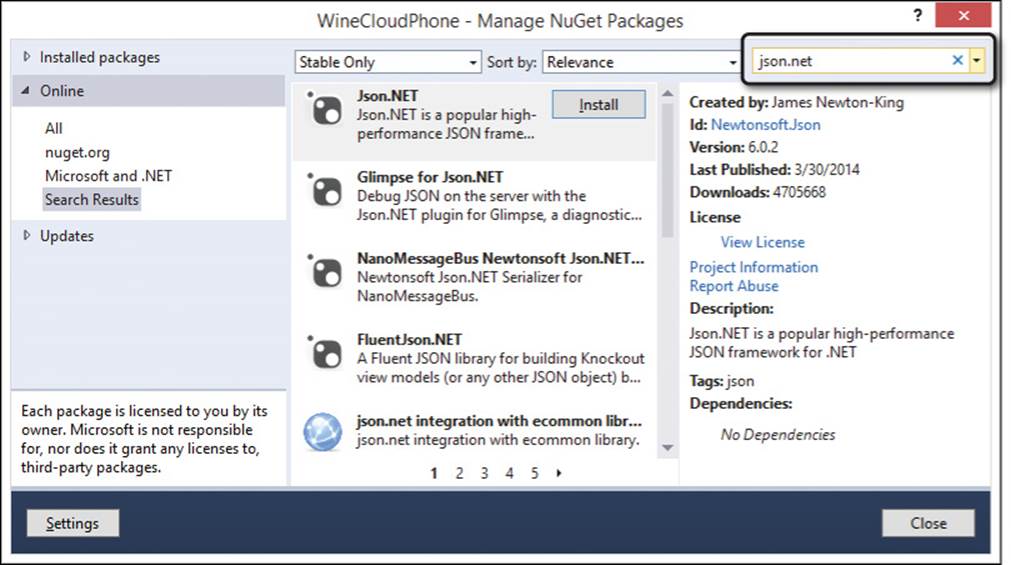
FIGURE 10-41 Downloading and adding a reference to Json.NET using the NuGet Package Manager
4. Click the Install button for Json.NET.
5. After Json.NET is installed, click Close to close the Manage NuGet Packages dialog.
With the Json.NET reference in place, it will be easy to deserialize JSON responses from the Web API service in the phone app.
Creating the App’s main page
The Windows Phone SDK provides multiple templates for creating Windows Phone apps. Among them is the Windows Phone Databound App template, which starts your new project off with all the elements in place to support the Model-View-ViewModel (MVVM) pattern. MVVM has similarities with MVC, where one of its differences is that it is stateful (MVVM retains state between requests) rather than stateless (MVC does not retain state). MVVM certainly has its benefits, but this project will use the basic Windows Phone App template. This is a minimal template that contains nothing more than a basic main page that you will customize for the wine catalog.
The main page will have two panels, only one of which shall be made visible at any time, programmatically. The app will present the complete list of wines in the first panel and enable data entry in controls laid out in the second panel.
Windows Phone apps have two files per page: Extensible Application Markup Language (XAML), and .NET (C# or Visual Basic) code-behind. As you will see, XAML has powerful binding capabilities. XAML binding features greatly reduce the amount of code-behind you need to write. This is particularly significant, because there are no scaffolding features in Visual Studio to build out the XAML as there is to build out the HTML views in an MVC application. Listing 10-5 shows the Wine model class, Listing 10-6 shows the XAML markup for the main page of the wine phone app, and Listing 10-7 shows the code-behind for the main page.
LISTING 10-5 The Wine.cs Windows Phone app model class
namespace WineCloudPhone
{
public class Wine
{
public int WineId { get; set; }
public string Name { get; set; }
public string Category { get; set; }
public int? Year { get; set; }
public decimal Price { get; set; }
}
}
LISTING 10-6 The MainPage.xaml Windows Phone app markup
<phone:PhoneApplicationPage
x:Class="WineCloudPhone.MainPage"
xmlns="http://schemas.microsoft.com/winfx/2006/xaml/presentation"
xmlns:x="http://schemas.microsoft.com/winfx/2006/xaml"
xmlns:phone="clr-namespace:Microsoft.Phone.Controls;assembly=Microsoft.Phone"
xmlns:shell="clr-namespace:Microsoft.Phone.Shell;assembly=Microsoft.Phone"
xmlns:d="http://schemas.microsoft.com/expression/blend/2008"
xmlns:mc="http://schemas.openxmlformats.org/markup-compatibility/2006"
mc:Ignorable="d"
FontFamily="{StaticResource PhoneFontFamilyNormal}"
FontSize="{StaticResource PhoneFontSizeNormal}"
Foreground="{StaticResource PhoneForegroundBrush}"
SupportedOrientations="Portrait" Orientation="Portrait"
shell:SystemTray.IsVisible="True"
Loaded="PhoneApplicationPage_Loaded">
<Grid x:Name="LayoutRoot" Background="Transparent">
<Grid.RowDefinitions>
<RowDefinition Height="Auto"/>
<RowDefinition Height="*"/>
</Grid.RowDefinitions>
<StackPanel x:Name="TitlePanel" Grid.Row="0">
<TextBlock Text="WINE CLOUD CATALOG" Style="{StaticResource PhoneTextNormalStyle}" />
<TextBlock Text="wines" Style="{StaticResource PhoneTextTitle1Style}" />
</StackPanel>
<Grid x:Name="ContentPanel" Grid.Row="1">
<StackPanel x:Name="WineListPanel">
<ListBox Height="500" x:Name="WineListBox" ItemsSource="{Binding}"
SelectionChanged="WineListBox_SelectionChanged">
<ListBox.ItemTemplate>
<DataTemplate>
<StackPanel>
<TextBlock Text="{Binding Path=Name}" TextWrapping="NoWrap"
Style="{StaticResource PhoneTextExtraLargeStyle}"/>
<TextBlock Text="{Binding Path=Year}" TextWrapping="NoWrap"
Style="{StaticResource PhoneTextSubtleStyle}"/>
<TextBlock Text="{Binding Path=Category}" TextWrapping="NoWrap"
Style="{StaticResource PhoneTextSubtleStyle}"/>
</StackPanel>
</DataTemplate>
</ListBox.ItemTemplate>
</ListBox>
<Button x:Name="NewWineButton" Content="New" Width="120"
Click="NewWineButton_Click" />
</StackPanel>
<StackPanel x:Name="WineDetailPanel" Visibility="Collapsed">
<TextBlock Text="NAME" />
<TextBox Text="{Binding Path=Name, Mode=TwoWay}" />
<TextBlock Text="YEAR" />
<TextBox Text="{Binding Path=Year, Mode=TwoWay}" />
<TextBlock Text="CATEGORY" />
<TextBox Text="{Binding Path=Category, Mode=TwoWay}" />
<TextBlock Text="PRICE" />
<TextBox Text="{Binding Path=Price, Mode=TwoWay}" />
<StackPanel Orientation="Horizontal" HorizontalAlignment="Center">
<Button x:Name="DeleteButton" Content="Delete" Width="120"
Click="DeleteButton_Click" />
<Button x:Name="SaveButton" Content="Save" Width="120"
Click="SaveButton_Click" />
<Button x:Name="CancelButton" Content="Cancel" Width="120"
Click="CancelButton_Click" />
</StackPanel>
</StackPanel>
</Grid>
</Grid>
</phone:PhoneApplicationPage>
LISTING 10-7 The MainPage.xaml.cs Windows Phone app code-behind
using Microsoft.Phone.Controls;
using Newtonsoft.Json;
using System;
using System.Net;
using System.Windows;
using System.Windows.Controls;
namespace WineCloudPhone
{
public partial class MainPage : PhoneApplicationPage
{
private const string WebApiUrl = @"http://winecloudweb.azurewebsites.net/api/Wine";
private Wine _wine;
public MainPage()
{
InitializeComponent();
}
private void PhoneApplicationPage_Loaded(object sender, RoutedEventArgs e)
{
LoadWines();
}
private void LoadWines()
{
var wc = new WebClient();
wc.Headers["Accept"] = "application/json";
wc.DownloadStringCompleted += new DownloadStringCompletedEventHandler(WinesLoaded);
// GET api/Wine
wc.DownloadStringAsync(new Uri(WebApiUrl));
}
private void WinesLoaded(object sender, DownloadStringCompletedEventArgs e)
{
if (e.Error != null)
{
MessageBox.Show("Error: " + e.Error.Message);
return;
}
var wines = JsonConvert.DeserializeObject<Wine[]>(e.Result);
WineListPanel.Visibility = Visibility.Visible;
WineDetailPanel.Visibility = Visibility.Collapsed;
LayoutRoot.DataContext = wines;
}
private void NewWineButton_Click(object sender, RoutedEventArgs e)
{
_wine = new Wine()
{
Name = "New Wine",
Year = 2004,
Category = "New Category",
Price = 19.99M
};
DeleteButton.Visibility = Visibility.Collapsed;
WineListPanel.Visibility = Visibility.Collapsed;
WineDetailPanel.Visibility = Visibility.Visible;
LayoutRoot.DataContext = _wine;
}
private void WineListBox_SelectionChanged(object sender, SelectionChangedEventArgs e)
{
var addedItems = e.AddedItems as object[];
if ((addedItems == null) || (addedItems.Length != 1))
{
return;
}
_wine = (Wine)e.AddedItems[0];
DeleteButton.Visibility = Visibility.Visible;
WineListPanel.Visibility = Visibility.Collapsed;
WineDetailPanel.Visibility = Visibility.Visible;
LayoutRoot.DataContext = _wine;
}
private void SaveButton_Click(object sender, RoutedEventArgs e)
{
var wc = new WebClient();
wc.Headers[HttpRequestHeader.ContentType] = "application/x-www-form-urlencoded";
wc.UploadStringCompleted += WinesUpdated;
var wineInfo = string.Format("Name={0}&Category={1}&Year={2}&Price={3}",
HttpUtility.UrlEncode(_wine.Name),
HttpUtility.UrlEncode(_wine.Category),
_wine.Year,
_wine.Price);
if (_wine.WineId == 0)
{
// POST api/Wine
wc.UploadStringAsync(new Uri(WebApiUrl), "POST", wineInfo);
}
else
{
// PUT api/Wine/5
var webApiUrl = string.Format("{0}/{1}", WebApiUrl, _wine.WineId);
wineInfo = string.Format("WineId={0}&{1}", _wine.WineId, wineInfo);
wc.UploadStringAsync(new Uri(webApiUrl), "PUT", wineInfo);
}
}
private void DeleteButton_Click(object sender, RoutedEventArgs e)
{
var confirm =
MessageBox.Show("Delete this wine?", "Confirm", MessageBoxButton.OKCancel);
if (confirm != MessageBoxResult.OK)
{
return;
}
// DELETE api/Wine/5
var wc = new WebClient();
wc.Headers[HttpRequestHeader.ContentType] = "application/x-www-form-urlencoded";
wc.UploadStringCompleted += WinesUpdated;
var webApiUrl = string.Format("{0}/{1}", WebApiUrl, _wine.WineId);
wc.UploadStringAsync(new Uri(webApiUrl), "DELETE", _wine.WineId.ToString());
}
private void WinesUpdated(object sender, UploadStringCompletedEventArgs e)
{
if (e.Error != null)
{
MessageBox.Show("Error: " + e.Error.Message);
return;
}
LoadWines();
}
private void CancelButton_Click(object sender, RoutedEventArgs e)
{
this.LoadWines();
}
}
}
We’ll explain all of this code in just a moment, right after you implement it in the project. To do so, follow these steps:
1. Right-click the WineCloudPhone project in Solution Explorer, and choose Add | Class.
2. Name the new class Wine.cs, and click Add.
3. Replace the template code with the code shown earlier in Listing 10-5 (or paste it in from the listing file downloaded from the book’s companion website).
4. Right-click the MainPage.xaml file in Solution Explorer (already created in the WineCloudPhone project), and choose View Designer. This opens a split view of the main page, with a design view on the left and a XAML code editor on the right.
5. In the XAML code editor, replace the template code generated automatically by Visual Studio with the code shown earlier in Listing 10-6 (or paste it in from the listing file downloaded from the book’s companion website).
6. Right-click the MainPage.xaml file in Solution Explorer, and choose View Code.
7. Replace the template code with the code shown earlier in Listing 10-7 (or paste it in from the listing file downloaded from the book’s companion website).
8. Edit the URL in the WebApiUrl string constant at the top of Listing 10-7 with the name you used for the Microsoft Azure website, assuming the name winecloudweb was not available to you.
9. Click the FILE menu, and choose Save All, or press Ctrl+Shift+S.
First we’ll explain the Wine model class (Listing 10-5). This class reflects the Wine entity in the EDM in the DAL. Web API services are very lightweight, and consequently, they do not advertise their schemas with metadata as WCF services can. Thus, there is no way to automatically generate client-side proxy classes that reflect the service-side entities, which means you manually need to re-create the desired entity classes (the Wine class, in this case) to represent a model in the phone app.
Now shift focus to the main page itself. The key points to note about the XAML markup in Listing 10-6 are the two StackPanel objects, named WineListPanel and WineDetailPanel. As mentioned, only one of these panels at a time will be made visible by the code-behind. In the markup,WineListPanel has a ListBox that displays all the wines, and embedded within the ListBox is a DataTemplate that defines how each wine in the list should be rendered. The template has three TextBlock elements, which render three parts of each wine. The Text property in each TextBlock is set to a Binding with a Path that points to a specific property of the Wine class: Name, Year, and Category. Also note that the Style of the first TextBlock is set to PhoneTextExtraLargeStyle, while the other two are set to PhoneTextSubtleStyle. This means that the wine name will appear nice and large in the list, with the year and category beneath in a smaller font size.
The list box also has a SelectionChanged event handler that fires in the C# code-behind whenever the user selects a wine from the list (that is, when the user taps one). When the code-behind responds, WineListPanel gets hidden and WineDetailsPanel gets made visible so that the user can edit the selected wine. There is also an Add button beneath the text box that the user can tap to add a new wine. This also toggles the panel, but it binds the UI to a new Wine object, rather than an existing Wine object from the list.
The second panel, WineDetailsPanel, contains four TextBox controls for editing the information of a new or existing wine. Again, the controls have a binding path to a specific Wine property, but this time, Mode=TwoWay is also specified. This small but critical detail is all that’s needed to implement bi-directional binding—properties of the bound object appear in the text boxes, and changes made by the user in those text boxes are pushed back into the bound object. Beneath the text boxes is a Save button to push the changes through the Web API service, through the DAL, and back to the SQL Database. There is also a Cancel button, which returns to the wine list panel, discarding any changes made on the details panel. Finally, there is a Delete button, which is hidden when entering a new wine.
Now turn your attention to the code-behind shown in Listing 10-7. First, notice the using statement for Newtonsoft.Json. This imports the namespace for the Json.NET library so that it can be easily called to deserialize JSON responses from the Web API services. Next, notice theWebApiUrl string constant defined at the top of the class, which points to the Wine Web API controller at URL http://winecloudweb.azurewebsites.net/api/Wine. Remember to change this constant accordingly if you named the website differently because winecloudweb was not available.
Right beneath the constant, you see the _wine variable defined as a private (page-level) variable of type Wine. This variable will hold an instance of the new or existing Wine object being created or updated in WineDetailsPanel. The page has a DataContext property that represents the object currently bound to the XAML. When the list panel is being displayed, the DataContext is set to the array of wines returned by the Web API service (which displays all the wines in the list box), and when the details panel is displayed, the DataContext is set to the _wine variable (which bi-directionally data-binds one specific wine to the text boxes).
In the PhoneApplicationPage_Loaded event, you can see that LoadWines is called. The LoadWines method prepares a WebClient object to issue an HTTP request, and it sets the HTTP Accept header to application/json. This lets the server know that the client is able to receive a response in JSON format. Next, the code registers a handler for the DownloadStringCompleted event. This specifies WinesLoaded as the callback function to the asynchronous service call. What this means is that your code doesn’t wait for a response after it calls the service. That would be asynchronous service call, which is never permitted in Silverlight, because synchronous calls block the UI while waiting for the service response. To keep the device responsive while interacting with services, only asynchronous service calls are allowed. So rather than waiting for a response, the WinesLoaded method is called automatically when the DownloadStringCompleted event fires, which means that the service is ready to return its response.
After registering on the DownloadStringCompleted event, the DownloadStringAsync method is called. This method takes a URL as a parameter, which is the URL to the Wine Web API services, and it issues an asynchronous GET request over HTTP. After issuing the asynchronous request, the method completes. As explained, the UI now remains responsive while the service processes the request, and the WinesLoaded method is called automatically when the service returns with its response.
The WinesLoaded method first examines the Error property of the DownloadStringCompletedEventArgs parameter passed into the callback. This checks to make sure that the service call succeeded without an error. An array of Wine objects is then created in the wines variable from the JSON response. This is accomplished by calling the JsonConvert.DeserializeObject method of the Json.NET library, passing in the Result property of the DownloadStringCompletedEventArgs parameter that contains the JSON-formatted string returned by the service.
At this point, wines is populated with the complete list of wine objects, deserialized from the JSON response returned by the service. The visibility properties are now set to show the list panel and hide the detail panel, and the LayoutRoot.DataContext property is set to wines, which binds the array to the list box.
When the user clicks the New button, the NewWineButton_Click event handler fires. The event handler code simply assigns _wine to a new Wine object instance, setting a few default properties to start the user off entering a new wine. After toggling the panels to display the data entry text box controls and hiding the Delete button, LayoutRoot.DataContext is set to _wine, which binds new wine object to the text box controls.
Next, the WineListBox_SelectionChanged event handler fires when the user taps on a wine in the list. This event actually fires several times, as selected items are either added or removed. The code is interested only in the event that fires when there is exactly one object in the AddedItemsproperty of the SelectionChangedEventArgs variable passed in as e. It then extracts the tapped wine object into _wine, Finally, it toggles the panel and sets LayoutRoot.DataContext to _wine, just as it does for a new wine (though this time the Delete button is made visible).
When the user clicks the Save button, the SaveButton_Click event handler fires and it’s time to push the changes back to the Web API service, which either creates or updates a wine in the database. The first part of the save logic works the same in either case. The code creates a newWebClient object and sets the HTTP ContentType header to application/x-www-form-urlencoded, which lets the service know that the client is sending URL-encoded strings in the HTTP header. Then it registers a handler for the UploadStringCompleted event. This specifies WinesUpdatedas the callback function to the asynchronous service call. After registering on the UploadStringCompleted event, a URL-encoded key-value-pair string containing the wine’s Name, Category, Year, and Price properties is built and stored in wineInfo. At this point, the save logic is handled differently for creating a new wine or updating an existing wine.
If the WineId property is zero, this is a new wine. In this case, the UploadStringAsync method is called. This method takes a URL as a parameter, which is the URL to the Wine Web API services. It also accepts an HTTP method parameter, which is set to POST. Thus, the code issues an asynchronous POST request over HTTP, which inserts the new wine. If WineId is not zero, this is an existing wine. In this case, UploadStringAsync is still called, but with a few differences. First, the URL for the Web API call is appended with /id (where id is the value of WineId). Second, the WineId property is prepended in the URL-encoded key-value-pair string because it is part of an existing wine entity. And third, the HTTP method parameter is set to PUT. Thus, the code issues an asynchronous PUT request over HTTP, which updates the existing wine.
When the user clicks the Delete button, the DeleteButton_Click event handler fires, and the user is first prompted to confirm before deleting the wine. Then the code creates a new WebClient object, sets the HTTP ContentType header to application/x-www-form-urlencoded, registers a handler for the UploadStringCompleted event, and appends /id to the URL for the Web API call—just the same as when updating an existing wine. This time, however, only the wine ID is passed in the HTTP header; there is no need to pass all the properties of an entity that is about to be deleted. The code then issues the asynchronous DELETE request over HTTP, which deletes the existing wine.
The WinesUpdated method is the callback function for all three asynchronous service calls: POST, PUT, and DELETE. As with WinesLoaded, this method first examines the Error property of the UploadStringCompletedEventArgs parameter passed into the callback to ensure that the service call succeeded without an error. If an error occurred, a message is displayed. Otherwise, LoadWines is called. This queries the service again to retrieve an updated wine list, and then toggles the display panels to view the list.
Testing the Windows Phone application
You can test the app now, using the phone emulator provided by the SDK. The phone emulator can only run on a physical machine; it will not run inside a virtual machine. Furthermore, your physical machine’s BIOS must support the necessary hardware virtualization required by the emulator, and that support must be enabled in the BIOS. If Visual Studio is unable to run the emulator for any reason, it displays the message “Deployment failed because no Windows Phone 8 phone was detected. Make sure a phone is connected and powered on” when you attempt to run the Windows Phone project.
To test the Windows Phone application, follow these steps:
1. Right-click the WineCloudPhone project in Solution Explorer, and choose Set As Startup Project.
2. Press F5 to build and run the app in the phone emulator (which can take a long time to load). The wine list should appear as shown in Figure 10-42.
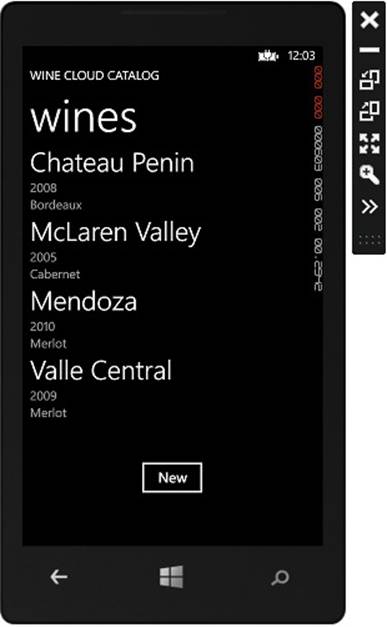
FIGURE 10-42 The wine list displayed in the Windows Phone emulator
![]() Tip
Tip
When you want to stop the app during a debugging session, don’t close the emulator. Instead, just stop your code execution inside Visual Studio and keep the emulator running so that it can host your app the next time you press F5.
3. Click on the third wine. The details page for Mendoza is displayed for editing.
4. Try editing the price. Click on the Price text box and change the value, as shown in Figure 10-43. (You need to click on the emulator’s on-screen keyboard; the emulator will not respond to your machine’s physical keyboard.)
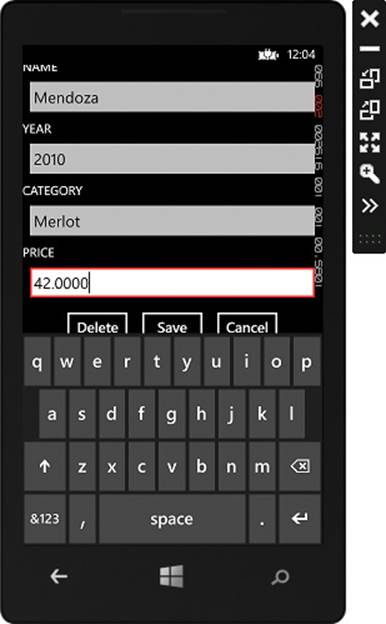
FIGURE 10-43 Editing a wine’s price in the Windows Phone emulator
Spend some time now to experiment a bit more with the app. Go ahead and create some new wines, update a few of them, and delete one or two. Then congratulate yourself—you’ve built a complete layered cloud solution on Microsoft Azure SQL Database, end-to-end, cloud-to-phone!
Summary
This chapter covered a lot of ground. There are myriad ways to create cloud solutions, and many different tools and technologies are available for you to create them with. To be successful with any of them, you need to design a properly layered stack of components to deliver a reliable, maintainable, and scalable solution. In this chapter, you learned how to do just that using Microsoft Azure SQL Database and readily available Microsoft .NET technologies.
After importing a SQL Database into a Visual Studio SQL Server Database project, you extended the design by adding new columns, tables, and stored procedures. Then you published the new design back to SQL Database and shifted focus to the data access layer. You created an Entity Data Model (EDM) to use Entity Framework as the data access layer, and then built an ASP.NET MVC website over the EDM to support order entry. After testing the website locally, you deployed it to the cloud to run on Microsoft Azure. Then you added Web API REST services to the website, which supports CRUD operations against the Wine table. Finally, you built a Windows Phone 8 wine catalog app that consumes the Web API services, allowing users to view, create, update, and delete wines in the database.
When creating your own solutions, you have many more alternatives than those presented in this chapter. For example, you don’t need to use Entity Framework; you can instead create your own data access layer using conventional ADO.NET. Instead of creating the website using ASP.NET MVC, you can choose to create it using ASP.NET web forms. And rather than using Web API, you can build the service layer using raw WCF, WCF Data Services, or WCF RIA Services. Regardless of which particular technologies you choose, however, applying the principles presented in this chapter will guide you in implementing a proper layered design across the various tiers of your cloud solution.
All materials on the site are licensed Creative Commons Attribution-Sharealike 3.0 Unported CC BY-SA 3.0 & GNU Free Documentation License (GFDL)
If you are the copyright holder of any material contained on our site and intend to remove it, please contact our site administrator for approval.
© 2016-2026 All site design rights belong to S.Y.A.