Microsoft Azure SQL Database Step by Step
Chapter 2. Configuration and pricing
—Leonard Lobel
Now that you have your first database up and running, you’re ready to explore additional options for managing the setup and configuration of SQL Database. You’ll learn more capabilities of the Microsoft Azure management portal you started working with in Chapter 1, “Getting started with Microsoft Azure SQL Database” as well as Microsoft SQL Server Management Studio (SSMS) and Windows PowerShell, all of which can be used to administer SQL Database.
In this chapter, we show you how to use the aforementioned tools to create and drop (delete) databases. Many other chapters in this book also use SSMS to perform more detailed actions and specific tasks. After acquainting you with these tools, the chapter concludes with a discussion of pricing and provides helpful tips for reducing the cost of using SQL Database.
Using the Microsoft Azure platform management portal
As you saw in Chapter 1, the Microsoft Azure management portal provides a good basic interface for creating and provisioning new SQL Database servers and databases. In this section, you’ll learn more about how the portal can be used to create databases with the Quick Create and Custom Create options, allow client access with firewall rules, obtain connection strings, and delete databases.
Creating a new database
The management portal offers three options for creating a new database: Quick Create, Custom Create, and Import.
Quick Create is the fastest and easiest way to create a database. If you are fine with a 1-gigabyte (GB) Web edition database and the default collation for North American and Western European languages, use the Quick Create option. (The different editions are explained later in this chapter in the section “Configuring the database edition and size.”) If you need to customize the language settings to support other language types stored in the database, or if you want to preset the database for a larger size than 1 GB, use the Custom Create option. Finally, if you already have an existing database (either a Microsoft Azure SQL Database on another server or an on-premises SQL Server database) that you want to bring into a particular Microsoft Azure SQL Database server, use the Import option.
 Warning
You can change the database edition and size at a later time, but not the collation. So if most users of this database are outside of the U.S. and western Europe, make sure to set the appropriate collation to support the required languages when you create the database.
Quick Create
With Quick Create, you need to supply only two pieces of information to create a database: The name of the new database, and the name of the existing server that the new database should be hosted on (although, indeed, Quick Create will allow you to create a new server for the database on the fly, at the same time the database is created.
To create a new SQL Database using Quick Create, follow these steps:
1. Log in to the Microsoft Azure portal at https://manage.windowsazure.com. This brings you to the main portal page showing ALL ITEMS.
2. Click SQL DATABASES in the vertical navigation pane on the left.
3. Click the NEW button at the bottom of the page.
4. Click QUICK CREATE, as shown in Figure 2-1.
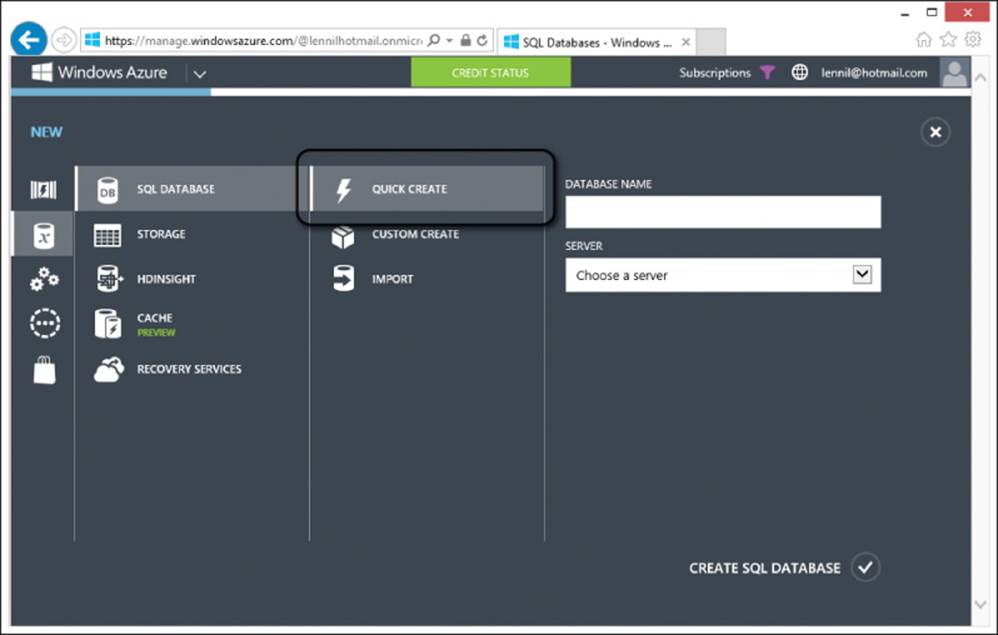
FIGURE 2-1 Using Quick Create to create a new database.
5. For DATABASE NAME, type MyQuickCreateDb.
6. For SERVER, choose any available server from the drop-down list to host the database (or choose New SQL Database Server from the drop-down list to create a new server on the fly).
7. Click CREATE SQL DATABASE.
After a brief moment, the MyQuickCreateDb database is created and ready for use. This is a 1-GB Web Edition SQL Database with the default collation.
Custom Create
With Custom Create, you have control over the options for the new database that you don’t get with Quick Create. These options include the database edition, size, and collation. Indeed, you used Custom Create in Chapter 1 to create the WineCloudDb database, you just invoked it differently, by clicking the CREATE A SQL DATABASE link. (Refer back to Figure 1-9.)
Database editions and size are discussed later in this chapter in the section “Configuring the database edition and size,” but the important thing to know up front is that you can always change these settings later on, after the database is created. The collation, however, cannot be changed once the database is created. Collation is important when you need to use languages other than western European languages. For example, if your main audience needs its data stored in Mandarin, Cyrillic, or Arabic, you should set the collation appropriately.
Follow these steps to create a new SQL Database using Custom Create:
1. Log in to the Microsoft Azure portal at https://manage.windowsazure.com. This brings you to the main portal page showing ALL ITEMS.
2. Click SQL DATABASES in the vertical navigation pane on the left.
3. Click the NEW button at the bottom of the page.
4. Click CUSTOM CREATE. This opens the NEW SQL DATABASE dialog, as shown in Figure 2-2.
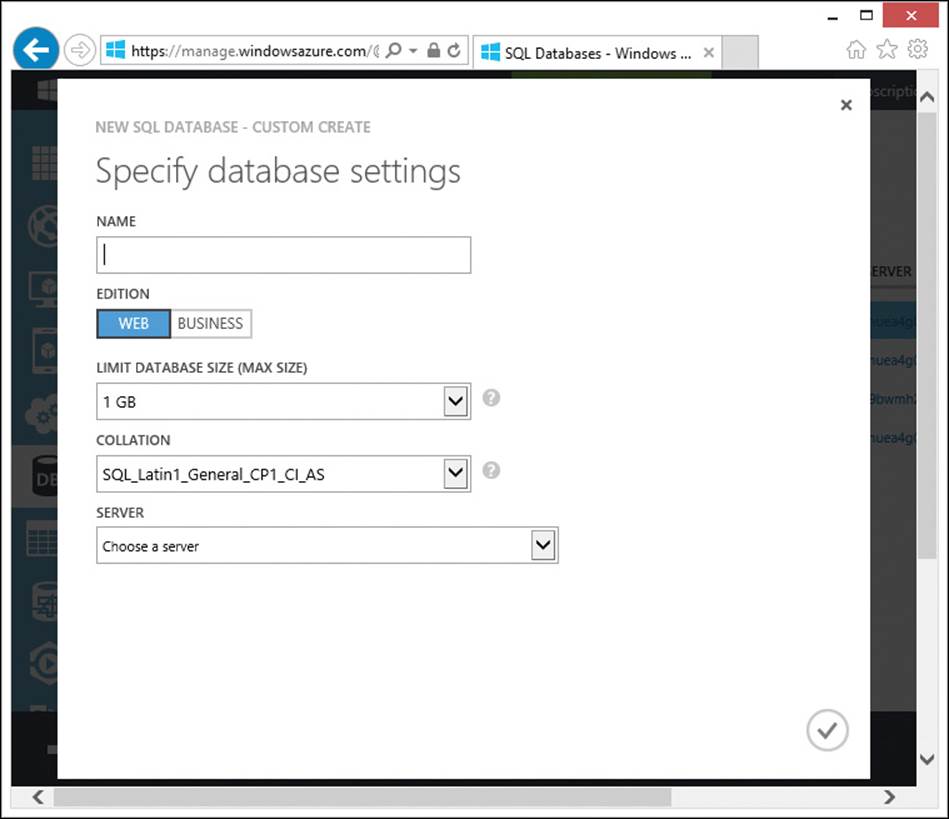
FIGURE 2-2 Using the NEW SQL DATABASE dialog with Custom Create.
5. For DATABASE NAME, type MyCustomCreateDb.
6. Choose the edition (Web for 1 to 5 GB, or Business for 10 to 150 GB).
7. Select the collation appropriate for your data.
8. For SERVER, choose any available server from the drop-down list to host the database (or choose New SQL Database Server from the drop-down list to create a new server on the fly).
9. Click the checkmark “finish” button to complete the settings.
After a brief moment, the MyCustomCreateDb database is created and configured with the edition, size, and collation you specified.
Importing a database
A third way of creating a database in the portal is to import an existing database from a BACPAC file. A BACPAC file is, essentially, a backup of an entire database (schema and data), stored as a binary large object (BLOB).
You can create a BACPAC file from a local SQL Server (on-premises) database or from a SQL Database on Azure. Once you have a BACPAC file, you can import it to SQL Database. This makes it easy to back up or migrate databases across multiple SQL Server instances and Microsoft Azure SQL Database servers, datacenters, and subscriptions.
Importing (and exporting) databases on Azure is facilitated by storing BACPAC files in Azure Blob Storage. This, in turn, requires the creation of a Microsoft Azure Storage Account, which is simply an account that provides access to cloud storage for your BACPAC files. The entire process is explained in Chapter 4, in the section “SQL data-tier applications.”
Setting firewall rules
Most of the time, you want your production SQL Databases to be accessed by only your production cloud services. Thus, the firewall settings for the server are set up by default to limit access only within the Microsoft Azure datacenters. However, you (and others) will sometimes need to access the databases directly from tools (such as SSMS and Microsoft Visual Studio) running on your own local machines. To do so, you need to create a whitelist of the IP address of users attempting to access the database over the Internet.
It is important to understand that the IP address that needs to be specified is not your IP address on your local network, but the IP address that the Microsoft Azure datacenter sees when you attempt to access something. So if you are accessing the database from your office, it is the public static IP address of the office router that needs to be specified. For example, if you have IP addresses as shown in Figure 2-3, the address you need for the firewall configuration is the public static IP address 123.456.789.012.
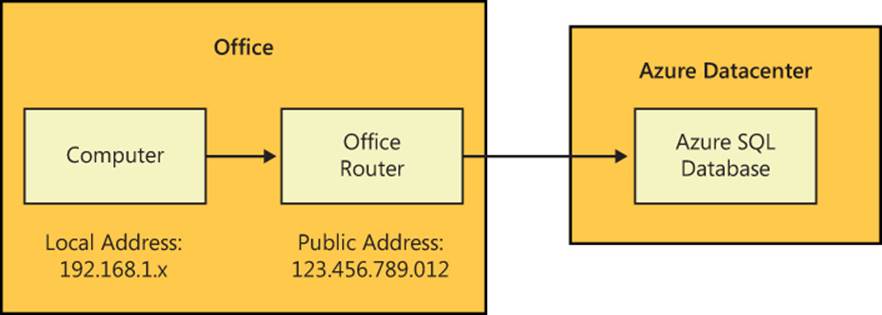
FIGURE 2-3 Public IP address of Internet Gateway Router requires access to SQL Database in the Microsoft Azure datacenter.
The method by which you find the appropriate IP address differs depending on whether you are behind that same public router or not. The next two sections describe how to enable the firewall rules in these two scenarios.
Enabling access to the local network
In Chapter 1, you already added the public IP address for your local machine. (Refer back to Figure 1-7.) This section shows you how to add additional IP addresses; for example, if you were at home when you worked on Chapter 1, and now you’re working on Chapter 2 from work.
To update the firewall rules with another IP address, follow these steps:
1. Log in to the Microsoft Azure portal at https://manage.windowsazure.com. This brings you to the main portal page showing ALL ITEMS.
2. Click SQL DATABASES in the vertical navigation pane on the left. This shows a list of available databases, which should include the WineCloudDb database you created in Chapter 1.
3. Click on the database name WineCloudDb. This displays a page of quick-start links for the database.
4. Click the Set Up Windows Azure Firewall Rules For This IP Address link, as shown in Figure 2-4 (Microsoft Azure was formerly called Windows Azure). Again, if you already added the same IP address as in Chapter 1, you will receive an error message stating that the IP address has already been added to the firewall rules (which is expected, of course).
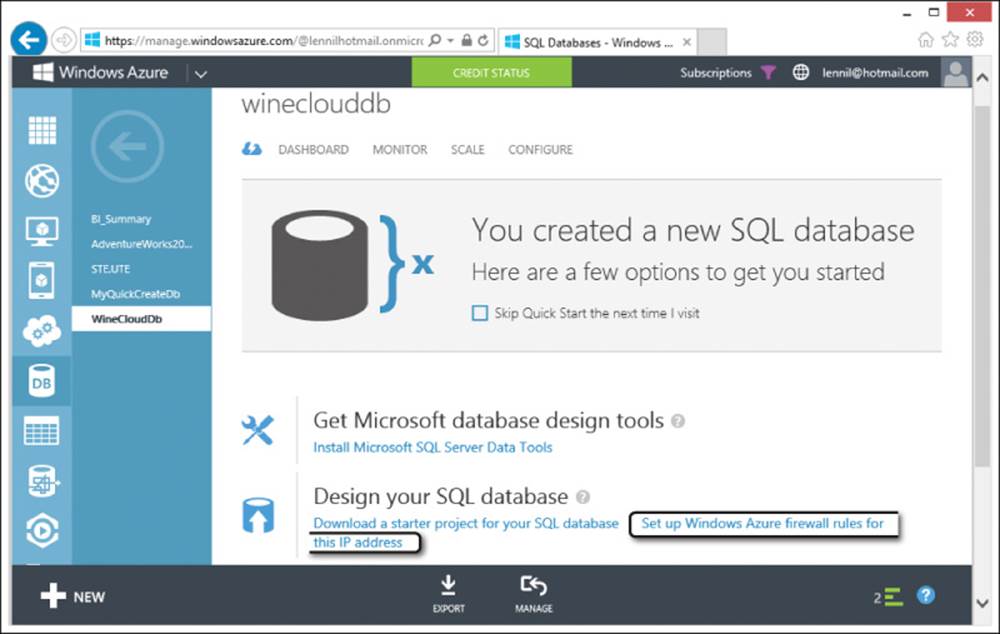
FIGURE 2-4 The quick-start link to create a firewall rule for the local network.
5. When prompted to update the firewall rules, as shown in Figure 2-5, click YES.
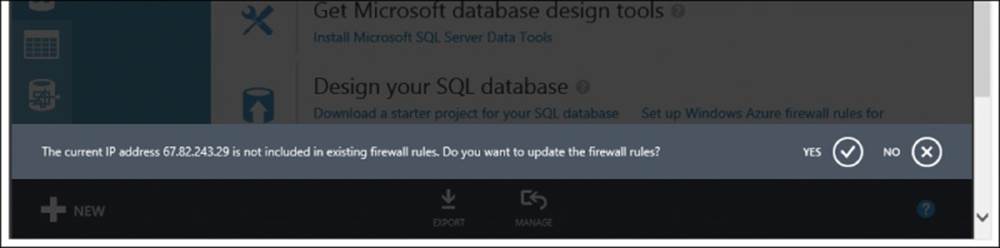
FIGURE 2-5 Automatically set up a firewall for this address.
Enabling access to a remote IP address
The previous scenario works if your computer is on the same network with the same public IP address as your computer or other computers that should be authorized to log in to the database. But what if you need to authorize some other computer at a different location on the Internet to be able to access the database? You need to find the public IP address of those other computers and add those IP addresses to the firewall rules as well.
To open the firewall for a remote user who needs access to the database, you normally need to contact a network administrator to learn the IP address or addresses. If you can’t or don’t want to reach out to the administrator, you can open the firewall for the remote user by working cooperatively, with the help of whatismyipaddress.com.
To do so, follow these steps:
1. Ask the remote user to log on to a computer on her network.
2. Have the user open a browser and navigate to the website http://whatismyipaddress.com.
3. Have the user read the IP address that the website reports to them and write it down.
4. Log in to the Microsoft Azure portal at https://manage.windowsazure.com. This brings you to the main portal page showing ALL ITEMS.
5. Click SQL DATABASES in the vertical navigation pane on the left.
6. Click the server name of the database to which the remote user needs access.
7. Click the CONFIGURE link at the top of the page. You will see a page that shows all the allowed IP addresses (the whitelist), which should already include the one for your local machine that was previously added automatically.
8. In the RULE NAME text box, enter a descriptive name (no spaces allowed) for the remote user or group to which you are granting access to the database—for example, RemoteDevOffice.
9. Enter the IP address you wrote down in step 3 (the one the remote user reported from whatismyipaddress.com) into both the START IP ADDRESS and END IP ADDRESS text boxes. (In this scenario, you are creating a rule for a single address, but these text boxes can also be used to specify a range of IP addresses as desired.) The page should appear similar to Figure 2-6.
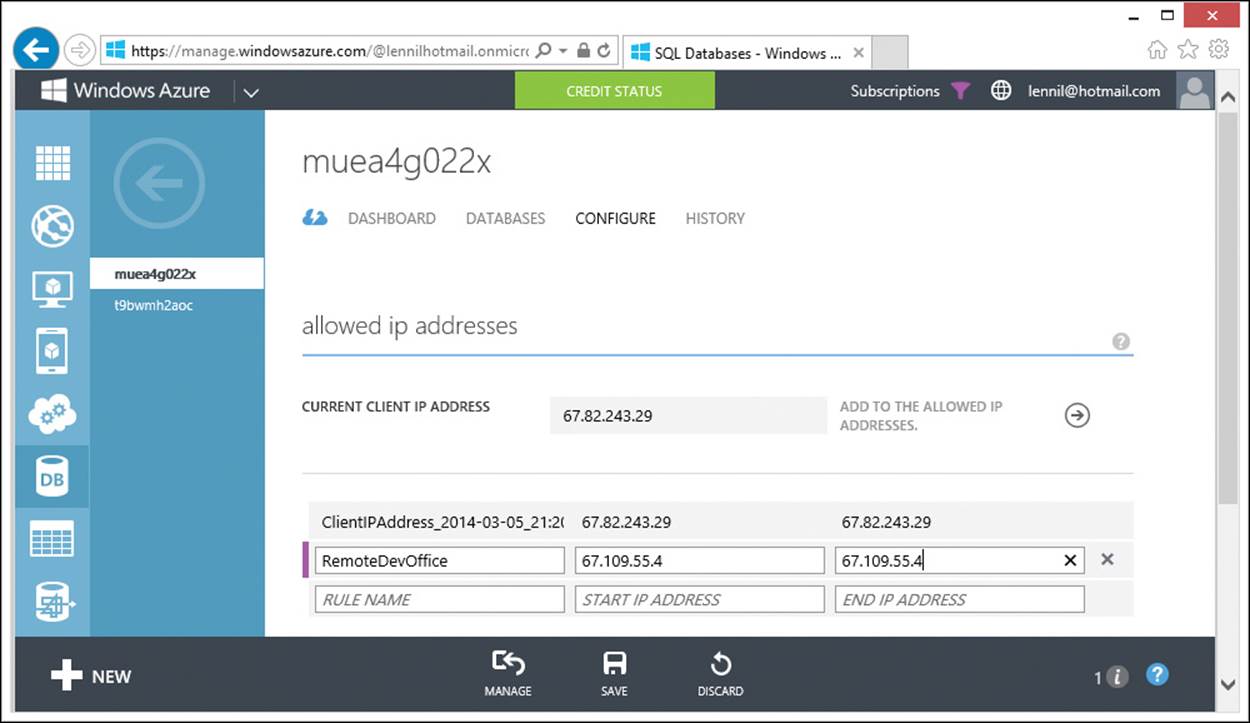
FIGURE 2-6 Adding a new IP address to the firewall rules for a server.
10. Click the SAVE button at the bottom of the page.
The specified IP address can now reach the database.
Obtaining connection strings
If you are building a client application that connects to this SQL Database, you’ll need the connection string for the database. You can obtain connection strings in a number of different formats that are suitable for the most common database clients, including ADO.NET, ODBC, PHP, and JDBC.
To obtain the connection string of the WineCloudDb database for various database clients, follow these steps:
1. Log in to the Microsoft Azure portal at https://manage.windowsazure.com. This brings you to the main portal page showing ALL ITEMS.
2. Click SQL DATABASES in the vertical navigation pane on the left. This shows a list of available databases, which should include the WineCloudDb database you created in Chapter 1.
3. Click on the database name WineCloudDb. This displays a page of quick-start links for the database.
4. Click the View SQL Database Connection Strings For ADO.Net, ODBC, HPP, And JDBC link, as shown in Figure 2-7. Also, take note of the server name beneath the link, which is always suffixed with .database.windows.net. You will need this server name to connect to SQL Database using SSMS a bit further on in the chapter.
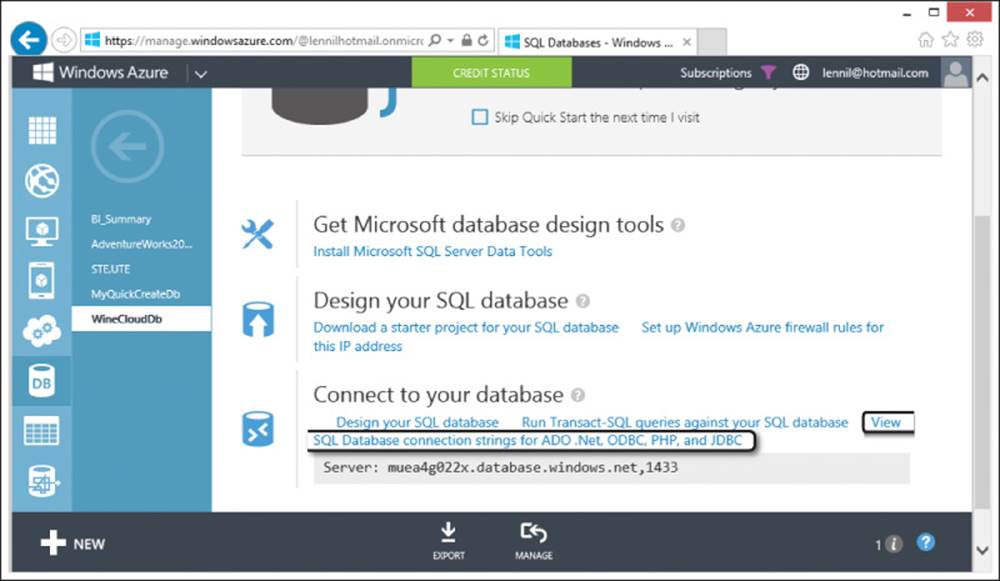
FIGURE 2-7 The quick-start link to display database connection strings.
5. The page displays the connections strings, as shown in Figure 2-8. Each connection string appears in a text box (that scrolls, if necessary), from which you can easily copy and paste into your client application.
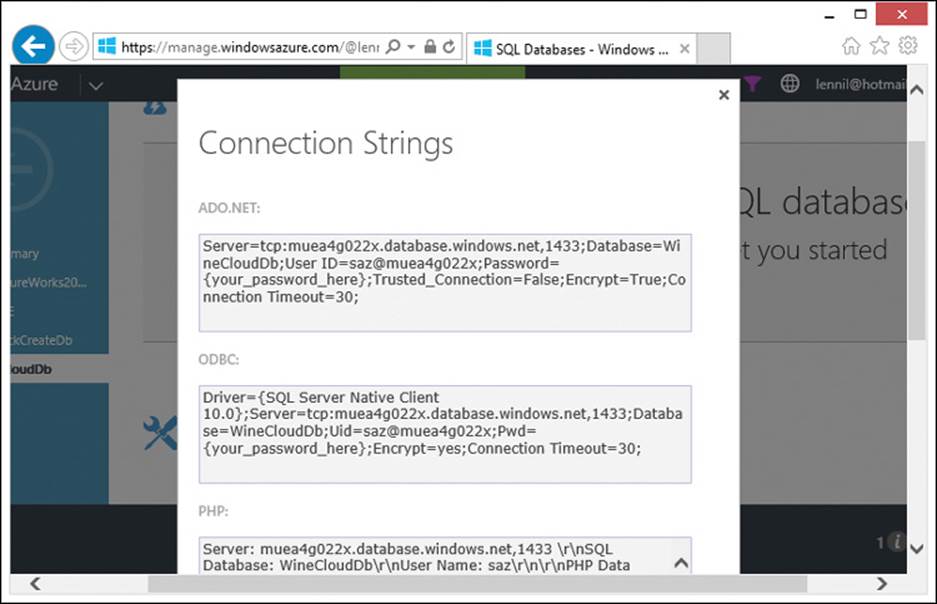
FIGURE 2-8 Viewing the database connection strings for ADO.NET, ODBC, PHP, and JDBC.
Deleting a database
When you no longer need a database (or server), you can use the management portal to delete it. In this section, you will delete the MyQuickCreateDb and MyCustomCreateDb databases you created earlier in this chapter.
To delete the unwanted databases, follow these steps:
1. Log in to the Microsoft Azure portal at https://manage.windowsazure.com. This brings you to the main portal page showing ALL ITEMS.
2. Click SQL DATABASES in the vertical navigation pane on the left. This shows a list of available databases, which should include the MyQuickCreateDb and MyCustomCreateDb databases you created earlier in this chapter.
3. Click to select the row for MyQuickCreateDb. (Don’t click in the NAME or SERVER columns.)
4. Click the DELETE button at the bottom of the page.
5. Click YES, DELETE when prompted that the database will be permanently deleted.
6. Repeat steps 3, 4, and 5 to delete the MyCustomCreateDb database.
The management portal is great for working with SQL Database from any computer with a web browser, without requiring any other special software or tools. Alternatively, there are a number of local tools available that can also connect to and work with SQL Database. This includes SSMS and PowerShell, which are covered next in this chapter, as well as SQL Server Data Tools (SSDT), which is covered in Chapter 10.
Using SQL Server Management Studio
You can also administer SQL Database using SQL Server Management Studio (SSMS), which (as of SSMS 2008 R2) has partial support for Microsoft Azure SQL Database built in. This section explains how to use SSMS to connect to your SQL Database server. You will then learn how to create, alter, and drop SQL Databases from within SSMS.
You must already have SSMS installed to follow the procedures in this section. If you don’t already have SSMS, you can download it for free (either by itself, or along with SQL Server Express edition). Instructions for downloading SSMS can be found in the Introduction.
Once you connect with SSMS, you can use Object Explorer to navigate between objects in SQL Database just as you can with an on-premises SQL Server database. However, most of the other graphical designers and dialogs are not available. For example, if you try to design a table or create a new database, SSMS will open a new query window with template Transact-SQL (T-SQL) script for you to edit, rather than opening the table designer or the New Database dialog, as you might expect. This is because these features rely on SQL Server Management Objects (SMO), which SQL Database has only limited support for. Therefore, almost everything needs to be done via T-SQL script when using SSMS to configure SQL Database.
 Note
Note
SQL Server Data Tools (SSDT), which runs inside Visual Studio, can also connect to SQL Database, and it works very similar to SSMS. Unlike SSMS, however, SSDT does not rely on SMO, so the SSDT table designer and other SSDT graphical dialogs are supported for SQL Database just the same as they are for on-premises SQL Server. You will learn much more about SSDT in Chapter 10.
Connecting to SQL Database
To connect to SQL Database from SSMS, follow these steps:
1. From the Windows Start screen, launch SSMS. You can either scroll through the app tiles to find it (in the Microsoft SQL Server 2012 category) or just type sql server management studio to run a search, and then click on the tile, as shown in Figure 2-9. After a brief moment, the Connect To Server dialog appears.
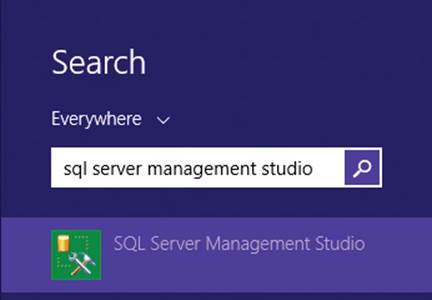
FIGURE 2-9 Launching SQL Server Management Studio from the Windows Start screen.
2. For Server Name, type <servername>.database.windows.net. This is the fully qualified name to the SQL Database server, where <servername> should be replaced by the name assigned to your server.
![]() Tip
Tip
If you have trouble figuring out the server name, you can easily find it at the bottom of the quick-start links page, as shown in Figure 2-7. You can also discover the server name by viewing the Connection Strings dialog, as shown in Figure 2-8.
3. For Authentication, select SQL Server Authentication from the drop-down list. (SQL Database does not support Windows Authentication.)
4. For Login and Password, type the user name and password you assigned the server when you created it in Chapter 1. The dialog should appear similar to Figure 2-10.
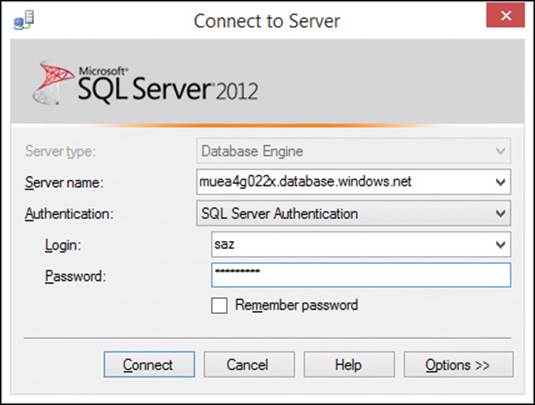
FIGURE 2-10 Connecting to SQL Database from the Connect To Server dialog in SSMS.
5. Click the Connect button.
After a brief moment, the connection is made, and you can then use SSMS to manage SQL Database. If SSMS fails to connect, the most likely cause is that your public IP address has not been added to the firewall rules, as described earlier in this chapter. The error message will make it clear if this is the problem. If the connection fails with a more generic error message, ensure that port 1433 is open on your local firewall. (SQL Database, like SQL Server, uses port 1433 to communicate.)
Once connected, you can drill through Object Explorer to the WineCloudDb database, as shown in Figure 2-11.
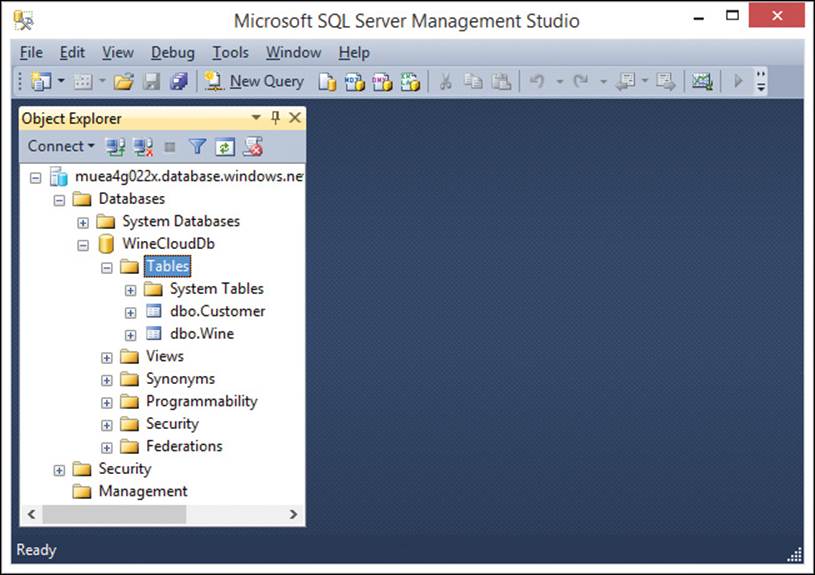
FIGURE 2-11 Drilling down to the tables in a database using Object Explorer in SSMS.
Creating a new database
As we mentioned, the usual New Database dialog in SSMS is not available when you are connected to SQL Database. Instead, SSMS will simply open a query window with the T-SQL script for the CREATE DATABASE statement templated in, which is a bit confusing. So the simpler way to create a SQL Database using SSMS is to just go straight to a blank query window and issue a basic CREATE DATABASE statement.
To create a new database using an SSMS query window, follow these steps:
1. Connect to a SQL Database server, as described in the previous procedure.
2. In Object Explorer, right-click the server and choose New Query.
3. In the new query window, type CREATE DATABASE MyDb. The SSMS window should appear similar to Figure 2-12.
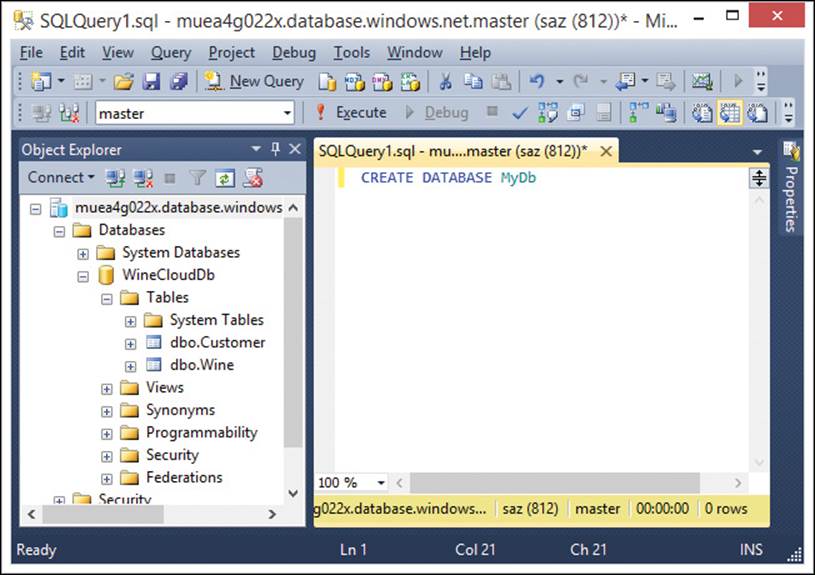
FIGURE 2-12 Creating a new database by executing T-SQL script in an SSMS query window.
4. Press F5 (or click Execute on the toolbar) to execute the statement. It should take only a few moments for execution to complete.
Changing the database edition and maximum size
The MyDb database created by the previous procedure has the default configuration, which is Web edition and a size of 1 GB, just like a database created using Quick Create. If you want to change the edition and size, you can do so by issuing an ALTER DATABASE statement. For example, to change from Web edition to Business edition with a maximum database size of 10 GB, execute the following T-SQL command in the query window:
ALTER DATABASE MyDb MODIFY (EDITION='business', MAXSIZE=10GB)
Deleting a database
Dropping a SQL Database is like dropping any SQL Server database. Either right-click on the database in Object Explorer and choose Delete, or execute the following T-SQL command in the query window:
DROP DATABASE MyDb
Using PowerShell
PowerShell is Microsoft’s modern scripting language for system administration that supports a wide variety of tasks by executing commands (known as cmdlets, pronounced command-lets) from the PowerShell command line. Microsoft has also developed PowerShell cmdlets for managing Microsoft Azure, including a number of useful SQL Database commands.
Even if you already have PowerShell installed, these special cmdlets for Microsoft Azure need to be installed separately. The following section describes how to download and install the cmdlets.
Installing the Microsoft Azure PowerShell cmdlets
To install the Microsoft Azure PowerShell cmdlets, follow these steps:
1. Navigate your web browser to https://www.windowsazure.com/en-us/downloads.
2. Scroll down to Command-Line Tools, and click the Install link beneath Windows PowerShell, as shown in Figure 2-13.
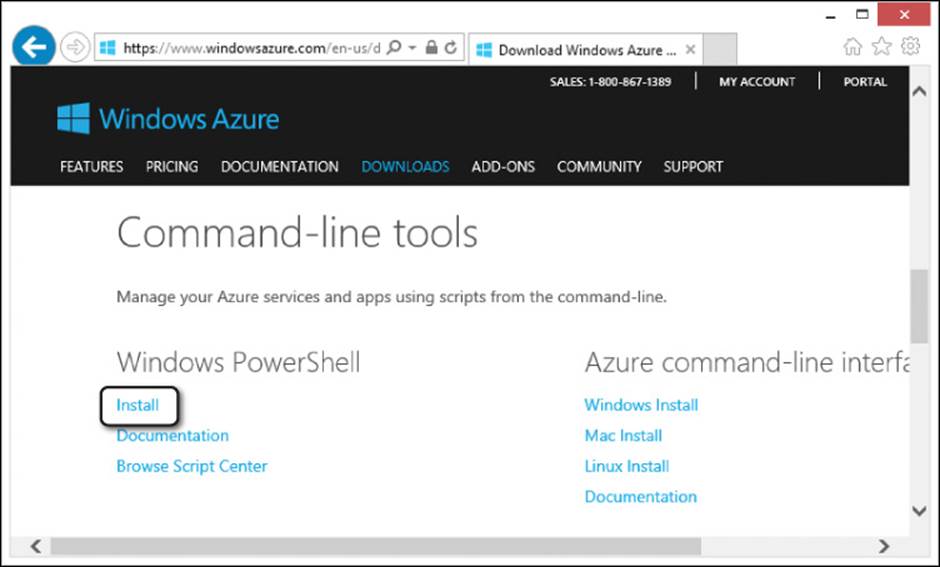
FIGURE 2-13 Downloading the Microsoft Azure cmdlets for PowerShell.
3. When prompted to run or save, click Run.
4. If the User Account Control dialog appears, click Yes.
5. In the Web Platform Installer dialog (shown in Figure 2-14), click Install.
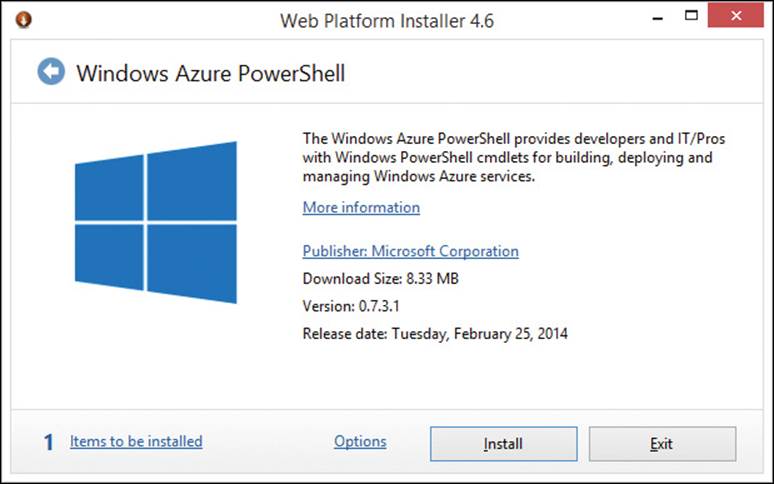
FIGURE 2-14 Installing the Azure cmdlets for PowerShell.
6. Click I Accept to start the installation.
7. When installation completes, click Finish.
8. Click Exit to close the Web Platform Installer dialog.
Using the PowerShell Integrated Scripting Environment
Although you can use a simple text editor (even Notepad) to write PowerShell scripts, the PowerShell Integrated Scripting Environment (ISE) is a much more productive environment. As you’ll see, it offers some nice features, such as syntax highlighting and IntelliSense-style auto-completion.
There is no app tile for the PowerShell ISE on the Windows Start screen, so it needs to be launched from the command line. To start the PowerShell ISE and view help information for the Azure SQL Database cmdlets, follow these steps:
1. Open a command prompt. (An app tile for it can be found on the Start screen in the Windows System category, or you can just type command prompt to search for it.)
2. At the command prompt, type powershell_ise.
3. At the PowerShell ISE prompt, type get-help get-azuresql, and then pause. In a moment, a popup window appears showing all the cmdlets that start with get-azuresql, as shown in Figure 2-15.
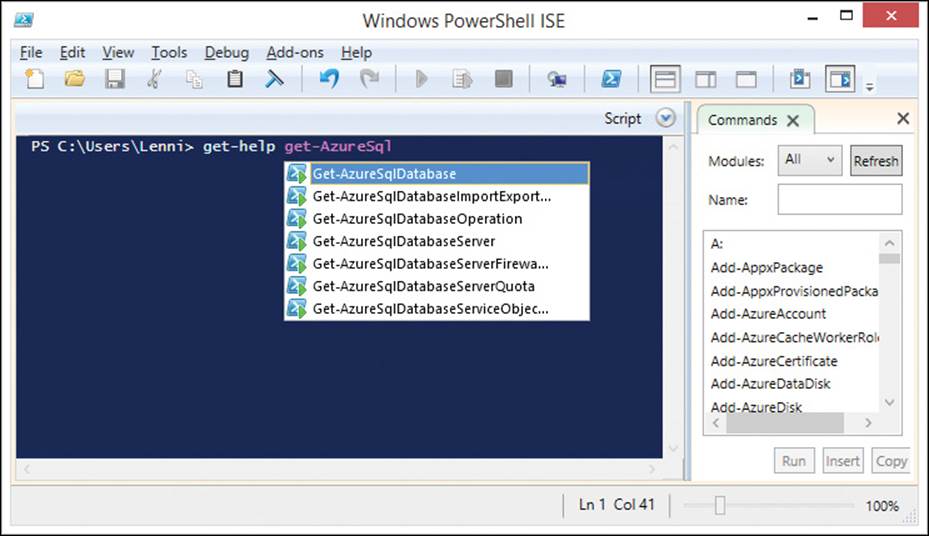
FIGURE 2-15 Obtaining help on the Microsoft Azure SQL Database PowerShell cmdlets.
4. Double-click on any of the cmdlets to complete the command, and then press Enter to view help for the selected cmdlet.
Configuring PowerShell for your Microsoft account
Before you can start using PowerShell to manage Azure, you need to configure it for your account. This is simply a matter of logging in to the portal, and then running a few PowerShell commands to retrieve your account information from Azure and import it into PowerShell. This section walks you through the process.
To configure PowerShell for your Microsoft account, follow these steps:
1. Log in to the Microsoft Azure portal at https://manage.windowsazure.com. This step is necessary for PowerShell to identify your account. If you don’t log in first, you will be prompted to log in when you try to retrieve your account settings in PowerShell.
2. Start the PowerShell ISE, as explained in the previous procedure.
3. Type Get-AzurePublishSettingsFile to retrieve your account settings. Internet Explorer will open up automatically and download a .publishsettings file with your account information.
4. Click Save to save the .publishsettings file to your default Downloads folder.
![]() Important
Important
The .publishsettings file should be kept safe and private, because it effectively provides access to the Azure subscriptions on your Microsoft account.
5. Back in the PowerShell ISE, type Import-AzurePublishSettingsFile <.publishsettings file>, where <.publishsettings file> is the complete file name (with path) of the account settings file you just saved to your default Downloads folder. (This is typically C:\Users\<username>\Downloads\<subscription-name>.publishsettings.)
Note
The file name might be long, but the PowerShell ISE auto-complete feature helps with an IntelliSense-style drop-down list as you type. Just press the Tab key to auto-complete your way through the command, and through the folder names and file name of the .publishsettings file.
The PowerShell ISE doesn’t boast with a message when the settings are imported successfully. You’ll only get an error message if it fails. Otherwise, you’ll know that all went well if you are silently returned back to the PowerShell command-line prompt.
As you learned in Chapter 1, every SQL Database is hosted on a server. Recall how you used the Microsoft Azure management portal to first create a server, and then to create a database on that server. You also used the portal to set firewall rules to allow access to your SQL Database from designated IP addresses. You will now perform those very same tasks using just a few simple PowerShell commands.
Creating a new server
First, create a new server and add a firewall rule for your IP address so that the server will allow you to connect to it using PowerShell. To do this, follow these steps in the PowerShell ISE:
1. Type New-AzureSqlDatabaseServer –Location “East US” –AdministratorLogin “<new-login>” –AdministratorLoginPassword “<new-password>”, where <new-login> and <new-password> are the credentials you want to assign for the new server. The server is created, and PowerShell responds by displaying the new server name, as shown in Figure 2-16.

FIGURE 2-16 Creating a new server with PowerShell.
2. Type New-AzureSqlDatabaseServerFirewallRule –ServerName <server-name> –RuleName <any-name> –StartIpAddress <your-ip-address> –EndIpAddress <your-ip-address>, where <server-name> is the name of the new server created in step 1, <any-name> is an arbitrary name for the new rule (no spaces permitted), and <your-ip-address> is the IP address of your machine. This command creates a new firewall rule to allow PowerShell access to the server from your IP address, as shown in Figure 2-17.

FIGURE 2-17 Creating a new server firewall rule with PowerShell.
Note
If you don’t know your IP address, you can find out what it is by using whatismyipaddress.com, as explained in the section “Enabling access to a remote IP address” earlier in the chapter.
Creating a new database
The New-AzureSqlDatabase cmdlet creates a new database. Before you can use this cmdlet, you must first create an object with your credentials, and then you use those credentials to create a context associated with the server that you want to create the new database on. You store the server context in a variable, and then you specify the server context variable with the New-AzureSqlDatabase cmdlet to create the database (as well as all other cmdlets you might run for that particular server).
To create a new database now, follow these steps in the PowerShell ISE:
1. Type $creds = new-object System.Management.Automation.PSCredential (“<login-name>”, (“<login-password>” | ConvertTo-SecureString –asPlainText –Force)), where <login-name> and <login-password> are the administrator login and password you assigned when you created the server in the previous procedure. This stores those administrator credentials in a secure string named $creds.
2. Type $context = New-AzureSqlDatabaseServerContext –ServerName <server-name> –Credential $creds, where <server-name> is the name of the server you created in the previous procedure. (The server name is displayed when you create the server, as shown in Figure 2-16.) This creates a context associated with the credentials you created in step 1 and the server you created in the previous procedure, and it stores that context in an object named $context.
3. Type New-AzureSqlDatabase –Context $context –DatabaseName MyNewDb. This creates a new database named MyNewDb. The database is created on the server associated with $context, using the credentials associated with $creds. When the database is created, PowerShell displays information about the new database, as shown in Figure 2-18.

FIGURE 2-18 Creating a new database with PowerShell.
4. It’s often useful to view all the databases that exist on the server. To do so, type Get-AzureSqlDatabase –Context $context. As shown by this cmdlet’s output in Figure 2-19, the server includes a master database, just as an on-premises SQL Server does.
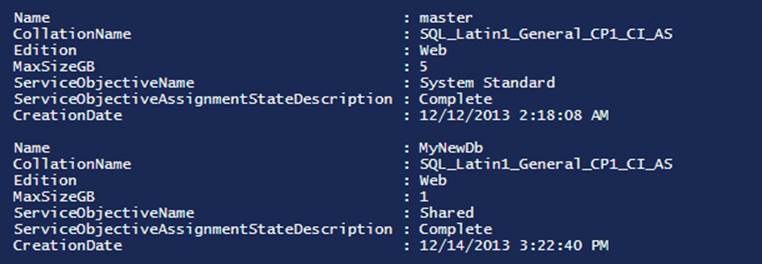
FIGURE 2-19 Listing all the databases that exist on the server.
The database you just created with New-AzureSqlDatabase is, by default, a Web edition database with a maximum size of 1 GB and the default collation. This is the same type of database that gets created when you use Quick Create in the Microsoft Azure management portal. To override these defaults, specify the –Edition, –MaxSizeGb, and –Collation switches with an edition, maximum size, and collation of your own choosing. For example, the following statement creates a Business edition database with a maximum size of 150 GB (the largest possible):
New-AzureSqlDatabase –Context $context –DatabaseName MyBigDb -Edition Business -MaxSizeGB 150
You can also change the edition and maximum size (but not the collation) of an existing database by using the Set-AzureSqlDatabase cmdlet with the –Edition and –MaxSizeGb switches. For example, you can use the following command to reconfigure the MyNewDb database you just created as a Business edition database with a maximum size of 20 GB:
Set-AzureSqlDatabase -Context $context -DatabaseName MyNewDb -Edition Business -MaxSizeGB 20
Deleting a database
The Remove-AzureSqlDatabase cmdlet deletes a SQL Database. To delete the MyNewDb database you just created in the previous section, follow these steps:
1. Type Remove-AzureSqlDatabase –Context $context –DatabaseName MyNewDb.
2. When prompted to confirm, click Yes.
If you are using Remove-AzureSqlDatabase to write scripts you intend to run with no user intervention, you can include the –Force switch. This switch causes the database to be deleted immediately, without being prompted to confirm.
Budgeting for SQL Database
The final section of this chapter covers various cost-related items you need to consider when using SQL Database. Specifically, we discuss pricing for the SQL Database storage and bandwidth that you consume. There are no procedures to follow in this section.
 Warning
As mentioned in the Introduction, Microsoft Azure pricing is subject to change. The following information is based on current pricing at the time this book was written. We strongly recommend that you visit the Microsoft website for the latest figures. Pricing for SQL Database can be found at http://www.windowsazure.com/en-us/pricing/details/sql-database.
The information in this section will help you figure out the right configuration and give you tips as to how to save money on your SQL Database deployments. You should also take a look at the online pricing calculator, which quickly calculates pricing based on your input. The online pricing calculator is available at http://www.windowsazure.com/en-us/pricing/calculator.
SQL storage
The biggest cost of using SQL Database is for the actual disk space required for storage in Microsoft Azure. Table 2-1 shows current pricing for SQL Database storage.
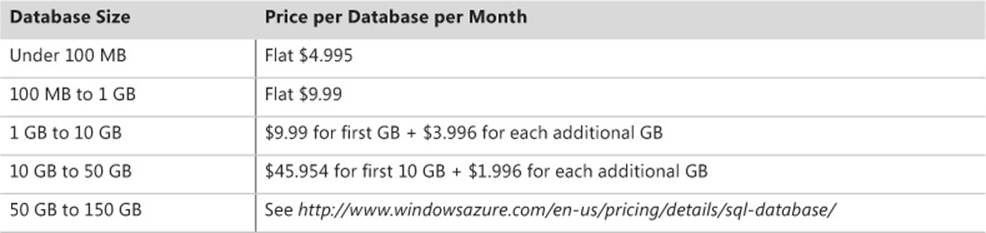
TABLE 2-1 SQL Database storage pricing
If you already have an on-premises SQL Server database and would like to calculate the size of the database for estimating the migration cost to SQL Database, you can query the reserved_page_count column in the sys.dm_db_partition_stats dynamic management view. That column value is expressed in pages, so you can use the following query to sum the total page count: multiply by 8192 (the number of bytes per page), and then divide by 1024 twice to convert the result into megabytes (the first division converts from bytes to kilobytes, the second from kilobytes to megabytes):
SELECT (SUM(reserved_page_count) * 8192) / 1024 / 1024 AS DbSizeInMB
FROM sys.dm_db_partition_stats
Client bandwidth
If you connect to your SQL database from within the same datacenter, you do not incur any bandwidth charges for the data flowing either in to or out of the database. If you connect to the database from outside the datacenter, your database incurs only “egress” charges for bandwidth usage, which means that data flowing out of the database to clients is charged, while “ingress” flows (data coming into the database) are free.
The charges are also different in different areas of the world. Client bandwidth pricing is based on the location of the Microsoft Azure datacenter, regardless of where the client accessing the database is located. Again, noting that pricing details are subject to change, the data-transfer pricing details at the time of this writing are shown in Table 2-2.
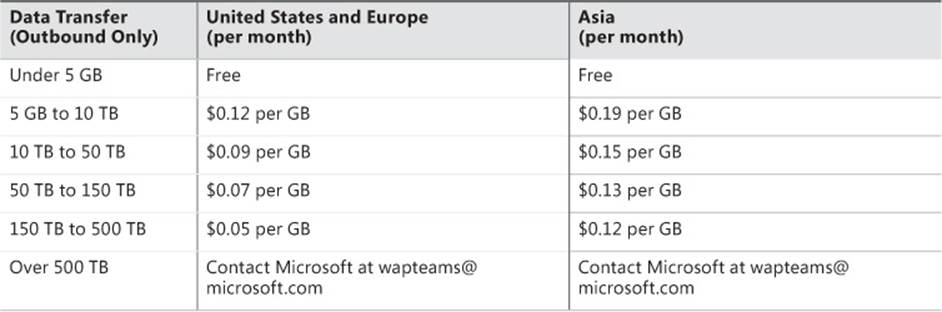
TABLE 2-2 SQL Database client bandwidth pricing
Backup storage space
When you use Azure Storage to manage your BACPAC files for backups, the storage space for the BACPAC files incurs usage costs. The prices vary with sizes, but using Azure Storage to hold your backups is generally much cheaper than using SQL Database storage. (See Table 2-3.)
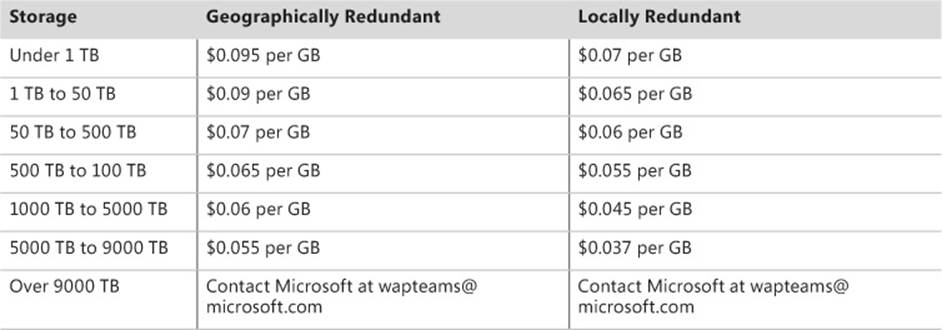
TABLE 2-3 Backup storage space pricing
For a very small (100-MB) database, the cost of the database is $4.95 per month, while the price for backup storage is only $0.035 (less than 1/100th the cost). As you go up in size, backup storage prices get relatively more expensive, but they are still cheaper than database storage. At 100 GB, the SQL Database cost is $175 per month, while the Azure Storage cost is only $7 per month for a single backup (1/20th the cost). Be careful though, because charges can accrue quickly if you have a backup strategy that requires storing a large number of backups. However, if you maintain a simple incremental backup strategy, in which you keep one backup for the latest hour, day, week, month, and year, then for a 100-MB database you are paying only $0.175 per month for backup, and for a 100-GB database you’re paying only $35—a relatively small price to pay to ensure the security of your data.
Alternatively, you can enable geo-replication on your storage account. This is an attractive option for backups because it builds in geographic distribution for disaster recovery, and it does so more cheaply than paying for storage in a separate datacenter as well as paying bandwidth costs to get to that datacenter.
Backup storage bandwidth
The main difference between offsite and onsite backup costs is bandwidth usage for sending your backups to a different datacenter. The bandwidth usage charges are the same as for the database itself, so you can look at Table 2-2 to understand the charges. Like database access, bandwidth charges are incurred only one way; you won’t get double-charged for bandwidth out of one datacenter and into the other. So if you have a 100-MB database and you have backups taken every day, your bandwidth charges are as follows:
0.1 GB X $0.12/GB X 30 days = $0.36/month
If you choose to take backups each hour, your bandwidth charges would be as follows:
0.1 GB X $0.12/GB X 24 hours/day X 30 days = $8.64/month
If you choose to run those backups within the same datacenter, the bandwidth is free.
Another option to consider is to use geo-replicated storage, as mentioned in the previous section, which also provides the protection of storing backups in different datacenters. In this scenario, the storage account you set up for your database backups has geo-replication turned on, and the data is automatically replicated out to another datacenter within the same region. For example, if your storage account is in the North Central datacenter, the replica of the data might be in the South Central datacenter, where both datacenters are in the U.S.; it would not be in some datacenter in Europe or Asia.
The main reason why geo-replicated storage is attractive is cost. Imagine you have a 100-MB database and take backups every hour to a remote storage account. If you have hourly, daily, weekly, monthly, and yearly backups, you pay the following:
0.1 GB X $0.070/GB/month X 5 backup files = $0.035/month for the storage plus another $8.64 per month in bandwidth charges, for a total of about $8.69 for backups
If you pay the higher amount for geo-replicated storage, it actually saves you money. The cost for the geo-replicated storage for the same database would be as follows:
0.1 GB X $0.095/GB/month X 5 backup files = $0.0475/month for the storage
However, because it is already geo-replicated, you do not have to pay for the bandwidth to do the replication. Your total amount for backup storage in that case is only $0.0475, instead of $8.69 in the manually replicated scenario.
Support
When discussing costs, one thing that is frequently overlooked is the cost of a support package. Microsoft offers several support tiers, which can be viewed at http://www.windowsazure.com/en-us/support/plans, as shown in Figure 2-20.
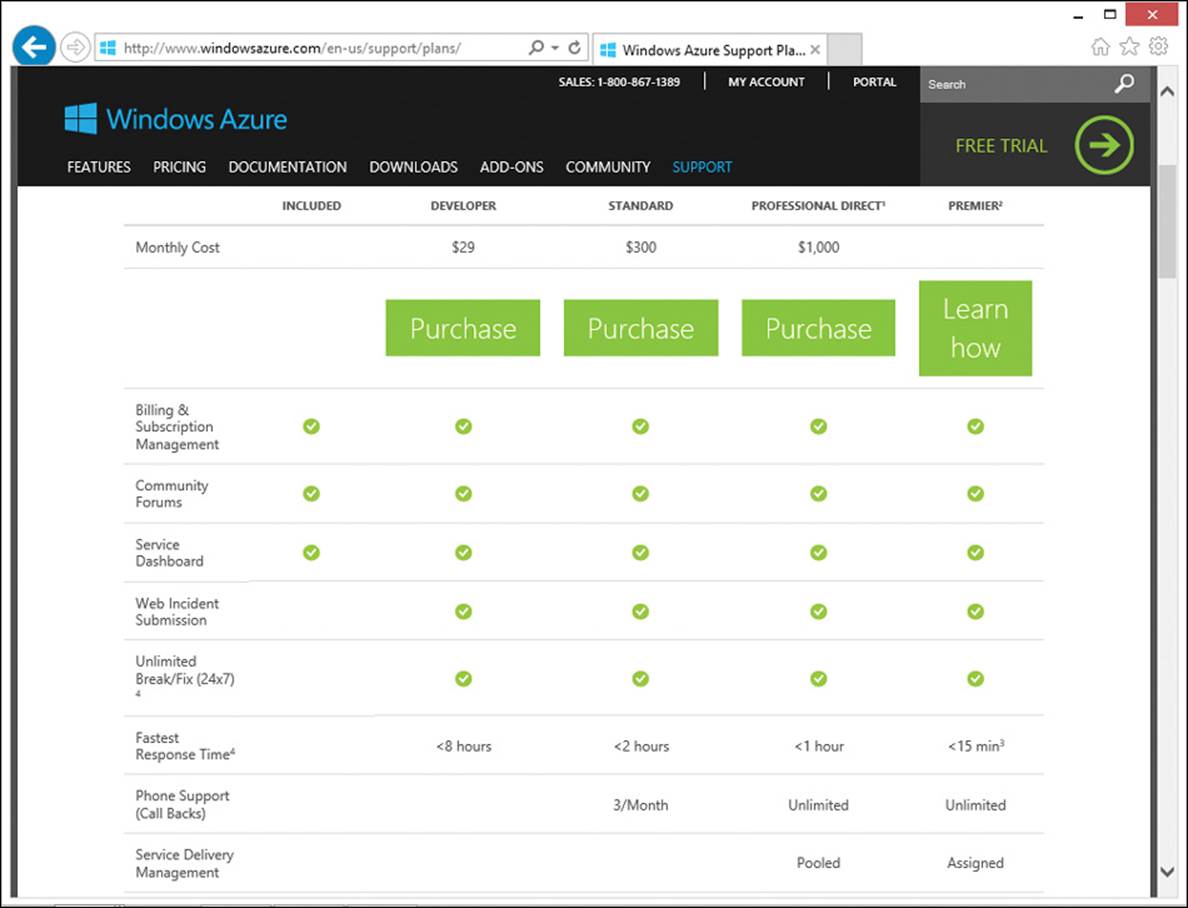
FIGURE 2-20 Browsing the available Azure support plans.
When you’re just getting started and need some help, it’s easy to get by on just the forums and other online resources. But once your applications start becoming more complex and you start supporting lots of users, it is a good idea to have a support plan in place. We have found that in the early stages of trying to diagnose issues with deployments, it is useful to have Microsoft personnel help with troubleshooting. We recommend that, after your trial period ends, you start off with at least the Developer support plan.
Optimizing your costs
To optimize your costs on SQL Database, here are the things you should think about:
![]() Don’t store BLOBs in the database. Use Azure Blob Storage for image, video, and text files that you might otherwise store as varbinary(max) or image column in the database. The cost of Blob Storage is much less than SQL Database. A 100-GB SQL Database costs $175 per month, but Blob Storage costs only $7 per month. To reduce costs and improve performance, put these large items in your Blob Storage, and just store the Blob Storage record key in your database to reference it. This strategy will have a huge effect on price if you store files in your database.
Don’t store BLOBs in the database. Use Azure Blob Storage for image, video, and text files that you might otherwise store as varbinary(max) or image column in the database. The cost of Blob Storage is much less than SQL Database. A 100-GB SQL Database costs $175 per month, but Blob Storage costs only $7 per month. To reduce costs and improve performance, put these large items in your Blob Storage, and just store the Blob Storage record key in your database to reference it. This strategy will have a huge effect on price if you store files in your database.
![]() Cycle out old records and tables in your database. This saves money, and knowing what you can or cannot delete is important if you hit your database Max Size and you need to quickly delete records to make space for new data.
Cycle out old records and tables in your database. This saves money, and knowing what you can or cannot delete is important if you hit your database Max Size and you need to quickly delete records to make space for new data.
![]() Place your SQL Database in the same datacenter as your websites, mobile services, and other Azure components that will be clients of the database. Co-locating the applications with the database not only prevents you from incurring data bandwidth charges for data going between two datacenters, but also makes your application run faster.
Place your SQL Database in the same datacenter as your websites, mobile services, and other Azure components that will be clients of the database. Co-locating the applications with the database not only prevents you from incurring data bandwidth charges for data going between two datacenters, but also makes your application run faster.
![]() Use a strategy for removing old backups such that you maintain history but reduce storage needs. If you maintain backups for the last hour, day, week, month, and year, you have good backup coverage while not incurring more than 25 percent of your database costs for backup. If you have a 1-GB database, your costs would be $9.99 per month for the database and only $0.10 per month for the backup space.
Use a strategy for removing old backups such that you maintain history but reduce storage needs. If you maintain backups for the last hour, day, week, month, and year, you have good backup coverage while not incurring more than 25 percent of your database costs for backup. If you have a 1-GB database, your costs would be $9.99 per month for the database and only $0.10 per month for the backup space.
![]() Instead of using a remote storage account for your backups, use geo-replicated storage to keep from incurring bandwidth charges.
Instead of using a remote storage account for your backups, use geo-replicated storage to keep from incurring bandwidth charges.
![]() If you intend to use a substantial amount of Azure resources for your application, you can choose to use a volume purchase plan. These plans allow you to save 20 to 30 percent of your datacenter costs for larger applications.
If you intend to use a substantial amount of Azure resources for your application, you can choose to use a volume purchase plan. These plans allow you to save 20 to 30 percent of your datacenter costs for larger applications.
Configuring the database edition and size
You’ve seen that when you create a SQL Database, you also specify the database edition and size (or at least, you allow it to default to a 1-GB Web edition database). This section explains the meaning of the database edition and size settings.
In the past, Microsoft has talked about the possibility of including more features in the Business edition than the Web edition. However, at this time, the features are the same for both editions. So then, what (if any) is the purpose of the edition and size settings? It essentially comes down to controlling cost. The database edition dictates your maximum size, and your maximum size is there for cost containment, as shown in Table 2-4.

TABLE 2-4 SQL Database editions and sizes
Note
At the time this book went to press, Microsoft announced the Preview availability of SQL Database Premium. This is a more costly option than the standard Web and Business editions of SQL Database, and it supports a maximum database size of 500 GB. As we explain in Chapter 8, SQL Database Premium also lets you scale up for performance using dedicated CPU and memory.
Monthly charges for SQL Database are based on the data that is actually stored in the database, not the maximum size. So if you are using 2 GB of space in a database with a maximum size of 150 GB, you are charged only for that 2 GB of space. You should therefore set the maximum size to an amount that will comfortably contain the data for your application and still give you some room to grow. The ceiling on the data size prevents some inadvertent programming error from adding too many records and running up your bills.
When your database reaches the maximum size, it will no longer allow you to insert data, although you may still update and delete data. You should plan ahead for this scenario. One option is to create space by deleting unnecessary records. Note that it can take a bit of time after you delete records for the space to free up, so don’t expect to be able to recover instantaneously after the cleanup. Your other option is to increase the limit on your database, whether permanently (for example, to accommodate expected business growth) or temporarily (for example, to accept new records while you sort out your longer term strategy for reducing the database size).
As a preventative measure, you should talk to your users about aging policies for certain types of records so that you can cycle old unused records out of the system. That is a good conversation to have before you hit your database size limit. Also, watch the size of your database as it grows over time so that you can anticipate when you’ll hit the limit of your database. Chapter 9 has more information about how to monitor your system.
As you saw earlier in this chapter, it’s easy to change the edition and size of a SQL Database at any time using both T-SQL and PowerShell. If you prefer a user interface, you can also use the Microsoft Azure management portal to configure the edition and size through the browser.
Summary
In this chapter, you learned how to use the Microsoft Azure management portal, SQL Server Management Studio, and PowerShell to create and configure a Microsoft Azure SQL Database. You saw how to connect each of these tools to Azure, and use them to create and manage servers, firewall rules, and databases.
The chapter then proceeded to discuss cost, pricing, and budget. We detailed the estimation and optimization of costs, and we explained all the cost-related elements you need to consider, including storage and bandwidth, as well as the database edition and maximum size settings.
All materials on the site are licensed Creative Commons Attribution-Sharealike 3.0 Unported CC BY-SA 3.0 & GNU Free Documentation License (GFDL)
If you are the copyright holder of any material contained on our site and intend to remove it, please contact our site administrator for approval.
© 2016-2026 All site design rights belong to S.Y.A.