BizTalk 2013 EDI for Health Care: HIPAA-Compliant 834 (Enrollment) and 837 (Claims) Solutions (2014)
Chapter 10. Solution: Sending 834 Data
You have looked at sending and receiving 837 data (in Chapters 2 and 3) and also at receiving 834 data (Chapter 6). There are several additional concepts to introduce, most notably the use of role links. The solution in this chapter will show how to receive flat file data on a receive port, map that data to an outbound 834 document, and use role links to send to a specific trading partner. You will look at options for how to use an adapter to pull data from an SFTP server, how to structure the source data you'll be mapping from, and how to configure role links to allow for sending to any number of trading partners dynamically from within an orchestration. The architectural overview of this solution is shown in Figure 10-1.
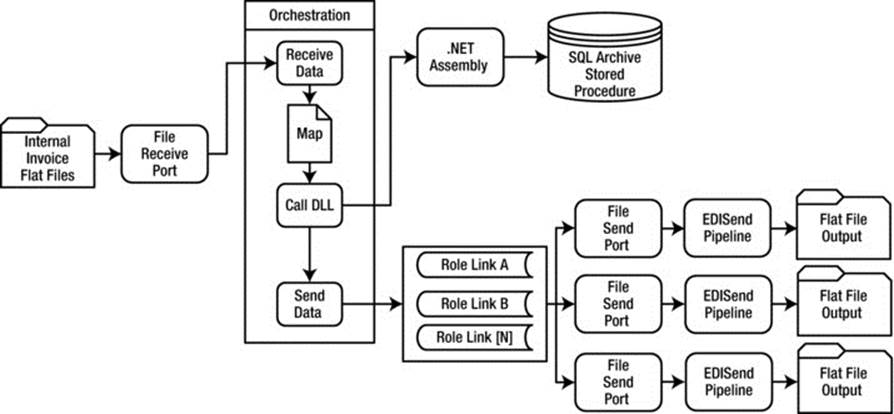
Figure 10-1. Outbound 834 Solution Overview
Visual Studio Solution
As discussed in the previous solution-based chapters, namespaces and project structure are essential to a successful project, so always take time in the beginning to think through all of the components that will be required and how best to name and organize them. Trying to change namespaces and project organization later in the development cycle is especially frustrating with BizTalk, given the number of components and complexity of testing. For this solution, the following Visual Studio projects and namespaces will be used:
· Solution Name: Company.BizTalk. You can use the same solution you used for the project in Chapter 6 “Solution: Receiving 834 Data.”
· Schemas. There are two schemas that will be used in this solution, as follows. The name of this project is Company.BizTalk.Schemas.X834. You can reuse the project from Chapter 6 here, and just include the additional schema.
o The 834 Schema. This is the target schema that will be mapped to and sent out.
o The Source Schema. This schema represents the internal representation of the enrollment data.
· Maps. The map project will contain a single map with logic to create an 834 from the source data, and will have a namespace of Company.BizTalk.Maps.X834.
The Schema Project
There will be two schemas required for this project. The first is the 834 schema that ships with BizTalk, the second is the schema which matches the source data that represents the internal format of the data.
In order to be able to define the schema for the source data, you'll need to either create it from scratch or use the Flat File Schema Wizard. The Flat File Schema Wizard is an excellent tool to use, and will allow you to quickly generate a valid schema from your source data (this, of course, assumes that you have a source system which produces a flat file). There are some tricks to using it, and it will most likely require several attempts and some manual cleanup before it is ready to use within your project, but for complex flat file types it will definitely save you time in the schema creation process. Some key hints for using the Flat File Schema Wizard include:
· To open it, add a new item to your project. You will see the wizard listed as an item option.
· You will need a valid flat file instance to point to in order for the wizard to generate an instance. Make sure and choose a sample instance that has enough data in it to ensure that all possible formatting combinations are represented (such as columns with null values, the presence of parent and child records, etc.).
· The final output of the Wizard is often two or more schemas; one will reference the other. Ideally, you will have a single schema that represents your source data, so if you have the patience to manually convert this into a single schema, you will save yourself time and frustration during the mapping process.
· If you already have a flat file schema that is similar to the format of your new source data, you should probably start by copying this and modifying it, rather than using the wizard. For example, if you have a schema that represents flat file data in a comma delineated format with line returns separating each record, and your new source schema has pipes for the separator and a number of additional columns, then it will be quicker to modify a copy of the existing schema than to work through the wizard.
The Map Project
You will have a single map for the outbound process, which will map the source data to the target 834 structure. Details for mapping are given in Chapter 4 “Mapping Data”, while advanced concepts for mapping the 834 are shown in Chapter 9 “Advanced 834 Mapping”.
The map project structure should be as follows:
· Create/reuse a new project in Visual Studio called Company.BizTalk.Maps.X834.
· Add a reference to the schema project you just created earlier in this chapter.
The .NET Helper Library Project
You will need a C# assembly for any of the database interactions that are done from the map or from the orchestration. Generally speaking, steer clear of using the SQL adapters for communication with the database, unless you have a very specific requirement such as polling on a timed basis. The adapters add a lot of unnecessary weight to a solution, and communicating through the use of C# and an assembly keeps things simple and easy to modify and maintain. A good discussion about the .NET library helper class can be found in Chapter 2 “Solution: Receiving 837P Data.” For the purposes of this demo, the library is used for lookups in the map and for archiving data to the database (which is outlined in full in Chapter 2). It is also used to determine the name of the party so that the orchestration can use role links to send the data.
The Orchestration Project
The process that will be taken for outbound 834s in the orchestration is shown in the following bulleted list (Figure 10-2 shows the orchestration in full). The details behind each of the shapes is also given in this section.
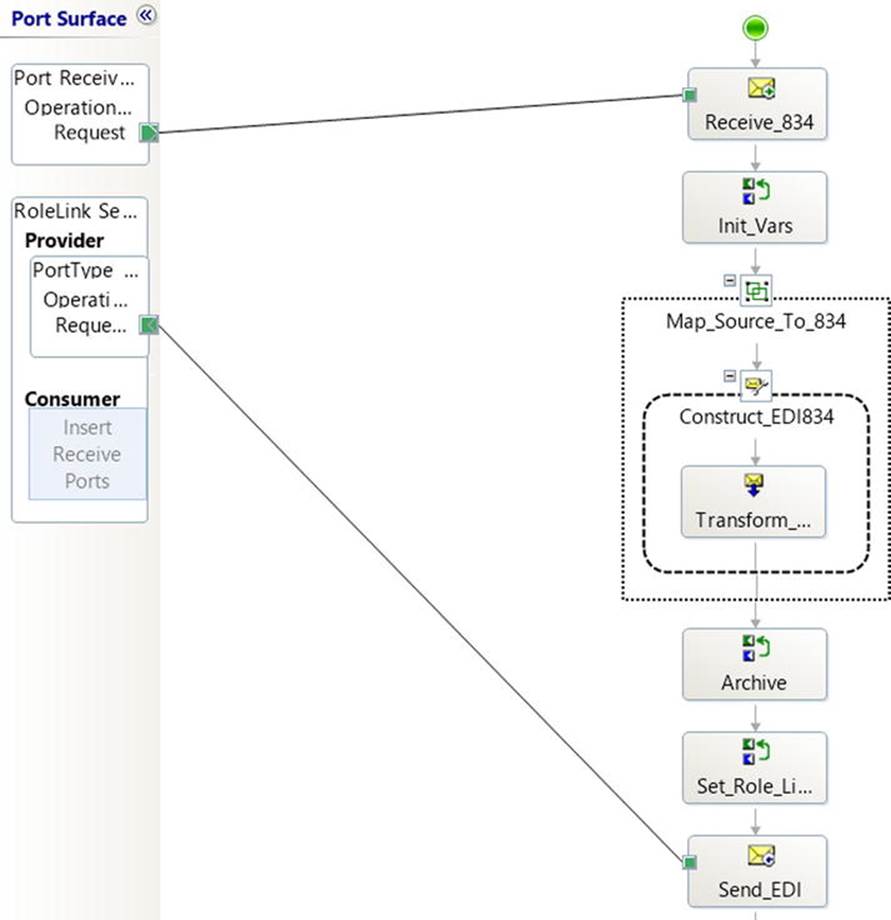
Figure 10-2. The Orchestration
· The internal representation of enrollment data is posted via a file drop, and the orchestration picks this up. The enrollment could be for any trading partner, the identification of the trading partner that will receive the document is contained in the data itself. This data will be used at the end of the orchestration to correlate the outbound message with a specific role link and party.
· The data will be mapped to the 834 EDI format, archived, and sent to the appropriate destination using the role link.
The Receive_834 Shape
This is the initial shape that instantiates the orchestration. When a flat file arrives on the port, the orchestration will be activated (set the Activate property on this shape to True). Create a message called msgSource and set the type of it to the source flat file schema defined in your schema project.
The Init_Vars Shape
The code in this shape has a number of lookups, and sets several variables to values from the inbound file that have been promoted for use. The lookups are for fields that are used in setting the appropriate outbound party for the role link and for overriding the GS02, if necessary. The code, with notes, is shown in Listing 10-1.
Listing 10-1. Init_Vars Expression Shape Code
// these fields are set here so that they can be easily written to the database
strType = "834 Outbound";
strTradingPartnerID = msgSource.RecordEnvelope.Line.CustomerID;
strReceivedFileName = msgSource(FILE.ReceivedFileName);
strLocationCode = msgSource.RecordEnvelope.Line.AddressCode;
// now get the public location code – this is a simple database lookup that
// uses a method in the helper library.
strLocationCode =
objHelper.LookupCustomerLocationCode(strTradingPartnerID,strLocationCode);
// get the party name so that the role link can be set. This is another
// simple lookup that uses a method in the helper assembly.
strPartyName =
objHelper.LookupCustomerInfo("vchPartyName","ST",strLocationCode);
// get the GS02, in case it needs to be overridden. Another lookup.
strGS02 =
objHelper.LookupCustomerInfo("vchGS02","ST",strLocationCode);
Make sure and review the additional notes around how the Init_Vars shape can be used to read from a configuration file as outlined in Chapter 2.
The Map_Source_to_834 Shape
This references the map that was created in the mapping project earlier in this chapter. The input is msgSource and the output can go into a message called msgEDI834 (and should be the 834 schema type).
The Archive Shape
This is basically the same process for archiving as was outlined in Chapter 2. The code within this shape simply takes an XML document and some additional parameters (like the document type, the party name, etc.) and passes it to a method in the helper assembly, which in turn writes the information to a SQL table.
The Set_RoleLink Shape
Since every outbound enrollment data structure is delivered to this orchestration, the orchestration has to determine who the receiving party is going to be. For example, say that there are ten trading partners who receive enrollment data, all on different FTP sites with different envelope information. If role links were not used, the orchestration logic would require ten different ports just to send the data, let alone determine the envelope settings and party to associate it with. Using role links allows the orchestration to have a single outbound port, and uses the settings in the configured role links and party settings to distribute the data to the correct target party.
The code for this shape is shown here:
RoleLink_Send834(Microsoft.XLANGs.BaseTypes.DestinationParty) =
new Microsoft.XLANGs.BaseTypes.Party(strPartyName,"OrganizationName");
This sets the value of the destination party (which will match the name of the role link to use, configured later in the BizTalk Admin console) that will be used to send the data. In order for this to work, you will need to take the following steps to configure the role link. The role link will act and look very similar to a send port.
1. On the port surface of your orchestration, right click and select New Role Link. In the wizard that pops up, do the following:
a. Set the name – for this Demo, it can be set to RoleLink_Send834.
b. Create a new Role Link Type. The name can be PortType_Send_EDI834
c. Set the role link to “Provider.”
d. Create a port type within the Provider role link that is set to the Send_EDI834 port type, has one-way communication and public access.
2. Create a new Role Link Type in the orchestration view of your orchestration, and link it to the role link “port” you created in the previous step.
The Send_EDI Shape
This shape needs to be set to the outbound message created from the map (the 834 EDI) and connected to the Provider type on the role link. The type of message should match the outbound port type within the Provider role link.
The Pipeline Project
The final project required is a simple custom flat file pipeline using the Flat File Disassembler component that ships with BizTalk. The use of this pipeline on a Receive Port will allow the inbound source document to be converted from the flat file format into XML. Figure 10-3shows this pipeline. The steps to create this pipeline are as follows:
· Create a new project called Company.BizTalk.Outbound.Pipelines.X834.
· Add a new Receive Pipeline to this project.
· In the pipeline GUI interface, drop a Flat File Disassembler component on the Disassemble stage.
· In the properties of the disassembler component, set the Document Schema property to the Company.BizTalk.Schemas.X834 schema created earlier in this project (you may have to deploy the schema DLL in order to have access to this).
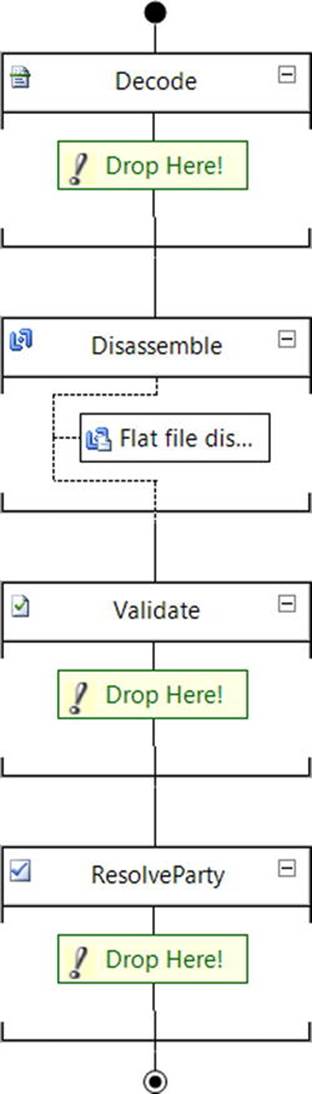
Figure 10-3. The Flat File Pipeline and Disassembler Component
Setting up the BizTalk Components
For this solution, you will need to set up the receive port and receive location, bind the orchestration, and configure the role link settings.
Before configuring these components, you will want to deploy your Visual Studio assemblies to the BizTalk Application. Steps for doing this are outlined in Chapter 2.
File Receive Port
The input to this solution is a simple File Receive Port. A flat file will arrive on a file drop and will be picked up by the orchestration. This receive location associated with this port needs to have the pipeline created earlier in this chapter associated with it, so that it can process the flat file.
· Create a new Receive Port and Receive Location combination, both named Company.BizTalk.Receive.Enrollment.FlatFile.
· Set the Type to File and point it to the directory where the flat files will be dropped.
· Set the Receive Pipeline to Company.BizTalk.Outbound.Pipelines.X834.
SFTP Send Ports
Each trading partner can receive their data via any protocol they require. In this case, you will look at configuring an SFTP Send Port. This port will be associated with the BizTalk party, and will be triggered from the orchestration through the role link that you will soon configure. There will be one send port created for each trading partner. In order to illustrate role links, two trading partners will be set up, so two send ports will need to be configured for this demo.
· Create two new Send Ports named Company.BizTalk.Send.TradingPartner_A and Company.BizTalk.Send.TradingPartner_B.
· Set the Type to SFTP. Details for configuring the SFTP adapter are given in Chapter 5.
· Set the Send Pipeline to EdiSend.
![]() Note A single send port can be used to send numerous EDI transaction types. You are configuring these for the 834, but if you were to deliver more transaction types (such as an 837, for example) you would not need to configure a new port – unless the actual physical location that is being delivered to is different for the various document types.
Note A single send port can be used to send numerous EDI transaction types. You are configuring these for the 834, but if you were to deliver more transaction types (such as an 837, for example) you would not need to configure a new port – unless the actual physical location that is being delivered to is different for the various document types.
Party Settings
In the previous chapter, you looked at configuring the base settings for the BizTalk Party and Agreement on inbound data. You can reuse these settings, or you can configure fresh trading partners. The home organization can remain the same. The basics of what you will want are as follows (Figure 10-4 shows a high-level summary of parties and agreements).
· Three trading partners. One representing the home organization (your company), and one for each of the recipient organizations that the 834 EDI documents are being sent to.
· Two agreements, one for each recipient organization.
· In the agreements, the critical information to configure is as follows
o The Identifiers tab must be set up on both the inbound and outbound settings.
o The Send Port tab on the outbound settings (Home Company ![]() Trading Partner) must have a reference to the SFTP Send Port configured earlier in this chapter. Make sure that the send port you are setting up corresponds to the party you are configuring the agreement for.
Trading Partner) must have a reference to the SFTP Send Port configured earlier in this chapter. Make sure that the send port you are setting up corresponds to the party you are configuring the agreement for.
o The Envelope tab must have the information for the 834 transaction type configured.
§ Transaction Type should be 834-Benefit Enrollment and Maintenance
§ Version is set to 00401 (match your correct version).
§ Target namespace should be http://schemas.microsoft.com/BizTalk/EDI/X12/2006
§ GS1 should be BE-Benefit Enrollment and Maintenance (834)
§ GS2 through GS7 should be set based on what your trading partner requires (see the trading partner implementation guide or a sample 834 instance from them)
§ GS8 should be 004010 (or 005010 for 5010, you will need to match the right version).
![]() Note The role links work in conjunction with the parties, and whatever send port is associated with the party in the agreements (and corresponds to the type of data being sent) will be used to send the physical file.
Note The role links work in conjunction with the parties, and whatever send port is associated with the party in the agreements (and corresponds to the type of data being sent) will be used to send the physical file.
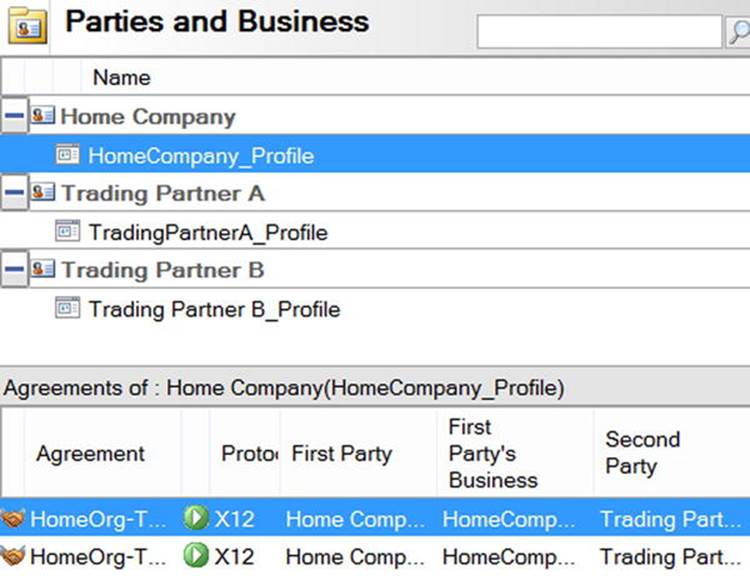
Figure 10-4. Parties and Agreements
Configuring the Role Links
The final step for this solution is the set up and configuration of the role links. The orchestration is set to pick up enrollment data that could be delivered to any trading partner in the 834 format. For the purposes of this demo, two trading partners have been configured, but in real-world scenarios you may be required to set up dozens of trading partners, all receiving the 834 transaction type. For each trading partner, you will need to:
· Configure a BizTalk party and create a new agreement (this is where the envelope and other information unique to a trading partner is configured).
· Set up a send port. A send port can be used to send multiple EDI document types (834, 837, etc.), but each trading partner will need to have its own dedicated send port.
· Set up a role link. This enables the orchestration to dynamically send to the appropriate target party.
To set up a role link, take these steps:
· Open the BizTalk Admin console and click on Role Links in the Company.BizTalk application.
· In the right-hand pane, double click the Provider option (this represents parties that will be sent to).
· Click the Enlist button. In the window that opens, select the trading partner that you will be configuring a role link for. You will enlist one role link for each of the trading partners receiving an 834 document. Click OK to save these. Figure 10-5 shows the settings in this window.
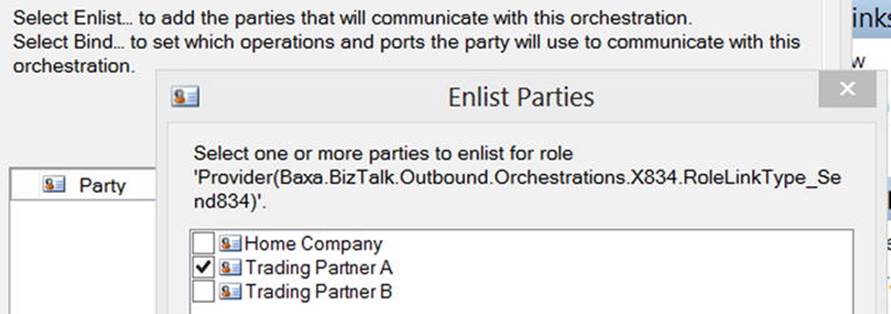
Figure 10-5. Enlisting a party for role link configuration
· Back in the main window, double click each party to bind them.
· In the window that opens for binding, select the send port to associate with the orchestration’s port operation. This send port should be unique to the trading partner (although it can be used for multiple document types). Figure 10-6 shows this binding for a trading partner.
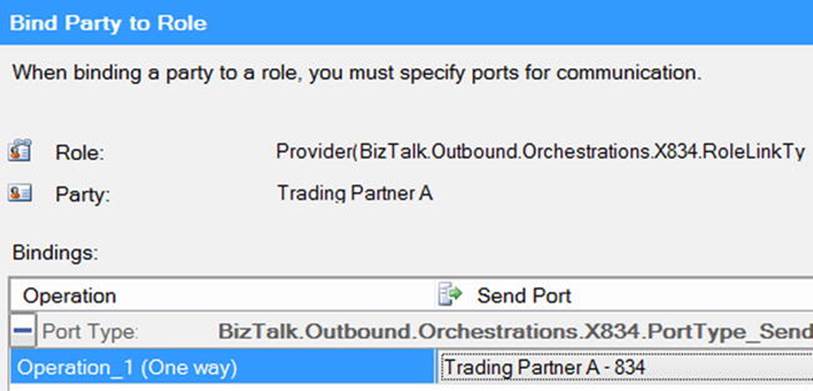
Figure 10-6. Binding the party to a role
· Once you have the role links fully configured, the orchestration will be able to utilize them.
· The orchestration binds to the role link using the party name. For example, if the role link shows “Trading Partner A” as the party name when it is has been bound, the orchestration must refer to it with this name. So – in the Set_RoleLink shape of the orchestration you created earlier in this chapter, the code would be:
o RoleLink_Send834(Microsoft.XLANGs.BaseTypes.DestinationParty) =
o new Microsoft.XLANGs.BaseTypes.Party(“Trading Partner A”,“OrganizationName”);
Enabling and Running the Solution
In order for this solution to work, the Receive Location must be enabled, the Send Ports must be started, and the orchestration must be running. You will want to restart the BizTalk Host Instance to ensure that all of the most recent configurations and components are loaded into memory.
Conclusion
This chapter covered some critical aspects of developing BizTalk EDI solutions using some advanced BizTalk concepts. You will likely find that the requirements for your specific implementation vary from the specific pattern outlined in this solution, but you should have more than enough information now to be able to architect an efficient and highly maintainable outbound solution. The next chapter will discuss the same outbound 834 flow, with all of the advanced components stripped out. This will allow you to compare the various styles of development and the required components for various architectures.
All materials on the site are licensed Creative Commons Attribution-Sharealike 3.0 Unported CC BY-SA 3.0 & GNU Free Documentation License (GFDL)
If you are the copyright holder of any material contained on our site and intend to remove it, please contact our site administrator for approval.
© 2016-2026 All site design rights belong to S.Y.A.