Exam Ref 70-246 Monitoring and Operating a Private Cloud
Chapter 4. Configure and maintain service management
IT professionals are responsible for providing specific services to the organization for which they work. Service Manager provides the ability to measure the performance of IT professionals in providing these services by tracking the speed at which incidents and problems are resolved. This chapter includes information on configuring Service Manager to track performance against service level objectives. You’ll learn how to configure and manage Service Manager incidents, problems, and knowledge articles. You’ll also learn about managing cloud resources through VMM by configuring available profiles and templates.
Objectives in this chapter:
![]() Objective 4.1: Implement service level management
Objective 4.1: Implement service level management
![]() Objective 4.2: Manage problems and incidents
Objective 4.2: Manage problems and incidents
![]() Objective 4.3: Manage cloud resources
Objective 4.3: Manage cloud resources
Objective 4.1: Implement service level management
This objective deals with how you implement service level management with Service Manager. This includes the steps that you need to take to allow Service Manager to measure and track whether service level objectives are being breached by configuring calendars, metrics, and service level objectives.
This section covers the following topics:
![]() Understanding service level management
Understanding service level management
![]() Creating calendar items
Creating calendar items
![]() Creating metrics
Creating metrics
![]() Creating queues
Creating queues
![]() Creating service level objectives
Creating service level objectives
![]() Sending notifications
Sending notifications
![]() SLA reporting
SLA reporting
Understanding service level management
Service level management is a term used to describe measuring incident and service request lifecycle. The lifecycle of an incident and service request starts when the incident or service request is created and concludes when the incident or service request is resolved.
A service level item comprises:
![]() Queues for specific service levels
Queues for specific service levels
![]() Time metrics for those queues
Time metrics for those queues
As a part of service level management, you can also configure notifications to be sent to users prior to and after service levels defined by those queue metrics is exceeded. You use the Calendar, Metric, and Service Level Objectives node of the Administration workspace of the Service Manager console, shown in Figure 4-1, to configure service level management.

FIGURE 4-1 Administration workspace
More Info: Service Level Management
You can learn more about service level management at http://technet.microsoft.com/en-US/library/hh519775.aspx.
Creating calendar items
You use the Calendar node to define operational periods, such as which days are workdays, which hours are work hours, and which days, such as holidays, count as exceptions. Calendar items are separate work schedules that constitute time that is available and which is measured where IT professionals resolve Service Manager incidents and service requests.
To create a calendar item, perform the following steps:
1. In the Administration workspace of the Service Manager console, click Calendar, under Service Level Management.
2. In the Tasks menu, click Calendar, and then click Create Calendar.
3. On the General page of the Create/Edit Calendar dialog box, provide the following information (Figure 4-2 shows an example calendar):
![]() Title A name for the calendar.
Title A name for the calendar.
![]() Time Zone The time zone in which the calendar will be used.
Time Zone The time zone in which the calendar will be used.
![]() Working Days And Hours Select which days of the week and which hours of each day will make up the period over which IT professionals are expected to resolve incidents and service requests.
Working Days And Hours Select which days of the week and which hours of each day will make up the period over which IT professionals are expected to resolve incidents and service requests.
![]() Holidays Specify any holidays that will function as exemptions to the calendar when it comes to calculating incident and service request metrics.
Holidays Specify any holidays that will function as exemptions to the calendar when it comes to calculating incident and service request metrics.
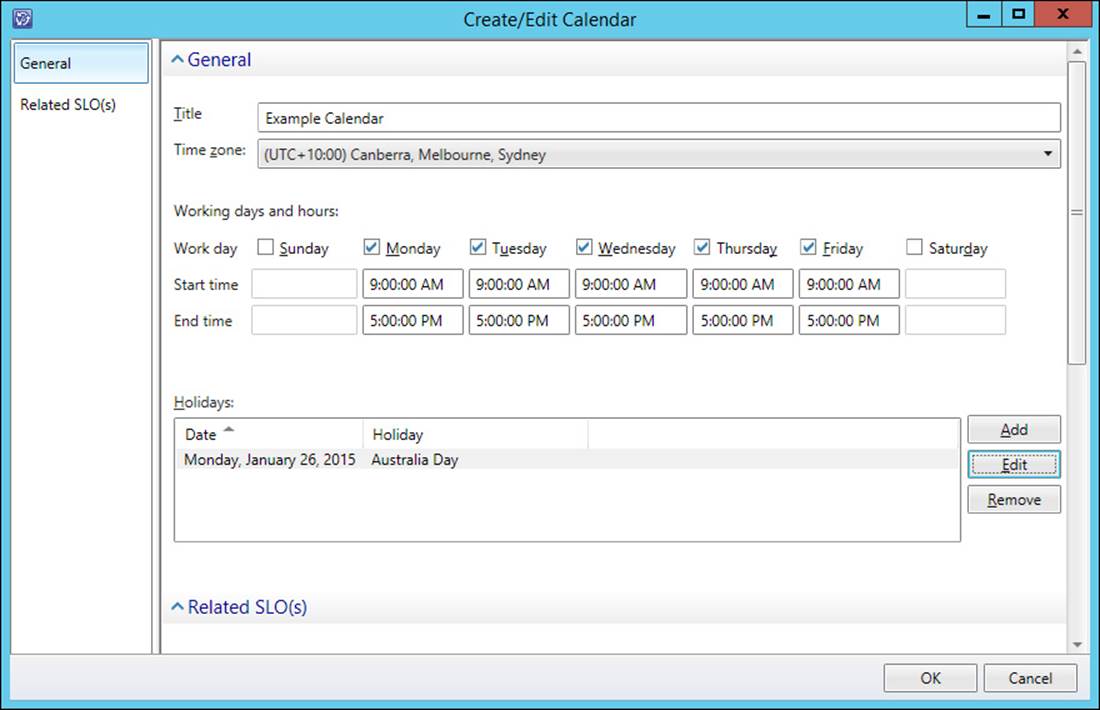
FIGURE 4-2 Create/Edit Calendar
4. Click OK to create the calendar.
More Info: Calendar Items
You can learn more about calendar items at http://technet.microsoft.com/en-us/library/hh519740.aspx.
Creating metrics
You use the Metric node to create time metrics using calendar items that correspond to service objectives. A Service Manager time metric is the amount of time that occurs between a start time and an end time. Service Manager terminology specifies both of these as “date,” but it is important for you to note that a Service Manager “date” includes the hour, minute, and second information, and is not simply the calendar day.
Service Manager includes the following predefined metrics:
![]() Resolution Time This is the maximum allowed time for incident resolution. Service Manager calculates resolution time using an incident’s creation time and resolution date.
Resolution Time This is the maximum allowed time for incident resolution. Service Manager calculates resolution time using an incident’s creation time and resolution date.
![]() Completion Time This is the maximum allowed time for service request completion. Service Manager calculates completion time, a service request’s creation time, and completion date.
Completion Time This is the maximum allowed time for service request completion. Service Manager calculates completion time, a service request’s creation time, and completion date.
Metrics for incidents and metrics for service requests use separate Service Manager classes. When creating an incident or metric for service requests, you don’t just have to choose creation date and resolution date. You can choose to assign one of the following items for Start Date and for End Date:
![]() Actual Downtime End Date
Actual Downtime End Date
![]() Actual Downtime Start Date
Actual Downtime Start Date
![]() Actual End Date
Actual End Date
![]() Actual Start Date
Actual Start Date
![]() Closed Date
Closed Date
![]() Created Date
Created Date
![]() First Assigned Date
First Assigned Date
![]() First Response Date
First Response Date
![]() Required By
Required By
![]() Resolve By
Resolve By
![]() Resolved Date
Resolved Date
![]() Scheduled Downtime End Date
Scheduled Downtime End Date
![]() Scheduled Downtime Start Date
Scheduled Downtime Start Date
![]() Scheduled End Date
Scheduled End Date
![]() Scheduled Start Date
Scheduled Start Date
To create a metric for incidents, perform the following steps:
1. In the Administration workspace of the Service Manager console, click Metric, under Service Level Management.
2. In the Tasks menu, click Metric, and then click Create Metric.
3. In the Create/Edit Metric dialog box, click Browse.
4. In the Select A Class dialog box, click Incident, as shown in Figure 4-3, and click OK.
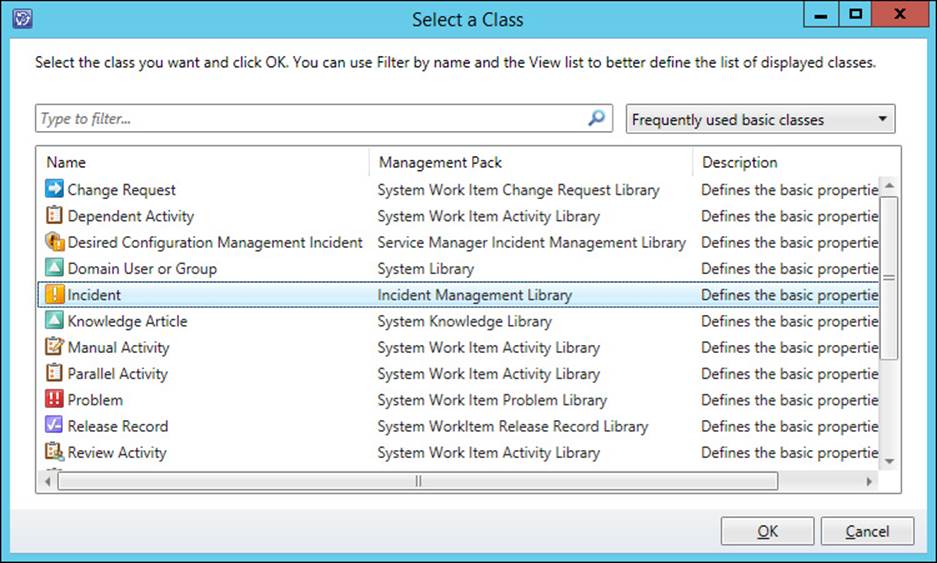
FIGURE 4-3 Select a class
5. Provide a name for the metric. On the Start Date drop-down list, select the event that you will use to start measuring the time taken to resolve the incident. For example, you might choose First Assigned Date. On the End Date drop-down list, select the event that will be used to conclude measuring the time taken to resolve the incident. For example, you might choose Resolved Date. Figure 4-4 shows an example of the Create/Edit Metric dialog box for an incident.
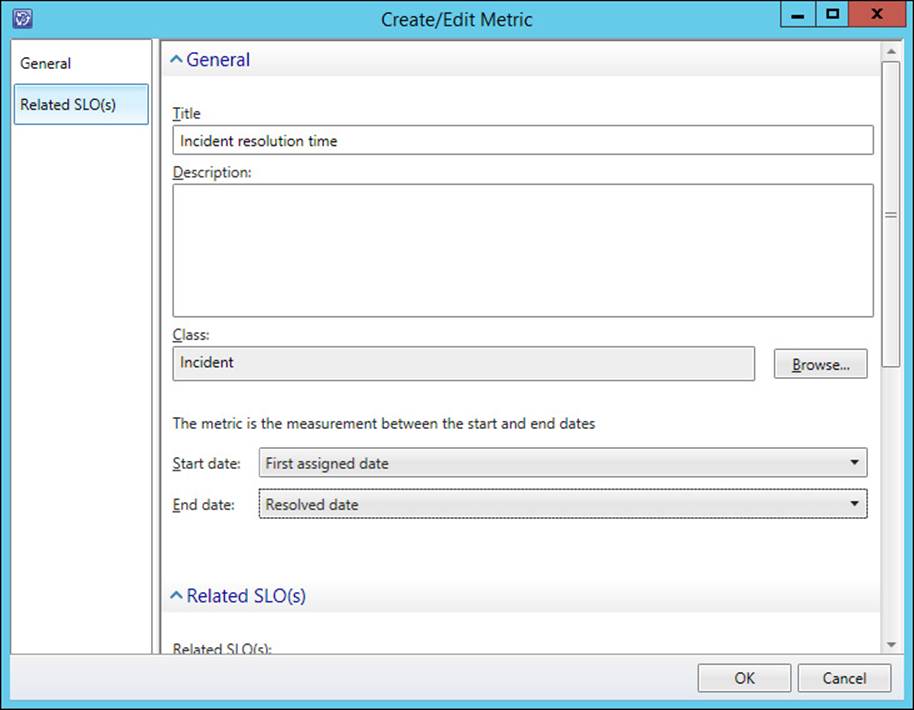
FIGURE 4-4 Create/Edit Metric
6. Click OK to create the metric.
To create a metric for service requests, perform the following steps:
1. In the Administration workspace of the Service Manager console, click Metric, under Service Level Management.
2. In the Tasks menu, click Metric, and then click Create Metric.
3. In the Create/Edit Metric dialog box, click Browse.
4. In the Select A Class dialog box, click Service Request, as shown in Figure 4-5, and click OK.
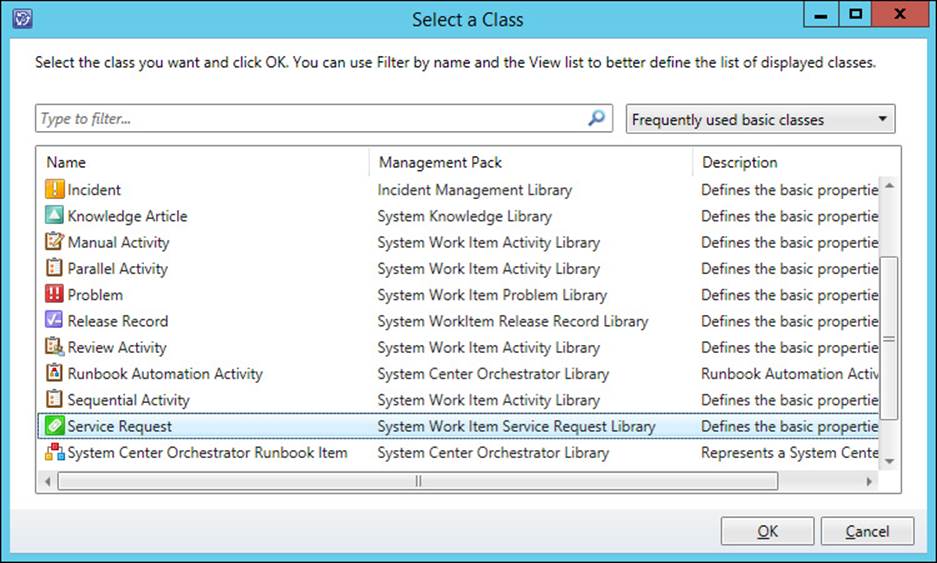
FIGURE 4-5 Select a Class
5. Provide a name for the metric. On the Start Date drop-down list, select the event that you will use to start measuring the time taken to resolve the service request. For example, you might choose Created Date. On the End Date drop-down list, select the event that will be used to conclude measuring the time taken to resolve the service request. For example, you might choose Completed Date. Figure 4-6 shows an example of the Create/Edit Metric dialog box for a service request.
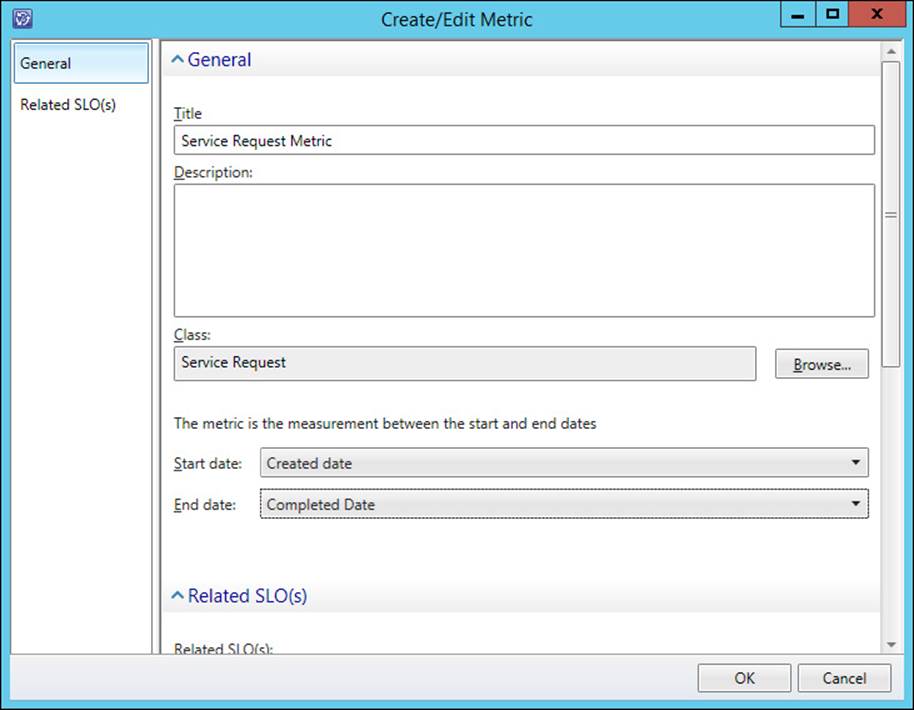
FIGURE 4-6 Create/Edit Metric
6. Click OK to close the Create/Edit Metric dialog box.
More Info: SLA Metrics
You can learn more about SLA metrics at http://technet.microsoft.com/en-us/library/hh519571.aspx.
Creating queues
Queues allow you to group related work items, such as incidents and service requests. You need to already have a queue, or create a queue, when creating a service level objective. When linking a service level objective to a queue, you will need to ensure that the queue and the service level objective are the same type of class.
To create an incident queue, perform the following steps:
1. In the Library workspace of the Service Manager console, click Queues, under Library.
2. In the Tasks menu, click Queues, and then click Create Queue.
3. On the General page of the Create A Queue Wizard, specify a name, set the work item type to Incident (or Service Request if creating a queue for service requests), and specify a management pack in which to save the queue. Figure 4-7 shows the General page.

FIGURE 4-7 Create A Queue
4. On the Criteria page, select the work items that you want to use to filter the queue. For example, you might only want to allow the queue to contain items with a specific minimum priority, so you’d choose the Priority filter, and set it to a value, as shown in Figure 4-8.
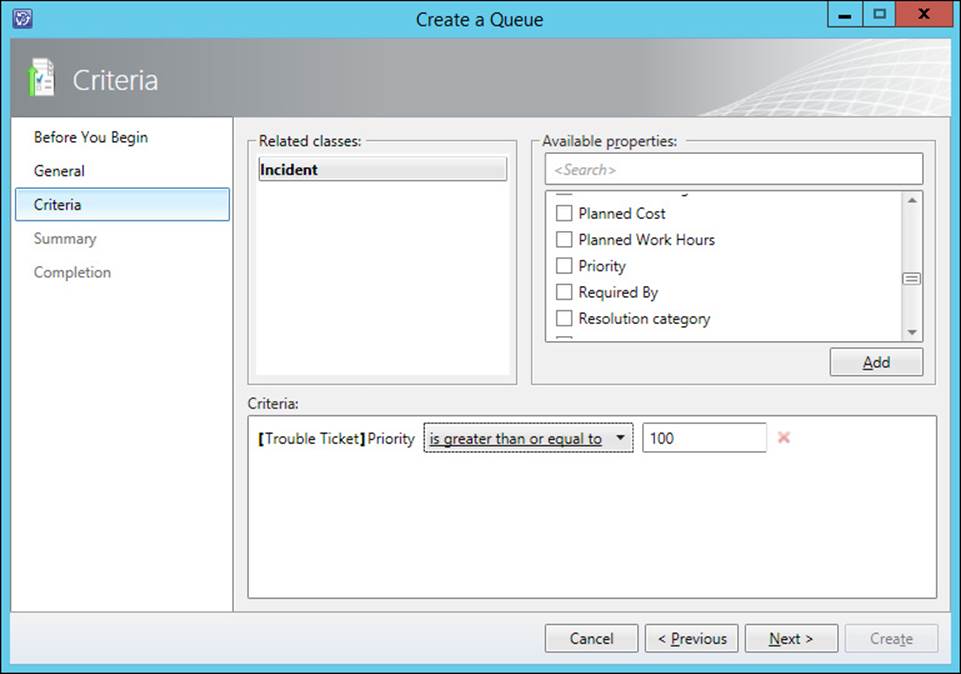
FIGURE 4-8 Create a queue criteria
5. Complete the wizard to create the queue.
More Info: Queues
You can learn more about queues at http://technet.microsoft.com/en-us/library/hh519613.aspx.
Creating service level objectives
A service level objective (SLO) is a relationship that you define using Service Manager between: a calendar item and a time metric, a queue and a service level, and actions occurring before or after a service level is exceeded. For example, you could configure a service level objective so that a notification is sent if a service request is not completed within a designated amount of time.
Although it is possible to create the metric, calendar items, and queues that the service level objective will use while creating the service level objective, best practice is to create these separately as detailed earlier before creating the service level objective.
To create a service level objective for incidents where a calendar item and time metric already exist, perform the following steps:
1. In the Administration workspace of the Service Manager console, click Service Level Objectives, under Service Level Management.
2. On the Tasks menu, click Service Level Objectives, and then click Create Service Level Objective.
3. On the General page of the Create Service Level Objective Wizard, provide a name for the service level objective, ensure that the class is set to Incident, as shown in Figure 4-9, (you would set the class to Service Request if creating a service level objective related to service requests), and specify a management pack in which to store the service level objective.
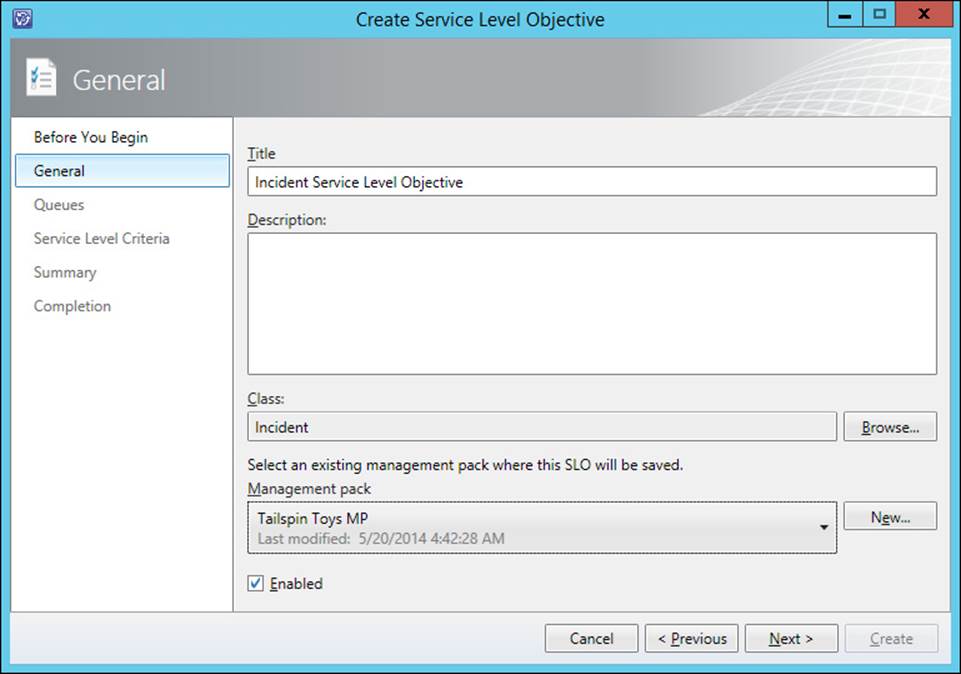
FIGURE 4-9 Create a service level objective
4. On the Queues page, select or create a queue that is configured for the same type of work item as the service level objective. Figure 4-10 shows the selection of a queue named Incident Queue.
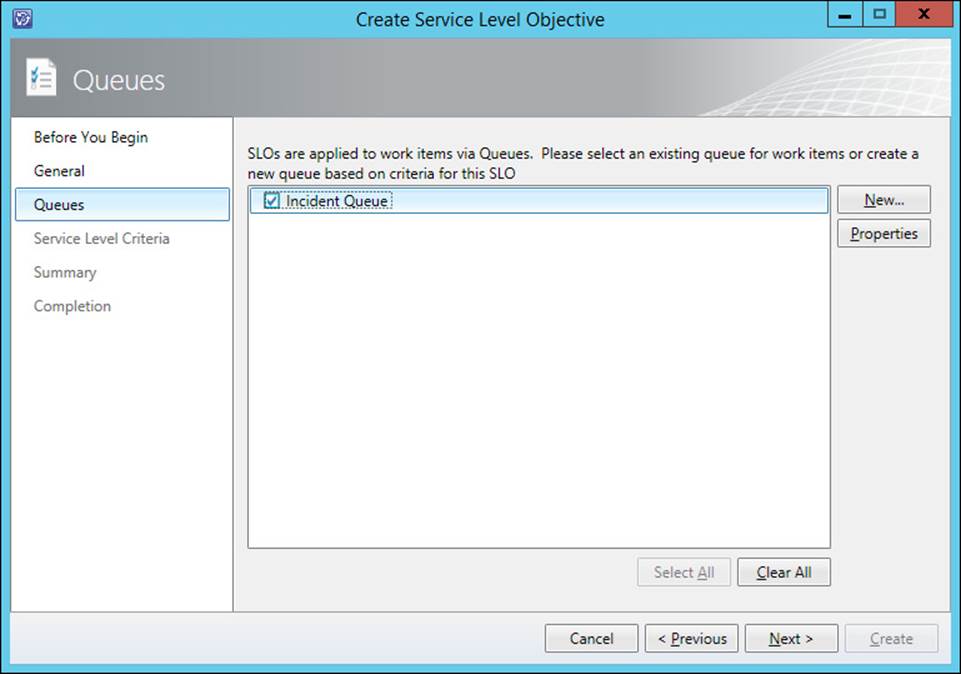
FIGURE 4-10 SLO queue
5. On the Service Level Criteria page, specify the following, as shown in Figure 4-11:
![]() Calendar The calendar that will be used to track which times count as work hours.
Calendar The calendar that will be used to track which times count as work hours.
![]() Metric The metric that will be used to define the start and end date of the incident.
Metric The metric that will be used to define the start and end date of the incident.
![]() Target The service level objective target that will be used to specify how much time can be spent on the incident or service request before being in breach of the service agreement.
Target The service level objective target that will be used to specify how much time can be spent on the incident or service request before being in breach of the service agreement.
![]() Warning Threshold The amount of time before the target is reached to send a warning notification.
Warning Threshold The amount of time before the target is reached to send a warning notification.
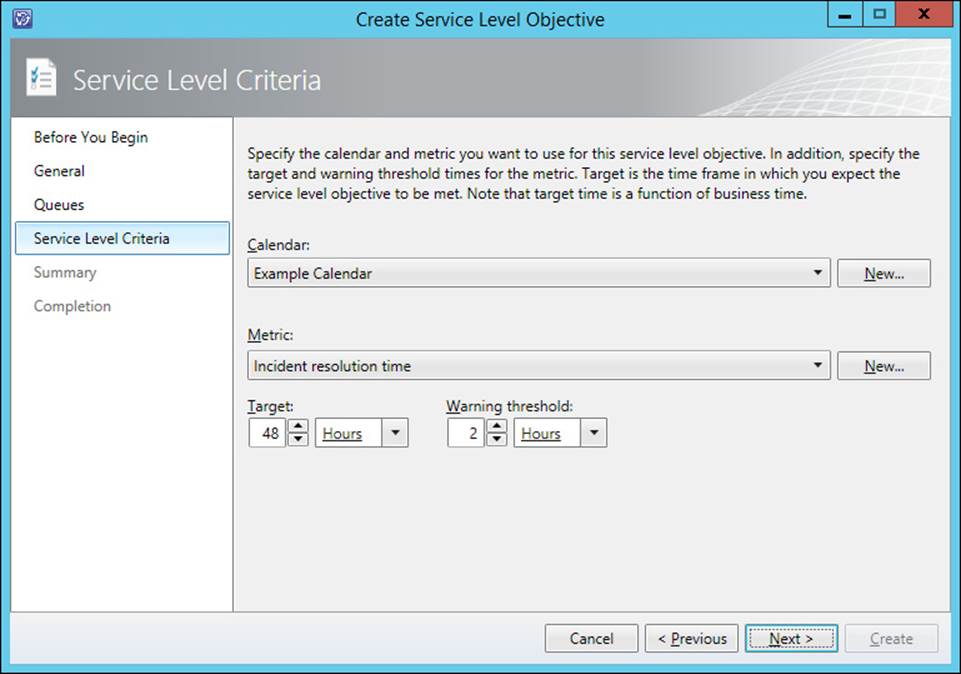
FIGURE 4-11 Service Level Criteria
6. Complete the wizard to create the service level objective.
To view incidents with SLA (Service Level Agreement) information, perform the following steps:
1. In the Work Items workspace, expand the Incident Management node.
2. Select either the Incidents with Service Level Breached node or the Incidents with Service Level Warning node, as shown in Figure 4-12.
FIGURE 4-12 Incidents With Service Level Warning
More Info: Service Level Objectives
You can learn more about service level objectives at http://technet.microsoft.com/en-US/library/hh519603.aspx.
Sending notifications
You can configure Service Manager to send notifications to the responsible IT professional when a service level objective reaches certain states, such as the warning or breach state. For example, to configure the responsible IT professional to be notified when an incident enters the warning state prior to breaching a SLO, perform the following steps:
1. In the Administration workspace of the Service Manager console, click Subscriptions, under Notifications.
2. In the Tasks menu, click Subscriptions, and then click Create Subscription.
3. On the General page of the Create E-Mail Notification Subscription Wizard, provide a name of the notification, select a management pack in which to store the notification, and configure the following settings, as shown in Figure 4-13:
![]() When To Notify When An Object Of The Selected Class Is Updated
When To Notify When An Object Of The Selected Class Is Updated
![]() Targeted Class Service Level Instance Time Information
Targeted Class Service Level Instance Time Information
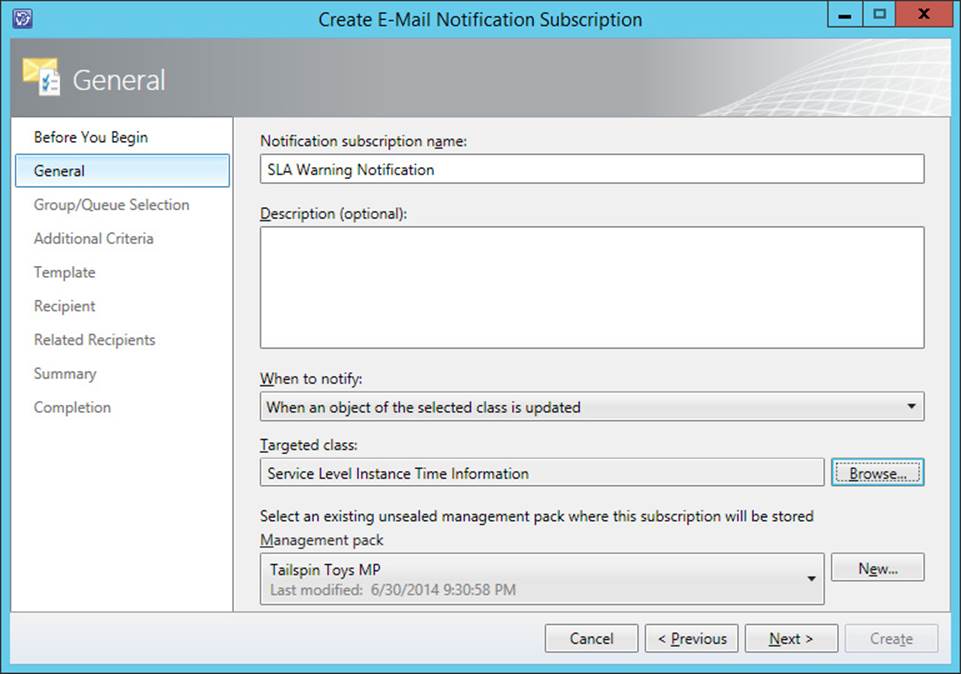
FIGURE 4-13 SLA Warning Notification
4. On the Group/Queue Selection page, click Next.
5. On the Additional Criteria page, configure the following settings:
![]() On the Changed From tab, set [Service Level Instance Time Information] Status Does Not Equal Warning.
On the Changed From tab, set [Service Level Instance Time Information] Status Does Not Equal Warning.
![]() On the Changed To tab, set [Service Level Instance Time Information] Status Equals Warning. This setting is shown in Figure 4-14.
On the Changed To tab, set [Service Level Instance Time Information] Status Equals Warning. This setting is shown in Figure 4-14.
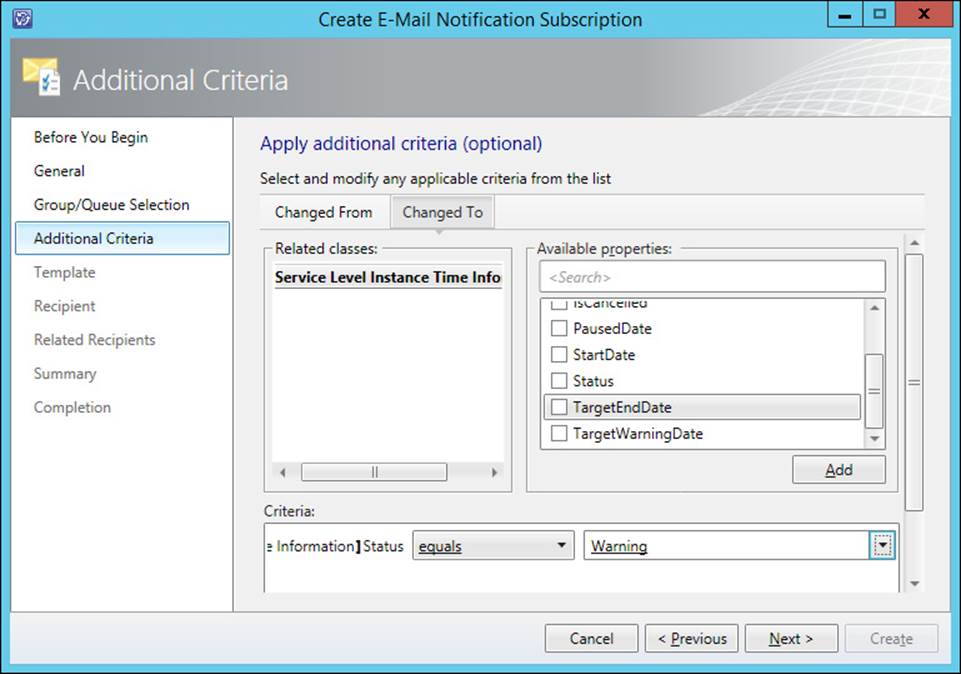
FIGURE 4-14 Additional Criteria
6. On the Template page, select or create an email template that is targeted at the Service Level Instance Time Information class. Figure 4-15 shows the creation of this template.
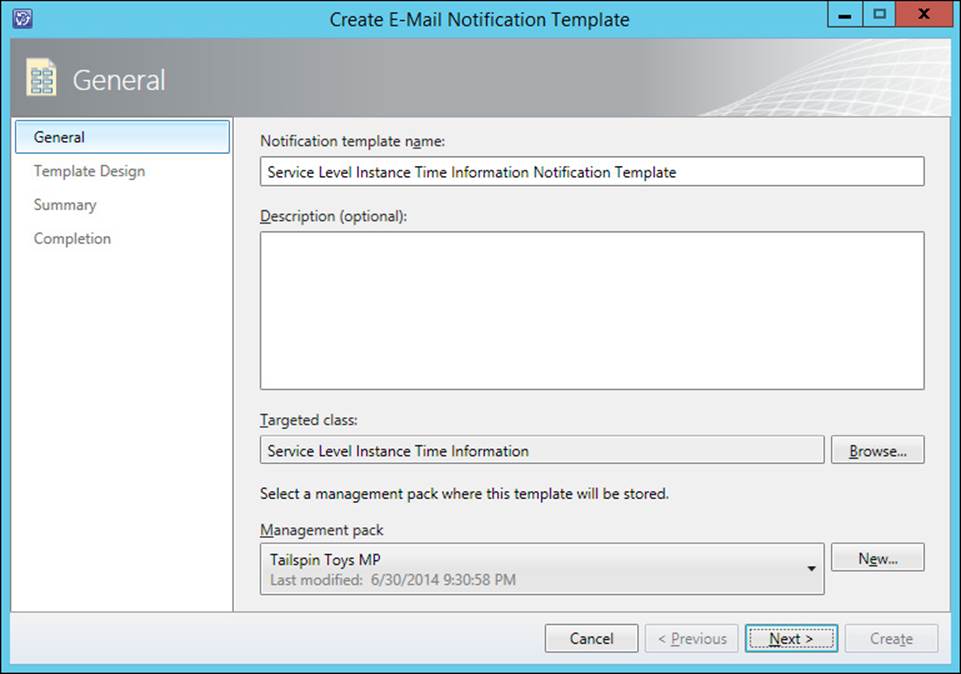
FIGURE 4-15 Notification template
7. On the Recipient page, click Add to select the groups and users to which the notification should be sent.
8. On the Related Recipient page, click Add. On the Select Related Recipient dialog box, click [Work Item] Work Item has Service Level Instance Information, and select Primary Owner, as shown in Figure 4-16, and Assigned To User.
FIGURE 4-16 Related recipient
9. Verify that the Related Recipients page matches Figure 4-17, and then complete the wizard.
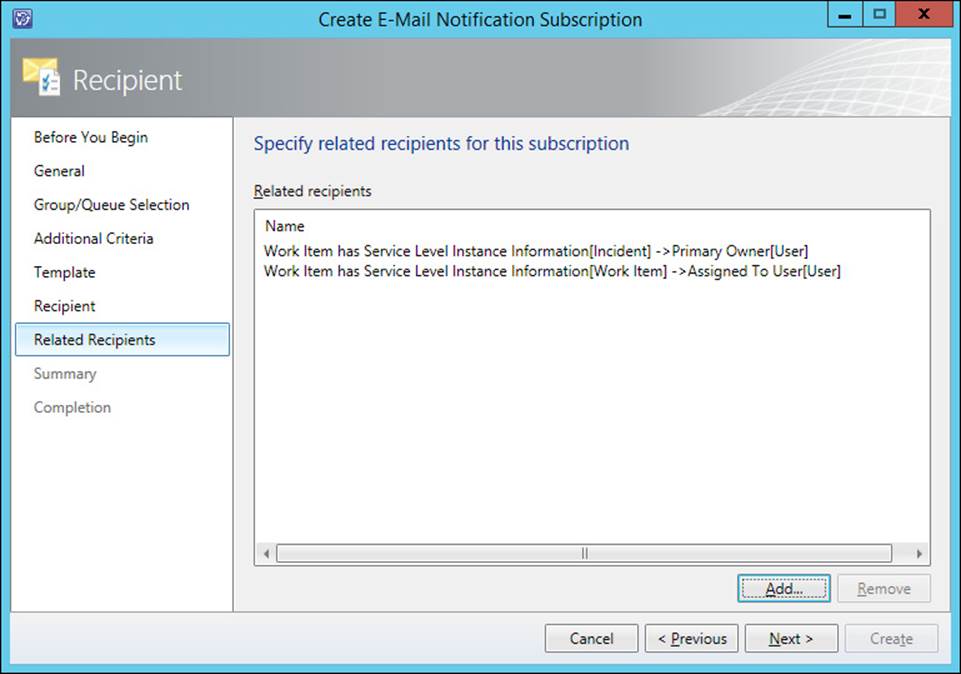
FIGURE 4-17 Email notification subscription
More Info: SLA Notifications
You can learn more about SLA notifications at http://technet.microsoft.com/en-US/library/hh519605.aspx
SLO escalation
You can use the Change To Warning Of Incident or a service request’s Service Level Instance Time Information as the trigger point for a custom workflow that automatically escalates incidents, or service requests that are in danger of breaching. You can also create and use an Orchestrator runbook to escalate an incident or service request when it enters a warning or breached state.
 Exam Tip
Remember which methods you can use to configure automatic escalation of incidents that are in danger of breaching SLO.
SLA reporting
Service Manager has a number of reports available through the Reporting workspace that you can use to analyze performance against service level agreements. Reports that can be used to analyze SLA performance include:
![]() Incident KPI Trend This report provides the number of incidents, the number of incidents past their target resolution time, the number of escalated incidents, average resolution time, labor minutes per incident, and the size of the incident backlog.
Incident KPI Trend This report provides the number of incidents, the number of incidents past their target resolution time, the number of escalated incidents, average resolution time, labor minutes per incident, and the size of the incident backlog.
![]() Incident Resolution This report provides the number of incidents, including number of incidents that have exceeded targeted resolution time, and average resolution time.
Incident Resolution This report provides the number of incidents, including number of incidents that have exceeded targeted resolution time, and average resolution time.
![]() Service KPI Trend This report provides metrics across services, groups, and collections for Service Manager, as well as for Operations Manager and Configuration Manager.
Service KPI Trend This report provides metrics across services, groups, and collections for Service Manager, as well as for Operations Manager and Configuration Manager.
More Info: Service Manager Reports
You can learn more about Service Manager reports at http://technet.microsoft.com/en-us/library/hh519764.aspx.
 Thought experiment: Service level management at Tailspin Toys
Tailspin Toys is going through a restructuring. As part of the restructuring until business picks up, the office will be closed every third Monday of each month. The service desk at Tailspin Toys has strict service level agreements, and incidents must be resolved in a timely manner. As part of ensuring that the service desk meets its obligations, the service desk manager needs to be made aware if any incidents are in danger of breaching SLO metrics. With this information in mind, answer the following questions:
1. How can you ensure that the Mondays that the office is closed are not measured when calculating SLOs?
2. How can you ensure that the service desk manager is made aware when incidents are in danger of breaching SLO metrics?
Objective summary
![]() A calendar allows you to specify which times and days constitute work hours when determining the basis of measuring time for service level objectives.
A calendar allows you to specify which times and days constitute work hours when determining the basis of measuring time for service level objectives.
![]() A Service Manager time metric is the amount of time that occurs between a start time and an end time, and is used to measure whether service objectives have been achieved.
A Service Manager time metric is the amount of time that occurs between a start time and an end time, and is used to measure whether service objectives have been achieved.
![]() Queues allow you to group related work items, such as incidents and service requests.
Queues allow you to group related work items, such as incidents and service requests.
![]() A Service Level Objective (SLO) is a relationship defined in Service Manager between a calendar item and a time metric, a queue and a service level, and actions, that occur preceding or after a service level is exceeded.
A Service Level Objective (SLO) is a relationship defined in Service Manager between a calendar item and a time metric, a queue and a service level, and actions, that occur preceding or after a service level is exceeded.
![]() Service Manager can send notifications when a service level objective reaches certain states, such as the warning or breach state.
Service Manager can send notifications when a service level objective reaches certain states, such as the warning or breach state.
![]() You can use the Change To Warning Of Incident or a service request’s Service Level Instance Time Information as the trigger point for a custom workflow that automatically escalates incidents, or service requests that are in danger of breaching.
You can use the Change To Warning Of Incident or a service request’s Service Level Instance Time Information as the trigger point for a custom workflow that automatically escalates incidents, or service requests that are in danger of breaching.
Objective review
Answer the following questions to test your knowledge of the information in this objective. You can find the answers to these questions and explanations of why each answer choice is correct or incorrect in the “Answers” section at the end of this chapter.
1. Which of the following must be present to complete the configuration of a Service Manager SLO?
A. Calendar
B. Metric
C. Queues
D. Subscriptions
2. You are configuring Service Manager to send notifications in the event that a service level objective reaches a warning or breach state. Which of the following targeted classes would you use when configuring this notification?
A. Service Level Instance Time Information
B. Change Request
C. Review Activity
D. Problem
3. You want to automatically have an incident be escalated when it is in danger of breaching the SLO. Which of the following could you configure to accomplish this goal?
A. A custom workflow
B. Orchestrator runbook
C. Scheduled task
D. Review activity
4. You are configuring a metric that should involve measuring the time between incident creation and the first response made to the incident. Which of the following should you choose for Start Date and End Date?
A. Required By
B. First Assigned Date
C. First Response Date
D. Created Date
Objective 4.2: Manage problems and incidents
This objective deals with Service Manager incidents, problems, and knowledge articles. This includes how to configure priorities for incidents and problems, how priority relates to resolution time, how to create incidents manually, how to have incidents automatically created using email messages sent to the service desk, and how to resolve incidents by resolving problems.
This section covers the following topics:
![]() Understanding problems and incidents
Understanding problems and incidents
![]() Managing incidents
Managing incidents
![]() Managing problems
Managing problems
![]() Creating knowledge articles
Creating knowledge articles
Understanding problems and incidents
A problem in Service Manager is a record that groups incidents that share a common cause. Addressing the cause and solving the problem means that the incidents that are associated with the problem also are resolved. For example, different users contact the service desk to lodge the following tickets:
![]() Oksana is unable to sign on to her computer.
Oksana is unable to sign on to her computer.
![]() Rooslan is unable to browse the Internet.
Rooslan is unable to browse the Internet.
![]() Kasia is unable to print.
Kasia is unable to print.
These separate issues may have a common cause; such as the failure of the hardware switch that each user’s computer uses to connect to the network. Replacing the failed switch will resolve each of these separate incident tickets.
Managing incidents
IT professionals that work on the help desk constantly create and resolve Service Manager incidents as a way of tracking their daily activity. Someone in the accounting department may ring the service desk, reporting an issue that they are having. The IT professional on the service desk instructs the caller to restart their computer, and the issue is resolved. During this process the IT professional creates an incident related to the issue, and if the issue is resolved by the restart, closes the incident. Incident templates allow you to pre-populate certain fields for a specific type of incident.
Incident priority
Service Manager determines incident priority using the settings you configure related to incident impact and incident urgency. You configure incident priority using the Incident Settings dialog box. You can configure priority values from 1 to 9 in a table where urgency is measured on one axis, and impact is measured on the other.
In almost all cases, organizations will assign a priority of 1 to high impact/high urgency incidents, and a priority of 9 to low impact/low urgency incidents. Priority values determine the assigned incident target resolution time. You configure incident target resolution time on another page of the same dialog box. To configure incident priority calculation settings, perform the following steps:
1. Select the Settings node of the Administration workspace of the Service Manager console.
2. Double-click Incident Settings in the details pane. This opens the Incident Settings dialog box.
3. In the Priority Calculation section of the Incident Settings dialog box, shown in Figure 4-18, configure priority settings from 1 through 9 based on the combination of impact and urgency.
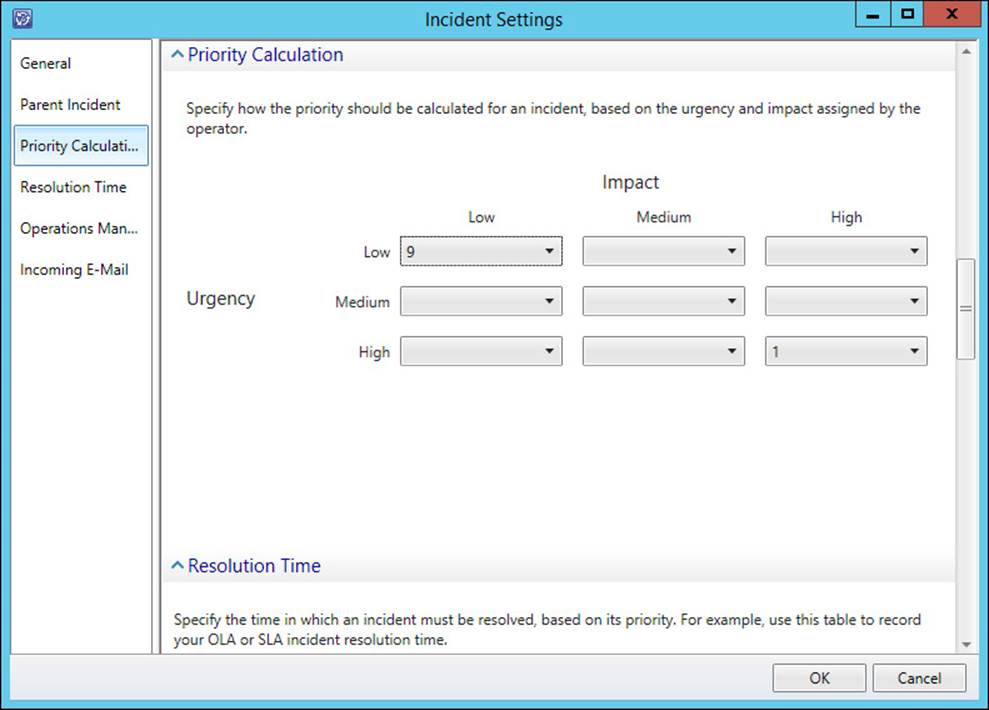
FIGURE 4-18 Priority calculation
More Info: Priority Calculation
You can learn more about priority calculation at http://technet.microsoft.com/en-us/library/hh524340.aspx.
Incident resolution time
You configure incident resolution time based on priority. The values that you assign for each incident priority will depend on the SLA you are working with, and with different organizations using different values for each priority. To configure default incident resolution time, perform the following steps:
1. Select the Settings node of the Administration workspace of the Service Manager console.
2. Double-click Incident Settings in the details pane. This opens the Incident Settings dialog box.
3. In the Resolution Time section of the Incident Settings dialog box, shown in Figure 4-19, specify the target resolution time for each priority.
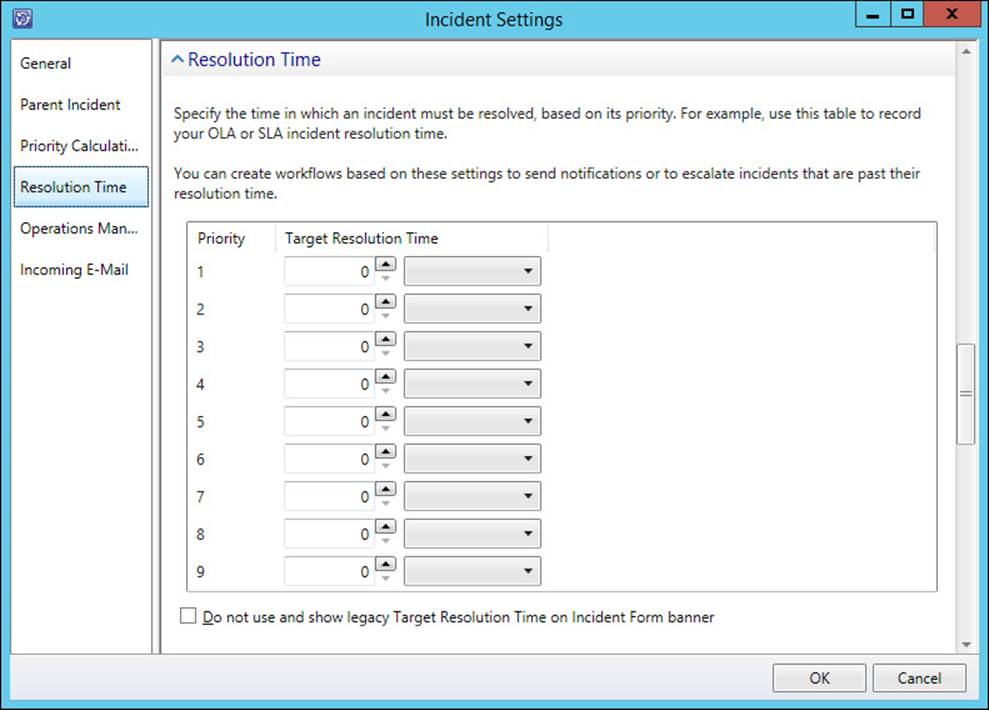
FIGURE 4-19 Resolution time
More Info: Incident Resolution Time
You can learn more about incident resolution time at http://technet.microsoft.com/en-us/library/hh495593.aspx.
Incident prefix
Service Manager incidents are automatically prefixed with the letters IR (Incident Record) by default. You can modify this prefix by performing the following steps:
1. Select the Settings node of the Administration workspace of the Service Manager console.
2. Double-click Incident Settings in the details pane. This opens the Incident Settings dialog box.
3. Change the Prefix setting, shown in Figure 4-20, to the desired prefix for your organization.
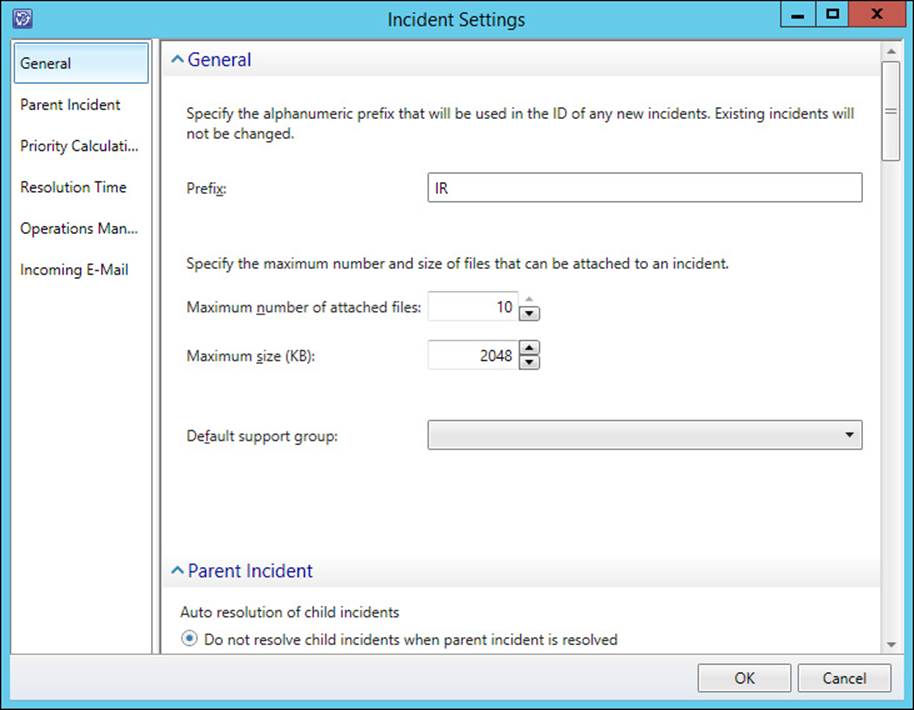
FIGURE 4-20 Incident prefix
More Info: Incident Management
You can learn more about incident management at http://technet.microsoft.com/en-us/library/hh524261.aspx.
Manually creating incidents
To manually create an incident using the Service Manager console, perform the following steps:
1. Determine what configuration item will serve as the basis for the incident. You can choose between the following categories:
![]() Builds
Builds
![]() Business Services
Business Services
![]() Computers
Computers
![]() Environments
Environments
![]() Printers
Printers
![]() Software
Software
![]() Software Updates
Software Updates
![]() Users
Users
2. Select the item for which you want to create the incident. For example, if there is a problem with a specific computer, you should select the computer under the Computers node, and on the Tasks menu, select the name of the computer, and then click Create Related Incident. This will load the Incident form.
3. In the Tasks pane of the Incident form, click Apply Template. This will open the Apply Template dialog box, shown in Figure 4-21. You can use this to apply an existing template that will automatically apply existing settings to the form. As a method of simplifying the process of incident creation, you can create incident templates for common incident profiles.
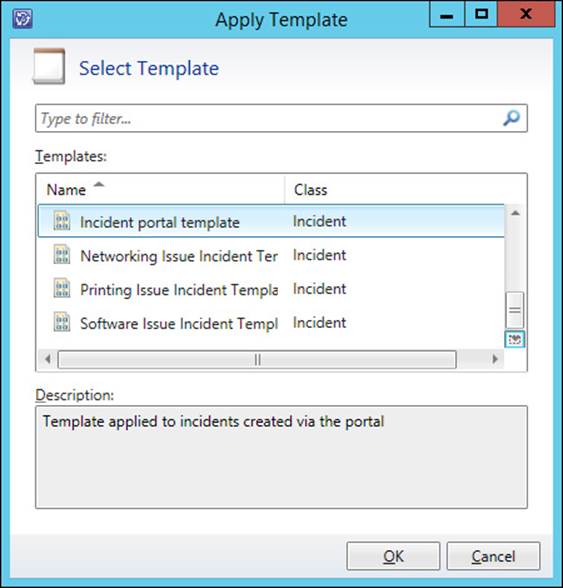
FIGURE 4-21 Apply template
More Info: Manually Creating Incidents
You can learn more about creating incidents manually at http://technet.microsoft.com/en-us/library/hh495514.aspx.
4. Using the Incident form, shown in Figure 4-22, you can then configure the following additional settings:
![]() Affected User Which user is affected by the incident.
Affected User Which user is affected by the incident.
![]() Alternate Contact Method Alternate method of contacting the affected user, such as telephone number.
Alternate Contact Method Alternate method of contacting the affected user, such as telephone number.
![]() Title Name for the incident.
Title Name for the incident.
![]() Description Description of the incident.
Description Description of the incident.
![]() Classification Category Allows you to classify the problem. Service Manager supports the creation of custom categories.
Classification Category Allows you to classify the problem. Service Manager supports the creation of custom categories.
![]() Source Shows how the incident was entered into Service Manager. Manual incident creation is usually through the Service Manager console.
Source Shows how the incident was entered into Service Manager. Manual incident creation is usually through the Service Manager console.
![]() Impact Incident impact rating.
Impact Incident impact rating.
![]() Urgency Incident urgency rating.
Urgency Incident urgency rating.
![]() Support Group Shows which support group is responsible for the incident.
Support Group Shows which support group is responsible for the incident.
![]() Assigned To IT Professional who the incident has been assigned to.
Assigned To IT Professional who the incident has been assigned to.
![]() Primary Owner Primary incident owner.
Primary Owner Primary incident owner.
![]() Escalated Allows you to specify if the incident is escalated.
Escalated Allows you to specify if the incident is escalated.
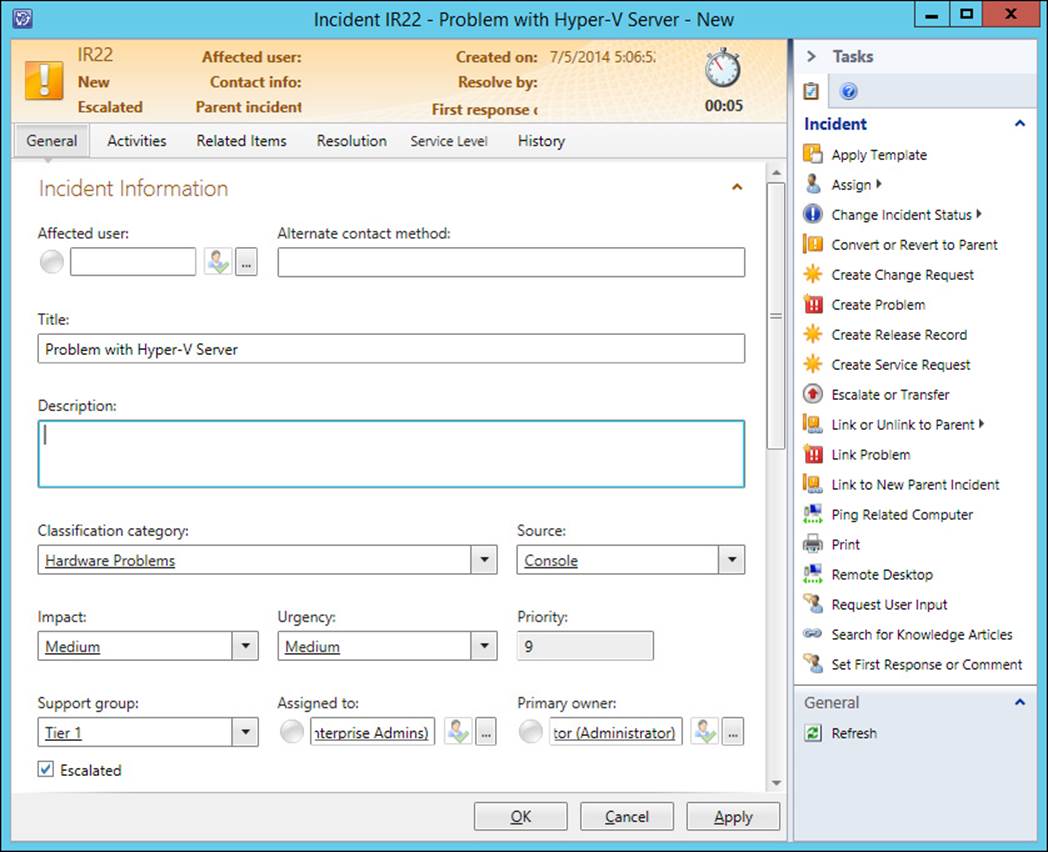
FIGURE 4-22 Incident form
Once the Incident has been created, it will be visible in the Work Items workspace of the Service Manager console, under the Incident Management node, as shown in Figure 4-23.
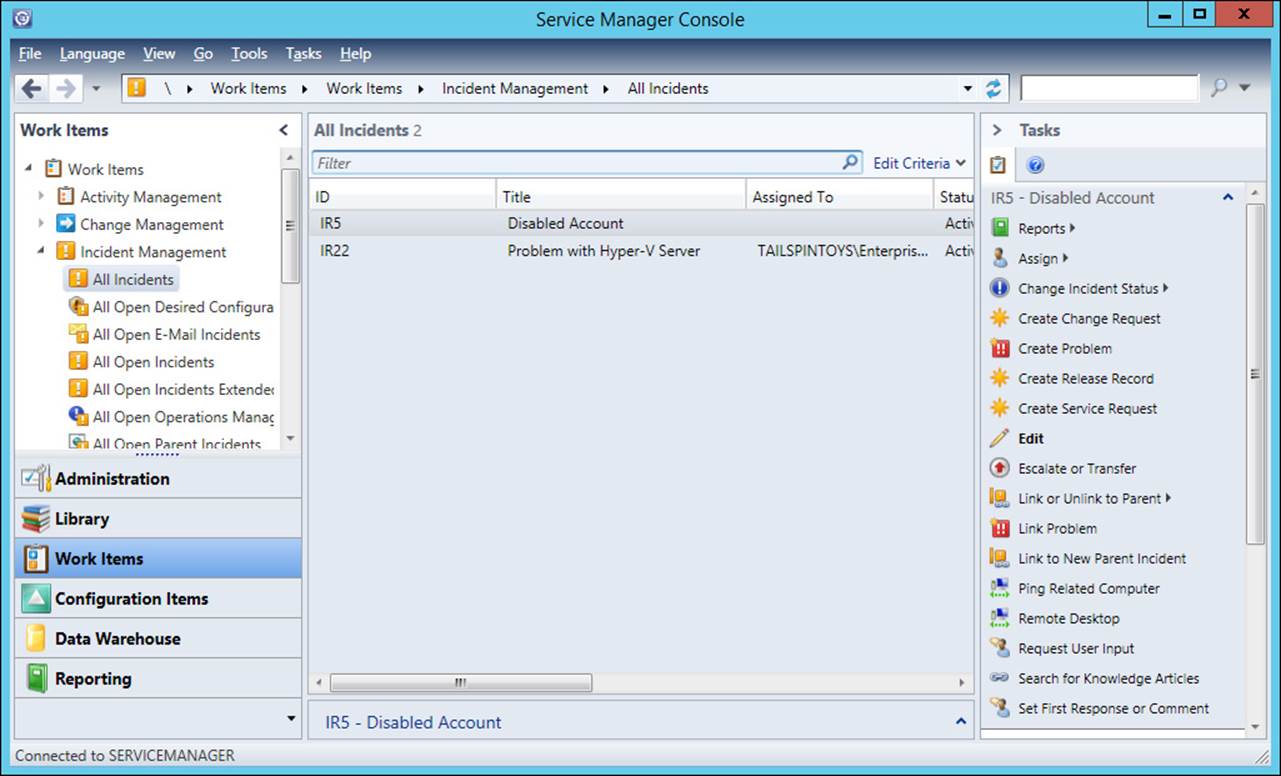
FIGURE 4-23 All incidents
From here, you can use the Tasks pane for the following:
![]() Reports Allows you to run an Incident KPI Trend, Incident Analyst, Incident Details, Incident Resolution, or List Of Incidents report based on the properties of the incident.
Reports Allows you to run an Incident KPI Trend, Incident Analyst, Incident Details, Incident Resolution, or List Of Incidents report based on the properties of the incident.
![]() Assign Allows you to assign the incident using the Select Objects dialog box, as shown in Figure 4-24.
Assign Allows you to assign the incident using the Select Objects dialog box, as shown in Figure 4-24.
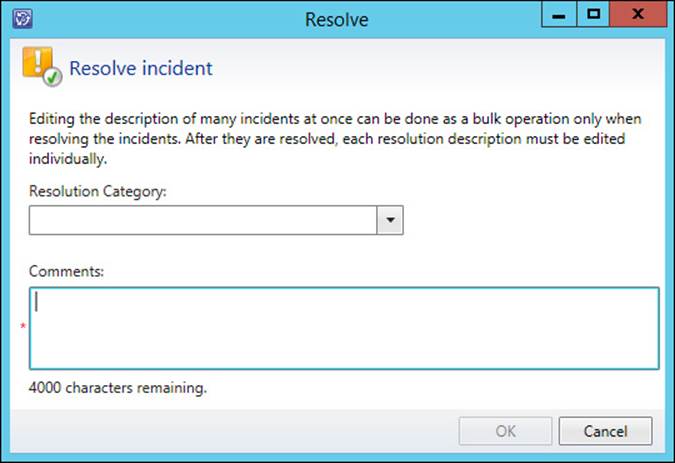
FIGURE 4-24 Select objects
![]() Change Incident Status Allows you to activate, close, resolve, or set another status using the Other option. When you resolve an incident, you provide a resolution category and comments, as shown in Figure 4-25.
Change Incident Status Allows you to activate, close, resolve, or set another status using the Other option. When you resolve an incident, you provide a resolution category and comments, as shown in Figure 4-25.

FIGURE 4-25 Resolve dialog box
Exam Tip
Remember that you can resolve an incident using the Change Incident Status task from the Work Items workspace of the Service Manager console.
![]() Create Change Request Allows you to create a change request. The incident will be configured as a related item.
Create Change Request Allows you to create a change request. The incident will be configured as a related item.
![]() Create Problem Allows you to create a Problem. The incident will be configured as a related item.
Create Problem Allows you to create a Problem. The incident will be configured as a related item.
![]() Create Service Request Allows you to create a Service Request. The incident will be configured as a related item.
Create Service Request Allows you to create a Service Request. The incident will be configured as a related item.
![]() Edit Allows you to edit the incident.
Edit Allows you to edit the incident.
![]() Escalate Or Transfer Allows you to escalate or transfer the incident. Figure 4-26 shows the Escalate Or Transfer dialog box. You use this dialog box to specify the support group to which the incident should be escalated or transferred.
Escalate Or Transfer Allows you to escalate or transfer the incident. Figure 4-26 shows the Escalate Or Transfer dialog box. You use this dialog box to specify the support group to which the incident should be escalated or transferred.
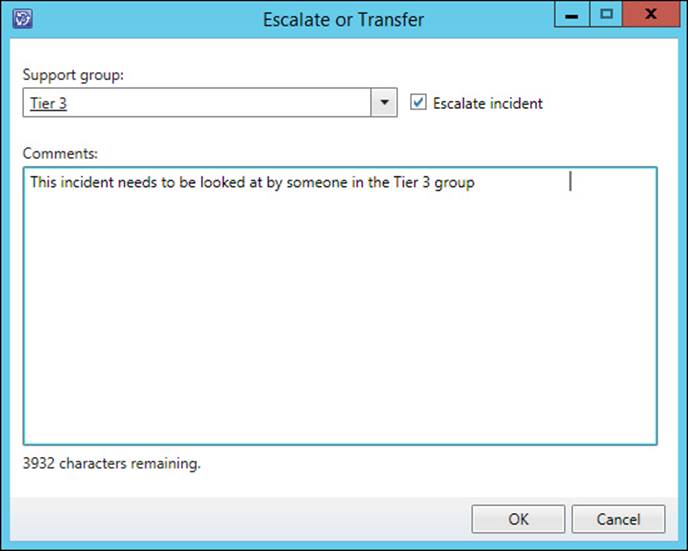
FIGURE 4-26 Escalate Or Transfer
![]() Link Or Unlink To Parent Allows you to link to a parent incident, or unlink the incident from a parent incident.
Link Or Unlink To Parent Allows you to link to a parent incident, or unlink the incident from a parent incident.
![]() Link Problem Allows you to link to a Problem. You’ll learn about managing Service Manager problems later in this chapter.
Link Problem Allows you to link to a Problem. You’ll learn about managing Service Manager problems later in this chapter.
![]() Link To New Parent Incident Allows you to create a new parent incident and link the incident to that parent.
Link To New Parent Incident Allows you to create a new parent incident and link the incident to that parent.
![]() Ping Related Computer Allows you to send an ICMP request to the affected computer.
Ping Related Computer Allows you to send an ICMP request to the affected computer.
![]() Remote Desktop Allows you to make a remote desktop connection to the affected computer.
Remote Desktop Allows you to make a remote desktop connection to the affected computer.
![]() Request User Input Sends a message from Service Manager to the user, requesting more information.
Request User Input Sends a message from Service Manager to the user, requesting more information.
![]() Search For Knowledge Articles Allows you to search for related knowledge articles.
Search For Knowledge Articles Allows you to search for related knowledge articles.
![]() Set First Response Or Comment Allows you to add comments to incidents.
Set First Response Or Comment Allows you to add comments to incidents.
Configuring email incidents
You can configure Service Manager to automatically create incidents based on email requests from users. If the user who sent the email is recognized by Service Manager as a user, Service Manager will automatically create a new incident.
If you have deployed Exchange in your organizational environment, you can configure Service Manager so that incidents can be created through email, by performing the following steps:
1. Install the SMTP server feature and related administrative consoles, as shown in Figure 4-27, on a computer that is not currently participating in your organization’s Exchange deployment.
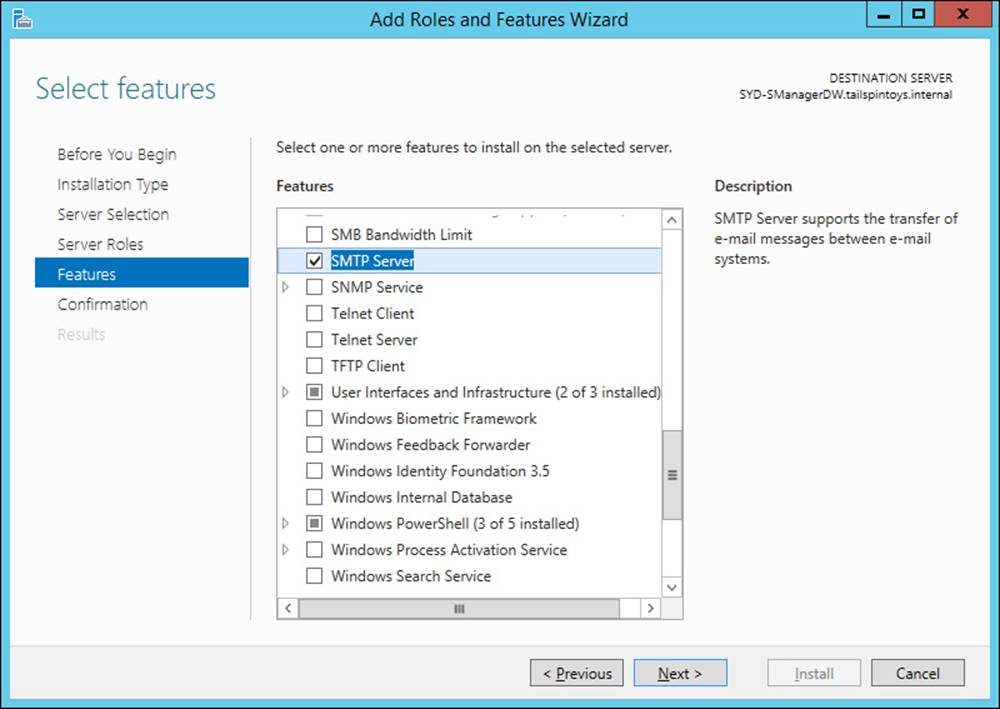
FIGURE 4-27 SMTP server feature
2. Rename the server from SMTP Virtual Server #1, or the name it had been automatically assigned, to the FQDN of the server hosting this service.
3. In the list of domains, rename the domain to the FQDN of the server hosting this service.
4. Edit the properties of the SMTP server. On the Access tab, click Relay, click All Except The List Below, and ensure that Allow All Computers Which Successfully Authenticate To Relay Regardless Of The List Above, as shown in Figure 4-28, is enabled, and click OK.
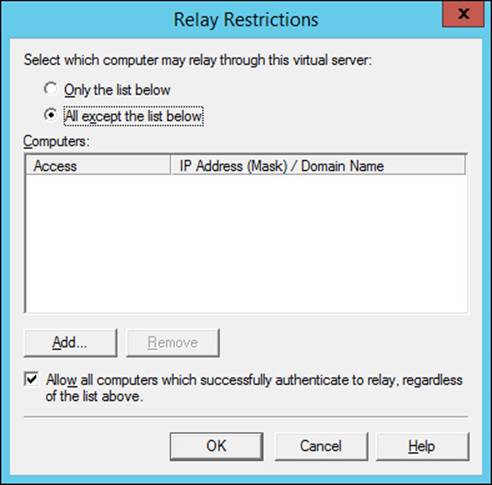
FIGURE 4-28 Relay restrictions
5. On the Delivery tab, click Advanced. In the Advanced Delivery dialog box, type the following, as shown in Figure 4-29, and click OK:
![]() Masquerade Domain The root domain of the domain in which the server is a member.
Masquerade Domain The root domain of the domain in which the server is a member.
![]() Fully Qualified Domain Name The name of an Exchange mailbox server (Exchange 2013), or server that hosts the Hub Transport role (Exchange 2010).
Fully Qualified Domain Name The name of an Exchange mailbox server (Exchange 2013), or server that hosts the Hub Transport role (Exchange 2010).
![]() Smart Host The name of an Exchange mailbox server (Exchange 2013) or server that hosts the Hub Transport role (Exchange 2010).
Smart Host The name of an Exchange mailbox server (Exchange 2013) or server that hosts the Hub Transport role (Exchange 2010).
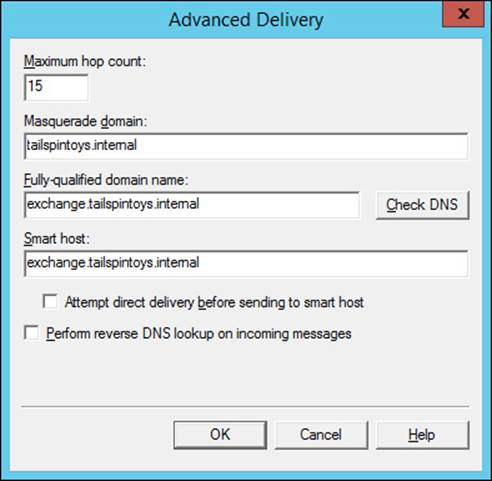
FIGURE 4-29 Advanced delivery
6. Close the SMTP server’s properties and share the <SystemDrive>:\Inetpub\Mailroot folder so that it is accessible to the Service Manager account.
7. In the Administration workspace of the Service Manager console, double-click Incident Settings in the details pane. This opens the Incident Settings dialog box.
8. In the Incoming E-mail settings page of the Incident Settings dialog, configure the following settings, as shown in Figure 4-30, and then click OK:
![]() SMTP Service Drop Folder Location This will be the UNC path of the Drop folder under the Mailroot folder that you shared in step 6.
SMTP Service Drop Folder Location This will be the UNC path of the Drop folder under the Mailroot folder that you shared in step 6.
![]() SMTP Service Bad Folder Location This will be the UNC path of the Badmail folder under the Mailroot folder that you shared in step 6.
SMTP Service Bad Folder Location This will be the UNC path of the Badmail folder under the Mailroot folder that you shared in step 6.
![]() Maximum Number Of E-mail Messages To Process At A Time This is the number of email messages that you want Server Manager to import at a time.
Maximum Number Of E-mail Messages To Process At A Time This is the number of email messages that you want Server Manager to import at a time.
![]() Turn On Incoming E-mail Processing Enable this setting.
Turn On Incoming E-mail Processing Enable this setting.
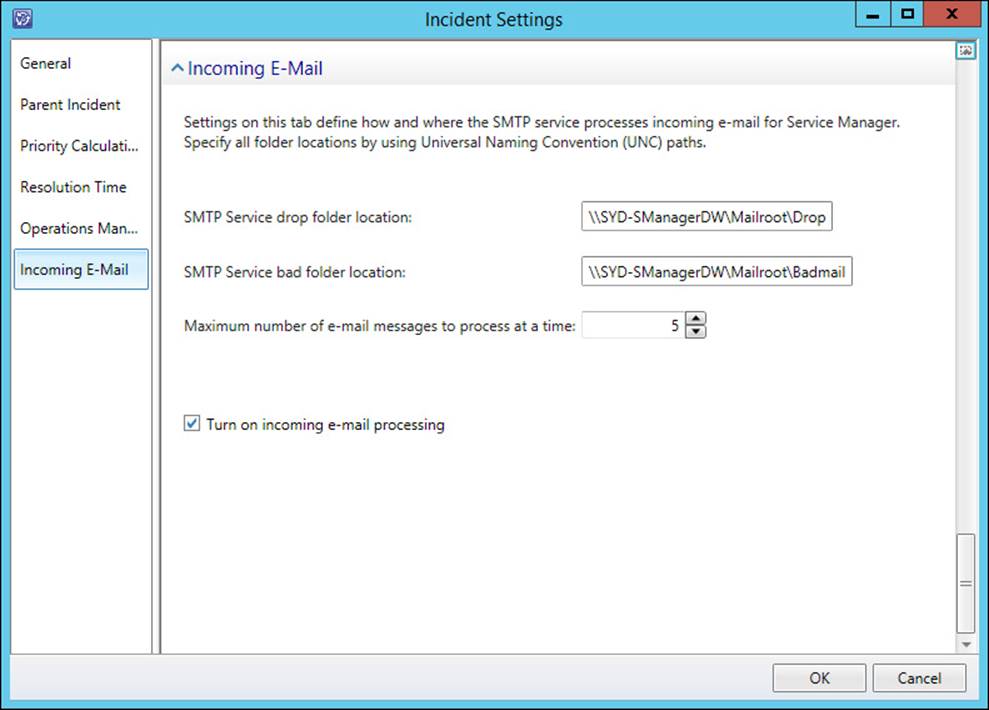
FIGURE 4-30 Incident settings
9. In Exchange:
![]() Configure *.servername.domain.name (where servername.domain.name is the FQDN of the SMTP server configured earlier) as an accepted domain.
Configure *.servername.domain.name (where servername.domain.name is the FQDN of the SMTP server configured earlier) as an accepted domain.
![]() Configure a receive connector to accept anonymous inbound traffic from the SMTP server configured earlier.
Configure a receive connector to accept anonymous inbound traffic from the SMTP server configured earlier.
![]() Configure a send connector to route email to the SMTP server when addressed to the *@servername.domain.name email domain.
Configure a send connector to route email to the SMTP server when addressed to the *@servername.domain.name email domain.
![]() Configure a mail contact in Exchange that will be used as the address for messages that should be converted as incidents. For example helpdesk@SYD-SmanagerDW.tailspintoys.internal.
Configure a mail contact in Exchange that will be used as the address for messages that should be converted as incidents. For example helpdesk@SYD-SmanagerDW.tailspintoys.internal.
More Info: Email Incident SMTP Configuration
You can learn more about incident SMTP configuration at http://technet.microsoft.com/en-us/library/jj900204.aspx.
Email incident templates
Email incident templates are used to convert email messages into Service Manager incidents. When Service Manager detects new messages in the drop folder on a specially configured SMTP server, it will take information from the email message and use it with an email incident template, to populate a new Service Manager incident. The process of creating an email incident template is very similar to that of creating any other type of incident template.
To create an email incident template, perform the following steps:
1. Select the Templates node in the Library workspace of the Service Manager console.
2. On the Tasks menu, click Templates, and then click Create Template.
3. In the Create Template dialog box, fill out the following settings, as shown in Figure 4-31:
![]() Name: E-mail incident template
Name: E-mail incident template
![]() Class: Incident
Class: Incident
![]() Management Pack: Service Manager Incident Management Configuration Library
Management Pack: Service Manager Incident Management Configuration Library
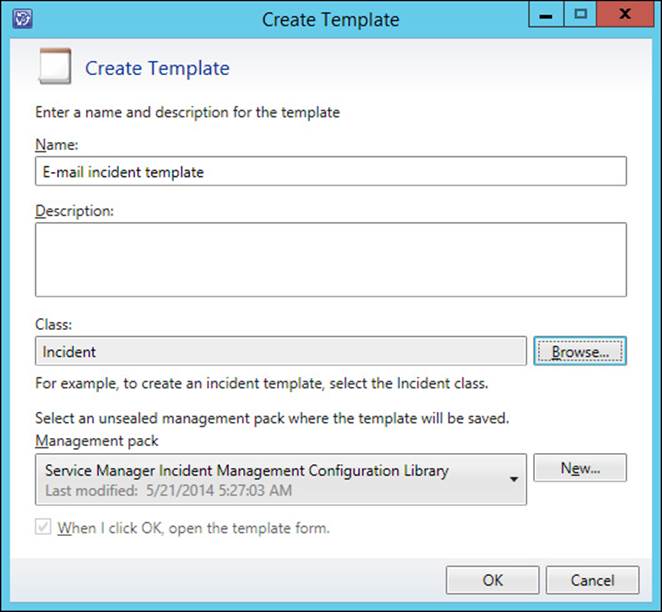
FIGURE 4-31 Create template
4. Clicking OK on the Create Template dialog box will open the Incident Template form. In the form, configure the following settings, as shown in Figure 4-32:
![]() Title: E-mail Template Form
Title: E-mail Template Form
![]() Classification Category: E-Mail Problems
Classification Category: E-Mail Problems
![]() Impact: Select the initial impact to assign to incidents submitted through email.
Impact: Select the initial impact to assign to incidents submitted through email.
![]() Urgency: Select the initial urgency to assign to incidents submitted through email.
Urgency: Select the initial urgency to assign to incidents submitted through email.
![]() Support Group: Select the support group that will be initially assigned incidents sent through email.
Support Group: Select the support group that will be initially assigned incidents sent through email.
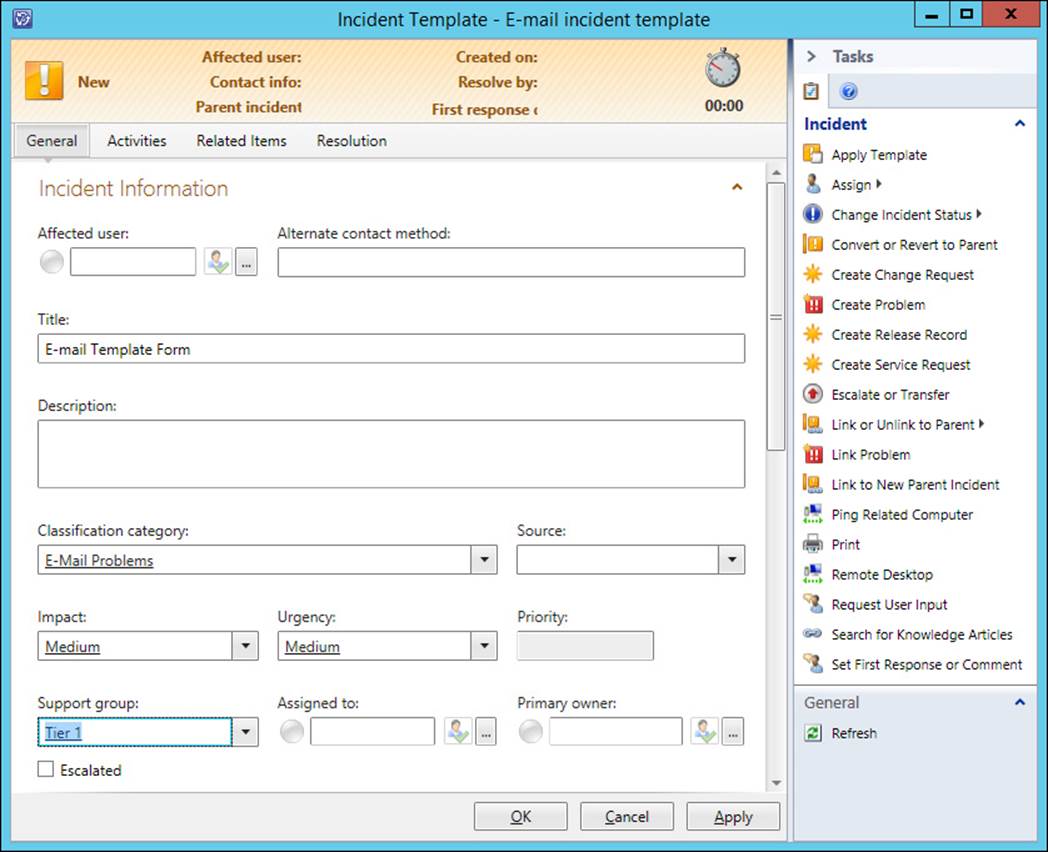
FIGURE 4-32 Incident template
5. Click OK to close the incident template.
More Info: Creating Incident Templates
You can learn more about email incident templates and creating incident templates at http://technet.microsoft.com/en-us/library/hh495665.aspx.
Managing problems
A problem is a Service Manager record that you create to minimize the chance that similar problems, or related incidents, will occur in the future, or to minimize the impact of an issue that you cannot prevent. Service Manager allows related incidents to be closed when a problem that they are related to is resolved.
More Info: Managing Problems
You can learn more about managing problems at http://technet.microsoft.com/en-us/library/hh519581.aspx.
Creating problem records
You can create problem records manually from the Service Manager console by performing the following steps:
1. Select the Problem Management node in the Work Items workspace of the Service Manager console.
2. In the Tasks menu, click Problem Management, and then click Create Problem.
3. On the Problem form, shown in Figure 4-33, provide the following information:
![]() Title A name for the problem.
Title A name for the problem.
![]() Description A description for the problem.
Description A description for the problem.
![]() Assigned To The person responsible for resolving the problem.
Assigned To The person responsible for resolving the problem.
![]() Source Source of the problem request.
Source Source of the problem request.
![]() Category Problem category.
Category Problem category.
![]() Impact Impact of the problem. This is used to calculate priority.
Impact Impact of the problem. This is used to calculate priority.
![]() Urgency Problem urgency. This is used to calculate priority.
Urgency Problem urgency. This is used to calculate priority.
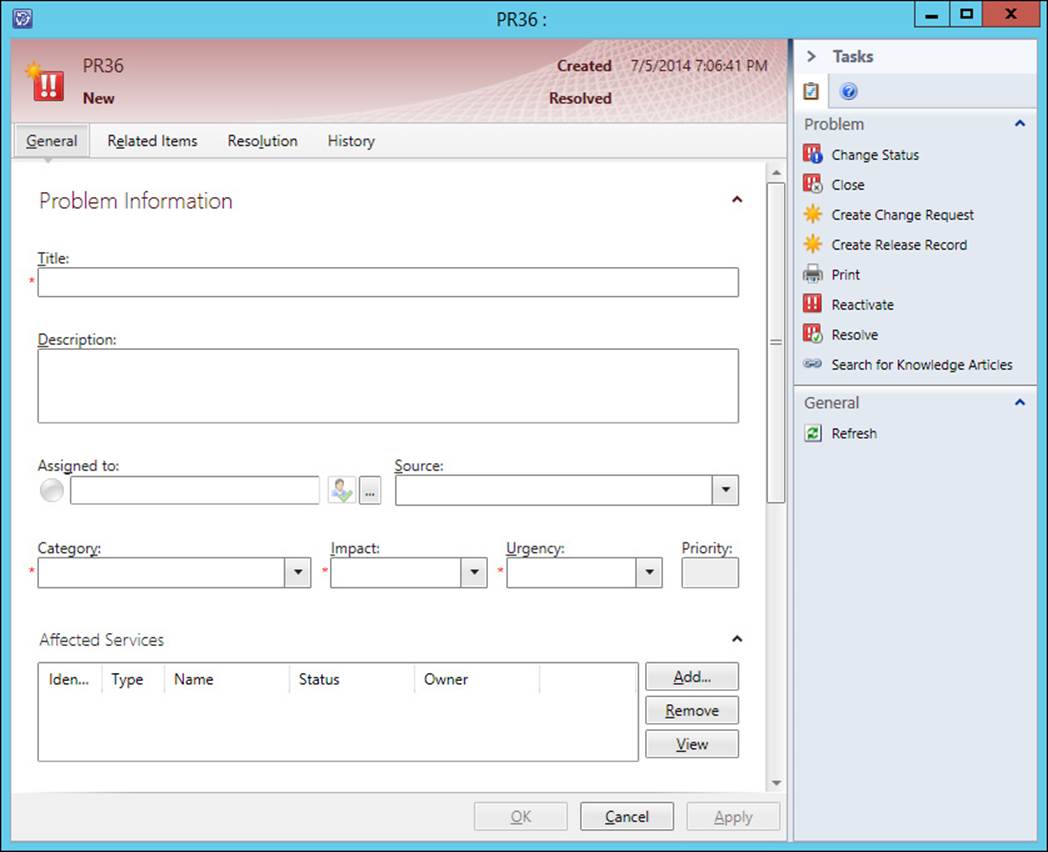
FIGURE 4-33 Problem form
More Info: Create Problem Records
You can learn more about creating problem records at http://technet.microsoft.com/en-us/library/hh519729.aspx.
Linking incidents to problems
Service Manager allows you to link incidents to problems. For example, a number of incidents reported to the help desk may have the same root cause, such as users contacting the help desk because they are unable to sign on to their computers. In this scenario, the root cause might be the failure of the DHCP service on the organization’s DHCP server. By fixing the DHCP service, the separate sign on failure incidents will also be resolved.
To link incidents to an existing problem, perform the following steps:
1. Select the Active Problems node under Problems in the Work Items workspace of the Service Manager console.
2. Select a problem, and then click Edit in the Tasks pane.
3. On the Related Items tab of the problem dialog box, click Add next to Work Items.
4. On the Select Objects dialog box, add the incidents you want to relate to the problem, as shown in Figure 4-34.
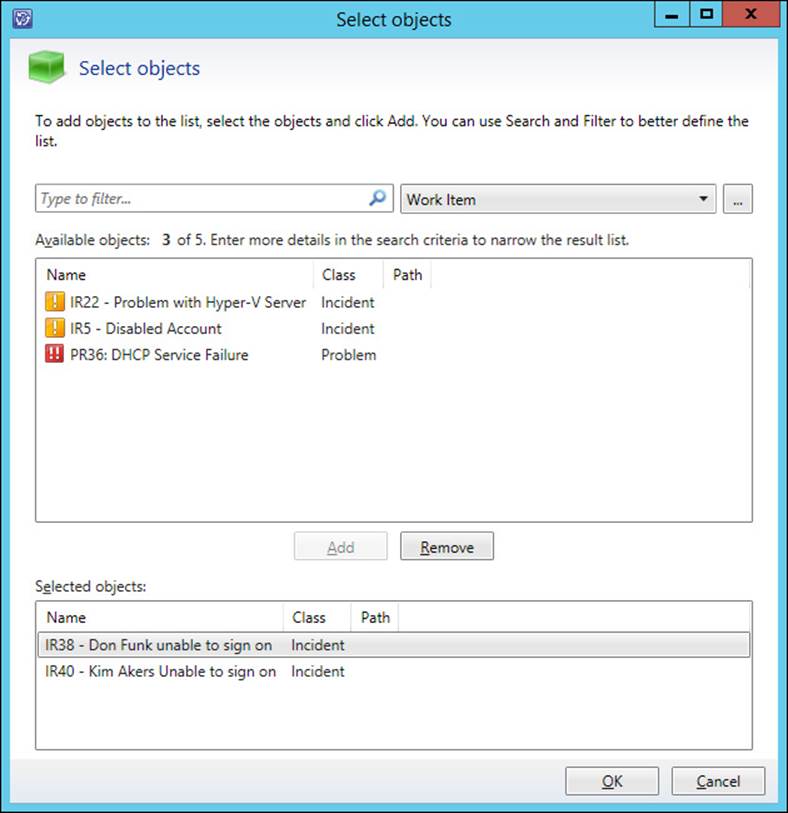
FIGURE 4-34 Select objects
5. Verify that the incidents are listed under work items, as shown in Figure 4-35.
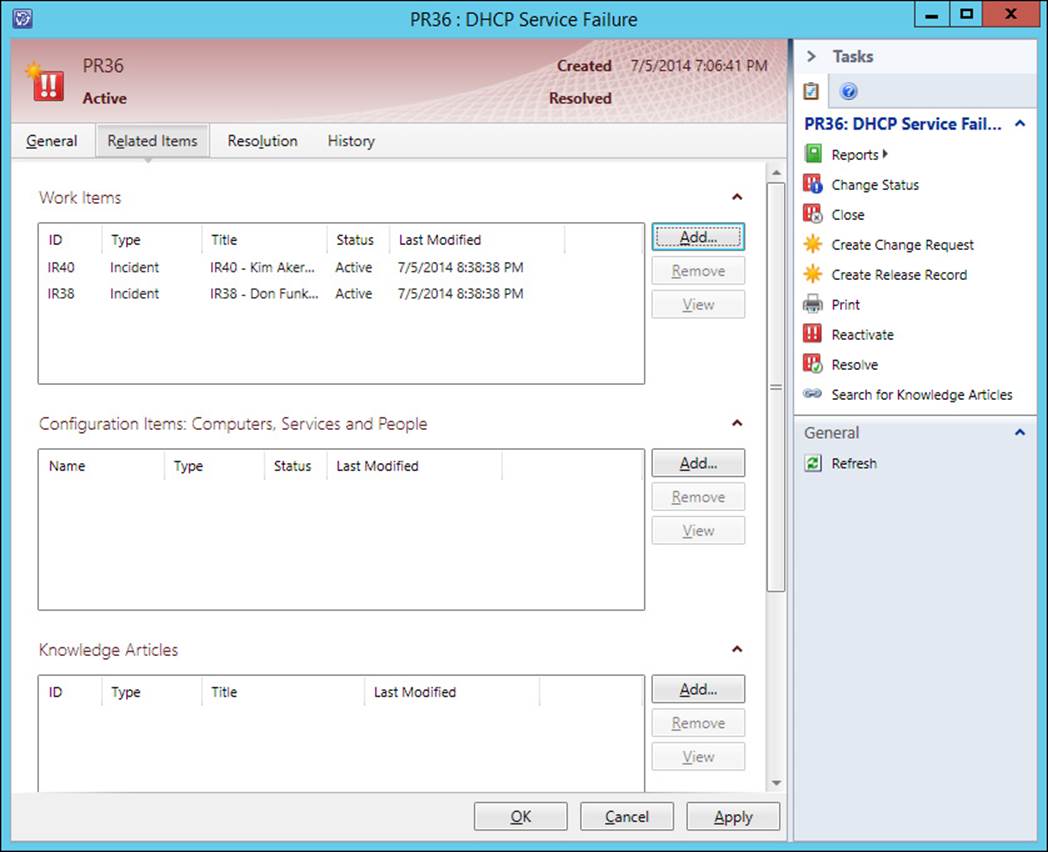
FIGURE 4-35 Related incidents
More Info: Linking Incidents to Problems
You can learn more about linking incidents to problems at http://technet.microsoft.com/en-us/library/hh519687.aspx.
Resolving problems and related incidents
An advantage to linking incidents with problems is that you are able to resolve all incidents that are linked to a problem automatically when you resolve that problem. To resolve a problem and its related incidents, perform the following steps:
1. In the Work Items workspace of the Service Manager console, locate the problem that you want to resolve in the Active Problems node, under the Problem Management node.
2. Select the problem, and click Edit in the Tasks pane.
3. Select the Resolution tab. In the Tasks pane, click Resolve, and then select Auto-Resolve All Incidents Associated With This Problem under Resolution Details, as shown in Figure 4-36. Also select a resolution category and an appropriate resolution description.
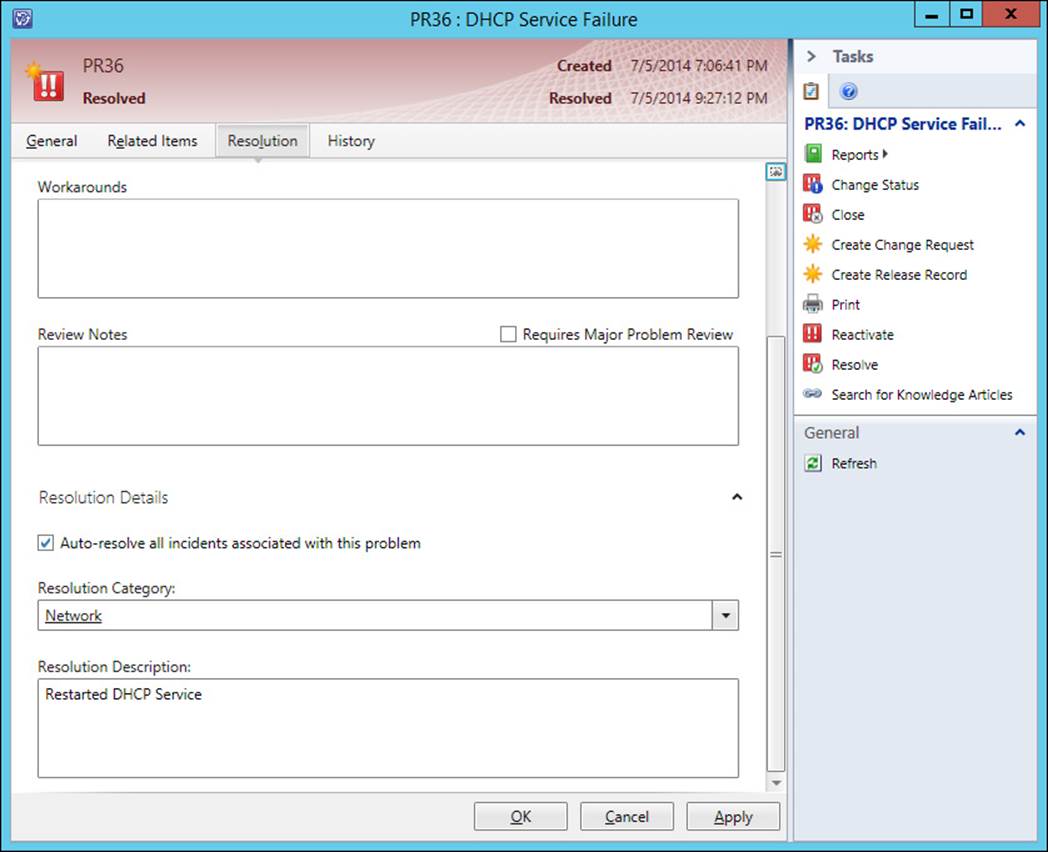
FIGURE 4-36 Resolution
4. Click OK to resolve the problems and the associated incidents.
More Info: Resolving Problems
You can learn more about resolving problems at http://technet.microsoft.com/en-us/library/hh495498.aspx.
Creating knowledge articles
Knowledge articles are documents, created by people inside the organization that allow the organization’s IT professionals and users to understand and remediate problems. To create a knowledge article, perform the following steps:
1. In the Library workspace of the Service Manager console, click the Knowledge node.
2. In the Tasks menu, click Knowledge, and then click Create Knowledge Article.
3. On the General tab of the Knowledge Article dialog box, shown in Figure 4-37, provide the following information:
![]() Title Name of the knowledge article.
Title Name of the knowledge article.
![]() Description Summary of the knowledge article.
Description Summary of the knowledge article.
![]() Keywords Knowledge article keywords.
Keywords Knowledge article keywords.
![]() Knowledge Article Owner Person responsible for the knowledge article.
Knowledge Article Owner Person responsible for the knowledge article.
![]() Tag Metadata tags for the article.
Tag Metadata tags for the article.
![]() Language The language in which the knowledge article is written.
Language The language in which the knowledge article is written.
![]() Category Knowledge article category.
Category Knowledge article category.
![]() Comments Any comments on the article.
Comments Any comments on the article.
![]() External Content Any links to external documentation hosted on the Internet.
External Content Any links to external documentation hosted on the Internet.
![]() Internal Content The content of the knowledge article, containing the information that the IT Professional or the user will use to resolve a problem.
Internal Content The content of the knowledge article, containing the information that the IT Professional or the user will use to resolve a problem.

FIGURE 4-37 Knowledge articles
More Info: Knowledge Articles
You can learn more about knowledge articles at http://technet.microsoft.com/en-us/library/hh495650.aspx.
Thought experiment: Incident management at Fabrikam
The service desk at Fabrikam uses Service Manager to manage user incidents and problems. At present, service desk hours are 9 A.M. to 5 P.M., Monday to Friday. Some users, however, are complaining that they want to be able to forward incidents to the service desk at any time during the day. You are planning on deploying a self-service portal to allow users to submit incident and service requests, but this project will not be completed for several months. In the meantime, you want to provide users with documentation allowing them to remediate their own issues, based on the incidents most commonly encountered by the users at Fabrikam. With this information in mind, answer the following questions:
1. What steps can you take to allow users to attempt to resolve their own incidents before contacting the service desk?
2. Until the self-service portal is deployed, what other method can users use to submit incidents to the service desk staff during the hours when the hotline is not answered?
Objective summary
![]() Incident templates allow you to pre-populate certain fields for a specific type of incident.
Incident templates allow you to pre-populate certain fields for a specific type of incident.
![]() Service Manager determines incident priority using the settings you configure related to incident impact and incident urgency.
Service Manager determines incident priority using the settings you configure related to incident impact and incident urgency.
![]() You configure incident resolution time based on priority. The values that you assign for each incident priority will depend on the SLA.
You configure incident resolution time based on priority. The values that you assign for each incident priority will depend on the SLA.
![]() Service Manager can be configured to automatically create incidents based on email requests from users.
Service Manager can be configured to automatically create incidents based on email requests from users.
![]() Service Manager allows you to link incidents to problems. You do this when incidents have the same root cause.
Service Manager allows you to link incidents to problems. You do this when incidents have the same root cause.
![]() Service Manager allows related incidents to be closed when a problem that they are related to is resolved.
Service Manager allows related incidents to be closed when a problem that they are related to is resolved.
![]() Knowledge articles are documents that allow the organization’s IT professionals and users to understand and remediate problems.
Knowledge articles are documents that allow the organization’s IT professionals and users to understand and remediate problems.
Objective review
Answer the following questions to test your knowledge of the information in this objective. You can find the answers to these questions and explanations of why each answer choice is correct or incorrect in the “Answers” section at the end of this chapter.
1. You have three incidents that you want to link to a problem. Which of the following methods can you use to accomplish this goal?
A. Add the problem to the list of work items on the Related Items tab of each incident’s properties.
B. Add the incidents to the list of work items on the Related Items tab of the problem’s properties.
C. Add each incident’s identification numbers to the description field on the General tab of the problem’s properties.
D. Add the problem’s identification number to the description field on the General tab of each incident’s properties.
2. You have three incidents related to a problem. Which of the following steps should you take to resolve both the problems and the incidents?
A. Resolve each incident manually.
B. Resolve the problem and select the option to auto-resolve all incidents associated with the problem.
C. Resolve an incident and select the option to auto-resolve all problems associated with the incident.
D. Close the problem and then manually resolve each incident.
3. Which of the following settings should you configure when configuring incident priority?
A. Low/Low: 9
B. Low/Low: 1
C. High/High: 1
D. High/High: 9
4. Which of the following fields in an incident form are used to calculate priority?
A. Impact
B. Source
C. Urgency
D. Support Group
Objective 4.3: Manage cloud resources
This objective deals with managing cloud resources through different types of VMM profiles. A VMM profile allows you to configure settings used for the configuration of simulated virtual machine hardware, guest operating systems, applications, SQL Server instances, and multi-tier services that include all of these segments.
This section covers the following topics:
![]() Creating hardware profiles
Creating hardware profiles
![]() Creating guest operating system profiles
Creating guest operating system profiles
![]() Creating application profiles
Creating application profiles
![]() Configuring SQL Server profiles
Configuring SQL Server profiles
![]() Configuring virtual machine templates
Configuring virtual machine templates
![]() Creating service templates
Creating service templates
Creating hardware profiles
A VMM hardware profile allows you to create templates for virtual machine hardware. This includes configuring the number of processors, the amount of RAM available to the virtual machine, as well as the IDE and SCSI configuration that the VM will use. You can also use a VMM hardware profile configuration, whether a virtual machine will use Generation 1 or Generation 2 hardware. While you can configure virtual machine hardware settings each time you use VMM to create a virtual machine, a VMM hardware profile allows you to create VMs that have a standardized virtual hardware configuration.
To create a hardware profile, perform the following steps:
1. In the Library workspace of the VMM console, right-click the Profiles node, and click Create Hardware Profile.
2. On the General page of the New Hardware Profile dialog box, shown in Figure 4-38, provide a name for the profile and select which VM generation you want to use. This can be Generation 1 or Generation 2. Remember that Generation 2 VMs can only be used with virtualization hosts running Windows Server 2012 R2 or later.
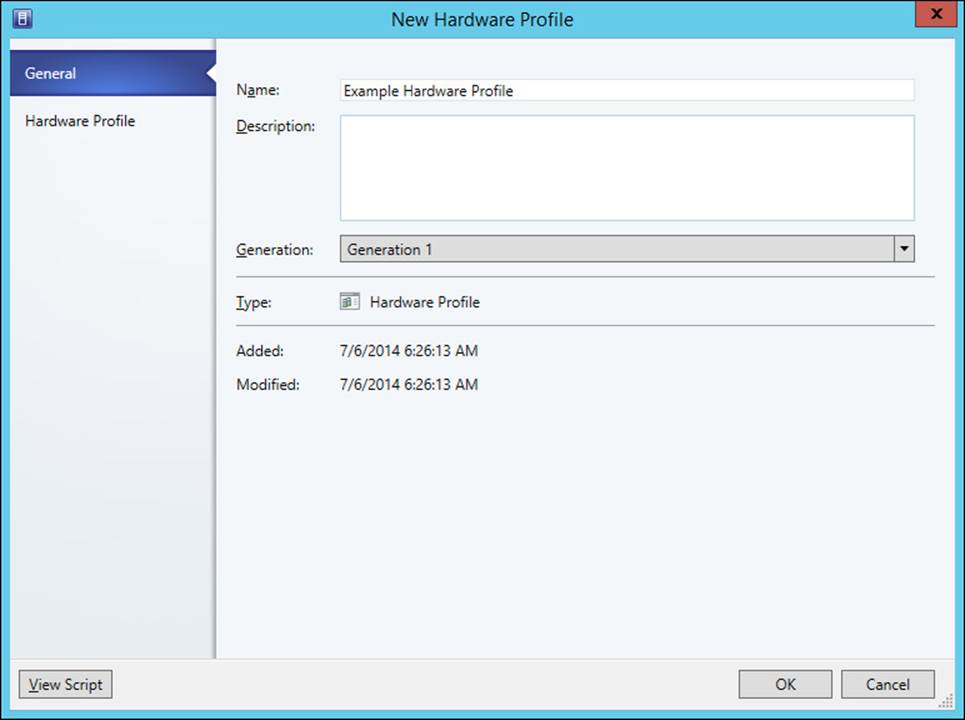
FIGURE 4-38 New Hardware Profile
3. On the Hardware Profile page, you can configure the following settings:
![]() Cloud Capability Profiles Specify which capability profile to use with the hardware profile. You can choose between XenServer, ESX Server, and Hyper-V. Figure 4-39 shows the selection of the Hyper-V profile.
Cloud Capability Profiles Specify which capability profile to use with the hardware profile. You can choose between XenServer, ESX Server, and Hyper-V. Figure 4-39 shows the selection of the Hyper-V profile.
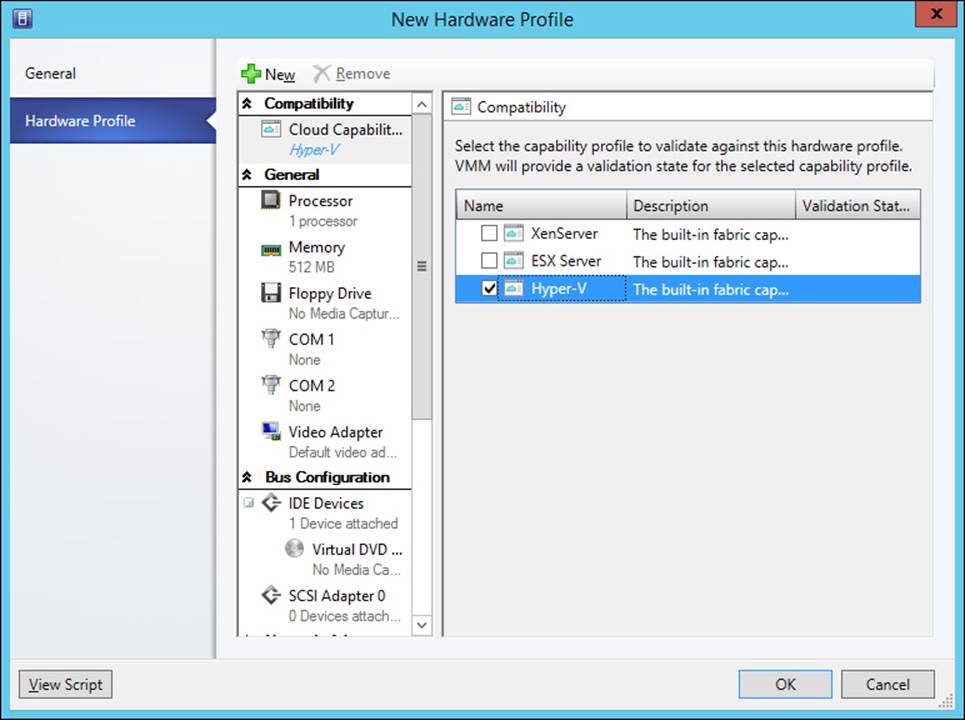
FIGURE 4-39 Cloud compatibility
![]() Processor Allows you to configure the number of processors to be used by the VM. This also allows you to configure whether migration can occur to a virtual machine host running a different processor version.
Processor Allows you to configure the number of processors to be used by the VM. This also allows you to configure whether migration can occur to a virtual machine host running a different processor version.
![]() Memory Allows you to configure the amount of memory that will be allocated to the VM. You can choose to statically assign memory, or to allow the use of dynamic memory. Figure 4-40 shows the memory settings.
Memory Allows you to configure the amount of memory that will be allocated to the VM. You can choose to statically assign memory, or to allow the use of dynamic memory. Figure 4-40 shows the memory settings.
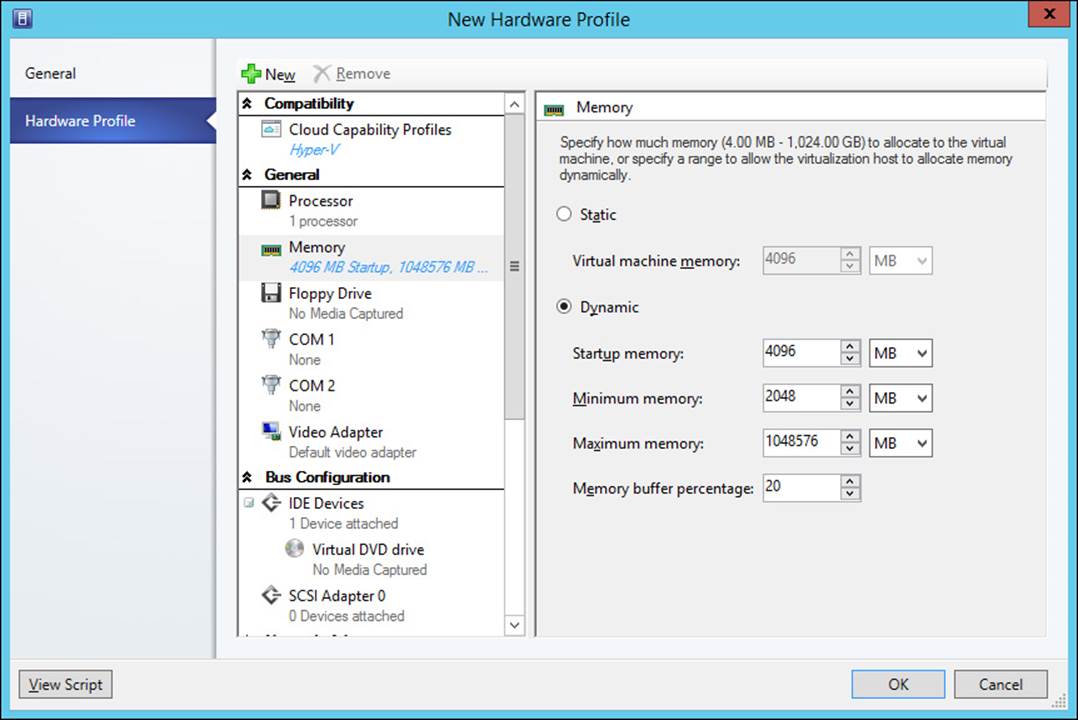
FIGURE 4-40 Memory
![]() Floppy Drive Allows you to configure a virtual floppy drive for Generation 1 virtual machines.
Floppy Drive Allows you to configure a virtual floppy drive for Generation 1 virtual machines.
![]() COM 1 Allows you to configure Com Port 1 settings for Generation 1 virtual machines.
COM 1 Allows you to configure Com Port 1 settings for Generation 1 virtual machines.
![]() COM 2 Allows you to configure Com Port 2 settings for Generation 1 virtual machines.
COM 2 Allows you to configure Com Port 2 settings for Generation 1 virtual machines.
![]() Video Adapter Allows you to configure whether a standard video adapter will be used, or a RemoteFX 3D video adapter will be available to virtual machines. You can also configure the maximum number of monitors and the maximum monitor resolution when choosing the RemoteFX 3D video adapter. Figure 4-41 shows this setting.
Video Adapter Allows you to configure whether a standard video adapter will be used, or a RemoteFX 3D video adapter will be available to virtual machines. You can also configure the maximum number of monitors and the maximum monitor resolution when choosing the RemoteFX 3D video adapter. Figure 4-41 shows this setting.
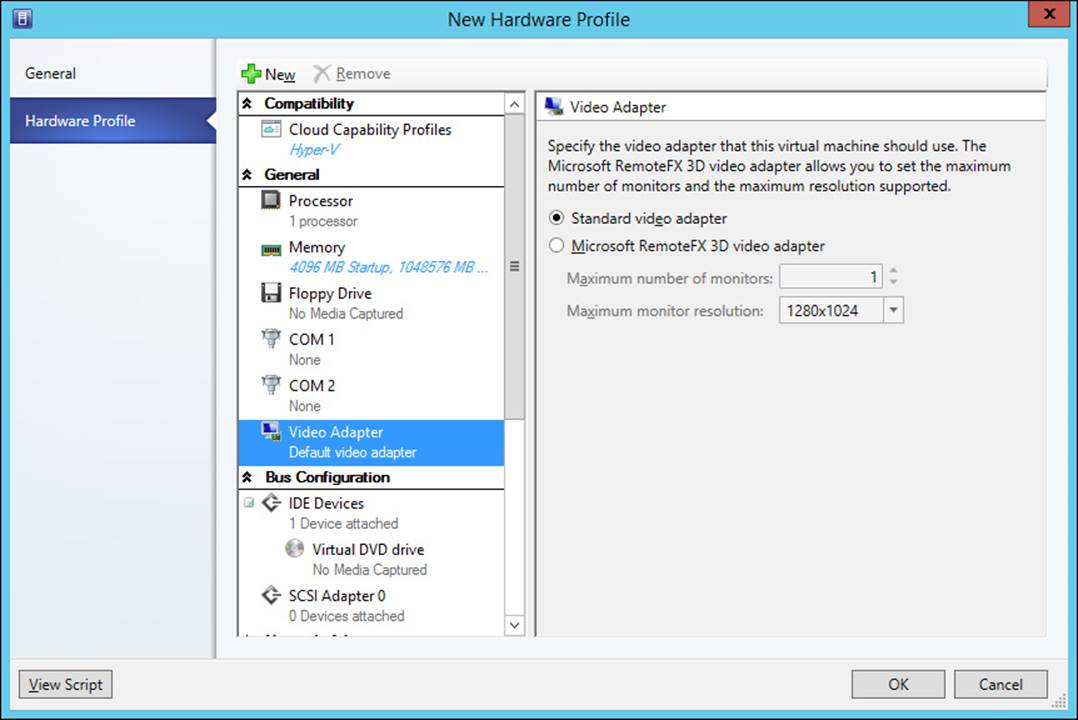
FIGURE 4-41 Video adapter
![]() IDE Devices Allows you to configure virtual IDE devices used by the VM for Generation 1 virtual machines.
IDE Devices Allows you to configure virtual IDE devices used by the VM for Generation 1 virtual machines.
![]() SCSI Adapter Allows you to configure virtual SCSI adapter settings.
SCSI Adapter Allows you to configure virtual SCSI adapter settings.
![]() Network Adapter Allows you to configure which network the virtual network adapters will be connected to, how they will obtain IP addresses and MAC addresses, as well as any virtual network port profiles. Figure 4-42 shows these options.
Network Adapter Allows you to configure which network the virtual network adapters will be connected to, how they will obtain IP addresses and MAC addresses, as well as any virtual network port profiles. Figure 4-42 shows these options.
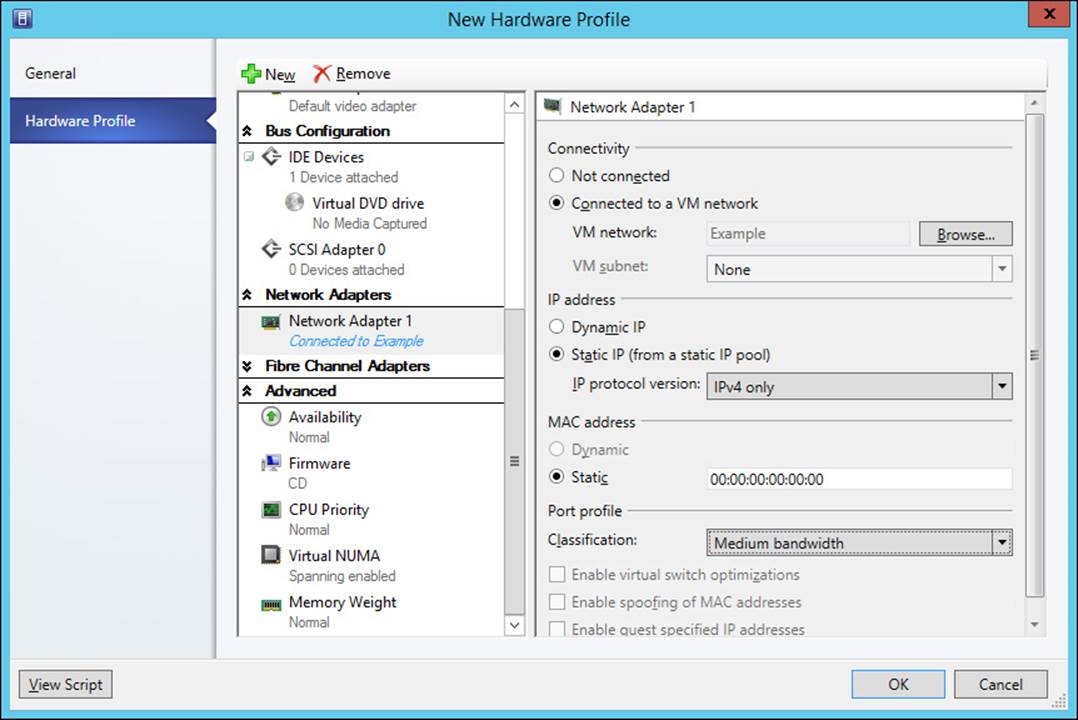
FIGURE 4-42 Network adapter settings
![]() Availability This option is for virtual machines that should be placed on highly available host clusters.
Availability This option is for virtual machines that should be placed on highly available host clusters.
![]() Firmware Allows you to configure VM startup order as shown in Figure 4-43.
Firmware Allows you to configure VM startup order as shown in Figure 4-43.
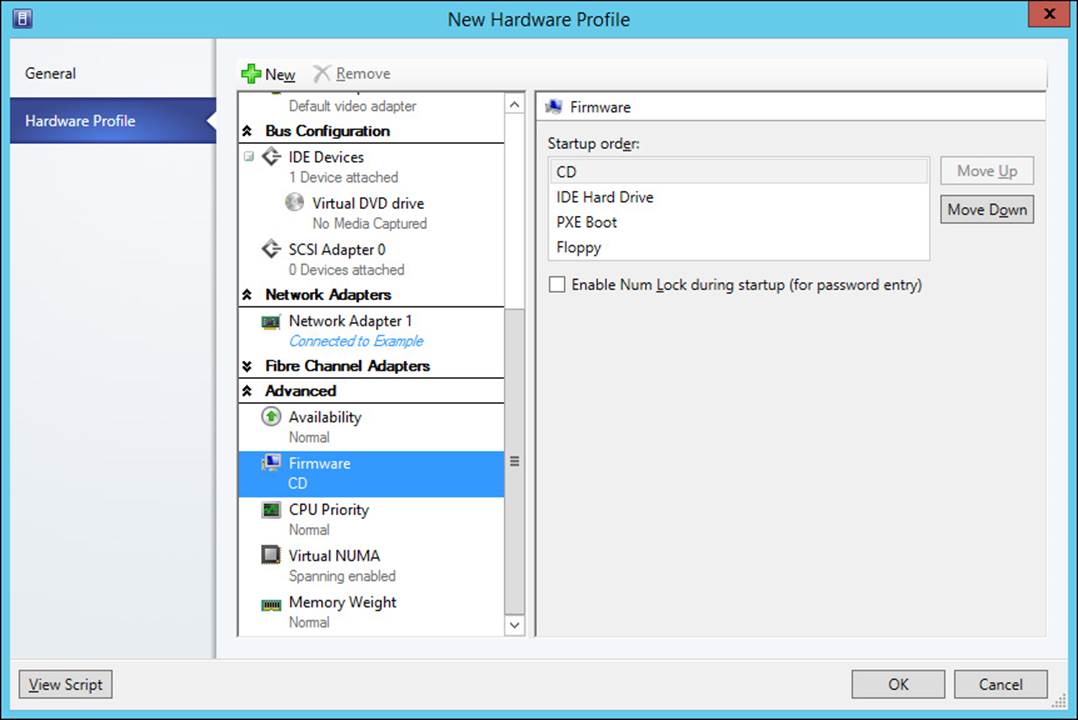
FIGURE 4-43 Firmware
![]() CPU Priority Allows you to configure the priority for the VM when the host is allocating CPU resources.
CPU Priority Allows you to configure the priority for the VM when the host is allocating CPU resources.
![]() Virtual NUMA Allows you to configure the VM to span hardware NUMA nodes.
Virtual NUMA Allows you to configure the VM to span hardware NUMA nodes.
![]() Memory Weight Allows you to configure how the VM is allocated memory when memory utilization on the virtualization host is high.
Memory Weight Allows you to configure how the VM is allocated memory when memory utilization on the virtualization host is high.
More Info: Hardware Profiles
You can learn more about hardware profiles at http://technet.microsoft.com/en-us/library/hh427289.aspx.
Creating guest operating system profiles
Guest operating system profiles allow you to configure guest operating system settings that will automatically be applied to the virtual machine. Depending on the guest OS you are configuring the profile for, this can include the local administrator account password, what roles and features are installed, domain join information, and computer name. You can configure a guest OS profile for Windows or Linux operating systems. Using a guest OS profile saves you having to perform these setup steps manually when deploying a virtual machine.
To create a guest OS profile for a Windows operating system, perform the following steps:
1. In the Library workspace of the VMM console, right-click the Profiles node, and click Create Guest OS Profile.
2. On the General page of the New Guest OS Profile dialog box, provide a name, and select which operating system the guest OS profile will apply to. Figure 4-44 shows a guest OS profile named Example Windows Server 2012 R2 for use with Microsoft Windows operating systems.
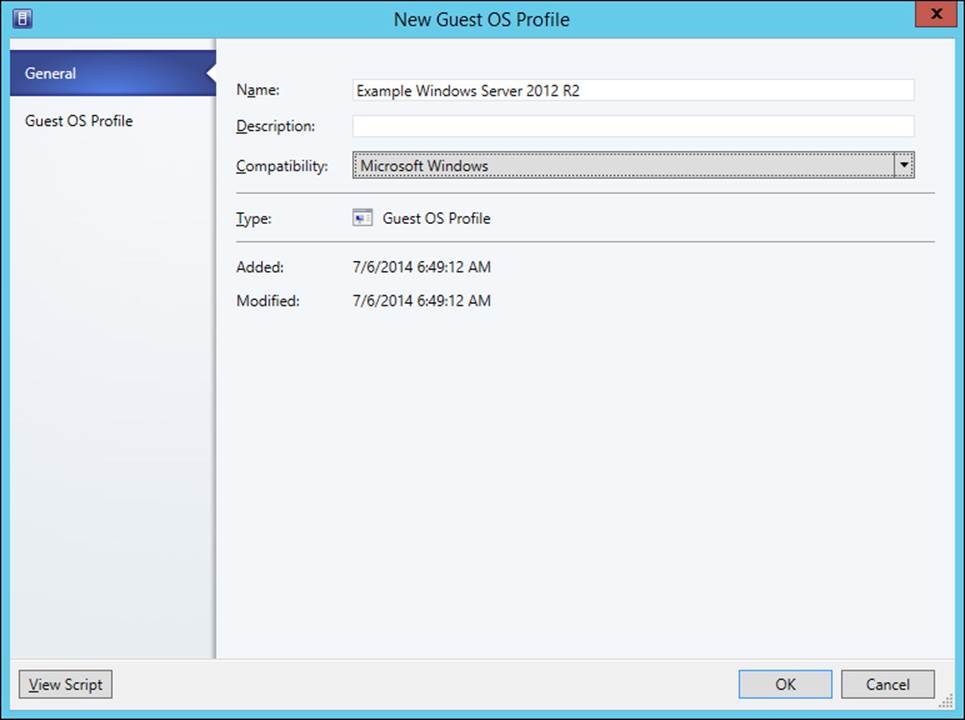
FIGURE 4-44 Guest OS profile
3. On the Guest OS Profile page, specify the following settings:
![]() Operating System Allows you to select which operating system the guest OS profile applies to. Figure 4-45 shows some of the options that can be selected using the drop-down menu.
Operating System Allows you to select which operating system the guest OS profile applies to. Figure 4-45 shows some of the options that can be selected using the drop-down menu.
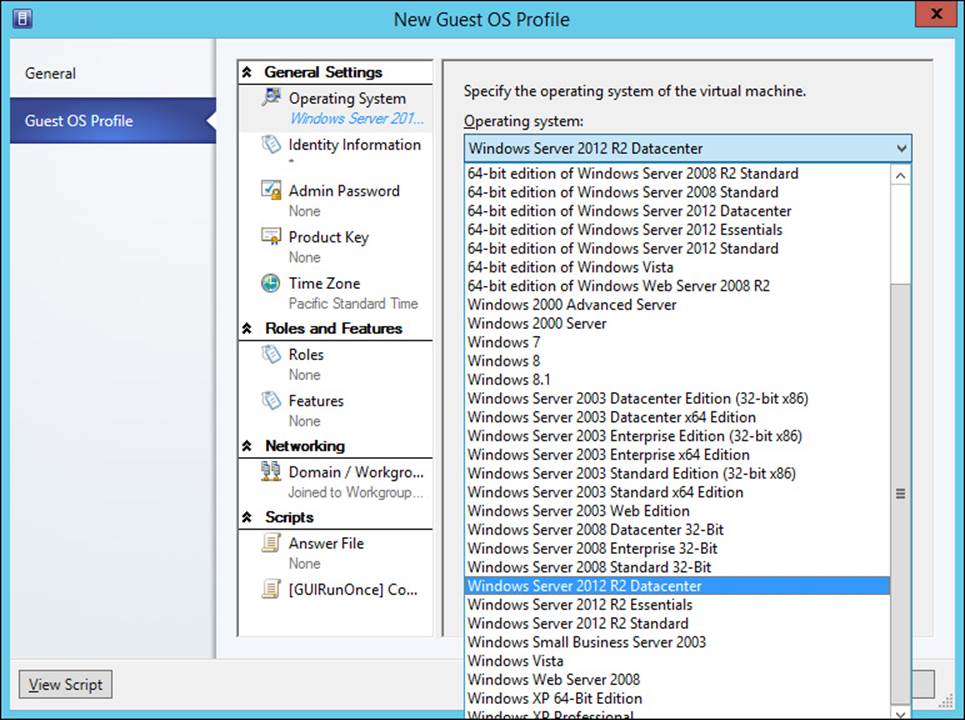
FIGURE 4-45 Operating system
![]() Identity Information Allows you to configure how the VM will be named.
Identity Information Allows you to configure how the VM will be named.
![]() Admin Password Allows you to configure the password of the built-in administrator account.
Admin Password Allows you to configure the password of the built-in administrator account.
![]() Product Key Allows you to specify a product key.
Product Key Allows you to specify a product key.
![]() Time Zone Allows you to configure which time zone the virtual machine will be configured to use.
Time Zone Allows you to configure which time zone the virtual machine will be configured to use.
![]() Roles Allows you to configure which roles and role services will automatically be installed on the virtual machine. Figure 4-46 shows the Web Server role selected.
Roles Allows you to configure which roles and role services will automatically be installed on the virtual machine. Figure 4-46 shows the Web Server role selected.
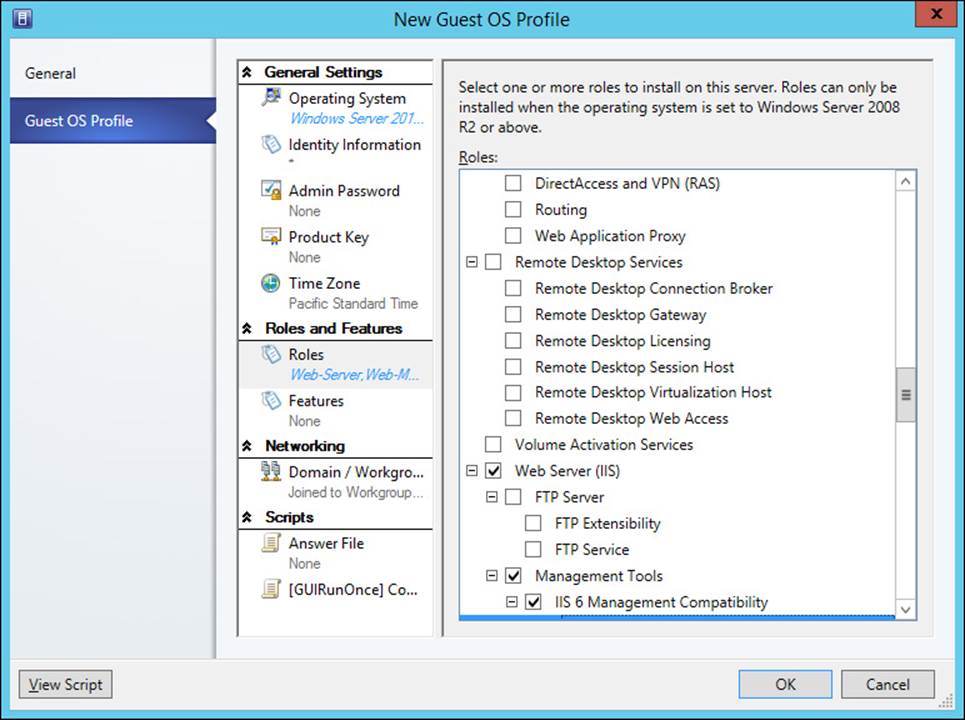
FIGURE 4-46 Roles
![]() Features Allows you to configure which features will be installed on the virtual machine.
Features Allows you to configure which features will be installed on the virtual machine.
![]() Domain / Workgroup Allows you to configure domain or workgroup settings. If specifying that the virtual machine be domain joined, you can provide credentials that allow this to occur. These options are shown in Figure 4-47.
Domain / Workgroup Allows you to configure domain or workgroup settings. If specifying that the virtual machine be domain joined, you can provide credentials that allow this to occur. These options are shown in Figure 4-47.
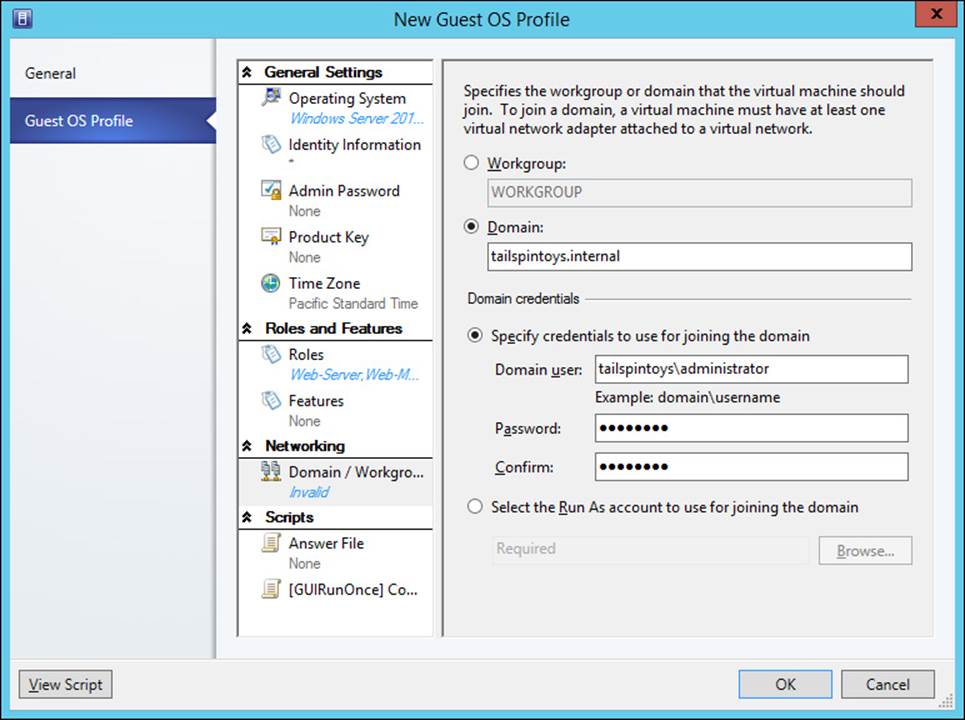
FIGURE 4-47 Domain information
![]() Answer File Allows you to specify an answer file to automatically configure the virtual machine.
Answer File Allows you to specify an answer file to automatically configure the virtual machine.
![]() [GUIRunOnce] Command Allows you to specify a set of commands that will be run automatically the first time a user logs on to the virtual machine.
[GUIRunOnce] Command Allows you to specify a set of commands that will be run automatically the first time a user logs on to the virtual machine.
More Info: Guest Operating System Profiles
You can learn more about guest operating system profiles at http://technet.microsoft.com/en-us/library/hh427296.aspx.
Creating application profiles
Application profiles include information that VMM can use for installing Microsoft Web Deploy applications, SQL Server data-tier applications, Microsoft Server App-V applications, and instructions for running scripts when you deploy a VM as part of a service. You only use application profiles if you are going to deploy a VM as part of a service, and don’t use them when deploying standalone VMs. You can add multiple applications of the same type, or applications of different types to the same profile.
Before creating an application profile, you should ensure that all packages and scripts that the profile will use are already present in a VMM library share. To create an application profile, perform the following steps:
1. In the Library workspace of the VMM console, right-click the Profiles node, and click Create Application Profile.
2. On the General page, shown in Figure 4-48, provide a name for the application profile and choose between one of the following compatibility options:
![]() SQL Server Application Host Select this option if you will use the profile to deploy SQL Server DAC packages or SQL Server scripts to an existing SQL Server instance.
SQL Server Application Host Select this option if you will use the profile to deploy SQL Server DAC packages or SQL Server scripts to an existing SQL Server instance.
![]() Web Application Host Select this option if you will use the profile to deploy Web Deploy packages to IIS.
Web Application Host Select this option if you will use the profile to deploy Web Deploy packages to IIS.
![]() General Select this option if you are deploying a combination of application types or Server-App-V applications.
General Select this option if you are deploying a combination of application types or Server-App-V applications.
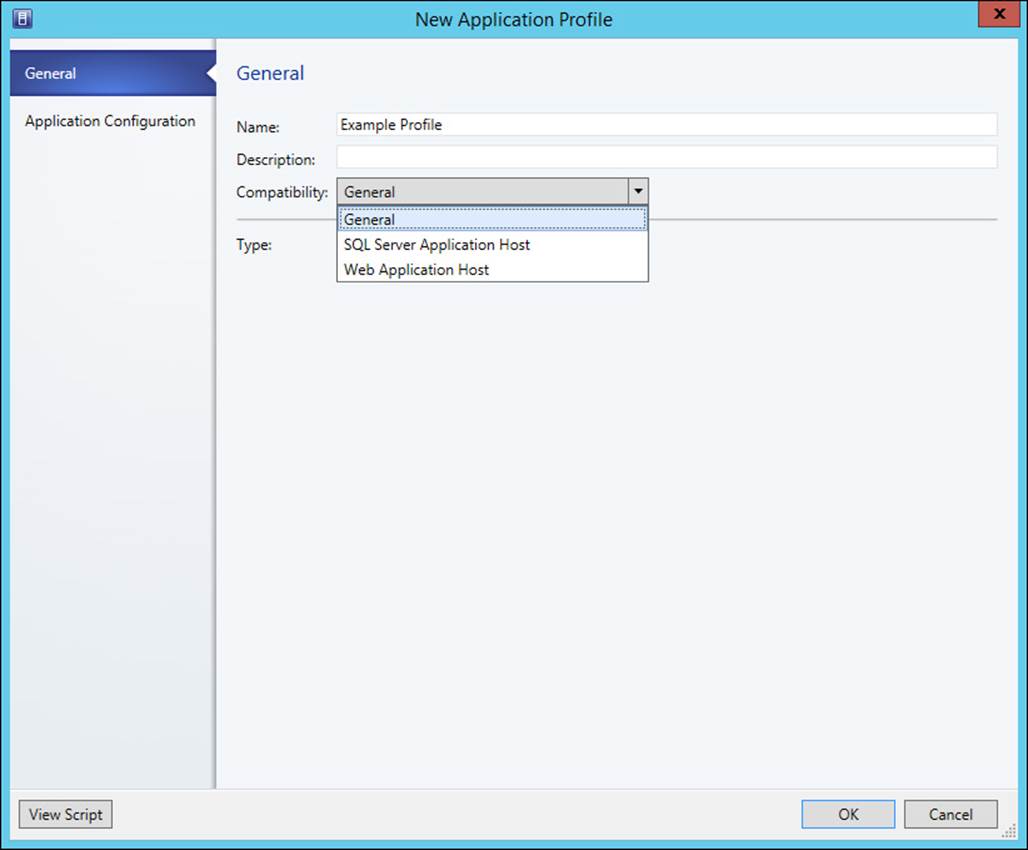
FIGURE 4-48 Application profile
3. On the Application Configuration page, select the operating system compatibility, as shown in Figure 4-49.
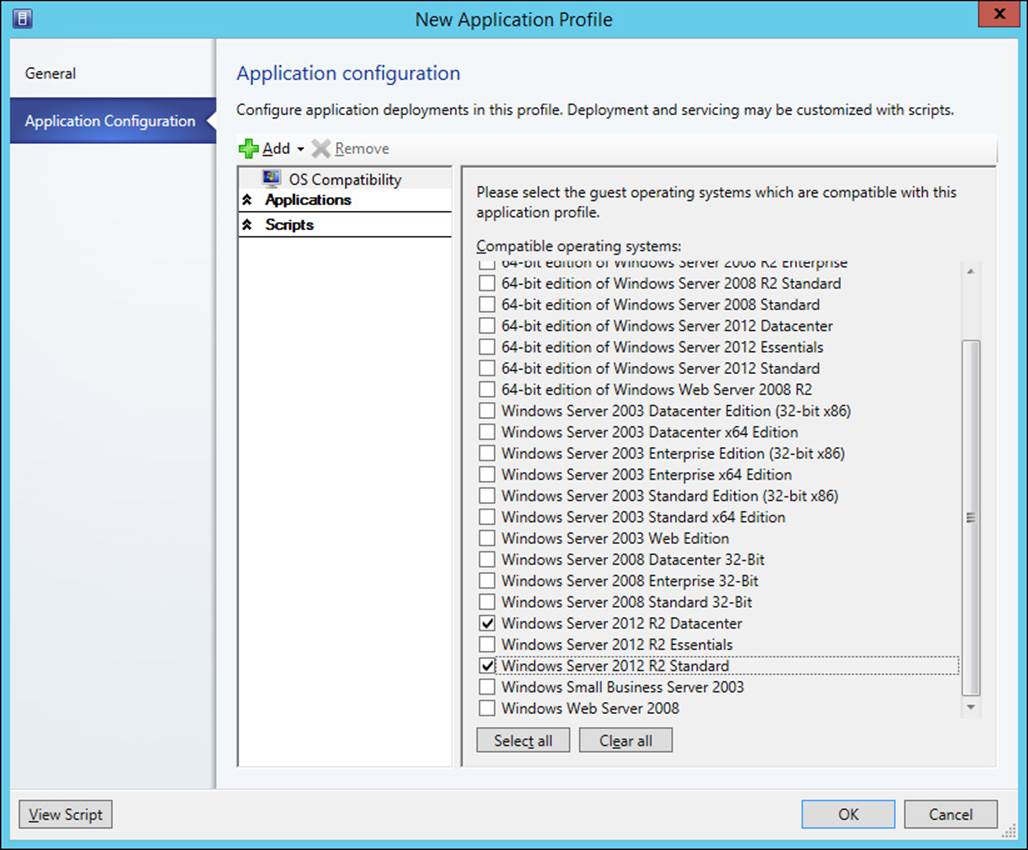
FIGURE 4-49 OS compatibility
4. Click Add, as shown in Figure 4-50, to add one of the following:
![]() Script Application
Script Application
![]() SQL Server Data-Tier Application
SQL Server Data-Tier Application
![]() Virtual Application
Virtual Application
![]() Web Application
Web Application
![]() Script To Application Profile
Script To Application Profile
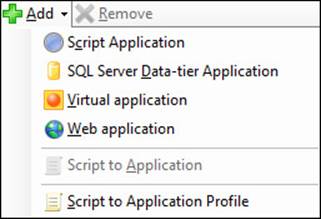
FIGURE 4-50 Add application
More Info: Application Profiles
You can learn more about application profiles at http://technet.microsoft.com/en-us/library/hh427291.aspx.
Configuring SQL Server profiles
A SQL Server profile allows you to configure a sysprepped instance of SQL Server 2008 R2, SQL Server 2012, or SQL Server 2014 for deployment through VMM. You use SQL Server profiles when deploying VMs that are part of a service. The SQL Server profile configures SQL Server according to the profile settings.
To configure a SQL Server profile, perform the following steps:
1. In the Library workspace of the VMM console, right-click the Profiles node, and click Create SQL Server Profile.
2. On the General page of the New SQL Server Profile dialog box, provide a name for the SQL Server profile.
3. On the SQL Server Configuration page, click Add SQL Server Deployment, and provide the following information, as shown in Figure 4-51.
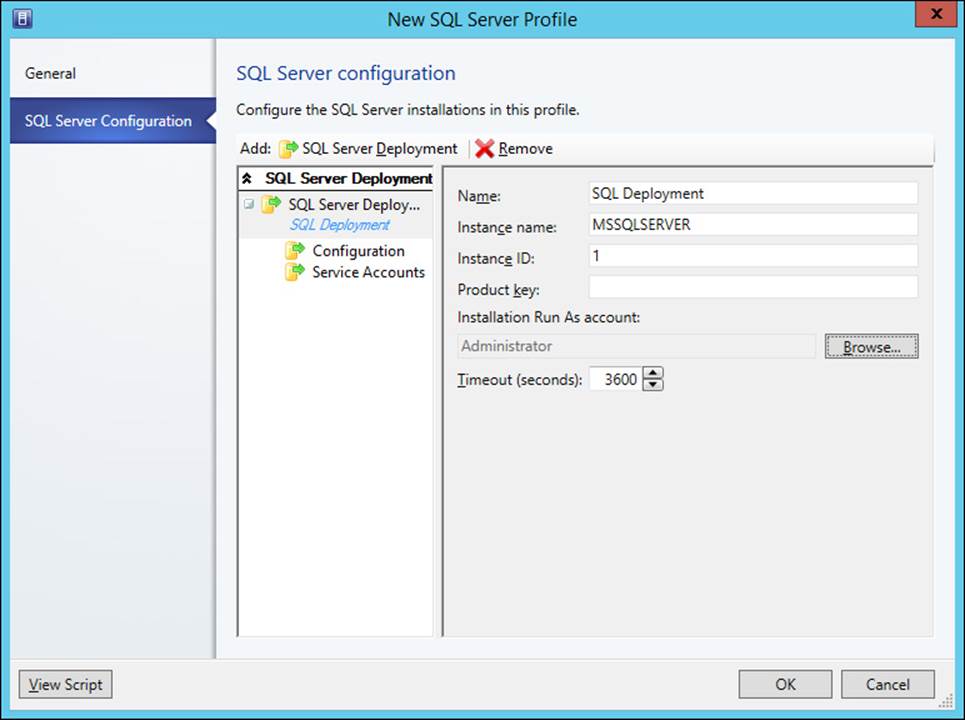
FIGURE 4-51 SQL Deployment
![]() Name Name for the SQL Server deployment.
Name Name for the SQL Server deployment.
![]() Instance Name The instance name. If left blank, it will use the default name MSSQLSERVER.
Instance Name The instance name. If left blank, it will use the default name MSSQLSERVER.
![]() Instance ID The instance ID used when you sysprepped the SQL instance.
Instance ID The instance ID used when you sysprepped the SQL instance.
![]() Installation Run As Account Account with the permission to deploy SQL Server.
Installation Run As Account Account with the permission to deploy SQL Server.
![]() Media Source Location of the SQL Server installation media, such as a VMM Library share.
Media Source Location of the SQL Server installation media, such as a VMM Library share.
![]() SQL Server Administrators Users or groups that will be configured as SQL Server Administrators. You must specify at least one account.
SQL Server Administrators Users or groups that will be configured as SQL Server Administrators. You must specify at least one account.
![]() Security Mode Select Windows or SQL Server authentication.
Security Mode Select Windows or SQL Server authentication.
![]() Service accounts Configuration for the SQL Server service, SQL Server agent, and Reporting Services service accounts. You must select a Run As account for all three services.
Service accounts Configuration for the SQL Server service, SQL Server agent, and Reporting Services service accounts. You must select a Run As account for all three services.
More Info: SQL Server Profiles
You can learn more about SQL Server profiles at http://technet.microsoft.com/en-us/library/hh427294.aspx.
Configuring virtual machine templates
A Virtual Machine Manager VM template allows you to deploy a single virtual machine with a consistent set of settings. A VMM VM template is an XML object that is stored with a VMM library, and includes one or more of the following segments:
![]() Guest Operating System Profile A guest OS profile that includes operating system settings.
Guest Operating System Profile A guest OS profile that includes operating system settings.
![]() Hardware Profile A hardware profile that includes VM hardware settings.
Hardware Profile A hardware profile that includes VM hardware settings.
![]() Virtual Hard Disk This can be a blank hard disk, or a virtual hard disk that hosts a specially prepared, sysprepped in the case of Windows based operating systems, version of an operating system.
Virtual Hard Disk This can be a blank hard disk, or a virtual hard disk that hosts a specially prepared, sysprepped in the case of Windows based operating systems, version of an operating system.
You can create VM templates based on existing virtual machines deployed on a virtualization host managed by VMM, based on virtual hard disks stored in a VMM library, or by using an existing VM template.
VM templates have the following limitations:
![]() A VM template allows you to customize IP address settings, but you can only configure a static IP address for a specific VM when deploying that VM from the template.
A VM template allows you to customize IP address settings, but you can only configure a static IP address for a specific VM when deploying that VM from the template.
![]() Application and SQL Server deployment are only used when you deploy a VM as part of a service.
Application and SQL Server deployment are only used when you deploy a VM as part of a service.
![]() When creating a template from an existing VM, ensure that the VM is a member of a workgroup and is not joined to a domain.
When creating a template from an existing VM, ensure that the VM is a member of a workgroup and is not joined to a domain.
![]() You should create a separate local administrator account on a VM before using it as the basis of a template. Using the built-in administrator account will cause the sysprep operation to fail.
You should create a separate local administrator account on a VM before using it as the basis of a template. Using the built-in administrator account will cause the sysprep operation to fail.
![]() You cannot create a virtual machine template for a Linux virtual machine based on an existing Linux VM deployed to a virtualization host.
You cannot create a virtual machine template for a Linux virtual machine based on an existing Linux VM deployed to a virtualization host.
To create a VM template based on an existing virtual hard disk (which can include a blank hard disk), or existing VM template, perform the following steps:
1. In the Library workspace of the VMM console, click Create VM Template on the ribbon.
2. On the Select Source page, click Browse next to Use An Existing VM Template For A Virtual Hard Disk Stored In The Library.
3. On the Select VM Template Source dialog box, select the hard disk that will serve as the basis for the VM template.
4. On the VM Template Identity page, provide a name for the VM template and choose between a Generation 1 and a Generation 2 VM. This page is shown in Figure 4-52.
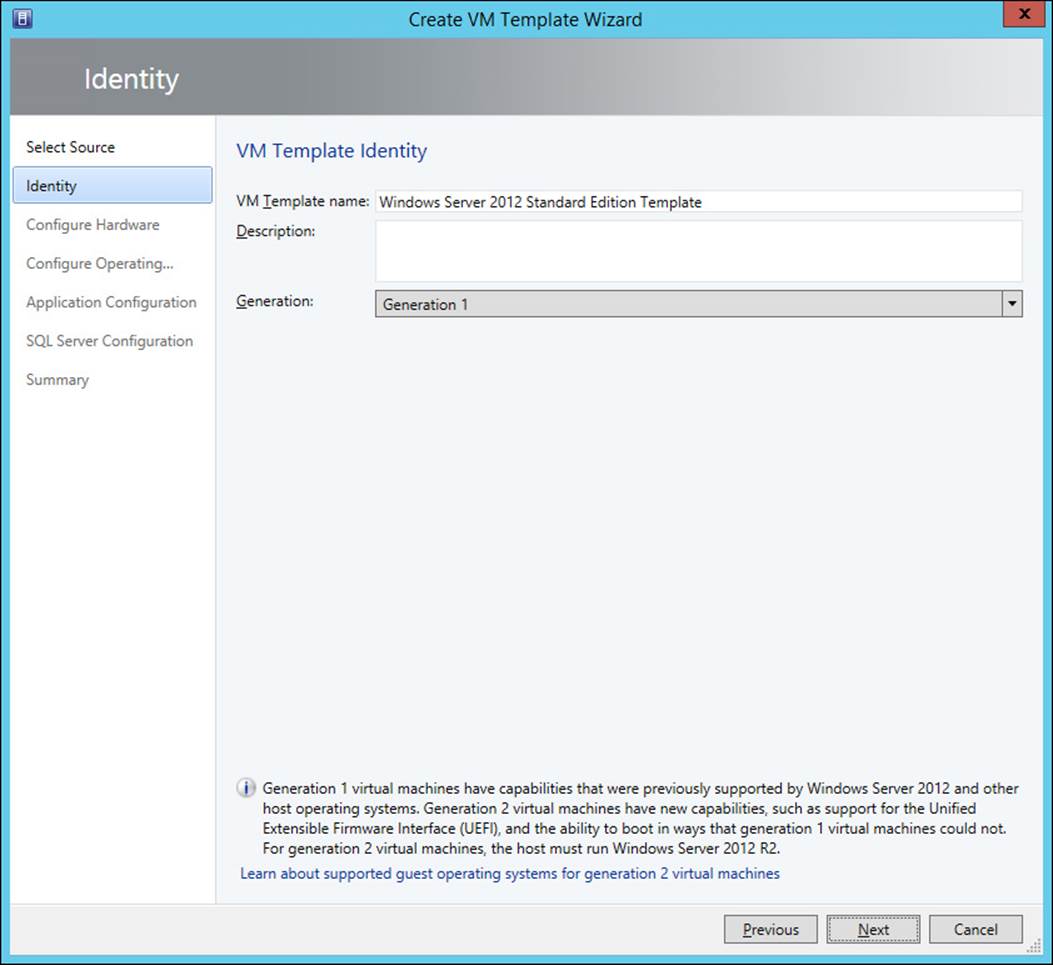
FIGURE 4-52 Template name
5. On the Configure Hardware page, you can select an existing hardware profile, or create a new hardware profile using the steps outlined earlier in this chapter. If you choose to create a new hardware profile, you can save this profile for use in the future. Figure 4-53 shows the selection of the Example Hardware Profile.
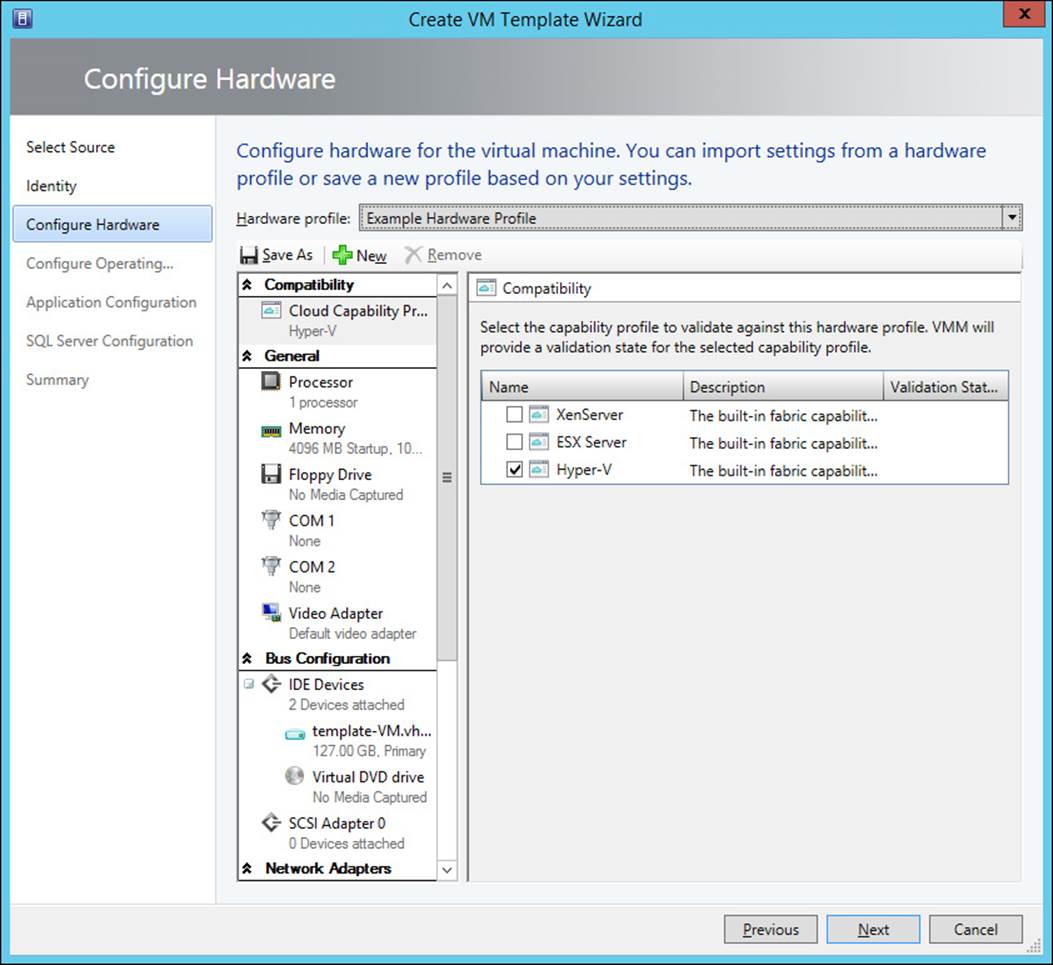
FIGURE 4-53 Select hardware profile
6. On the Configure Operating System page, select a guest OS profile or configure a new Guest OS Profile using the steps outlined earlier. If you choose to create a new guest OS profile, you can save it for use again later. Figure 4-54 shows the Example Windows Server 2012 R2 profile selected.
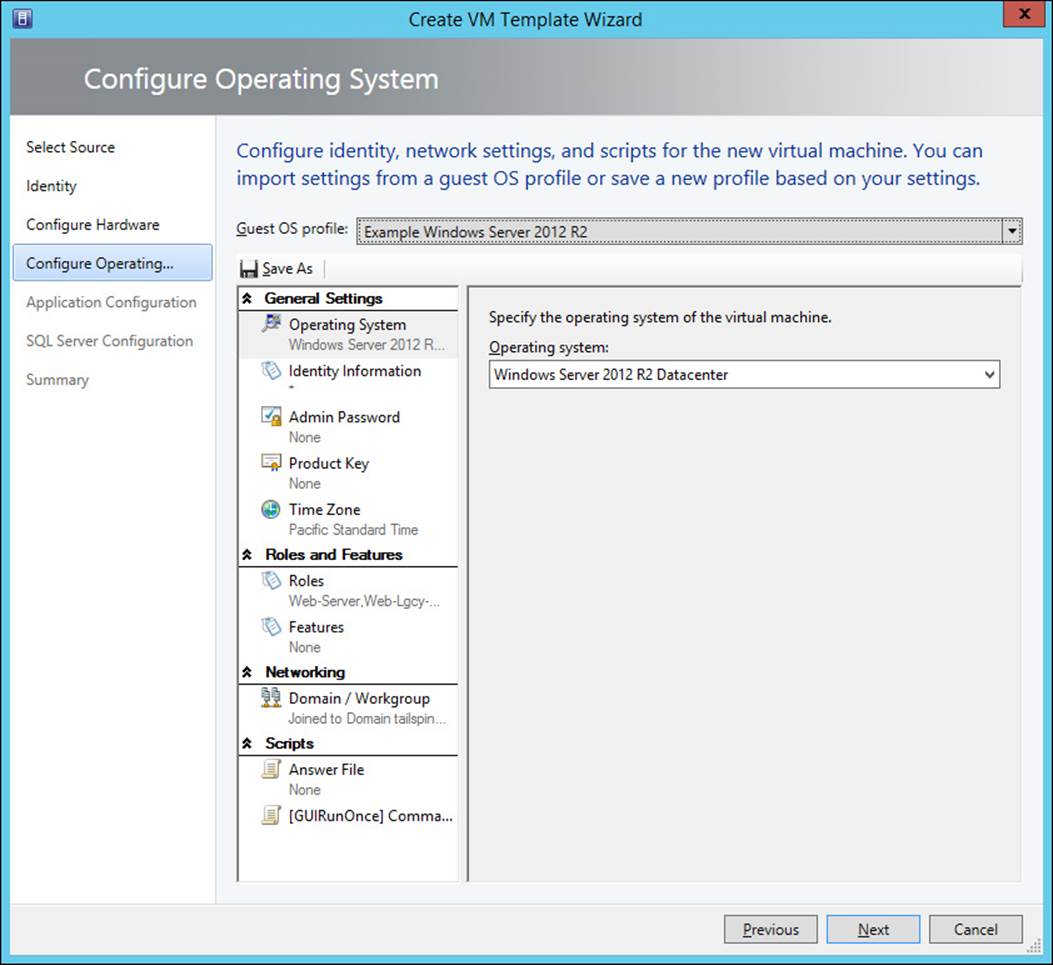
FIGURE 4-54 Select Guest OS Profile
7. On the Application Configuration page, you can select an existing application profile. This will only be used if the VM is deployed as a service, and you don’t have to select an application profile when configuring a VM template.
8. On the SQL Server Configuration page, you can select an existing SQL Server profile. This will only be used if the VM is deployed as a service and you don’t have to select SQL Server profile when configuring a VM template.
9. Complete the wizard, which creates the profile.
When creating a VM template from a VM that is already deployed, you’ll be asked to select an existing VM from a list of those that are deployed on a virtualization host managed by VMM.
More Info: Virtual Machine Templates
You can learn more about virtual machine templates at http://technet.microsoft.com/en-us/library/hh427282.aspx.
Creating service templates
Service templates differ from virtual machine templates in the following ways:
![]() Service templates allow you to deploy multiple virtual machines rather than a single virtual machine.
Service templates allow you to deploy multiple virtual machines rather than a single virtual machine.
![]() Service templates can include settings for Windows Server roles and features. If a VM template includes role and feature settings, they will only be used if the VM is deployed as part of a service.
Service templates can include settings for Windows Server roles and features. If a VM template includes role and feature settings, they will only be used if the VM is deployed as part of a service.
![]() Service templates can include application profiles and SQL server profiles. These profiles are not available when deploying a VM from a VM template.
Service templates can include application profiles and SQL server profiles. These profiles are not available when deploying a VM from a VM template.
To create a service template, perform the following steps:
1. In the Library workspace of the VMM console, click the Create Service Template item on the ribbon.
2. In the New Service Template dialog box, specify a Name, a Release version, and select between a Blank, Single Machine, Two Tier Application, or Three Tier Application pattern. Figure 4-55 shows the selection of a Two Tier Application.
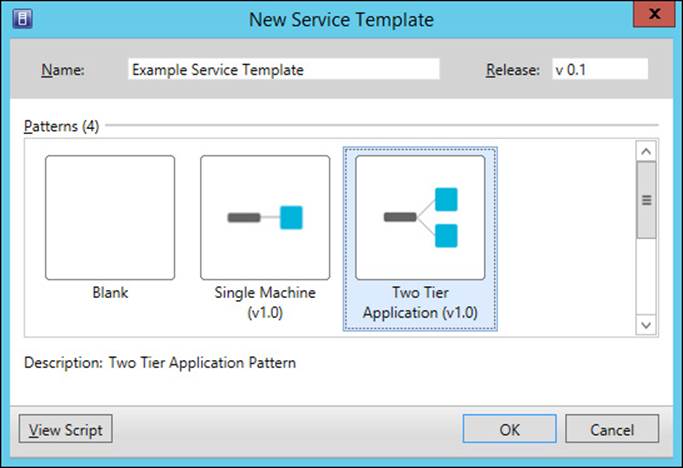
FIGURE 4-55 New Service Template
3. In the Virtual Machine Manager Service Template Designer, shown in Figure 4-56, use the drag and drop interface to add applications and configure which VM templates will be used with the multiple tier application. You can also add VM networks and load balancers, as well as adding additional machine tiers using the designer.
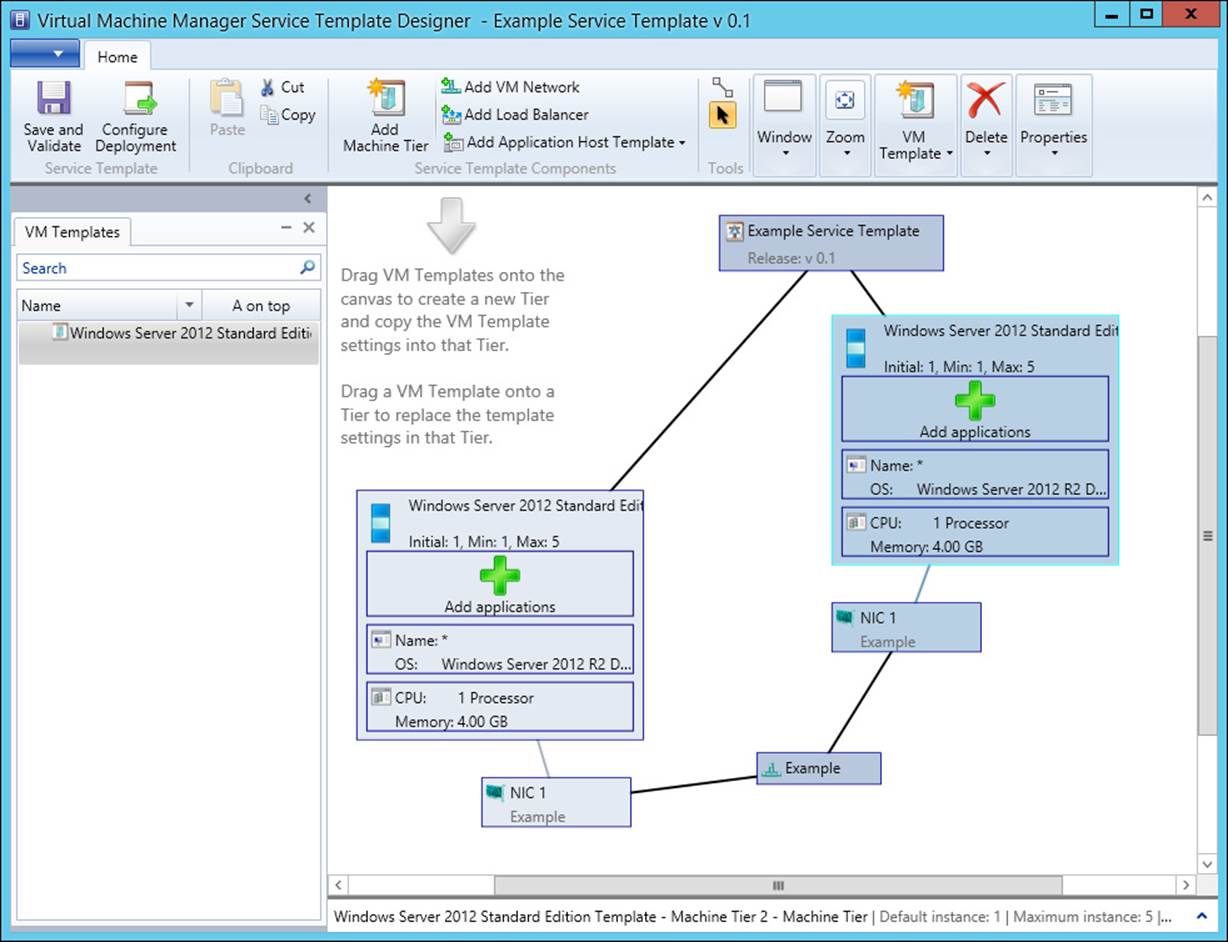
FIGURE 4-56 VMM Service Template Designer
4. When you have competed configuring the service template, click Save And Validate. This will check the service template for errors which must be resolved before the template can be saved and used for deployment.
More Info: Service Templates
You can learn more about creating service templates at http://technet.microsoft.com/en-us/library/gg675105.aspx.
Thought experiment: VMM service deployment at Contoso
You are in the process of configuring service deployment using VMM at Contoso. You want to automate the deployment of VMs, applications, and multi-tier services using VMM profiles and templates. With this in mind, answer the following questions:
1. What should you configure to automate the deployment of Microsoft Server App-V applications to a virtual service in VMM?
2. What should you configure so that you can simplify the deployment of a multi-tier application using VMM?
Objective Summary
![]() Hardware profiles allow you to configure virtual machine hardware settings.
Hardware profiles allow you to configure virtual machine hardware settings.
![]() Guest operating system profiles allow you to configure operating system settings, including settings for local administrator accounts, computer name, and domain join information.
Guest operating system profiles allow you to configure operating system settings, including settings for local administrator accounts, computer name, and domain join information.
![]() Application profiles allow you to configure Server App-V, SQL DAC, and Web Deploy settings for when you deploy services.
Application profiles allow you to configure Server App-V, SQL DAC, and Web Deploy settings for when you deploy services.
![]() SQL Server profiles allow you to configure SQL Server settings for when you deploy services.
SQL Server profiles allow you to configure SQL Server settings for when you deploy services.
![]() Virtual machine templates allow you to create templates that serve as the basis for virtual machine deployment. These include hardware and guest operating system settings. You can create VM templates based on an existing virtual hard disk, virtual machine, or existing VM template.
Virtual machine templates allow you to create templates that serve as the basis for virtual machine deployment. These include hardware and guest operating system settings. You can create VM templates based on an existing virtual hard disk, virtual machine, or existing VM template.
![]() Service templates allow you to deploy multiple virtual machines and applications in multi-tier configurations.
Service templates allow you to deploy multiple virtual machines and applications in multi-tier configurations.
Objective review
Answer the following questions to test your knowledge of the information in this objective. You can find the answers to these questions and explanations of why each answer choice is correct or incorrect in the “Answers” section at the end of this chapter.
1. Which of the following do you use to configure the service account used by a SQL Server instance’s SQL Server service?
A. SQL Server profile
B. Hardware profile
C. Guest operating system profile
D. Application profile
2. Which of the following do you use to configure a virtual machine’s memory configuration?
A. Application profile
B. Guest operating system profile
C. Hardware profile
D. SQL Server profile
3. Which of the following do you use to configure the local administrator account password on a virtual machine?
A. SQL Server profile
B. Hardware profile
C. Guest operating system profile
D. Application profile
4. Which of the following can you use as the basis for creating a virtual machine template?
A. Deployed virtual machine
B. VMM VM template
C. Virtual hard disk
D. Guest OS profile
Answers
This section contains the solutions to the thought experiments and answers to the lesson review questions in this chapter
Objective 4.1: Thought experiment
1. You need to configure the Mondays that the office is closed as holidays in the Service Manager calendar used to calculate metrics.
2. You should configure notifications that send an email to the service desk manager when an incident enters a warning state.
Objective 4.1: Review
1. Correct answers: A, B, and C
A. Correct: You need a calendar prior to completing the configuration of a Service Manager SLO.
B. Correct: You need a metric prior to completing the configuration of a Service Manager SLO.
C. Correct: You need a queue prior to completing the configuration of a Service Manager SLO.
D. Incorrect: Subscriptions are necessary for notifications, but not necessary for configuring Service Manager SLOs.
2. Correct answer: A
A. Correct: You should target the Service Level Instance Time Information class when configuring this notification.
B. Incorrect: You should target the Service Level Instance Time Information class rather than the Change Request class.
C. Incorrect: You should target the Service Level Instance Time Information class rather than the Review Activity class.
D. Incorrect: You should target the Service Level Instance Time Information class rather than the Problem class.
3. Correct answers: A and B
A. Correct: You can use a custom workflow or an Orchestrator runbook to automatically escalate an incident in the event that it is likely to breach an SLO.
B. Correct: You can use a custom workflow or an Orchestrator runbook to automatically escalate an incident in the event that it is likely to breach an SLO.
C. Incorrect: You can use a custom workflow or an Orchestrator runbook to automatically escalate an incident in the event that it is likely to breach an SLO.
D. Incorrect: You can use a custom workflow or an Orchestrator runbook to automatically escalate an incident in the event that it is likely to breach an SLO.
4. Correct answers: C and D
A. Incorrect: Required By does not measure the incident creation date or when the incident is first responded to.
B. Incorrect: First Assigned Date is when the incident or service request is first assigned.
C. Correct: The First Response Date should be configured as the End Date for the metric.
D. Correct: The Created Date is when the incident is created. This should form the Start Date for the metric.
Objective 4.2: Thought experiment
1. You can configure and make knowledge articles available that detail procedures that users can use to attempt to self-remediate incidents before contacting the service desk.
2. You can configure Service Manager so that incidents can be submitted using email.
Objective 4.2: Review
1. Correct answers: A and B
A. Correct: You need to add the problem as a related work item to each incident, or the incidents as related work items to the problem.
B. Correct: You need to add the problem as a related work item to each incident, or the incidents as related work items to the problem.
C. Incorrect: You need to add the problem as a related work item to each incident, or the incidents as related work items to the problem.
D. Incorrect: You need to add the problem as a related work item to each incident, or the incidents as related work items to the problem.
2. Correct answer: B
A. Incorrect: You should resolve the problem. When doing so, you should select the option to auto-resolve all incidents associated with the problem.
B. Correct: You should resolve the problem. When doing so, you should select the option to auto-resolve all incidents associated with the problem.
C. Incorrect: You should resolve the problem. When doing so, you should select the option to auto-resolve all incidents associated with the problem.
D. Incorrect: You should resolve the problem. When doing so, you should select the option to auto-resolve all incidents associated with the problem.
3. Correct answers: B and C
A. Incorrect: You should assign the highest priority, which is the lowest number, to incidents that are high impact and high urgency.
B. Correct: You should assign the lowest priority, which is the highest number, to incidents that are of low impact and low urgency.
C. Correct: You should assign the highest priority, which is the lowest number, to incidents that are high impact and high urgency.
D. Incorrect: You should assign the lowest priority, which is the highest number, to incidents that are of low impact and low urgency.
4. Correct answers: A and C
A. Correct: Priority is calculated using impact and urgency.
B. Incorrect: Priority is calculated using impact and urgency.
C. Correct: Priority is calculated using impact and urgency.
D. Incorrect: Priority is calculated using impact and urgency.
Objective 4.3: Thought experiment
1. You should configure an Application Profile to automate the deployment to Microsoft Server App-V applications to virtual services.
2. You should configure a service template so that you can automate the deployment of multi-tier applications. Service templates include VM templates, application, and SQL Server profiles.
Objective 4.3: Review
1. Correct answer: A
A. Correct: You use a SQL Server profile to configure a SQL Server instance’s service accounts.
B. Incorrect: You use a hardware profile to configure a virtual machine’s hardware settings.
C. Incorrect: You use a guest operating system profile to configure guest operating system settings.
D. Incorrect: You use an application profile to configure application installation settings.
2. Correct answer: C
A. Incorrect: You use an application profile to configure application installation settings.
B. Incorrect: You use a guest operating system profile to configure guest operating system settings.
C. Correct: You use a hardware profile to configure a virtual machine’s hardware settings.
D. Incorrect: You use a SQL Server profile to configure a SQL Server instance’s service accounts.
3. Correct answer: C
A. Incorrect: You use a SQL Server profile to configure a SQL Server instance’s service accounts.
B. Incorrect: You use a hardware profile to configure a virtual machine’s hardware settings.
C. Correct: You use a guest operating system profile to configure guest operating system settings.
D. Incorrect: You use an application profile to configure application installation settings.
4. Correct answers: A, B, and C
A. Correct: You can use a deployed virtual machine, an existing VMM template, or a virtual hard disk as the basis for a VMM VM template.
B. Correct: You can use a deployed virtual machine, an existing VMM template, or a virtual hard disk as the basis for a VMM VM template.
C. Correct: You can use a deployed virtual machine, an existing VMM template, or a virtual hard disk as the basis for a VMM VM template.
D. Incorrect: You can use a deployed virtual machine, an existing VMM template, or a virtual hard disk as the basis for a VMM VM template.
All materials on the site are licensed Creative Commons Attribution-Sharealike 3.0 Unported CC BY-SA 3.0 & GNU Free Documentation License (GFDL)
If you are the copyright holder of any material contained on our site and intend to remove it, please contact our site administrator for approval.
© 2016-2026 All site design rights belong to S.Y.A.