Exam Ref 70-247 Configuring and Deploying a Private Cloud
Chapter 2. Configure System Center infrastructure
After you have deployed System Center, you need to configure additional elements to ensure that you can use System Center to manage your organization’s private cloud. You’ll need to configure Data Protection Manager to ensure that the infrastructure is being protected, and configure appropriate security roles and Run As accounts to ensure that tasks can be performed with least privilege. You’ll also have to configure and manage portals and dashboards to grant access to users who are not directly responsible for managing System Center products.
Objectives in this chapter:
![]() Objective 2.1: Configure System Center components
Objective 2.1: Configure System Center components
![]() Objective 2.2: Configure portals and dashboards
Objective 2.2: Configure portals and dashboards
Objective 2.1: Configure System Center components
This objective deals with several diverse elements of a System Center deployment, focusing initially on data protection using Data Protection Manager, but also covering how role-based permissions work through the use of roles, and how credentials work with Run As accounts.
This objective covers the following topics:
![]() DPM storage pools
DPM storage pools
![]() DPM secondary servers
DPM secondary servers
![]() System Center agents
System Center agents
![]() Run As accounts and profiles
Run As accounts and profiles
![]() User roles
User roles
![]() Watcher nodes
Watcher nodes
![]() Gateway servers
Gateway servers
Understanding Data Protection Manager
Data Protection Manager (DPM) is the data protection, or backup and recovery element, of the System Center suite. Even though you are likely to deploy your private cloud workloads on to a fabric of highly redundant storage, network, and compute resources, hardware redundancy doesn’t obviate the need for data protection. This is because you can lose critical data to other events like software errors, malware, or end users simply making mistakes.
DPM storage pools
A DPM storage pool is a collection of disks that DPM uses to store backup replicas and recovery points for the workloads that it protects. While DPM can also write data to tables, and store data in a Microsoft Azure recovery vault, the primary location for DPM to store protected data is within a storage pool.
DPM storage pools have the following requirements:
![]() DPM storage pools must be located on disks separate to the ones that host the system files, database files, and program files.
DPM storage pools must be located on disks separate to the ones that host the system files, database files, and program files.
![]() A storage pool must exist before DPM can start protecting data.
A storage pool must exist before DPM can start protecting data.
![]() A storage pool can contain a single disk. You can add more disks to a storage pool at a later point in time.
A storage pool can contain a single disk. You can add more disks to a storage pool at a later point in time.
![]() DPM storage pools do not support USB/1394 disks.
DPM storage pools do not support USB/1394 disks.
![]() DPM storage pools can only allocate space that exists in volumes it creates on disks. DPM ignores any existing volumes on a disk added to a storage pool.
DPM storage pools can only allocate space that exists in volumes it creates on disks. DPM ignores any existing volumes on a disk added to a storage pool.
![]() To maximize the amount of space allocated on a disk that you are going to add to a storage pool, delete any existing volumes prior to adding the disk to the pool.
To maximize the amount of space allocated on a disk that you are going to add to a storage pool, delete any existing volumes prior to adding the disk to the pool.
To add disks to a DPM storage pool, perform the following steps:
1. In the Management workspace of the DPM console, click Disks, and then on the ribbon, click Add.
2. In the Add Disks To Storage Pool dialog box, shown in Figure 2-1, select the disks that you want to add, and click Add.
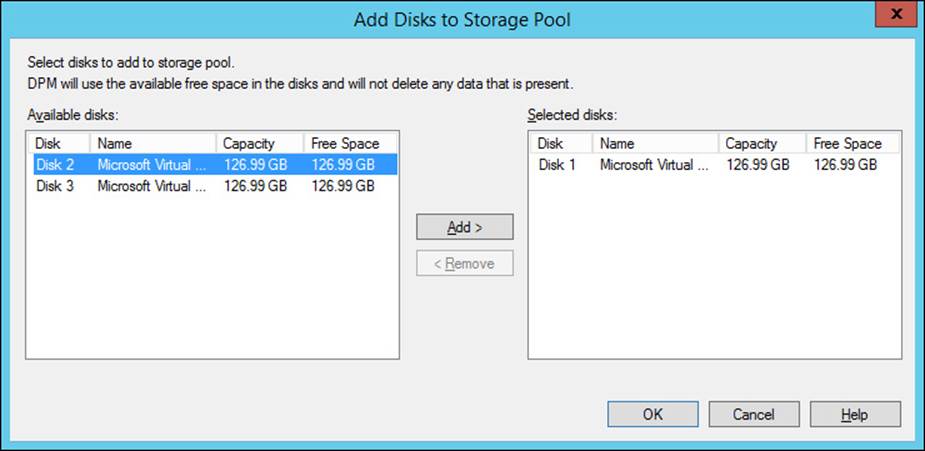
FIGURE 2-1 Adding disks to storage pool
3. If a warning dialog informs you that DPM will convert disks so that they are dynamic, and any existing volumes will be converted to simple volumes, click Yes.
4. Review the list of disks in the storage pool in the DPM console, as shown in Figure 2-2.
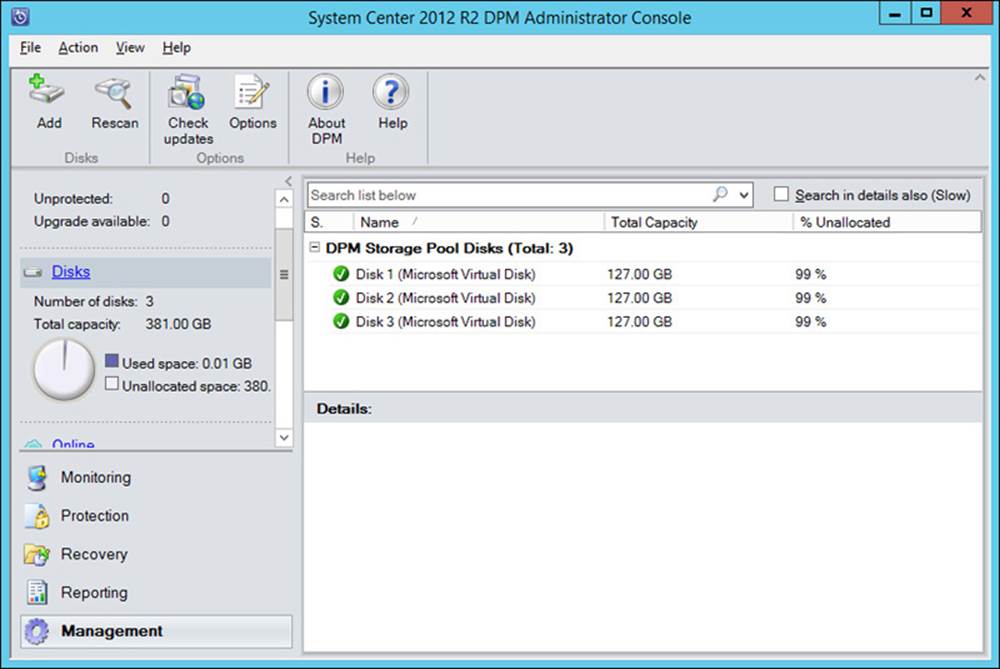
FIGURE 2-2 Disks in the storage pool
More Info: DPM Storage Pools
You can learn more about DPM storage pools at http://technet.microsoft.com/en-us/library/hh758075.aspx.
DPM secondary servers
You can configure a second DPM server at the same site, or at another site, to protect the primary DPM server. The primary DPM server is the server that directly protects data sources. You configure the secondary DPM server to protect the backup replicas and databases on the primary DPM server. This allows you to use the secondary DPM server for recovery in the event that the primary fails. It’s also possible to switch protected workloads from the primary server so that they are protected by the secondary (which becomes the new primary) if necessary.
To configure secondary protection, perform the following steps:
1. Deploy the DPM protection agent from the secondary server on the primary DPM server.
2. Add the primary DPM server to a protection group on the secondary DPM server. Configure protection for the following, as shown in Figure 2-3:
![]() The SQL Server database on the primary DPM server
The SQL Server database on the primary DPM server
![]() All volumes on the primary DPM server
All volumes on the primary DPM server
![]() All protected workload replicas on the primary DPM server
All protected workload replicas on the primary DPM server
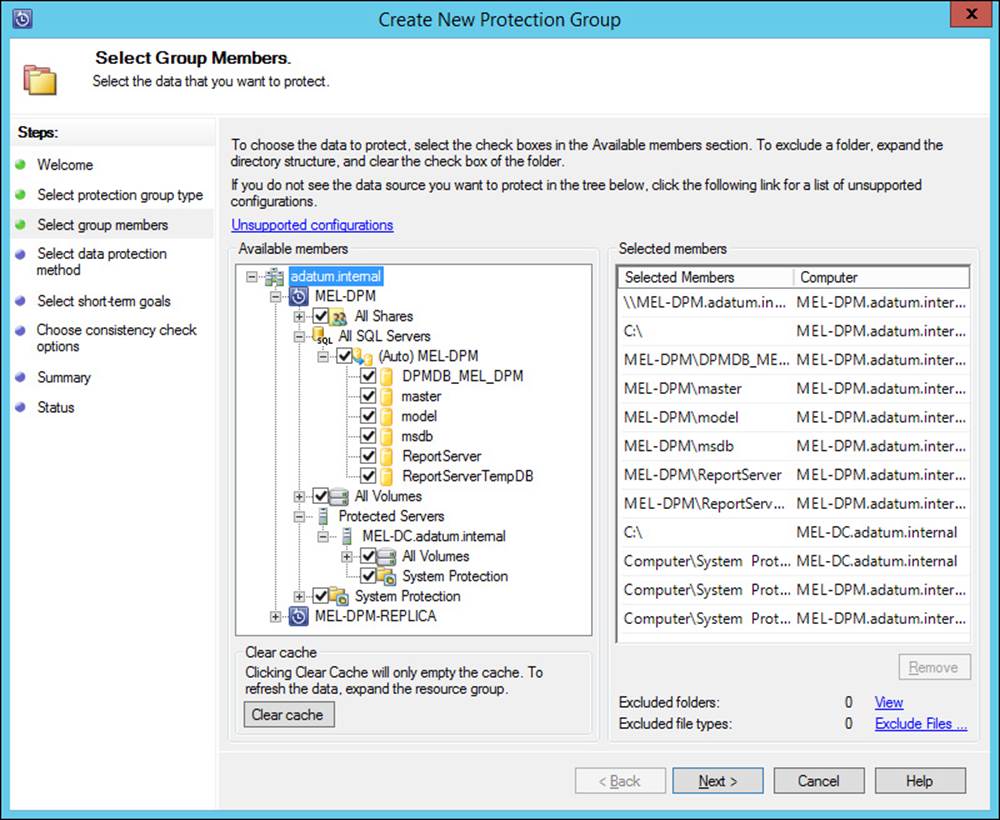
FIGURE 2-3 Select group members
Note that the following conditions apply when deploying this configuration:
![]() The primary and secondary DPM servers must be running the same operating system version, service packs, and software updates.
The primary and secondary DPM servers must be running the same operating system version, service packs, and software updates.
![]() The primary and secondary DPM servers must be running the same version of DPM, including service packs and software updates.
The primary and secondary DPM servers must be running the same version of DPM, including service packs and software updates.
![]() You cannot configure file name extension exclusions when configuring the protection group.
You cannot configure file name extension exclusions when configuring the protection group.
![]() You can configure short-term disk-based protection, or short-term disk-based protection, and long-term tape-based protection. Figure 2-4 shows the selection of short-term protection.
You can configure short-term disk-based protection, or short-term disk-based protection, and long-term tape-based protection. Figure 2-4 shows the selection of short-term protection.
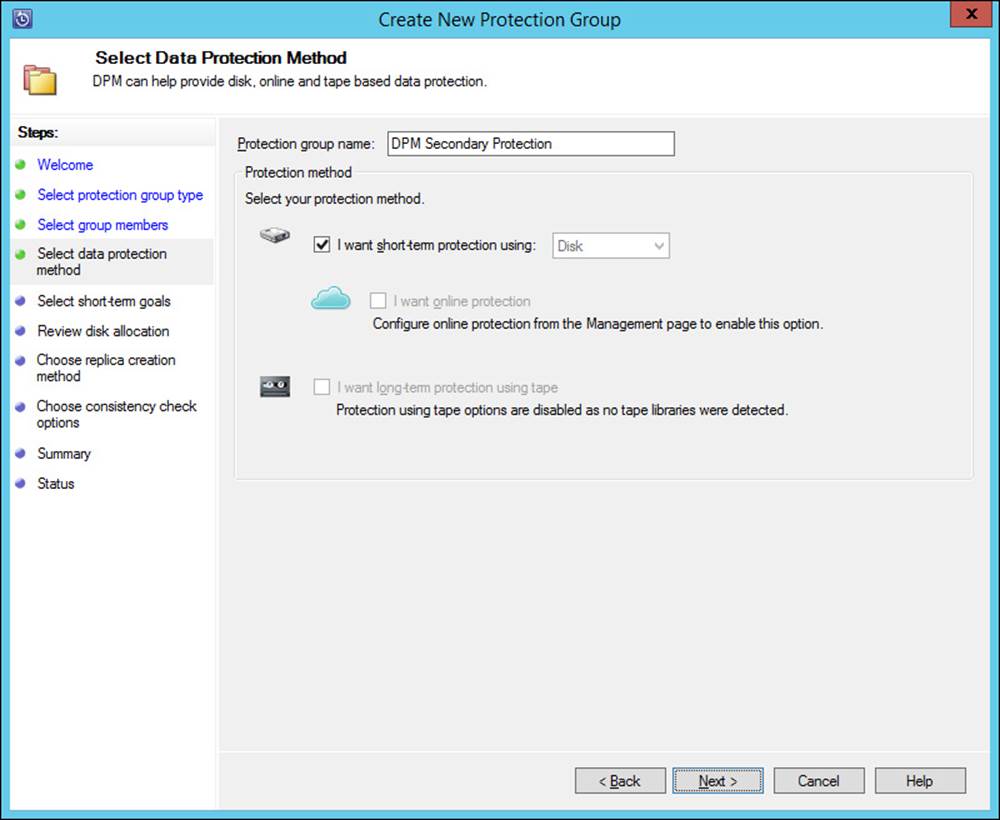
FIGURE 2-4 Short-term protection
More Info: DPM Secondary Servers
You can learn more about DPM secondary servers at http://technet.microsoft.com/en-us/library/jj244598.aspx.
DPM chaining
DPM chaining differs from a basic secondary DPM server configuration because not only does the second DPM server protect the first, but the first DPM server is configured to protect the second. Each DPM server has a set of workloads for which it functions as the primary DPM server. Those workloads are configured for secondary protection on the partner DPM server.
For example, you have two DPM servers, SYD-DPM and MEL-DPM. In a chaining configuration, you configure SYD-DPM to protect MEL-DPM, and configure MEL-DPM to protect SYD-DPM. If you configure SYD-DPM as the primary server protecting servers SYD-FS1 and SYD-FS2, you would configure secondary protection for SYD-FS1 and SYD-FS2 on MEL-DPM. Similarly, if you configure MEL-DPM as the primary server protecting servers MEL-FS3 and MEL-FS4, you would configure secondary protection for MEL-FS3 and MEL-FS4 on SYD-DPM. In the event that one of the DPM servers fails, you can switch protection across to the partner server.
All DPM servers in a chained configuration need to be running the same operating system and DPM version, including service packs and software updates.
More Info: DPM Chaining
You can learn more about DPM chaining at http://technet.microsoft.com/en-us/library/hh758194.aspx.
Protection groups
A DPM protection group is a grouping of protected data sources and the properties of that protection, including the data retention period. The retention period determines how long protected data can be stored by DPM and is determined by the frequency of backups and the amount of available space to store those backups. DPM protection groups have the following properties:
![]() A computer can only be protected by a single DPM server.
A computer can only be protected by a single DPM server.
![]() Different sources on the same computer can be protected using different protection groups.
Different sources on the same computer can be protected using different protection groups.
![]() A single data source cannot be protected by multiple protection groups.
A single data source cannot be protected by multiple protection groups.
![]() If you want to move a data source from one protection group to another, stop protecting it in the first protection group before initiating protection in the second protection group.
If you want to move a data source from one protection group to another, stop protecting it in the first protection group before initiating protection in the second protection group.
![]() A protection group can have multiple computers as members.
A protection group can have multiple computers as members.
![]() All data sources within a protection group share the same retention settings.
All data sources within a protection group share the same retention settings.
To configure a protection group, perform the following steps:
1. In the Protection workspace of the DPM console, click New on the ribbon. This will launch the Create New Protection Group Wizard.
2. On the Select Protection Group Type page, choose between Servers and Clients. You should only choose the Clients option if you are backing up computers running a client operating system like Windows 8.1. This page is shown in Figure 2-5.
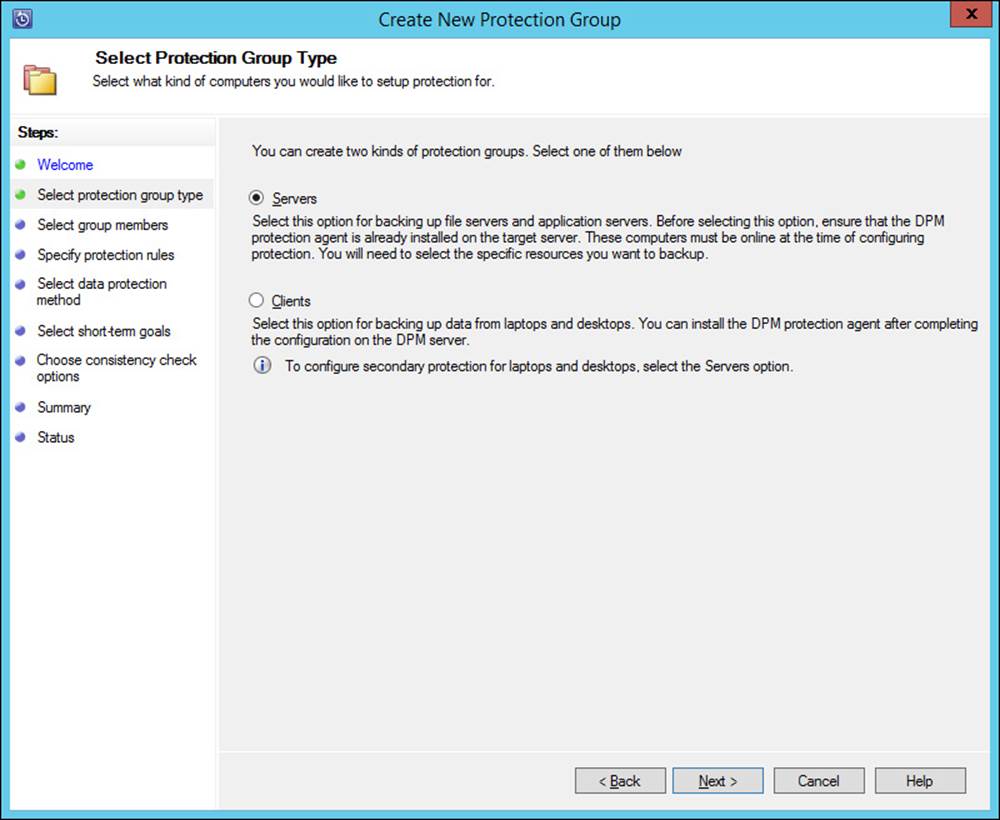
FIGURE 2-5 Protection group type
3. On the Select Group Members page, select the data sources that you want to protect. For example, in Figure 2-6, under MEL-OPSMGR, the following items are protected:
![]() All Shares This option protects all shares and any new shares that may be created on the computer.
All Shares This option protects all shares and any new shares that may be created on the computer.
![]() All SQL Servers This option protects all SQL instances and all databases hosted on those instances. This includes automatic protection for any new databases created on those instances.
All SQL Servers This option protects all SQL instances and all databases hosted on those instances. This includes automatic protection for any new databases created on those instances.
![]() All Volumes This option protects all volumes and any new volumes added to the computer.
All Volumes This option protects all volumes and any new volumes added to the computer.
![]() System Protection This option protects the system state and also provides the option of performing a bare metal recovery of this server. Bare metal recovery is a complete recovery of the entire server, either to hardware or to a virtual environment.
System Protection This option protects the system state and also provides the option of performing a bare metal recovery of this server. Bare metal recovery is a complete recovery of the entire server, either to hardware or to a virtual environment.
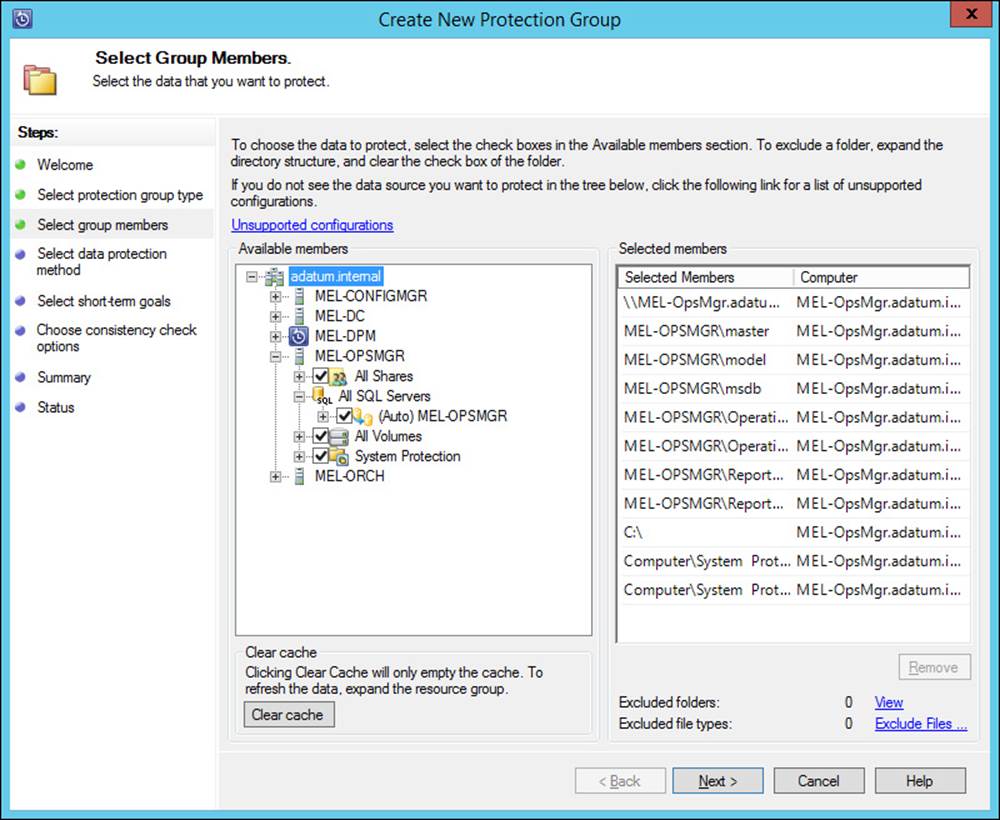
FIGURE 2-6 Select group members
4. On the Select Data Protection Method dialog box, you can select short-term protection using Disk. You can choose long-term protection if a tape drive has been configured. You can also configure online protection if online protection has been configured. Online protection is available if you have configured Microsoft Azure Backup.
5. On the Specify Short-Term Goals page, specify the Retention Range and the Synchronization Frequency. You also specify File Recovery and Application Recovery Points. Figure 2-7 shows the Specify Short-Term Goals page.
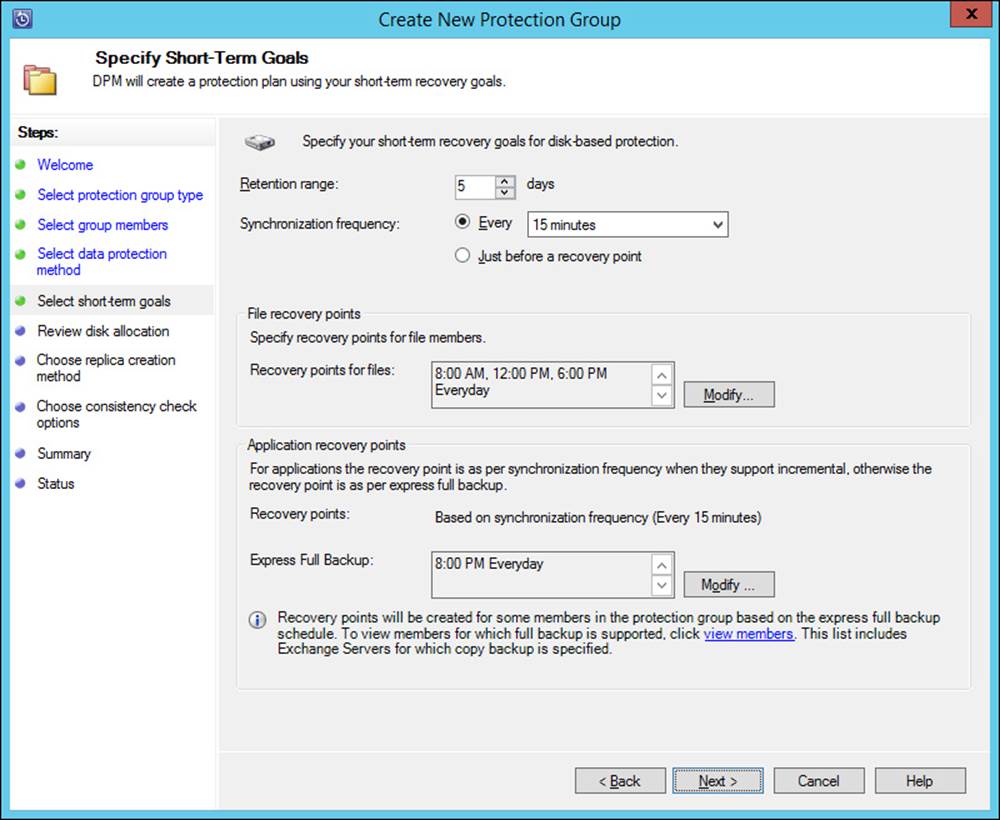
FIGURE 2-7 Short-term retention goals
6. On the Review Disk Allocation page, review how DPM has allocated storage space for the protected workload. Choose whether to co-locate data in the storage pool, which puts multiple data sources on replica volumes. Choose also whether to automatically grow the volumes. If you enable the option to grow volumes, ensure that you add capacity to the storage pool as necessary.
7. On the Choose Replica Creation Method, you specify how to create the initial replica of the protected data. You can configure DPM to create a replica immediately or at a later point in time over the network. Alternatively, you can transfer the data manually using removable media.
8. On the Consistency Check Options page, specify whether to automatically run a consistency check if a replica becomes inconsistent. You can also run daily consistency checks according to a schedule. Consistency checks are processor and disk intensive. Figure 2-8 shows this page.
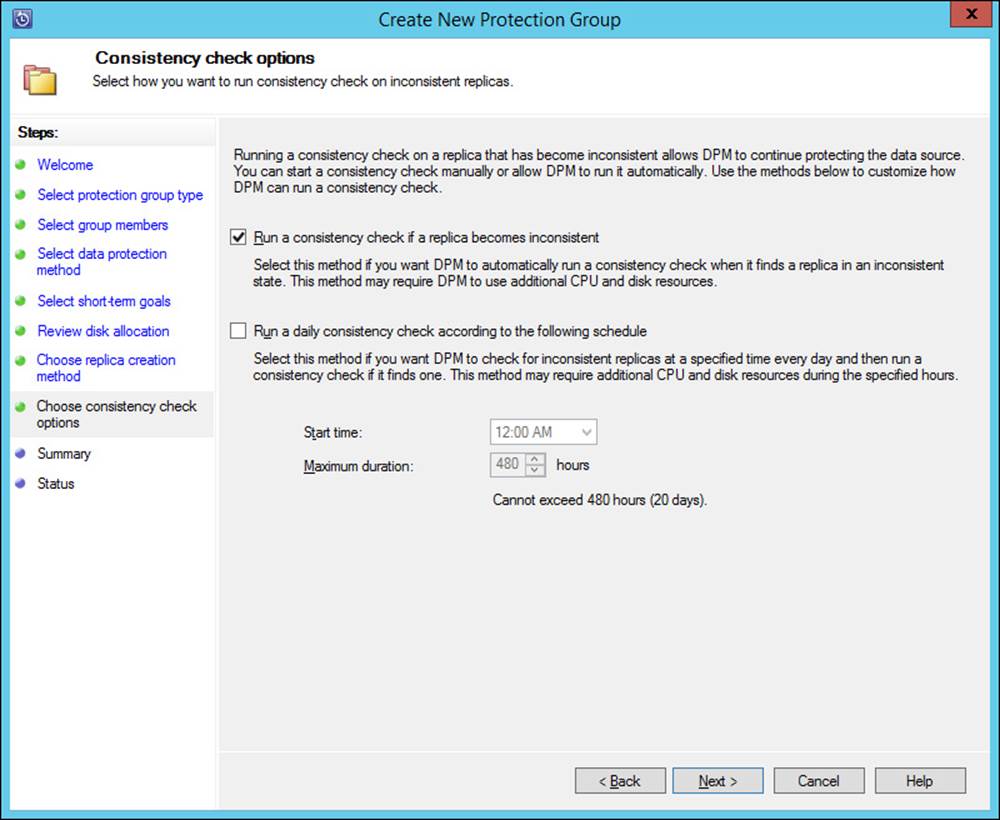
FIGURE 2-8 Consistency check options
9. On the Summary page, review the options, and then click Create Group. The protection group will be created. If you’ve specified that the replica be created immediately, DPM will create the replica.
More Info: DPM Protection Groups
You can learn more about DPM protection groups at http://technet.microsoft.com/en-us/library/hh758123.aspx.
Understanding System Center agents
Agents are special software elements that allow certain System Center products to perform tasks on the computers on which they are installed. Each agent is specific to a separate product, and not all System Center products have an agent.
Operations Manager agent
The Operations Manager agent allows Operations Manager to monitor and interact with the computer on which it is installed. Although Operations Manager does support agentless monitoring, in the majority of private cloud scenarios, Operations Manager will monitor and manage computers that have the Operations Manager agent installed.
You can install the agent in three ways:
![]() Perform a push installation by running the Discovery Wizard from the Operations Manager console.
Perform a push installation by running the Discovery Wizard from the Operations Manager console.
![]() Run the MOMAgent.msi Setup Wizard from the Operations Manager installation media on the computer on which you want to install the agent.
Run the MOMAgent.msi Setup Wizard from the Operations Manager installation media on the computer on which you want to install the agent.
![]() Perform a command line installation on computers running Windows and supported UNIX and Linux operating systems. On computers running Windows operating systems, this involves using Msiexec.exe with the MOMAgent.msi installer.
Perform a command line installation on computers running Windows and supported UNIX and Linux operating systems. On computers running Windows operating systems, this involves using Msiexec.exe with the MOMAgent.msi installer.
You can deploy the Operations Manager agent by performing the following steps:
1. In the Administration workspace of the Operations Manager console, right-click on Device Management, and click Discovery Wizard.
2. On the Discovery Type page of the Computer And Device Management Wizard, shown in Figure 2-9, click Windows Computers, and click Next.
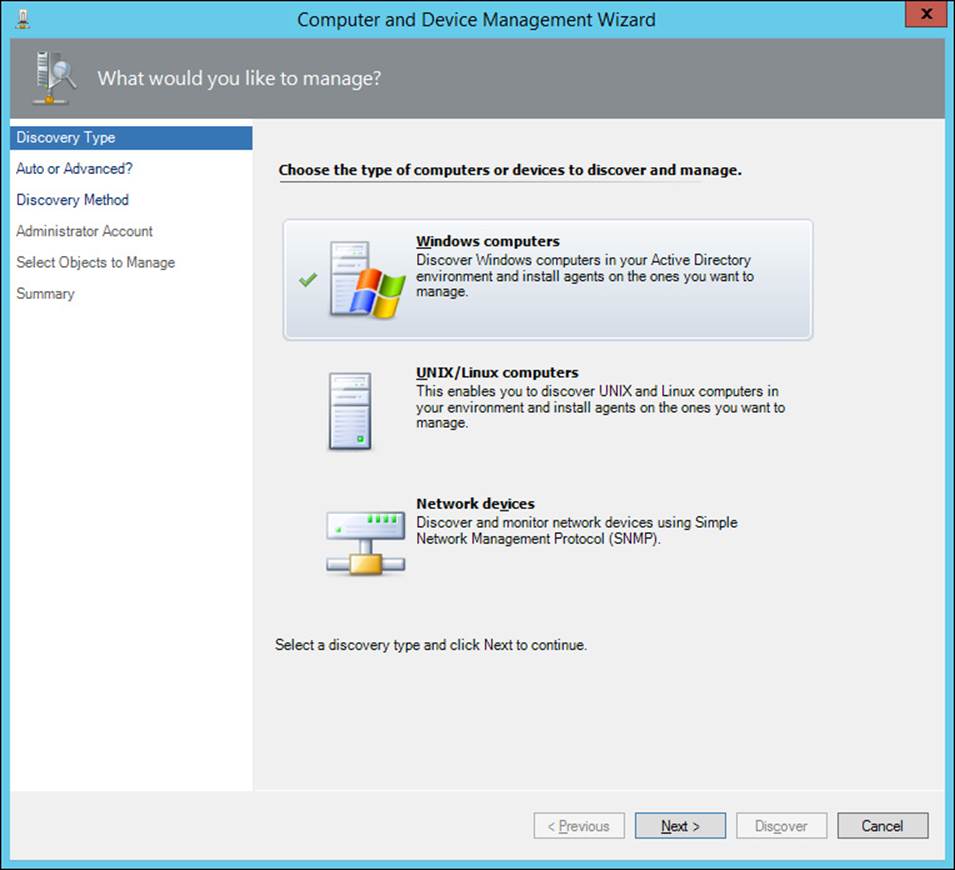
FIGURE 2-9 Discovery type
3. On the Auto Or Advanced page, choose between Automatic Computer Discovery, which will check the domain for all Windows-based computers, or Advanced Discovery, as shown in Figure 2-10, which allows you to choose between Clients, Servers, or Clients And Server.
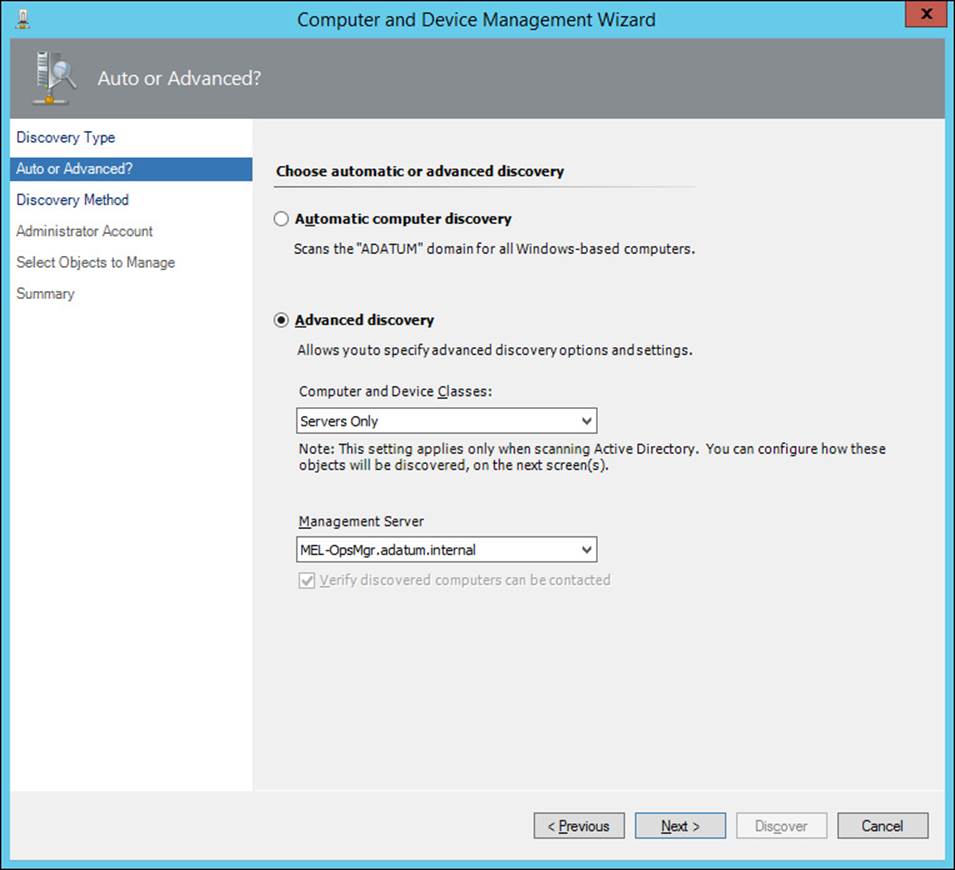
FIGURE 2-10 Advanced discovery
4. On the Discovery Method page, shown in Figure 2-11, choose whether to Scan Active Directory, Create An Advanced Query, or Browse For, Or Type-In Computer Names.
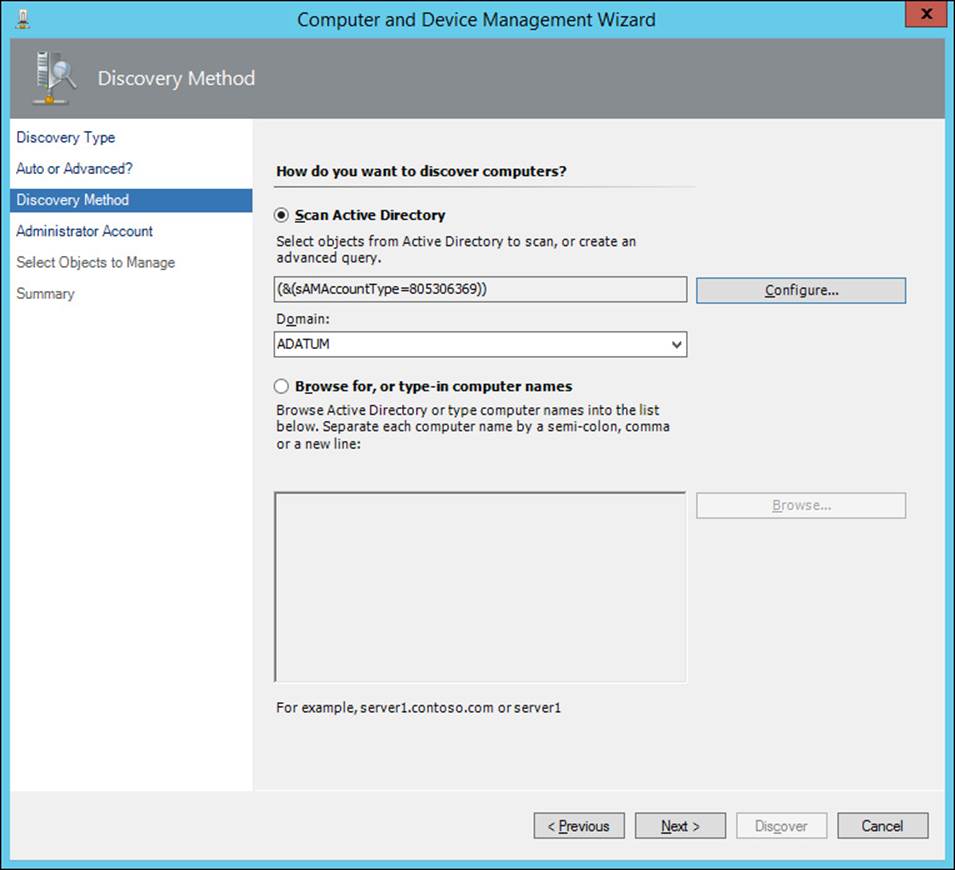
FIGURE 2-11 Discovery Method
5. On the Administrator Account name, choose whether to use the Management Server Action account or a specific user account. This account must have administrator rights on the computers to be scanned and to which you want to add agents.
6. On the Select Objects To Manage page, shown in Figure 2-12, select the computer to which you want to deploy the Operations Manager agent. If multiple management servers are present in the management group, you can select the management server to which the agent will report. You can also choose between Agent and Agentless Management Mode.
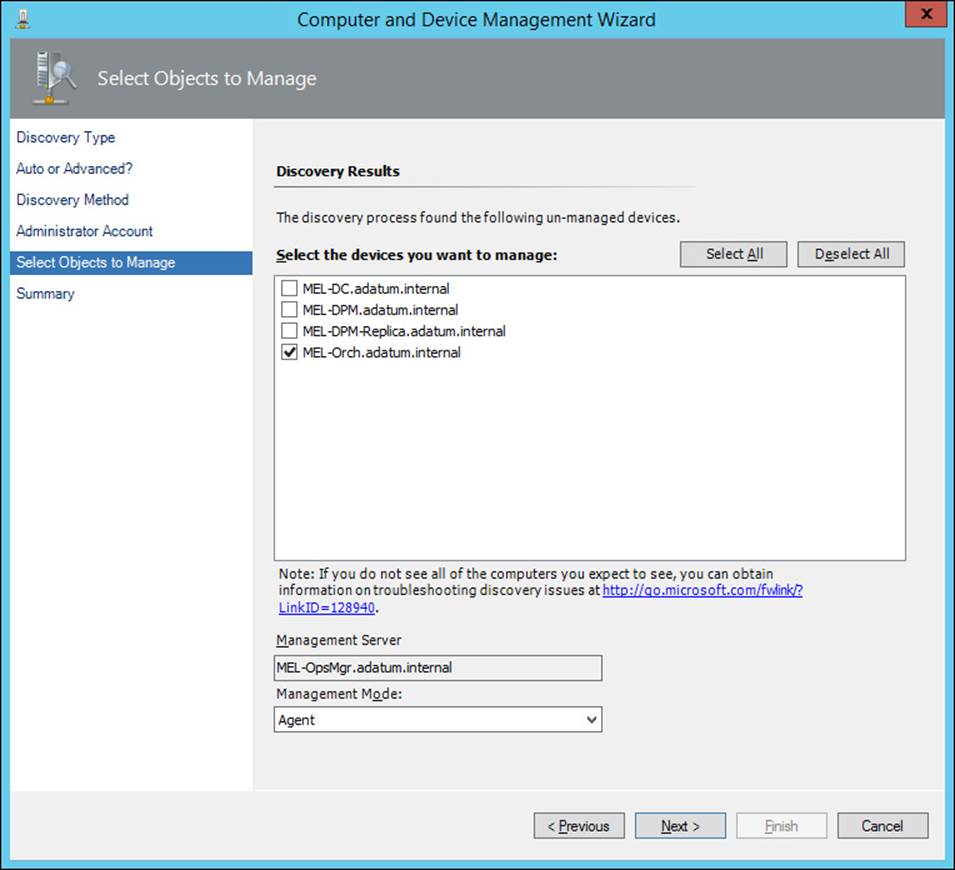
FIGURE 2-12 Select Objects To Manage
7. On the Summary page, shown in Figure 2-13, specify the location where the agent files should be deployed. You also specify the credentials that the agent will use when performing actions. The Local System account is used by default.
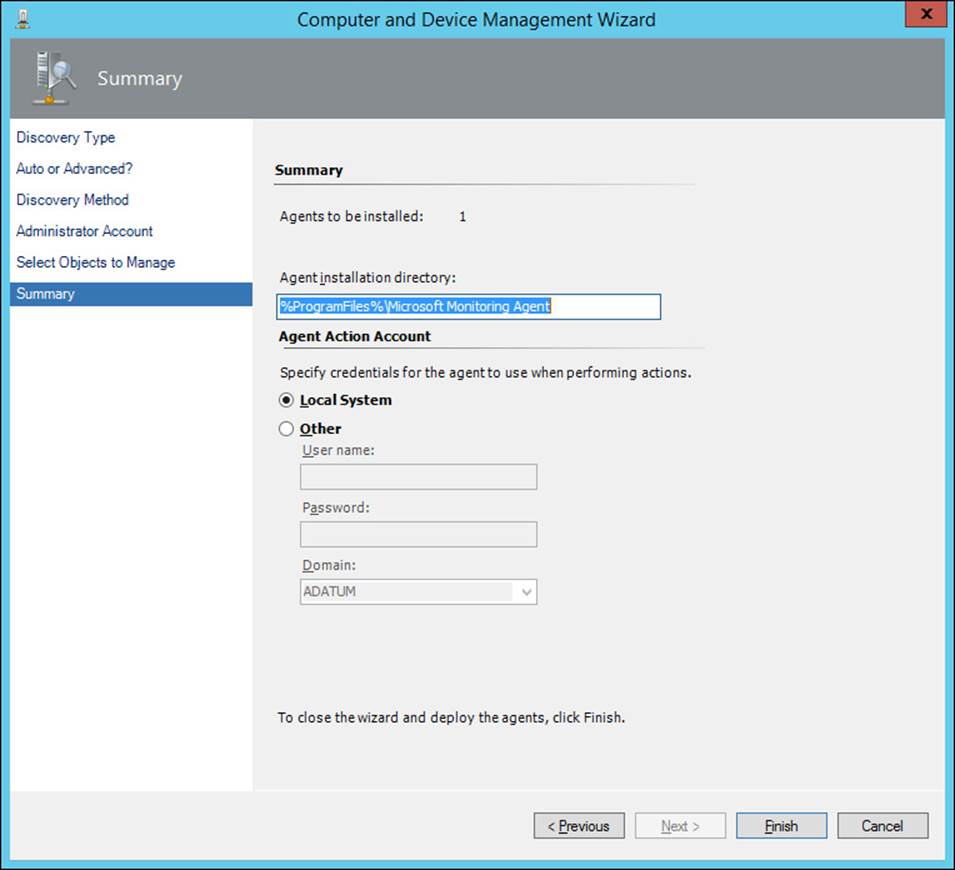
FIGURE 2-13 Account and installation directory
An Operations Manager agent can be a member of up to four separate management groups. When this is done, the agent sends back data to each management group. To configure the Operations Manager agent to be a member of more than one management group, perform one of the following actions:
![]() Open the Microsoft Monitoring Agent item in the control panel. On the Operations Manager tab, shown in Figure 2-14, click Add to add additional management groups.
Open the Microsoft Monitoring Agent item in the control panel. On the Operations Manager tab, shown in Figure 2-14, click Add to add additional management groups.
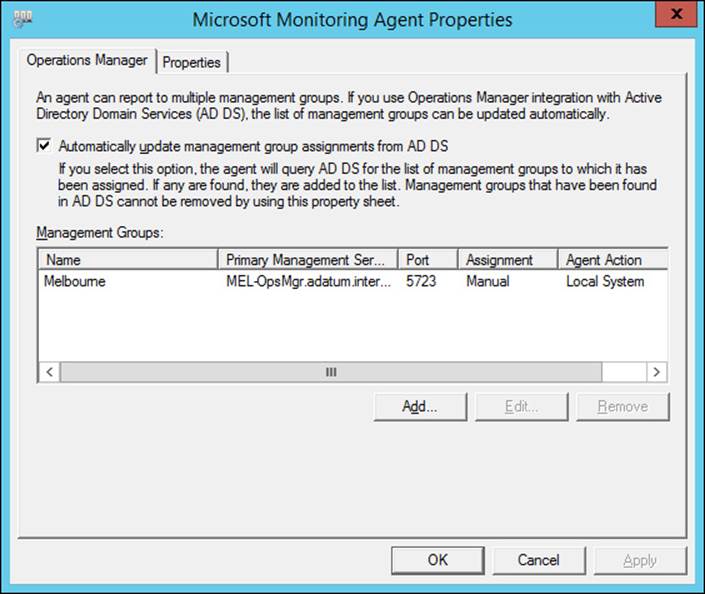
FIGURE 2-14 Additional management groups
![]() Run the Discovery Wizard from the Operations Manager console in each management group.
Run the Discovery Wizard from the Operations Manager console in each management group.
![]() Run MOMAgent.msi on the computer multiple times, specifying a new management group.
Run MOMAgent.msi on the computer multiple times, specifying a new management group.
More Info: Operations Manager Agent
You can learn more about the Operations Manager agent at http://technet.microsoft.com/en-us/library/hh212883.aspx.
Configuration Manager client
The Configuration Manager client applies settings configured in Configuration Manager to the computer on which it is installed. The client is also responsible for reporting information back to the Configuration Manager site, such as providing inventory and compliance data.
The Configuration Manager client has two user interface elements, the Configuration Manager control panel item and the Software Center. The control panel item allows administrators to configure or troubleshoot Configuration Manager client settings. The Software Center allows users to request and install software made available through Configuration Manager, as well as to configure maintenance, power management, and remote assistance settings.
You can install the Configuration Manager client using the following methods:
![]() Client Push from Configuration Manger Allows you to deploy the client from the Configuration Manager console. This method is suitable when clients have already been deployed. You can configure automatic client push installation, which will deploy the Configuration Manager client to all specified computer resources. As Figure 2-15 shows, you can limit whether this targets servers, workstations, domain controllers, and Configuration Manager site systems servers.
Client Push from Configuration Manger Allows you to deploy the client from the Configuration Manager console. This method is suitable when clients have already been deployed. You can configure automatic client push installation, which will deploy the Configuration Manager client to all specified computer resources. As Figure 2-15 shows, you can limit whether this targets servers, workstations, domain controllers, and Configuration Manager site systems servers.
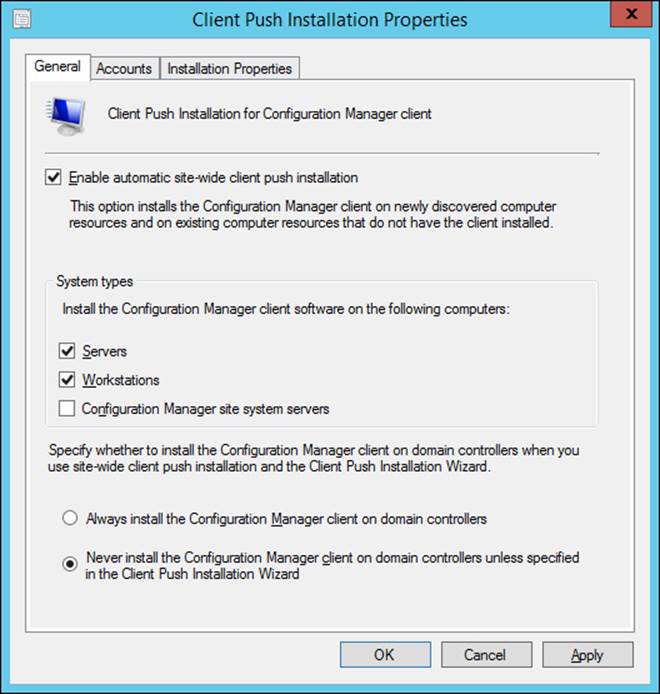
FIGURE 2-15 Client Push Installation Properties
![]() Including the client in an operating system image Rather than deploy the client after a computer has been deployed, this method allows you to include the Configuration Manager client in the operating system image. You would include the client when creating an operating system image deployed with a VMM template for a private cloud deployment. You could also configure a task sequence in an Operating System Deployment (OSD) sequence to include this client, and other System Center clients and agents when building the image.
Including the client in an operating system image Rather than deploy the client after a computer has been deployed, this method allows you to include the Configuration Manager client in the operating system image. You would include the client when creating an operating system image deployed with a VMM template for a private cloud deployment. You could also configure a task sequence in an Operating System Deployment (OSD) sequence to include this client, and other System Center clients and agents when building the image.
![]() Deployment from Windows Server Update Services This method allows you to configure client deployment as a software update published through WSUS.
Deployment from Windows Server Update Services This method allows you to configure client deployment as a software update published through WSUS.
![]() Manual installation Use this method when you need to perform a small number of client installations.
Manual installation Use this method when you need to perform a small number of client installations.
![]() Group Policy based installation This method involves using Group Policy based software deployment to deploy the Configuration Manager agent.
Group Policy based installation This method involves using Group Policy based software deployment to deploy the Configuration Manager agent.
![]() Logon scripts When you use this method, a logon script installs the Configuration Manager client software.
Logon scripts When you use this method, a logon script installs the Configuration Manager client software.
To install the Configuration Manager client using the client push method, you need to have first configured computer discovery and the client push installation account. To configure these elements, perform the following steps:
1. In the Administration workspace of the Configuration Manager console, click the Sites node under Site Configuration.
2. On the ribbon, click Client Installation Settings and then click Client Push Installation.
3. On the Accounts tab of the Client Push Installation Properties dialog box, click New, and then click New Account.
4. On the Windows User Account dialog box, specify the credentials of a user account that has the rights to perform agent installation on each computer.
5. In the Administration workspace, click Discovery Methods. Click Active Directory System Discovery, and click Properties.
6. On the General tab of the Active Directory System Discovery Properties dialog box, click Enable Active Directory System Discovery.
7. Next to Active Directory Containers, click New.
8. On the Active Directory Container dialog box, click Browse. On the Select New Container, select the container that will form the basis of your discovery search. For example, select the domain container if you want to locate all computers in a particular domain.
9. Specify an account that has permissions to search Active Directory. Figure 2-16 shows a scan of Active Directory that will search the Adatum.internal domain using the Adatum\Administrator account.
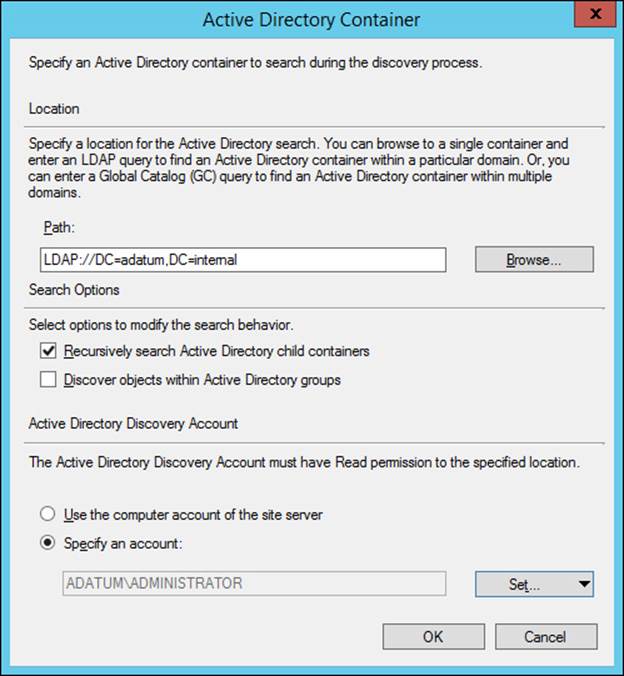
FIGURE 2-16 Scan Adatum domain
10. To trigger Active Directory System Discovery, select it from the list of discovery methods, and click Run Full Discovery Now on the ribbon.
11. In the Assets And Compliance workspace, click the Devices node.
12. In the list of devices, click the computer to which you want to deploy the agent and then click Install Client on the ribbon.
13. On the Installation Options page of the Install Configuration Manager Client Wizard, review the options shown in Figure 2-17, and click Next. You only need to select the option to Always Install The Client Software if the computer previously had a version of the client software. You can also choose to Install The Client Software From A Specific Site. Use this option if the client isn’t already assigned to a specific site.
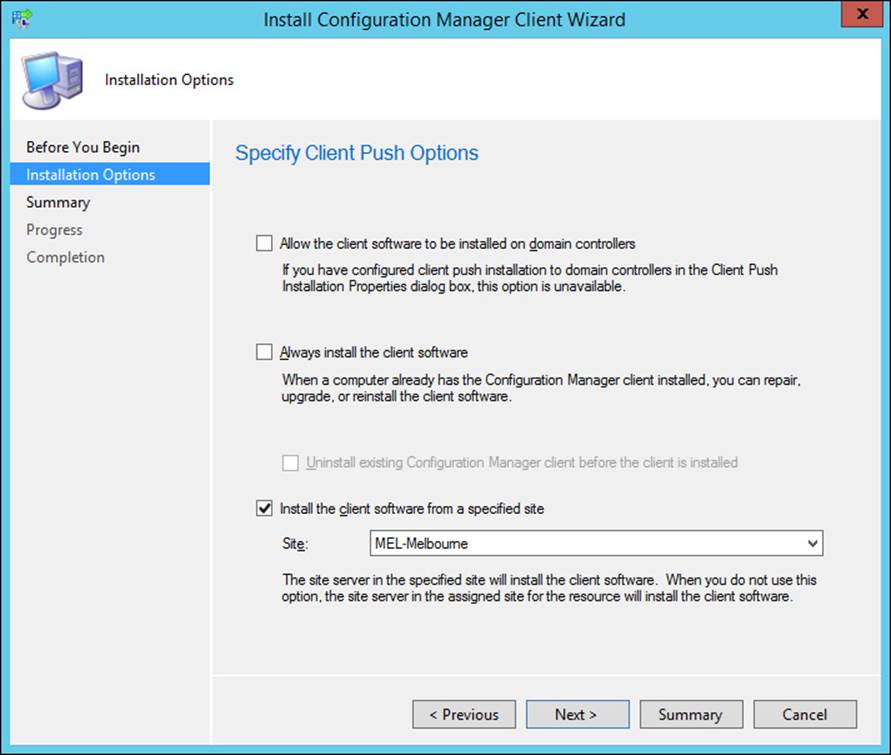
FIGURE 2-17 Client push options
14. Complete the wizard. You can verify that the client has installed by selecting the device in the Devices node of the Configuration Manager console, and verifying that the Client column says Yes, and that the Summary pane indicates that the client has communicated with the management point.
More Info: Configuration Manager Client
You can learn more about Configuration Manager client at http http://technet.microsoft.com/en-us/library/gg699391.aspx.
DPM agent
The DPM agent allows DPM to discover and protect the workloads that are present on the computer that has the agent installed. You can perform a push installation of the agent from the DPM console, or install the agent from the command line. Installing the agent from the command line involves attaching the agent to a DPM management server. To do this, specify the DPM server name with the command line, either as:
DpmAgentInstaller_x64.exe <DPMServerName>
DpmAgentInstaller_x86.exe <DPMServerName>
The FQDN of the DPM server is <DPMServerName>. To perform a push installation of the agent from the DPM console, perform the following steps:
1. In the Management workspace of the DPM console, click Agents, and then on the ribbon, click Install.
2. On the Select Agent Deployment Method page of the Protection Agent Installation Wizard, shown in Figure 2-18, select Install Agents, and click Next. You would select the Attach Agents option if you had already deployed the agent software to the computers that you wanted to protect.
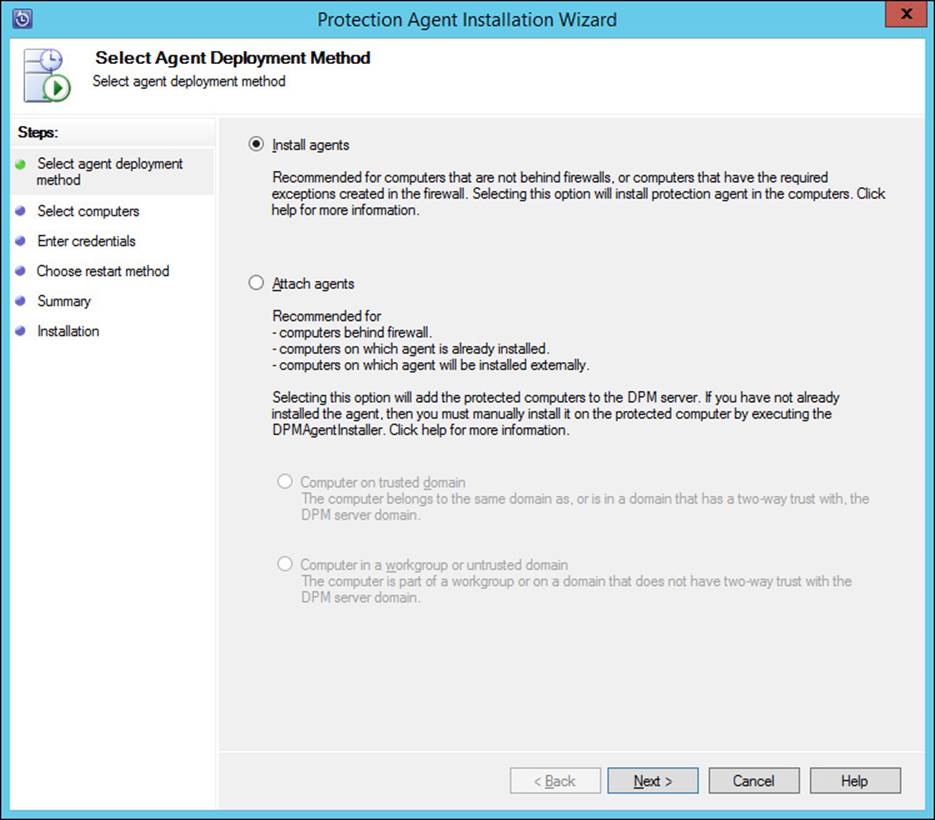
FIGURE 2-18 Install agents
3. On the Select Computers page, shown in Figure 2-19, select the computers on which you want to deploy the agent.
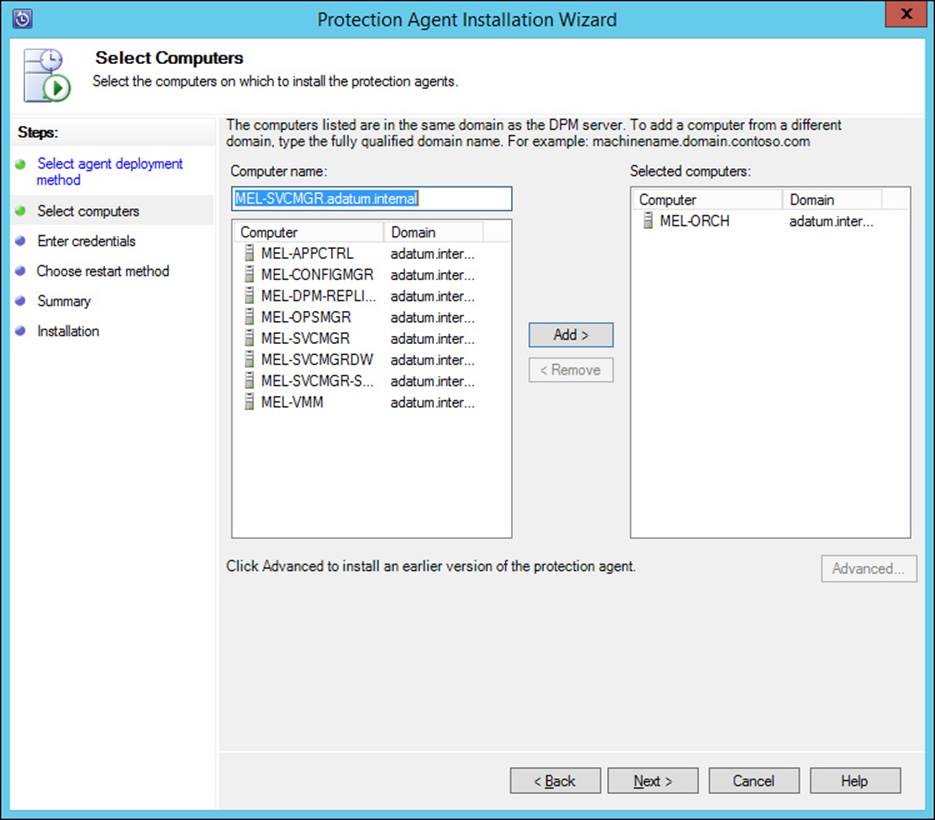
FIGURE 2-19 Select computers
4. On the Enter Credentials page, provide the credentials of a user account that has local administrator rights on the computers to which you want to deploy agents.
5. On the Choose Restart Method page, shown in Figure 2-20, select whether you want to have the target computer installed automatically (if required). The alternative is for you to perform a manual restart at a later point in time. A restart is generally only required for computers running Windows Server 2003 (or Windows XP which is no longer a supported operating system).
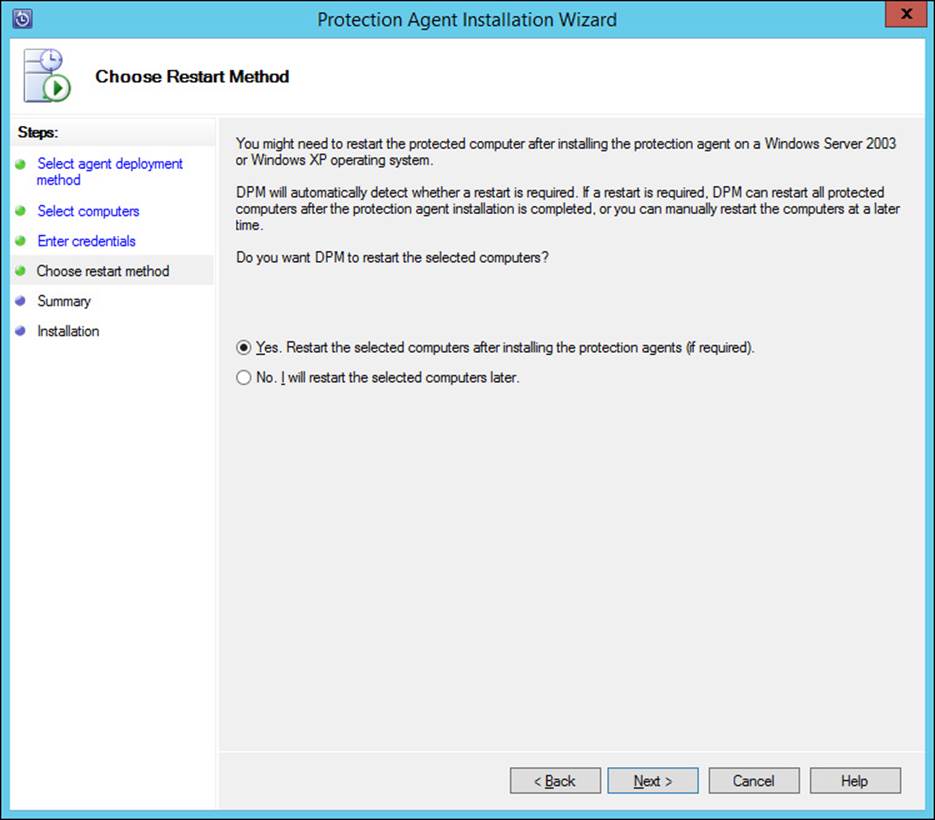
FIGURE 2-20 Choose restart method
6. On the Summary page, review the tasks that will be carried out by the Agent Installation Wizard.
7. On the Installation page, review the progress of the agent installation, as shown in Figure 2-21. Close the dialog box when the installation completes.
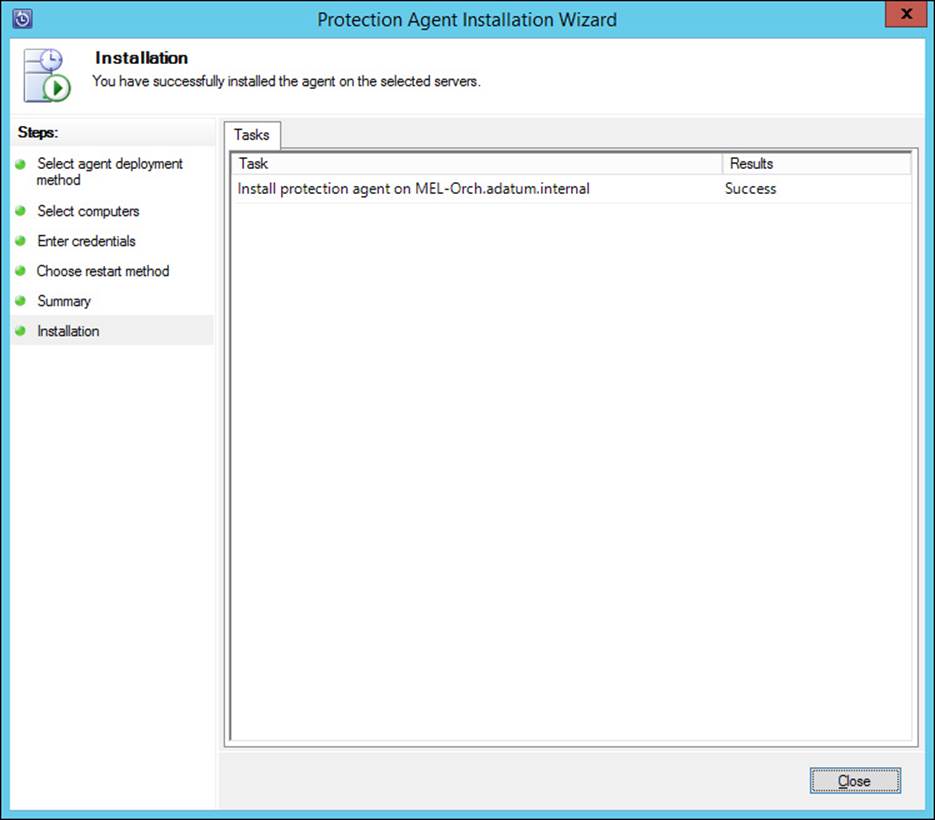
FIGURE 2-21 Agent Installation
More Info: DPM Agent
You can learn more about the DPM agent at http://technet.microsoft.com/en-us/library/hh758039.aspx.
VMM agent
You deploy the VMM agent to virtualization hosts and virtualization host clusters that you want to manage using VMM. You can deploy the VMM agent directly to computers that are members of trusted Active Directory domains, to computers in untrusted domains, and stand-alone computers located on perimeter networks.
To add Hyper-V hosts in a disjoined namespace scenario, where the computer’s primary DNS suffix does not match the domain name, you’ll need to:
![]() Ensure that the VMM service has permission to register a Service Principal Name in Active Directory.
Ensure that the VMM service has permission to register a Service Principal Name in Active Directory.
![]() Add the DNS suffix of the Hyper-V host to the TCP/IP connection settings on the VMM server.
Add the DNS suffix of the Hyper-V host to the TCP/IP connection settings on the VMM server.
To add Hyper-V hosts in an untrusted domain, ensure that you have local Administrator credentials on the target Hyper-V host, and then initiate a connection from the Fabric workspace of the VMM console using the FQDN or IP address of the target Hyper-V host. To add a Hyper-V host that is on a perimeter network, perform the following:
![]() Install the VMM agent locally on the computer running Hyper-V.
Install the VMM agent locally on the computer running Hyper-V.
![]() Create an encryption key during installation.
Create an encryption key during installation.
![]() The key will be stored in a file, and the default name of this file is SecurityFile.txt.
The key will be stored in a file, and the default name of this file is SecurityFile.txt.
![]() Transfer the file to the VMM server.
Transfer the file to the VMM server.
![]() Provide the path to the file that contains the key when adding the Hyper-V host using the VMM console.
Provide the path to the file that contains the key when adding the Hyper-V host using the VMM console.
To deploy the VMM agent on a Windows computer that is already a member of a trusted Active Directory domain, perform the following steps:
1. In the Fabric workspace of the VMM console, click Servers, and on the ribbon click Add Resources, and then click Hyper-V Hosts And Clusters.
2. On the Resource Location page of the Add Resource Wizard, select Windows Servers In A Trusted Active Directory Domain, as shown in Figure 2-22.
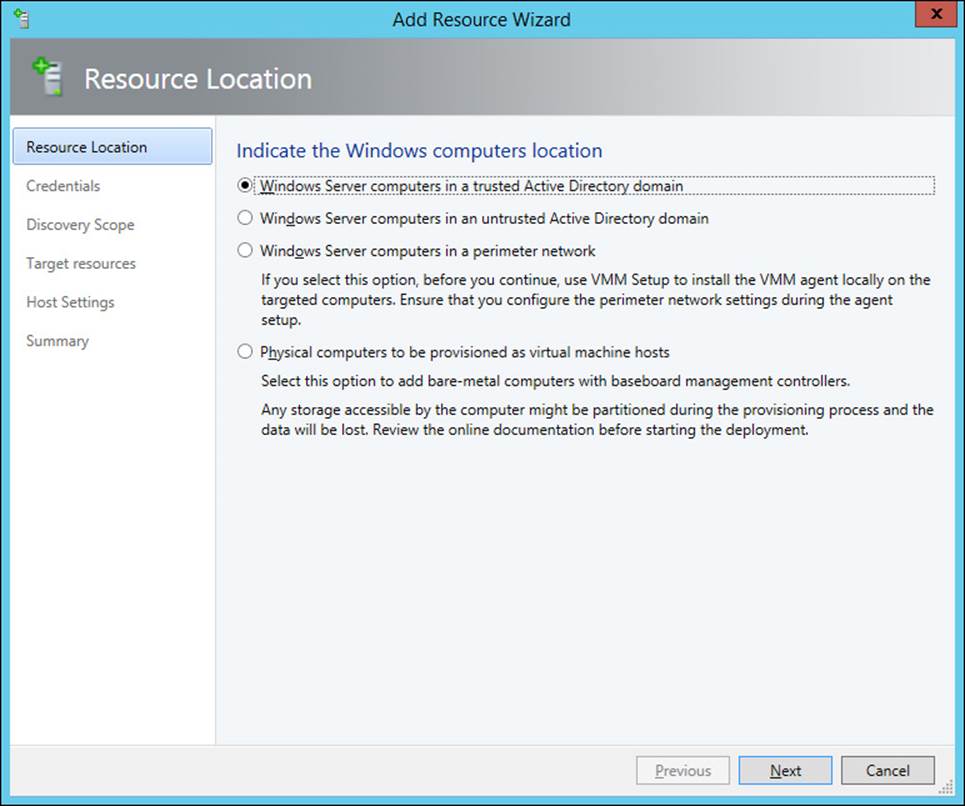
FIGURE 2-22 Add Resource Wizard
3. On the Credentials page, either select an existing Run As account, or manually provide credentials that are able to query Active Directory, and that have local Administrator permissions on the target computers.
4. On the Discovery Scope page, choose between specifying the Windows Server computers by NetBIOS name, FQDN, IPv4, or IPv6 address, or by querying Active Directory.
5. On the Target Resources page, select the computer that you want to add as hosts, and click Next. Figure 2-23 shows Mel-hv1.adatum.internal selected.
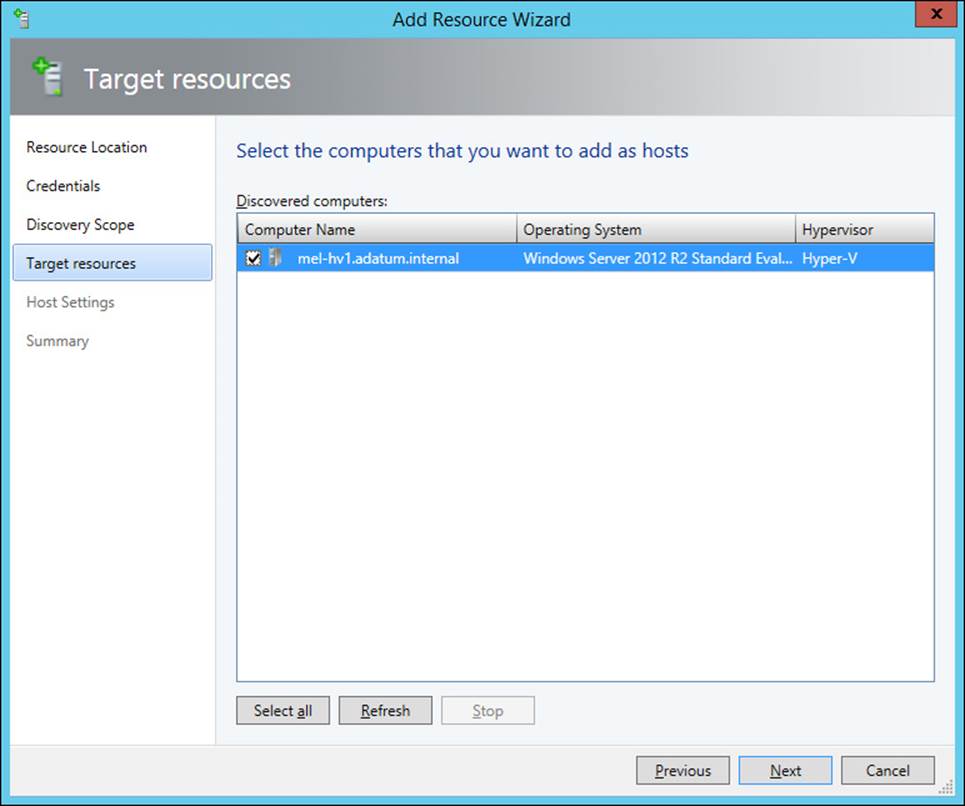
FIGURE 2-23 Target resources
6. On the Host Settings page, specify the Host Group to which you want to add the new Hyper-V host. You can also specify the default virtual machine placement paths. If the computer needs to be reassociated with the VMM server, you’ll need to select the Reassociate This Host With This VMM Environment option. Figure 2-24 shows the Host Group set to All Hosts, and VM placement set to volume D.
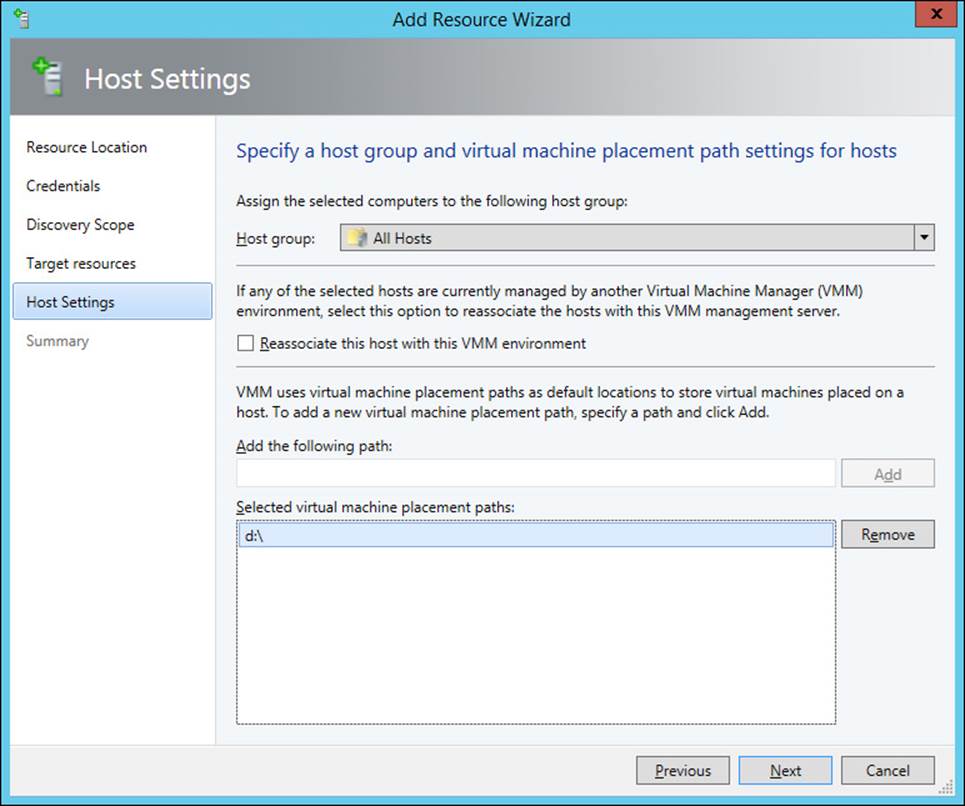
FIGURE 2-24 Host Settings
7. Complete the wizard, and verify agent deployment in the Jobs window.
More Info: VMM Agent
You can learn more about the VMM agent at http://technet.microsoft.com/en-us/library/gg610646.aspx.
Run As accounts and Run As profiles
Run As accounts are used with Configuration Manager, Operations Manager, Virtual Machine Manager, and Service Manager. Run As accounts are stored sets of credentials that allow tasks to be performed, such as the installation of agents. Through a Run As account, a low privileged user can perform a specific task through an agent that would require elevated privileges without needing to have those tasks directly granted to them. For example, rather than add a user to the local Administrators group on a large number of servers, a Run As account can be configured that is a member of this group. When the user needs to perform a task on a remote computer with a specific System Center product that requires the permissions available to members of this group, they can use the Run As account to perform the task for them.
Operations Manager
Operations Manager uses Run As accounts and Run As profiles. A Run As account contains a single set of credentials. A Run As profile can have multiple Run As accounts associated with it. For example, you may need different sets of credentials to perform the same task on different computers. You could configure separate Run As accounts associated with those credentials, and then associate those Run As accounts with a specific profile.
Run As profiles are often defined in Operations Manager management packs. When configuring the management pack to function in your organization’s private cloud, you’ll need to create Run As accounts with credentials specific to your environment and associate them with the Run As profile that came with the management pack. Each Run As account in Operations Manager has a security classification, which can be set to More Secure or Less Secure. Setting a Run As account as More Secure allows you to limit which computers the Run As account credentials are distributed to.
To create a Run As account in Operations Manager for use with Windows based workloads, perform the following steps:
1. In the Administration workspace of the Operations Manager console, click Accounts under the Run As configuration node.
2. On the Tasks menu, click Actions, and then click Create Run As Account.
3. On the General Properties page of the Create Run As Account Wizard, specify the Run As account type, and a display name. The Run As account can be one of the following types:
![]() Windows
Windows
![]() Community String
Community String
![]() Basic Authentication
Basic Authentication
![]() Simple Authentication
Simple Authentication
![]() Digest Authentication
Digest Authentication
![]() Binary Authentication
Binary Authentication
![]() Action Account
Action Account
![]() SNMPv3 Account
SNMPv3 Account
4. On the Credentials page, specify a Username, Password, and Domain for the account.
5. On the Distribution Security page, specify whether you want to use the More Secure or Less Secure option. Figure 2-25 shows that the More Secure option selected.
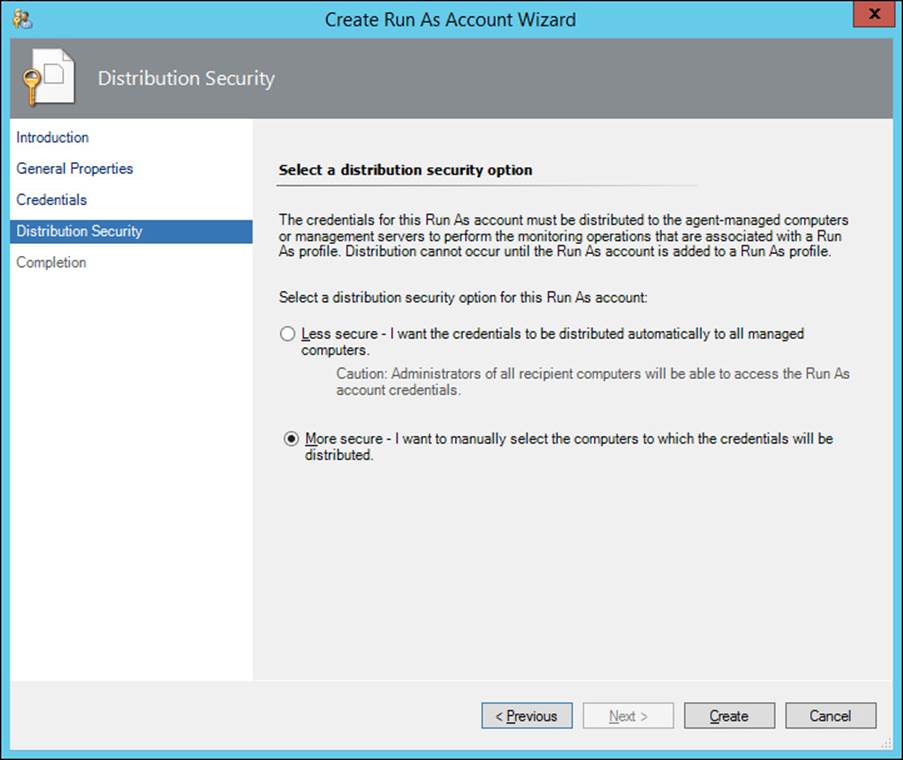
FIGURE 2-25 Distribution Security
6. Create the Run As account.
To create a Run As profile, perform the following steps:
1. In the Administration workspace of the Operations Manager console, click Profiles under Run As Configuration.
2. On the Tasks menu, click Actions, and then click Create Run As Profile.
3. On the General Properties page of the Run As Profile Wizard, provide a name for the Run As profile, and specify a management pack in which to save the Run As profile.
4. On the Run As Accounts page, add each Run As account that you want to associate with the Run As Profile. Figure 2-26 shows this page. Click Create to create the Run As profile.

FIGURE 2-26 Run As Accounts
More Info: Operations Manager Run As Accounts and Profiles
You can learn more about Run As accounts and profiles at http://technet.microsoft.com/en-us/library/hh212714.aspx.
Virtual Machine Manager
VMM has Run As accounts, but does not have Run As profiles. To create a Run As account in VMM, perform the following steps:
1. In the Settings workspace of the VMM console, click Create Run As Account on the ribbon.
2. On the Create Run As Account dialog box, provide a Name for the Run As account, the User Name that the Run As account is associated with, and the Password. Figure 2-27 shows this dialog box.
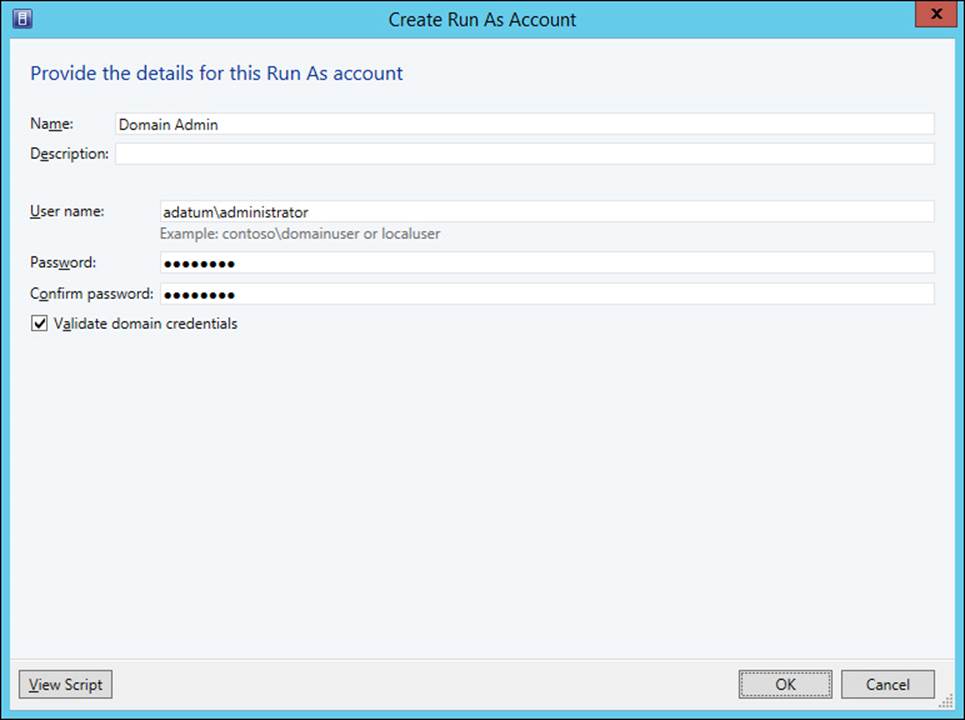
FIGURE 2-27 Create Run As Account
More Info: Run As Accounts in VMM
You can learn more about Run As accounts in VMM at http://technet.microsoft.com/en-us/library/gg675096.aspx.
Service Manager
Unlike Operations Manager or VMM, where you configure Run As accounts on an as-needed basis, Run As accounts in Service Manger are configured during installation and only exist for the following purposes:
![]() Operational database account
Operational database account
![]() Workflow Run As account
Workflow Run As account
![]() SQL Server Analysis Services account
SQL Server Analysis Services account
![]() SQL Server Reporting Services account
SQL Server Reporting Services account
Figure 2-28 shows some of the Service Manager Run As accounts.
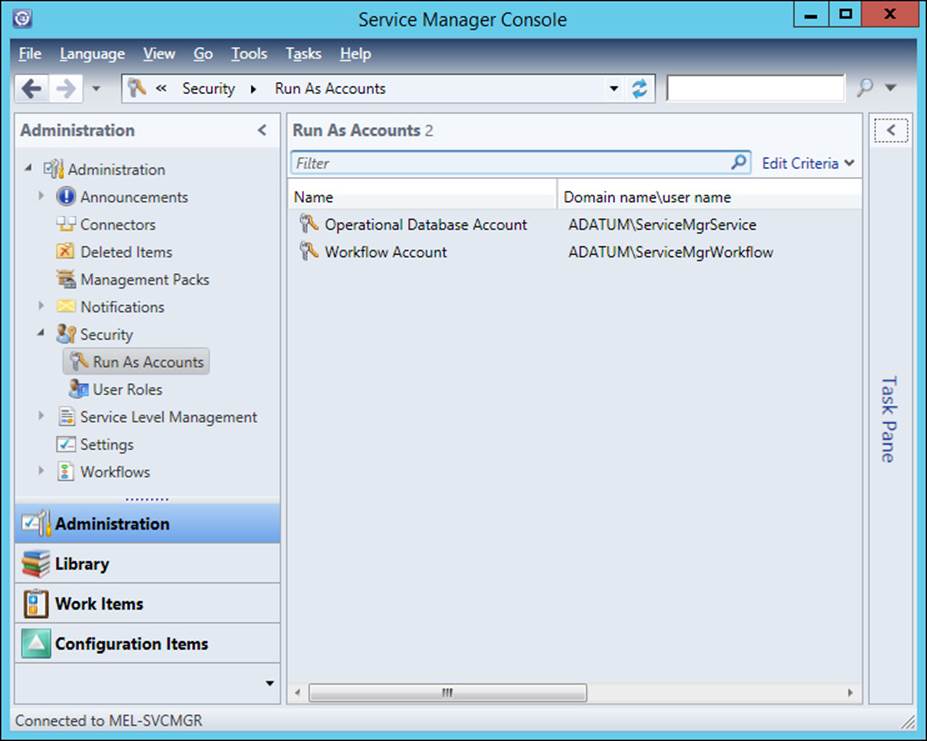
FIGURE 2-28 Service Manager Run As accounts
More Info: Service Manager Run As Accounts
You can learn more about Service Manager Run As accounts at http://technet.microsoft.com/en-us/library/hh495673.aspx.
Configuration Manager
In Configuration Manager, the Accounts node of the Administration workspace stores accounts used as Run As accounts. Accounts differ from Configuration Manager Administrative Users. Configuration Manager Administrative Users are the way that you assign permissions and privileges in a Configuration Manager deployment.
Assigning user roles
Roles allow you to configure the permissions and privileges for users of System Center products. In general, you assign a security principle, usually a security group, but occasionally a user account to a role. You also often specify a scope, which limits the permissions and privileges assigned to a subset of product elements.
App Controller roles
App Controller has two separate roles. The Administrator role allows a person that holds it to perform all administrative actions. VMM administrators are not automatically added to the App Controller Administrator role. App Controller administrators can create one or more self-service user roles.
Members of a self-service user role are able to deploy and manage services to Microsoft Azure subscriptions or to VMM private clouds. Administrators can also create App Controller self-service roles that have read-only access for the scope.
More Info: App Controller Roles
You can learn more about App Controller roles at http://technet.microsoft.com/en-us/library/hh221345.aspx.
Configuration Manager roles
In Configuration Manager, you create administrative users by selecting:
![]() A security group to host the accounts that you want to provide permissions to.
A security group to host the accounts that you want to provide permissions to.
![]() Security roles that describe those permissions.
Security roles that describe those permissions.
![]() Security scopes and collections to define the objects over which those permissions apply.
Security scopes and collections to define the objects over which those permissions apply.
The Configuration Manger security roles are shown in Figure 2-29.
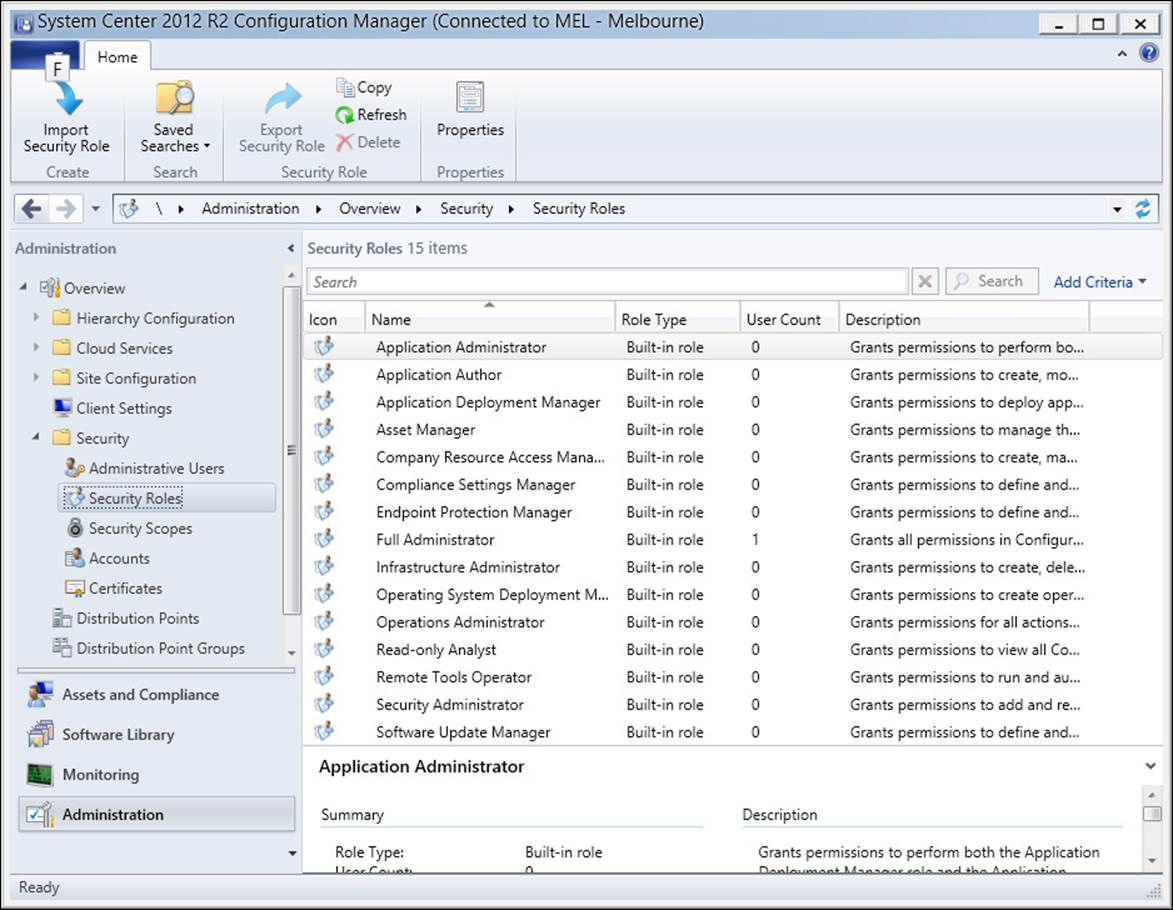
FIGURE 2-29 Security Roles
![]() Application Administrator Includes the permissions of the Application Deployment Manager and Application Author roles. Allows management of queries, collections, user device affinity settings, and grants the ability to view site settings.
Application Administrator Includes the permissions of the Application Deployment Manager and Application Author roles. Allows management of queries, collections, user device affinity settings, and grants the ability to view site settings.
![]() Application Author Provides permission to create, modify, and retire applications.
Application Author Provides permission to create, modify, and retire applications.
![]() Application Deployment Manager Provides permissions to manage application deployment.
Application Deployment Manager Provides permissions to manage application deployment.
![]() Asset Manager Provides permission to manage the asset intelligence synchronization point.
Asset Manager Provides permission to manage the asset intelligence synchronization point.
![]() Company Resource Access Manager Provides permission to manage company resource access profiles.
Company Resource Access Manager Provides permission to manage company resource access profiles.
![]() Compliance Settings Manager Provides permission to manage compliance settings.
Compliance Settings Manager Provides permission to manage compliance settings.
![]() Endpoint Protection Manager Provides permission to manage Endpoint Protection security policies.
Endpoint Protection Manager Provides permission to manage Endpoint Protection security policies.
![]() Full Administrator Provides all Configuration Manager permissions. Assigned to the user who performs installation of the first Configuration Manager site.
Full Administrator Provides all Configuration Manager permissions. Assigned to the user who performs installation of the first Configuration Manager site.
![]() Infrastructure Administrator Provides permission to manage Configuration Manager infrastructure. Can also perform migration tasks.
Infrastructure Administrator Provides permission to manage Configuration Manager infrastructure. Can also perform migration tasks.
![]() Operating system Deployment Manager Provides permissions to create and deploy operating system images.
Operating system Deployment Manager Provides permissions to create and deploy operating system images.
![]() Operations Administrator Can perform any task in Configuration Manager, except for those related to managing security roles, administrative users, and security scopes.
Operations Administrator Can perform any task in Configuration Manager, except for those related to managing security roles, administrative users, and security scopes.
![]() Read-Only Analyst Can view settings for all Configuration Manager objects.
Read-Only Analyst Can view settings for all Configuration Manager objects.
![]() Remote Tools Operator Can run Remote Control, Remote Assistance, and Remote Desktop from the Configuration Manager console.
Remote Tools Operator Can run Remote Control, Remote Assistance, and Remote Desktop from the Configuration Manager console.
![]() Security Administrator Provides permissions to manage security roles, collections, and security scopes.
Security Administrator Provides permissions to manage security roles, collections, and security scopes.
![]() Software Update Manager Provides permissions to define and deploy software updates.
Software Update Manager Provides permissions to define and deploy software updates.
More Info: Configuration Manager Roles
You can learn more about the roles in Configuration Manager at http://blogs.technet.com/b/hhoy/archive/2012/03/07/role-based-administration-in-system-center-2012-configuration-manager.aspx.
DPM roles
DPM has seven roles that you can use to control the assignment of permissions. These roles are:
![]() DPM Admins Members of this role can perform all actions in DPM.
DPM Admins Members of this role can perform all actions in DPM.
![]() Recovery Operator Members of this role can perform recovery operations using DPM.
Recovery Operator Members of this role can perform recovery operations using DPM.
![]() Reporting Operator Members of this role can run and manage reports.
Reporting Operator Members of this role can run and manage reports.
![]() Read-Only User Members of this role can view configuration items but cannot perform actions.
Read-Only User Members of this role can view configuration items but cannot perform actions.
![]() Tier-1 Support (help desk) Members of this role are able to resume backups and take automated recommended actions.
Tier-1 Support (help desk) Members of this role are able to resume backups and take automated recommended actions.
![]() Tier-2 Support (escalation) Members of this role are able to run backups on demand and can enable and disable agents.
Tier-2 Support (escalation) Members of this role are able to run backups on demand and can enable and disable agents.
![]() Tape Operator Members of this role can rerun backups and perform tape drive tasks.
Tape Operator Members of this role can rerun backups and perform tape drive tasks.
![]() Tape Admins Members of this role can perform any action related to tape drives.
Tape Admins Members of this role can perform any action related to tape drives.
More Info: DPM Roles
You can learn more about DPM roles at http://blogs.technet.com/b/dpm/archive/2011/09/08/dpm-2012-centralized-management-role-based-access-control.aspx.
Operations Manager roles
You configure user roles in Operations Manager by selecting a profile and a scope. The scope defines the elements against which the permissions contained in the profile can be used. Figure 2-30 shows the available Operations Manager profiles.
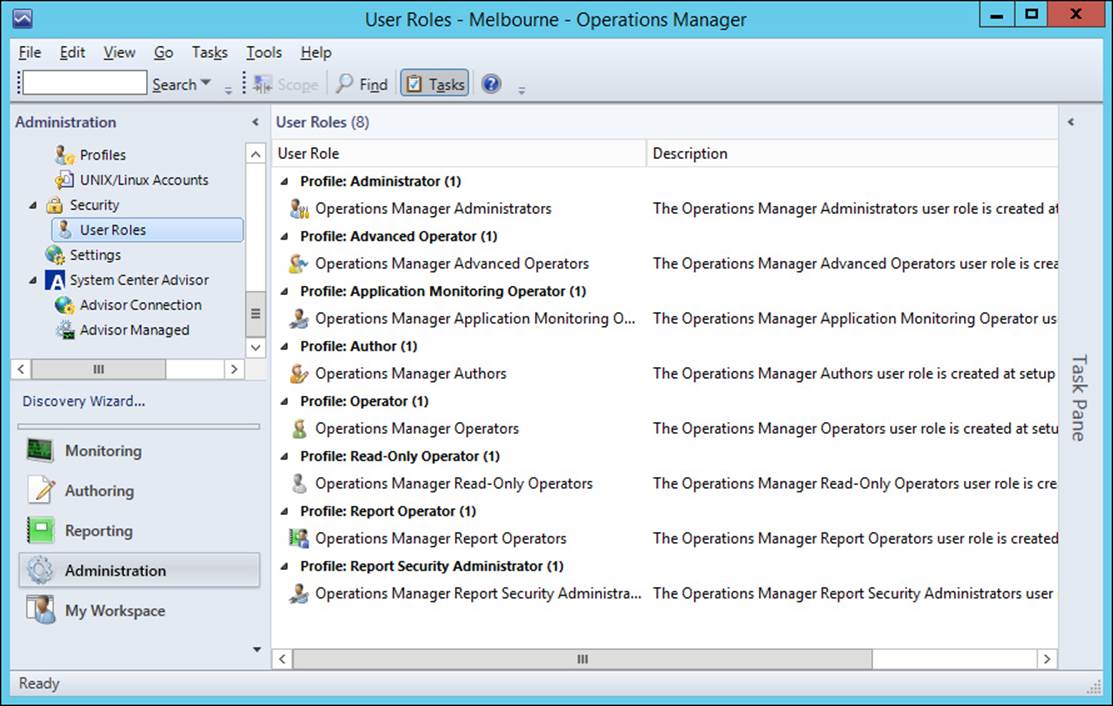
FIGURE 2-30 User Roles
These roles have the following permissions:
![]() Administrator Has all privileges over the Operations Manager deployment.
Administrator Has all privileges over the Operations Manager deployment.
![]() Advanced Operator Has access to alerts, views, and tasks, and the ability to override the configuration of rules and monitors within the configured scope.
Advanced Operator Has access to alerts, views, and tasks, and the ability to override the configuration of rules and monitors within the configured scope.
![]() Application Monitoring Operator Grants members the ability to see Application Monitoring events.
Application Monitoring Operator Grants members the ability to see Application Monitoring events.
![]() Author Can create and manage monitoring configuration for targets and groups of targets within configured scope.
Author Can create and manage monitoring configuration for targets and groups of targets within configured scope.
![]() Operator Provides permission to interact with alerts, run tasks, and access views within their designated scope.
Operator Provides permission to interact with alerts, run tasks, and access views within their designated scope.
![]() Read-Only Operator Provides read-only access to alerts and views within the designated scope.
Read-Only Operator Provides read-only access to alerts and views within the designated scope.
![]() Report Operator Provides access to reports within the designated scope.
Report Operator Provides access to reports within the designated scope.
![]() Report Security Administrator Provides the ability to control access to reports.
Report Security Administrator Provides the ability to control access to reports.
More Info: Operations Manager User Roles
You can learn more about Operations Manager user roles at http://technet.microsoft.com/en-us/library/hh230728.aspx.
Orchestrator roles
Orchestrator has two different roles, the runbook author, and the runbook operator.
![]() Runbook authors User accounts that are members of the Orchestrator Users group. You specify which group functions as the Orchestrator Users group during deployment. Members of this group have full administrator access to the Orchestrator deployment.
Runbook authors User accounts that are members of the Orchestrator Users group. You specify which group functions as the Orchestrator Users group during deployment. Members of this group have full administrator access to the Orchestrator deployment.
![]() Runbook operators Runbook operators have permissions granted by runbook authors using the Orchestrator Runbook Designer. They can access the Orchestration console, can view and invoke runbooks to which they have been given permission.
Runbook operators Runbook operators have permissions granted by runbook authors using the Orchestrator Runbook Designer. They can access the Orchestration console, can view and invoke runbooks to which they have been given permission.
More Info: Orchestrator Roles
You can learn more about Orchestrator security groups at http://technet.microsoft.com/en-us/library/hh912320.aspx.
Service Manager roles
Service Manager includes 13 different built-in user roles that allow administrators to create additional user roles based on the built-in roles. These roles are available in the User Roles node of the Administration workspace, as shown in Figure 2-31, and have the following properties:
![]() Activity Implementers Can edit manual activities in their queue scope. Have read-only access to other work items in their queue scope. Have read-only access to queue items in their group scope.
Activity Implementers Can edit manual activities in their queue scope. Have read-only access to other work items in their queue scope. Have read-only access to queue items in their group scope.
![]() Administrators Full access to all elements of a Service Manager deployment.
Administrators Full access to all elements of a Service Manager deployment.
![]() Advanced Operators Are able to manage work items and configuration items in their queue scope. Can manage announcements in the Self-Service Portal.
Advanced Operators Are able to manage work items and configuration items in their queue scope. Can manage announcements in the Self-Service Portal.
![]() Change Initiators Can create change requests and activities for configuration items in their group scope. Have read access to work items in their queue scope.
Change Initiators Can create change requests and activities for configuration items in their group scope. Have read access to work items in their queue scope.
![]() Service Request Analysts Can create and edit service requests and activity work items in their queue scope. Have read access to work items in their queue scope. Have read access to configuration items in their queue scope.
Service Request Analysts Can create and edit service requests and activity work items in their queue scope. Have read access to work items in their queue scope. Have read access to configuration items in their queue scope.
![]() End Users Can create incidents, request software, view announcements and knowledge base articles in the Self-Service Portal.
End Users Can create incidents, request software, view announcements and knowledge base articles in the Self-Service Portal.
![]() Read-Only Operators Have read-only access to work items in their queue scope. Have read-only access to configuration items in their group scope.
Read-Only Operators Have read-only access to work items in their queue scope. Have read-only access to configuration items in their group scope.
![]() Release Managers Can manage release records and activity work items in their queue scope. Have read-only access to other items in their queue scope. Have read-only access to items in their group scope.
Release Managers Can manage release records and activity work items in their queue scope. Have read-only access to other items in their queue scope. Have read-only access to items in their group scope.
![]() Authors Can manage work items in their queue scope. Can manage configuration items in their group scope. Can manage announcements in the Self-Service Portal.
Authors Can manage work items in their queue scope. Can manage configuration items in their group scope. Can manage announcements in the Self-Service Portal.
![]() Problem Analysts Can manage problems in their queue scope. Have read-only access to other work items in their queue scope. Have read-only access to configuration items in their group scope.
Problem Analysts Can manage problems in their queue scope. Have read-only access to other work items in their queue scope. Have read-only access to configuration items in their group scope.
![]() Workflows Can create and edit any configuration item or work item.
Workflows Can create and edit any configuration item or work item.
![]() Incident Resolvers Can manage incidents, problems, and manual activities in their group scope. Have read-only access to work items in their queue scope. Have read-only access to configuration items in their group scope.
Incident Resolvers Can manage incidents, problems, and manual activities in their group scope. Have read-only access to work items in their queue scope. Have read-only access to configuration items in their group scope.
![]() Change Managers Can manage change requests and activity work items in their queue scope. Have read-only access to work items in their queue scope. Have read-only access to configuration items in their group scope.
Change Managers Can manage change requests and activity work items in their queue scope. Have read-only access to work items in their queue scope. Have read-only access to configuration items in their group scope.
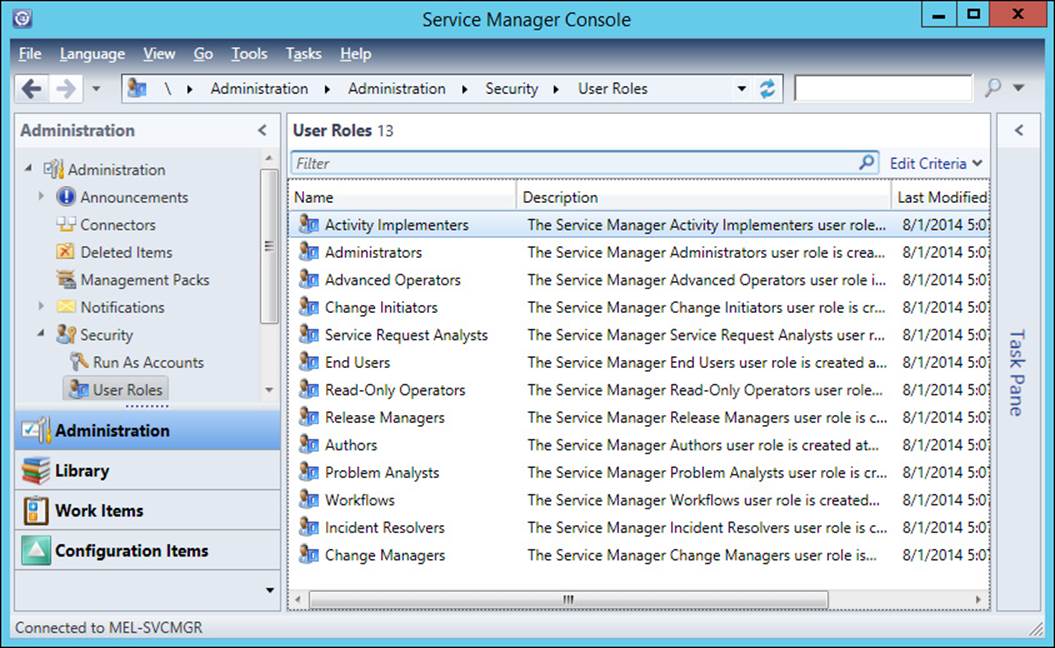
FIGURE 2-31 User Roles
More Info: Service Manager User Roles
You can learn more about Service Manager user roles at http://technet.microsoft.com/en-us/library/hh524267.aspx.
Virtual Machine Manager roles
VMM has the built in Administrator role, which allows role members to perform any administrative action on all elements that VMM manages. Other roles in VMM are used when you create user roles. A user role consists of a profile, members, scope, library servers, and Run As accounts.Figure 2-32 shows the available user role profiles, which determine what actions a member of the user role can perform.
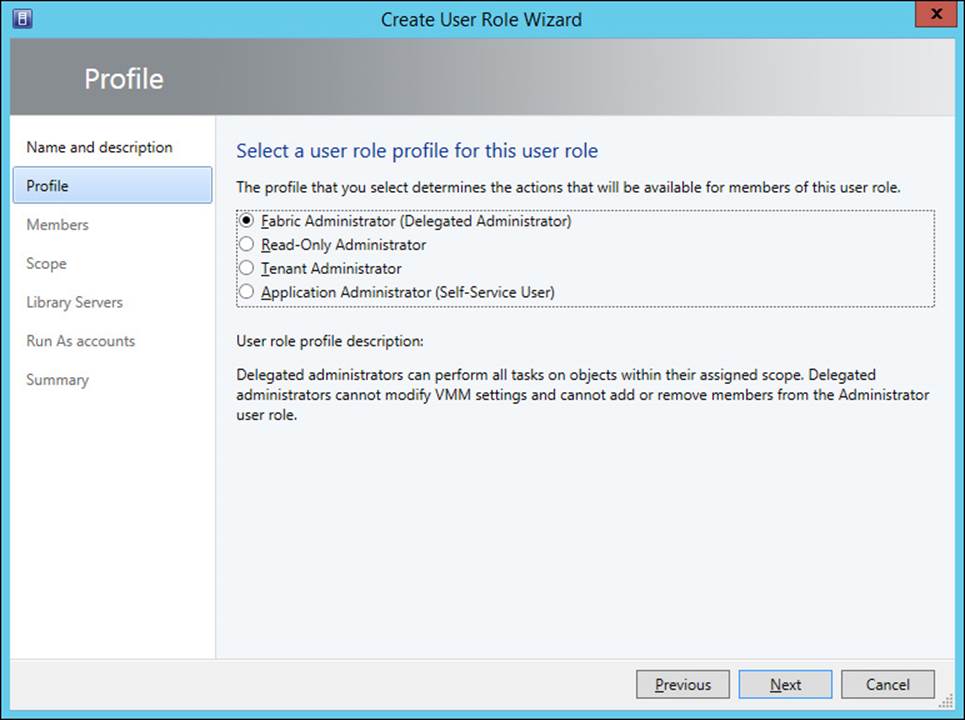
FIGURE 2-32 User Role Profiles
These user role profiles are as follows:
![]() Fabric Administrator Members of this role are able to perform any administrative tasks within their specifically assigned host groups, clouds, and library servers. Members of this role are unable to add XenServer or WSUS servers. They are also unable to modify VMM settings or the Administrator user role.
Fabric Administrator Members of this role are able to perform any administrative tasks within their specifically assigned host groups, clouds, and library servers. Members of this role are unable to add XenServer or WSUS servers. They are also unable to modify VMM settings or the Administrator user role.
![]() Read-Only Administrator Members of this role can view the properties, status, and job status within their assigned host groups, clouds, and library servers. They are unable to modify these objects.
Read-Only Administrator Members of this role can view the properties, status, and job status within their assigned host groups, clouds, and library servers. They are unable to modify these objects.
![]() Tenant Administrator Members of this role can manage self-service users and VM networks. They can also manage virtual machines and services as well as place quotas on resources.
Tenant Administrator Members of this role can manage self-service users and VM networks. They can also manage virtual machines and services as well as place quotas on resources.
![]() Application Administrator Called the Self-Service User Role in previous versions of VMM, allows the creation, deployment, and management of VMs and services.
Application Administrator Called the Self-Service User Role in previous versions of VMM, allows the creation, deployment, and management of VMs and services.
More Info: VMM User Roles
You can learn more about VMM user roles at http://technet.microsoft.com/en-us/library/gg696971.aspx.
Understanding Operations Manager watcher nodes
An Operations Manager watcher node is a computer, a management server, or a device that hosts an Operations Manager agent that runs rules that probe an application or feature running on a third computer or device. For example, you might want to use Operations Manager to test the availability of a TCP port on a VPN appliance located on your organization’s perimeter network. You could do this by using a computer deployed on the perimeter network, that has the Operations Manager agent installed, to probe the port of the VPN appliance to determine its availability. In this scenario, this computer on the perimeter network is functioning as the watcher node.
Operations Manager watcher nodes support synthetic transactions. Synthetic transactions are special tests that can be used to determine the availability or performance of the following:
![]() OLE DB Data Source
OLE DB Data Source
![]() Process
Process
![]() TCP Port
TCP Port
![]() UNIX or Linux Log File
UNIX or Linux Log File
![]() UNIX or Linux Process
UNIX or Linux Process
![]() Web Application Availability
Web Application Availability
![]() Web Application Transaction
Web Application Transaction
![]() Windows Service
Windows Service
If you are planning on using watcher nodes to verify the availability of an application, consider using watcher nodes on different networks. This will allow you to determine whether the application is available from multiple locations.
The following management pack templates use watcher nodes:
![]() OLE DB Data Source
OLE DB Data Source
![]() TCP Port
TCP Port
![]() Web Application Transaction Monitoring
Web Application Transaction Monitoring
If necessary, you can configure the computer that hosts the application or feature that you want to monitor as the watcher node. You specify which agent managed computes will function as watcher nodes on the Watcher Node page of the Add Monitoring Wizard, as shown in Figure 2-33.
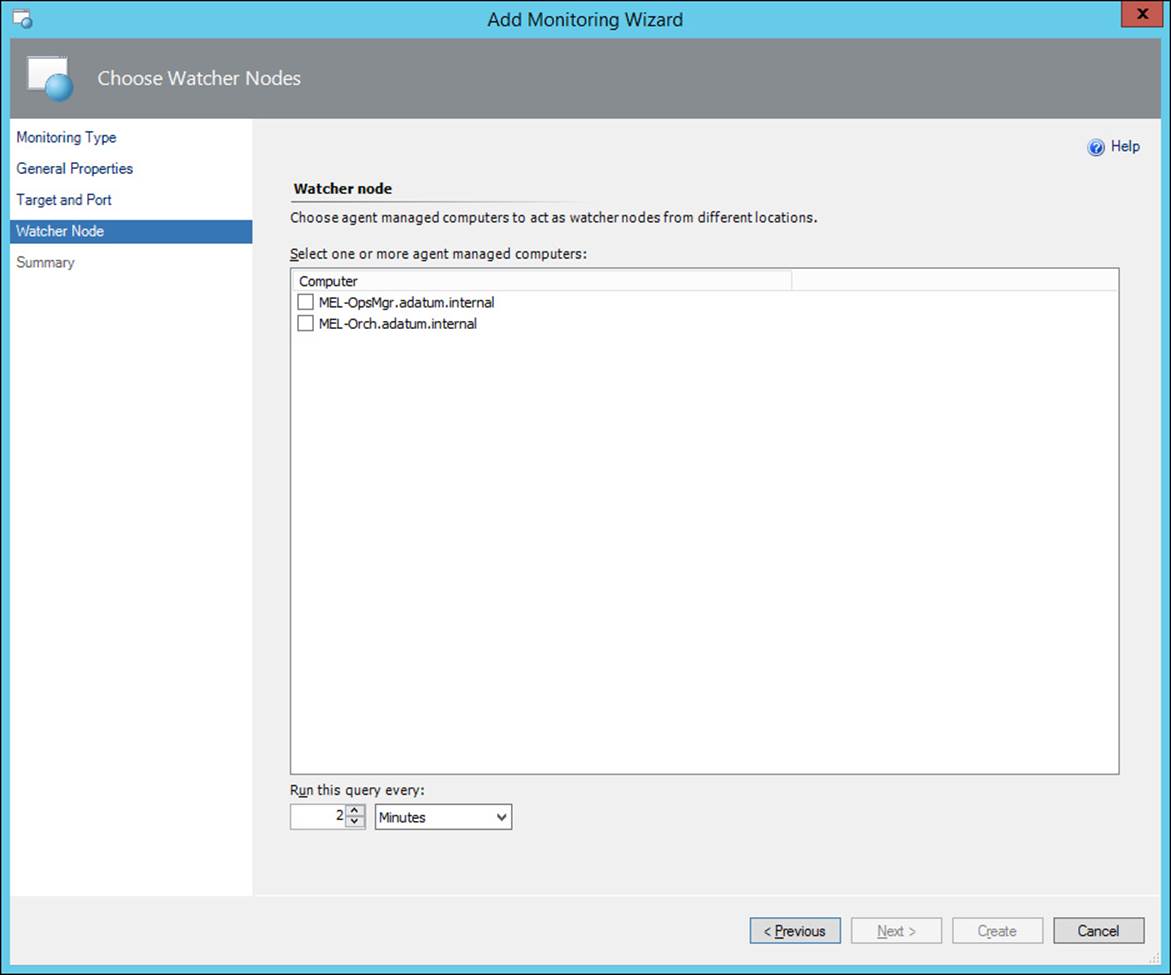
FIGURE 2-33 Watcher nodes
More Info: Operations Manager Watcher Nodes
You can learn more about Operations Manager watcher nodes at http://technet.microsoft.com/en-us/library/hh457584.aspx.
Operations Manager gateway servers
Mutual authentication must occur for an Operations Manager server to communicate with a computer or device that it manages. This is straightforward when the Operations Manager server, and the computer or device are members of the same Active Directory domain, or members of domains that have an existing trust relationship. Operations Manager gateway servers allow computers and devices that Operations Manager monitors, that do not have such a trust relationship, to perform authentication.
You deploy gateway servers within the trust boundary of the computer or devices that you want to monitor. For example, imagine two domains that don’t have a trust relationship, Fabrikam.internal and Fabrikam.perimeter. An Operations Manager management server is deployed in the Fabrikam.internal domain. Computers that you want to monitor are located in the Fabrikam.perimeter domain. In this scenario, you would deploy an Operations Manager gateway server in the Fabrikam.perimeter domain. Authentication between the Operations Manager management server and the Operations Manager gateway server occurs using certificates.
To deploy a gateway server, you need to perform the following general steps:
1. Request certificates for computers or devices that have the Operations Manager agent installed, will function as the Operations Manager gateway server, or will function as the Operations Manager management server from a trusted certificate authority. This can be a third-party certificate authority, or an internal certificate authority.
2. Use the MOMCertImport.exe tool to import the certificates. The syntax of this command, used from an elevated command prompt, is:
momcertimport.exe /SubjectName <certificate subject name>
3. On the Operations Manager management server, use the Microsoft.EnterpriseManagement.GatewayApprovalTool.exe to configure communication between the management server and the computer that will function as the gateway server using the following syntax from an elevated command prompt:
Microsoft.EnterpriseManagement.gatewayApprovalTool.exe /ManagementServerName=<mana
gementserverFQDN> /GatewayName=<GatewayFQDN> /Action=Create
4. Install the gateway server using the Operations Manager installation media.
More Info: Operations Manager Gateway Servers
You can learn more about Operations Manager gateway servers at http://technet.microsoft.com/en-us/library/hh212823.aspx.
 Exam Tip
Remember the difference between roles and Run As profiles.
![]() Thought experiment: VMM user role configuration at Contoso
Thought experiment: VMM user role configuration at Contoso
In this thought experiment, apply what you’ve learned about this objective. You can find answers to these questions in the “Answers” section at the end of this chapter.
You are the administrator of the VMM deployment at Contoso. The Contoso VMM server manages two clouds, Contoso_Production, and Contoso_Test. You need to assign user roles to three users. These users have the following requirements:
![]() Rooslan should be able to perform any administrative task on the Contoso_Test cloud, but should not have access to the Contoso_Production cloud.
Rooslan should be able to perform any administrative task on the Contoso_Test cloud, but should not have access to the Contoso_Production cloud.
![]() Nestor should be able to view all settings for elements within the Contoso_Production cloud, but should not be able to modify any settings.
Nestor should be able to view all settings for elements within the Contoso_Production cloud, but should not be able to modify any settings.
![]() Oksana should be able to create and deploy virtual machines with the Contoso_Production cloud.
Oksana should be able to create and deploy virtual machines with the Contoso_Production cloud.
With the principle of least privilege in mind, answer the following questions:
1. Which role should you assign to Oksana?
2. Which role should you assign to Rooslan?
3. Which role should you assign to Nestor?
Objective summary
![]() DPM storage pools store backed up data. You must have a DPM storage pool configured before you can start protecting workloads with DPM.
DPM storage pools store backed up data. You must have a DPM storage pool configured before you can start protecting workloads with DPM.
![]() DPM secondary servers are DPM servers that back up all workloads on the primary server.
DPM secondary servers are DPM servers that back up all workloads on the primary server.
![]() DPM chaining involves spreading protected workloads across two or more DPM servers, with a separate DPM server providing a secondary backup location for each workload protected by any DPM server in the chain.
DPM chaining involves spreading protected workloads across two or more DPM servers, with a separate DPM server providing a secondary backup location for each workload protected by any DPM server in the chain.
![]() Protection groups define which workloads are protected, the type of protection that is configured, and the retention period for that protection.
Protection groups define which workloads are protected, the type of protection that is configured, and the retention period for that protection.
![]() Agents or clients are special software that some System Center products use to interact with computers.
Agents or clients are special software that some System Center products use to interact with computers.
![]() Operations Manager watcher nodes are used to perform synthetic transactions to monitor availability.
Operations Manager watcher nodes are used to perform synthetic transactions to monitor availability.
![]() Run As accounts allow operators of a System Center product to carry out a task using an alternate set of credentials.
Run As accounts allow operators of a System Center product to carry out a task using an alternate set of credentials.
![]() User roles define the permissions that an operator has when using a System Center product.
User roles define the permissions that an operator has when using a System Center product.
![]() Operations Manager gateway servers allow computers and devices that Operations Manager monitors that do not have such a trust relationship to perform authentication.
Operations Manager gateway servers allow computers and devices that Operations Manager monitors that do not have such a trust relationship to perform authentication.
Objective review
Answer the following questions to test your knowledge of the information in this objective. You can find the answers to these questions and explanations of why each answer choice is correct or incorrect in the “Answers” section at the end of this chapter.
1. What is the minimum number of disks required for a DPM storage pool?
A. One
B. Two
C. Three
D. Four
2. How many Operations Manager management groups can a single Operations Manager agent report to?
A. One
B. Two
C. Four
D. Eight
3. Which of the following methods can you use to deploy the Configuration Manager client to virtual machines running Windows Server 2012 R2 in your organization’s private cloud without requiring a logon to that VM?
A. Client push installation account
B. Deployment from Windows Server Update Services
C. Deployment from Windows Intune
D. Manual installation
4. Which of the following Operations Manager user roles has the ability to override the configuration of rules and monitors within the configured scope?
A. Operator
B. Report Security Administrator
C. Advanced Operator
D. Author
5. Which of the following Service Manager roles allow a user assigned the role the ability to create change requests for configuration items in their group scope?
A. Service Request Analysts
B. Read-Only Operators
C. Problem Analysts
D. Change Initiators
Objective 2.2: Configure portals and dashboards
In this section, you will learn about the different portals and dashboards that you can use to interact with and monitor your organization’s private cloud environment.
This objective covers the following topics:
![]() App Controller
App Controller
![]() Service Manager Self-Service Portal
Service Manager Self-Service Portal
![]() Operations Manager dashboards
Operations Manager dashboards
![]() Application monitoring
Application monitoring
Using App Controller
App Controller allows you to manage private clouds created with VMM, and public clouds running in Microsoft Azure. App Controller also functions as the Self-Service Portal for VMM. Administrators can use VMM to create services and service templates that they can then deploy to a private cloud. Users in the organization can use App Controller to manage and deploy those services.
More Info: Configuring App Controller
You can learn more about configuring App Controller at http://technet.microsoft.com/en-us/library/gg696038.aspx.
Deploying services and virtual machines
System Center App Controller provides users with self-service virtual machine deployment functionality for VMM 2012 SP1 and VMM 2012 R2. App Controller runs as a web application, shown in Figure 2-34. To perform self-service virtual machine deployment using App Controller, a user must be a member of a VMM self-service user role. This role is termed Application Administrator in VMM 2012 R2.

FIGURE 2-34 App Controller
To create a self-service user role in VMM, perform the following steps:
1. Click Create User Role on the ribbon when in the Settings workspace of the VMM console.
2. On the Name And Description page of the Create User Role Wizard, provide a name for the role and an optional description.
3. On the Profile page, click Application Administrator (Self-Service User), as shown in Figure 2-35.
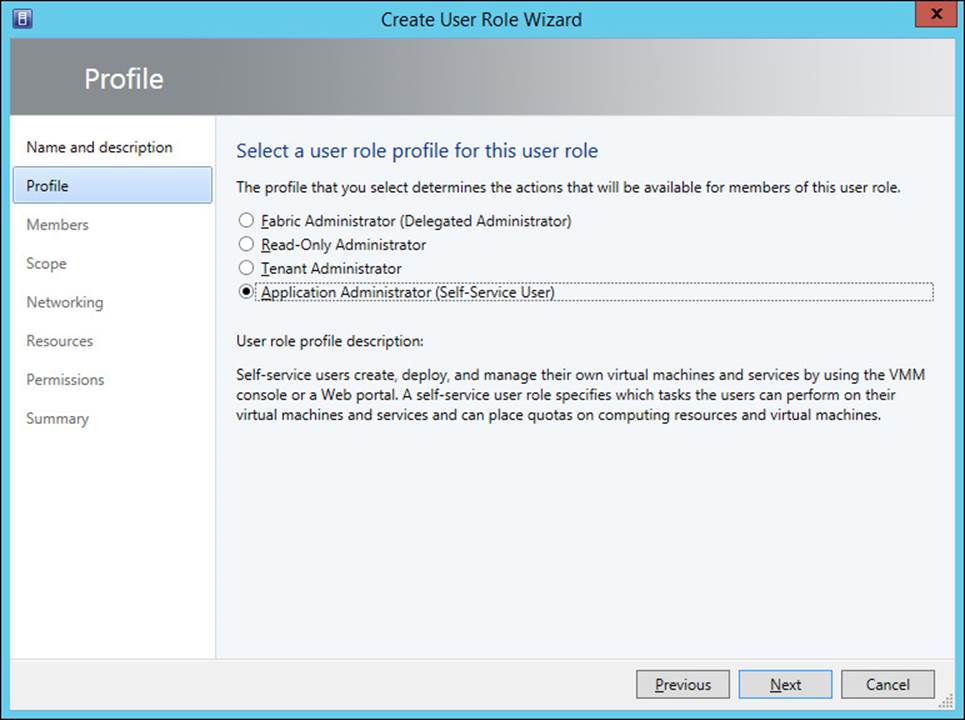
FIGURE 2-35 Create user role
4. On the Members page of the Create User Role Wizard, click Add, and add an Active Directory security group that will host the user accounts of the people who you want to grant self-service privileges to.
5. On the Scope page, shown in Figure 2-36, select the private cloud into which self-service users will be able to deploy VMs.
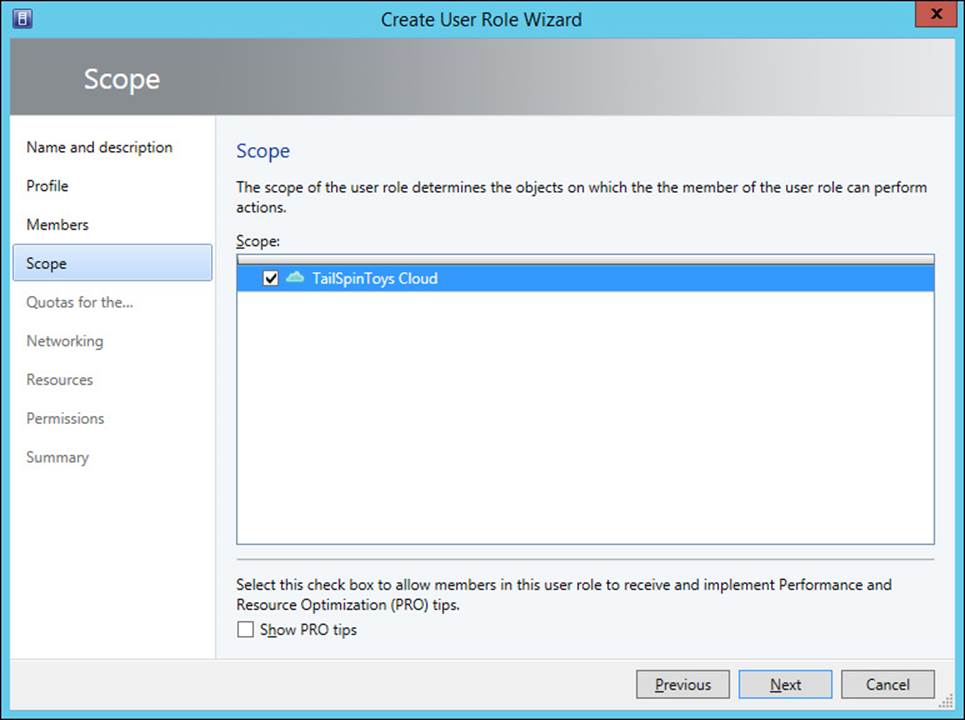
FIGURE 2-36 Create user role
6. On the Quotas page, specify the quotas for the self-service user role. You can configure role level quotas, which apply to all users of the role, or individual quotas, that apply to individual users. For example, Figure 2-37 shows member level quotas configured so that each role member can use a maximum of 2 virtual CPUs, 8192 MB of RAM, 50 GB of storage, and deploy a maximum of 2 virtual machines.
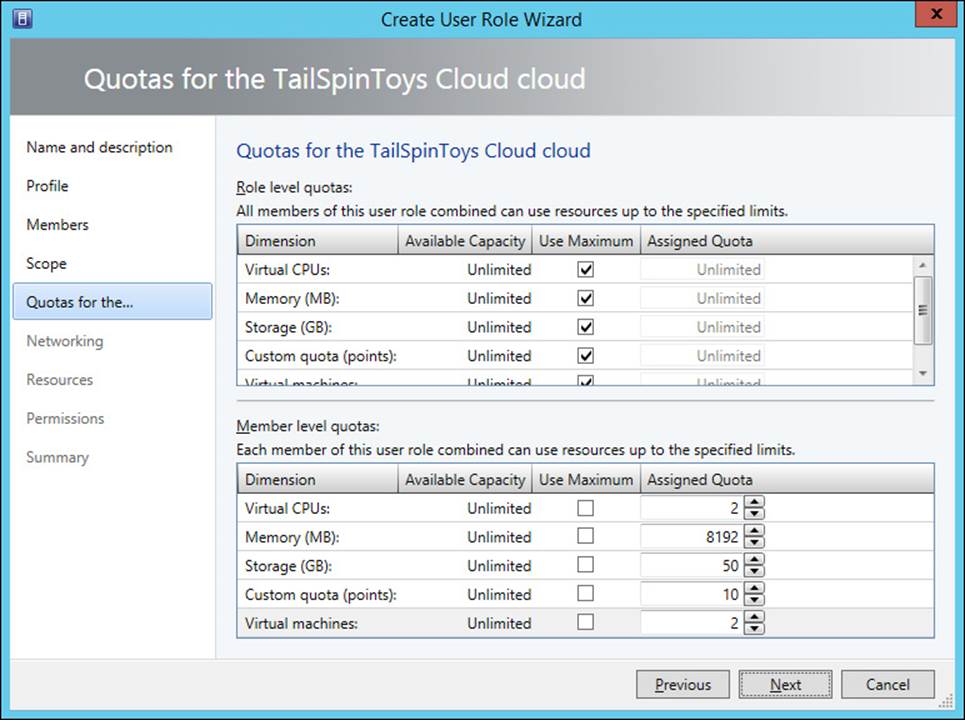
FIGURE 2-37 Member level quotas
7. On the Networking page, select which networks, if any, to which you will restrict the self-service users. If you don’t specify any networks, self-service users can use any configured VM network.
8. On the Resources page, select which resources, if any, to which you will restrict the self-service users. If you don’t specify any resources, self-service users can use any available VMM resources.
9. On the Permissions page, shown in Figure 2-38, configure the permissions that you want to assign to the users.
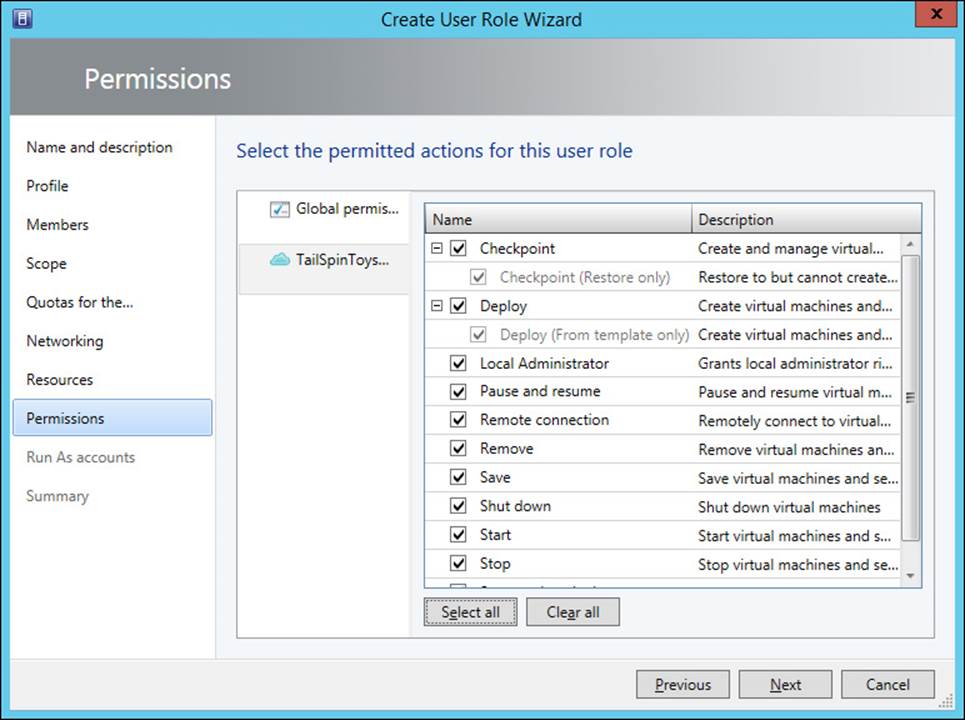
FIGURE 2-38 Permitted actions
10. On the Run As accounts page, select which VMM Run As accounts that members of the user role can utilize.
If a user is assigned the appropriate permissions through the VMM role they will be able to sign in to the App Controller portal. From there they will be able to connect to the private clouds hosted through VMM to which they have been assigned access, and deploy and manage virtual machines.
More Info: Deploying Services and Virtual Machines
You can learn more about deploying services and virtual machines at http://technet.microsoft.com/en-us/library/gg696042.aspx.
Managing services
You can use App Controller to manage services that you have deployed to your organization’s private cloud.
To change the state of a deployed service, perform the following steps:
1. On the Services node of the App Controller console, click the Service Instance.
2. On the task bar, click the state that you want the service to enter. The available options are Start, Stop, Resume, Suspend, and Shut Down.
To change the properties of a service that is deployed to your organization’s private cloud, click on the service in the Services node of the App Controller console, select Open Diagram from the task bar, and in the diagram, click the service to open the service’s Properties page. Once you have made the necessary changes, click Update to modify the service.
More Info: Managing Services and Virtual Machines
You can learn more about managing services and virtual machines at http://technet.microsoft.com/en-us/library/gg696044.aspx.
Using Service Manager Self-Service Portal
The Service Manager 2012 R2 Self-Service Portal is a SharePoint 2010 website that people in your organization can use to submit requests for service offerings and request offerings using their web browser. The Self-Service Portal leverages Service Manager user roles, meaning that users will be presented with different request and service offerings depending on role membership. Users are able to submit requests and view the status of those requests using the portal. Figure 2-39 shows the Service Manager 2012 R2 Self-Service Portal.

FIGURE 2-39 Self-Service Portal
When a user submits a request using the self-service website, the request is forwarded to the Service Manager server where the information submitted through the self-service website is processed. You can publish Service Manager requests and service offerings to the Self-Service Portal. Many organizations use the Self-Service Portal to allow users to submit their own incident tickets as an alternative to contacting the help desk.
This functionality is only the tip of the iceberg. If you integrate Service Manager with other System Center products, such as Operations Manager, Orchestrator, and Virtual Machine Manager, you can offer services that leverage these products through the Self-Service Portal. For example, you could create a service offering that:
![]() Allows users to request and deploy virtual machines through System Center Virtual Machine Manager, with the details of that request and subsequent deployment all logged within Service Manager.
Allows users to request and deploy virtual machines through System Center Virtual Machine Manager, with the details of that request and subsequent deployment all logged within Service Manager.
![]() Allows users to put SQL Server databases into protection, or perform self-service recovery by leveraging Service Manager integration with Data Protection Manager and Orchestrator.
Allows users to put SQL Server databases into protection, or perform self-service recovery by leveraging Service Manager integration with Data Protection Manager and Orchestrator.
![]() Allows users to trigger Orchestrator runbooks. Since runbooks can be created to perform almost any task within your organization’s Windows-based infrastructure, you can provide users with the ability, through the Self-Service Portal, to trigger any task for which you can build a runbook.
Allows users to trigger Orchestrator runbooks. Since runbooks can be created to perform almost any task within your organization’s Windows-based infrastructure, you can provide users with the ability, through the Self-Service Portal, to trigger any task for which you can build a runbook.
The Self-Service Portal can be hosted on a separate computer from the Service Manager server. One important thing to note is that you can only use SharePoint 2010 to host the Service Manager 2012 R2 RTM self-service website. You cannot use SharePoint 2013 to host the Service Manager 2012 R2 RTM self-service website. This is important as you cannot deploy versions of SharePoint 2010 prior to Service Pack 2 on computers running the Windows Server 2012 and Windows Server 2012 R2 operating systems.
More Info: Service Manager Self-Service Portal
You can learn more about the Service Manager Self-Service Portal at http://technet.microsoft.com/en-us/library/hh667344.aspx.
Creating Operations Manager dashboards
Dashboards give you a way of quickly displaying Operations Manager information. Dashboards allow you to see pertinent information “at a glance,” so that you can quickly ascertain whether an event has occurred that requires important information. Dashboards allow you to present multiple types of data in a single view. You can view dashboards in the Operations Manager console, or by using a web browser when the dashboard is published to SharePoint.
When creating a dashboard, you can choose from one of the following templates, as shown in Figure 2-40.
![]() Column Layout Column layouts consist of multiple columns of information.
Column Layout Column layouts consist of multiple columns of information.
![]() Grid Layout Grid layouts consist of multiple cells, each of which contains separate information.
Grid Layout Grid layouts consist of multiple cells, each of which contains separate information.
![]() Service Level Dashboard A service level dashboard allows you to display information related to service level tracking.
Service Level Dashboard A service level dashboard allows you to display information related to service level tracking.
![]() Summary Dashboard The summary dashboard will display the top selected number of performance counters for chosen values.
Summary Dashboard The summary dashboard will display the top selected number of performance counters for chosen values.
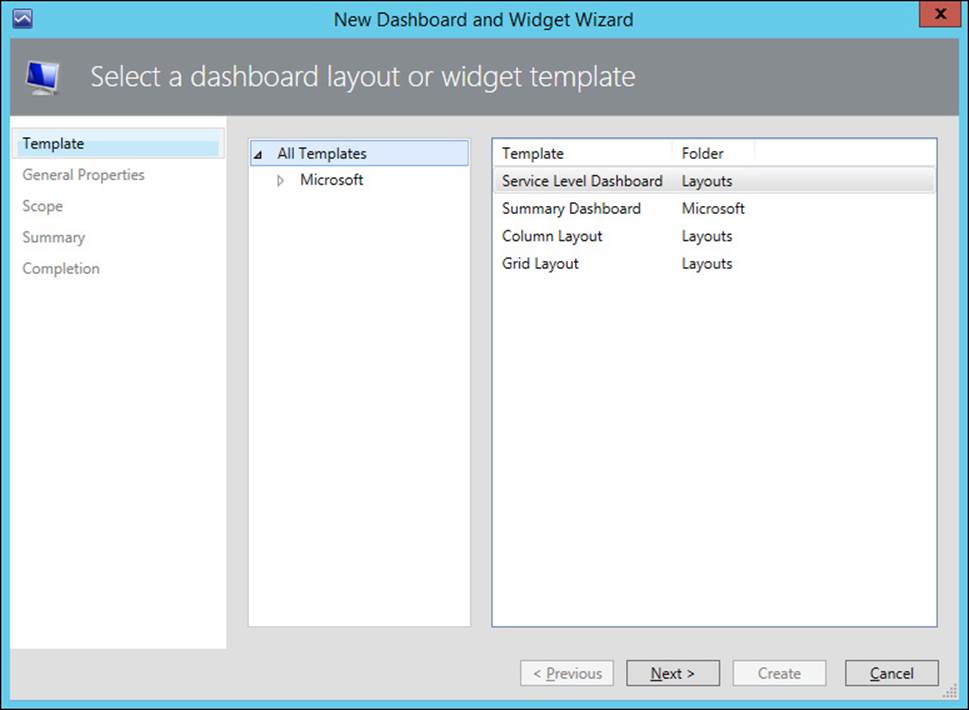
FIGURE 2-40 Dashboard layout
Once you choose a layout, you add widgets to the dashboard that display information that you are interested in viewing. You can add the following widget types to a dashboard:
![]() State Allows you to view the state of monitored objects.
State Allows you to view the state of monitored objects.
![]() Performance Allows you to view performance metrics.
Performance Allows you to view performance metrics.
![]() Alert Allows you to view alert information.
Alert Allows you to view alert information.
![]() Details The properties of the item that is highlighted in the dashboard.
Details The properties of the item that is highlighted in the dashboard.
![]() Instance Details Provides details of the instances related to the object.
Instance Details Provides details of the instances related to the object.
![]() Objects By Performance Performance counter data in tabular format for the selected object.
Objects By Performance Performance counter data in tabular format for the selected object.
You create dashboards in the My Workspace view. For example, to create a grid layout dashboard view named Domain Controller Availability And Alerts in Operations Manager, perform the following tasks:
1. In the My Workspace view of the Operations Manager console, right-click Favorite View, click New, and then click Dashboard View.
2. On the Template page, click Grid Layout, and then click Next.
3. On the General Properties page, type the name Domain Controller Availability and Alerts, and click Next.
4. On the Layout page, click 2 Cells, and then click the layout on the left, as shown in Figure 2-41, and click Next.
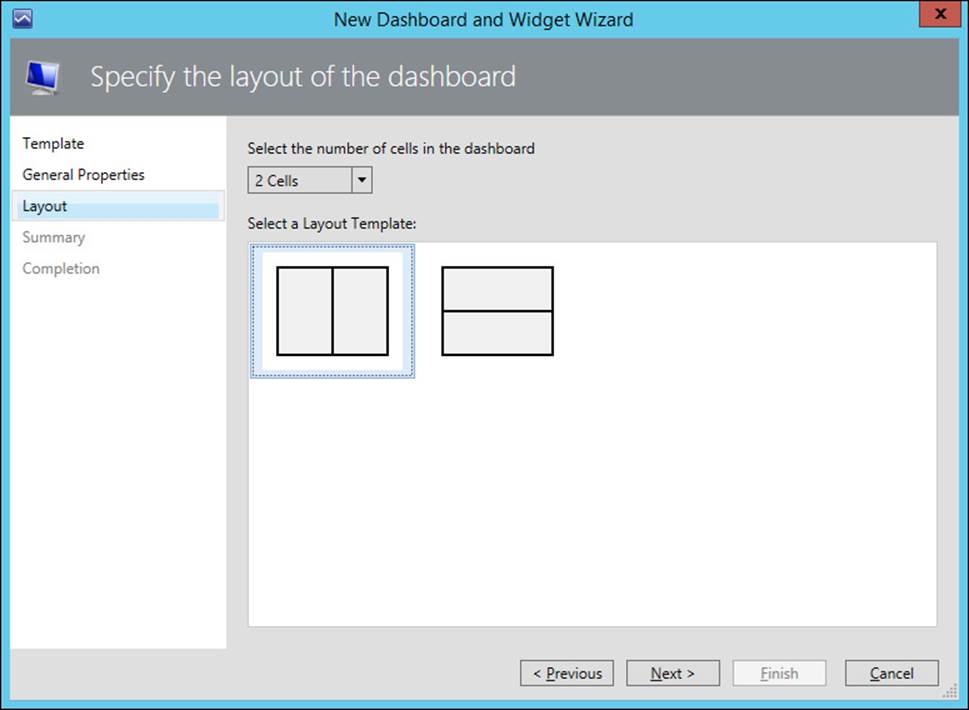
FIGURE 2-41 Dashboard cells
5. On the Summary page, click Create, and then click Close.
6. The new Dashboard will appear under the Favorite Views node. Click the new dashboard, in this case named Domain Controller Availability And Alerts, and then click the text Click To Add Widget. This will open the New Dashboard And Widget Wizard. Click State Widget, as shown in Figure 2-42, and click Next.
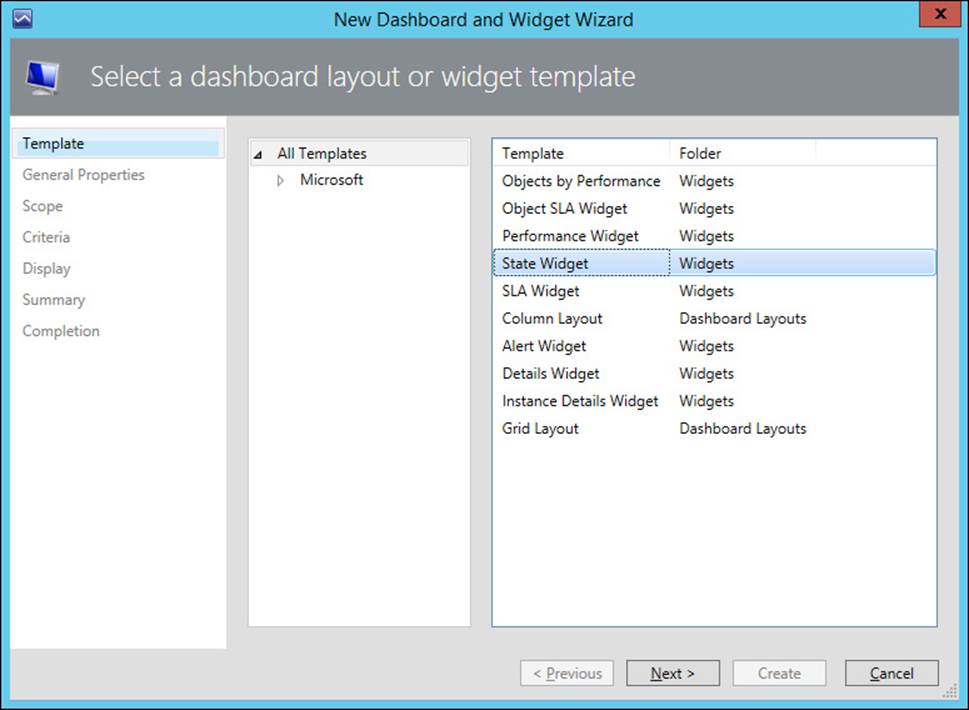
FIGURE 2-42 Dashboard widget
7. On the General Properties page, type Domain Controller State, and then click Next.
8. On the Scope page, click Add. On the Add Groups Or Objects dialog box, click Show All Objects And Groups. Type the domain suffix to limit the displayed items, and then navigate to the object that represents one of your organization’s domain controllers. Figure 2-43 shows MEL-DC.adatum.internal selected. Click Add, and then click OK.
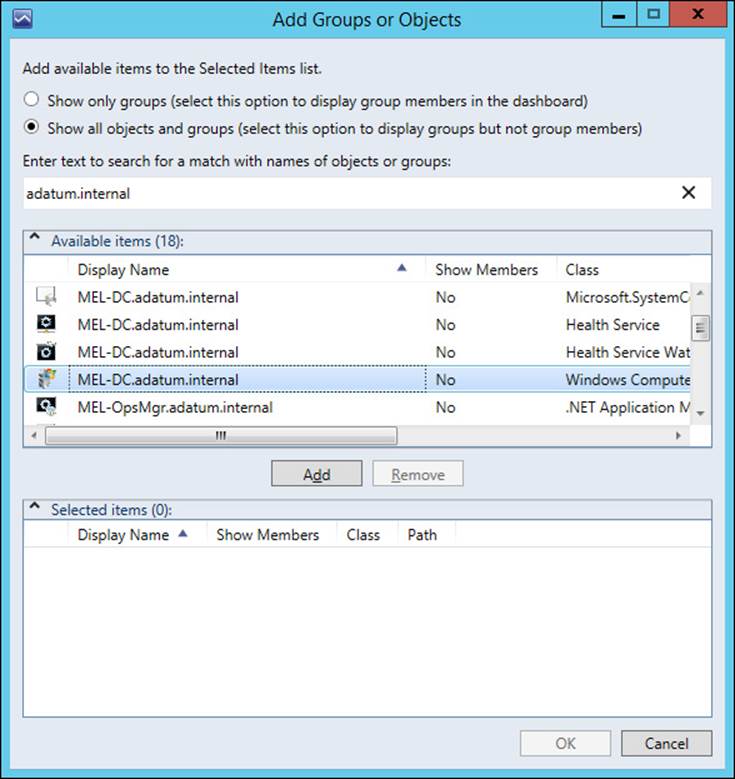
FIGURE 2-43 Add object
9. On the Scope page, verify that the domain controller’s computer object is listed.
10. On the Criteria page, select all of the available criteria except Display Only Objects In Maintenance Mode, as shown in Figure 2-44.
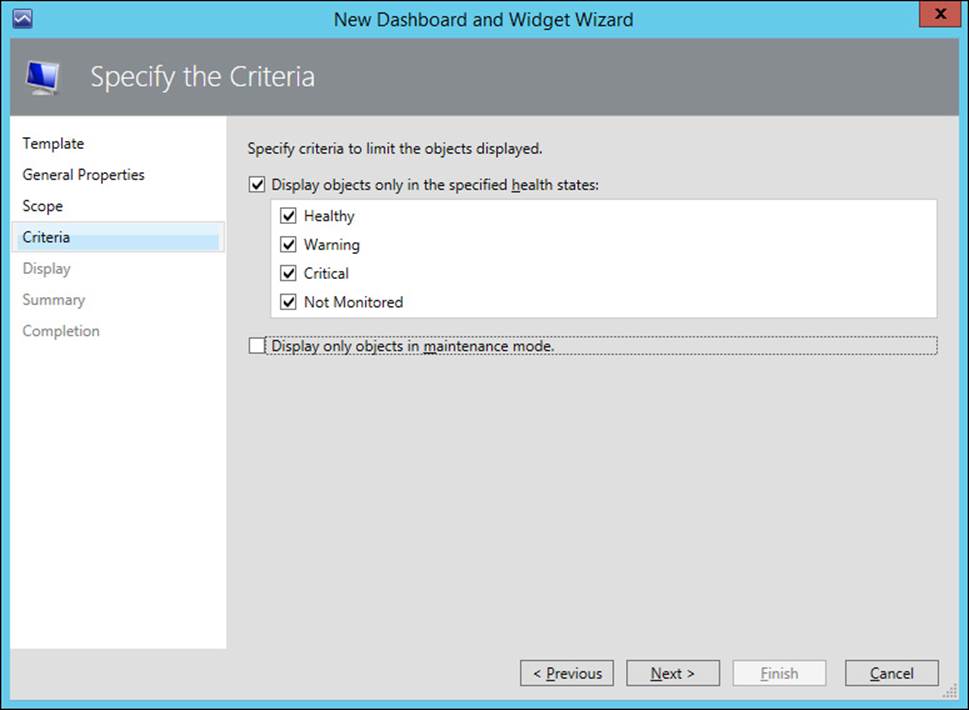
FIGURE 2-44 Dashboard criteria
11. On the Display page, select the Columns To Display, as shown in Figure 2-45, and then click Next.
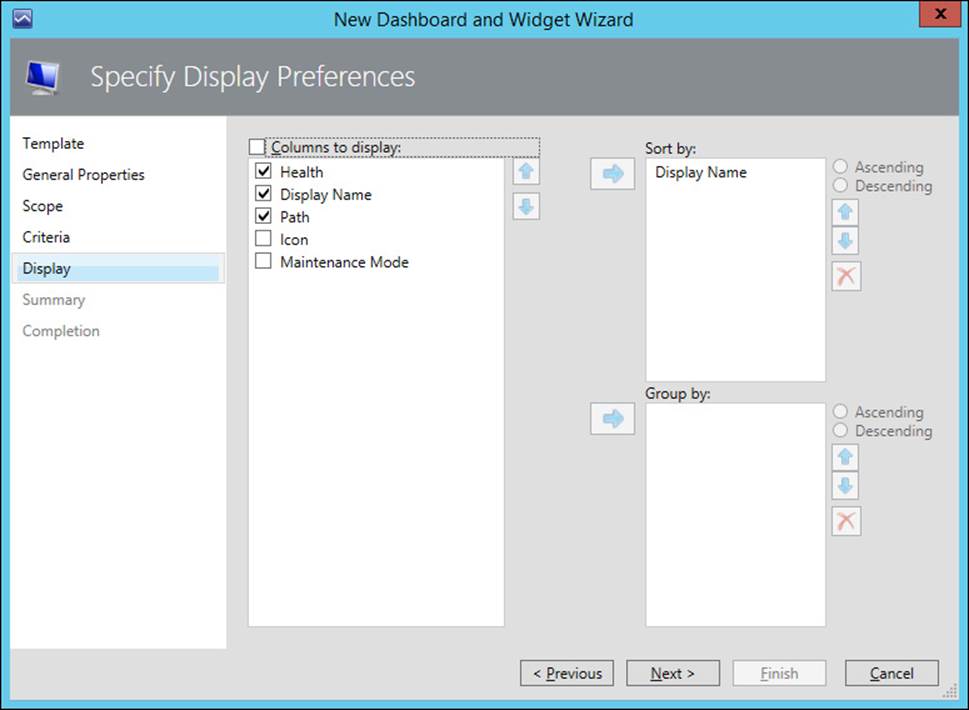
FIGURE 2-45 Display configuration
12. On the Summary page, click Create, and then click Close.
13. With the Domain Controller Availability And Alerts node selected, click the Click To Add Widget text.
14. On the Select A Dashboard Layout Or Widget template page of the New Dashboard And Widget Wizard, click Alert Widget, as shown in Figure 2-46, and click Next.
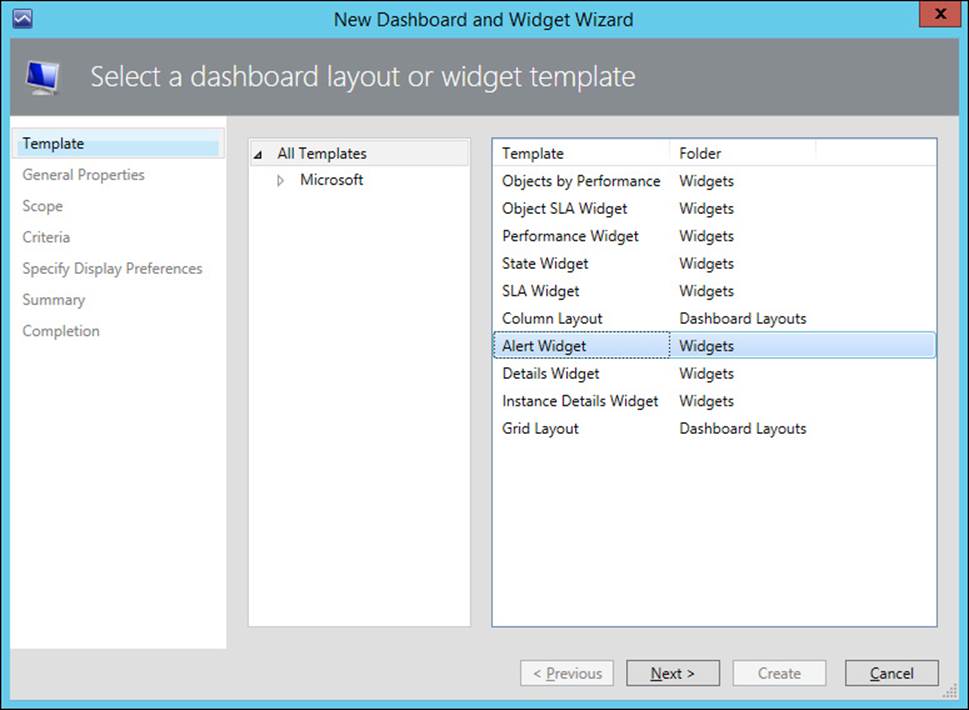
FIGURE 2-46 Alert widget
15. On the General Properties page, type the name, Domain Controller Host Alerts, and click Next.
16. On the Select Group Or Object page, click the ellipsis button (...).
17. On the Select A Group Or Object dialog box, click Groups And Objects, and then type the domain name suffix, and click Search. Figure 2-47 shows the MEL-DC.tailspintoys. internal object, and the Health Service Watcher Class is selected. Click OK.
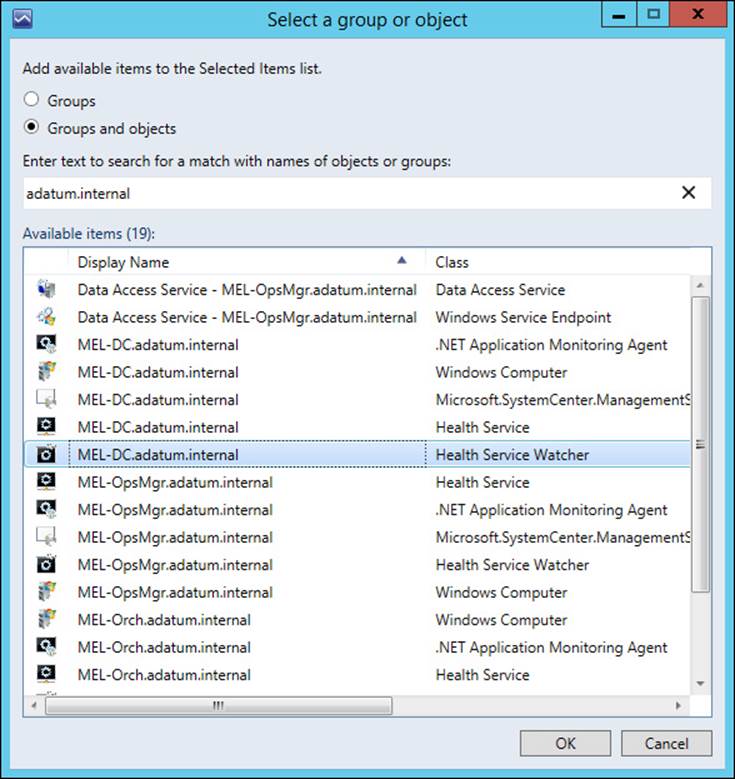
FIGURE 2-47 Health Service Watcher object
18. On the Criteria page, select the following check boxes, as shown in Figure 2-48.
![]() Display Alerts Only With The Specified Severities
Display Alerts Only With The Specified Severities
![]() Critical
Critical
![]() Warning
Warning
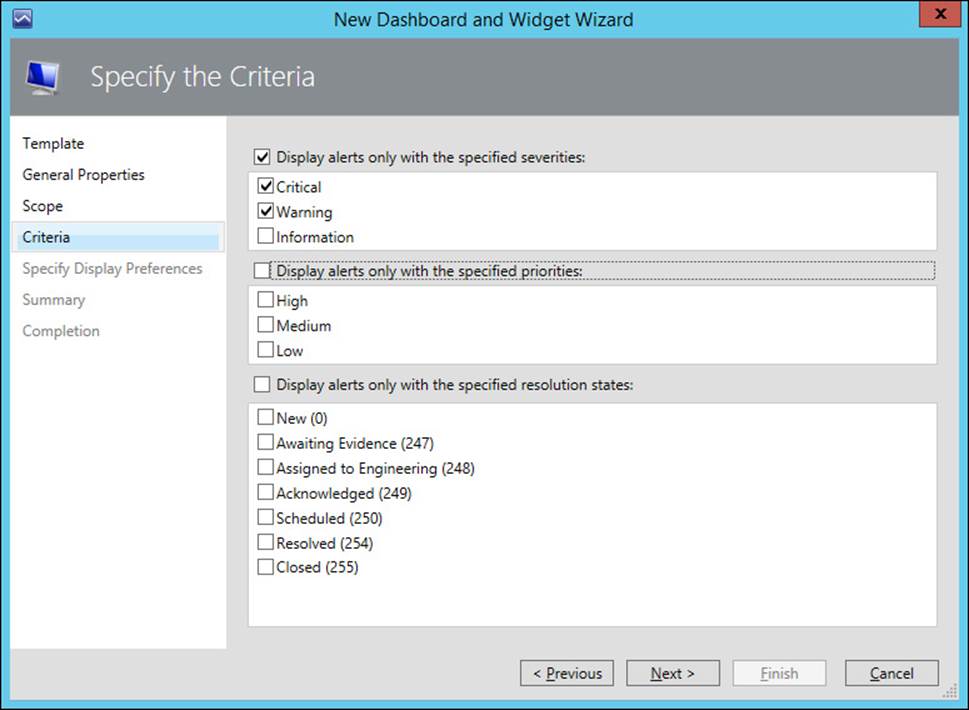
FIGURE 2-48 Criteria selection
19. Review the options on the Display tab, and click Next. Then click Create, and click Close. The resultant dashboard will look similar to Figure 2-49.
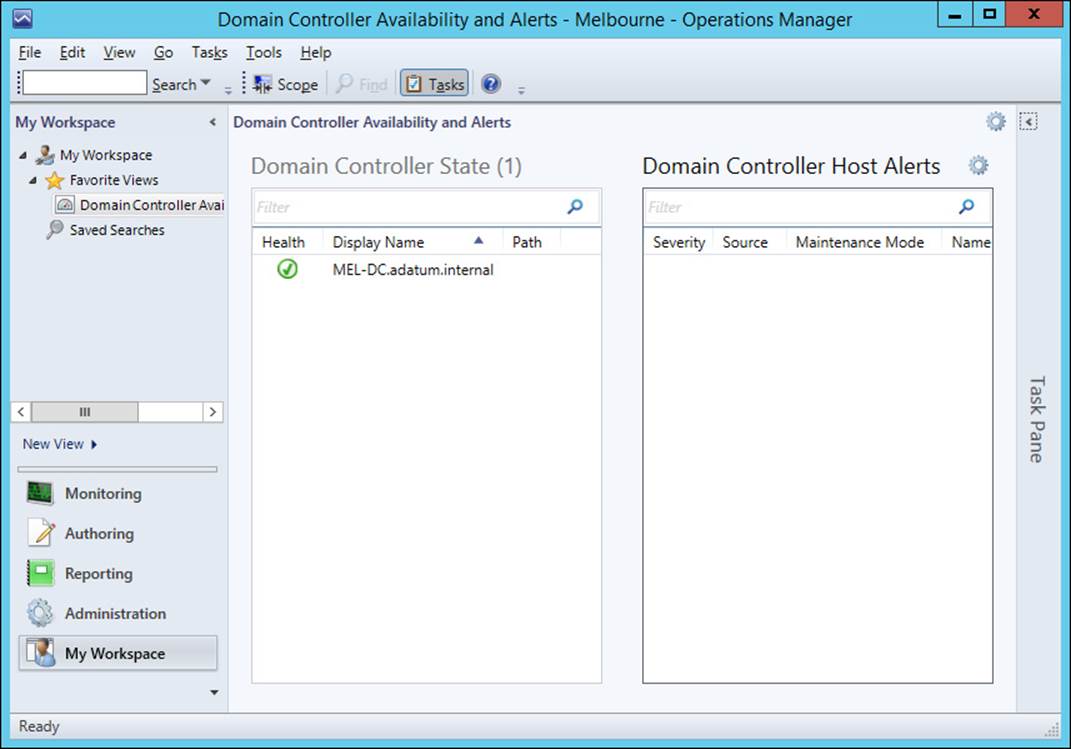
FIGURE 2-49 Dashboard view
To be able to display a dashboard in SharePoint, you need to have installed the Operations Manager SharePoint Web Part on the SharePoint server. A user that has administrative permissions on the SharePoint server must install the Operations Manager SharePoint Web Part.
More Info: Operations Manager Dashboards
You can learn more about Operations Manager dashboards at http://blogs.technet.com/b/momteam/archive/2011/09/27/introducing-operations-manager-2012-dashboards.aspx.
Application Performance Monitoring
You can use Application Performance Monitoring (APM) to monitor Internet Information Services (IIS) hosted .NET and Windows Communication Foundation (WCF) applications from both the perspective of the server that hosts the application, and the client that is interacting with the application. APM allows you to use Operations Manager to collect detailed information about a specific application’s performance and reliability.
You configure Application Performance Monitoring using the .NET Application Performance Monitoring Template that is available through the Authoring workspace of the Operations console.
To view Application Performance Monitoring event details, you’ll need the Operations Manger web console. It’s also necessary to import the following management packs and their dependencies into Operations Manager:
![]() Windows Server 2008 IIS 7.0
Windows Server 2008 IIS 7.0
![]() Operations Manager APM Web IIS 7
Operations Manager APM Web IIS 7
If you need to monitor applications hosted on Windows Server 2012 or Windows Server 2012 R2, you’ll need to import the following management packs and their dependencies:
![]() Microsoft Windows Server 2012 IIS 8
Microsoft Windows Server 2012 IIS 8
![]() Microsoft System Center APM Web IIS 8
Microsoft System Center APM Web IIS 8
Once you have installed these management packs, you can view the ASP.NET applications that Operations Manager finds in the Monitoring workspace, under Application Monitoring, under the .NET Monitoring node in the ASP.NET Web Application Inventory node. You’ll be able to view WCF applications under the IIS Hosted WCF Web Service Inventory node.
When APM discovers an application, you’ll usually need to restart IIS before you can start monitoring. You need to restart IIS so that the application pools recycle. This enables the APM extensions, and allows the APM function to register with the application.
The server-side monitoring capabilities of APM include:
![]() Performance event monitoring and alerting.
Performance event monitoring and alerting.
![]() Exception event monitoring and alerting.
Exception event monitoring and alerting.
![]() Modifying performance event threshold.
Modifying performance event threshold.
![]() Configuring performance event monitoring thresholds and sensitivity on a per-namespace or per-method basis.
Configuring performance event monitoring thresholds and sensitivity on a per-namespace or per-method basis.
![]() Configuring exception event monitoring types on a per-exception or per-exception handler basis.
Configuring exception event monitoring types on a per-exception or per-exception handler basis.
The client-side monitoring capabilities of APM include:
![]() Performance event monitoring and alerting.
Performance event monitoring and alerting.
![]() Exception event monitoring and alerting.
Exception event monitoring and alerting.
![]() Performance event thresholds for:
Performance event thresholds for:
![]() Page load
Page load
![]() Asynchronous JavaScript and XML
Asynchronous JavaScript and XML
![]() WCF
WCF
![]() Collecting data related to images, scripts, CSS, HTML components, global variables, and exception stack.
Collecting data related to images, scripts, CSS, HTML components, global variables, and exception stack.
![]() Collecting load balancer header data.
Collecting load balancer header data.
To configure Application Performance Monitoring, perform the following steps:
1. In the Authoring workspace of the Operations Manager console, click Management Pack Templates, and then click Add Monitoring Wizard on the ribbon.
2. On the Monitoring Type page, shown in Figure 2-50, click .NET Application Performance Monitoring.
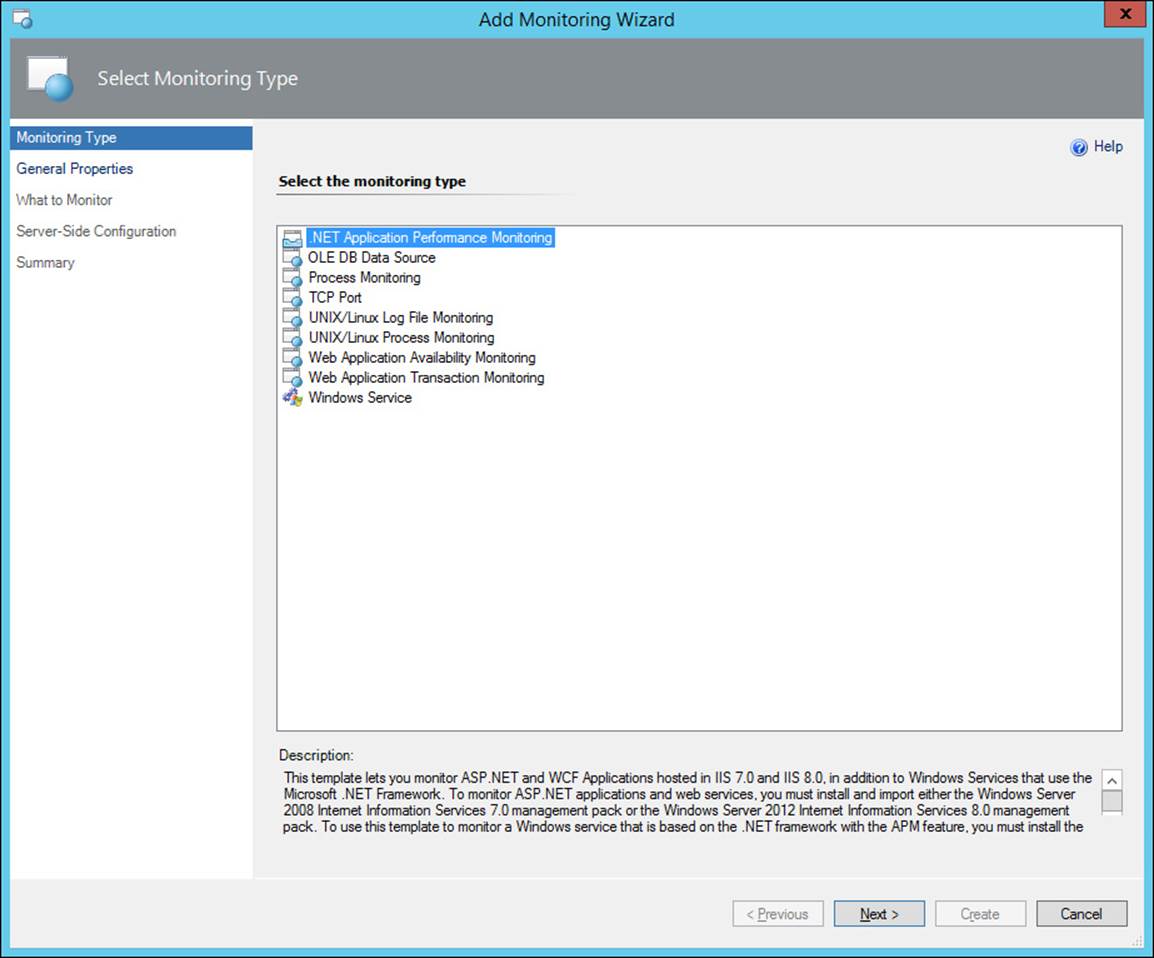
FIGURE 2-50 .NET Application Performance Monitoring template
3. On the General Properties page, provide a name for the monitor, and choose an unsealed management pack in which to store the monitor files.
4. On the What To Monitor page, click Add. On the Object Search page, click Search. A list of web applications and services that Operations Manager has discovered will be displayed. Select the applications that you want to manage, and click Add. This dialog box is shown in Figure 2-51.
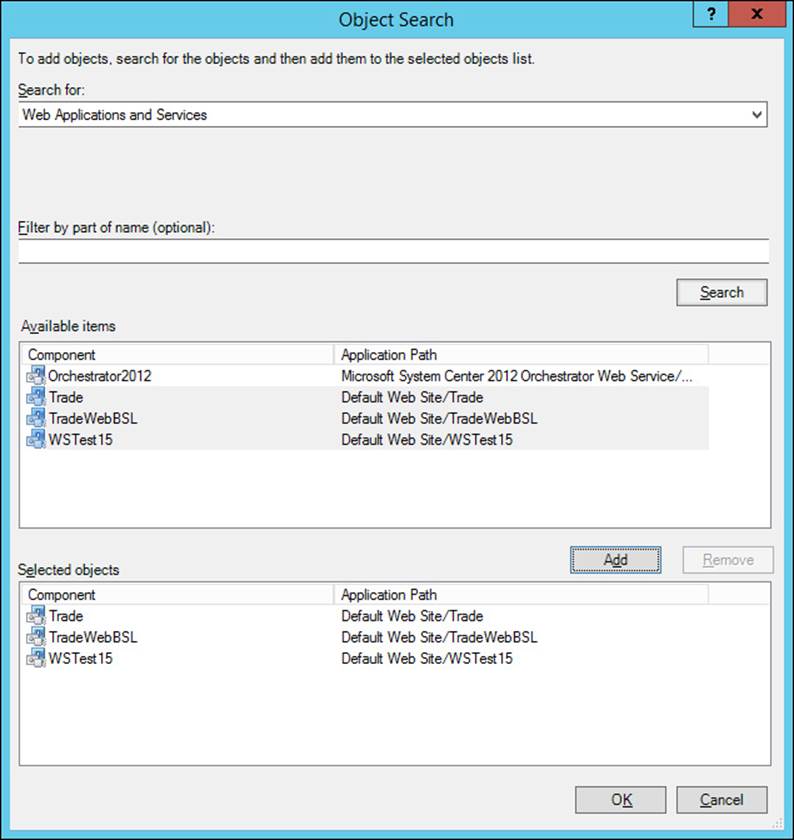
FIGURE 2-51 Web application search
5. On the Server-Side Configuration, select Enable Additional Configuration Options For Server-Side And Client-Side Monitoring, as shown in Figure 2-52, and then click Advanced Settings.
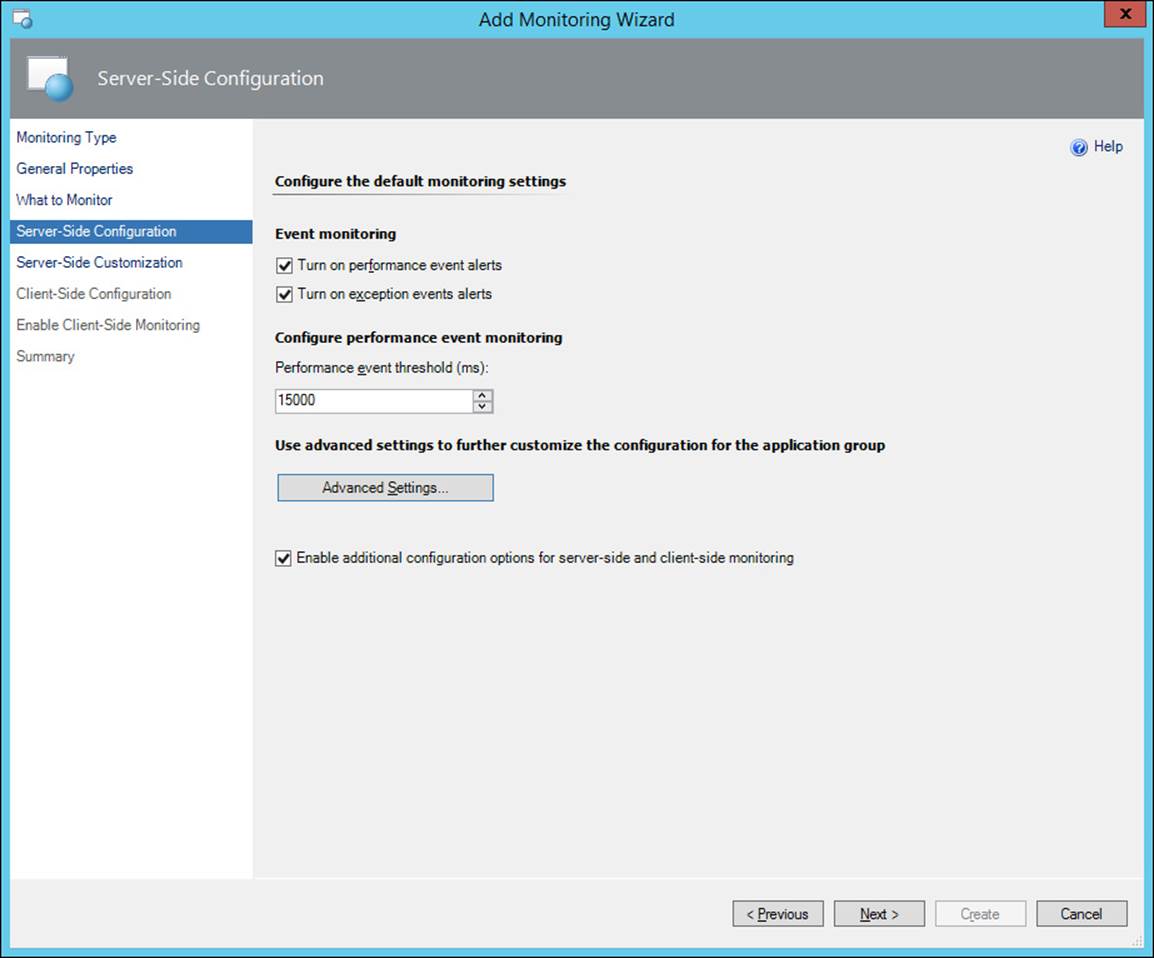
FIGURE 2-52 Server-side configuration
6. On the Advanced Settings page, review the current configuration, click Use Default Configuration, and then enable exception event monitoring for Application Failure Alerts, as shown in Figure 2-53.
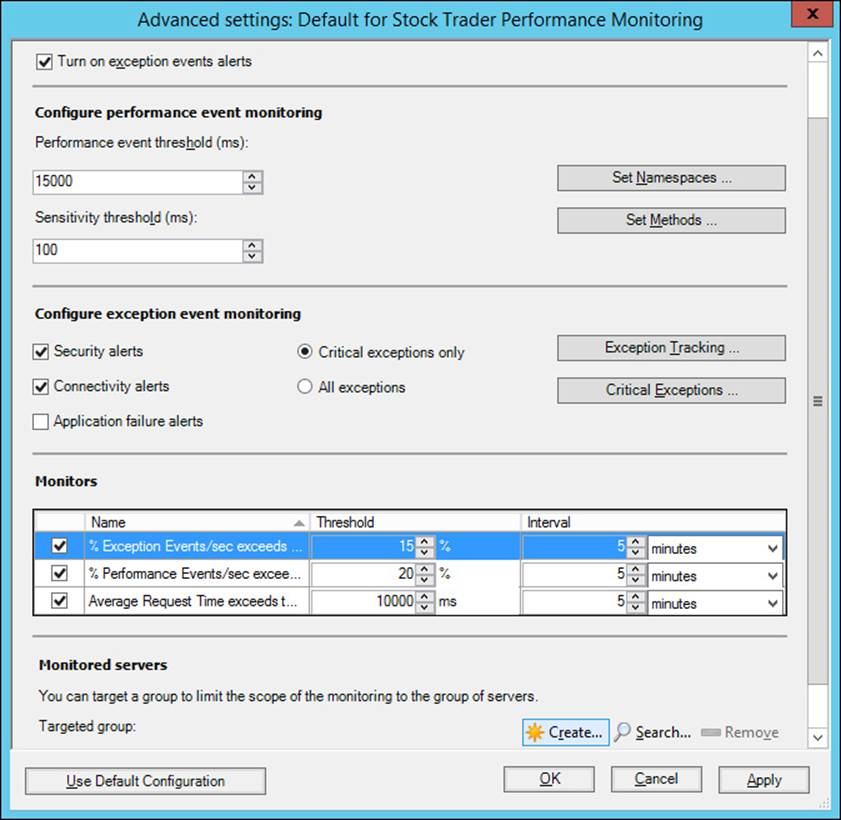
FIGURE 2-53 Advanced monitoring settings
7. On the Server-Side Customization page, select the first component, and click Customize. Verify that you can configure separate performance event monitoring settings for each application component, and then click OK.
8. On the Client-Side Configuration page, enable performance event alerts and exception event alerts, as shown in Figure 2-54. Review the page load threshold, and Ajax and WCF threshold settings.
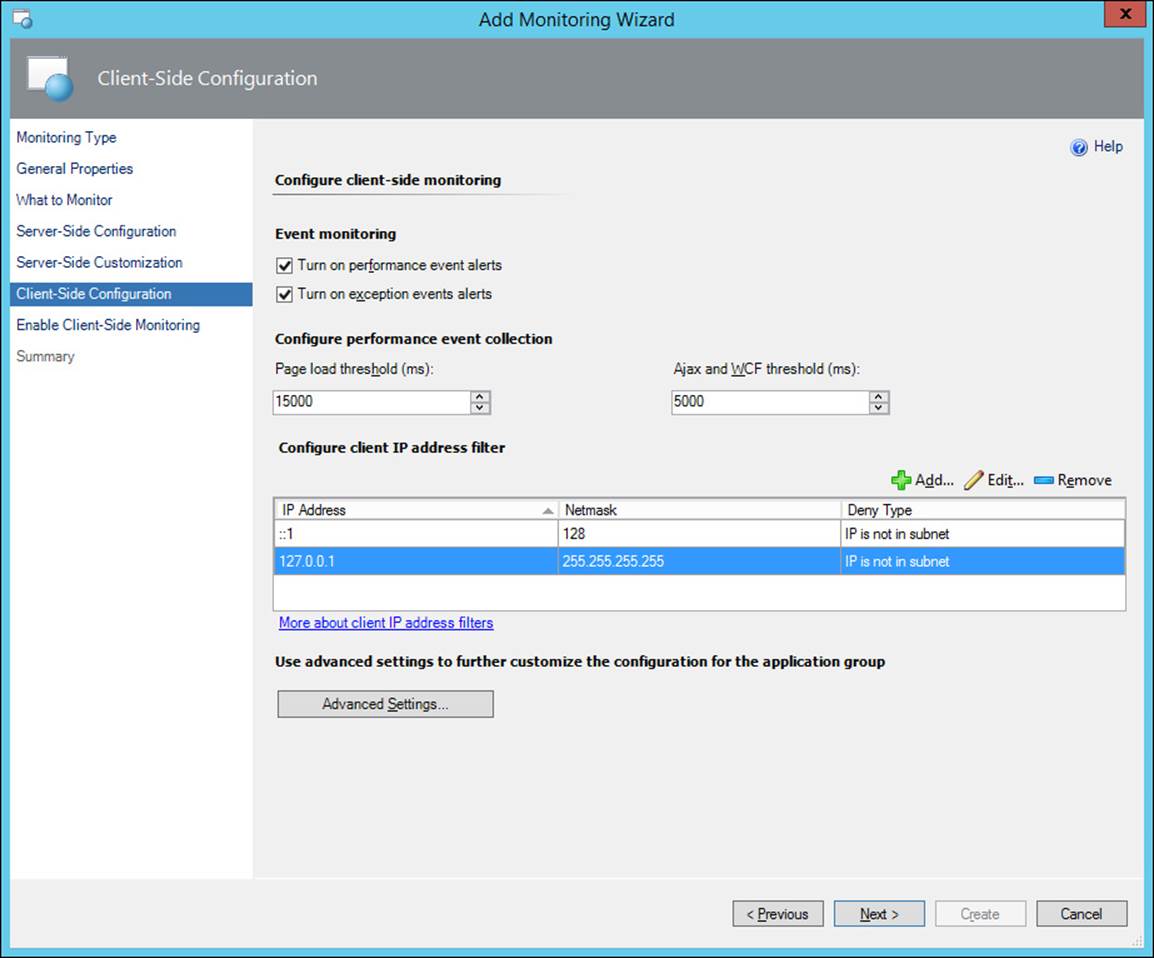
FIGURE 2-54 Client-side configuration
9. On the Enable Client-Side Monitoring page, review the information presented, and then complete the wizard. Note that it is likely that you’ll need to restart IIS on the server that hosts the web application.
More Info: Application Performance Monitoring
You can learn more about Application Performance Monitoring at http://technet.microsoft.com/en-us/library/hh457578.aspx.
![]() Thought experiment: Operations Manager dashboards at Fabrikam
Thought experiment: Operations Manager dashboards at Fabrikam
In this thought experiment, apply what you’ve learned about this objective. You can find answers to these questions in the “Answers” section at the end of this chapter.
You are creating a two-pane dashboard for use with Operations Manager at Fabrikam. The first pane should display alert information. The second pane should display performance counter data in tabular format.
1. Which widget would you use with the first pane?
2. Which widget would you use with the second pane?
Objective summary
![]() App Controller functions as a Self-Service Portal for VMM. It allows you to manage up to four separate VMM deployments. App Controller can also be used to manage Microsoft Azure private clouds.
App Controller functions as a Self-Service Portal for VMM. It allows you to manage up to four separate VMM deployments. App Controller can also be used to manage Microsoft Azure private clouds.
![]() The Service Manager Self-Service Portal runs on SharePoint 2010 and allows Service Manager self-service users to interact with Service Manager service offerings.
The Service Manager Self-Service Portal runs on SharePoint 2010 and allows Service Manager self-service users to interact with Service Manager service offerings.
![]() Operations Manager dashboards are customized views of Operations Manager information.
Operations Manager dashboards are customized views of Operations Manager information.
![]() You can use Application Performance Monitoring (APM) to monitor Internet Information Services (IIS) hosted .NET and Windows Communication Foundation (WCF) applications from both the perspective of the server that hosts the application, and the client that is interacting with the application.
You can use Application Performance Monitoring (APM) to monitor Internet Information Services (IIS) hosted .NET and Windows Communication Foundation (WCF) applications from both the perspective of the server that hosts the application, and the client that is interacting with the application.
Objective review
Answer the following questions to test your knowledge of the information in this objective. You can find the answers to these questions and explanations of why each answer choice is correct or incorrect in the “Answers” section at the end of this chapter.
1. You have configured App Controller to function as the Self-Service Portal for your organization’s VMM 2012 R2 deployment. Which VMM role has the minimum required permissions to start and stop VMs in a VMM cloud to which it has been assigned permissions when used through App Controller?
A. Tenant Administrator
B. Fabric Administrator
C. Application Administrator
D. Read-Only Administrator
2. Which version of SharePoint can you deploy on Windows Server 2012 R2 to support the System Center 2012 R2 Service Manager Self-Service Portal?
A. SharePoint 2010 SP2
B. SharePoint 2013
C. SharePoint 2007
D. SharePoint 2010
3. You are creating an Operations Manager dashboard. Which of the following dashboard templates would you choose when creating a dashboard if you wanted to display the top 20 performance counters for chosen values? (choose the best answer)
A. Service Level Dashboard
B. Grid Layout
C. Summary Dashboard
D. Column Layout
Answers
This section contains the solutions to the thought experiments and answers to the objective review questions in this chapter.
Objective 2.1: Thought experiment
1. You should assign Oksana the Application Administrator role for the Contoso_Production as this will allow her to create and deploy virtual machines within the Contoso_Production cloud.
2. You should assign Rooslan the Fabric Administrator user role for the Contoso_Test cloud. This will allow Rooslan to perform administrative tasks within the Contoso_Test cloud, but not within the Contoso_Production cloud.
3. You should assign Nestor the read-only administrator role for the Contoso_Production cloud. This will allow Nestor to view all settings related to the Contoso_Production cloud, but not to modify those settings.
Objective 2.1: Review
1. Correct answer: A
A. Correct: A DPM storage pool requires a minimum of a single disk.
B. Incorrect: A DPM storage pool requires a minimum of a single disk.
C. Incorrect: A DPM storage pool requires a minimum of a single disk.
D. Incorrect: A DPM storage pool requires a minimum of a single disk.
2. Correct answer: C
A. Incorrect: The Operations Manager agent can report to four separate management groups.
B. Incorrect: The Operations Manager agent can report to four separate management groups.
C. Correct: The Operations Manager agent can report to four separate management groups.
D. Incorrect: The Operations Manager agent can report to four separate management groups.
3. Correct answers: A and B
A. Correct: You can remotely deploy the Configuration Manager client using a client push installation.
B. Correct: You can remotely deploy the Configuration Manager client using Windows Server Update Services.
C. Incorrect: The Configuration Manager client cannot be deployed using Windows Intune.
D. Incorrect: Manual installation requires a logon to the local computer.
4. Correct answer: C
A. Incorrect: This role provides permission to interact with alerts, run tasks, and access views within their designated scope.
B. Incorrect: This role provides the ability to control access to reports.
C. Correct: This role provides access to alerts, views and tasks, and the ability to override the configuration of rules and monitors within the configured scope.
D. Incorrect: This role can create and manage monitoring configuration for targets and groups of targets within configured scope.
5. Correct answer: D
A. Incorrect: Users assigned to this role can create and edit service requests and activity work items in their queue scope. Have read access to work items in their queue scope. Have read access to configuration items in their queue scope.
B. Incorrect: Users assigned to this role have read-only access to work items in their queue scope. Have read-only access to configuration items in their group scope.
C. Incorrect: Users assigned this role can manage problems in their queue scope. Have read-only access to other work items in their queue scope. Have read-only access to configuration items in their group scope.
D. Correct: Users that are members of this role can create change requests and activities for configuration items in their group scope. Have read access to work items in their queue scope.
Objective 2.2: Thought experiment
1. You would add the Alert widget to the dashboard to view alert information.
2. You would add the Objects By Performance widget as this displays performance counter data in tabular format for the selected object.
Objective 2.2: Review
1. Correct answer: C
A. Incorrect: The Tenant Administrator has more permissions than the Application Administrator role and can make configuration changes.
B. Incorrect: The Fabric Administrator has more permissions than the Application Administrator role and can make configuration changes.
C. Correct: The Application Administrator role, formerly known as the self-service user role, has the minimum necessary required permissions to start and stop VMs in a VMM cloud to which it has been assigned permissions.
D. Incorrect: The read-only administrator cannot start and stop virtual machines.
2. Correct answer: A
A. Correct: SharePoint 2010 SP2 is the only version of SharePoint that you can deploy on Windows Server 2012 R2 that supports System Center 2012 R2 Service Manager.
B. Incorrect: While SharePoint 2013 will deploy on Windows Server 2012 R2, it is not supported by System Center 2012 R2 Service Manager.
C. Incorrect: You cannot deploy SharePoint 2007 on Windows Server 2012 R2.
D. Incorrect: You can only deploy SharePoint 2010 SP2 on Windows Server 2012 R2.
3. Correct answer: C
A. Incorrect: A service level dashboard allows you to display information related to service level tracking.
B. Incorrect: Grid layouts consist of multiple cells, each of which contains separate information.
C. Correct: The summary dashboard will display the top selected number of performance counters for chosen values.
D. Incorrect: Column layouts consist of multiple columns of information.
All materials on the site are licensed Creative Commons Attribution-Sharealike 3.0 Unported CC BY-SA 3.0 & GNU Free Documentation License (GFDL)
If you are the copyright holder of any material contained on our site and intend to remove it, please contact our site administrator for approval.
© 2016-2026 All site design rights belong to S.Y.A.