Easy Computer Basics, Windows 10 Edition (2016)
Chapter 2. Setting Up Your PC

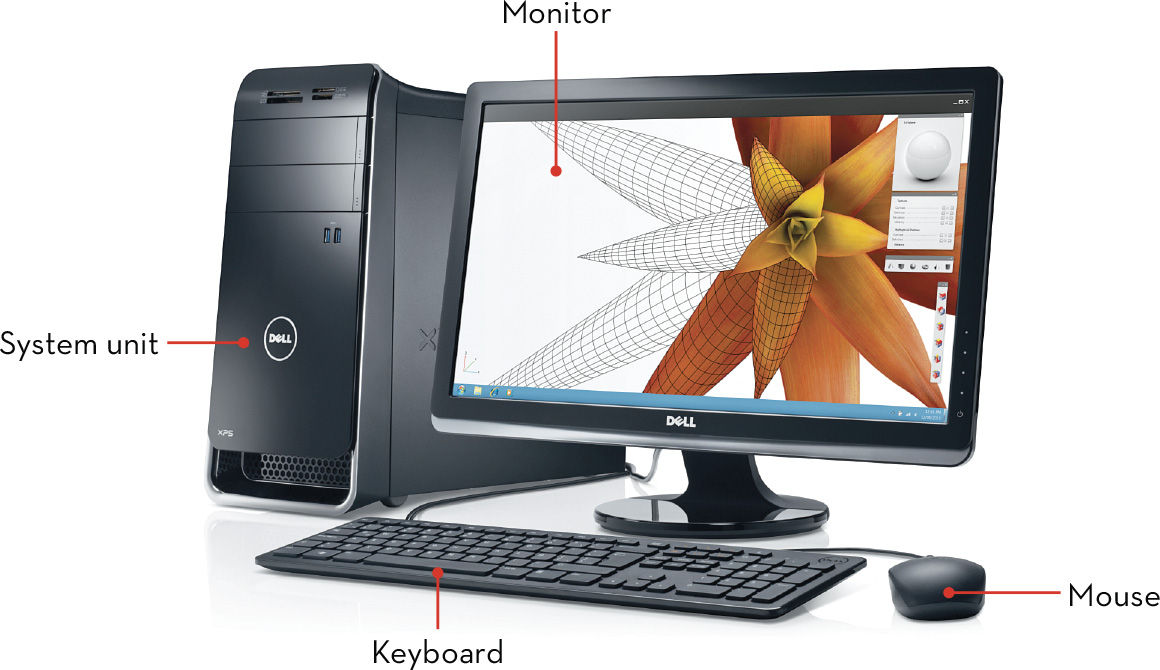
When you first get a new PC, you have to get everything set up, connected, and ready to run. If you’re using a traditional desktop PC, setup involves plugging in all the external devices—your monitor, speakers, keyboard, and such. If you’re using an all-in-one desktop, the task is a bit easier because the system unit, monitor, and speakers are all in a single unit; all you have to connect are the keyboard and mouse.
Setup is even easier if you have a notebook PC, because all the major components are built in to the computer itself. Same thing with a tablet; there’s really nothing to connect.
If you’re connecting a desktop PC, or even a notebook with external peripherals, start by positioning it so that you easily can access all the connections on the unit. You’ll need to carefully run the cables from each of the external peripherals to the main unit, without stretching the cables or pulling anything out of place. And remember, when you plug in a cable, make sure that it’s firmly connected—both to the computer and to the specific piece of hardware. Loose cables can cause all sorts of weird problems, so be sure they’re plugged in really well.
Desktop Computer System
Setting Up a Notebook PC
Setting up a notebook PC is much simpler than setting up a desktop model. That’s because almost everything is built in to the notebook—except external peripherals, such as a printer. Just connect the printer, plug your notebook into a power outlet, and you’re ready to go.

![]() If you have a printer, connect one end of your printer’s USB cable to a USB port on your notebook; connect the other end of the cable to your printer.
If you have a printer, connect one end of your printer’s USB cable to a USB port on your notebook; connect the other end of the cable to your printer.
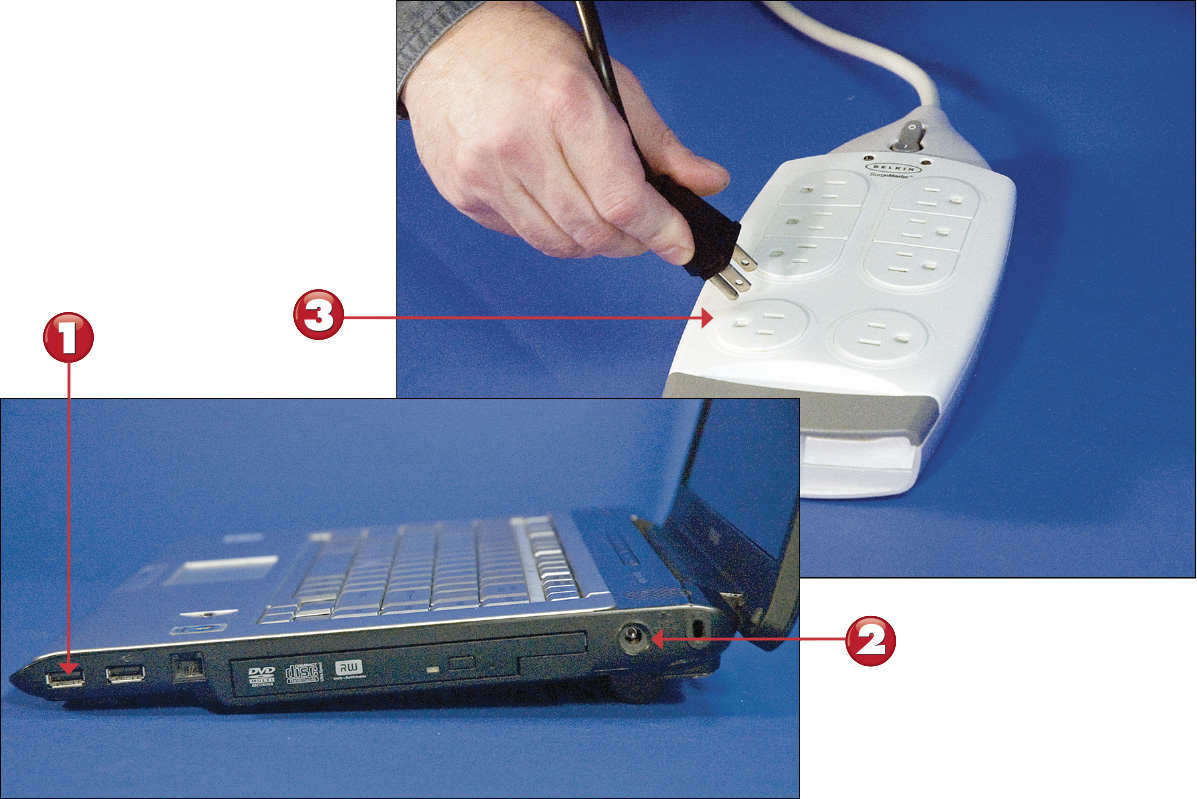
![]() Connect one end of your computer’s power cable to the power connector on the side or back of your notebook; connect the other end of the power cable to a power source.
Connect one end of your computer’s power cable to the power connector on the side or back of your notebook; connect the other end of the power cable to a power source.
![]() Connect your printer and other powered external peripherals to an appropriate power source.
Connect your printer and other powered external peripherals to an appropriate power source.

 Tip: External Peripherals
If you’re using an external mouse or keyboard, connect it to a USB port on your notebook. If you’re using an external monitor, connect it to your notebook’s external video port.
Setting Up an All-in-One Desktop PC
In an all-in-one desktop PC, the speakers and system unit are built in to the monitor, so you have fewer things to connect—just the mouse, keyboard, and any external peripherals, such as a printer. This makes for a quicker and easier setup than with a traditional desktop PC.
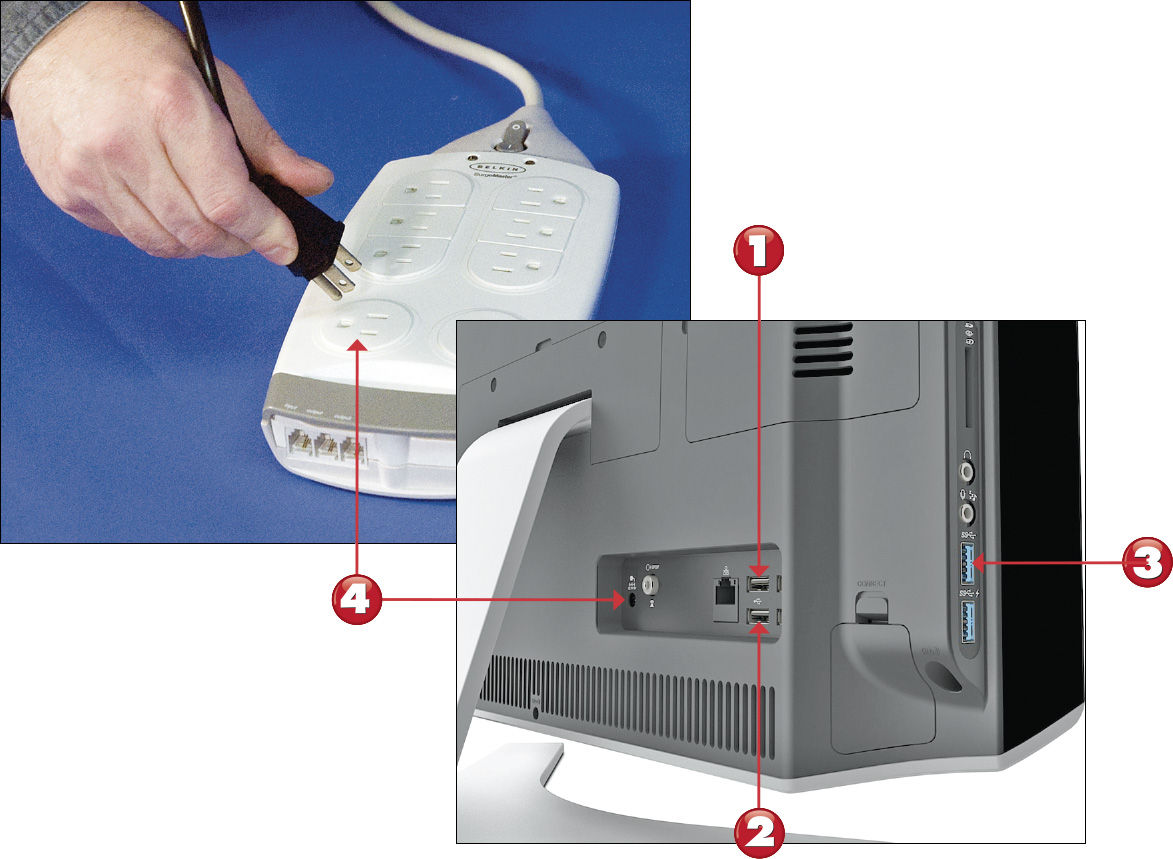
![]() Connect the mouse cable to a USB port on the back of the monitor.
Connect the mouse cable to a USB port on the back of the monitor.
![]() Connect the keyboard cable to a USB port on the back of the monitor.
Connect the keyboard cable to a USB port on the back of the monitor.
![]() Connect one end of your printer’s USB cable to a USB port on the back or side of your system unit; connect the other end of the cable to your printer.
Connect one end of your printer’s USB cable to a USB port on the back or side of your system unit; connect the other end of the cable to your printer.
![]() Connect one end of your computer’s power cable to the power connector on the back of your system unit; connect the other end of the power cable to a power source. Connect any powered peripherals to a power source.
Connect one end of your computer’s power cable to the power connector on the back of your system unit; connect the other end of the power cable to a power source. Connect any powered peripherals to a power source.
Tip: Back and Side Connections
Most all-in-one PCs have USB ports on both the back and the side of the unit. It doesn’t matter which of these ports you use, although connecting to the back ports is usually a little cleaner looking—it does a better job of hiding the cables from view.
 Note: External Speakers
Some all-in-one PCs feature a speaker output you can use to add additional external speakers or perhaps a subwoofer (for better-sounding bass). On other all-in-ones, you can connect external USB speakers to an open USB port, if you like.
Setting Up a Traditional Desktop PC
If you have a traditional desktop computer, you need to connect all the pieces and parts to your computer’s system unit before powering it on. After connecting all your peripherals, you can then connect your system unit to a power source. Just make sure the power source is turned off before you connect!
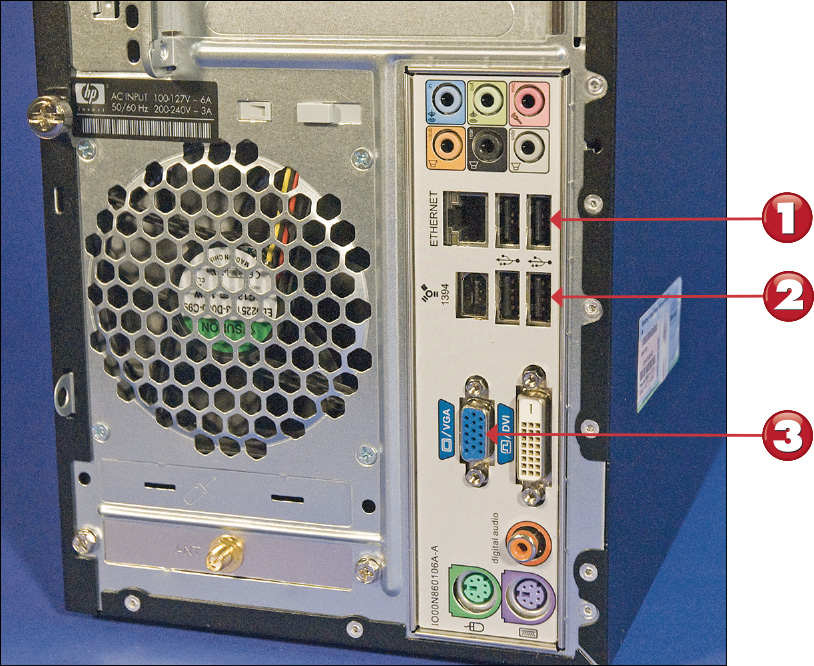
![]() Connect the mouse cable to a USB port on your system unit.
Connect the mouse cable to a USB port on your system unit.
![]() Connect the keyboard cable to a USB port on your system unit.
Connect the keyboard cable to a USB port on your system unit.
![]() Connect the blue monitor cable to the blue monitor port on your system unit; make sure the other end is connected to your video monitor. (If your monitor has a DVI or HDMI connection, use that instead.)
Connect the blue monitor cable to the blue monitor port on your system unit; make sure the other end is connected to your video monitor. (If your monitor has a DVI or HDMI connection, use that instead.)
Note: Mice and Keyboards
Most newer mice and keyboards connect via USB. Some older models, however, connect to dedicated mouse and keyboard ports on your system unit. You should use whatever connection is appropriate.
Tip: Digital Connections
Some newer computer monitors use a Digital Video Interface (DVI) or HDMI (High-Definition Multimedia Interface) connection instead of the older Video Graphics Array (VGA) type of connection. If you have a choice, a DVI or HDMI connection delivers a crisper picture than the older analog connection. HDMI is preferred if you’re connecting to a flat-screen TV or home theater system because it transmits both video and audio.
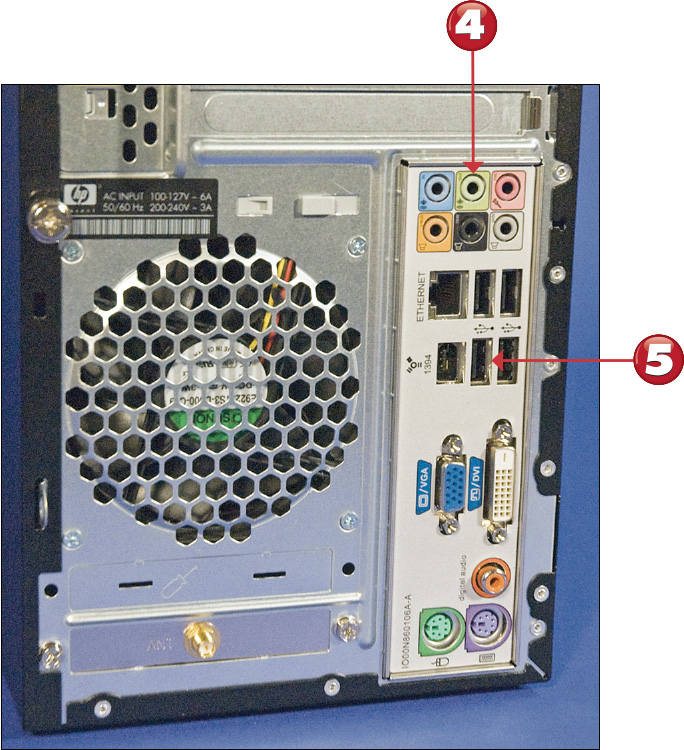
![]() Connect the green phono cable from your main external speaker to the audio-out or sound-out connector on your system unit; connect the other end of the cable to the speaker.
Connect the green phono cable from your main external speaker to the audio-out or sound-out connector on your system unit; connect the other end of the cable to the speaker.
![]() Connect one end of your printer’s USB cable to a USB port on the back of your system unit; connect the other end of the cable to your printer.
Connect one end of your printer’s USB cable to a USB port on the back of your system unit; connect the other end of the cable to your printer.
Tip: Your Connection May Vary
Not all speaker systems connect the same way. For example, some systems run the main cable to one speaker (such as the subwoofer) and then connect that speaker to the other speakers in the systems. Other systems connect via USB. Make sure to read the manufacturer’s instructions before you connect your speaker system.
Note: Connect by Color
Most PC manufacturers color-code the cables and connectors to make connecting things even easier. Just plug the blue cable into the blue connector and so on.
![]() Connect one end of your computer’s power cable to the power connector on the back of your system unit; connect the other end of the power cable to a power source.
Connect one end of your computer’s power cable to the power connector on the back of your system unit; connect the other end of the power cable to a power source.
![]() Connect your printer, speakers, and other powered external peripherals to an appropriate power source.
Connect your printer, speakers, and other powered external peripherals to an appropriate power source.
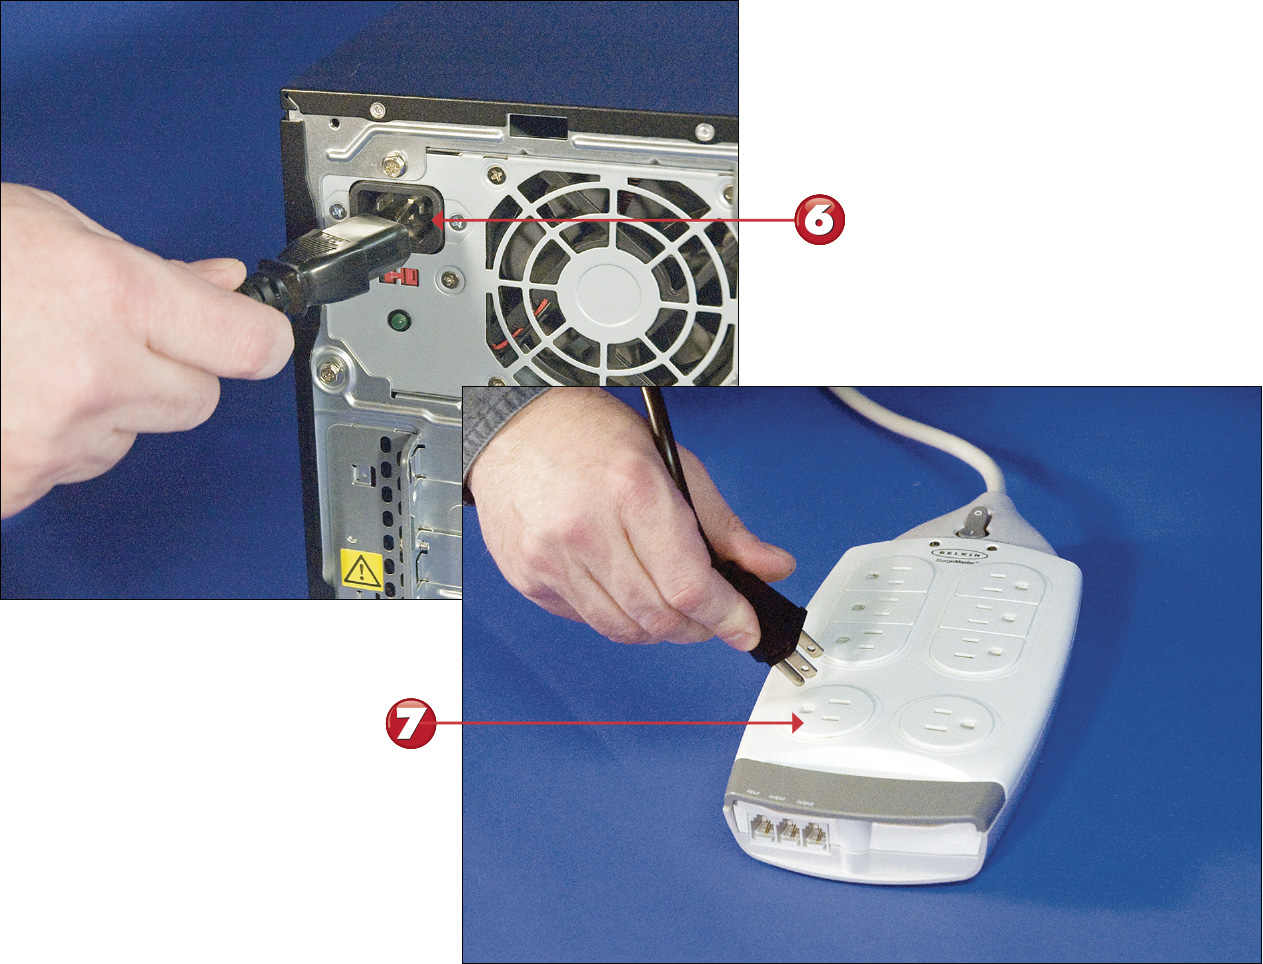
Tip: Use a Surge Suppressor
For extra protection, connect the power cable on your system unit to a surge suppressor rather than directly into an electrical outlet. This protects your PC from power-line surges that can damage its delicate internal parts.
 Caution: Power Surges
A power surge, whether from a lightning strike or due to an issue with your electric company, can do significant damage to a computer system. Too much power, even for just a second, can destroy your computer’s microprocessor, memory chips, and other delicate components. In many instances, recovery from a power surge is either costly or impossible.
Powering On
Now that you have everything connected, sit back and rest for a minute. Next up is the big step: turning it all on!
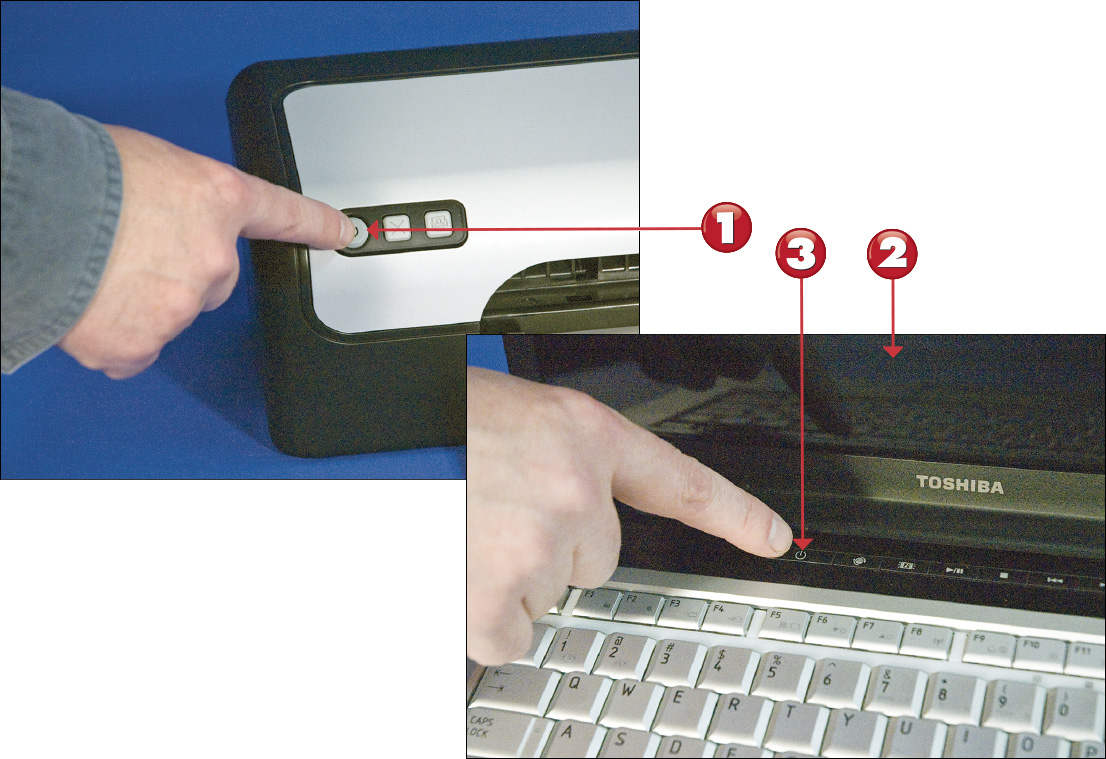
![]() Turn on your printer, monitor (for a traditional desktop PC), and other powered external peripherals.
Turn on your printer, monitor (for a traditional desktop PC), and other powered external peripherals.
![]() If you’re using a notebook PC, open the notebook’s case so that you can see the screen and access the keyboard.
If you’re using a notebook PC, open the notebook’s case so that you can see the screen and access the keyboard.
![]() Press the power or “on” button on your computer.
Press the power or “on” button on your computer.
Note: Booting Up
Technical types call the procedure of starting a computer booting or booting up the system. Restarting a system (turning it off and then back on) is called rebooting.
Caution: Go in Order
Your computer is the last thing you turn on in your system. That’s because when it powers on it has to sense all the other components—which it can do only if the other components are plugged in and turned on.
Logging On to Windows
Windows launches automatically as your computer starts. After you get past the Windows lock screen, you’re taken directly to the Windows Start screen, and your system is ready to run.
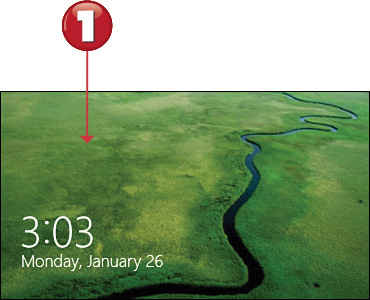
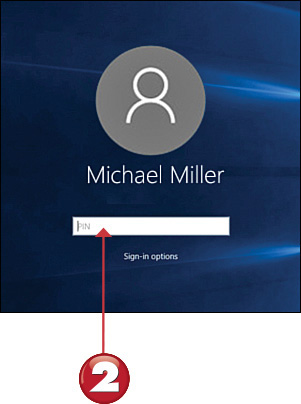
![]() When you start your PC, you see the Windows lock screen; press any key to display your logon information.
When you start your PC, you see the Windows lock screen; press any key to display your logon information.
![]() Enter your password (if necessary) and press Enter on your keyboard.
Enter your password (if necessary) and press Enter on your keyboard.
Tip: Starting for the First Time
The first time you start your new PC, you’re asked to perform some basic setup operations, including activating and registering Windows and configuring your system for your personal use.
Note: Lock Screen Information
The Windows lock screen displays a photographic background with some useful information on top—including the date and time, power status, and Wi-Fi (connectivity) status.
Shutting Down
When you want to turn off your computer, you do it through Windows. In fact, you don’t want to turn off your computer any other way. You always want to turn things off through the official Windows procedure.
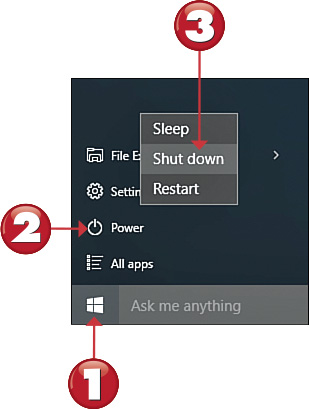
![]() Click the Start button at the far left side of the taskbar to display the Start menu.
Click the Start button at the far left side of the taskbar to display the Start menu.
![]() Click Power to display the submenu of options.
Click Power to display the submenu of options.
![]() Select Shut Down.
Select Shut Down.
Tip: Sleep Mode
If you’re using a notebook or tablet PC, Windows includes a special Sleep mode that keeps your computer running in a low-power state, ready to start quickly when you open the lid or turn it on again. In most instances, you enter Sleep mode by closing the tablet cover or the lid of your notebook.
All materials on the site are licensed Creative Commons Attribution-Sharealike 3.0 Unported CC BY-SA 3.0 & GNU Free Documentation License (GFDL)
If you are the copyright holder of any material contained on our site and intend to remove it, please contact our site administrator for approval.
© 2016-2026 All site design rights belong to S.Y.A.