Easy Computer Basics, Windows 10 Edition (2016)
Chapter 9. Working with Files and Folders

All the data for documents and programs on your computer is stored in electronic files. These files are then arranged into a series of folders and subfolders—just as you’d arrange paper files in a series of file folders in a filing cabinet.
In Windows 10, you use File Explorer to view and manage your folders and files. You can navigate to folders and files on your computer and connected devices, or to those on other computers on your network.
File Explorer
Launching File Explorer
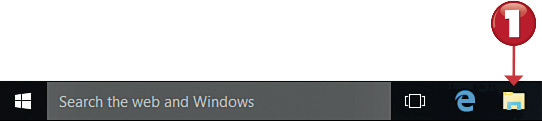
There are three ways to open File Explorer in Windows 10.

![]() Click the File Explorer icon on the taskbar.
Click the File Explorer icon on the taskbar.
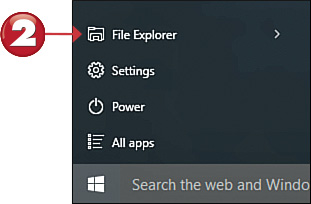
![]() Click the Start button to open the Start menu, then click File Explorer.
Click the Start button to open the Start menu, then click File Explorer.
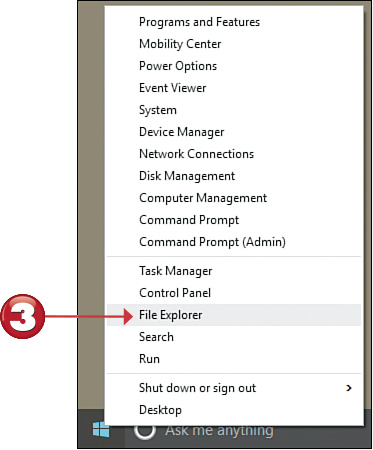
![]() Right-click the Start menu to display the Quick Access menu, and then click File Explorer.
Right-click the Start menu to display the Quick Access menu, and then click File Explorer.

 Note: Windows Explorer
In some previous versions of Windows, File Explorer was known as Windows Explorer—or, more colloquially, as either the My Computer or My Documents folder.

Exploring the Ribbon
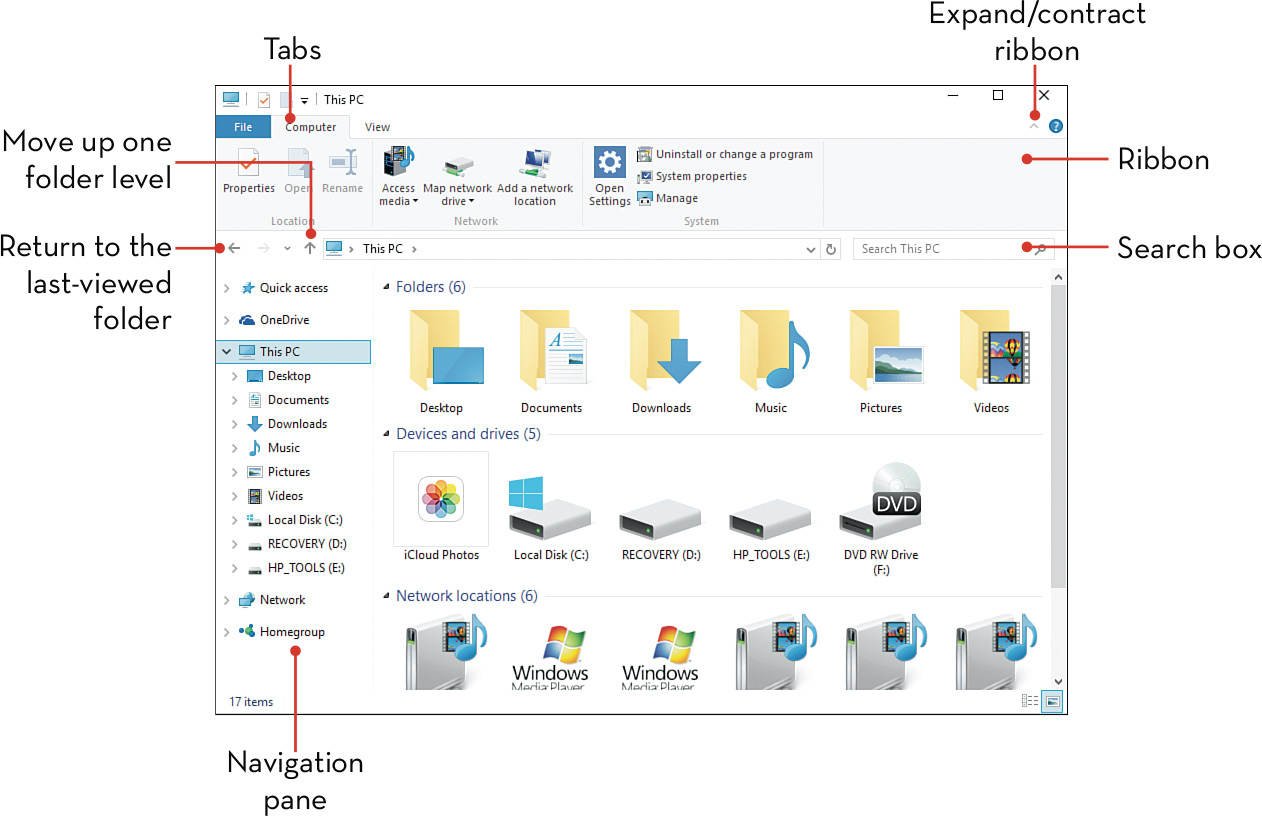
Most file-related operations are located on the ribbon at the top of the File Explorer window. The File Explorer ribbon consists of three tabs and the File drop-down menu.
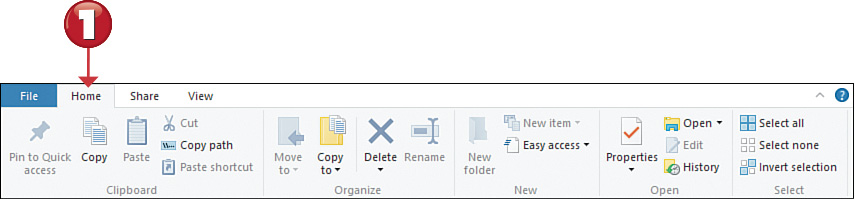
![]() Select the Home tab to access the most common file-related commands—Cut, Copy, Paste, Move, New Folder, and so forth.
Select the Home tab to access the most common file-related commands—Cut, Copy, Paste, Move, New Folder, and so forth.
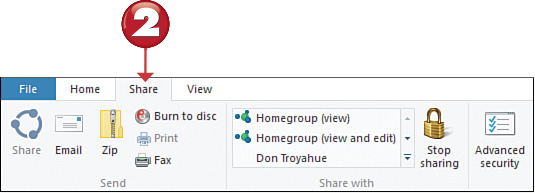
![]() Select the Share tab to share or email a folder or file, burn files to a removable disc, print a file, or “zip” files into a compressed folder.
Select the Share tab to share or email a folder or file, burn files to a removable disc, print a file, or “zip” files into a compressed folder.
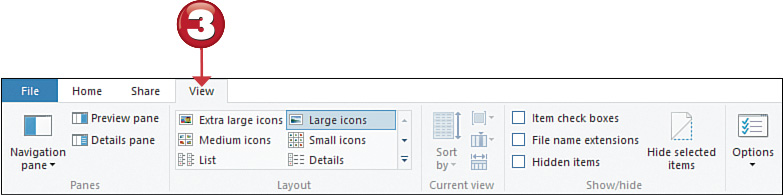
![]() Select the View tab to change the way files and folders appear in File Explorer, as well as sort and group items.
Select the View tab to change the way files and folders appear in File Explorer, as well as sort and group items.
Note: File Menu
Click the File menu to open a new window, the DOS command prompt (used on older operating systems), or the Windows PowerShell (a more advanced version of the command prompt). You can also use the File menu to delete recent history, open the Help system, or close the File Explorer window.

Navigating with the Navigation Pane
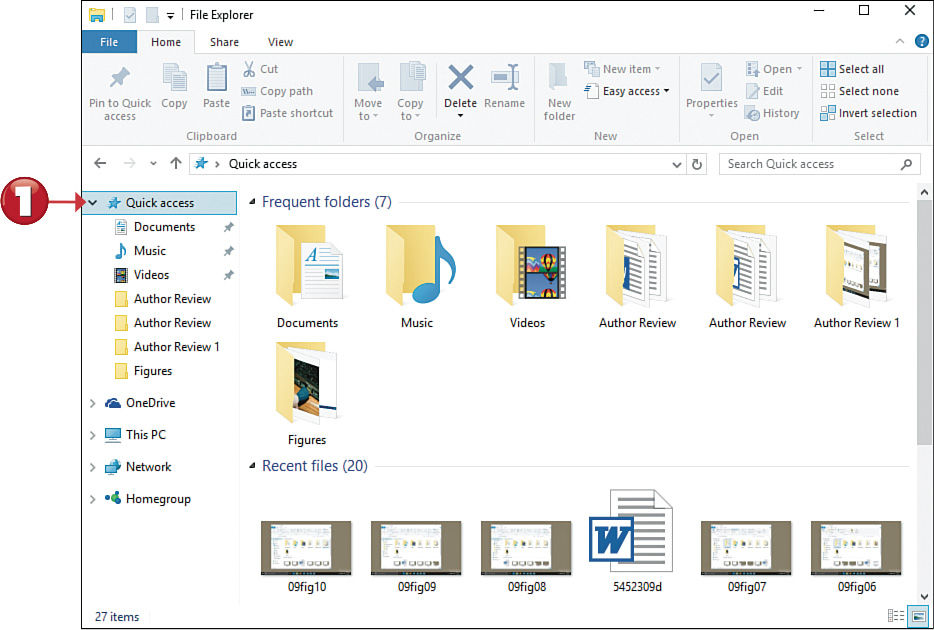
The Navigation pane on the left side of the File Explorer window displays both favorite links and hierarchical folder trees for your computer, network, and OneDrive online storage. Click the arrow icon next to any folder to display all the subfolders it contains. Click a folder to display its contents in the main File Explorer window.
![]() Select Quick Access to view frequently accessed folders and recent files.
Select Quick Access to view frequently accessed folders and recent files.
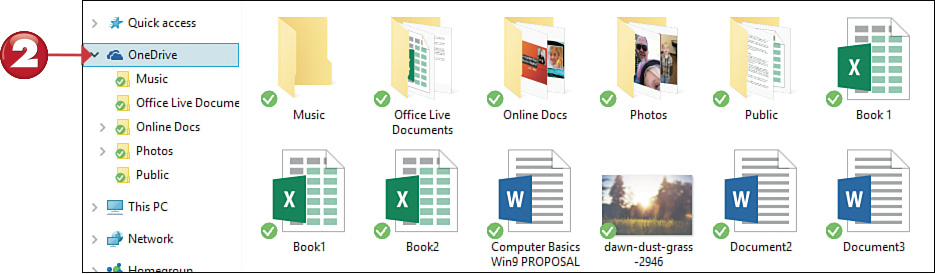
![]() Select OneDrive to view files and folders stored online on Microsoft’s OneDrive cloud storage service.
Select OneDrive to view files and folders stored online on Microsoft’s OneDrive cloud storage service.
![]() Select This PC to view your default folders (Desktop, Documents, Downloads, Music, Pictures, and Videos), as well as all drives and devices connected to your PC.
Select This PC to view your default folders (Desktop, Documents, Downloads, Music, Pictures, and Videos), as well as all drives and devices connected to your PC.

Note: Major Folders
The Documents, Music, Pictures, and other folders displayed when you click This PC are not the only folders on your PC, but they are the ones most likely to contain data files. Other folders, which can be displayed if you click the Local Disk icon, are more likely to contain programs and apps rather than documents and data.
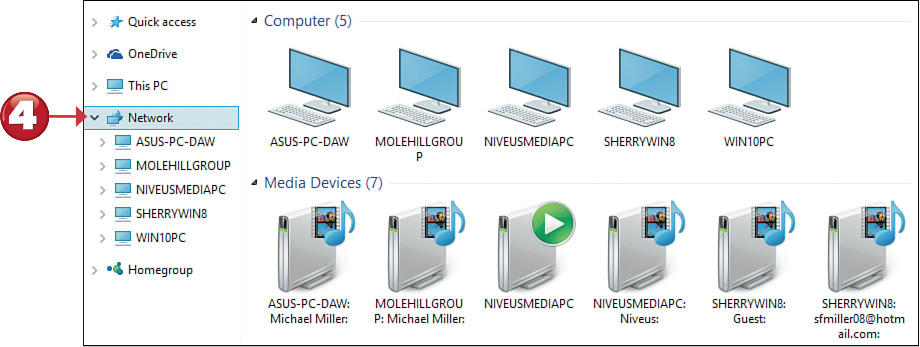
![]() Select Network to view all computers connected to your network.
Select Network to view all computers connected to your network.
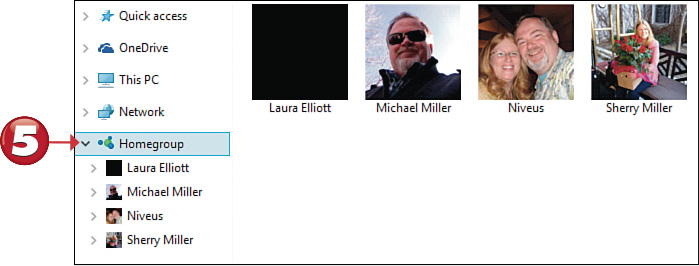
![]() Select Homegroup to view all users and computers connected to your network homegroup.
Select Homegroup to view all users and computers connected to your network homegroup.
Working with Folders
You can navigate through the folders and subfolders in File Explorer in several ways.
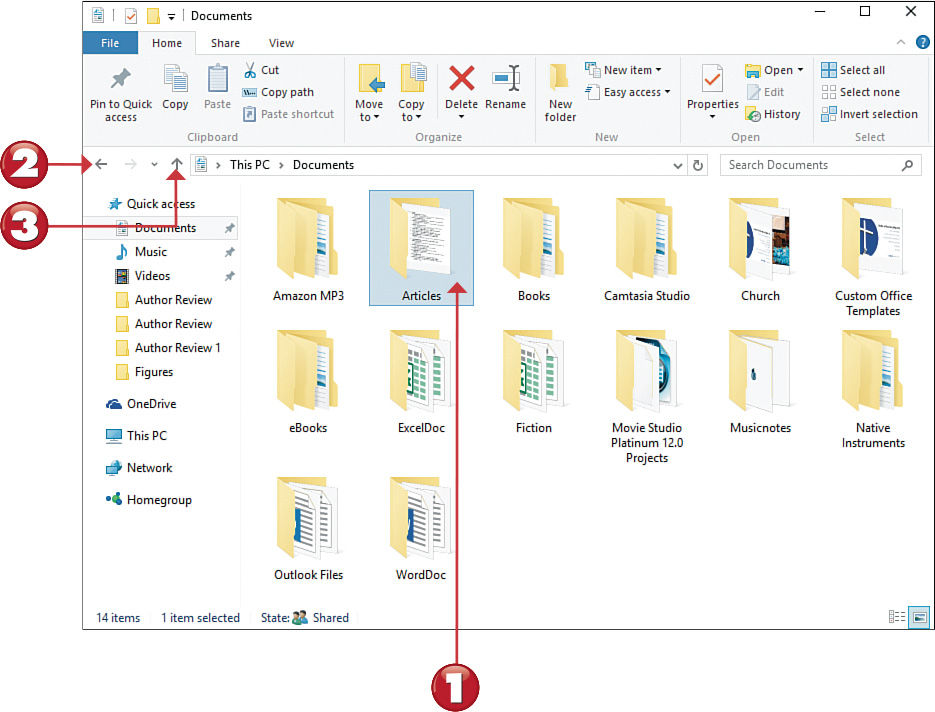
![]() A given folder might contain multiple subfolders. Double-click any item to view its contents.
A given folder might contain multiple subfolders. Double-click any item to view its contents.
![]() To move back to the disk or folder previously selected, click the Back button on the toolbar.
To move back to the disk or folder previously selected, click the Back button on the toolbar.
![]() To move up the hierarchy of folders and subfolders to the next highest item, click the up arrow button on the toolbar.
To move up the hierarchy of folders and subfolders to the next highest item, click the up arrow button on the toolbar.
 Tip: Breadcrumbs
The list of folders and subfolders in File Explorer’s Address box presents a “breadcrumb” approach to navigation. You can view additional items by clicking the separator arrow next to the folder icon in the Address box; this displays a pull-down menu of the contents of the item to the left of the arrow.
Changing the Way Files Are Displayed
You can choose to view the contents of a folder in various ways. The icon views are nice in that they show a small thumbnail preview of any selected file.
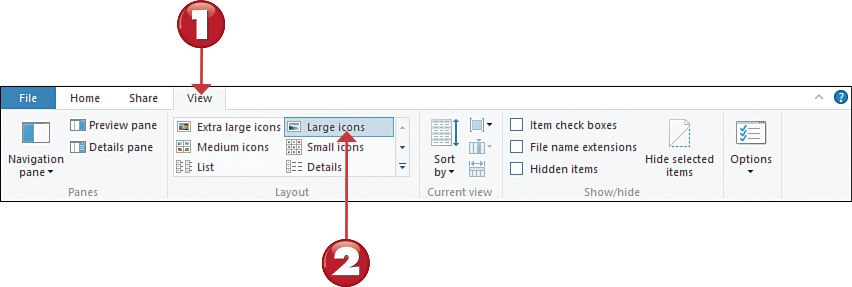
![]() Click the View tab on the ribbon.
Click the View tab on the ribbon.
![]() Go to the Layout section and click one of the following view options: Content, Tiles, Details, List, Small Icons, Medium Icons, Large Icons, or Extra Large Icons.
Go to the Layout section and click one of the following view options: Content, Tiles, Details, List, Small Icons, Medium Icons, Large Icons, or Extra Large Icons.
Tip: Which View Is Best?
Any of the larger icon views is best for working with graphics files. Details view is best if you’re looking for files by date or size.
Sorting Files and Folders
When viewing files in File Explorer, you can sort your files and folders in a number of ways. To view your files in alphabetic order, choose to sort by Name. To see all similar files grouped together, choose to sort by Type. To sort your files by the date and time they were last edited, select Date Modified.
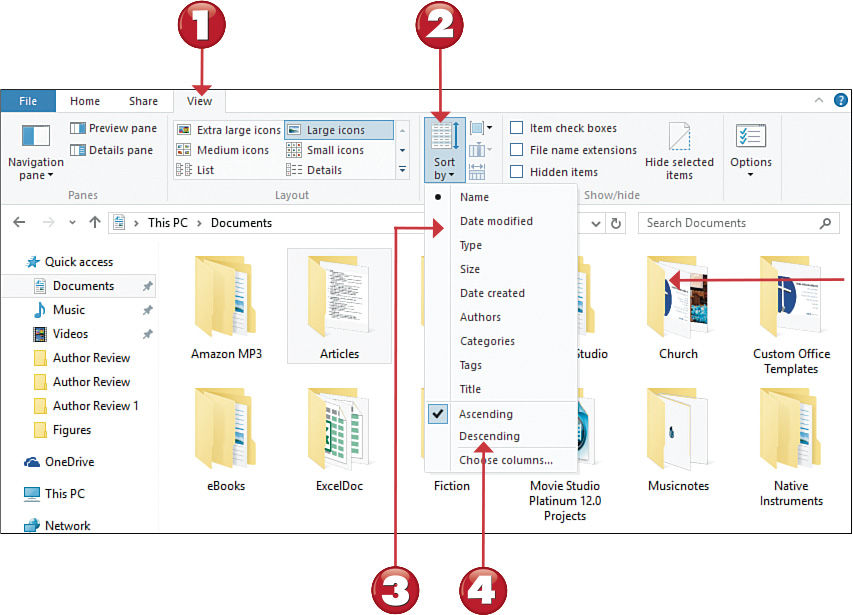
![]() Click the View tab on the ribbon.
Click the View tab on the ribbon.
![]() Click the Sort By button.
Click the Sort By button.
![]() Choose to sort by Name, Date Modified, Type, Size, Date Created, Authors, Categories, Tags, or Title.
Choose to sort by Name, Date Modified, Type, Size, Date Created, Authors, Categories, Tags, or Title.
![]() By default, Windows sorts items in ascending order. To change the sort order, click Descending.
By default, Windows sorts items in ascending order. To change the sort order, click Descending.
Tip: Different Sorting Options
Different types of files have different sorting options. For example, if you’re viewing music files, you can sort by Album, Artists, Bit Rate, Composers, Genre, and the like.
Creating a New Folder
The more files you create, the harder it is to organize and find things on your hard disk. When the number of files you have becomes unmanageable, you need to create more folders—and subfolders—to better categorize your files.
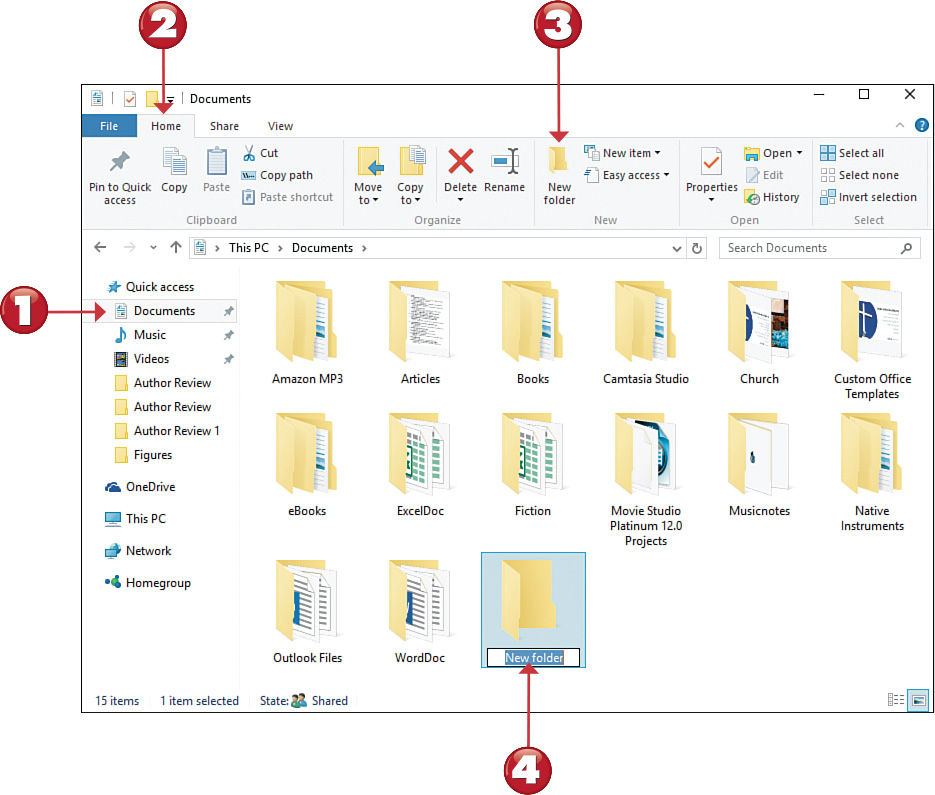
![]() Navigate to the drive or folder where you want to place the new folder.
Navigate to the drive or folder where you want to place the new folder.
![]() Click the Home tab on the ribbon.
Click the Home tab on the ribbon.
![]() Click the New Folder button.
Click the New Folder button.
![]() A new, empty folder now appears with the filename New Folder highlighted. Type a name for your folder and press Enter.
A new, empty folder now appears with the filename New Folder highlighted. Type a name for your folder and press Enter.
 Caution: Illegal Characters
Folder names and filenames can include up to 255 characters—including many special characters. You can’t, however, use the following “illegal” characters: \ / : * ? “ < > |.

Renaming a File or Folder
When you create a new file or folder, it helps to give it a name that describes its contents. Sometimes, however, you might need to change a file’s name. Fortunately, Windows makes renaming an item relatively easy.
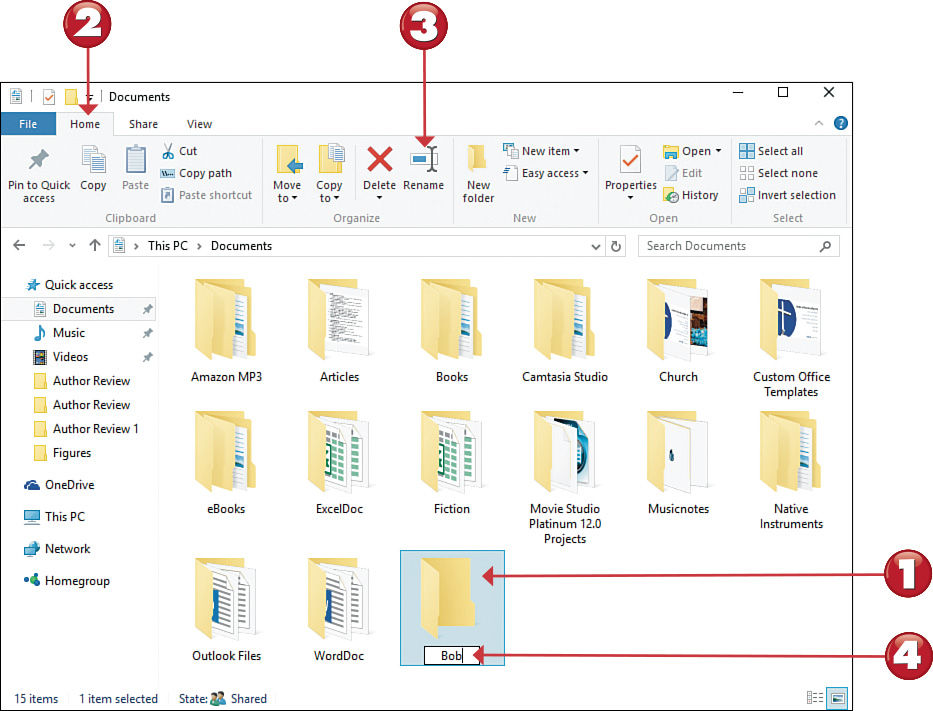
![]() Click the file or folder you want to rename.
Click the file or folder you want to rename.
![]() Click the Home tab on the ribbon.
Click the Home tab on the ribbon.
![]() Click the Rename button; this highlights the filename.
Click the Rename button; this highlights the filename.
![]() Type a new name for your folder (which overwrites the current name), and press Enter.
Type a new name for your folder (which overwrites the current name), and press Enter.
Caution: Don’t Change the Extension
The one part of the filename you should never change is the extension—the part that comes after the final “dot” if you choose to show file extensions. Try to change the extension, and Windows will warn you that you’re doing something wrong.
Tip: Keyboard Shortcut
You can also rename a file by selecting the file and pressing F2 on your computer keyboard. This highlights the filename and readies it for editing.
Copying a File or Folder
There are many ways to copy a file in Windows. The easiest method is to use the Copy To button on the Home ribbon.
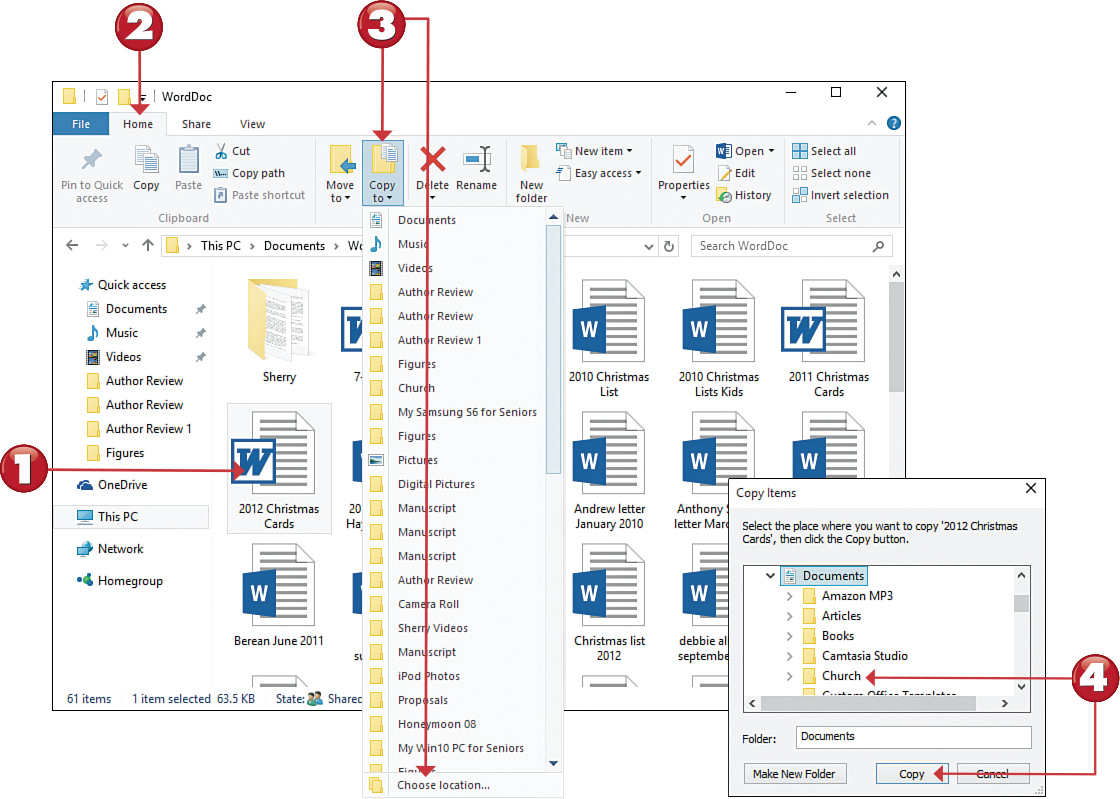
![]() Click the item you want to copy.
Click the item you want to copy.
![]() Click the Home tab on the ribbon.
Click the Home tab on the ribbon.
![]() Click the Copy To button and select one of the suggested locations or select Choose Location to copy the file elsewhere.
Click the Copy To button and select one of the suggested locations or select Choose Location to copy the file elsewhere.
![]() When the Copy Items dialog box appears, navigate to the new location for the item and then click the Copy button.
When the Copy Items dialog box appears, navigate to the new location for the item and then click the Copy button.

Moving a File or Folder
Moving a file or folder is different from copying it. Moving cuts the item from its previous location and pastes it into a new location. Copying leaves the original item where it was and creates a copy of the item elsewhere.
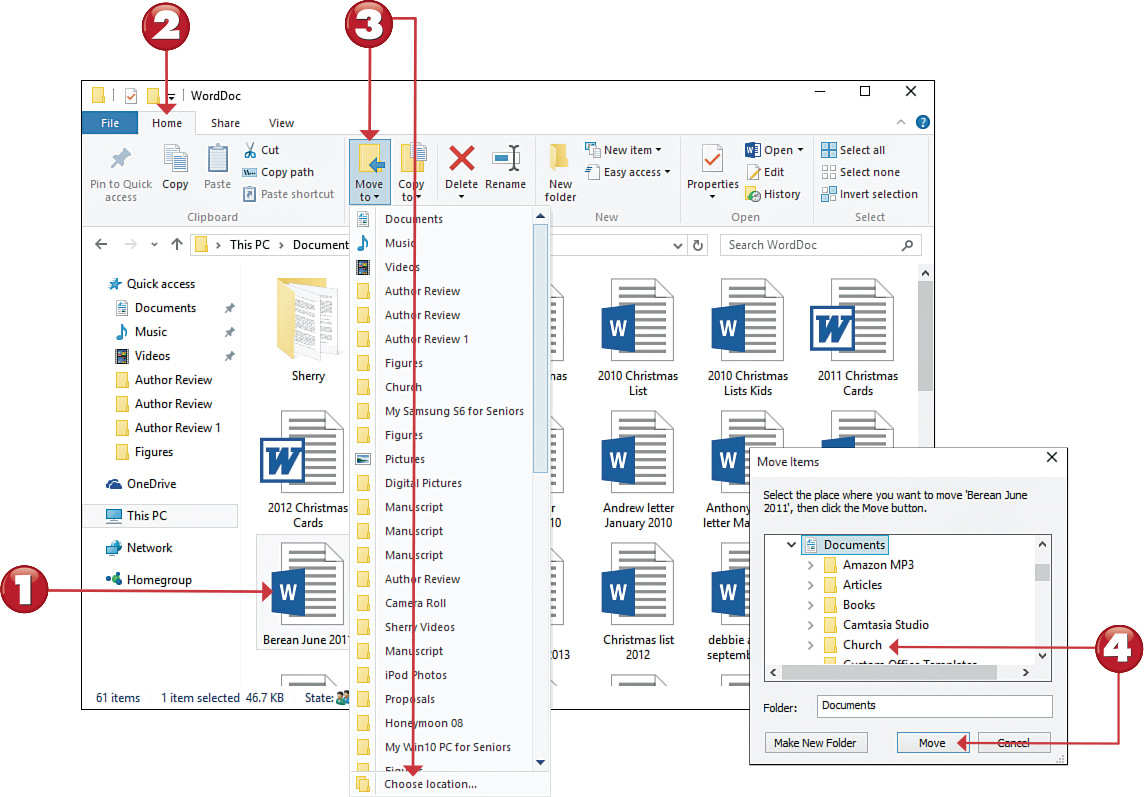
![]() Click the item you want to move.
Click the item you want to move.
![]() Click the Home tab on the ribbon.
Click the Home tab on the ribbon.
![]() Click the Move To button and select one of the suggested locations or click Choose Location to move the file to another location.
Click the Move To button and select one of the suggested locations or click Choose Location to move the file to another location.
![]() When the Move Items dialog box appears, navigate to the new location for the item, and then click the Move button.
When the Move Items dialog box appears, navigate to the new location for the item, and then click the Move button.
Searching for a File
As organized as you might be, you might not always be able to find the specific files you want. Fortunately, Windows offers an easy way to locate difficult-to-find files, via the Instant Search function. Instant Search lets you find files by extension, filename, or keywords within the file.
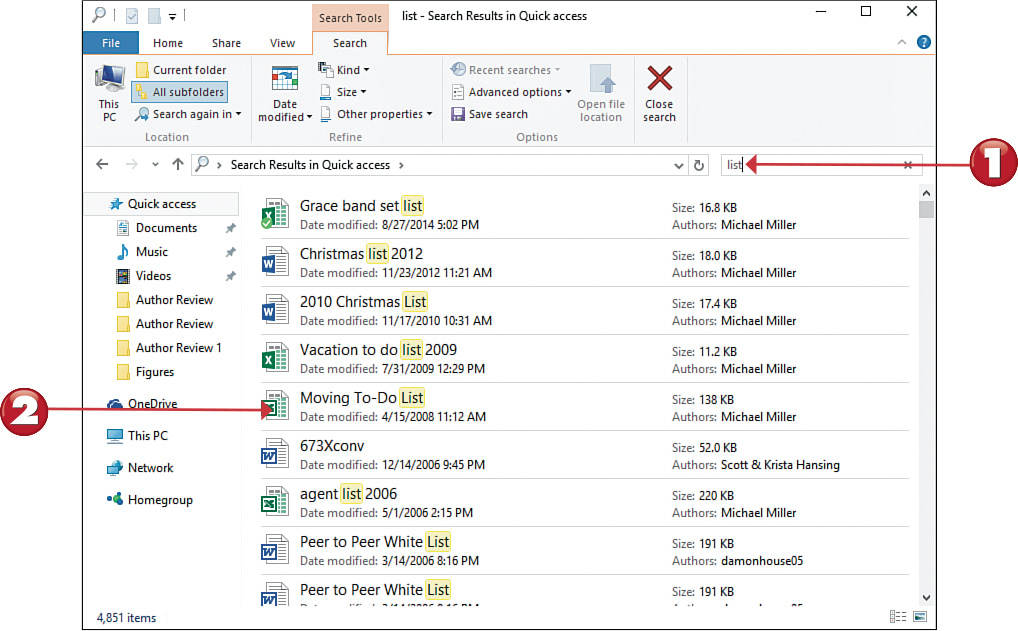
![]() From within File Explorer, enter one or more keywords into the Search box and press Enter.
From within File Explorer, enter one or more keywords into the Search box and press Enter.
![]() Windows now displays a list of files that match your search criteria. Double-click any item to open that file.
Windows now displays a list of files that match your search criteria. Double-click any item to open that file.
Tip: Search Index
Instant Search indexes all the files stored on your hard disk (including email messages) by type, title, and contents.

Deleting a File or Folder
Keeping too many files eats up too much hard disk space—which is a bad thing. Because you don’t want to waste disk space, you should periodically delete those files (and folders) you no longer need. When you delete a file, you send it to the Windows Recycle Bin, which is kind of a trash can for deleted files.
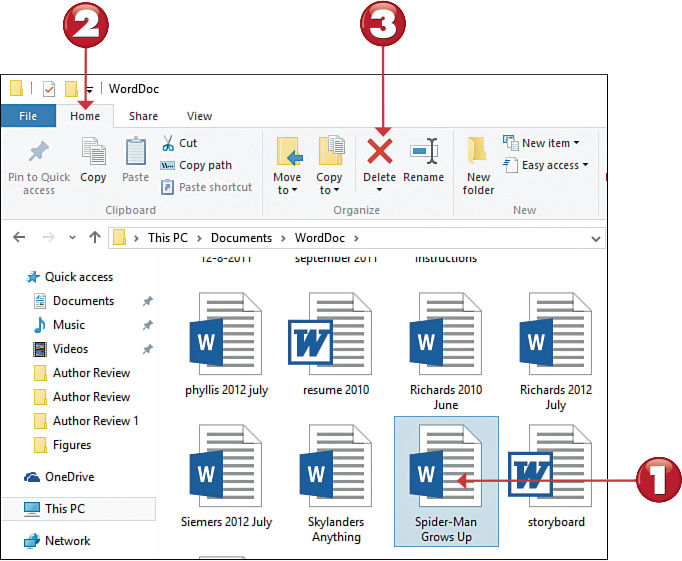
![]() Click the file you want to delete.
Click the file you want to delete.
![]() Click the Home tab on the ribbon bar.
Click the Home tab on the ribbon bar.
![]() Click the Delete button.
Click the Delete button.
Tip: Other Ways to Delete
You can also delete a file by dragging it from the folder window onto the Recycle Bin icon on the desktop or by highlighting it and pressing the Delete key on your computer keyboard.
Restoring Deleted Files
Have you ever accidentally deleted the wrong file? If so, you’re in luck. Windows stores the files you delete in the Recycle Bin, which is actually a special folder on your hard disk. For a short time (in most instances, several days), you can “undelete” files from the Recycle Bin back to their original locations.
![]() From the Windows desktop, double-click the Recycle Bin icon to open the Recycle Bin folder.
From the Windows desktop, double-click the Recycle Bin icon to open the Recycle Bin folder.
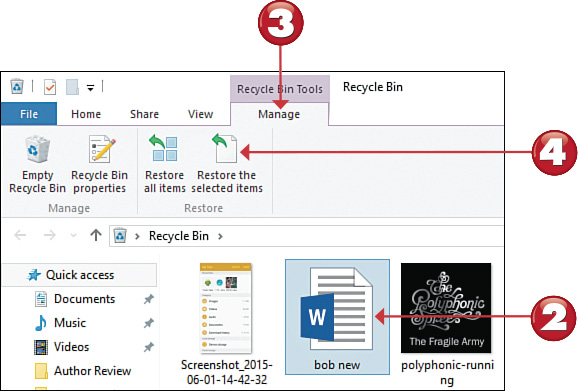
![]() Click the file you want to restore.
Click the file you want to restore.
![]() Click the Manage tab on the ribbon bar.
Click the Manage tab on the ribbon bar.
![]() Click the Restore the Selected Items button.
Click the Restore the Selected Items button.

Emptying the Recycle Bin
By default, the deleted files in the Recycle Bin can occupy 4GB plus 5% of your hard disk space. When you’ve deleted enough files to exceed this limit, the oldest files in the Recycle Bin are automatically and permanently deleted from your hard disk. You can also manually empty the Recycle Bin and thus free up some hard disk space.
![]() From the Windows desktop, double-click the Recycle Bin icon to open the Recycle Bin folder.
From the Windows desktop, double-click the Recycle Bin icon to open the Recycle Bin folder.
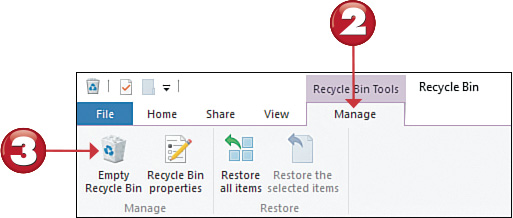
![]() Click the Manage tab on the ribbon bar.
Click the Manage tab on the ribbon bar.
![]() Click the Empty the Recycle Bin button.
Click the Empty the Recycle Bin button.
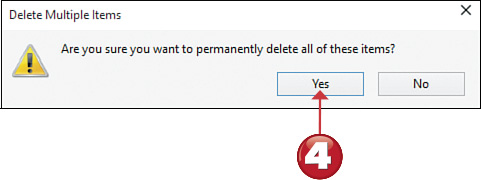
![]() When the Delete Multiple Items dialog box appears, click Yes to completely erase the files.
When the Delete Multiple Items dialog box appears, click Yes to completely erase the files.
Tip: Fast Empty
You can also empty the Recycle Bin by right-clicking its icon on the Windows desktop and selecting Empty Recycle Bin from the pop-up menu.

Compressing a File
Really big files can be difficult to copy or share. Fortunately, Windows lets you create compressed folders, which take big files and compress them in size (called a “zipped” file). After the file has been transferred, you can then uncompress the file to its original state.
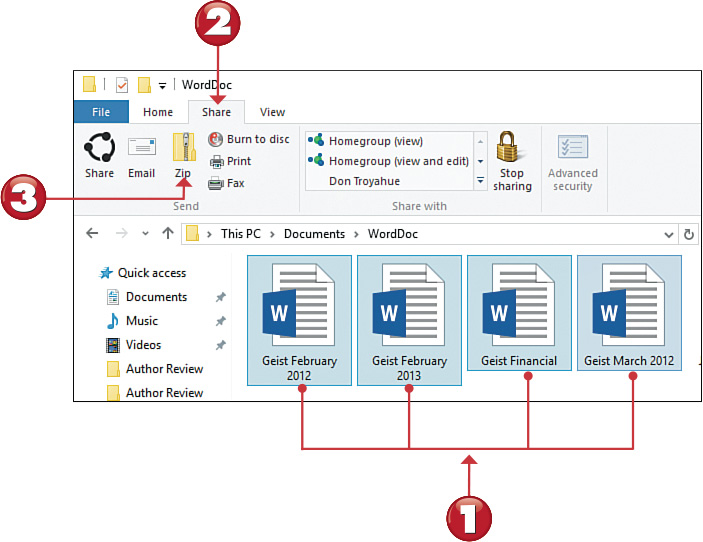
![]() Click the files you want to compress. (To select more than one file, hold down the Ctrl key while clicking.)
Click the files you want to compress. (To select more than one file, hold down the Ctrl key while clicking.)
![]() Click the Share tab on the ribbon bar.
Click the Share tab on the ribbon bar.
![]() Click the Zip button. Windows now creates a new folder that contains compressed versions of the files you selected.
Click the Zip button. Windows now creates a new folder that contains compressed versions of the files you selected.
Note: Zip Files
The compressed folder is actually a file with a .zip extension, so it can be used with other compression/decompression programs.
Extracting Files from a Compressed Folder
The process of decompressing a file is actually an extraction process. That’s because you extract the original files from the compressed folder to the desired location on your computer’s hard drive.
![]() Select the compressed folder.
Select the compressed folder.
![]() Click the Extract tab on the ribbon bar.
Click the Extract tab on the ribbon bar.
![]() Click the Extract All button.
Click the Extract All button.
![]() When the Extract Compressed (Zipped) Folders dialog box appears, click the Browse button to select a location for the extracted files, and then click the Extract button.
When the Extract Compressed (Zipped) Folders dialog box appears, click the Browse button to select a location for the extracted files, and then click the Extract button.
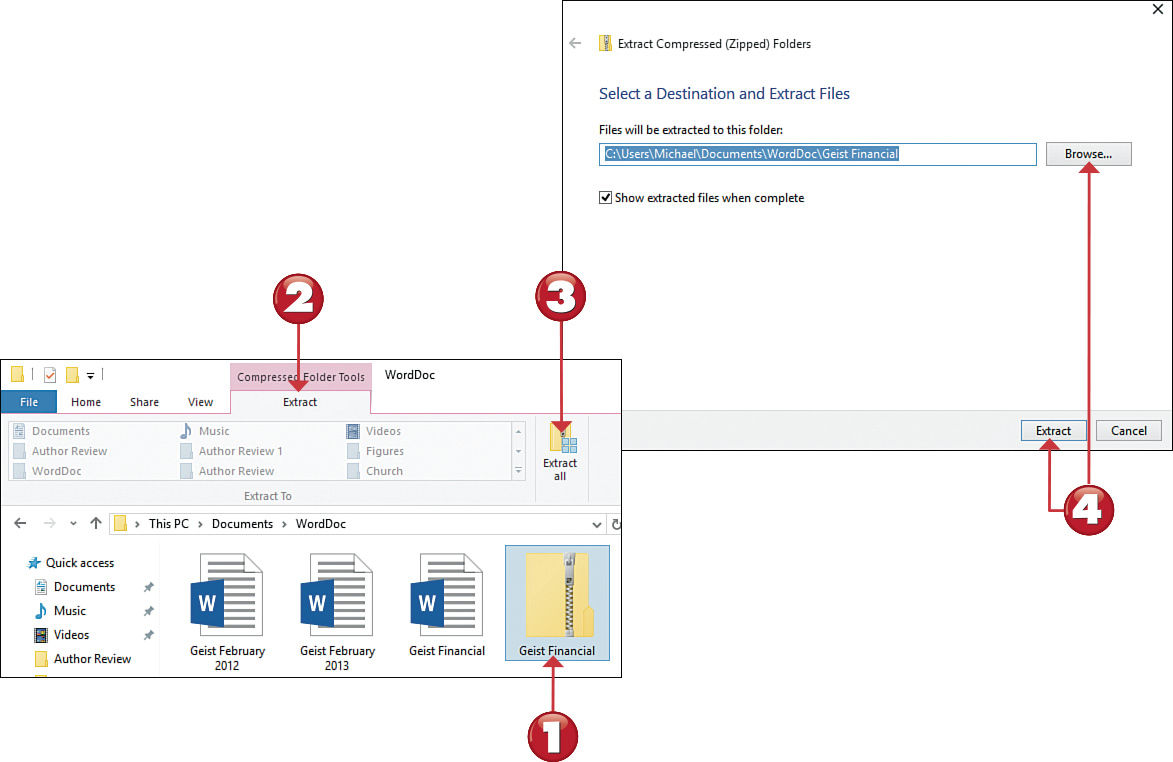
Tip: Extracted Folder
By default, compressed files are extracted to a new folder with the same name. You can change this, however, to extract to any folder you like.
Tip: Zipper Icon
Compressed folders are distinguished by the little zipper on the folder icon.
Working with Files on OneDrive
Microsoft offers online storage for all your documents and data, via its OneDrive service. When you store your files on OneDrive, you can access them via any computer or mobile device connected to the Internet. You manage all your online files from the OneDrive website, using your web browser.
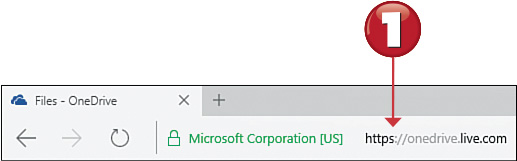
![]() From within your web browser, enter onedrive.live.com into the Address box and press Enter.
From within your web browser, enter onedrive.live.com into the Address box and press Enter.
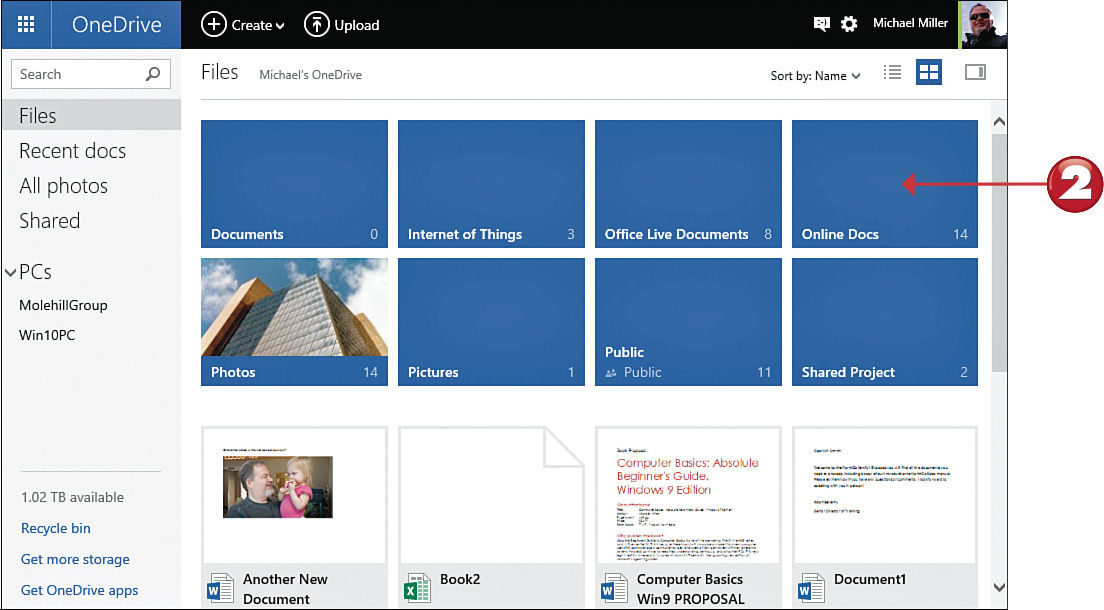
![]() Your OneDrive files are stored in folders. Click a folder to view its contents.
Your OneDrive files are stored in folders. Click a folder to view its contents.
Tip: Syncing Folders
You can synchronize folders between your computer and the OneDrive service. From within File Explorer, move a given folder into the OneDrive folder. That folder now appears on the OneDrive website and on your PC. Make changes in one location and those changes are automatically applied to the other. Click OneDrive in File Explorer’s Navigation pane to view your synced folders.
Note: Cloud Storage
Online file storage, such as that offered by OneDrive, Apple’s iCloud, and Google Drive, is called cloud storage. The main advantage of cloud storage is that files can be accessed from any computer (work, home, or other) at any location. You’re not limited to using a given file on a single computer only.
![]() Click a file to view it or, in the case of an Office document, open it in its host application.
Click a file to view it or, in the case of an Office document, open it in its host application.
![]() To copy, move, or rename a file, right-click the file to display the options menu, and then select the action you want to perform.
To copy, move, or rename a file, right-click the file to display the options menu, and then select the action you want to perform.
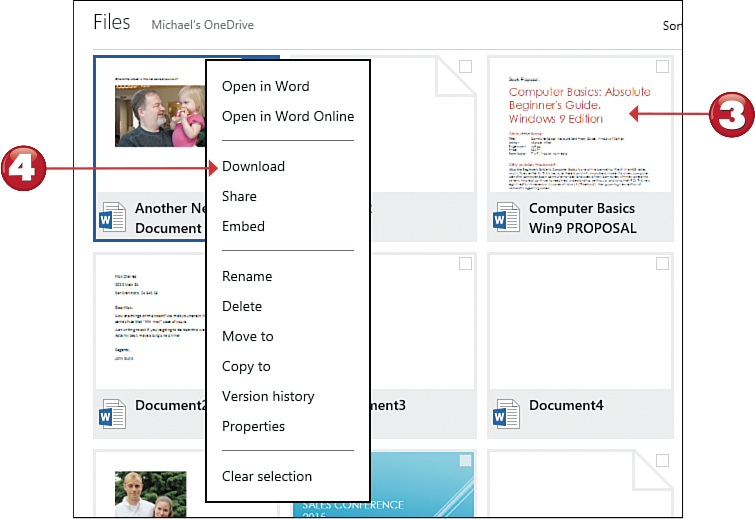
Tip: Download a File
To download a file from OneDrive to your local hard disk, right-click the file to display the options menu, and then click Download.
Note: Storage Plans
Microsoft gives you 15GB of storage in your free OneDrive account, which is more than enough to store most users’ documents, digital photos, and the like. If you need more storage, you can purchase 100GB of storage for $1.99/month, 200GB storage for $3.99/month, or 1TB storage for $6.99/month.
All materials on the site are licensed Creative Commons Attribution-Sharealike 3.0 Unported CC BY-SA 3.0 & GNU Free Documentation License (GFDL)
If you are the copyright holder of any material contained on our site and intend to remove it, please contact our site administrator for approval.
© 2016-2026 All site design rights belong to S.Y.A.