Exam Ref 70-695 Deploying Windows Devices and Enterprise Apps (2015)
Chapter 5. Prepare and deploy the VDIapplication environment
You should perform several initial steps when preparing to deploy applications in your environment. First, perform a discovery of the current environment to understand the existing application landscape. This information will play a key role in preparing for application compatibility and remediation as well as prepare you to deploy applications such as Office 2013. Second, have a firm understanding of the installation options when deploying Office 2013 by using the Windows Installer (MSI) to customize a deployment, manage activation, and provide ongoing support and maintenance effectively. Finally, know the intricacies of deploying Office 2013 by using Click-to-Run so that you can manage licensing, perform the deployment, deploy updates, and provide ongoing usage monitoring.
Objectives in this chapter:
![]() Objective 5.1: Plan for and implement application compatibility and remediation
Objective 5.1: Plan for and implement application compatibility and remediation
![]() Objective 5.2: Deploy Office 2013 by using MSI
Objective 5.2: Deploy Office 2013 by using MSI
![]() Objective 5.3: Deploy Office 2013 by using Click-to-Run
Objective 5.3: Deploy Office 2013 by using Click-to-Run
Objective 5.1: Plan for and implement application compatibility and remediation
Understanding the existing application landscape is the vital first task in an app deployment project. Know which apps are already deployed in the environment, the different versions of deployed applications, and compatibility of the deployed apps based on your existing and future operating systems. After you’ve gathered this information, you are ready to deploy tools and compatibility fixes to reach the desired state.
This objective covers how to:
![]() Plan for Remote Desktop Services (RDS)
Plan for Remote Desktop Services (RDS)
![]() Plan for a virtual desktop infrastructure (VDI)
Plan for a virtual desktop infrastructure (VDI)
![]() Plan for Client Hyper-V
Plan for Client Hyper-V
![]() Plan for 32-bit versus 64-bit
Plan for 32-bit versus 64-bit
![]() Plan for application version coexistence
Plan for application version coexistence
![]() Use the Application Compatibility Toolkit (ACT)
Use the Application Compatibility Toolkit (ACT)
![]() Deploy compatibility fixes
Deploy compatibility fixes
Planning for Remote Desktop Services (RDS)
Many organizations rely on multiple methods of delivering applications and desktops to users. RDS is one such method, used to deliver virtual applications and virtual desktops. It has other functionality that isn’t applicable to the 70-695 exam and is not covered here. For the exam, this chapter focuses specifically on planning for an RDS deployment to support application compatibility and remediation.
Licensing
Planning for RDS licensing is one of the most important steps you take when embarking on an RDS project. Licensing is so important because it factors into your project budget, the decision whether RDS is the appropriate solution, and whether your organization is licensed for your specific use case. In some cases, not having the right licensing could mean that users cannot use the RDS environment. Every user who uses RDS must be covered by a Windows Server 2012 RDS Client Access License (CAL). In addition, there are two RDS CAL types for internal users:
![]() RDS User CAL An RDS User CAL is tied to a single user and allows that user to use RDS services on any of your RDS servers from any supported device. When you have users that use your RDS infrastructure from several of their devices, a User CAL is the best license choice to minimize license costs.
RDS User CAL An RDS User CAL is tied to a single user and allows that user to use RDS services on any of your RDS servers from any supported device. When you have users that use your RDS infrastructure from several of their devices, a User CAL is the best license choice to minimize license costs.
![]() RDS Device CAL An RDS Device CAL is tied to a single device and allows any users using that device to use RDS services on any of your RDS servers.
RDS Device CAL An RDS Device CAL is tied to a single device and allows any users using that device to use RDS services on any of your RDS servers.
A single license is required for external users, such as those who access your RDS infrastructure from the Internet. The RDS External Connector allows Internet users to access a single server in your RDS environment. Each RDS server in your environment that serves Internet users must have an RDS External Connector.
A dedicated server role service, named Remote Desktop Licensing, is responsible for managing the RDS licenses needed in your RDS environment. It issues licenses to users and devices, it tracks existing license usage such as if you are running low on available licenses, and it allows you to install recently purchased licenses. Before it can perform any of those tasks, however, the licensing server must be activated with Microsoft. You can activate the licensing server online, through a web browser, or over the telephone. To activate a newly installed license server by using the automatic connection method, perform the following steps:
1. From Server Manager, click Tools and then click Terminal Services. In the context menu, click Remote Desktop Licensing Manager.
In the RD Licensing Manager window, as shown in Figure 5-1, you see your license server and an activation status of Not Activated.
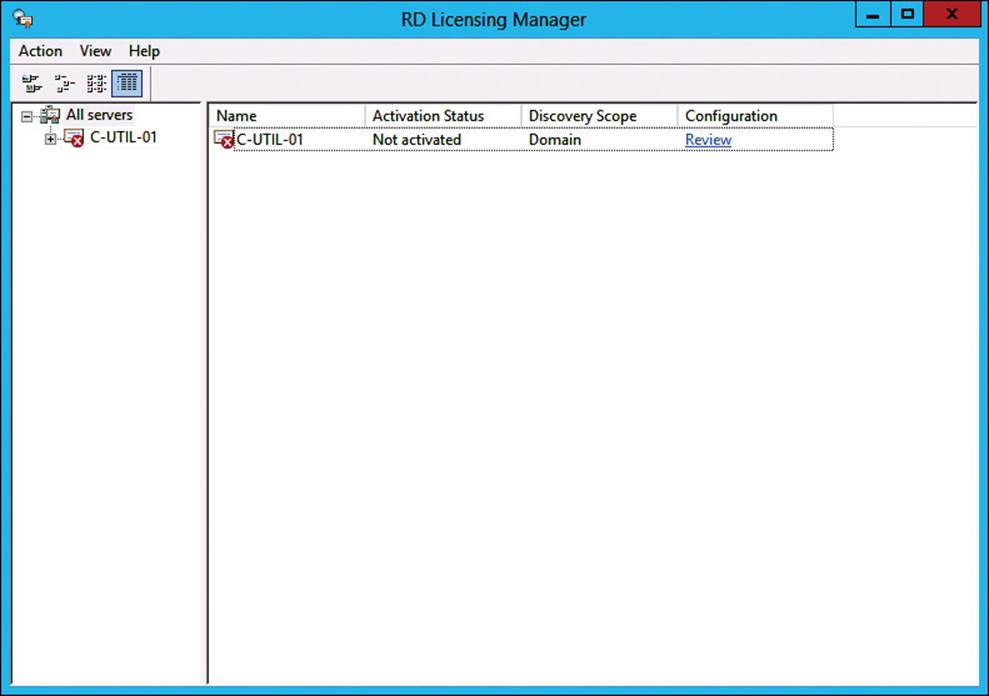
FIGURE 5-1 RD Licensing Manager console
2. Right-click your licensing server and then click Activate Server.
3. In the Activate Server Wizard window, on the Welcome To The Activate Server Wizard page, click Next.
4. On the Connection Method page, shown in Figure 5-2, ensure that the connection method is set to Automation Connection (Recommended) and then click Next.
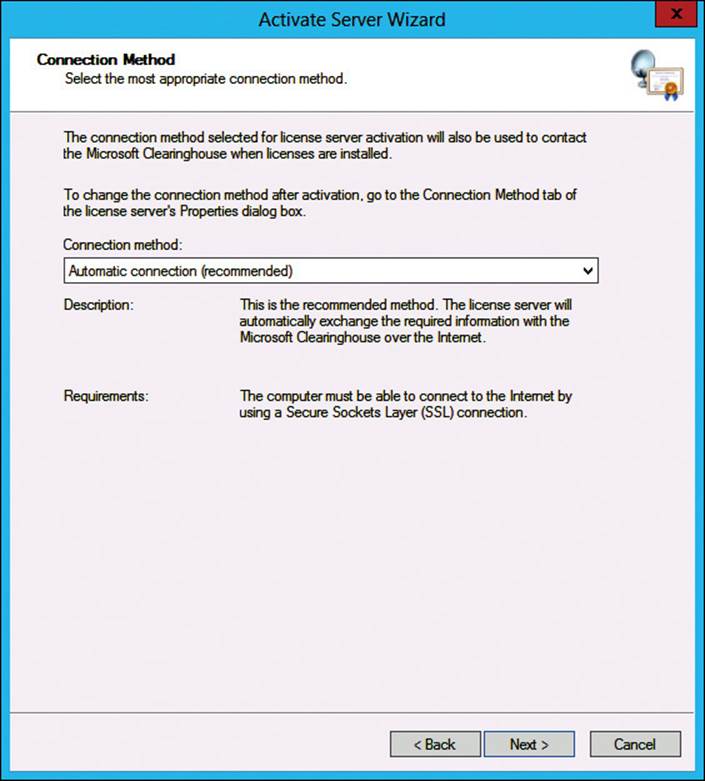
FIGURE 5-2 Activate Server Wizard, Connection Method page
5. On the Company Information page, shown in Figure 5-3, enter the information and then click Next.
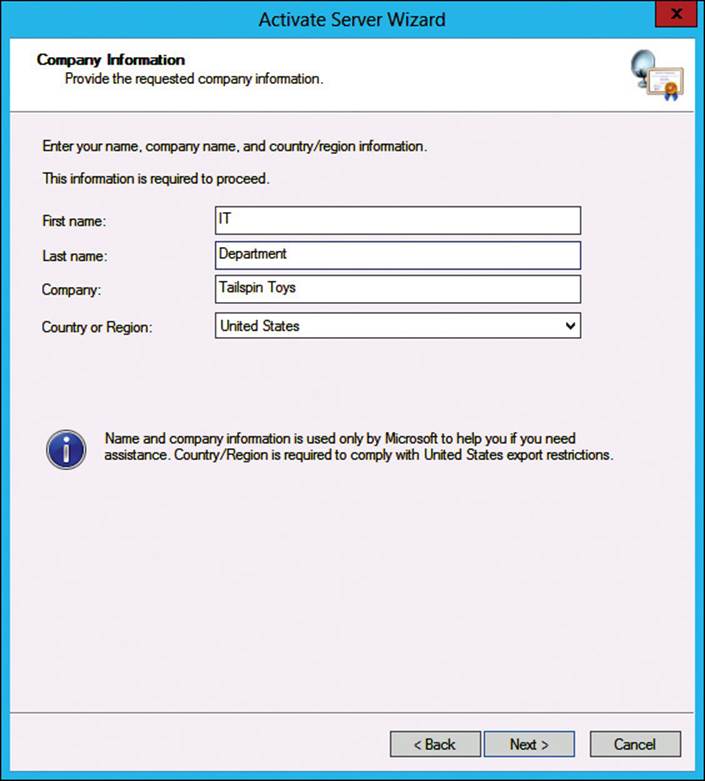
FIGURE 5-3 Activate Server Wizard, Company Information page
6. On the second Company Information page, shown in Figure 5-4, enter the optional information, or leave the fields blank, and then click Next.
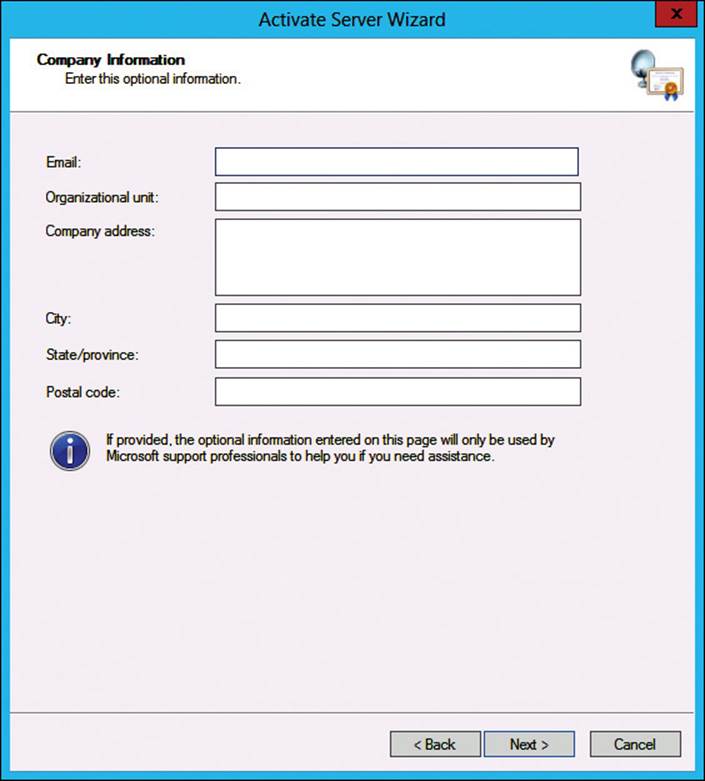
FIGURE 5-4 Activate Server Wizard, Company Information page (optional)
7. On the Completing The Activate Server Wizard page, shown in Figure 5-5, clear the Start Install Licenses Wizard Now check box and then click Finish.
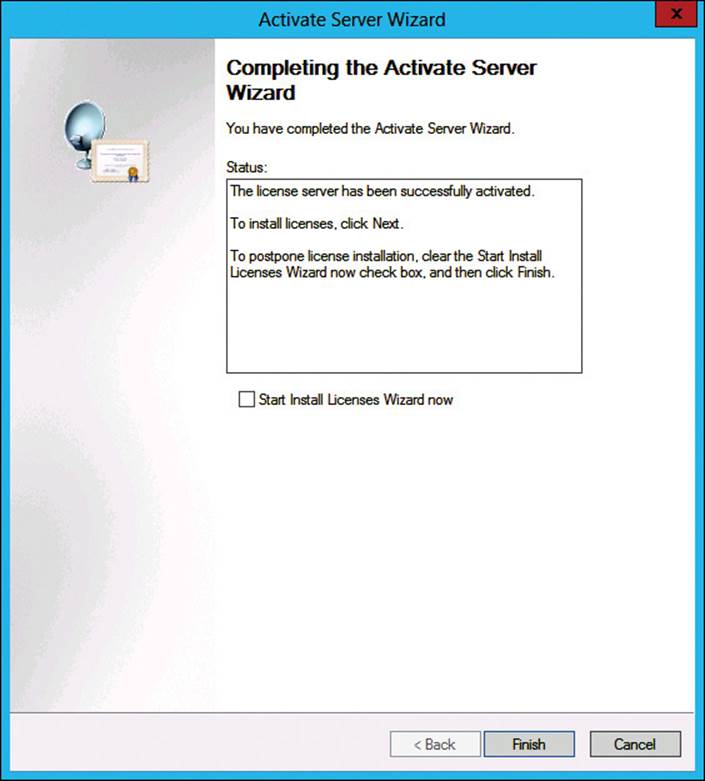
FIGURE 5-5 Activate Server Wizard, Completing The Activate Server Wizard page
After the license server is activated, you must add licenses based on your requirements. After you deploy RDS, you get a 120-day licensing grace period during which RDS is fully functional without RDS CALs. After the grace period expires, RDS services will not be available to users. Do not put off acquiring RDS CALs because of the grace period. It is not uncommon for organizations to face an RDS outage when the grace period expires before it purchases RDS CALs.
 Exam Tip
Watch for exam questions about RDS licensing when an environment has a large number of shared computing devices such as a call center, training rooms, or business locations with multiple shifts. In such scenarios, opt for RDS Device CALs because multiple users on the shared computing device can use RDS services under a single device license. This reduces the overall cost of your RDS licensing while still providing RDS services to all your users.
RDS roles
When planning for RDS, RDS roles make up the foundation of your planning. After you’ve gathered your business requirements, you can investigate which of the RDS roles should be part of your proposed solution. It is important to understand the roles, how they work together, and the prerequisites. The following are all the available RDS roles in Windows Server 2012 R2:
![]() Remote Desktop Connection Broker (RD Connection Broker) A connection broker is a technology that provides connectivity from end users to RDS services such as virtual desktops or published applications. It also provides a load balancing mechanism to ensure that connections are evenly balanced across the RDS infrastructure. Finally, it provides a service that enables users to reconnect seamlessly to their RDS resources after a disconnection.
Remote Desktop Connection Broker (RD Connection Broker) A connection broker is a technology that provides connectivity from end users to RDS services such as virtual desktops or published applications. It also provides a load balancing mechanism to ensure that connections are evenly balanced across the RDS infrastructure. Finally, it provides a service that enables users to reconnect seamlessly to their RDS resources after a disconnection.
![]() Remote Desktop Gateway (RD Gateway) The RD Gateway role facilitates connectivity from the Internet to an internal RDS deployment. It must be domain joined, which has a big impact on where you place it in your network. Often, organizations deploy the gateway on the local area network (LAN) and use a reverse proxy server in the perimeter network. However, it can also be deployed in the perimeter network, although that can complicate things due to the domain-joining requirement. A key prerequisite is having a Secure Sockets Layer (SSL) certificate. Because the RD Gateway services the Internet, you should obtain an SSL certificate from a third-party trusted certificate vendor. Although you can use a certificate from an internal public key infrastructure (PKI), your Internet-based users might not trust it.
Remote Desktop Gateway (RD Gateway) The RD Gateway role facilitates connectivity from the Internet to an internal RDS deployment. It must be domain joined, which has a big impact on where you place it in your network. Often, organizations deploy the gateway on the local area network (LAN) and use a reverse proxy server in the perimeter network. However, it can also be deployed in the perimeter network, although that can complicate things due to the domain-joining requirement. A key prerequisite is having a Secure Sockets Layer (SSL) certificate. Because the RD Gateway services the Internet, you should obtain an SSL certificate from a third-party trusted certificate vendor. Although you can use a certificate from an internal public key infrastructure (PKI), your Internet-based users might not trust it.
![]() Remote Desktop Licensing (RD Licensing) A licensing server manages all the RDS licensing for your organization. Although a license server is not required during the initial 120-day license grace period, a license server is required thereafter. The RD Licensing role can be collocated with another RDS role, but you should opt for a dedicated license server in larger organizations to maximize performance and security.
Remote Desktop Licensing (RD Licensing) A licensing server manages all the RDS licensing for your organization. Although a license server is not required during the initial 120-day license grace period, a license server is required thereafter. The RD Licensing role can be collocated with another RDS role, but you should opt for a dedicated license server in larger organizations to maximize performance and security.
![]() Remote Desktop Session Host (RD Session Host) The RD Session Host role provides session-based virtual desktop and published applications.
Remote Desktop Session Host (RD Session Host) The RD Session Host role provides session-based virtual desktop and published applications.
![]() Remote Desktop Virtualization Host (RD Virtualization Host) The RD Virtualization Host role is a foundational role for a VDI. It provides the VDI management functionality, such as starting up virtual machines (VMs) on demand, as users request access to a VM. This role must be run on a Hyper-V server and thus requires hardware-assisted virtualization.
Remote Desktop Virtualization Host (RD Virtualization Host) The RD Virtualization Host role is a foundational role for a VDI. It provides the VDI management functionality, such as starting up virtual machines (VMs) on demand, as users request access to a VM. This role must be run on a Hyper-V server and thus requires hardware-assisted virtualization.
![]() Remote Desktop Web Access (RD Web Access) RD Web Access is a web-based portal that users can use to run published applications or connect to virtualized desktops. Figure 5-6 shows the RD Web Access portal.
Remote Desktop Web Access (RD Web Access) RD Web Access is a web-based portal that users can use to run published applications or connect to virtualized desktops. Figure 5-6 shows the RD Web Access portal.
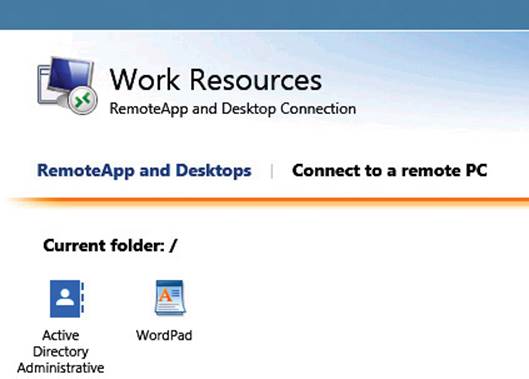
FIGURE 5-6 RD Web Access portal with published applications
Infrastructure and capacity planning
Planning for RDS also involves thinking about related infrastructure components and capacity. Before beginning, find the answers to the following questions:
![]() How many people will use RDS?
How many people will use RDS?
![]() Where do the users reside?
Where do the users reside?
![]() Which RDS services will be offered?
Which RDS services will be offered?
![]() What activity level will the users generate?
What activity level will the users generate?
Starting with the infrastructure, pay special attention to the following components:
![]() Network On the network side, one important factor is response time (often referred to as round-trip time). For RDS services, 200ms has been established as the slowest response time that allows an acceptable user experience. When you design your RDS environment, look closely at response times from all the locations users will access RDS services. If response times are over 200ms, you should strongly consider placing RDS infrastructure closer to the access locations. Another important factor is bandwidth. For example, if you have 15 branch offices that currently access services at their respective branch office, moving those services to RDS at the corporate headquarters will have an impact on bandwidth, wide area network (WAN) performance, and user experience.
Network On the network side, one important factor is response time (often referred to as round-trip time). For RDS services, 200ms has been established as the slowest response time that allows an acceptable user experience. When you design your RDS environment, look closely at response times from all the locations users will access RDS services. If response times are over 200ms, you should strongly consider placing RDS infrastructure closer to the access locations. Another important factor is bandwidth. For example, if you have 15 branch offices that currently access services at their respective branch office, moving those services to RDS at the corporate headquarters will have an impact on bandwidth, wide area network (WAN) performance, and user experience.
![]() Security On the security side, plan for securing the communication to your RDS environment, especially for Internet-based connections. Although an internal PKI can provide SSL certificates to secure communications, you must evaluate whether all the RDS clients trust your PKI. If not, use a third-party SSL vendor. You must also plan for firewall changes. Although RDS mostly operates over Transmission Control Protocol (TCP) port 443, there are exceptions. For example, if you deploy the RD Gateway role to a perimeter network and join it to the internal domain, or if you deploy the RD Gateway role to a perimeter network with Active Directory Domain Services (AD DS) that has a trust with the internal AD DS, you must open additional ports.
Security On the security side, plan for securing the communication to your RDS environment, especially for Internet-based connections. Although an internal PKI can provide SSL certificates to secure communications, you must evaluate whether all the RDS clients trust your PKI. If not, use a third-party SSL vendor. You must also plan for firewall changes. Although RDS mostly operates over Transmission Control Protocol (TCP) port 443, there are exceptions. For example, if you deploy the RD Gateway role to a perimeter network and join it to the internal domain, or if you deploy the RD Gateway role to a perimeter network with Active Directory Domain Services (AD DS) that has a trust with the internal AD DS, you must open additional ports.
More Info: RDS Gateway Firewall Ports
For more information about deploying RDS Gateway servers in a perimeter network, see http://blogs.msdn.com/b/rds/archive/2009/07/31/rd-gateway-deployment-in-a-perimeter-network-firewall-rules.aspx.
With regard to capacity planning for RDS, evaluate the following considerations:
![]() Hardware You must acquire hardware so that you can service all the users with all the services, without performance degradation. Strive to right-size the hardware: acquire hardware that isn’t undersized or oversized for the business requirements. To plan for hardware, understand the impact each connection has on the services. Microsoft has published some capacity-planning guides that walk through an actual capacity-planning test environment to help you plan your capacity needs.
Hardware You must acquire hardware so that you can service all the users with all the services, without performance degradation. Strive to right-size the hardware: acquire hardware that isn’t undersized or oversized for the business requirements. To plan for hardware, understand the impact each connection has on the services. Microsoft has published some capacity-planning guides that walk through an actual capacity-planning test environment to help you plan your capacity needs.
![]() Database A database is required for the RD Connection Broker server. It can be a SQL Server Express instance installed on the connection broker server. For large-capacity environments or environments that require high availability (HA), use a dedicated SQL server.
Database A database is required for the RD Connection Broker server. It can be a SQL Server Express instance installed on the connection broker server. For large-capacity environments or environments that require high availability (HA), use a dedicated SQL server.
![]() Proof of concept Although looking at the official capacity planning guides is extremely helpful, it is a good idea also to validate your design in your network. You must validate that the rest of the infrastructure is performing acceptably while the overall user experience is satisfactory. There are two primary tools to simulate RDS connections:
Proof of concept Although looking at the official capacity planning guides is extremely helpful, it is a good idea also to validate your design in your network. You must validate that the rest of the infrastructure is performing acceptably while the overall user experience is satisfactory. There are two primary tools to simulate RDS connections:
![]() TSGSServer.exe This tool simulates an RD Session Host server and is used from an RD Session Host server.
TSGSServer.exe This tool simulates an RD Session Host server and is used from an RD Session Host server.
![]() TSGSClient.exe This tool simulates a Remote Desktop Connection client while also running from a Remote Desktop Connection client computer.
TSGSClient.exe This tool simulates a Remote Desktop Connection client while also running from a Remote Desktop Connection client computer.
More Info: RDS Capacity Planning Guides
For more information about capacity planning for the RD Gateway role, see RD Gateway Capacity Planning in Windows Server 2012 at http://www.microsoft.com/en-ie/download/details.aspx?id=38798.
Published applications
Published applications, also known as RemoteApp programs, are applications installed on the RD Session Host servers and configured to be available to RDS users through their Start screen or through the RDS web portal. There are many use cases for published applications; the following use cases are popular:
![]() Provide users with older versions of software that are not compatible with their current client operating systems. In this use case, you might have migrated from Windows XP to Windows 8.1 but still require an older application for one of your departments. You can publish that application as a RemoteApp program and make it available to the department instead.
Provide users with older versions of software that are not compatible with their current client operating systems. In this use case, you might have migrated from Windows XP to Windows 8.1 but still require an older application for one of your departments. You can publish that application as a RemoteApp program and make it available to the department instead.
![]() Enable users to run multiple versions of the same application on their computers. In this use case, you can publish Internet Explorer 8 on one RD Session Host server, Internet Explorer 9 on another RD Session Host server, and Internet Explorer 10 on a third RD Session Host server. Users who have Internet Explorer 11 on their client computer can then use four versions of IE, even simultaneously. This is especially helpful for developers or IT staff that develop or troubleshoot end-user web incidents.
Enable users to run multiple versions of the same application on their computers. In this use case, you can publish Internet Explorer 8 on one RD Session Host server, Internet Explorer 9 on another RD Session Host server, and Internet Explorer 10 on a third RD Session Host server. Users who have Internet Explorer 11 on their client computer can then use four versions of IE, even simultaneously. This is especially helpful for developers or IT staff that develop or troubleshoot end-user web incidents.
![]() Enable users to run corporate applications from any computing device. When you publish applications to the Internet (usually with the use of a gateway and reverse proxy), you can allow authenticated users to run corporate applications from their personal computing devices. This is a great benefit to organizations embarking on a bring-your-own-device (BYOD) initiative.
Enable users to run corporate applications from any computing device. When you publish applications to the Internet (usually with the use of a gateway and reverse proxy), you can allow authenticated users to run corporate applications from their personal computing devices. This is a great benefit to organizations embarking on a bring-your-own-device (BYOD) initiative.
Publishing applications has some notable characteristics:
![]() By publishing an application, you drastically reduce the administrative overhead of deploying security and software updates because the application is only installed on RD Session Host servers.
By publishing an application, you drastically reduce the administrative overhead of deploying security and software updates because the application is only installed on RD Session Host servers.
![]() Published applications can appear to be locally installed applications to end users. When they launch the application, however, it actually connects to the published application automatically.
Published applications can appear to be locally installed applications to end users. When they launch the application, however, it actually connects to the published application automatically.
![]() Accessing published applications works the same way as accessing virtual desktops does, which is by using RDP. Thus, to provide a good user experience, the round-trip time over the network should be 200ms or less.
Accessing published applications works the same way as accessing virtual desktops does, which is by using RDP. Thus, to provide a good user experience, the round-trip time over the network should be 200ms or less.
Plan for VDI
Two primary RDS solutions are in scope for the 70-695 exam. It is important to understand both of these services, including the specific use cases that each service is best suited for. The two primary solutions are virtual desktops and session-based desktops.
![]() Virtual desktops Virtual desktops are virtualized client computers that you provide to your users. There are two methods of delivering virtual desktops.
Virtual desktops Virtual desktops are virtualized client computers that you provide to your users. There are two methods of delivering virtual desktops.
![]() Session-based desktops Session-based desktops are accessed through Remote Desktop Protocol (RDP). Session-based desktops are, at their foundation, an RDP session to an RD Session Host server. To end users, though, session-based desktops appear like many other virtualized desktops such as those delivered by a VDI, especially when users access them using the full-screen display. However, session-based desktops rely on the underlying operating system. Thus, the operating system for session-based desktops is actually a server-based operating system such as Windows Server 2012 R2. This is an important distinction between session-based desktops and desktops delivered by a VDI, which is a client-based operating system such as Windows 8.1.
Session-based desktops Session-based desktops are accessed through Remote Desktop Protocol (RDP). Session-based desktops are, at their foundation, an RDP session to an RD Session Host server. To end users, though, session-based desktops appear like many other virtualized desktops such as those delivered by a VDI, especially when users access them using the full-screen display. However, session-based desktops rely on the underlying operating system. Thus, the operating system for session-based desktops is actually a server-based operating system such as Windows Server 2012 R2. This is an important distinction between session-based desktops and desktops delivered by a VDI, which is a client-based operating system such as Windows 8.1.
• Virtual desktop infrastructure (VDI) VDI deployment first became available on Windows with the release of Windows Server 2008 R2. VDI provides virtualized Windows client computer desktops to end users. Thus, the operating system for the user is a desktop-based operating system such as Windows 8.1. Access to the VDI is by an RDP connection. There are two VM deployment methods for VDI:
• Pooled A pooled virtual machine collection is made up of identical VMs that can be used by any VDI user. All the VMs share a single master image of the operating system. A pooled collection reduces administrative overhead and storage costs. However, for power users that require more control, such as access to install applications, a pooled collection might not suffice.
• Personal A personal virtual machine collection gives every VDI user his or her own personal VM. With this option, VDI users can be local administrators on their VMs, install applications, and fully manage their VMs. Providing each VDI user with a personal VM results in additional administrative overhead to manage multiple images, manage storage space, troubleshoot, and support a wide variety of application compatibility scenarios. Although this is the most expensive option, it is also the most flexible and customizable.
More Info: RDS Capacity Planning Guides
For more information about capacity planning for VDI, see the Windows Server 2012 Capacity Planning for VDI whitepaper at http://download.microsoft.com/download/2/4/B/24B5EC7D-1D03-49A2-B792-C7EDF24549EE/Windows_Server_2012_Capacity_Planning_for_VDI_White_Paper.pdf.
Planning for Client Hyper-V
First introduced with Windows 8, Client Hyper-V is a client version of the Hyper-V role that runs on Windows Server. You can enable it by choosing Program and Features in Control Panel, as shown in Figure 5-7.

FIGURE 5-7 Enabling Hyper-V on Windows 8
Client Hyper-V is a virtualization technology that enables you to run virtualized instances of computers on Windows 8 and Windows 8.1. Client Hyper-V has the following requirements:
![]() A 64-bit process with second level address translation (SLAT)
A 64-bit process with second level address translation (SLAT)
![]() A 64-bit version of Windows 8 or later (Pro or Enterprise only)
A 64-bit version of Windows 8 or later (Pro or Enterprise only)
![]() 4 GB of RAM
4 GB of RAM
The primary use cases for Client Hyper-V are for:
![]() IT administrator testing such as when updating or making configuration changes.
IT administrator testing such as when updating or making configuration changes.
![]() IT developers developing to different operating systems and needing to understand quickly the different application experience in those operating systems.
IT developers developing to different operating systems and needing to understand quickly the different application experience in those operating systems.
Although some organizations have large nonproduction environments in which IT administrators and developers can perform tests, often the environments are shared and do not provide all the necessary services.
Be aware of these characteristics of Hyper-V on Windows 8:
![]() You must have a Windows license for each Windows VM you run in Hyper-V on Windows 8. This is unlike Windows Server, which gives you virtualization rights, depending on the server license.
You must have a Windows license for each Windows VM you run in Hyper-V on Windows 8. This is unlike Windows Server, which gives you virtualization rights, depending on the server license.
![]() The following features that are available when using Hyper-V on Windows Server are not available with Hyper-V on Windows 8:
The following features that are available when using Hyper-V on Windows Server are not available with Hyper-V on Windows 8:
![]() Virtual Fibre Channel
Virtual Fibre Channel
![]() Shared .VHDX, 32-bit single root I/O virtualization (SR-IOV) networking
Shared .VHDX, 32-bit single root I/O virtualization (SR-IOV) networking
![]() Hyper-V Replica
Hyper-V Replica
![]() Live migration
Live migration
![]() RemoteFX
RemoteFX
![]() Connected Standby, which Windows tablets such as the Surface use, does not work after Hyper-V is enabled on Windows 8.
Connected Standby, which Windows tablets such as the Surface use, does not work after Hyper-V is enabled on Windows 8.
Planning for 32-bit versus 64-bit
Many operating systems, including Windows 8, offer a 32-bit version and a 64-bit version. Many applications, including Microsoft Office 2013, offer a 32-bit version and a 64-bit version. As an IT administrator, your understanding of the key differences between 32-bit and 64-bit implementations enables you to propose appropriate solutions for your organization. The following characteristics represent interoperability of 32-bit and 64-bit applications on Windows:
![]() Most 32-bit applications run without issue on 64-bit installations of Windows. Some common exceptions are antivirus applications. Drivers, although not thought of as applications, are also exceptions.
Most 32-bit applications run without issue on 64-bit installations of Windows. Some common exceptions are antivirus applications. Drivers, although not thought of as applications, are also exceptions.
![]() 64-bit applications do not run on 32-bit installations of Windows.
64-bit applications do not run on 32-bit installations of Windows.
Beyond interoperability, there are other 32-bit and 64-bit factors to consider when planning to deploy Windows or applications:
![]() Client Hyper-V requires the 64-bit version of Windows 8.
Client Hyper-V requires the 64-bit version of Windows 8.
![]() The 64-bit version of Office 2013, although capable of higher performance than the 32-bit version, might not support all the plug-ins. For example, if you have third-party plug-ins for Microsoft Outlook, they might only be supported with the 32-bit version of Outlook. It is important to test the 64-bit version of Office 2013 in your environment to check compatibility with the existing applications.
The 64-bit version of Office 2013, although capable of higher performance than the 32-bit version, might not support all the plug-ins. For example, if you have third-party plug-ins for Microsoft Outlook, they might only be supported with the 32-bit version of Outlook. It is important to test the 64-bit version of Office 2013 in your environment to check compatibility with the existing applications.
![]() The 64-bit version of Windows generally provides higher performance than the 32-bit version of Windows. The performance difference is most noticeable, however, when you have 4 GB or more of RAM.
The 64-bit version of Windows generally provides higher performance than the 32-bit version of Windows. The performance difference is most noticeable, however, when you have 4 GB or more of RAM.
![]() The 64-bit version of Office generally provides higher performance than the 32-bit version of Windows. This is most noticeable with large Microsoft Excel and Project files. On 32-bit versions of Excel and Project, the maximum amount of virtual address space is 2 GB. This space must be shared with the Office application, the data being worked with, and the add-ons that are loaded. The 64-bit version of Office is only limited by the available memory, which is often much higher than 2 GB with a modern computer.
The 64-bit version of Office generally provides higher performance than the 32-bit version of Windows. This is most noticeable with large Microsoft Excel and Project files. On 32-bit versions of Excel and Project, the maximum amount of virtual address space is 2 GB. This space must be shared with the Office application, the data being worked with, and the add-ons that are loaded. The 64-bit version of Office is only limited by the available memory, which is often much higher than 2 GB with a modern computer.
Planning for application version coexistence
Occasionally, you might need to run two versions of the same application on the same computer. Understand the available methods for application version coexistence as well as the limitations so that you can plan properly. There are two primary methods to deploy applications in coexistence:
![]() Microsoft Application Virtualization (App-V) App-V is one of the tools in the Microsoft Desktop Optimization Pack (MDOP) for Microsoft Software Assurance customers. App-V is a tool to virtualize applications and then stream the applications to App-V clients. App-V clients download only a small portion of the overall application to start the application. Then, a local App-V cache is built up so that subsequent application launches use the cache to launch the application quickly. App-V can enable offline use of streamed applications, which is a major difference between App-V apps and RemoteApp programs because RemoteApp programs require a network connection.
Microsoft Application Virtualization (App-V) App-V is one of the tools in the Microsoft Desktop Optimization Pack (MDOP) for Microsoft Software Assurance customers. App-V is a tool to virtualize applications and then stream the applications to App-V clients. App-V clients download only a small portion of the overall application to start the application. Then, a local App-V cache is built up so that subsequent application launches use the cache to launch the application quickly. App-V can enable offline use of streamed applications, which is a major difference between App-V apps and RemoteApp programs because RemoteApp programs require a network connection.
![]() RemoteApp Earlier in this chapter, the details of RemoteApp were discussed. For coexistence scenarios, the most common use of RemoteApp is to publish one version of the application through RemoteApp while installing the other version of the application locally on client computers. Although this is functional, it isn’t as flexible as App-V, especially when you use more than two versions of an application.
RemoteApp Earlier in this chapter, the details of RemoteApp were discussed. For coexistence scenarios, the most common use of RemoteApp is to publish one version of the application through RemoteApp while installing the other version of the application locally on client computers. Although this is functional, it isn’t as flexible as App-V, especially when you use more than two versions of an application.
More Info: Learn More about App-V
For more information about virtualizing applications with App-V, see the video on the App-V Sequencer at http://technet.microsoft.com/en-us/windows/jj835810.aspx.
Using the Application Compatibility Toolkit
The Application Compatibility Toolkit (ACT) is a free suite of tools from Microsoft to manage application compatibility in your environment. ACT helps you assess and mitigate application compatibility with different versions of Windows. To demonstrate the typical use of ACT, suppose that you want to migrate an existing Windows 7 environment to Windows 8.1. The following high-level steps describe the core uses of ACT for your migration:
![]() Inventory your existing Windows 7 environment You must create and deploy inventory-collector packages to perform an inventory of your existing computers. The inventory package installs compatibility evaluators, and the evaluators collect detailed hardware and software information about your client computers.
Inventory your existing Windows 7 environment You must create and deploy inventory-collector packages to perform an inventory of your existing computers. The inventory package installs compatibility evaluators, and the evaluators collect detailed hardware and software information about your client computers.
![]() Test application compatibility on Windows 8.1 In a migration or upgrade scenario, you must test application compatibility on the new operating system. This testing should occur before any migrations take place to avoid unexpected compatibility issues.
Test application compatibility on Windows 8.1 In a migration or upgrade scenario, you must test application compatibility on the new operating system. This testing should occur before any migrations take place to avoid unexpected compatibility issues.
![]() Analyze the compatibility data To move forward with your migration to Windows 8, you must analyze the data collected about your existing Windows 7 environment. Based on that analysis, you might be able to proceed with the migration without any changes, or you will begin to plan how to fix compatibility issues.
Analyze the compatibility data To move forward with your migration to Windows 8, you must analyze the data collected about your existing Windows 7 environment. Based on that analysis, you might be able to proceed with the migration without any changes, or you will begin to plan how to fix compatibility issues.
![]() Remediate compatibility issues Sometimes, you can remedy compatibility issues by updating the application to the latest version or rewriting application code. Other times, you might need to use a workaround. A workaround is most often used when you are already running the latest version of the application or when you can’t rewrite application code. The next section in this chapter discusses deploying application compatibility fixes in more detail.
Remediate compatibility issues Sometimes, you can remedy compatibility issues by updating the application to the latest version or rewriting application code. Other times, you might need to use a workaround. A workaround is most often used when you are already running the latest version of the application or when you can’t rewrite application code. The next section in this chapter discusses deploying application compatibility fixes in more detail.
Before you can use ACT, you must install it and then walk through the initial configuration. The steps to configure ACT initially are as follows:
1. Run Application Compatibility Manager.
2. In the Application Compatibility Toolkit (ACT) Configuration Wizard window, click Next, as shown in Figure 5-8.
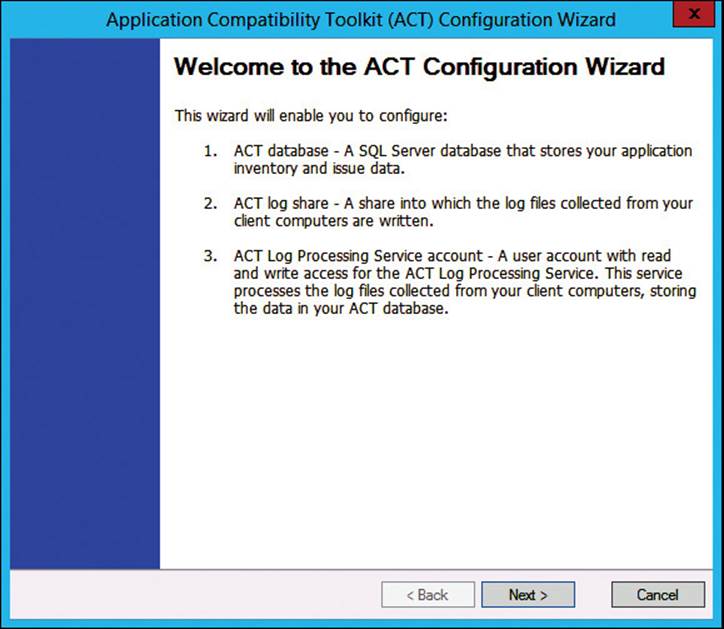
FIGURE 5-8 Application Compatibility Toolkit (ACT) Configuration Wizard, Welcome page
3. On the ACT Log Processing Service page, shown in Figure 5-9, leave the default selection of Yes, which specifies the computer to run the log processing service, and then click Next.
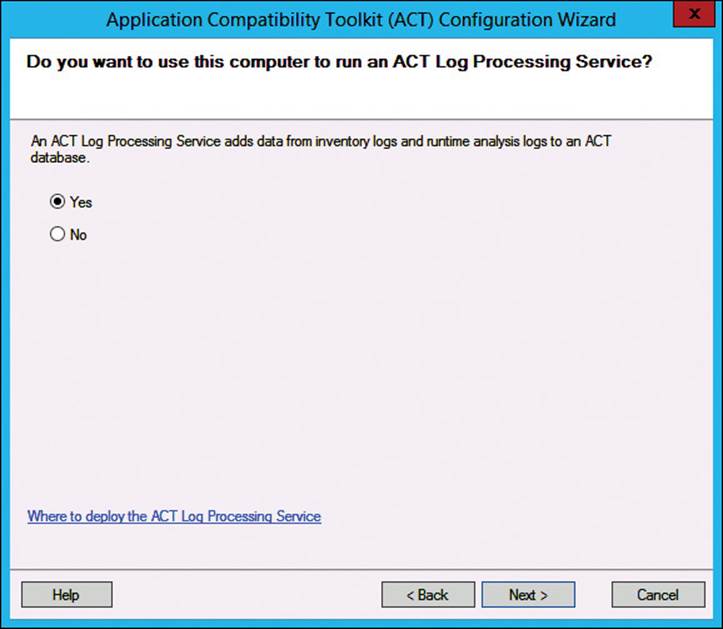
FIGURE 5-9 Application Compatibility Toolkit (ACT) Configuration Wizard, ACT Log Processing Service page
4. On the second Configure Your ACT Database Settings page, shown in Figure 5-10, specify the SQL Server name and database name and then click Next.
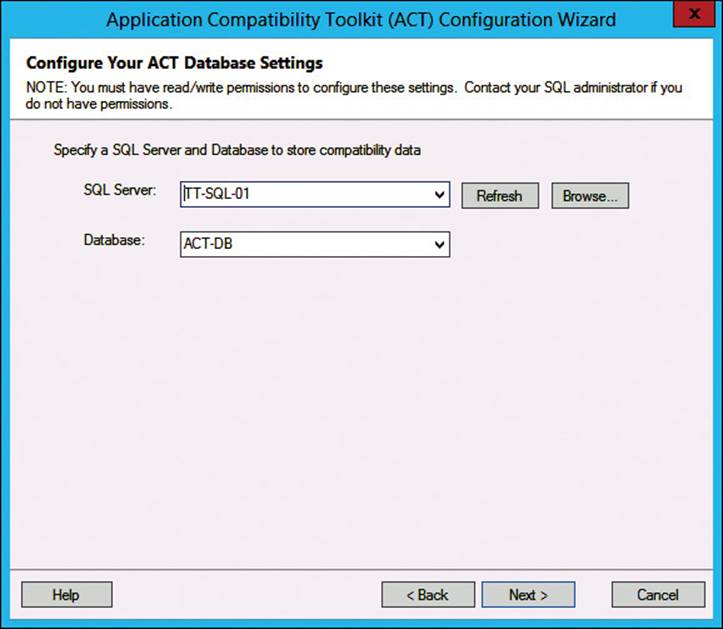
FIGURE 5-10 Application Compatibility Toolkit (ACT) Configuration Wizard, Configure Your ACT Database Settings page
5. On the second Configure Your ACT Database Settings page, review the necessary database permissions and then click Next.
6. On the Configure Your Log File Location page, type the path or existing share you want to use and then click Next.
Note that an existing share is specified in Figure 5-11. The Domain Computers group must be able to write to the directory.
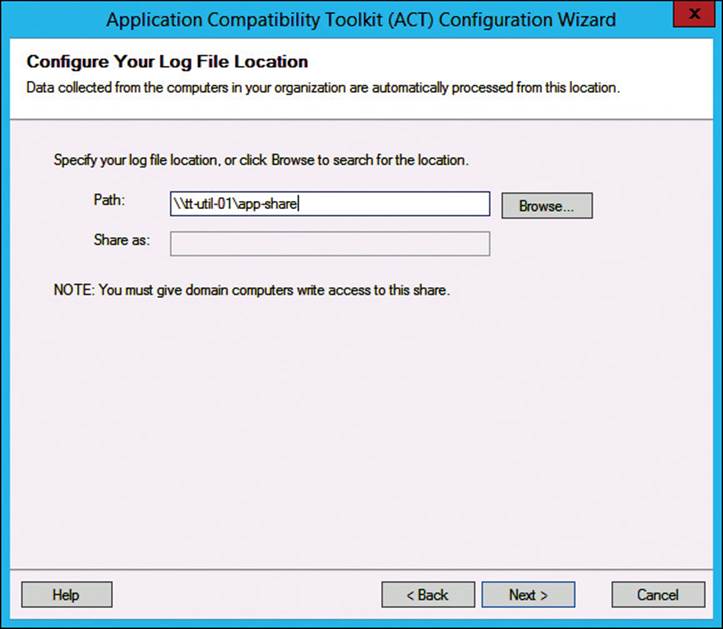
FIGURE 5-11 Application Compatibility Toolkit (ACT) Configuration Wizard, Configure Your Log File Location page
7. On the Configure Your ACT Log Processing Service Account page, shown in Figure 5-12, specify a user account or leave the default of using the Local System account.
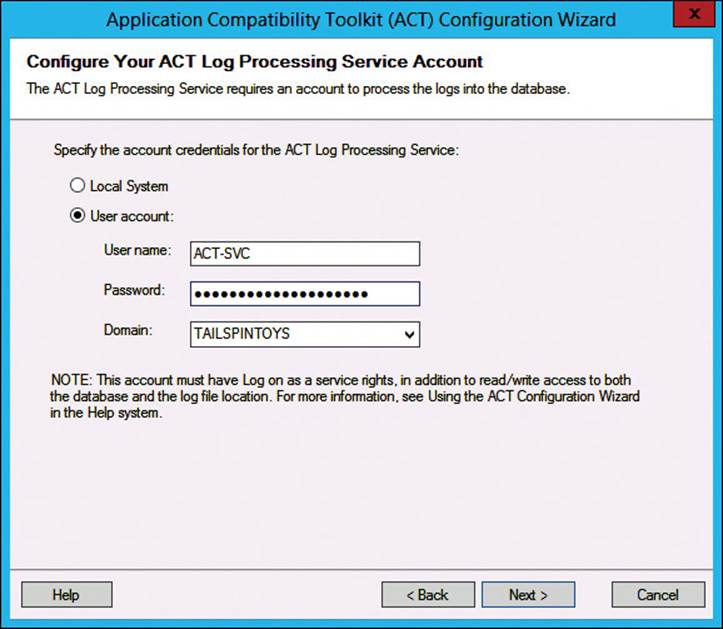
FIGURE 5-12 Application Compatibility Toolkit (ACT) Configuration Wizard, Configure Your Log Processing Service Account page
It is a good practice to use a dedicated service account so that you can set the necessary permissions and simplify your security auditing.
8. When you are finished, click Next.
9. On the Congratulations page, shown in Figure 5-13, review and adjust any changes required for the usage data, update checks, and then click Finish.
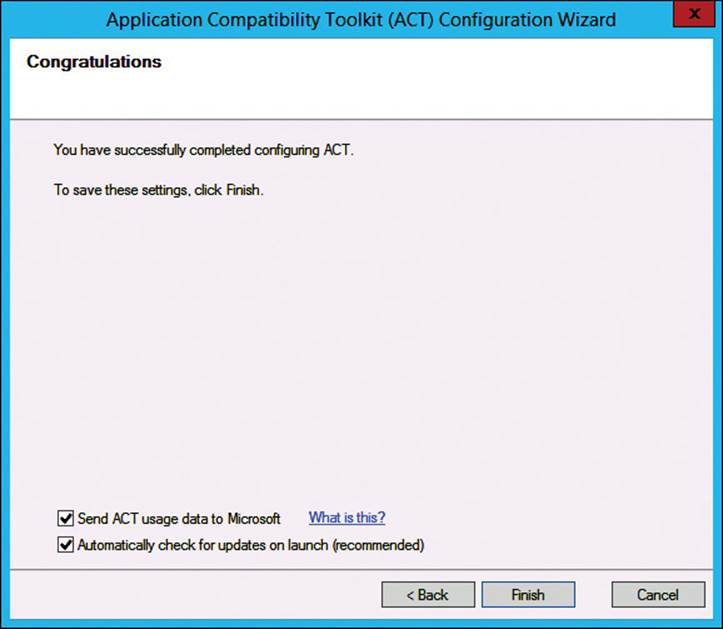
FIGURE 5-13 Application Compatibility Toolkit (ACT) Configuration Wizard, Congratulations page
Deploying compatibility fixes
After you’ve examined your existing environment and found application compatibility issues, decide how you want to fix them. Application compatibility fixes were referred to as shims for a long time. With the release of ACT 6.0, however, the new term that you should use is compatibility fix. A compatibility fix is application code that changes application programming interface (API) calls from incompatible applications to ensure that the calls are compatible with the new operating system. Often, you can find compatibility fixes that are already written and ready for use. You use the Compatibility Administrator tool, which is part of ACT, to search for existing fixes. After you’ve located a fix, you can deploy it. Otherwise, you can create a new fix in Compatibility Administrator. The following compatibility fix strategies represent the two available options:
![]() Use application installation packages with the compatibility fix integrated In this scenario, you update your application installation packages with the compatibility fix and then deploy the package. This method requires a custom compatibility fix database (an .sdb file). After the database is ready with the compatibility fix, you must deploy the database to the computers that run the incompatible application and install the database locally by using the Sdbinst.exe command. Most organizations package the database and command in an .msi file and rely on their existing application deployment methods such as Group Policy or ConfigMgr to deploy the database. However, if you need to fix a large number of applications, consider the other strategy, which uses a centralized compatibility fix database. Otherwise, you will end up with many database deployments, which can be unwieldy to manage.
Use application installation packages with the compatibility fix integrated In this scenario, you update your application installation packages with the compatibility fix and then deploy the package. This method requires a custom compatibility fix database (an .sdb file). After the database is ready with the compatibility fix, you must deploy the database to the computers that run the incompatible application and install the database locally by using the Sdbinst.exe command. Most organizations package the database and command in an .msi file and rely on their existing application deployment methods such as Group Policy or ConfigMgr to deploy the database. However, if you need to fix a large number of applications, consider the other strategy, which uses a centralized compatibility fix database. Otherwise, you will end up with many database deployments, which can be unwieldy to manage.
![]() Use a centralized compatibility fix database In this scenario, you use a single compatibility fix database for all the applications that have compatibility issues. You deploy the database to computers that run the incompatible applications and install the database locally by using the Sdbinst.exe command. Most organizations package the database and command in an .msi file and rely on their existing application deployment methods such as Group Policy or ConfigMgr to deploy the database.
Use a centralized compatibility fix database In this scenario, you use a single compatibility fix database for all the applications that have compatibility issues. You deploy the database to computers that run the incompatible applications and install the database locally by using the Sdbinst.exe command. Most organizations package the database and command in an .msi file and rely on their existing application deployment methods such as Group Policy or ConfigMgr to deploy the database.
Because testing application compatibility happens early in a client computer migration project, you can usually include compatibility fixes in your client computer image. This greatly simplifies things because all the computers being imaged and delivered to users already have the application compatibility fixes.
 Thought experiment: Configuring RDS at Contoso
You work as a systems administrator for Contoso, Ltd., a consulting company that provides infrastructure and cloud solutions to customers worldwide. About half the customers collocate their infrastructure in Contoso’s private cloud.
Contoso has a call center for level 1 support. In the call center, 30 administrative computers are running Windows 7, which have several support applications the support team uses to manage and troubleshoot customers’ hardware and software issues. There is an Active Directory Domain Services forest with a single domain named contoso.com. Call center employees are issued a laptop for home use.
The company has decided to offer call center employees an option to work from home for two days a week. You plan to update the infrastructure to ensure that call center employees can work effectively from home.
1. You are working with one of the call center managers. He reports that the call center employees often perform large file copy operations between their computers and customers’ servers. He is concerned that copy operations might not perform adequately when call center employees are working at home. What should you propose to avoid affecting copy operations when employees are working from home?
2. Some of the support applications are licensed per device. The management team has expressed a desire to minimize licensing costs, especially in light of the laptops being issued for home use. What should you do to minimize licensing costs?
3. The laptops will be running Windows 8.1. Because some of the support applications will run on the laptops, you must validate application compatibility for Windows 8.1. What should you do before you issue the laptops?
Objective summary
![]() Remote Desktop Services requires a licensed server to function after the initial 120-day license grace period. You must activate your licensing server with Microsoft before you can add any licenses to it.
Remote Desktop Services requires a licensed server to function after the initial 120-day license grace period. You must activate your licensing server with Microsoft before you can add any licenses to it.
![]() An RDS User CAL is the appropriate license choice when users access RDS services from multiple devices.
An RDS User CAL is the appropriate license choice when users access RDS services from multiple devices.
![]() An RDS Device CAL is the appropriate license choice when users share computing devices, such as in a call center or factory with three shifts of workers.
An RDS Device CAL is the appropriate license choice when users share computing devices, such as in a call center or factory with three shifts of workers.
![]() Be familiar with the functionality each RDS role provides: RD Connection Broker (load balancer and seamless reconnection services), RD Gateway (facilitates communication from the Internet to the RDS environment on the LAN), RD Licensing (manages all aspects of RDS licensing), RD Session Host (session-based desktops and published applications), and RD Virtualization Host (VDI).
Be familiar with the functionality each RDS role provides: RD Connection Broker (load balancer and seamless reconnection services), RD Gateway (facilitates communication from the Internet to the RDS environment on the LAN), RD Licensing (manages all aspects of RDS licensing), RD Session Host (session-based desktops and published applications), and RD Virtualization Host (VDI).
![]() Publishing applications by using RemoteApp is a good solution for web developers or other IT staff who need to run multiple versions of an application from a single computer, even if the application versions are incompatible.
Publishing applications by using RemoteApp is a good solution for web developers or other IT staff who need to run multiple versions of an application from a single computer, even if the application versions are incompatible.
![]() The Application Compatibility Toolkit (ACT) is a suite of tools you use to assess application compatibility in your environment, especially before a migration to a new client operating system.
The Application Compatibility Toolkit (ACT) is a suite of tools you use to assess application compatibility in your environment, especially before a migration to a new client operating system.
![]() You can use Compatibility Administrator to look for existing application compatibility fixes, create new application compatibility fixes, and deploy fixes to your computers.
You can use Compatibility Administrator to look for existing application compatibility fixes, create new application compatibility fixes, and deploy fixes to your computers.
Objective review
Answer the following questions to test your knowledge of the information in this objective. You can find the answers to these questions and explanations of why each answer choice is correct or incorrect in the “Answers” section at the end of this chapter.
1. You are preparing to deploy RDS in your environment. The management team has requested a proof of concept to be deployed and tested before purchasing RDS CALs. How many days can you use RDS before you must add RDS CALs to the environment?
A. 60
B. 90
C. 120
D. 180
2. You have an existing LAN environment with a single AD DS domain. You also have a perimeter network. Not all computers in the perimeter network are joined to a domain. You are preparing to deploy an RDS Gateway server and a reverse proxy server. To maximize security, to which environments should you deploy each server?
A. Deploy the RDS Gateway server and the reverse proxy server in the perimeter network.
B. Deploy the RDS Gateway server in the LAN environment and the reverse proxy server in the perimeter network.
C. Deploy the RDS Gateway server in the perimeter network and reverse proxy server in the LAN environment.
D. Deploy the RDS Gateway server and the reverse proxy server in the LAN environment.
3. You are planning to virtualize a software development application for your developers. The developers have requested the ability to use the application even if they are not connected to your corporate network. Which technology should you use?
A. App-V
B. System Center App Controller
C. Client Hyper-V
D. VDI
Objective 5.2: Deploy Office 2013 by using MSI
Office 2013 has many supported deployment methods, such as deploying by using MSI or deploying by using Click-to-Run. This section discusses using the Windows Installer (MSI).
This objective covers how to:
![]() Customize deployments
Customize deployments
![]() Manage Office 2013 activation
Manage Office 2013 activation
![]() Manage Office 2013 settings
Manage Office 2013 settings
![]() Integrate Lite-Touch deployment
Integrate Lite-Touch deployment
![]() Rearm Office 2013
Rearm Office 2013
![]() Provide slipstream updates
Provide slipstream updates
Capabilities of MSI deployments
Deploying Office by using an MSI provides many options for managing and customizing the deployment process. MSI deployments use a volume license key, which can be activated by using either a Key Management Service (KMS) or a multiple activation key (MAK). When using MSI deployments, the product activations are device-based.
To update an MSI installation, the updates and service packs must be downloaded separately before they can be applied. A benefit of using this model is that different levels of updates can be applied for each product within Office. For example, Microsoft Word could have all available updates applied, but Excel could only apply critical updates.
Office MSI deployments are also highly customizable by using either the Office Customization Tool (OCT) or by customizing the Config.xml file.
Supported deployment methods
You can deploy an Office MSI by using a variety of methods. The supported installation methods when using MSI include:
![]() Local installation.
Local installation.
![]() Network installation.
Network installation.
![]() Group Policy script.
Group Policy script.
![]() System Center Configuration Manager (ConfigMgr).
System Center Configuration Manager (ConfigMgr).
![]() Microsoft Intune.
Microsoft Intune.
![]() Remote Desktop Services (RDS).
Remote Desktop Services (RDS).
![]() Microsoft Application Virtualization (App-V).
Microsoft Application Virtualization (App-V).
![]() Microsoft Deployment Toolkit (MDT).
Microsoft Deployment Toolkit (MDT).
For local installations, the Office product and language files can be copied to the local computer, and then the setup files can be run from the local source. To complete this installation, the user account running the setup files must be of a local administrator on the client computer to run and install the Office setup.
To use a network installation, copy the Office product and language files to a network share that is accessible from the client computers. The user accounts need only the Read permission on the network share. Users can access the network share and run the Office setup normally. In addition, you can use a script or batch file to automate the installation from the network share. The user completing the installation is still required to have a local administrator account on the client computer.
One method of deploying Office to client computers is by using a Group Policy object (GPO). By using a computer startup script in a GPO, the Office setup will be completed before a user logs on. GPO scripts run by using the Local System account, so user accounts do not require any additional permissions to complete the installation.
Exam Tip
The only supported method of using a GPO to deploy Office 2013 is by using a startup script. Using Group Policy software installation is not a supported deployment method.
A common method of deploying Office 2013 is by using a software distribution product. This could be either ConfigMgr or Intune. A software distribution product is a valuable method of deploying software because of the additional capabilities that provide updating and reporting of the deployed software. Another benefit of using a software distribution product is that the users are not required to be local administrators of the client computer.
You can also deploy Office 2013 by using virtualization technologies such as RDS and App-V. By using RDS, users can log on to an RD Session Host server to access an Office 2013 installation from their computing device. This is especially useful if the device does not meet the requirements for Office. App-V offers a similar deployment method, by which the Office installation is located on a centrally located server. Instead of accessing the installation remotely, however, App-V streams the application directly to the client device.
More Info: Office 2013 Prerequisites
For more detailed information about the system requirements for Office 2013, see http://technet.microsoft.com/en-us/library/ee624351(v=office.15).aspx.
Finally, the Office product can also be preinstalled in your corporate images so that client computers receive a preconfigured version of Office with their operating system. This can be accomplished by using MDT or ConfigMgr. These tools enable either a Lite-Touch or Zero-Touch deployment method.
More Info: Deployment Methods for Office 2013
For more detailed information about the supported deployment methods for Office 2013, see http://technet.microsoft.com/en-us/library/ee656739%28v=office.15%29.aspx.
Customizing deployments
As mentioned earlier in the chapter, Office deployments can be customized by using either the Office Customization Tool (OCT) or by modifying the Config.xml file.
Using the Office Customization Tool
You can use the OCT to perform many deployment tasks for Office, including
![]() Specifying installation options.
Specifying installation options.
![]() Selecting Office applications and features.
Selecting Office applications and features.
![]() Setting default user settings.
Setting default user settings.
![]() Customizing additional files, registry entries, and shortcuts.
Customizing additional files, registry entries, and shortcuts.
![]() Specifying server settings, profiles, and email accounts in Outlook.
Specifying server settings, profiles, and email accounts in Outlook.
Note: Volume Licenses Only
OCT is only available with a volume license version of Office. To verify that the media you are using is a volume license version, check for a folder named Admin in the root of the installation media. The admin folder is only available on volume license media.
Start OCT by running the setup.exe /admin command from the Office 2013 installation files location. When you run the OCT, you are asked whether to create a new customization file or open an existing configur ation. When creating a new customization file, the OCT displays a welcome screen, as shown in Figure 5-14.
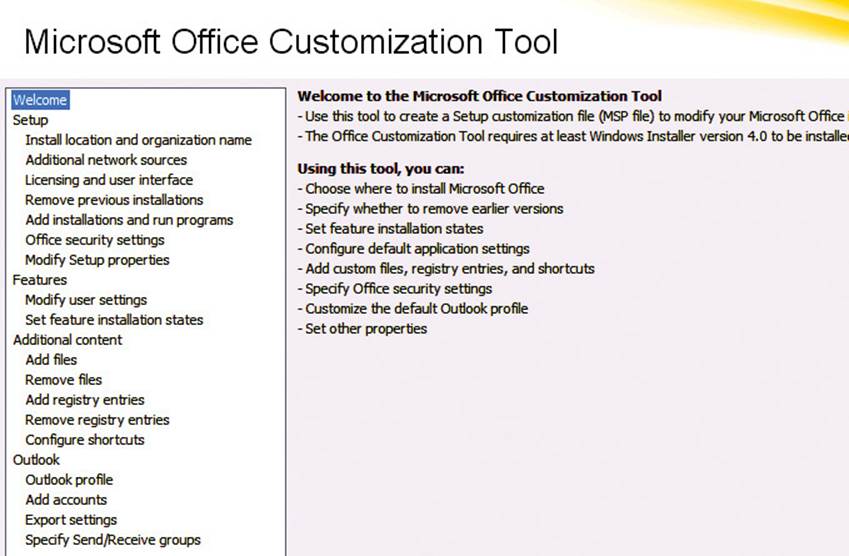
FIGURE 5-14 Microsoft Office Customization Tool
In the following section, you use the OCT to customize an Office 2013 deployment. Although the OCT can customize a multitude of Office settings, step through a sample of often-customized settings. As you prepare for the exam, spend some time working with the OCT and looking through the various settings. In an upcoming section, Table 5-1 displays the available settings along with some supporting information. To customize an Office 2013 deployment with the OCT, perform the following steps:
1. Run the OCT.
2. In the Select Product window, shown in Figure 5-15, click OK to create a new customization file.
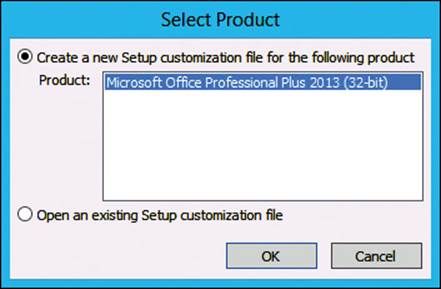
FIGURE 5-15 OCT Select Product window
If you had created a customization file, you could choose to open an existing file instead.
3. In the left pane, click Additional network sources. In the right pane, click Add, specify the UNC path to the Office 2013 installation files, and then click OK.
Figure 5-16 shows an additional network source. After installation of Office 2013, each computer has a local installation source, which is useful for repairing an installation or adding additional applications to the local installation. If the local installation source is deleted or becomes corrupt, Office 2013 attempts to contact the original network installation source for the needed files. If that source is no longer available, it will use additional specified network sources. This setting is useful in large enterprise environments.

FIGURE 5-16 OCT, additional network sources settings
One of the most important customizations you make is to the licensing and user interface section. This section handles the product key (KMS or MAK), the acceptance of the license agreement (users have to accept the license agreement manually, or you automate the acceptance), the display level (users see nothing, a little bit, or everything), and the display level modifiers.
4. Select The I Accept The License Agreement check box, set Display Level to None, and select the Suppress Modal check box, as shown in Figure 5-17.
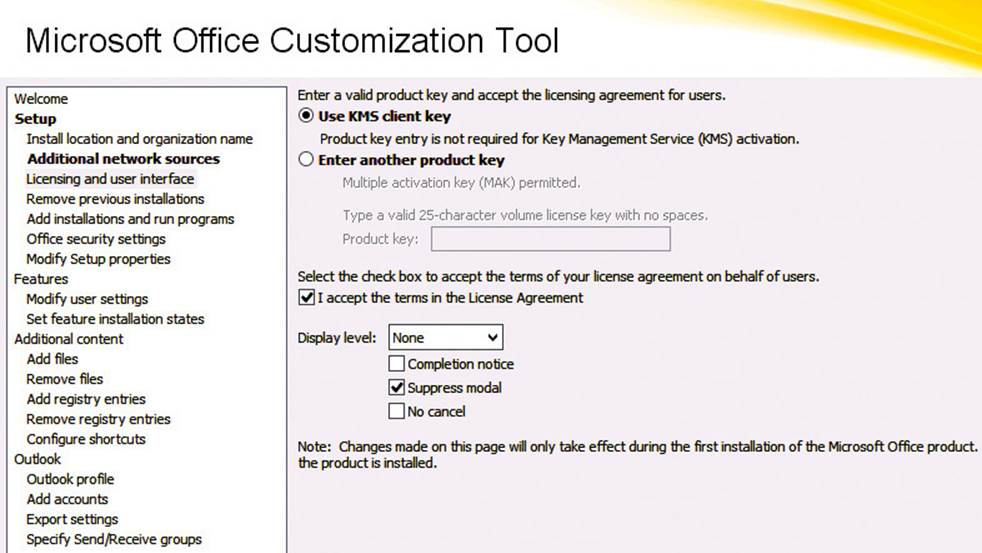
FIGURE 5-17 OCT, licensing and user interface settings
5. In the left pane, click Modify user settings, after which you can customize a large number of Office user settings. In the middle pane, each Office 2013 application is represented. Expand each to look through the various settings.
In the example shown cropped in Figure 5-18, Outlook 2013 Junk E-mail settings are adjusted.
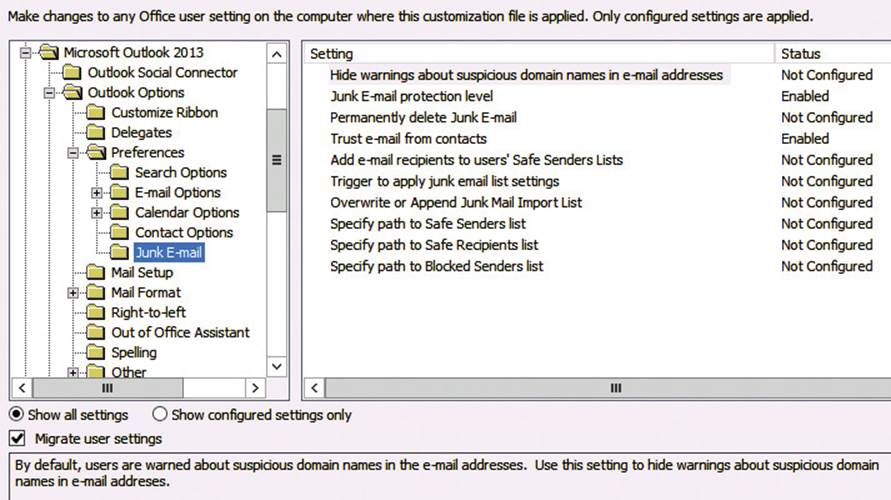
FIGURE 5-18 OCT, modifying user settings
6. In the left pane, click Set Feature Installation States.
This is another heavily used customization area. From here, you can dictate which Office applications and features are installed and available for later installation. In the example shown in Figure 5-19, Microsoft Access, Microsoft Publisher, and Microsoft InfoPath are removed.
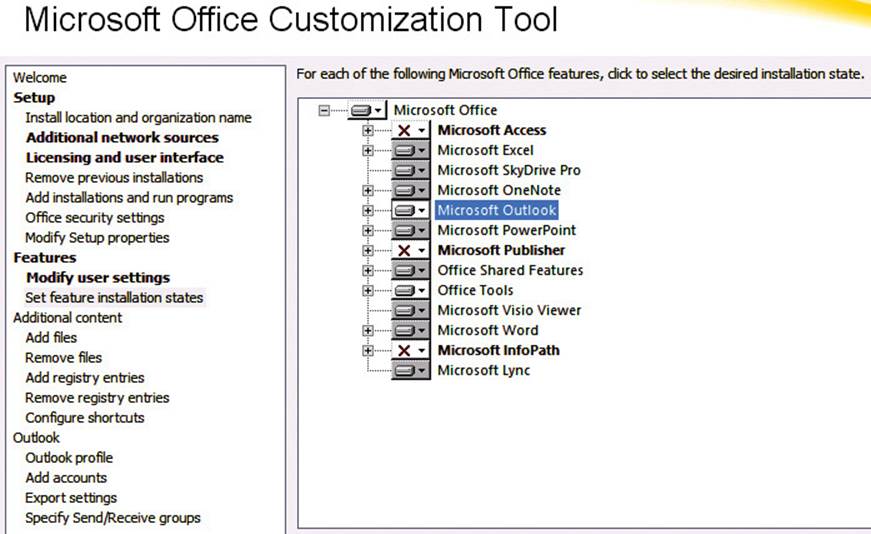
FIGURE 5-19 OCT, set feature installation states
7. After customizing the Office deployment with the OCT, save the customization file and place it in the Updates folder of the installation media.
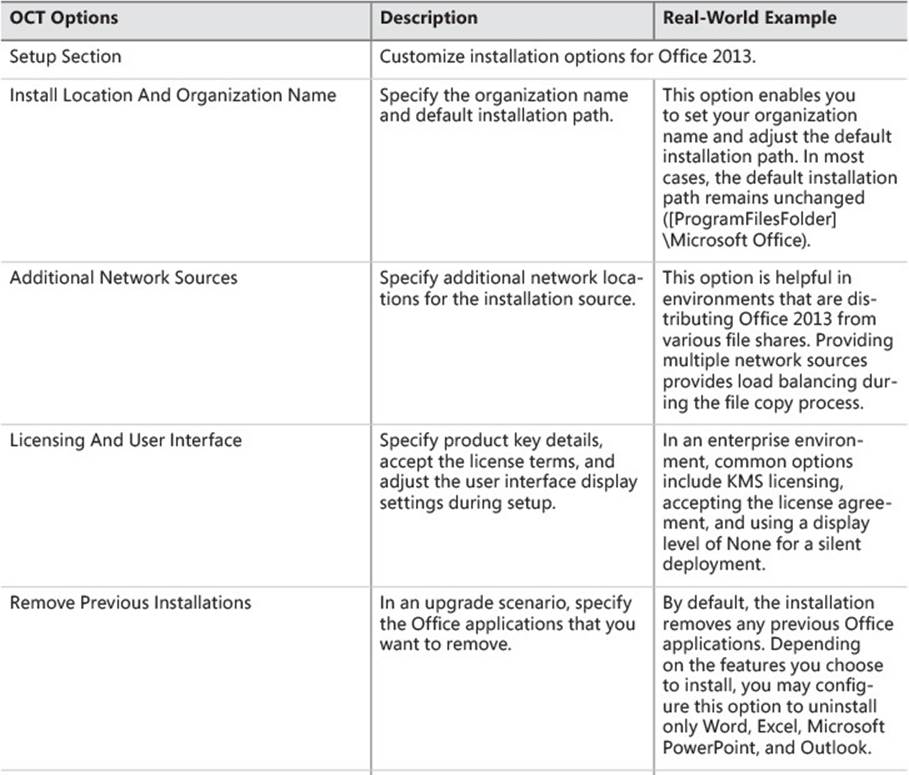
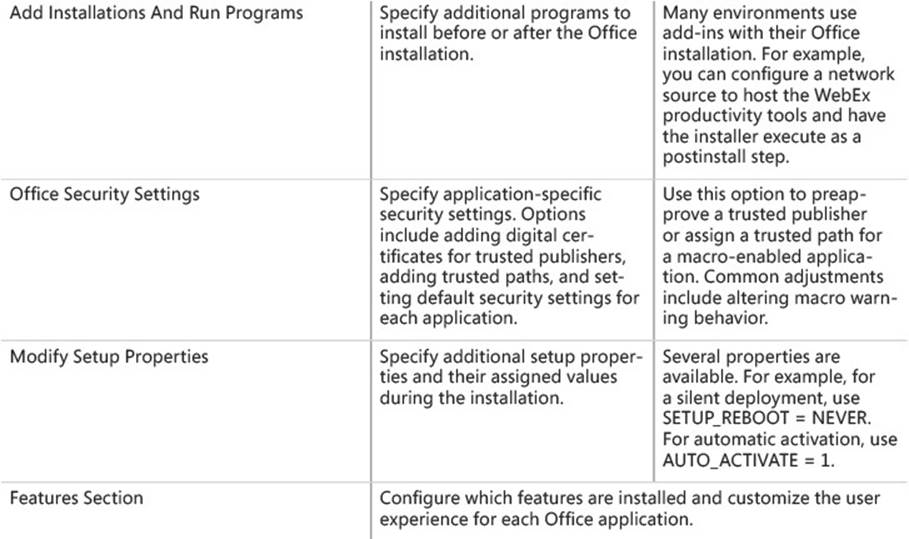
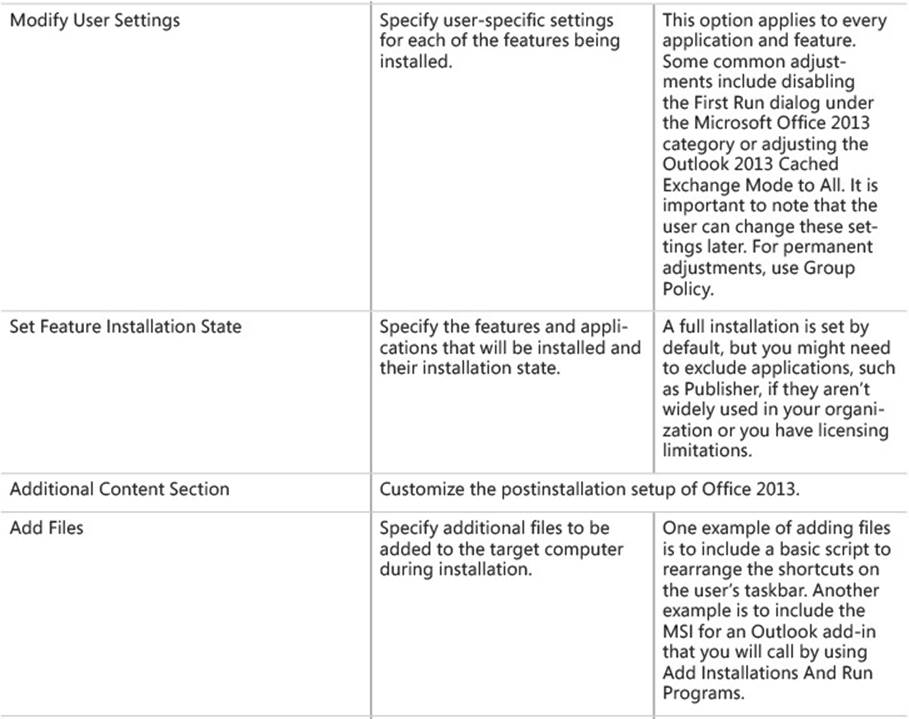
TABLE 5-1 OCT optional customization settings
OCT files can also be used to update an installation after it has been deployed. For a manual installation, you can specify the file when you run setup.exe from the command line with the /adminfile parameter. For example, if you have saved a customization file to a file server, you could use the following command to reference it during a manual setup:
setup.exe /adminfile "\\tt-util-02\software\Office 2013\office2013.msp"
Table 5-1 discusses some of the additional customization settings that you can use in the OCT.
More Info: Office Customization Tool Reference for Office 2013
For more information about how to customize Office, see http://technet.microsoft.com/en-us/library/cc179097%28v=office.15%29.aspx.
Important: Office 2013 Security Settings
Although the OCT is the primary tool for customizing an Office 2013 deployment, you should be aware of one important caveat. Some settings that you specify in the OCT, such as security-related Office settings, can be changed by users after the installation. To enforce such settings, use Group Policy. For more information about using Group Policy for securing Office 2013, see http://technet.microsoft.com/en-us/library/ff400327(v=office.15).aspx.
Using the Config.xml file
You can use the Config.xml file in addition to or separately from the OCT. The Config.xml file can customize the same settings that you can customize with the OCT. Often, administrators choose one or the other but prefer the OCT tool. If you use Config.xml and the OCT to customize a deployment, the Config.xml file overrides OCT settings if there is a conflict. By default, the Config.xml file is stored in the core product folder. For example, for Office 2013 ProPlus, the core product folder is ProPlus.WW. The Config.xml file customizes many installation options, including:
![]() The path of the network installation point.
The path of the network installation point.
![]() The product(s) to install.
The product(s) to install.
![]() User, company name, and other logging options.
User, company name, and other logging options.
![]() Additional languages.
Additional languages.
You can also use the Config.xml file to modify the settings of existing installations by running Setup again. After you customize a Config.xml file, you can reference it when launching the Office setup program, as follows:
\\tt-util-03\share\Office\setup.exe /config \\tt-util-03\share\Office\ProPlus.WW\Config.xml
Note: Editing Config.xml
Edit the Config.xml file with a text editor such as Notepad.
A Config.xml file might look similar to the following:
<Configuration Product="ProPlus">
<Display Level="full" CompletionNotice="yes" SuppressModal="no" AcceptEula="yes" />
<USERNAME Value="User01" />
<COMPANYNAME Value="Tailspin Toys" />
<INSTALLLOCATION Value="%programfiles%\Microsoft Office" />
<LIS CACHEACTION="CacheOnly" />
<LIS SOURCELIST="\\tt-util-03\share\Office" />
<DistributionPoint Location="\\tt-util-03\share\Office" />
<OptionState Id="OptionID" State="absent" Children="force" />
<Setting Id="SETUP_REBOOT" Value="IfNeeded" />
<Command Path="%windir%\system32\msiexec.exe" Args="/i \\tt-util-03\share\office.msi"
QuietArg="/q" ChainPosition="after" Execute="install" />
</Configuration>
More Info: Config.xml File Reference for Office 2013
For more detailed information about each of the parameters in the Config.xml file, as well as their expected values, see http://technet.microsoft.com/en-us/library/cc179195%28v=office.15%29.aspx.
Managing Office 2013 activation
When using the MSI method of deploying Office, Office is usually activated by using volume licenses. As mentioned earlier in this chapter, volume licenses can be activated by using either a KMS or a MAK. When using KMS, you don’t need to specify the product key as part of the installation. The product key is entered on the KMS host instead. However, if you’re using MAK, the customization method, either OCT or Config.xml, you must define the MAK product key.
If the customization method’s product key isn’t defined, the installation will still proceed. In such a case, you can configure the MAK after Office installation by using either the Volume Activation Management Tool (VAMT) or the Office Software Protection Platform script (ospp.vbs).
Volume Activation Management Tool
The VAMT is a free license management tool from Microsoft. It comes prepackaged with the Windows Assessment and Deployment Kit. After it’s installed, you can use it to manage license keys and activations centrally for Windows operating systems, Microsoft Office 2010, and Microsoft Office 2013. It can work as a stand-alone solution or with KMS and Active Directory–based activation. You can use the VAMT to perform the following tasks.
![]() Remotely install license keys on computers. For example, you can add a license key remotely to a computer that just had Office 2013 installed.
Remotely install license keys on computers. For example, you can add a license key remotely to a computer that just had Office 2013 installed.
![]() Remotely activate computers. You can activate Windows or Office remotely from the VAMT management console.
Remotely activate computers. You can activate Windows or Office remotely from the VAMT management console.
![]() Centrally manage your product keys for Windows and Office.
Centrally manage your product keys for Windows and Office.
![]() Run built-in licensing reports to view a variety of licensing and activation-related information such as which products are unlicensed, which products are not activated, and current usage of MAKs.
Run built-in licensing reports to view a variety of licensing and activation-related information such as which products are unlicensed, which products are not activated, and current usage of MAKs.
Upon first starting the VAMT, connect the VAMT to an existing SQL server, as shown in Figure 5-20; or you can install Microsoft SQL Server Express on the VAMT server. For best performance, use a dedicated SQL server. Specify the database name. If it doesn’t exist, VAMT creates a new database. The VAMT prompts you to create the database if it doesn’t find an existing database based on the specified name.

FIGURE 5-20 VAMT database connection
After connecting the VAMT to a database, the management console populates the tool with management areas. Initially, you won’t see any products or keys, as shown in Figure 5-21.
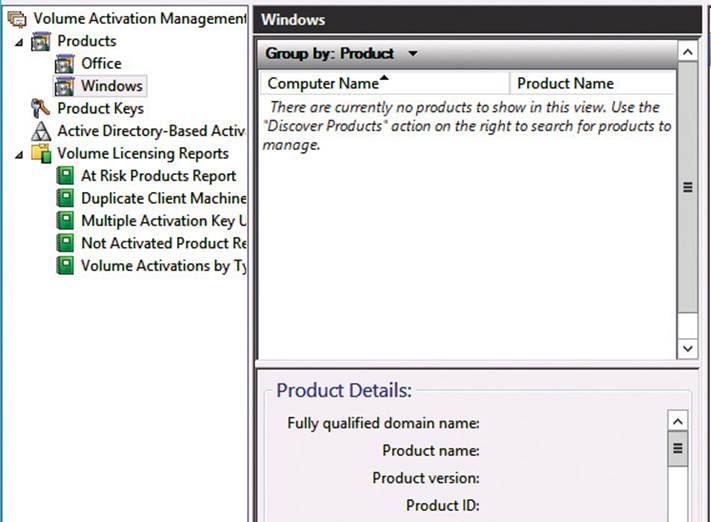
FIGURE 5-21 VAMT management console
Populate the VAMT with computers. To do this, right-click Products in the left pane and then click Discover Products. In the Discover Products dialog box, shown in Figure 5-22, leave the default option of Search For Computers In The Active Directory and then click Search.
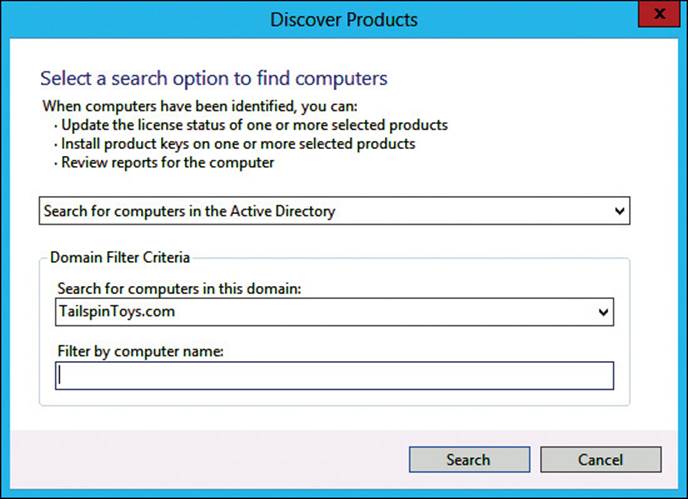
FIGURE 5-22 VAMT discovery
If successful, a pop-up window appears that indicates how many computers were discovered, as shown in Figure 5-23.
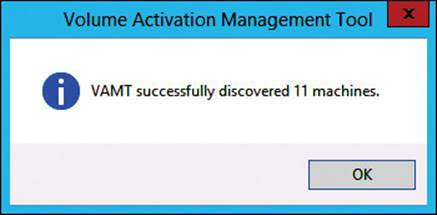
FIGURE 5-23 VAMT successful discovery
Add your product keys to VAMT. Although the exam focuses strictly on activating Office, be aware that you can add Windows product keys and Office product keys to VAMT. In Figure 5-24, the Add Product Keys dialog box shows example keys being added to VAMT.
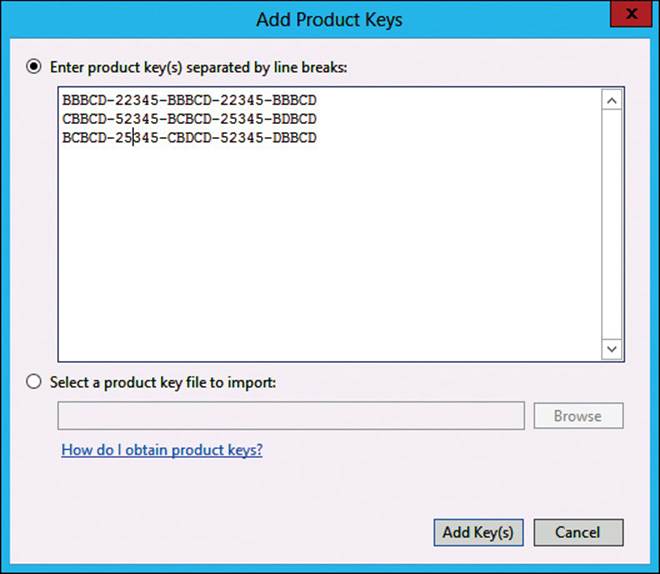
FIGURE 5-24 VAMT Add Product Keys dialog box
If the keys are added successfully, a notification window appears, indicating how many of the keys were successfully added, as shown in Figure 5-25.
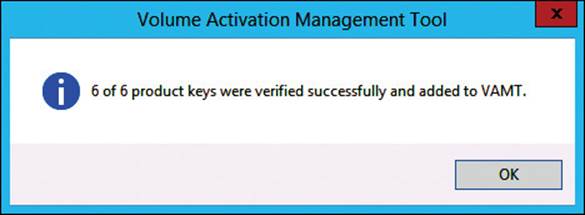
FIGURE 5-25 VAMT successful addition of product keys
At this point, you’ve added some computers and some product keys to VAMT. You can now install product keys and activate products remotely. In the following procedure, an Office 2013 product key is installed on a computer named TT-W7CLIENT-01, and Office is activated remotely.
1. In the VAMT console, shown in Figure 5-26, right-click the computer in the list of computers and then click Install Product Key.
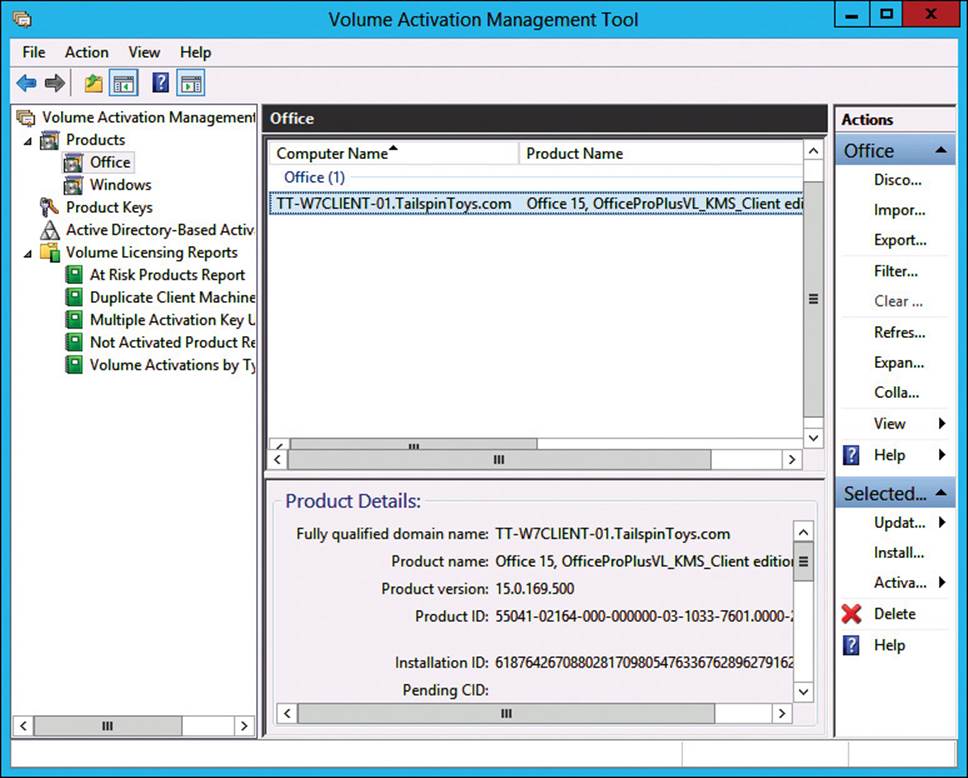
FIGURE 5-26 VAMT console
In the Install Product Key dialog box, shown in Figure 5-27, a list of the available product keys appears. The VAMT usually displays a recommended key. The recommended key is the product key that corresponds to the product. For example, if you add multiple Windows keys and one Office key to VAMT and you decide to install an Office product key on a computer, VAMT will recommend the Office key.
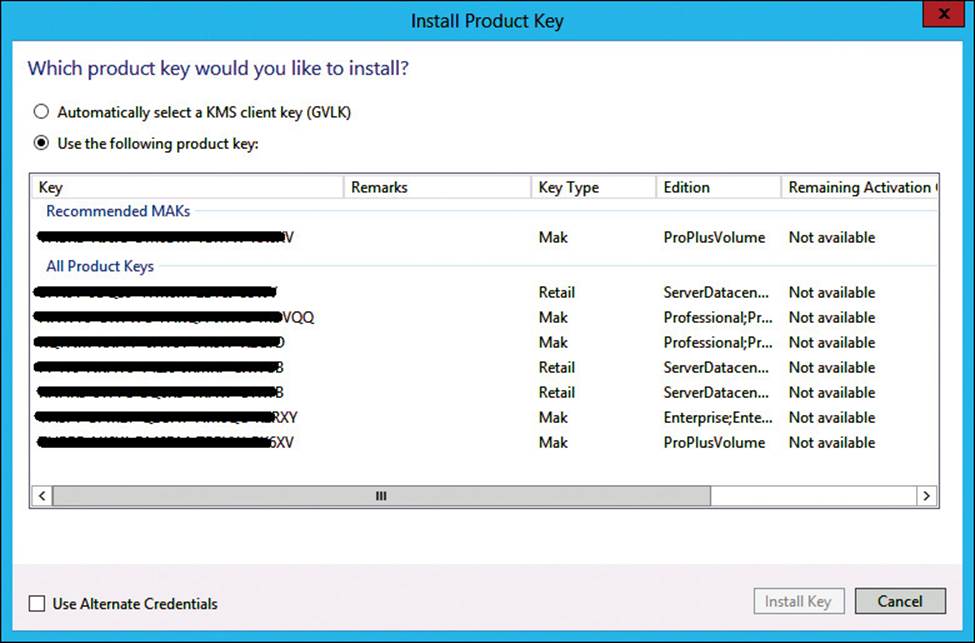
FIGURE 5-27 VAMT Install Product Key dialog box
2. Click to select the desired key and then click Install Key.
VAMT installs the product key on the selected computer and reports the status when complete. If successful, you see a success message, as shown in Figure 5-28.
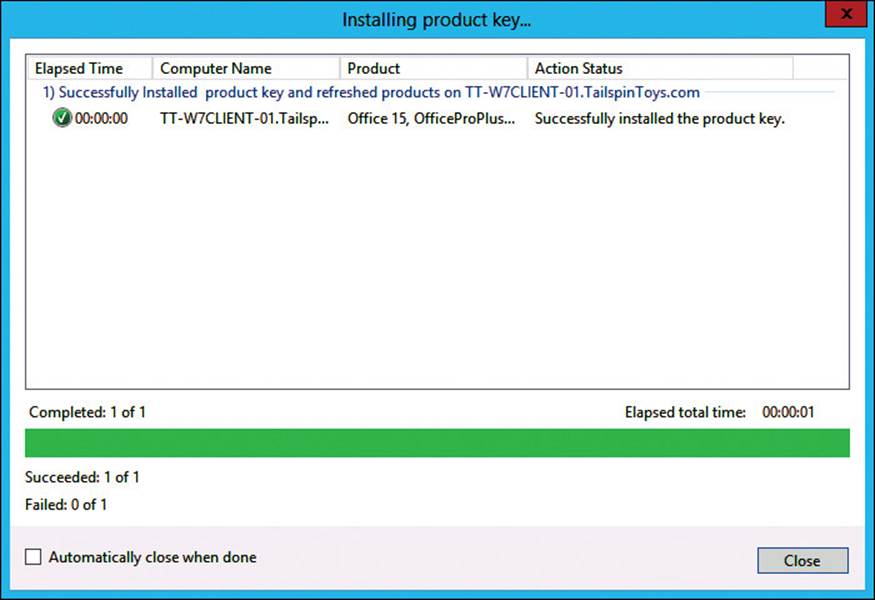
FIGURE 5-28 VAMT Installing Product Key window
3. Activate the product. Right-click the computer in the right pane, click Activate, click Online Activate, and then click Current Credential.
This attempts an online activation by using your current credentials. An Activating Products window displays the progress and status. If successful, a success message appears, as shown in Figure 5-29.
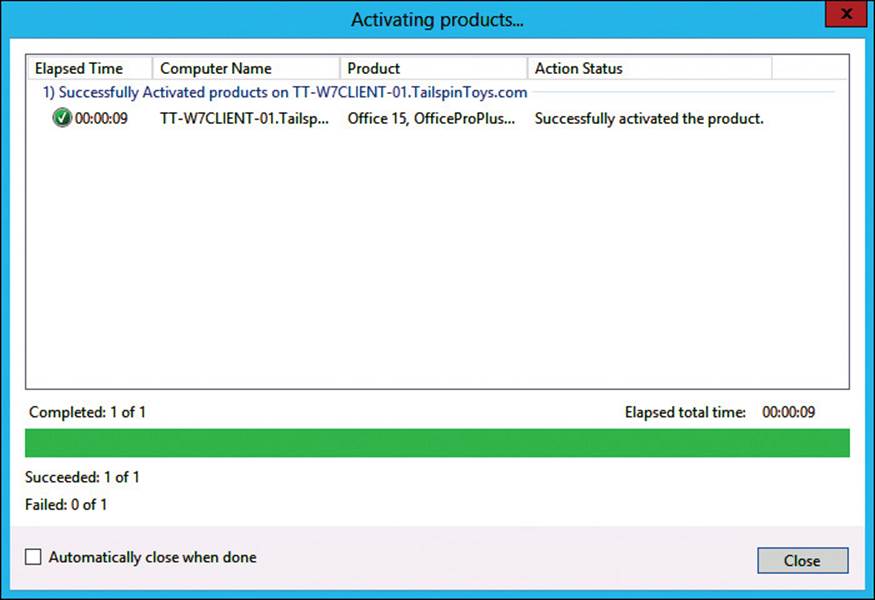
FIGURE 5-29 VAMT Activating Products window
In addition to the VAMT console, you can use Windows PowerShell to accomplish some VAMT management tasks. First, import the VAMT module by performing the following steps:
1. Start the 32-bit version of Windows PowerShell.
The VAMT module is not supported when using the 64-bit version of Windows PowerShell. You can use the 32-bit version of Windows PowerShell while on a 64-bit installation of Windows.
2. Navigate to the VMAT installation directory. By default, it is located at %ProgramFiles(x86)%\Windows Kits\8.1\Assessment and Deployment Kit\VAMT3.
3. Run the Import-Module .\VAMT.psd1 command to import the module.
After the import is complete, you have access to 12 cmdlets.
Exam Tip
The VMAT module for Windows PowerShell is new to VMAT 3.1. Prior to VMAT 3.1, you could use the vmat.exe command-line utility to perform VMAT management tasks. However, vmat.exe is no longer available and does not come with VMAT 3.1. Watch out for answer choices that use vmat.exe, especially in scenarios that mention VAMT 3.1.
Key Management Service
The KMS is a server-based solution that provides activation for Microsoft products on a network. A client that has a product that requires activation will contact the KMS host on the network. The client does not have a product key because all product keys are specified on the KMS host. KMS uses remote procedure calls through TCP port number 1688.
Exam Tip
The KMS threshold for Office 2013 is five computers; at least five computers must have requested activation before KMS begins activating clients. Therefore, the first four computers will not activate until the fifth has been deployed and requests activation.
By default, when a client is activated with KMS, the license is valid for 180 days. The client contacts the KMS host after 180 days to verify that the license is still valid. If the activation is unsuccessful in a 180-day period, Office enters the out-of-tolerance license state for 30 days. Users are prompted for activation during this 30-day time period. If Office is still not licensed after 30 days, users receive an unlicensed notification, and the title bar of the user interface becomes red.
To trigger activation, run the cscript ospp.vbs /act command. If successful, a successful message appears along with other license data, as shown in Figure 5-30.
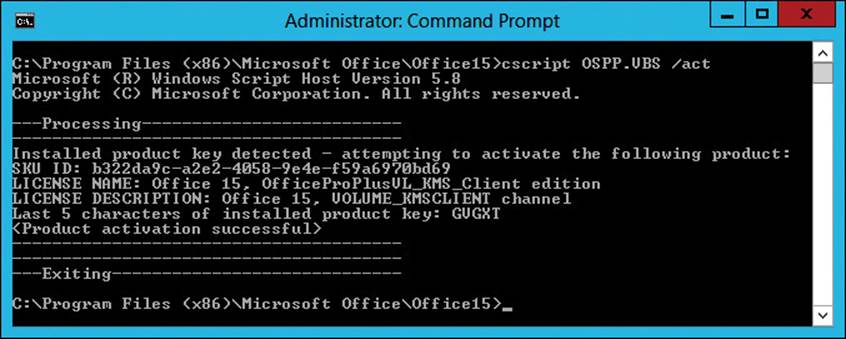
FIGURE 5-30 Command prompt activation
Multiple Activation Key (MAK)
To activate Office, you can use a MAK as a one-time activation process that communicates directly with Microsoft hosted activation services. Each MAK key has a predefined maximum number of activations, which are typically in the volume license agreement. The maximum activation limit does not always match the number of licensed installations.
Activations with MAKs can be performed in two ways:
![]() MAK independent activation
MAK independent activation
![]() MAK proxy activation by using VAMT
MAK proxy activation by using VAMT
Independent activation requires each computer to contact the Microsoft hosted activation service. Activation can be performed over the Internet or by telephone. This type of activation is recommended for computers that are not always connected to a corporate network.
Proxy activation with VAMT centralizes individual requests from multiple computers to a single proxy, which contacts Microsoft directly. Proxy activation is configured with the VAMT and is recommended for large organizations with computers that have corporate network access. It is also useful in test environments where the computers might not have Internet access.
Active Directory–based activation
When using computers running Windows 8 or later, Office activation can also be performed by using Active Directory–based activation, which requires a computer running Windows 8, Windows 8.1, Windows Server 2012, or Windows Server 2012 R2 to support the activation of all deployments in the domain. The computer will have a generic volume license key or KMS key pair. When using Active Directory–based activation, the Office installation is activated for 180 days. The Software Protection Platform service (SPPSvc) occasionally attempts to activate Office, which will then reset the activation for another 180 days.
Updating a deployment
There are many types of updates for Office. They include:
![]() Service packs
Service packs
![]() Security updates
Security updates
![]() General updates
General updates
![]() Hotfixes
Hotfixes
There are many methods to deploy the updates, including:
![]() Microsoft Updates
Microsoft Updates
![]() Windows Server Updates Services (WSUS)
Windows Server Updates Services (WSUS)
![]() System Center 2012 Configuration Manager (ConfigMgr)
System Center 2012 Configuration Manager (ConfigMgr)
![]() Microsoft Self-Extractor files
Microsoft Self-Extractor files
![]() Updates folder
Updates folder
Microsoft Updates is a common method of applying Office updates because they are downloaded directly from Microsoft during a normal update cycle. This method uses the settings that have been configured on the Windows client to download or install updates automatically.
Larger environments often use a WSUS server in addition to Microsoft Updates. In such environments, computers use the Microsoft Updates settings but contact and download the updates from a local WSUS server. This reduces the bandwidth to the Internet because only one computer is downloading updates. Each client then receives the updates from the local network.
Enterprises can also use ConfigMgr as a software distribution tool to control the deployment and update process for all client computers.
Microsoft Self-Extractor files are software updates in a downloadable file. This is useful if you want to control the update process manually, such as in a test environment. There are many command-line parameters to enable scripted deployment for larger environments.
The Updates folder of the installation source can also be used to slipstream updates to new deployments. This folder is only for new installations and does not affect any existing deployments. The files placed in the Updates folder will be used during the deployment process to update Office automatically during the installation.
Integrating Lite-Touch deployment
Office 2013 can be included in a Lite-Touch deployment by performing a deployment with the Microsoft Deployment Toolkit (MDT). The Deployment Workbench of MDT enables you to add applications to a repository, including Office 2013, for use with task sequences. To add an application to the deployment work, select the Applications tree items, as shown in Figure 5-31, and then click New Application.
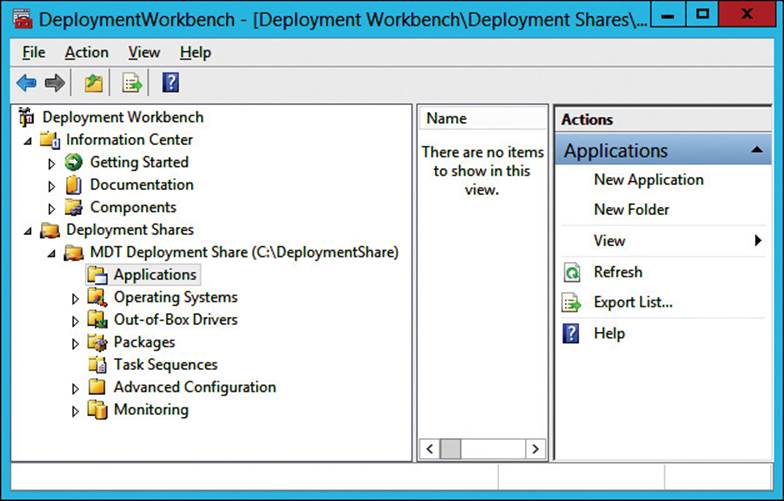
FIGURE 5-31 MDT Deployment Workbench
The New Application Wizard appears, as shown in Figure 5-32, in which one of three options can be selected. The choice you make depends on how you want to use the installation files to install the application during the deployment. The available options are:
![]() Application With Source Files.
Application With Source Files.
![]() Application Without Source Files Or Elsewhere On The Network.
Application Without Source Files Or Elsewhere On The Network.
![]() Application Bundle, which only installs application dependencies.
Application Bundle, which only installs application dependencies.
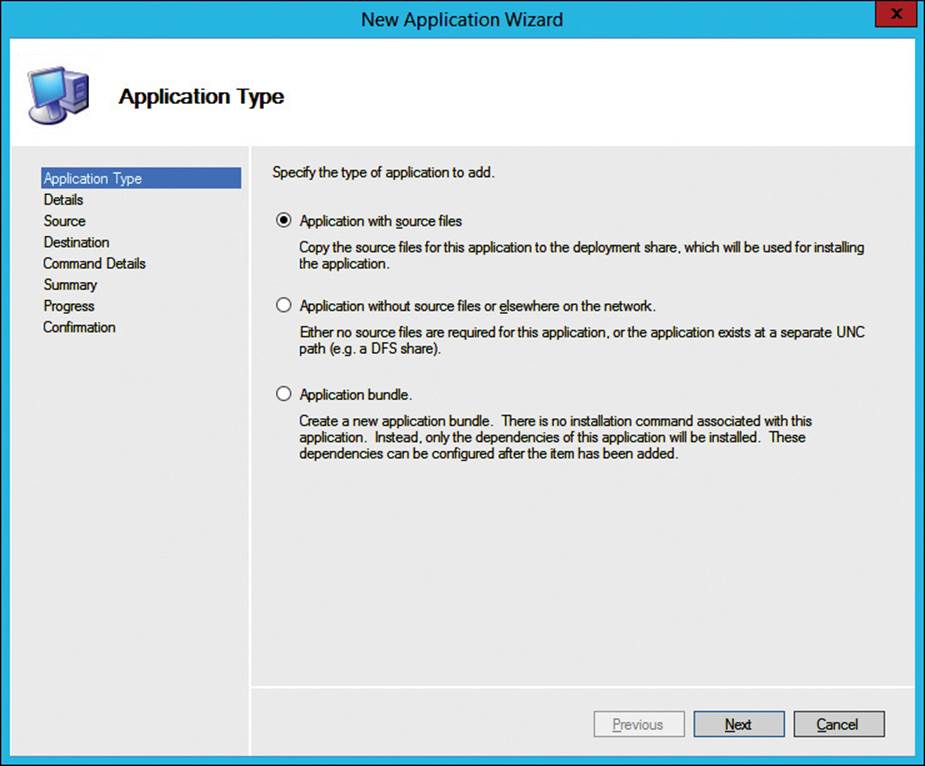
FIGURE 5-32 MDT New Application Wizard, Application Type page
The Details page of the New Application Wizard, shown in Figure 5-33, asks for details of the application, including:
![]() Publisher
Publisher
![]() Application Name
Application Name
![]() Version
Version
![]() Language
Language
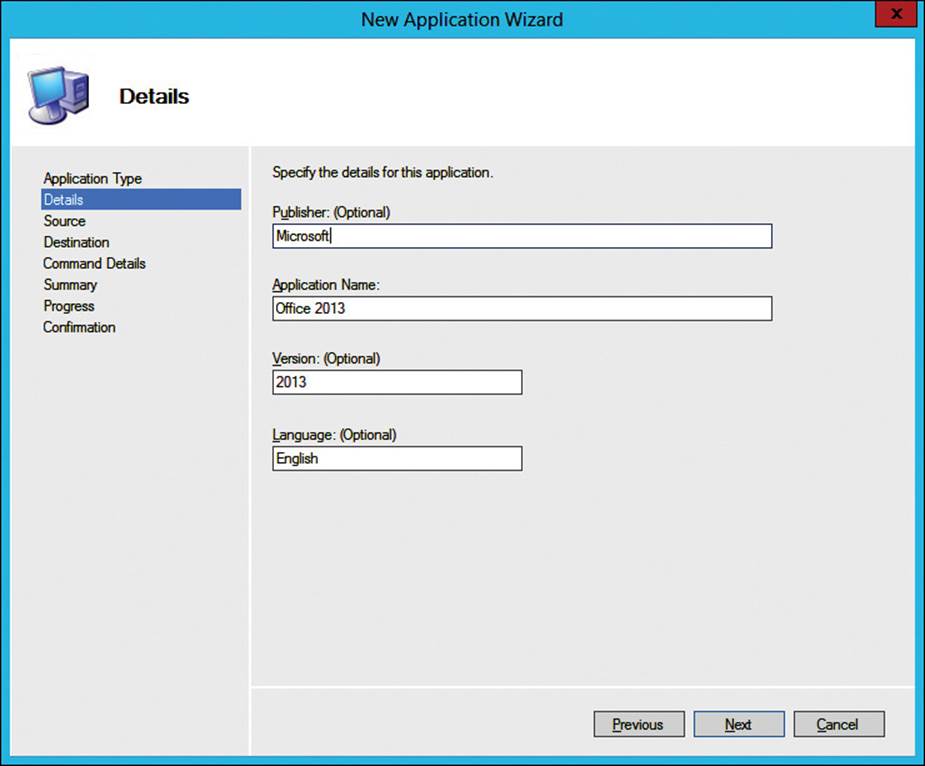
FIGURE 5-33 MDT New Application Wizard, Details page
The only required field is the Application Name field. However, additional details that are provided can be useful when there are application updates or when multiple languages are needed.
The New Application Wizard then asks for the source installation files, as shown in Figure 5-34. Click Browse and then provide the folder location where the installation files are located. In this instance, Application With Source Files on the first screen of the wizard was selected; therefore, the installation files will be copied from the provided location to the deployment share. In this example, a location with the mounted Office 2013 ISO file is used.
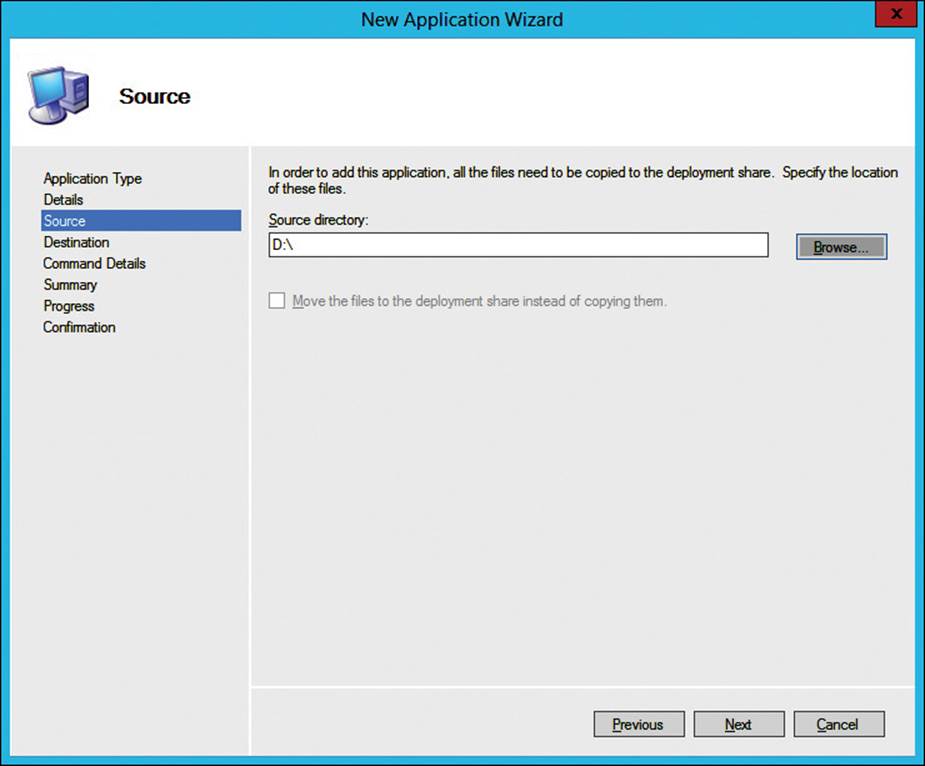
FIGURE 5-34 MDT New Application Wizard, Source page
The wizard then asks how you want to name the destination directory that will be created. By default, this is automatically populated with the name of the application, as shown in Figure 5-35.
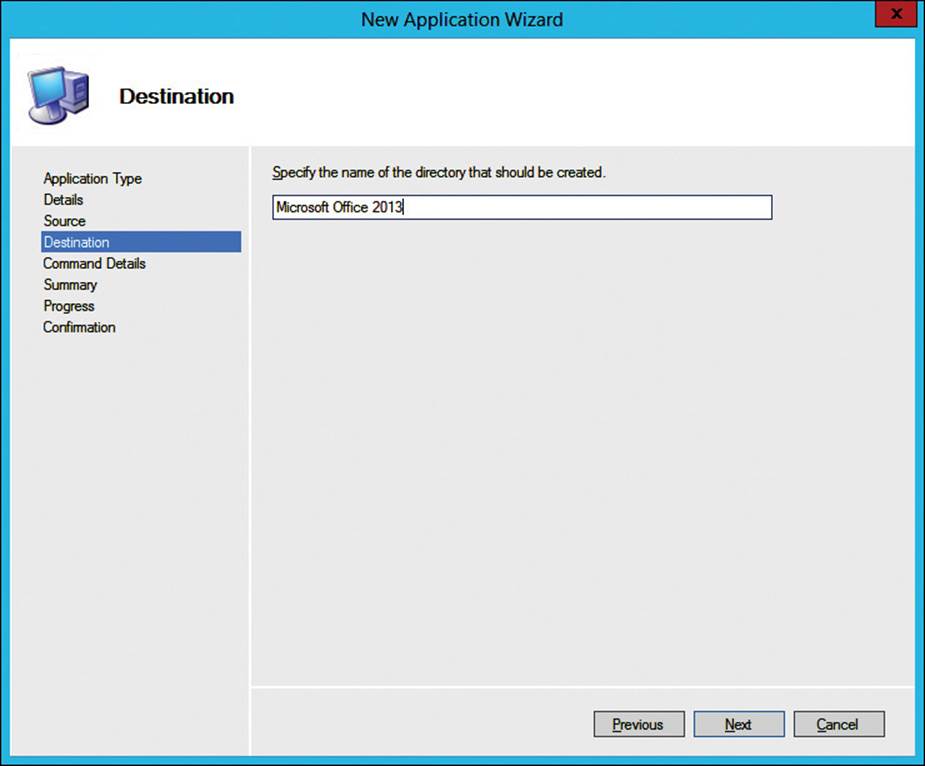
FIGURE 5-35 MDT New Application Wizard, Destination page
The wizard will then ask for a command to install the application quietly, or without user interaction, as shown in Figure 5-36. Because you are installing Office 2013, specify the setup utility and the /config parameter with the location of the Config.xml file. The Config.xml settings should include the necessary configuration for a quiet installation.
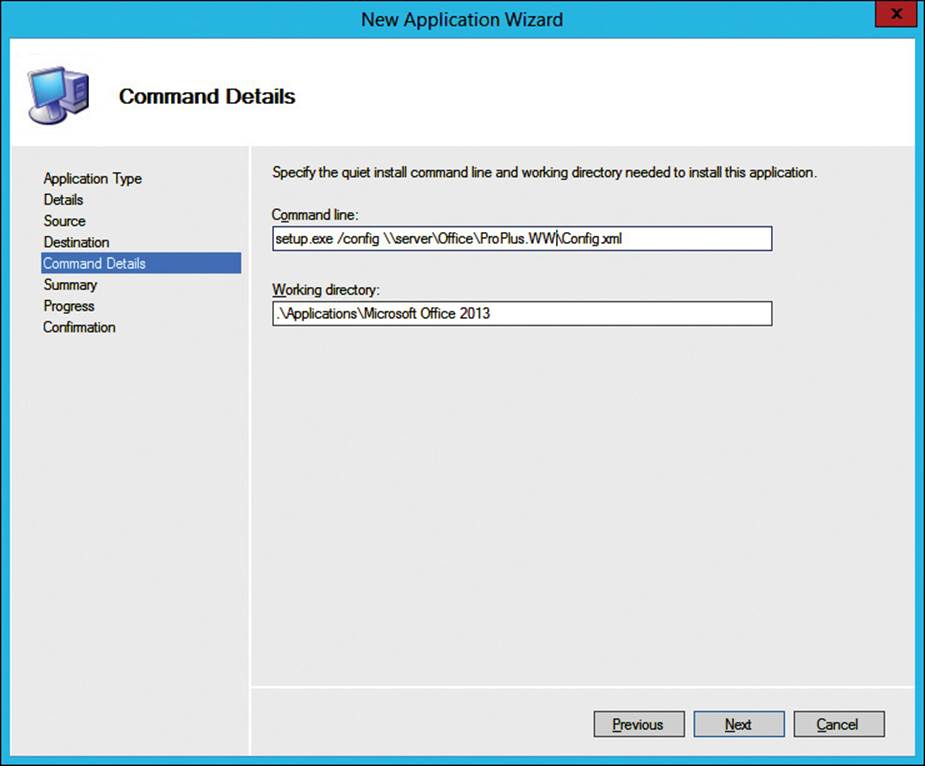
FIGURE 5-36 MDT New Application Wizard, Command Details page
The Confirmation page appears, as shown in Figure 5-37. On this page, you can review the information that has been specified during the wizard. Click Next to begin copying the installation files from the original directory to the deployment share. After the process has completed, a success confirmation appears. Click Finish to close the wizard and complete the process.
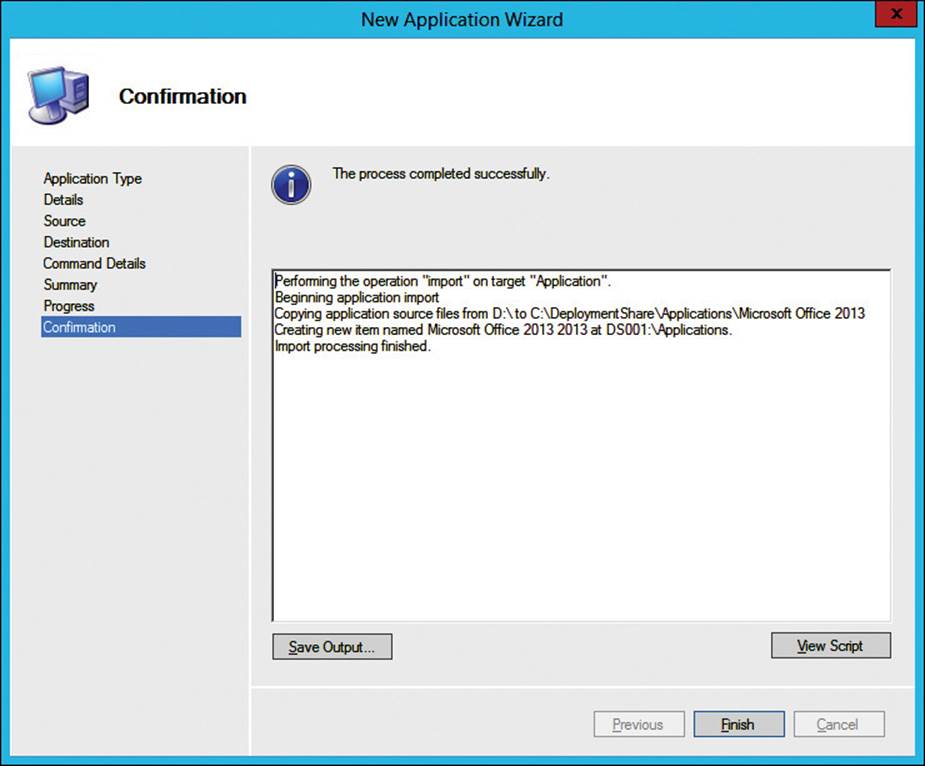
FIGURE 5-37 MDT New Application Wizard, Confirmation page
After you have added the application to the deployment share, it can be configured as part of a task sequence. The task sequence can then be included as part of an operating system deployment so that Office 2013 is installed automatically. To create a new task sequence, navigate to the Task Sequences menu, shown in Figure 5-38, and then click New Task Sequence from the Common Actions menu.
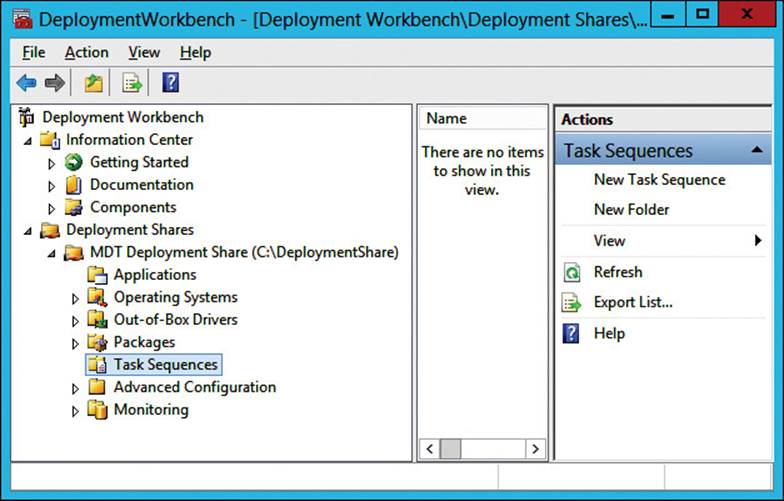
FIGURE 5-38 MDT Deployment Workbench, Task Sequences
The New Task Sequence Wizard begins, as shown in Figure 5-39. The wizard asks for the task sequence ID, sequence name, and any comments for the task sequence. Be descriptive when completing these fields so that they can be easily identified in the Deployment Workbench.
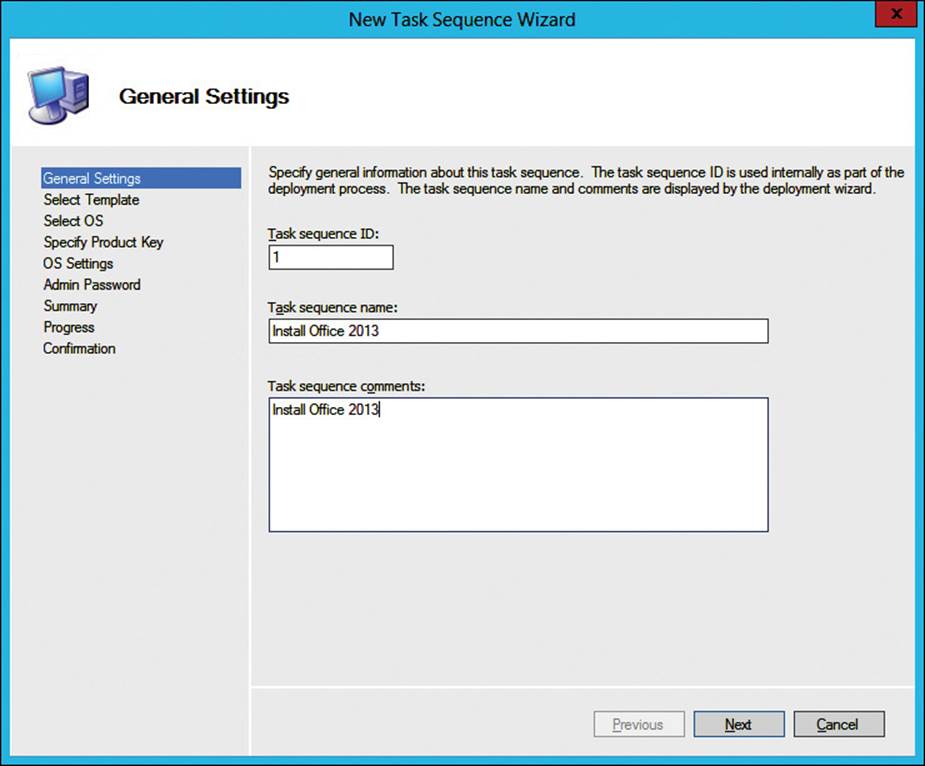
FIGURE 5-39 MDT New Task Sequence Wizard, General Settings page
The Task Sequence Wizard asks for the template to use for the task sequence, as shown in Figure 5-40. To install an application, select the Post OS Installation Task Sequence template.
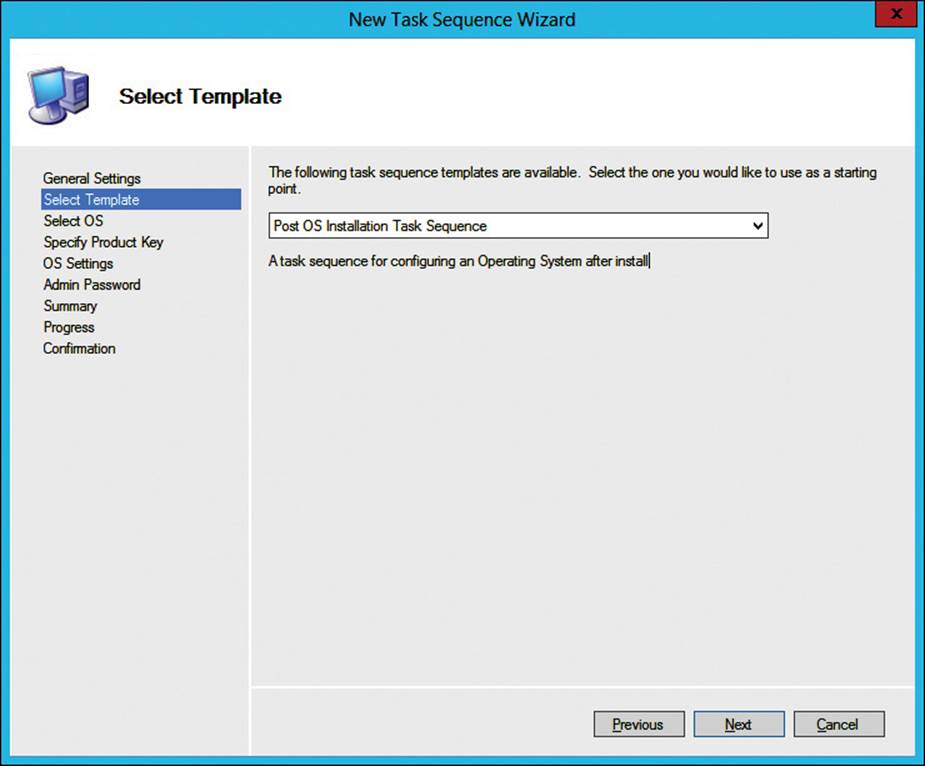
FIGURE 5-40 MDT New Task Sequence Wizard, Select Template page
After clicking Next, the remaining steps of the wizard are skipped, and you are taken directly to the Confirmation page, as shown in Figure 5-41. Click Next to confirm the settings and create the task sequence. The Confirmation page shows that the task sequence has been created successfully.

FIGURE 5-41 MDT New Task Sequence Wizard, Confirmation page
After the task sequence has been created, you can modify the properties of the task sequence and edit the steps that are taken during that sequence. Specify the application that was previously added to the application repository in the Deployment Workbench, as shown in Figure 5-42.
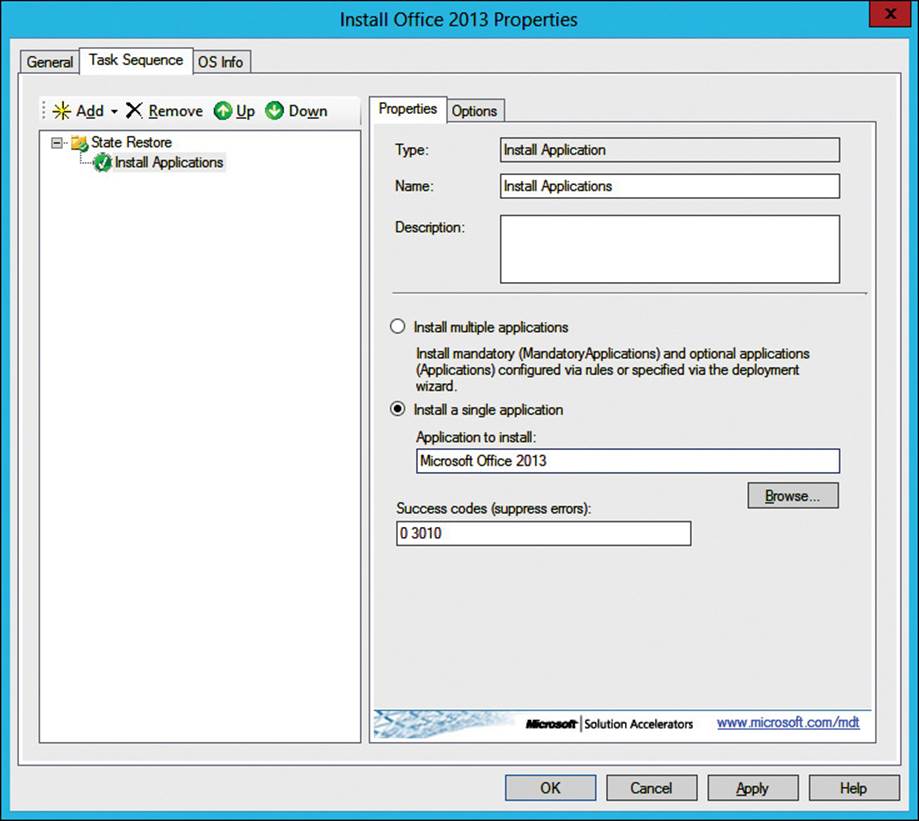
FIGURE 5-42 Task Sequence Properties dialog box
Re-arming Office 2013
After you install Office 2013, Office can remain unlicensed during a 25-day license grace period before activation notifications appear. To maximize the user experience, especially when deploying Office in an image, it is important to freeze the grace period so that future deployments are not automatically out of license immediately after deployment. If you don’t freeze the grace period, activation notifications appear to users during their first use of an Office application. To rearm Office on a computer, open an administrative command prompt. Navigate to the %ProgramFiles(x86)%\Microsoft Office\Office15 directory. Run the ospprearm.exe command. If successful, a success message appears, as shown in Figure 5-43.
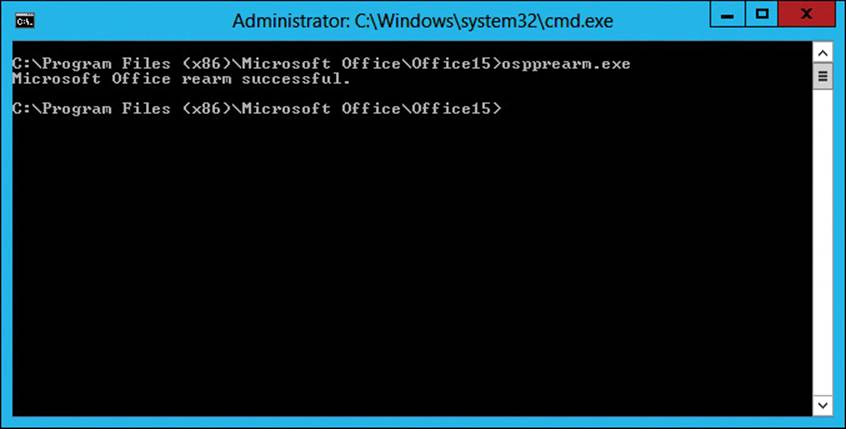
FIGURE 5-43 Re-arming Office 2013
You should be aware of the following facts about re-arming Office:
![]() You can re-arm an Office installation up to five times.
You can re-arm an Office installation up to five times.
![]() When using a KMS host, you re-arm one additional time to bring to six the total number of allowed re-arms.
When using a KMS host, you re-arm one additional time to bring to six the total number of allowed re-arms.
![]() Re-arming resets the grace period to 30 days.
Re-arming resets the grace period to 30 days.
![]() Re-arming stops the grace period timer until an Office application or ospp.vbs is run.
Re-arming stops the grace period timer until an Office application or ospp.vbs is run.
![]() Re-arming resets the computer ID (CMID) so that subsequent installations are counted as unique for KMS activations. Remember, KMS requires a minimum of five unique activation requests of Office before it begins activating Office.
Re-arming resets the computer ID (CMID) so that subsequent installations are counted as unique for KMS activations. Remember, KMS requires a minimum of five unique activation requests of Office before it begins activating Office.
![]() If you are using MAKs, you should activate Office remotely to ensure that users do not get activation notifications upon first running an Office application. You can activate Office remotely by using the VAMT or ospp.vbs.
If you are using MAKs, you should activate Office remotely to ensure that users do not get activation notifications upon first running an Office application. You can activate Office remotely by using the VAMT or ospp.vbs.
Providing slipstream updates
Updates for Office can be downloaded from the Microsoft website as .exe files. To provide the update automatically during an installation, the .msp file must be extracted from the .exe file and included with the installation files. To extract the .msp file from the .exe file to E:\Updates, run the following command:
outlook2013-kb273132-fullfile-x86-glb.exe /extract:"E:\Updates"
After the update has been extracted, you are prompted to accept the license agreement. After accepting the license agreement, the MSP file is extracted to the location you provided, and a confirmation window appears, as shown in Figure 5-44.
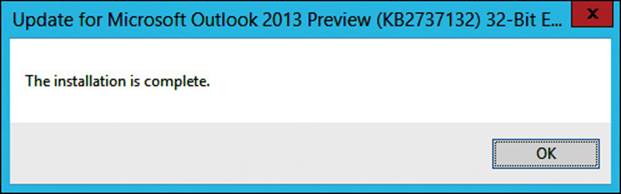
FIGURE 5-44 Update confirmation window
You can also verify that the extraction was successful by navigating to the directory you provided in the command. A license agreement file, MSP file, and XML file should exist for the update that was extracted, as shown in Figure 5-45.
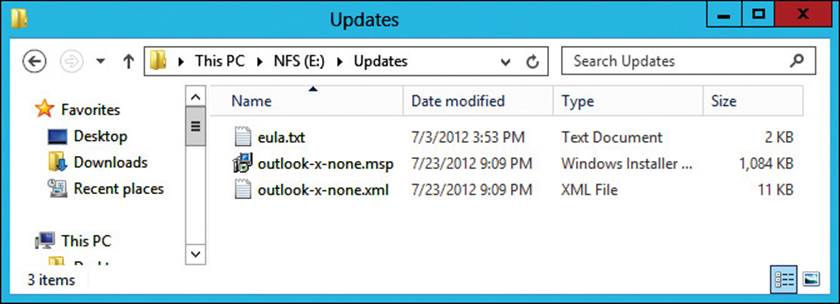
FIGURE 5-45 View of the extracted files in File Explorer
After the MSP files have been extracted from the EXE, they can be provided with the installation files. If the extraction was not to the Updates folder of the installation files, copy the files to the Updates folder. You must repeat this process for each update that must be included when performing a deployment or installation.
In larger deployments, multiple installation locations might be necessary—for example, a deployment for multiple offices. For bandwidth or other reasons, each office might require a local copy of the installation files. You can update the Config.xml file to include multiple network locations by using the SUpdateLocation parameter. The syntax for use in the Config.xml file is:
<SetupUpdates [CheckForSUpdates="Yes" |"No"] [SUpdateLocation="path-list"]/>
To check for updates in a location on a server named tt-util-01 and a server named tt-util-02, you would use the following syntax:
<SetupUpdates CheckForSUpdates="Yes" SUpdateLocation="\\tt-util-01\updates;\\tt-util-02
\updates"/>
Exam Tip
Update files typically reside in the Updates folder. However, if another location or directory must be used, it is possible to list alternate locations with the SUpdateLocation parameter in the Config.xml file.
Alternatively, you can specify additional locations by using the Office Customization Tool (OCT). These network locations would be included in the custom MSP file that is created when saving the OCT settings.
More Info: Distributing Updates for Office 2013 Products
For more information about distributing updates for Office 2013, see http://technet.microsoft.com/en-us/library/cc178995%28v=office.15%29.aspx.
Thought experiment: Deploying Office at Alpine Ski House
You work as a systems administrator for Alpine Ski House, an outdoor recreational company specializing in ski vacations with four locations. Eight hundred employees are spread across the four locations. Alpine Ski House currently uses Office 2010, and each client computer has a local installation of it. The company has decided to deploy Office 2013, and you plan to explore deployment methods and potential customizations.
1. Some of the ski instructors have a portable computer that is only occasionally connected to the network. You want to allow the ski instructors to install Office 2013 manually when it is convenient for them. What should you do?
2. The management team has requested only Office Word and Excel to be part of the Office 2013 installation for a couple of departments. How should you handle this?
3. The IT team struggled to keep up with updating Office 2010. Sometimes, updates weren’t installed at regular intervals or were delayed. For Office 2013, the company has requested more timely updates. What should you do to automate timely updates of Office 2013?
Objective summary
![]() Office 2013 can be deployed by a variety of methods when using an MSI. There are many supported deployment methods, including
Office 2013 can be deployed by a variety of methods when using an MSI. There are many supported deployment methods, including
![]() Local and network installations
Local and network installations
![]() Scripts
Scripts
![]() Software distribution products
Software distribution products
![]() Application virtualization
Application virtualization
![]() Each of these deployment methods can be customized for the specific environment by using either the Office Customization Tool or the Config.xml file.
Each of these deployment methods can be customized for the specific environment by using either the Office Customization Tool or the Config.xml file.
![]() After Office has been deployed, you can activate it by using the Key Management Service, a multiple activation key, or Active Directory–based activation.
After Office has been deployed, you can activate it by using the Key Management Service, a multiple activation key, or Active Directory–based activation.
![]() Office updates can be applied by using the traditional Microsoft Updates service, a WSUS server, ConfigMgr, or self-extractor files or by slipstreaming the updates as part of the deployment.
Office updates can be applied by using the traditional Microsoft Updates service, a WSUS server, ConfigMgr, or self-extractor files or by slipstreaming the updates as part of the deployment.
![]() You can slipstream updates into an Office 2013 installation by extracting the MSP file from the downloadable EXE file.
You can slipstream updates into an Office 2013 installation by extracting the MSP file from the downloadable EXE file.
Objective review
1. Which of the following are supported methods of deploying an Office 2013 MSI? (Choose two. Each correct answer presents a complete solution.)
A. Group Policy software installation
B. Group Policy startup script
C. AppLocker
D. Windows Intune
2. Which Office customization method uses an MSP file?
A. Office Customization Tool
B. Config.xml
C. Group Policy script
D. Windows Intune
3. Which activation methods verify the Office license every 180 days? (Choose two. Each correct answer presents a complete solution.)
A. Key Management Service
B. Multiple Activation Keys
C. Active Directory–based activation
D. Windows Server Update Services
Objective 5.3: Deploy Office 2013 by using Click-to-Run
Click-to-Run technology is a streaming and virtualization method of deploying Office applications. You can use the streaming technology to enable users to use an Office product before all its applications have been downloaded to the local computer. The virtualization aspect of the technology isolates the run-time environment for Office so you can run two versions of Office, such as Office 2010 and Office 2013, side by side on the same computer. However, the versions must be on the same architecture, either 32-bit or 64-bit. Click-to-Run is an alternate method of deploying Office to the MSI method that was discussed earlier in this chapter. Click-to-Run is available for the following Office products:
![]() Office Professional 2013
Office Professional 2013
![]() Office Home and Business 2013
Office Home and Business 2013
![]() Office Home and Student 2013
Office Home and Student 2013
![]() Office 365 ProPlus
Office 365 ProPlus
![]() Visio Pro for Office 365
Visio Pro for Office 365
![]() Project Pro for Office 365
Project Pro for Office 365
![]() SharePoint Designer 2013
SharePoint Designer 2013
![]() Lync 2013
Lync 2013
![]() Lync 2013 Basic
Lync 2013 Basic
To determine whether Office was installed by using Click-to-Run, check to verify that the VirtualOutlook key exists in the following registry location:
HKEY_LOCAL_MACHINE\Software\Microsoft\Office\15.0\Common\InstallRoot\Virtual\VirtualOutlook
If the key exists with a value that indicates the product language—for example: en-us—Office was installed by using Click-to-Run.
This objective covers the following topics:
![]() Configure licensing
Configure licensing
![]() Customize deployment
Customize deployment
![]() Configure updates
Configure updates
![]() Monitor usage by using Office Telemetry Dashboard
Monitor usage by using Office Telemetry Dashboard
Configuring licensing
Click-to-Run is available from both a traditional license purchase, such as retail or volume license, and from Office 365. The licensing model you choose doesn’t affect how Click-to-Run operates. If using a traditional license, you can use Click-to-Run to distribute the installation files from the Office 2013 product. If using Office 365 with the appropriate licensing, you can still deploy Office 2013 by using Click-to-Run. The licensing type that you use depends on the business requirements.
Customizing deployment
When using Click-to-Run, you use a Configuration.xml file to configure installation and update parameters. The Office Deployment Tool (ODT) includes a sample Configuration.xml file that you can customize for your specific deployment. You can customize the configuration file to handle the following tasks:
![]() Add or remove products from the installation
Add or remove products from the installation
![]() Add or remove languages from the installation
Add or remove languages from the installation
![]() Specify the display options
Specify the display options
![]() Configure the logging location
Configure the logging location
![]() Configure software updates
Configure software updates
The following is a sample Configuration.xml file
<Configuration>
<Add SourcePath="\\tt-util-03\Office\" OfficeClientEdition="32" >
<Product ID="O365ProPlusRetail">
<Language ID="en-us" />
</Product>
</Add> -->
<Updates Enabled="TRUE" />
<Display Level="None" AcceptEULA="TRUE" />
<Logging Path="%temp%" />
<Property Name="AUTOACTIVATE" Value="1" />
</Configuration>
Another benefit of using Click-to-Run is that language-neutral resources are packaged together and contain all the resources. Language-specific resources are packaged separately and strictly only for that language, for example, en-us for English (United States). Then, you have the option to install multiple languages, or the product can be installed in each language. If you are using Office 365 with Office ProPlus, you can use the Office 365 portal to manage language installations, or end users can select additional languages from the portal. A view of the ODT folder with the setup program and the configuration file is shown in Figure 5-46.
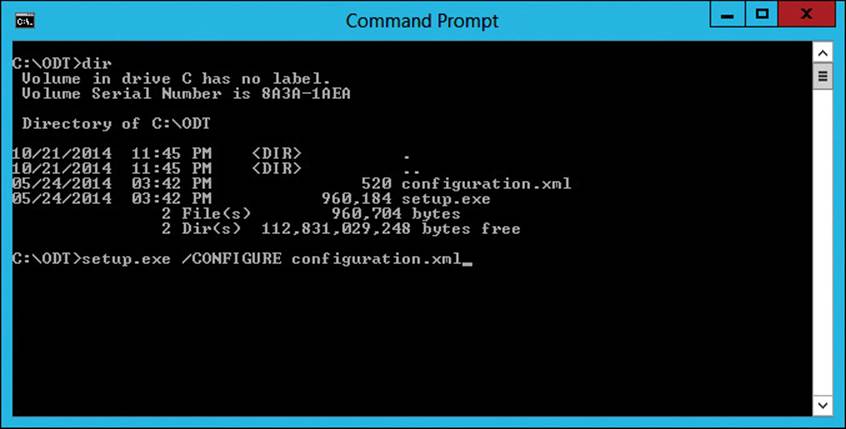
FIGURE 5-46 Office Click-to-Run setup
Exam Tip
You can’t customize the installation location for Office when using Click-to-Run. You must deploy it to the system drive only.
More Info: Click-to-Run configuration.xml File
For more information about the Click-to-Run configuration.xml file, see http://technet.microsoft.com/en-us/library/jj219426%28v=office.15%29.aspx.
Configuring updates
When using Click-to-Run, you can choose from three options for software updates:
![]() Automatically update Office from the Internet For this option, Microsoft pushes out updates over the Internet as they are released. Office installations are automatically updated after the updates are finished downloading. If any Office applications are running when the update installation begins, those updates will be delayed until the application is closed and opened again.
Automatically update Office from the Internet For this option, Microsoft pushes out updates over the Internet as they are released. Office installations are automatically updated after the updates are finished downloading. If any Office applications are running when the update installation begins, those updates will be delayed until the application is closed and opened again.
![]() Automatically update Office from an internal location This option is similar to the default option of automatically updating from the Internet. The key difference is that the update location is customized and usually points to an internal file server.
Automatically update Office from an internal location This option is similar to the default option of automatically updating from the Internet. The key difference is that the update location is customized and usually points to an internal file server.
![]() Disable automatic updates In some organizations, internal testing is required before updating applications. This is especially true in large enterprise environments or environments with a lot of complexity. In this case, you can download a monthly release of updates, test the updates, and then use your preferred deployment solution to push the updates out. Following are some of the most common reasons for disabling automatic updates:
Disable automatic updates In some organizations, internal testing is required before updating applications. This is especially true in large enterprise environments or environments with a lot of complexity. In this case, you can download a monthly release of updates, test the updates, and then use your preferred deployment solution to push the updates out. Following are some of the most common reasons for disabling automatic updates:
![]() Test compatibility of the updates with existing software. You might want to ensure that the updates work with Office add-ons or other infrastructure applications such as Microsoft Lync and Microsoft SharePoint.
Test compatibility of the updates with existing software. You might want to ensure that the updates work with Office add-ons or other infrastructure applications such as Microsoft Lync and Microsoft SharePoint.
![]() Adhere to a change control process. If you have specific change control windows, you might have to disable automatic updates to ensure that the updates are installed in the change control window.
Adhere to a change control process. If you have specific change control windows, you might have to disable automatic updates to ensure that the updates are installed in the change control window.
![]() Provide a consistent support experience. You might want all users at a specific location to get the updates at the same time or for all users company-wide to get the updates at the same time. This enables your support organization to prepare for extra activity if necessary. You can also provide notification to users about the upcoming updates and any changes that they should be aware of.
Provide a consistent support experience. You might want all users at a specific location to get the updates at the same time or for all users company-wide to get the updates at the same time. This enables your support organization to prepare for extra activity if necessary. You can also provide notification to users about the upcoming updates and any changes that they should be aware of.
For the option that automatically updates Office from the Internet, a daily scheduled task performs a check against the web service at http://officecdn.microsoft.com/. If an update is available, Office schedules a random time for the update to be downloaded and installed. The local computer checks the difference in data and downloads only the required files for the update, which reduces the required bandwidth. The Updates Enabled line of the Configuration.xml file dictates the update method. For this method, the line will read True, with no other configuration parameters, as follows.
<Updates Enabled="TRUE" />
If an internal location has been specified for updates, an administrator controls the update process. Each month, a new build version of Office is available to download by using the Office Deployment Tool. The administrator then specifies the network location that is accessible by the clients to store the files. Just as in the automatic update method, a daily scheduled task runs and checks the location of the network files. If updates are detected, they are applied in the background without requiring any interaction by the user. The Configuration.xml file entry would look like the following example:
<Updates Enabled="TRUE" UpdatePath="\\Server\OfficeShare\NewOfficeBuild" />
When you disable automatic updates, Office will not use an internal location or the Microsoft CDN servers to apply any updates. Instead, you control the update process by using your application deployment solution. However, you can set the Configuration.xml file to specify the exact version of Office that should be installed, and the client will ensure that the version is always the same as what is specified. For example, the configuration.xml entry would look like the following example:
<Updates Enabled="FALSE" />
<Add SourcePath="\\tt-util-04\Updates\" Version="15.0.xxxx.xxxx" OfficeClientEdition="32" >
Exam Tip
Be aware of the difference in parameters for configuring automatic updates as well as the location of the software binaries. You can view the list of available parameters for the Configuration.xml file at http://technet.microsoft.com/en-us/library/jj219426%28v=office.15%29.aspx.
Monitoring usage by using Office Telemetry Dashboard
Office Telemetry is a new feature in Office 2013 that monitors the compatibility of documents, gathers environment-specific information such as hardware and software versions, and tracks issues that end users run into while using Office. Because Office Telemetry wasn’t available in previous versions of Office, an agent must be deployed to collect information from a computer that is running Office 2003, Office 2007, or Office 2010.
The following use cases are some of the most common uses of Office Telemetry Dashboard:
![]() Maximize the chances of a successful migration from a previous version of Office to Office 2013. By using Office Telemetry Dashboard from the beginning of your migration, the support team can proactively monitor the telemetry data and take immediate action. This enables you to adjust your migration schedule for optimal times to reduce poor end-user experiences.
Maximize the chances of a successful migration from a previous version of Office to Office 2013. By using Office Telemetry Dashboard from the beginning of your migration, the support team can proactively monitor the telemetry data and take immediate action. This enables you to adjust your migration schedule for optimal times to reduce poor end-user experiences.
![]() Gather data in an Office 2013 pilot. If you’re still in a pilot stage of an Office deployment, telemetry data can help paint a very clear picture of usage and issues. The team can spend time resolving issues prior to beginning a production rollout of Office 2013.
Gather data in an Office 2013 pilot. If you’re still in a pilot stage of an Office deployment, telemetry data can help paint a very clear picture of usage and issues. The team can spend time resolving issues prior to beginning a production rollout of Office 2013.
![]() Analyze your existing Office documents to see whether they perform adequately in Office 2013. For example, your accounting or tax department might work with very large and complex Excel spreadsheets. Will the user experience be acceptable when opening and working with those spreadsheets? Use Office Telemetry Dashboard to find out.
Analyze your existing Office documents to see whether they perform adequately in Office 2013. For example, your accounting or tax department might work with very large and complex Excel spreadsheets. Will the user experience be acceptable when opening and working with those spreadsheets? Use Office Telemetry Dashboard to find out.
Office Telemetry Dashboard requires Excel 2013 and is installed automatically with Office Professional Plus 2013 and Office 365 ProPlus. It also requires the use of a SQL database. If an existing SQL server is in the environment, a new database can be created when you launch Office Telemetry Dashboard. Alternatively, you can use Microsoft SQL Server Express to create a new SQL instance and database. To get started, type Telemetry Dashboard from the Start screen and then run Office Telemetry Dashboard or Office Telemetry Dashboard For Office 2013. Excel will run and display a custom Office Telemetry Dashboard spreadsheet, as shown in Figure 5-47.
FIGURE 5-47 Office Telemetry Dashboard—Set Up Prerequisites in the Getting Started dialog box
Office Telemetry Processor is the agent that collects the data from Office and imports it into the database. The installation information is shown in Figure 5-48.
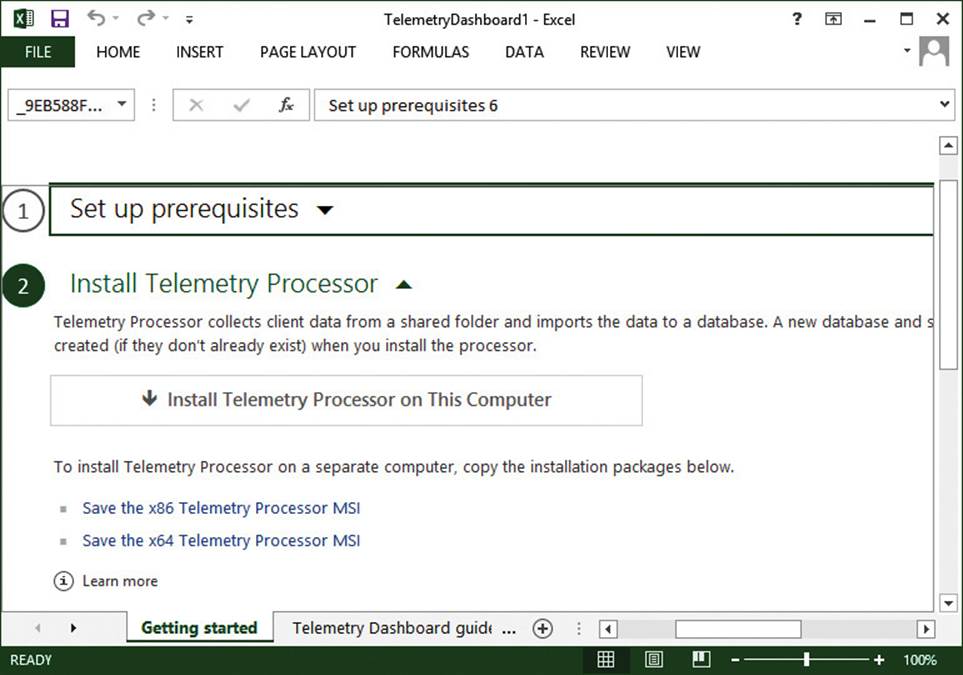
FIGURE 5-48 Office Telemetry Dashboard, Install Telemetry Processor
Office Telemetry Processor is a simple wizard installation. However, the SQL Server database must be online before reaching this point. The wizard prompts for the SQL Server and instance name and enables you to select or create a database in the instance, as shown in Figure 5-49.
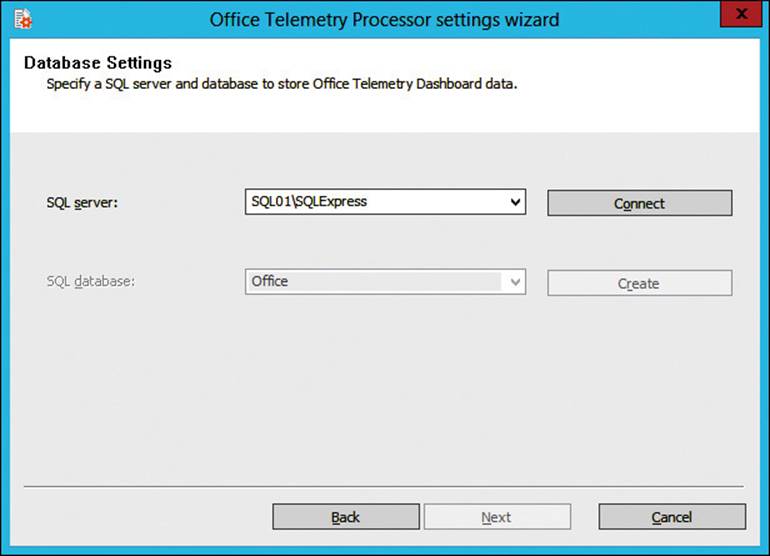
FIGURE 5-49 Office Telemetry Processor Settings Wizard
The next step in Office Telemetry Dashboard is to deploy Office Telemetry Agent to the necessary computers, as shown in Figure 5-50. As mentioned earlier, Office 2013 includes an agent that collects compatibility data. This is not true for Office 2003, Office 2007, or Office 2010, which require an additional agent. Save and deploy the agent to the computers that are running older versions of Office. The agent is packaged as an MSI file, so you can deploy it using Group Policy. You can also use Group Policy to configure Office Telemetry Agent by using the provided administrative templates.
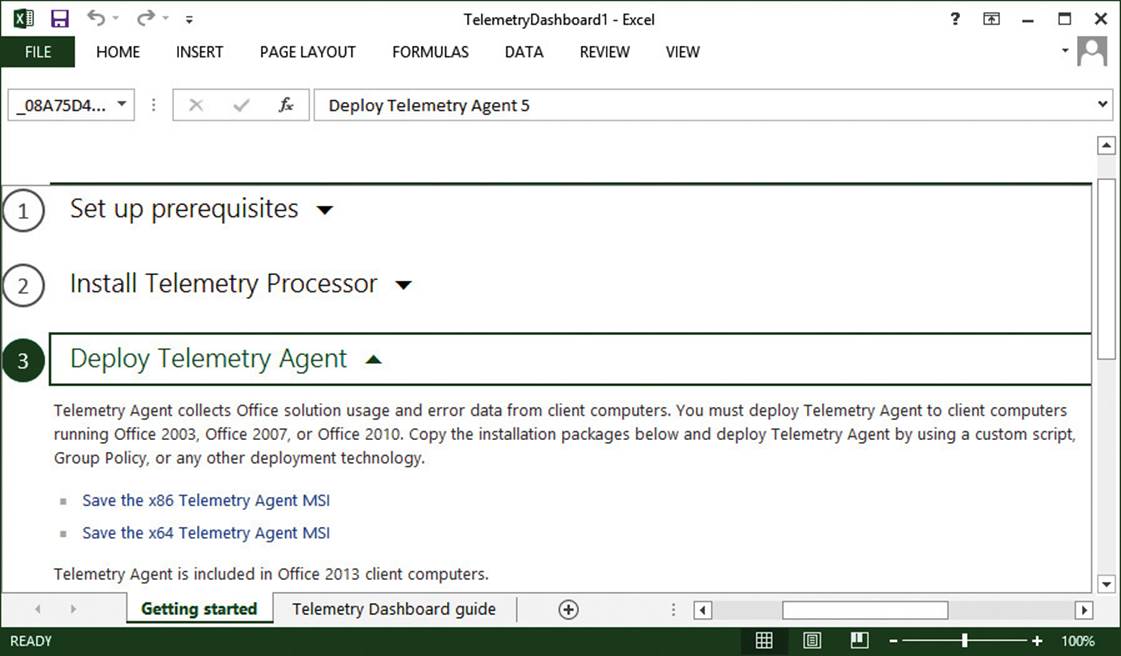
FIGURE 5-50 Office Telemetry Dashboard Deploy Telemetry Agent
After the agents have been deployed and configured, you can connect to the SQL database that was previously configured. The data that Office Telemetry Agent imported into the database appear. Various tabs are available to perform additional tasks, such as to
![]() Summarize the telemetry data from the Office clients.
Summarize the telemetry data from the Office clients.
![]() List the Office document files and their usage data.
List the Office document files and their usage data.
![]() List Office solutions such as COM and other add-ins.
List Office solutions such as COM and other add-ins.
![]() List the servers that are running Office Telemetry Processor.
List the servers that are running Office Telemetry Processor.
![]() List the versions of Office that have been deployed.
List the versions of Office that have been deployed.
![]() Create custom PivotTable reports.
Create custom PivotTable reports.
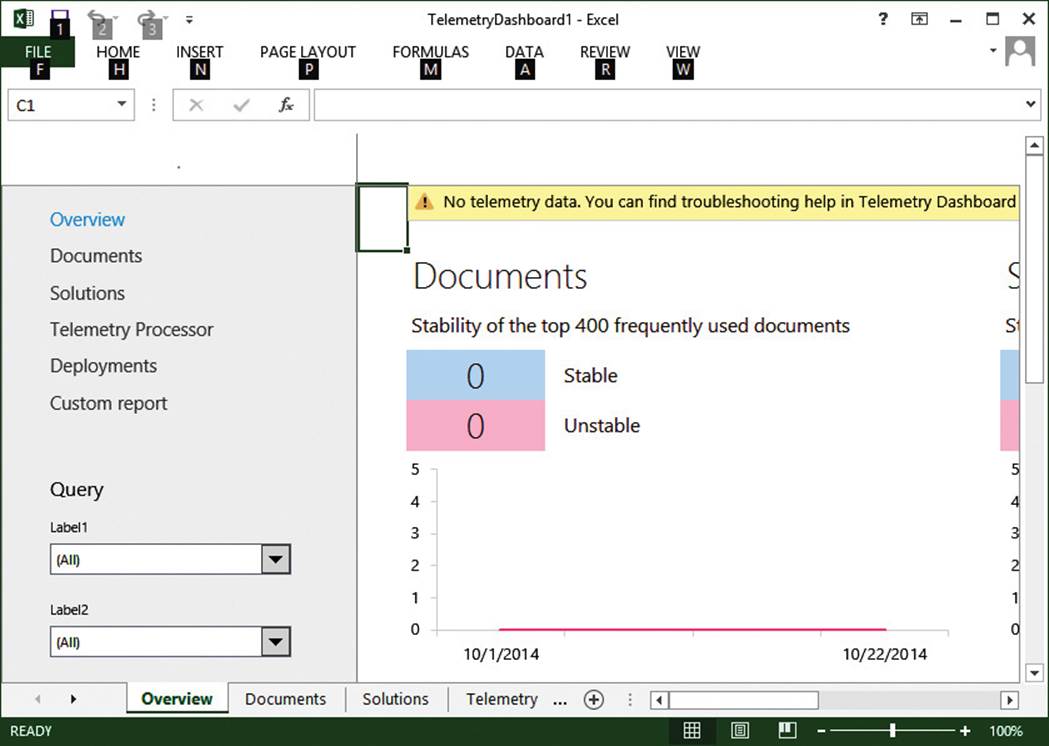
FIGURE 5-51 Office Telemetry Dashboard, Overview worksheet
Thought experiment
You are planning to migrate 300 computers from Office 2010 to Office 2013. During the migration, users must be able to run both versions of Office simultaneously. All compatibility issues must be centrally reported. You must also ensure that all Office updates are tested before being implemented on client computers.
1. How does selecting a license affect the available deployment methods?
2. What configuration parameters should be included in the Configuration.xml script?
3. What should be used to satisfy the reporting requirement?
Objective summary
![]() Click-to-Run is available for several versions of Office and Office applications.
Click-to-Run is available for several versions of Office and Office applications.
![]() Office 2013 licensing is available in two forms: traditional and Office 365. Either licensing type can be used with Click-to-Run.
Office 2013 licensing is available in two forms: traditional and Office 365. Either licensing type can be used with Click-to-Run.
![]() The Configuration.xml file specifies the parameters for customizing a Click-to-Run installation.
The Configuration.xml file specifies the parameters for customizing a Click-to-Run installation.
![]() There are three methods of updating Office software after it has been deployed by using Click-to-Run.
There are three methods of updating Office software after it has been deployed by using Click-to-Run.
![]() Office Telemetry Dashboard tracks Office application compatibility.
Office Telemetry Dashboard tracks Office application compatibility.
![]() Office Telemetry Dashboard requires a SQL Server database.
Office Telemetry Dashboard requires a SQL Server database.
![]() Office Telemetry Dashboard can take an inventory of the Office deployment.
Office Telemetry Dashboard can take an inventory of the Office deployment.
Objective review
Answer the following questions to test your knowledge of the information in this objective. You can find the answers to these questions and explanations of why each answer choice is correct or incorrect in the “Answers” section at the end of this chapter.
1. Which Office version does not support Click-to-Run?
A. Office Professional Plus 2013
B. Office 365 ProPlus
C. Office Home and Student 2013
D. Office Professional Plus 2010
2. How does virtualization technology enhance Office compatibility?
A. Enables you to install the 64-bit version of Office 2013 locally on a computer running a 32-bit version of Windows.
B. Allows multiple versions of Office to be installed.
C. Enables end users to manage software updates.
D. Prevents end users from denying software updates.
3. Which part of a Click-to-Run installation is not customizable?
A. Installation location
B. Activation
C. Source file location
D. Product language
4. How is Office Telemetry Agent configured after it has been deployed?
A. Office Customization Tool
B. Office Deployment Tool
C. Group Policy
D. Configuration.xml file
5. What must be configured before setting up Office Telemetry Processor?
A. SQL Server instance
B. Group Policy objects
C. Telemetry Agents
D. Office 2013
Answers
This section contains the solutions to the thought experiments and answers to the objective review questions in this chapter.
Objective 5.1
Thought experiment
1. To avoid affecting copy operations, you must ensure that the copy operations occur at the Contoso datacenter. A VDI would enable call center employees to connect to a virtualized support computer and perform copy operations from the Contoso datacenter, which would eliminate call center employees’ home Internet connections from the copy operations.
2. Deploy the applications to a virtual machine. In the case of personal virtual desktops, the application installations would be limited to one installation per call center employee. If supported, you might also be able to install some of the applications on an RD Session Host server, which would substantially reduce licensing costs.
3. Use the Application Compatibility Toolkit (ACT) to assess and resolve application compatibility. Take an inventory, test compatibility, analyze the compatibility data, and, finally, resolve any compatibility issues.
Objective review
1. Correct answer: C
A. Incorrect: 60 days is incorrect because the grace period is 120 days.
B. Incorrect: 90 days is incorrect because the grace period is 120 days.
C. Correct: The grace period is 120 days.
D. Incorrect: 180 days is incorrect because the grace period is 120 days.
2. Correct answer: B
A. Incorrect: Deploying the RDS Gateway server and the reverse proxy server in the perimeter network is incorrect because the RDS Gateway should be placed in the LAN and protected by the reverse proxy server. This also allows you to join the RDS Gateway to the internal domain and have AD DS authentication without opening up a large amount of ports between the perimeter network and the LAN.
B. Correct: Deploying the RDS Gateway server in the LAN and the reverse proxy server in the perimeter network is correct because the RDS Gateway should be placed in the LAN and protected by the reverse proxy server. This also allows you to join the RDS Gateway to the internal domain and have AD DS authentication without opening up a large amount of ports between the perimeter network and the LAN.
C. Incorrect: Deploying the RDS Gateway server in the perimeter network and the reverse proxy server in the LAN environment is incorrect because the reverse proxy server will handle connections from the Internet; the perimeter network is the correct network segment for that duty.
D. Incorrect: Deploying the RDS Gateway server and the reverse proxy server in the LAN environment is incorrect because the reverse proxy server will handle connections from the Internet; the perimeter network is the correct network segment for that duty.
3. Correct answer: A
A. Correct: App-V is the correct answer because it offers offline access to virtualized applications.
B. Incorrect: System Center App Controller is not correct because it is a self-service virtual machine management platform and does not virtualize applications.
C. Incorrect: Client Hyper-V is incorrect because it virtualizes computers, not applications.
D. Incorrect: VDI is incorrect because it virtualizes client computers, not applications.
Objective 5.2
Thought experiment
1. For a manual installation, you should use a network-based installation. This enables the ski instructors to perform the Office 2013 installation at their convenience. Copy the Office product and language files to a network share and grant the user accounts Read permission on the network share. The ski instructors can then access the network share and run the Office setup normally.
2. You should run the setup.exe /admin command from where the Office 2013 installation files are located. That will start the OCT, which enables you to customize the installation so that only Word and Excel are part of the installation.
3. You should use WSUS or ConfigMgr. Both products can automate the distribution of Office updates, which allow for a routine deployment cycle.
Objective review
1. Correct answers: B and D
A. Incorrect: Using a Group Policy software installation is incorrect because only a startup script can be used to deploy Office by using Group Policy.
B. Correct: A Group Policy startup script in a GPO is the only supported Group Policy method for deploying Office.
C. Incorrect: AppLocker does not deploy software.
D. Correct: Windows Intune can deploy MSI software and Office through MSI.
2. Correct answer: A
A. Correct: The OCT uses MSP files.
B. Incorrect: Config.xml is incorrect because it uses config.xml.
C. Incorrect: A Group Policy script does not use an MSP file.
D. Incorrect: Windows Intune does not use an MSP file.
3. Correct answers: A and C
A. Correct: KMS validates a license every 180 days.
B. Incorrect: MAKs use a one-time validation during installation.
C. Correct: Active Directory–based activation validates a license every 180 days.
D. Incorrect: WSUS is not an activation method.
Objective 5.3
Thought experiment
1. Licensing is only a business aspect of Office 2013 and does not affect how Office 2013 can be deployed. Office 2013 can be deployed by using a traditional MSI or by using Click-to-Run, no matter which licensing model is chosen.
2. Given that the scenario requires updates to be tested before they are deployed, you must ensure that the UpdatePath parameter of the Updates Enabled section is specified to an internal network location. This ensures that the update files will be made available after they have been tested.
3. This scenario requires compatibility issues to be reported. After Office Telemetry Dashboard has been configured, you must ensure that Office Telemetry Agent has been deployed for all previous versions of Office.
Objective review
1. Correct answer: D
A. Incorrect. You can deploy Office Professional Plus 2013 by using Click-to-Run.
B. Incorrect: You can deploy Office 365 ProPlus by using Click-to-Run.
C. Incorrect: You can deploy Office Home and Student 2013 by using Click-to-Run.
D. Correct: Click-to-Run was first introduced for Office 2013; it does not support deployments of Office 2010.
2. Correct answer: B
A. Incorrect: Virtualization technology for Office does not enable you to install the 64-bit version of Office 2013 on a computer running the 32-bit version of Windows.
B. Correct: Virtualization technology enables you to run two versions of Office on the same computer. For example, you can run Office 2010 and Office 2013 on the same computer. Normally, this isn’t a supported configuration, but the virtualization technology segments each Office installation into a virtual container, which makes it a supported configuration.
C. Incorrect: Virtualization technology isn’t applicable to software updates or to delegating administrative rights to end users.
D. Incorrect: Virtualization technology isn’t applicable to software updates or to preventing end users from denying software updates.
3. Correct answer: A
A. Correct: The installation location is not customizable. The default location for installation is on the system drive in the Program Files\Microsoft Office 15 folder.
B. Incorrect: Activation is configurable. One example is the AUTOACTIVATE attribute, which enables or disables automatic activation.
C. Incorrect: The source file location can be customized. One example is for setting updates to a specific location.
D. Incorrect: The product language can be customized based on your requirements.
4. Correct answer: C
A. Incorrect: The OCT customizes the installation of Office. Telemetry is data gathered after the installation, so the OCT doesn’t deal with telemetry.
B. Incorrect: The ODT is used for the installation of Office and doesn’t deal with telemetry data that is available after installation.
C. Correct: There are two ways to configure Office Telemetry Agent. One way is by using Group Policy and the other is by modifying the registry.
D. Incorrect: The Configuration.xml file is used to customize the installation and updates for Office and doesn’t deal with telemetry data.
5. Correct answer: A
A. Correct: SQL Server is required as part of the Office Telemetry Processor setup. You cannot complete setup without having SQL Server available and a database created. You can create the database during the setup.
B. Incorrect: You do not need to configure Group Policy before setting up Office Telemetry Processor.
C. Incorrect: Configuration of Office Telemetry Agent is not a prerequisite for Office Telemetry Processor.
D. Incorrect: Configuration of Office 2013 is not a prerequisite of Office Telemetry Processor.
All materials on the site are licensed Creative Commons Attribution-Sharealike 3.0 Unported CC BY-SA 3.0 & GNU Free Documentation License (GFDL)
If you are the copyright holder of any material contained on our site and intend to remove it, please contact our site administrator for approval.
© 2016-2026 All site design rights belong to S.Y.A.