Code-First Development with Entity Framework (2015)
Chapter 7. Database Migrations and Additional Features
In this chapter, you will learn how to make structural database changes using the Entity Framework migrations API. Previously, we used an initializer to drop and recreate the database to handle such changes. Now, you will learn how to use Entity Framework migrations to achieve the same end result without data loss. We will also discuss the process of integrating Entity Framework with an existing database, instead of allowing the framework to create a database from scratch. We will also take a look at some additional features in Entity Framework that we need to be aware of that are not commonly used on a daily basis.
In this chapter, we will cover how to:
· Enable migrations on a project that uses Entity Framework
· Use automatic migrations
· Create explicit migrations
· Add database artifacts, such as indexes
· Add migrations to an existing database
· Use additional Entity Framework features (not covered in previous chapters)
Enabling and running migrations
Entity Framework is an ORM tool, thus it works with a database. We already saw that we are faced with the challenge of keeping an RDBMS structure and our Entity Framework entities synchronized. Previously, we used an initializer to drop and recreate the database to have the new structure match our context and entities. Obviously, we cannot do this in production. So, we have two choices. We can pick another tool, for example, SSDT for SQL Server, to separately maintain and upgrade database artifacts. The second choice, the one we are going to work on in this chapter, is to use Entity Framework itself to update the database at such times when the structure changes. In order to utilize this technology, we have to enable migrations on our project.
Previously, we used a single project for our application and Entity Framework's entity classes. This is not a common structure for typical non-trivial solutions. It is more likely that we would separate Entity Framework objects into their own project. This project would be of the type class library. We will do so in the sample project we are going to work on in this chapter. We can create this additional Data project following the same simple steps as we did before. We need to add the Entity Framework NuGet package reference to the new class library project, and write entity classes and the context class. Then, we can add this project as a reference to our application's main project, the console app, in the downloadable sample.
The next step is to enable migrations for our Data project. We will use the NuGet Package Manager Console window we referred to in previous chapters. We can pull up this window by navigating to Tools | NuGet Package Manager | Package Manager Consolefrom the Visual Studio menu. Once this window is visible, select the Data project from the project drop-down menu, then type Enable-Migrations in the window, and press the Enter key, as shown in the following screenshot:

If we need to get detailed help for the PowerShell commandlet, Enable-Migrations, we just type Get-Help Enable-Migrations. We will find the parameters' information, which in part enables developers to point migrations to a specific project or connection string. In our case, we did not need to specify any parameters because we added the target connection string to the configuration file inside our Data project. After we run this command, we will see an additional folder created in our project called Migrations. There will be a class inside that folder that specifies migration configuration, tying it to our context class through the generic type parameter, as shown in the following code:
internal sealed class Configuration : DbMigrationsConfiguration<Chapter7.CSharp.Data.Context>
{
public Configuration()
{
AutomaticMigrationsEnabled = false;
}
protected override void Seed(Chapter7.CSharp.Data.Context context)
{
}
}
Here is the same class in VB.NET as follows:
Friend NotInheritable Class Configuration
Inherits DbMigrationsConfiguration(Of Context)
Public Sub New()
AutomaticMigrationsEnabled = False
End Sub
Protected Overrides Sub Seed(context As Context)
End Sub
End Class
This class also has the Seed method, which is invoked every time migrations are applied to a database, enabling developers to perform miscellaneous tasks, such as inserting seed data. Since this method can be run many times on a database, we need to ensure that seeded data is not duplicated. Thus, we need to check whether our data already exists in the target database before inserting it.
Now we are ready to proceed with the database creation. If we are working locally, simply creating and/or upgrading the local database, we can continue using the Package Manager Console window. This time we can use the Update-Database commandlet. Again, we can use the Get-Help commandlet to take a look at the parameters we can work with. At this point, we are interested in the -script parameter. This parameter is useful, as it will generate a migration SQL script that we can hand to our DBA or run ourselves. When the Update-Database commandlet is run, it will compare the structure defined by our entity classes and the Context class against the physical database. In our case, we can omit parameters because we copied the connection string into our Data project and we only have a single class that inherits from DbContext in the project. If we run the command now, we will get the following error, shown in the following screenshot:
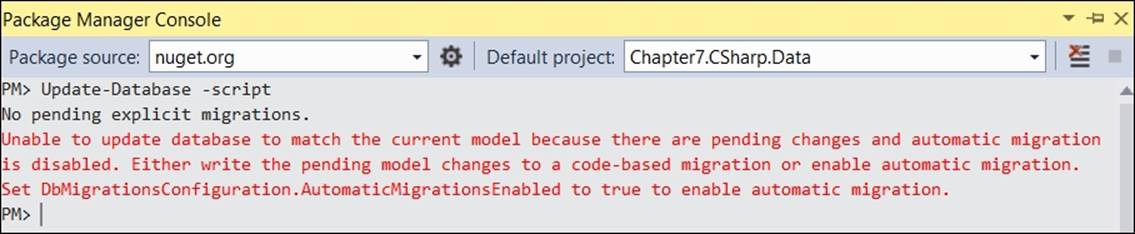
This error refers to the setting that allows us to enable the automatic migration generation. Let's update our migration's configuration class to enable automatic migrations, just as the error informs us. Then, we can build the solution and rerun the commandlet to create the script. We will see that the SQL script will open in Visual Studio. We can then create the target database by running the script. This functionality is useful when we are working with a DBA who needs to review our upgrade scripts. Since we do not need to do this locally, let's create the local database by running the Update-Database commandlet without any parameters. No errors should be shown. If we now open SQL Server Management Studio (SSMS), we will see our new Chapter 7 database! Congratulations, we just used Entity Framework migrations for the first time!
Automatic migrations are really easy to use. We can just make changes and rerun Update-Database to propagate the changes to our SQL Server database. To verify that there is no data loss, let's manually add a row to our People table using SSMS, as shown in the following screenshot:

Let's try the following now. We are going to add a new property to the Person class, called Age, which is a numeric property, and rerun Update-Database. The class looks as follows:
public class Person
{
public int PersonId { get; set; }
public string FirstName { get; set; }
public string LastName { get; set; }
public int Age { get; set; }
}
This is how the class looks in VB.NET:
Public Class Person
Property PersonId() As Integer
Property FirstName() As String
Property LastName() As String
Property Age() As Integer
End Class
After we update the database, we will see that our data is preserved. Our existing row is still there, and the Age column value is 0. If we look at the table structure, we will notice our new Age column, which has the database default value of 0. This is what Entity Framework does for us. For non-nullable columns, it attempts to pick a default value, which in fact is the type's default. Let's add a non-nullable string property with a maximum size of 50 characters, called NickName. We remember that we need to update the entityconfiguration class to do so. Say, we accidentally made a mistake, and we want to make the NickName column smaller, say 40 characters. Let's make this change and attempt to update the database again. We will see an error as shown in the following screenshot:.
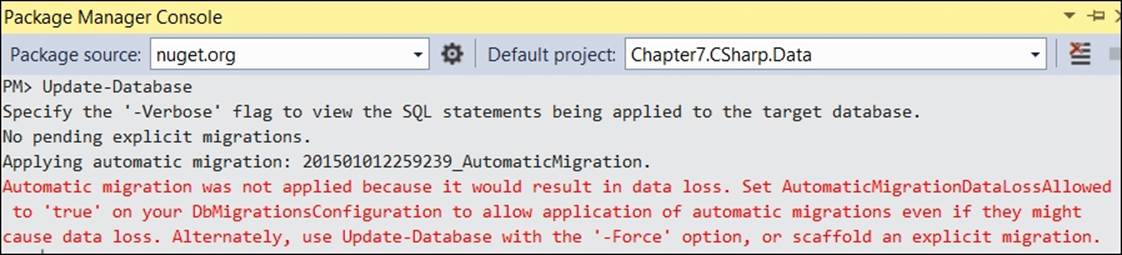
We now need to use another parameter for Update-Database, called Force. It forces change to run, even when it results in potential data loss. We can run Update-Database –Force to update our database this time. Alternatively, we can just enable support for data loss as Entity Framework exposes this setting, just like the error text tells us.
As we saw, simple scenarios can be easily accommodated via automatic migrations. This approach falls apart when our migrations get more complicated, as we will see in the following content.
Using the migrations API
Let's add non-nullable date property:
public DateTime DateAdded { get; set; }
This is how the new property looks in VB.NET:
Property DateAdded() As DateTime
We want this new column to default to the current date. If we update our database again, we will see that the new column will have a default of 1/1/1900. This is not what we want, and here is when we need to switch to explicit migrations. In general, explicit migrations are more flexible than automatic ones. Although we need to write more code, we have far more control over the flow of migrations, their names, and the rollback process. If we start mixing the two approaches, we may get confused. For example, we would have to search the project to see if a column was added by automatic or manual migration. So, in order to provide consistency and for maintenance purposes, we may want to standardize on explicit migrations, and at that point, we should disable automatic migrations.
In order to get started with this approach, let's drop our sample database in SSMS, disable automatic migrations using the property we saw before on our migration configuration class, and create our first manual migration.
In order to create our initial database migration, we need to use a new commandlet, Add-Migration. Here is how our command looks:
Add-Migration InitialMigration
InitialMigration is just a name; one can provide a different name if desired. This action will add a new class to our Migrations folder. The physical file will be named something similar to 201501012315236_InitialMigration. The filename is prefixed with the time when the migration was created, helping us organize migrations within the folder.
The generated class looks as follows:
public partial class InitialMigration : DbMigration
{
public override void Up()
{
CreateTable(
"dbo.Companies",
c => new
{
CompanyId = c.Int(nullable: false, identity: true),
Name = c.String(),
})
.PrimaryKey(t => t.CompanyId);
CreateTable(
"dbo.People",
c => new
{
PersonId = c.Int(nullable: false, identity: true),
FirstName = c.String(nullable: false, maxLength: 30),
LastName = c.String(nullable: false, maxLength: 30),
NickName = c.String(nullable: false, maxLength: 40),
Age = c.Int(nullable: false),
})
.PrimaryKey(t => t.PersonId);
}
public override void Down()
{
DropTable("dbo.People");
DropTable("dbo.Companies");
}
}
Let's take a closer look at the generated code. We are using the base class called DbMigration to implement our migration. We override the Up and Down methods. The Up method moves our database structure forward, creating two new tables in our case. The Downmethod helps us revert the changes in case we discover software issues and want to rollback to the previous structure which may be required at a later date. Let's update the database one more time by running Update-Database. We will notice that our database was created along with two new tables.
If we take a closer look at the created database, we will see another table, _MigrationHistory. Here is what the data looks like in this table, as shown in the next screenshot:

We see that the migration identifier (MigrationId) corresponds to the file name for our initial migration. The Model column contains the context hash value, uniquely identifying it for the Entity Framework engine. Finally, the ContextKey column contains the class name for our context's configuration class.
Let's go back to the previous example and add the DateAdded property back to our class. Then, let's create a new migration for this new property, again using the Add-Migration commandlet, as shown in the following code line:
Add-Migration PersonDateAdded
Here is the code that was generated by Entity Framework:
public partial class PersonDateAdded : DbMigration
{
public override void Up()
{
AddColumn("dbo.People", "DateAdded", c => c.DateTime(nullable: false));
}
public override void Down()
{
DropColumn("dbo.People", "DateAdded");
}
}
We already saw the AddTable method. Now, we also see the AddColumn method. It takes the table and column names as well as the column type, specified via the corresponding .NET type. We are going to add a custom default value this time. Migrations support hardcoded default values as well as the database engine's default values that are specified as strings. In order to specify the hardcoded default, we can use the defaultValue parameter. We will use defaultValueSql instead, as shown in the following code snippet:
public partial class PersonDateAdded : DbMigration
{
public override void Up()
{
AddColumn("dbo.People", "DateAdded",
c => c.DateTime(nullable: false, defaultValueSql: "GetDate()"));
}
public override void Down()
{
DropColumn("dbo.People", "DateAdded");
}
}
We used the SQL server GetDate function to populate the newly added column with the current date, as per our business requirements. The AddColumn method and column configuration classes support a variety of other parameters besides a default value, using theColumnModel class. Essentially, we can specify many of the same values that we can in our EntityTypeConfiguration class. All parameters that can be discovered based on our EntityTypeConfiguration class will be scripted for us automatically by Entity Framework migrations. The default value is something we can add manually.
The DbMigration base class, which is used to write migrations, supports maintenance of many database artifacts besides columns and tables. We can perform the following:
· Create, drop, and alter stored procedures
· Add and drop foreign keys
· Move artifacts, such as tables and stored procedures, between schemas
· Rename objects, such as tables, procedures, and columns
· Maintain primary key constraints
· Create, rename, and drop indexes
Finally, when we encounter a unique circumstance where none of the stated methods work, we can use either the Sql or SqlFile method. Just as their names implies, they allow us to execute arbitrary SQL statements as part of any migration. The former method takes a string that represents SQL statement(s). The latter takes a file name, whereas the file itself contains any number of SQL statements.
All migrations, by default, run as part of an overarching transaction, ensuring that either all migration operations succeed, or none. This is certainly true for SQL Server. This may or may not be the case for other RDBMSes. For example, Oracle does not support transactions on structural operations, defined by Data Definition Language (DDL). DDL is simply a term that refers to SQL statements that define data structures. There is also Data Manipulation Language (DML), which refers to CRUD operation statements or other statements that manipulate the data.
We do not have to have pending changes to create a migration. For example, in order to create an index, no pending changes are needed. Alternatively, we can use the API introduced in Entity Framework 9.6.1, which enables us to create indexes via the model builder API. For the purposes of this example, we will use the migration API. We still follow the same steps as before, running the Add-Migration commandlet. This will add a migration to our project, but both Up and Down methods will be empty. Now, we just need to add some custom code to create the desired index, as shown in the following code snippet:
public partial class PersonPersonNamesIndex : DbMigration
{
public override void Up()
{
CreateIndex(
"People",
new[] { "LastName", "FirstName" },
name: "IX_PERSON_NAMES");
}
public override void Down()
{
DropIndex("People", "IX_PERSON_NAMES");
}
}
In this migration, we create a new index with the name of IX_PERSON_NAMES on the People table that contains two columns: LastName and FirstName. In the Down method, we revert this change, dropping an index. Here is how the code looks in VB.NET:
Partial Public Class PersonPersonNamesIndex
Inherits DbMigration
Public Overrides Sub Up()
CreateIndex( _
"People", _
New String() {"LastName", "FirstName"}, _
name:="IX_PERSON_NAMES")
End Sub
Public Overrides Sub Down()
DropIndex("People", "IX_PERSON_NAMES")
End Sub
End Class
Until now, we have not seen the Down method being used. It turns out that Entity Framework migrations support target migration as part of its API, allowing developers to move the database structure to any version, that is, migration. Migrations are sorted by their time of creation, essentially the file name, coded into the migration designer file. You can see that each migration contains three files by expanding any migration in the Solution Explorer, as shown in the following screenshot. The first file is the actual migration code. The second file, containing the word Designer, specifies the migration identifier and a few other properties. The third file, resource file, contains values such as the schema name and migration target hash.

Let's now try to drop the index by specifying the target migration to be the one just before our index-creating migration. Its name is PersonDateAdded from the previous example. To do so, we just need to run the Update-Database commandlet with the target migration parameter, as shown here:
Update-Database -TargetMigration "PersonDateAdded"
Entity Framework will immediately inform us which migrations were reverted, in our case, just the index-creating migration. If we now look at the database structure, we will see that the index no longer exists.
Applying migrations
So far, we applied all migrations using Visual Studio. This works really well when developers are working on features inside Visual Studio. However, when it comes to updating, testing, or production environments, this approach does not really work.
In order to update such software installations, we are given more options, which are as follows:
· Generate the changes script
· Use migrate.exe
· Use the migrating initializer
Applying migrations via a script
We can easily generate a script by running the Update-Database commandlet with the Script parameter inside the same Package Manager Console window, using the following code line:
Update-Database -Script
As soon as this commandlet completes, the generated script will be opened. It will contain all the required changes to bring the structure of the target database up to date. We just need to give this script to our DBA, who will maintain our production environment.
Tip
We need to specify the correct connection string to the database that matches our target environment, since the migrations API compares the live database with the context from the data folder. We can use either another parameter to Update-Database and provide this connection string, or use a proper connection string in the configuration file that is used by our Data project.
Applying migrations via migrate.exe
Migrate.exe is a utility that is shipped with Entity Framework. It will be located in the same NuGet package folder as the Entity Framework DLL itself. We just need to distribute this utility with the binaries folder of our application to allow the utility to find all the assemblies it needs to work. This utility takes the same parameters as the Update-Database commandlet, for example:
migrate.exe Chapter7.VB.data
/connectionString="Data Source=.;Initial Catalog=Chapter7;IntegratedSecurity=SSPI"
/connectionProviderName="System.Data.SqlClient"
/startupConfigurationFile=Chapter7.VB.exe.config
We separated the command line into multiple lines for clarity, putting each argument on its own line for readability. The first argument is the assembly containing our context and migrations. Then, we specify the connection string, provider, and configuration file. We need the configuration file because our context's constructor is set up to take the connection string name from the configuration file.
Applying migrations via an initializer
We already saw how to use an initializer to recreate a database when structural changes are required. Entity Framework comes with an initializer base class that can be used to apply pending migrations. The base class is called MigrateDatabaseToLatestVersion. Here is how we define our initializer:
public class Initializer :
MigrateDatabaseToLatestVersion<Context, Configuration>
{
}
This is a very simple class; there is no code we need to write for it, unless we want to use the InitializeDatabase method, which allows us to run some code when migrations are applied. This method gets an instance of our DbContext object, thus we can add more data to the database in this method or perform other functions. Here is how this code looks in VB.NET:
Public Class Initializer
inherits MigrateDatabaseToLatestVersion(Of Context, Configuration)
End Class
Alternatively, we can use our migration configuration class, which has the familiar Seed method to populate our database with some seeded data.
Now, we just need to plug this new initializer into Entity Framework at the application startup time and call the context to force migrations to be applied, as shown in the following code snippet:
Database.SetInitializer(new Initializer());
using (var context = new Context())
{
context.Database.Initialize(true);
}
We already saw similar code when we worked with other initializers. Here, we also call the Initialize method on the database to force schema verification and migrations application on an existing database. If the database does not exist, it will be created. Here is how the code looks in VB.NET:
Database.SetInitializer(new Initializer)
Using context = new Context
context.Database.Initialize(True)
End Using
We do not have to call the initialization method at the application start up time; it will automatically run during the first query execution. This code just makes migration application time more predictable.
Adding migrations to an existing database
Sometimes, we have a use case where we want to add Entity Framework migrations to an existing database so that we can move from one way to handle schema changes to the migrations API. Of course, since our database is already in production, we need to let migrations know that we are starting with a known state. This is quite easy to do with another parameter to the Add-Migration commandlet: –IgnoreChanges. When we issue this command, Entity Framework will create an empty migration. It will assume that your model defined by context and entities are compatible with our database. Once you update the database by running this migration, no schema changes will take place, but a new row will be added to the _MigrationHistory table for this initial migration. Once this is accomplished, we can safely switch to the Entity Framework migration API to maintain schema changes from that point on.
Tip
Some database systems do not support underscore as the first character for a table name. Entity Framework allows developers to customize this name.
Another use case we want to address is when we also want to create entities for this existing database, thus adding Entity Framework not only to an existing database, but also to an existing software. This task can be accomplished with Entity Framework Power Tools. This Visual Studio extension is available on Visual Studio gallery at https://visualstudiogallery.msdn.microsoft.com/72a60b14-1581-4b9b-89f2-846072eff19d/. Once we install this extension, we will see a new option available on the right-click menu, Reverse Engineer Code First, at the project level.
All developers need to do is point this to the database they want to support with Entity Framework, and this tool will scaffold entities, context, and configuration classes for all entity classes for all tables in the database. We can also use Entity Framework Tools, which can be downloaded from the download center at http://www.microsoft.com/en-us/download/details.aspx?id=40762. This set of tools supports Code-First generation from a database as well. In order to use this functionality, we just need to select ADO.NET Entity Data Model from the Add New Item dialog and then follow the steps shown by the wizard.
Additional Entity Framework features
Let's take a look at a few more features that do not neatly fit into anything we have talked about thus far. They are not frequently used, but it is important that developers know that these features exist.
Custom conventions
Sometimes, we want to make global changes that are applied to many entity types or tables. For example, we want all decimal fields be of a certain size by default, unless we specify otherwise. We may also want to globally set all string properties to be mapped to non-Unicode columns because our application is intended only for English-speaking users. We can accomplish such tasks by using the global configuration API or custom conventions. Inside conventions, we also have access to the public mapping API, which allows us to inspect current mappings between entities to database tables and columns. For example, here is how we can set all string properties to be stored as non-Unicode columns in our database:
protected override void OnModelCreating(DbModelBuilder modelBuilder)
{
modelBuilder.Properties<string>()
.Configure(config => config.IsUnicode(false));
}
We use our context class, which inherits from DbContext to accomplish our goal. Here is how the code looks in VB.NET:
Protected Overrides Sub OnModelCreating(ByVal modelBuilder As DbModelBuilder)
modelBuilder.Properties(Of String) _
.Configure(Function(p) p.IsUnicode(False))
End Sub
We could also write the same code as a custom convention and add it to the conventions collection inside model builder. In order to do so, we will create a class that inherits from the Convention base class, override the constructor, then use the same preceding code, call the Properties method of the Convention class instead of modelBuilder. If you like, feel free to practice by writing such conventions.
Tip
We must always remember to add custom conventions to the conventions collection inside modelBuilder.
These types of conventions are referred to as configuration conventions. Entity Framework has the model convention API to create two types of conventions: the store model and conceptual model conventions. The purpose is still the same. These conventions allow us to apply changes globally to many places in our model, instead of entity by entity and property by property. We can also write multiple conventions per .NET type, as Entity Framework allows us to control the order in which conventions are applied.
Geospatial data
Beside scalar types, such as string or decimal, Entity Framework also supports geo spatial data via the DbGeometry and DbGeography types in .NET. These types have built-in support and proper translation to support geospatial queries, such as the distance between two points on a map. These specific query methods are available under the geospatial properties of our entities as part of any query. In other words, we still write .NET code when we work with spatial types.
Dependency injection and logging
Entity Framework now implements the service location pattern, thus enabling dependency injection. Dependency injection is used to support configuration methods. For example, we can create our own dependency resolver that uses our custom approach to create common Entity Framework objects, such as IDbConnectionFactory. We can read documentation for Entity Framework to find out what classes or interfaces we can inject into a running application, and force Entity Framework to use them instead of the default implementations. For more information, read the MSDN article, available at http://msdn.microsoft.com/en-us/data/jj680697.
We can also inject a custom logger into Entity Framework, so that we can log all actions executed by Entity Framework to our custom logging source. The Database object has the Log property that developers can set in order to create a custom log. This Log property expects a method with one string parameter. Set it to Console.Write for your console application as an experiment. If you don't like the format of such logging, a custom formatter can be also created.
Startup performance
Startup time can be relatively long for large databases and contexts at times. Entity Framework Power Tools allows us to speed up this process by exposing an ability to us to pregenerate views. We are not talking about database views in this case. Instead, we are referring to statements that entity framework generates to be able to create CRUD operation statements. All we need to do to in order to generate these precompiled views is right-click on a file that contains the class derived from DbContext after we install power tools and select the Generate Views action under the Entity Framework menu. This action will create all the code that needs to be compiled into our assembly.
Multiple contexts per database
We do not always have to put all collections that map to tables inside a single context. There are a few advantages to using multiple DbContext classes. This approach will likely reduce the start up time, since this time is generally proportionate to a number of collections inside the context that is being accessed for the first time. It will also reduce the surface of data exposed by each context to developers. Also, it will help developers organize the data into data modules. Of course, if we use migrations, we still need a context that contains every collection or table, as we will use this context for migrations support. This would be the only context we actually need to configure. When we use multiple contexts and save data in a single transaction to multiple contexts, we need to take a few extra steps. Each SaveChanges call is transactional on its own, but we need to create a single overarching transaction across all SaveChanges calls. We may find it easier to use a single large DbContext class with all the collections in it for save operations that involve multiple modules.
Self-test questions
Q1. You have to enable migrations on a project to take advantage of schema updates built into Entity Framework, true or false?
Q2. Automatic migrations work 100 percent of the time; there is no reason to ever create explicit migrations, true or false?
Q3. You do not need access to the target database in order to generate the migrations script to the latest version, true or false?
Q4. In order to add migrations to an existing production database, you need to do which of the following?
1. Just enable automatic migrations
2. Create an initial migration, scripting the entire database
3. Create an initial empty migration
Q5. You cannot use Visual Studio in order to update a local development environment, true or false?
Q6. Entity Framework migrations have no support for stored procedures, so you must use other tools to achieve this task, true or false?
Q7. In order to set a common precision and scale for all decimal fields across all the entity classes and tables, you have to specify this size for every such field for each entity, true or false?
Q8. If you want to log the commands fired against your RDBMS by Entity Framework, you can only use database tools, such as the SQL Server profiler, true or false?
Q9. You have to use stored procedures in order to determine a distance between two geographic points, stored in our database using coordinates specified by SQL Server geography data types, true or false?
Summary
In this chapter, we saw how to use Entity Framework to maintain a database schema. You learned that we can enable migrations on a project by running the Enable-Migrations commandlet inside the NuGet package manager console. Once we enabled migrations, which created a configuration class, we could start moving the schema of our database forward. Developers have two options for migrations. They can rely on automatic migrations or create explicit migrations. Automatic migrations have limitations. Some tasks, such as setting a default value, are not possible. In order to ensure migrations consistency, developers may opt to only use explicit migrations. All explicit migrations inherit from the DbMigration class, which contains methods to allow developers to update a schema of the target database. This class exposes a method that allows us to create or drop tables, create, drop and alter columns, create and drop indexes, and so on. Finally, when an appropriate method is not found or when we need to simply make data only changes, we can use the Sql method to run arbitrary SQL command(s). If we need to enable migrations on an existing database, we simply need to create one empty migration, thus marking our context as up to date with our database. Once this empty initial migration is created, we can start writing migrations as usual. We can update a database we use in our development environment quite easily, using the Update-Database commandlet inside Visual Studio. When it comes to updating a production database, this strategy does not work. Thus, we have to use a different approach. We can use an initializer to migrate the database. We can use migrate.exe or we can generate a migration script inside Visual Studio. If we use script generation, we must have access to the production database, or at least an empty database with the same schema.
In this book, we did not cover all the details of Entity Framework, as the surface of its API is quite large. We did cover all the features that developers use on a daily basis. There are some other really cool features that we will encounter once in a while. So, we needed to take a quick look at such features. Entity Framework supports geospatial data now. We can use logging capabilities in order to capture the details of the commands that Entity Framework creates to be run against the database. We also can speed up the startup time of Entity Framework by using multiple context classes or pregenerating views.
This concludes our adventure into the exciting world of data access with Entity Framework. You learned how to maintain database structures and manipulate and query data by writing C# or VB.NET code. You have learned a lot of information that makes us better data access developers in the Microsoft world.
All materials on the site are licensed Creative Commons Attribution-Sharealike 3.0 Unported CC BY-SA 3.0 & GNU Free Documentation License (GFDL)
If you are the copyright holder of any material contained on our site and intend to remove it, please contact our site administrator for approval.
© 2016-2026 All site design rights belong to S.Y.A.