Microsoft Excel 2016 Step by Step (2015)
Part 3: Collaborate and share in Excel
CHAPTER 11
Print worksheets and charts
CHAPTER 12
Automate repetitive tasks by using macros
CHAPTER 13
Work with other Microsoft Office apps
CHAPTER 14
Collaborate with colleagues
11. Print worksheets and charts
In this chapter
![]() Add headers and footers to printed pages
Add headers and footers to printed pages
![]() Prepare worksheets for printing
Prepare worksheets for printing
![]() Print worksheets
Print worksheets
![]() Print parts of worksheets
Print parts of worksheets
![]() Print charts
Print charts
Practice files
For this chapter, use the practice files from the Excel2016SBS\Ch11 folder. For practice file download instructions, see the introduction.
Microsoft Excel 2016 gives you a wide range of tools with which to create and manipulate your data. By using filters, by sorting, and by creating PivotTables and charts, you can change your worksheets so that they convey the greatest possible amount of information. After you configure your worksheet so that it shows your data to best advantage, you can print your Excel documents to use in a presentation or include in a report. You can choose to print all or part of any of your worksheets, change how your data and charts appear on the printed page, and even suppress any error messages that might appear in your worksheets.
This chapter guides you through procedures related to preparing your worksheets for printing, printing all or part of a worksheet, printing charts, and adding headers and footers to your worksheets.
Add headers and footers to printed pages
If you want to ensure that the same information appears at the top or bottom of every printed page, you can do so by using headers or footers. A header is a section that appears at the top of every printed page; a footer is a section that appears at the bottom of every printed page.
Headers and footers provide space to add information about your workbook
When you display your workbook’s headers and footers, Excel displays the workbook in Page Layout view. Page Layout view shows you exactly how your workbook will look when printed, while still enabling you to edit your file, a capability not provided by Print Preview.
Excel divides its headers and footers into left, middle, and right sections. When you point to an editable header or footer section, Excel highlights the section to indicate that clicking will open that header or footer section for editing.
![]() Tip
Tip
If you have a chart selected when you click the Header & Footer button on the Insert tab, Excel displays the Header/Footer page of the Page Setup dialog box instead of opening a header or footer section for editing.
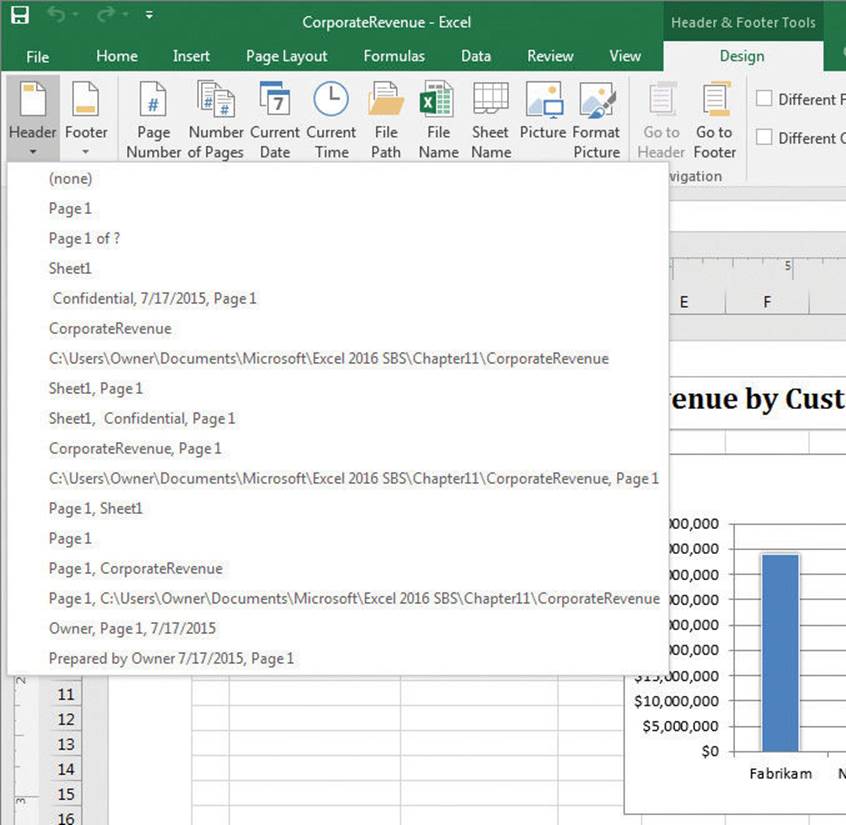
Excel generates headers based on your worksheet’s properties
When you activate a header or footer section, you can add one of several standard headers and footers, such as page numbers by themselves or followed by the name of the workbook. The list of headers that appears will vary depending on the properties and contents of your worksheet and workbook.
You can also create custom headers by entering your own or adding a graphic, such as a company logo, to a worksheet. By adding graphics, you can identify the worksheet as referring to your company and help reinforce your company’s identity if you include the worksheet in a printed report distributed outside your company. After you insert a graphic into a header or footer, you can make it larger or smaller, change its appearance, or add borders.
When you print or display a worksheet, you might want to have different headers for odd and even pages, or perhaps just for the first page. After you indicate that you want separate headers, Excel indicates whether a header or footer applies to the first page or, if appropriate, an odd or even page.
Your worksheet’s header and footer will always be the same width as the printed worksheet, but you can adjust their vertical size.
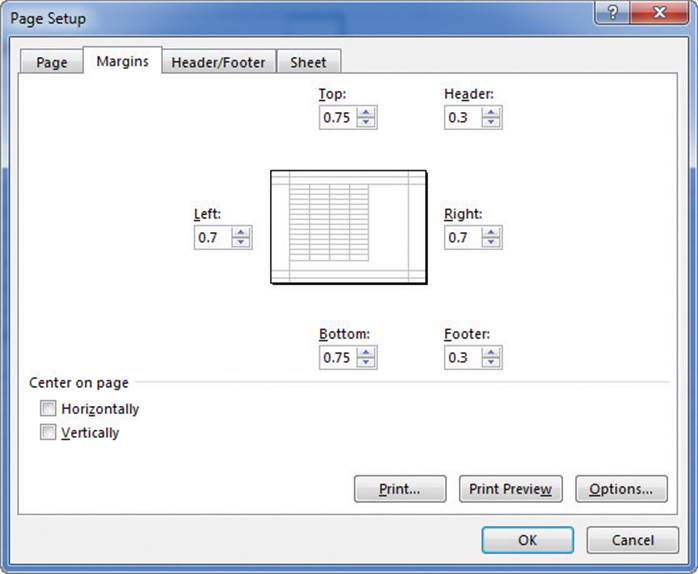
Change header and footer heights in the Page Setup dialog box
To edit headers and footers
1. On the Insert tab of the ribbon, in the Text group, click Header & Footer.
2. Click in the header or footer section you want to edit.
To switch between the header and the footer
1. Click Header & Footer.
2. Click the Go to Footer button to move to the footer.
Or
Click the Go to Header button to move to the header.
To add text to a header or footer
1. Open a header or footer section for editing.
2. On the Design tab of the ribbon, in the Header & Footer Elements group, click a button representing the text you want to add to your header or footer.
3. Enter any additional text you want to appear in the header or footer.
4. Use the controls on the Home tab to format the text.
To add an automatically generated header or footer
1. Open a header or footer section for editing.
2. In the Header & Footer group, click the Header button and click the automatically generated header you want to add.
Or
Click the Footer button and click the automatically generated footer you want to add.
To add a graphic from your computer to a header or footer
1. Open a header or footer section for editing.
2. In the Header & Footer Elements group, click Picture.
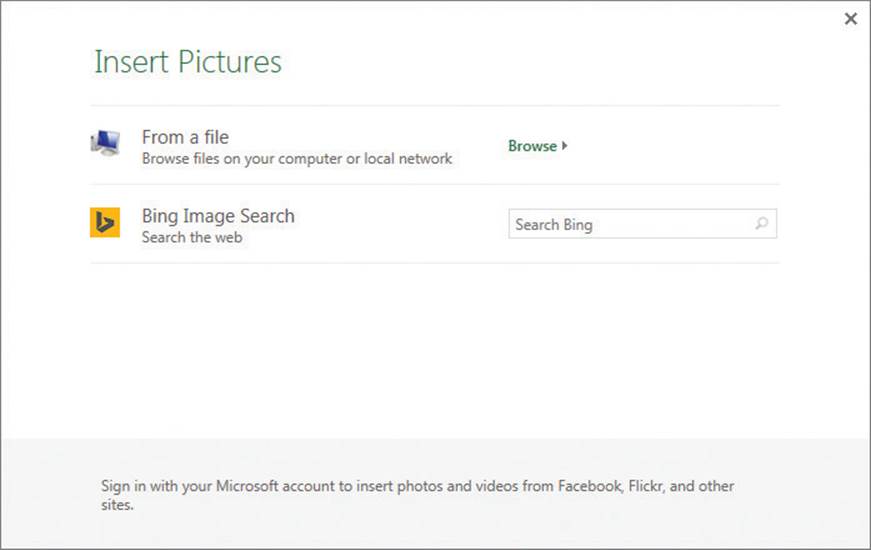
Add a graphic to a header or footer from the Insert Pictures dialog box
3. In the Insert Pictures dialog box, click From a file.
4. Navigate to the folder that contains the picture you want to add.
5. Double-click the file.
To edit a graphic in a header or footer
1. Activate the header or footer section that contains the &[Picture] code.
2. In the Header & Footer Elements group, click Format Picture.
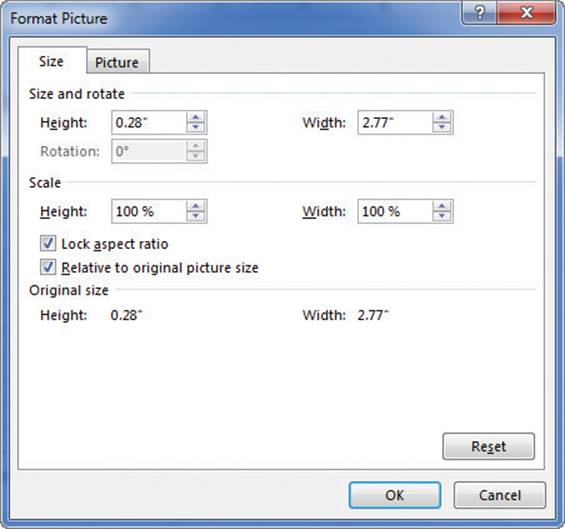
Edit graphics you have added to a header or footer
3. Make the changes you want in the Format Picture dialog box.
4. Click OK.
To put a different header on the first printed page
1. Activate a header or footer in your worksheet.
2. In the Options group, select the Different First Page check box.
3. Display the first page of the worksheet and create its header.
To use separate headers and footers for odd and even pages
1. Activate a header or footer in your workbook.
2. In the Options group, select the Different Odd & Even Pages check box.
3. Display an odd page and create the header for odd pages.
Or
Display an even page and create the header for even pages.
To change the vertical size of headers and footers
1. Activate a header or footer in your worksheet.
2. On the Page Layout tab of the ribbon, click the Margins button, and then click Custom Margins.
3. On the Margins tab of the Page Setup dialog box, change the Header and Footer margins to the values you want.
Prepare worksheets for printing
When you are ready to print your workbook, you can change the workbook’s properties to ensure that your worksheets display all your information and that printing is centered on the page. In Excel, all of these printing functions are gathered together in one place: the Backstage view.
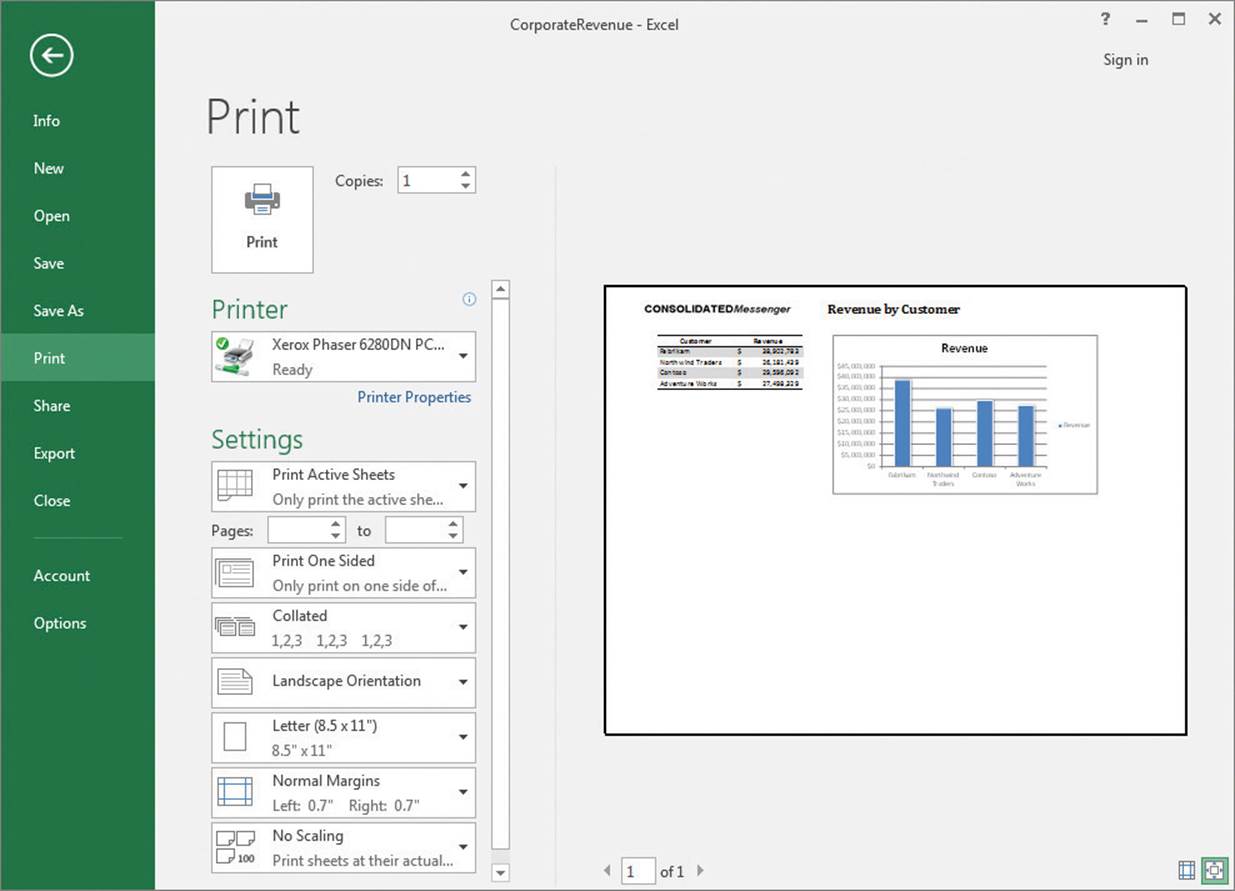
You can control most aspects of your printed worksheet
![]() Tip
Tip
Press Ctrl+P to preview your worksheet in the Backstage view.
You can change the number of copies to print, the printer to which you will send the file, whether Excel should print the page in landscape or portrait orientation, which paper size to use, which margin settings you want, and whether to scale the worksheet’s contents so they fit on a specific number of printed pages.
Fit your worksheet contents to the printed page
Excel comes with three margin settings: Normal, Wide, and Narrow. Excel applies the Normal setting by default, but you can select any of the three options you want, or you can set your own custom margins.
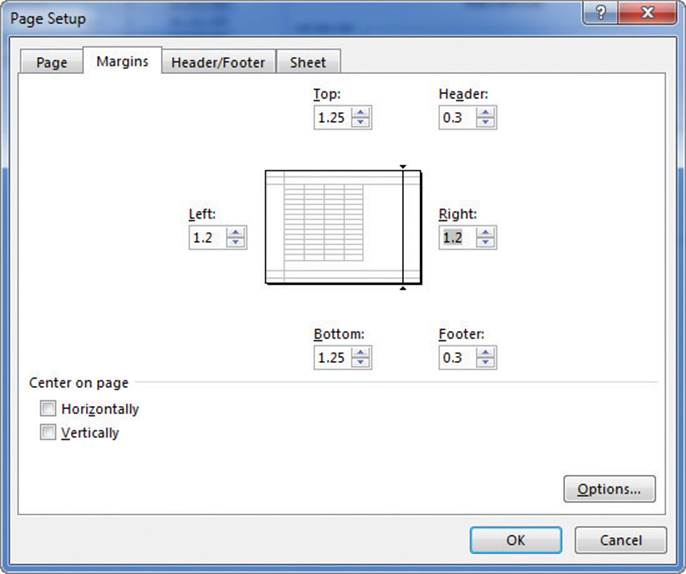
You can control the white space, or margins, around your printed worksheet
A potential issue with printing worksheets is that the data in worksheets tends to be wider horizontally than a standard sheet of paper. If that’s the case, you can change the alignment of the rows and columns on the page. When the columns parallel the long edge of a piece of paper, the page is laid out in portrait mode; when the columns parallel the short edge of a piece of paper, it is in landscape mode. Changing between portrait and landscape mode might result in a better fit.
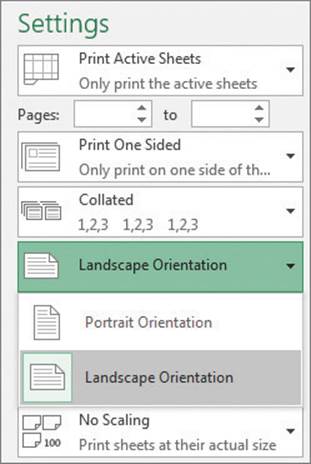
Select landscape or portrait mode for a better fit
If you can’t fit your worksheet contents on a single page by changing its orientation, you can change its scale. Scaling a worksheet for printing lets you specify the number of printed pages the worksheet will take up. You can scale your worksheet until everything fits on a specified number of printed pages, specify the number of printed pages the columns will appear on, or specify the number of printed pages the rows will appear on. If you have a list of data that’s 15 columns wide and 100 rows long, you could scale it so the columns all fit on each page of your printout.
When you look at your worksheet in the Backstage view, you can preview what it will look like when printed, including the number of pages it will be printed on.
![]() Tip
Tip
When you display a workbook in the Backstage view, you can view the next printed page by pressing the Page Down key; to move to the previous page, press the Page Up key. You can also use the Previous and Next arrows at the bottom of the Backstage view, enter a page number in the Current Page box, or scroll through the pages by using the vertical scroll bar at the right edge of the Backstage view.
To select landscape or portrait mode for a printed worksheet
1. Display the Backstage view.
2. In the left pane of the Backstage view, click Print.
3. On the Print page, in the Settings area, click the Orientation button.
4. Click the orientation you want.
To scale a worksheet for printing
1. On the Print page of the Backstage view, in the Settings area, click the Scaling button.
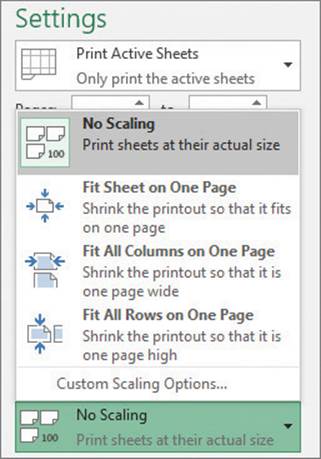
Select a scaling option to print your worksheet on a set number of pages
2. Click the scaling option you want.
Change page breaks in a worksheet
Another way to affect how your worksheet will appear on the printed page is to change where Excel assigns its page breaks. A page break is the point at which Excel prints all subsequent data on a new sheet of paper. You can make these changes indirectly by modifying a worksheet’s margins, but you can also do so directly. You can view a worksheet in Page Break Preview mode by displaying the View tab of the ribbon and clicking the Page Break Preview button. In Page Break Preview mode, the blue lines in the window represent the page breaks.
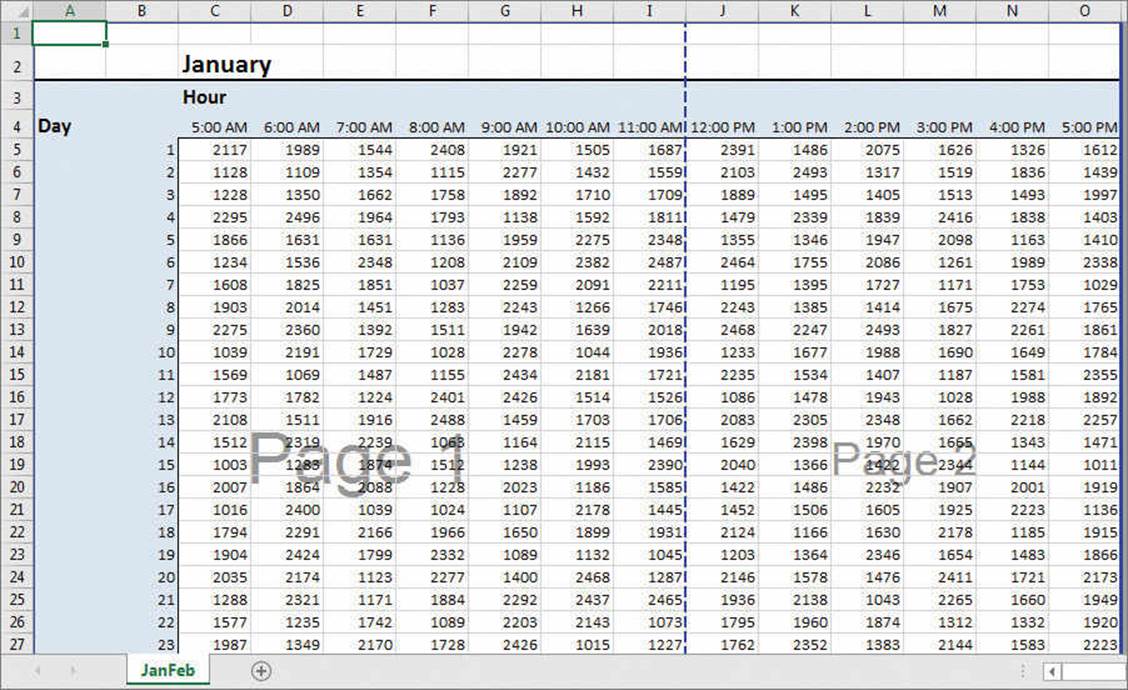
In Page Break Preview mode, page breaks appear in blue
![]() Important
Important
If you want to insert a single page break (not both vertical and horizontal page breaks at the same point) in Page Break Preview mode, be sure to click a row header or column header. If you right-click a cell within the body of a worksheet in Page Break Preview mode and then click Insert Page Break, Excel creates both a vertical page break to the left of the selected cell and a horizontal page break above the selected cell.
You can also move a page break by dragging it to its new position. Excel will change the worksheet’s properties so that the area you defined will be printed on a single page, if possible.
To add a page break to a worksheet
1. Click the row or column header where you want to add the page break.
2. On the Page Layout tab of the ribbon, in the Page Setup group, click the Breaks button, and then click Insert Page Break.
To remove a page break
1. Click the column header to the right of the page break.
Or
Click the row header below the page break.
2. In the Page Setup group, click the Breaks button, and then click Remove Page Break.
To reset all page breaks
1. Click the Breaks button, and then click Reset All Page Breaks.
Change the page printing order for worksheets
When you view a document in Page Break Preview mode, Excel indicates the order in which the pages will be printed with light gray words on the worksheet pages. (These indicators appear only in Page Break Preview mode; they don’t show up when the document is printed.) If you want, you can change the order in which the pages are printed. One reason to change the order in which Excel prints your worksheet pages would be to keep related information on consecutive pages.
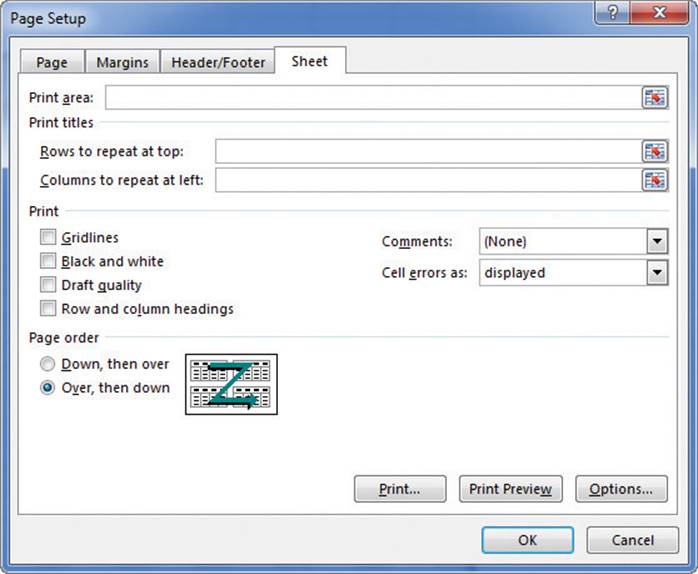
You can change the order in which worksheet pages are printed
To change the order in which worksheet pages are printed
1. On the Page Layout tab, in the Page Setup group, click the dialog box launcher.
2. In the Page Setup dialog box, click the Sheet tab.
3. Select Down, then over.
Or
Select Over, then down.
4. Click OK.
Print worksheets
When you’re ready to print a worksheet, you can control how Excel prints it. For example, you can choose the printer to which you want to send this job, print multiple copies of the worksheet, and select whether the copies are collated (all pages of a document are printed together) or not (multiple copies of the same page are printed together). You can also print more than one worksheet at a time by selecting the worksheet tabs in the tab bar before you start printing, or you can have Excel print the entire workbook at once.
![]() Tip
Tip
The worksheets you select for printing do not need to be next to one another in the workbook.
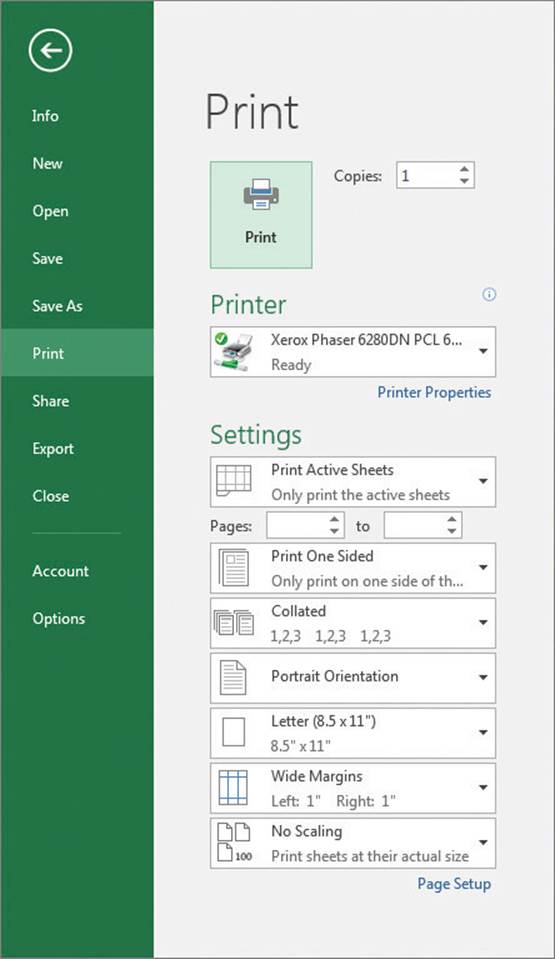
Control your print job from the Print page of the Backstage view
Some worksheets you print might be works in progress, where some of the formulas might display errors due to missing values. You can select how Excel will print any errors in your worksheet: printing it as it normally appears in the worksheet, printing a blank cell in place of the error, or choosing one of two other indicators that are not standard error messages.
To print a worksheet in Excel
1. Display the worksheet you want to print.
2. In the left pane of the Backstage view, click Print.
Or
Press Ctrl+P.
3. Select the options you want to apply to the print job.
4. Click the Print button.
To print multiple copies of a worksheet
1. Press Ctrl+P.
2. Change the value in the Copies box.
3. Click the Print button.
To print multiple worksheets
1. Hold down the Ctrl key and click the tabs of any worksheets you want to print.
2. Press Ctrl+P.
3. Click the Print button.
To control how Excel prints worksheet errors
1. On the Page Layout tab, in the Page Setup group, click the dialog box launcher.
2. In the Page Setup dialog box, click the Sheet tab.
3. In the Cell errors as list, select the option representing how you want errors to be printed.
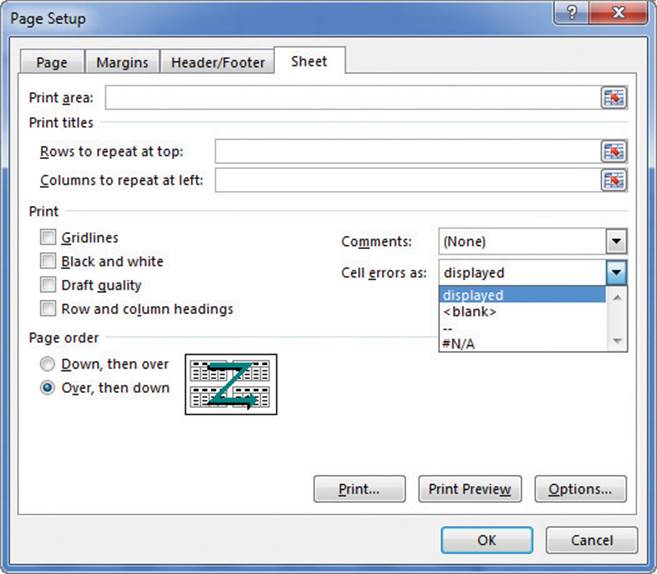
Specify how Excel should print worksheet errors
4. Click OK.
Print parts of worksheets
Excel gives you a great deal of control over what your worksheets look like when you print them, but you also have a lot of control over which parts of your worksheets will be printed. For example, you can choose which pages of a multipage worksheet you want to print. If you want to print a portion of a worksheet instead of the entire worksheet, you can define the area or areas you want to have printed and use the Center On Page controls on the Margins tab of the Page Setup dialog box to specify how Excel should position the area on the printed page.
![]() Tip
Tip
You can include noncontiguous groups of cells in the area to be printed by holding down the Ctrl key as you select the cells.
Center printed items on the page horizontally and vertically
If the contents of a worksheet will take up more than one printed page, you can have Excel repeat one or more rows at the top of the page or columns at the left of the page. Repeating a row with headers makes the data easier to read throughout the printed document, because you and your colleagues won’t need to refer to the first page to know which data each row and column contains.
To print specific pages
1. Press Ctrl+P.
2. On the Print page of the Backstage view, in the first Pages box, enter the number of the first page you want to print.
3. In the second Pages box, enter the number of the last page you want to print.
To define a print area
1. Select the cells you want to print.
2. On the Page Layout tab, in the Print Setup group, click Print Area to display a menu of print area choices, and then click Set Print Area.
When you click Print in the Backstage view, your selections will be reflected in the preview. You can then print the worksheet or go back to the worksheet and repeat the steps to adjust your changes.
To define a multiregion print area
1. Select the first cell region you want to print.
2. Hold down the Ctrl key and select any other cells you want to print.
3. On the Print Area menu, click Set Print Area.
When you click Print in the Backstage view, your selections will be reflected in the preview. You can then print the worksheet or go back to the worksheet and repeat the steps to adjust your changes.
To remove a print area
1. Click any cell in the print area.
2. On the Print Area menu, click Clear Print Area.
When you click Print in the Backstage view, your selections will be reflected in the preview. You can then print the worksheet or go back to the worksheet and repeat the steps to adjust your changes.
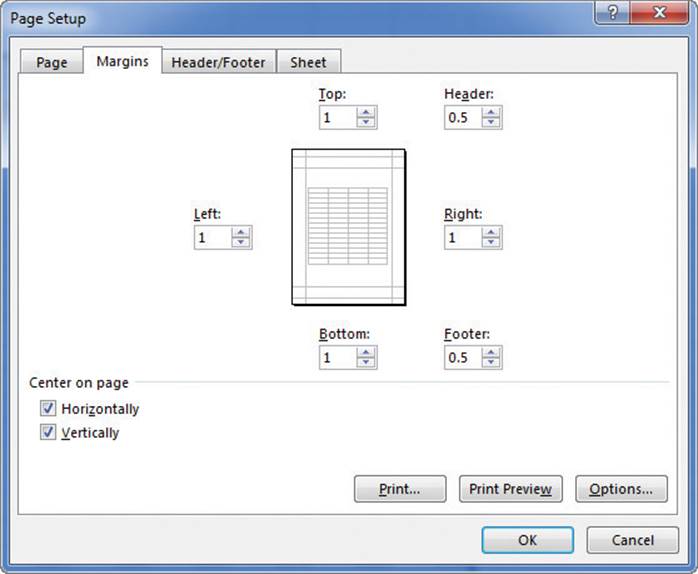
To position printed material on the page
1. In the Page Setup group, click the dialog box launcher.
2. In the Page Setup dialog box, click the Margins tab.
3. Select the Horizontally check box to center printing on the page horizontally.
Or
Select the Vertically check box to center printing on the page vertically.
When you click Print in the Backstage view, your selections will be reflected in the preview. You can then print the worksheet or go back to the worksheet and repeat the steps to adjust your changes.
To repeat columns at the left of each printed page
1. In the Page Setup group, click Print Titles.
2. On the Sheet tab of the Page Setup dialog box, at the right edge of the Columns to repeat at left box, click the Collapse Dialog button to collapse the dialog box.
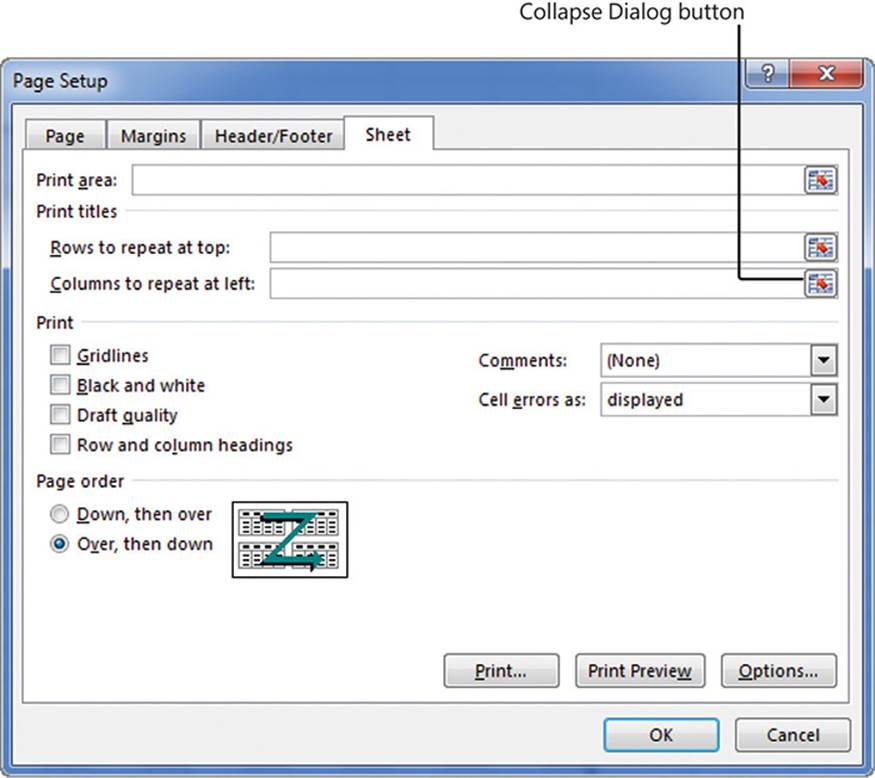
Identify rows or columns to repeat on printed pages
3. Select the column headers of the columns you want to repeat at the left of the page.
4. Click the Expand Dialog button.
5. Click OK.
When you click Print in the Backstage view, your selections will be reflected in the preview. You can then print the worksheet or go back to the worksheet and repeat the steps to adjust your changes.
To repeat rows at the top of each printed page
1. Click Print Titles.
2. On the Sheet tab of the Page Setup dialog box, at the right edge of the Rows to repeat at top box, click the Collapse Dialog button to collapse the dialog box.
3. Select the row headers of any rows you want to repeat at the top of the page.
4. Click the Expand Dialog button.
5. Click OK.
When you click Print in the Backstage view, your selections will be reflected in the preview. You can then print the worksheet or go back to the worksheet and repeat the steps to adjust your changes.
Print charts
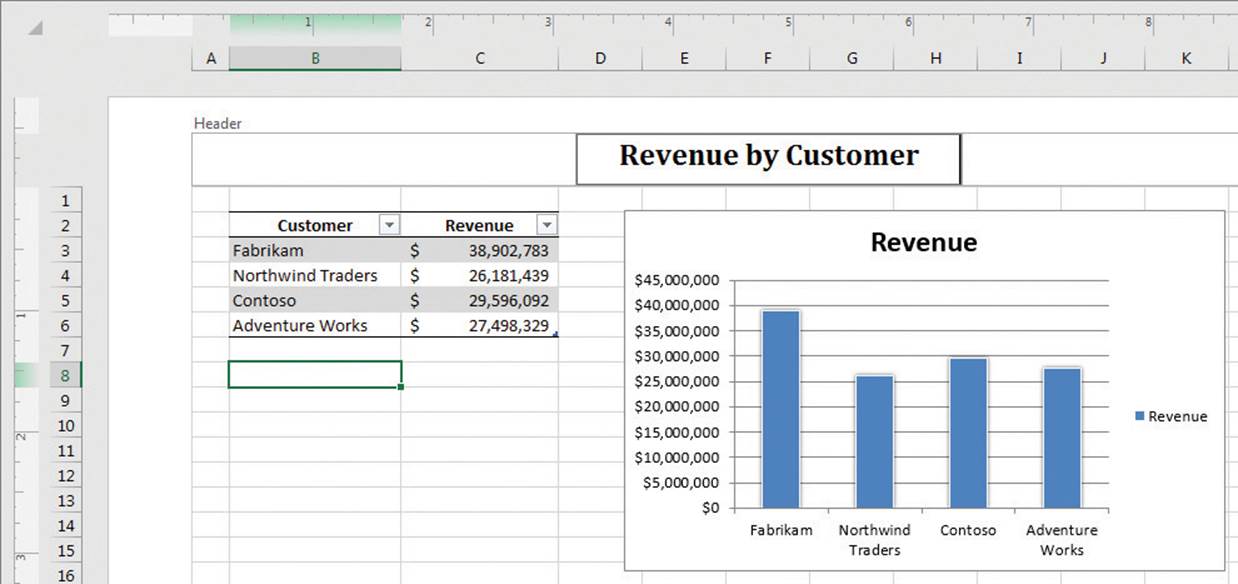
With charts, which are graphic representations of your Excel data, you can communicate a lot of information with a single picture. Depending on your data and the type of chart you make, you can show trends across time, indicate the revenue share for various departments in a company for a month, or project future sales by using trendline analysis. After you create a chart, you can print it to include in a report or use in a presentation.
If you embed a chart in a worksheet, however, the chart will probably obscure some of your data unless you move the chart to a second page in the worksheet. That’s one way to handle printing a chart or the underlying worksheet, but there are other ways that don’t involve changing the layout of your worksheets.

Click a chart in your worksheet to print it by itself on a page
To print a chart
1. Select the chart.
2. Press Ctrl+P.
3. Verify that the Print Selected Chart option is selected.
4. Click the Print button.
Skills review
In this chapter, you learned how to:
![]() Add headers and footers to printed pages
Add headers and footers to printed pages
![]() Prepare worksheets for printing
Prepare worksheets for printing
![]() Print worksheets
Print worksheets
![]() Print parts of worksheets
Print parts of worksheets
![]() Print charts
Print charts
 Practice tasks
The practice files for these tasks are located in the Excel2016SBS\Ch11 folder. You can save the results of the tasks in the same folder.
Add headers and footers to printed pages
Open the AddHeaders workbook in Excel, and then perform the following tasks:
1. Enter the text Q1 2016 in the center section of the header, and press Enter.
2. Add a code to display the name of the current file, followed by a comma and a space, and then add a control to display the current date.
3. Create separate headers for odd and even pages.
4. In the middle section of the footer, add the ConsolidatedMessenger.png file, and then click any worksheet cell above the footer to view what the image looks like in the footer.
5. Edit the image so it is 80 percent of its original size.
6. Change the margins for both the header and footer so they are 0.5 inches high.
Prepare worksheets for printing
Open the PrepareWorksheets workbook in Excel, and then perform the following tasks:
1. Change the orientation of the JanFeb worksheet to Landscape.
2. Change the scale of the JanFeb worksheet to 80 percent.
3. On the JanFeb worksheet, set a horizontal page break above row 38.
4. Set the margins of the MarJun worksheet to the Wide preset values.
5. For the MarJun worksheet, change the page print order to Over, then down.
Print worksheets
Open the PrintWorksheets workbook in Excel, and then perform the following tasks:
1. Configure the worksheet so cell errors are displayed as blank cells.
2. Select the Summary and Northwind sheets, and display them on the Print page of the Backstage view.
3. If you want, click the Print button to print your worksheets on the local printer.
Print parts of worksheets
Open the PrintParts workbook in Excel, and then perform the following tasks:
1. Set the print titles of the worksheet so that columns A and B are repeated at the left edge of each printed page.
2. Change the printer properties so Excel will print only pages 1 and 2 of the worksheet.
3. Scale the worksheet so its columns will fit on one page when printed, and preview what the worksheet will look like when printed.
4. Define a multiregion print area including cells A1:E8 and A38:E45.
5. Center the regions on the printed page.
6. Clear the print area you created.
Print charts
Open the PrintCharts workbook in Excel, and then perform the following tasks:
1. Select the revenue chart.
2. Continue as if you are going to print the revenue chart, and then change the settings on the Print page of the Backstage view to print the entire worksheet.
All materials on the site are licensed Creative Commons Attribution-Sharealike 3.0 Unported CC BY-SA 3.0 & GNU Free Documentation License (GFDL)
If you are the copyright holder of any material contained on our site and intend to remove it, please contact our site administrator for approval.
© 2016-2026 All site design rights belong to S.Y.A.