Microsoft Excel 2016 Step by Step (2015)
Part 3: Collaborate and share in Excel
12. Automate repetitive tasks by using macros
In this chapter
![]() Enable and examine macros
Enable and examine macros
![]() Create and modify macros
Create and modify macros
![]() Run macros when you click a button
Run macros when you click a button
![]() Run a macro when you open a workbook
Run a macro when you open a workbook
![]() Insert form controls into a worksheet
Insert form controls into a worksheet
Practice files
For this chapter, use the practice files from the Excel2016SBS\Ch12 folder. For practice file download instructions, see the introduction.
Many tasks you perform in Excel 2016, such as entering data or creating formulas, you do only once. However, there are probably one or two tasks you perform frequently that require a lot of steps to accomplish. To save time, you can create a macro, which is a recorded series of actions, to perform the steps for you. After you have created a macro, you can run, edit, or delete it as needed.
You can make your macros easier to access by creating new buttons on the Quick Access Toolbar and assigning your macros to them. If you run a macro to highlight specific cells in a worksheet every time you show that worksheet to a colleague, you can save time by adding a Quick Access Toolbar button that runs the macro to highlight the cells for you. You can also create macros that run whenever you open the workbook that contains them, and you can add form controls, such as list boxes, to your worksheets to facilitate data entry.
This chapter guides you through procedures related to opening, running, creating, and modifying macros; creating Quick Access Toolbar buttons you can use to run macros with a single mouse click; defining macro security settings; running a macro when a workbook is opened; and inserting form controls into a worksheet.
Enable and examine macros
It’s possible for unscrupulous programmers to write viruses and other harmful programs by using the Microsoft Visual Basic for Applications (VBA) programming language, so you need to be sure that you don’t run macros from unknown sources. In addition to running protective software such as Windows Defender, you can also change your Excel macro security settings to control when macros can be run. After you’re sure a macro is safe, you can open it in the Visual Basic Editor to examine its code.
Set macro security levels in Excel 2016
In versions of Excel prior to Excel 2007, you could define macro security levels to determine which macros, if any, your workbooks would be allowed to run, but there was no workbook type in which all macros were disallowed. Excel 2016 has several file types you can use to control whether a workbook will allow macros to run. The following table summarizes the macro-related file types.
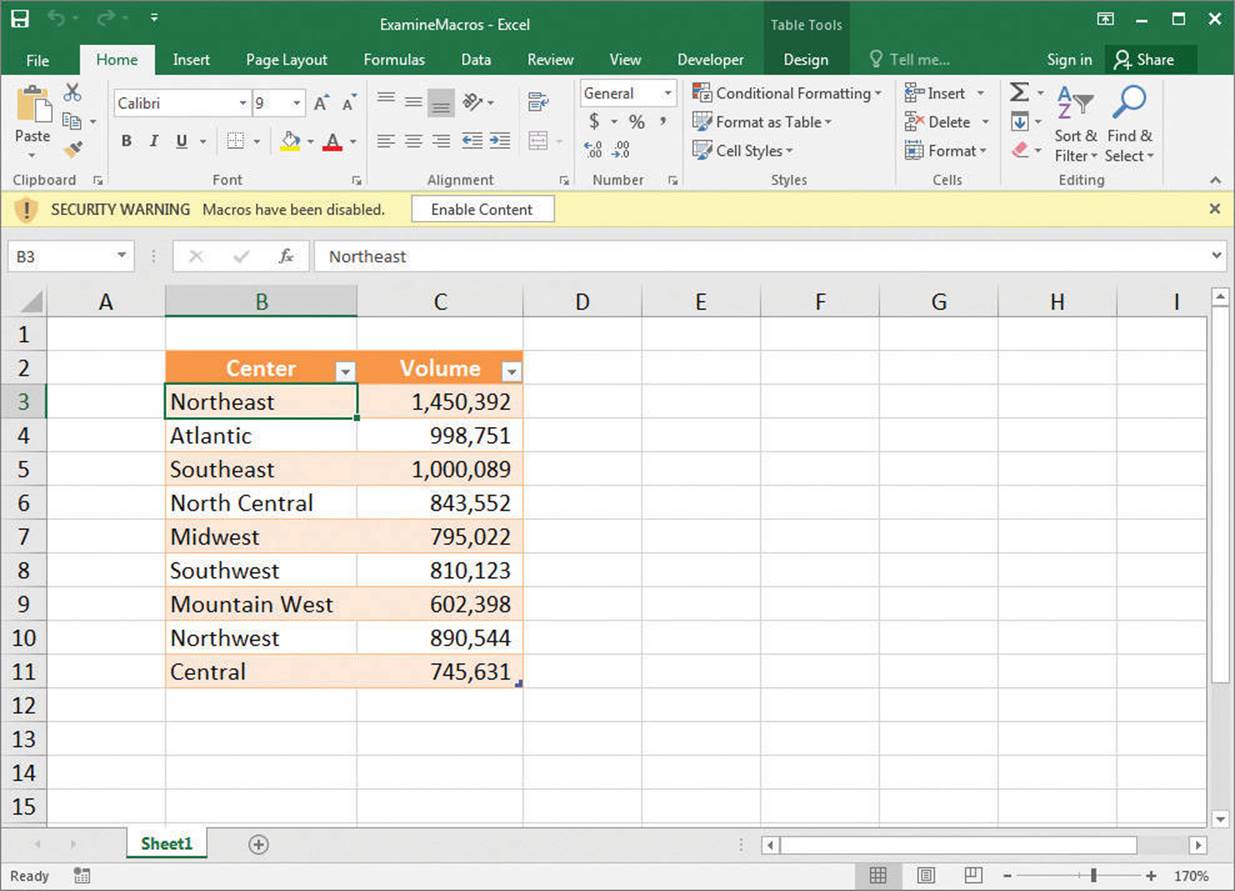
When you open a macro-enabled workbook, the Excel app-level security settings might prevent the workbook from running the macro code. When that happens, Excel displays a security warning on the message bar.
Macro security settings help reduce outside threats
Clicking the Enable Content button lets the workbook use its macros. Always take the time to verify the workbook’s source and consider whether you expected the workbook to contain macros before you enable the content. If you decide not to enable the macros in a workbook, close the message bar without enabling the content. You will still be able to edit the workbook, but macros and other active content will not be available.
You can change your app-level security settings to make them more or less restrictive by using the Trust Center dialog box.
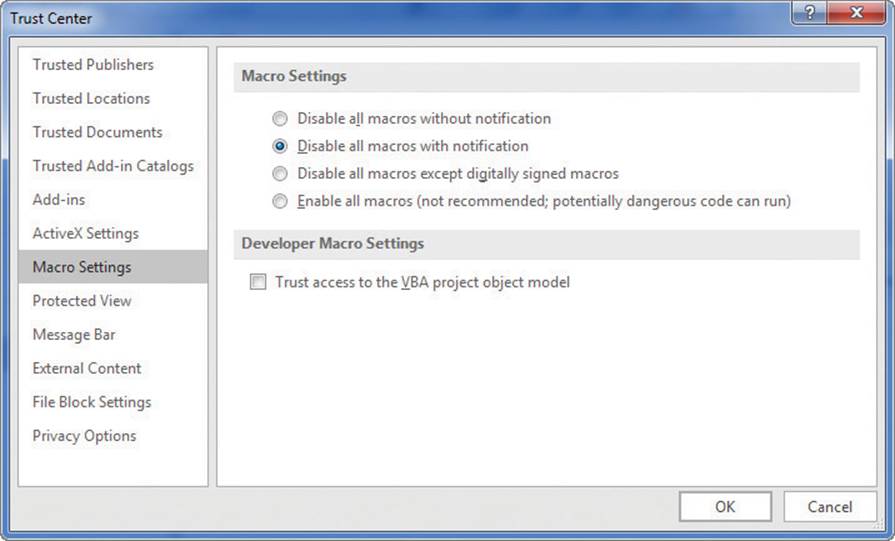
Define macro security settings in the Trust Center
The Excel default macro security level is Disable All Macros With Notification, which means that Excel displays a warning on the message bar but allows you to enable the macros manually. Selecting the Disable All Macros Without Notification option does exactly what the label says. If you work in an environment where your workbooks contain macros verified with digital signatures, you could select the Disable All Macros Except Digitally Signed Macros option.
![]() Important
Important
Because it is possible to write macros that act as viruses, potentially causing harm to your computer and spreading copies of themselves to other computers, you should never choose the Enable All Macros security setting, even if you have virus-checking software installed on your computer.
To change macro security settings
1. Display the Backstage view, and then click Options.
2. In the Excel Options dialog box, click the Trust Center category.
3. Click Trust Center Settings.
4. Click Macro Settings.
5. Select one of the following security levels:
• Disable all macros without notification
• Disable all macros with notification
• Disable all macros except digitally signed macros
• Enable all macros (not recommended; potentially dangerous code can run)
6. Click OK twice.
Examine macros
One great way to get an idea of how macros work is to examine an existing macro. The Macro dialog box displays a list of macros in your workbook by default, but you can also choose to display the macros available in other workbooks. When you display a macro’s code, Excel opens it in the Visual Basic Editor.
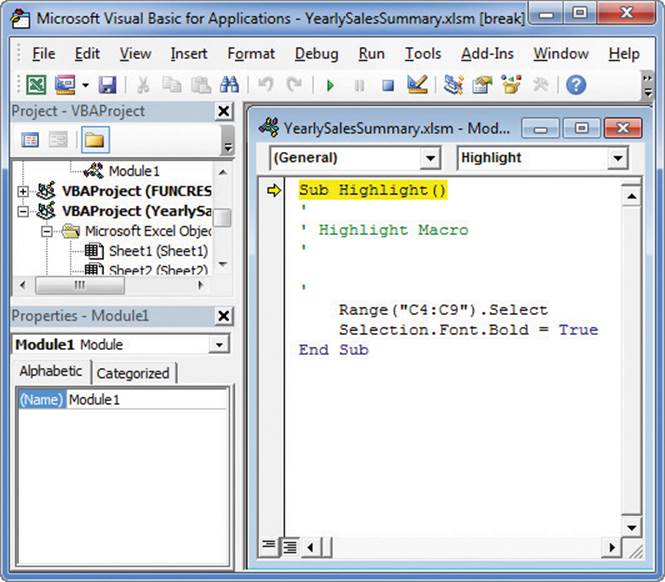
View and edit macros in the Visual Basic Editor
![]() Tip
Tip
You can also open and close the Visual Basic Editor by pressing Alt+F11.
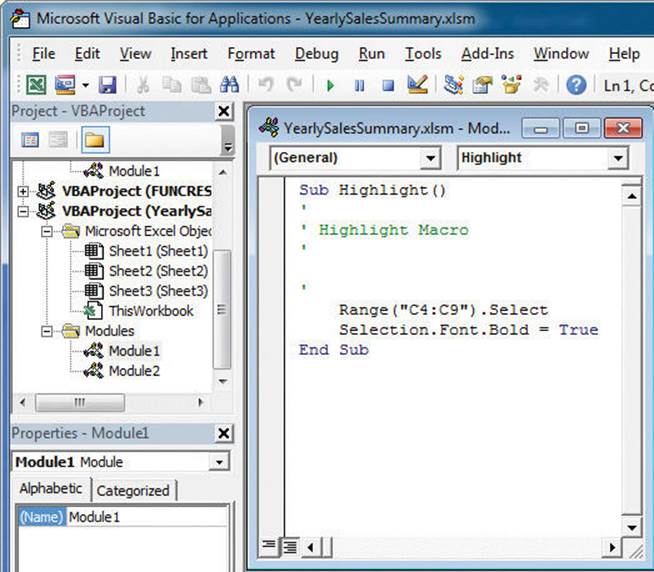
Consider, for example, the code for a macro that selects the cell range C4:C9 and changes the cells’ formatting to bold. The first line of the macro identifies the cell range to be selected (in this case, cells C4:C9). After the macro selects the cells, the next line of the macro changes the formatting of the selected cells to bold, which has the same result as clicking a cell and then clicking the Bold button in the Font group on the Home tab.
You can move through a macro one step at a time to observe how the code executes, run the macro to a breakpoint, or run the macro the whole way through.
![]() Tip
Tip
To execute an instruction, press F8. The highlight moves to the next instruction, and your worksheet then changes to reflect the action that resulted from executing the preceding instruction.
Step through a macro one instruction at a time
You can run a macro without stopping from within the Macro dialog box. You’ll usually run the macro this way; after all, the point of using macros is to save time.
![]() Tip
Tip
To open the Macro dialog box by using a keyboard shortcut, press Alt+F8.
To examine a macro
1. On the View tab of the ribbon, in the Macros group, click the Macros button.
2. In the Macro dialog box, click the macro you want to examine.
3. Click Edit.
4. Make any changes you want to the macro’s code.
5. In the Visual Basic Editor, click File, and then click Close and Return to Microsoft Excel.
To move through a macro one step at a time
1. Click the Macros button.
2. In the Macro dialog box, click the macro you want to step through.
3. Click Step Into.
4. In the Visual Basic Editor, press F8 to execute the highlighted step.
5. Do one of the following:
• Repeat step 4 until you have moved through the entire macro.
• Press F5 to run the remaining steps without stopping.
• On the Visual Basic Editor toolbar, click the Reset button to stop stepping through the macro.
6. In the Visual Basic Editor, click File, and then click Close and Return to Microsoft Excel.
Create and modify macros
The first step in creating a macro is to plan the process you want to automate. Computers today are quite fast, so adding an extra step during recording doesn’t slow you down noticeably, but leaving out a step means that you will need to re-record your macro. After you plan your process, you can record your macro by using the tools in the Record Macro dialog box.
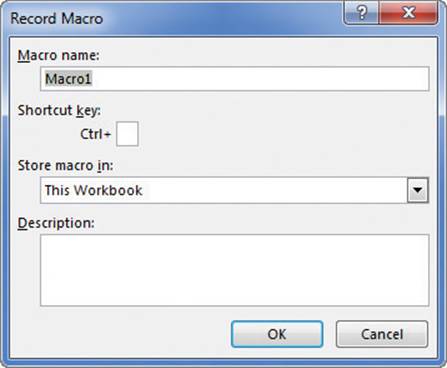
Automate repeatable processes by using the Record Macro dialog box to create a macro
After you give your macro a name and description, you can record your actions. To modify an existing macro, you can simply delete the macro and re-record it. Or, if you just need to make a quick change, you can open it in the Visual Basic Editor and add to or change the macro’s instructions.
![]() Tip
Tip
For more information about using the Visual Basic Editor, press Alt+F11 to display the Visual Basic Editor, press F1 to display the Context Help dialog box, click VBA, and then click Help to display the Visual Basic Help dialog box.
To record a macro
1. On the View tab, in the Macros group, click the Macros arrow (not the button), and then click Record Macro.
2. In the Macro name box, enter a name for your macro.
3. Enter a quick description for your macro in the Description box.
4. Click OK.
5. Perform the steps you want to record in your macro.
6. Click the Macros arrow (not the button), and then click Stop Recording.
To edit a macro
1. Click the Macros button.
2. Click the macro you want to edit.
3. Click Edit.
4. Make the changes you want to make to your macro’s code.
5. Press Ctrl+S to save your changes.
6. In the Visual Basic Editor, click File, and then click Close and Return to Microsoft Excel.
To delete a macro
1. Click the Macros button.
2. Click the macro you want to delete.
3. Click Delete.
4. In the confirmation dialog box that appears, click Yes.
Run macros when you click a button
You can use the ribbon to quickly access the commands built into Excel. However, it can take a few seconds to open the Macro dialog box. When you’re in the middle of a presentation, taking even those few seconds can reduce your momentum and force you to regain your audience’s attention.
If you want to run a macro without having to display the Macro dialog box, you can do so by adding a button representing the macro to the Quick Access Toolbar. Clicking that button runs the macro immediately, which is very handy when you create a macro for a task you perform frequently.
If you want to add more than one macro button to the Quick Access Toolbar, or if you want to change the button that represents your macro on the Quick Access Toolbar, you can select a new button from more than 160 options.
Change the appearance of buttons on your Quick Access Toolbar
Finally, you can have Excel run a macro when you click a shape in your workbook. By using this technique, you can create “buttons” that are graphically richer than those available on the Quick Access Toolbar. If you want, you can even create custom button layouts that represent other objects, such as a remote control.
![]() Important
Important
When you assign a macro to run when you click a shape, don’t change the name of the macro that appears in the Assign Macro dialog box. The name that appears refers to the object and what the object should do when it is clicked; changing the macro name breaks that connection and prevents Excel from running the macro.
To add a macro button to the Quick Access Toolbar
1. Right-click any ribbon tab, and then click Customize Quick Access Toolbar.
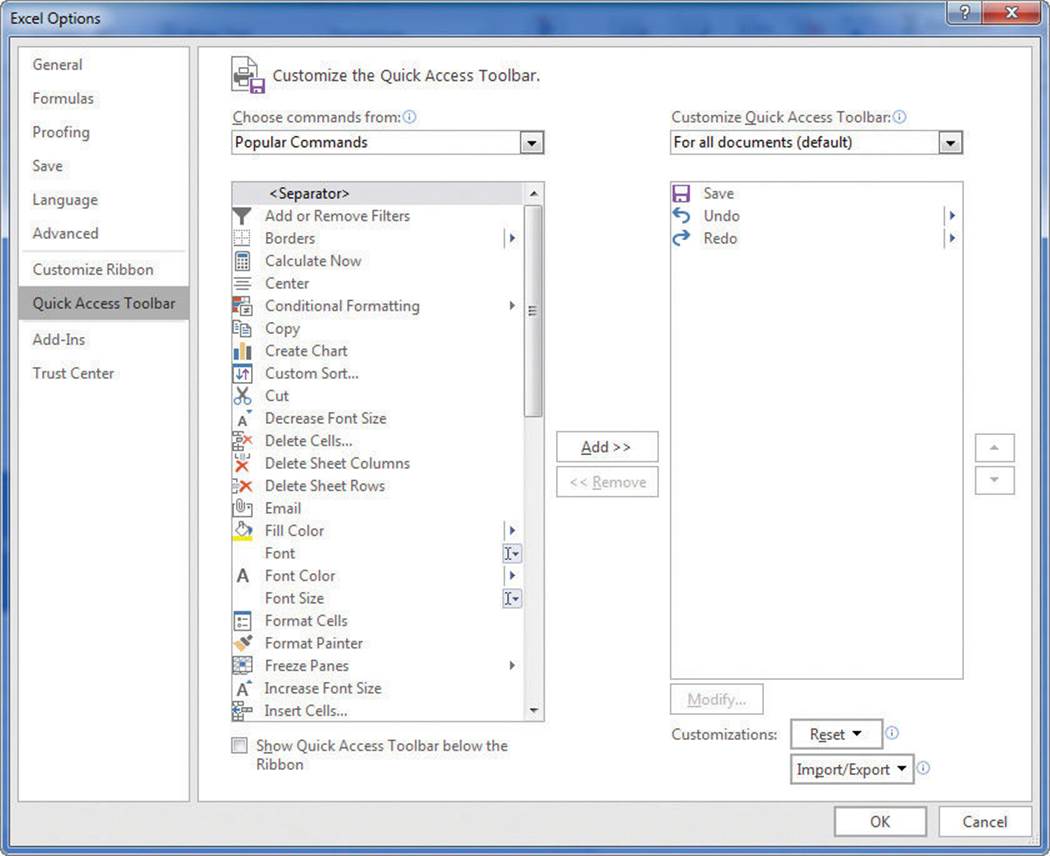
Change the buttons on the Quick Access Toolbar to enhance your usage
2. In the Excel Options dialog box, click the Choose commands from arrow, and then click Macros.
![]() Tip
Tip
If you have more than one workbook open, the macro list will contain macros stored in the other workbooks. To limit the list to macros available in the active workbook, click the Customize Quick Access Toolbar button, and then click For workbook.xlsm.
3. Click the macro you want to add, and then click the Add button.
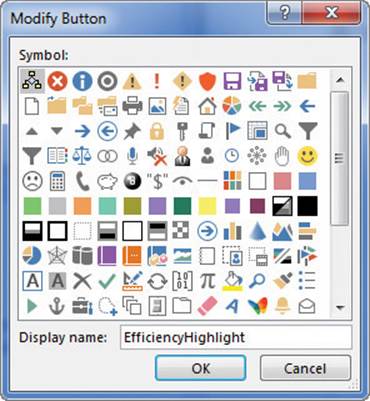
4. Click Modify.
5. In the Symbol pane, click the button image you want.
6. the Display name box, enter a new name for the button.
7. Click OK twice to close the Modify Button dialog box and then the Excel Options dialog box.
To edit the appearance of a macro button on the Quick Access Toolbar
1. On the Quick Access Toolbar page of the Excel Options dialog box, in the list of commands that are on the toolbar, click the button you want to modify.
2. Click Modify.
3. In the Symbol pane, click the button image you want.
4. In the Display name box, enter a new name for the button.
5. Click OK twice to close the Modify Button dialog box and then the Excel Options dialog box.
To assign a macro to a shape
1. Right-click the shape to which you want to assign a macro, and then click Assign Macro.
![]() See Also
See Also
For information about how to edit the text displayed within a shape, see Chapter 9, “Create charts and graphics.”
2. In the Assign Macro dialog box, click the name of the macro you want to run when the shape is clicked.
3. Click OK.
To run a macro assigned to a shape
1. Click the shape to which the macro has been assigned.
To edit a shape to which a macro has been assigned
1. Right-click the shape you want to edit.
2. In the shortcut menu, click Format Shape.
3. Use the tools in the Format Shape task pane to change the shape’s formatting.
4. Click the Close button to close the Format Shape task pane.
Run a macro when you open a workbook
One advantage of writing Excel macros in VBA is that you can have Excel run a macro whenever you open a workbook. For example, if you use a worksheet for presentations, you can create macros that render the contents of selected cells in bold type, italic, or different typefaces to set the data apart from data in neighboring cells. If you close a workbook without removing that formatting, however, the contents of your workbook will still have that formatting applied the next time you open it. Although this change might not be a catastrophe, returning the workbook to its original formatting might take some time to accomplish.
Instead of running a macro manually, or even from a toolbar button or a menu, you can have Excel run a macro whenever you open a workbook. The trick of making that happen is in the name you give the macro. When Excel finds a macro with the name Auto_Open, it runs the macro when the workbook to which it is attached is opened.
![]() Tip
Tip
If you have your macro security set to the Disable All Macros With Notification level, you can click the Options button that appears on the message bar, select the Enable This Content option, and then click OK to allow the Auto_Open macro to run.
To run a macro when you open a workbook
1. On the View tab, in the Macros group, click the Macros button.
2. Click the macro you want to run when the workbook is opened.
3. Click Edit.
4. Edit the Sub MacroName() line so it reads Sub Auto_Open().
5. Press Ctrl+S to save your changes.
6. In the Visual Basic Editor, click File, and then click Close and Return to Microsoft Excel.
Or
1. Click the Macros arrow (not the button), and then click Record Macro.
2. In the Macro name box, enter Auto_Open.
3. Click OK.
4. Record the steps you want Excel to execute when the workbook is opened.
5. Click the Macros arrow (not the button), and then click Stop Recording.
Insert form controls into a worksheet
When you summarize data in an Excel workbook, you can change the values used in your visualizations in many different ways. Some of those methods include creating filters, sorting your data, or entering new values into a cell to change the result of a formula or filter. You can enhance those capabilities by adding form controls to your worksheets, a process you start by displaying the Developer tab of the ribbon.

Manage macros and other advanced elements by using the options on the Developer tab
A form control provides additional interactivity that you can use to change your worksheet quickly and visually.
![]() Tip
Tip
The form controls described in this chapter mimic controls such as list boxes, check boxes, and option buttons that are available in many Excel dialog boxes.
Two form controls, the list box and the combo box, display a list of values from a cell range you define. The difference between the list box and the combo box is that a list box displays all of its values at the same time, and a combo box has an arrow you can click to display the values from which you can choose.
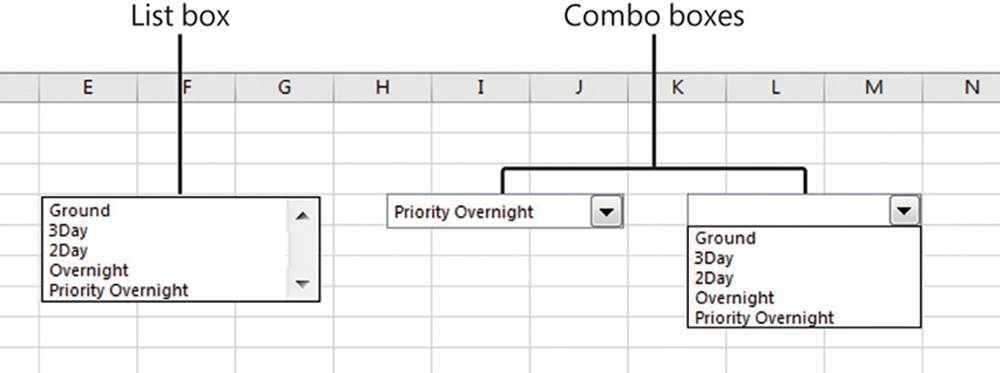
Select values by using list boxes and combo boxes
After you add a combo box or list box to your worksheet, you can use the settings in the Format Control dialog box to identify the cells that provide values for the control, the cell that displays the control’s value, and many other properties on the other tabs of the dialog box.
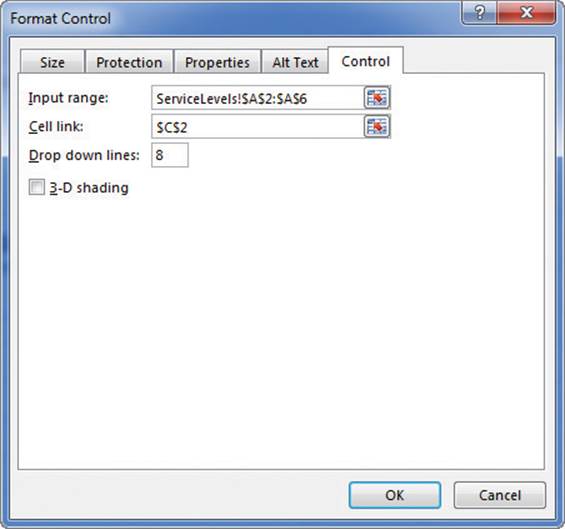
Set form control parameters by using the Format Control dialog box
![]() Tip
Tip
The cells that provide values for your list box or combo box don’t have to be on the same worksheet as the form control. Putting the values on another worksheet lets you reduce the clutter in the worksheet that contains the visualization. Hiding the worksheet that contains the source data also helps prevent users from changing those values.
Another form control, the spin button, lets you change numerical values in increments. For example, you could use spin buttons to increase or decrease the pounds and ounces representing a package’s weight.
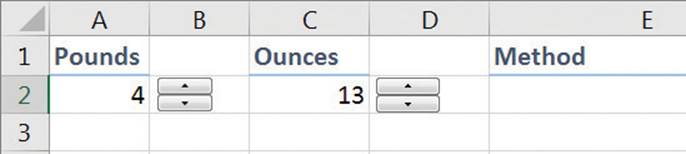
A worksheet with two spin buttons to change cell values
Spin buttons are effective presentation tools. With a series of mouse clicks, you can change a value up or down in increments you define, illustrating how your worksheet’s results change.
Spin buttons use slightly different parameters than combo boxes or list boxes. Rather than identifying the cell range that provides values for the control, you specify the maximum value, minimum value, increment (amount the value changes with each mouse click), and which worksheet cell displays the spin button’s value.
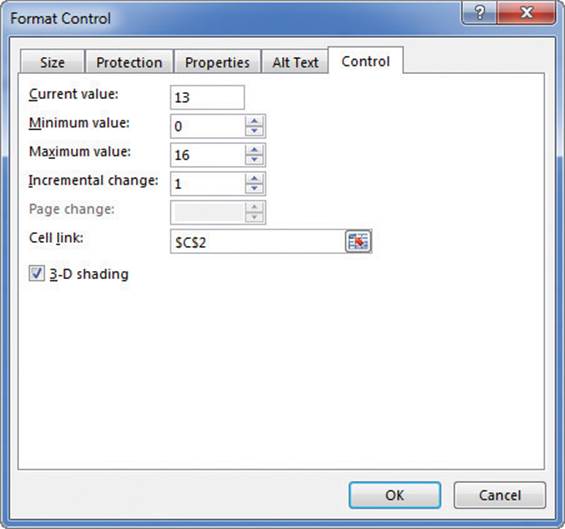
Change a spin button’s values in the Format Control dialog box
![]() Important
Important
The maximum, minimum, and increment values must be whole numbers. If you want to use a spin button to change a percentage, for example, you’ll need to create a formula in another cell that divides the spin button’s value by 100.
The button form control, also referred to as a command button, runs a macro when it’s clicked. When you add a button to a worksheet, the Assign Macro dialog box appears so you can tell it which macro to run.
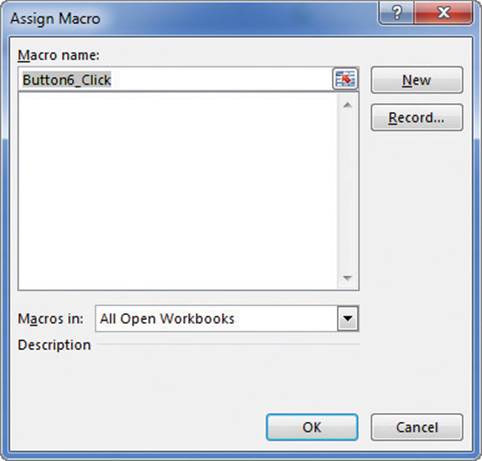
The Assign Macro dialog box for a newly created command button
The next two form controls, the check box and option button, both let users turn particular options on or off. For example, a package delivery company could allow customers to waive a signature when a package is dropped off. If the Signature required option button (the first option button in the group) is selected, the cell displaying the option button’s value would contain the number 1. If the Signature waived option button is selected, the cell would contain the number 2.
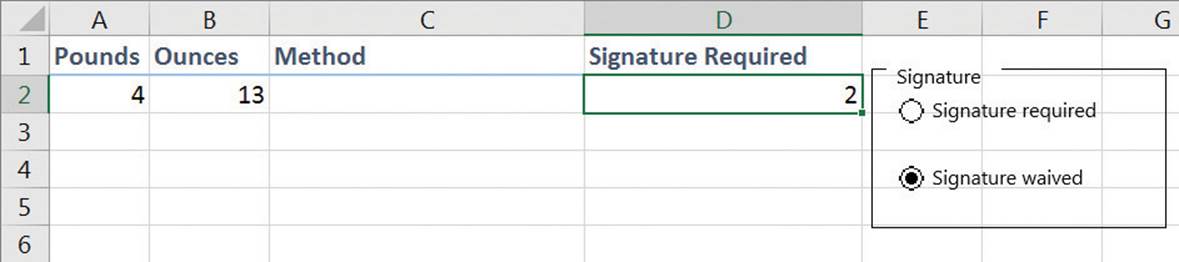
Option button groups let the user select one of several values
![]() Tip
Tip
Even though the check box and option button serve the same purpose, you should consider using both types of controls to distinguish among different sets of options.
You can have a cell display whether a check box or option button is selected, or define a control group that contains the possible options.
![]() Tip
Tip
Control groups can contain either option buttons or check boxes, but you can’t mix them in the same group.
After you add your controls to your worksheet, you can move, align, edit, and delete them, just as you can with other shapes. One important element to edit is the control’s caption, or label, which indicates the type of value the control represents. For example, an option button could have the label Signature required, indicating that selecting that option requires the delivery person to have the recipient sign for the package.
To display the Developer tab of the ribbon
1. Display the Backstage view, and then click Options.
2. In the Excel Options dialog box, click Customize Ribbon.
3. If necessary, click the Customize the Ribbon arrow, and then click Main Tabs.
4. In the pane below the list box, select the Developer check box.
5. Click OK.
To add a list box to a worksheet
1. On the Developer tab, in the Controls group, click the Insert button, and then click the List Box (Form Control) icon.
2. In the body of the worksheet, draw the list box.
3. Right-click the list box, and then click Format Control to display the Control tab of the Format Control dialog box.
4. Click in the Input range box, and then select the cells that will provide the values for the list box.
5. Click in the Cell link box, and then click the cell where you want to display the control’s value.
6. In the Selection type group, select the option button representing the type of selection you want to allow.
7. To display the list box with 3-D shading, select the 3-D shading check box.
8. Click OK.
To add a combo box to a worksheet
1. Click the Insert button, and then click the Combo Box (Form Control) icon.
2. In the body of the worksheet, draw the combo box.
3. Right-click the combo box, and then click Format Control to display the Control tab of the Format Control dialog box.
4. Click in the Input range box, and then select the cells that will provide the values for the combo box.
5. Click in the Cell link box, and then click the cell where you want to display the control’s value.
6. In the Drop down lines box, enter the number of items to be displayed when you click the combo box’s arrow.
7. To display the list box with 3-D shading, select the 3-D shading check box.
8. Click OK.
To add a spin button to a worksheet
1. Click the Insert button, and then click the Spin Button (Form Control) icon.
2. In the body of the worksheet, draw the spin button.
3. Right-click the spin button, and then click Format Control to display the Control tab of the Format Control dialog box.
4. In the Current value box, enter the control’s initial value.
5. In the Minimum value box, enter the smallest value allowed in the spin control.
6. In the Maximum value box, enter the largest value allowed in the spin control.
7. In the Incremental change box, enter the increment by which the value should increase or decrease with each click.
8. Click in the Cell link box, and then click the cell where you want to display the control’s value.
9. To display the spin button with 3-D shading, select the 3-D shading check box.
10. Click OK.
To add a button to a worksheet
1. Click the Insert button, and then click the Button (Form Control) icon.
2. In the body of the worksheet, draw the button.
3. In the Assign Macro dialog box, click the macro you want to run when the button is clicked.
4. Click OK.
To add a check box to a worksheet
1. Click the Insert button, and then click the Check Box (Form Control) icon.
2. In the body of the worksheet, draw the check box.
3. Right-click the check box, and then click Format Control to display the Control tab of the Format Control dialog box.
4. In the Value group, indicate whether the check box should initially be selected, cleared, or mixed.
5. Click in the Cell link box, and then click the cell where you want to display the control’s value.
6. To display the check box with 3-D shading, select the 3-D shading check box.
7. Click OK.
To add an option button to a worksheet
1. Click the Insert button, and then click the Option Button (Form Control) icon.
2. In the body of the worksheet, draw the option button.
3. Right-click the option button, and then click Format Control to display the Control tab of the Format Control dialog box.
4. In the Value group, indicate whether the option button should initially be selected or unselected.
5. Click in the Cell link box, and then click the cell where you want to display the control’s value.
6. To display the option button with 3-D shading, select the 3-D shading check box.
7. Click OK.
To create a group of form controls
1. Click the Insert button, and then click the Group Box (Form Control) icon.
2. In the body of the worksheet, draw the group box around the items you want to make up your group.
To resize a form control
1. Right-click the control, and then click Format Control.
2. Click the Size tab.
3. Use the settings available on the Size tab to change the control’s size.
4. Click OK.
Or
1. Select the control, and then drag the handles on the control’s edges to change the control’s shape.
To edit the text of a form control
1. Right-click the control, and then click Edit Text.
2. Edit the control’s text in the text box.
3. Click away from the control to stop editing.
To delete a form control
1. Right-click the control, and then click Cut.
Skills review
In this chapter, you learned how to:
![]() Enable and examine macros
Enable and examine macros
![]() Create and modify macros
Create and modify macros
![]() Run macros when you click a button
Run macros when you click a button
![]() Run a macro when you open a workbook
Run a macro when you open a workbook
![]() Insert form controls into a worksheet
Insert form controls into a worksheet
 Practice tasks
The practice files for these tasks are located in the Excel2016SBS\Ch12 folder. You can save the results of the tasks in the same folder.
Enable and examine macros
Open the ExamineMacros workbook in Excel, and then perform the following tasks:
1. If necessary, on the message bar that appears when you open the workbook, click Enable Content to enable macros.
2. Open the Macro dialog box.
3. Open the HighlightSouthern macro for editing.
4. Press F8 to step through the first three macro steps, and then press F5 to run the rest of the macro without stopping.
5. Close the Visual Basic Editor and return to Excel.
Create and modify macros
Open the RecordMacros workbook in Excel, and then perform the following tasks:
1. Record a macro that removes bold formatting from cells C4:C5. You are intentionally leaving the values in cells C6:C7 bold.
2. Restore bold formatting to cells C4:C5, and then run the macro.
3. Restore bold formatting to cells C4:C5 again, and then edit the macro so it removes bold formatting from cells C4:C7.
4. Run the macro you created.
5. Delete the macro.
Run macros when you click a button
Open the AssignMacros workbook in Excel, and then perform the following tasks:
1. Assign the SavingsHighlight macro to a button on the Quick Access Toolbar.
2. Change the button icon assigned to the SavingsHighlight macro button on the Quick Access Toolbar.
3. Run the SavingsHighlight macro.
4. Assign the EfficiencyHighlight macro to the Show Efficiency shape in the worksheet.
5. Run the EfficiencyHighlight macro.
Run a macro when you open a workbook
Open the RunOnOpen workbook in Excel, and then perform the following tasks:
1. Run the Highlight macro to display the values in cells C4, C6, and C10 in bold.
2. Record a macro named Auto_Open that first applies and then removes bold formatting from the cell range B3:C11.
3. Re-run the Highlight macro to highlight the values in cells C4, C6, and C10.
4. Save the RunOnOpen workbook, close it, and then reopen it to run the Auto_Open macro.
Insert form controls into a worksheet
Open the InsertFormControls workbook in Excel, and then perform the following tasks:
1. Create a spin button, with the label text Pounds, that initially displays the number 0 and lets the user enter a value from 0 to 70 pounds, in increments of 1 pound, into cell A2.
2. Create a spin button, with the label text Ounces, that initially displays the number 0 and lets the user enter a value from 0 to 16 ounces, in increments of 1 ounce, into cell B2.
3. Create a combo box with the label text Method that derives its values from cells A2:A6 on the ServiceLevels worksheet, and assign its output to cell C2.
4. Create two option buttons labeled Signature Required and Signature Waived. Assign the value of the Signature Required option button to cell D2 and the value of the Signature Waived option button to cell E2.
5. Create a group that allows either the Signature Required or Signature Waived option button to be selected, but not both.
All materials on the site are licensed Creative Commons Attribution-Sharealike 3.0 Unported CC BY-SA 3.0 & GNU Free Documentation License (GFDL)
If you are the copyright holder of any material contained on our site and intend to remove it, please contact our site administrator for approval.
© 2016-2026 All site design rights belong to S.Y.A.