Microsoft Excel 2016 Step by Step (2015)
Part 3: Collaborate and share in Excel
13. Work with other Microsoft Office apps
In this chapter
![]() Include Office documents in workbooks and other files
Include Office documents in workbooks and other files
![]() Create hyperlinks
Create hyperlinks
![]() Paste charts into documents
Paste charts into documents
Practice files
For this chapter, use the practice files from the Excel2016SBS\Ch13 folder. For practice file download instructions, see the introduction.
By itself, Excel 2016 provides a broad range of tools so that you can store, present, and summarize your data. When you use other Microsoft Office 2016 apps, you can extend your capabilities even further. For example, you can include a file created with another Office app in an Excel workbook. If you use Microsoft Word 2016 to write a quick note about why a customer’s shipping expenditures decreased significantly in January, you can include the report in your workbook. Similarly, you can include your Excel workbooks in documents created with other Office apps. If you want to copy only part of a workbook, such as a chart, to another Office document, you can also do that.
Excel integrates well with the web. If you know of a web-based resource that would be useful to someone who is viewing a document, you can create a hyperlink, which is a connection from one place in a document to a place in the same file, or to another file anywhere on a network or on the Internet, as long as the user’s computer can reach that location.
This chapter guides you through procedures related to including an Office 2016 document in a workbook, storing an Excel workbook as part of another Office document, creating hyperlinks, and pasting an Excel chart into another document.
Include Office documents in workbooks and other files
One benefit of working with Excel 2016 is that because it is part of Office 2016, you can combine data from Excel and other Office apps to create informative documents and presentations. Just as you do when you combine data from more than one Excel document, when you combine information from another Office file with an Excel workbook, you can either embed the other Office document into the Excel workbook or create a link between the workbook and the other document.
Embed an Excel workbook in another Office file
When you link to an Office file from within Excel, any changes made to the Office file will appear in your Excel workbook.
Link to other Office documents from Excel
Link Office documents to Excel workbooks
There are two advantages to creating a link between your Excel workbook and the other file. The first benefit is that linking to the other file, as opposed to copying the entire file into your workbook, keeps your Excel workbook small. If the workbook is copied to another drive or computer, you can maintain the link by copying the linked file along with the Excel workbook or by re-creating the link if the linked file is on the same network as the Excel workbook. It is also possible to use the workbook if the linked file isn’t available. The second benefit of linking to another file is that any changes in the file to which you link are reflected in your Excel workbook.
You create a link between an Excel workbook and another Office document by identifying the file, specifying how to connect to it, and choosing how to display the file within your workbook. After you’ve defined this connection, you can still edit the file by opening it from within Excel or in the app used to create it.
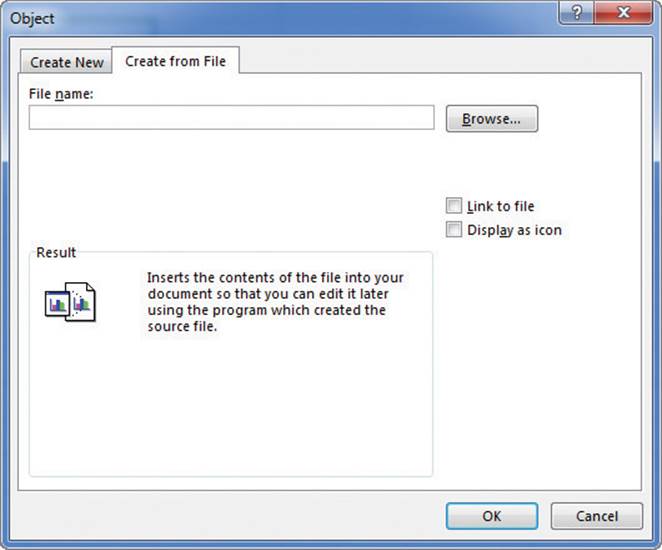
Identify the file to include in your workbook by using the Object dialog box
![]() Tip
Tip
The upper-left corner of the linked or embedded file, or the icon that represents the file, appears in the worksheet’s active cell.
To create a link to an Office document
1. On the Insert tab of the ribbon, in the Text group, click Object to open the Object dialog box.
2. Click the Create from File tab to display the Create From File page.
3. Click Browse to open the Browse dialog box.
4. Browse to the directory that contains the file you want to insert, select it in the file list, and then click Insert.
5. Select the Link to file check box, and then click OK to create a link from your workbook to the presentation.
To edit a file from its link in an Excel workbook
1. Right-click the linked file in your Excel workbook, point to ObjectType, and click Edit.
2. Edit the file in the other Office app, then save and close the file.
Embed files in Excel and other Office apps
The preceding section described how to link to another file from within your Excel workbook. The advantages of linking to a second file are that the size of your workbook is kept small, and any changes in the second document will be reflected in your workbook. The disadvantage is that the second document must be copied with the workbook—or it must at least be on a network-accessible computer. If Excel can’t find or access the second file where the link says it is located, Excel can’t display it. You can still open your workbook, but you won’t be able to view the linked file’s contents.
If file size isn’t an issue and you want to ensure that the second document is always available, you can embed the file in your workbook. Embedding another file in an Excel workbook means that the entirety of the other file is saved as part of your workbook. Wherever your workbook goes, the embedded file goes along with it. Of course, the embedded version of the file is no longer connected to the original file, so changes in one aren’t reflected in the other.
![]() Important
Important
To view a linked or embedded file, you must have the app used to create it installed on the computer on which you open the workbook.
If you don’t want your workbook to take up much room in the file where you embed it, you can have the other app display the workbook as an icon to save space. As with a linked file, you can always edit your workbook in Excel.
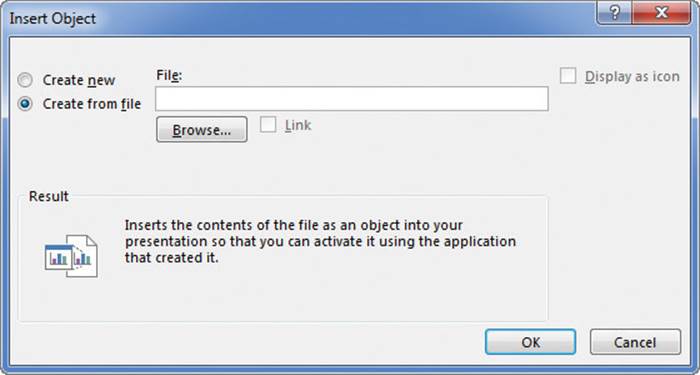
Similarly, you can also embed an Excel workbook in another Office file. This is done from the Insert Object dialog box in the other Office file. In this dialog box, if the Link check box is cleared, the Excel workbook will be embedded. If that check box is selected, you will create a link to the Excel workbook instead of embedding it.
Include an Excel workbook in other Office documents by using the Insert Object dialog box
To embed an Office document in an Excel workbook
1. On the Insert tab, in the Text group, click Object.
2. In the Object dialog box, click the Create from File tab.
3. Click Browse.
4. Navigate to the folder that contains the file you want to embed, click the file, and then click Insert.
5. Click OK.
To embed an Excel workbook in an Office document
1. In the Office app, on the Insert tab, click Object.
2. Click Create from file.
3. Click Browse to open the Browse dialog box, navigate to the folder that contains the workbook you want to embed, and double-click the file’s name.
4. Click OK.
Embed Excel files in Microsoft PowerPoint and Word documents
Create hyperlinks
One of the characteristics of the web is that documents published on webpages can have references, or hyperlinks, that you can click to display them. In Excel, you can also create hyperlinks that connect to locations in the same document or to other web documents. A hyperlink functions much like a link between two cells or between two files, but hyperlinks can reach any computer on the Internet, not just those on a corporate network. Hyperlinks that haven’t been clicked usually appear as underlined blue text, and hyperlinks that have been followed appear as underlined purple text, but you can change those settings.
Add resources to your workbook by using hyperlinks
You can choose exactly what kind of hyperlink you want to create and specify the text you want to represent it in your workbook.
Create a link to an existing file or webpage
You can choose one of four types of targets, or destinations, for your hyperlink: an existing file or webpage, a place in the current document, a new document you create on the spot, or an email address. Creating a mailto hyperlink, which is the technical term for a hyperlink that creates an email message, also lets you specify a subject for messages generated by clicking the link. Regardless of the type of hyperlink you create, you can change the text that appears in your worksheet, edit the hyperlink, or remove it at any time.
To create a hyperlink to an existing file
1. Click the cell where you want the hyperlink to appear.
2. On the Insert tab, in the Links group, click the Hyperlink button.
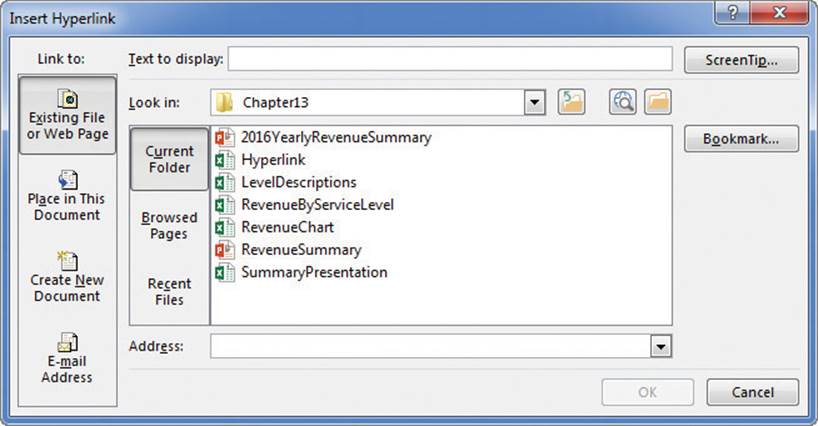
3. In the Insert Hyperlink dialog box, click the Existing File or Web Page button.
4. Use the controls in the Look in box to locate the file to which you want to create a hyperlink.
5. Select the file name.
6. In the Text To Display box, enter the text you want to appear in your workbook.
7. Click OK.
To create a hyperlink to a webpage
1. Click the cell where you want the hyperlink to appear.
2. Click the Hyperlink button.
3. In the Insert Hyperlink dialog box, click the Existing File or Web Page button.
4. In the Text to display box, enter the text to appear in the cell that contains the hyperlink.
5. In the Address box, enter the address of the webpage to which you want to link.
Or
Click the Address box’s arrow and select a web address.
Or
Click the Browsed Pages button and click a recently visited page to add its address to the hyperlink definition.
6. Click OK.
To create a hyperlink to a place in the current file
1. Click the cell where you want the hyperlink to appear.
2. Click the Hyperlink button.
3. In the Insert Hyperlink dialog box, click the Place in This Document button.
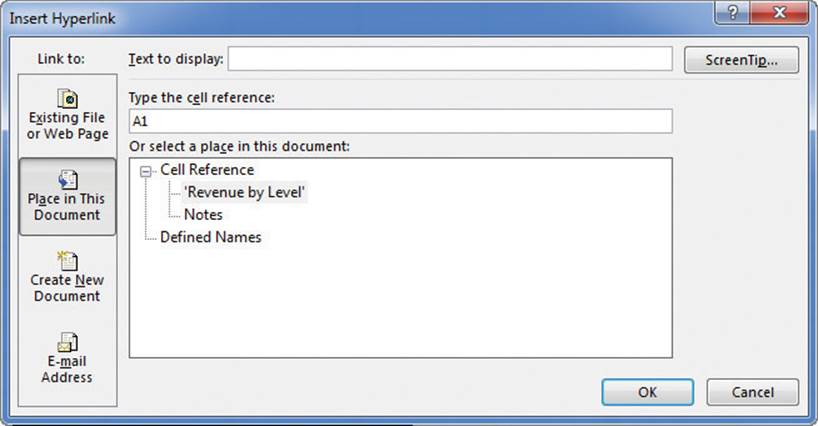
Create hyperlinks that lead to places in the current workbook
4. Enter the cell reference in the Type the cell reference box.
Or
Click the link target in the Or select a place in this document box.
5. In the Text to display box, enter the text you want to appear in your workbook.
6. Click OK.
To create a hyperlink to a new file
1. Click the cell where you want the hyperlink to appear.
2. Click the Hyperlink button.
3. In the Insert Hyperlink dialog box, click the Create New Document button.
4. In the Name of new document box, enter a name for the new document.
5. Click the Change button and then, in the Create New Document dialog box, select the folder where you want to create the document.
6. In the Save as type list, select the type of file you want to create, and click OK.
7. Select Edit the new document later.
Or
Select Edit the new document now.
8. In the Text to display box, enter the text you want to appear in your workbook.
9. Click OK.
To create a mailto hyperlink that creates an email message when clicked
1. Click the cell where you want the hyperlink to appear.
2. Click the Hyperlink button.
3. In the Insert Hyperlink dialog box, click the E-mail Address button.
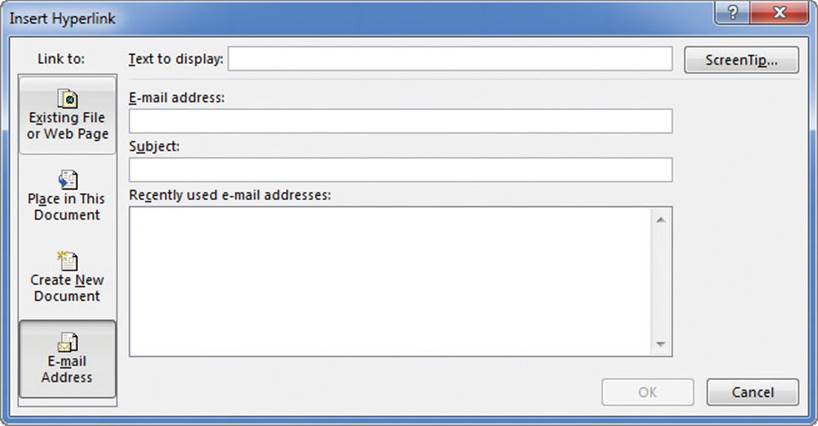
Create a hyperlink that generates a new email message
4. In the Text to display box, enter the text you want to appear in your workbook.
5. Enter the target email address in the E-mail address box.
Or
Select an email address in the Recently used e-mail addresses box.
6. Enter a subject for the email message in the Subject box.
7. Click OK.
To display the target of a hyperlink
1. Click the hyperlink.
To edit a hyperlink
1. Right-click the hyperlink and click Edit Hyperlink on the shortcut menu.
2. Make the changes you want in the Edit Hyperlink dialog box.
3. Click OK.
To delete a hyperlink
1. Right-click the hyperlink and click Remove Hyperlink on the shortcut menu.
Paste charts into documents
One more way to include objects from a workbook in another Office document is to copy the object you want to share and then paste it into its new location. You can copy Excel charts to Word documents and PowerPoint presentations directly, which lets the chart update whenever the data in the source workbook changes. You can also copy the chart’s current appearance as an image. Doing so doesn’t create a link to the original data, but it does provide an accurate picture of the chart’s appearance when you captured the image.
![]() Important
Important
If you create a link to an Excel chart, the Excel workbook must keep the same relationship with the file as when you linked the chart. If the workbook and other Office file are in the same folder, they must remain in the same folder. If the workbook is on a networked computer, it must remain in its original folder so the link path remains the same.
To paste a chart into an Office document, preserving a link to the original workbook
1. In Excel, right-click the chart and click Copy.
2. Display the Office file in which you want to paste the chart, and press Ctrl+V.
To paste an image of a chart in an Office document
1. In Excel, right-click the chart and click Copy.
2. Display the Office file in which you want to paste the chart, and press Ctrl+V.
3. Click the Paste Options button in the lower-right corner of the pasted chart.

Add links to charts or just copy the chart’s current appearance
4. Click the Picture icon.
Skills review
In this chapter, you learned how to:
![]() Include Office documents in workbooks and other files
Include Office documents in workbooks and other files
![]() Create hyperlinks
Create hyperlinks
![]() Paste charts into documents
Paste charts into documents
 Practice tasks
The practice files for these tasks are located in the Excel2016SBS\Ch13 folder. You can save the results of the tasks in the same folder.
![]() Important
Important
You must have PowerPoint installed to complete some of the following procedures.
Include Office documents in workbooks and other files
Open the LinkFiles workbook in Excel and the LinkWorkbooks presentation in PowerPoint, and then perform the following tasks:
1. Click cell B3.
2. Create a link to the LinkWorkbooks PowerPoint presentation.
3. Display the linked file as an icon in your workbook.
4. Open the LinkWorkbooks presentation for editing from within Excel, save your changes, and close the presentation.
5. Switch to the LinkWorkbooks presentation and display the second slide.
6. Embed the EmbedWorkbook Excel workbook in the PowerPoint presentation.
7. Edit the embedded file from within PowerPoint, make a change, and save the presentation.
8. Open the EmbedWorkbook workbook in Excel and compare it with your changed file.
Create hyperlinks
Open the CreateHyperlinks workbook in Excel, and then perform the following tasks:
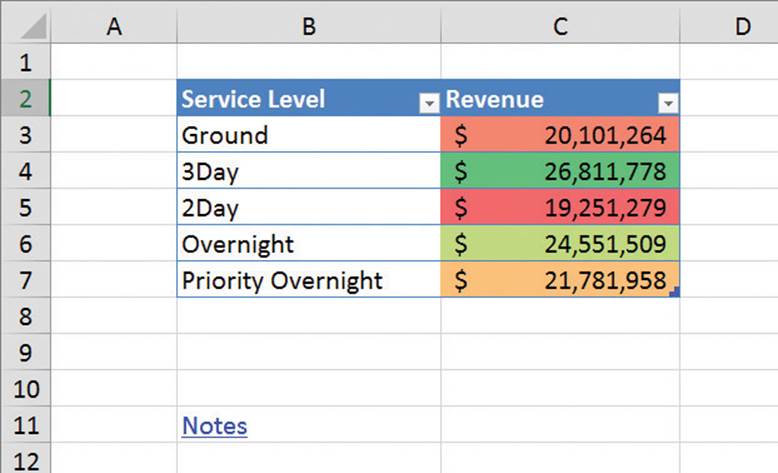
1. On the Revenue by Level worksheet, click cell E2.
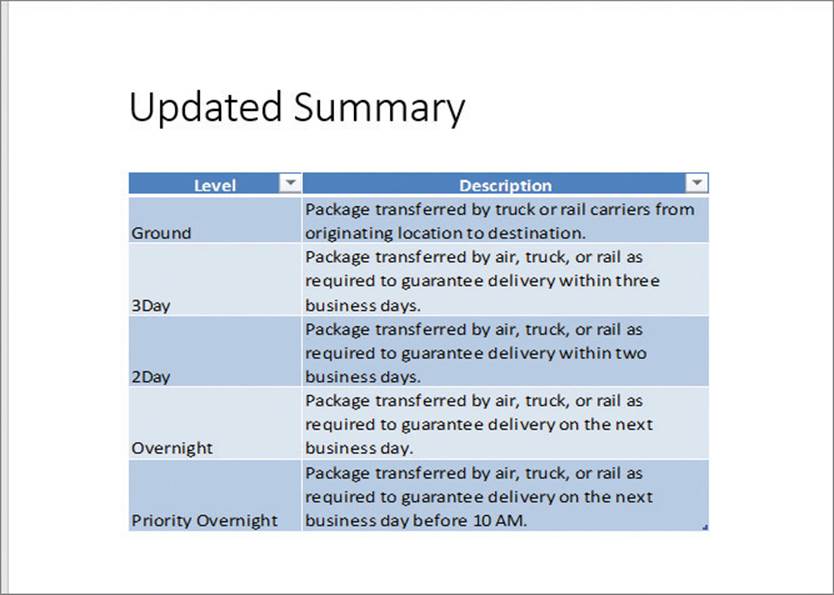
2. Create a hyperlink to the LevelDescriptions workbook in the practice files folder.
3. Click cell B11 and create a hyperlink from the Notes text on the Revenue by Level worksheet to the Notes worksheet.
4. Click cell C11 and create a mailto hyperlink that sends a message to your email account with the subject Test from Excel.
5. Edit the Text to display field of the hyperlink to the LevelDescriptions workbook to read Information on service levels.
6. Delete the hyperlink to the Notes worksheet.
Paste charts into documents
Open the LinkCharts workbook in Excel and the ReceiveLinks and LinkWorkbooks presentations in PowerPoint, and then perform the following tasks:
1. Paste the chart from the LinkCharts workbook into the ReceiveLinks presentation.
2. Paste an image of the chart from the LinkCharts workbook into the LinkWorkbooks presentation.
All materials on the site are licensed Creative Commons Attribution-Sharealike 3.0 Unported CC BY-SA 3.0 & GNU Free Documentation License (GFDL)
If you are the copyright holder of any material contained on our site and intend to remove it, please contact our site administrator for approval.
© 2016-2026 All site design rights belong to S.Y.A.