Excel 2016 Formulas (2016)
PART VI
Developing Custom Worksheet Functions
Chapter 24
VBA Programming Concepts
In This Chapter
· Understanding VBA’s language elements, including variables, data types, and constants
· Using the built-in VBA functions
· Controlling the execution of your Function procedures
· Using ranges in your code
To truly go beyond recording macros and into writing your own custom functions, it’s important to understand the underlying Visual Basic for Applications (VBA) typically used in Excel macros.
This chapter starts you on that journey by giving you a primer on some of the objects, variables, events, and error handlers you will encounter in the examples found in this book.
![]() On the Web
On the Web
Many of the code examples in this chapter are available at this book’s website. The file is named function examples.xlsm.
A Brief Overview of the Excel Object Model
VBA is an object-oriented programming language. The basic concept of object-oriented programming is that a software application (Excel in this case) consists of various individual objects, each of which has its own set of features and uses. An Excel application contains cells, worksheets, charts, pivot tables, drawing shapes—the list of Excel’s objects is seemingly endless. Each object has its own set of features, which are called properties, and its own set of uses, called methods.
You can think of this concept just as you would the objects you encounter every day, such as your computer, your car, and the refrigerator in your kitchen. Each of those objects has identifying qualities, such as height, weight, and color. Each has its own distinct uses, such as your computer for working with Excel, your car to transport you over long distances, and your refrigerator to keep your perishable foods cold.
VBA objects also have their identifiable properties and methods of use. A worksheet cell is an object, and among its describable features (its properties) are its address, its height, and its formatted fill color. A workbook is also a VBA object, and among its usable features (its methods) are its abilities to be opened, closed, and have a chart or pivot table added to it.
In Excel you deal with workbooks, worksheets, and ranges on a daily basis. You likely think of each of these “objects” as part of Excel, not really separating them in your mind. However, Excel thinks about these internally as part of a hierarchical model called the Excel Object Model. The Excel Object Model is a clearly defined set of objects that are structured according to the relationships between them.
Understanding objects
In the real world, you can describe everything you see as an object. When you look at your house, it is an object. Your house has rooms; those rooms are also separate objects. Those rooms may have closets. Those closets are likewise objects. As you think about your house, the rooms, and the closets, you may see a hierarchical relationship between them. Excel works in the same way.
In Excel, the Application object is the all-encompassing object—similar to your house. Inside the Application object, Excel has a workbook. Inside a workbook is a worksheet. Inside that is a range. All these are objects that live in a hierarchical structure.
To point to a specific object in VBA, you can traverse the object model. For example, to get to cell A1 on Sheet 1, you can enter this code:
Activeworbook.Sheets("Sheet1").Range("A1").Select
In most cases, the object model hierarchy is understood, so you don’t have to type every level. Entering this code also gets you to cell A1 because Excel infers that you mean the active workbook and the active sheet:
Range("A1").Select
Indeed, if you have your cursor already in cell A1, you can simply use the ActiveCell object, negating the need to actually spell out the range:
Activecell.Select
Understanding collections
Many of Excel’s objects belong to collections. For example, your house sits within a collection of houses that are called a neighborhood. Each neighborhood sits in a collection of neighborhoods called a city. Excel considers collections to be objects themselves.
In each workbook object, you have a collection of worksheets. The Worksheets collection is an object that you can call upon through VBA. Each worksheet in your workbook lives in the Worksheets collection.
If you want to refer to a worksheet in the Worksheets collection, you can refer to it by its position in the collection, as an index number starting with 1, or by its name, as quoted text. If you run these two lines of code in a workbook that has only one worksheet called MySheet, they both do the same thing:
Worksheets(1).Select
Worksheets("MySheet").Select
If you have two worksheets in the active workbook that have the names MySheet and YourSheet, in that order, you can refer to the second worksheet by typing either of these statements:
Worksheets(2).Select
Worksheets("YourSheet").Select
If you want to refer to a worksheet called MySheet in a particular workbook called MyData.xlsx that is not active, you must qualify the worksheet reference and the workbook reference, as follows:
Workbooks("MyData.xlsx").Worksheets("MySheet").Select
Understanding properties
Properties are essentially the characteristics of an object. Your house has a color, a square footage, an age, and so on. Some properties can be changed, such as the color of your house. Other properties can’t be changed, such as the age of your house.
Likewise, an object in Excel like the Worksheet object has a sheet name property that can be changed and a Rows.Count row property that cannot.
You refer to the property of an object by referring to the object and then the property. For instance, you can change the name of your worksheet by changing its Name property.
In this example, you are renaming Sheet1 to MySheet:
Sheets("Sheet1").Name = "MySheet"
Some properties are read only, which means that you can’t assign a value to them directly; an example is the Text property of a cell. The Text property gives you the formatted appearance of value in a cell, but you cannot overwrite or change it.
Understanding methods
Methods are the actions that can be performed against an object. It helps to think of methods as verbs. You can paint your house, so in VBA, that translates to something like this:
house.paint
A simple example of an Excel method is the Select method of the Range object:
Range("A1").Select
Another is the Copy method of the Range object:
Range("A1").Copy
Some methods have parameters that can dictate how they are applied. For instance, the Paste method can be used more effectively by explicitly defining the Destination parameter:
ActiveSheet.Paste Destination:=Range("B1")
A brief look at variables
Another concept you will see throughout the macros in this book is variables. It’s important to dedicate a few words to this concept because it will play a big part in most of the macros you will encounter here.
You can think of variables as memory containers that you can use in your procedures. There are different types of variables, each tasked with holding a specific type of data.
Following are some of the common types of variables you will see in this book:
§ String: Holds textual data
§ Integer: Holds numeric data ranging from –32,768 to 32,767
§ Long: Holds numeric data ranging from –2,147,483,648 to 2,147,483,647
§ Double: Holds floating point numeric data
§ Variant: Holds any kind of data
§ Boolean: Holds binary data that returns TRUE or FALSE
§ Object: Holds an actual object from the Excel Object Model
The term used for creating a variable in a macro is declaring a variable. You do so by entering Dim (abbreviation for dimension), then the name of your variable, and then the type. For instance:
Dim MyText as String
Dim MyNumber as Integer
Dim MyWorksheet as Worksheet
Once you create your variable, you can fill it with data. Here are a few simple examples of how you would create a variable and then assign values to them:
Dim MyText as String
Mytext = Range("A1").Value
Dim MyNumber as Integer
MyNumber = Range("B1").Value * 25
Dim MyObject as Worksheet
Set MyWorksheet = Sheets("Sheet1")
The values you assign to your variables often come from data stored in your cells. However, the values may also be information that you yourself create. It all depends on the task at hand. This notion will become clearer as you go through the macros in this book.
What’s so great about variables?
Although it is possible to create code that does not use variables, you will encounter many examples of VBA code where variables are employed. There are two main reasons for this.
First, Excel doesn’t inherently know what your data is used for. It doesn’t see numerals, symbols, or letters. It just sees data. When you declare variables with specific data types, you help Excel know how it should handle certain pieces of data so that your macros will produce the results you’d expect.
Second, variables help by making your code more efficient and easier to understand. For example, suppose you have a number in cell A1 that you are repeatedly referring to in your macro. You can retrieve that number by pointing to cell A1 each time you need it:
Sub Macro1()
Range("B1").Value = Range("A1").Value * 5
Range("C1").Value = Range("A1").Value * 10
Range("D1").Value = Range("A1").Value * 15
End Sub
However, this forces Excel to waste cycles storing the same number into memory every time you point to cell A1. Also, if you need to change your workbook so that the target number is not in cell A1, but in, let’s say, cell A2, you must edit your code by changing all the references from A1 to A2.
A better way is to store the number in cell A1 just once. For example, you can store the value in cell A1 in an Integer variable called myValue.
Sub WithVariable()
Dim myValue As Integer
myValue = Range("A1").Value
Range("B1").Value = myValue * 5
Range("C1").Value = myValue * 10
Range("D1").Value = myValue * 15
End Sub
This not only improves the efficiency of your code (ensuring Excel reads the number in Cell A1 just once) but ensures that you only have to edit one line should the design of your workbook change.
Using assignment statements
An assignment statement is a VBA instruction that evaluates an expression and assigns the result to a variable or an object. An expression is a combination of keywords, operators, variables, and constants that yields a string, number, or object. An expression can perform a calculation, manipulate characters, or test data.
If you know how to create formulas in Excel, you’ll have no trouble creating expressions in VBA. With a worksheet formula, Excel displays the result in a cell. Similarly, you can assign a VBA expression to a variable or use it as a property value.
VBA uses the equal sign (=) as its assignment operator. Note the following examples of assignment statements. (The expressions are to the right of the equal sign.)
x = 1
x = x + 1
x = (y * 2) / (z * 2)
MultiSheets = True
Expressions often use functions. These can be VBA’s built-in functions, Excel’s worksheet functions, or custom functions that you develop in VBA. We discuss VBA’s built-in functions later in this chapter.
Operators play a major role in VBA. Familiar operators describe mathematical operations, including addition (+), multiplication (*), division (/), subtraction (–), exponentiation (^), and string concatenation (&). Less familiar operators are the backslash (\) that’s used in integer division and the Mod operator that’s used in modulo arithmetic. The Mod operator returns the remainder of one integer divided by another. For example, the following expression returns 2:
17 Mod 3
You may be familiar with the Excel MOD function. Note that in VBA, Mod is an operator, not a function.
VBA also supports the same comparative operators used in Excel formulas: equal to (=), greater than (>), less than (<), greater than or equal to (>=), less than or equal to (<=), and not equal to (<>). Additionally, VBA provides a full set of logical operators, as shown inTable 24.1. Refer to the Help system for additional information and examples of these operators.
Table 24.1 VBA Logical Operators
|
Operator |
What It Does |
|
Not |
Performs a logical negation on an expression |
|
And |
Performs a logical conjunction on two expressions |
|
Or |
Performs a logical disjunction on two expressions |
|
Xor |
Performs a logical exclusion on two expressions |
|
Eqv |
Performs a logical equivalence on two expressions |
|
Imp |
Performs a logical implication on two expressions |
The order of precedence for operators in VBA exactly matches that in Excel. Of course, you can add parentheses to change the natural order of precedence.
![]() Warning
Warning
The negation operator (a minus sign) is handled differently in VBA. In Excel, the following formula returns 25:
=–5^2
In VBA, x equals –25 after this statement is executed:
x = –5 ^ 2
VBA performs the exponentiation operation and then applies the negation operator. The following statement returns 25:
x = (–5) ^ 2
Error handling
In some of the macros in this book, you will see a line similar to this:
On Error GoTo MyError
This is called an error handler. Error handlers allow you to specify what happens when an error is encountered while your code runs.
Without error handlers, any error that occurs in your code prompts Excel to activate a less-than-helpful error message, which typically won’t clearly convey what actually happened. However, with the aid of error handlers, you can choose to ignore the error or exit the code gracefully with your own message to the user.
There are three types of On Error statements:
§ On Error GoTo SomeLabel: The code jumps to the specified label.
§ On Error Resume Next: The error is ignored and the code resumes.
§ On Error GoTo 0: VBA resets to normal error checking behavior.
On Error GoTo SomeLabel
There are times when an error in your code means you need to gracefully exit the procedure and give your users a clear message. In these situations, you can use the On Error GoTo statement to tell Excel to jump to a certain line of code.
Take this small piece of code, for example. Here, we are telling Excel to divide the value in cell A1 by the value in cell A2 and then place the answer in cell A3. Easy. What could go wrong?
Sub Macro1()
Range("A3").Value = Range("A1").Value / Range("A2").Value
End Sub
As it turns out, two major things can go wrong. If cell A2 contains a 0, we get a divide by 0 error. If cell A1 or A2 contains a nonnumeric value, we get a type mismatch error.
To avoid a nasty error message, we can tell Excel that On Error, we want the code execution to jump to the label called MyExit.
In the code that follows, you see that the MyExit label is followed by a message to the user that gives her friendly advice instead of a nasty error message. Also note the Exit Sub line before the MyExit label. This ensures that the code simply exits if no error is encountered:
Sub Macro1()
On Error GoTo MyExit
Range("A3").Value = Range("A1").Value / Range("A2").Value
Exit Sub
MyExit:
MsgBox "Please Use Valid Non-Zero Numbers"
End Sub
On Error Resume Next
Sometimes you want Excel to ignore an error and simply resume running the code. In these situations, you can use the On Error Resume Next statement.
For example, this piece of code is meant to delete a file called GhostFile.exe from the C:\Temp directory. After the file is deleted, a nice message box tells the user the file is gone:
Sub Macro1()
Kill "C:\Temp\GhostFile.exe"
MsgBox "File has been deleted."
End Sub
It works great if there is indeed a file to delete. But if for some reason the file called GhostFile.exe does not exist in the C:\Temp drive, an error is thrown.
In this case, we don’t care if the file is not there. We were going to delete it anyway. So we can simply ignore the error and move on with the code.
By using the On Error Resume Next statement, the code runs its course whether or not the targeted file exists:
Sub Macro1()
On Error Resume Next
Kill "C:\Temp\GhostFile.exe"
MsgBox "File has been deleted."
End Sub
On Error GoTo 0
When you’re using certain error statements, it may be necessary to reset the error-checking behavior of VBA. To understand what this means, take a look at this example.
Here, we first want to delete a file called GhostFile.exe from the C:\Temp directory. To avoid errors that may stem from the fact that the targeted file does not exist, we use the On Error Resume Next statement. After that, we are trying to do some suspect math by dividing 100/Mike:
Sub Macro1()
On Error Resume Next
Kill "C:\Temp\GhostFile.exe"
Range("A3").Value = 100 / "Mike"
End Sub
Running this piece of code should generate an error due to the fuzzy math, but it doesn’t. Why? Because the last instruction we gave to the code was On Error Resume Next. Any error encountered after that line is effectively ignored.
To remedy this problem, we can use the On Error GoTo 0 statement to resume the normal error-checking 'margin-top:12.0pt;margin-right:0cm;margin-bottom: 12.0pt;margin-left:0cm;line-height:normal;background:#EEEEEE;vertical-align: baseline'>Sub Macro1()
On Error Resume Next
Kill "C:\Temp\GhostFile.exe"
On Error GoTo 0
Range("A3").Value = 100 / "Mike"
End Sub
This code ignores errors until the On Error GoTo 0 statement. After that statement, the code goes back to normal error-checking where it triggers the expected error stemming from the fuzzy math.
Using code comments
A comment is descriptive text embedded within your code. VBA completely ignores the text of a comment. It’s a good idea to use comments liberally to describe what you do because the purpose of a particular VBA instruction is not always obvious.
You can use a complete line for your comment, or you can insert a comment after an instruction on the same line. A comment is indicated by an apostrophe. VBA ignores any text that follows an apostrophe up until the end of the line. An exception occurs when an apostrophe is contained within quotation marks. For example, the following statement does not contain a comment, even though it has an apostrophe:
Result = "That doesn't compute"
The following example shows a VBA Function procedure with three comments:
Function LASTSPACE(txt)
' Returns the position of the last space character
LASTSPACE = InStrRev(txt, Chr(32)) 'character 32 is a space
' If no spaces, return #NA error
If LASTSPACE = 0 Then LASTSPACE = CVErr(xlErrNA)
End Function
When developing a function, you may want to test it without including a particular statement or group of statements. Instead of deleting the statement, simply convert it to a comment by inserting an apostrophe at the beginning. VBA then ignores the statement(s) when the routine is executed. To convert the comment back to a statement, delete the apostrophe.
![]() Tip
Tip
The VB Editor Edit toolbar contains two useful buttons. Select a group of instructions and then use the Comment Block button to convert the instructions to comments. The Uncomment Block button converts a group of comments back to instructions. If the Edit toolbar is not visible, choose View ➜ Toolbars ➜ Edit.
An Introductory Example Function Procedure
At this point, you should have enough working knowledge to evaluate a real-life Function procedure. This function, named REMOVESPACES, accepts a single argument and returns that argument without spaces. For example, the following worksheet formula uses the REMOVESPACES function and returns ThisIsATest:
=REMOVESPACES("This Is A Test")
To create this function, insert a VBA module into a project and then enter the following Function procedure into the code window of the module:
Function REMOVESPACES(cell) As String
' Removes all spaces from cell
Dim CellLength As Long
Dim Temp As String
Dim Character As String
Dim i As Long
CellLength = Len(cell)
Temp = ""
For i = 1 To CellLength
Character = Mid(cell, i, 1)
If Character <> Chr(32) Then Temp = Temp & Character
Next i
REMOVESPACES = Temp
End Function
Look closely at this function’s code line by line:
§ The first line of the function is called the function’s declaration line. Notice that the procedure starts with the keyword Function, followed by the name of the function (REMOVESPACES). This function uses only one argument (cell); the argument name is enclosed in parentheses. As String defines the data type of the function’s return value. The As part of the function declaration is optional.
§ The second line is a comment (optional) that describes what the function does. The initial apostrophe designates this line as a comment. Comments are ignored when the function is executed.
§ The next four lines use the Dim keyword to declare the four variables used in the procedure: CellLength, Temp, Character, and i. Declaring variables is not necessary, but as you’ll see later, it’s an excellent practice.
§ The procedure’s next line assigns a value to a variable named CellLength. This statement uses the VBA Len function to determine the length of the contents of the argument (cell).
§ The next line creates a variable named Temp and assigns it an empty string.
§ The next four lines make up a For-Next loop. The statements between the For statement and the Next statement are executed a number of times; the value of CellLength determines the number of times. For example, assume that the cell passed as the argument contains the text Bob Smith. The statements within the loop would execute nine times—one time for each character in the string.
§ Within the loop, the Character variable holds a single character that is extracted using the VBA Mid function (which works just like Excel’s MID function). The If statement determines whether the character is not a space. (The VBA Chr function is equivalent to Excel’s CHAR function, and an argument of 32 represents a space character.) The two angle brackets (<>) represent “not equal to.” If the character is not a space, the character is appended to the string stored in the Temp variable (using an ampersand, the concatenation operator). If the character is a space, the Temp variable is unchanged, and the next character is processed. If you prefer, you can replace this statement with the following:
If Character <> " " Then Temp = Temp & Character
§ When the loop finishes, the Temp variable holds all the characters that were originally passed to the function in the cell argument, except for the spaces.
§ The string contained in the Temp variable is assigned to the function’s name. This string is the value that the function returns.
§ The Function procedure ends with an End Function statement.
The REMOVESPACES procedure uses some common VBA language elements, including
§ A Function declaration statement
§ A comment (the line preceded by the apostrophe)
§ Variable declarations
§ Three assignment statements
§ Three built-in VBA functions (Len, Mid, and Chr)
§ A looping structure (For-Next)
§ A comparison operator (<>)
§ An If-Then structure
§ String concatenation (using the & operator)
Not bad for a first effort, eh? The remainder of this chapter provides more information on these (and many other) programming concepts.
![]() Note
Note
The REMOVESPACES function listed here is for instructional purposes only. You can accomplish the same effect by using the Excel SUBSTITUTE function, which is much more efficient than using a custom VBA function. The following formula, for example, removes all space characters from the text in cell A1:
=SUBSTITUTE(A1," ","")
Using Built-In VBA Functions
VBA has a variety of built-in functions that simplify calculations and operations. Many of VBA’s functions are similar (or identical) to Excel’s worksheet functions. For example, the VBA function UCase, which converts a string argument to uppercase, is equivalent to the Excel worksheet function UPPER.
![]() Tip
Tip
To display a list of VBA functions while writing your code, type VBA followed by a period (.). The VB Editor displays a list of all functions and constants (see Figure 24.1). If this does not work for you, make sure that you select the Auto List Members option. Choose Tools ➜ Options and click the Editor tab. In addition to functions, the displayed list includes built-in constants. All the VBA functions are described in the online help. To view Excel Help, just move the cursor over a function name and press F1.
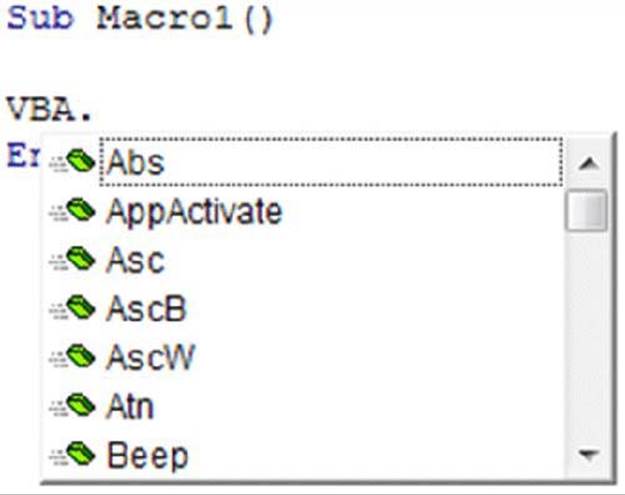
Figure 24.1 Displaying a list of VBA functions in the VB Editor.
Here’s a statement that calculates the square root of a variable by using VBA’s Sqr function and then assigns the result to a variable named x:
x = Sqr(MyValue)
Having knowledge of VBA functions can save you lots of work. For example, consider the REMOVESPACES Function procedure presented in the previous section. That function uses a For-Next loop to examine each character in a string and builds a new string. A much simpler (and more efficient) version of that Function procedure uses the VBA Replace function. The following is a rewritten version of the Function procedure:
Function REMOVESPACES2(cell) As String
' Removes all spaces from cell
REMOVESPACES2 = Replace(cell, " ", "")
End Function
You can use many (but not all) of Excel’s worksheet functions in your VBA code. To use a worksheet function in a VBA statement, just precede the function name with WorksheetFunction and a period.
The following code demonstrates how to use an Excel worksheet function in a VBA statement. The code snippet uses the ENCODEURL function to encode a URL:
URL = "http://spreadsheetpage.com"
Encoded = WorksheetFunction.ENCODEURL(URL)
For some reason, you can’t use worksheet functions that have an equivalent VBA function. For example, VBA can’t access Excel’s SQRT worksheet function because VBA has its own version of that function: Sqr. Therefore, the following statement generates an error:
x = WorksheetFunction.SQRT(123) 'error
Controlling Execution
Some VBA procedures start at the top and progress line by line to the bottom. Often, however, you need to control the flow of your routines by skipping over some statements, executing some statements multiple times, and testing conditions to determine what the routine does next.
This section discusses several ways of controlling the execution of your VBA procedures:
§ If-Then constructs
§ Select Case constructs
§ For-Next loops
§ Do While loops
§ Do Until loops
§ On Error statements
The If-Then construct
Perhaps the most commonly used instruction grouping in VBA is the If-Then construct. This instruction is one way to endow your applications with decision-making capability. The basic syntax of the If-Then construct is as follows:
If condition Then true_instructions [Else false_instructions]
The If-Then construct executes one or more statements conditionally. The Else clause is optional. If included, it enables you to execute one or more instructions when the condition that you test is not true.
The following Function procedure demonstrates an If-Then structure without an Else clause. The example deals with time. VBA uses the same date-and-time serial number system as Excel (but with a much wider range of dates). The time of day is expressed as a fractional value—for example, noon is represented as .5. The VBA Time function returns a value that represents the time of day, as reported by the system clock. In the following example, the function starts out by assigning an empty string to GREETME. The If-Thenstatement checks the time of day. If the time is before noon, the Then part of the statement executes, and the function returns Good Morning:
Function GREETME()
GREETME = ""
If Time < 0.5 Then GREETME= "Good Morning"
End Function
The following function uses two If-Then statements. It displays either Good Morning or Good Afternoon:
Function GREETME()
If Time < 0.5 Then GREETME = "Good Morning"
If Time >= 0.5 Then GREETME = "Good Afternoon"
End Function
Notice that the second If-Then statement uses >= (greater than or equal to). This covers the extremely remote chance that the time is precisely 12:00 noon when the function is executed.
Another approach is to use the Else clause of the If-Then construct:
Function GREETME()
If Time < 0.5 Then GREETME = "Good Morning" Else _
GREETME = "Good Afternoon"
End Function
Notice that the preceding example uses the line continuation sequence (a space followed by an underscore); If-Then-Else is actually a single statement.
The following is another example that uses the If-Then construct. This Function procedure calculates a discount based on a quantity (assumed to be an integer value). It accepts one argument (quantity) and returns the appropriate discount based on that value:
Function DISCOUNT(quantity)
If quantity <= 5 Then DISCOUNT = 0
If quantity >= 6 Then DISCOUNT = 0.1
If quantity >= 25 Then DISCOUNT = 0.15
If quantity >= 50 Then DISCOUNT = 0.2
If quantity >= 75 Then DISCOUNT = 0.25
End Function
Notice that each If-Then statement in this procedure is always executed, and the value for DISCOUNT can change as the function executes. The final value, however, is the desired value.
The preceding examples all used a single statement for the Then clause of the If-Then construct. However, you often need to execute multiple statements if a condition is TRUE. You can still use the If-Then construct, but you need to use an End If statement to signal the end of the statements that make up the Then clause. Here’s an example that executes two statements if the If clause is TRUE:
If x > 0 Then
y = 2
z = 3
End If
You can also use multiple statements for an If-Then-Else construct. Here’s an example that executes two statements if the If clause is TRUE and two other statements if the If clause is not TRUE:
If x > 0 Then
y = 2
z = 3
Else
y = –2
z = –3
End If
The Select Case construct
The Select Case construct is useful for choosing among three or more options. This construct also works with two options and is a good alternative to using If-Then-Else. The syntax for Select Case is as follows:
Select Case testexpression
[Case expressionlist–n
[instructions–n]]
[Case Else
[default_instructions]]
End Select
The following example of a Select Case construct shows another way to code the GREETME examples presented in the preceding section:
Function GREETME()
Select Case Time
Case Is < 0.5
GREETME = "Good Morning"
Case 0.5 To 0.75
GREETME = "Good Afternoon"
Case Else
GREETME = "Good Evening"
End Select
End Function
And here’s a rewritten version of the DISCOUNT function from the previous section, this time using a Select Case construct:
Function DISCOUNT2(quantity)
Select Case quantity
Case Is <= 5
DISCOUNT2 = 0
Case 6 To 24
DISCOUNT2 = 0.1
Case 25 To 49
DISCOUNT2 = 0.15
Case 50 To 74
DISCOUNT2 = 0.2
Case Is >= 75
DISCOUNT2 = 0.25
End Select
End Function
Any number of instructions can be written below each Case statement; all execute if that case evaluates to TRUE.
Looping blocks of instructions
Looping is repeating a block of VBA instructions within a procedure. You may know the number of times to loop, or it may be determined by the values of variables in your program. VBA offers a number of looping constructs:
§ For-Next loops
§ Do While loops
§ Do Until loops
For-Next loops
The following is the syntax for a For-Next loop:
For counter = start To end [Step stepval]
[instructions]
[Exit For]
[instructions]
Next [counter]
The following listing is an example of a For-Next loop that does not use the optional Step value or the optional Exit For statement. This function accepts two arguments and returns the sum of all integers between (and including) the arguments:
Function SUMINTEGERS(first, last)
total = 0
For num = first To last
total = total + num
Next num
SUMINTEGERS = total
End Function
The following formula, for example, returns 55—the sum of all integers from 1 to 10:
=SUMINTEGERS(1,10)
In this example, num (the loop counter variable) starts out with the same value as the first variable and increases by 1 each time the loop repeats. The loop ends when num is equal to the last variable. The total variable simply accumulates the various values of num as it changes during the looping.
![]() Warning
Warning
When you use For-Next loops, you should understand that the loop counter is a normal variable; it is not a special type of variable. As a result, you can change the value of the loop counter within the block of code executed between the For and Next statements. This is, however, a bad practice that can cause problems. In fact, you should take special precautions to ensure that your code does not change the loop counter.
You also can use a Step value to skip some values in the loop. Here’s the same function rewritten to sum every other integer between the first and last arguments:
Function SUMINTEGERS2(first, last)
total = 0
For num = first To last Step 2
total = total + num
Next num
SUMINTEGERS2 = Total
End Function
The following formula returns 25, which is the sum of 1, 3, 5, 7, and 9:
=SUMINTEGERS2(1,10)
For-Next loops can also include one or more Exit For statements within the loop. When this statement is encountered, the loop terminates immediately, as the following example demonstrates:
Function ROWOFLARGEST(c)
NumRows = Rows.Count
MaxVal = WorksheetFunction.Max(Columns(c))
For r = 1 To NumRows
If Cells(r, c) = MaxVal Then
ROWOFLARGEST = r
Exit For
End If
Next r
End Function
The ROWOFLARGEST function accepts a column number (1–16,384) for its argument and returns the row number of the largest value in that column. It starts by getting a count of the number of rows in the worksheet. (This varies, depending on the version of Excel.) This number is assigned to the NumRows variable. The maximum value in the column is calculated by using the Excel MAX function, and this value is assigned to the MaxVal variable.
The For-Next loop checks each cell in the column. When the cell equal to MaxVal is found, the row number (variable r, the loop counter) is assigned to the function’s name, and the Exit For statement ends the procedure. Without the Exit For statement, the loop continues to check all cells in the column, which can take quite a long time.
The previous examples use relatively simple loops. But you can have any number of statements in the loop, and you can even nest For-Next loops inside other For-Next loops. The following is VBA code that uses nested For-Next loops to initialize a 10 × 10 × 10 array with the value –1. When the three loops finish executing, each of the 1,000 elements in MyArray contains –1:
Dim MyArray(1 to 10, 1 to 10, 1 to 10)
For i = 1 To 10
For j = 1 To 10
For k = 1 To 10
MyArray(i, j, k) = –1
Next k
Next j
Next i
Do While loops
A Do While loop is another type of looping structure available in VBA. Unlike a For-Next loop, a Do While loop executes while a specified condition is met. A Do While loop can have one of two syntaxes:
Do [While condition]
[instructions]
[Exit Do]
[instructions]
Loop
or
Do
[instructions]
[Exit Do]
[instructions]
Loop [While condition]
As you can see, VBA enables you to put the While condition at the beginning or the end of the loop. The difference between these two syntaxes involves the point in time when the condition is evaluated. In the first syntax, the contents of the loop may never be executed if the condition is met as soon as the Do statement is executed. In the second syntax, the contents of the loop are always executed at least one time.
The following example is the ROWOFLARGEST function presented in the previous section, rewritten to use a Do While loop (using the first syntax):
Function ROWOFLARGEST2(c)
NumRows = Rows.Count
MaxVal = Application.Max(Columns(c))
r = 1
Do While Cells(r, c) <> MaxVal
r = r + 1
Loop
ROWOFLARGEST2 = r
End Function
The variable r starts out with a value of 1 and increments within the Do While loop. The looping continues as long as the cell being evaluated is not equal to MaxVal. When the cell is equal to MaxVal, the loop ends, and the function is assigned the value of r. Notice that if the maximum value is in row 1, the looping does not occur.
The following procedure uses the second Do While loop syntax. The loop always executes at least once:
Function ROWOFLARGEST(c)
MaxVal = Application.Max(Columns(c))
r = 0
Do
r = r + 1
Loop While Cells(r, c) <> MaxVal
ROWOFLARGEST = r
End Function
Do While loops can also contain one or more Exit Do statements. When an Exit Do statement is encountered, the loop ends immediately.
Do Until loops
The Do Until loop structure closely resembles the Do While structure. The difference is evident only when the condition is tested. In a Do While loop, the loop executes while the condition is TRUE. In a Do Until loop, the loop executes until the condition is TRUE. Do Until also has two syntaxes:
Do [Until condition]
[instructions]
[Exit Do]
[instructions]
Loop
or
Do
[instructions]
[Exit Do]
[instructions]
Loop [Until condition]
The following example demonstrates the first syntax of the Do Until loop. This example makes the code a bit clearer because it avoids the negative comparison required in the Do While example:
Function ROWOFLARGEST4(c)
NumRows = Rows.Count
MaxVal = Application.Max(Columns(c))
r = 1
Do Until Cells(r, c) = MaxVal
r = r + 1
Loop
ROWOFLARGEST4 = r
End Function
Finally, the following function is the same procedure but is rewritten to use the second syntax of the Do Until loop:
Function ROWOFLARGEST5(c)
NumRows = Rows.Count
MaxVal = Application.Max(Columns(c))
r = 0
Do
r = r + 1
Loop Until Cells(r, c) = MaxVal
ROWOFLARGEST5 = r
End Function
Using Ranges
Most of the custom functions that you develop will work with the data contained in a cell or in a range of cells. Recognize that a range can be a single cell or a group of cells. This section describes some key concepts to make this task easier. The information in this section is intended to be practical rather than comprehensive. If you want more details, consult Excel’s online help.
![]() Cross-Ref
Cross-Ref
Chapter 26, “VBA Custom Function Examples,” contains many practical examples of functions that use ranges. Studying those examples helps to clarify the information in this section.
The For Each-Next construct
Your Function procedures often need to loop through a range of cells. For example, you may write a function that accepts a range as an argument. Your code needs to examine each cell in the range and do something. The For Each-Next construct is useful for this sort of thing. The syntax of the For Each-Next construct follows:
For Each element In group
[instructions]
[Exit For]
[instructions]
Next [element]
The following Function procedure accepts a range argument and returns the sum of the squared values in the range:
Function SUMOFSQUARES(rng as Range)
Dim total as Double
Dim cell as Range
total = 0
For Each cell In rng
total = total + cell ^ 2
Next cell
SUMOFSQUARES = total
End Function
The following is a worksheet formula that uses the SUMOFSQUARES function:
=SUMOFSQUARES(A1:C100)
In this case, the function’s argument is a range that consists of 300 cells.
![]() Note
Note
In the preceding example, both cell and rng are variable names. There’s nothing special about either name; you can replace them with any valid variable name.
Referencing a range
VBA code can reference a range in a number of different ways:
§ Using the Range property
§ Using the Cells property
§ Using the Offset property
The Range property
You can use the Range property to refer to a range directly by using a cell address or name. The following example assigns the value in cell A1 to a variable named Init. In this case, the statement accesses the range’s Value property.
Init = Range("A1").Value
In addition to the Value property, VBA enables you to access a number of other properties of a range. For example, the following statement counts the number of cells in a range and assigns the value to the Cnt variable:
Cnt = Range("A1:C300").Count
The Range property is also useful for referencing a single cell in a multicell range. For example, you may create a function that is supposed to accept a single-cell argument. If the user specifies a multicell range as the argument, you can use the Range property to extract the upper-left cell in the range. The following example uses the Range property (with an argument of “A1”) to return the value in the upper-left cell of the range represented by the cell argument:
Function SQUARE(cell as Range)
CellValue = cell.Range("A1").Value
SQUARE = CellValue ^ 2
End Function
Assume that the user enters the following formula:
=SQUARE(C5:C12)
The SQUARE function works with the upper-left cell in C5:C12 (which is C5) and returns the value squared.
![]() Note
Note
Many Excel worksheet functions work in this way. For example, if you specify a multicell range as the first argument for the LEFT function, Excel uses the upper-left cell in the range. However, Excel is not consistent. If you specify a multicell range as the argument for the SQRT function, Excel returns an error.
The Cells property
Another way to reference a range is to use the Cells property. The Cells property accepts two arguments (a row number and a column number) and returns a single cell. The following statement assigns the value in cell A1 to a variable named FirstCell:
FirstCell = Cells(1, 1).Value
The following statement returns the upper-left cell in the range C5:D12:
UpperLeft = Range("C5:D12").Cells(1,1).Value
![]() Tip
Tip
If you use the Cells property without an argument, it returns a range that consists of all cells on the object of which it is a property. In the following example, the TotalCells variable contains the total number of cells in the worksheet:
TotalCells = Cells.Count
The following statement uses the Excel COUNTA function to determine the number of nonempty cells in the worksheet:
NonEmpty =WorksheetFunction.COUNTA(Cells)
The Offset property
The Offset property (like the Range and Cells properties) also returns a Range object. The Offset property is used in conjunction with a range. It takes two arguments that correspond to the relative position from the upper-left cell of the specified Range object. The arguments can be positive (down or right), negative (up or left), or zero. The following example returns the value one cell below cell A1 (that is, cell A2) and assigns it to a variable named NextCell:
NextCell = Range("A1").Offset(1,0).Value
The following Function procedure accepts a single-cell argument and returns the sum of the eight cells that surround it:
Function SUMSURROUNDINGCELLS(cell)
Dim Total As Double
Dim r As Long, c As Long
Total = 0
For r = –1 To 1
For c = –1 To 1
Total = Total + cell.Offset(r, c)
Next c
Next r
SUMSURROUNDINGCELLS = Total – cell
End Function
This function uses a nested For-Next loop. So when the r loop counter is –1, the c loop counter goes from –1 to 1. Nine cells are summed, including the argument cell, which is Offset(0, 0). The final statement subtracts the value of the argument cell from the total. The function returns an error if the argument does not have eight surrounding cells (for example, if it’s in row 1 or column 1).
To better understand how the nested loop works, following are nine statements that perform the same calculation:
Total = Total + cell.Offset(–1, –1) ' upper left
Total = Total + cell.Offset(–1, 0) 'left
Total = Total + cell.Offset(–1, 1) 'upper right
Total = Total + cell.Offset(0, –1) 'above
Total = Total + cell.Offset(0, 0) 'the cell itself
Total = Total + cell.Offset(0, 1) 'right
Total = Total + cell.Offset(1, –1) 'lower left
Total = Total + cell.Offset(1, 0) 'below
Total = Total + cell.Offset(1, 1) 'lower right
Some useful properties of ranges
Previous sections in this chapter gave you examples that used the Value property for a range. VBA gives you access to many additional range properties. Some of the more useful properties for function writers are briefly described in the following sections. For complete information on a particular property, refer to the VBA help system.
The Formula property
The Formula property returns the formula (as a string) contained in a cell. If you try to access the Formula property for a range that consists of more than one cell, you get an error. If the cell does not have a formula, this property returns a string, which is the cell’s value as it appears in the Formula bar. The following function simply displays the formula for the upper-left cell in a range:
Function CELLFORMULA(cell)
CELLFORMULA = cell.Range("A1").Formula
End Function
You can use the HasFormula property to determine whether a cell has a formula.
The Address Property
The Address property returns the address of a range as a string. By default, it returns the address as an absolute reference (for example, $A$1:$C$12). The following function, which is not all that useful, returns the address of a range:
Function RANGEADDRESS(rng)
RANGEADDRESS = rng.Address
End Function
For example, the following formula returns the string $A$1:$C$3:
=RANGEADDRESS(A1:C3)
The formula that follows returns the address of a range named MyRange:
=RANGEADDRESS(MyRange)
The Count property
The Count property returns the number of cells in a range. The following function uses the Count property:
Function CELLCOUNT(rng)
CELLCOUNT = rng.Count
End Function
The following formula returns 9:
=CELLCOUNT(A1:C3)
![]() Warning
Warning
The Count property of a Range object is not the same as the COUNT worksheet function. The Count property returns the number of cells in the range, including empty cells and cells with any kind of data. The COUNT worksheet function returns the number of cells in the range that contain numeric data.
![]() The CountLarge property
The CountLarge property
Excel 2007 and later worksheets contain more than 17 billion cells compared with a mere 17 million in previous versions. Because of this dramatic increase, the Count property—which returns a Long—may return an error if there are more than 2,147,483,647 cells to be counted. You can use the CountLarge property instead of Count to be safe, but beware that CountLarge does not work in older versions of Excel. In the CELLCOUNT function, the following statement handles any size range (including all cells on a worksheet):
CELLCOUNT = rng.CountLarge
The Parent property
The Parent property returns an object that corresponds to an object’s container object. For a Range object, the Parent property returns a Worksheet object (the worksheet that contains the range).
The following function uses the Parent property and returns the name of the worksheet of the range passed as an argument:
Function SHEETNAME(rng)
SHEETNAME = rng.Parent.Name
End Function
The following formula, for example, returns the string Sheet1:
=SHEETNAME(Sheet1!A16)
The Name property
The Name property returns a Name object for a cell or range. To get the actual cell or range name, you need to access the Name property of the Name object. If the cell or range does not have a name, the Name property returns an error.
The following Function procedure displays the name of a range or cell passed as its argument. If the range or cell does not have a name, the function returns an empty string. Note the use of On Error Resume Next. This handles situations in which the range does not have a name:
Function RANGENAME(rng)
On Error Resume Next
RANGENAME = rng.Name.Name
If Err.Number <> 0 Then RANGENAME = ""
End Function
The NumberFormat property
The NumberFormat property returns the number format (as a string) assigned to a cell or range. The following function simply returns the number format for the upper-left cell in a range:
Function NUMBERFORMAT(cell)
NUMBERFORMAT = cell.Range("A1").NumberFormat
End Function
The Font property
The Font property returns a Font object for a range or cell. To actually do anything with this Font object, you need to access its properties. For example, a Font object has properties such as Bold, Italic, Name, Color, and so on. The following function returns TRUE if the upper-left cell of its argument is formatted as bold:
Function ISBOLD(cell)
ISBOLD = cell.Range("A1").Font.Bold
End Function
The EntireRow and EntireColumn properties
The EntireRow and EntireColumn properties enable you to work with an entire row or column for a particular cell. The following function accepts a single cell argument and then uses the EntireColumn property to get a range consisting of the cell’s entire column. It then uses the Excel COUNTA function to return the number of nonempty cells in the column:
Function NONEMPTYCELLSINCOLUMN(cell)
NONEMPTYCELLSINCOLUMN = WorksheetFunction.CountA(cell.EntireColumn)
End Function
You cannot use this function in a formula that’s in the same column as the cell argument. Doing so generates a circular reference.
The Hidden property
The Hidden property is used with rows or columns. It returns TRUE if the row or column is hidden. If you try to access this property for a range that does not consist of an entire row or column, you get an error. The following function accepts a single cell argument and returns TRUE if either the cell’s row or the cell’s column is hidden:
Function CELLISHIDDEN(cell)
If cell.EntireRow.Hidden Or cell.EntireColumn.Hidden Then
CELLISHIDDEN = True
Else
CELLISHIDDEN = False
End If
End Function
You can also write this function without using an If-Then-Else construct. In the following function, the expression to the right of the equal sign returns either TRUE or FALSE—and this value is returned by the function:
Function CELLISHIDDEN(cell)
CELLISHIDDEN = cell.EntireRow.Hidden Or cell.EntireColumn.Hidden
End Function
The Set keyword
An important concept in VBA is the ability to create a new Range object and assign it to a variable—more specifically, an object variable. You do so by using the Set keyword. The following statement creates an object variable named MyRange:
Set MyRange = Range("A1:A10")
After the statement executes, you can use the MyRange variable in your code in place of the actual range reference. Examples in subsequent sections help to clarify this concept.
![]() Note
Note
Creating a Range object is not the same as creating a named range. In other words, you can’t use the name of a Range object in your worksheet formulas.
The Intersect function
The Intersect function returns a range that consists of the intersection of two other ranges. For example, consider the two ranges selected in Figure 24.2. These ranges, D3:D5 and B5:E5, contain one cell in common (D5). In other words, D5 is the intersection of D3:D5 and B5:E5.
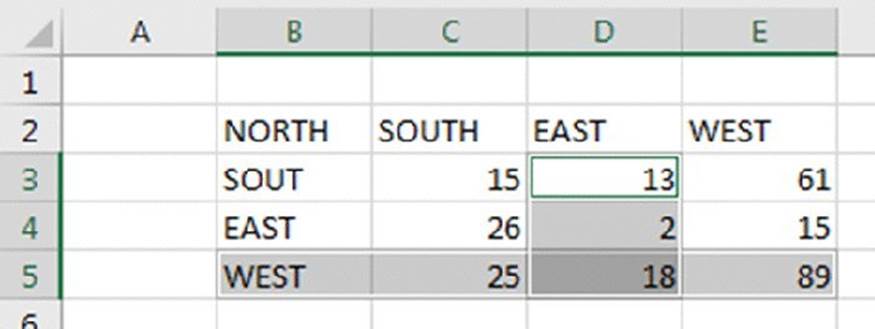
Figure 24.2 The intersection of two ranges.
The following Function procedure accepts two range arguments and returns the count of the number of cells that the ranges have in common:
Function CELLSINCOMMON(rng1, rng2)
Dim CommonCells As Range
On Error Resume Next
Set CommonCells = Intersect(rng1, rng2)
If Err.Number = 0 Then
CELLSINCOMMON = CommonCells.CountLarge
Else
CELLSINCOMMON = 0
End If
End Function
The CELLSINCOMMON function uses the Intersect function to create a range object named CommonCells. Note the use of On Error Resume Next. This statement is necessary because the Intersect function returns an error if the ranges have no cells in common. If the error occurs, it is ignored. The final statement checks the Number property of the Err object. If it is 0, no error occurs, and the function returns the value of the CountLarge property for the CommonCells object. If an error does occur, Err.Number has a value other than 0, and the function returns 0.
The Union function
The Union function combines two or more ranges into a single range. The following statement uses the Union function to create a range object that consists of the first and third columns of a worksheet:
Set TwoCols = Union(Range("A:A"), Range("C:C"))
The Union function takes between 2 and 30 arguments.
The UsedRange property
The UsedRange property returns a Range object that represents the used range of the worksheet. Press Ctrl+End to activate the lower-right cell of the used range. The UsedRange property can be very useful in making your functions more efficient.
Consider the following Function procedure. This function accepts a range argument and returns the number of formula cells in the range:
Function FORMULACOUNT(rng)
cnt = 0
For Each cell In rng
If cell.HasFormula Then cnt = cnt + 1
Next cell
FORMULACOUNT = cnt
End Function
In many cases, the preceding function works just fine. But what if the user enters a formula like this one?
=FORMULACOUNT(A:C)
The three-column argument consists of 3,145,728 cells. With an argument that consists of one or more entire columns, the function does not work well because it loops through every cell in the range, even those that are well beyond the area of the sheet that’s actually used. The following function is rewritten to make it more efficient:
Function FORMULACOUNT(rng)
cnt = 0
Set WorkRange = Intersect(rng, rng.Parent.UsedRange)
If WorkRange Is Nothing Then
FORMULACOUNT = 0
Exit Function
End If
For Each cell In WorkRange
If cell.HasFormula Then cnt = cnt + 1
Next cell
FORMULACOUNT = cnt
End Function
This function creates a Range object variable named WorkRange that consists of the intersection of the range passed as an argument and the used range of the worksheet. In other words, WorkRange consists of a subset of the range argument that only includes cells in the used range of the worksheet. Note the If-Then construct that checks if the WorkRange is Nothing. That will be the case if the argument for the function is outside the used range. In such a case, the function returns 0, and execution ends.
All materials on the site are licensed Creative Commons Attribution-Sharealike 3.0 Unported CC BY-SA 3.0 & GNU Free Documentation License (GFDL)
If you are the copyright holder of any material contained on our site and intend to remove it, please contact our site administrator for approval.
© 2016-2026 All site design rights belong to S.Y.A.