My Excel 2016 (2016)
17. Introducing the Excel Web App
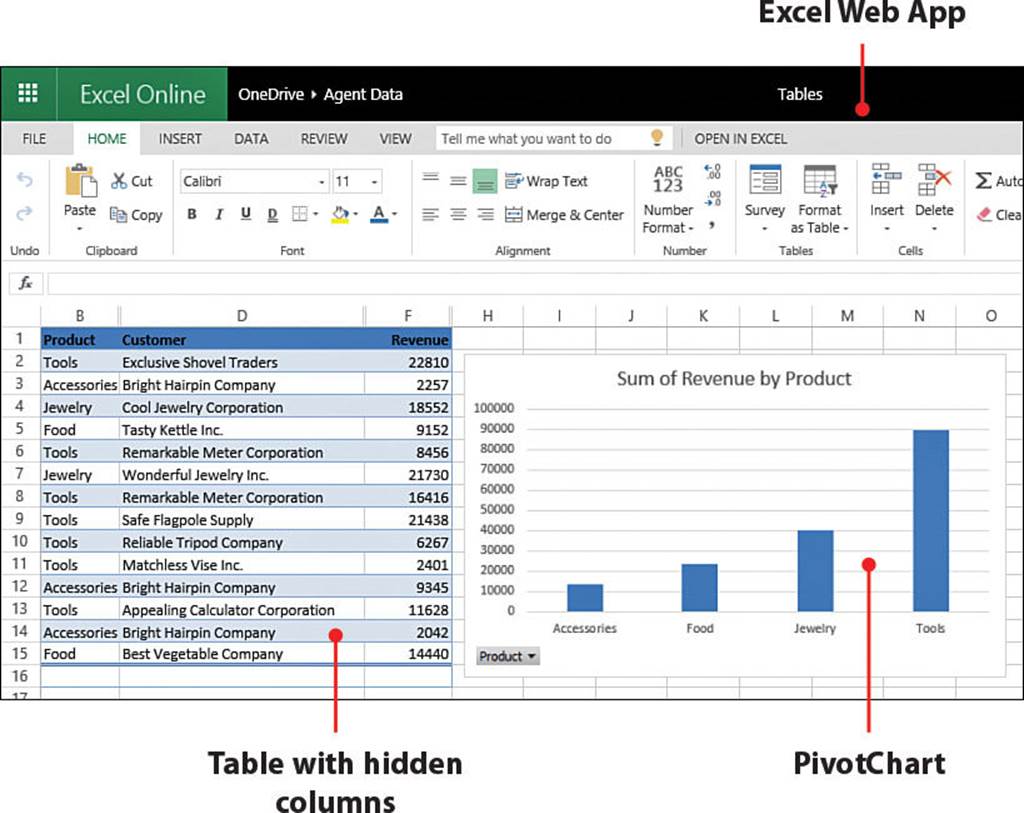
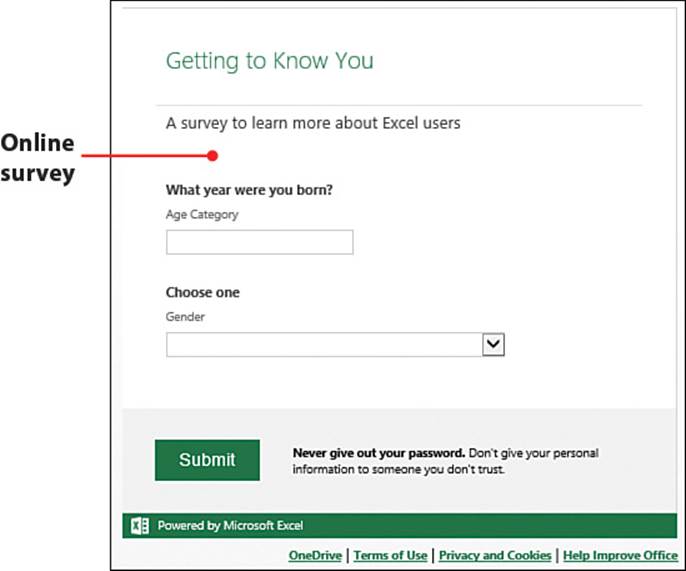
The Excel Web App allows multiple users anywhere with Internet access to enter data in the same workbook. Topics in this chapter cover the following:
→ Sharing a workbook online
→ Creating an online form to help users fill in a sheet and print the results
→ Creating a survey that can be filled out anonymously by others
The Excel Web App is a browser-based version of Excel that allows users to enter new data and formulas in an Excel workbook while online. Those users do not need to have Excel installed on their computers to use the app. Advanced functionality, such as creating PivotTables, is not present, but if you insert the PivotTable on the desktop version, it can be pivoted in the Web App.
All you need to get started is a Microsoft account, a current web browser, and an Internet connection.
Acquiring a Microsoft Account
With a Microsoft account, you can access the OneDrive online storage, where you can store, view, edit, and share your Excel workbooks. You don’t need a Microsoft account if you are accessing a public file on someone else’s OneDrive. But if you want to upload your own files or access a OneDrive requiring sign in, you will need a Microsoft account.
Other Microsoft-Owned Sites
A Microsoft account enables you to sign in to a variety of websites, such as Skype, Office Online, Outlook.com, and Xbox Live, using one account. If you already signed in to a Microsoft-owned site, it is possible you already have a Microsoft account. Before creating a new account, try signing in to onedrive.com with your existing credentials.
Create an Account
You can create the account using an existing email address, or you can obtain a new email address through the outlook.com or hotmail.com domain.
1. Use your web browser to navigate to signup.live.com.
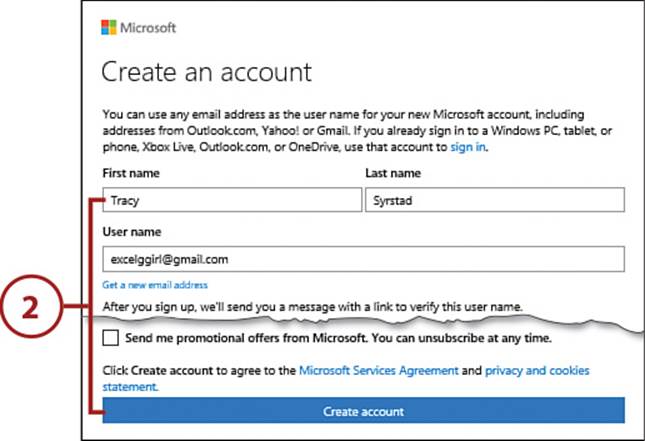
2. Fill in the fields and click Create Account.
3. Follow the Microsoft instructions for verifying your email address.

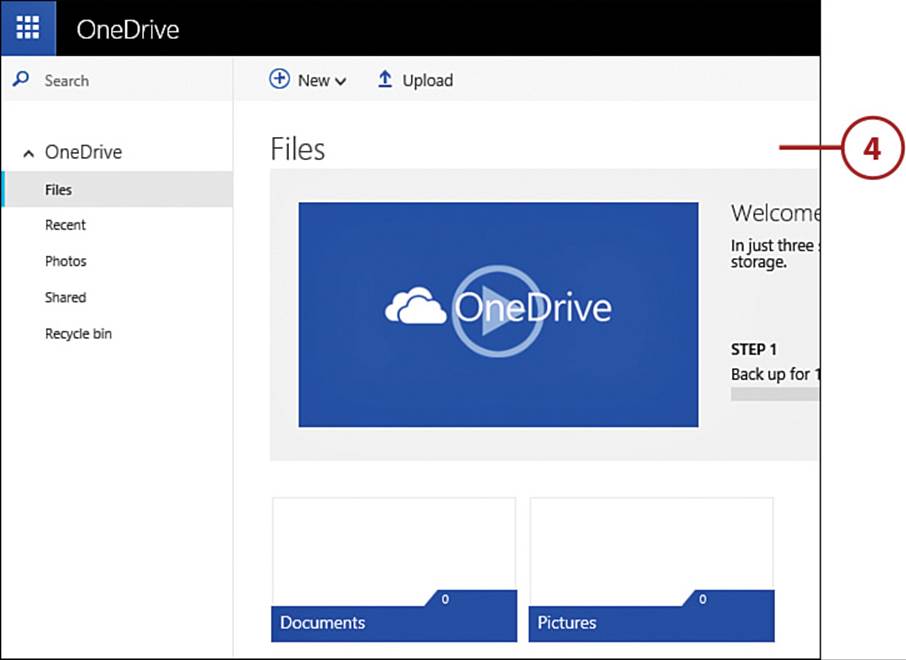
4. You’ll be signed in to your OneDrive account.
Uploading a Workbook
After you’ve signed in to your Microsoft account, you can upload your own workbooks or create new ones for viewing, editing, and sharing.
Upload Through OneDrive
You don’t have to go through Excel to upload a workbook to OneDrive.
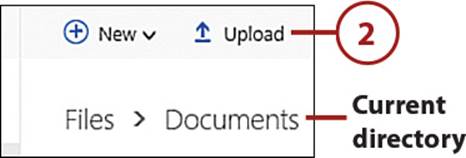
1. Select the folder to which you want to add your workbook.
2. Select Upload.
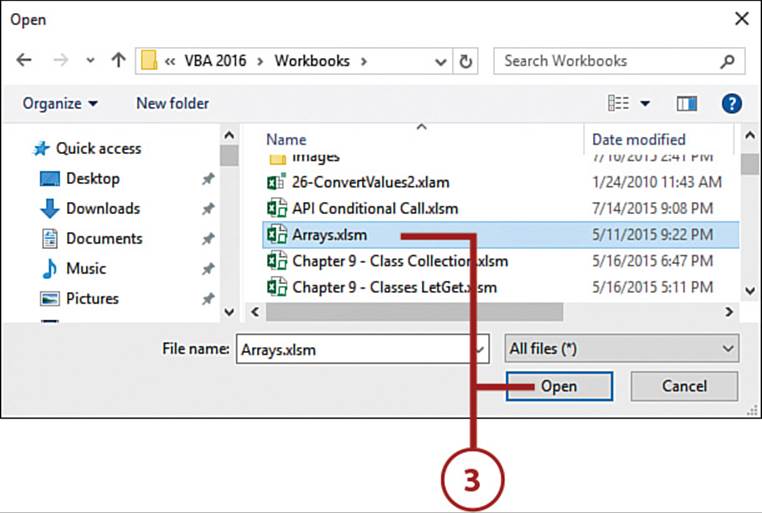
3. Select the file and click Open.
Unprotect the Workbook
Only unprotected workbooks can be opened online.
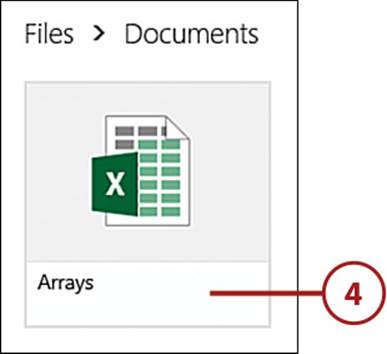
4. The file will be uploaded to your OneDrive. When the upload is complete, the page will update with an icon for the file.
Save from Excel
You can save the workbook you’re working on in the desktop version directly to the OneDrive.
1. Click File to open Backstage view.
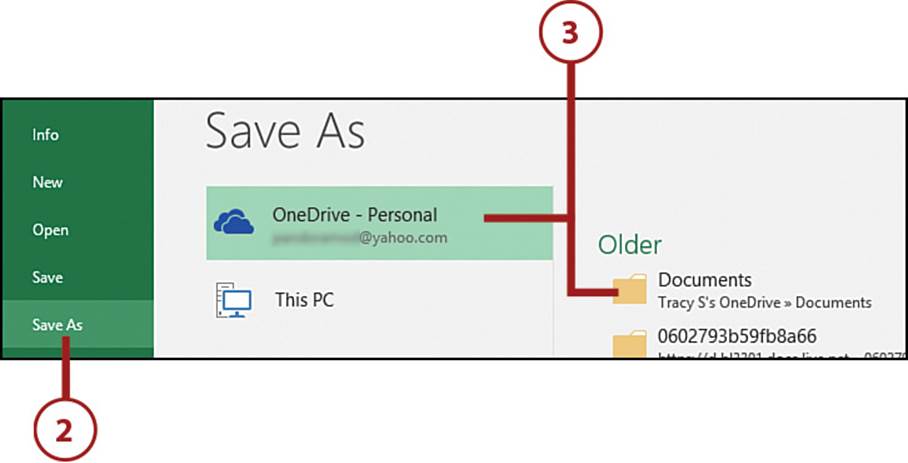
2. Select Save As.
3. Select the OneDrive icon and then select a specific folder to save to.
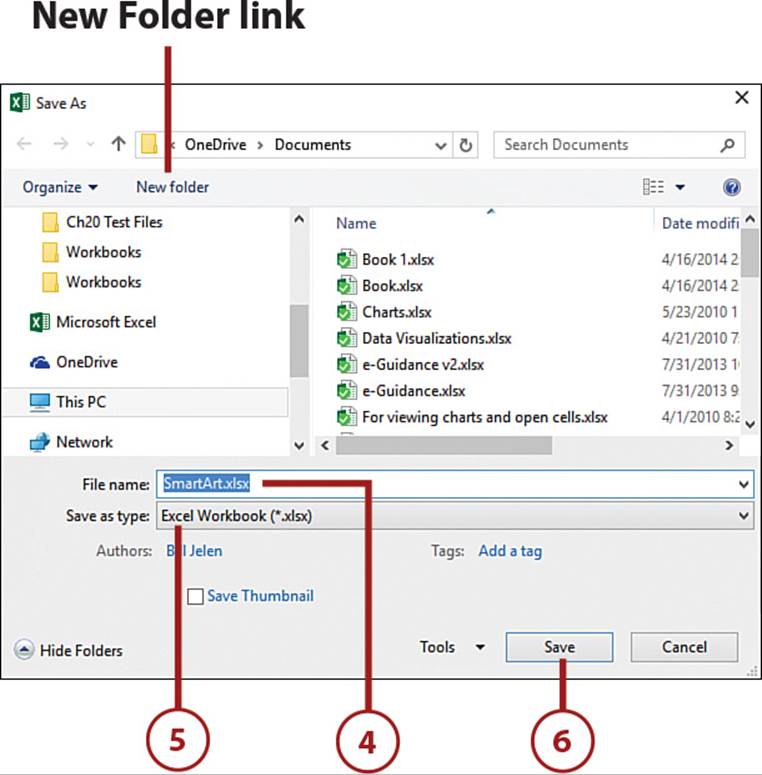
4. Enter a filename.
5. Select a file type.
Uploading Workbooks with Macros
You can upload a workbook with macros, but the macros will not work online.
6. Click Save.
Create New Folder
If you need to create a new folder on your OneDrive, select any visible folder to open the Save As dialog box and use the New Folder link there to create the new folder. The folder will be created in your local OneDrive folder and online.
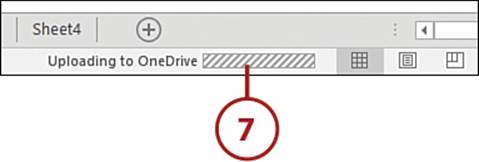
7. The file will be saved locally and then uploaded. You can watch the status of the upload in the status bar.
Delete a File from OneDrive
Delete files from your OneDrive when you no longer need them.
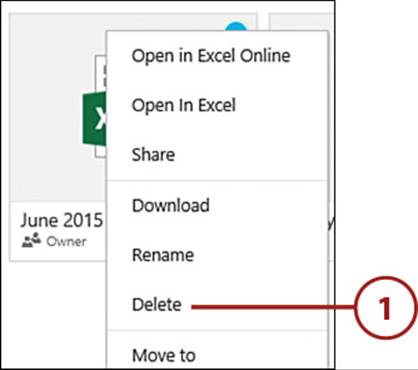
1. Right-click over the file and select Delete.
Or
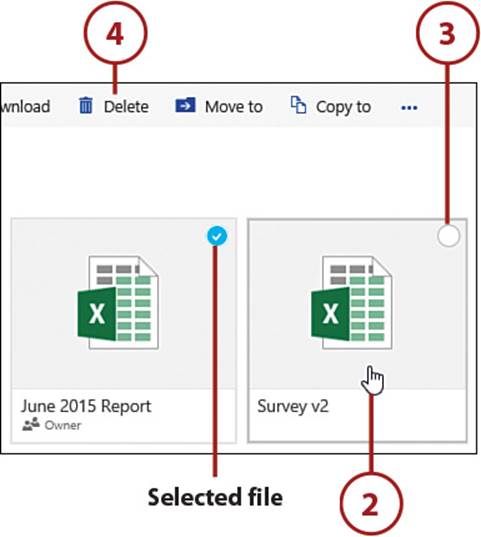
2. Place your cursor over the file, but do not click it yet.
3. Check the box that appears in the upper-right corner. It will change color to show it is selected. Repeat for any other files.
4. Select Delete.
Undoing Deletions
When you delete a file, a message box appears, for a few seconds, in the upper-right corner of the page, giving you the chance to undo the deletion. If you miss that chance, click the Recycle Bin on the left side of the page and restore it from there.
Opening a Workbook Online or Locally
If don’t see a ribbon when you open a workbook in the Web App, the workbook is in Reading View, which is view-only.

Open a Workbook
You can open an online workbook using the Web App or with the locally installed version of Excel.
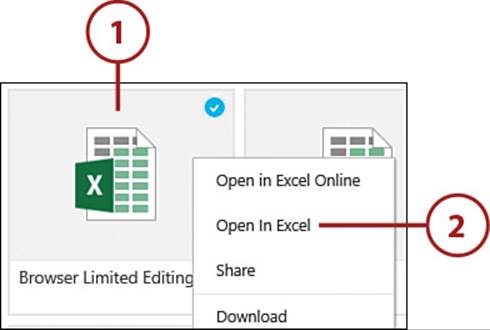
1. Click the File icon to open the file in the Web App.
2. Right-click and select Open in Excel to open the file in the desktop version of Excel.
Download a Workbook
Eventually, you will want to work on a workbook saved locally. This can be done in several ways.
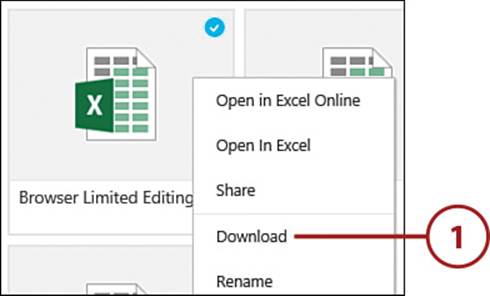
1. Right-click over the file and select Download. Follow your browser’s prompts to save the file.
Or
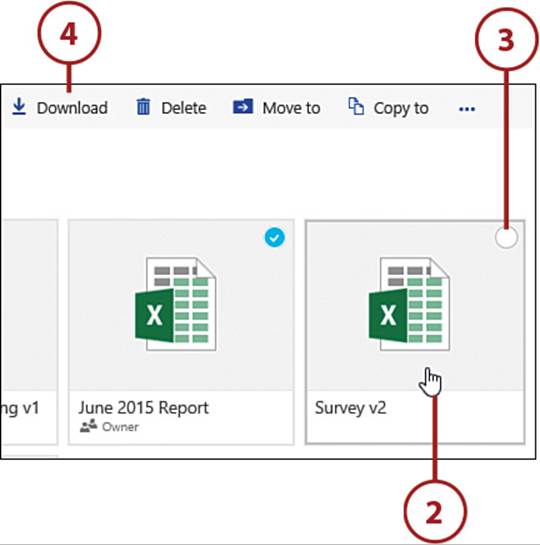
2. Place your cursor over the file, but do not click it yet.
3. Check the box that appears in the upper-right corner. It will change color to show it is selected. Repeat this step for any other files.
4. Select Download. Follow your browser’s prompts to save the file.
Download an Open Workbook
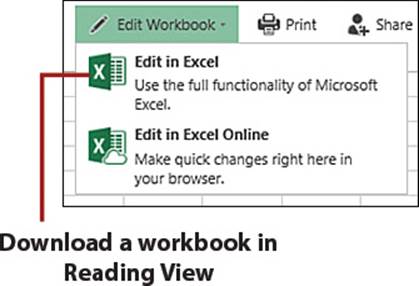
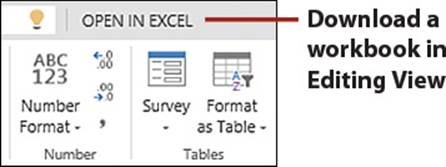
There are two ways to download a workbook you already have open in the Web App:
• With the file open in Reading View, select Edit in Excel from the Edit Workbook drop-down.
• With the file open normally, select Open in Excel.
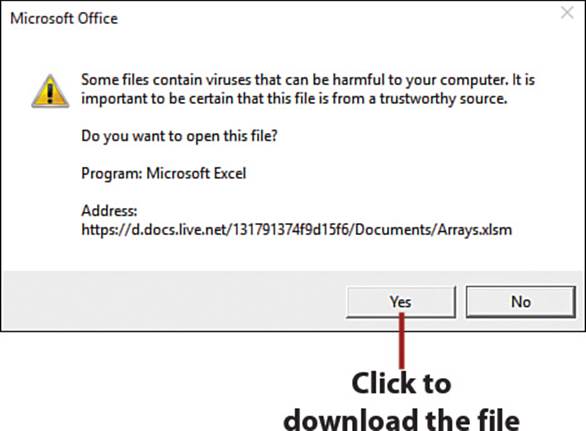
In either case, Microsoft will warn about viruses. Click Yes if you trust the file.
Creating a New Workbook Online
You aren’t limited to workbooks created previously in the desktop version of Excel. You can create a new workbook online and download it when you return to the office.
Create a Workbook
Excel will automatically save a new file online, using the default workbook naming convention (Book1.xlsx, Book2.xlsx, and so on).
1. From your OneDrive account, select Excel Workbook from the New drop-down.
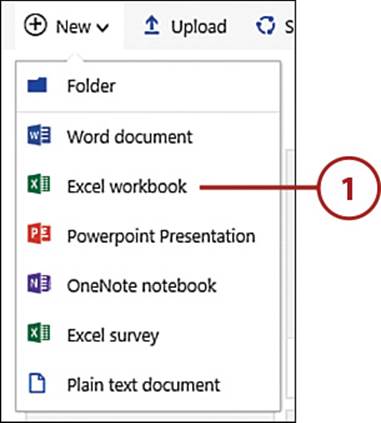
2. The workbook is opened in the Web App.
Rename the New Workbook
Because the Web App will automatically save the workbook you create online using the default naming convention, you have the option of renaming the file or saving a new copy of it.
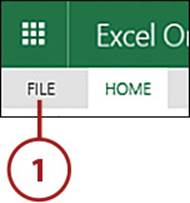
1. Select File.
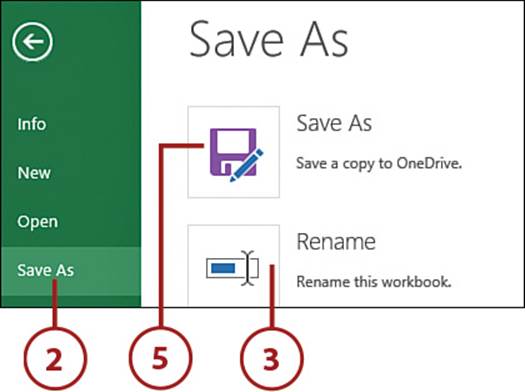
2. Select Save As.
3. If you want to leave the file in its current location but give it a new name, select Rename.
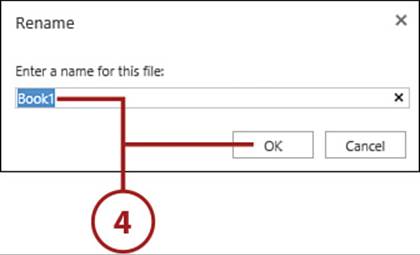
4. Enter a new name and then click OK.
5. If you want to save a copy of the file in a new location, select Save As.
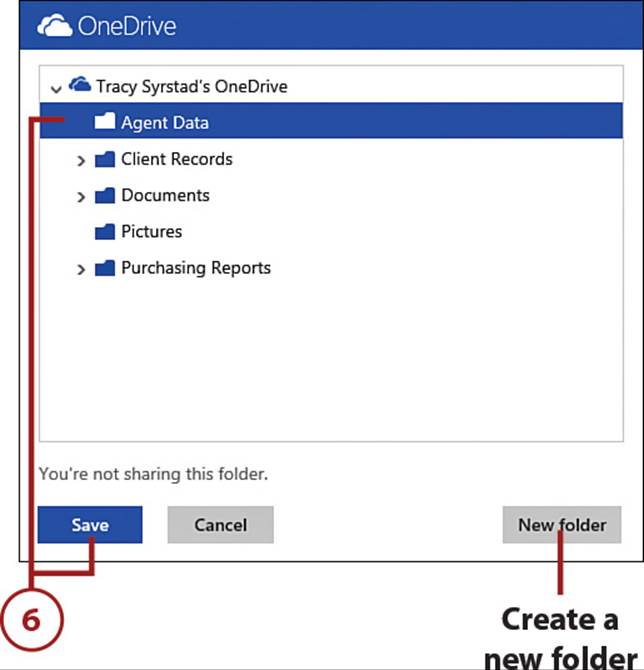
6. Select the folder you want to save the file in and click Save.
Create a New Folder
You don’t have to go back out to the OneDrive main page to create a new folder. If you find you need a new folder while doing a Save As, click the New Folder button and follow the prompts.
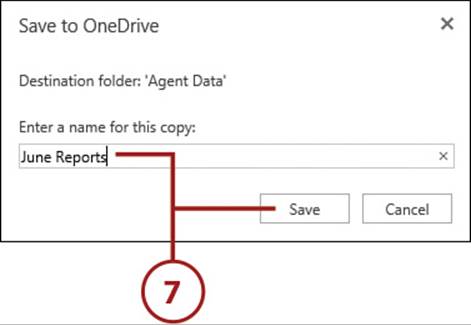
7. Enter a filename and then click Save.
Don’t Include the Extension
Do not include an extension when saving a file. The Web App will automatically include the extension, which is xlsx for new files. If you need to change from one file format to another (for example, from *.xlsx to *.xlsm), you will need to do this in the desktop version of Excel.
Sharing a Folder or Workbook
OneDrive doesn’t just provide you with the convenience of being able to work with your workbooks wherever you are. It also helps you share your workbooks and the folders you create with other people.
Create a View-Only Folder
If you set up a view-only folder, by default, any new files created in the folder will also be view-only.
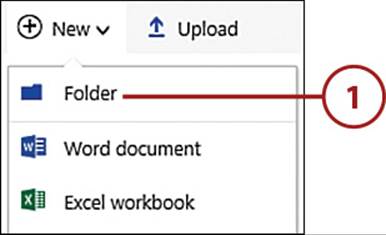
1. Select Folder from the New drop-down.
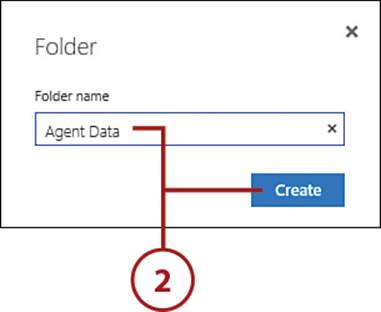
2. Enter a name for the folder and then click Create.
3. Place your cursor over the new folder, but do not click it yet.
4. Check the box that appears in the upper-right corner. It will change color to show it is selected.
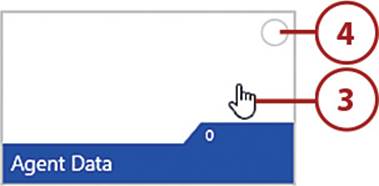
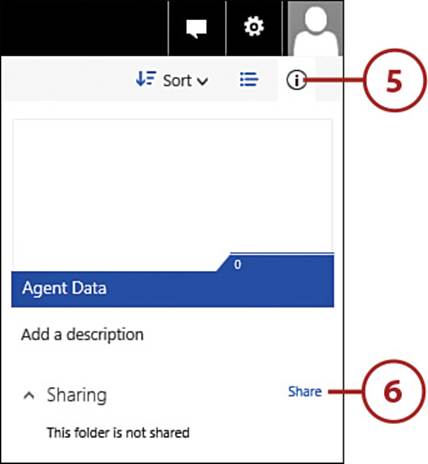
5. Click the details icon to view the properties of the folder.
6. Select the Share link.
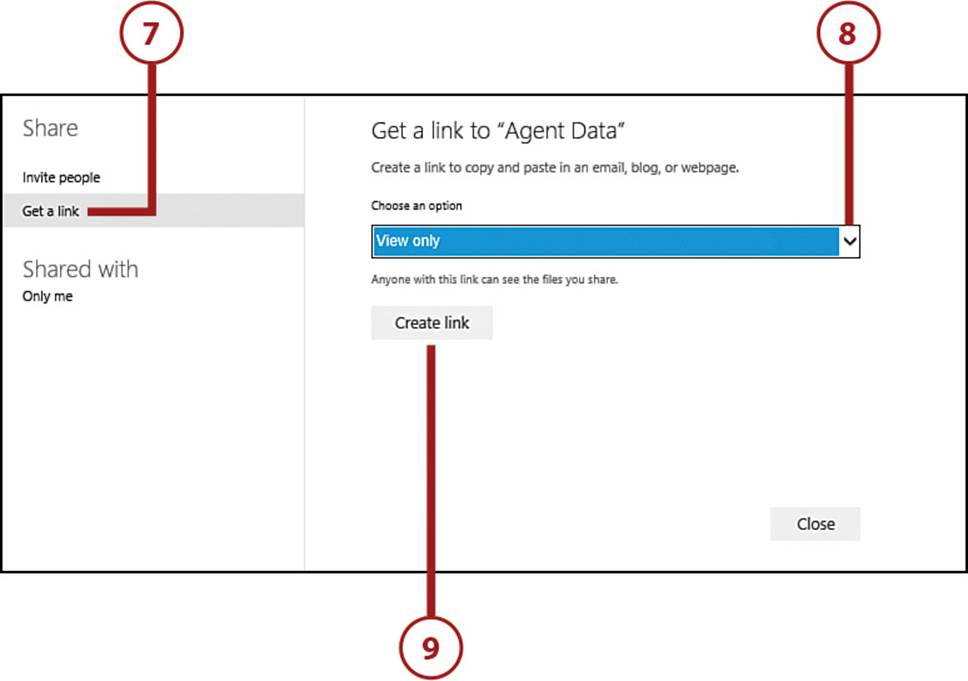
7. Select Get a Link.
8. Select View Only from the drop-down
9. Select Create Link.
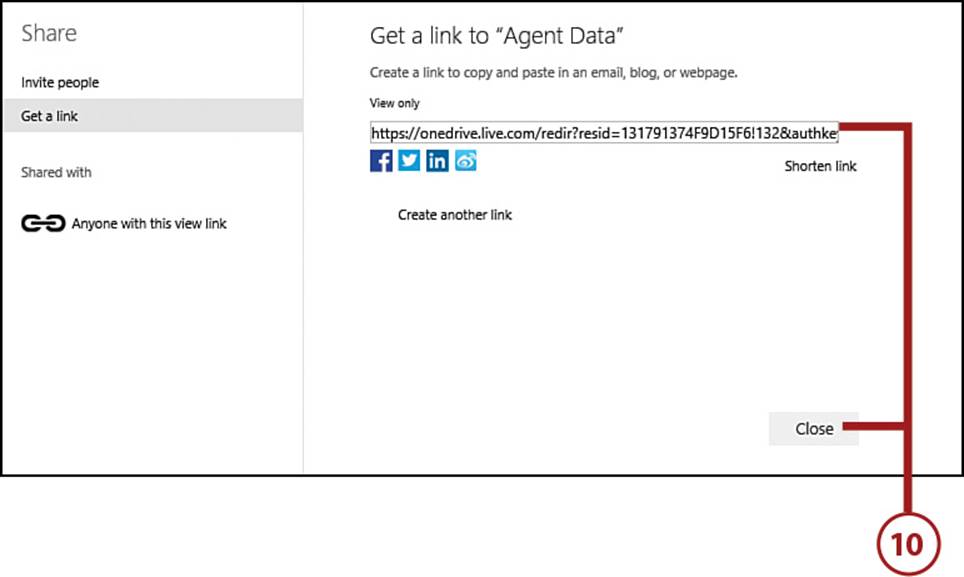
10. Copy the link if you wish to share it now. Click Close.
>>>Go Further: Allow Some Users to Edit the Folder
If you want to allow some users to edit the folder, use the Invite People option. This option allows you to control permissions for each person, thus allowing a user to edit the folder. You can even set up whether the recipient does or does not require a Microsoft account to access the folder and its files.
Remove Sharing
If you’ve shared a link to your workbook but no longer want others to access it, you can remove their access.
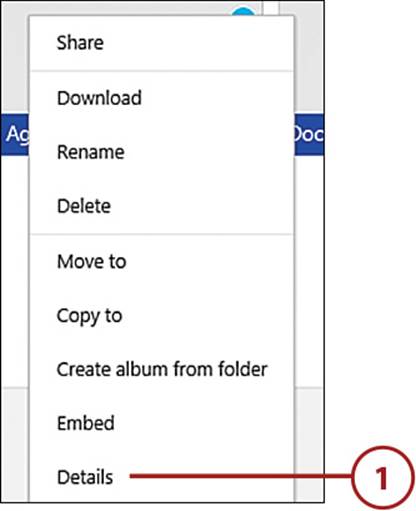
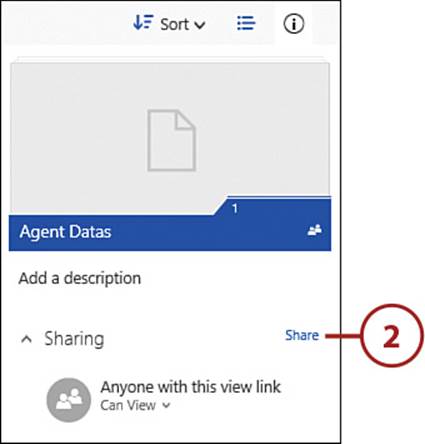
1. Right-click over the folder and select Details.
2. Select the Share link.
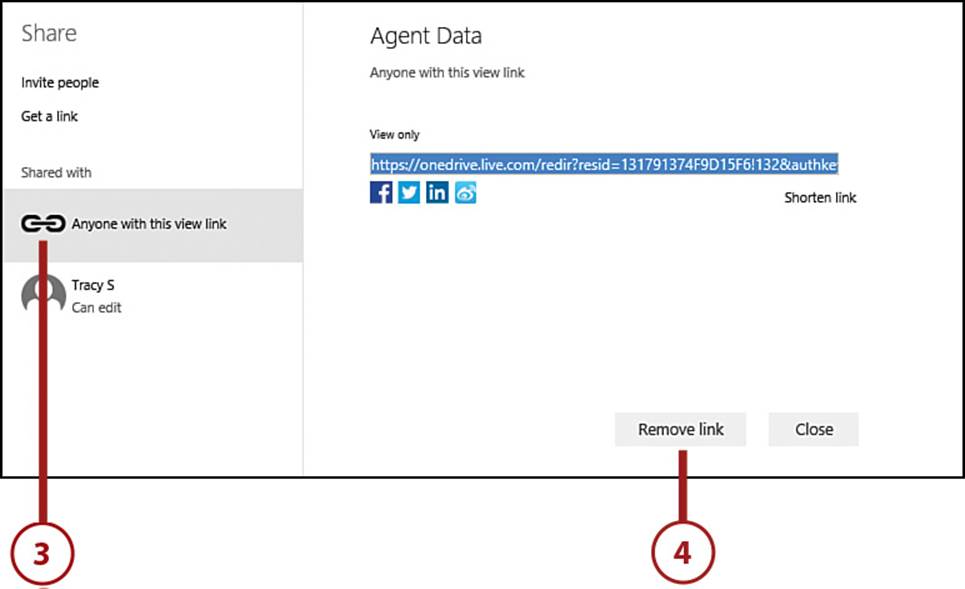
3. Select the link to remove.
4. Select Remove Link.
No Remove Link Button
If a folder gets its sharing setting from its parent folder, the Remove Link Button will not be available. You will have to remove the sharing from the parent folder.
>>>Go Further: Remove a Co-owner
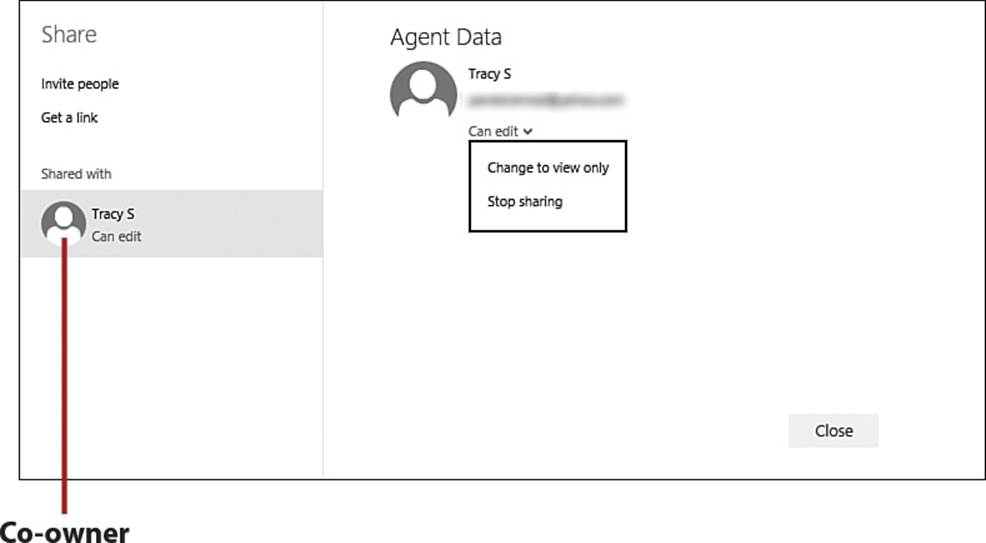
A user who creates a file in a folder becomes co-owner of the folder. This means if you delete the shared link previously sent to users, the co-owner will have access to any new workbooks added to the folder until the co-owner permission is also removed from the Sharing list.
To remove a co-owner, go into the Share properties of the file or folder, select the person’s name, and then select Stop Sharing from the drop-down.
Edit Simultaneously
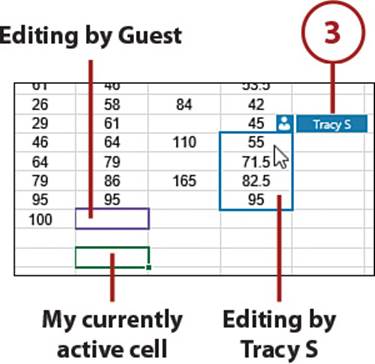
If you’re allowing others to edit your workbook, eventually you will be editing the workbook at the same time as another person. You’ll be able to see changes as they happen. The latest entry always has priority.
1. Click the drop-down to get details on who else has the workbook open.
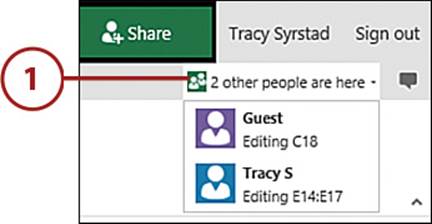
2. The cells being edited will be highlighted with the user’s corresponding color.
3. Place the cursor over an edited cell to get a user name tag.
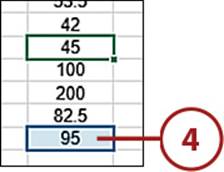
4. A cell is shaded when another user is actively editing it.
Configuring Browser View Options
You can control which sheets are visible in the Web App from the desktop version of Excel. You can also configure specific ranges on the sheet for data entry, whether the user has View or Edit privileges. All of this is done via the Browser View Options available through the Save As dialog box in Excel.
Create an Online Form
You may not want users to see all your sheets or be able to edit any cell they wish. You can choose sheets to hide and configure parameters, limiting user entry.
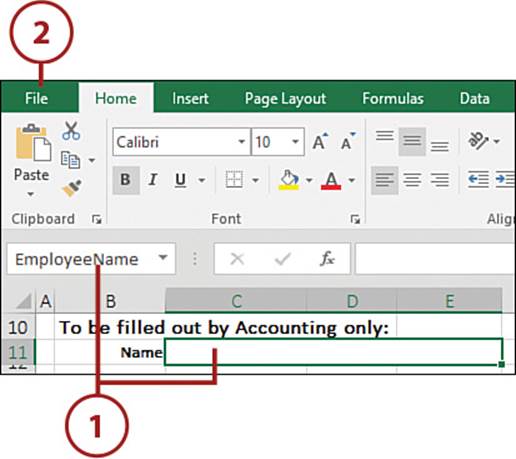
1. In the desktop version of Excel, apply a name to each cell you want the user to edit. Note that only single cells, including merged cells, can be configured for user entry. Use short names that will make sense to users as they fill in the form.
More Information on Named Ranges
For more information on created named ranges, see “Using Names to Simplify References” in Chapter 8, “Using Formulas.”
2. Click File to open Backstage view.
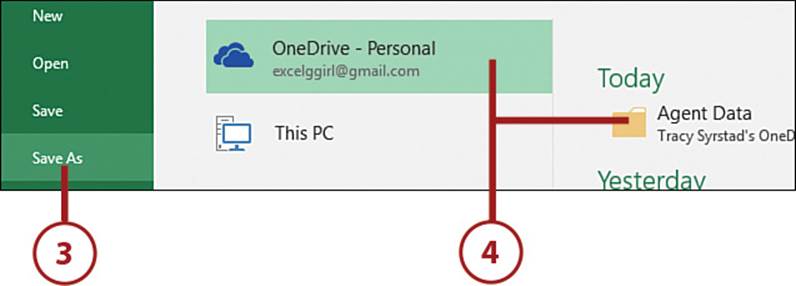
3. Select Save As.
4. Select your OneDrive and then the specific folder.
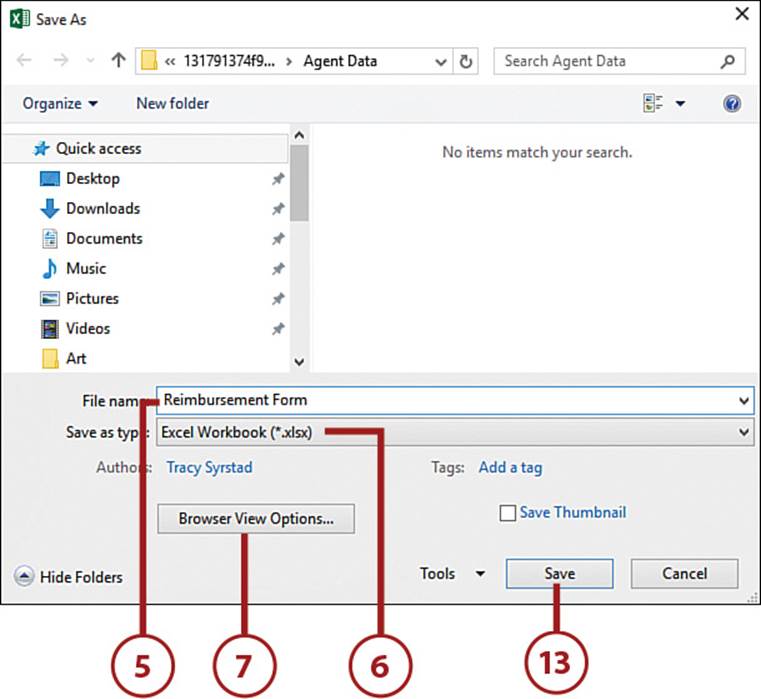
5. Enter a filename.
6. Select a file extension.
7. Select Browser View Options.
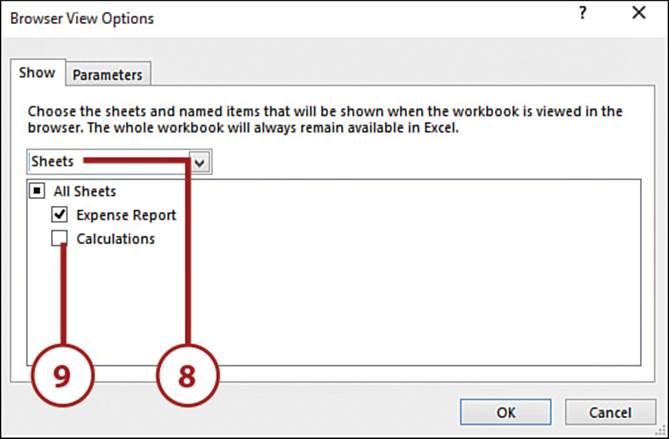
8. To hide specific sheets, select Sheets from the drop-down on the Show tab.
9. Unselect the sheets you don’t want users to see. They’ll still be uploaded, just hidden.
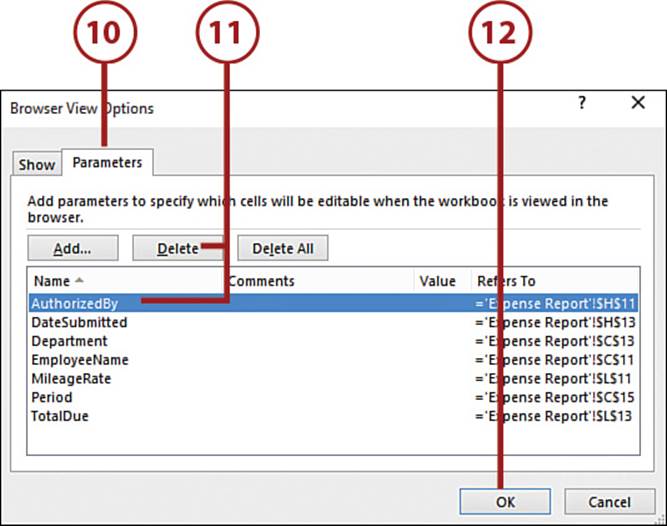
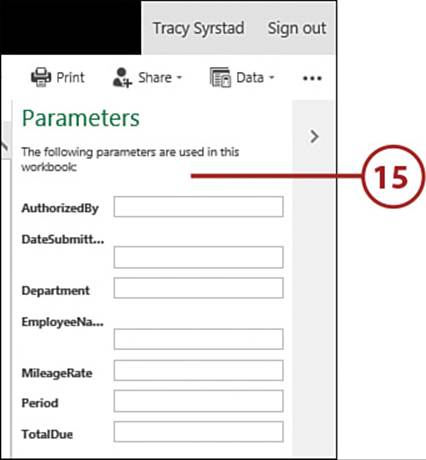
10. On the Parameters tab is a list of all permissible names.
11. Select a name and click Delete to remove it from the list.
12. Click OK.
13. Click Save. The file will be uploaded to your OneDrive.
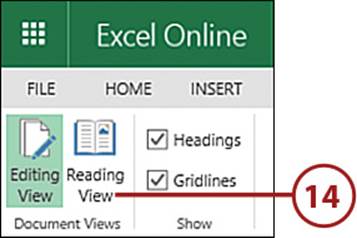
14. To view the file as another user would, open the file in the Web App and select Reading View from the View tab.
15. Users can place data into the allowable fields by entering the data in the Parameters task pane.
>>>Go Further: Limitations for the Browser View Options
When you add parameters to a sheet, a few of the Web App sharing rules change:
• Recipients with View and Edit links can only enter information in the parameters. The rest of the workbook is protected.
• Workbooks with data entry parameters are not shared. Each user opens a unique copy.
• Entries are not automatically saved. The user must save his or her own copy.
• Parameters only affect the online sheet. Once the sheet is downloaded, the data entry limitations are removed.
Designing a Survey Through the Web App
You could design a survey on a sheet and share the workbook. Or, you can use the Web App tools to create a survey that looks nothing like a sheet. Users can fill it out anonymously and the results will be saved to an online workbook.
Create a Survey
Create an online survey from within the Web App and provide a link to others to fill it out.
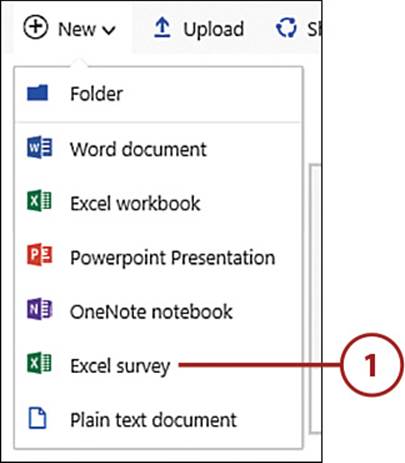
1. Select Excel Survey from the New drop-down in the OneDrive Web App.
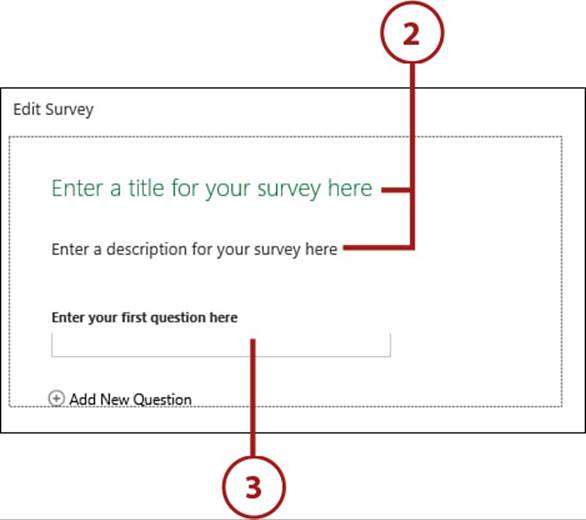
2. Fill in the title and description of the survey.
3. Select the first question field.
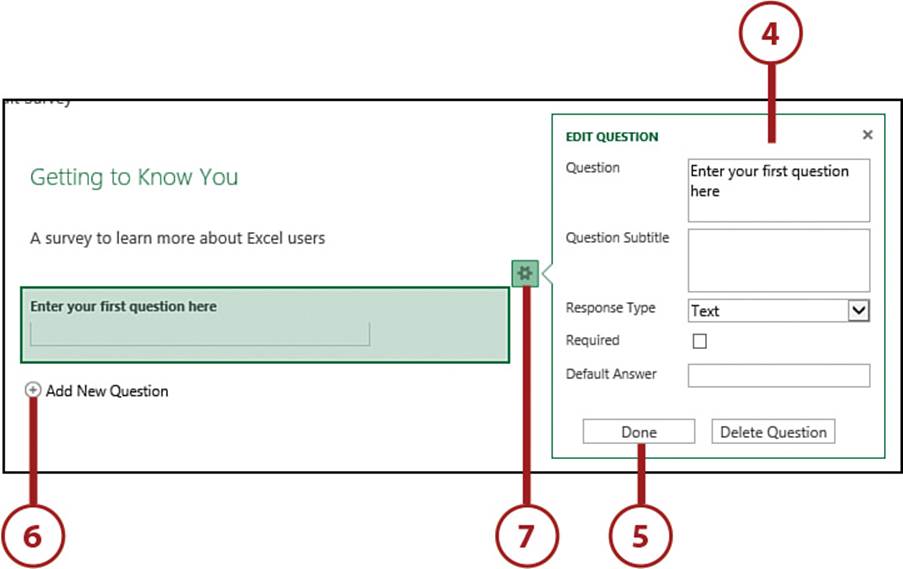
4. Fill in the fields in the Edit Question dialog box.
5. Select Done.
6. Select Add New Question for each additional survey question and fill in the required information.
7. To edit a question, select it, and the Edit dialog box will open. If it doesn’t, click the Settings icon for the selected question.
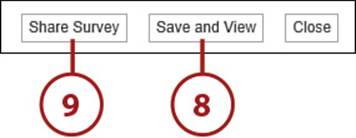
8. Click Save and View to see what the survey will look like.
9. Click Share Survey to generate a link to distribute the survey.
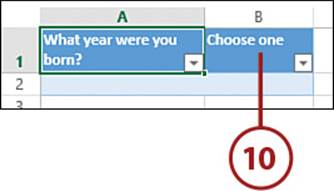
10. As users fill out the survey, their results are added to the workbook. To view the survey results, open the workbook.
Edit an Existing Survey
To edit an existing survey, open the workbook in the Web App and select Edit Survey from the Survey drop-down on the Insert tab.
All materials on the site are licensed Creative Commons Attribution-Sharealike 3.0 Unported CC BY-SA 3.0 & GNU Free Documentation License (GFDL)
If you are the copyright holder of any material contained on our site and intend to remove it, please contact our site administrator for approval.
© 2016-2026 All site design rights belong to S.Y.A.