My Excel 2016 (2016)
5. Selecting and Moving Data on a Sheet
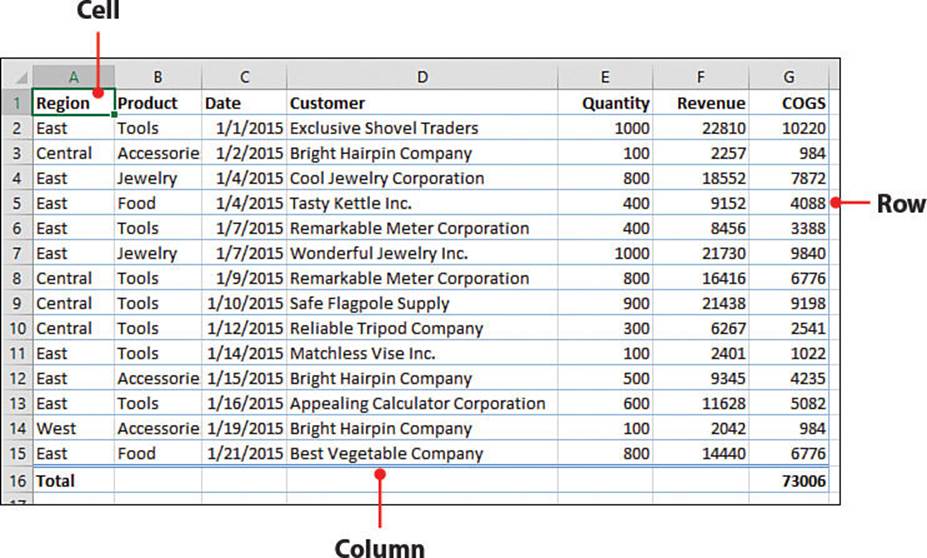
The ability to move data around easily is important. Excel makes the process fairly easy by offering numerous methods. In this chapter, you’ll learn about moving entire rows and columns and selected ranges. This chapter also covers the following:
→ Selecting, inserting, and deleting rows and columns
→ Selecting noncontiguous cells and ranges
→ Selecting, inserting, moving and deleting cells
It’s hard to create the perfect data table the first time around. There’s always something you’ve forgotten, such as the date column. Or maybe you did remember the date column but put it in the wrong place. Thankfully, you don’t have to start over. You can insert, delete, and move entire columns and rows, or just some cells, with a few clicks of the mouse.
Working with Rows and Columns
When working with an entire row or column, what you do affects the entire sheet, beyond what you can see on your screen. In other words, when you select an entire row or column, whatever you do to the part you can see affects the entire selection.
Select a Row or Column
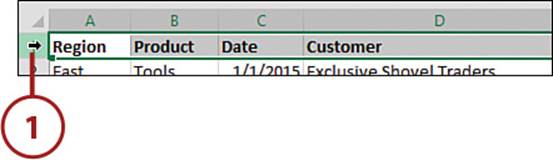
A click in the right place will select an entire row or column.
1. Place your pointer on the row number so that it turns into a single black arrow. Then click. The row will be highlighted from the first column to the very last.
Select a Column
Selecting a column isn’t that different from selecting a row. To select an entire column, click the column letter.
Turn Off a Selection
When you cut or copy data, a flashing border appears around it. If you need to cancel the selection, press Esc.
>>>Go Further: Select Multiple Rows or Columns
If you need to select multiple, contiguous rows, click the heading of the first row, then, as you hold down the mouse button, drag the mouse down (or up) until you have selected all the rows you need. Let go of the mouse button and perform your desired action on the selection.
You can also select multiple rows (or columns) by selecting the first row, holding the Shift key down, and selecting the last row you want.
>>>Go Further: Select Noncontiguous Rows or Columns
If you need to select multiple, noncontiguous rows, click the heading of the first row, then, as you hold down the Ctrl key, carefully click the numbers of the other rows you want to select. When you are done selecting, release the Ctrl key and perform your desired action on the selection.
Once a row has been selected using the Ctrl key method, you cannot deselect it without also deselecting all other selected rows. If you make a mistake in your selection, you have to start over.
Insert a New Row or Column
You might want to insert a row if your dataset is missing titles over the data. Or, you might need to insert a column if the data table is missing a column of information and you don’t want to enter the information at the end (right side) of the table. When you insert a new row, Excel shifts the existing data down. When you insert a new column, Excel shifts the existing data to the right.
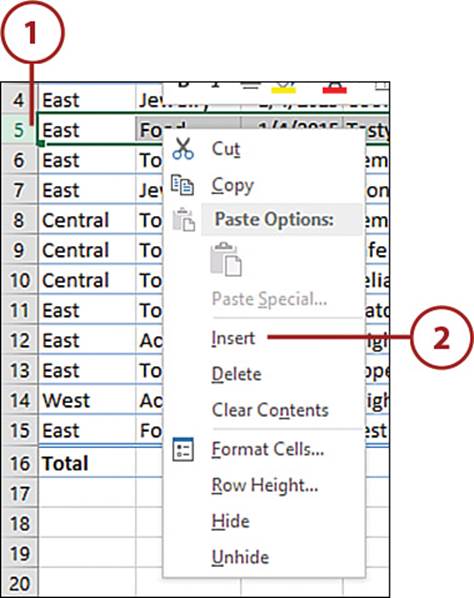
1. Right-click the number of the row where you want to insert a blank row.
2. Select Insert.
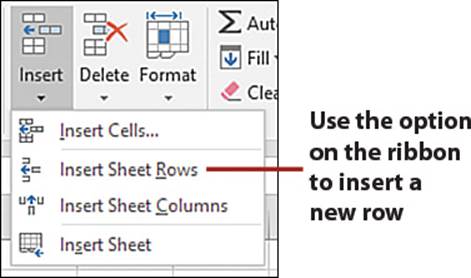
Insert Sheet Rows Ribbon Option
Rows can also be inserted using the ribbon. First, select a cell where you want the new row to go. For example, if you need to insert a new row 5, select a cell in row 5. Then, on the Home tab, select Insert Sheet Rows from the Insert drop-down.
Insert a Column
Inserting a column isn’t that different from inserting a row. To insert a column, click the column heading and then right-click and choose Insert or Insert Sheet Columns from the Insert drop-down.
Insert Individual Cells
If you don’t have the entire row or column selected and you try to right-click and insert, Excel displays the Insert dialog box, prompting you to specify whether you want to shift the selected cells right or down, or if you want to insert an entire row or column. See the “Insert Cells” section for more information.
Insert Multiple Rows or Columns
If you select multiple rows or columns, Excel will insert that many rows or columns. For example, if you need to insert five new rows in your data, select five rows before choosing Insert.
This also applies to deleting multiple rows or columns—Excel deletes all of what you have selected.
Delete a Row or Column
When you import data from another source, you might need to clean it up by deleting rows or columns of data you don’t need. When deleting a row, Excel shifts the data below the row up. For example, after you delete row 5, what was in row 6 now appears in row 5. If you’re deleting a column, Excel shifts the data that was to the right of the deleted column to the left.
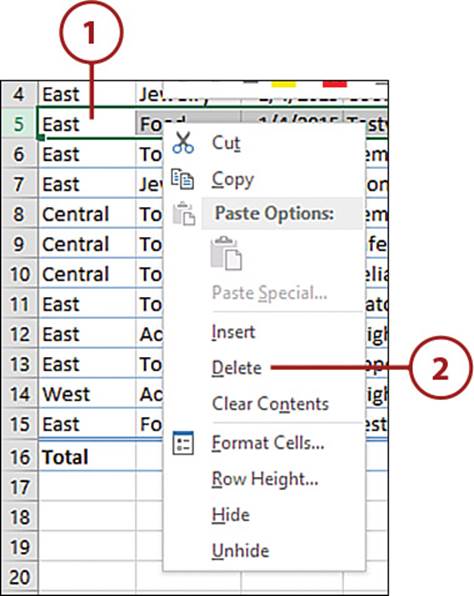
1. Right-click the heading of the row you want to delete.
2. Select Delete.
Delete Sheet Rows Ribbon Option
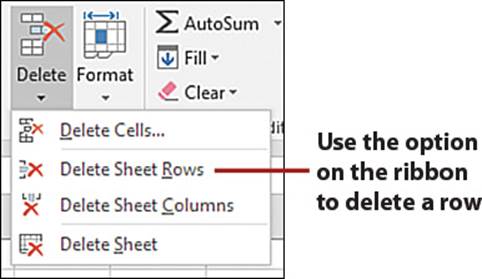
Rows can also be deleted using the ribbon. First, select a cell in the row you want to delete. Then, on the Home tab, select Delete Sheet Rows from the Delete drop-down.
Delete Noncontiguous Rows or Columns
Your selection of rows or columns does not have to be contiguous. Excel will delete what you have selected. See the section “Select a Row or Column” for instructions on how to select the data.
>>>Go Further: Hiding and Unhiding Rows or Columns
You don’t have to delete your rows and columns to get them out of your way. Instead, you can choose to hide them—and you can unhide them at a later time. To do this, select the heading and, from the Format drop-down on the Home tab, open the Hide & Unhide menu and choose what you want to hide—either Hide Rows or Hide Columns.
To unhide data, select the visible headings on both sides of the hidden data and select Unhide Rows or Unhide Columns from the Hide & Unhide menu in the Format drop-down.
Move Rows or Columns by Dragging
You have to be careful when moving rows and columns. Depending on the method you use, you could end up overwriting other cells. Use this method to move rows or columns when you aren’t worried about overwriting existing data. If you don’t want to overwrite existing data, see the section “Move Rows or Columns by Cutting.”
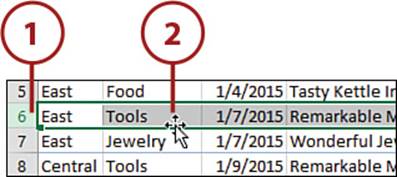
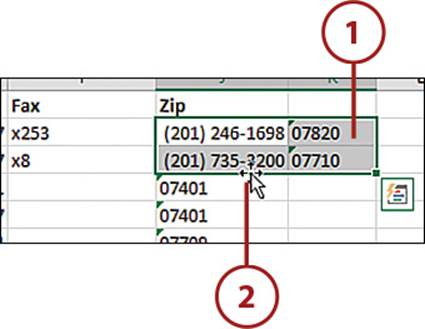
1. Select the row you want to move.
2. Place the pointer over the selection’s border so that a four-headed arrow appears.
3. Click the border and hold the mouse button down.
4. Drag the selection to a new location and let go of the mouse button.
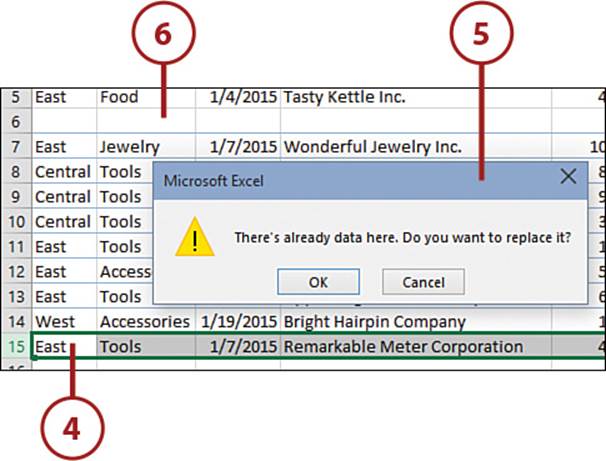
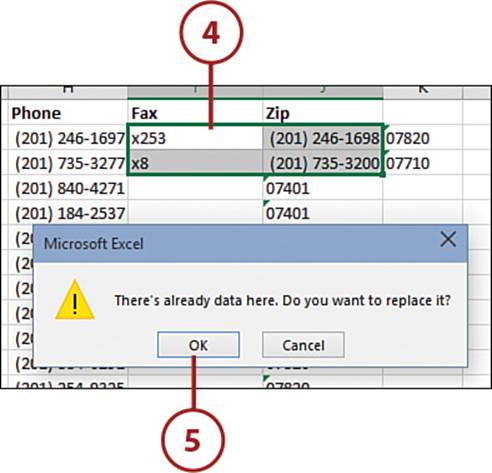
5. If there is any data in the new location, Excel asks if you want to overwrite it. If you select Cancel, the move will be canceled. Click OK if you want to overwrite the data.
6. After you have moved the row, the original row will still be there, but it will be empty.
Drag a Column to a New Location
Moving a column isn’t that different from moving a row. To move an entire column, select the column and place your pointer on the border, where it becomes a four-headed arrow. Then, as you hold the mouse button down, drag the column to a new location.
Move Rows or Columns by Cutting
When you cut a row or column, you have the option of pasting it to a new location, overwriting anything that was already there. Alternatively, you can tell Excel to insert the data. When you choose the insert option, Excel moves the existing data over before pasting the cut selection. The space that was cut will be filled as Excel shifts data up (for cut rows) or to the left (for cut columns).
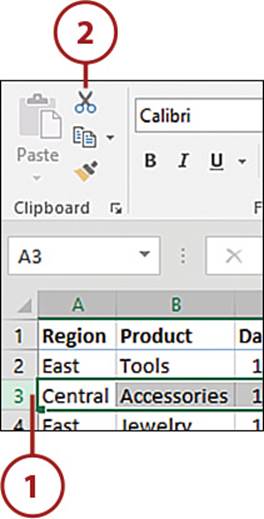
1. Select the row you want to cut.
2. On the Home tab, select Cut.
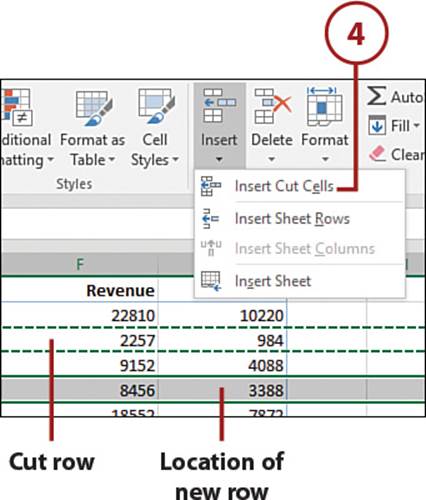
3. Select the row where you want the cut row to go. For example, if the cut row needs to be where the data in row 5 is, select row 5.
4. On the Home tab, select Insert Cut Cells from the Insert drop-down. Excel will insert a new row before pasting the data. It will delete the original row, shifting all the data beneath it up.
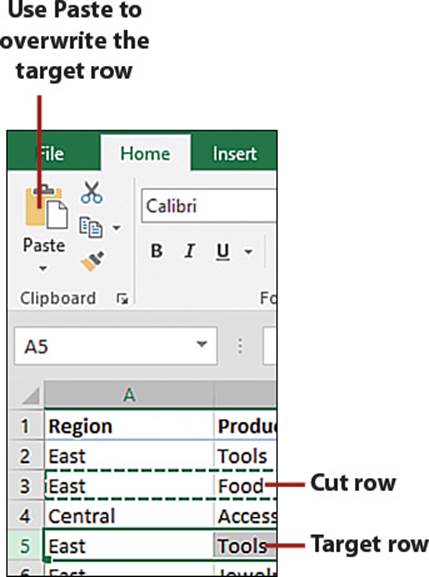
Overwrite Data
If you want to overwrite data in an existing row, instead of Insert Cut Cells, on the Home tab, select the Paste button. Excel will overwrite the data in the selected row. It will not remove the original row—only the data in the cells.
It’s Not All Good: Accidental Overwrite
When you cut and paste a selection over existing data, Excel won’t give you any warning—it will just do it. To undo the overwrite, click the Undo button in the QAT or press Ctrl+Z.
Cut a Column
Cutting a column isn’t that different from cutting a row. Select the column letter and then click the Cut button of the Home tab. Select the column you want to replace and then select either Paste to overwrite it or Insert Cut Cells to shift it over.
Copy Rows or Columns
When you copy a row or column, you have the option of pasting it to a new location, overwriting anything that was already there. Alternatively, you can tell Excel to insert the data. When you choose the insert option, Excel shifts the existing data over before pasting the copied selection.
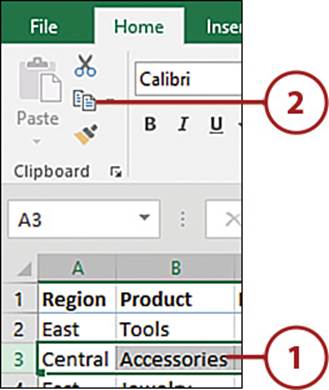
1. Select the row you want to copy.
2. On the Home tab, select Copy.
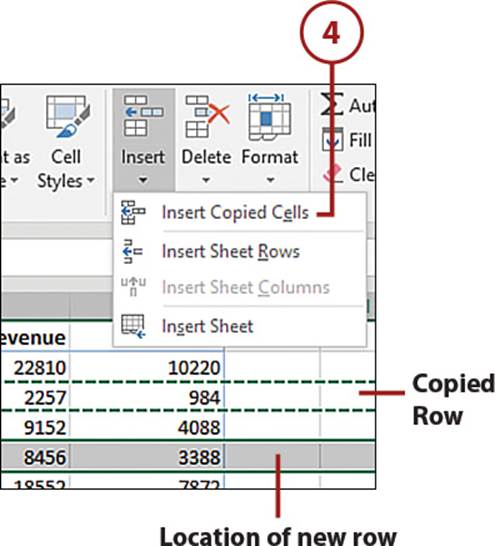
3. Select the row where you want the copied row to go. For example, if the copied row needs to be row 5, select row 5.
4. On the Home tab, select Insert Copied Cells from the Insert drop-down. Excel will insert the new row, shifting the rows below it down.
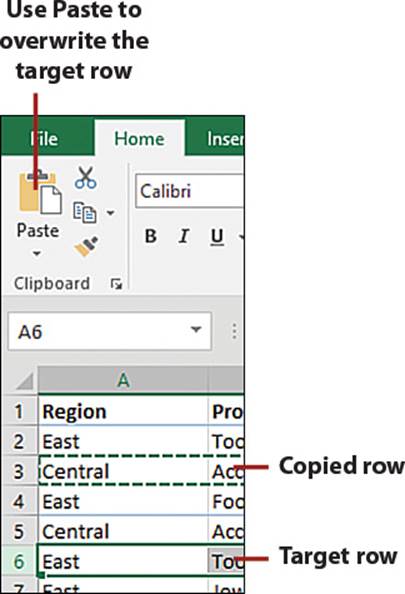
Overwrite Data
If you want to overwrite data, instead of Insert Copied Cells, on the Home tab, select the Paste button. Excel will overwrite the data in the selected row.
Do It Quicker
To quickly copy a row, select the row and then hold down the Ctrl key as you click on the border and drag the row to the other location.
It’s Not All Good: Insert Multiple Copies
Suppose you need to make several copies of a specific row (or column). You select the row, select where you want it to go, choose Insert Copied Cells. You then go to the next row where you need the duplicate data... and the option Insert Copied Cells is no longer available. You look at the original row and see it is still selected. So what’s up?
The copied data is still in the clipboard. You can still paste it. However, by design, the insert functionality is removed. To get it back, you’ll need to copy the data again.
Copy a Column
Copying a column isn’t that different from copying a row. Select the column heading and then click the Copy button of the Home tab. Select the column you want to replace and then select either Paste to overwrite it or Insert Copied Cells to shift it over.
Working with Cells
Just like you can insert, move, and delete entire rows and columns, you can also insert, move, and delete cells. This section shows you how to quickly jump to a cell you can’t currently see on your sheet, select noncontiguous ranges, and insert, move, and delete cells.
Select a Cell Using the Name Box
Chapter 1, “Understanding the Microsoft Excel Interface,” explains how each cell has an address made up of the column and row it resides in. The basics of navigation were touched upon—you can either click a cell or use the keyboard to select a cell.
You can also jump to a cell by typing the cell address in the Name box, located above the sheet in the left corner. This is a great way of traveling quickly to a specific location on a large sheet.
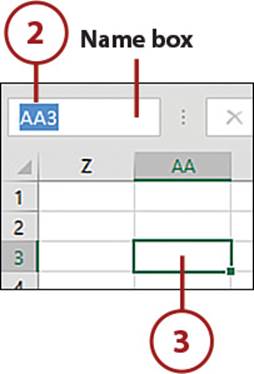
1. Click in the Name box.
2. Type the desired cell address. For example, if you want to jump to cell AA3, type in AA3; typing 3AA won’t work.
3. Press Enter and the currently selected cell will be cell AA3.
When Column Headings Are Numbers
If you have R1C1 notation turned on—you’ll have numbers instead of letters in the column heading—A1 notation won’t work. To turn off R1C1 notation, go to File, Options and select the Formulas menu. Under Working with Formulas, unselect R1C1 Reference Style.
Select Noncontiguous Cells and Ranges
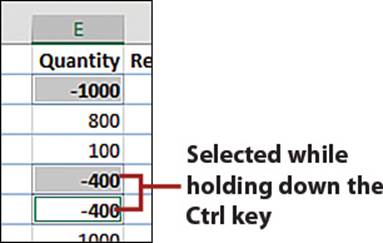
You don’t always want to select cells right next to each other. For example, you might want to select only the cells with negative values and make them bold. You can use the Ctrl key to select noncontiguous cells and then apply your desired format (or perform some other action).
1. Select the first cell to include.

2. Hold down the Ctrl key.
3. Select the next cell to include. Repeat this step until all the desired cells are selected.
4. Release the Ctrl key. Do what you need to the selection, such as making the cells bold.
You Can’t Deselect
Once a range has been selected using the Ctrl key method, you cannot deselect it without deselecting all other selected cells. If you make a mistake in your cell selection, you have to start over.
Insert Cells
When you insert or delete rows and columns, Excel shifts all the other data on the sheet. If you only want part of the data shifted, you need to select the specific range where you want empty cells.
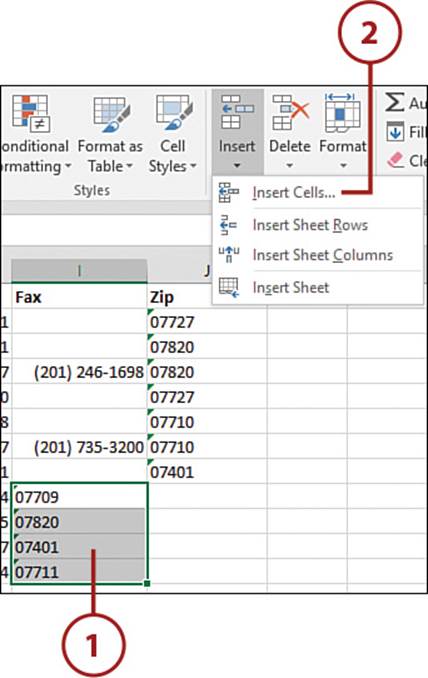
1. Select the cells you need to shift.
2. On the Home tab, click the Insert drop-down and select Insert Cells.
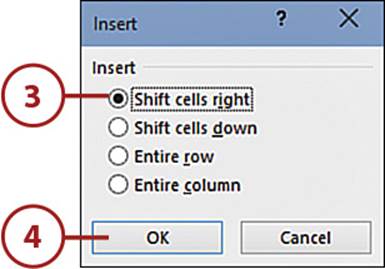
3. Choose which direction you want to shift your existing data. If you want the selected cells to shift downward, choose Shift Cells Down. If you want the selected cells to shift to the right, choose Shift Cells Right.
4. Click OK. New cells will be inserted and the selected data shifted.
It’s Not All Good: Watch Out for Misaligned Data
When you use this method for inserting cells, versus inserting entire rows or columns, Excel inserts only the number of cells that you have selected. This has the potential to mess up your data layout if you don’t select the entire range that needs to be affected.
This also applies to deleting cells—Excel will delete only as much data as you have selected, shifting data over to fill in the empty space.
Delete Cells
When you delete a range, you remove the cells from the sheet, thus shifting other data to fill in the empty space. If you aren’t cautious, you can ruin the careful layout of your sheet—for example, moving data from the credit column to the debit column.
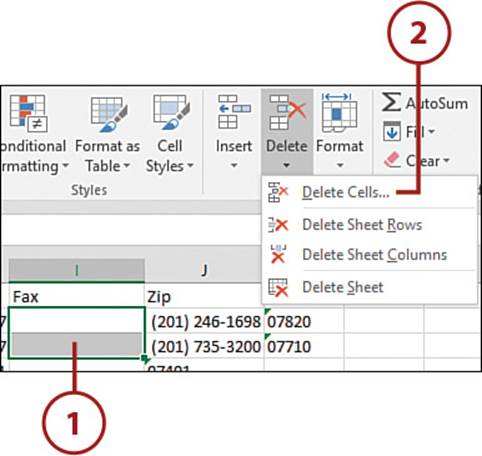
1. Select the cells you want to delete.
2. On the Home tab, click the Delete drop-down and select Delete Cells.
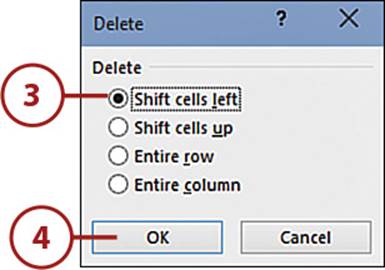
3. Choose either Shift Cells Left or Shift Cells Up.
4. Click OK. The selected cells will be deleted and the remaining data shifted.
Clear Data But Leave Cells Intact
If what you really want is to remove the data from the cells, leaving the cells intact, Excel calls this “clearing the contents.” For specifics on clearing contents, see the section “Clearing the Contents of a Cell,” in Chapter 4, “Getting Data onto a Sheet.”
Move Cells
You have to be careful when moving a range—you could end up overwriting other cells.
1. Select the range you want to move.
2. Place your pointer over the selection’s border until a four-headed arrow appears.
3. Click the border and hold the mouse button down.
4. Drag the selection to a new location and let go of the mouse button.
5. If there is any data in the new location, Excel asks if you want to overwrite it. If you select Cancel, the move will be canceled. Click OK if you want to overwrite the data.
Move Cells by Cutting and Pasting
You can also move cells by cutting and pasting the range. But be warned! Whereas the dragging method prompts to let you know you’re overwriting data, Excel won’t be so kind if you paste the data. So before you cut and paste, make sure the new location is big enough for your dataset.
All materials on the site are licensed Creative Commons Attribution-Sharealike 3.0 Unported CC BY-SA 3.0 & GNU Free Documentation License (GFDL)
If you are the copyright holder of any material contained on our site and intend to remove it, please contact our site administrator for approval.
© 2016-2026 All site design rights belong to S.Y.A.