Excel 2016 Power Programming with VBA (2016)
Part II. Advanced VBA Techniques
Chapter 10. Interacting with Other Applications
In This Chapter
· Understanding Microsoft Office automation
· Automating Access from Excel
· Automating Word from Excel
· Automating PowerPoint from Excel
· Automating Outlook from Excel
· Starting other applications from Excel
Understanding Microsoft Office Automation
Through this book, you’ve discovered how to leverage VBA to automate tasks, processes, and program flow. In this chapter, automation will take on a different meaning. Automation here will define the means of manipulating or controlling one application with another.
Why would you even want to control one application with another? Data-oriented processes quite often involve a succession of applications. It’s not uncommon to see data being analyzed and aggregated in Excel, used in a PowerPoint presentation, and then emailed via Outlook.
The reality is that each Microsoft Office application has strengths that you routinely leverage through manual processes. With VBA, you can go further and automate the interactions between Excel and other Office applications.
Understanding the concept of binding
Each program in the Microsoft Office suite comes with its own Object Library. As you know, the Object Library is a kind of encyclopedia of all the objects, methods, and properties available in each Office application. Excel has its own object library, just as all the other Office applications have their own object library.
In order for Excel to be able to speak to another Office program, you have to bind it to that program. Binding is the process of exposing the Object Library for a server application to a client application. There are two types of binding: early binding and late binding.
 Note
Note
In the context of this discussion, a client application is the application that is doing the controlling, while the server application is the application being controlled.
Early binding
With early binding, you explicitly point a client application to the server application’s Object Library in order to expose its object model during design-time or while programming. Then you use the exposed objects in your code to call a new instance of the application as such:
Dim XL As Excel.Application
Set XL = New Excel.Application
Early binding has several advantages:
· Because the objects are exposed at design-time, the client application can compile your code before execution. This allows your code to run considerably faster than with late binding.
· Since the object library is exposed during design time, you have full access to the server application’s object model in the Object Browser.
· You have the benefit of using intellisense. Intellisense is the functionality you experience when you type a keyword and a dot (.) or an equal sign (=) and you see a popup list of the methods and properties available to you.
· You automatically have access to the server application’s built-in constants.
To use early binding, you will need to create a reference to the appropriate object library by choosing the Tools ➜ References command in Visual Basic Editor (VBE). In the References dialog box (shown in Figure 10.1), find the Office application you want to automate, and then place a check next to it. The version of the available library on your system will be equal to your version of Office. So for instance, if you are working with Office 2016, you will have the PowerPoint 16.0 library. If you have Office 2013, you will have the PowerPoint 15.0 library.
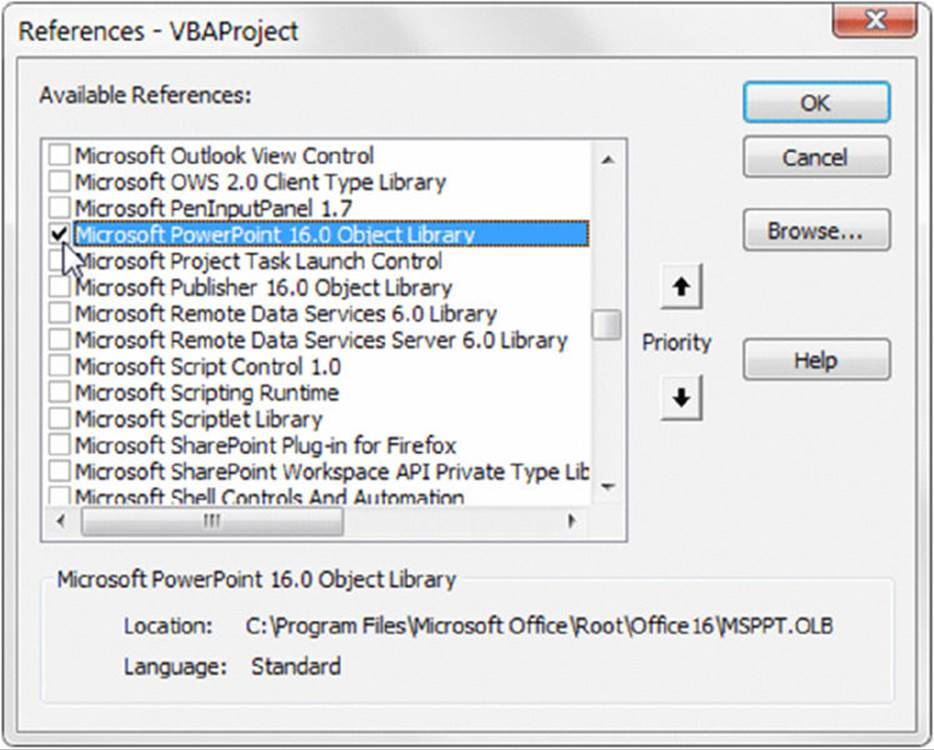
Figure 10.1 Add a reference to the object library for the application you are automating.
Late binding
Late binding is different in that you don’t point a client application to a specific Object Library. Instead, you purposely keep things ambiguous, only using the CreateObject function to bind to the needed library at runtime or during program execution.
Dim XL As Object
Set XL = CreateObject("Excel.Application")
Late binding has one primary advantage. Late binding allows your automation procedures to be version-independent. That is to say, your automation procedure will not fail due to compatibility issues between multiple versions of a component.
For example, suppose you decide to use early binding and set a reference to the Excel Object Library on your system. The version of the available library on your system will be equal to your version of Excel. The problem is that if your users have a lower version of Excel on their machine, your automation procedure will fail. You do not have this problem with late binding.
 GetObject versus CreateObject
The VBA GetObject and CreateObject functions both return a reference to an object but work in different ways.
The CreateObject function creates an interface to a new instance of an application. Use this function when the application isn’t running. If an instance of the application is already running, a new instance is started. For example, the following statement starts Excel, and the object returned in XLApp is a reference to the Excel.Application object that it created:
Set XLApp = CreateObject("Excel.Application")
The GetObject function is used either with an application that’s already running or to start an application with a file already loaded. The following statement, for example, starts Excel with the file Myfile.xls already loaded. The object returned in XLBook is a reference to the Workbook object (the Myfile.xlsx file):
Set XLBook = GetObject("C:\Myfile.xlsx")
A simple automation example
The following example demonstrates how to create a Word object by using late binding. This procedure creates an instance of Word, displays the current version number, closes the Word application, and then destroys the object (thus freeing the memory that it used):
Sub GetWordVersion()
Dim WordApp As Object
Set WordApp = CreateObject("Word.Application")
MsgBox WordApp.Version
WordApp.Quit
Set WordApp = Nothing
End Sub
Note
The Word object that’s created in this procedure is invisible. If you’d like to see the object’s window while it’s being manipulated, set its Visible property to True, as follows:
WordApp.Visible = True
This example can be adjusted to use early binding. Before doing so, we will need to activate the References dialog box in VBE (Tools ➜ References) and set a reference to the Word object library. Once we set the appropriate reference, we can use the following code:
Sub GetWordVersion()
Dim WordApp As New Word.Application
MsgBox WordApp.Version
WordApp.Quit
Set WordApp = Nothing
End Sub
Automating Access from Excel
It typically doesn’t occur to most Excel users to automate Access using Excel. Indeed, it’s difficult for most to think of situations where this would even be necessary. Although there are admittedly few mind-blowing reasons to automate Access from Excel, you may find some of the automation tricks found in this section strangely appealing. Who knows? You may even implement a few of them.
Running an Access Query from Excel
Here’s a nifty macro for those of you who often copy and paste the results of your Microsoft Access queries to Excel. In this macro, you use DAO (Data Access Object) to open and run an Access query in the background and output the results into Excel.
In this macro, you are pointing Excel to an Access database and pulling data from an existing Access query. You then store that query in a Recordset object, which you can use to populate your Excel spreadsheet.
 On the Web
This workbook, named Running an Access Query from Excel.xlsm, is available on the book’s website.
Note
Since you are automating Access, you will need to set a reference to the Microsoft Access Object Library. To do so, open the VBE in Excel and select Tools ➜ References. The Reference dialog box will activate. Scroll down until you find the entry “Microsoft Access XX Object Library,” where the XX is your version of Access. Place a check in the checkbox next to the entry.
Sub RunAccessQuery()
'Declare your variables
Dim MyDatabase As DAO.Database
Dim MyQueryDef As DAO.QueryDef
Dim MyRecordset As DAO.Recordset
Dim i As Integer
'Identify the database and query
Set MyDatabase = DBEngine.OpenDatabase _
("C:\Temp\YourAccessDatabse.accdb")
Set MyQueryDef = MyDatabase.QueryDefs("Your Query Name")
'Open the query
Set MyRecordset = MyQueryDef.OpenRecordset
'Clear previous contents
Sheets("Sheet1").Select
ActiveSheet.Range("A6:K10000").ClearContents
'Copy the recordset to Excel
ActiveSheet.Range("A7").CopyFromRecordset MyRecordset
'Add column heading names to the spreadsheet
For i = 1 To MyRecordset.Fields.Count
ActiveSheet.Cells(6, i).Value = MyRecordset.Fields(i - 1).Name
Next i
End Sub
Running an Access macro from Excel
You can run Access macros from Excel, using automation to fire the macro without opening Access. This technique can not only be useful for running those epic macros that involve a multi-step series of 20 queries, but can also come in handy for everyday tasks like outputting Access data to an Excel file.
On the Web
This workbook, named Running an Access Macro from Excel.xlsm, is available on the book’s website.
The following macro is a simple way to trigger an Access macro programmatically.
Note
You will need to set a reference to the Microsoft Access Object Library. To do so, open the VBE in Excel and select Tools ➜ References. The Reference dialog box will activate. Scroll down until you find the entry “Microsoft Access XX Object Library,” where the XX is your version of Access. Place a check in the checkbox next to the entry.
Sub RunAccessMacro()
'Declare your variables
Dim AC As Access.Application
'Start Access and open the target database
Set AC = New Access.Application
AC.OpenCurrentDatabase _
("C:\Temp\YourAccessDatabse.accdb")
'Run the Target Macro
With AC
.DoCmd.RunMacro"MyMacro"
.Quit
End With
End Sub
Automating Word from Excel
It’s not unusual to see a Word document that contains a table which originated in Excel. In most cases, that table was simply copied and pasted directly into Word. While copying and pasting data from Excel into Word is indeed a valid form of integration, there are countless ways to integrate Excel and Word that go beyond copying and pasting data. This section offers a few examples that demonstrate techniques you can leverage to integrate Excel and Word.
Sending Excel data to a Word document
If you find that you are constantly copying and pasting data into Microsoft Word, you can use a macro to automate this task.
Before walking through the macro, it’s important to go over a few set up steps.
To set up for a process like this, you must have a template Word document already created. In that document, create a bookmark tagging the location where you want your Excel data to be copied.
To create a bookmark in a Word document, place your cursor where you want the bookmark, select the Insert tab, and select Bookmark (found under the Links group). This will activate the Bookmark dialog box where you assign a name for your bookmark. Once the name has been assigned, click the Add button.
On the Web
This workbook, named Sending Excel Data to a Word Document.xlsm, is available on the book’s website. You will also find a document called PasteTable .docx. This document is a simple template that contains one bookmark called DataTableHere. In this example code, you copy a range to that PasteTable.docx template, using the DataTableHere bookmark to specify where to paste the copied range.
Note
You will need to set a reference to the Microsoft Word Object Library. To do so, open the Visual Basic Editor in Excel and select Tools ➜ References. The Reference dialog box will activate. Scroll down until you find the entry“Microsoft Word XX Object Library,” where the XX is your version of Word. Place a check in the checkbox next to the entry.
Sub SendDataToWord()
'Declare your variables
Dim MyRange As Excel.Range
Dim wd As Word.Application
Dim wdDoc As Word.Document
Dim WdRange As Word.Range
'Copy the defined range
Sheets("Revenue Table").Range("B4:F10").Copy
'Open the target Word document
Set wd = New Word.Application
Set wdDoc = wd.Documents.Open _
(ThisWorkbook.Path &"\" &"PasteTable.docx")
wd.Visible = True
'Set focus on the target bookmark
Set WdRange = wdDoc.Bookmarks("DataTableHere").Range
'Delete the old table and paste new
On Error Resume Next
WdRange.Tables(1).Delete
WdRange.Paste 'paste in the table
'Adjust column widths
WdRange.Tables(1).Columns.SetWidth _
(MyRange.Width / MyRange.Columns.Count), wdAdjustSameWidth
'Reinsert the bookmark
wdDoc.Bookmarks.Add"DataTableHere", WdRange
'Memory cleanup
Set wd = Nothing
Set wdDoc = Nothing
Set WdRange = Nothing
End Sub
Simulating mail merge with a Word document
One of the most requested forms of integration with Word is the mail merge. In most cases, mail merge refers to the process of creating one letter or document for each customer in a list of customers. For example, suppose you had a list of customers and you wanted to compose a letter to each customer. With mail merge, you can write the body of the letter one time and then run the Mail Merge feature in Word to automatically create a letter for each customer, affixing the appropriate, address, name, and other information to each letter.
If you are an automation buff, you can use a macro to simulate the Word Mail Merge function from Excel. The idea is relatively simple. You start with a template that contains bookmarks identifying where each element of contact information will go. With the template set to go, the idea is to simply loop through each contact in your contact list, assigning the component pieces of their contact information to the respective bookmarks.
On the Web
This workbook, named Simulating Mail Merge with a Word Document .xlsm, is available on the book’s website. You will also find a document called MailMerge.docx. This document has all the bookmarks needed to run the sample code shown here.
Note
You will need to set a reference to the Microsoft Word Object Library. To do so, open the Visual Basic Editor in Excel and select Tools ➜ References. The Reference dialog box will activate. Scroll down until you find the entry“Microsoft Word XX Object Library,” where the XX is your version of Word. Place a check in the checkbox next to the entry.
Sub WordMailMerge()
'Declare your variables
Dim wd As Word.Application
Dim wdDoc As Word.Document
Dim MyRange As Excel.Range
Dim MyCell As Excel.Range
Dim txtAddress As String
Dim txtCity As String
Dim txtState As String
Dim txtPostalCode As String
Dim txtFname As String
Dim txtFullname As String
'Start Word and add a new document
Set wd = New Word.Application
Set wdDoc = wd.Documents.Add
wd.Visible = True
'Set the range of your contact list
Set MyRange = Sheets("Contact List").Range("A5:A24")
'Start the loop through each cell
For Each MyCell In MyRange.Cells
'Assign values to each component of the letter
txtAddress = MyCell.Value
txtCity = MyCell.Offset(, 1).Value
txtState = MyCell.Offset(, 2).Value
txtPostalCode = MyCell.Offset(, 3).Value
txtFname = MyCell.Offset(, 5).Value
txtFullname = MyCell.Offset(, 6).Value
'Insert the structure of template document
wd.Selection.InsertFile _
ThisWorkbook.Path &"\" &"MailMerge.docx"
'Fill each relevant bookmark with respective value
wd.Selection.Goto What:=wdGoToBookmark, Name:="Customer"
wd.Selection.TypeText Text:=txtFullname
wd.Selection.Goto What:=wdGoToBookmark, Name:="Address"
wd.Selection.TypeText Text:=txtAddress
wd.Selection.Goto What:=wdGoToBookmark, Name:="City"
wd.Selection.TypeText Text:=txtCity
wd.Selection.Goto What:=wdGoToBookmark, Name:="State"
wd.Selection.TypeText Text:=txtState
wd.Selection.Goto What:=wdGoToBookmark, Name:="Zip"
wd.Selection.TypeText Text:=txtPostalCode
wd.Selection.Goto What:=wdGoToBookmark, Name:="FirstName"
wd.Selection.TypeText Text:=txtFname
'Clear any remaining bookmarks
On Error Resume Next
wdDoc.Bookmarks("Address").Delete
wdDoc.Bookmarks("Customer").Delete
wdDoc.Bookmarks("City").Delete
wdDoc.Bookmarks("State").Delete
wdDoc.Bookmarks("FirstName").Delete
wdDoc.Bookmarks("Zip").Delete
'Go to the end, insert new page, and start with the next cell
wd.Selection.EndKey Unit:=wdStory
wd.Selection.InsertBreak Type:=wdPageBreak
Next MyCell
'Set cursor to beginning and clean up memory
wd.Selection.HomeKey Unit:=wdStory
wd.Activate
Set wd = Nothing
Set wdDoc = Nothing
End Sub
Automating PowerPoint from Excel
It has been estimated that up to 50 percent of PowerPoint presentations contain data that has been copied straight out of Excel. This is not difficult to believe. It’s often much easier to analyze and create charts and data views in Excel than in PowerPoint. Once those charts and data views have been created, why wouldn’t you simply copy them into PowerPoint? The time and effort saved by copying directly from Excel is too good to pass up.
This section offers up a few techniques that can help you automate the process of getting your Excel data into PowerPoint.
Sending Excel data to a PowerPoint presentation
To help get a few fundamentals down, let’s start simple and automate the creation of a PowerPoint presentation containing one slide with a title. In this example, you are copying a range from an Excel file and pasting that range to a slide in a newly created PowerPoint presentation.
On the Web
This workbook, named Sending Excel Data to a PowerPoint Presentation.xlsm, is available on the book’s website.
Note
You will need to set a reference to the Microsoft PowerPoint Object Library. Again, you can set the reference by opening the Visual Basic Editor in Excel and selecting Tools ➜ References. Scroll down until you find the entry “Microsoft PowerPoint XX Object Library,” where the XX is your version of PowerPoint. Place a check in the checkbox next to the entry.
Sub CopyRangeToPresentation ()
'Declare your variables
Dim PP As PowerPoint.Application
Dim PPPres As PowerPoint.Presentation
Dim PPSlide As PowerPoint.Slide
Dim SlideTitle As String
'Open PowerPoint and create new presentation
Set PP = New PowerPoint.Application
Set PPPres = PP.Presentations.Add
PP.Visible = True
Add new slide as slide 1 and set focus to it
Set PPSlide = PPPres.Slides.Add(1, ppLayoutTitleOnly)
PPSlide.Select
'Copy the range as a picture
Sheets("Slide Data").Range("A1:J28").CopyPicture _
Appearance:=xlScreen, Format:=xlPicture
'Paste the picture and adjust its position
PPSlide.Shapes.Paste.Select
PP.ActiveWindow.Selection.ShapeRange.Align msoAlignCenters, True
PP.ActiveWindow.Selection.ShapeRange.Align msoAlignMiddles, True
'Add the title to the slide
SlideTitle ="My First PowerPoint Slide"
PPSlide.Shapes.Title.TextFrame.TextRange.Text = SlideTitle
'Memory Cleanup
PP.Activate
Set PPSlide = Nothing
Set PPPres = Nothing
Set PP = Nothing
End sub
Sending all Excel charts to a PowerPoint presentation
It’s not uncommon to see multiple charts on one worksheet. Many people have the need to copy charts to PowerPoint presentations. The macro here assists in that task, effectively automating the process of copying each one of these charts into its own slide.
In this macro, we loop through the Activesheet.ChartObjects collection to copy each chart as a picture into its own page in a newly created PowerPoint presentation.
On the Web
This workbook, named Sending All Excel Charts to a PowerPoint Presentation.xlsm, is available on the book’s website.
Note
You will need to set a reference to the Microsoft PowerPoint Object Library. Again, you can set the reference by opening the Visual Basic Editor in Excel and selecting Tools ➜ References. Scroll down until you find the entry “Microsoft PowerPoint XX Object Library,” where the XX is your version of PowerPoint. Place a check in the checkbox next to the entry.
Sub CopyAllChartsToPresentation()
'Declare your variables
Dim PP As PowerPoint.Application
Dim PPPres As PowerPoint.Presentation
Dim PPSlide As PowerPoint.Slide
Dim i As Integer
'Check for charts; exit if no charts exist
Sheets("Slide Data").Select
If ActiveSheet.ChartObjects.Count < 1 Then
MsgBox"No charts existing the active sheet"
Exit Sub
End If
'Open PowerPoint and create new presentation
Set PP = New PowerPoint.Application
Set PPPres = PP.Presentations.Add
PP.Visible = True
'Start the loop based on chart count
For i = 1 To ActiveSheet.ChartObjects.Count
'Copy the chart as a picture
ActiveSheet.ChartObjects(i).Chart.CopyPicture _
Size:=xlScreen, Format:=xlPicture
Application.Wait (Now + TimeValue("0:00:1"))
'Count slides and add new slide as next available slide number
ppSlideCount = PPPres.Slides.Count
Set PPSlide = PPPres.Slides.Add(SlideCount + 1, ppLayoutBlank)
PPSlide.Select
'Paste the picture and adjust its position; Go to next chart
PPSlide.Shapes.Paste.Select
PP.ActiveWindow.Selection.ShapeRange.Align msoAlignCenters, True
PP.ActiveWindow.Selection.ShapeRange.Align msoAlignMiddles, True
Next i
'Memory Cleanup
Set PPSlide = Nothing
Set PPPres = Nothing
Set PP = Nothing
End Sub
Convert a workbook into a PowerPoint presentation
This last macro takes the concept of using Excel data in PowerPoint to the extreme. Open the sample workbook called Convert a Workbook into a PowerPoint Presentation.xlsm. In this workbook, you will notice that each worksheet contains its own data about a region. It’s almost like each worksheet is its own separate slide, providing information on a particular region.
The idea here is that you can build a workbook in such a way that it mimics a PowerPoint presentation; the workbook is the presentation itself and each worksheet becomes a slide in the presentation. Once you do that, you can easily convert that workbook into an actual PowerPoint presentation using a bit of automation.
With this technique, you can build entire presentations in Excel where you have better analytical and automation tools. Then you can simply convert the Excel version of your presentation to a PowerPoint presentation.
On the Web
This workbook, named Convert a Workbook into a PowerPoint Presentation.xlsm, is available on the book’s website.
Note
You will need to set a reference to the Microsoft PowerPoint Object Library. Again, you can set the reference by opening the Visual Basic Editor in Excel and selecting Tools ➜ References. Scroll down until you find the entry“Microsoft PowerPoint XX Object Library”, where the XX is your version of PowerPoint. Place a check in the checkbox next to the entry.
Sub SendWorkbookToPowerPoint()
'Declare your variables
Dim pp As PowerPoint.Application
Dim PPPres As PowerPoint.Presentation
Dim PPSlide As PowerPoint.Slide
Dim xlwksht As Excel.Worksheet
Dim MyRange As String
Dim MyTitle As String
'Open PowerPoint, add a new presentation and make visible
Set pp = New PowerPoint.Application
Set PPPres = pp.Presentations.Add
pp.Visible = True
'Set the ranges for your data and title
MyRange ="A1:I27"
'Start the loop through each worksheet
For Each xlwksht In ActiveWorkbook.Worksheets
xlwksht.Select
Application.Wait (Now + TimeValue("0:00:1"))
MyTitle = xlwksht.Range("C19").Value
'Copy the range as picture
xlwksht.Range(MyRange).CopyPicture _
Appearance:=xlScreen, Format:=xlPicture
'Count slides and add new slide as next available slide number
SlideCount = PPPres.Slides.Count
Set PPSlide = PPPres.Slides.Add(SlideCount + 1, ppLayoutTitleOnly)
PPSlide.Select
'Paste the picture and adjust its position
PPSlide.Shapes.Paste.Select
pp.ActiveWindow.Selection.ShapeRange.Align msoAlignCenters, True
pp.ActiveWindow.Selection.ShapeRange.Top = 100
'Add the title to the slide then move to next worksheet
PPSlide.Shapes.Title.TextFrame.TextRange.Text = MyTitle
Next xlwksht
'Memory Cleanup
pp.Activate
Set PPSlide = Nothing
Set PPPres = Nothing
Set pp = Nothing
End Sub
Automating Outlook from Excel
In this section, you’ll discover a few examples of how you can integrate Excel and Outlook in a more automated fashion.
Mailing the Active Workbook as an Attachment
The most fundamental Outlook task we can perform through automation is sending an email. In the example code shown here, the active workbook is sent to two email recipients as an attachment.
On the Web
This workbook, named Mailing the Active Workbook as Attachment .xlsm, is available on the book’s website.
Note
You will need to set a reference to the Microsoft Outlook Object Library. You can set the reference by opening the Visual Basic Editor in Excel and selecting Tools ➜ References. Scroll down until you find the entry “Microsoft Outlook XX Object Library,” where the XX is your version of Outlook. Place a check in the checkbox next to the entry.
Sub EmailWorkbook()
'Declare our variables
Dim OLApp As Outlook.Application
Dim OLMail As Object
'Open Outlook start a new mail item
Set OLApp = New Outlook.Application
Set OLMail = OLApp.CreateItem(0)
OLApp.Session.Logon
'Build our mail item and send
With OLMail
.To ="admin@datapigtechnologies.com; mike@datapigtechnologies.com"
.CC =""
.BCC =""
.Subject ="This is the Subject line"
.Body ="Sample File Attached"
.Attachments.Add ActiveWorkbook.FullName
.Display
End With
'Memory cleanup
Set OLMail = Nothing
Set OLApp = Nothing
End Sub
Mailing a Specific Range as an Attachment
You can imagine that we may not always want to send our entire workbook through email. This macro demonstrates how we would send a specific range of data rather than the entire workbook.
On the Web
This workbook, named Mailing a Specific Range as Attachment.xlsm, is available on the book’s website.
Note
You will need to set a reference to the Microsoft Outlook Object Library. You can set the reference by opening the Visual Basic Editor in Excel and selecting Tools ➜ References. Scroll down until you find the entry “Microsoft Outlook XX Object Library,” where the XX is your version of Outlook. Place a check in the checkbox next to the entry.
Sub EmailRange()
'Declare our variables
Dim OLApp As Outlook.Application
Dim OLMail As Object
'Copy range, paste to new workbook, and save it
Sheets("Revenue Table").Range("A1:E7").Copy
Workbooks.Add
Range("A1").PasteSpecial xlPasteValues
Range("A1").PasteSpecial xlPasteFormats
ActiveWorkbook.SaveAs ThisWorkbook.Path &"\TempRangeForEmail.xlsx"
'Open Outlook start a new mail item
Set OLApp = New Outlook.Application
Set OLMail = OLApp.CreateItem(0)
OLApp.Session.Logon
'Build our mail item and send
With OLMail
.To ="admin@datapigtechnologies.com; mike@datapigtechnologies.com"
.CC =""
.BCC =""
.Subject ="This is the Subject line"
.Body ="Sample File Attached"
.Attachments.Add (ThisWorkbook.Path &"\TempRangeForEmail.xlsx")
.Display
End With
'Delete the temporary Excel file
ActiveWorkbook.Close SaveChanges:=True
Kill ThisWorkbook.Path &"\TempRangeForEmail.xlsx"
'Memory cleanup
Set OLMail = Nothing
Set OLApp = Nothing
End Sub
Mailing a Single Sheet as an Attachment
This example demonstrates how we would send a specific worksheet of data rather than the entire workbook.
On the Web
This workbook, named Mailing a Single Sheet as an Attachment.xlsm, is available on the book’s website.
Note
You will need to set a reference to the Microsoft Outlook Object Library. You can set the reference by opening the Visual Basic Editor in Excel and selecting Tools ➜ References. Scroll down until you find the entry “Microsoft Outlook XX Object Library,” where the XX is your version of Outlook. Place a check in the checkbox next to the entry.
Sub EmailWorkSheet()
'Declare our variables
Dim OLApp As Outlook.Application
Dim OLMail As Object
'Copy Worksheet, paste to new workbook, and save it
Sheets("Revenue Table").Copy
ActiveWorkbook.SaveAs ThisWorkbook.Path &"\TempRangeForEmail.xlsx"
'Open Outlook start a new mail item
Set OLApp = New Outlook.Application
Set OLMail = OLApp.CreateItem(0)
OLApp.Session.Logon
'Build our mail item and send
With OLMail
.To ="admin@datapigtechnologies.com; mike@datapigtechnologies.com"
.CC =""
.BCC =""
.Subject ="This is the Subject line"
.Body ="Sample File Attached"
.Attachments.Add (ThisWorkbook.Path &"\TempRangeForEmail.xlsx")
.Display
End With
'Delete the temporary Excel file
ActiveWorkbook.Close SaveChanges:=True
Kill ThisWorkbook.Path &"\TempRangeForEmail.xlsx"
'Memory cleanup
Set OLMail = Nothing
Set OLApp = Nothing
End Sub
Mailing All Email Addresses in Your Contact List
Ever need to send out a mass mailing such as a newsletter or a memo? Instead of manually entering each of your contacts’ email addresses, you can run the following procedure. In this procedure, you send out one email, automatically adding all the email addresses in your contact list to your email.
On the Web
This workbook, named Mailing All Email Addresses in Your Contact List, is available on the book’s website.
Note
You will need to set a reference to the Microsoft Outlook Object Library. You can set the reference by opening the Visual Basic Editor in Excel and selecting Tools ➜ References. Scroll down until you find the entry “Microsoft Outlook XX Object Library,” where the XX is your version of Outlook. Place a check in the checkbox next to the entry.
Sub EmailContactList()
'Declare our variables
Dim OLApp As Outlook.Application
Dim OLMail As Object
Dim MyCell As Range
Dim MyContacts As Range
'Define the range to loop through
Set MyContacts = Sheets("Contact List").Range("H2:H21")
'Open Outlook
Set OLApp = New Outlook.Application
Set OLMail = OLApp.CreateItem(0)
OLApp.Session.Logon
'Add each address in the contact list
With OLMail
For Each MyCell In MyContacts
.BCC = .BCC & Chr(59) & MyCell.Value
Next MyCell
.Subject ="Sample File Attached"
.Body ="Sample file is attached"
.Attachments.Add ActiveWorkbook.FullName
.Display
End With
'Memory cleanup
Set OLMail = Nothing
Set OLApp = Nothing
End Sub
Starting Other Applications from Excel
You may find it necessary to launch other applications from Excel. For example, you might want to call up a Windows dialog box, open Internet Explorer, or execute a DOS batch file from Excel. Or, as an application developer, you may want to make it easy for a user to access the Windows Control Panel to adjust system settings.
In this section you’ll lean the fundamental functions needed to launch all kinds of programs from Excel.
Using the VBA Shell function
The VBA Shell function makes launching other programs relatively easy. Following is an example of VBA code that launches the Windows Calculator:
Sub StartCalc()
Dim Program As String
Dim TaskID As Double
On Error Resume Next
Program ="calc.exe"
TaskID = Shell(Program, 1)
If Err <> 0 Then
MsgBox"Cannot start" & Program, vbCritical,"Error"
End If
End Sub
The Shell function returns a task identification number for the application specified in the first argument. You can use this number later to activate the task. The second argument for the Shell function determines how the application is displayed. (1 is the code for a normal-size window that has the focus.) Refer to the Help system for other values for this argument.
If the Shell function isn’t successful, it generates an error. Therefore, this procedure uses an On Error statement to display a message if the executable file can’t be found or if some other error occurs.
It’s important to understand that your VBA code doesn’t pause while the application that was started with the Shell function is running. In other words, the Shell function runs the application asynchronously. If the procedure has more instructions after the Shellfunction is executed, these instructions are executed concurrently with the newly loaded program. If any instruction requires user intervention (for example, displaying a message box), Excel’s title bar flashes while the other application is active.
In some cases, you may want to launch an application with the Shell function, but you need your VBA code to pause until the application is closed. For example, the launched application might generate a file that is used later in your code. Although you can’t pause the execution of your code, you can create a loop that does nothing except monitor the application’s status. The example that follows displays a message box when the application launched by the Shell function has ended:
Declare PtrSafe Function OpenProcess Lib"kernel32" _
(ByVal dwDesiredAccess As Long, _
ByVal bInheritHandle As Long, _
ByVal dwProcessId As Long) As Long
Declare PtrSafe Function GetExitCodeProcess Lib"kernel32" _
(ByVal hProcess As Long, _
lpExitCode As Long) As Long
Sub StartCalc2()
Dim TaskID As Long
Dim hProc As Long
Dim lExitCode As Long
Dim ACCESS_TYPE As Integer, STILL_ACTIVE As Integer
Dim Program As String
ACCESS_TYPE = &H400
STILL_ACTIVE = &H103
Program ="Calc.exe"
On Error Resume Next
' Shell the task
TaskID = Shell(Program, 1)
' Get the process handle
hProc = OpenProcess(ACCESS_TYPE, False, TaskID)
If Err <> 0 Then
MsgBox"Cannot start" & Program, vbCritical,"Error"
Exit Sub
End If
Do 'Loop continuously
' Check on the process
GetExitCodeProcess hProc, lExitCode
' Allow event processing
DoEvents
Loop While lExitCode = STILL_ACTIVE
' Task is finished, so show message
MsgBox Program &" was closed"
End Sub
While the launched program is running, this procedure continually calls the GetExitCodeProcess function from a Do-Loop structure, testing for its returned value (lExitCode). When the program is finished, lExitCode returns a different value, the loop ends, and the VBA code resumes executing.
On the Web
Both of the previous examples are available on the book’s website. The filename is start calculator.xlsm.
 Tip
Tip
Another way to launch an app is to create a hyperlink in a cell (VBA not required). For example, this formula creates a hyperlink in a cell that, when clicked, runs the Windows Calculator program:
=HYPERLINK("C:\Windows\System32\calc.exe","Windows Calculator")
You need to make sure that the link points to the correct location. And you’ll probably get at least one security warning when you click the link. This technique works also for files, and loads the file into the default application for the file type. For example, clicking the hyperlink created by the following formula loads the file into the default app for text files:
=HYPERLINK("C:\files\data.txt","Open the data file")
Displaying a folder window
The Shell function is handy also if you need to display a particular directory using Windows Explorer. For example, the statement that follows displays the folder of the active workbook (but only if the workbook has been saved):
If ActiveWorkbook.Path <>"" Then _
Shell"explorer.exe" & ActiveWorkbook.Path, vbNormalFocus
Using the Windows ShellExecute API function
ShellExecute is a Windows Application Programming Interface (API) function that is useful for starting other applications. Importantly, this function can start an application only if an associated filename is known (assuming that the file type is registered with Windows). For example, you can use ShellExecute to display a web document by starting the default web browser. Or you can use an email address to start the default email client.
The API declaration follows (this code works only with Excel 2010 or later):
Private Declare PtrSafe Function ShellExecute Lib"shell32.dll" _
Alias"ShellExecuteA" (ByVal hWnd As Long, _
ByVal lpOperation As String, ByVal lpFile As String, _
ByVal lpParameters As String, ByVal lpDirectory As String, _
ByVal nShowCmd As Long) As Long
The following procedure demonstrates how to call the ShellExecute function. In this example, it opens a graphics file by using the graphics program that’s set up to handle JPG files. If the result returned by the function is less than 32, an error occurred.
Sub ShowGraphic()
Dim FileName As String
Dim Result As Long
FileName = ThisWorkbook.Path &"\flower.jpg"
Result = ShellExecute(0&, vbNullString, FileName, _
vbNullString, vbNullString, vbNormalFocus)
If Result < 32 Then MsgBox"Error"
End Sub
The next procedure opens a text file, using the default text file program:
Sub OpenTextFile()
Dim FileName As String
Dim Result As Long
FileName = ThisWorkbook.Path &"\textfile.txt"
Result = ShellExecute(0&, vbNullString, FileName, _
vbNullString, vbNullString, vbNormalFocus)
If Result < 32 Then MsgBox"Error"
End Sub
The following example is similar, but it opens a web URL by using the default browser:
Sub OpenURL()
Dim URL As String
Dim Result As Long
URL ="http://spreadsheetpage.com"
Result = ShellExecute(0&, vbNullString, URL, _
vbNullString, vbNullString, vbNormalFocus)
If Result < 32 Then MsgBox"Error"
End Sub
You can use this technique also with an email address. The following example opens the default email client (if one exists) and then addresses an email to the recipient:
Sub StartEmail()
Dim Addr As String
Dim Result As Long
Addr ="mailto:nobody@example.com"
Result = ShellExecute(0&, vbNullString, Addr, _
vbNullString, vbNullString, vbNormalFocus)
If Result < 32 Then MsgBox"Error"
End Sub
On the Web
These examples are available on the book’s website in a file named shellexecute examples.xlsm in a folder called shellexecute. This file uses API declarations that are compatible with all versions of Excel.
Using AppActivate
You may find that if an application is already running, using the Shell function may start another instance of it. In most cases, however, you want to activate the instance that’s running — not start another instance of it.
The following StartCalculator procedure uses the AppActivate statement to activate an application (in this case, the Windows Calculator) if it’s already running. The argument for AppActivate is the caption of the application’s title bar. If the AppActivate statement generates an error, Calculator is not running and the routine starts the application.
Sub StartCalculator()
Dim AppFile As String
Dim CalcTaskID As Double
AppFile ="Calc.exe"
On Error Resume Next
AppActivate"Calculator"
If Err <> 0 Then
Err = 0
CalcTaskID = Shell(AppFile, 1)
If Err <> 0 Then MsgBox"Can't start Calculator"
End If
End Sub
On the Web
This example is available on the book’s website. The filename is start calculator .xlsm.
Running Control Panel dialog boxes
Windows provides quite a few system dialog boxes and wizards, most of which are accessible from the Windows Control Panel. You might need to display one or more of these from your Excel application. For example, you might want to display the Windows Date and Time dialog box.
The key to running other system dialog boxes is to execute the rundll32.exe application by using the VBA Shell function.
The following procedure displays the Date and Time dialog box:
Sub ShowDateTimeDlg()
Dim Arg As String
Dim TaskID As Double
Arg ="rundll32.exe shell32.dll,Control_RunDLL timedate.cpl"
On Error Resume Next
TaskID = Shell(Arg)
If Err <> 0 Then
MsgBox ("Cannot start the application.")
End If
End Sub
Following is the general format for the rundll32.exe application:
rundll32.exe shell32.dll,Control_RunDLL filename.cpl, n,t
where:
· filename.cpl: The name of one of the Control Panel *.CPL files
· n: The zero-based number of the applet in the *.CPL file
· t: The number of the tab (for multitabbed applets)
On the Web
A workbook that displays 12 additional Control Panel applets is available on this book’s website. The filename is control panel dialogs.xlsm.
All materials on the site are licensed Creative Commons Attribution-Sharealike 3.0 Unported CC BY-SA 3.0 & GNU Free Documentation License (GFDL)
If you are the copyright holder of any material contained on our site and intend to remove it, please contact our site administrator for approval.
© 2016-2026 All site design rights belong to S.Y.A.