Excel 2016 Power Programming with VBA (2016)
Part II. Advanced VBA Techniques
Chapter 11. Working with External Data and Files
In This Chapter
· Working with external data connections
· Using ActiveX data objects to get external data
· Performing common file operations
· Working with text files
Working with External Data Connections
External data is exactly what it sounds like: data that isn’t located in the Excel workbook in which you’re operating. Some examples of external data sources are text files, Access tables, SQL Server tables, and even other Excel workbooks.
There are numerous ways to get data into Excel. In fact, between the functionality found in the UI and the VBA/code techniques, there are too many techniques to focus on in one chapter. Instead, then, in this chapter we’ll focus on a handful of techniques that can be implemented in most situations and don’t come with a lot of pitfalls and gotchas.
The first of those techniques is to use an external data connection.
Manually creating a connection
Excel has made it easy to manually connect to external data sources such as Microsoft Access, SQL Server, or any other ODBC connection you regularly use. For example, you can connect to an Access database by following these steps:
 On the Web
Feel free to follow along by using the Facility Services.accdb Access database found on this book’s website. The DynamicDataConnection.xlsm file contains the sample macros found in this section.
1. Open a new Excel workbook and click the Data tab on the Ribbon.
2. In the Get External Data group, select the From Access icon.
The Select Data Source dialog box opens, as shown in Figure 11.1. If the database from which you want to import data is local, browse to the file’s location and select it. If your target Access database resides on a network drive at another location, you need the proper authorization to select it.
3. Navigate to your sample database and click Open.
In some environments, a series of Data Link Properties dialog boxes opens asking for credentials (username and password). Most Access databases don’t require logon credentials, but if your database does require a username and password, type them in the Data Link Properties dialog box.
4. Click OK. The Select Table dialog box shown in Figure 11.2 opens. This dialog box lists all the available tables and queries in the selected database.
 Tip
Tip
The Select Table dialog box contains a column called Type. There are two types of Access objects you can work with: views and tables. VIEW indicates that the dataset listed is an Access query, and TABLE indicates that the dataset is an Access table. In this example, Sales_By_Employee is actually an Access query. This means that you import the results of the query. This is true interaction at work; Access does all the back-end data management and aggregation, and Excel handles the analysis and presentation!
5. Select your target table or query and click OK.
The Import Data dialog box shown in Figure 11.3 opens. Here you define where and how to import the table. You have the option of importing the data into a Table, a PivotTable Report, a PivotChart, or a Power View Report. You also have the option of creating only the connection, making the connection available for later use.
Note that if you choose PivotChart or PivotTable Report, the data is saved to a pivot cache without writing the actual data to the worksheet. Thus your pivot table can function as normal without you having to import potentially hundreds of thousands of data rows twice (once for the pivot cache and once for the spreadsheet).
6. Select Table as the output view and define cell A1 as the output location, as shown in Figure 11.3.
7. Click OK.
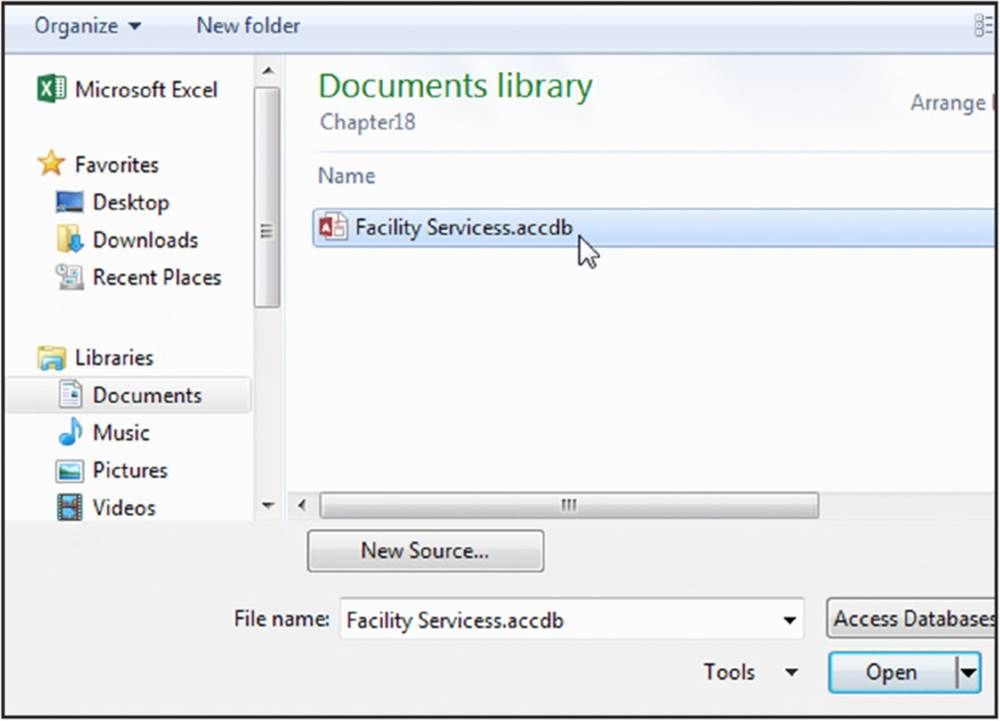
Figure 11.1 Choose the source database that contains the data you want imported.
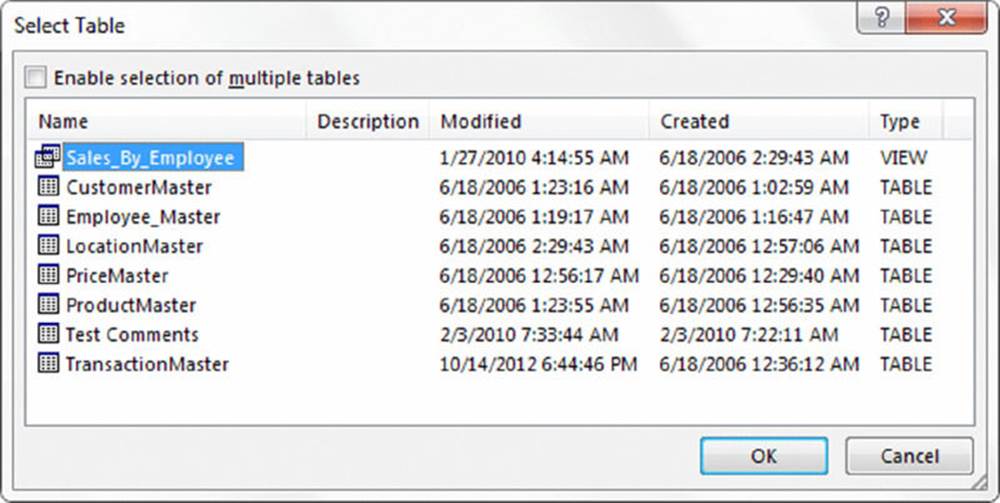
Figure 11.2 Select the Access object you want to import.
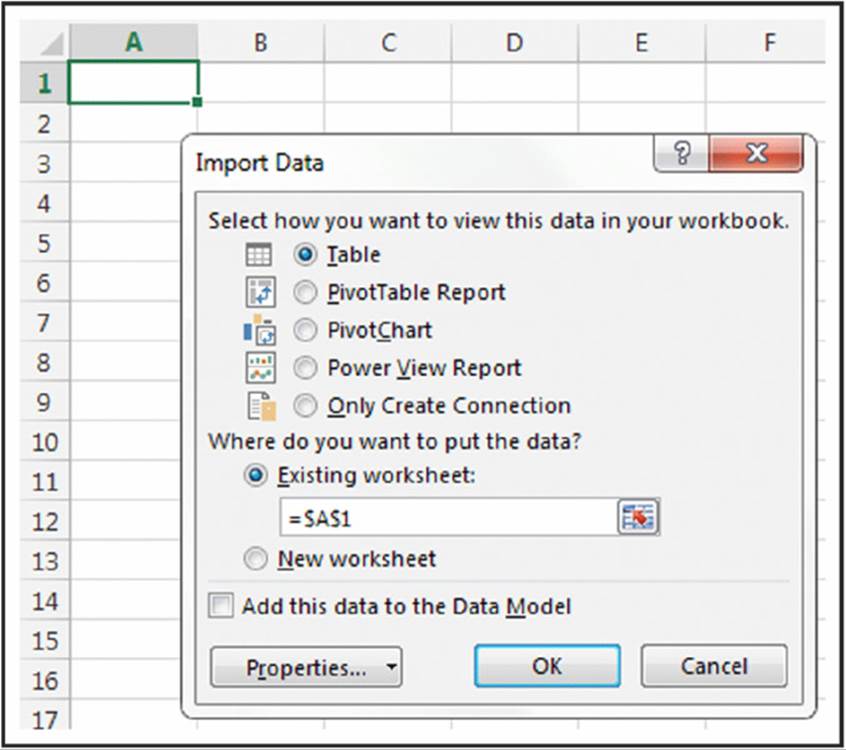
Figure 11.3 Choosing how and where to view your Access data.
Your reward for all your work is a table that contains the imported data from your Access database, as shown in Figure 11.4.
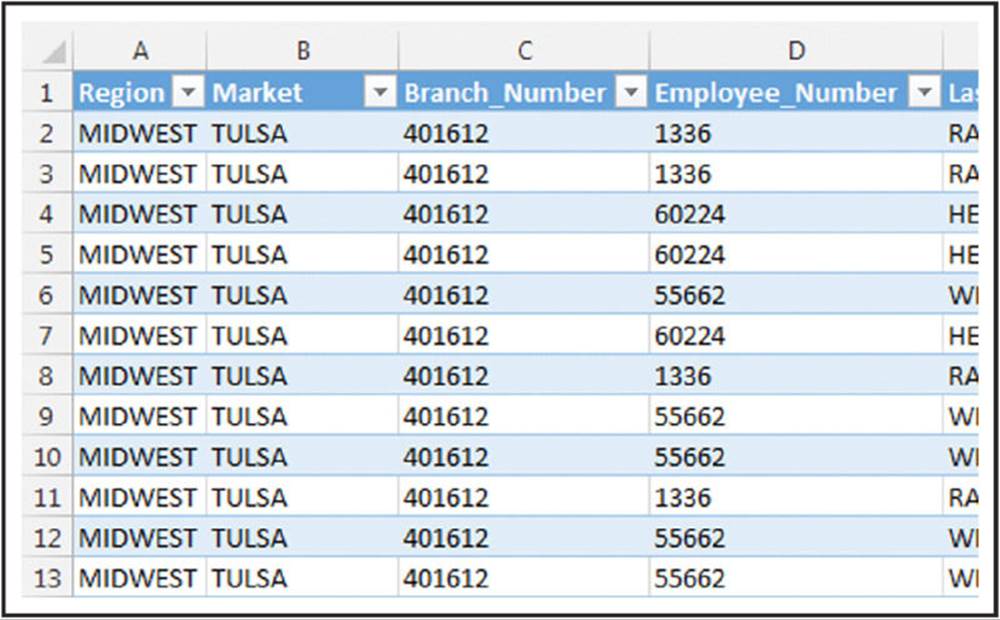
Figure 11.4 Data imported from Access.
The incredibly powerful thing about importing data this way is that it’s refreshable. That’s right. If you import data from Access using this technique, Excel creates a table that you can update by right-clicking it and selecting Refresh from the pop-up menu, as shown in Figure 11.5. When you update your imported data, Excel reconnects to your Access database and imports the data again. As long as a connection to your database is available, you can refresh with a mere click of the mouse.
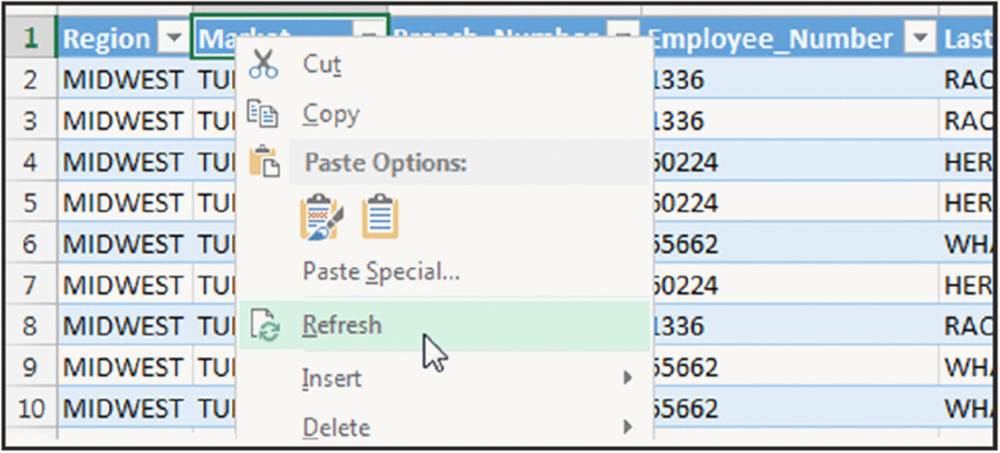
Figure 11.5 As long as a connection to your database is available, you can update your table with the latest data.
Again, a major advantage to using the Get External Data group is that you can establish a refreshable data connection between Excel and Access. In most cases, you can set up the connection one time and then just update the data connection when needed. You can even record an Excel macro to update the data on some trigger or event, which is ideal for automating the transfer of data from Access.
Manually editing data connections
Once you have a connection, you can use the connection properties to write your own SQL statements. This gives you more control over the data you pull into your Excel model and allows you to perform advanced actions like running SQL Server stored procedures.
Go to the Data tab on the Ribbon and select Connections. This will activate the Workbook Connections dialog box shown in Figure 11.6. Choose the connection you want to edit and then click on the Properties button.
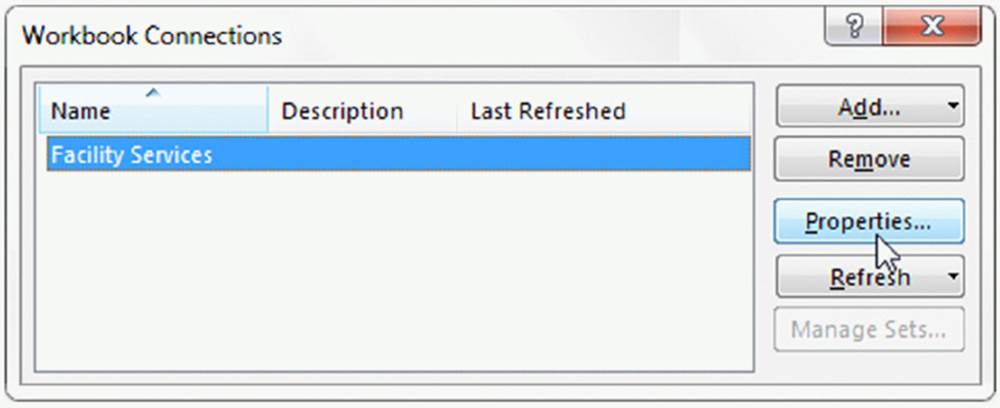
Figure 11.6 Choose the Properties button for the connection you want to change.
The Connection Properties dialog box will open. Here, you can click on the Definition tab (see Figure 11.7). Change the Command Type property to SQL, and then enter your SQL statement.
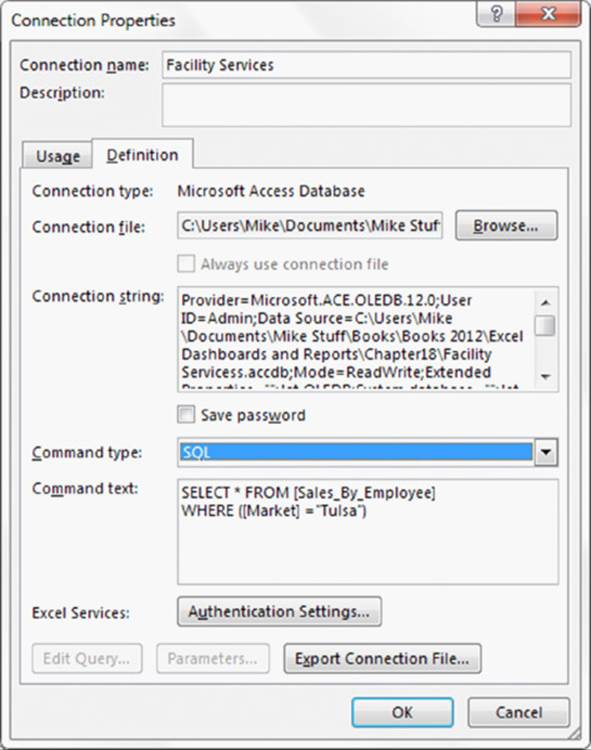
Figure 11.7 On the Definition tab, select the SQL command type and enter your SQL Statement.
Using VBA to create dynamic connections
You may have noticed that the last few examples have hard-coded the criteria in the SQL statements. For example, in Figure 11.7, Tulsa is specified directly into the SQL statement WHERE clause. This obviously would cause the data being returned to always be data for Tulsa.
But what if you wanted to select a market and have the SQL statement dynamically change to respond to your selection? Well, you can use a bit of VBA to change the SQL statement on the fly. Follow these steps:
1. Designate a cell in your worksheet that will catch the dynamic selection for your criteria. For example, in Figure 11.8, cell C2 will be the place that users can select a market. You typically give users a way to select criteria with either a Combo Box or a Data Validation list.
2. Open the Workbook Connections dialog box by clicking the Connections command on the Data tab. Take note of the name for the connection you want to dynamically change. In Figure 11.9, you see the connection name is Facility Services.
3. Close the Workbook Connections dialog box and press Alt+F11 on your keyboard. This will take you to the Visual Basic Editor.
4. In the Visual Basic Editor, select Insert ➜ Module from the menu bar.
5. Enter the following code in the newly created module:
6. Sub RefreshQuery()
7.
8. ActiveWorkbook.Connections( _
9. "Facility Services").OLEDBConnection.CommandText = _
10. "SELECT * FROM [Sales_By_Employee] WHERE [Market] = '" & _
11. Range("C2").Value &"'"
12.
13. ActiveWorkbook.Connections("Facility Services").Refresh
14.
15. End Sub
This code creates a new macro called RefreshQuery. This macro uses the Workbook .Connections collection to change the attributes of the specified connection. In this case, you want to change the CommandText property of the FacilityServices connection.
The command text is essentially the SQL Statement you want the connection to use when connecting to the data source. In this example, the Command Text selects from the [Sales_By_Employee] table and sets the criteria for the [Market] field to the value in cell C2. The code then refreshes the Facility Services connection.
16.Close the Visual Basic Editor and place a new command button on your worksheet. To do this, click on the Developer tab, select the Insert dropdown, and add a Button Form control.
17.Assign the newly created RefreshQuery macro to the command button.
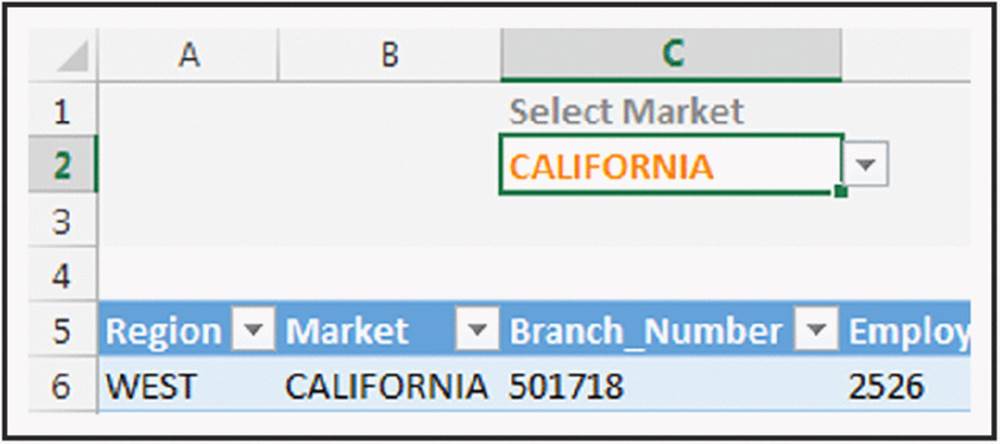
Figure 11.8 Designate a cell that will trap the criteria selection.

Figure 11.9 Take note of the connection name (Facility Services in this example).
If all went smoothly, you will have a nifty mechanism that allows for the dynamic extraction of data from your external database based on the criteria you specified (See Figure 11.10).
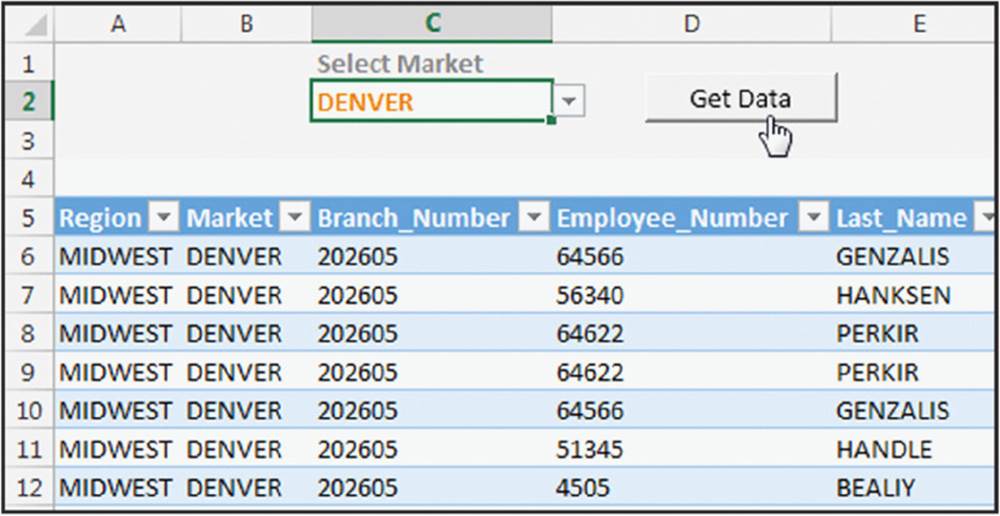
Figure 11.10 You now have an easy-to-use mechanism for pulling external data for a specified market.
Iterating through all connections in a workbook
You can also use the Workbook.Connections collection to iterate through all the connection objects in a workbook and examine or modify their properties. For instance, the following macro populates a worksheet with a list of all connection objects in the current workbook, along with their associated connection strings and command texts:
Sub ListConnections()
Dim i As Long
Dim Cn As WorkbookConnection
Worksheets.Add
With ActiveSheet.Range("A1:C1")
.Value = Array("Cn Name","Connection String","Command Text")
.EntireColumn.AutoFit
End With
For Each Cn In ThisWorkbook.Connections
i = i + 1
Select Case Cn.Type
Case Is = xlConnectionTypeODBC
With ActiveSheet
.Range("A1").Offset(i, 0).Value = Cn.Name
.Range("A1").Offset(i, 1).Value = Cn.ODBCConnection.Connection
.Range("A1").Offset(i, 2).Value = Cn.ODBCConnection.CommandText
End With
Case Is = xlConnectionTypeOLEDB
With ActiveSheet
.Range("A1").Offset(i, 0).Value = Cn.Name
.Range("A1").Offset(i, 1).Value = Cn.OLEDBConnection.Connection
.Range("A1").Offset(i, 2).Value = Cn.OLEDBConnection.CommandText
End With
End Select
Next Cn
End Sub
Using ADO and VBA to Pull External Data
Another technique for working with external data is to use VBA with ADO (ActiveX Data Objects). Using the combination of ADO with VBA will allow you to work with external data sets in memory. This comes in handy when you need to perform complex, multi-layered procedures and checks on external data sets, but you don’t want to create workbook connections or return those external data sets to the workbook.
 Note
Note
When working with complex Excel workbooks that pull data from external sources, you will periodically encounter code (written by others) that utilizes ADO. It’s important you recognize and understand the basics of ADO so you can deal with this kind of code. The next few sections will walk you through some of the fundamental concepts of ADO and will show you how to construct your own ADO procedures to pull data. Keep in mind that ADO programming is a broad topic that cannot be fully covered here. If you find that you need to work extensively with ADO and external data in your Excel application, you’ll probably want to invest in one or more books that cover this topic in detail.
When trying to grasp the basics of ADO, it helps to think of ADO as a tool that will help you accomplish two tasks: connect to a data source and specify the dataset with which to work. In the following section, you will explore the fundamental syntax you will need to know in order to do just that.
The connection string
The first thing you must do is connect to a data source. In order to do this, you must give VBA a few pieces of information. This information is passed to VBA in the form of a connection string. Here is an example connection string that points to an Access database.
"Provider=Microsoft.ACE.OLEDB.12.0;" & _
"Data Source= C:\MyDatabase.accdb;" & _
"User ID=Administrator;" & _
"Password=AdminPassword"
Don’t be intimidated by all the syntax here. A connection string is fundamentally nothing more than a text string that holds a series of variables (also called arguments), which VBA uses to identify and open a connection to a data source. Although connection strings can get pretty fancy with a myriad of arguments and options, there are a handful of arguments that are commonly used when connecting to either Access or Excel.
For novices of ADO, it helps to focus on these commonly used arguments when working with connection strings: Provider, Data Source, Extended Properties, User ID, and Password:
· Provider: The Provider argument tells VBA what type of data source with which you are working. When using Access or Excel as the data source, the Provider syntax will read: Provider=Microsoft.ACE.OLEDB.12.0.
· Data Source: The Data Source argument tells VBA where to find the database or workbook that contains the data needed. With the Data Source argument, you will pass the full path of the database or workbook. For example: Data Source=C:\Mydirectory\MyDatabaseName.accdb.
· Extended Properties: The Extended Properties argument is typically used when connecting to an Excel workbook. This argument tells VBA that the data source is something other than a database. When working with an Excel workbook, this argument reads:Extended Properties=Excel 12.0.
· User ID: The User ID argument is optional and only used if a user id is required to connect to the data source: User Id=MyUserId.
· Password: The Password argument is optional and only used if a password is required to connect to the data source: Password=MyPassword.
Take a moment now to examine a few examples of how these arguments are used in different connection strings.
· Connecting to an Access database:
·"Provider=Microsoft.ACE.OLEDB.12.0;" & _
·"Data Source= C:\MyDatabase.accdb"
· Connecting to an Access database with Password and User ID:
·
·"Provider=Microsoft.ACE.OLEDB.12.0;" & _
·"Data Source= C:\MyDatabase.accdb;" & _
·"User ID=Administrator;" & _
·"Password=AdminPassword"
· Connecting to an Excel workbook:
·"Provider=Microsoft.ACE.OLEDB.12.0;" & _
·"Data Source=C:\MyExcelWorkbook.xlsx;" & _
·"Extended Properties=Excel 12.0"
Declaring a Recordset
In addition to building a connection to your data source, you will need to define the data set with which you need to work. In ADO, this dataset is referred to as the Recordset. A Recordset object is essentially a container for the records and fields returned from the data source. The most common way to define a Recordset is to open an existing table or query using the following arguments:
Recordset.Open Source, ConnectString, CursorType, LockType
The Source argument specifies the data that is to be extracted. This is typically a table, a query, or a SQL statement that retrieves records. The ConnectString argument specifies the connection string used to connect to your chosen data source. The CursorType argument defines how a Recordset allows you to move through the data to be extracted. The CursorTypes that are commonly used are:
· adOpenForwardOnly: This is the default setting; if you don’t specify a CursorType, the Recordset will automatically be adOpenForwardOnly. This CursorType is the most efficient type because it only allows you to move through the Recordset one way: from beginning to end. This is ideal for reporting processes where data only needs to be retrieved and not traversed. Keep in mind that you cannot make changes to data when using this CursorType.
· adOpenDynamic: This CursorType is typically used in processes where there is a need for looping, moving up and down through the dataset, or the ability to dynamically see any edits made to the dataset. This CursorType is typically memory- and resource-intensive and should be used only when needed.
· adOpenStatic: This CursorType is ideal for the quick return of results as it essentially returns a snapshot of your data. However, this is different from the adOpenForwardOnly CursorType as it allows you to navigate the returned records. In addition, when using this CursorType, the data returned can be made updateable by setting its LockType to something other than adLockReadOnly.
The LockType argument lets you specify whether the data returned by the Recordset can be changed. This argument is typically set to adLockReadOnly (the default setting) to indicate that there is no need to edit the data returned. Alternatively, you can set this argument to adLockOptimistic which allows for the free editing of the data returned.
Referencing the ADO object library
With these basic ADO fundamentals under your belt, you’re ready to create your own ADO procedure. But before you do anything with ADO, you need to first set a reference to the ADO object library. Just as each Microsoft Office application has its own set of objects, properties, and methods, so does ADO. Since Excel does not inherently know the ADO object model, you will need to point Excel to the ADO reference library.
Start by opening a new Excel workbook and opening the Visual Basic Editor.
Once you are in the Visual Basic Editor, go up to the application menu and select Tools ➜ References. This will open the References dialog box illustrated here in Figure 11.11. Scroll down until you locate the latest version of the Microsoft ActiveX Data Objects Library. Place a checkmark beside this entry and click OK.
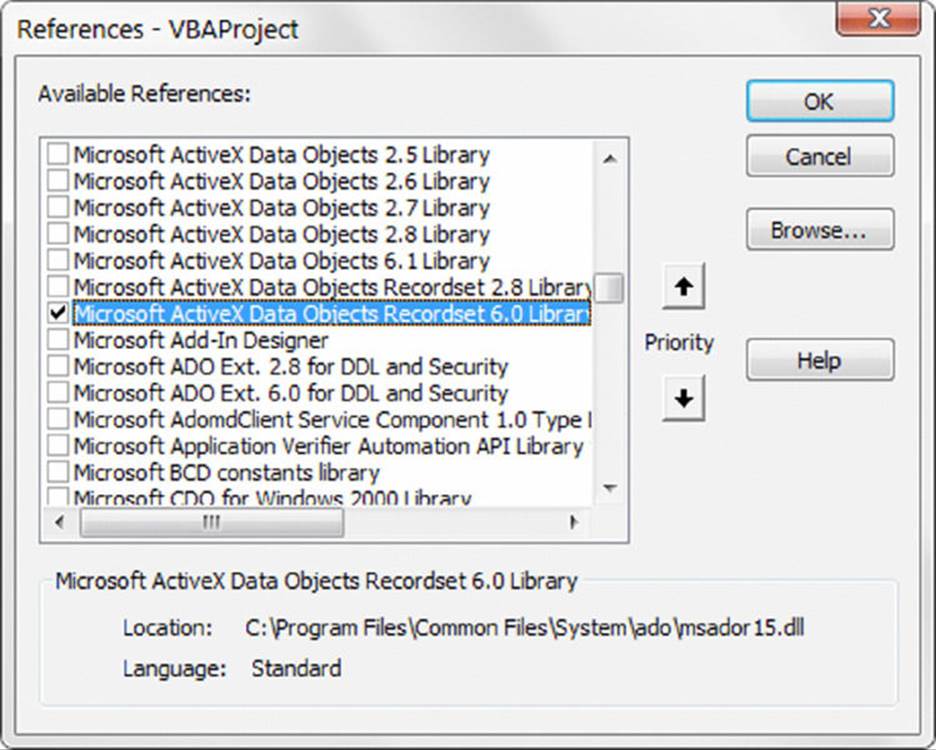
Figure 11.11 Select the latest version of the Microsoft ActiveX Data Objects Library.
Note
It is normal to have several versions of the same library displayed in the References dialog box. It’s generally best to select the latest version available. Note that versions after 2.8 are called Microsoft ActiveX Data Objects Recordset Library.
After you click the OK button, you can open the References dialog box again to ensure that your reference is set. You will know that your selection took effect when the Microsoft ActiveX Data Objects Library is displayed at the top of the Reference dialog box with a check next to it.
Note
Keep in mind that the references you set in any given workbook or database are not applied at the application level. This means that you will need to repeat these steps with each new workbook or database you create.
Putting it all together in code
Now that you understand a few of the basics of ADO, take a look at how they come together in VBA. The following example code uses ADO to connect to an Access database and retrieve the Products table.
Sub GetAccessData()
Dim MyConnect As String
Dim MyRecordset As ADODB.Recordset
MyConnect ="Provider=Microsoft.ACE.OLEDB.12.0;" & _
"Data Source= C:\MyDir\MyDatabaseName.accdb"
Set MyRecordset = New ADODB.Recordset
MyRecordset.Open"Products", _
MyConnect, adOpenStatic, adLockReadOnly
Sheets("MySheetName").Range("A2").CopyFromRecordset _
MyRecordset
With ActiveSheet.Range("A1:C1")
.Value = Array("Product","Description","Segment")
.EntireColumn.AutoFit
End With
End Sub
Now take a moment to understand what this macro is doing.
You first declare two variables: a string variable to hold the connection string and a Recordset object to hold the results of the data pull. In this example, the variable called MyConnect will hold the connection string identifying the data source. Meanwhile, the variable called MyRecordset will hold the data that is returned by the procedure.
Next, you define the connection string for the ADO procedure. In this scenario, you are connecting to the MyDatabaseName.accdb file found in the C:\MyDir\ directory. Once you have defined the data source, you can open the Recordset and use MyConnect to return static read-only data.
Now you can use Excel’s CopyFromRecordset method to get the data out of the RecordSet and into the spreadsheet. This method requires two pieces of information: the location of the data output and the Recordset object that holds the data. In this example, you are copying the data in the MyRecordset object onto the sheet called MySheetName (starting at cell A2).
Interestingly enough, the CopyFromRecordset method does not return column headers or field names. This forces one final action where you add column headers by simply defining them in an array and writing them to the active sheet.
With ADO and VBA, you can build all the necessary components one time in a nicely packaged macro and then simply forget about it. As long as the defined variables in your code (i.e. the data source path, the Recordset, the output path) do not change, then your ADO-based procedures will require virtually zero maintenance.
Using ADO with the active workbook
There are countless ways you can use the fundamentals you have learned in this chapter. Of course, it would be impossible to go through every possibility here. However, there are some common scenarios where VBA can greatly enhance integration between Excel and Access.
Querying data from an Excel workbook
You can use an Excel workbook as a data source for your ADO procedures. To do so, you simply build an SQL statement that references the data within the Excel workbook. The idea is to pinpoint the dataset in Excel to query by passing either a sheet name, a range of cells, or a named range to the SQL statement.
To query all of the data on a specific worksheet, you pass the name of that worksheet followed by the dollar sign ($) as the table name in your SQL statement. Be sure to encapsulate the worksheet name with square brackets. For example:
SELECT * FROM [MySheet$]
If the worksheet name contains spaces or characters that are not alphanumeric, you need to wrap the worksheet name in single quotes. For instance:
Select * from ['January Forecast vs. Budget$']
To query a range of cells within a given worksheet, you first identify the sheet as described above and then add the target range. For example:
SELECT * FROM [MySheet$A1:G17]
To query a named range, simply use the name of the range as the table name in your SQL statement. For example:
SELECT * FROM MyNamedRange
In the following example, the entire used range in the SampleData worksheet is queried to return only those records that belong to the North Region.
Sub GetData_From_Excel_Sheet()
Dim MyConnect As String
Dim MyRecordset As ADODB.Recordset
Dim MySQL As String
MyConnect ="Provider=Microsoft.ACE.OLEDB.12.0;" & _
"Data Source=" & ThisWorkbook.FullName &";" & _
"Extended Properties=Excel 12.0"
MySQL =" SELECT * FROM [SampleData$]" & _
" WHERE Region ='NORTH'"
Set MyRecordset = New ADODB.Recordset
MyRecordset.Open MySQL, MyConnect, adOpenStatic, adLockReadOnly
ThisWorkbook.Sheets.Add
ActiveSheet.Range("A2").CopyFromRecordset MyRecordset
With ActiveSheet.Range("A1:F1")
.Value = Array("Region","Market","Branch_Number", _
"Invoice_Number","Sales_Amount","Contracted Hours")
.EntireColumn.AutoFit
End With
End Sub
On the Web
A working example of this code is available on the book’s website in the workbook called QueryDataFromExcel.xlsm.
Appending records to an existing Excel table
There are often times when you don’t necessarily want to overwrite the data in your Excel worksheet when you bring in fresh data. Instead, you may want to simply add or append data to the existing table. In a typical scenario, you hard-code the location or range where you want a given recordset to be copied. In these situations, this location must dynamically change to reflect the first empty cell in your worksheet. The following example code demonstrates this technique.
Sub Append_Results()
Dim MyConnect As String
Dim MyRecordset As ADODB.Recordset
Dim MyRange As String
MyConnect ="Provider=Microsoft.ACE.OLEDB.12.0;" & _
"Data Source= C:\MyDir\MyDatabase.accdb"
Set MyRecordset = New ADODB.Recordset
MyRecordset.Open"Products", MyConnect, adOpenStatic
Sheets("AppendData").Select
MyRange ="A" & _
ActiveSheet.Cells.SpecialCells(xlCellTypeLastCell).Row + 1
ActiveSheet.Range(MyRange).CopyFromRecordset MyRecordset
End Sub
Because you want to append data to an existing table, you need to dynamically determine the first available empty cell that can be used as the output location for the data pull. The first step in accomplishing this goal is to find the first empty row. This is relatively easy to do thanks to Excel’s SpecialCells method.
Using the SpecialCells method, you can find the last used cell in the worksheet and then extract the row number of that cell. This gives you the last used row. To get the row number of the first empty row, you simply add 1; the next row down from the last used row will inherently be empty.
The idea is to concatenate the SpecialCells routine with a column letter (in this case “A”) to create a string that represents a range. For example, if the first empty row turns out to be 10, then the following code returns “A10.”
"A" & ActiveSheet.Cells.SpecialCells(xlCellTypeLastCell).Row + 1
Trapping this answer in the MyRange string variable allows you to pass the answer to the CopyFromRecordset.
Working with Text Files
VBA contains a number of statements that allow low-level manipulation of files. These input/output (I/O) statements give you much more control over files than Excel’s normal text file import and export options.
You can access a file in any of three ways:
· Sequential access: By far the most common method. This type allows reading and writing individual characters or entire lines of data.
· Random access: Used only if you’re programming a database application, which is not often done using VBA.
· Binary access: Used to read or write to any byte position in a file, such as when storing or displaying a bitmap image. This access method is rarely used in VBA.
Because random and binary access files are rarely used with VBA, this chapter focuses on sequential access files. In sequential access, your code starts reading from the beginning of the file and reads each line sequentially. For output, your code writes data to the end of the file.
Note
The method of reading and writing text files discussed in this book is the traditional data-channel approach. Another option is to use the object approach. The FileSystemObject object contains a TextStream object that can be used to read and write text files. The FileSystemObject object is part of Windows Scripting Host, which is disabled on some systems because of the malware potential associated with it.
Opening a text file
The VBA Open statement (not to be confused with the Open method of the Workbooks object) opens a file for reading or writing. Before you can read from or write to a file, you must open it.
The Open statement is versatile and has a complex syntax:
Open pathname For mode [Access access] [lock] _
As [#]filenumber [Len=reclength]
· pathname: Required. The pathname part of the Open statement is straightforward. It simply contains the name and path (optional) of the file to be opened.
· mode: Required. The file mode must be one of the following:
· Append: A sequential access mode that either allows the file to be read or allows data to be appended to the end of the file.
· Input: A sequential access mode that allows the file to be read but not written to.
· Output: A sequential access mode that allows the file to be read or written to. In this mode, a new file is always created. (An existing file with the same name is deleted.)
· Binary: A random access mode that allows data to be read or written to on a byte-by-byte basis.
· Random: A random access mode that allows data to be read or written in units determined by the reclength argument of the Open statement.
· access: Optional. The access argument determines what can be done with the file. It can be Read, Write, or Read Write.
· lock: Optional. The lock argument is useful for multiuser situations. The options are Shared, Lock Read, Lock Write, and Lock Read Write.
· filenumber: Required. A file number ranging from 1 to 511. You can use the FreeFile function to get the next available file number. (Read about FreeFile in the upcoming section, “Getting a file number.”)
· reclength: Optional. The record length (for random access files) or the buffer size (for sequential access files).
Reading a text file
The basic procedure for reading a text file with VBA consists of the following steps:
1. Open the file by using the Open statement.
2. Specify the position in the file by using the Seek function (optional).
3. Read data from the file by using the Input, Input #, or Line Input # statement.
4. Close the file by using the Close statement.
Writing a text file
The basic procedure for writing a text file is as follows:
1. Open or create the file by using the Open statement.
2. Optional. Specify the position in the file by using the Seek function.
3. Write data to the file by using the Write # or Print # statement.
4. Close the file by using the Close statement.
Getting a file number
Most VBA programmers simply designate a file number in their Open statement. For example:
Open"myfile.txt" For Input As #1
Then you can refer to the file in subsequent statements as #1.
If a second file is opened while the first is still open, you’d designate the second file as #2:
Open"another.txt" For Input As #2
Another approach is to use the VBA FreeFile function to get a file handle. Then you can refer to the file by using a variable. Here’s an example:
FileHandle = FreeFile
Open"myfile.txt" For Input As FileHandle
Determining or setting the file position
For sequential file access, you rarely need to know the current location in the file. If for some reason you need to know this information, you can use the Seek function.
 Excel’s text file import and export features
Excel can directly read and write three types of text files:
· CSV (comma-separated value) files: Columns of data are separated by a comma, and each row of data ends in a carriage return character. For some non-English versions of Excel, a semicolon rather than a comma is used.
· PRN: Columns of data are aligned by character position, and each row of data ends in a carriage return. These files are also known as fixed-width files.
· TXT (Tab-delimited) files: Columns of data are separated by tab characters, and each row of data ends in a carriage return.
When you attempt to open a text file with the File ➜ Open command, the Text Import Wizard might appear to help you delineate the columns. If the text file is tab-delimited or comma-delimited, Excel usually opens the file without displaying the Text Import Wizard. If the data isn’t interpreted correctly, close the file and try renaming it to use a .txt extension.
The Text to Columns Wizard (accessed by choosing Data ➜ Data Tools ➜ Text to Columns) is identical to the Text Import Wizard but works with data stored in a single worksheet column.
Statements for reading and writing
VBA provides several statements to read and write data to a file.
Three statements are used for reading data from a sequential access file:
· Input: Reads a specified number of characters from a file.
· Input #: Reads data as a series of variables, with variables separated by a comma.
· Line Input #: Reads a complete line of data (delineated by a carriage return character, a linefeed character, or both).
Two statements are used for writing data to a sequential access file:
· Write #: Writes a series of values, with each value separated by a comma and enclosed in quotes. If you end the statement with a semicolon, a carriage return/linefeed sequence is not inserted after each value. Data written with Write # is usually read from a file with an Input # statement.
· Print #: Writes a series of values, with each value separated by a tab character. If you end the statement with a semicolon, a carriage return/linefeed sequence isn’t inserted after each value. Data written with Print # is usually read from a file with a Line Input # or an Input statement.
Text File Manipulation Examples
This section contains a number of examples that demonstrate various techniques that manipulate text files.
Importing data in a text file
The code in the following example reads a text file and then places each line of data in a single cell (beginning with the active cell):
Sub ImportData()
Open"c:\data\textfile.txt" For Input As #1
r = 0
Do Until EOF(1)
Line Input #1, data
ActiveCell.Offset(r, 0) = data
r = r + 1
Loop
Close #1
End Sub
In most cases, this procedure won’t be very useful because each line of data is simply dumped into a single cell. It is easier to just open the text file directly by using File ➜ Open.
Exporting a range to a text file
The example in this section writes the data in a selected worksheet range to a CSV text file. Although Excel can export data to a CSV file, it exports the entire worksheet. This macro works with a specified range of cells.
Sub ExportRange()
Dim Filename As String
Dim NumRows As Long, NumCols As Integer
Dim r As Long, c As Integer
Dim Data
Dim ExpRng As Range
Set ExpRng = Selection
NumCols = ExpRng.Columns.Count
NumRows = ExpRng.Rows.Count
Filename = Application.DefaultFilePath &"\textfile.csv"
Open Filename For Output As #1
For r = 1 To NumRows
For c = 1 To NumCols
Data = ExpRng.Cells(r, c).Value
If IsNumeric(Data) Then Data = Val(Data)
If IsEmpty(ExpRng.Cells(r, c)) Then Data =""
If c <> NumCols Then
Write #1, Data;
Else
Write #1, Data
End If
Next c
Next r
Close #1
End Sub
Note that the procedure uses two Write # statements. The first statement ends with a semicolon, so a return/linefeed sequence isn’t written. For the last cell in a row, however, the second Write # statement doesn’t use a semicolon, which causes the next output to appear on a new line.
You used a variable named Data to store the contents of each cell. If the cell is numeric, the variable is converted to a value. This step ensures that numeric data won’t be stored with quotation marks. If a cell is empty, its Value property returns 0. Therefore, the code also checks for a blank cell (by using the IsEmpty function) and substitutes an empty string instead of a 0.
On the Web
These exporting and importing examples are available on the book’s website in the export and import csv.xlsm file.
Importing a text file to a range
The example in this section reads the CSV file created in the preceding example and then stores the values beginning at the active cell in the active worksheet. The code reads each character and essentially parses the line of data, ignoring quote characters and looking for commas to delineate the columns.
Sub ImportRange()
Dim ImpRng As Range
Dim Filename As String
Dim r As Long, c As Integer
Dim txt As String, Char As String * 1
Dim Data
Dim i As Integer
Set ImpRng = ActiveCell
On Error Resume Next
Filename = Application.DefaultFilePath &"\textfile.csv"
Open Filename For Input As #1
If Err <> 0 Then
MsgBox"Not found:" & Filename, vbCritical,"ERROR"
Exit Sub
End If
r = 0
c = 0
txt =""
Application.ScreenUpdating = False
Do Until EOF(1)
Line Input #1, Data
For i = 1 To Len(Data)
Char = Mid(Data, i, 1)
If Char ="," Then 'comma
ActiveCell.Offset(r, c) = txt
c = c + 1
txt =""
ElseIf i = Len(Data) Then 'end of line
If Char <> Chr(34) Then txt = txt & Char
ActiveCell.Offset(r, c) = txt
txt =""
ElseIf Char <> Chr(34) Then
txt = txt & Char
End If
Next i
c = 0
r = r + 1
Loop
Close #1
Application.ScreenUpdating = True
End Sub
Note
The preceding procedure works with most data, but it has a flaw: It doesn’t handle data that contains a comma or a quote character. But commas resulting from formatting are handled correctly (they’re ignored). In addition, an imported date will be surrounded by number signs: for example, #2013-05-12#.
Logging Excel usage
The example in this section writes data to a text file every time Excel is opened and closed. For this example to work reliably, the procedure must be located in a workbook that’s opened every time you start Excel. Storing the macro in your Personal Macro Workbook is an excellent choice.
The following procedure, stored in the code module for the ThisWorkbook object, is executed when the file is opened:
Private Sub Workbook_Open()
Open Application.DefaultFilePath &"\excelusage.txt" For Append As #1
Print #1,"Started" & Now
Close #1
End Sub
The procedure appends a new line to a file named excelusage.txt. The new line contains the current date and time and might look something like this:
Started 11/16/2013 9:27:43 PM
The following procedure is executed before the workbook is closed. It appends a new line that contains the word Stopped along with the current date and time.
Private Sub Workbook_BeforeClose(Cancel As Boolean)
Open Application.DefaultFilePath &"\excelusage.txt" _
For Append As #1
Print #1,"Stopped" & Now
Close #1
End Sub
On the Web
A workbook that contains these procedures is available on the book’s website in the excel usage log.xlsm file.
 Cross-Ref
Refer to Chapter 6 for more information about event-handler procedures such as Workbook_Open and Workbook_BeforeClose.
Filtering a text file
The example in this section demonstrates how to work with two text files at once. The FilterFile procedure that follows reads a text file (infile.txt) and copies only the rows that contain a specific text string ("January") to a second text file (output.txt):
Sub FilterFile()
Open ThisWorkbook.Path &"\infile.txt" For Input As #1
Open Application.DefaultFilePath &"\output.txt" For Output As #2
TextToFind ="January"
Do Until EOF(1)
Line Input #1, data
If InStr(1, data, TextToFind) Then
Print #2, data
End If
Loop
Close 'Close all files
End Sub
On the Web
This example, named filter text file.xlsm, is available on the book’s website.
Performing Common File Operations
Many applications that you develop for Excel require working with external files. For example, you might need to get a listing of files in a directory, delete files, or rename files. Excel can import and export several types of text files. In many cases, however, Excel’s built-in text file handling isn’t sufficient. For example, you might want to paste a list of filenames into a range or export a range of cells to a simple HyperText Markup Language (HTML) file.
In this chapter, you explore how to use Visual Basic for Applications (VBA) to perform common (and not so common) file operations and work directly with text files.
Excel provides two ways to perform common file operations:
· Use traditional VBA statements and functions: This method works for all versions of Excel.
· Use theFileSystemObjectobject, which uses the Microsoft Scripting Library: This method works for Excel 2000 and later.
 Caution
Some earlier versions of Excel also supported the use of the FileSearch object. That feature was removed, beginning with Excel 2007. If you execute an old macro that uses the FileSearch object, the macro will fail.
In the sections that follow, you explore these two methods and some examples.
Using VBA file-related statements
The VBA statements that you can use to work with files are summarized in Table 11.1. Most of these statements are straightforward, and all are described in the Help system.
Table 11.1 VBA File-Related Statements
|
Command |
What It Does |
|
ChDir |
Changes the current directory |
|
ChDrive |
Changes the current drive |
|
Dir |
Returns a filename or directory that matches a specified pattern or file attribute |
|
FileCopy |
Copies a file |
|
FileDateTime |
Returns the date and time when a file was last modified |
|
FileLen |
Returns the size of a file, in bytes |
|
GetAttr |
Returns a value that represents an attribute of a file |
|
Kill |
Deletes a file |
|
MkDir |
Creates a new directory |
|
Name |
Renames a file or directory |
|
RmDir |
Removes an empty directory |
|
SetAttr |
Changes an attribute for a file |
The remainder of this section consists of examples that demonstrate some of the file manipulation commands.
A VBA function to determine whether a file exists
The following function returns True if a particular file exists and False if it doesn’t exist. If the Dir function returns an empty string, the file couldn’t be found, so the function returns False.
Function FileExists(fname) As Boolean
FileExists = Dir(fname) <>""
End Function
The argument for the FileExists function consists of a full path and filename. The function can be used in a worksheet or called from a VBA procedure. Here’s an example:
MyFile ="c:\budgeting\2013 budget notes.docx"
Msgbox FileExists(MyFile)
A VBA function to determine whether a path exists
The following function returns True if a specified path exists and False otherwise:
Function PathExists(pname) As Boolean
' Returns TRUE if the path exists
On Error Resume Next
PathExists = (GetAttr(pname) And vbDirectory) = vbDirectory
End Function
The pname argument is a string that contains a directory (without a filename). The trailing backslash in the pathname is optional. Here’s an example of calling the function:
MyFolder ="c:\users\john\desktop\downloads\"
MsgBox PathExists(MyFolder)
On the Web
The FileExists and PathExists functions are available on the book’s website in the file functions.xlsm file.
A VBA procedure to display a list of files in a directory
The following procedure displays (in the active worksheet) a list of files in a particular directory, along with the file size and date:
Sub ListFiles()
Dim Directory As String
Dim r As Long
Dim f As String
Dim FileSize As Double
Directory ="f:\excelfiles\budgeting\"
r = 1
' Insert headers
Cells(r, 1) ="FileName"
Cells(r, 2) ="Size"
Cells(r, 3) ="Date/Time"
Range("A1:C1").Font.Bold = True
' Get first file
f = Dir(Directory, vbReadOnly + vbHidden + vbSystem)
Do While f <>""
r = r + 1
Cells(r, 1) = f
'Adjust for filesize > 2 gigabytes
FileSize = FileLen(Directory & f)
If FileSize < 0 Then FileSize = FileSize + 4294967296#
Cells(r, 2) = FileSize
Cells(r, 3) = FileDateTime(Directory & f)
' Get next file
f = Dir()
Loop
End Sub
Note
The VBA FileLen function uses the Long data type. Consequently, it will return an incorrect size (a negative number) for files larger than about 2GB. The code checks for a negative value from the FileLen function and makes an adjustment if necessary.
Note that the procedure uses the Dir function twice. The first time (used with an argument), it retrieves the first matching filename found. Subsequent calls (without an argument) retrieve additional matching filenames. When no more files are found, the Dir function returns an empty string.
On the Web
The book’s website contains a version of this procedure that allows you to select a directory from a dialog box. The filename is create file list.xlsm.
The Dir function also accepts wildcard file specifications in its first argument. To get a list of Excel files, for example, you could use a statement such as this:
f = Dir(Directory &"*.xl??", vbReadOnly + vbHidden + vbSystem)
This statement retrieves the name of the first *.xl?? file in the specified directory. The wildcard specification returns a four-character extension that begins with XL. For example, the extension could be .xlsx, .xltx, or .xlam. The second argument for the Dir function lets you specify the attributes of the files (in terms of built-in constants). In this example, the Dir function retrieves filenames that have no attributes, read-only files, hidden files, and system files.
To also retrieve Excel files in an earlier format (for example, .xls and .xla files), use the following wildcard specification:
*.xl*
Table 11.2 lists the built-in constants for the Dir function.
Table 11.2 File Attribute Constants for the Dir Function
|
Constant |
Value |
Description |
|
vbNormal |
0 |
Files with no attributes. This is the default setting and is always in effect. |
|
vbReadOnly |
1 |
Read-only files. |
|
vbHidden |
2 |
Hidden files. |
|
vbSystem |
4 |
System files. |
|
vbVolume |
8 |
Volume label. If any other attribute is specified, this attribute is ignored. |
|
vbDirectory |
16 |
Directories. This attribute doesn’t work. Calling the Dir function with the vbDirectory attribute doesn’t continually return subdirectories. |
Caution
If you use the Dir function to loop through files and call another procedure to process the files, make sure that the other procedure doesn’t use the Dir function. Only one"set" of Dir calls can be active at any time.
A recursive VBA procedure to display a list of files in nested directories
The example in this section creates a list of files in a specified directory, including its subdirectories. This procedure is unusual because it calls itself — a concept known as recursion.
Public Sub RecursiveDir(ByVal CurrDir As String, Optional ByVal Level As Long)
Dim Dirs() As String
Dim NumDirs As Long
Dim FileName As String
Dim PathAndName As String
Dim i As Long
Dim Filesize As Double
' Make sure path ends in backslash
If Right(CurrDir, 1) <>"\" Then CurrDir = CurrDir &"\"
' Put column headings on active sheet
Cells(1, 1) ="Path"
Cells(1, 2) ="Filename"
Cells(1, 3) ="Size"
Cells(1, 4) ="Date/Time"
Range("A1:D1").Font.Bold = True
' Get files
FileName = Dir(CurrDir &"*.*", vbDirectory)
Do While Len(FileName) <> 0
If Left(FileName, 1) <>"." Then 'Current dir
PathAndName = CurrDir & FileName
If (GetAttr(PathAndName) And vbDirectory) = vbDirectory Then
'store found directories
ReDim Preserve Dirs(0 To NumDirs) As String
Dirs(NumDirs) = PathAndName
NumDirs = NumDirs + 1
Else
'Write the path and file to the sheet
Cells(WorksheetFunction.CountA(Range("A:A")) + 1, 1) = _
CurrDir
Cells(WorksheetFunction.CountA(Range("B:B")) + 1, 2) = _
FileName
'adjust for filesize > 2 gigabytes
Filesize = FileLen(PathAndName)
If Filesize < 0 Then Filesize = Filesize + 4294967296#
Cells(WorksheetFunction.CountA(Range("C:C")) + 1, 3) = Filesize
Cells(WorksheetFunction.CountA(Range("D:D")) + 1, 4) = _
FileDateTime(PathAndName)
End If
End If
FileName = Dir()
Loop
' Process the found directories, recursively
For i = 0 To NumDirs - 1
RecursiveDir Dirs(i), Level + 2
Next i
End Sub
The procedure takes one argument, CurrDir, which is the directory being examined. Information for each file is displayed in the active worksheet. As the procedure loops through the files, it stores the subdirectory names in an array named Dirs. When no more files are found, the procedure calls itself using an entry in the Dirs array for its argument. When all directories in the Dirs array have been processed, the procedure ends.
Because the RecursiveDir procedure uses an argument, it must be executed from another procedure by using a statement like this:
Call RecursiveDir("c:\directory\")
On the Web
The book’s website contains a version of this procedure that allows you to select a directory from a dialog box. The filename is recursive file list.xlsm.
Using the FileSystemObject object
The FileSystemObject object is a member of Windows Scripting Host and provides access to a computer’s file system. This object is often used in script-oriented web pages (for example, VBScript and JavaScript) and can be used with Excel 2000 and later versions.
Caution
Windows Scripting Host can potentially be used to spread computer viruses and other malware, so it may be disabled on some systems. In addition, some antivirus software products have been known to interfere with Windows Scripting Host. Therefore, use caution if you’re designing an application that will be used on many different systems.
The name FileSystemObject is a bit misleading because it includes a number of objects, each designed for a specific purpose:
· Drive: A drive or a collection of drives
· File: A file or a collection of files
· Folder: A folder or a collection of folders
· TextStream: A stream of text that is read from, written to, or appended to a text file
The first step in using the FileSystemObject object is to create an instance of the object. You can perform this task in two ways: early binding or late binding.
The late binding method uses two statements, like this:
Dim FileSys As Object
Set FileSys = CreateObject("Scripting.FileSystemObject")
Note that the FileSys object variable is declared as a generic Object rather than as an actual object type. The object type is resolved at runtime.
The early binding method of creating the object requires that you set up a reference to Windows Script Host Object Model. You do this by using Tools ➜ References in VBE. After you’ve established the reference, create the object by using statements like these:
Dim FileSys As FileSystemObject
Set FileSys = CreateObject("Scripting.FileSystemObject")
Using the early binding method enables you to take advantage of the VBE Auto List Members feature to help you identify properties and methods as you type. In addition, you can use Object Browser (by pressing F2) to learn more about the object model.
The examples that follow demonstrate various tasks using the FileSystemObject object.
Using FileSystemObject to determine whether a file exists
The Function procedure that follows accepts one argument (the path and filename) and returns True if the file exists:
Function FileExists3(fname) As Boolean
Dim FileSys As Object 'FileSystemObject
Set FileSys = CreateObject("Scripting.FileSystemObject")
FileExists3 = FileSys.FileExists(fname)
End Function
The function creates a new FileSystemObject object named FileSys and then accesses the FileExists property for that object.
Using FileSystemObject to determine whether a path exists
The Function procedure that follows accepts one argument (the path) and returns True if the path exists:
Function PathExists2(path) As Boolean
Dim FileSys As Object 'FileSystemObject
Set FileSys = CreateObject("Scripting.FileSystemObject")
PathExists2 = FileSys.FolderExists(path)
End Function
Using FileSystemObject to list information about all available disk drives
The example in this section uses FileSystemObject to retrieve and display information about all disk drives. The procedure loops through the Drives collection and writes various property values to a worksheet.
On the Web
This workbook, named show drive info.xlsm, is available on the book’s website.
Sub ShowDriveInfo()
Dim FileSys As FileSystemObject
Dim Drv As Drive
Dim Row As Long
Set FileSys = CreateObject("Scripting.FileSystemObject")
Cells.ClearContents
Row = 1
' Column headers
Range("A1:F1") = Array("Drive","Ready","Type","Vol. Name", _
"Size","Available")
On Error Resume Next
' Loop through the drives
For Each Drv In FileSys.Drives
Row = Row + 1
Cells(Row, 1) = Drv.DriveLetter
Cells(Row, 2) = Drv.IsReady
Select Case Drv.DriveType
Case 0: Cells(Row, 3) ="Unknown"
Case 1: Cells(Row, 3) ="Removable"
Case 2: Cells(Row, 3) ="Fixed"
Case 3: Cells(Row, 3) ="Network"
Case 4: Cells(Row, 3) ="CD-ROM"
Case 5: Cells(Row, 3) ="RAM Disk"
End Select
Cells(Row, 4) = Drv.VolumeName
Cells(Row, 5) = Drv.TotalSize
Cells(Row, 6) = Drv.AvailableSpace
Next Drv
'Make a table
ActiveSheet.ListObjects.Add xlSrcRange, _
Range("A1").CurrentRegion, , xlYes
End Sub
Cross-Ref
Chapter 7 describes another method of getting drive information by using Windows API functions.
Zipping and Unzipping Files
Perhaps the most commonly used type of file compression is the Zip format. Even Excel 2007 (and later) files are stored in the Zip format (although they don’t use the .zip extension). A Zip file can contain any number of files, and even complete directory structures. The content of the files determines the degree of compression. For example, JPG image files and MP3 audio files are already compressed, so zipping these file types has little effect on the file size. Text files, on the other hand, usually shrink quite a bit when compressed.
On the Web
The examples in this section are available on the book’s website in files named zip files.xlsm and unzip a file.xlsm.
Zipping files
The example in this section demonstrates how to create a Zip file from a group of user-selected files. The ZipFiles procedure displays a dialog box so that the user can select the files. It then creates a Zip file named compressed.zip in Excel’s default directory.
Sub ZipFiles()
Dim ShellApp As Object
Dim FileNameZip As Variant
Dim FileNames As Variant
Dim i As Long, FileCount As Long
' Get the file names
FileNames = Application.GetOpenFilename _
(FileFilter:="All Files (*.*),*.*", _
FilterIndex:=1, _
Title:="Select the files to ZIP", _
MultiSelect:=True)
' Exit if dialog box canceled
If Not IsArray(FileNames) Then Exit Sub
FileCount = UBound(FileNames)
FileNameZip = Application.DefaultFilePath &"\compressed.zip"
'Create empty Zip File with zip header
Open FileNameZip For Output As #1
Print #1, Chr$(80) & Chr$(75) & Chr$(5) & Chr$(6) & String(18, 0)
Close #1
Set ShellApp = CreateObject("Shell.Application")
'Copy the files to the compressed folder
For i = LBound(FileNames) To UBound(FileNames)
ShellApp.Namespace(FileNameZip).CopyHere FileNames(i)
'Keep script waiting until Compressing is done
On Error Resume Next
Do Until ShellApp.Namespace(FileNameZip).items.Count = i
Application.Wait (Now + TimeValue("0:00:01"))
Loop
Next i
If MsgBox(FileCount &" files were zipped to:" & _
vbNewLine & FileNameZip & vbNewLine & vbNewLine & _
"View the zip file?", vbQuestion + vbYesNo) = vbYes Then _
Shell"Explorer.exe /e," & FileNameZip, vbNormalFocus
End Sub
The ZipFiles procedure creates a file named compressed.zip and writes a string of characters, which identify it as a Zip file. Next, a Shell.Application object is created, and the code uses its CopyHere method to copy the files to the Zip archive. The next section of the code is a Do Until loop, which checks the number of files in the Zip archive every second. This step is necessary because copying the files could take some time, and if the procedure ends before the files are copied, the Zip file will be incomplete (and probably corrupt).
When the number of files in the Zip archive matches the number that should be there, the loop ends and the user is presented with a message box asking if he wants to see the files. Clicking the Yes button opens a Windows Explorer window that shows the zipped files.
Caution
The ZipFiles procedure presented here was kept simple to make it easy to understand. The code does no error checking and is not flexible. For example, there is no option to choose the Zip filename or location, and the current compressed.zip file is always overwritten without warning. It’s certainly no replacement for the zipping tools built into Windows, but it’s an interesting demonstration of what you can do with VBA.
Unzipping a file
The example in this section performs the opposite function of the preceding example. It asks the user for a ZIP filename and then unzips the files and puts them in a directory named Unzipped, located in Excel’s default file directory.
Sub UnzipAFile()
Dim ShellApp As Object
Dim TargetFile
Dim ZipFolder
' Target file & temp dir
TargetFile = Application.GetOpenFilename _
(FileFilter:="Zip Files (*.zip), *.zip")
If TargetFile = False Then Exit Sub
ZipFolder = Application.DefaultFilePath &"\Unzipped\"
' Create a temp folder
On Error Resume Next
RmDir ZipFolder
MkDir ZipFolder
On Error GoTo 0
' Copy the zipped files to the newly created folder
Set ShellApp = CreateObject("Shell.Application")
ShellApp.Namespace(ZipFolder).CopyHere _
ShellApp.Namespace(TargetFile).items
If MsgBox("The files was unzipped to:" & _
vbNewLine & ZipFolder & vbNewLine & vbNewLine & _
"View the folder?", vbQuestion + vbYesNo) = vbYes Then _
Shell"Explorer.exe /e," & ZipFolder, vbNormalFocus
End Sub
The UnzipAFile procedure uses the GetOpenFilename method to get the Zip file. It then creates the new folder and uses the Shell.Application object to copy the contents of the Zip file to the new folder. Finally, the user can choose to display the new directory.
All materials on the site are licensed Creative Commons Attribution-Sharealike 3.0 Unported CC BY-SA 3.0 & GNU Free Documentation License (GFDL)
If you are the copyright holder of any material contained on our site and intend to remove it, please contact our site administrator for approval.
© 2016-2026 All site design rights belong to S.Y.A.