Excel 2016 Power Programming with VBA (2016)
Part III. Working with UserForms
Chapter 15. Advanced UserForm Techniques
In This Chapter
· Using modeless UserForms
· Displaying a progress indicator
· Creating a wizard — an interactive series of dialog boxes
· Creating a function that emulates VBA’s MsgBox function
· Allowing users to move UserForm controls
· Displaying a UserForm with no title bar
· Simulating a toolbar with a UserForm
· Emulating a task pane with a UserForm
· Allowing users to resize a UserForm
· Handling multiple controls with a single event handler
· Using a dialog box to select a color
· Displaying a chart in a UserForm
· Creating puzzles and games with Userforms
A Modeless Dialog Box
Most dialog boxes that you encounter are modal dialog boxes, which you must dismiss from the screen before the user can do anything with the underlying application. Some dialog boxes, however, are modeless, which means the user can continue to work in the application while the dialog box is displayed.
To display a modeless UserForm, use a statement such as:
UserForm1.Show vbModeless
The keyword vbModeless is a built-in constant that has a value of 0. Therefore, the following statement works identically:
UserForm1.Show 0
Figure 15.1 shows a modeless dialog box that displays information about the active cell. When the dialog box is displayed, the user is free to move the cell cursor, activate other sheets, and perform other Excel actions. The information displayed in the dialog box changes when the active cell changes.
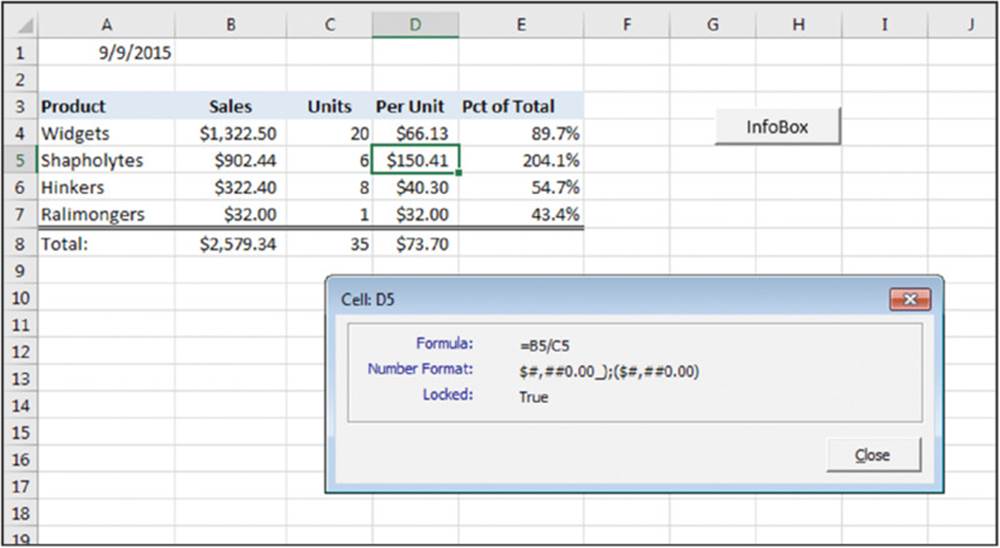
Figure 15.1 This modeless dialog box remains visible while the user continues working.
 On the Web
This example, named modeless userform1.xlsm, is available on the book’s website.
The key to making this UserForm work is determining when to update the information in the dialog box. To do so, the code in the example monitors two workbook events: SheetSelectionChange and SheetActivate. These event-handler procedures are located in the code module for the ThisWorkbook object.
 Cross-Ref
Refer to Chapter 6 for additional information about events.
The event-handler procedures are simple:
Private Sub Workbook_SheetSelectionChange _
(ByVal Sh As Object, ByVal Target As Range)
UpdateBox
End Sub
Private Sub Workbook_SheetActivate(ByVal Sh As Object)
UpdateBox
End Sub
The two previous procedures call the UpdateBox procedure, which follows:
Sub UpdateBox()
With UserForm1
' Make sure a worksheet is active
If TypeName(ActiveSheet) <>"Worksheet" Then
.lblFormula.Caption ="N/A"
.lblNumFormat.Caption ="N/A"
.lblLocked.Caption ="N/A"
Else
.Caption ="Cell:" & _
ActiveCell.Address(False, False)
' Formula
If ActiveCell.HasFormula Then
.lblFormula.Caption = ActiveCell.Formula
Else
.lblFormula.Caption ="(none)"
End If
' Number format
.lblNumFormat.Caption = ActiveCell.NumberFormat
' Locked
.lblLocked.Caption = ActiveCell.Locked
End If
End With
End Sub
The UpdateBox procedure changes the UserForm’s caption to show the active cell’s address; then it updates the three Label controls (lblFormula, lblNumFormat, and lblLocked).
Following are a few points to help you understand how this example works:
· The UserForm is displayed modeless so that you can still access the worksheet while it’s displayed.
· Code at the top of the procedure checks to make sure that the active sheet is a worksheet. If the sheet isn’t a worksheet, the Label controls are assigned the text N/A.
· The workbook monitors the active cell by using the SheetSelectionChange event (which is located in the ThisWorkbook code module).
· The information is displayed in Label controls on the UserForm.
Figure 15.2 shows a more sophisticated version of this example. This version displays quite a bit of additional information about the selected cell. The code is too lengthy to display here, but you can view the well-commented code in the example workbook.

Figure 15.2 This modeless UserForm displays various information about the active cell.
On the Web
This example, named modeless userform2.xlsm, is available on the book’s website.
Following are some key points about this more sophisticated version:
· The UserForm has a check box (Auto Update). When this check box is selected, the UserForm is updated automatically. When Auto Update isn’t turned on, the user can use the Update button to refresh the information.
· The workbook uses a class module to monitor two events for all open workbooks: the SheetSelectionChange event and the SheetActivate event. As a result, the code to display the information about the current cell is executed automatically whenever these events occur in any workbook (assuming that the Auto Update option is in effect). Some actions (such as changing a cell’s number format) do not trigger either of these events. Therefore, the UserForm also contains an Update button.
Cross-Ref
Refer to Chapter 20 for more information about class modules.
· The counts displayed for the cell precedents and dependents fields include cells in the active sheet only, due to a limitation of the Precedents and Dependents properties.
· Because the length of the information will vary, VBA code is used to size and vertically space the labels — and also change the height of the UserForm if necessary.
 Modeless UserForms in Excel 2016
The single-document interface, which was introduced in Excel 2013, adds a new wrinkle to modeless UserForms. When a modeless UserForm is displayed, it’s associated with the active workbook window. So if you switch to a different workbook window, the modeless dialog box may not be visible. Even if it is visible, it will not work as you intended if a different workbook is active.
If you would like a modeless UserForm to be available in all workbook windows, you need to do some extra work. A workbook (modeless SDI.xlsm) on the book’s website demonstrates the technique.
The example uses a Windows API function to get the Windows handle of the modeless UserForm. The workbook uses a class module to monitor all Window Activate events. When a window is activated, another Windows API function sets the UserForm’s parent to the new workbook window. As a result, the UserForm always appears on top of the active window.
Displaying a Progress Indicator
One of the most common requests among Excel developers involves progress indicators. A progress indicator is a graphical thermometer-type display that shows the progress of a task, such as a lengthy macro.
In this section, I describe how to create three types of progress indicators:
· A progress bar on a UserForm that’s called by a separate macro (a stand-alone progress indicator).
· A progress bar that’s integrated into the same UserForm that initiates the macro.
· A progress bar on a UserForm that shows tasks being completed, rather than a graphical bar.
Using a progress indicator requires that your code gauge how far along your macro is in completing its given task. How you do this will vary, depending on the macro. For example, if your macro writes data to cells and you know the number of cells that will be written to, it’s a simple matter to write code that calculates the percent completed. Even if you can’t accurately gauge the progress of a macro, it’s a good idea to give the user some indication that the macro is still running and Excel hasn’t crashed.
 Caution
A progress indicator will slow down your macro a bit because of the extra overhead of having to update it. If speed is absolutely critical, you might prefer to forgo using a progress indicator.
Displaying progress in the status bar
A simple way to display the progress of a macro is to use Excel’s status bar. The advantage is that a status bar is easy to program. However, the disadvantage is that most users aren’t accustomed to watching the status bar and prefer a more visual display.
To write text to the status bar, use a statement such as:
Application.StatusBar ="Please wait..."
You can, of course, update the status bar while your macro progresses. For example, if you have a variable named Pct that represents the percent completed, you can write code that periodically executes a statement such as this:
Application.StatusBar ="Processing..." & Pct &"% Completed"
You can simulate a graphical progress indicator in the status bar by repeating a character as your code progresses. The VBA function Chr$(149) produces a solid dot character, and the String() function will repeat any character a specified number of times. The following statement shows up to 50 dots:
Application.StatusBar = String(Int(Pct * 50), Chr$(149))
When your macro finishes, you must reset the status bar to its normal state with the following statement:
Application.StatusBar = False
If you don’t reset the status bar, the final message will continue to be displayed.
Creating a stand-alone progress indicator
This section describes how to set up a stand-alone progress indicator — that is, one that isn’t initiated by displaying a UserForm — to display the progress of a macro. The macro in this example clears the worksheet and writes 20,000 random numbers to a range of cells:
Sub GenerateRandomNumbers()
' Inserts random numbers on the active worksheet
Const RowMax As Long = 500
Const ColMax As Long = 40
Dim r As Long, c As Long
If TypeName(ActiveSheet) <>"Worksheet" Then Exit Sub
Cells.Clear
For r = 1 To RowMax
For c = 1 To ColMax
Cells(r, c) = Int(Rnd * 1000)
Next c
Next r
End Sub
After you make a few modifications to this macro (described in the next section), the UserForm, shown in Figure 15.3, displays the progress.
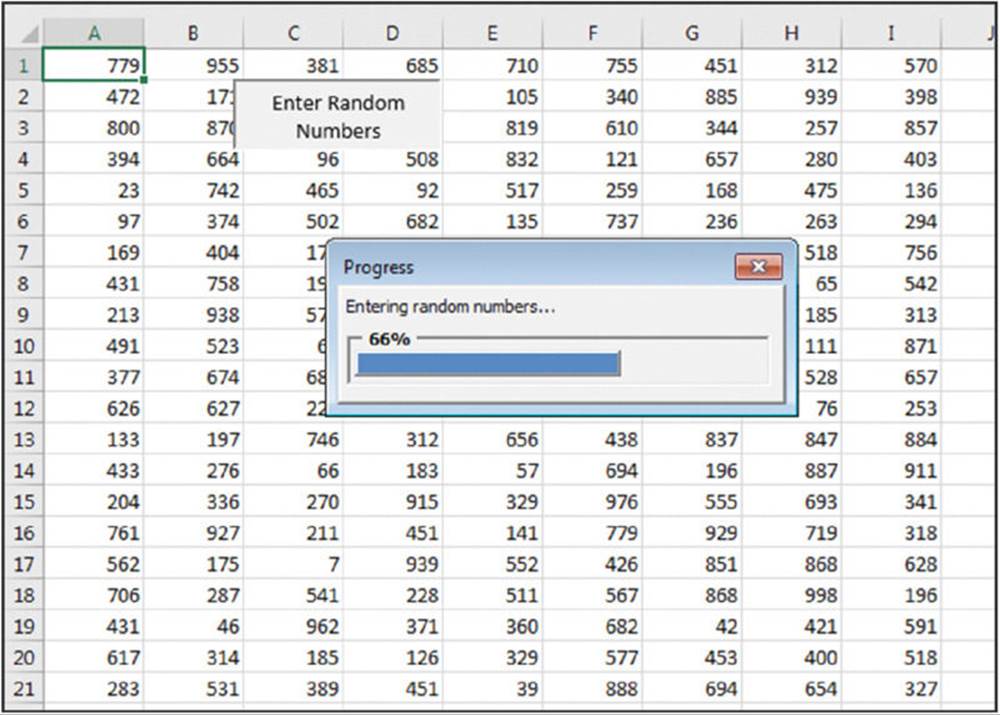
Figure 15.3 A UserForm displays the progress of a macro.
On the Web
This example, named progress indicator1.xlsm, is available on the book’s website.
Building the stand-alone progress indicator UserForm
Follow these steps to create the UserForm that will be used to display the progress of your task:
1. Insert a new UserForm, change its Name property to UProgress, and change its Caption property to Progress.
2. Add a Frame control and name it frmProgress.
3. Add a Label control inside the Frame, name it lblProgress, remove the label’s caption, and make its background color (BackColor property) something that will stand out.
The label’s size doesn’t matter for now.
4. Optional. Add another label above the frame to describe what’s going on.
5. Adjust the UserForm and controls so that they look something like Figure 15.4.
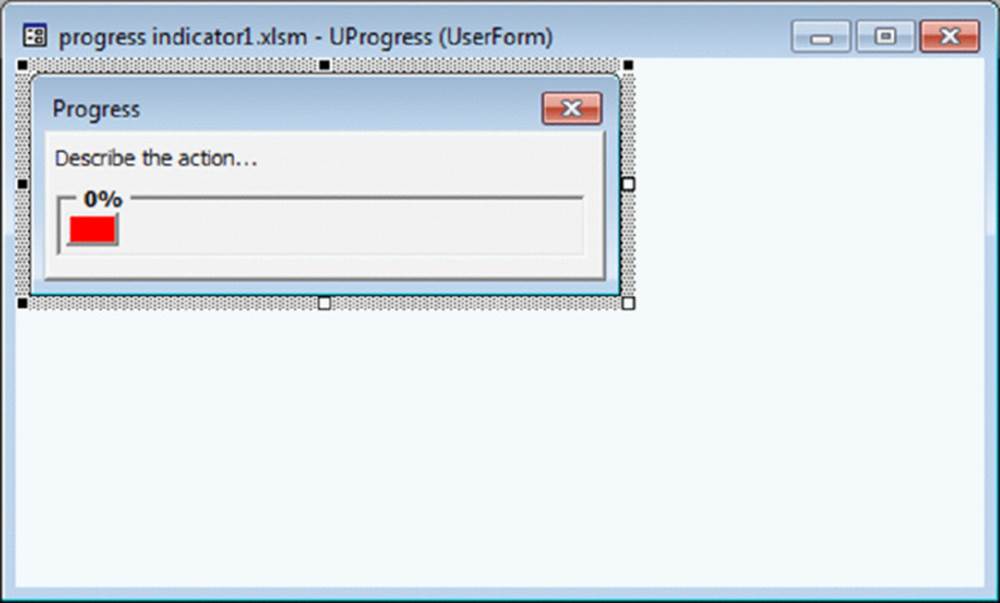
Figure 15.4 This UserForm will serve as a progress indicator.
You can, of course, apply any other type of formatting to the controls. For example, I changed the SpecialEffect property for the Frame control to make it appear sunken.
Creating the code that increments the progress bar
When the form is first called, its Initialize event is triggered. The following event procedure sets the color of the progress bar to red and sets its initial width to 0.
Private Sub UserForm_Initialize()
With Me
.lblProgress.BackColor = vbRed
.lblProgress.Width = 0
End With
End Sub
The form’s SetDescription method is used to add some text above the progress bar to let the user know what’s going on. If you chose not to include this label on your form, you don’t need to include this procedure.
Public Sub SetDescription(Description As String)
Me.lblDescription.Caption = Description
End Sub
The form’s UpdateProgress method sets the Frame’s caption and increases the width of the progress label. As the calling procedure progresses, higher percentages are passed into UpdateProgress and the label widens. Note that the UpdateProgress method uses the Repaintmethod of the UserForm object. Without this statement, the changes to the label would not be updated.
Public Sub UpdateProgress(PctDone As Double)
With Me
.frmProgress.Caption = Format(PctDone,"0%")
.lblProgress.Width = PctDone * (.frmProgress.Width - 10)
.Repaint
End With
End Sub
 Tip
Tip
An additional accoutrement is to make the progress bar color match the workbook’s current theme. To do so, just add this statement to the ShowUserForm procedure:
.lblProgress.BackColor = ActiveWorkbook.Theme. _
ThemeColorScheme.Colors(msoThemeAccent1)
Calling the stand-alone progress indicator from your code
The modified version of the GenerateRandomNumbers procedure (which was presented earlier) follows. Note that additional code shows the form and updates its controls to indicate progress.
Sub GenerateRandomNumbers()
' Inserts random numbers on the active worksheet
Dim Counter As Long
Dim r As Long, c As Long
Dim PctDone As Double
Const RowMax As Long = 500
Const ColMax As Long = 40
If TypeName(ActiveSheet) <>"Worksheet" Then Exit Sub
ActiveSheet.Cells.Clear
UProgress.SetDescription"Generating random numbers..."
UProgress.Show vbModeless
Counter = 1
For r = 1 To RowMax
For c = 1 To ColMax
ActiveSheet.Cells(r, c) = Int(Rnd * 1000)
Counter = Counter + 1
Next c
PctDone = Counter / (RowMax * ColMax)
UProgress.UpdateProgress PctDone
Next r
Unload UProgress
End Sub
The GenerateRandomNumbers procedure calls the form’s SetDescription property and shows the form modeless so the remaining code continues to run. The procedure then executes two loops to write random values to cells, keeping count as it goes. In the outer loop the procedure calls the form’s UpdateProgress method, which takes one argument (the PctDone variable, which represents the progress of the macro). PctDone will contain a value between 0 and 1. At the end of the procedure, the form is unloaded.
Benefits of a stand-alone progress indicator
You now have a UserForm that you can call from any procedure where you want to show progress. Simply show the form modeless and call the UpdateProgress method in the appropriate place in your code. There’s nothing in this UserForm that ties it to a particular calling procedure. The only requirement is that you send it increasing percentages, and the form takes care of the rest.
In the calling procedure, you need to figure out how to determine the percentage completed and assign it to the PctDone variable. In this example, you know how many cells you are going to fill and you only need to keep a count of how many have already been filled to calculate the progress. This calculation will be different for other calling procedures. If your code runs in a loop (as in this example), determining the percentage completed is easy. If your code is not in a loop, you might need to estimate the progress completed at various points in your code.
Showing a progress indicator that’s integrated into a UserForm
In the preceding example, you called a progress indicator UserForm that was completely separate from your calling procedure. You may prefer to include the progress indicator directly on the UserForm that’s running the code. In this section, I’ll show you a couple of options for including a professional looking progress indicator right on your form.
On the Web
This book’s website demonstrates this technique in the progress indicator2 .xlsm file.
Like the previous example, this one enters random numbers into a worksheet. The difference here is that the application contains a UserForm that allows the user to specify the number of rows and columns for the random numbers (see Figure 15.5).
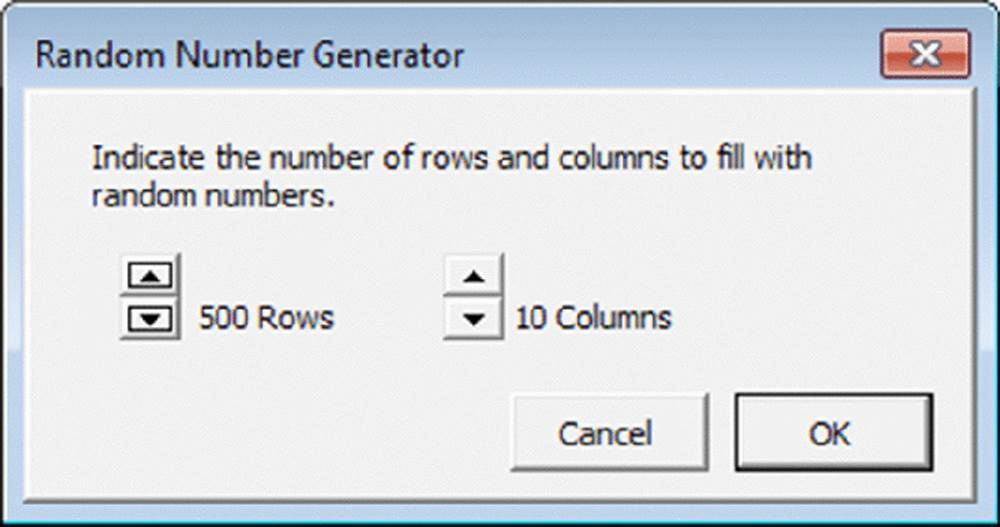
Figure 15.5 The user specifies the number of rows and columns for the random numbers.
Modifying your UserForm for a progress indicator with a MultiPage control
The first technique will display a progress indicator on another page of a MultiPage control. This step assumes that you have a UserForm all set up. You’ll add a MultiPage control. The first page of the MultiPage control will contain all your original UserForm controls. The second page will contain the controls that display the progress indicator. When the macro begins executing, VBA code will change the Value property of the MultiPage control to effectively hide the original controls and display the progress indicator.
The first step is to add a MultiPage control to your UserForm. Then move all the existing controls on the UserForm to Page1 of the MultiPage control.
Next, activate Page2 of the MultiPage control and set it up as shown in Figure 15.6. This is essentially the same combination of controls used in the example in the previous section.

Figure 15.6 Page2 of the MultiPage control will display the progress indicator.
Follow these steps to set up the MultiPage control:
1. Add a Frame control and name it frmProgress.
2. Add a Label control inside the Frame, name it lblProgress, remove the label’s caption, and make its background color red.
3. Optional. Add another label to describe what’s going on.
4. Next, activate the MultiPage control itself (not a page on the control) and set its Style property to 2 – fmTabStyleNone. (This will hide the tabs.) You’ll probably need to adjust the size of the MultiPage control to account for the fact that the tabs aren’t displayed.
Tip
The easiest way to select the MultiPage control when the tabs are hidden is to use the drop-down list in the Properties window. To select a particular page, specify a Value for the MultiPage control: 0 for Page1, 1 for Page2, and so on.
Inserting the UpdateProgress procedure for a progress indicator with a MultiPage control
Insert the following procedure in the code module for the UserForm:
Sub UpdateProgress(Pct)
With Me
.frmProgress.Caption = Format(Pct,"0%")
.frmProgress.Width = Pct * (.frmProgress.Width - 10)
.Repaint
End With
End Sub
The UpdateProgress procedure is called from the macro that’s executed when the user clicks the OK button and performs the updating of the progress indicator.
Modifying your procedure for a progress indicator with a MultiPage control
You need to modify the procedure that is executed when the user clicks the OK button — the Click event-handler procedure for the button named cmdOK_Click. First, insert the following statement at the top of your procedure:
Me.mpProgress.Value = 1
This statement activates Page2 of the MultiPage control (the page that displays the progress indicator). If you named your MultiPage control something other than mpProgress, you’ll need to adjust the code to use your name.
In the next step, you’re pretty much on your own. You need to write code to calculate the percent completed and assign this value to a variable named PctDone. Most likely, this calculation will be performed inside a loop. Then insert the following statement, which will update the progress indicator:
UpdateProgress(PctDone)
How a progress indicator with a MultiPage control works
Using a MultiPage control as a progress indicator is straightforward and, as you’ve seen, it involves only one UserForm. The code switches pages of the MultiPage control and converts your normal dialog box into a progress indicator. Because the MultiPage tabs are hidden, it doesn’t even resemble a MultiPage control.
Showing a progress indicator without using a MultiPage control
The second technique is simpler because it doesn’t use a MultiPage control. Rather, the progress indicator is stored at the bottom of the UserForm — but the UserForm’s height is reduced so that the progress indicator controls aren’t visible. When it’s time to display the progress indicator, the UserForm’s height is increased, which makes the progress indicator visible.
Figure 15.7 shows the UserForm in VBE.
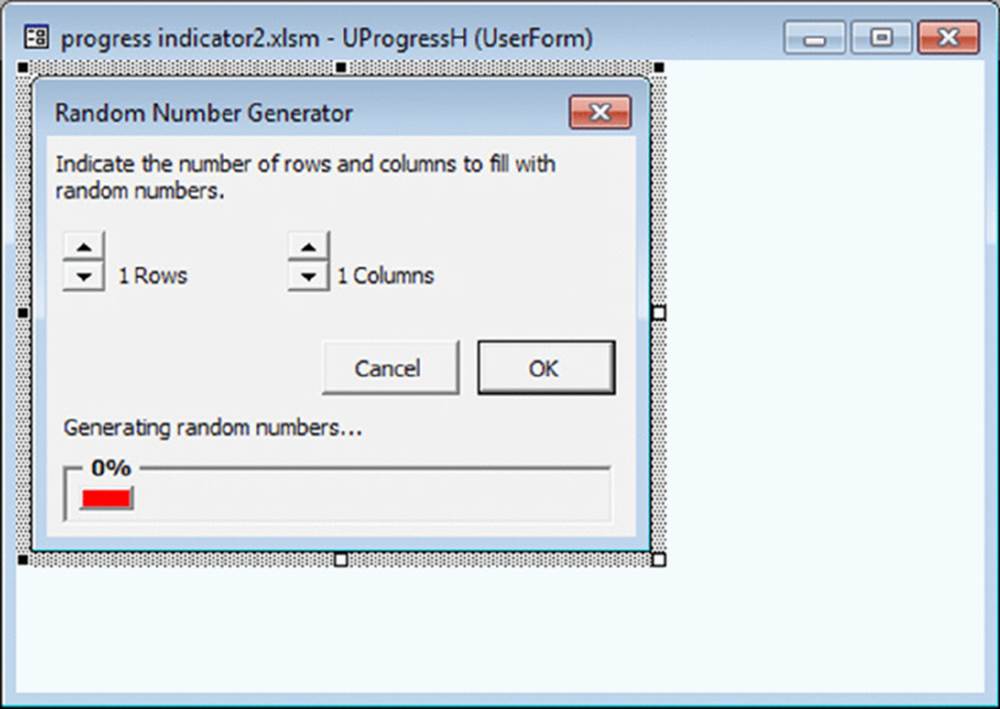
Figure 15.7 The progress indicator will be hidden by reducing the height of the UserForm.
The Height property of the UserForm is 177. However, before the UserForm is displayed, the VBA code changes the Height to 130 (which means the progress indicator controls aren’t visible to the user). When the user clicks OK, the VBA code changes the Heightproperty to 177 with the following statement:
Me.Height = 177
Figure 15.8 shows the UserForm with the progress indicator section unhidden.
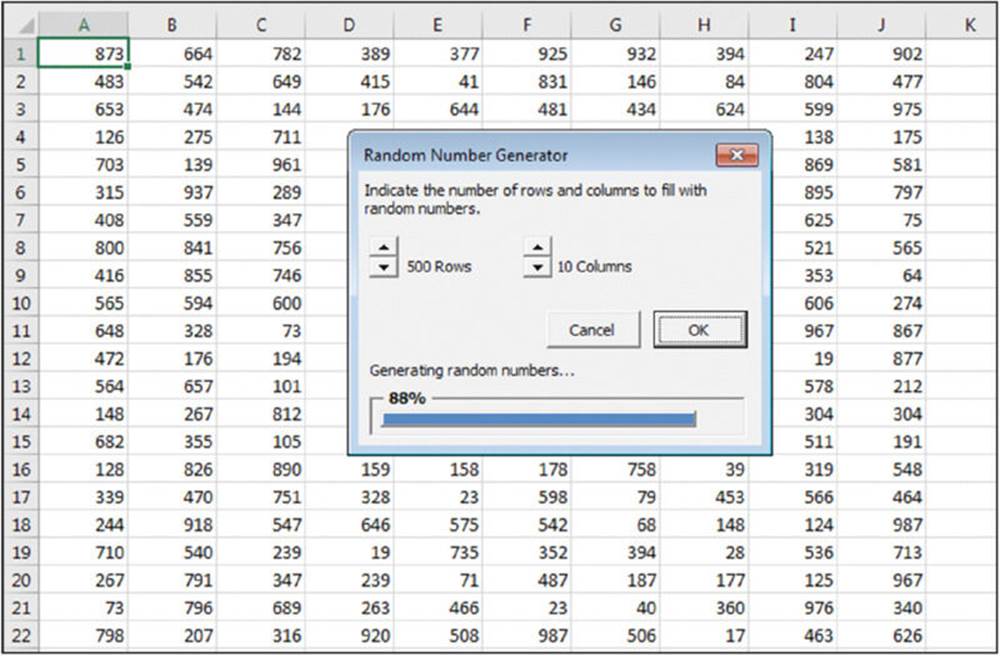
Figure 15.8 The progress indicator in action.
Creating a non-graphical progress indicator
The preceding examples showed graphical progress indicators by increasing the width of a label. If you have a smaller number of steps, you may prefer to show a description of the steps as they’re completed. The following procedure processes a small number of text files in a folder. Instead of showing a progress bar, you can list the names of the files as they are processed.
On the Web
This book’s website demonstrates this technique in the progress indicator3 .xlsm file.
Sub ProcessFiles()
Dim sFile As String, lFile As Long
Const sPATH As String ="C:\Text Files\"
sFile = Dir(sPATH &"*.txt")
Do While Len(sFile) > 0
ImportFile sFile
sFile = Dir
Loop
End Sub
The procedure finds all the text files in a directory and calls another procedure that imports them. What happens to the file isn’t important, merely that there are a finite number of steps to be completed.
Creating the UserForm to display the steps
Figure 15.9 shows the simple UserForm in the VBE. It only has two controls: a label to describe what’s happening and a ListBox control to list the steps.
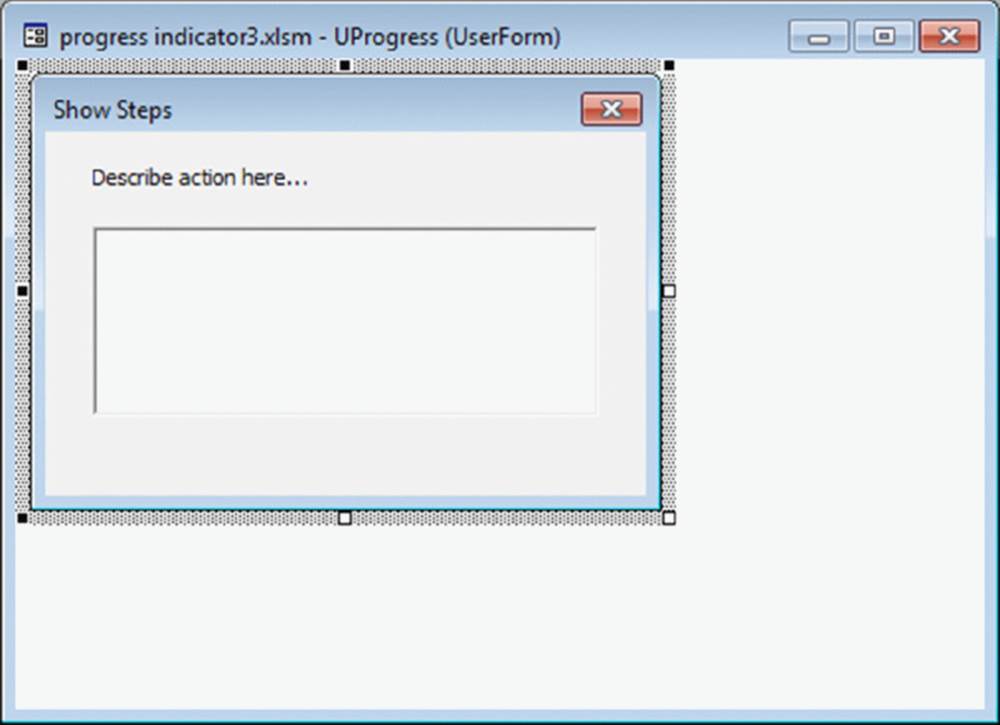
Figure 15.9 The steps are listed in a ListBox control.
The code behind the UserForm is equally simple. You change the descriptive label by calling the SetDescription procedure. As the calling procedure progresses, you call the AddStep procedure to add an item to the ListBox. The TopIndex property of the ListBox object keeps the most recent steps visible if the ListBox isn’t tall enough.
Public Sub AddStep(sStep As String)
With Me.lbxSteps
.AddItem sStep
.TopIndex = Application.Max(.ListCount, .ListCount - 6)
End With
Me.Repaint
End Sub
Modifying the calling procedure to use the progress indicator
The ProcessFiles procedure shown below has been modified to use the progress indicator as it processes files. First, the UserForm’s Caption property is set to indicate what process is occurring. Next, the SetDescription method is called so the user knows what’s appearing in the ListBox control. The Show method includes the vbModeless parameter that allows the calling procedure to continue executing. Inside the loop, the AddStep method adds file names to indicate progress. Figure 15.10 shows the userform in action.
Sub ProcessFiles()
Dim sFile As String, lFile As Long
Const sPATH As String ="C:\Text Files\"
sFile = Dir(sPATH &"*.txt")
UProgress.Caption ="Proccesing File Progress"
UProgress.SetDescription"Completed files..."
UProgress.Show vbModeless
Do While Len(sFile) > 0
ImportFile sFile
UProgress.AddStep sPATH & sFile
sFile = Dir
Loop
Unload UProgress
End Sub
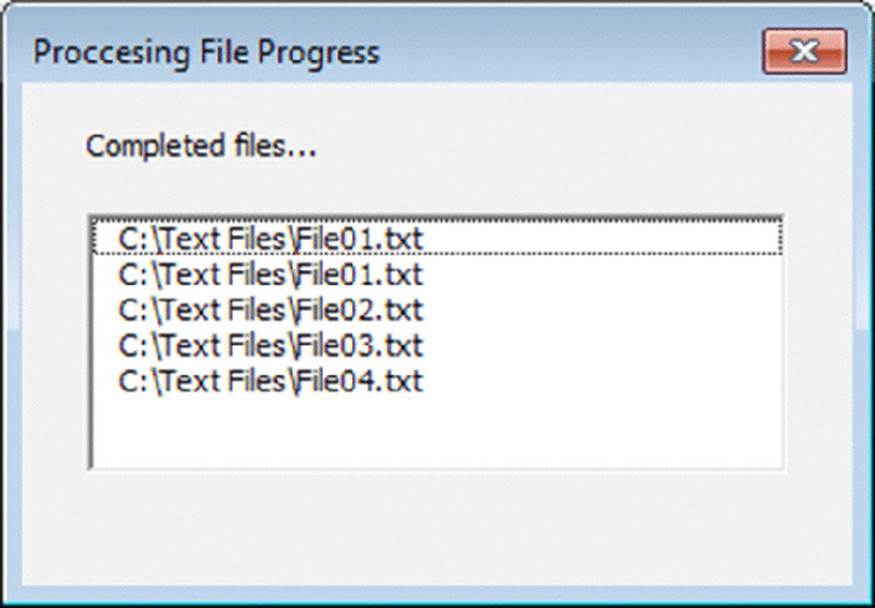
Figure 15.10 Files are added to the list to show progress.
This progress indicator is similar to the stand-alone progress indicator shown in a previous section. It doesn’t care what the steps to your procedure are. You can process files, fill ranges on a Worksheet, or perform any number of steps. By changing the Captionproperty and calling the SetDescription method, you can customize this progress indicator for whatever process you’re completing.
Creating Wizards
Many applications incorporate wizards to guide users through an operation. Excel’s Text Import Wizard is a good example. A wizard is essentially a series of dialog boxes that solicit information from the user. Usually, the user’s choices in earlier dialog boxes influence the contents of later dialog boxes. In most wizards, the user is free to go forward or backward through the dialog box sequence or to click the Finish button to accept all defaults.
You can create wizards by using VBA and a series of UserForms. However, I’ve found that the most efficient way to create a wizard is to use a single UserForm and a MultiPage control with the tabs hidden.
Figure 15.11 shows an example of a simple four-step wizard, which consists of a single UserForm that contains a MultiPage control. Each step of the wizard displays a different page in the MultiPage control.
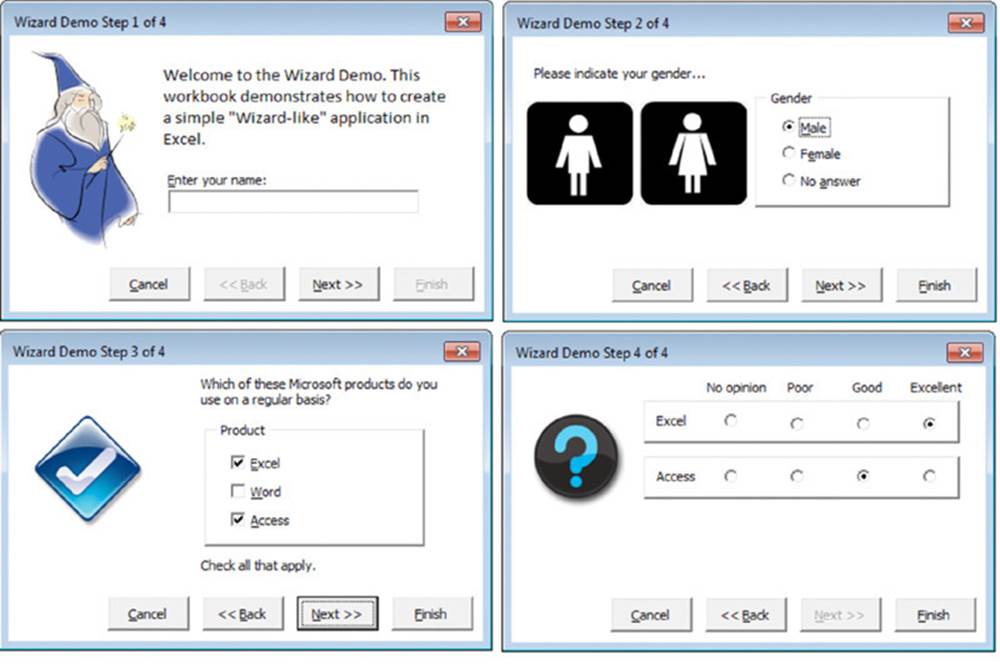
Figure 15.11 This four-step wizard uses a MultiPage control.
On the Web
The wizard example in this section is available on the book’s website. in a file named wizard demo.xlsm.
The sections that follow describe how I created the sample wizard.
Setting up the MultiPage control for the wizard
Start with a new UserForm and add a MultiPage control. By default, this control contains two pages. Right-click the MultiPage tab and insert enough new pages to handle your wizard (one page for each wizard step). This example is a four-step wizard, so the MultiPagecontrol has four pages. The captions of the MultiPage tabs are irrelevant because they won’t be seen. The MultiPage control’s Style property will eventually be set to 2 - fmTabStyleNone.
Tip
While working on the UserForm, you’ll want to keep the MultiPage tabs visible to make it easier to access various pages.
Next, add the desired controls to each page of the MultiPage control. These controls will, of course, vary depending on your application. You may need to resize the MultiPage control while you work to have room for the controls.
Adding the buttons to the wizard’s UserForm
Now add the buttons that control the progress of the wizard. These buttons are placed outside the MultiPage control because they’re used while any of the pages are displayed. Most wizards have four buttons:
· Cancel: Cancels the wizard and performs no action.
· Back: Returns to the previous step. During Step 1 of the wizard, this button should be disabled.
· Next: Advances to the next step. During the last wizard step, this button should be disabled.
· Finish: Finishes the wizard.
In the example, these CommandButtons are named cmdCancel, cmdBack, cmdNext, and cmdFinish.
 Note
Note
In some cases, the user is allowed to click the Finish button at any time and accept the defaults for items that were skipped. In other cases, the wizard requires a user response for some items, so the Finish button is disabled until all required input is made. The example requires an entry in the TextBox in Step 1.
Programming the wizard’s buttons
Each of the four wizard buttons requires a procedure to handle its Click event. The event handler for the cmdCancel control follows.
Private Sub cmdCancel_Click()
Dim Msg As String
Dim Ans As Long
Msg ="Cancel the wizard?"
Ans = MsgBox(Msg, vbQuestion + vbYesNo, APPNAME)
If Ans = vbYes Then Unload Me
End Sub
This procedure uses a MsgBox function (see Figure 15.12) to verify that the user really wants to exit. If the user clicks the Yes button, the UserForm is unloaded with no action taken. This type of verification, of course, is optional.
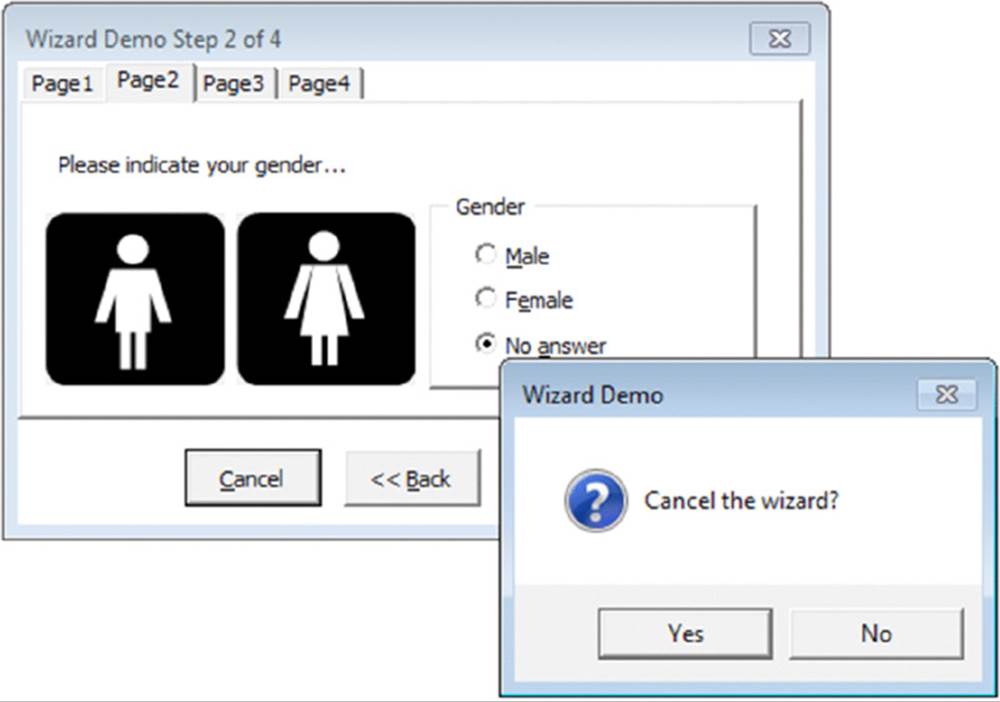
Figure 15.12 Clicking the Cancel button displays a confirmation message box.
The event-handler procedures for the Back and Next buttons follow:
Private Sub cmdBack_Click()
Me.mpgWizard.Value = Me.mpgWizard.Value - 1
UpdateControls
End Sub
Private Sub cmdNext_Click()
Me.mpgWizard.Value = Me.mpgWizard.Value + 1
UpdateControls
End Sub
These two procedures are simple. They change the Value property of the MultiPage control and then call another procedure named UpdateControls (which follows).
The UpdateControls procedure is responsible for enabling and disabling the cmdBack and cmdNext controls.
Sub UpdateControls()
' Enable back if not on page 1
Me.cmdBack.Enabled = Me.mpgWizard.Value > 0
' Enable next if not on the last page
Me.cmdNext.Enabled = Me.mpgWizard.Value < Me.mpgWizard.Pages.Count - 1
' Update the caption
Me.Caption = APPNAME &" Step" _
& Me.mpgWizard.Value + 1 &" of" _
& Me.mpgWizard.Pages.Count
' the Name field is required
Me.cmdFinish.Enabled = Len(Me.tbxName.Text) > 0
End Sub
The procedure checks the Value property of the MultiPage control to see what page is showing. If the first page is showing, the Enabled property of cmdBack is set to False. If the last page is showing, the Enabled property of cmdNext is set to False. Next, the procedure changes the UserForm’s caption to display the current step and the total number of steps. APPNAME is a public constant, defined in Module1. The procedure then examines the name field on the first page (a TextBox named tbxName). This field is required, so if it’s empty the user can’t click the Finish button. If the TextBox is empty (the length of its contents is zero), cmdFinish is disabled; otherwise, it’s enabled.
Programming dependencies in a wizard
In most wizards, a user’s response on a particular step can affect what’s displayed in a subsequent step. In this example, the users indicate which products they use in Step 3 and then rate those products in Step 4. The OptionButtons for a product’s rating are visible only if the users have indicated a particular product.
Programmatically, you accomplish this task by monitoring the MultiPage’s Change event. Whenever the value of the MultiPage is changed (by clicking the Back or Next button), the mpgWizard_Change procedure is executed. If the MultiPage control is on the last tab (Step 4), the procedure examines the values of the CheckBox controls in Step 3 and makes the appropriate adjustments in Step 4.
In this example, the code uses two arrays of controls — one for the product CheckBox controls (Step 3) and one for the Frame controls (Step 4). The code uses a For-Next loop to hide the Frames for the products that aren’t used and then adjusts their vertical positioning. If none of the check boxes in Step 3 are checked, everything in Step 4 is hidden except a Label that displays Click Finish to exit (if a name is entered in Step 1) or A name is required in Step 1 (if a name isn’t entered in Step 1). The mpgWizard_Change procedure follows:
Private Sub mpgWizard_Change()
Dim TopPos As Long
Dim FSpace As Long
Dim AtLeastOne As Boolean
Dim i As Long
' Set up the Ratings page?
If Me.mpgWizard.Value = 3 Then
' Create an array of CheckBox controls
Dim ProdCB(1 To 3) As MSForms.CheckBox
Set ProdCB(1) = Me.chkExcel
Set ProdCB(2) = Me.chkWord
Set ProdCB(3) = Me.chkAccess
' Create an array of Frame controls
Dim ProdFrame(1 To 3) As MSForms.Frame
Set ProdFrame(1) = Me.frmExcel
Set ProdFrame(2) = Me.frmWord
Set ProdFrame(3) = Me.frmAccess
TopPos = 22
FSpace = 8
AtLeastOne = False
' Loop through all products
For i = 1 To 3
If ProdCB(i).Value Then
ProdFrame(i).Visible = True
ProdFrame(i).Top = TopPos
TopPos = TopPos + ProdFrame(i).Height + FSpace
AtLeastOne = True
Else
ProdFrame(i).Visible = False
End If
Next i
' Uses no products?
If AtLeastOne Then
Me.lblHeadings.Visible = True
Me.imgRating.Visible = True
Me.lblFinishMsg.Visible = False
Else
Me.lblHeadings.Visible = False
Me.imgRating.Visible = False
Me.lblFinishMsg.Visible = True
If Len(Me.tbxName.Text) = 0 Then
Me.lblFinishMsg.Caption = _
"A name is required in Step 1."
Else
Me.lblFinishMsg.Caption = _
"Click Finish to exit."
End If
End If
End If
End Sub
Performing the task with the wizard
When the user clicks the Finish button, the wizard performs its task: transferring the information from the UserForm to the next empty row in the worksheet. This procedure, named cmdFinish_Click, is straightforward. It starts by determining the next empty worksheet row and assigns this value to a variable (r). The remainder of the procedure simply translates the values of the controls and enters data into the worksheet.
Private Sub cmdFinish_Click()
Dim r As Long
r = Application.WorksheetFunction. _
CountA(Range("A:A")) + 1
' Insert the name
Cells(r, 1) = Me.tbxName.Text
' Insert the gender
Select Case True
Case Me.optMale.Value: Cells(r, 2) ="Male"
Case Me.optFemale: Cells(r, 2) ="Female"
Case Me.optNoAnswer: Cells(r, 2) ="Unknown"
End Select
' Insert usage
Cells(r, 3) = Me.chkExcel.Value
Cells(r, 4) = Me.chkWord.Value
Cells(r, 5) = Me.chkAccess.Value
' Insert ratings
If Me.optExcelNo.Value Then Cells(r, 6) =""
If Me.optExcelPoor.Value Then Cells(r, 6) = 0
If Me.optExcelGood.Value Then Cells(r, 6) = 1
If Me.optExcelExc.Value Then Cells(r, 6) = 2
If Me.optWordNo.Value Then Cells(r, 7) =""
If Me.optWordPoor.Value Then Cells(r, 7) = 0
If Me.optWordGood.Value Then Cells(r, 7) = 1
If Me.optWordExc.Value Then Cells(r, 7) = 2
If Me.optAccessNo.Value Then Cells(r, 8) =""
If Me.optAccessPoor.Value Then Cells(r, 8) = 0
If Me.optAccessGood.Value Then Cells(r, 8) = 1
If Me.optAccessExc.Value Then Cells(r, 8) = 2
Unload Me
End Sub
After you test your wizard, and everything is working properly, you can set the MultiPage control’s Style property to 2 - fmTabStyleNone to hide the tabs.
Emulating the MsgBox Function
The VBA MsgBox function (discussed in Chapter 12) is a bit unusual because, unlike most functions, it displays a dialog box. But, similar to other functions, it also returns a value: an integer that represents which button the user clicked.
This section describes a custom function that I created that emulates the VBA MsgBox function. On first thought, creating such a function might seem easy. Think again! The MsgBox function is extraordinarily versatile because of the arguments that it accepts. Consequently, creating a function to emulate MsgBox is no small feat.
Note
The point of this exercise is not to create an alternative messaging function. Rather, it’s to demonstrate how to develop a complex function that also incorporates a UserForm. However, some people might like the idea of being able to customize their messages. If so, you’ll find that this function is easy to customize. For example, you can change the font, colors, button text, and so on.
I named my pseudo-MsgBox function MyMsgBox. The emulation is close but not perfect. The MyMsgBox function has the following limitations:
· It does not support the Helpfile argument (which adds a Help button that, when clicked, opens a Help file).
· It does not support the Context argument (which specifies the context ID for the Help file).
· It does not support the system modal option, which puts everything in Windows on hold until you respond to the dialog box.
· It does not play a sound when it is called.
The syntax for MyMsgBox is:
MyMsgBox(prompt[, buttons] [, title])
This syntax is the same as the MsgBox syntax except it doesn’t use the last two optional arguments (Helpfile and Context). MyMsgBox also uses the same predefined constants as MsgBox: vbOKOnly, vbQuestion, vbDefaultButton1, and so on.
Note
If you’re not familiar with the VBA MsgBox function, consult the Help system to become acquainted with its arguments.
MsgBox emulation: MyMsgBox code
The MyMsgBox function uses a UserForm named UMsgBox. The function itself, which follows, sets up the UserForm according to the arguments passed to the function. It calls several other procedures to make many of the settings.
Function MyMsgBox(ByVal Prompt As String, _
Optional ByVal Buttons As Long, _
Optional ByVal Title As String) As Long
' Emulates VBA's MsgBox function
' Does not support the HelpFile or Context arguments
With UMsgBox
' Do the Caption
If Len(Title) > 0 Then .Caption = Title _
Else .Caption = Application.Name
SetImage Buttons
SetPrompt Prompt
SetButtons Buttons
.Height = .cmdLeft.Top + 54
SetDefaultButton Buttons
.Show
End With
MyMsgBox = UMsgBox.UserClick
End Function
On the Web
The complete code for the MyMsgBox function is too lengthy to list here, but it’s available in a workbook named msgbox emulation.xlsm, available on the book’s website. The workbook is set up so that you can easily try various options.
Figure 15.13 shows MyMsgBox in use. It looks similar to the VBA message box, but I used a different font for the message text and also used some different icons.
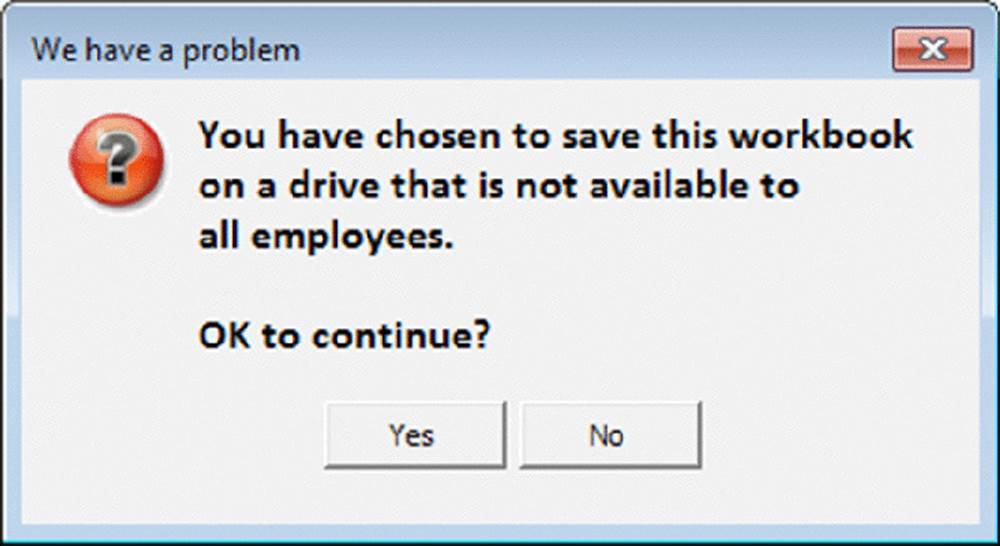
Figure 15.13 The result of the MsgBox emulation function.
If you use a multiple monitor system, the position of the displayed UserForm may not be centered in Excel’s window. To solve that problem, use the following code to display UMsgBox:
With UMsgBox
.StartUpPosition = 0
.Left = Application.Left + (0.5 * Application.Width) - (0.5 * .Width)
.Top = Application.Top + (0.5 * Application.Height) - (0.5 * .Height)
.Show
End With
Here’s the code that I used to execute the function:
Prompt ="You have chosen to save this workbook" & vbCrLf
Prompt = Prompt &"on a drive that is not available to" & vbCrLf
Prompt = Prompt &"all employees." & vbCrLf & vbCrLf
Prompt = Prompt &"OK to continue?"
Buttons = vbQuestion + vbYesNo
Title ="Network Location Notice"
Ans = MyMsgBox(Prompt, Buttons, Title)
How the MyMsgBox function works
The MyMsgBox function examines the arguments and it, or one of the procedures it calls, does the following:
· Determines which, if any, image to display (and hides the others)
· Determines which button(s) to display (and hides the others)
· Determines which button is the default button
· Centers the buttons in the dialog box
· Determines the captions for the CommandButtons
· Determines the position of the text within the dialog box
· Determines the width and height of the dialog box (by using an API function call to get the video resolution)
· Displays the UserForm
Interpreting the second argument (buttons) is challenging. This argument can consist of a number of constants added together. For example, the second argument can be something like this:
VbYesNoCancel + VbQuestion + VbDefaultButton3
This argument creates a three-button MsgBox (with Yes, No, and Cancel buttons), displays the question mark icon, and makes the third button the default button. The actual argument is 547 (3 + 32 + 512).
To determine what to display on the UserForm, the function uses a technique called Bitwise And. Each of the three arguments can be one of a series of numbers and those numbers don’t overlap with the other arguments. The six types of buttons that you can display are numbered 0 to 5. If you add up all of the numbers 0 to 5, you get 15. The lowest value of the possible icon values is 16, which is one more than all of the buttons put together.
One of the procedures called by MyMsgBox is named SetDefaultButtons and is shown below. It uses Bitwise And by comparing the Buttons argument to a constant, such as vbDefaultButton3. If the result of the Bitwise And is equal to vbDefaultButton3, then you can be sure that vbDefaultButton3 was one of the choices that made up the Buttons argument, regardless of any other choices included in that argument.
Private Sub SetDefaultButton(Buttons As Long)
With UMsgBox
Select Case True
Case (Buttons And vbDefaultButton4) = vbDefaultButton4
.cmdLeft.Default = True
.cmdLeft.TabIndex = 0
Case (Buttons And vbDefaultButton3) = vbDefaultButton3
.cmdRight.Default = True
.cmdRight.TabIndex = 0
Case (Buttons And vbDefaultButton2) = vbDefaultButton2
.cmdMiddle.Default = True
.cmdMiddle.TabIndex = 0
Case Else
.cmdLeft.Default = True
.cmdLeft.TabIndex = 0
End Select
End With
End Sub
The UserForm (shown in Figure 15.14) contains four Label controls. Each of these Label controls has an image, which I pasted into the Picture property. The UserForm also has three CommandButton controls and a TextBox control.
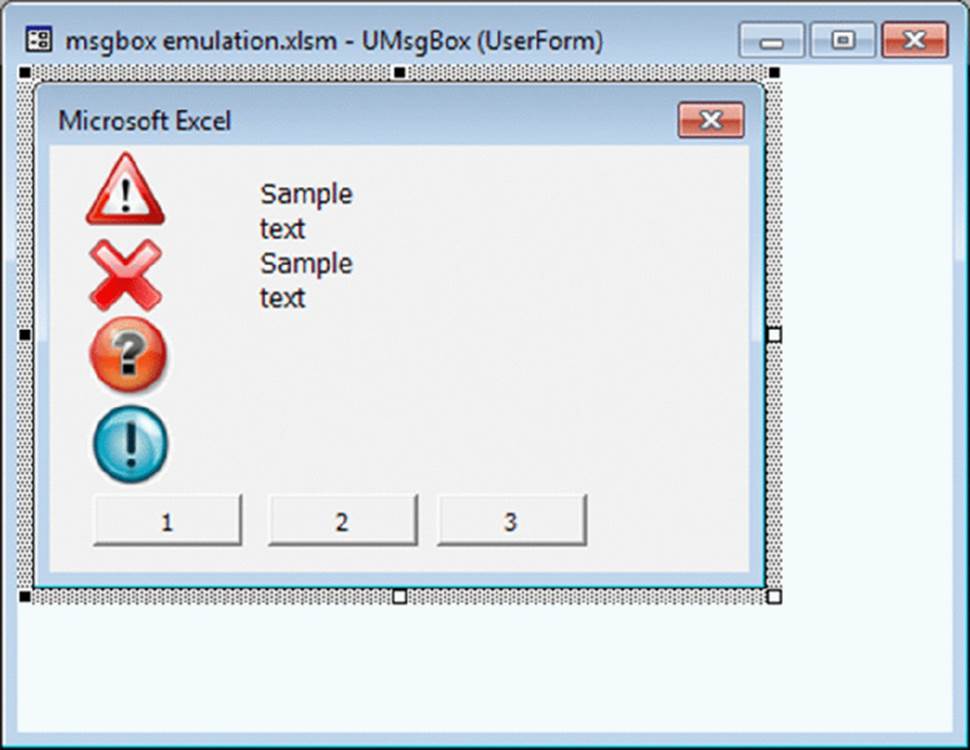
Figure 15.14 The UserForm for the MyMsgBox function.
Note
I originally used Image controls to hold the four icons, but the images displayed with a faint outline. I switched to Label controls because the image is not displayed with an outline.
Three additional event-handler procedures are included (one for each CommandButton). These routines determine which button was clicked and return a value for the function by setting a value for the UserClick variable.
Using the MyMsgBox function
To use this function in your own project, export the MyMsgBoxMod module and the UMsgBox UserForm. Then import these two files into your project. You can then use the MyMsgBox function in your code just as you’d use the MsgBox function.
A UserForm with Movable Controls
The UserForm shown in Figure 15.15 contains three Image controls. The user can use the mouse to drag these images around in the dialog box. I’m not sure of the practical significance of this technique, but the example in this section will help you understand mouse-related events.
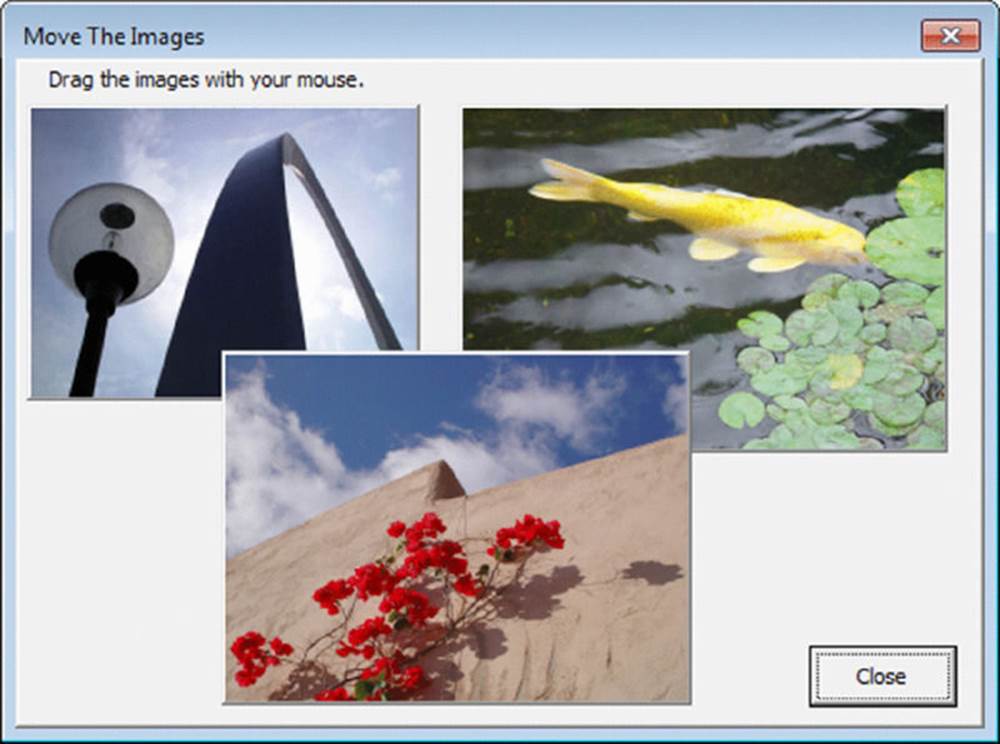
Figure 15.15 You can drag and rearrange the three Image controls by using the mouse.
On the Web
This example is available on the book’s website in a file named move controls.xlsm.
Each Image control has two associated event procedures: MouseDown and MouseMove. The event procedures for the Image1 control are shown here. (The others are identical except for the control names.)
Private Sub Image1_MouseDown(ByVal Button As Integer, _
ByVal Shift As Integer, ByVal X As Single, ByVal Y As Single)
' Starting position when button is pressed
OldX = X
OldY = Y
Image1.ZOrder 0
End Sub
Private Sub Image1_MouseMove(ByVal Button As Integer, _
ByVal Shift As Integer, ByVal X As Single, ByVal Y As Single)
' Move the image
If Button = 1 Then
Image1.Left = Image1.Left + (X - OldX)
Image1.Top = Image1.Top + (Y - OldY)
End If
End Sub
When the mouse button is pressed, the MouseDown event occurs, and the X and Y positions of the mouse pointer are stored. Two public variables are used to keep track of the original position of the controls: OldX and OldY. This procedure also changes the ZOrderproperty, which puts the image on top of the others.
When the mouse is being moved, the MouseMove event occurs repeatedly. The event procedure checks the mouse button. If the Button argument is 1, it means that the left mouse button is depressed. If so, then the Image control is shifted relative to its old position.
Also note that the mouse pointer changes when it’s over an image. That’s because the MousePointer property is set to 15 - fmMousePointerSizeAll, a mouse pointer style that’s commonly used to indicate that an item can be dragged.
A UserForm with No Title Bar
Excel provides no direct way to display a UserForm without its title bar. But this feat is possible with the help of a few API functions. Figure 15.16 shows a UserForm with no title bar.
Figure 15.16 This UserForm lacks a title bar.
Another example of a UserForm without a title bar is in Figure 15.17. This dialog box contains an Image control and a CommandButton control.
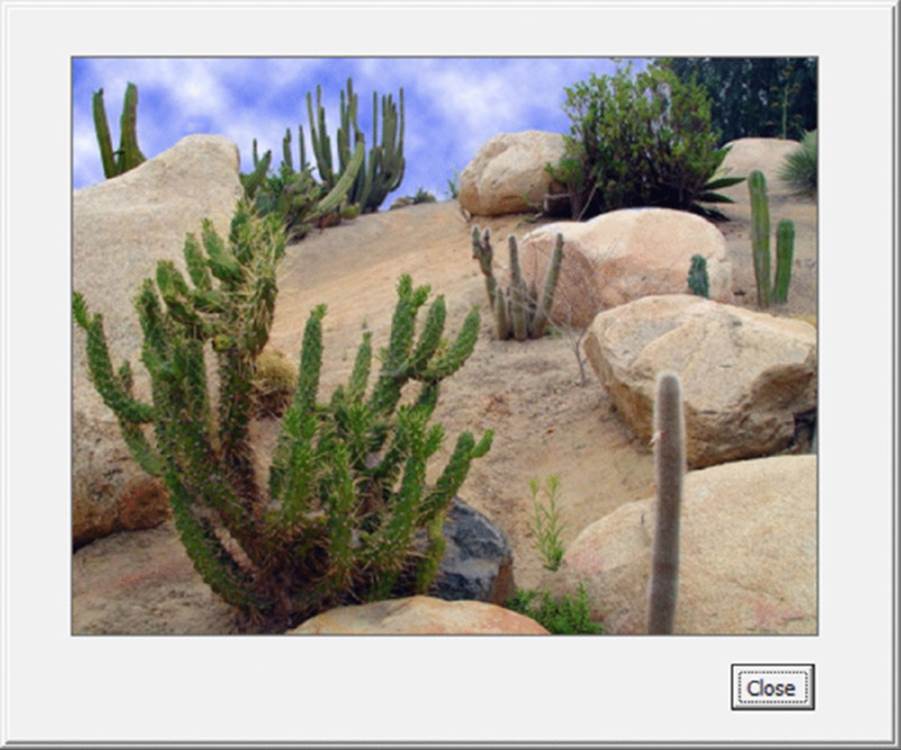
Figure 15.17 Another UserForm without a title bar.
On the Web
Both examples are in a workbook named no title bar.xlsm, which is available on the book’s website. Also available is another version of the splash screen example presented in Chapter 14. This version, named splash screen2.xlsm, displays the UserForm without a title bar.
Displaying a UserForm without a title bar requires four windows API functions: GetWindowLong, SetWindowLong, DrawMenuBar, and FindWindowA (see the example file for the function declarations). The UserForm_Initialize procedure calls these functions:
Private Sub UserForm_Initialize()
Dim lngWindow As Long, lFrmHdl As Long
lFrmHdl = FindWindowA(vbNullString, Me.Caption)
lngWindow = GetWindowLong(lFrmHdl, GWL_STYLE)
lngWindow = lngWindow And (Not WS_CAPTION)
Call SetWindowLong(lFrmHdl, GWL_STYLE, lngWindow)
Call DrawMenuBar(lFrmHdl)
End Sub
One problem is that the user has no way to reposition a dialog box without a title bar. The solution is to use the MouseDown and MouseMove events, as described in the preceding section.
Note
Because the FindWindowA function uses the UserForm’s caption, this technique won’t work if the Caption property is set to an empty string.
Simulating a Toolbar with a UserForm
Creating a custom toolbar in versions prior to Excel 2007 was relatively easy. Beginning with Excel 2007, you can no longer create custom toolbars. More accurately, you can still create custom toolbars with VBA, but Excel ignores many of your VBA instructions. Beginning with Excel 2007, all custom toolbars are displayed in the Add-Ins ➜ Custom Toolbars Ribbon group. You can’t move, float, resize, or dock these toolbars.
This section describes how to create a toolbar alternative: a modeless UserForm that simulates a floating toolbar. Figure 15.18 shows a UserForm that may substitute for a toolbar. It uses Windows API calls to make the title bar a bit shorter than normal, and also displays the UserForm with square (rather than rounded) corners. The Close button is also smaller.
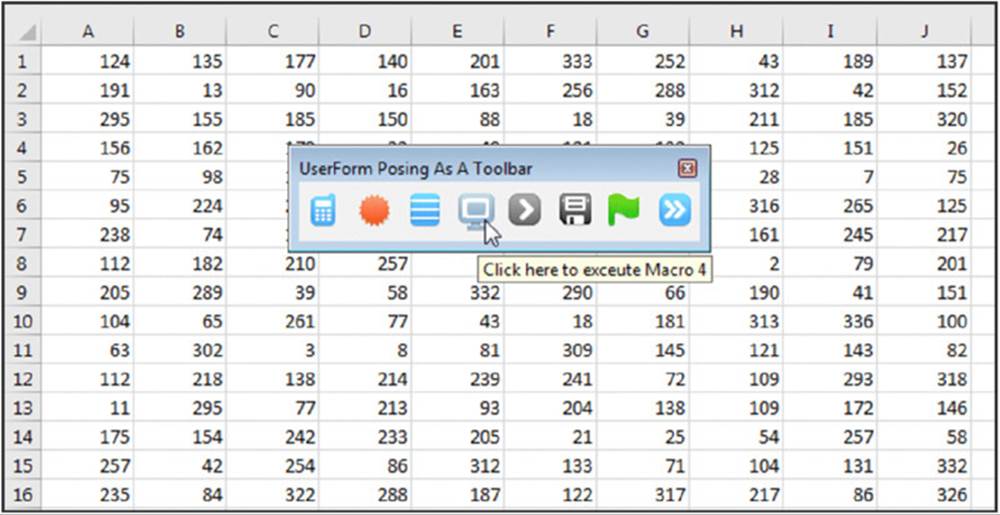
Figure 15.18 A UserForm set up to function as a toolbar.
On the Web
This example, named simulated toolbar.xlm, is available on the book’s website.
The UserForm contains eight Image controls, and each executes a macro. Figure 15.19 shows the UserForm in VBE. Note that:
· The controls aren’t aligned.
· The images displayed are not necessarily the final images.
· The UserForm isn’t the final size.
· The title bar is the standard size.
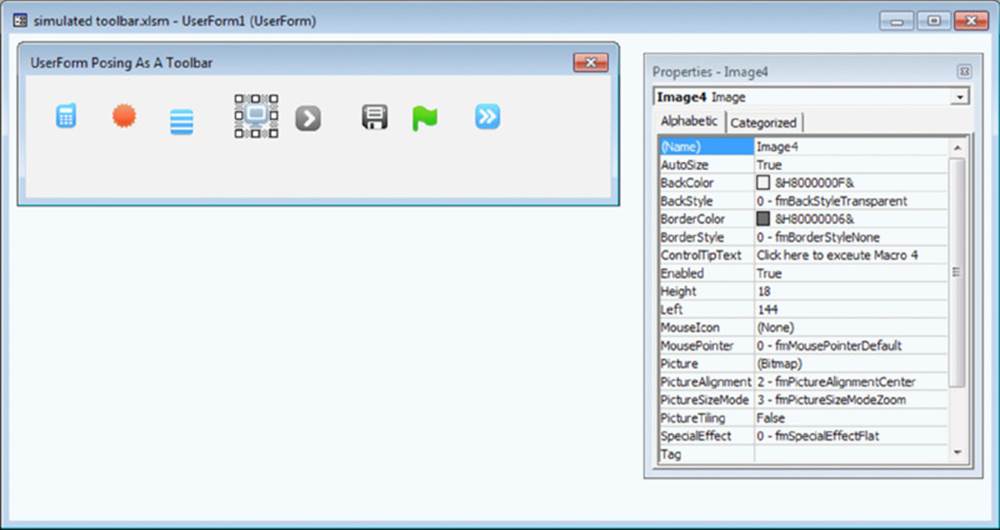
Figure 15.19 The UserForm that simulates a toolbar.
The VBA code takes care of the cosmetic details, including borrowing images from Excel’s Ribbon. For example, this statement assigns an image to the Image1 control:
Image1.Picture = Application.CommandBars. _
GetImageMso("ReviewAcceptChange", 32, 32)
See Chapter 17 for more information about accessing images from the Ribbon.
The code also aligns the controls and adjusts the size of the UserForm to eliminate wasted space. In addition, the code uses Windows API functions to make the UserForm’s title bar smaller — just like a real toolbar. To make the UserForm look even more like a toolbar, I also set the ControlTipText property of each Image control — which displays a toolbar-like tooltip when the mouse cursor is hovered over the control.
If you open the example file, you’ll also notice that the images increase in size slightly when the mouse cursor is hovered over them. That’s because each Image control has an associated MouseMove event handler that changes the size. Here’s the MouseMove event handler procedure for Image1 (the others are identical):
Private Sub Image1_MouseMove(ByVal Button As Integer, _
ByVal Shift As Integer, ByVal X As Single, ByVal Y As Single)
Call NormalSize
Image1.Width = 26
Image1.Height = 26
End Sub
This procedure calls the NormalSize procedure, which returns each image to its normal size:
Private Sub NormalSize()
' Make all controls normal size
Dim ctl As Control
For Each ctl In Controls
ctl.Width = 24
ctl.Height = 24
Next ctl
End Sub
The net effect is that the user gets some visual feedback when the mouse cursor moves over a control — just like a real toolbar. The toolbar simulation only goes so far, however. You can’t resize the UserForm (for example, make the images display vertically rather than horizontally). And, of course, you can’t dock the pseudotoolbar to one of the Excel window borders.
Emulating a Task Pane with a UserForm
Beginning in Office 2013, task panes took on an expanded role and are used for adjusting formatting for many objects, including charts and images. The task panes also got a new look.
The UserForm in Figure 15.20 is an attempt to emulate the look of a built-in task pane. The example is the same as the modeless UserForm example at the beginning of the chapter (refer to Figure 15.2). You can move the UserForm by dragging its title (the same way your move a task pane). The UserForm also has an X (Close) button in the upper-right corner. And, like a task pane, it displays a vertical scrollbar only when needed.
Figure 15.20 A UserForm designed to look like a task pane.
The task pane shown in the figure has a white background. The color of the task pane background varies, depending on the Office theme (specified in the General tab of the Excel Options dialog box). I made the background of the control transparent, and used this code to set the background color:
Me.BackColor = RGB(255, 255, 255)
Frame1.BackColor = RGB(255, 255, 255)
Frame2.BackColor = RGB(255, 255, 255)
Frame controls cannot have a transparent background, so I had to set the background color of the two Frame controls separately.
To create a UserForm that has a background color that matches the Light Gray theme, use this expression:
RGB(240, 240, 240)
To emulate the Dark Gray theme, use this expression:
RGB(222, 222, 222)
The UserForm has the basic look of a task pane, but it falls short in terms of behavior. For example, the sections cannot be collapsed and it’s not possible to dock the UserForm to the side of the screen. Also, it’s not resizable by the user — but it could be (see the next section).
On the Web
This example, named emulate task pane.xlm, is available on the book’s website.
A Resizable UserForm
Excel uses several resizable dialog boxes. For example, you can resize the Name Manager dialog box by clicking and dragging the bottom-right corner.
If you’d like to create a resizable UserForm, you’ll eventually discover that there’s no direct way to do it. One solution is to resort to Windows API calls. That method works, but it’s complicated to set up and doesn’t generate any events, so your code can’t respond when the UserForm is resized. In this section, I present a much simpler technique for creating a user-resizable UserForm.
Note
Credit for this technique goes to Andy Pope, an Excel expert and Microsoft MVP who lives in the UK. Andy is one of the most creative Excel developers I’ve ever met. For a real treat (and lots of interesting downloads), visit his website athttp://andypope.info.
Figure 15.21 shows the UserForm that’s described in this section. It contains a ListBox control that displays data from a worksheet. The scrollbars on the ListBox indicate that the ListBox contains information that doesn’t fit. In addition, a (perhaps) familiar sizing control appears in the bottom-right corner of the dialog box.
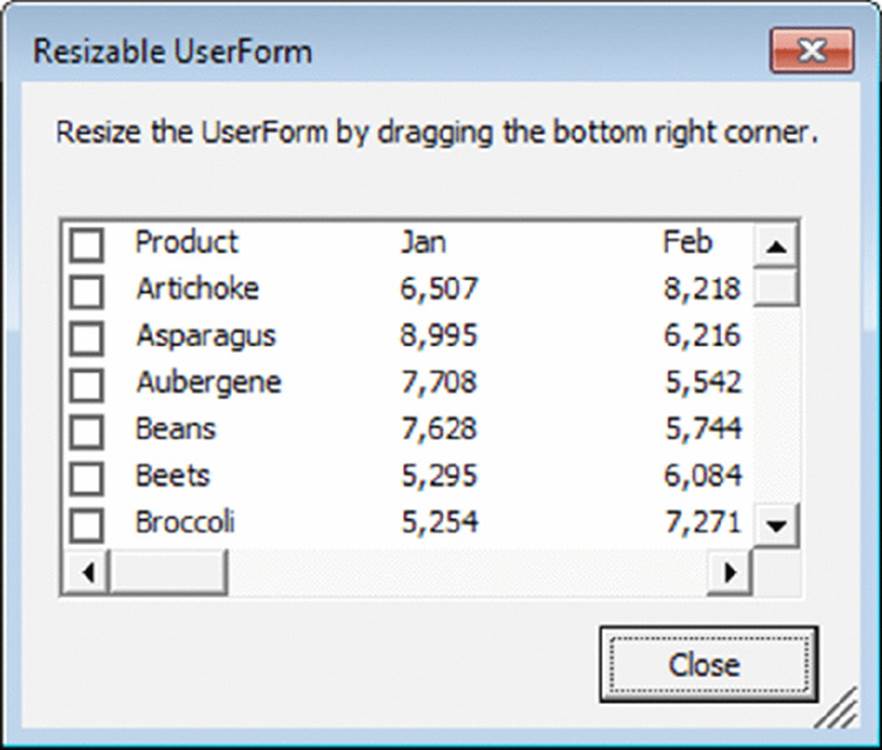
Figure 15.21 This UserForm is resizable.
Figure 15.22 shows the same UserForm after the user resized it. The size of the ListBox is also increased, and the Close button remains in the same relative position. You can stretch this UserForm to the limits of your monitor.
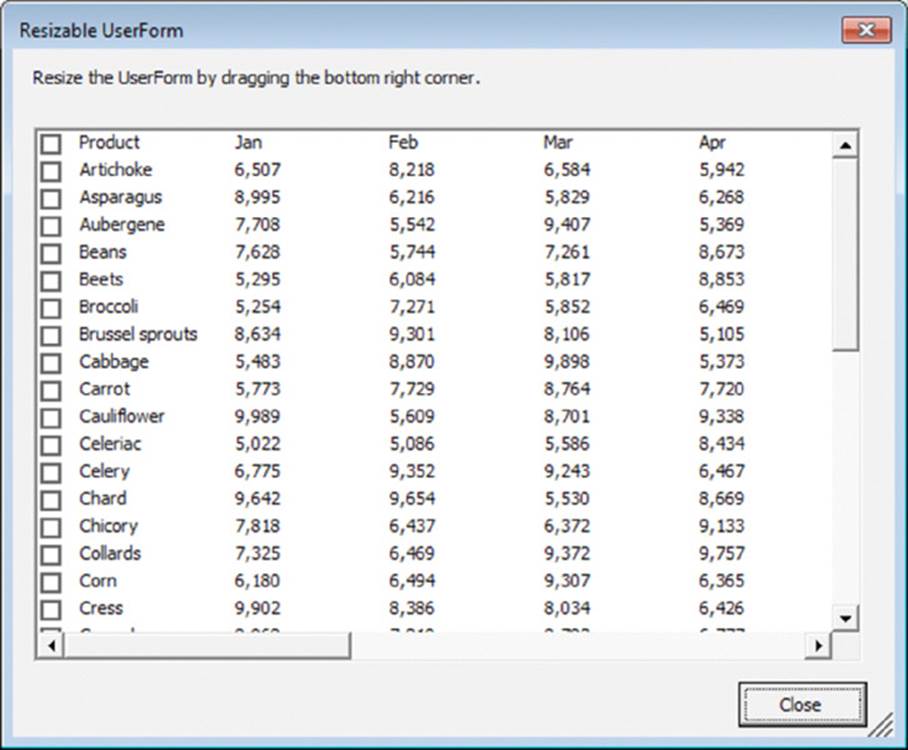
Figure 15.22 The UserForm after it was increased.
On the Web
This example is available on the book’s website in the resizable userform.xlsm file.
The sizing control at the bottom-right corner is actually a Label control that displays a single character: The letter o (character 111) from the Marlett font, character set 2. This control (named objResizer) is added to the UserForm in the UserForm_Initialize procedure at runtime:
Private Sub UserForm_Initialize()
' Add a resizing control to bottom right corner of UserForm
Set objResizer = Me.Controls.Add("Forms.label.1", MResizer, True)
With objResizer
.Caption = Chr(111)
.Font.Name ="Marlett"
.Font.Charset = 2
.Font.Size = 14
.BackStyle = fmBackStyleTransparent
.AutoSize = True
.ForeColor = RGB(100, 100, 100)
.MousePointer = fmMousePointerSizeNWSE
.ZOrder
.Top = Me.InsideHeight - .Height
.Left = Me.InsideWidth - .Width
End With
End Sub
Note
Although the Label control is added at runtime, the event-handler code for the object is contained in the module. Including code for an object that doesn’t exist does not present a problem.
This technique relies on these facts:
· The user can move a control on a UserForm (see “A UserForm with Movable Controls,” earlier in this chapter).
· Events exist that can identify mouse movements and pointer coordinates. Specifically, these events are MouseDown and MouseMove.
· VBA code can change the size of a UserForm at runtime, but a user cannot.
Do a bit of creative thinking about these facts, and you see that it’s possible to translate the user’s movement of a Label control into information that you can use to resize a UserForm.
When the user clicks the objResizer Label object, the objResizer_MouseDown event-handler procedure is executed:
Private Sub objResizer_MouseDown(ByVal Button As Integer, _
ByVal Shift As Integer, ByVal X As Single, ByVal Y As Single)
If Button = 1 Then
LeftResizePos = X
TopResizePos = Y
End If
End Sub
This procedure executes only if the left mouse button is pressed (that is, the Button argument is 1) and the cursor is on the objResizer label. The X and Y mouse coordinates at the time of the button click are stored in module-level variables: LeftResizePos andTopResizePos.
Subsequent mouse movements fire the MouseMove event, and the objResizer_MouseMove event handler kicks into action. Here’s an initial take on this procedure:
Private Sub objResizer_MouseMove(ByVal Button As Integer, _
ByVal Shift As Integer, ByVal X As Single, ByVal Y As Single)
If Button = 1 Then
With objResizer
.Move .Left + X - LeftResizePos, .Top + Y - TopResizePos
Me.Width = Me.Width + X - LeftResizePos
Me.Height = Me.Height + Y - TopResizePos
.Left = Me.InsideWidth - .Width
.Top = Me.InsideHeight - .Height
End With
End If
End Sub
If you study the code, you’ll see that the UserForm’s Width and Height properties are adjusted based on the movement of the objResizer Label control. Figure 15.23 shows how the UserForm looks after the user moves the Label control down and to the right.
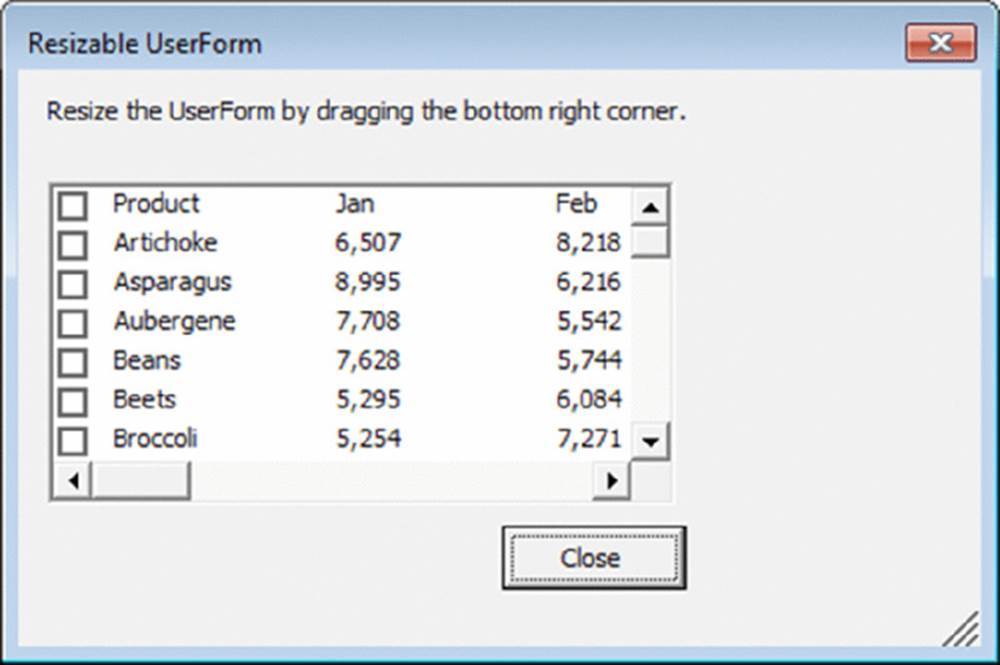
Figure 15.23 VBA code converts Label control movements into new Width and Height properties for the UserForm.
The problem, of course, is that the other controls in the UserForm don’t respond to the UserForm’s new size. The ListBox should be expanded, and the CommandButton should be relocated so that it remains in the lower-left corner.
More VBA code is needed to adjust the controls in the UserForm when the UserForm size is changed. The location for this new code is in the objResizer_MouseMove event-handler procedure. The statements that follow do the job:
' Adjust the ListBox
On Error Resume Next
With ListBox1
.Width = Me.Width - 37
.Height = Me.Height - 100
End With
On Error GoTo 0
' Adjust the Close Button
With CloseButton
.Left = Me.Width - 85
.Top = Me.Height - 54
End With
These two controls are adjusted relative to the UserForm’s size (that is, Me). After adding this new code, the dialog box works like a charm. The user can make the dialog box as large as needed, and the controls adjust.
It should be clear that the most challenging part of creating a resizable dialog box is figuring out how to adjust the controls. When you have more than two or three controls, coding can get complicated.
Handling Multiple UserForm Controls with One Event Handler
Every CommandButton on a UserForm must have its own procedure to handle its events. For example, if you have two CommandButtons, you’ll need two event-handler procedures for the controls’ click events:
Private Sub CommandButton1_Click()
' Code goes here
End Sub
Private Sub CommandButton2_Click()
' Code goes here
End Sub
In other words, you can’t assign a macro to execute when any CommandButton is clicked. Each Click event handler is hard-wired to its CommandButton. You can, however, have each event handler call another all-inclusive macro in the event-handler procedures, but you’ll need to pass an argument to indicate which button was clicked. In the following examples, clicking either CommandButton1 or CommandButton2 executes the ButtonClick procedure, and the single argument tells the ButtonClick procedure which button was clicked:
Private Sub CommandButton1_Click()
Call ButtonClick(1)
End Sub
Private Sub CommandButton2_Click()
Call ButtonClick(2)
End Sub
If your UserForm has many CommandButtons, setting up all these event handlers can get tedious. You might prefer to have a single procedure that can determine which button was clicked and take the appropriate action.
This section describes a way around this limitation by using a class module to define a new class.
On the Web
This example, named multiple buttons.xlsm, is available on the book’s website.
The following steps describe how to re-create the example UserForm shown in Figure 15.24:
1. Create your UserForm as usual and add several CommandButtons. (The example contains 16 CommandButton controls.) This example assumes that the form is named UserForm1.
2. Insert a class module into your project (choose Insert ➜ Class Module), give it the name BtnClass, and enter the following code:
3.
4. Public WithEvents ButtonGroup As MsForms.CommandButton
5.
6. Private Sub ButtonGroup_Click()
7. Dim Msg As String
8. Msg ="You clicked" & ButtonGroup.Name & vbCrLf & vbCrLf
9. Msg = Msg &"Caption:" & ButtonGroup.Caption & vbCrLf
10. Msg = Msg &"Left Position:" & ButtonGroup.Left & vbCrLf
11. Msg = Msg &"Top Position:" & ButtonGroup.Top
12. MsgBox Msg, vbInformation, ButtonGroup.Name
13. End Sub
You will need to customize the ButtonGroup_Click procedure.
 Tip
Tip
You can adapt this technique to work with other types of controls. You need to change the type name in the Public WithEvents declaration. For example, if you have OptionButtons instead of CommandButtons, use a declaration statement like this:
Public WithEvents ButtonGroup As MsForms.OptionButton
14. Insert a normal VBA module and enter the following code:
15. Sub ShowDialog()
16. UserForm1.Show
17. End Sub
18.
This routine simply displays the UserForm.
19.In the code module for the UserForm, enter the UserForm_Initialize code that follows.
20. Dim Buttons() As New BtnClass
21.
22. Private Sub UserForm_Initialize()
23. Dim ButtonCount As Long
24. Dim ctl As Control
25.
26. ' Create the Button objects
27. ButtonCount = 0
28. For Each ctl In Me.Controls
29. If TypeName(ctl) ="CommandButton" Then
30. 'Skip the OK Button
31. If ctl.Name <>"cmdOK" Then
32. ButtonCount = ButtonCount + 1
33. ReDim Preserve Buttons(1 To ButtonCount)
34. Set Buttons(ButtonCount).ButtonGroup = ctl
35. End If
36. End If
37. Next ctl
38. End Sub
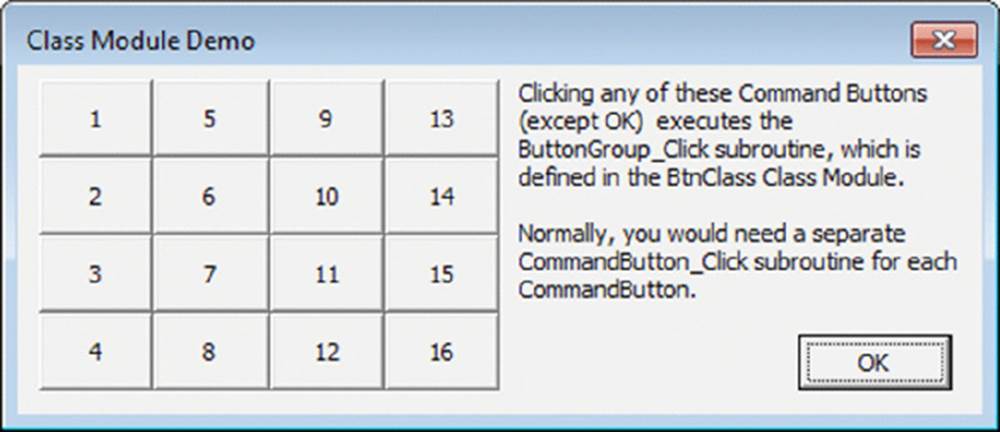
Figure 15.24 Multiple CommandButtons with a single event-handler procedure.
This procedure is triggered by the UserForm’s Initialize event. Note that the code excludes a button named cmdOK from the button group. Therefore, clicking the OK button doesn’t execute the ButtonGroup_Click procedure.
After performing these steps, you can execute the ShowDialog procedure to display the UserForm. Clicking any CommandButton (except the OK button) executes the ButtonGroup_Click procedure. Figure 15.25 shows an example of the message displayed when a button is clicked.
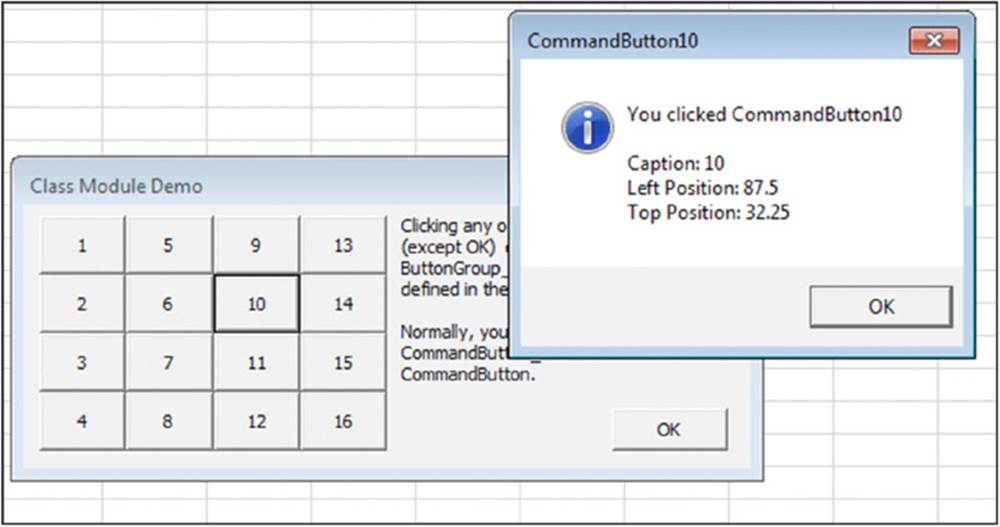
Figure 15.25 The ButtonGroup_Click procedure describes the button that was clicked.
Selecting a Color in a UserForm
The example in this section is a function that displays a dialog box (similar in concept to the MyMsgBox function, presented earlier). The function, named GetAColor, returns a color value:
Function GetAColor() As Variant
UGetAColor.Show
GetAColor = UGetAColor.ColorValue
Unload UGetAColor
End Function
You can use the GetAColor function with a statement like the following:
UserColor = GetAColor()
Executing this statement displays the UserForm. The user selects a color and clicks OK. The function then assigns the user’s selected color value to the UserColor variable.
The UserForm, shown in Figure 15.26, contains three ScrollBar controls — one for each of the color components (red, green, and blue). The value range for each ScrollBar is from 0 to 255. The module contains procedures for the ScrollBar Change events. For example, here’s the procedure that’s executed when the first ScrollBar is changed:
Private Sub scbRed_Change()
Me.lblRed.BackColor = RGB(Me.scbRed.Value, 0, 0)
UpdateColor
End Sub

Figure 15.26 This dialog box lets the user select a color by specifying the red, green, and blue components.
The UpdateColor procedure adjusts the color sample displayed, and also updates the RGB values.
On the Web
This example, named getacolor function.xlsm, is available on the book’s website.
The GetAColor UserForm has another twist: It remembers the last color that was selected. When the function ends, the three ScrollBar values are stored in the Windows Registry, using this code (APPNAME is a string defined in Module1):
SaveSetting APPNAME,"Colors","RedValue", Me.scbRed.Value
SaveSetting APPNAME,"Colors","BlueValue", Me.scbBlue.Value
SaveSetting APPNAME,"Colors","GreenValue", scbGreen.Value
The UserForm_Initialize procedure retrieves these values and assigns them to the scrollbars:
Me.scbRed.Value = GetSetting(APPNAME,"Colors","RedValue", 128)
Me.scbGreen.Value = GetSetting(APPNAME,"Colors","GreenValue", 128)
Me.scbBlue.Value = GetSetting(APPNAME,"Colors","BlueValue", 128)
The last argument for the GetSetting function is the default value, which is used if the Registry key is not found. In this case, each color defaults to 128, which produces middle gray.
The SaveSetting and GetSetting functions always use this Registry key:
HKEY_CURRENT_USER\Software\VB and VBA Program Settings\
Figure 15.27 shows the Registry data, displayed with the Windows Regedit.exe program.
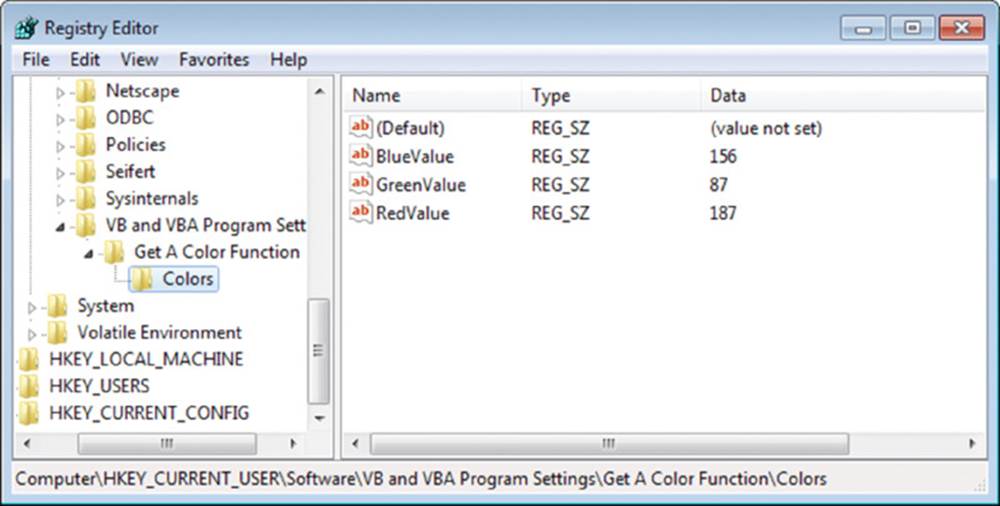
Figure 15.27 The user’s ScrollBar values are stored in the Windows Registry and retrieved the next time the GetAColor function is used.
Displaying a Chart in a UserForm
Excel provides no direct way to display a chart in a UserForm. You can, of course, copy the chart and paste it to the Picture property of an Image control, but this creates a static image of the chart, so it won’t display any changes that are made to the chart.
This section describes a technique to display a chart in a UserForm. Figure 15.28 shows a UserForm with a chart displayed in an Image object. The chart resides on a worksheet, and the UserForm always displays the current chart. This technique works by copying the chart to a temporary graphics file and then using the LoadPicture function to specify that file for the Image control’s Picture property.
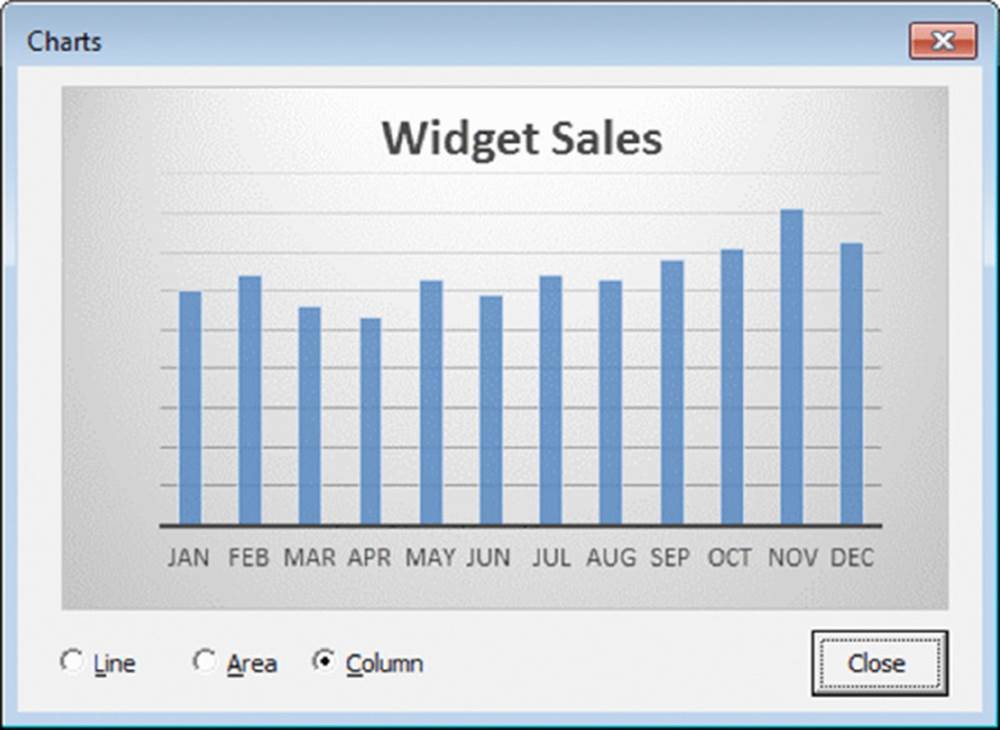
Figure 15.28 With a bit of trickery, a UserForm can display “live” charts.
On the Web
This workbook is available on the book’s website in the chart in userform.xlsm file.
To display a chart in a UserForm, follow these general steps:
1. Create your chart or charts as usual.
2. Insert a UserForm and then add an Image control.
3. Write VBA code to save the chart as a GIF file and then set the Image control’s Picture property to the GIF file. You need to use VBA’s LoadPicture function to do this task.
4. Add other bells and whistles as desired. For example, the UserForm in the demo file contains controls that let you change the chart type. Alternatively, you could write code to display multiple charts.
Saving a chart as a GIF file
The following code demonstrates how to create a GIF file (named temp.gif) from a chart (in this case, the first chart object on the sheet named Data):
Set CurrentChart = Sheets("Data").ChartObjects(1).Chart
Fname = ThisWorkbook.Path &"\temp.gif"
CurrentChart.Export FileName:=Fname, FilterName:="GIF"
Changing the Image control’s Picture property
If the Image control on the UserForm is named Image1, the following statement loads the image (represented by the Fname variable) into the Image control:
Me.Image1.Picture = LoadPicture(Fname)
Note
This technique works fine, but you may notice a slight delay when the chart is saved and then retrieved. On a fast system, however, this delay is hardly noticeable.
Making a UserForm Semitransparent
Normally, a UserForm is opaque — it completely hides whatever is underneath it. However, you can make a UserForm semitransparent, such that the user can see the worksheet under the UserForm.
Creating a semitransparent UserForm requires a number of Windows API functions. You can set the transparency level using values that range from 0 (UserForm is invisible) to 255 (UserForm is completely opaque, as usual). Values in between 0 and 255 specify a level of semitransparency.
Figure 15.29 shows an example of a UserForm with a transparency level of about 128.
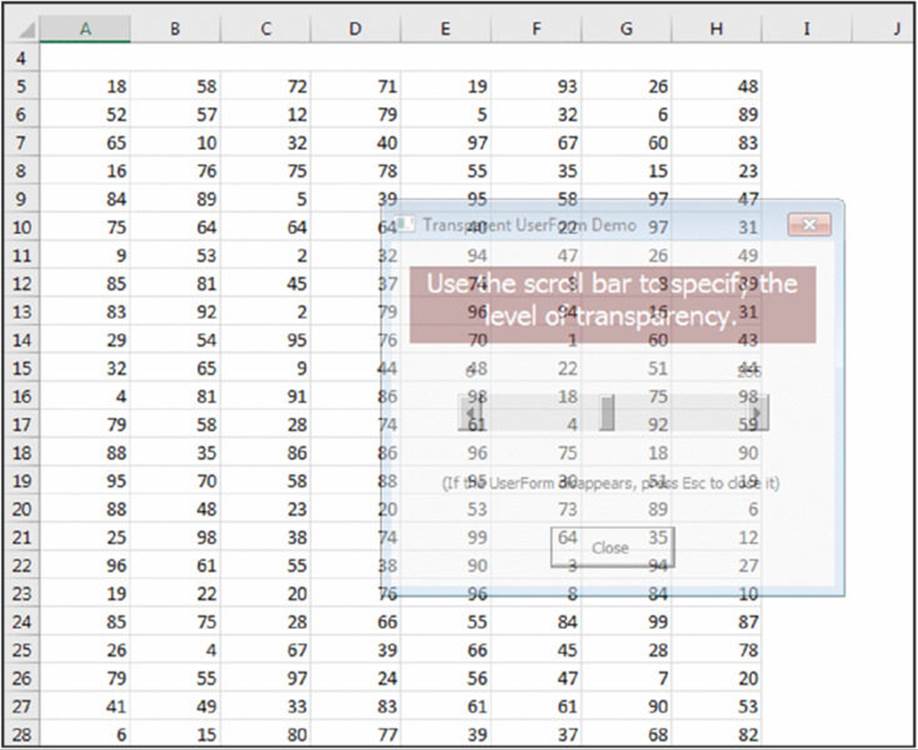
Figure 15.29 A semitransparent UserForm.
On the Web
This workbook is available on the book’s website. The filename is semi-transparent userform.xlsm.
What good is a semitransparent UserForm? After giving this question some thought, I came up with a potential use for this technique: creating a light-box effect. You’ve probably seen websites that use the light-box effect. The web page is dimmed (as if the lights are lowered), and an image or a pop-up is displayed. This effect serves to focus the user’s attention to a specific item on the screen.
Figure 15.30 shows an Excel workbook that uses the light-box effect. Excel’s window is dimmed, but the message box is displayed normally. How does it work? I created a UserForm with a black background. Then I wrote code to resize and position the UserForm so that it covers Excel’s window. Here’s the code to accomplish the cover-up:
With Me
.Height = Application.Height
.Width = Application.Width
.Left = Application.Left
.Top = Application.Top
End With
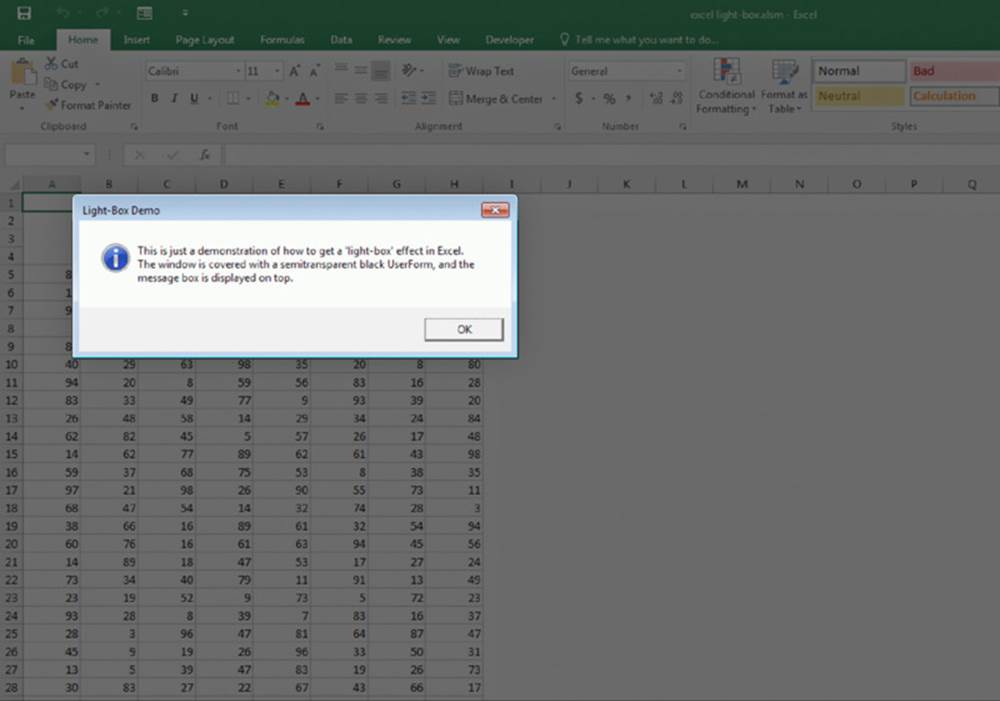
Figure 15.30 Creating a light-box effect in Excel.
Then, I made the UserForm semitransparent, which gives Excel’s window a dimmed appearance. The message box (or another UserForm) is displayed on top of the semitransparent UserForm.
On the Web
This workbook is available on the book’s website in the excel light-box.xlsm file.
A Puzzle on a UserForm
The example in this section is a familiar sliding puzzle, displayed on a UserForm (see Figure 15.31). This puzzle was invented by Noyes Chapman in the late 1800s. In addition to providing a few minutes of amusement, you may find the coding instructive.
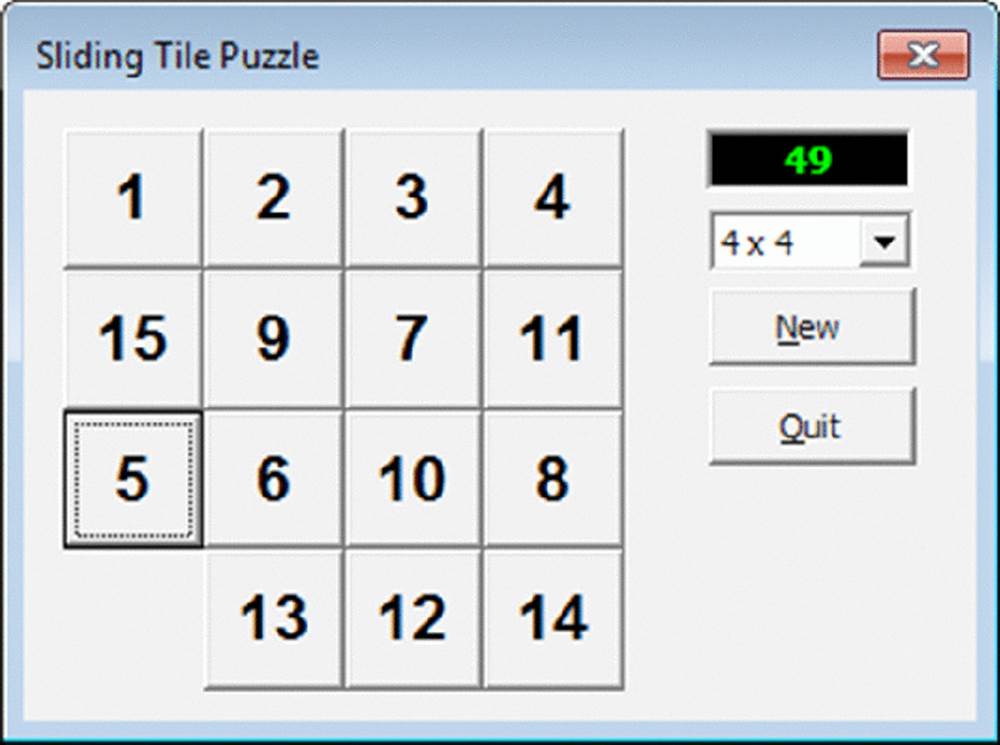
Figure 15.31 A sliding tile puzzle in a UserForm.
The goal is to arrange the shuffled tiles (CommandButton controls) in numerical order. Click a button next to the empty space, and the button moves to the empty space. The ComboBox control lets the user choose from three configurations: 3 x 3, 4 x 4, and 5 x 5. The New button shuffles the tiles, and a Label control keeps track of the number of moves.
This application uses a class module to handle all button events (see “Handling Multiple UserForm Controls with One Event Handler,” earlier in this chapter).
The VBA code is lengthy, so it’s not listed here. Here are a few points to keep in mind when examining the code:
· The CommandButton controls are added to the UserForm via code. The number and size of the buttons are determined by the ComboBox value.
· The tiles are shuffled by simulating a few thousand random clicks on the buttons. Another option is to simply assign random numbers, but that could result in some unsolvable games.
· The blank space in the tile grid is actually a CommandButton with its Visible property set to False.
· The class module contains one event procedure (MouseUp), which is executed whenever the user clicks a tile.
· When the user clicks a CommandButton tile, its Caption is swapped with the hidden button. The code doesn’t actually move any buttons.
On the Web
This workbook, named sliding tile puzzle.xlsm, is available on the book’s website.
Video Poker on a UserForm
And finally, proof that Excel doesn’t have to be boring. Figure 15.32 shows a UserForm set up as a casino-style video poker game.
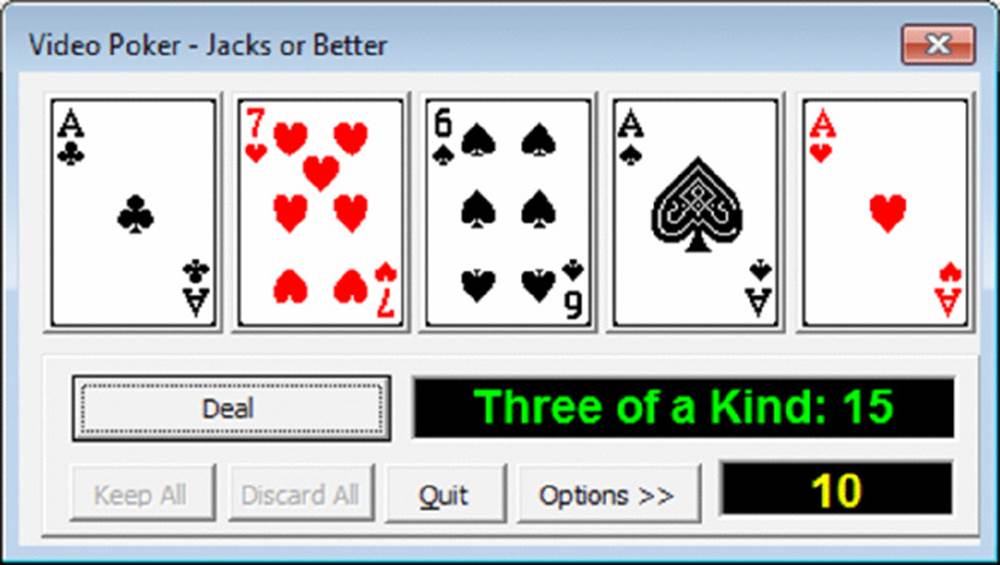
Figure 15.32 A feature-packed video poker game.
The game features:
· A choice between two games: Joker’s Wild and Jacks or Better
· A chart that shows your winning (or losing) history
· The capability to change the payoffs
· Help (displayed on a worksheet)
· An emergency button that quickly hides the UserForm
All that’s missing is the casino noise.
On the Web
This workbook, named video poker.xlsm, is available on the book’s website.
As you might expect, the code is much too lengthy to list here, but if you examine the workbook, you’ll find lots of useful UserForm tips — including a class module example.
All materials on the site are licensed Creative Commons Attribution-Sharealike 3.0 Unported CC BY-SA 3.0 & GNU Free Documentation License (GFDL)
If you are the copyright holder of any material contained on our site and intend to remove it, please contact our site administrator for approval.
© 2016-2026 All site design rights belong to S.Y.A.