Excel 2016 Power Programming with VBA (2016)
Part IV. Developing Excel Applications
· Chapter 16
Creating and Using Add-Ins
· Chapter 17
Working with the Ribbon
· Chapter 18
Working with Shortcut Menus
· Chapter 19
Providing Help for Your Applications
· Chapter 20
Leveraging Class Modules
· Chapter 21
Understanding Compatibility Issues
Chapter 16. Creating and Using Add-Ins
In This Chapter
· Understanding the concept of add-ins
· Exploring Excel’s Add-In Manager
· Creating an add-in
· Comparing XLAM add-in files to XLSM files
· Viewing VBA code that manipulates add-ins
· Detecting whether an add-in is installed properly
What Is an Add-In?
One of Excel’s most useful features for developers is the capability to create add-ins. Creating add-ins adds a professional touch to your work, and add-ins offer several key advantages over standard workbook files.
Generally speaking, a spreadsheet add-in is something added to a spreadsheet to give it additional functionality. Excel ships with several add-ins. Examples include Analysis ToolPak, (which adds statistical and analysis capabilities) and Solver (which performs advanced optimization calculations).
Some add-ins also provide new worksheet functions that you can use in formulas. With a well-designed add-in, the new features blend in well with the original interface, so they appear to be part of Excel.
Comparing an add-in with a standard workbook
Any knowledgeable Excel user can create an add-in from an Excel workbook file; no additional software or programming tools are required. You can convert any workbook file to an add-in, but not every workbook is appropriate for an add-in. An Excel add-in is basically a normal XLSM workbook with the following differences:
· The IsAddin property of the ThisWorkbook object is True. By default, this property is False.
· The workbook window is hidden in such a way that it can’t be unhidden by choosing the View ➜ Window ➜ Unhide command. This means that you can’t display worksheets or chart sheets contained in an add-in unless you write code to copy the sheet to a standard workbook.
· An add-in isn’t a member of the Workbooks collection. Rather, it’s a member of the AddIns collection. However, you can access an add-in through the Workbooks collection (see “XLAM file VBA collection membership,” later in this chapter).
· You install and uninstall add-ins by using the Add-Ins dialog box. When an add-in is installed, it remains installed across Excel sessions.
· The Macro dialog box (invoked by choosing Developer ➜ Code ➜ Macros or View ➜ Macros ➜ Macros) doesn’t display the names of the macros contained in an add-in.
· When you write formulas, you can use a custom worksheet function stored in an add-in without having to precede the function’s name with the source workbook’s filename.
 Note
Note
In the past, Excel allowed you to use any extension for an add-in. Beginning with Excel 2007, you can still use any extension for an add-in, but if the extension is not XLA or XLAM, you see the warning shown in Figure 16.1. This prompt occurs even if the add-in is an installed add-in that opens automatically when Excel starts, and even if the file is in a trusted location.

Figure 16.1 Excel warns you if an add-in uses a nonstandard file extension.
Why create add-ins?
You might decide to convert your Excel application into an add-in for any of the following reasons:
· To restrict access to your code and worksheets: When you distribute an application as an add-in and you protect its VBA project with a password, users can’t view or modify the sheets or the VBA code in the workbook. Therefore, if you use proprietary techniques in your application, you can prevent anyone from copying the code — or at least make it more difficult to do so.
· To separate your VBA code from your data: If you send a macro-enabled workbook to a user that contains both code and data, it’s difficult to update the code. The user may have added data or changed existing data. If you send another workbook with update code, the data changes will be lost.
· To make deploying your application easier: You can put an add-in on a network share and have users load it from there. If changes are required, you can replace the add-in on the network share, and when the users restart Excel, the new add-in will load.
· To avoid confusion: If a user loads your application as an add-in, the file isn’t visible and is, therefore, less likely to confuse novice users or get in the way. Unlike a hidden workbook, an add-in can’t be unhidden.
· To simplify access to worksheet functions: Custom worksheet functions stored in an add-in don’t require the workbook name qualifier. For example, if you store a custom function named MOVAVG in a workbook named Newfuncs.xlsm, you must use syntax like the following to use this function in a formula that’s in a different workbook:
·=Newfuncs.xlsm!MOVAVG(A1:A50)
But if this function is stored in an add-in file that’s open, you can use much simpler syntax because you don’t need to include the file reference:
=MOVAVG(A1:A50)
· To provide easier access for users: After you identify the location of your add-in, it appears in the Add-Ins dialog box with a friendly name and a description of what it does.
· To gain better control over loading: Add-ins can be opened automatically when Excel starts, regardless of the directory in which they are stored.
· To avoid displaying prompts when unloading: When an add-in is closed, the user never sees the Do you want to save change? prompt.
Note
The capability to use add-ins is determined by the user’s security settings in the Add-Ins tab of the Trust Center dialog box (see Figure 16.2). To display this dialog box, choose Developer ➜ Code ➜ Macro Security. Or, if the Developer tab isn’t displayed, choose Office ➜ Excel Options ➜ Trust Center, and then click the Trust Center Settings button.
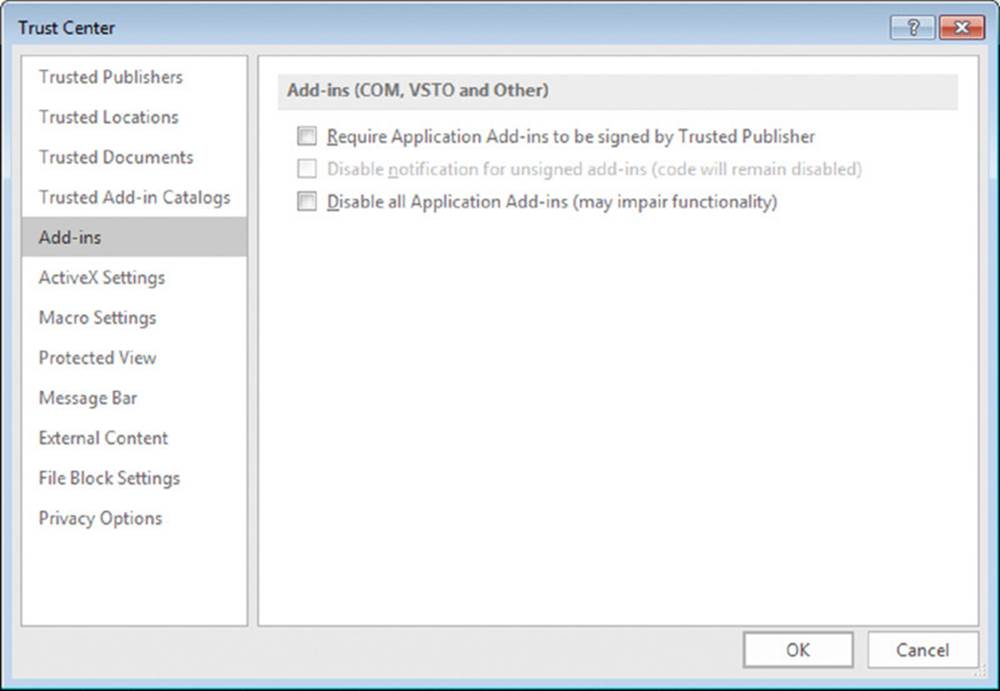
Figure 16.2 These settings affect whether add-ins can be used.
 About COM add-ins
Excel also supports COM (Component Object Model) add-ins. These files have a .dll or .exe file extension. A COM add-in can be written so that it works with all Office applications that support add-ins. An additional advantage is that the code is compiled, so the original source isn’t viewable. Unlike XLAM add-ins, a COM add-in can’t contain Excel sheets or charts. COM add-ins are developed in Visual Basic .NET. Discussion of creating COM add-in procedures is well beyond the scope of this book.
Understanding Excel’s Add-In Manager
The most efficient way to load and unload add-ins is with Excel’s Add-Ins dialog box, which you access by using either of these methods:
· Choose File ➜ Options ➜ Add-Ins. Then, in the Excel Options dialog box, choose Excel Add-Ins from the Manage drop-down box and click Go.
· Choose Developer ➜ Add-Ins ➜ Excel ➜ Add-Ins. Note that, by default, the Developer tab is not visible. At least one file must be open for this Ribbon button to be enabled.
· Press Alt+TI, a shortcut key sequence used in earlier versions of Excel that still works. At least one file must be open for this shortcut to work.
Figure 16.3 shows the Add-Ins dialog box. The list contains the names of all add-ins that Excel knows about, and check marks identify installed add-ins. You can open (install) and close (uninstall) add-ins from this dialog box by selecting or deselecting the check boxes. When you uninstall an add-in, it is not removed from your system. It remains in the list in case you want to install it later. Use the Browse button to locate additional add-ins and add them to the list.
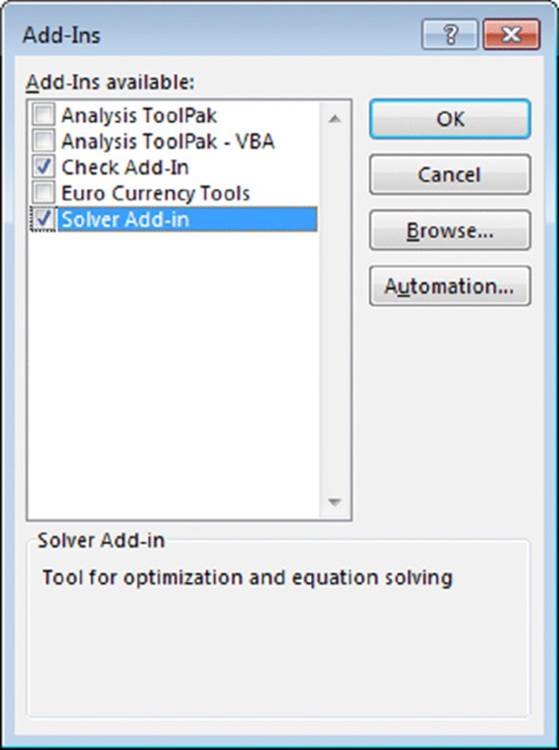
Figure 16.3 The Add-Ins dialog box.
 Caution
You can open most add-in files also by choosing the File ➜ Open command. Because an add-in is never the active workbook, however, you can’t close an add-in by choosing File ➜ Close. You can remove the add-in only by exiting and restarting Excel or by executing VBA code to close the add-in. For example:
Workbooks("myaddin.xlam").Close
Opening an add-in with the File ➜ Open command opens the file but does not officially install the add-in.
When you open an add-in, you might notice something different about Excel. In almost every case, the user interface changes in some way: Excel displays either a new command on the Ribbon or new menu items on a shortcut menu. For example, when the Analysis ToolPak add-in is installed, it gives you a new command: Data ➜ Analysis ➜ Data Analysis. When you install Excel’s Euro Currency Tools add-in, you get a new group in the Formulas tab: Solutions.
If the add-in contains only custom worksheet functions, the new functions appear in the Insert Function dialog box.
Note
If you open an add-in created in a version before Excel 2007, any user interface modifications made by the add-in won’t appear as they were intended to appear. Rather, you must access the user interface items (menus and toolbars) by choosing Add-Ins ➜ Menu Commands or Add-Ins ➜ Custom Toolbars.
Creating an Add-In
You can convert any workbook to an add-in, but not all workbooks are appropriate candidates for add-ins. First, an add-in must contain macros. (Otherwise, it’s useless.)
Generally, a workbook that benefits most from being converted to an add-in is one that contains general-purpose macro procedures. A workbook that consists only of worksheets would be inaccessible as an add-in because worksheets within add-ins are hidden from the user. You can, however, write code that copies all or part of a sheet from your add-in to a visible workbook.
Creating an add-in from a workbook is simple. The following steps describe the general procedure for creating an add-in from a normal workbook file:
1. Develop your application and make sure that everything works properly.
2. Include a way to execute the macro or macros in the add-in.
 Cross-Ref
See Chapters 17 and 18 for more information about modifying Excel’s user interface.
3. Activate the Visual Basic Editor (VBE) and select the workbook in the Project window.
4. Choose Tools ➜ xxx Properties (where xxx represents the name of the project), click the Protection tab, and select the Lock Project for Viewing check box. Then enter a password (twice), and click OK.
This step is necessary only if you want to prevent others from viewing or modifying your macros or UserForms.
5. Reactivate Excel and choose Developer ➜ Modify ➜ Document Panel to display the Document Properties panel.
6. Enter a brief descriptive title in the Title field and a longer description in the Comments field.
This step isn’t required, but it makes the add-in easier to use by displaying descriptive text in the Add-Ins dialog box.
7. Choose File ➜ Save As to display the Save As dialog box.
8. In the Save As dialog box, select Excel Add-In (*.xlam) from the Save as Type drop-down list.
Excel proposes the standard add-ins directory, but you can save the add-in to any location.
9. Click Save.
A copy of the workbook is saved (with an .xlam extension), and the original workbook remains open.
10.Close the original workbook, and then install the add-in version.
11. Test the add-in to make sure it works correctly.
If your add-in doesn’t work, make changes to your code. And don’t forget to save your changes. Because an add-in doesn’t appear in an Excel window, you must save it from the VBE.
Caution
A workbook being converted to an add-in must have at least one worksheet, and a worksheet must be the active sheet when you create the add-in. If a chart sheet is active, the option to save the workbook as an add-in does not appear in the Save As dialog box.
A few words about passwords
Microsoft has never promoted Excel as a product that creates applications in which the source code is secure. The password feature provided in Excel is sufficient to prevent casual users from accessing parts of your application that you’d like to keep hidden. However, if you must be absolutely sure that no one ever sees your code or formulas, Excel isn’t your best choice as a development platform.
An Add-In Example
In this section, I discuss the steps involved in creating a useful add-in. The example uses a utility I created that exports charts to separate graphic files. The utility adds a new group (Export Charts) to the Home tab (and can be accessed also by pressing Ctrl+Shift+E).Figure 16.4 shows the main dialog box for this utility. This is a fairly complicated utility, and you might want to take some time to see how it works.
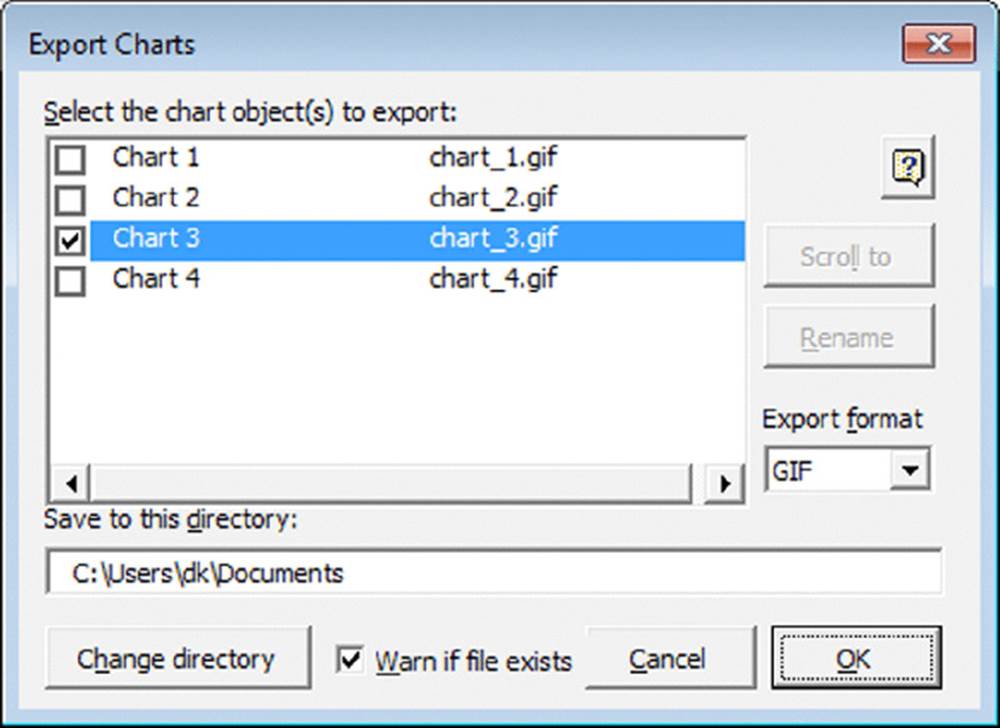
Figure 16.4 The Export Charts workbook will make a useful add-in.
 On the Web
The XLSM version of the Export Charts utility (named export charts.xlsm) is available on the book’s website. You can use this file to create the described add-in.
In this example, you’ll be working with an application that has already been developed and debugged. The workbook consists of the following items:
· A worksheet named Sheet1: This sheet is not used, but it must be present because every add-in must have at least one worksheet.
· A UserForm named UExport: This dialog box serves as the primary user interface. The code module for this UserForm contains several event-handler procedures.
· A UserForm named URename: This dialog box is displayed when the user clicks the Rename button to change the filename of a chart to be exported.
· A UserForm named USplash: This dialog box is displayed when the workbook is opened. It briefly describes how to access the Export Charts utility and also contains a Don't Show This Message Again check box.
· A VBA module named Module1: This module contains several procedures, including the main procedure (named StartExportCharts), which displays the UExport dialog box.
· ThisWorkbook code module: This module contains a Workbook_Open procedure that reads the saved settings and displays a start-up message.
· XML code to customize the Ribbon: This customization was done outside Excel. See Chapter 17 for more information about customizing the Ribbon by using RibbonX.
Adding descriptive information for the example add-in
To enter a title and description for your add-in, choose File ➜ Info, and choose Advanced Properties from the Properties drop-down.
Enter a title for the add-in in the Title field. This text will appear in the list in the Add-Ins dialog box. In the Comments field, enter a description of the add-in. This information will appear at the bottom of the Add-Ins dialog box when the add-in is selected.
Adding a title and description for the add-in is optional but highly recommended.
Creating an add-in
To create an add-in, do the following:
1. Activate VBE and select the future add-in workbook in the Project window.
2. Choose Debug ➜ Compile.
This step forces a compilation of the VBA code and also identifies any syntax errors so that you can correct them. When you save a workbook as an add-in, Excel creates the add-in even if it contains syntax errors.
3. Choose Tools ➜ xxx Properties (where xxx represents the name of the project) to display the Project Properties dialog box, click the General tab, and enter a new name for the project.
By default, all VB projects are named VBProject. In this example, the project name is changed to ExpCharts. This step is optional but recommended.
4. Save the workbook one last time using its *.XLSM name.
Strictly speaking, this step isn’t necessary, but it gives you an XLSM backup (with no password) of your XLAM add-in file.
5. With the Project Properties dialog box still displayed, click the Protection tab, select the Lock Project for Viewing check box, and enter a password (twice). Click OK.
The code will remain viewable, and the password protection will take effect the next time the file is opened. If you don’t need to protect the project, you can skip this step.
6. In Excel, choose File ➜ Save As.
Excel displays its Save As dialog box.
7. In the Save as Type drop-down list, select Excel Add-In (*.xlam).
8. Click Save.
A new add-in file is created, and the original XLSM version remains open.
When you create an add-in, Excel proposes the standard add-ins directory, but add-ins can be located in any directory.
About Excel’s Add-In Manager
You install and uninstall add-ins by using Excel’s Add-Ins dialog box. This dialog box lists the names of all available add-ins. Those with check marks are installed.
In VBA terms, the Add-In dialog box lists the Title property of each AddIn object in the AddIns collection. Each add-in that appears with a check mark has its Installed property set to True.
You can install an add-in by selecting its check box, and you can uninstall an installed add-in by removing the check mark. To add an add-in to the list, use the Browse button to locate its file. By default, the Add-In dialog box lists files of the following types:
· XLAM: An Excel 2007 or later add-in created from an XLSM file
· XLA: A pre–Excel 2007 add-in created from an XLS file
· XLL: A stand-alone compiled DLL file
If you click the Automation button, you can browse for COM add-ins. Note that the Automation Servers dialog box will probably list many files, including COM add-ins that don’t work with Excel.
You can include an add-in file in the AddIns collection with the Add method of the VBA AddIns collection, but you can’t remove one by using VBA. You can also open an add-in from within VBA code by setting the AddIn object’s Installed property to True. Setting it to False closes the add-in.
Add-In Manager stores the installed status of the add-ins in the Windows Registry when you exit Excel. Therefore, all add-ins that are installed when you close Excel are automatically opened the next time you start Excel.
Installing an add-in
To avoid confusion, close the XLSM workbook before installing the add-in created from that workbook.
To install an add-in, do the following:
1. Choose File ➜ Options, and click the Add-Ins tab.
2. Choose Excel Add-Ins from the Manage drop-down list, and then click Go (or press Alt+TI).
Excel displays the Add-Ins dialog box.
3. Click the Browse button and locate and double-click the add-in that you just created.
After you find your new add-in, the Add-Ins dialog box displays the add-in in its list. As shown in Figure 16.5, the Add-Ins dialog box also displays the descriptive information that you provided in the Document Properties panel.
4. Click OK to close the dialog box and open the add-in.
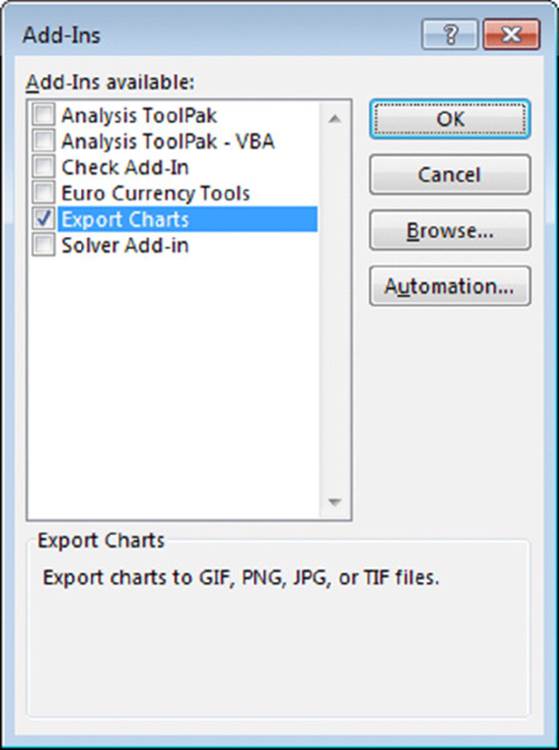
Figure 16.5 The Add-Ins dialog box with the new add-in selected.
When the Export Charts add-in is opened, the Home tab displays a new group, Export Charts, with two controls. One control displays the Export Charts dialog box; the other displays the Help file.
You can use the add-in also by pressing its shortcut key combination: Ctrl+Shift+E.
Testing the add-in
After installing the add-in, it’s a good idea to perform some additional testing. For this example, open a new workbook and create some charts to try out the various features in the Export Charts utility. Do everything you can think of to try to make the add-in fail. Better yet, seek the assistance of someone unfamiliar with the application to give it a crash test.
If you discover any errors, you can correct the code in the add-in (the original file is not required). After making changes, save the file by choosing File ➜ Save in VBE.
Distributing an add-in
You can distribute this add-in to other Excel users simply by giving them a copy of the XLAM file (they don’t need the XLSM version) along with instructions on how to install it. If you locked the file with a password, your macro code cannot be viewed or modified by others unless they know the password.
Modifying an add-in
If you need to modify an add-in, first open it and then unlock the VB project if you applied a password. To unlock it, activate VBE and then double-click its project’s name in the Project window. You’ll be prompted for the password. Make your changes, and then save the file from VBE (choose File ➜ Save).
If you create an add-in that stores its information in a worksheet, you must set its IsAddIn property to False before you can view that workbook in Excel. You do this in the Properties window shown in Figure 16.6 when the ThisWorkbook object is selected. After you make your changes, set the IsAddIn property back to True before you save the file. If you leave the IsAddIn property set to False, Excel won’t let you save the file with the XLAM extension.

Figure 16.6 Making an add-in not an add-in.
Creating an add-in: A checklist
Before you release your add-in to the world, take a few minutes to run through this checklist:
· Did you test your add-in with all supported platforms and Excel versions?
· Did you give your VB project a new name? By default, every project is named VBProject. It’s a good idea to give your project a more meaningful name.
· Does your add-in make any assumptions about the user’s directory structure or directory names?
· When you use the Add-Ins dialog box to load your add-in, are its name and description correct and appropriate?
· If your add-in uses VBA functions that aren’t designed to be used in a worksheet, have you declared the functions as Private? If not, these functions will appear in the Insert Function dialog box.
· Did you remember to remove all Debug.Print statements from your code?
· Did you force a recompile of your add-in to ensure that it contains no syntax errors?
· Did you account for any international issues?
· Is your add-in file optimized for speed? See “Optimizing the Performance of Add-Ins” later in this chapter.
Comparing XLAM and XLSM Files
This section begins by comparing an XLAM add-in file with its XLSM source file. Later in this chapter, I discuss methods that you can use to optimize the performance of your add-in.
For starters, an add-in based on an XLSM source file is the same size as the original. The VBA code in XLAM files isn’t optimized, so faster performance isn’t among the benefits of using an add-in.
XLAM file VBA collection membership
An add-in is a member of the AddIns collection but isn’t an official member of the Workbooks collection. However, you can refer to an add-in by using the Workbooks method of the Application object and supplying the add-in’s filename as its index. The following instruction creates an object variable that represents an add-in named myaddin.xlam:
Dim TestAddin As Workbook
Set TestAddin = Workbooks("myaddin.xlam")
Add-ins cannot be referenced by an index number in the Workbooks collection. If you use the following code to loop through the Workbooks collection, the myaddin.xlam workbook isn’t displayed:
Dim w as Workbook
For Each w in Application.Workbooks
MsgBox w.Name
Next w
The following For-Next loop, on the other hand, displays myaddin.xlam — assuming that Excel “knows” about it — in the Add-Ins dialog box:
Dim a as Addin
For Each a in Application.AddIns
MsgBox a.Name
Next a
Visibility of XLSM and XLAM files
Ordinary workbooks are displayed in one or more windows. For example, the following statement displays the number of windows for the active workbook:
MsgBox ActiveWorkbook.Windows.Count
You can manipulate the visibility of each window for a workbook by choosing the View ➜ Window ➜ Hide command (in Excel) or by changing the Visible property using VBA. The following code hides all windows for the active workbook:
Dim Win As Window
For Each Win In ActiveWorkbook.Windows
Win.Visible = False
Next Win
Add-in files are never visible, and they don’t officially have windows, even though they have unseen worksheets. Consequently, add-ins don’t appear in the windows list when you choose the View ➜ Window ➜ Switch Windows command. If myaddin.xlam is open, the following statement returns 0:
MsgBox Workbooks("myaddin.xlam").Windows.Count
Worksheets and chart sheets in XLSM and XLAM files
Add-in files, like normal workbook files, can have any number of worksheets or chart sheets. But to convert an XLSM file to an add-in, the file must have at least one worksheet. In many cases, this worksheet will be empty.
When an add-in is open, your VBA code can access its sheets as if they were in an ordinary workbook. Because add-in files aren’t part of the Workbooks collection, however, you must always reference an add-in by its name and not by an index number. The following example displays the value in cell A1 of the first worksheet in myaddin.xla, which is assumed to be open:
MsgBox Workbooks("myaddin.xlam").Worksheets(1).Range("A1").Value
If your add-in contains a worksheet that you’d like the user to see, you can either copy the sheet to an open workbook or create a new workbook from the sheet.
The following code, for example, copies the first worksheet from an add-in and places it in the active workbook (as the last sheet):
Sub CopySheetFromAddin()
Dim AddinSheet As Worksheet
Dim NumSheets As Long
Set AddinSheet = Workbooks("myaddin.xlam").Sheets(1)
NumSheets = ActiveWorkbook.Sheets.Count
AddinSheet.Copy After:=ActiveWorkbook.Sheets(NumSheets)
End Sub
Note that this procedure works even if the VBA project for the add-in is protected with a password.
Creating a new workbook from a sheet within an add-in is even simpler:
Sub CreateNewWorkbook()
Workbooks("myaddin.xlam").Sheets(1).Copy
End Sub
Note
The previous examples assume that the code is in a file other than the add-in file. VBA code within an add-in should always use ThisWorkbook to qualify references to sheets or ranges within the add-in. For example, the following statement is assumed to be in a VBA module in an add-in file. This statement displays the value in cell A1 on Sheet 1:
MsgBox ThisWorkbook.Sheets("Sheet1").Range("A1").Value
Accessing VBA procedures in an add-in
Accessing the VBA procedures in an add-in is a bit different from accessing procedures in a normal XLSM workbook. First of all, when you choose the View ➜ Macros ➜ Macros command, the Macro dialog box doesn’t display the names of macros that are in open add-ins. It’s almost as if Excel were trying to prevent you from accessing them.
 Tip
Tip
If you know the name of the procedure in the add-in, you can enter it directly in the Macro dialog box and click Run to execute it. The Sub procedure must be in a standard VBA module and not in a code module for an object.
Because procedures contained in an add-in aren’t listed in the Macro dialog box, you must provide other means to access them. Your choices include direct methods (such as shortcut keys and Ribbon commands) as well as indirect methods (such as event handlers). One such candidate, for example, may be the OnTime method, which executes a procedure at a specific time of day.
You can use the Run method of the Application object to execute a procedure in an add-in. For example:
Application.Run"myaddin.xlam!DisplayNames"
Another option is to use the Tools ➜ References command in VBE to enable a reference to the add-in. Then you can refer directly to one of its procedures in your VBA code without the filename qualifier. In fact, you don’t need to use the Run method; you can call the procedure directly as long as it’s not declared as Private. The following statement executes a procedure named DisplayNames in an add-in that has been added as a reference:
Call DisplayNames
Note
Even when a reference to the add-in has been established, its macro names don’t appear in the Macro dialog box.
Function procedures defined in an add-in work just like those defined in an XLSM workbook. They’re easy to access because Excel displays their names in the Insert Function dialog box under the User Defined category (by default). The only exception is if theFunction procedure was declared with the Private keyword; then the function doesn’t appear there. That’s why it’s a good idea to declare custom functions as Private if they will be used only by other VBA procedures and aren’t designed to be used in worksheet formulas.
You can use worksheet functions contained in add-ins without the workbook name qualifier. For example, if you have a custom function named MOVAVG stored in the file newfuncs.xlsm, you’d use the following instruction to address the function from a worksheet in a different workbook:
=newfuncs.xlsm!MOVAVG(A1:A50)
But if this function is stored in an add-in file that’s open, you can omit the file reference and write the following instead:
=MOVAVG(A1:A50)
Keep in mind that a workbook that uses a function defined in an add-in will have a link to that add-in. Therefore, the add-in must be available whenever that workbook is used.
Sleuthing a protected add-in
The Macro dialog box doesn’t display the names of procedures contained in add-ins. But what if you’d like to run such a procedure? You can’t run a procedure if you don’t know it’s name, but you can find its name by using Object Browser.
To illustrate, install the Euro Currency Tools add-in. This add-in is distributed with Excel and is password-protected, so you can’t view the code. When installed, the add-in creates a new group, called Solutions, on the Formulas tab of the Ribbon. When you click the Euro Conversion button, the Euro Conversion dialog box is displayed. This dialog box lets you convert a range that contains currencies.
To determine the name of the procedure that displays this dialog box, follow these steps:
1. Activate VBE, and then select the EUROTOOL.XLAM project in the Project window.
2. Press F2 to activate Object Browser.
3. In the Libraries drop-down list, select EuroTool, which displays all the classes in the EUROTOOL.XLAM add-in, as depicted in the following figure.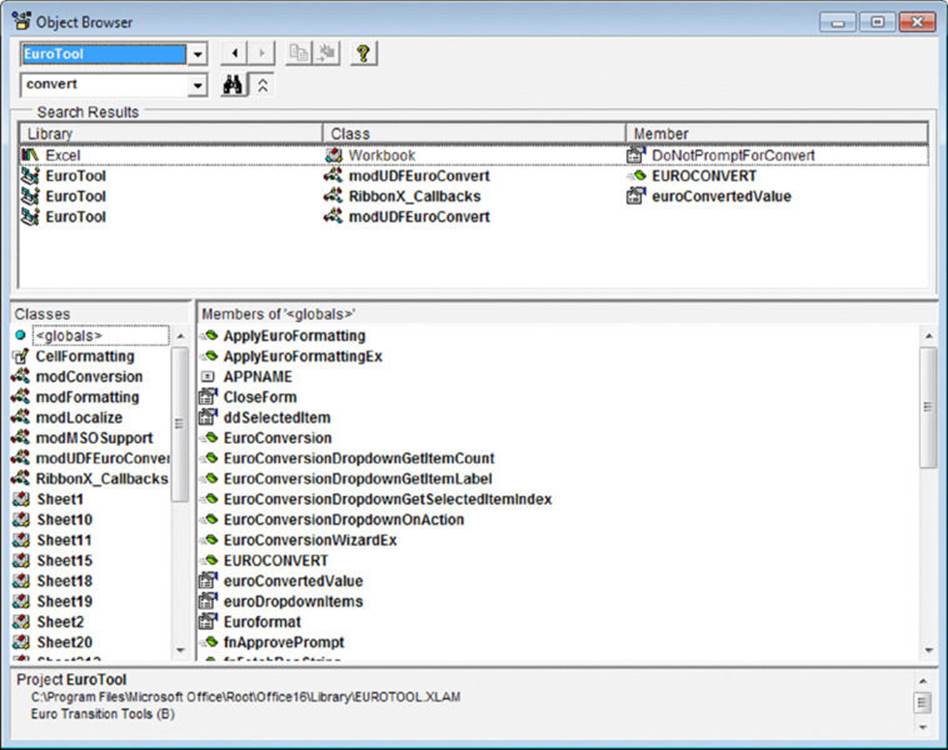
4. Select various items in the Classes list to see what class they are and the members that they contain.
You see that this add-in has quite a few worksheets. Excel allows you to copy sheets from protected add-ins, so if you’d like to take a look at one of the worksheets, use the Immediate window and copy the worksheet to a new workbook using a statement like this:
Workbooks("eurotool.xlam").Sheets(1).Copy
Or to examine all the worksheets, execute this statement, which converts the add-in to a standard workbook:
Workbooks("eurotool.xlam").IsAddin = False
The following figure shows a portion of the workbook. This sheet (and the others) contain information used to localize the add-in for different languages.
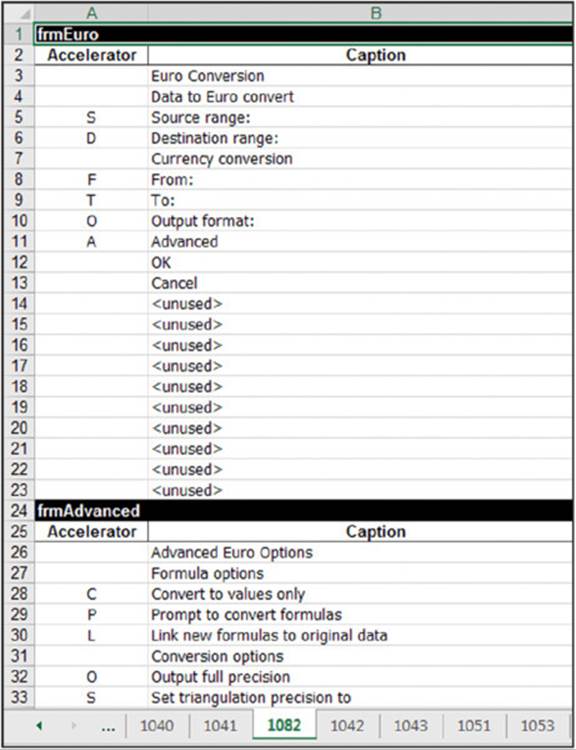
That’s interesting, but it doesn’t help identify the procedure name we’re seeking.
This add-in has many procedures; I tried executing several likely candidates, but none of them displayed the dialog box. Then I looked at the members listed in the ThisWorkbook code module and noticed a procedure called EuroConversionWizard. I tried to execute it, but I got an error. Then I tried another command:
Application.Run"eurotool.xlam!ThisWorkbook.EuroConversionWizard"
Success! Executing this statement displays the Euro Conversion dialog box.
Armed with this information, you can write VBA code to display the Euro Conversion dialog box — assuming, of course, that you can think of a reason to do so.
Manipulating Add-Ins with VBA
In this section, I present information that can help you write VBA procedures that manipulate add-ins.
The AddIns collection consists of all add-ins that Excel knows about. These add-ins can be either installed or not. The Add-Ins dialog box lists all members of the AddIns collection. Those entries accompanied by a check mark are installed.
Note
Beginning with Excel 2010, an additional collection is available: AddIns2. This collection is the same as the AddIns collection but also includes add-ins that were opened using the File ➜ Open command. In the past, accessing these add-ins required an XLM macro.
Adding an item to the AddIns collection
The add-in files that make up the AddIns collection can be stored anywhere. Excel maintains a partial list of these files and their locations in the Windows Registry. For Excel 2016, this list is stored at:
HKEY_CURRENT_USER\Software\Microsoft\Office\16.0\Excel\Add-in Manager
You can use the Windows Registry Editor (regedit.exe) to view this Registry key. Note that the standard add-ins shipped with Excel do not appear in this Registry key. In addition, add-in files stored in the following directory also appear in the list but aren’t listed in the Registry:
C:\Program Files\Microsoft Office\root\Office16\Library Note that the path on your system may be different depending on the version of Windows you are using. You can add a new AddIn object to the AddIns collection either manually or programmatically. To add a new add-in to the collection manually, display the Add-Ins dialog box, click the Browse button, and locate the add-in.
To add a new member to the AddIns collection with VBA, use the collection’s Add method. Here’s an example:
Application.AddIns.Add"c:\files\newaddin.xlam"
After the preceding instruction is executed, the AddIns collection has a new member, and the Add-Ins dialog box shows a new item in its list. If the add-in already exists in the collection, nothing happens and an error isn’t generated.
If the add-in is on removable media (for example, a CD-ROM), you can also copy the file to Excel’s library directory with the Add method. The following example copies myaddin.xlam from drive E and adds it to the AddIns collection. The second argument (True, in this case) specifies whether the add-in should be copied. If the add-in resides on a hard drive, the second argument can be ignored.
Application.AddIns.Add"e:\myaddin.xla", True
Note
Adding a new file to the AddIns collection does not install it. To install the add-in, set its Installed property to True.
Caution
The Windows Registry doesn’t get updated until Excel closes normally. Therefore, if Excel ends abnormally (that is, if it crashes), the add-in’s name won’t get added to the Registry and the add-in won’t be part of the AddIns collection when Excel restarts.
Removing an item from the AddIns collection
Oddly, there is no direct way to remove an add-in from the AddIns collection. The AddIns collection doesn’t have a Delete or Remove method. One way to remove an add-in from the Add-Ins dialog box is to edit the Windows Registry database (using regedit.exe). After you do this, the add-in won’t appear in the Add-Ins dialog box the next time that you start Excel. Note that this method isn’t guaranteed to work with all add-in files.
Another way to remove an add-in from the AddIns collection is to delete, move, or rename its XLAM (or XLA) file. You’ll get a warning like the one in Figure 16.7 the next time you try to install or uninstall the add-in, along with an opportunity to remove it from theAddIns collection.
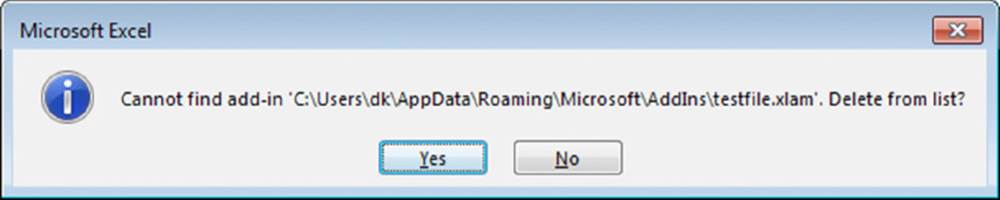
Figure 16.7 One way to remove a member of the AddIns collection.
AddIn object properties
An AddIn object is a single member of the AddIns collection. For example, to display the filename of the first member of the AddIns collection, use the following:
Msgbox AddIns(1).Name
An AddIn object has 15 properties, which you can read about in the Help system. Of these properties, 5 are hidden. Some of the terminology is a bit confusing, so I discuss a few of the more important properties in the sections that follow.
The Name property of an AddIn object
The Name property holds the filename of the add-in. Name is a read-only property, so you can’t change the name of the file by changing the Name property.
The Path property of an AddIn object
The Path property holds the drive and path where the add-in file is stored. It doesn’t include a final backslash or the filename.
The FullName property of an AddIn object
The FullName property holds the add-in’s drive, path, and filename. This property is redundant because this information is also available from the Name and Path properties. The following instructions produce the same message:
MsgBox AddIns(1).Path &"\" & AddIns(1).Name
MsgBox AddIns(1).FullName
The Title property of an AddIn object
The Title property is a hidden property that holds a descriptive name for the add-in. The Title property is what appears in the Add-Ins dialog box. This property is set when Excel reads the file’s Title property from Windows and can’ be changed in code. You can add or change the Title property of an add-in by first setting the IsAddin property to False (so the add-in will appear as a normal workbook in Excel) and choosing File ➜Info and changing Title in the Backstage area. Don’t forget to set the IsAddin property back to Trueand save the add-in from the VBE. Because Excel only reads file properties when an add-in is installed, it won’t know about this change until you uninstall and reinstall the add-in (or restart Excel).
Of course you can also change any file property (including Title) through Windows Explorer. Right-click the add-in file in Windows Explorer and choose Properties from the shortcut menu. Then click the Details tab and make the change. If the file is open in Excel, changes you make in Windows Explorer won’t be saved, so uninstall it or close Excel before using this method.
Typically, a member of a collection is addressed by way of its Name property setting. The AddIns collection is different; it uses the Title property instead. The following example displays the filename for the Analysis ToolPak add-in (that is, analys32.xll), whose Titleproperty is "Analysis ToolPak".
Sub ShowName()
MsgBox AddIns("Analysis Toolpak").Name
End Sub
You can also reference a particular add-in with its index number if you happen to know it. But in the vast majority of cases, you will want to refer to an add-in by using its Title property.
The Comments property of an AddIn object
The Comments property stores text that is displayed in the Add-Ins dialog box when a particular add-in is selected. Like Title, Comments is read from the file property of the same name and can’t be changed in code. To change it, use either of the methods described in the preceding section. Comments can be as long as 255 characters, but the Add-Ins dialog box can display only about 100 characters.
The Installed property of an AddIn object
The Installed property is True if the add-in is currently installed — that is, if it has a check mark in the Add-Ins dialog box. Setting the Installed property to True opens the add-in. Setting it to False unloads it. Here’s an example of how to install (that is, open) the Analysis ToolPak add-in with VBA:
Sub InstallATP()
AddIns("Analysis ToolPak").Installed = True
End Sub
After this procedure is executed, the Add-Ins dialog box displays a check mark next to Analysis ToolPak. If the add-in is already installed, setting its Installed property to True has no effect. To remove this add-in (uninstall it), simply set the Installed property to False.
Caution
If an add-in was opened with the File ➜ Open command, it isn’t considered to be officially installed. Consequently, its Installed property is False. An add-in is installed only if it appears in the Add-Ins dialog box, with a check mark next to its name.
The ListAllAddIns procedure that follows creates a table that lists all members of the AddIns collection and displays the following properties: Name, Title, Installed, Comments, and Path.
Sub ListAllAddins()
Dim ai As AddIn
Dim Row As Long
Dim Table1 As ListObject
Cells.Clear
Range("A1:E1") = Array("Name","Title","Installed", _
"Comments","Path")
Row = 2
On Error Resume Next
For Each ai In Application.AddIns
Cells(Row, 1) = ai.Name
Cells(Row, 2) = ai.Title
Cells(Row, 3) = ai.Installed
Cells(Row, 4) = ai.Comments
Cells(Row, 5) = ai.Path
Row = Row + 1
Next ai
On Error GoTo 0
Range("A1").Select
ActiveSheet.ListObjects.Add
ActiveSheet.ListObjects(1).TableStyle = _
"TableStyleMedium2"
End Sub
Figure 16.8 shows the result of executing this procedure. If you modify the code to use the AddIns2 collection, the table will also include add-ins that were opened using the File ➜ Open command (if any). The AddIns2 collection is available only in Excel 2010 and later.
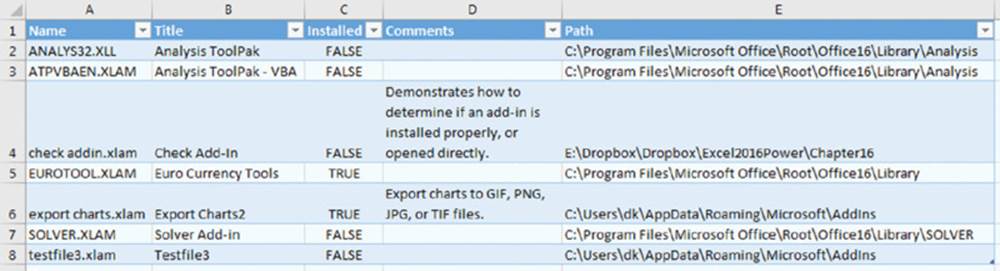
Figure 16.8 A table that lists information about all members of the AddIns collection.
On the Web
This procedure is available on the book’s website in the list add-in information.xlsm file.
Note
You can determine whether a particular workbook is an add-in by accessing its IsAddIn property. This property isn’t read-only, so you can also convert a workbook to an add-in by setting the IsAddIn property to True. And, conversely, you can convert an add-in to a workbook by setting the IsAddIn property to False. After doing so, the add-in’s worksheets will be visible in Excel — even if the add-in’s VBA project is protected. By using this technique, I learned that most of the dialog boxes in SOLVER .XLAMare old Excel 5/95 dialog sheets, not UserForms. Also, SOLVER.XLAM contains more than 500 named ranges.
Accessing an add-in as a workbook
You can open an XLAM add-in file by using the Add-Ins dialog box or by choosing the File ➜ Open command. The former method is the preferred method for the following reason: When you open an add-in with the File ➜Open command, its Installed property isnot set to True. Therefore, you can’t close the file by using the Add-Ins dialog box. In fact, the only way to close such an add-in is with a VBA statement such as the following:
Workbooks("myaddin.xlam").Close
Caution
Using the Close method on an installed add-in removes the add-in from memory but does not set its Installed property to False. Therefore, the Add-Ins dialog box still lists the add-in as installed, which can be confusing. The proper way to remove an installed add-in is to set its Installed property to False.
As you may have surmised, Excel’s add-in capability is quirky. This component (except for the addition of the AddIns2 collection) hasn’t been improved in many years. Therefore, as a developer, you need to pay particular attention to issues involving installing and uninstalling add-ins.
AddIn object events
An AddIn object has two events: AddInInstall (occurs when the add-in is installed) and AddInUninstall (occurs when it is uninstalled). You can write event-handler procedures for these events in the ThisWorkbook code module for the add-in.
The following example is displayed as a message when the add-in is installed:
Private Sub Workbook_AddInInstall()
MsgBox ThisWorkbook.Name & _" add-in has been installed."
End Sub
Caution
Don’t confuse the AddInInstall event with the Open event. The AddInInstall event occurs only when the add-in is first installed — not every time it is opened. If you need to execute code every time the add-in is opened, use a Workbook_Open procedure.
 Cross-Ref
For additional information about events, see Chapter 6.
Optimizing the Performance of Add-Ins
If you ask a dozen Excel programmers to automate a particular task, chances are that you’ll get a dozen different approaches. Most likely, not all these approaches will perform equally well.
Following are a few tips that you can use to ensure that your code runs as quickly as possible. These tips apply to all VBA code, not just the code in add-ins.
· Set the Application.ScreenUpdating property to False when writing data to a worksheet or performing any other actions that cause changes to the display.
· Declare the data type for all variables used and avoid variants whenever possible. Use an Option Explicit statement at the top of each module to force yourself to declare all variables.
· Create object variables to avoid lengthy object references. For example, if you’re working with a Series object for a chart, create an object variable by using code like this:
·
·Dim S1 As Series
·Set S1 = ActiveWorkbook.Sheets(1).ChartObjects(1). _
· Chart.SeriesCollection(1)
· Whenever possible, declare object variables as a specific object type — not As Object.
· Use the With-End With construct, when appropriate, to set multiple properties or call multiple methods for a single object.
· Remove all extraneous code. This tip is especially important if you’ve used the macro recorder to create procedures.
· Manipulate data with VBA arrays rather than worksheet ranges, if possible. Reading and writing to a worksheet usually take much longer than manipulating data in memory. However, for best results, test both options.
· Consider setting the calculation mode to Manual if your code writes lots of data to worksheets. Doing so may increase the speed significantly. Here’s a statement that changes the calculation mode:
·Application.Calculation = xlCalculationManual
· Avoid linking UserForm controls to worksheet cells. Doing so may trigger a recalculation whenever the user changes the UserForm control.
· Compile your code before creating the add-in. Doing so may increase the file size slightly, but it eliminates the need for Excel to compile the code before executing the procedures.
Special Problems with Add-Ins
Add-ins are great, but you should realize by now that there’s no free lunch. Add-ins present their share of problems — or should I say challenges? In this section, I discuss some issues that you need to know about if you’ll be developing add-ins for widespread user distribution.
Ensuring that an add-in is installed
In some cases, you may need to ensure that your add-in is installed properly — that is, opened using the Add-Ins dialog box and not the File ➜ Open command. This section describes a technique that determines how an add-in was opened and gives the user an opportunity to install the add-in if it is not properly installed.
If the add-in isn’t properly installed, the code displays a message (see Figure 16.9). Clicking Yes installs the add-in. Clicking No leaves the file open but doesn’t install it. Clicking Cancel closes the file.
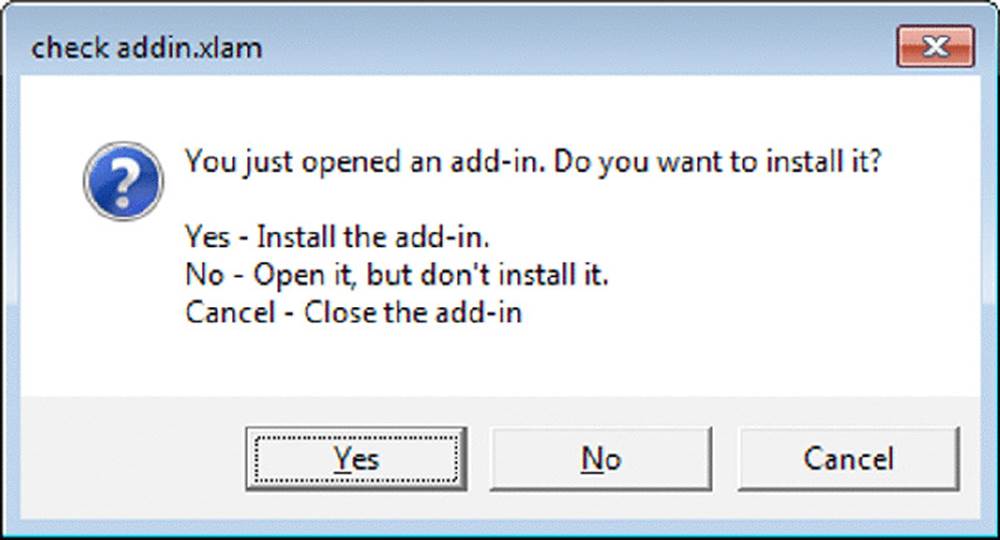
Figure 16.9 When attempting to open the add-in incorrectly, the user sees this message.
The code that follows is the code module for the add-in’s ThisWorkbook object. This technique relies on the fact that the AddInInstall event occurs before the Open event for the workbook.
Dim InstalledProperly As Boolean
Private Sub Workbook_AddinInstall()
InstalledProperly = True
End Sub
Private Sub Workbook_Open()
Dim ai As AddIn, NewAi As AddIn
Dim M As String
Dim Ans As Long
'Was just installed using the Add-Ins dialog box?
If InstalledProperly Then Exit Sub
'Is it in the AddIns collection?
For Each ai In AddIns
If ai.Name = ThisWorkbook.Name Then
If ai.Installed Then
MsgBox"This add-in is properly installed.", _
vbInformation, ThisWorkbook.Name
Exit Sub
End If
End If
Next ai
'It's not in AddIns collection, prompt user.
M ="You just opened an add-in. Do you want to install it?"
M = M & vbNewLine
M = M & vbNewLine &"Yes - Install the add-in."
M = M & vbNewLine &"No - Open it, but don't install it."
M = M & vbNewLine &"Cancel - Close the add-in"
Ans = MsgBox(M, vbQuestion + vbYesNoCancel, _
ThisWorkbook.Name)
Select Case Ans
Case vbYes
' Add it to the AddIns collection and install it.
Set NewAi = _
Application.AddIns.Add(ThisWorkbook.FullName)
NewAi.Installed = True
Case vbNo
'no action, leave it open
Case vbCancel
ThisWorkbook.Close
End Select
End Sub
The procedure covers the following possibilities:
· The add-in was opened automatically because it’s an installed add-in listed (and displaying a check mark) in the Add-Ins dialog box. The user doesn’t see a message.
· The user uses the Add-Ins dialog box to install the add-in. The user doesn’t see a message.
· The add-in was opened manually (by using File ➜ Open) and is not a member of the AddIns collection. The user sees the message and must take one of the three actions.
· The add-in was opened manually, is a member of the AddIns collection, but is not installed (not displayed with a check mark). The user sees the message and must take one of the three actions.
By the way, you can also use this code as a way to simplify the installation of an add-in that you give to someone. Just tell them to double-click the add-in’s filename (which opens it in Excel) and respond Yes to the prompt. Better yet, modify the code so that the add-in is installed without a prompt.
On the Web
This add-in, named check addin.xlam, is available on the book’s website. Try opening it using both methods (with the Add-Ins dialog box and by choosing File ➜ Open).
Referencing other files from an add-in
If your add-in uses other files, you need to be especially careful when distributing the application. You can’t assume anything about the storage structure of the system on which users will run the application. The easiest approach is to insist that all files for the application be copied to a single directory. Then you can use the Path property of your application’s workbook to build path references to all other files.
For example, if your application uses a custom help file, be sure that the help file is copied to the same directory as the application itself. Then you can use a procedure like the following to make sure that the help file can be located:
Sub GetHelp()
Application.Help ThisWorkbook.Path &"\userhelp.chm"
End Sub
If your application uses Application Programming Interface (API) calls to standard Windows DLLs, you can assume that these can be found by Windows. But if you use custom DLLs, the best practice is to make sure that they’re installed in the Windows\Systemdirectory (which might or might not be named Windows\System). You’ll need to use the GetSystemDirectory Windows API function to determine the exact path of the System directory.
Detecting the proper Excel version for your add-in
As you may know, those who use an earlier version of Excel can open Excel 2007 (and later) files if they’ve installed Microsoft’s Compatibility Pak. If your add-in uses any features unique to Excel 2007 or later, you’ll want to warn users who attempt to open the add-in with an earlier version. The following code does the trick:
Sub CheckVersion()
If Val(Application.Version) < 12 Then
MsgBox"This works only with Excel 2007 or later"
ThisWorkbook.Close
End If
End Sub
The Version property of the Application object returns a string. For example, this might return 12.0a. This procedure uses VBA’s Val function, which ignores everything beginning with the first non-numeric character.
Cross-Ref
See Chapter 21 for additional information about compatibility.
All materials on the site are licensed Creative Commons Attribution-Sharealike 3.0 Unported CC BY-SA 3.0 & GNU Free Documentation License (GFDL)
If you are the copyright holder of any material contained on our site and intend to remove it, please contact our site administrator for approval.
© 2016-2026 All site design rights belong to S.Y.A.