Excel 2016 Power Programming with VBA (2016)
Part I. Introduction to Excel VBA
· Chapter 1
Essentials of Spreadsheet Application Development
· Chapter 2
Introducing Visual Basic for Applications
· Chapter 3
VBA Programming Fundamentals
· Chapter 4
Working with VBA Sub Procedures
· Chapter 5
Creating Function Procedures
· Chapter 6
Understanding Excel’s Events
· Chapter 7
VBA Programming Examples and Techniques
Chapter 1. Essentials of Spreadsheet Application Development
In This Chapter
· Discovering the basic steps involved in spreadsheet application development
· Determining end users’ needs
· Planning applications to meet users’ needs
· Developing and testing your applications
· Documenting your development efforts and writing user documentation
What Is a Spreadsheet Application?
For the purposes of this book, a spreadsheet application is a spreadsheet file (or group of related files) that is designed so that someone other than the developer can perform useful work without extensive training. According to this definition, most of the spreadsheet files that you’ve developed probably don’t qualify as spreadsheet applications. You may have dozens or hundreds of spreadsheet files on your hard drive, but it’s a safe bet that most of them aren’t designed for others to use.
A good spreadsheet application:
· Enables the end user to perform a task that he or she probably would not be able to do otherwise.
· Provides the appropriate solution to the problem. (A spreadsheet environment isn’t always the optimal approach.)
· Accomplishes what it is supposed to do. This prerequisite may be obvious, but it’s not at all uncommon for applications to fail this test.
· Produces accurate results and is free of bugs.
· Uses appropriate and efficient methods and algorithms to accomplish its job.
· Traps errors before the user is forced to deal with them.
· Does not allow the user to delete or modify important components accidentally (or intentionally).
· Has a clear and consistent user interface so that the user always knows how to proceed.
· Has well-documented formulas, macros, and user interface elements that allow for subsequent changes, if necessary.
· Is designed so that it can be modified in simple ways without making major changes. A basic fact is that a user’s needs change over time.
· Has an easily accessible help system that provides useful information on at least the major procedures.
· Is designed to be portable and to run on any system that has the proper software (in this case, a copy of the appropriate version of Excel).
It should come as no surprise that it is possible to create spreadsheet applications for many different usage levels, ranging from a simple fill-in-the-blank template to an extremely complex application that uses a custom interface and may not even look like a spreadsheet.
Steps for Application Development
There is no simple, surefire recipe for developing an effective spreadsheet application. Everyone has his or her own style for creating such applications. In addition, every project is different and, therefore, requires its own approach. Finally, the demands and technical expertise of the people you work with (or for) also play a role in how the development process proceeds.
Spreadsheet developers typically perform the following activities:
· Determine the needs of the user(s)
· Plan an application that meets these needs
· Determine the most appropriate user interface
· Create the spreadsheet, formulas, macros, and user interface
· Test and debug the application
· Attempt to make the application bulletproof
· Make the application aesthetically appealing and intuitive
· Document the development effort
· Develop user documentation and Help systems
· Distribute the application to the user
· Update the application when necessary
Not all these steps are required for each application, and the order in which these activities are performed varies from project to project. We describe each of these activities in the pages that follow. For most of these items, we cover the technical details in subsequent chapters.
Determining User Needs
When you undertake a new Excel project, one of your first steps is to identify exactly what the end users require. Failure to thoroughly assess the end users’ needs early on often results in additional work later when you have to adjust the application so that it does what it was supposed to do in the first place.
In some cases, you’ll be intimately familiar with the end users — you may even be an end user yourself. In other cases (for example, if you’re a consultant developing a project for a new client), you may know little or nothing about the users or their situations.
How do you determine the needs of the user? If you’ve been asked to develop a spreadsheet application, it’s a good idea to meet with the end users and ask specific questions. Better yet, get everything in writing, create flow diagrams, pay attention to minor details, and do anything else to ensure that the product you deliver is the product that is needed.
Here are some guidelines that may help make this phase easier:
· Don’t assume that you know what the user needs. Second-guessing at this stage almost always causes problems later.
· If possible, talk directly to the end users of the application, not just their supervisor or manager.
· Learn what, if anything, is currently being done to meet the users’ needs. You might be able to save some work by simply adapting an existing application. At the very least, looking at current solutions will familiarize you with the operation.
· Identify the resources available at the users’ site. For example, try to determine whether you must work around any hardware or software limitations.
· If possible, determine the specific hardware systems that will be used. If your application will be used on slow systems, you need to take that into account.
· Identify which versions of Excel are in use. Although Microsoft does everything in its power to urge users to upgrade to the latest version of the software, the majority of Excel users don’t.
· Understand the skill levels of the end users. This information will help you design the application appropriately.
· Determine how long the application will be used and whether any changes are anticipated during the lifetime of the project. Knowing this information may influence the amount of effort that you put into the project and help you plan for changes.
And finally, don’t be surprised if the project specifications change before you complete the application. This occurrence is common, and you’re in a better position if you expect changes rather than being surprised by them. Just make sure that your contract (if you have one) addresses the issue of changing specifications.
Planning an Application That Meets User Needs
After you determine the end users’ needs, it’s tempting to jump right in and start fiddling around in Excel. Take it from someone who suffers from this problem: Try to restrain yourself. Builders don’t construct a house without a set of blueprints, and you shouldn’t build a spreadsheet application without some type of plan. The formality of your plan depends on the scope of the project and your general style of working, but you should spend at least some time thinking about what you’re going to do and coming up with a plan of action.
Before rolling up your sleeves and settling down at your keyboard, you’ll benefit by taking some time to consider the various ways you can approach the problem. This planning period is where a thorough knowledge of Excel pays off. Avoiding blind alleys rather than stumbling into them is always a good idea.
If you ask a dozen Excel experts to design an application based on precise specifications, chances are you’ll get a dozen different implementations of the project that meet those specifications. Of those solutions, some will be better than the others because Excel often provides several options to accomplish a task. If you know Excel inside and out, you’ll have a good idea of the potential methods at your disposal, and you can choose the one most appropriate for the project at hand. Often, a bit of creative thinking yields an unusual approach that’s vastly superior to other methods.
So at the beginning stage of this planning period, consider some general options, such as these:
· File structure: Think about whether you want to use one workbook with multiple sheets, several single-sheet workbooks, or a template file.
· Data structure: You should always consider how your data will be structured and also determine whether you will be using external database files or storing everything in worksheets.
· Add-in or workbook file: In some cases, an add-in may be the best choice for your final product. Or perhaps you might use an add-in with a standard workbook.
· Version of Excel: Will your Excel application be used with Excel 2016 only? With Excel 2010 and later? What about Excel 2003 and earlier versions? Will your application also be run on a Macintosh? These considerations are important because each new version of Excel adds features that aren’t available in previous versions. The Ribbon interface introduced in Excel 2007 makes it more challenging than ever to create an application that works with older versions.
· Error handling: Error handling is a major issue with applications. You need to determine how your application will detect and deal with errors. For example, if your application applies formatting to the active worksheet, you need to be able to handle a case in which a chart sheet is active.
· Use of special features: If your application needs to summarize a lot of data, you may want to consider using Excel’s pivot table feature. Or you may want to use Excel’s data validation feature as a check for valid data entry.
· Performance issues: The time to start thinking about increasing the speed and efficiency of your application is at the development stage, not when the application is completed and users are complaining.
· Level of security: As you may know, Excel provides several protection options to restrict access to particular elements of a workbook. For example, you can lock cells so that formulas cannot be changed, and you can assign a password to prevent unauthorized users from viewing or accessing specific files. Determining up front exactly what you need to protect — and what level of protection is necessary — will make your job easier.
 Note
Note
Be aware that Excel’s protection features aren’t 100 percent effective — far from it. If you desire complete and absolute security for your application, Excel probably isn’t the best platform.
You’ll probably have to deal with many other project-specific considerations in this phase. Consider all options and don’t settle on the first solution that comes to mind.
Another design consideration is remembering to plan for change. You’ll do yourself a favor if you make your application as generic as possible. For example, don’t write a procedure that works with only a specific range of cells. Rather, write a procedure that accepts any range as an argument. When the inevitable changes are requested, such a design makes it easier for you to carry out the revisions. Also, you may find that the work that you do for one project is similar to the work that you do for another. Keep reusability in mind when you are planning a project.
Avoid letting the end user completely guide your approach to a problem. For example, suppose that you meet with a manager who tells you that the department needs an application to write text files that will be imported into another application. Don’t confuse the user’s need with the solution. The user’s real need is to share data. Using an intermediate text file to do it is just one possible solution; better ways to approach the problem may exist. In other words, don’t let the users define their problem by stating it in terms of a solution approach. Determining the best approach is your job.
Determining the Most Appropriate User Interface
When you develop spreadsheets that others will use, you need to pay special attention to the user interface. By user interface, we mean the method by which the user interacts with the application and executes your VBA macros.
Since the introduction of Excel 2007, some of these user interface decisions are irrelevant. Custom menus and toolbars are, for all intents and purposes, obsolete. Consequently, developers must learn how to work with the Ribbon.
Excel provides several features that are relevant to user interface design:
· Ribbon customization
· Shortcut menu customization
· Shortcut keys
· Custom dialog boxes (UserForms)
· Controls (such as a ListBox or a CommandButton) placed directly on a worksheet
We discuss these features briefly in the following sections and cover them more thoroughly in later chapters.
Customizing the Ribbon
The Ribbon UI introduced in Excel 2007 is a dramatic shift in user interface design. Fortunately, the developer has a fair amount of control over the Ribbon. Although Excel allows the end user to modify the Ribbon, making UI changes via code isn’t a simple task.
 Cross-Ref
See Chapter 17 for information about working with the Ribbon.
Customizing shortcut menus
Excel allows the VBA developer to customize the right-click shortcut menus. Right-click menus can offer users a way to easily trigger an action without having to move too far from the range in which they are working. Figure 1.1 illustrates a customized shortcut menu that appears when a cell is right-clicked.
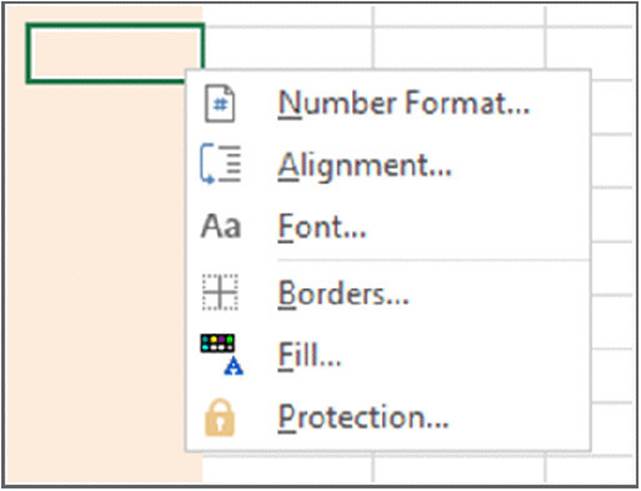
Figure 1.1 A customized shortcut menu.
Cross-Ref
Chapter 18 describes how to work with shortcut menus using VBA, including some limitations due to the single document interface introduced in Excel 2013.
Creating shortcut keys
Another user interface option at your disposal is a custom shortcut key. Excel lets you assign a Ctrl key (or Shift+Ctrl key) combination to a macro. When the user presses the key combination, the macro executes.
Be aware, however, of two caveats. First, make it clear to the user which keys are active and what they do. Second, do not assign a key combination that’s already used for something else. A key combination that you assign to a macro takes precedence over the built-in shortcut keys. For example, Ctrl+S is a built-in Excel shortcut key used to save the current file. If you assign this key combination to a macro, you lose the capability to save the file with Ctrl+S. Remember that shortcut keys are case sensitive, so you can use a combination such as Ctrl+Shift+S.
Creating custom dialog boxes
Anyone who has used a personal computer for any length of time is undoubtedly familiar with dialog boxes. Consequently, custom Excel dialog boxes can play a major role in the user interfaces that you design for your applications. Figure 1.2 shows an example of a custom dialog box.
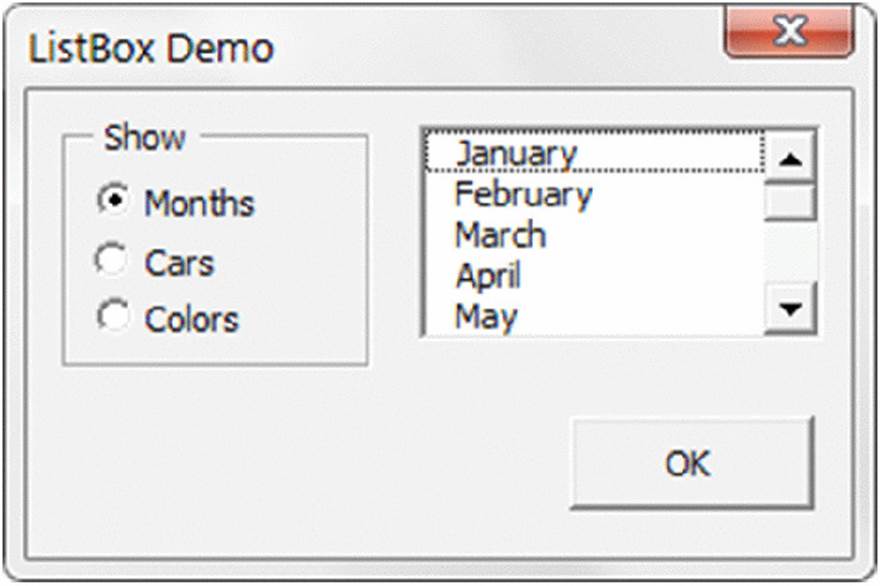
Figure 1.2 A dialog box created with Excel’s UserForm feature.
A custom dialog box is known as a UserForm. A UserForm can solicit user input, get a user’s options or preferences, and direct the flow of your entire application. The elements that make up a UserForm (buttons, drop-down lists, check boxes, and so on) are calledcontrols — more specifically, ActiveX controls. Excel provides a standard assortment of ActiveX controls, and you can also incorporate third-party controls.
After adding a control to a dialog box, you can link it to a worksheet cell so that it doesn’t require any macros (except a simple macro to display the dialog box). Linking a control to a cell is easy, but it’s not always the best way to get user input from a dialog box. Most of the time, you want to develop VBA macros that work with your custom dialog boxes.
Cross-Ref
We cover UserForms in detail in Part III.
Using ActiveX controls on a worksheet
Excel also lets you add UserForm ActiveX controls to a worksheet’s drawing layer (an invisible layer on top of a sheet that holds pictures, charts, and other objects). Figure 1.3 shows a simple worksheet model with several UserForm controls inserted directly in the worksheet. This sheet contains the following ActiveX controls: a CheckBox, a ScrollBar, and two sets of OptionButtons. This workbook uses no macros. Rather, the controls are linked to worksheet cells.
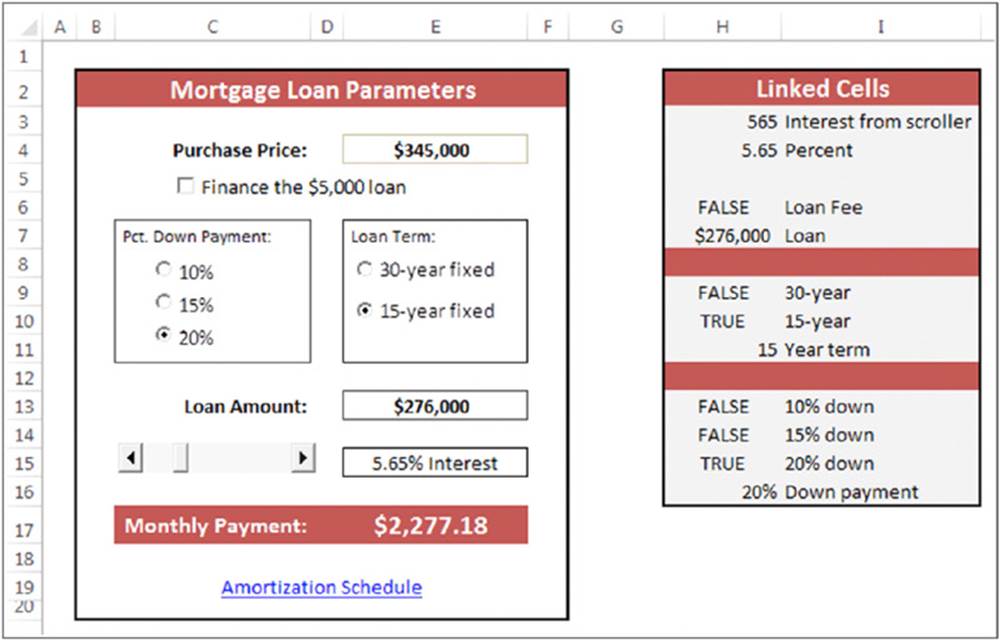
Figure 1.3 You can add UserForm controls to worksheets and link them to cells.
 On the Web
This workbook is available at this book’s website. The file is named worksheet controls.xlsx.
Perhaps the most common control is a CommandButton. By itself, a CommandButton doesn’t do anything, so you need to attach a macro to each CommandButton.
Using dialog box controls directly in a worksheet often eliminates the need for custom dialog boxes. You can often greatly simplify the operation of a spreadsheet by adding a few ActiveX controls (or Form controls) to a worksheet. These ActiveX controls let the user make choices by operating familiar controls rather than making entries in cells.
Access these controls by using the Developer ➜ Controls ➜ Insert command (see Figure 1.4). If the Developer tab isn’t on the Ribbon, add it by using the Customize Ribbon tab of the Excel Options dialog box.
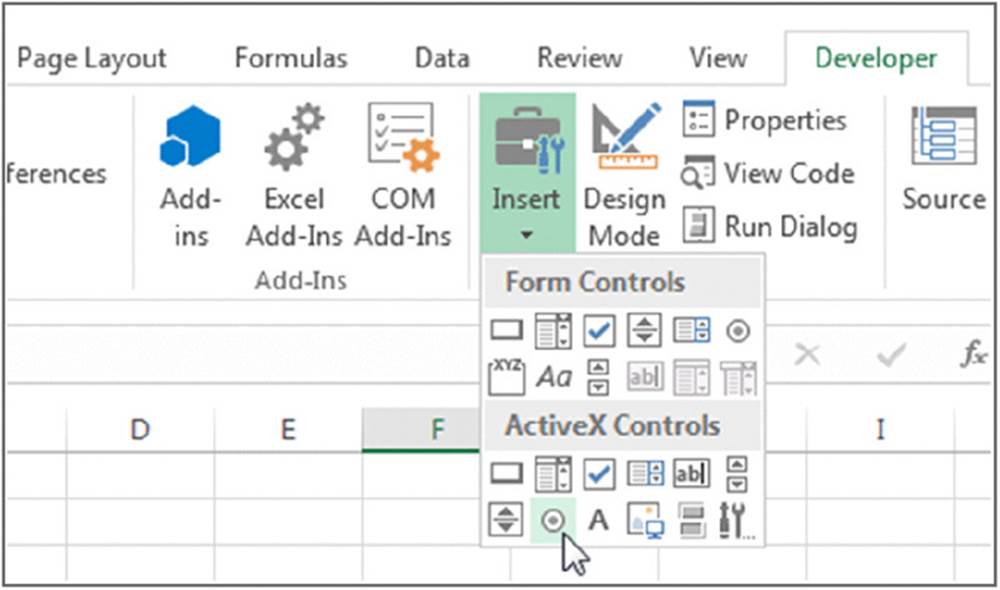
Figure 1.4 Using the Ribbon to add controls to a worksheet.
The controls come in two types: Form controls and ActiveX controls. Both sets of controls have their advantages and disadvantages. Generally, Form controls are easier to use, but ActiveX controls are a bit more flexible. Table 1.1 summarizes these two classes of controls.
Table 1.1 ActiveX Controls versus Form Controls
|
ActiveX Controls |
Form Controls |
|
|
Excel versions |
97, 2000, 2002, 2003, 2007, 2010, 2013, 2016 |
5, 95, 97, 2000, 2002, 2003, 2007, 2010, 2013, 2016 |
|
Controls available |
CheckBox, TextBox, CommandButton, OptionButton, ListBox, ComboBox, ToggleButton, SpinButton, ScrollBar, Label, Image (and others can be added) |
GroupBox, Button, CheckBox, OptionButton, ListBox, DropDown (ComboBox), ScrollBar, Spinner |
|
Macro code storage |
In the code module for the sheet |
In any standard VBA module |
|
Macro name |
Corresponds to the control name (for example, CommandButton1_Click) |
Any name you specify |
|
Correspond to |
UserForm controls |
Pre–Excel 97 dialog sheet controls |
|
Customization |
Extensive, using the Properties box |
Minimal |
|
Respond to events |
Yes |
Click or Change events only |
Executing the development effort
After you identify user needs, determine the approach that you’ll take to meet those needs, and decide on the components that you’ll use for the user interface, it’s time to get down to the nitty-gritty and start creating the application. This step, of course, comprises a great deal of the total time that you spend on a particular project.
How you go about developing the application depends on your personal style and the nature of the application. Except for simple fill-in-the-blanks template workbooks, your application will probably use macros. Creating macros in Excel is easy, but creating goodmacros is difficult.
Concerning Yourself with the End User
In this section, we discuss the important development issues that surface as your application becomes more and more workable and as the time to package and distribute your work grows nearer.
Testing the application
How many times have you used a commercial software application, only to have it bomb out on you at a crucial moment? Most likely, the problem was caused by insufficient testing that didn’t catch all the bugs. All nontrivial software has bugs, but in the best software, the bugs are simply more obscure. As you’ll see, you sometimes must work around the bugs in Excel to get your application to perform properly.
After you create your application, you need to test it. Testing is one of the most crucial steps; it’s not uncommon to spend as much time testing and debugging an application as you did creating the application. Actually, you should be doing a great deal of testing during the development phase. After all, whether you’re writing a VBA routine or creating formulas in a worksheet, you want to make sure that the application is working the way it’s supposed to work.
Like standard compiled applications, spreadsheet applications that you develop are prone to bugs. A bug can be defined as (1) something that does happen but shouldn’t happen while a program (or application) is running, or (2) something that doesn’t happen when it should happen. Both species of bugs are equally nasty, and you should plan on devoting a good portion of your development time to testing the application under all reasonable conditions and fixing any problems that you find.
It’s important to thoroughly test any spreadsheet application that you develop for others. And depending on its eventual audience, you may want to make your application bulletproof. In other words, try to anticipate all the errors and screw-ups that could possibly occur and make concerted efforts to avoid them — or, at least, to handle them gracefully. This foresight not only helps the end user but also makes it easier on you and protects your reputation. Also consider using beta testing; your end users are likely candidates because they’re the ones who will be using your product. (See the upcoming sidebar “What about beta testing?”)
Although you can’t conceivably test for all possibilities, your macros should be able to handle common types of errors. For example, what if the user enters a text string instead of a numeric value? What if the user tries to run your macro when a workbook isn’t open? What if he cancels a dialog box without making any selections? What happens if the user presses Ctrl+F6 and jumps to the next window? When you gain experience, these types of issues become very familiar, and you account for them without even thinking.
 What about beta testing?
Software manufacturers typically have a rigorous testing cycle for new products. After extensive internal testing, the pre-release product is usually sent to a group of interested users for beta testing. This phase often uncovers additional problems that are usually corrected before the product’s final release.
If you’re developing an Excel application that more than a few people will use, you may want to consider a beta test. This test enables your intended users to use your application in its intended setting on different hardware (usually).
The beta period should begin after you’ve completed all your own testing and you feel that the application is ready to distribute. You’ll need to identify a group of users to help you. The process works best if you distribute everything that will ultimately be included in your application: user documentation, the installation program, help, and so on. You can evaluate the beta test in a number of ways, including face-to-face discussions, email, questionnaires, and phone calls.
You almost always become aware of problems that you need to correct or improvements that you need to make before you undertake a widespread distribution of the application. Of course, a beta-testing phase takes additional time, and not all projects can afford that luxury.
Making the application bulletproof
If you think about it, destroying a spreadsheet is fairly easy. Erasing one critical formula or value can cause errors throughout the entire worksheet — and perhaps even other dependent worksheets. Even worse, if the damaged workbook is saved, it replaces the good copy on disk. Unless a backup procedure is in place, the user of your application may be in trouble, and you’ll probably be blamed for it.
Obviously, you can easily see why you need to add some protection when users — especially novices — will be using your worksheets. Excel provides several techniques for protecting worksheets and parts of worksheets:
· Lock specific cells: You can lock specific cells (by using the Protection tab in the Format Cells dialog box) so that users can’t change them. Locking takes effect only when the document is protected with the Review ➜Changes ➜ Protect Sheet command. The Protect Sheet dialog box has options that allow you to specify which actions users can perform on a protected sheet (see Figure 1.5).
· Hide the formulas in specific cells: You can hide the formulas in specific cells (by using the Protection tab in the Format Cells dialog box) so that others can’t see them. Again, hiding takes effect only when the document is protected by choosing the Review ➜ Changes ➜ Protect Sheet command.
· Protect an entire workbook: You can protect an entire workbook — the structure of the workbook, the window position and size, or both. Use the Review ➜ Changes ➜ Protect Workbook command for this purpose.
· Lock objects on the worksheet: Use the Properties section in the task pane to lock objects (such as shapes) and prevent them from being moved or changed. To access this section of the task pane, right-click the object and choose Size and Properties. Locking objects takes effect only when the document is protected using the Review ➜ Changes ➜ Protect Sheet command. By default, all objects are locked.
· Hide rows, columns, sheets, and documents: You can hide rows, columns, sheets, and entire workbooks. Doing so helps prevent the worksheet from looking cluttered and also provides some modest protection against prying eyes.
· Designate an Excel workbook as read-only recommended: You can designate an Excel workbook as read-only recommended (and use a password) to ensure that the file can’t be overwritten with any changes. You make this designation in the General Options dialog box. Display this dialog box by choosing File ➜ Save As, clicking the Tools button, and then choosing General Options.
· Assign a password: You can assign a password to prevent unauthorized users from opening your file. Choose File ➜ Info ➜ Protect Workbook ➜ Encrypt with Password.
· Use a password-protected add-in: You can use a password-protected add-in, which doesn’t allow the user to change anything on its worksheets.
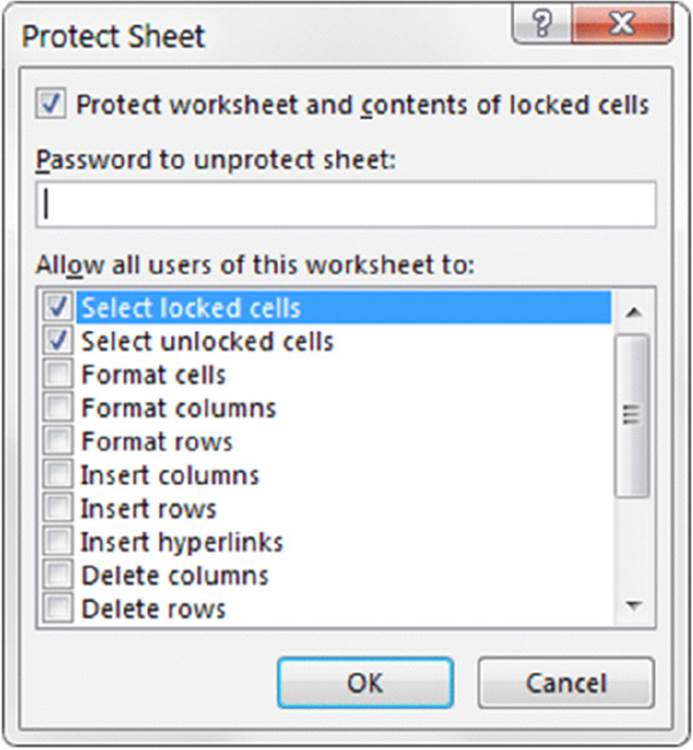
Figure 1.5 Using the Protect Sheet dialog box to specify what users can and can’t do.
Excel passwords are not foolproof
Be aware that Excel passwords can often be easily circumvented using commercially available password breaking programs. Excel 2007 and later versions seem to have stronger security than previous versions, but a determined user can still crack them. Bottom line? Don’t think of password protection as foolproof. Sure, it will be effective for the casual user. But if someone really wants to break your password, he or she probably can.
Making the application aesthetically appealing and intuitive
If you’ve used many different software packages, you’ve undoubtedly seen examples of poorly designed user interfaces, difficult-to-use programs, and just plain ugly screens. If you’re developing spreadsheets for other people, you should pay particular attention to how the application looks.
How a computer program looks can make all the difference in the world to users, and the same is true with the applications that you develop with Excel. Beauty, however, is in the eye of the beholder. If your skills lean more in the analytical direction, consider enlisting the assistance of someone with a more aesthetic sensibility to provide help with design.
The good news is that features found in Excel 2007 and later make creating better-looking spreadsheets a relatively easy task. If you stick with predesigned cell styles, your work stands a good chance of looking good. And, with the click of a mouse, you can apply a new theme that transforms the look of the workbook — and still looks good.
End users appreciate a good-looking user interface, and your applications will have a much more polished and professional look if you devote additional time to design and aesthetic considerations. An application that looks good demonstrates that its developer cared enough about the product to invest extra time and effort. Take the following suggestions into account:
· Strive for consistency. When designing dialog boxes, for example, try to emulate the look and feel of Excel’s dialog boxes whenever possible. Be consistent with formatting, fonts, text size, and colors.
· Keep it simple. A common mistake that developers make is trying to cram too much information into a single screen or dialog box. A good rule is to present only one or two chunks of information at a time.
· Break down input screens. If you use an input screen to solicit information from the user, consider breaking it up into several, less-crowded screens. If you use a complex dialog box, you may want to break it up by using a MultiPage control, which lets you create a familiar tabbed dialog box.
· Don’t overdo color. Use color sparingly. It’s very easy to overdo color and make the screen look gaudy.
· Monitor typography and graphics. Pay attention to numeric formats and use consistent typefaces, font sizes, and borders.
Evaluating aesthetic qualities is subjective. When in doubt, strive for simplicity and clarity.
Creating a user Help system
With regard to user documentation, you basically have two options: paper-based documentation or electronic documentation. Providing electronic help is standard fare in Windows applications. Fortunately, your Excel applications can also provide help — even context-sensitive help. Developing help text takes quite a bit of additional effort, but for a large project, it may be worth it.
Another point to consider is support for your application. In other words, who gets the phone call if the user encounters a problem? If you aren’t prepared to handle routine questions, you need to identify someone who is. In some cases, you want to arrange it so that only highly technical or bug-related issues escalate to the developer.
Cross-Ref
In Chapter 19, we discuss several alternatives for providing help for your applications.
Documenting the development effort
Putting a spreadsheet application together is one thing. Making it understandable for other people is another. As with traditional programming, it’s important that you thoroughly document your work. Such documentation helps you if you need to go back to it (and you will), and it helps anyone else whom you might pass it on to.
How do you document a workbook application? You can either store the information in a worksheet or use another file. You can even use a paper document, if you prefer. Perhaps the easiest way is to use a separate worksheet to store your comments and key information for the project. For VBA code, use comments liberally. (VBA text preceded with an apostrophe is ignored because that text is designated as a comment.) Although an elegant piece of VBA code can seem perfectly obvious to you today, when you come back to it in a few months, your reasoning may be completely obscured unless you use the VBA comment feature.
Distributing the application to the user
You’ve completed your project, and you’re ready to release it to the end users. How do you go about distributing it? You can choose from many ways to distribute your application, and the method that you choose depends on many factors.
You could just hand over a CD-ROM or thumb drive, scribble a few instructions, and be on your way. Or you may want to install the application yourself — but this approach isn’t always feasible. Another option is to develop an official setup program that performs the task automatically. You can write such a program in a traditional programming language, purchase a generic setup program, or write your own in VBA.
Excel incorporates technology to enable developers to digitally sign their applications. This process is designed to help end users identify the author of an application, to ensure that the project has not been altered, and to help prevent the spread of macro viruses or other potentially destructive code. To digitally sign a project, you first apply for a digital certificate from a formal certificate authority (or you can self-sign your project by creating your own digital certificate). Refer to the Help system or the Microsoft website for additional information.
Updating the application when necessary
After you distribute your application, you’re finished with it, right? You can sit back, enjoy yourself, and try to forget about the problems that you encountered (and solved) during development. In rare cases, yes, you may be finished. More often, however, the users of your application won’t be completely satisfied. Sure, your application adheres to all the original specifications, but things change. Seeing an application working often causes the user to think of other things that the application could be doing.
When you need to update or revise your application, you’ll appreciate that you designed it well in the first place and that you fully documented your efforts.
Other Development Issues
You need to keep several other issues in mind when developing an application — especially if you don’t know exactly who will be using the application. If you’re developing an application that will have widespread use (a shareware application, for example), you have no way of knowing how the application will be used, what type of system it will run on, or what other software will be running concurrently.
The user’s installed version of Excel
Although Excel 2016 is available, many large corporations are still using earlier versions of Excel. Unfortunately, there is no guarantee that an application developed for, say, Excel 2010 will work perfectly with later versions of Excel. If you need your application to work with a variety of Excel versions, the best approach is to work with the lowest version — and then test it thoroughly with all other versions.
Also, be aware of any service packs and security updates Microsoft releases. Although rare, some changes introduced in these releases can cause certain components of your application to no longer work as designed.
Cross-Ref
Compatibility issues are discussed in Chapter 21.
Language issues
Consider yourself fortunate if all your end users have the English language version of Excel. Non-English versions of Excel aren’t always 100 percent compatible, so that means additional testing on your part. In addition, keep in mind that two users can both be using the English language version of Excel yet use different Windows regional settings. In some cases, you may need to be aware of potential problems.
Cross-Ref
We briefly discuss language issues in Chapter 21.
System speed
You’re probably a fairly advanced computer user and tend to keep your hardware reasonably up to date. In other words, you have a fairly powerful system that is probably better than the average user’s system. In some cases, you’ll know exactly what hardware the end users of your applications are using. If so, testing your application on that system is vital. A procedure that executes almost instantaneously on your system may take several seconds on another system. In the world of computers, several seconds may be unacceptable.
 Tip
Tip
When you gain more experience with VBA, you’ll discover that there are ways to get the job done, and there are ways to get the job done fast. It’s a good idea to get into the habit of coding for speed. Other chapters in this book can certainly help you out in this area.
Video modes
As you probably know, users’ video displays vary widely. Currently, the most commonly used video resolution is 1280 x 1024, followed closed by 1024 x 768. Systems with a resolution of 800 x 600 are becoming much less common, but quite a few are still in use. Higher resolution displays and even dual displays are becoming increasingly common. Just because you have a super-high-resolution monitor, you can’t assume that everyone else does.
Video resolution can be a problem if your application relies on specific information being displayed on a single screen. For example, if you develop an input screen that fills the screen in 1280 x 1024 mode, users with a 1024 x 768 display won’t be able to see the whole input screen without scrolling or zooming.
Also, it’s important to realize that a restored (that is, not maximized or minimized) workbook is displayed at its previous window size and position. In the extreme case, it’s possible that a window saved by using a high-resolution display may be completely off the screen when opened on a system running in a lower resolution.
Unfortunately, you can’t automatically scale things so that they look the same regardless of the display resolution. In some cases, you can zoom the worksheet (using the Zoom control in the status bar), but doing so reliably may be difficult. Unless you’re certain of the video resolution that the users of your application will use, you should probably design your application so it works with the lowest common denominator — 800 x 600 or 1024 x 768 mode.
As you discover later in the book, you can determine the user’s video resolution by using Windows API calls from VBA. In some cases, you may want to programmatically adjust things, depending on the user’s video resolution.
All materials on the site are licensed Creative Commons Attribution-Sharealike 3.0 Unported CC BY-SA 3.0 & GNU Free Documentation License (GFDL)
If you are the copyright holder of any material contained on our site and intend to remove it, please contact our site administrator for approval.
© 2016-2026 All site design rights belong to S.Y.A.