Excel 2016 Power Programming with VBA (2016)
Part IV. Developing Excel Applications
Chapter 20. Leveraging Class Modules
In This Chapter
· Introducing class modules
· Exploring some typical uses for class modules
· Seeing examples that demonstrate some key concepts related to class modules
What Is a Class Module?
For many VBA programmers, the concept of a class module is a mystery. This feature can be confusing, but the examples in this chapter may help to make it less mysterious.
A class module is a special type of VBA module that you can insert in a VBA project. Basically, a class module enables the programmer (you) to create a new object. As you should know by now, programming Excel really boils down to manipulating objects. A class module allows you to create new objects, along with corresponding properties, methods, and events.
At this point, you might be asking, “Do I really need to create new objects?” The answer is no. You don’t need to, but you might want to after you understand some of the benefits of doing so. In many cases, a class module simply serves as a substitute for functions or procedures, but it could be a more convenient and manageable alternative. In other cases, however, you’ll find that a class module is the only way to accomplish a particular task.
Following is a list of some typical uses for class modules:
· To encapsulate code and improve readability: By moving all your code related to payroll, for example, into custom objects representing employees and paychecks, you can keep your code more organized.
· To handle events of objects not exposed by Excel: such as application events, chart events, or query table events. Chapter 15 shows an example of using application events.
· To encapsulate a Windows Application Programming Interface (API) function to make it easier to use in your code: For example, you can create a class that makes it easy to detect or set the state of the Num Lock or Caps Lock key. Or you can create a class that simplifies access to the Windows Registry.
· To enable multiple objects in a UserForm to execute a single procedure: Normally, each object has its own event handler. The example in Chapter 15 demonstrates how to use a class module so that multiple CommandButtons have a single Click event-handler procedure.
· To create reusable components that can be imported into other projects: After you create a general-purpose class module, you can import it into other projects to reduce your development time.
Built-in class modules
If you’ve been following the examples in this book so far, then you’ve already used a class module. Excel automatically creates a class module for the Workbook object, each Worksheet object, and any Userform objects. That’s right: The ThisWorkbook module is just a class module. And when you insert a Userform into your project, you’re inserting a class module.
The difference between a Userform’s class module and a custom class module is that the Userform has a user-interface component (the form and its controls) that a custom class module doesn’t have. However, you can create properties and methods in a Userform’s class module to extend its functionality because it’s just a class module.
Custom class modules
The remainder of this chapter deals with creating custom class modules. Unlike built-in class modules where Excel defines the object and its properties and methods, custom class modules allow you to define them. What custom objects you create depends on your application. If you’re writing a contact manager application, you might have a Company class and a Contact class. For a sales commission calculator, you might have a Salesperson class and an Invoice class. One of the benefits of class modules is that you can design them to fit your specific needs perfectly.
Classes and objects
The terms class and object are used interchangeably by many VBA developers. They are very closely related, but there is a minor distinction. A class module defines an object, but it’s not the actual object.
Think of a class module as a blueprint for a house. The blueprint describes all the properties and dimensions of the house, but it’s not a house. You can create a bunch of houses from one blueprint. Similarly, you can create a bunch of objects from one class.
Objects, properties, and methods
It’s helpful to think of objects, properties, and methods in terms of grammar. The objects are the nouns. They are things. They may represent tangible things like an employee, a customer, or a dump truck. They may also represent intangible things like a transaction. When you’re designing your application using a class module, start by identifying the objects that live in your domain.
Objects have properties. Properties are the adjectives in the grammar analogy. They describe the characteristics of an object. One characteristic of a house is how many cars fit in the garage. If you create a house class, you might also create a GarageCarCount property. Similarly, you might create an ExteriorColor property that holds the color of the paint used on the outside of the house. You don’t have to create a property for every conceivable characteristic of an object. You only create properties for characteristics that are important to your application. Excel has a Font object that has a Size property. You can read this property to find out what the font size is, or you can set this property to change the font size.
Finally, methods are the verbs of the class grammar. Methods describe actions that the class module takes. In general, there are two types of methods: methods that change more than one property at a time and methods that interact with the outside world. Excel’s Workbook object has a Name property. You can read the Name property, but you can’t change it. In order to change the Name property, you have to use a method (like Save or SaveAs) because the outside world, namely the operating system, cares what the name of the workbook is.
Creating a NumLock Class
One of the benefits of class modules is to give complicated, hard-to-use code (like Windows APIs) a better interface. Detecting or changing the state of the Num Lock key requires a couple of Windows API functions and is fairly complicated. You can put the API functions into a class module and build your own properties and methods that are far easier to use than the API functions.
In this section, I provide step-by-step instructions for creating a useful, albeit simple, class module. This class module creates a NumLock class that has one property (Value) and one method (Toggle).
After the class is created, your VBA code can determine the current state of the Num Lock key by using an instruction such as the following, which displays the Value property:
MsgBox clsNumLock.Value
In addition, your code can toggle the Num Lock key by using the Toggle method:
clsNumLock.Toggle
The class is designed so that you can’t simply set the Value property. The Value property isn’t just a value that you’re storing in a class, but the actual state of the keyboard. To change the Value property, you define a method that interacts with the keyboard via the Windows API and that changes the property value. It’s important to understand that a class module contains the code that defines the object, including its properties and methods. You can then create an instance of this object in your VBA general code modules and manipulate its properties and methods.
To better understand the process of creating a class module, you might want to follow the instructions in the next sections. Start with an empty workbook.
Inserting a class module
Activate Visual Basic Editor (VBE) and choose Insert ➜ Class Module. This step adds an empty class module named Class1. If the Properties window isn’t displayed, press F4 to display it. Then change the name of the class module to CNumLock (see Figure 20.1).
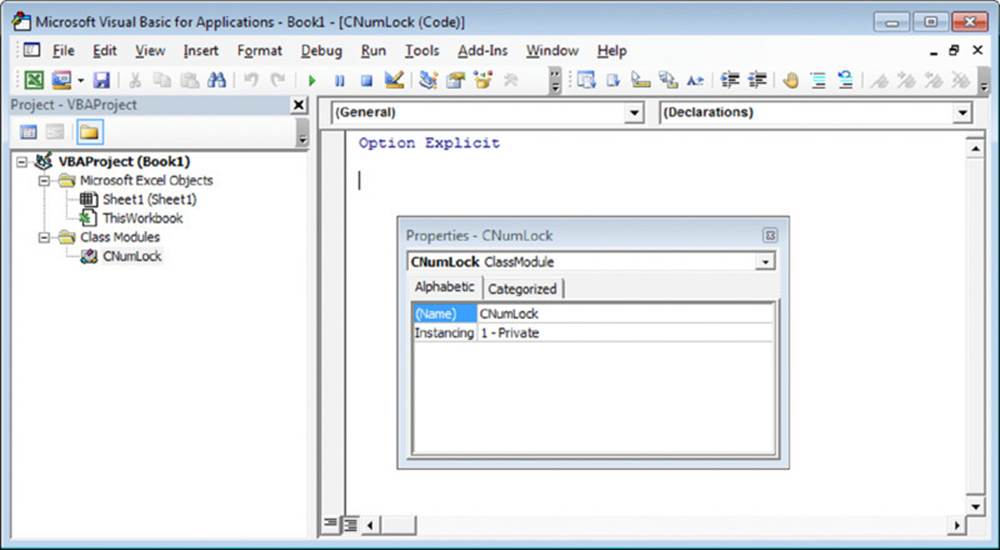
Figure 20.1 An empty class module named CNumLock.
Adding VBA code to the class module
In the next step, you create the code for the Value property. To detect or change the state of the Num Lock key, the class module needs the Windows API declarations that detect and set the Num Lock key. That code follows.
Private Declare Sub keybd_event Lib"user32" _
(ByVal bVk As Byte, _
ByVal bScan As Byte, _
ByVal dwFlags As Long, ByVal dwExtraInfo As Long)
Private Declare PtrSafe Function GetKeyboardState Lib"user32" _
(pbKeyState As Byte) As Long
Private Declare PtrSafe Function SetKeyboardState Lib"user32" _
(lppbKeyState As Byte) As Long
'Constant declarations
Const VK_NUMLOCK = &H90
Next, you need a procedure that retrieves the current state of the Num Lock key. I called this the Value property of the object, but you can use any name for the property. To retrieve the state, insert the following Property Get procedure:
Public Property Get Value() As Boolean
' Get the current state
Dim Keys(0 To 255) As Byte
GetKeyboardState Keys(0)
Value = CBool(Keys(VK_NUMLOCK))
End Property
 Cross-Ref
The details of Property procedures are described later in this chapter, in the “Programming properties of objects” section.
This procedure, which uses the GetKeyboardState Windows API function to determine the current state of the Num Lock key, is called whenever VBA code reads the Value property of the object. For example, after the object is created, a VBA statement such as this executes the Property Get procedure:
MsgBox clsNumLock.Value
If the Value property were read/write, you would need a Property Let procedure to go with your Property Get. Since we’re setting the Value property via the Toggle method, there is no Property procedure.
Next, you need a procedure to toggle the NumLock state. I called this procedure the Toggle method.
Public Sub Toggle()
' Toggles the state
' Simulate Key Press
keybd_event VK_NUMLOCK, &H45, KEYEVENTF_EXTENDEDKEY Or 0, 0
' Simulate Key Release
keybd_event VK_NUMLOCK, &H45, KEYEVENTF_EXTENDEDKEY _
Or KEYEVENTF_KEYUP, 0
End Sub
Note that Toggle is a standard Sub procedure (not a Property Let or Property Get procedure). A VBA statement such as the following one toggles the state of the clsNumLock object by executing the Toggle procedure:
clsNumLock.Toggle
Using the CNumLock class
Before you can use the CNumLock class, you must create an instance of the object. The following statement, which resides in a regular VBA module (not the class module), does just that:
Dim clsNumLock As CNumLock
Note that the object type is CNumLock (that is, the name of the class module). The object variable can have any name, but I use the convention of prefixing class modules with a capital C and prefixing the object variables that are derived from those class modules with cls. So the CNumLock class is instantiated as the clsNumLock object variable. The following procedure reads the Value property of the clsNumLock object, toggles the value, reads the value again, and displays a message to the user describing what just happened.
Public Sub NumLockTest()
Dim clsNumLock As CNumLock
Dim OldValue As Boolean
Set clsNumLock = New CNumLock
OldValue = clsNumLock.Value
clsNumLock.Toggle
DoEvents
MsgBox"Num Lock was changed from" & _
OldValue &" to" & clsNumLock.Value
End Sub
Figure 20.2 shows the result of running NumLockTest. Using the NumLock class is much simpler than dealing directly with the API functions. After you create a class module, you can reuse it in any other project simply by importing the class module.
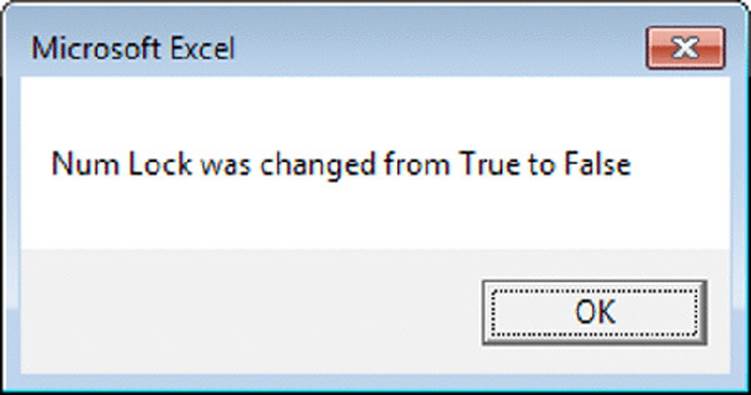
Figure 20.2 A message box shows the change in status of the Num Lock key.
 On the Web
The completed class module for this example is available on the book’s website. The workbook, named keyboard class.xlsm, also contains a class module to detect and set the state of the Caps Lock key and the Scroll Lock key.
Coding Properties, Methods, and Events
The example in the preceding section demonstrates how to create a new object class with a single read-only property named Value and a single method named Toggle. An object class can contain any number of properties, methods, and events.
The name that you use for the class module in which you define the object class is also the name of the object class. By default, class modules are named Class1, Class2, and so on. Usually, you’ll want to provide a more meaningful name for your object class.
Programming properties of objects
Most objects have at least one property, and you can give them as many as you need. After a property is defined and the object is created, you can use it in your code using the standard dot syntax:
object.property
The VBE Auto List Members option works with objects defined in a class module, which makes it easier to select properties or methods when writing code.
Properties for the object that you define can be read-only, write-only, or read/write. You define a read-only property with a single procedure — using the Property Get keyword. Here’s an example of a Property Get procedure:
Public Property Get FileNameOnly() As String
Dim Sep As String, LastSep As Long
Sep = Application.PathSeparator
LastSep = InStrRev(FullName, Sep)
FileNameOnly = Right(FullName, Len(FullName) - LastSep)
End Property
You may have noticed that a Property Get procedure works like a Function procedure. The code performs calculations and then returns a property value that corresponds to the procedure’s name. In this example, the procedure’s name is FileNameOnly. The property value returned is the filename part of a path string (contained in a Public variable named FullName). For example, if FullName is c:\data\myfile.txt, the procedure returns a property value of myfile.txt. The FileNameOnly procedure is called when VBA code references the object and property.
For read/write properties, you create two procedures: a Property Get procedure (which reads a property value) and a Property Let procedure (which writes a property value). The value being assigned to the property is treated as the final argument (or the only argument) of a Property Get procedure.
Two example procedures follow:
Dim XLFile As Boolean
Property Get SaveAsExcelFile() As Boolean
SaveAsExcelFile = XLFile
End Property
Property Let SaveAsExcelFile(bVal As Boolean)
XLFile = bVal
End Property
 Note
Note
Use Property Set in place of Property Let when the property is an object data type.
A Public variable in a class module can also be used as a property of the object. In the preceding example, the Property Get and Property Let procedures could be eliminated and replaced with this module-level declaration:
Public SaveAsExcelFile As Boolean
In the unlikely event that you need to create a write-only property, you create a single Property Let procedure with no corresponding Property Get procedure.
The previous examples use a Boolean module-level variable named XLFile. The Property Get procedure simply returns the value of this variable as the property value. If the object were named FileSys, for example, the following statement would display the current value of the SaveAsExcelFile property:
MsgBox FileSys.SaveAsExcelFile
The Property Let statement, on the other hand, accepts an argument and uses the argument to change the value of a property. For example, you could write a statement such as the following to set the SaveAsExcelFile property to True:
FileSys.SaveAsExcelFile = True
In this case, the value True is passed to the Property Let statement, thus changing the property’s value.
You’ll need to create a variable that represents the value for each property that you define within your class module.
Note
Normal procedure-naming rules apply to property procedures, and you’ll find that VBA won’t let you use some names if they are reserved words. If you get a syntax error when creating a property procedure, try changing the name of the procedure.
Programming methods for objects
A method for an object class is programmed by using a standard Sub or Function procedure placed in the class module. An object might or might not use methods. Your code executes a method by using standard notation:
object.method
Like any other VBA method, a method that you write for an object class will perform some type of action. The following procedure is an example of a method that saves a workbook in one of two file formats, depending on the value of the XLFile variable. As you can see, nothing about this procedure is special.
Sub SaveFile()
If XLFile Then
ActiveWorkbook.SaveAs FileName:=FName, _
FileFormat:=xlWorkbookNormal
Else
ActiveWorkbook.SaveAs FileName:=FName, _
FileFormat:=xlCSV
End If
End Sub
Class module events
Every class module has two events: Initialize and Terminate. The Initialize event occurs when a new instance of the object is created; the Terminate event occurs when the object is destroyed. You might want to use the Initialize event to set default property values.
The frameworks for these event-handler procedures are as follows:
Private Sub Class_Initialize()
' Initialization code goes here
End Sub
Private Sub Class_Terminate()
' Termination code goes here
End Sub
An object is destroyed (and the memory it uses is freed) when the procedure or module in which it is declared finishes executing. You can destroy an object at any time by setting it to Nothing. The following statement, for example, destroys the object named MyObject:
Set MyObject = Nothing
Exposing a QueryTable Event
Excel automatically creates class modules for some objects, like ThisWorkbook and Sheet1. These class modules expose events like Workbook_SheetActivate and Worksheet_SelectionChange. Other objects in the Excel object model have events, but you have to create a custom class module to expose them. In this section, I’ll show you how to expose the events of a QueryTable object.
Figure 20.3 shows a worksheet with a web query that starts in cell A5. The web query pulls financial information from a website. The only thing that’s missing is the date when this web query was last updated so you can know whether the prices are current.
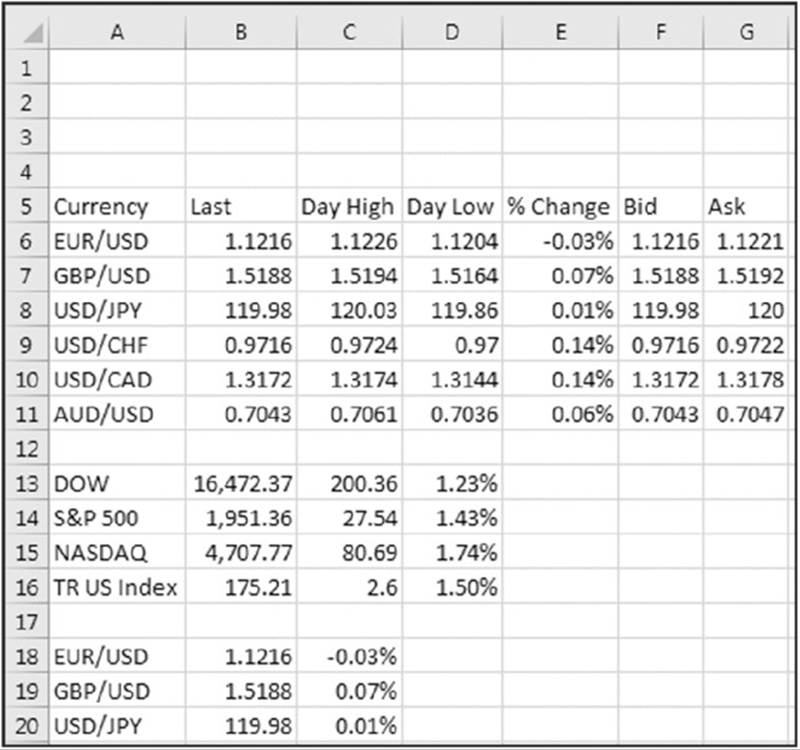
Figure 20.3 A web query for financial information.
In VBA, a web query is a QueryTable object. The QueryTable object has two events: BeforeRefresh and AfterRefresh. Those events are pretty well named, and you’ve probably already figured out when they fire.
To be able to use the QueryTable events, you need to:
· Create a custom class module.
· Declare a QueryTable using the WithEvents keyword.
· Write the event procedure code.
· Create a Public variable to keep the object in scope.
· Create a procedure to instantiate the class.
Those are the basic steps for exposing events of any object that supports events. (Not all of them do.) When you use the WithEvents keyword, VBA will only let you declare objects that support events. Follow these steps to add a message to a worksheet informing the user when a web query was last updated:
1. In the VBE, choose Insert ➜ Class Module to insert a new class module.
2. Press F4 to go to the Properties dialog and name the module CQueryEvents.
3. Type the following code in the class module:
4. Private WithEvents qt As QueryTable
5.
6. Public Property Get QTable() As QueryTable
7. Set QTable = qt
8. End Property
9.
10. Public Property Set QTable(rQTable As QueryTable)
11. Set qt = rQTable
12. End Property
The first line declares a module-level variable that will store the web query. You can see that it was declared with the WithEvents keyword. Next, Property Get and Property Set procedures are written so we can set the variable from outside of the class.
13.From the drop-downs at the top of the code pane (see Figure 20.4), select qt and AfterRefresh. This will insert the Sub and End Sub statements for the event module.
14. Type the following code into the event procedure:
15. Private Sub qt_AfterRefresh(ByVal Success As Boolean)
16. If Success Then
17. Me.QTable.Parent.Range("A1").Value = _
18. "Last updated:" & Format(Now,"mm-dd-yyyy hh:mm:ss")
19. End If
20. End Sub
The event procedure has a built-in argument, Success, that is True if the query updated without errors. Now that the class is set up, you need to create an object based on it.
21.Insert a standard module (Insert ➜ Module). You can accept the default name of Module1 for this exercise or change it if you wish.
22. Type the following code into the module:
23. Public clsQueryEvents As CQueryEvents
24.
25. Sub Auto_Open()
26. Set clsQueryEvents = New CQueryEvents
27. Set clsQueryEvents.QTable = Sheet1.QueryTables(1)
28. End Sub
A globally scoped variable (declared with the Public keyword) will stay in scope for as long as the worksheet is open. That means the class will continue to “listen” for events until you close the workbook. The Auto_Open procedure runs when the workbook is first opened. It creates the clsQueryEvents object and then sets the events variable to the web query on Sheet1.
29.Run Auto_Open from the Immediate Window or by pressing F5 in the VBE.
That’s it. You now have code that will run after the web query on Sheet1 is refreshed. You can click Refresh All on the Data tab of the Ribbon to test the code. If you followed the steps, you should see something similar to Figure 20.5.
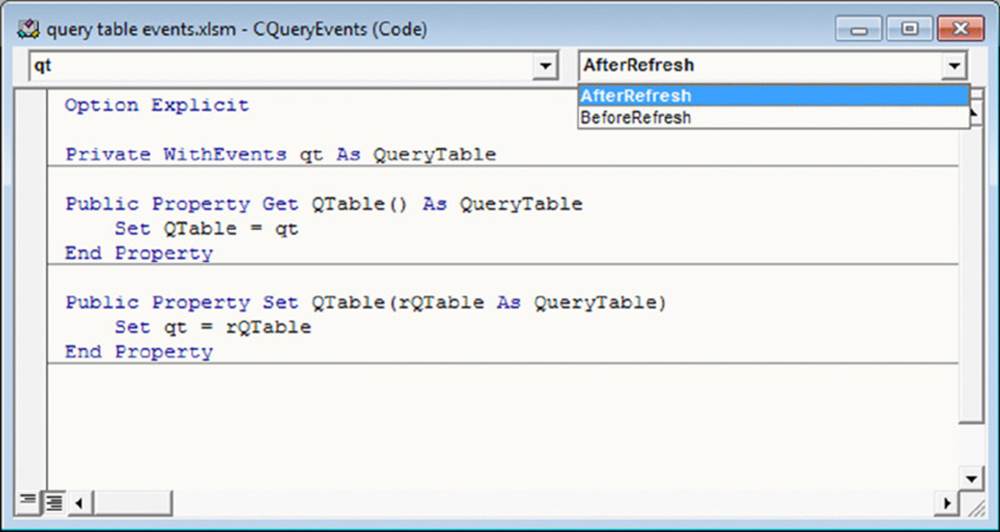
Figure 20.4 The code pane lists available events.
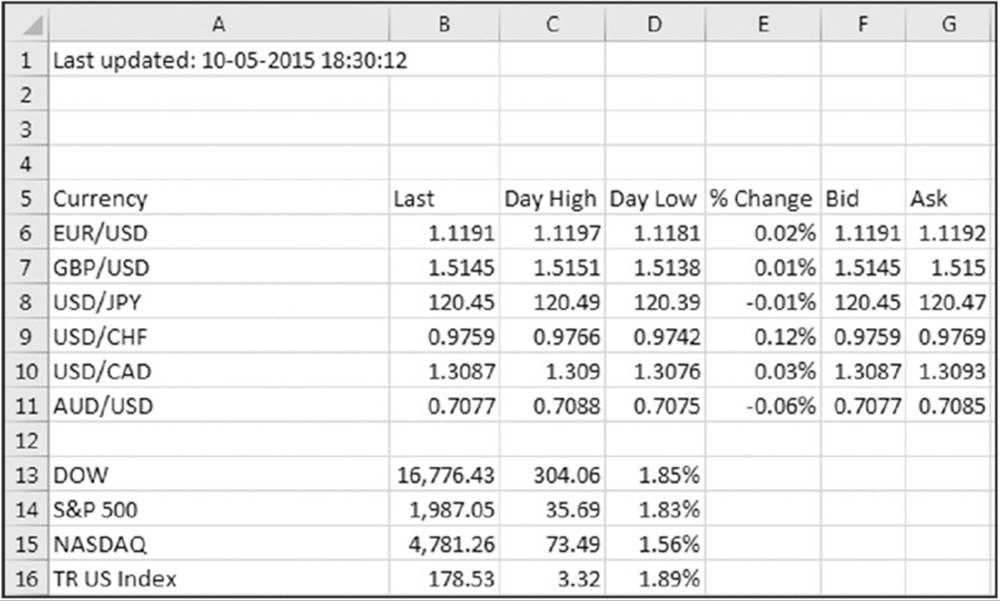
Figure 20.5 After a web query is refreshed, the last update time is recorded.
On the Web
A workbook named query table events.xlsm is available on this book’s website. It contains the web query used in the example in this section. Another workbook, named query table events complete.xlsm, contains the web query and the completed code.
Creating a Class to Hold Classes
One of the benefits of using class modules is to organize your code according to the objects the code affects. You may, for instance, create a CEmployee class for your code that deals with employees. But you probably don’t have just one employee. Often, you create many objects from one class, and a great way to keep track of them is within another class.
In this section, you’ll learn how to create parent classes and child classes in a commission calculating application. You’ll create a CSalesRep child class and keep track of all instances of it in a CSalesReps class. (Naming the parent class as the plural of the child class is a common convention.) Similarly, you’ll create a CInvoices parent class to hold CInvoice objects.
On the Web
A workbook with all the data and code for this section is available on this book’s website. The workbook is named commission calc.xlsm.
Creating the CSalesRep and CSalesReps classes
Figure 20.6 shows two tables. The first lists all the sales representatives and some commission information. The second table is a list of invoices. Start by creating a CSalesRep class module and include the following code:
Private mSalesRepID As Long
Private mSalesRep As String
Private mCommissionRate As Double
Private mThreshold As Double
Public Property Let SalesRepID(ByVal lSalesRepID As Long)
mSalesRepID = lSalesRepID
End Property
Public Property Get SalesRepID() As Long
SalesRepID = mSalesRepID
End Property
Public Property Let SalesRep(ByVal sSalesRep As String)
mSalesRep = sSalesRep
End Property
Public Property Get SalesRep() As String
SalesRep = mSalesRep
End Property
Public Property Let CommissionRate( _
ByVal dCommissionRate As Double)
mCommissionRate = dCommissionRate
End Property
Public Property Get CommissionRate() As Double
CommissionRate = mCommissionRate
End Property
Public Property Let Threshold(ByVal dThreshold As Double)
mThreshold = dThreshold
End Property
Public Property Get Threshold() As Double
Threshold = mThreshold
End Property
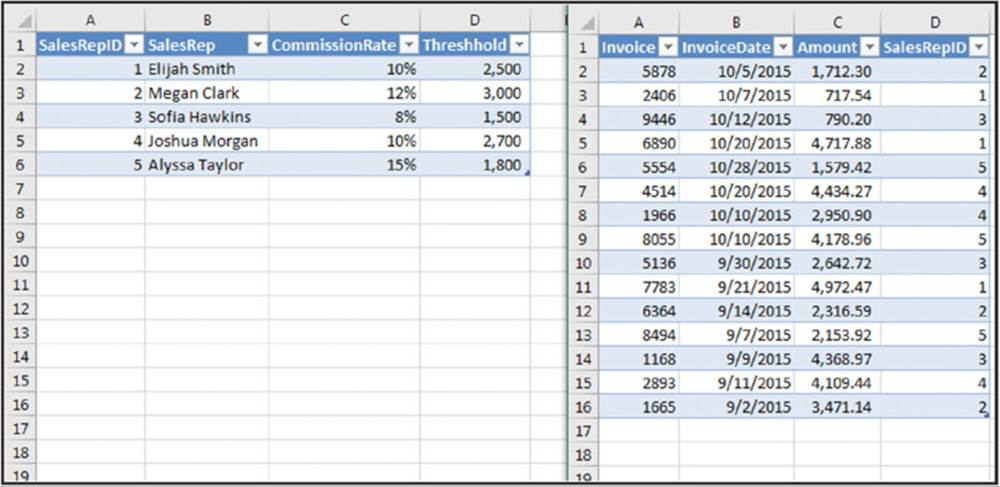
Figure 20.6 Excel tables hold the information for the objects.
You’ll notice that there is a private variable for every column in the sales rep table and a Property Get and Property Let statement for every variable. Next, add another class module named CSalesReps. This will be the parent class that holds all of the CSalesRep objects.
In the parent class, create a Collection variable that will hold all the children.
Private mSalesReps As New Collection
Now you need to add a way to get the children into the collection. Create an Add method, an Item property, and a Count property in the CSalesReps class module using this following code:
Public Sub Add(clsSalesRep As CSalesRep)
mSalesReps.Add clsSalesRep, CStr(clsSalesRep.SalesRepID)
End Sub
Public Property Get Count() As Long
Count = mSalesReps.Count
End Property
Public Property Get Item(lId As Long) As CSalesRep
Set Item = mSalesReps(lId)
End Property
You might notice that all you’ve done is mimic the Collection object’s Add method and Item and Count properties. The Collection object’s key argument must be a unique string, so you used the SalesRepID property and the Cstr() function to ensure the key is unique and a string.
That’s all there is to creating a parent class. Simply add a Collection variable and mimic whichever of the Collection’s properties and methods you need.
Creating the CInvoice and CInvoices classes
Following is the code for the CInvoice class:
Private mInvoice As String
Private mInvoiceDate As Date
Private mAmount As Double
Public Property Let Invoice(ByVal sInvoice As String)
mInvoice = sInvoice
End Property
Public Property Get Invoice() As String
Invoice = mInvoice
End Property
Public Property Let InvoiceDate(ByVal dtInvoiceDate As Date)
mInvoiceDate = dtInvoiceDate
End Property
Public Property Get InvoiceDate() As Date
InvoiceDate = mInvoiceDate
End Property
Public Property Let Amount(ByVal dAmount As Double)
mAmount = dAmount
End Property
Public Property Get Amount() As Double
Amount = mAmount
End Property
I won’t go into as much detail on CInvoice because, like CSalesRep, it simply creates a property for every column in the table. But it doesn’t create one for the SalesRepID column, and you’ll see why later in this section. The following code is in the CInvoices class module:
Private mInvoices As New Collection
Public Sub Add(clsInvoice As CInvoice)
mInvoices.Add clsInvoice, clsInvoice.Invoice
End Sub
Public Property Get Count() As Long
Count = mInvoices.Count
End Property
Like CSalesReps, this class has a Collection, an Add method, and a Count property. It doesn’t have an Item property because that’s not currently needed. But you can add an Item property later if the application requires it. Now you have two parent classes and two child classes. The final step before you can start creating objects is to define the relationship between them. In CSalesRep, include the following code:
Private mInvoices As New CInvoices
Public Property Get Invoices() As CInvoices
Set Invoices = mInvoices
End Property
Now the hierarchy is CSalesReps > CSalesRep > CInvoices > CInvoice.
Filling the parent classes with objects
With your classes defined, you can create new CSalesRep and CInvoice objects and add them to their respective parent classes. The following two procedures do just that.
Public Sub FillSalesReps(ByRef clsSalesReps As CSalesReps)
Dim i As Long
Dim clsSalesRep As CSalesRep
Dim loReps As ListObject
Set loReps = Sheet1.ListObjects(1)
'loop through all the sales reps
For i = 1 To loReps.ListRows.Count
'create a new sales rep object
Set clsSalesRep = New CSalesRep
'Set the properties
With loReps.ListRows(i).Range
clsSalesRep.SalesRepID = .Cells(1).Value
clsSalesRep.SalesRep = .Cells(2).Value
clsSalesRep.CommissionRate = .Cells(3).Value
clsSalesRep.Threshold = .Cells(4).Value
End With
'Add the child to the parent class
clsSalesReps.Add clsSalesRep
'Fill invoices for this rep
FillInvoices clsSalesRep
Next i
End Sub
Public Sub FillInvoices(ByRef clsSalesRep As CSalesRep)
Dim i As Long
Dim clsInvoice As CInvoice
Dim loInv As ListObject
'create a variable for the table
Set loInv = Sheet2.ListObjects(1)
'loop through the invoices table
For i = 1 To loInv.ListRows.Count
With loInv.ListRows(i).Range
'Only if it's for this rep, add it
If .Cells(4).Value = clsSalesRep.SalesRepID Then
Set clsInvoice = New CInvoice
clsInvoice.Invoice = .Cells(1).Value
clsInvoice.InvoiceDate = .Cells(2).Value
clsInvoice.Amount = .Cells(3).Value
clsSalesRep.Invoices.Add clsInvoice
End If
End With
Next i
End Sub
The first procedure accepts a CSalesReps argument. This is the class at the top of the hierarchy. The procedure loops through all the rows in the sales rep table, creates a new CSalesRep object, sets the properties of the new object, and adds it to the parent class.
Inside the loop, the FillSalesReps procedure calls FillInvoices and passes it a CSalesRep object. Only those invoices that relate to the CSaleRep object are created and added to it. There isn’t just one CInvoices parent class like there’s only one CSalesReps class. Instead, each CSalesRep has its own CInvoices instance that holds the invoices that relate to it. This relationship of using a parent class like CInvoices acting as a child to another class is a complicated but powerful coding technique.
Calculating the commissons
Insert a new standard module and type the following code to calculate the commission and output the results.
Public Sub CalculateCommission()
Dim clsSalesReps As CSalesReps
Dim i As Long
'Create a new parent object and fill it with child objects
Set clsSalesReps = New CSalesReps
FillSalesReps clsSalesReps
'Loop through all the reps and print commissions
For i = 1 To clsSalesReps.Count
With clsSalesReps.Item(i)
Debug.Print .SalesRep, _
Format(.Commission,"$#,##0.00")
End With
Next i
End Sub
You may have noticed that the above procedure uses a Commisson property that has not yet been created. In the CSalesRep class, insert the following code to create a Commission property.
Public Property Get Commission() As Double
If Me.Invoices.Total < Me.Threshhold Then
Commission = 0
Else
Commission = (Me.Invoices.Total - Me.Threshhold) _
* Me.CommissionRate
End If
End Property
If the total of all the invoices is less than the threshold, this procedure sets the commission to zero. Otherwise, the total sales in excess of the threshold is multiplied by the commission rate. To get the total of the invoices, this property uses a Total property fromCInvoices. Since you haven’t created that property yet, insert the following code into CInvoices to do so.
Public Property Get Total() As Double
Dim i As Long
For i = 1 To mInvoices.Count
Total = Total + mInvoices.Item(i).Amount
Next i
End Property
Figure 20.7 shows the output in the Immediate Window from running CalculateCommissions. You probably noticed that using the class module requires a little more setup than writing normal procedures. And for an application as simple as this, it may not be worth the effort. But as your applications get more complicated, you’ll find that organizing your code in class modules will make it more readable, easier to maintain, and easier to modify should the need arise.
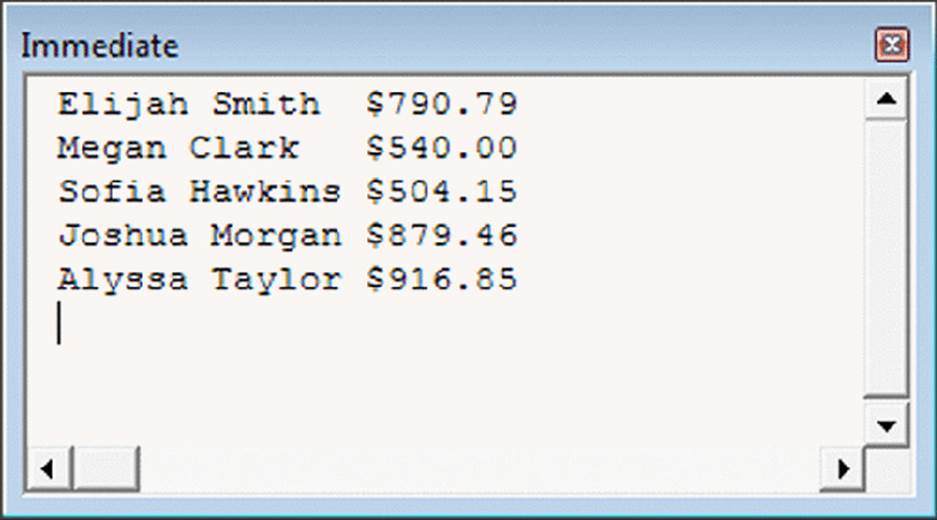
Figure 20.7 The commission calculation is output to the Immediate Window.
All materials on the site are licensed Creative Commons Attribution-Sharealike 3.0 Unported CC BY-SA 3.0 & GNU Free Documentation License (GFDL)
If you are the copyright holder of any material contained on our site and intend to remove it, please contact our site administrator for approval.
© 2016-2026 All site design rights belong to S.Y.A.