Excel 2016 Power Programming with VBA (2016)
Part I. Introduction to Excel VBA
Chapter 2. Introducing Visual Basic for Applications
In This Chapter
· Using Excel’s macro recorder
· Working with the Visual Basic Editor
· Understanding the Excel Object Model
· Diving into the Range object
· Knowing where to turn for help
Getting a Head Start with the Macro Recorder
A macro is essentially Visual Basic for Applications (VBA) code that you can call to execute any number of actions. In Excel, macros can be written or recorded.
Excel programming terminology can be a bit confusing. A recorded macro is technically no different from a VBA procedure you create manually. The terms macro and VBA procedure are often used interchangeably. Many Excel users call any VBA procedure a macro. However, when most people think of macros, they think of recorded macros.
Recording a macro is like programming a phone number into your cell phone. You first manually dial and save a number. Then when you want, you can redial the number with the touch of a button. Just as on a cell phone, you can record your actions in Excel while you perform them. While you record, Excel gets busy in the background, translating and storing your keystrokes and mouse clicks to VBA code. After a macro is recorded, you can play back those actions anytime you want.
The absolute best way to become familiar with VBA, without question, is to simply turn on the macro recorder and record some of the actions that you perform in Excel. This approach is a quick way to learn the relevant VBA syntax for a task.
In this section, you’ll explore macros and learn how you can use the macro recorder to start familiarizing yourself with VBA.
Creating your first macro
To start recording your first macro, you need to first find the Macro Recorder, which is on the Developer tab. Unfortunately, Excel comes out of the box with the Developer tab hidden — you may not see it on your version of Excel at first. If you plan to work with VBA macros, you’ll want to make sure that the Developer tab is visible. To display this tab, follow these steps:
1. Choose File ➜ Excel Options.
2. In the Excel Options dialog box, select Customize Ribbon.
3. In the list box on the right, place a check mark next to Developer.
4. Click OK to return to Excel.
Now that you have the Developer tab showing in the Excel Ribbon, you can start up the Macro Recorder by selecting the Record Macro command found in the Code group on the Developer tab. This activates the Record Macro dialog box, as shown in Figure 2.1.
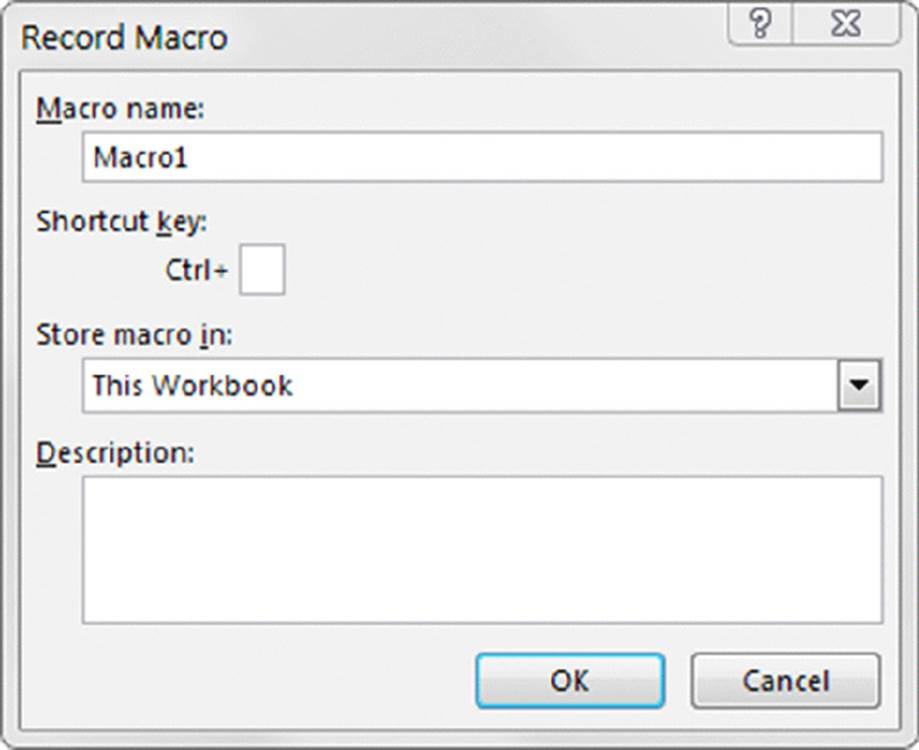
Figure 2.1 The Record Macro dialog box.
Here are the four parts of the Record Macro dialog box:
· Macro Name: This should be self-explanatory. Excel gives a default name to your macro, such as Macro1, but you should give your macro a name more descriptive of what it actually does. For example, you might name a macro that formats a generic table as FormatTable.
· Shortcut Key: Every macro needs an event, or something to happen, for it to run. This event can be a button press, a workbook opening, or in this case, a keystroke combination. When you assign a shortcut key to your macro, entering that combination of keys triggers your macro to run. This is an optional field.
· Store Macro In: This Workbook is the default option. Storing your macro in This Workbook simply means that the macro is stored along with the active Excel file. The next time you open that particular workbook, the macro is available to run. Similarly, if you send the workbook to another user, that user can run the macro as well (provided the macro security is properly set by your user — more on that later in this chapter).
· Description: This is an optional field, but it can come in handy if you have numerous macros in a spreadsheet or if you need to give a user a more detailed description about what the macro does.
With the Record Macro dialog box open, follow these steps to create a simple macro that enters your name into a worksheet cell:
1. Enter a new single-word name for the macro to replace the default Macro1 name. A good name for this example is MyName.
2. Assign this macro to the shortcut key Ctrl+Shift+N by entering uppercase N in the edit box labeled Shortcut Key.
3. Click OK to close the Record Macro dialog box and begin recording your actions.
4. Select any cell on your Excel spreadsheet, type your name into the selected cell, and then press Enter.
5. Choose Developer ➜ Code ➜ Stop Recording (or click the Stop Recording button in the status bar).
Examining your macro
The macro was recorded in a new module named Module1. To view the code in this module, you must activate the Visual Basic Editor. You can activate the VB Editor in either of two ways:
· Press Alt+F11.
· Choose Developer ➜ Code ➜ Visual Basic.
In the VB Editor, the Project window displays a list of all open workbooks and add-ins. This list is displayed as a tree diagram on the left of the screen, which you can expand or collapse. The code that you recorded previously is stored in Module1 in the current workbook. When you double-click Module1, the code in the module appears in the Code window.
 Note
Note
If you don’t see a Project window in the VB Editor, you can activate it by going up to the menu and selecting View ➜ Project Explorer. Alternatively, you can use the keyboard shortcut Ctrl+R.
The macro should look something like this:
Sub MyName()
'
' MyName Macro
'
' Keyboard Shortcut: Ctrl+Shift+N
'
' ActiveCell.FormulaR1C1 ="Michael Alexander"
End Sub
The macro recorded is a Sub procedure that is named MyName. The statements tell Excel what to do when the macro is executed.
Notice that Excel inserted some comments at the top of the procedure. These comments are some of the information that appeared in the Record Macro dialog box. These comment lines (which begin with an apostrophe) aren’t really necessary, and deleting them has no effect on how the macro runs. If you ignore the comments, you’ll see that this procedure has only one VBA statement:
ActiveCell.FormulaR1C1 ="Michael Alexander"
This single statement causes the name you typed while recording to be inserted into the active cell.
Testing your macro
Before you recorded this macro, you set an option that assigned the macro to the Ctrl+Shift+N shortcut key combination. To test the macro, return to Excel by using either of the following methods:
· Press Alt+F11.
· Click the View Microsoft Excel button on the VB Editor toolbar.
When Excel is active, activate a worksheet. (It can be in the workbook that contains the VBA module or in any other workbook.) Select a cell and press Ctrl+Shift+N. The macro immediately enters your name into the cell.
Note
In the preceding example, notice that you selected your target cell before you started recording your macro. This step is important. If you select a cell while the macro recorder is turned on, the actual cell that you selected will be recorded into the macro. In such a case, the macro would always format that particular cell, and it would not be a general-purpose macro.
Editing your macro
After you record a macro, you can make changes to it. For example, assume that you want your name to be bold. You could re-record the macro, but this modification is simple, so editing the code is more efficient. Press Alt+F11 to activate the VB Editor window. Then activate Module1 and insert: ActiveCell.Font.Bold = True as demonstrated in the sample code below.
ActiveCell.Font.Bold = True
The edited macro appears as follows:
Sub MyName()
'
' MyName Macro
'
' Keyboard Shortcut: Ctrl+Shift+N
'
ActiveCell.Font.Bold = True
ActiveCell.FormulaR1C1 ="Michael Alexander"
End Sub
Test this new macro, and you see that it performs as it should.
Comparing absolute and relative macro recording
Now that you’ve read about the basics of the Macro Recorder interface, it’s time to go deeper and begin recording a more complex macro. The first thing you need to understand before you begin is that Excel has two modes for recording — absolute reference and relative reference.
Recording macros with absolute references
Excel’s default recording mode is in absolute reference. As you may know, the term absolute reference is often used in the context of cell references found in formulas. When a cell reference in a formula is an absolute reference, it does not automatically adjust when the formula is pasted to a new location.
The best way to understand how this concept applies to macros is to try it out. Open the Chapter 2 Sample.xlsm file and record a macro that counts the rows in the Branchlist worksheet. (See Figure 2.2.)
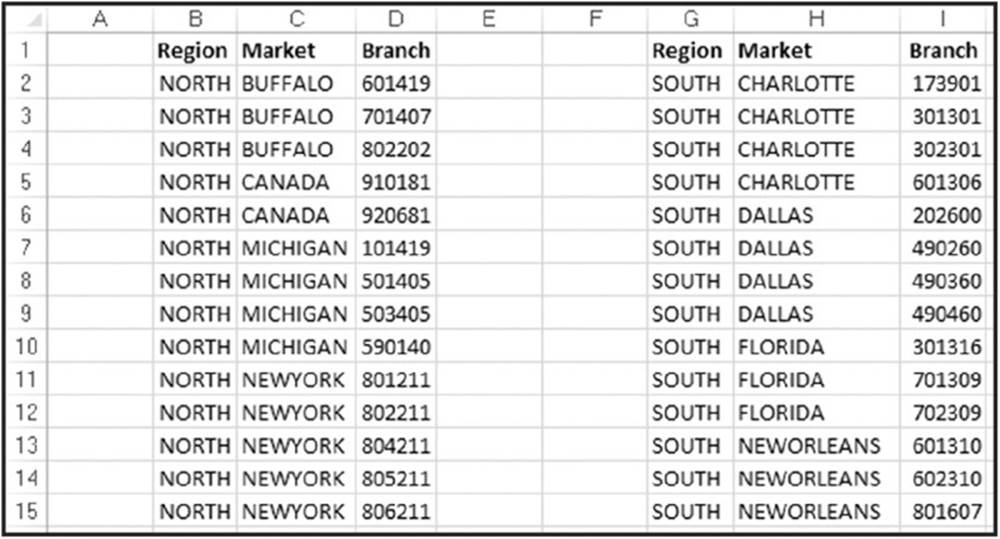
Figure 2.2 Your pre-totaled worksheet containing two tables.
 The sample dataset used in this chapter can be found on this book’s companion website. See this book’s Introduction for more on the companion website.
Follow these steps to record the macro:
1. Before recording, make sure cell A1 is selected.
2. Select Record Macro from the Developer tab.
3. Name the macro AddTotal.
4. Choose This Workbook for the save location.
5. Click OK to start recording.
At this point, Excel is recording your actions. While Excel is recording, perform the following steps:
6. Select cell A16 and type Total in the cell.
7. Select the first empty cell in Column D (D16) and type = COUNTA(D2:D15). This gives a count of branch numbers at the bottom of column D. The COUNTA function is used to catch any branch numbers stored as text.
8. Click Stop Recording on the Developer tab to stop recording the macro.
The formatted worksheet should look like something like the one in Figure 2.3.
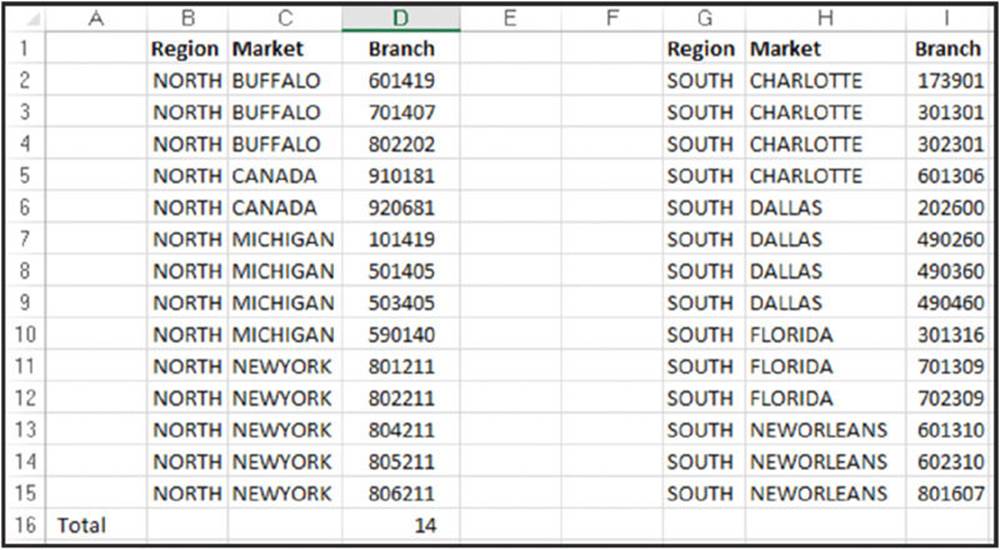
Figure 2.3 Your post-totaled worksheet.
To see your macro in action, delete the total row you just added and play back your macro by following these steps:
1. Select Macros from the Developer tab.
2. Find and select the AddTotal macro you just recorded.
3. Click the Run button.
If all goes well, the macro plays back your actions perfectly and gives your table a total. Here’s the thing: No matter how hard you try, you can’t make the AddTotal macro work on the second table. Why? Because you recorded it as an absolute macro.
To understand what this means, examine the underlying code. To examine the code, select Macros from the Developer tab to get the Macro dialog box illustrated in Figure 2.4. The Macro dialog box will, by default, list the macros available in all open Excel workbooks (including any Add-ins you may have installed). You can limit the list to only those macros contained in the active workbook by changing the Macros In setting to This Workbook.
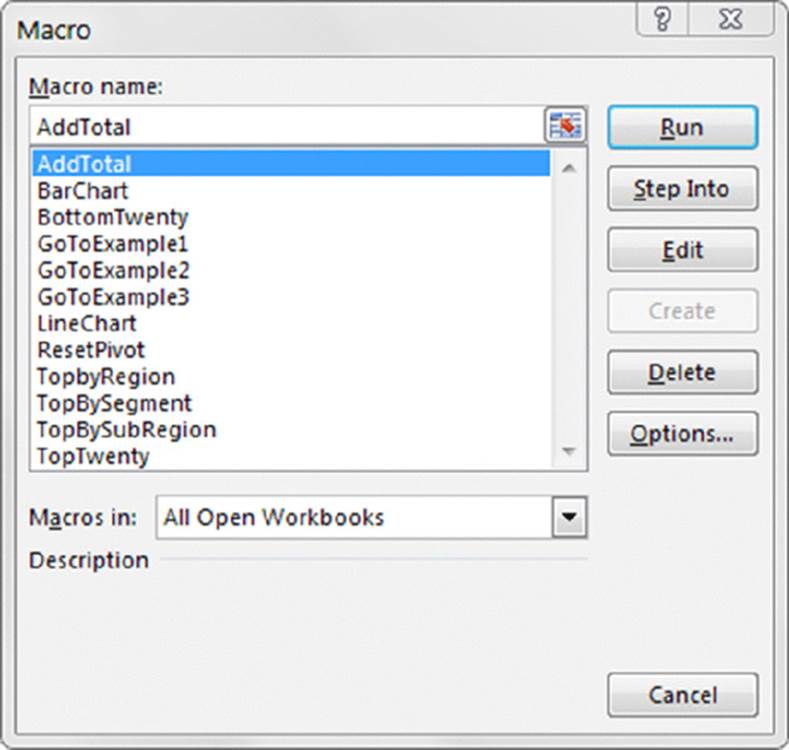
Figure 2.4 The Excel Macro dialog box.
Select the AddTotal macro and click the Edit button. This opens the Visual Basic Editor to show you the code that was written when you recorded your macro:
Sub AddTotal()
Range("A16").Select
ActiveCell.FormulaR1C1 ="Total"
Range("D16").Select
ActiveCell.FormulaR1C1 ="=COUNTA(R[-14]C:R[-1]C)"
End Sub
Pay particular attention to lines two and four of the macro. When you asked Excel to select cell range A16 and then D16, those cells are exactly what it selected. Because the macro was recorded in absolute reference mode, Excel interpreted your range selection as absolute. In other words, if you select cell A16, that cell is what Excel gives you. In the next section, you take a look at what the same macro looks like when recorded in relative reference mode.
Recording macros with relative references
In the context of Excel macros, relative means relative to the currently active cell. So you should use caution with your active cell choice — both when you record the relative reference macro and when you run it.
First, make sure the Chapter 2 Sample.xlsm file is open. (This file is available on this book’s companion website.) Then, use the following steps to record a relative-reference macro:
1. Select the Use Relative References option from the Developer tab, as shown in Figure 2.5.
2. Before recording, make sure cell A1 is selected.
3. Select Record Macro from the Developer tab.
4. Name the macro AddTotalRelative.
5. Choose This Workbook for the save location.
6. Click OK to start recording.
7. Select cell A16 and type Total in the cell.
8. Select the first empty cell in Column D (D16) and type = COUNTA(D2:D15).
9. Click Stop Recording on the Developer tab to stop recording the macro.
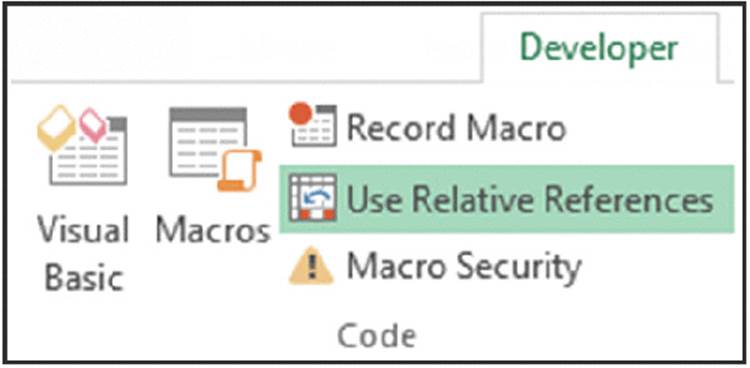
Figure 2.5 Recording a macro with relative references.
At this point, you have recorded two macros. Take a moment to examine the code for your newly-created macro.
Select Macros from the Developer tab to open the Macro dialog box. Here, choose the AddTotalRelative macro and click Edit.
Again, this opens the Visual Basic Editor to show you the code that was written when you recorded your macro. This time, your code looks something like the following:
Sub AddTotalRelative()
ActiveCell.Offset(15, 0).Range("A1").Select
ActiveCell.FormulaR1C1 ="Total"
ActiveCell.Offset(0, 3).Range("A1").Select
ActiveCell.FormulaR1C1 ="=COUNTA(R[-14]C:R[-1]C)"
End Sub
Notice that there are no references to any specific cell ranges at all (other than the starting point “A1”). Let’s take a moment to take a quick look at what the relevant parts of this VBA code really mean.
Notice that in line 2, Excel uses the Offset property of the active cell. This property tells the cursor to move a certain number of cells up or down and a certain number of cells left or right.
The Offset property code tells Excel to move 15 rows down and 0 columns across from the active cell (in this case, A1). There’s no need for Excel to explicitly select a cell as it did when recording an absolute reference macro.
To see this macro in action, delete the total row and do the following:
1. Select cell A1.
2. Select Macros from the Developer tab.
3. Find and select the AddTotalRelative macro.
4. Click the Run button.
5. Now select cell F1.
6. Select Macros from the Developer tab.
7. Find and select the AddTotalRelative macro.
8. Click the Run button.
Notice that this macro, unlike your previous macro, works on both sets of data. Because the macro applies the totals relative to the currently active cell, the totals are applied correctly.
For this macro to work, you simply need to ensure that:
· You’ve selected the correct starting cell before running the macro.
· The block of data has the same number of rows and columns as the data on which you recorded the macro.
Hopefully, this simple example has given you a firm grasp of macro recording with both absolute and relative references.
Other macro recording concepts
At this point, you should feel comfortable recording your own Excel Macros. Now here are some of the other important concepts you’ll need to keep in mind when writing or recording macros.
Macro-enabled file extensions
Beginning with Excel 2007, Excel workbooks were given the standard file extension .xlsx. Files with the .xlsx extension cannot contain macros. If your workbook contains macros and you then save that workbook as an .xlsx file, all VBA code is removed automatically. Luckily, Excel will warn you that your macro content will be removed when saving a workbook with macros as an .xlsx file.
If you want to retain the macros, you must save your file as an Excel Macro-Enabled Workbook. This gives your file an .xlsm extension. The idea is that all workbooks with an .xlsx file extension are automatically known to be safe, whereas you can recognize .xlsm files as a potential threat.
Macro security in Excel
With the release of Office 2010, Microsoft introduced significant changes to its Office security model. One of the most significant changes is the concept of trusted documents. Without getting into the technical minutia, a trusted document is essentially a workbook you have deemed safe by enabling macros.
If you open a workbook that contains macros, you will see a yellow bar message under the Ribbon stating that macros (active content) have, in effect, been disabled.
If you click Enable, it automatically becomes a trusted document. This means you no longer are prompted to enable the content as long as you open that file on your computer. The basic idea is that if you told Excel that you “trust” a particular workbook by enabling macros, it is highly likely that you will enable macros each time you open it. Thus, Excel remembers that you’ve enabled macros before and inhibits any further messages about macros for that workbook.
This is great news for you and your clients. After enabling your macros just one time, they won’t be annoyed at the constant messages about macros, and you won’t have to worry that your macro-enabled dashboard will fall flat because macros have been disabled.
Trusted locations
If the thought of any macro message coming up (even one time) unnerves you, you can set up a trusted location for your files. A trusted location is a directory that is deemed a safe zone where only trusted workbooks are placed. A trusted location allows you and your clients to run a macro-enabled workbook with no security restrictions as long as the workbook is in that location.
To set up a trusted location, follow these steps:
1. Select the Macro Security button on the Developer tab. This activates the Trust Center dialog box.
2. Click the Trusted Locations button. This opens the Trusted Locations menu (see Figure 2.6), which shows you all the directories that are considered trusted.
3. Click the Add New Location button.
4. Click Browse to find and specify the directory that will be considered a trusted location.
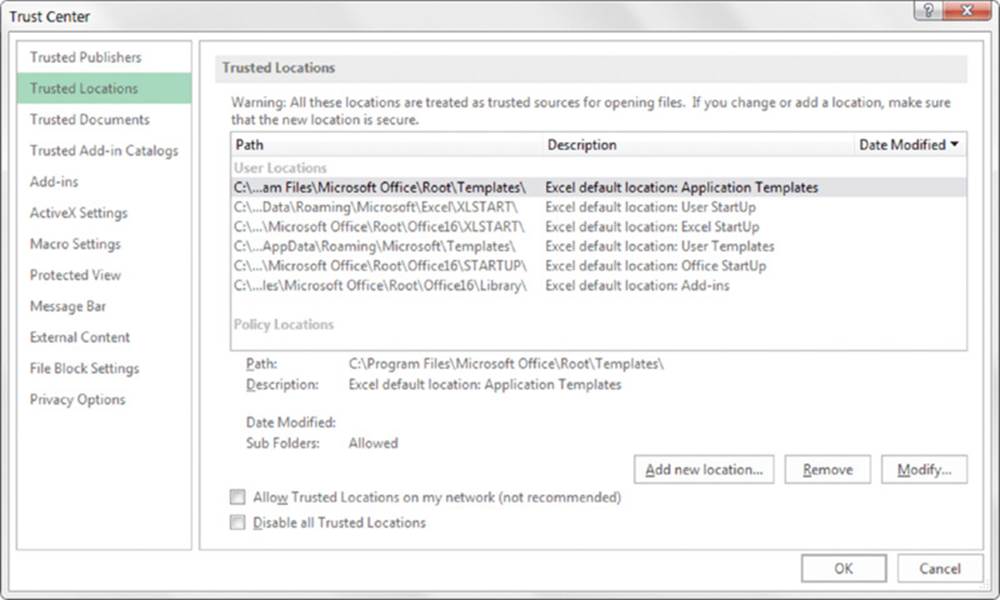
Figure 2.6 The Trusted Locations menu allows you to add directories that are considered trusted.
After you specify a trusted location, any Excel file that is opened from this location will have macros automatically enabled.
Storing macros in your Personal Macro Workbook
Most user-created macros are designed for use in a specific workbook, but you may want to use some macros in all your work. You can store these general-purpose macros in the Personal Macro Workbook so that they’re always available to you. The Personal Macro Workbook is loaded whenever you start Excel. This file, named personal.xlsb, doesn’t exist until you record a macro using Personal Macro Workbook as the destination.
To record the macro in your Personal Macro Workbook, select the Personal Macro Workbook option in the Record Macro dialog box before you start recording. This option is in the Store Macro In drop-down list (refer back to Figure 2.1 under “Creating Your First Macro”).
If you store macros in the Personal Macro Workbook, you don’t have to remember to open the Personal Macro Workbook when you load a workbook that uses macros. When you want to exit, Excel asks whether you want to save changes to the Personal Macro Workbook.
Note
The Personal Macro Workbook normally is in a hidden window to keep it out of the way.
Assigning a macro to a button and other form controls
When you create macros, you may want to have a clear and easy way to run each macro. A basic button can provide a simple but effective user interface.
As luck would have it, Excel offers a set of form controls designed specifically for creating user interfaces directly on spreadsheets. There are several different types of form controls, from buttons (the most-commonly-used control) to scrollbars.
The idea behind using a form control is simple. You place a form control on a spreadsheet and then assign a macro to it — that is, a macro you’ve already recorded. When a macro is assigned to the control, that macro is executed, or played, when the control is clicked.
Take a moment to create a button for the AddTotalRelative macro you created earlier. Here’s how:
1. Click the Insert button under the Developer tab. (See Figure 2.7.)
2. Select the Button Form Control from the drop-down list that appears.
3. Click the location where you want to place your button.
When you drop the button control onto your spreadsheet, the Assign Macro dialog box, as shown in Figure 2.8, activates and asks you to assign a macro to this button.
4. Select the macro you want to assign to the button and then click OK.
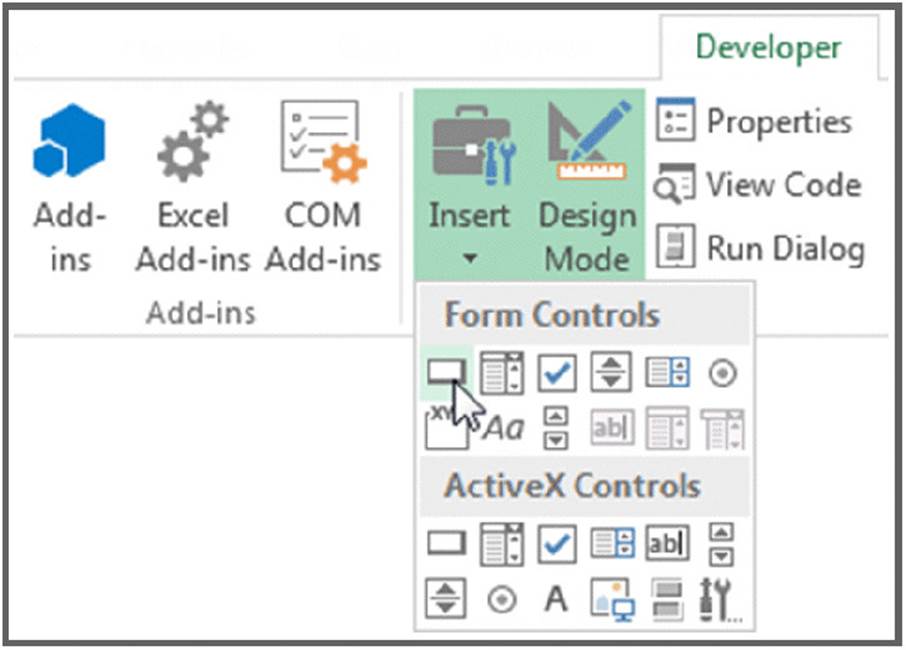
Figure 2.7 You can find the form controls in the Developer tab.
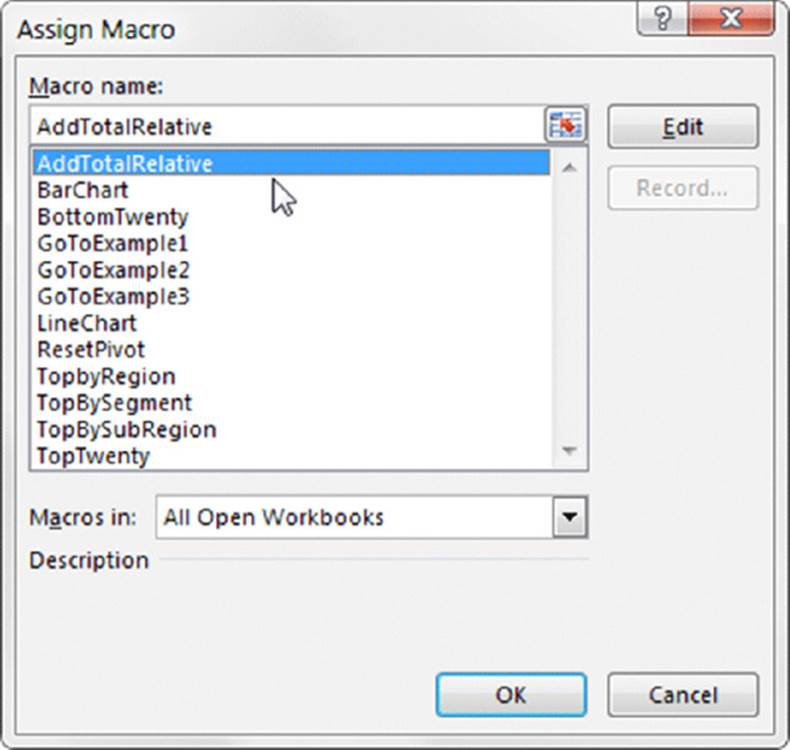
Figure 2.8 Assign a macro to the newly-added button.
At this point, you have a button that runs your macro when you click it! Keep in mind that all the controls in the Form Controls group (shown in Figure 2.7) work in the same way as the command button, in that you assign a macro to run when the control is clicked.
 Note
Note
Notice the form controls and ActiveX controls in Figure 2.7. Although they look similar, they’re quite different. Form controls are designed specifically for use on a spreadsheet, and ActiveX controls are typically used on Excel user forms. As a general rule, you should always use form controls when working on a spreadsheet. Why? Form controls need less overhead, so they perform better, and configuring form controls is far easier than configuring their ActiveX counterparts.
Placing a macro on the Quick Access toolbar
You can also assign a macro to a button in Excel’s Quick Access toolbar. The Quick Access Toolbar sits either above or below the Ribbon. You can add a custom button that will run your macro by following these steps:
1. Right-click your Quick Access toolbar and select Customize Quick Access Toolbar. This will open the dialog box illustrated in Figure 2.9.
2. Click the Quick Access Toolbar button on the left of the Excel Options dialog box.
3. Select Macros from the Choose Commands From drop-down list on the left.
4. Select the macro you want to add and click the Add button.
5. Change the icon by clicking the Modify button.
6. Click the OK button.
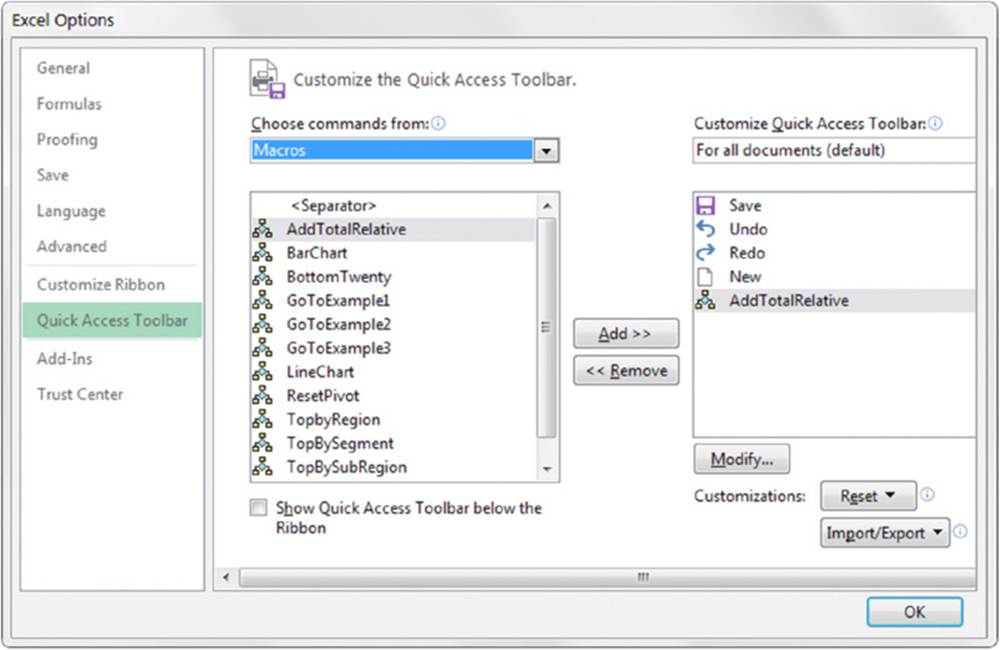
Figure 2.9 Adding a macro to the Quick Access toolbar.
Working with the Visual Basic Editor
The Visual Basic Editor is actually a separate application that runs when you open Excel. In order to see this hidden VBE environment, you’ll need to activate it. The quickest way to activate the VBE is to press Alt+F11 when Excel is active. To return to Excel, press Alt+F11 again.
You can also activate the VBE by using the Visual Basic command found on Excel’s Developer tab.
Understanding VBE components
Figure 2.10 shows the VBE program with some of the key parts identified. Chances are your VBE program window won’t look exactly like what you see in Figure 2.10. The VBE contains several windows and is highly customizable. You can hide windows, rearrange windows, dock windows, and so on.
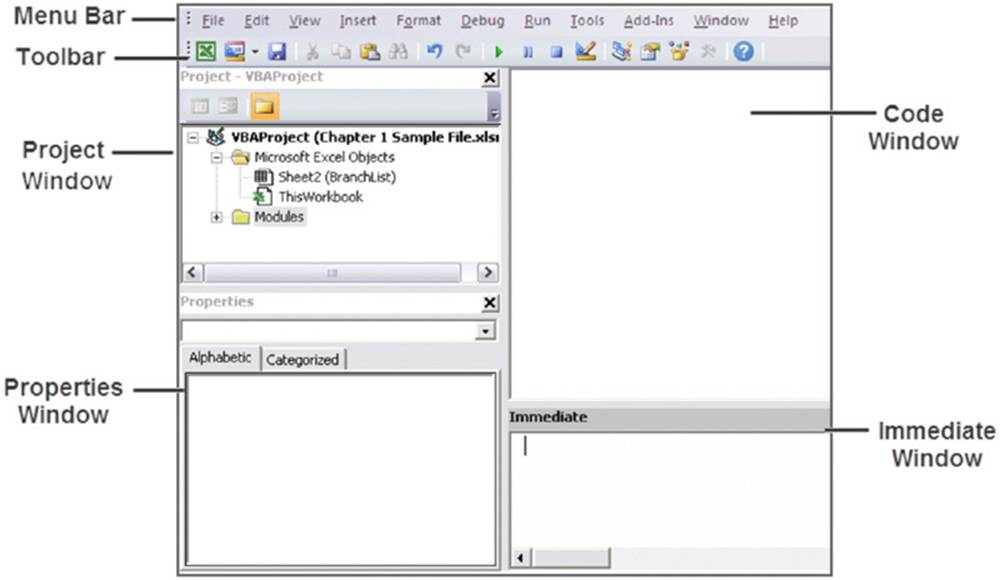
Figure 2.10 The VBE with significant elements identified.
Menu bar
The VBE menu bar works just like every other menu bar you’ve encountered. It contains commands that you use to do things with the various components in the VBE. You will also find that many of the menu commands have shortcut keys associated with them.
The VBE also features shortcut menus. You can right-click virtually anything in the VBE and get a shortcut menu of common commands.
Toolbar
The Standard toolbar, which is directly under the menu bar by default, is one of four VBE toolbars available. You can customize the toolbars, move them around, display other toolbars, and so on. If you’re so inclined, use the View ➜ Toolbars command to work with VBE toolbars. Most people just leave them as they are.
Project window
The Project window displays a tree diagram that shows every workbook currently open in Excel (including add-ins and hidden workbooks). Double-click items to expand or contract them. You’ll explore this window in more detail in the “Working with the Project Window” section later in this chapter.
If the Project window is not visible, press Ctrl+R or use the View ➜ Project Explorer command. To hide the Project window, click the Close button in its title bar. Alternatively, right-click anywhere in the Project window and select Hide from the shortcut menu.
Code window
A Code window contains VBA code. Every object in a project has an associated Code window. To view an object’s Code window, double-click the object in the Project window. For example, to view the Code window for the Sheet1 object, double-click Sheet1 in the Project window. Unless you’ve added some VBA code, the Code window will be empty.
You find out more about Code windows later in this chapter’s “Working with a Code Window” section.
Immediate window
The Immediate window may or may not be visible. If it isn’t visible, press Ctrl+G or use the View ➜ Immediate Window command. To close the Immediate window, click the Close button in its title bar (or right-click anywhere in the Immediate window and select Hide from the shortcut menu).
The Immediate window is most useful for executing VBA statements directly and for debugging your code. If you’re just starting out with VBA, this window won’t be all that useful, so feel free to hide it and free up some screen space for other things.
Working with the Project window
When you’re working in the VBE, each Excel workbook and add-in that’s open is a project. You can think of a project as a collection of objects arranged as an outline. You can expand a project by clicking the plus sign (+) at the left of the project’s name in the Project window. Contract a project by clicking the minus sign (-) to the left of a project’s name. Or, you can double-click the items to expand and contract them.
Figure 2.11 shows a Project window with two projects listed: a workbook named Book1 and a workbook named Book2.
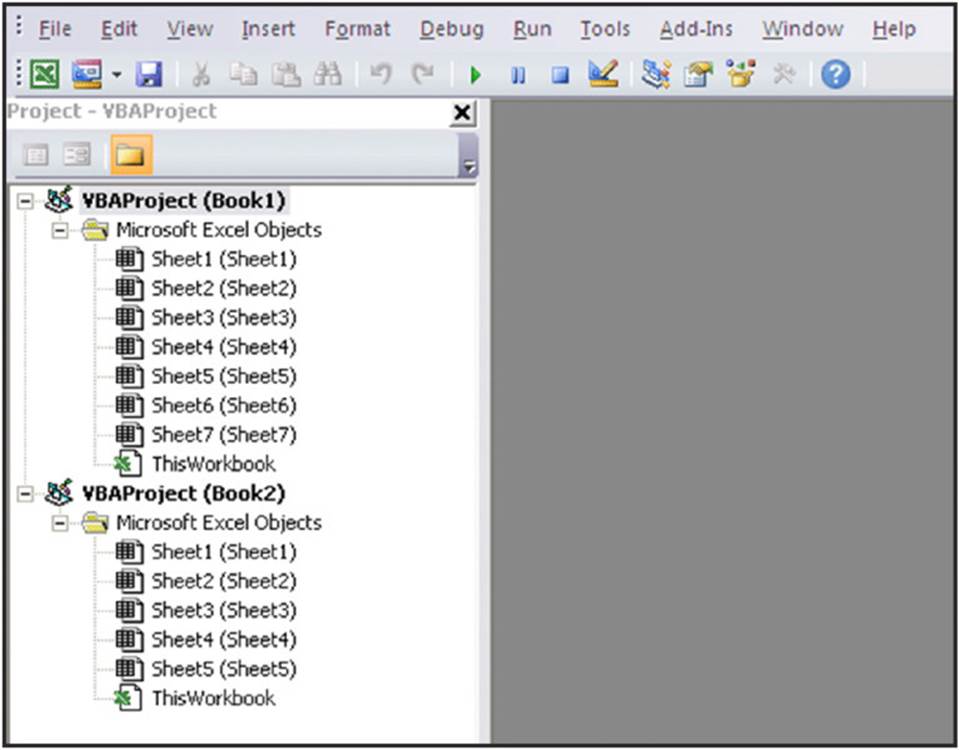
Figure 2.11 This Project window lists two projects. They are expanded to show their objects.
Every project expands to show at least one node called Microsoft Excel Objects. This node expands to show an item for each sheet in the workbook (each sheet is considered an object), and another object called ThisWorkbook (which represents the Workbook object). If the project has any VBA modules, the project listing also shows a Modules node.
Adding a new VBA module
When you record a macro, Excel automatically inserts a VBA module to hold the recorded code. The workbook that holds the module for the recorded macro depends on where you chose to store the recorded macro, just before you started recording.
In general, a VBA module can hold three types of code:
· Declarations: One or more information statements that you provide to VBA. For example, you can declare the data type for variables you plan to use, or set some other module-wide options.
· Sub procedures: A set of programming instructions that performs some action. All recorded macros will be Sub procedures.
· Function procedures: A set of programming instructions that returns a single value (similar in concept to a worksheet function, such as Sum).
A single VBA module can store any number of Sub procedures, Function procedures, and declarations. How you organize a VBA module is completely up to you. Some people prefer to keep all their VBA code for an application in a single VBA module; others like to split up the code into several different modules. It’s a personal choice, just like arranging furniture.
Follow these steps to manually add a new VBA module to a project:
1. Select the project’s name in the Project window.
2. Choose Insert ➜ Module.
Or you can:
1. Right-click the project’s name.
2. Choose Insert ➜ Module from the shortcut menu.
The new module is added to a Modules folder in the Project window (see Figure 2.12). Any module you create in a given workbook is placed in this Modules folder.
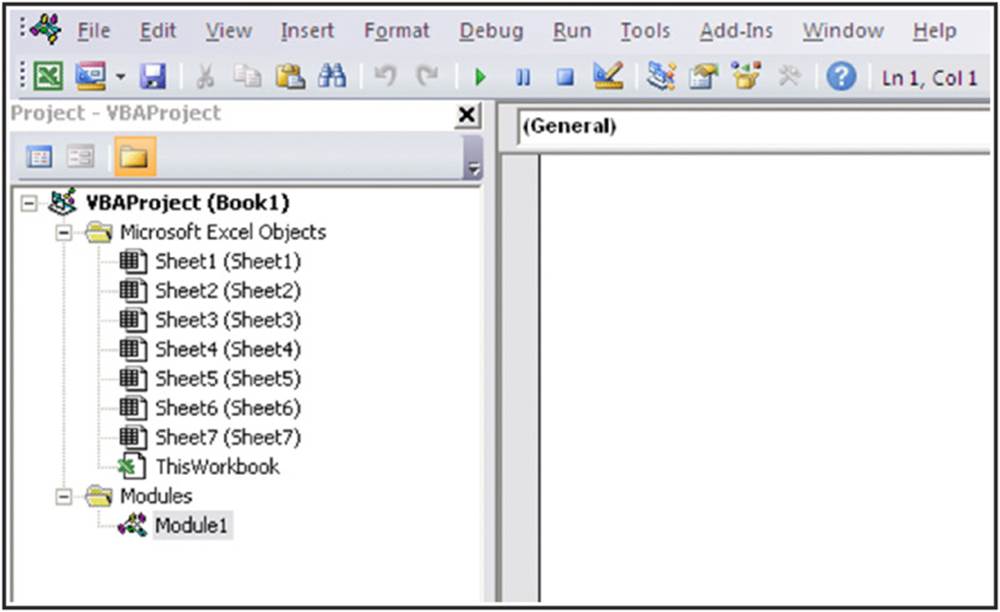
Figure 2.12 Code modules are visible in the Project window in a folder called Modules.
Removing a VBA module
You may want to remove a code module that is no longer needed. To do so, follow these steps:
1. Select the module’s name in the Project window.
2. Choose File ➜ Remove xxx, where xxx is the module name.
Or
1. Right-click the module’s name in the Project window.
2. Choose Remove xxx from the shortcut menu.
Note
You can remove VBA modules, but there is no way to remove the other code modules such as those for the Sheet objects, or ThisWorkbook.
Working with a Code window
As you become proficient with VBA, you spend lots of time working in Code windows. Macros that you record are stored in a module, and you can type VBA code directly into a VBA module.
Minimizing and maximizing windows
Code windows are much like workbook windows in Excel. You can minimize them, maximize them, resize them, hide them, rearrange them, and so on. Most people find it much easier to maximize the Code window that they’re working on. Doing so lets you see more code and keeps you from getting distracted.
To maximize a Code window, click the maximize button in its title bar (right next to the X). Or, just double-click its title bar to maximize it. To restore a Code window to its original size, click the Restore button. When a window is maximized, its title bar isn’t really visible, so you’ll find the Restore button to the right of the Type a Question for Help box.
Sometimes, you may want to have two or more Code windows visible. For example, you may want to compare the code in two modules or copy code from one module to another. You can arrange the windows manually, or use the Window ➜ Tile Horizontally or Window ➜ Tile Vertically commands to arrange them automatically.
You can quickly switch among code windows by pressing Ctrl+Tab. If you repeat that key combination, you keep cycling through all the open code windows. Pressing Ctrl+Shift+Tab cycles through the windows in reverse order.
Minimizing a Code window gets it out of the way. You can also click the window’s Close button in a Code window’s title bar to close the window completely. (Closing a window just hides it; you won’t lose anything.) To open it again, just double-click the appropriate object in the Project window. Working with these Code windows sounds more difficult than it really is.
Getting VBA code into a module
Before you can do anything meaningful, you must have some VBA code in the VBA module. You can get VBA code into a VBA module in three ways:
· Use the Excel macro recorder to record your actions and convert them to VBA code.
· Enter the code directly.
· Copy the code from one module and paste it into another.
You have discovered the excellent method for creating code by using the Excel Macro recorder. However, not all tasks can be translated to VBA by recording a macro. You often have to enter your code directly into the module. Entering code directly basically means either typing the code yourself or copying and pasting code you have found somewhere else.
Entering and editing text in a VBA module works as you might expect. You can select, copy, cut, paste, and do other things to the text.
A single line of VBA code can be as long as you like. However, you may want to use the line-continuation character to break up lengthy lines of code. To continue a single line of code (also known as a statement) from one line to the next, end the first line with a space followed by an underscore (_). Then continue the statement on the next line. Here’s an example of a single statement split into three lines:
Selection.Sort Key1:=Range("A1"), _
Order1:=xlAscending, Header:=xlGuess, _
Orientation:=xlTopToBottom
This statement would perform exactly the same way if it were entered in a single line (with no line-continuation characters). Notice that the second and third lines of this statement are indented. Indenting is optional, but it helps clarify the fact that these lines are not separate statements.
The VBE has multiple levels of undo and redo. If you deleted a statement that you shouldn’t have, use the Undo button on the toolbar (or press Ctrl+Z) until the statement appears again. After undoing, you can use the Redo button to perform the changes you’ve undone.
Are you ready to enter some real, live code? Try the following steps:
1. Create a new workbook in Excel.
2. Press Alt+F11 to activate the VBE.
3. Click the new workbook’s name in the Project window.
4. Choose Insert ➜ Module to insert a VBA module into the project.
5. Type the following code into the module:
6. Sub GuessName()
7. Dim Msg as String
8. Dim Ans As Long
9. Msg ="Is your name" & Application.UserName &"?"
10. Ans = MsgBox(Msg, vbYesNo)
11. If Ans = vbNo Then MsgBox"Oh, never mind."
12. If Ans = vbYes Then MsgBox"I must be clairvoyant!"
End Sub
13.Make sure the cursor is located anywhere within the text you typed and press F5 to execute the procedure.
 F5 is a shortcut for the Run ➜ Run Sub/UserForm command.
When you enter the code listed in Step 5, you might notice that the VBE makes some adjustments to the text you enter. For example, after you type the Sub statement, the VBE automatically inserts the End Sub statement. And if you omit the space before or after an equal sign, the VBE inserts the space for you. Also, the VBE changes the color and capitalization of some text. This is all perfectly normal. It’s just the VBE’s way of keeping things neat and readable.
If you followed the previous steps, you just created a VBA Sub procedure, also known as a macro. When you press F5, Excel executes the code and follows the instructions. In other words, Excel evaluates each statement and does what you told it to do. You can execute this macro any number of times — although it tends to lose its appeal after a few dozen executions.
This simple macro uses the following concepts:
· Defining a Sub procedure (the first line)
· Declaring variables (the Dim statements)
· Assigning values to variables (Msg and Ans)
· Concatenating (joining) two strings (using the & operator)
· Using a built-in VBA function (MsgBox)
· Using built-in VBA constants (vbYesNo, vbNo, and vbYes)
· Using an If-Then construct (twice)
· Ending a Sub procedure (the last line)
As mentioned previously, you can copy and paste code into a VBA module. For example, a Sub or Function procedure that you write for one project might also be useful in another project. Instead of wasting time reentering the code, you can activate the module and use the normal copy-and-paste procedures (Ctrl+C to copy and Ctrl+V to paste). After pasting it into a VBA module, you can modify the code as necessary.
Customizing the VBA environment
If you’re serious about becoming an Excel programmer, you’ll spend a lot of time with VBA modules on your screen. To help make things as comfortable as possible, the VBE provides quite a few customization options.
When the VBE is active, choose Tools ➜ Options. You’ll see a dialog box with four tabs: Editor, Editor Format, General, and Docking. Take a moment to explore some of the options found on each tab.
The Editor tab
Figure 2.13 shows the options accessed by clicking the Editor tab of the Options dialog box. Use the options in the Editor tab to control how certain things work in the VBE.
· The Auto Syntax Check option: The Auto Syntax Check setting determines whether the VBE pops up a dialog box if it discovers a syntax error while you’re entering your VBA code. The dialog box tells roughly what the problem is. If you don’t choose this setting, VBE flags syntax errors by displaying them in a different color from the rest of the code, and you don’t have to deal with any dialog boxes popping up on your screen.
· The Require Variable Declaration option: If the Require Variable Declaration option is set, VBE inserts the following statement at the beginning of each new VBA module you insert: Option Explicit. Changing this setting affects only new modules, not existing modules. If this statement appears in your module, you must explicitly define each variable you use. Using a Dim statement is one way to declare variables.
· The Auto List Members option: If the Auto List Members option is set, VBE provides some help when you’re entering your VBA code. It displays a list that would logically complete the statement you’re typing. This is one of the best features of the VBE.
· The Auto Quick Info option: If the Auto Quick Info option is selected, VBE displays information about functions and their arguments as you type. This is similar to the way Excel lists the arguments for a function as you start typing a new formula.
· The Auto Data Tips option: If the Auto Data Tips option is set, VBE displays the value of the variable over which your cursor is placed when you’re debugging code. This is turned on by default and often quite useful. There is no reason to turn this option off.
· The Auto Indent setting: The Auto Indent setting determines whether VBE automatically indents each new line of code the same as the previous line. Most Excel developers are keen on using indentations in their code, so this option is typically kept on.
· The Drag-and-Drop Text Editing option: The Drag-and-Drop Text Editing option, when enabled, lets you copy and move text by dragging and dropping with your mouse.
· The Default to Full Module View option: The Default to Full Module View option sets the default state for new modules. (It doesn’t affect existing modules.) If set, procedures in the Code window appear as a single scrollable list. If this option is turned off, you can see only one procedure at a time.
· The Procedure Separator option: When the Procedure Separator option is turned on, separator bars appear at the end of each procedure in a Code window. Separator bars provide a nice visual line between procedures, making it easy to see where one piece of code ends and where another starts.
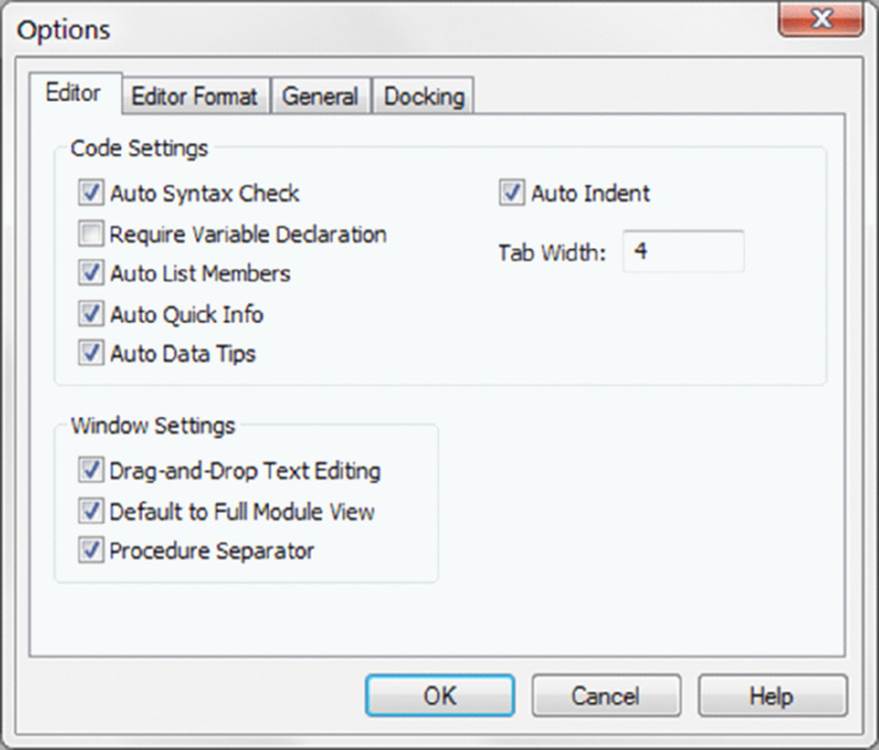
Figure 2.13 The Editor tab in the Options dialog box.
The Editor Format tab
Figure 2.14 shows the Editor Format tab of the Options dialog box. With this tab, you can customize the way the VBE looks.
· The Code Colors option: The Code Colors option lets you set the text color and background color displayed for various elements of VBA code. This is largely a matter of personal preference. Personally, most Excel developers stick with the default colors. But if you like to change things up, you can play around with these settings.
· The Font option: The Font option lets you select the font that’s used in your VBA modules. For best results, stick with a fixed-width font such as Courier New. In a fixed-width font, all characters are exactly the same width. This makes your code more readable because the characters are nicely aligned vertically and you can easily distinguish multiple spaces (which is sometimes useful).
· The Size setting: The Size setting specifies the point size of the font in the VBA modules. This setting is a matter of personal preference determined by your video display resolution and how good your eyesight is.
· The Margin Indicator Bar option: This option controls the display of the vertical margin indicator bar in your modules. You should keep this turned on; otherwise, you won’t be able to see the helpful graphical indicators when you’re debugging your code.
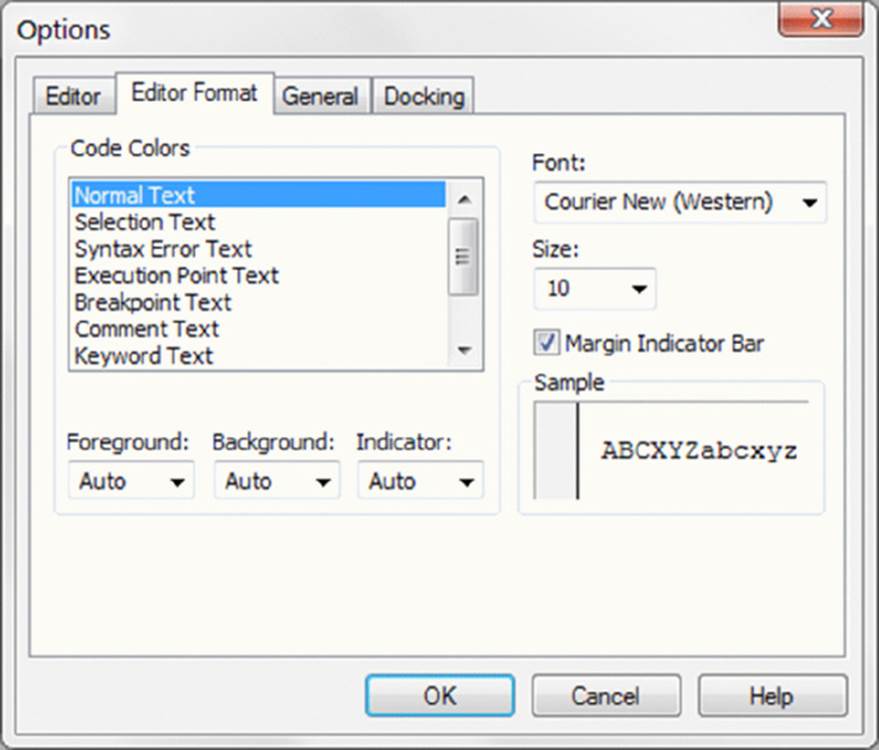
Figure 2.14 Change the VBE’s looks with the Editor Format tab.
The General tab
Figure 2.15 shows the options available under the General tab in the Options dialog box. In almost every case, the default settings are just fine. The most important setting on the General tab is Error Trapping. If you are just starting your Excel macro writing career, it’s best to leave the Error Trapping set to Break on Unhandled Errors. This ensures Excel warns you of errors as you type your code – as opposed to waiting until you try to run your macro.
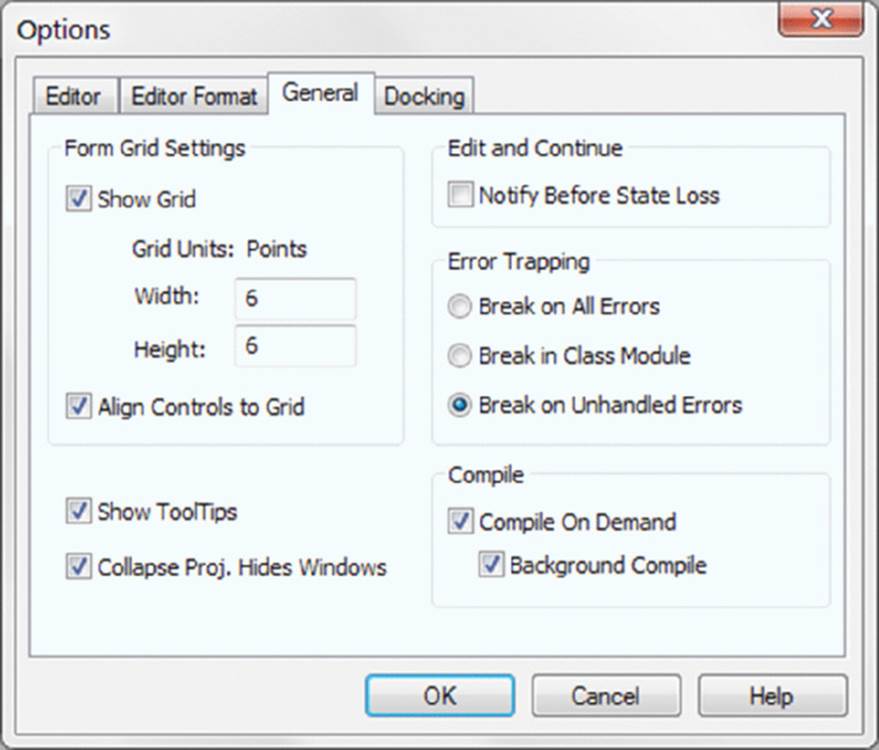
Figure 2.15 The General tab of the Options dialog box.
The Docking tab
Figure 2.16 shows the Docking tab. These options determine how the various windows in the VBE behave. When a window is docked, it is fixed in place along one of the edges of the VBE program window. This makes it much easier to identify and locate a particular window. If you turn off all docking, you have a big, confusing mess of windows. Generally, the default settings work fine.
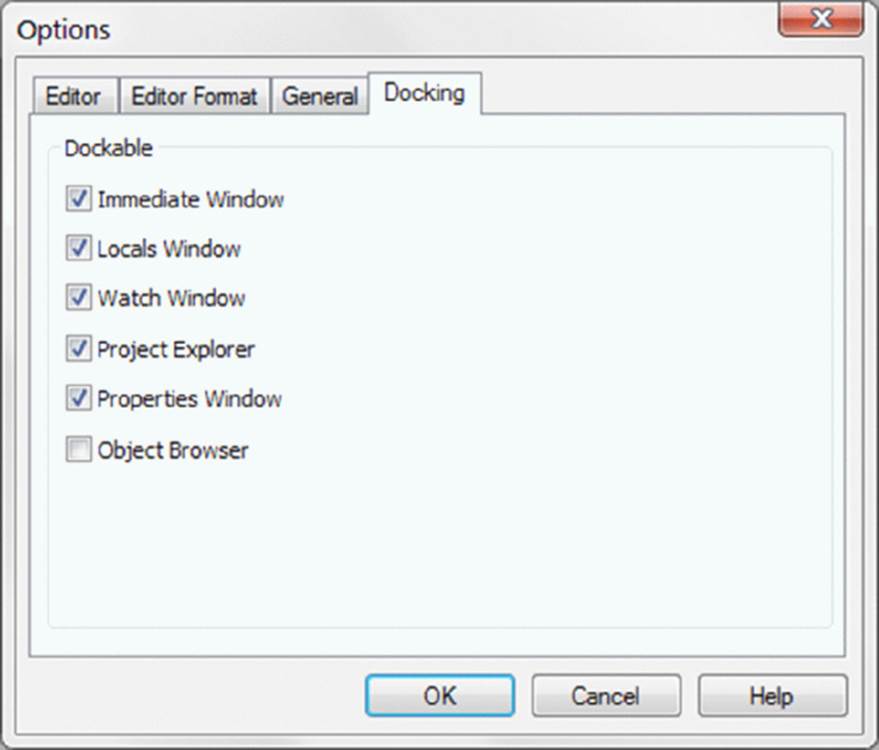
Figure 2.16 The Docking tab of the Options dialog box.
VBA Fundamentals
VBA is an object-oriented programming language. The basic concept of object-oriented programming is that a software application (Excel in this case) consists of various individual objects, each of which has its own set of features and uses. An Excel application contains workbooks, worksheets, cells, charts, pivot tables, shapes, and the list goes on. Each object has its own set of features, which are called properties, and its own set of uses, called methods.
You can think of this concept just as you would the objects you encounter every day, such as your computer, your car, or the refrigerator in your kitchen. Each of those objects has identifying qualities, such as height, weight, and color. They each have their own distinct uses, such as your computer for working with Excel, your car to transport you over long distances, and your refrigerator to keep your perishable foods cold.
VBA objects also have their identifiable properties and methods of use. A worksheet cell is an object, and among its describable features (its properties) are its address, its height, its formatted fill color, and so on. A workbook is also a VBA object, and among its usable features (its methods) are its abilities to be opened, closed, and have a chart or pivot table added to it.
In Excel you deal with workbooks, worksheets, and ranges on a daily basis. You likely think of each of these “objects” as all part of Excel, not really separating them in your mind. However, Excel thinks about these internally as all part of a hierarchical model called the Excel Object Model. The Excel Object Model is a clearly defined set of objects that are structured according to the relationships between them.
Understanding objects
In the real world, you can describe everything you see as an object. When you look at your house, it is an object. Your house has rooms; those rooms are also separate objects. Those rooms may have closets. Those closets are likewise objects. As you think about your house, the rooms, and the closets, you may see a hierarchical relationship between them. Excel works in the same way.
In Excel, the Application object is the all-encompassing object — similar to your house. Inside the Application object, Excel has a workbook. Inside a workbook is a worksheet. Inside that is a range. These are all objects that live in a hierarchical structure.
To point to a specific object in VBA, you can traverse the object model. For example, to get to cell A1 on Sheet 1, you can enter this code:
Application.ThisWorkbook.Sheets("Sheet1").Range("A1").Select
In most cases, the object model hierarchy is understood, so you don’t have to type every level. Entering this code also gets you to cell A1 because Excel infers that you mean the active workbook, and the active sheet:
Range("A1").Select
Indeed, if you have your cursor already in cell A1, you can simply use the ActiveCell object, negating the need to actually spell out the range.
Activecell.Select
Understanding collections
Many of Excel’s objects belong to collections. Your house sits within a neighborhood, for example, which is a collection of houses called a neighborhood. Each neighborhood sits in a collection of neighborhoods called a city. Excel considers collections to be objects themselves.
In each Workbook object, you have a collection of Worksheets. The Worksheets collection is an object that you can call upon through VBA. Each worksheet in your workbook lives in the Worksheets collection.
If you want to refer to a worksheet in the Worksheets collection, you can refer to it by its position in the collection, as an index number starting with 1, or by its name, as quoted text. If you run these two lines of code in a workbook that has only one worksheet called MySheet, they both do the same thing:
Worksheets(1).Select
Worksheets("MySheet").Select
If you have two worksheets in the active workbook that have the names MySheet and YourSheet, in that order, you can refer to the second worksheet by typing either of these statements:
Worksheets(2).Select
Worksheets("YourSheet").Select
If you want to refer to a worksheet called in a workbook called MySheet in a particular workbook that is not active, you must qualify the worksheet reference and the workbook reference, as follows:
Workbooks("MyData.xlsx").Worksheets("MySheet").Select
Understanding properties
Properties are essentially the characteristics of an object. Your house has a color, a square footage, an age, and so on. Some properties can be changed — like the color of your house. Other properties can’t be changed — like the year your house was constructed.
Likewise, an object in Excel like the Worksheet object has a sheet name property that can be changed, and a Rows.Count row property that cannot.
You refer to the property of an object by referring to the object, and then the property. For instance, you can change the name of your worksheet by changing its Name property.
In this example, you are renaming Sheet1 to MySheet:
Sheets("Sheet1").Name ="MySheet"
Some properties are read-only, which means that you can’t assign a value to them directly — for instance, the Text property of a cell. The Text property gives you the formatted appearance of value in a cell, but you cannot overwrite or change it.
Some properties have arguments that further specify the property value. For instance, this line of code uses the RowAbsolute and ColumnAbsolute arguments to return the Address of cell A1 as absolute reference ($A$1).
MsgBox Range("A1").Address(RowAbsolute:=True, ColumnAbsolute:=True)
Specifying properties for the active object
When you’re working with Excel, only one workbook at a time can be active. In that workbook, only one sheet can be active. And if the sheet is a worksheet, one cell is the active cell (even if a multicell range is selected). VBA knows about active workbooks, worksheets, and cells and lets you refer to these active objects in a simplified manner.
This method of referring to objects is often useful because you won’t always know the exact workbook, worksheet, or range on which you want to operate. VBA makes object referencing easy by providing properties of the Application object. For example, theApplication object has an ActiveCell property that returns a reference to the active cell. The following instruction assigns the value 1 to the active cell:
ActiveCell.Value = 1
Note that in the preceding example, we omitted the reference to the Application object and to the active worksheet because both are assumed. This instruction will fail if the active sheet isn’t a worksheet. For example, if VBA executes this statement when a chart sheet is active, the procedure halts, and you get an error message.
If a range is selected in a worksheet, the active cell is a cell within the selected range. In other words, the active cell is always a single cell (never a multicell range).
The Application object also has a Selection property that returns a reference to whatever is selected, which may be a single cell (the active cell), a range of cells, or an object such as ChartObject, TextBox, or Shape.
Table 2.1 lists the other Application properties that are useful when working with cells and ranges.
Table 2.1 Some Useful Properties of the Application Object
|
Property |
Object Returned |
|
ActiveCell |
The active cell. |
|
ActiveChart |
The active chart sheet or chart contained in a ChartObject on a worksheet. This property is Nothing if a chart isn’t active. |
|
ActiveSheet |
The active sheet (worksheet or chart sheet). |
|
ActiveWindow |
The active window. |
|
ActiveWorkbook |
The active workbook. |
|
Selection |
The object selected. It could be a Range object, Shape, ChartObject, and so on. |
|
ThisWorkbook |
The workbook that contains the VBA procedure being executed. This object may or may not be the same as the ActiveWorkbook object. |
The advantage of using these properties to return an object is that you don’t need to know which cell, worksheet, or workbook is active, and you don’t need to provide a specific reference to it. This allows you to write VBA code that isn’t specific to a particular workbook, sheet, or range. For example, the following instruction clears the contents of the active cell, even though the address of the active cell isn’t known:
ActiveCell.ClearContents
The example that follows displays a message that tells you the name of the active sheet:
MsgBox ActiveSheet.Name
If you want to know the name and directory path of the active workbook, use a statement like this:
MsgBox ActiveWorkbook.FullName
If a range on a worksheet is selected, you can fill the entire range with a value by executing a single statement. In the following example, the Selection property of the Application object returns a Range object that corresponds to the selected cells. The instruction simply modifies the Value property of this Range object, and the result is a range filled with a single value:
Selection.Value = 12
Note that if something other than a range is selected (such as a ChartObject or a Shape), the preceding statement generates an error because ChartObject and Shape objects don’t have a Value property.
The following statement, however, enters a value of 12 into the Range object that was selected before a non-Range object was selected. If you look up the RangeSelection property in the Help system, you find that this property applies only to a Window object.
ActiveWindow.RangeSelection.Value = 12
To find out how many cells are selected in the active window, access the Count property. Here’s an example:
MsgBox ActiveWindow.RangeSelection.Count
Understanding methods
Methods are the actions that can be performed against an object. It helps to think of methods as verbs. You can paint your house, so in VBA, that translates to something like house.paint.
A simple example of an Excel method is the Select method of the Range object:
Range("A1").Select
Another is the Copy method of the Range object:
Range("A1").Copy
Some methods have arguments that can dictate how they are applied. For instance, the Paste method can be used more effectively by explicitly defining the Destination argument.
ActiveSheet.Paste Destination:=Range("B1")
 More about arguments
An issue that often leads to confusion among new VBA programmers concerns arguments. Some methods use arguments to further clarify the action to be taken, and some properties use arguments to further specify the property value. In some cases, one or more of the arguments are optional.
Consider the Protect method for a workbook object. Check the Help system, and you’ll find that the Protect method takes three arguments: password, structure, and windows. These arguments correspond to the options in the Protect Structure and Windows dialog box.
If you want to protect a workbook named MyBook.xlsx, for example, you might use a statement like this:
Workbooks("MyBook.xlsx").Protect"xyzzy", True, False
In this case, the workbook is protected with a password (argument 1). Its structure is protected (argument 2) but not its windows (argument 3).
If you don’t want to assign a password, you can use a statement like this:
Workbooks("MyBook.xlsx").Protect , True, False
Note that the first argument is omitted and that we specified the placeholder by using a comma.
You can make your code more readable by using named arguments. Here’s an example of how you use named arguments for the preceding example:
Workbooks("MyBook.xlsx").Protect Structure:=True, Windows:=False
Using named arguments is a good idea, especially for methods that have many optional arguments and also when you need to use only a few of them. When you use named arguments, you don’t need to use a placeholder for missing arguments.
For properties (and methods) that return a value, you must use parentheses around the arguments. For example, the Address property of a Range object takes five optional arguments. Because the Address property returns a value, the following statement isn’t valid because the parentheses are omitted:
MsgBox Range("A1").Address False ' invalid
The proper syntax for such a statement requires parentheses, as follows:
MsgBox Range("A1").Address(False)
You can also write the statement using a named argument:
MsgBox Range("A1").Address(rowAbsolute:=False)
These nuances will become clearer as you gain more experience with VBA.
Deep Dive: Working with Range Objects
Much of the work that you will do in VBA involves cells and ranges in worksheets. That being the case, let’s take some time to use the Range object as a case study on how to explore and get familiar with a specific object.
Finding the properties of the Range object
Open the Visual Basic Editor and then go up to the menu and click Help ➜ Microsoft Visual Basic for Applications Help. You’ll be taken to the Microsoft Developer Network (MSDN) website. While on MSDN, search for the word Range to see the page for the Rangeobject. There, you will discover that the Range object exposes three properties that can be used to manipulate your worksheets via VBA.
· The Range property of a Worksheet or Range class object
· The Cells property of a Worksheet object
· The Offset property of a Range object
The Range property
The Range property returns a Range object. If you consult the Help system for the Range property, you learn that this property has two syntaxes:
object.Range(cell1)
object.Range(cell1, cell2)
The Range property applies to two types of objects: a Worksheet object or a Range object. Here, cell1 and cell2 refer to placeholders for terms that Excel recognizes as identifying the range (in the first instance) and delineating the range (in the second instance). Following are a few examples of using the Range property.
You’ve already seen examples like the following one earlier in the chapter. The instruction that follows simply enters a value into the specified cell. In this case, it puts the value 12.3 into cell A1 on Sheet1 of the active workbook:
Worksheets("Sheet1").Range("A1").Value = 12.3
The Range property also recognizes defined names in workbooks. Therefore, if a cell is named Input, you can use the following statement to enter a value into that named cell:
Worksheets("Sheet1").Range("Input").Value = 100
The example that follows enters the same value in a range of 20 cells on the active sheet. If the active sheet isn’t a worksheet, the statement causes an error message:
ActiveSheet.Range("A1:B10").Value = 2
The next example produces exactly the same result as the preceding example:
Range("A1","B10") = 2
The sheet reference is omitted, however, so the active sheet is assumed. Also, the value property is omitted, so the default property (which is Value for a Range object) is assumed. This example also uses the second syntax of the Range property. With this syntax, the first argument is the cell at the top left of the range, and the second argument is the cell at the lower right of the range.
The following example uses the Excel range intersection operator (a space) to return the intersection of two ranges. In this case, the intersection is a single cell, C6. Therefore, this statement enters 3 in cell C6:
Range("C1:C10 A6:E6") = 3
And finally, this next example enters the value 4 in five cells: that is, a noncontiguous range. The comma serves as the union operator. Note that the commas are within the quote marks.
Range("A1,A3,A5,A7,A9") = 4
So far, all the examples have used the Range property on a Worksheet object. As mentioned before, you can also use the Range property on a Range object.
For example, the following line of code treats the Range object as if it were the upper-left cell in the worksheet, and then it enters a value of 5 in the cell that would be B2. In other words, the reference returned is relative to the upper-left corner of the Range object. Therefore, the statement that follows enters a value of 5 into the cell directly to the right and one row below the active cell:
ActiveCell.Range("B2") = 5
Fortunately, you can access a cell relative to a range in a much clearer way: the Offset property. We discuss this property after the next section.
The Cells property
Another way to reference a range is to use the Cells property. You can use the Cells property, like the Range property, on Worksheet objects and Range objects. Check the Help system, and you see that the Cells property has three syntaxes:
object.Cells(rowIndex, columnIndex)
object.Cells(rowIndex)
object.Cells
Some examples demonstrate how to use the Cells property. The first example enters the value 9 in cell A1 on Sheet1. In this case, We’re using the first syntax, which accepts the index number of the row (from 1 to 1048576) and the index number of the column (from 1 to 16384):
Worksheets("Sheet1").Cells(1, 1) = 9
Here’s an example that enters the value 7 in cell D3 (that is, row 3, column 4) in the active worksheet:
ActiveSheet.Cells(3, 4) = 7
You can also use the Cells property on a Range object. When you do so, the Range object returned by the Cells property is relative to the upper-left cell of the referenced Range. Confusing? Probably. An example may help clear up any confusion. The following instruction enters the value 5 in the active cell. Remember, in this case, the active cell is treated as if it were cell A1 in the worksheet:
ActiveCell.Cells(1, 1) = 5
Note
The real advantage of this type of cell referencing will be apparent when you explore variables and looping (in Chapter 3). In most cases, you don’t use actual values for the arguments; rather, you use variables.
To enter a value of 5 in the cell directly below the active cell, you can use the following instruction:
ActiveCell.Cells(2, 1) = 5
Think of the preceding example as though it said this: “Start with the active cell and consider this cell as cell A1. Place 5 in the cell in the second row and the first column.”
The second syntax of the Cells property uses a single argument that can range from 1 to 17,179,869,184. This number is equal to the number of cells in an Excel worksheet. The cells are numbered starting from A1 and continuing right and then down to the next row. The 16,384th cell is XFD1; the 16,385th is A2.
The next example enters the value 2 into cell SZ1 (which is the 520th cell in the worksheet) of the active worksheet:
ActiveSheet.Cells(520) = 2
To display the value in the last cell in a worksheet (XFD1048576), use this statement:
MsgBox ActiveSheet.Cells(17179869184)
You can also use this syntax with a Range object. In this case, the cell returned is relative to the Range object referenced. For example, if the Range object is A1:D10 (40 cells), the Cells property can have an argument from 1 to 40 and can return one of the cells in the Rangeobject. In the following example, a value of 2000 is entered in cell A2 because A2 is the fifth cell (counting from the top, to the right, and then down) in the referenced range:
Range("A1:D10").Cells(5) = 2000
Note
In the preceding example, the argument for the Cells property isn’t limited to values between 1 and 40. If the argument exceeds the number of cells in the range, the counting continues as if the range were taller than it actually is. Therefore, a statement like the preceding one could change the value in a cell that’s outside the range A1:D10. The statement that follows, for example, changes the value in cell A11:
Range("A1:D10").Cells(41) = 2000
The third syntax for the Cells property simply returns all cells on the referenced worksheet. Unlike the other two syntaxes, in this one, the return data isn’t a single cell. This example uses the ClearContents method on the range returned by using the Cells property on the active worksheet. The result is that the content of every cell on the worksheet is cleared:
ActiveSheet.Cells.ClearContents
Getting information from a cell
If you need to get the contents of a cell, VBA provides several properties. Following are the most commonly used properties:
· The Formula property returns the formula in a single cell, if the cell has one. If the cell doesn’t contain a formula, it returns the value in the cell. The Formula property is a read/write property. Variations on this property include FormulaR1C1, FormulaLocal, and FormulaArray. (Consult the Help system for details.)
· The Value property returns the raw, unformatted value in the cell. This property is a read/write property.
· The Text property returns the text that is displayed in the cell. If the cell contains a numeric value, this property includes all the formatting, such as commas and currency symbols. The Text property is a read-only property.
· The Value2 property is just like the Value property, except that it doesn’t use the Date and Currency data types. Rather, this property converts Date and Currency data types to Variants containing Doubles. If a cell contains the date 3/16/2016, the Valueproperty returns it as a Date, while the Value2 property returns it as a double (for example, 42445).
The Offset property
The Offset property, like the Range and Cells properties, also returns a Range object. But unlike the other two methods discussed, the Offset property applies only to a Range object and no other class. Its syntax is as follows:
object.Offset(rowOffset, columnOffset)
The Offset property takes two arguments that correspond to the relative position from the upper-left cell of the specified Range object. The arguments can be positive (down or to the right), negative (up or to the left), or 0. The example that follows enters a value of 12into the cell directly below the active cell:
ActiveCell.Offset(1,0).Value = 12
The next example enters a value of 15 in the cell directly above the active cell:
ActiveCell.Offset(-1,0).Value = 15
If the active cell is in row 1, the Offset property in the preceding example generates an error because it can’t return a Range object that doesn’t exist.
The Offset property is useful, especially when you use variables in looping procedures. We discuss these topics in the next chapter.
When you record a macro using the relative reference mode, Excel uses the Offset property to reference cells relative to the starting position (that is, the active cell when macro recording begins). For example, we used the macro recorder to generate the following code. We started with the cell pointer in cell B1, entered values into B1:B3, and then returned to B1.
Sub Macro1()
ActiveCell.FormulaR1C1 ="1"
ActiveCell.Offset(1, 0).Range("A1").Select
ActiveCell.FormulaR1C1 ="2"
ActiveCell.Offset(1, 0).Range("A1").Select
ActiveCell.FormulaR1C1 ="3"
ActiveCell.Offset(-2, 0).Range("A1").Select
End Sub
Note that the macro recorder uses the FormulaR1C1 property. Normally, you want to use the Value property to enter a value in a cell. However, using FormulaR1C1 or even Formula produces the same result.
Also note that the generated code references cell A1 — a cell that wasn’t even involved in the macro. This notation is a quirk in the macro recording procedure that makes the code more complex than necessary. You can delete all references to Range("A1"), and the macro still works perfectly:
Sub Modified_Macro1()
ActiveCell.FormulaR1C1 ="1"
ActiveCell.Offset(1, 0).Select
ActiveCell.FormulaR1C1 ="2"
ActiveCell.Offset(1, 0).Select
ActiveCell.FormulaR1C1 ="3"
ActiveCell.Offset(-2, 0).Select
End Sub
In fact, you can enter this much more efficient version of the macro. Note that in this version you don’t do any selecting.
Sub Macro1()
ActiveCell = 1
ActiveCell.Offset(1, 0) = 2
ActiveCell.Offset(2, 0) = 3
End Sub
Essential Concepts to Remember
In this section, we note some additional essential concepts for would-be VBA gurus. These concepts will become clearer when you work with VBA and read subsequent chapters:
· Objects have unique properties and methods. Each object has its own set of properties and methods. Some objects, however, share some properties (for example, Name) and some methods (such as Delete).
· You can manipulate objects without selecting them. This idea may be contrary to how you normally think about manipulating objects in Excel. The fact is that it’s usually more efficient to perform actions on objects without selecting them first. When you record a macro, Excel generally selects the object first, an unnecessary step that may make your macro run more slowly.
· It’s important that you understand the concept of collections. Most of the time, you refer to an object indirectly by referring to the collection that it’s in. For example, to access a Workbook object named Myfile, reference the Workbooks collection as follows:
Workbooks("Myfile.xlsx")
This reference returns an object, which is the workbook with which you’re concerned.
· Properties can return a reference to another object. For example, in the following statement, the Font property returns a Font object contained in a Range object. Bold is a property of the Font object, not the Range object.
Range("A1").Font.Bold = True
· You can refer to the same object in many different ways. Assume that you have a workbook named Sales, and it’s the only workbook open. Then assume that this workbook has one worksheet, named Summary. You can refer to the sheet in any of the following ways:
·Workbooks("Sales.xlsx").Worksheets("Summary")
·Workbooks(1).Worksheets(1)
·Workbooks(1).Sheets(1)
·Application.ActiveWorkbook.ActiveSheet
·ActiveWorkbook.ActiveSheet
ActiveSheet
The method that you use is usually determined by how much you know about the workspace. For example, if more than one workbook is open, the second and third methods aren’t reliable. If you want to work with the active sheet (whatever it may be), any of the last three methods would work. To be absolutely sure that you’re referring to a specific sheet on a specific workbook, the first method is your best choice.
About the code examples
Throughout this book, we present many small snippets of VBA code to make a point or to provide an example. In some cases, this code consists of a single statement or only an expression, which isn’t a valid instruction by itself.
For example, the following is an expression:
Range("A1").Value
To test an expression, you must evaluate it. The MsgBox function is a handy tool for this:
MsgBox Range("A1").Value
To try out these examples, put the statement in a procedure in a VBA module, like this:
Sub Test()
' statement goes here
End Sub
Then put the cursor anywhere in the procedure and press F5 to execute it. Also, make sure that the code is being executed in the proper context. For example, if a statement refers to Sheet1, make sure that the active workbook has a sheet named Sheet1.
If the code is just a single statement, you can use the VBE Immediate window. The Immediate window is useful for executing a statement immediately — without having to create a procedure. If the Immediate window isn’t displayed, press Ctrl+G in VBE.
Just type the VBA statement in the Immediate window and press Enter. To evaluate an expression in the Immediate window, precede the expression with a question mark (?), which is a shortcut for Print. For example, you can type the following in the Immediate window:
? Range("A1").Value
The result of this expression is displayed in the next line of the Immediate window.
Don’t Panic — You Are Not Alone
If this is your first exposure to VBA, you’re probably a bit overwhelmed by objects, properties, and methods. That’s normal. No one is going to be a VBA expert in one day. VBA is a journey of time and practice. The good news is that you won’t be alone on this journey. There are plenty of resources out there that can help you on your path. This section highlights a few resources you can leverage when you need a push in the right direction.
Read the rest of the book
Don’t forget, the name of this chapter is “Introducing Visual Basic for Applications.” The remainder of this book covers many additional details and provides many useful and informative examples.
Let Excel help write your macro
One of the best places to get macro help is the Macro Recorder in Excel. When you record a macro with the Macro Recorder, Excel writes the underlying VBA for you. After recording, you can review the code; see what the recorder is doing, and then try to turn the code it creates into something more suited to your needs.
For example, let’s say you need a macro that refreshes all the pivot tables in your workbook and clears all the filters in each pivot table. Writing this macro from a blank canvas would be a daunting task. Instead, you can start the Macro Recorder and record yourself refreshing all the pivot tables and clearing all the filters. Once you’ve stopped recording, you can review the macro and make any changes you deem necessary.
Use the Help system
To a new Excel user, the Help system may seem like a clunky mechanism that returns a perplexing list of topics that has nothing to do with the original topic being searched. The truth is, however, once you learn how to use the Excel Help system effectively, it’s often the fastest and easiest way to get extra help on a topic.
You just need to remember two basic tenets of the Excel Help system: Location matters when asking for help, and you need to be connected to the Internet to use Excel’s Help system.
Location matters when asking for help
In Excel, there are actually two Help systems: one providing help on Excel features and another providing help on VBA programming topics. Instead of doing a global search with your criteria, Excel throws your search criteria only against the Help system that is relevant to your current location. This essentially means that the help you get is determined by the area of Excel in which you’re working. So, if you need help on a topic that involves macros and VBA programming, you’ll need to be in the VBA Editor while performing your search. This will ensure that your keyword search is performed on the correct Help system.
You need to be connected to the Internet
When you search for help on a topic, Excel checks to see if you’re connected to the Internet. If you are, Excel takes you to the MSDN website where you can search for the topic you need help with. If you aren’t connected to the Internet, Excel gives you a message telling you that you need to be online to use Help.
Use the Object Browser
The Object Browser is a handy tool that lists every property and method available for every object. When you are in in the VBE, you can bring up Object Browser in any of the following three ways:
· Press F2.
· Choose View ➜ Object Browser.
· Click the Object Browser tool on the Standard toolbar.
Object Browser is shown in Figure 2.17.

Figure 2.17 Object Browser is a great reference source.
The drop-down list in the upper-left corner of Object Browser includes a list of all object libraries that you have access to:
· Excel itself
· MSForms (if user forms are utilized in your workbook)
· Office (objects common to all Microsoft Office applications)
· Stdole (OLE automation objects)
· VBA
· The current project (the project that’s selected in Project Explorer) and any workbooks referenced by that project
Your selection in this upper-left drop-down list determines what is displayed in the Classes window, and your selection in the Classes window determines what is visible in the Members Of panel.
After you select a library, you can search for a particular text string to get a list of properties and methods that contain the text. You do so by entering the text in the second drop-down list and then clicking the binoculars (Search) icon.
1. Select the library of interest.
If you’re not sure which object library is appropriate, you can select <All Libraries>.
2. Enter the object you’re looking for in the drop-down list below the library list.
3. Click the binoculars icon to begin the text search.
The Search Results window displays the matching text. Select an object to display its classes in the Classes window. Select a class to display its members (properties, methods, and constants). Pay attention to the bottom pane, which shows more information about the object. You can press F1 to go directly to the appropriate help topic.
Object Browser may seem complex at first, but its usefulness to you will increase over time.
Pilfer code from the Internet
All the macro syntax you will ever need has likely been documented somewhere on the Internet. In many ways, programming has become less about the code one creates from scratch, and more about how to take existing code and apply it creatively to a particular scenario.
If you are stuck trying to create a macro for a particular task, fire up your favorite online search engine and simply describe the task you are trying to accomplish. For the best results, enter “Excel VBA” before your description.
For example, if you are trying to write a macro that deletes all the blank rows in a worksheet, search for “Excel VBA delete blank rows in a worksheet.” You can bet two months’ salary that someone out there on the Internet has tackled the same problem. Nine times out of ten, you will find some example code that will give you the nugget of information you need to jump-start some ideas for building your own macro.
Leverage user forums
If you find yourself in a bind, you can post your question in a forum to get customized guidance based on your scenario.
User forums are online communities that revolve around a particular topic. In these forums, you can post questions and have experts offer advice on how to solve particular problems. The folks answering the questions are typically volunteers who have a passion for helping the community solve real-world challenges.
There are many forums dedicated to all things Excel. To find an Excel Forum, enter the words “Excel Forum” in your favorite online search engine.
Here are a few tips for getting the most out of user forums:
· Always read and follow the forum rules before you get started. These rules often include advice on posting questions and community etiquette guidelines.
· Use concise and accurate subject titles for your questions. Don’t create forum questions with abstract titles like “Need Advice” or “Please Help.”
· Keep the scope of your questions as narrow as possible. Don’t ask questions like “How do I build an invoicing macro in Excel?”
· Be patient. Remember that the folks answering your questions are volunteers who typically have day-jobs. Give the community some time to answer your question.
· Check back often. After posting your question, you may receive requests for more details about your scenario. Do everyone a favor and return to your posting to either review the answers or respond to follow-up questions.
· Thank the expert who answered your question. If you receive an answer that helps you, take a moment to post a thank you to the expert who helped you out.
Visit expert blogs
There are a few dedicated Excel gurus who share their knowledge through blogs. These blogs are often treasure troves of tips and tricks, offering nuggets that can help build up your skills. Best of all, they are free!
Although these blogs will not necessarily speak to your particular needs, they offer articles that advance your knowledge of Excel and can even provide general guidance on how to apply Excel in practical business situations.
Here is a starter list of a few of the best Excel blogs on the Internet today:
http://chandoo.org
http://www.contextures.com
http://www.datapigtechnologies.com/blog
http://www.dailydoseofexcel.com
http://www.excelguru.ca/blog
http://www.mrexcel.com
Mine YouTube for video training
Some of us learn better if we watch a task being done. If you find that you absorb video training better than online articles, consider mining YouTube. There are dozens of channels run by amazing folks who have a passion for sharing knowledge. You’ll be surprised at how many free high-quality video tutorials you’ll find.
Go to www.YouTube.com and search for the words “Excel VBA.”
Learn from the Microsoft Office Dev Center
The Microsoft Office Dev Center is a site dedicated to helping new developers get a quick start in programming Office products. You can get to the Excel portion of this site by going to:
https://msdn.microsoft.com/en-us/library/office/fp179694.aspx
Although the site can be a bit difficult to navigate, it’s worth a visit to see all the free resources, including sample code, tools, step-by-step instructions, and much more.
Dissect the other Excel files in your organization
Like finding gold in your backyard, the existing files in your organization are often a treasure trove for learning. Consider cracking open those Excel files that contain macros, and have a look under the covers. See how others in your organization use macros. Try to go through the macros line-by-line and see if you can spot new techniques. You may even stumble upon entire chunks of useful code that you can copy and implement in your own workbooks.
Ask your local Excel genius
Do you have an Excel genius in your company, department, organization, or community? Make friends with that person today. Most Excel experts love sharing their knowledge. Don’t be afraid to approach your local Excel guru to ask questions or seek out advice on how to tackle macro problems.
All materials on the site are licensed Creative Commons Attribution-Sharealike 3.0 Unported CC BY-SA 3.0 & GNU Free Documentation License (GFDL)
If you are the copyright holder of any material contained on our site and intend to remove it, please contact our site administrator for approval.
© 2016-2025 All site design rights belong to S.Y.A.