Excel VBA Programming For Dummies, 4th Edition (2015)
Part II. How VBA Works with Excel
 Read about the IsDate function at www.dummies.com/extras/excelvbaprogramming.
In this part …
![]() See how to access the important part of the Visual Basic Editor.
See how to access the important part of the Visual Basic Editor.
![]() Discover VBA code modules (where you store your VBA code).
Discover VBA code modules (where you store your VBA code).
![]() Get an overview of the Excel object model.
Get an overview of the Excel object model.
![]() Discover a bit about two key concepts: object properties and methods.
Discover a bit about two key concepts: object properties and methods.
![]() Find out the differences between Sub procedures and Function procedures.
Find out the differences between Sub procedures and Function procedures.
![]() Get a crash course in using the Excel macro recorder.
Get a crash course in using the Excel macro recorder.
Chapter 3. Working in the Visual Basic Editor
In This Chapter
![]() Understanding the Visual Basic Editor
Understanding the Visual Basic Editor
![]() Discovering the Visual Basic Editor parts
Discovering the Visual Basic Editor parts
![]() Knowing what goes into a VBA module
Knowing what goes into a VBA module
![]() Understanding three ways to get VBA code into a module
Understanding three ways to get VBA code into a module
![]() Customizing the VBA environment
Customizing the VBA environment
As a more experienced-than-average Excel user, you probably know a good deal about workbooks, formulas, charts, and other Excel goodies. Now it’s time to expand your horizons and explore an entirely new aspect of Excel: the Visual Basic Editor. In this chapter, you find out how to work with the Visual Basic Editor, and you get down to the nitty-gritty of writing some VBA code.
What Is the Visual Basic Editor?
I'm going to save some wear and tear on my fingers and refer to the Visual Basic Editor as the VBE. The VBE is a separate application where you write and edit your VBA macros. It works seamlessly with Excel. By seamlessly, I mean that Excel takes care of opening the VBE when you need it.
Beginning with Excel 2013, every workbook displays in a separate window. However, there is only one VBE window, and it works with all open Excel windows.
 You can’t run the VBE separately; Excel must be running for the VBE to run.
Activating the VBE
The quickest way to activate the VBE is to press Alt+F11 when Excel is active. To return to Excel, press Alt+F11 again. Or you can just click the Close button on the VBE's title bar. When the VBE window closes, Excel is activated.
You can also activate the VBE by choosing the Developer ⇒ Code ⇒ Visual Basic command. If you don't have a Developer tab at the top of your Excel window, refer to Chapter 2, where I explain how to get that handy Developer tab to show up.
Understanding VBE components
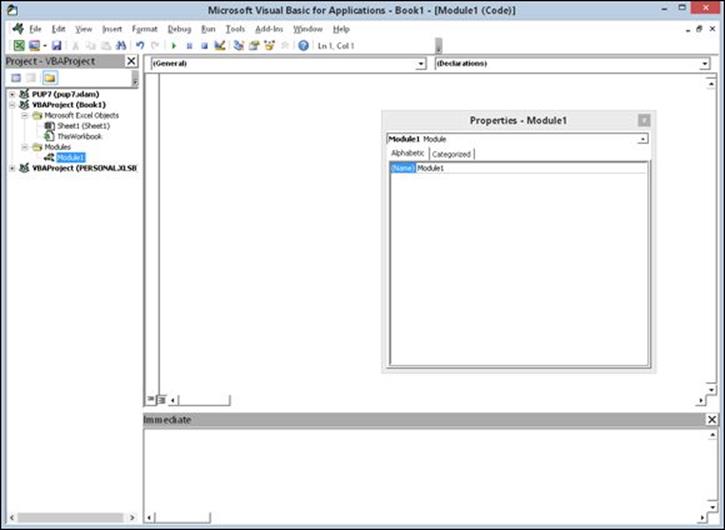
 Figure 3-1 shows the VBE program, with some of the key parts identified. Because so much is going on in the VBE, I like to maximize the window to see as much as possible.
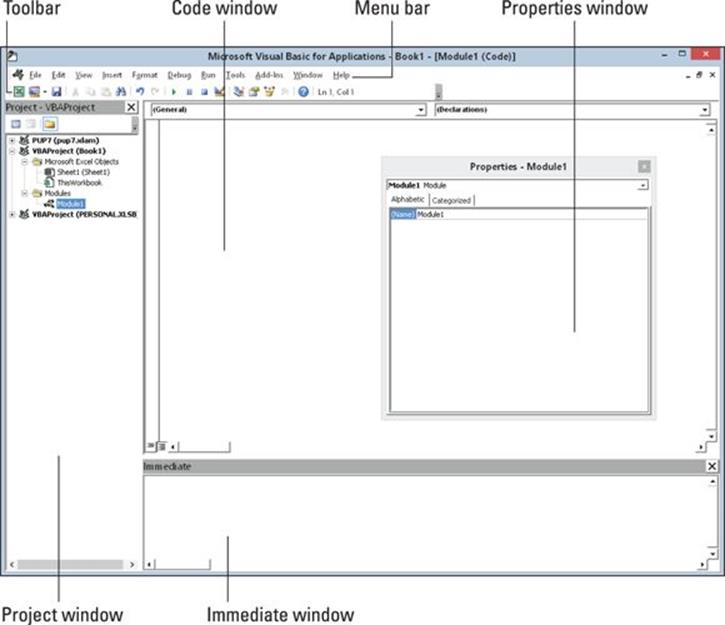
Figure 3-1: The VBE is your customizable friend.
Chances are that your VBE program window won’t look exactly like what you see in Figure 3-1. The VBE contains several windows, and it's highly customizable. You can hide windows, rearrange windows, dock windows, and so on.
Actually, the VBE has even more parts than are shown in Figure 3-1. I discuss these additional components throughout the book when they become relevant.
Menu bar
The VBE menu bar works just like every other menu bar you’ve encountered. It contains commands that you use to do things with the various components in the VBE. You also find that many of the menu commands have shortcut keys associated with them.
The VBE also features shortcut menus. You can right-click virtually anything in the VBE and get a shortcut menu of common commands.
Toolbar
The Standard toolbar, which is directly below the menu bar by default (refer to Figure 3-1), is one of four VBE toolbars available. You can customize the toolbars, move them around, display other toolbars, and so on. If you're so inclined, use the View ⇒ Toolbars command to work with VBE toolbars. Most people (including me) just leave them as they are.
Project window
The Project window displays a tree diagram that shows every workbook currently open in Excel (including add-ins and hidden workbooks). Double-click items to expand or contract them within the outline. I discuss this window in more detail in the upcoming “Working with the Project Window” section.
If the Project window is not visible, press Ctrl+R or choose the View ⇒ Project Explorer command. To hide the Project window, click the Close button on its title bar. Or right-click anywhere in the Project window and choose Hide from the shortcut menu.
Code window
A Code window is where you put your VBA code. Every object in a project has an associated Code window. To view an object’s Code window, double-click the object in the Project window. For example, to view the Code window for the Sheet1 object in Book1, double-click Sheet1 in the VBAProject for Book1. Unless you’ve added some VBA code, the Code window will be empty.
You find out more about Code windows later in this chapter’s “Working with a Code Window” section.
Immediate window
The Immediate window may or may not be visible. If it isn’t visible, press Ctrl+G or choose the View ⇒ Immediate Window command. To close the Immediate window, click the Close button on its title bar (or right-click anywhere in the Immediate window and choose Hide from the shortcut menu).
The Immediate window is most useful for executing VBA statements directly and for debugging your code. If you’re just starting out with VBA, this window won’t be all that useful, so feel free to hide it and free up some screen space for other things.
In Chapter 13, I discuss the Immediate window in detail. It may just become your good friend!
What's new in the Visual Basic Editor?
Excel 2007 introduced a brand-new user interface. Menus and toolbars were replaced with a slick new Ribbon user interface (UI). But the VBE never got the facelift and has kept the old-school menu and toolbar UI.
The VBA programming language has been updated to accommodate the new Excel features, but nothing else has changed. Maybe Microsoft will eventually get around to updating the VBE, but I'm not holding my breath.
One thing that has changed is the Help system. In the past, help information was stored on your computer, and you had the option of accessing Help via the Internet. Beginning with Excel 2013, all help information is on the Internet and is displayed in your web browser. In other words, you must be connected to the Internet to access the Help system. You can, however, download your very own copy of the Help system from Microsoft’s site. Do a web search for download excel vba documentation, and you’ll find it.
Working with the Project Window
When you’re working in the VBE, each Excel workbook and add-in that’s open is a project. You can think of a project as a collection of objects arranged as an outline. You can expand a project by clicking the plus sign (+) at the left of the project’s name in the Project window. Contract a project by clicking the minus sign (–) to the left of a project’s name. Or you can double-click the items to expand and contract them.
If a project is password-protected, you’re prompted for the password when you double-click a project name. If you don't know the password, you can't expand the project — which means that you can't view or modify any part of the project.
Figure 3-2 shows a Project window with four projects listed: an add-in named pup7.xlam, an unsaved workbook named Book1, a workbook named investments.xlsm, and the Personal Macro Workbook (which is always named PERSONAL.XLSB). Of the four, only the investments.xlsm project is expanded to show all of its objects.
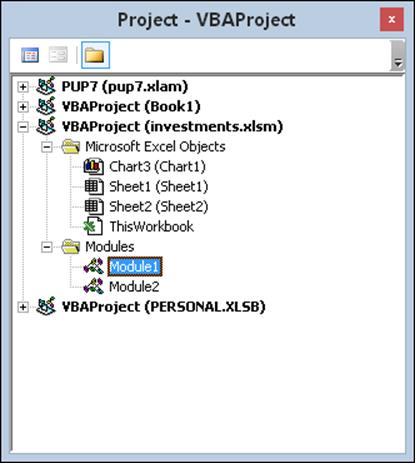
Figure 3-2: This Project window lists four projects. One of them is expanded to show its objects.
Every project expands to show at least one node called Microsoft Excel Objects. This node expands to show an item for each sheet in the workbook (each sheet is considered an object) and another object called ThisWorkbook (which represents the Workbook object). If the project has any VBA modules, the project listing also shows a Modules node. And as you see in Part IV, a project may also contain a node called Forms, which contains UserForm objects (which hold custom dialog boxes).
The concept of objects may be a bit fuzzy for you. However, I guarantee that things become much clearer in subsequent chapters. Don’t be too concerned if you don’t understand what’s going on at this point.
Adding a new VBA module
Follow these steps to add a new VBA module to a project:
1. In the VBE, select the project’s name in the Project window.
2. Choose Insert ⇒ Module.
Or
1. Right-click the project’s name.
2. Choose Insert ⇒ Module from the shortcut menu.
When you record a macro, Excel automatically inserts a VBA module to hold the recorded code. Which workbook holds the module for the recorded macro depends on where you chose to store the recorded macro, just before you started recording.
Removing a VBA module
Sometimes, you need to remove a VBA module from a project. For example, it may contain code that you no longer need, or it's empty because you inserted the module and then changed your mind. To remove a VBA module from a project:
1. Select the module’s name in the Project window.
2. Choose File ⇒ Remove xxx, where xxx is the module name.
Or
1. Right-click the module’s name.
2. Choose Remove xxx from the shortcut menu.
Excel, always trying to keep you from doing something you'll regret, will ask if you want to export the code in the module before you delete it. Almost always, you don't. (If you do want to export the module, see the next section.)
You can remove VBA modules, but there is no way to remove the other code modules — those for the Sheet objects or ThisWorkbook.
Exporting and importing objects
Every object in a VBA project can be saved to a separate file. Saving an individual object in a project is known as exporting. It stands to reason that you can also import objects into a project. Exporting and importing objects might be useful if you want to use a particular object (such as a VBA module or a UserForm) in a different project. Or maybe you want to send a co-worker a copy of a VBA module, which she can then import into her project.
Follow these steps to export an object:
1. Select an object in the Project window.
2. Choose File ⇒ Export File or press Ctrl+E.
You get a dialog box that asks for a filename. Note that the object remains in the project; only a copy of it is exported. Excel provides the file extension for you, and the extension depends on what type of object you're exporting. In all cases, the result is a text file. If you're so inclined, you can open it with a text editor and take a look.
Importing a file to a project goes like this:
1. Select the project’s name in the Explorer window.
2. Choose File ⇒ Import File or press Ctrl+M.
You get a dialog box that asks for a file.
3. Locate the file, and click Open.
You should import a file only if you exported it by choosing the File ⇒ Export File command.
Working with a Code Window
As you become proficient with VBA, you spend lots of time working in Code windows. Macros that you record are stored in a module, and you can type VBA code directly in a VBA module.
Minimizing and maximizing windows
If you have several projects open, the VBE may have lots of Code windows at any given time. Figure 3-3 shows an example of what I mean.
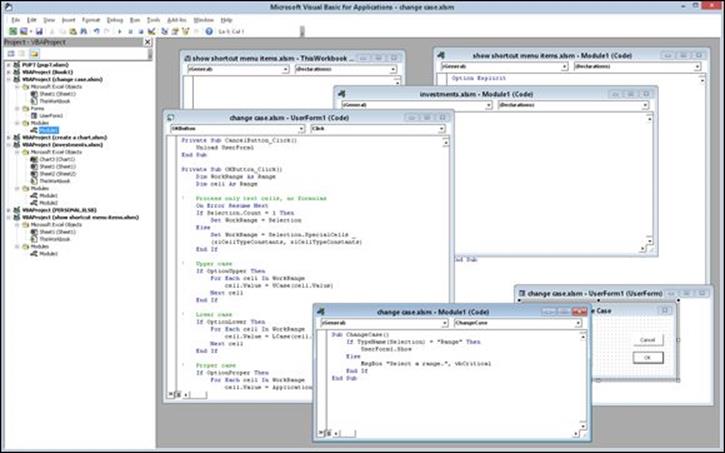
Figure 3-3: Code window overload isn’t a pretty sight.
Code windows are much like workbook windows in Excel. You can minimize them, maximize them, resize them, hide them, rearrange them, and so on. Most people find it much easier to maximize the Code window that they’re working on. Doing so lets you see more code and keeps you from getting distracted.
To maximize a Code window, click the Maximize button on its title bar (right next to the X). Or just double-click its title bar to maximize it. To restore a Code window to its original size, click the Restore button. When a window is maximized, its title bar isn't visible, so you'll find the Restore button below the VBE title bar.
Sometimes, you may want to have two or more Code windows visible. For example, you may want to compare the code in two modules or copy code from one module to another. You can arrange the windows manually or choose the Window ⇒ Tile Horizontally or Window ⇒ Tile Vertically command to arrange them automatically.
You can quickly switch among Code windows by pressing Ctrl+F6. If you repeat that key combination, you keep cycling through all the open Code windows. Pressing Ctrl+Shift+F6 cycles through the windows in reverse order.
Minimizing a Code window gets it out of the way. You can also click the window's Close button (which displays X) on a Code window’s title bar to close the window. (Closing a window just hides it; you won't lose anything.) To open it again, just double-click the appropriate object in the Project window. By the way, working with these Code windows sounds more difficult than it really is.
Creating a module
In general, a VBA module can hold three types of code:
· Declarations: One or more information statements that you provide to VBA. For example, you can declare the data type for variables you plan to use or set some other module-wide options. Declarations are basically housekeeping statements. They aren't actually executed.
· Sub procedures: A set of programming instructions that, when executed, performs some action.
· Function procedures: A set of programming instructions that returns a single value (similar in concept to a worksheet function, such as SUM).
A single VBA module can store any number of Sub procedures, Function procedures, and declarations. Well, there is a limit — about 64,000 characters per module. By way of comparison, this particular chapter has about half that many characters. After more than 20 years of VBA programming, I haven't even come close to reaching the 64,000-character limit. And if I did, the solution is simple: Just insert a new module.
How you organize a VBA module is completely up to you. Some people prefer to keep all their VBA code for an application in a single VBA module; others like to split the code into several modules. It’s a personal choice, just like arranging furniture.
Getting VBA code into a module
An empty VBA module is like the fake food you see in the windows of some Chinese restaurants; it looks good but it doesn’t really do much for you. Before you can do anything meaningful, you must have some VBA code in the VBA module. You can get VBA code into a VBA module in three ways:
· Enter the code directly.
· Use the Excel macro recorder to record your actions and convert those actions to VBA code (see Chapter 6).
· Copy the code from one module and paste it into another.
 Pause for a terminology break
I need to digress for a moment to discuss terminology. Throughout this book, I use the terms Sub procedure, routine, program, procedure, and macro. These terms are a bit confusing. Programming folks usually use the word procedure to describe an automated task. Technically, a procedure can be a Sub procedure or a Function procedure — both of which are sometimes called routines — or even programs. I use all these terms interchangeably. As detailed in later chapters, however, there is an important difference between Sub and Function procedures. For now, don’t worry about the terminology. Just try to understand the concepts.
Entering code directly
Sometimes, the best route is the most direct one. Entering code directly involves … well, entering the code directly. In other words, you type the code by using your keyboard. Entering and editing text in a VBA module works as you might expect. You can select, copy, cut, paste, and do other things to the text.
Use the Tab key to indent some of the lines to make your code easier to read. Indenting isn’t necessary, but it’s a good habit to acquire. As you study the code I present in this book, you’ll understand why indenting code lines is helpful.
A single line of VBA code can be as long as you need it to be. However, you may want to use the line-continuation characters to break up lengthy lines of code. To continue a single line of code (also known as a statement) from one line to the next, end the first line with a space followed by an underscore (_). Then continue the statement on the next line. And don't forget the space. An underscore character that's not preceded by a space won't do the job.
Here’s an example of a single statement split into three lines:
Selection.Sort Key1:=Range("A1"), _
Order1:=xlAscending, Header:=xlGuess, _
Orientation:=xlTopToBottom
This statement would perform exactly the same way if it were entered in a single line (with no line-continuation characters). Notice that I indented the second and third lines of this statement. Indenting is optional, but it helps clarify the fact that these lines are not separate statements.
The white-coated engineers who designed the VBE anticipated that people like us would be making mistakes. Therefore, the VBE has multiple levels of undo and redo. If you deleted a statement that you shouldn’t have, click the Undo button on the toolbar (or press Ctrl+Z) until the statement shows up again. After undoing, you can use the Redo button to perform the changes you’ve undone. I recommend playing around with this feature until you understand how it works.
Are you ready to enter some real-live code? Try the following steps:
1. Create a new workbook in Excel.
2. Press Alt+F11 to activate the VBE.
3. Click the new workbook’s name in the Project window.
4. Choose Insert ⇒ Module to insert a VBA module into the project.
5. Type the following code in the module:
Sub GuessName()
Msg = "Is your name " & Application.UserName & "?"
Ans = MsgBox(Msg, vbYesNo)
If Ans = vbNo Then MsgBox "Oh, never mind."
If Ans = vbYes Then MsgBox "I must be psychic!"
End Sub
6. Position the cursor anywhere within the text you typed and press F5 to execute the procedure.
F5 is a shortcut for the Run ⇒ Run Sub/UserForm command. If you entered the code correctly, Excel executes the procedure, and you can respond to the simple dialog box shown in Figure 3-4. Unless your name happens to be the same as mine, the text in the dialog box will be different from the text shown in the figure.
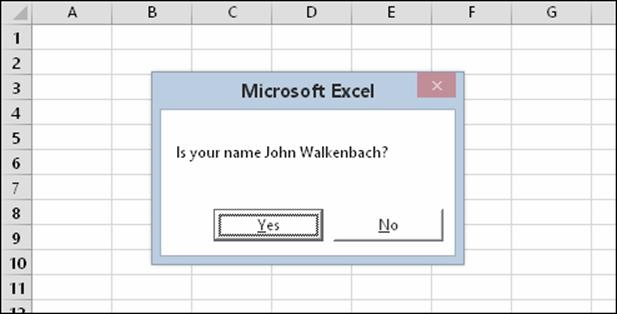
Figure 3-4: The GuessName procedure displays this dialog box.
Compile Error?
There's a chance that the GuessName macro won't work. When you try to run it, Excel may complain and pop up an error message: Compile Error: Variable Not Defined. Don't worry; there's an easy fix for that.
If you get that error, look at the top of your module, and you'll see this text: Option Explicit. Just delete that line, and the macro should work. That line, when present at the top of a module, means that you must “declare” all of your variables. I cover this topic in Chapter 7. If that line was added, it means that your VBE is set up to add the line automatically. For now, don't worry about it. Just delete the line and forget about the rude interruption.
When you enter the code listed in Step 5, you might notice that the VBE makes some adjustments to the text you enter. For example, after you type the Sub statement, the VBE automatically inserts the End Sub statement. And if you omit the space before or after an equal sign, the VBE inserts the space for you. Also, the VBE changes the color and capitalization of some text. This is all perfectly normal. It’s just the VBE’s way of keeping things neat and readable.
If you followed the previous steps, you just wrote a VBA Sub procedure, also known as a macro. When you press F5, Excel executes the code and follows the instructions. In other words, Excel evaluates each statement and does what you told it to do. (Don’t let this newfound power go to your head.) You can execute this macro any number of times — although it tends to lose its appeal after a few dozen times.
For the record, this simple macro uses the following concepts, all of which are covered later in this book:
· Defining a Sub procedure (the first line)
· Assigning values to variables (Msg and Ans)
· Concatenating (joining) a string (using the & operator)
· Using a built-in VBA function (MsgBox)
· Using built-in VBA constants (vbYesNo, vbNo, and vbYes)
· Using an If-Then construct (twice)
· Ending a Sub procedure (the last line)
Not bad for a beginner, eh?
Using the macro recorder
Another way you can get code into a VBA module is by recording your actions, using the Excel macro recorder. If you worked through the hands-on exercise in Chapter 2, you already have some experience with this technique.
 By the way, there is absolutely no way you can record the GuessName procedure shown in the preceding section. You can record only things that you can do directly in Excel. Displaying a message box is not in Excel’s normal repertoire. (It’s a VBA thing.) The macro recorder is useful, but in many cases, you’ll probably need to enter at least some code manually.
Here’s a step-by-step example that shows you how to record a macro that inserts a new worksheet and hides all but the first ten rows and all but the first ten columns. If you want to try this example, start with a new, blank workbook and follow these steps:
1. Activate a worksheet in the workbook.
Any worksheet will do.
2. Click the Developer tab, and make sure that Use Relative References is not highlighted.
This macro will be recorded using Absolute References.
3. Choose Developer ⇒ Code ⇒ Record Macro, or click the icon next to the Ready indicator on the left end of the status bar.
Excel displays its Record Macro dialog box.
4. In the Record Macro dialog box, name the macro TenByTen, and press Shift+T for the shortcut key.
The macro can be executed when you press Ctrl+Shift+T.
5. Click OK to start recording.
Excel automatically inserts a new VBA module into the project that corresponds to the active workbook. From this point on, Excel converts your actions to VBA code. While you’re recording, the icon in the status bar turns into a small square. This is a reminder that the macro recorder is running. You can also click that icon to stop the macro recorder.
6. Click the New Sheet icon to the right of the last sheet tab.
Excel inserts a new worksheet.
7. Select the entire Column K (the 11th column) and press Ctrl+Shift+right arrow; then right-click any selected column and choose Hide from the shortcut menu.
Excel hides all of the selected columns.
8. Select the entire Row 11 and press Ctrl+Shift+down arrow; then right-click any selected row and choose Hide from the shortcut menu.
Excel hides all of the selected columns.
9. Select cell A1.
10. Choose Developer ⇒ Code ⇒ Stop Recording, or click the Stop Recording button on the status bar (the small square).
Excel stops recording your actions.
To view this newly recorded macro, press Alt+F11 to activate the VBE. Locate the workbook’s name in the Project window. You see that the project has a new module listed. The name of the module depends on whether you had any other modules in the workbook when you started recording the macro. If you didn’t, the module will be named Module1. You can double-click the module to view the Code window for the module.
Here’s the code generated by your actions:
Sub TenByTen()
'
' TenByTen Macro
'
' Keyboard Shortcut: Ctrl+Shift+T
'
Sheets.Add After:=ActiveSheet
Columns("K:K").Select
Range(Selection, Selection.End(xlToRight)).Select
Selection.EntireColumn.Hidden = True
Rows("11:11").Select
Range(Selection, Selection.End(xlDown)).Select
Selection.EntireRow.Hidden = True
Range("A1").Select
End Sub
To try out this macro, activate any worksheet and press the shortcut key that you assigned in Step 4: Ctrl+Shift+T.
If you didn't assign a shortcut key to the macro, don't worry. Here's how to display a list of all macros available and run the one you want:
1. Choose Developer ⇒ Code ⇒ Macros.
Keyboard fans can press Alt+F8. Either of these methods displays a dialog box that lists all the available macros.
2. Select the macro in the list (in this case, TenByTen).
3. Click the Run button.
Excel executes the macro, and you get a new worksheet with ten visible rows and ten visible columns.
You can execute any number of commands and perform any number of actions while the macro recorder is running. Excel dutifully translates your mouse actions and keystrokes to VBA code.
And, of course, you can also edit the macro after you record it. To test your new skills, try editing the macro so that it inserts a worksheet with nine visible rows and columns — perfect for a Sudoku puzzle.
Copying VBA code
The final method for getting code into a VBA module is to copy it from another module or from some other place (such as a website). For example, a Sub or Function procedure that you write for one project might also be useful in another project. Instead of wasting time reentering the code, you can activate the module and use the normal Clipboard copy-and-paste procedures. (I'm rather fond of the keyboard shortcuts Ctrl+C to copy and Ctrl+V to paste.) After pasting the code into a VBA module, you can modify the code if necessary.
By the way, you'll find lots of VBA code examples on the web. If you'd like to try them, select the code in your browser and press Ctrl+C to copy it. Then activate a module and press Ctrl+V to paste it.
When you copy code from a website, it sometimes requires some fixing. For example, quote characters may be “smart quotes” and they must be converted to simple quote characters. And sometimes, long lines wrap around. Erroneous statements are easy to spot in the VBE because they appear in red.
Customizing the VBA Environment
If you’re serious about becoming an Excel programmer, you’ll spend a lot of time with VBA modules on your screen. To help make things as comfortable as possible (no, please keep your shoes on), the VBE provides quite a few customization options.
When the VBE is active, choose Tools ⇒ Options. You’ll see a dialog box with four tabs: Editor, Editor Format, General, and Docking. I discuss some of the most useful options in the sections that follow.
Using the Editor tab
Figure 3-5 shows the options you can access by clicking the Editor tab of the Options dialog box. Use the options in the Editor tab to control how certain things work in the VBE.
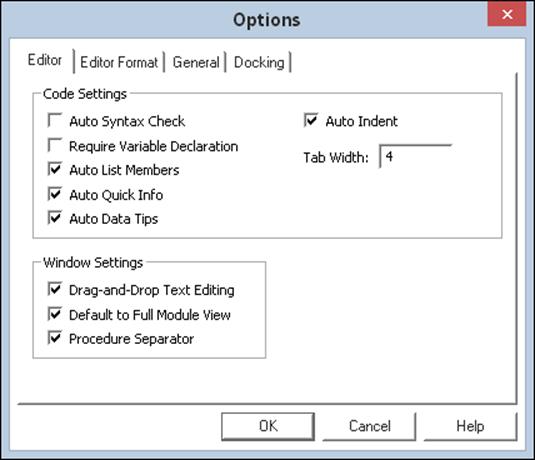
Figure 3-5: This is the Editor tab of the Options dialog box.
Auto Syntax Check option
The Auto Syntax Check setting determines whether the VBE pops up a dialog box if it discovers a syntax error while you’re entering your VBA code. The dialog box tells roughly what the problem is. If you don’t choose this setting, VBE flags syntax errors by displaying them in a different color from the rest of the code, and you don’t have to deal with any dialog boxes popping up on your screen.
I usually keep this setting turned off because I find the dialog boxes annoying, and I can usually figure out what’s wrong with a statement. But back in the olden days (before I was a VBA veteran), I found this assistance quite helpful.
Require Variable Declaration option
If the Require Variable Declaration option is set, VBE inserts the following statement at the beginning of each new VBA module you insert:
Option Explicit
Changing this setting affects only new modules, not existing modules. If this statement appears in your module, you must explicitly define each variable you use. In Chapter 7, I explain why you should develop this habit.
Normally, I keep this option turned off because I prefer to add the Option Explicit statement myself.
Auto List Members option
If the Auto List Members option is set, VBE provides some help when you’re entering your VBA code. It displays a list that would logically complete the statement you’re typing. This bit of magic is sometimes called IntelliSense.
This is one of the best features of the VBE, and I always keep it turned on. Figure 3-6 shows an example (which will make lots more sense when you start writing VBA code).
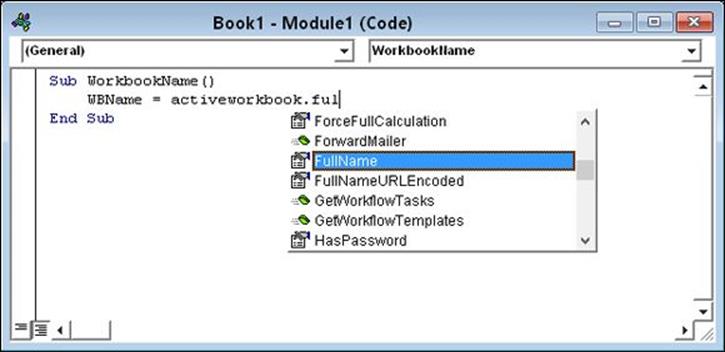
Figure 3-6 An example of Auto List Members.
Auto Quick Info option
If the Auto Quick Info option is set, VBE displays information about functions and their arguments as you type. This can be very helpful. Figure 3-7 shows this feature in action, telling me about the arguments for the MsgBox function.
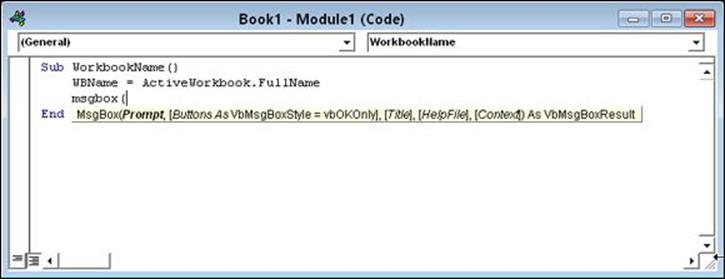
Figure 3-7 Auto Quick Info offers help about the MsgBox function.
Auto Data Tips option
If the Auto Data Tips option is set, VBE displays the value of the variable over which your cursor is placed when you’re debugging code. When you enter the wonderful world of debugging, as I describe in Chapter 13, you’ll appreciate this option.
Auto Indent setting
The Auto Indent setting determines whether VBE automatically indents each new line of code the same as the previous line. I’m big on using indentations in my code, so I keep this option on.
 Use the Tab key to indent your code, not the space bar. Also, you can press Shift+Tab to “unindent” a line of code. If you want to indent more than just one line, select all the lines you want to indent. Then press the Tab key.
The VBE’s Edit toolbar (which is hidden by default) contains two useful buttons: Indent and Outdent. These buttons let you quickly indent or “unindent” a block of code. Select the code and click one of these buttons to change the block’s indenting.
Drag-and-Drop Text Editing option
The Drag-and-Drop Text Editing option, when enabled, lets you copy and move text by dragging and dropping with your mouse. I keep this option turned on, but I never use it. I prefer to copy and move by using the keyboard.
Default to Full Module View option
The Default to Full Module View option sets the default state for new modules. (It doesn’t affect existing modules.) If this option is set, procedures in the Code window appear as a single scrollable list. If this option is turned off, you can see only one procedure at a time. I keep this option turned on.
Procedure Separator option
When the Procedure Separator option is turned on, separator bars appear at the end of each procedure in a Code window. I like the idea of separator bars, so I keep this option turned on.
Using the Editor Format tab
Figure 3-8 shows the Editor Format tab of the Options dialog box. With this tab, you can customize the way the VBE looks.
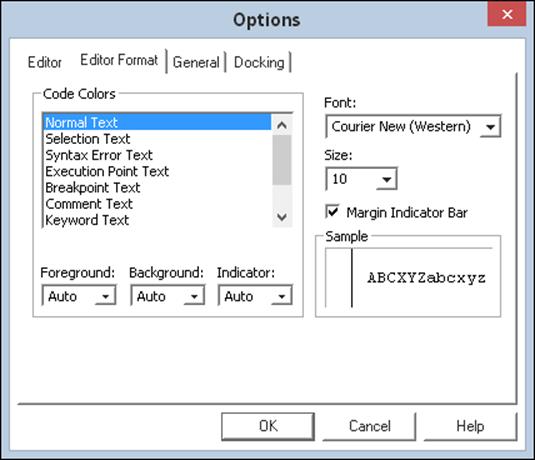
Figure 3-8 Change the VBE’s looks with the Editor Format tab.
Code Colors option
The Code Colors option lets you set the text color and background color displayed for various elements of VBA code. This is largely a matter of personal preference. Personally, I find the default colors to be just fine. But for a change of scenery, I occasionally play around with these settings.
Font option
The Font option lets you select the font that’s used in your VBA modules. For best results, stick with a fixed-width font such as Courier New. In a fixed-width font, all characters are exactly the same width. This makes your code more readable because the characters are nicely aligned vertically, and you can easily distinguish multiple spaces (which is sometimes useful).
Size setting
The Size setting specifies the point size of the font in the VBA modules. This setting is a matter of personal preference determined by your video display resolution and how many carrots you've been eating.
Margin Indicator Bar option
This option controls the display of the vertical margin indicator bar in your modules. You should keep this turned on; otherwise, you won’t be able to see the helpful graphical indicators when you’re debugging your code.
Using the General tab
Figure 3-9 shows the options available on the General tab of the Options dialog box. In almost every case, the default settings are just fine.
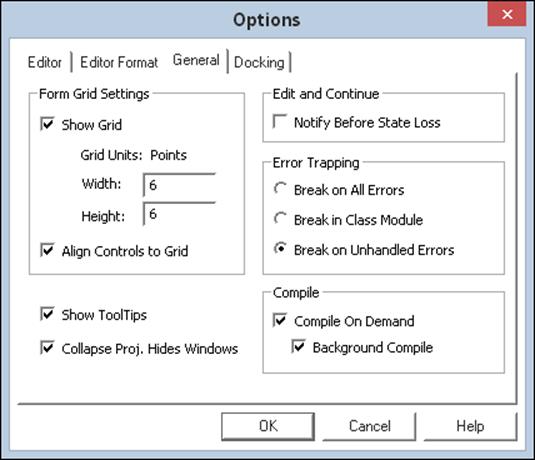
Figure 3-9 The General tab of the Options dialog box.
The most important setting is Error Trapping. I strongly suggest that you use the Break on Unhandled Errors setting (which is the default). If you use a different setting, your error-handling code won't work. You can read more about this in Chapter 12.
If you’re really interested in these options, click the Help button for details.
Using the Docking tab
Figure 3-10 shows the Docking tab. These options determine how the various windows in the VBE behave. When a window is docked, it is fixed in place along one of the edges of the VBE program window. This makes it much easier to identify and locate a particular window. If you turn off all docking, you have a big, confusing mess of windows. Generally, the default settings work fine.
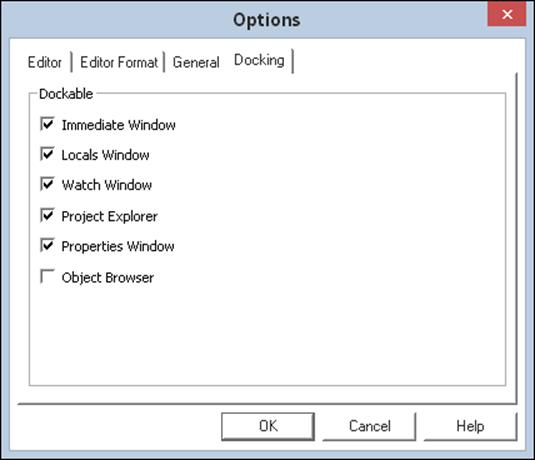
Figure 3-10 The Docking tab of the Options dialog box.
You'll find that sometimes the VBE seems to have a mind of its own when you're trying to dock a window. If docking doesn't seem to work correctly, just stick with it, and you'll get the hang of things.
All materials on the site are licensed Creative Commons Attribution-Sharealike 3.0 Unported CC BY-SA 3.0 & GNU Free Documentation License (GFDL)
If you are the copyright holder of any material contained on our site and intend to remove it, please contact our site administrator for approval.
© 2016-2026 All site design rights belong to S.Y.A.