Microsoft Excel 2016 BIBLE (2016)
Part VI
Programming Excel with VBA
Chapter 44
VBA Examples
IN THIS CHAPTER
1. Working with ranges
2. Working with charts
3. Modifying properties
4. Speeding up your VBA code
My philosophy about learning to write Excel macros places heavy emphasis on examples. Often, a well thought-out example communicates a concept much better than a lengthy description of the underlying theory. In this book, space limitations don't allow describing every nuance of VBA, so I prepared many examples. Don't overlook the VBA Help system for specific details. To get help while working in the VB Editor window, press F1. For context-sensitive help, select a VBA keyword, object name, property, or method before you press F1.
This chapter consists of several examples that demonstrate common VBA techniques. You may be able to use some examples directly, but in most cases, you must adapt them to your own needs.
Working with Ranges
Most of what you do in VBA probably involves worksheet ranges. When you work with range objects, keep the following points in mind:
· Your VBA code doesn't need to select a range to work with the range.
· If your code does select a range, its worksheet must be active.
· The macro recorder doesn't always generate the most efficient code. Often, you can use the recorder to create your macro and then edit the code to make it more efficient.
· I recommend that you use named ranges in your VBA code. For example, a reference such as Range("Total") is better than Range("D45"). In the latter case, you need to modify the macro if you add a row above row 45.
· When you record macros that select ranges, pay close attention to Relative versus Absolute recording mode. The recording mode that you choose can determine whether your macro works correctly.
 See Chapter 39, “Introducing Visual Basic for Applications,” for more on recording modes.
· If you create a macro that loops through each cell in the current range selection, be aware that the user can select entire columns or rows. In such a case, you need to create a subset of the selection that consists only of nonblank cells. Or you can work with cells in the worksheet's used range (by using the UsedRange property).
· Be aware that Excel allows you to select multiple ranges in a worksheet. For example, you can select a range, press Ctrl, and then select another range. You can test for this in your macro and take appropriate actions.
The examples in the following sections demonstrate these points.
Copying a range
Copying a range is a frequent activity in macros. When you turn on the macro recorder (using Absolute recording mode) and copy a range from A1:A5 to B1:B5, you get a VBA macro like this:
Sub CopyRange()
Range("A1:A5").Select
Selection.Copy
Range("B1").Select
ActiveSheet.Paste
Application.CutCopyMode = False
End Sub
This macro works, but it's not the most efficient way to copy a range. You can accomplish the same result with the following one-line macro:
Sub CopyRange2()
Range("A1:A5").Copy Range("B1")
End Sub
This code takes advantage of the fact that the Copy method can use an argument that specifies the destination. Useful information about properties and methods is available in the Help system.
The example demonstrates that the macro recorder doesn't always generate the most efficient code. As you see, you don't have to select an object to work with it. Note that CopyRange2 doesn't select a range; therefore, the active cell doesn't change when this macro is executed.
Copying a variable-size range
Often, you want to copy a range of cells in which the exact row and column dimensions are unknown.
Figure 44.1 shows a range on a worksheet. This range contains data that is updated weekly. Therefore, the number of rows changes. Because the exact range address is unknown at any given time, writing a macro to copy the range can be challenging.
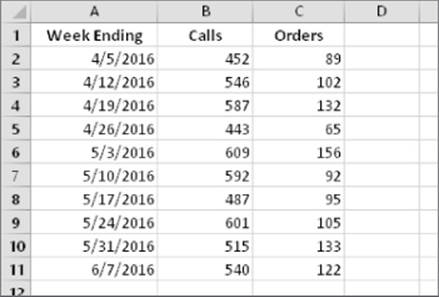
Figure 44.1 This range can consist of any number of rows.
The macro that follows demonstrates how to copy this range to Sheet2 (beginning at cell A1). It uses the CurrentRegion property, which returns a Range object that corresponds to the block of used cells surrounding a particular cell. This is equivalent to choosing Home ![]() Editing
Editing ![]() Find & Select
Find & Select ![]() Go To, clicking the Special button, and then selecting the Current Region option:
Go To, clicking the Special button, and then selecting the Current Region option:
Sub CopyCurrentRegion()
Range("A1").CurrentRegion.Copy Sheets("Sheet2").Range("A1")
End Sub
Another approach is to use a table to store the data. When you add new rows to a table, the table's range address adjusts automatically, so you can use a procedure like this:
Sub CopyTable()
Range("Table1[#All]").Copy Sheets("Sheet2").Range("A1")
End Sub
A workbook that contains these macros is available on this book's website at www.wiley.com/go/excel2016bible. The file is named range copy.xlsm.
Selecting to the end of a row or column
You're probably in the habit of using key combinations, such as pressing Ctrl+Shift+→ and Ctrl+Shift+↓, to select from the active cell to the end of a row or column. When you record these actions in Excel (using Relative recording mode), you'll find that the resulting code works as you would expect it to.
The following VBA procedure selects the range that begins at the active cell and extends down to the last cell in the column (or to the first empty cell, whichever comes first). When the range is selected, you can do whatever you want with it — copy it, move it, format it, and so on:
Sub SelectDown()
Range(ActiveCell, ActiveCell.End(xlDown)).Select
End Sub
Notice that the Range property has two arguments. These arguments represent the upper-left and lower-right cells in a range.
This example uses the End method of the Range object, which returns a Range object. The End method takes one argument, which can be any of the following constants: xlUp, xlDown, xlToLeft, or xlToRight.
A workbook that contains this macro is available on this book's website at www.wiley.com/go/excel2016bible. The file is named select cells.xlsm .
Selecting a row or column
The macro that follows demonstrates how to select the column of the active cell. It uses the EntireColumn property, which returns a range that consists of a column:
Sub SelectColumn()
ActiveCell.EntireColumn.Select
End Sub
As you may suspect, an EntireRow property also is available, which returns a range that consists of a row.
If you want to perform an operation on all cells in the selected column, you don't need to select the column. For example, when the following procedure is executed, all cells in the row that contains the active cell are made bold:
Sub MakeRowBold()
ActiveCell.EntireRow.Font.Bold = True
End Sub
Moving a range
Moving a range consists of cutting it to the Clipboard and then pasting it to another area. If you record your actions while performing a move operation, the macro recorder generates code as follows:
Sub MoveRange()
Range(“A1:C6”).Select
Selection.Cut
Range(“A10”).Select
ActiveSheet.Paste
End Sub
As demonstrated with copying earlier in this chapter (see “Copying a range”), this method is not the most efficient way to move a range of cells. In fact, you can do it with a single VBA statement, as follows:
Sub MoveRange2()
Range(“A1:C6”).Cut Range(“A10”)
End Sub
This statement takes advantage of the fact that the Cut method can use an argument that specifies the destination.
A workbook that contains this macro is available on this book's website at www.wiley.com/go/excel2016bible. The file is named range move.xlsm .
Looping through a range efficiently
Many macros perform an operation on each cell in a range, or they may perform selective actions based on the content of each cell. These operations usually involve a For-Next loop that processes each cell in the range.
The following example demonstrates how to loop through all the cells in a range. In this case, the range is the current selection. In this example, Cell is a variable name that refers to the cell being processed. (Notice that this variable is declared as a Range object.) Within the For-Next loop, the single statement evaluates the cell. If the cell is negative, it's converted to a positive value:
Sub ProcessCells()
Dim Cell As Range
For Each Cell In Selection
If Cell.Value < 0 Then Cell.Value = Cell.Value * -1
Next Cell
End Sub
The preceding example works, but what if the selection consists of an entire column or an entire range? This is not uncommon because Excel lets you perform operations on entire columns or rows. In this case, though, the macro seems to take forever because it loops through each cell — even those that are blank. What's needed is a way to process only the nonblank cells.
You can accomplish this task by using the SelectSpecial method. In the following example, the SelectSpecial method is used to create a new object: the subset of the selection that consists of cells with constants (as opposed to formulas). This subset is processed, with the net effect of skipping all blank cells and all formula cells:
Sub ProcessCells2()
Dim ConstantCells As Range
Dim Cell As Range
' Ignore errors
On Error Resume Next
' Process the constants
Set ConstantCells = Selection.SpecialCells(xlConstants, xlNumbers)
For Each Cell In ConstantCells
If Cell.Value < 0 Then Cell.Value = Cell.Value * -1
Next Cell
End Sub
The ProcessCells2 procedure works fast, regardless of what is selected. For example, you can select the range, select all columns in the range, select all rows in the range, or even select the entire worksheet. In all these cases, only the cells that contain constants are processed inside the loop. This procedure is a vast improvement over the ProcessCells procedure presented earlier in this section.
Notice that the following statement is used in the procedure:
On Error Resume Next
This statement causes Excel to ignore any errors that occur and simply process the next statement. This statement is necessary because the SpecialCells method produces an error if no cells qualify and because the numerical comparison will fail if a cell contains an error value. Normal error checking is resumed when the procedure ends. To tell Excel explicitly to return to normal error-checking mode, use the following statement:
On Error GoTo 0
This macro is available on this book's website at www.wiley.com/go/excel2016bible. The file is named skip blanks while looping.xlsm.
Prompting for a cell value
As discussed in Chapter 41, “Creating UserForms,” you can take advantage of the VBA InputBox function to ask the user to enter a value. Figure 44.2 shows an example.
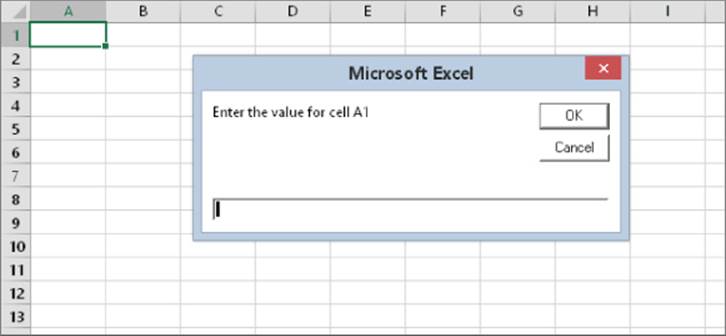
Figure 44.2 Using the VBA InputBox function to get a value from the user.
You can assign this value to a variable and use it in your procedure. Often, however, you want to place the value into a cell. The following procedure demonstrates how to ask the user for a value and place it into cell A1 of the active worksheet, using only one statement:
Sub GetValue()
Range("A1").Value = InputBox("Enter the value for cell A1")
End Sub
This procedure has a problem: if the user clicks Cancel, the contents of cell A1 are replaced with an empty string. Here's a modified version in which the InputBox entry is assigned to a variable named UserVal. The code checks this variable and takes action only if the variable is not empty:
Sub GetValue()
UserVal = InputBox("Enter the value for cell A1")
If UserVal <> "" Then Range("A1").Value = UserVal
End Sub
Here's a variation that accepts only a numeric value. If the user enters a nonnumber, a message box appears and the GetValue procedure is executed again:
Sub GetValue()
UserVal = InputBox("Enter the value for cell A1")
If UserVal = "" Then
Exit Sub
Else
If IsNumeric(UserVal) Then
Range("A1").Value = UserVal
Else
MsgBox "You must enter a number."
Call GetValue
End If
End If
End Sub
Determining the type of selection
If your macro is designed to work with a range selection, you need to determine that a range is actually selected. Otherwise, the macro most likely fails. The following procedure identifies the type of object selected:
Sub SelectionType()
MsgBox TypeName(Selection)
End Sub
A workbook that contains this macro is available on this book's website at www.wiley.com/go/excel2016bible. The file is named selection type.xlsm.
If a cell or a range is selected, the MsgBox displays Range. If your macro is designed to work only with ranges, you can use an If statement to ensure that a range is actually selected. The following is an example that displays a message and exits the procedure if the current selection is not a Range object:
Sub CheckSelection()
If TypeName(Selection) <> "Range" Then
MsgBox "Select a range."
Exit Sub
End If
' … [Other statements go here]
End Sub
Another way to approach this task is to define a custom function that returns TRUE if the selection (represented by the sel argument) is a Range object, and FALSE otherwise. The following function does just that:
Function IsRange(sel) As Boolean
IsRange = False
If TypeName(sel) = "Range" Then IsRange = True
End Function
Here's a more compact version of the IsRange function:
Function IsRange(sel) As Boolean
IsRange = (TypeName(sel) = "Range")
End Function
If you enter the IsRange function in your module, you can rewrite the CheckSelection procedure as follows:
Sub CheckSelection()
If IsRange(Selection) Then
' … [Other statements go here]
Else
MsgBox "Select a range."
Exit Sub
End If
End Sub
This approach is efficient if you have many procedures that need to check for a range selection.
Identifying a multiple selection
Excel enables you to make a multiple selection by pressing Ctrl while you select objects or ranges. This method can cause problems with some macros; for example, you can't copy a multiple selection that consists of nonadjacent ranges. The following macro demonstrates how to determine whether the user has made a multiple selection:
Sub MultipleSelection()
If Selection.Areas.Count > 1 Then
MsgBox "Multiple selections not allowed."
Exit Sub
End If
' … [Other statements go here]
End Sub
This example uses the Areas method, which returns a collection of all Range objects in the selection. The Count property returns the number of objects that are in the collection.
The following is a VBA function that returns TRUE if the selection is a multiple selection:
Function IsMultiple(sel) As Boolean
IsMultiple = Selection.Areas.Count > 1
End Function
Counting selected cells
You can create a macro that works with the selected range of cells. Use the Count property of the Range object to determine how many cells are contained in a range selection (or any range, for that matter). For example, the following statement displays a message box that contains the number of cells in the current selection:
MsgBox Selection.Count
Caution
With the larger worksheet size introduced in Excel 2007, the Count property can generate an error. The Count property uses the Long data type, so the largest value that it can store is 2,147,483,647. For example, if the user selects 2,048 complete columns (2,147,483,648 cells), the Count property generates an error. Fortunately, Microsoft added a new property — CountLarge — which uses the Double data type, which can handle values up to 1.79+E^308.
For more on VBA data types, see Table 44.1.
Bottom line? In the majority of situations, the Count property will work fine. If there's a chance that you may need to count more cells (such as all cells in a worksheet), use CountLarge instead of Count.
Table 44.1 VBA Data Types
|
Data Type |
Bytes Used |
Approximate Range of Values |
|
Byte |
1 |
0 to 255 |
|
Boolean |
2 |
True or False |
|
Integer |
2 |
–32,768 to 32,767 |
|
Long (long integer) |
4 |
–2,147,483,648 to 2,147,483,647 |
|
Single (single precision floating point) |
4 |
–3.4E38 to –1.4E–45 for negative values; 1.4E–45 to 4E38 for positive values |
|
Double (double precision floating point) |
8 |
–1.7E308 to –4.9E–324 for negative values; 4.9E–324 to .7E308 for positive values |
|
Currency (scaled integer) |
8 |
–9.2E14 to 9.2E14 |
|
Decimal |
14 |
+/–7.9E28 with no decimal point |
|
Date |
8 |
January 1, 100 to December 31, 9999 |
|
Object |
4 |
Any object reference |
|
String (variable length) |
10 + string length |
0 to approximately 2 billion |
|
String (fixed length) |
Length of string |
1 to approximately 65,400 |
|
Variant (with numbers) |
16 |
Any numeric value up to the range of a Double |
|
Variant (with characters) |
22 + string length |
Same range as for variable-length String |
|
User-defined (using Type) |
Number required by elements |
Range of each element is the same as the range of its data type |
If the active sheet contains a range named data, the following statement assigns the number of cells in the data range to a variable named CellCount:
CellCount = Range("data").Count
You can also determine how many rows or columns are contained in a range. The following expression calculates the number of columns in the currently selected range:
Selection.Columns.Count
And, of course, you can use the Rows property to determine the number of rows in a range. The following statement counts the number of rows in a range named data and assigns the number to a variable named RowCount:
RowCount = Range("data").Rows.Count
Working with Workbooks
The examples in this section demonstrate various ways to use VBA to work with workbooks.
Saving all workbooks
The following procedure loops through all workbooks in the Workbooks collection and saves each file that has been saved previously:
Public Sub SaveAllWorkbooks()
Dim Book As Workbook
For Each Book In Workbooks
If Book.Path <> "" Then Book.Save
Next Book
End Sub
Notice the use of the Path property. If a workbook's Path property is empty, the file has never been saved. (It's a new workbook.) This procedure ignores such workbooks and saves only the workbooks that have a nonempty Path property.
Saving and closing all workbooks
The following procedure loops through the Workbooks collection. The code saves and closes all workbooks:
Sub CloseAllWorkbooks()
Dim Book As Workbook
For Each Book In Workbooks
If Book.Name <> ThisWorkbook.Name Then
Book.Close savechanges:=True
End If
Next Book
ThisWorkbook.Close savechanges:=True
End Sub
The procedure uses an If statement within the For-Next loop to determine whether the workbook is the workbook that contains the code. This is necessary because closing the workbook that contains the procedure would end the code, and subsequent workbooks would not be affected.
Working with Charts
Manipulating charts with VBA can be confusing, mainly because of the large number of objects involved. To get a feel for working with charts, turn on the macro recorder, create a chart, and perform some routine chart editing. You may be surprised by the amount of code that's generated.
When you understand the way objects function in a chart, however, you can create some useful macros. This section presents a few macros that deal with charts. When you write macros that manipulate charts, you need to understand some terminology. An embedded chart on a worksheet is a ChartObject object, and the ChartObject contains the actual Chart object. A chart on a chart sheet, on the other hand, does not have a ChartObject container.
It's often useful to create an object reference to a chart. (See “Simplifying object references,” later in this chapter.) For example, the following statement creates an object variable (MyChart) for the embedded chart named Chart 1 on the active sheet:
Dim MyChart As Chart
Set MyChart = ActiveSheet.ChartObjects("Chart 1")
The following sections contain examples of macros that work with charts.
Caution
For some reason, VBA code does not work with the new chart types introduced in Excel 2016 (treemap, sunburst, histogram, box & whisker, and waterfall charts). In addition, recording a macro while working with one of these new chart types generates no VBA code.
These macros are available on this book's website at www.wiley.com/go/excel2016bible. The file is named chart macros.xlsm.
Modifying the chart type
The following example changes the chart type of every embedded chart on the active sheet. It makes each chart a clustered column chart by adjusting the ChartType property of the Chart object. A built-in constant, xlColumnClustered, represents a standard column chart:
Sub ChartType()
Dim ChtObj As ChartObject
For Each ChtObj In ActiveSheet.ChartObjects
ChtObj.Chart.ChartType = xlColumnClustered
Next ChtObj
End Sub
The preceding example uses a For-Next loop to cycle through all the ChartObject objects on the active sheet. Within the loop, the chart type is assigned a new value, making it a column chart.
The following macro performs the same function but works on all chart sheets in the active workbook:
Sub ChartType2()
Dim Cht As Chart
For Each Cht In ActiveWorkbook.Charts
Cht.ChartType = xlColumnClustered
Next Cht
End Sub
Modifying chart properties
The following example changes the legend font for all charts that are on the active sheet. It uses a For-Next loop to process all ChartObject objects and uses the HasLegend property to ensure that the chart has a legend. The code then adjusts the properties of the Fontobject contained in the Legend object:
Sub LegendMod()
Dim ChtObj As ChartObject
For Each ChtObj In ActiveSheet.ChartObjects
ChtObj.Chart.HasLegend = True
With ChtObj.Chart.Legend.Font
.Name = "Arial"
.FontStyle = "Bold"
.Size = 8
End With
Next ChtObj
End Sub
Applying chart formatting
This example applies several formatting types to the specified chart (in this case, Chart 1 on the active sheet):
Sub ChartMods()
With ActiveSheet.ChartObjects("Chart 1").Chart
.ChartType = xlColumnClustered
.ChartTitle.Text = "XYZ Corporation"
.ChartArea.Font.Name = "Arial"
.ChartArea.Font.FontStyle = "Regular"
.ChartArea.Font.Size = 9
.PlotArea.Interior.ColorIndex = 6
.Axes(xlValue).TickLabels.Font.Bold = True
.Axes(xlCategory).TickLabels.Font.Bold = True
End With
End Sub
One way to learn about these properties is to record a macro while you apply various changes to a chart.
VBA Speed Tips
VBA is fast, but it's often not fast enough. This section presents programming examples that you can use to help speed your macros.
Turning off screen updating
You've probably noticed that when you execute a macro, you can watch everything that occurs in the macro. Sometimes this view is instructive, but after you get the macro working properly, it can be annoying and slow things considerably.
Fortunately, you can disable the normal screen updating that occurs when you execute a macro. Insert the following statement to turn off screen updating:
Application.ScreenUpdating = False
If, at any point during the macro, you want the user to see the results of the macro, use the following statement to turn screen updating back on:
Application.ScreenUpdating = True
Preventing alert messages
One benefit of using a macro is that you can perform a series of actions automatically. You can start a macro and then get a cup of coffee while Excel does its thing. Some operations cause Excel to display messages that must be attended to, however. For example, if your macro deletes a sheet, you see the message that is shown in the dialog box in Figure 44.3. These types of messages mean that you can't execute your macro unattended.
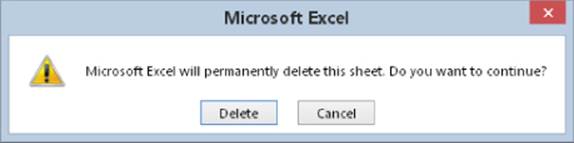
Figure 44.3 You can instruct Excel not to display these types of alerts while a macro is running
To avoid these alert messages (and automatically choose the default response), insert the following VBA statement:
Application.DisplayAlerts = False
To turn alerts back on, use this statement:
Application.DisplayAlerts = True
Simplifying object references
As you may have discovered, references to objects can get lengthy — especially if your code refers to an object that's not on the active sheet or in the active workbook. For example, a fully qualified reference to a Range object may look like this:
Workbooks("MyBook.xlsx").Worksheets("Sheet1").Range("IntRate")
If your macro uses this range frequently, you may want to use the Set command to create an object variable. For example, to assign this Range object to an object variable named Rate, use the following statement:
Set Rate= Workbooks("MyBook.xlsx").Worksheets("Sheet1").Range("IntRate")
After this variable is defined, you can use the object variable Rate instead of the lengthy reference. Here's an example:
Rate.Font.Bold = True
Rate.Value = .0725
Besides simplifying your coding, using object variables speeds your macros quite a bit. I've seen complex macros execute twice as fast after creating object variables.
Declaring variable types
Usually, you don't have to worry about the type of data that's assigned to a variable. Excel handles all these details behind the scenes. For example, if you have a variable named MyVar, you can assign a number of any type to it. You can even assign a text string to it later in the procedure.
If you want your procedures to execute as fast as possible, though, you should tell Excel in advance what type of data is going be assigned to each of your variables. Providing this information in your VBA procedure is known as declaring a variable's type.
Table 44.1 lists all the data types that VBA supports. This table also lists the number of bytes that each type uses and the approximate range of possible values.
If you don't declare a variable, Excel uses the Variant data type. In general, the best approach is to use the data type that uses the smallest number of bytes yet can still handle all the data assigned to it. An exception is when you're performing floating-point calculations. In such a case, it's always best to use the Double data type (rather than the Single data type) to maintain maximum precision. Another exception involves the Integer data type. Although the Long data type uses more bytes, it usually results in faster performance.
When VBA works with data, execution speed is a function of the number of bytes that VBA has at its disposal. In other words, the fewer bytes that data uses, the faster VBA can access and manipulate the data.
To declare a variable, use the Dim statement before you use the variable for the first time. For example, to declare the variable Units as a Long data type, use the following statement:
Dim Units as Long
To declare the variable UserName as a string, use the following statement:
Dim UserName as String
If you declare a variable within a procedure, the declaration is valid only within that procedure. If you declare a variable outside of any procedures (but before the first procedure), the variable is valid in all procedures in the module.
If you use an object variable (as described in “Simplifying object references,” earlier in this chapter), you can declare the variable as the appropriate object data type. The following is an example:
Dim Rate as Range
Set Rate = Workbooks("MyBook.xlsx").Worksheets("Sheet1").
Range("IntRate")
To force yourself to declare all the variables that you use, insert the following statement at the top of your module:
Option Explicit
If you use this statement and Excel encounters a variable that hasn't been declared, Excel displays an error message. After you get into the habit of correctly declaring all your variables, you'll find that it helps eliminate errors and makes spotting errors easier.
All materials on the site are licensed Creative Commons Attribution-Sharealike 3.0 Unported CC BY-SA 3.0 & GNU Free Documentation License (GFDL)
If you are the copyright holder of any material contained on our site and intend to remove it, please contact our site administrator for approval.
© 2016-2026 All site design rights belong to S.Y.A.