Pro Exchange 2013 SP1 PowerShell Administration: For Exchange On-Premises and Office 365 (2014)
Chapter 9. Compliance
In today’s world of complex electronic communications, many organizations utilize email for communicating both internally and with other organizations. Because everybody has become used to sending and receiving email on all sorts of devices, and because some of the underlying complexities and potential adverse consequences are unknown to end-users, many companies want their communications to conform to certain rules—whether those rules are company policies for sending email containing sensitive information to external organizations or are operations to comply with external laws and regulations, such as the Sarbanes-Oxley Act in the United States or the European Union’s Data Protection Directive.
Exchange Server 2010 brought certain features that address some of those concerns. Exchange Server 2013 introduced new ones while extending existing features, albeit using different names for some of them.
In this chapter we discuss the following compliance-related features:
· In-place archiving
· In-place eDiscovery
· In-place dold
· Messaging records management (MRM)
· Data loss prevention (DLP)
· Transport rules
· Auditing
· Information rights management (IRM)
In-Place Archiving
An in-place archive is an extension of a regular, primary mailbox, and it is hosted on an Exchange server or online (e.g., Exchange Online Archive). This feature was introduced with Exchange Server 2010 as personal archive or archive mailbox; as of Exchange Server 2013, this feature is known as in-place archiving.
An in-place archive can be used to offload contents from the primary mailbox, keeping the primary mailbox small and tidy; it also helps organizations manage the space occupied by a large offline cache, or .OST files. However, OST size management has become less of an issue with Outlook 2013, which contains an option. This option in the form of a slider limits the information that can be stored in the offline cache to a certain age, and then Outlook is capable of retrieving the non-cached mailbox information from the online mailbox as required; this slider is shown inFigure 9-1.

Figure 9-1. Outlook 2013 offline cached Exchange mode slider
![]() Note In-place archives are always accessed in online mode. Keep this in mind when considering use of Exchange Online Archives.
Note In-place archives are always accessed in online mode. Keep this in mind when considering use of Exchange Online Archives.
Second, and perhaps more important, is that the in-place archives serve as a much better alternative for the infamous personal folders, or .PST files. This is because in-place archives are stored in Exchange (or the cloud when using Exchange Online Archives), and this has several advantages over .PST files:
· The information is stored in Exchange and does not require inventory and collection of end-user .PST files for discovery, which might be inaccessible and can be tampered with.
· Information stored in Exchange is not prone to theft or loss as are .PST files, which are often hosted on laptops or are transported using USB sticks.
· In-place archives are treated just like mailboxes, and thus can be incorporated into your Exchange backup solution, or you can replicate the information using a database availability group.
· Information stored in in-place archives can be discovered from a compliance perspective, just like regular mailboxes.
Offloading your mailbox contents to an in-place archive can be done manually or retention policies can be used to move the items from the primary mailbox to the in-place archive, depending on criteria such as the age of the item.
In-place archives also come with certain limitations you should be aware of:
· They are not supported by all clients. For example, mobile devices or Outlook for Mac will not allow you to access your in-place archives.
· They and their related primary mailboxes are tightly coupled; you can’t simply detach an in-place archive and attach it to a different primary mailbox. This is because both the primary mailbox and the in-place archive have the same legacyExchangeDN. A possible workaround for this limitation would be to export the contents of the in-place archive and import it elsewhere. Be advised, though, that if the primary mailbox is deleted, the in-place archive will be deleted also.
![]() Note In-place archiving is a premium feature and requires an Enterprise CAL when used on premises; as such,it has specific Outlook licensing requirements. For more information, see http://office.microsoft.com/en-us/outlook-help/license-requirements-for-personal-archive-and-retention-policies-HA102576659.aspx. To quickly check how many mailboxes are configured with in-place archives, use (Get-Mailbox –Archive).Count.
Note In-place archiving is a premium feature and requires an Enterprise CAL when used on premises; as such,it has specific Outlook licensing requirements. For more information, see http://office.microsoft.com/en-us/outlook-help/license-requirements-for-personal-archive-and-retention-policies-HA102576659.aspx. To quickly check how many mailboxes are configured with in-place archives, use (Get-Mailbox –Archive).Count.
Enabling In-Place Archives
![]() Note When you consider using in-place archives, check if the clients used in your organization support in-place archives.
Note When you consider using in-place archives, check if the clients used in your organization support in-place archives.
To create an in-place archive for a mailbox using the Exchange Admin Center, you do the following:
1. Open up the Exchange Admin Center.
2. Navigate to Recipients ![]() Mailboxes.
Mailboxes.
3. In the in-place archive section, select Enable.
4. In the Create In-Place Archive Wizard, select Browse. . . and then select the mailbox database (see Figure 9-2). If you do not select a database, the database used to store the mailbox will be selected.
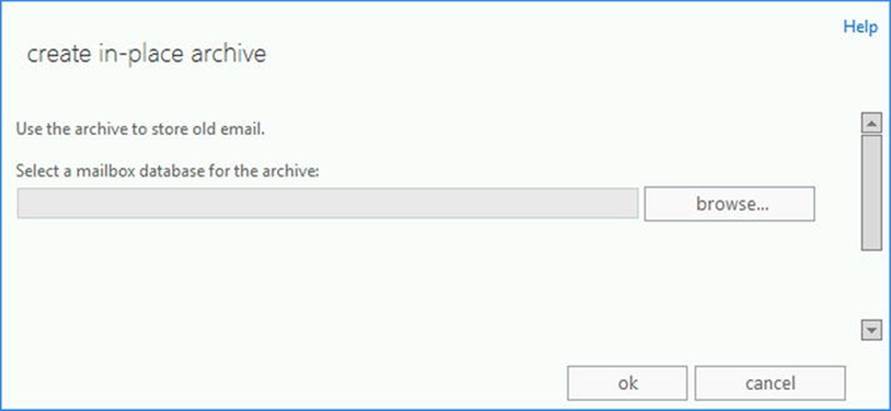
Figure 9-2. Dialog for creating in-place archive
5. Confirm the creation of the in-place archive by selecting OK.
To create an in-place archive from the Exchange Management Shell, use the Enable-Mailbox cmdlet in conjunction with the Archive parameter. For example, to create an in-place archive for a user with the identity Philip, you would use:
Enable-Mailbox –Identity Philip –Archive
The target database for the in-place archive will automatically be picked by the mailbox resources management agent. You can also create an in-place archive on a specific mailbox database by specifying the archive database, as follows:
Enable-Mailbox –Identity Philip –Archive –ArchiveDatabase MDB2
After an in-place archive is enabled, additional mailbox properties will get populated. For example, when you are retrieving the mailbox properties using Get-Mailbox, you will see the following archive-related attributes:
ArchiveDatabase : MDB1
ArchiveGuid : d972ef60-8eca-4b0b-a36d-cb9d0903883c
ArchiveName : {In-Place Archive - Philip Mortimer}
JournalArchiveAddress :
ArchiveQuota : 100 GB (107,374,182,400 bytes)
ArchiveWarningQuota : 90 GB (96,636,764,160 bytes)
ArchiveDomain :
ArchiveStatus : None
ArchiveState : Local
DisabledArchiveDatabase :
DisabledArchiveGuid : 00000000-0000-0000-0000-000000000000
ArchiveRelease :
The property ArchiveDatabase contains the name of the database where the archive is stored. ArchiveGuid identifies the in-place archive mailbox. The quota settings are inherited from the default values of the hosting database and they limit the amount of information stored in the archive as well as when a warning is generated. ArchiveDomain contains the SMTP domain of the tenant hosting the archive and it is set when using an Exchange Online Archive, for example; for on-premises, this property remains blank.
ArchiveStatus indicates the status of the archive and can be set to None or Active; the latter is used to indicate when the Exchange Online Archive is ready. The property ArchiveState indicates the state of the archive and can be Hosted Pending, Hosted Provisioned, Local, None, or On Premise. When an archive is disabled, the DisabledArchiveGuid will contain the value of the disabled archive. For on-premises archives, ArchiveDatabase will contain the name of the mailbox database hosting the disabled archive.
![]() Caution If you enable a primary mailbox for an in-place archive on premises, it will create a new archive. If you want to reuse a formerly disabled archive, see the section on reconnecting in-place archives.
Caution If you enable a primary mailbox for an in-place archive on premises, it will create a new archive. If you want to reuse a formerly disabled archive, see the section on reconnecting in-place archives.
When you have added an in-place archive to a mailbox, the Autodiscover response will contain an additional alternative mailbox section that provides information to the client, such as that there is an in-place archive configured for this mailbox. The client can leverage Autodiscover to connect to the in-place archive. Because the information is contained in the initial Autodiscover response, no additional configuration is required on the client, and the archive will automatically be configured and added onto the supported clients, as shown in Figure 9-3.
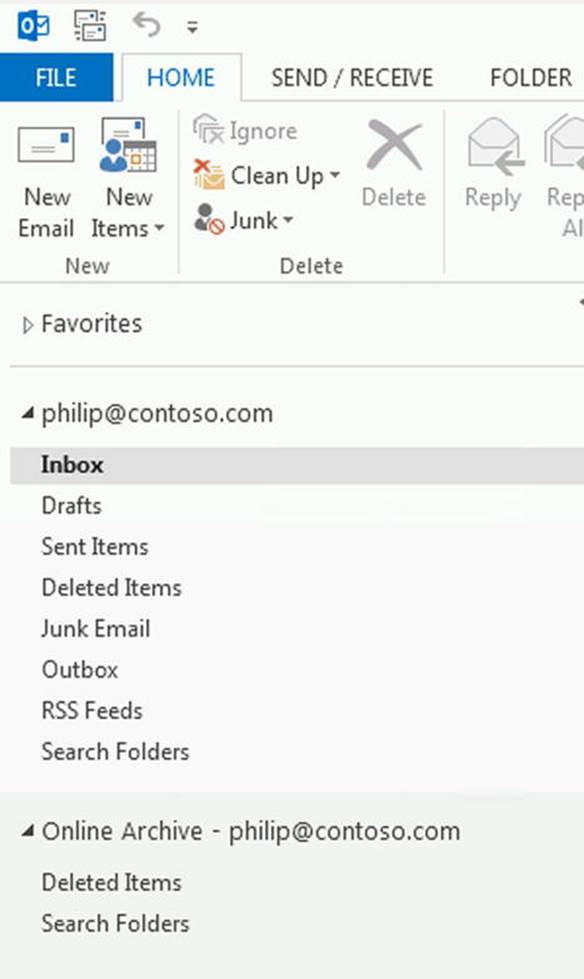
Figure 9-3. Outlook client with in-place archive configured
For example, in the excerpt of the Autodiscover response shown in Figure 9-4, you can see that there is an additional mailbox of type Archive configured, which has the identity shown at the LegacyDN attribute and is accessible through the provided Server attribute.
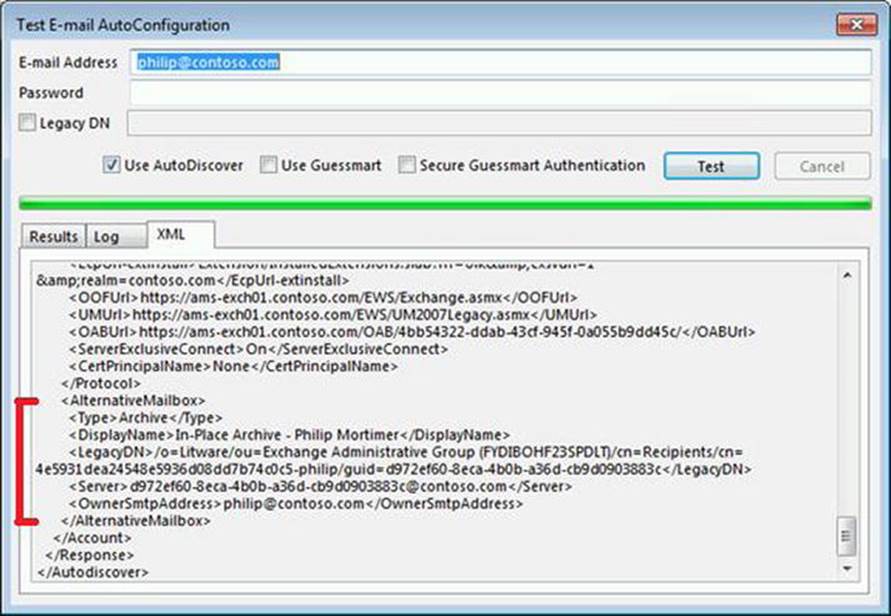
Figure 9-4. Autodiscover in-place archive alternative mailbox section
Disabling In-Place Archives
To disconnect an archive from the primary mailbox, use the Disable-Mailbox cmdlet in conjunction with the Archive parameter. For example, to disable the archive for the mailbox of Philip, use the following command:
Disable-Mailbox –Identity Philip –Archive
![]() Note Disconnected in-place archives follow the same deleted mailbox retention settings as their primary mailboxes. By default this means that they will be removed from the mailbox database after 30 days.
Note Disconnected in-place archives follow the same deleted mailbox retention settings as their primary mailboxes. By default this means that they will be removed from the mailbox database after 30 days.
Reconnecting In-Place Archives
Just as when you disable a mailbox, the mailbox doesn’t get deleted but it does get disconnected. This means the user object is stripped of its in-place archive–related properties and the in-place archive is retained in the mailbox database until the mailbox retention expires; after that, it is physically removed from the database.
![]() Note If you want to reconnect a disabled Exchange Online Archive, just enable the Exchange Online Archive for the primary mailbox.
Note If you want to reconnect a disabled Exchange Online Archive, just enable the Exchange Online Archive for the primary mailbox.
As with mailboxes, you can reconnect a disabled on-premises archive to a mailbox-enabled user, and this will be the original primary mailbox. To get a list of all disconnected in-place archives, use the following command:
Get-MailboxDatabase | Get-MailboxStatistics | Where {$_.DisconnectDate –and $_.IsArchiveMailbox}
To connect an on-premises archive to its original primary mailbox, use the Connect-Mailbox cmdlet in conjunction with the Archive parameter; for example:
Connect-Mailbox –Identity d972ef60-8eca-4b0b-a36d-cb9d0903883c –Archive –User Philip –Database MDB2
Checking and Modifying in-Place Archive Quotas
Primary mailboxes and their related in-place archives can have different quota settings. You can query the in-place archive quota settings for all mailboxes by using the following command, receiving results as shown in Figure 9-5:
Get-Mailbox –Archive | fl Name, Archive*Quota

Figure 9-5. In-place archive quota settings
You can modify the in-place archive quota settings using Set-Mailbox; for example,
Set-Mailbox –Identity Philip –ArchiveQuota 200GB –ArchiveWarningQuota 190GB
Relocating the in-Place Archives
Since Exchange Server 2010 SP1, the primary mailbox and the archive don’t need to be hosted in the same mailbox database. This means you can have dedicated mailbox servers for hosting primary mailboxes and for hosting archives.
When you want to relocate only the in-place archives to a different database, you can utilize the New-MoveRequest cmdlet in conjunction with the ArchiveOnly parameter. In addition, you can use the ArchiveTargetDatabase parameter to specify the target database for the in-place archives. For example, to relocate all the in-place archives to a database called MDB2, you use the following command:
Get-Mailbox –Archive | New-MoveRequest –ArchiveOnly –ArchiveTargetDatabase MDB2
Don’t forget to clean up your move requests when the archives have been moved successfully; you do this by using this command:
Get-MoveRequest | Where {$_.Status –eq 'Completed'} | Remove-MoveRequest
Exporting and Exporting in-Place Archives
Should you need to physically move the contents of an in-place archive to a different mailbox, you can opt to export and import the information. To export or import mailbox contents, you first need to have the mailbox import/export management role. You can use the Exchange Admin Center to assign this role or you can use the following command:
New-ManagementRoleAssignment –Role 'Mailbox Import Export' –User Administrator
Next, you create a network share for hosting the .PST files. (Exporting and importing require a network share because it is undetermined which Exchange server will ultimately handle the import or export request in a multi-Exchange server environment.) You make sure the Exchange Trusted Subsystem has read/write permissions.
Then, to export the contents in an in-place archive, you use New-MailboxExportRequest in conjunction with the –IsArchive parameter, and use –FilePath to specify the full UNC filename of the .PST file; for example,
New-MailboxExportRequest –Mailbox Philip –FilePath '\\AMS-FS01\PST\Philip_Archive.pst' -IsArchive
To import the contents in a subfolder, you use TargetRootFolder; for example,
New-MailboxImportRequest –Mailbox Philip –FilePath '\\AMS-FS01\PST\Philip_Archive.pst' –IsArchive –TargetRootFolder 'Imported Archive'
When you’re finished, you can remove the import and export requests using Remove-MailboxExportRequest and Remove-MailboxImportRequest.
In-Place eDiscovery
Electronic discovery, or eDiscovery, refers to the discovery or the ability to discover exchange of information. Exchange Server 2010 introduced multi-mailbox search and legal hold, which were features to discover organization-wide contents of mailboxes or to freeze mailbox contents and record changes for legal purposes. Both features are renamed in Exchange Server 2013: multi-mailbox search has become in-place eDiscovery, and legal hold is now known as in-place hold (there’s more on in-place hold later in this chapter).
Early versions of Exchange did not contain such features and had no options to retain deleted information, let alone retain changed information. If Exchange administrators were requested to provide mailbox information for a certain period, that would most certainly result in having to restore mailbox backups and to extract the requested information.
![]() Caution When you are in a co-existence scenario of Exchange Server 2013 with Exchange Server 2010, you need to move the system mailbox to Exchange Server 2013. If you do not, you will not be able to perform eDiscovery searches, as eDiscovery also stores configuration information in the system mailbox.
Caution When you are in a co-existence scenario of Exchange Server 2013 with Exchange Server 2010, you need to move the system mailbox to Exchange Server 2013. If you do not, you will not be able to perform eDiscovery searches, as eDiscovery also stores configuration information in the system mailbox.
Management of In-Place eDiscovery
In-place eDiscovery of information stored in Exchange and management of in-place hold on mailboxes are secure processes dealing with potentially confidential information, and thus they are subject to privacy legislation. To be able to create eDiscovery searches, the user needs to be a member of the RBAC role group Discovery Management. This group is empty by default.
![]() Note To be able to create in-place eDiscovery searches, the user needs to be member of the Discovery Management role group.
Note To be able to create in-place eDiscovery searches, the user needs to be member of the Discovery Management role group.
To manage the Discovery Management role group using the Exchange Admin Center, you follow these steps, as shown in Figure 9-6:
1. Open up the Exchange Admin Center.
2. Navigate to Permissions ![]() Admin Roles.
Admin Roles.
3. Select Discovery Management.
4. Select the Edit icon to add or remove members to the role group.
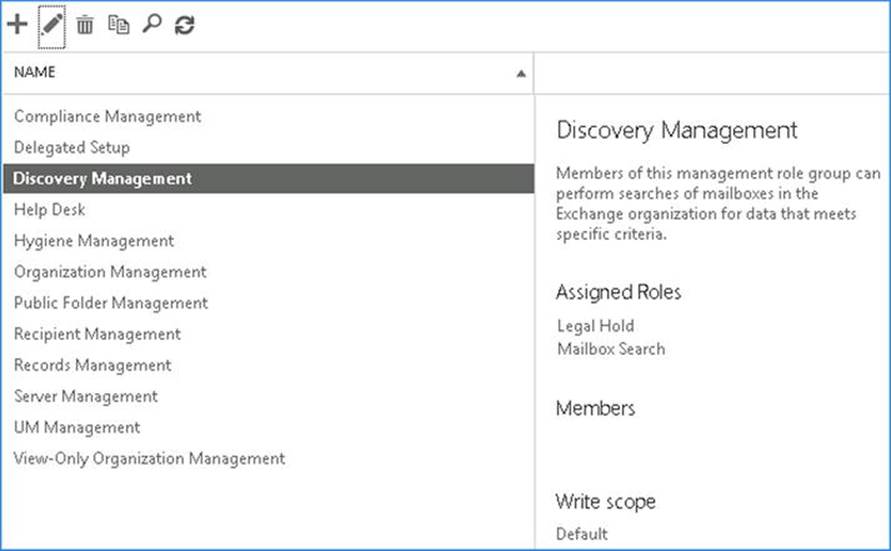
Figure 9-6. Manage the Discovery Management role group using EAC
To use the Exchange Management Shell to add users to the Discover Management group, so as to perform eDiscovery searches or put mailboxes on in-place hold, you use the following command (where Philip is the identity of the user you want to be able to create eDiscovery searches):
Add-RoleGroupMember –Identity 'Discovery Management' –Member Philip
To list the current members of the Discovery Management role group, you use:
Get-RoleGroupMember –Identity 'Discovery Management'
When the investigation is over, do not forget to remove the user from the role group, as follows:
Remove-RoleGroupMember –Identity 'Discovery Management' –Member Philip
Discovery Mailbox
A discovery mailbox is a mailbox that can be used for storing contents retrieved as part of an in-place eDiscovery search. During setup, Exchange Server 2013 creates a default discovery mailbox whose name starts with DiscoverySearchMailbox followed by a GUID. You can create additional discovery mailboxes when you need them—for example, to support multiple searches. Because they are like ordinary mailboxes, you can remove a discovery mailbox when it no longer serves a purpose.
To create a discovery mailbox, you use New-Mailbox in conjunction with the discovery switch; for example,
New-Mailbox DiscoveryBox1 –Discovery –UserPrincipalName discoverybox1@contoso.com

Figure 9-7. Creating a discovery mailbox
To list the currently known discovery mailboxes, you use Get-Mailbox and filter on RecipientTypeDetails:
Get-Mailbox | Where {$_.RecipientTypeDetails –eq 'DiscoveryMailbox'}
![]() Note Discovery mailboxes by default have a fixed mailbox quota of 50 GB and so they might fill up easily, depending on the underlying query. Be sure to properly manage the storage used by these large discovery mailboxes.
Note Discovery mailboxes by default have a fixed mailbox quota of 50 GB and so they might fill up easily, depending on the underlying query. Be sure to properly manage the storage used by these large discovery mailboxes.
Searching Mailboxes
To define a discovery search from the Exchange Admin Center, you do the following:
1. Open up the Exchange Admin Center.
2. Navigate to Compliance Management ![]() In-Place eDiscovery & Hold.
In-Place eDiscovery & Hold.
3. Select New.
4. Enter a name and optionally a description, and select Next.
5. Select Search All Mailboxes to perform an organization-wide discovery on all mailboxes or specify the mailboxes to search and select Next.
6. Choose whether you want to search all content or enter search criteria, such as keywords or a specific date range. When you’re finished entering the criteria, select Next.
7. Select Finish to save the discovery search.
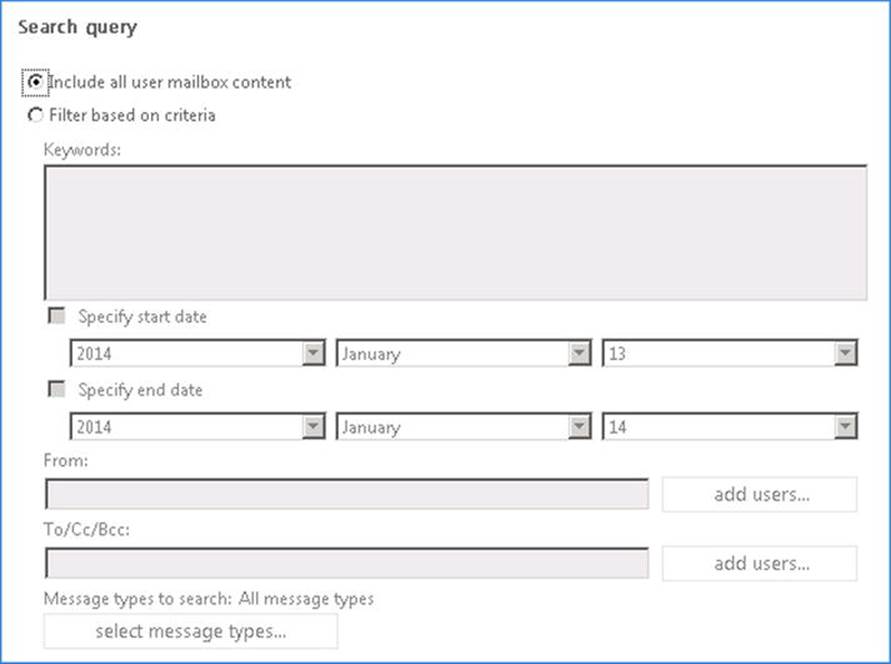
Figure 9-8. Search query for new in-place discovery and in-place hold
![]() Tip When specifying search query keywords, you can use “and” or “or” Boolean operators to construct queries using multiple keywords. For example, to search for fabrikam and options, enter FABRIKAM AND OPTIONS. To influence the evaluation order, you can use parentheses—that is, X AND Y OR Z is not the same as X AND (Y OR Z). To include spaces in a search string, put the string in quotes—for example, “WINGTIP TOYS.” To look for words in each other’s vicinity, you can use the NEAR(N), where N is the number of words before or after to take into account—for example, FABRIKAM NEAR(5) OPTIONS. Finally, you can use asterisk (*) for wildcard matching—for example, CON* matches words starting with CON (e.g., consultant, connection, construction).
Tip When specifying search query keywords, you can use “and” or “or” Boolean operators to construct queries using multiple keywords. For example, to search for fabrikam and options, enter FABRIKAM AND OPTIONS. To influence the evaluation order, you can use parentheses—that is, X AND Y OR Z is not the same as X AND (Y OR Z). To include spaces in a search string, put the string in quotes—for example, “WINGTIP TOYS.” To look for words in each other’s vicinity, you can use the NEAR(N), where N is the number of words before or after to take into account—for example, FABRIKAM NEAR(5) OPTIONS. Finally, you can use asterisk (*) for wildcard matching—for example, CON* matches words starting with CON (e.g., consultant, connection, construction).
After defining the discovery search criteria, the results will be shown in the in-place discovery and hold section. Exchange will then start to estimate the amount of data and number of unsearchable items. Note that the query will only be activated when you view or export the results, meaning the query will also return items added after the discovery search was created.
![]() Note Unsearchable items are items that can’t be or are not indexed because of unrecognized, nonindexed file types or encryption. IRM protected messages can be indexed.
Note Unsearchable items are items that can’t be or are not indexed because of unrecognized, nonindexed file types or encryption. IRM protected messages can be indexed.
After defining the discovery search, you have the following options:
1. Update the search results figures, such as the amount of data and the number of items.
2. Preview the search results on-screen.
3. Copy the search results to a discovery mailbox. Besides the option to exclude unsearchable items, you can cancel duplicate items so as to have items only returned once, even if they match multiple criteria. Also, you can have Exchange send you an email with a summary of the results.
4. Export the discovered items to a .PST file. This option can be useful if you need to ship the information to third parties.
Of course, you can also utilize the Exchange Management Shell to perform discovery searches using the New-MailboxSearch cmdlet. When using New-MailboxSearch to perform discovery searches, you have the following parameter options:
· Name to set the name of the search.
· EndDate to set the end of the search time span.
· StartDate to set the start of the search time span.
· EstimateOnly to indicate you only want an estimate of the number of items.
· ExcludeDuplicateMessages to remove duplicates items from the results.
· IncludeUnsearchableItems to include include items not indexed by Exchange Search.
· LogLevel to set the level of logging; options are Supress, Basic, or Full.
· MessageTypes to limit the search to a specific message type. Valid options are Email, Meetings, Tasks, Notes, Docs, Journals, Contacts, and IM. When omitted, all items are searched.
· Recipients to limit the search to certain recipients (examines TO, CC, and BCC fields).
· SearchQuery to specify terms to search for.
· Senders to limit the search to certain senders (FROM).
· SourceMailboxes to specify the mailboxes to be searched.
· StatusMailRecipients to specify users who should receive status reports.
· TargetMailbox to set the mailbox that should receive a copy of the search results.
![]() Note When a start date or end date is specified, it is matched against the receive date or creation date (depending on the item type) of discovered items.
Note When a start date or end date is specified, it is matched against the receive date or creation date (depending on the item type) of discovered items.
For example, to create a discovery search titled DiscoverySearch1 for all mailboxes on items received or created between January 1, 2013, and December 31, 2013, of type Email, with the keyword fabrikam and the destination set to DiscoveryBox1, you use the following command:
New-MailboxSearch DiscoverySearch1 –StartDate 1/1/2013 –EndDate 12/31/2013 –TargetMailbox 'DiscoveryBox1' –SearchQuery 'FABRIKAM' –MessageTypes Email

Figure 9-9. Creating a new discovery search using New-MailboxSearch
To get a list of your current discovery search entries, you use the Get-MailboxSearch cmdlet. To run a discovery search, use Start-MailboxSearch. When you have selected to copy the discovered data to a discovery mailbox, you start the mailbox search, which clears any existing results for that specific mailbox search from that discovery mailbox, as follows:
Start-MailboxSearch -Identity DiscoverySearch1
![]() Note You cannot change the properties of a running discovery search; to do that, you need to restart the search by using Stop/Resume in EAC or by using the cmdlets Stop-MailboxSearch and Start-MailboxSearch.
Note You cannot change the properties of a running discovery search; to do that, you need to restart the search by using Stop/Resume in EAC or by using the cmdlets Stop-MailboxSearch and Start-MailboxSearch.
To modify a discovery search, you use Set-MailboxSearch; for example,
Set-MailboxSearch -Identity DiscoverySearch1 –StatusMailRecipients philip@contoso.com
When the search is finished, the configured StatusMailRecipients will receive a status report, which will look similar to what is shown in Figure 9-10.
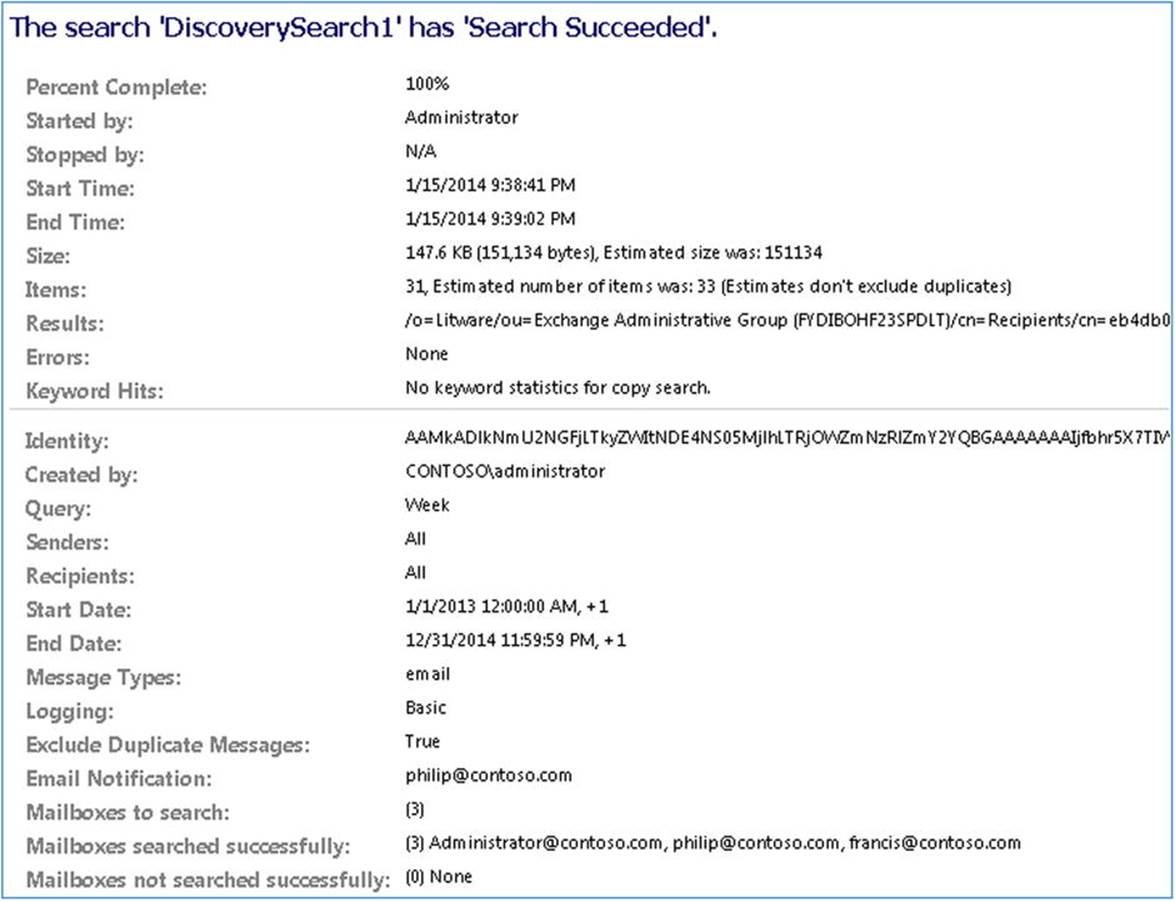
Figure 9-10. In-place eDiscovery search report
When you explore a discovery mailbox, you’ll notice the discovered data is stored in a folder named after the discovery search.
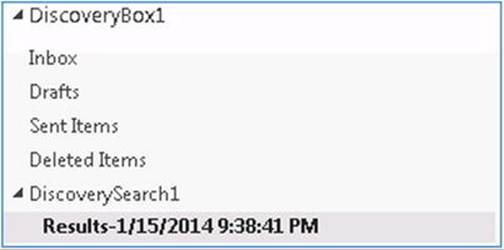
Figure 9-11. Contents of in-place eDiscovery folder
While the search is running, you will notice a folder named <SEARCH NAME>.Working. This folder is used to temporarily store the search results and will be renamed after the search is finished.
Finally, you have the option to delete the contents from mailboxes using discovery search. For this purpose, you can use Search-Mailbox with the DeleteContent parameter; for example,
Search-Mailbox –Identity DiscoverySearch1 -DeleteContent
To preview the information that would potentially be deleted, you can first use Search-Mailbox with the LogOnly parameter. Be advised that the in-place eDiscovery search process is throttled, and by default is subject to the following limitations:
· The maximum number of concurrent searches per user is two (DiscoveryMaxConcurrency).
· The maximum number of mailboxes searches per discovery is 5,000 (DiscoveryMaxMailboxes).
· The maximum number of keywords per search is 500 (DiscoveryMaxKeywords).
· The maximum number of items displayed per page in preview is 200 (DiscoveryMaxSearchResultsPageSize).
· The maximum running time of a search before it times out is 10 minutes (DiscoverySearchTimeoutPeriod).
Should you need to adjust these limitations, you can create a new throttling policy with the ThrottlingPolicyScope set to Organization so it applies to all users in the organization. For example, to create a custom throttling policy named OrgInPlaceDiscoveryPolicy using different limits, use the following:
New-ThrottlingPolicy –Name OrgInPlaceDiscoveryPolicy -DiscoveryMaxConcurrency 10 -DiscoveryMaxMailboxes 1000 –ThrottlingPolicyScope organization
To verify the current settings, use Get-ThrottlingPolicy; for example,
Get-ThrottlingPolicy OrgInPlaceDiscoveryPolicy | fl Discovery*
In-Place Hold
There could be circumstances when an organization needs to preserve its email records, such as for a legal investigation. It may also be necessary to freeze the contents of a mailbox, preventing it from being processed by the managed folder assistant (MFA) as part of the messaging records management (MRM) process. A possible task of the managed folder assistant is, for example, the automatic removal of items after a certain period.
To support requests to preserve mailbox information, Exchange Server 2013 contains a feature called in-place hold. (This feature was introduced with Exchange Server 2010 as litigation hold.) In-place hold allows organizations to freeze mailbox contents, prevent manual or automatic updating, and/or not remove expired items that have passed the retention period.
In-place hold integrates with in-place eDiscovery, allowing you to limit the hold items by using criteria such as keywords or senders. It is also possible to specify a time span or to search for specific item types, such as email or calendar items.
![]() Note When the managed folder assistant processes a mailbox, and it finds five or more query-based holds applying to the same mailbox, it will put the whole mailbox on in-place hold. If the number of matching queries drops below five, the MFA will revert to query-based in-place hold again.
Note When the managed folder assistant processes a mailbox, and it finds five or more query-based holds applying to the same mailbox, it will put the whole mailbox on in-place hold. If the number of matching queries drops below five, the MFA will revert to query-based in-place hold again.
Normally, when a mailbox is not on in-place hold, deleted messages are moved to the deleted items folder. When items get deleted from the deleted items folder or when the user shift-deletes the messages, those messages get moved to the recoverable items\deletions folder. This is the folder in which contents are displayed when, for example, you use the Recover Deleted Items option in Outlook. When the managed folder assistant processes the mailbox, the deleted items that had passed the retention period are purged.
When a mailbox is put on in-place hold, though, items that would normally be purged from the recoverable items\deletions folder are instead moved to the recoverable items\discoveryholds folder. These items remain there until the in-place hold is lifted.
![]() Note To use query-based in-place hold, such as queries based on sender or start time, the user requires both the Mailbox Search and the Litigation Hold management roles. Without the Mailbox Search management role, the user cannot specify the criteria and can only put whole mailboxes on in-place hold. The Discovery Management role group is assigned both these management roles.
Note To use query-based in-place hold, such as queries based on sender or start time, the user requires both the Mailbox Search and the Litigation Hold management roles. Without the Mailbox Search management role, the user cannot specify the criteria and can only put whole mailboxes on in-place hold. The Discovery Management role group is assigned both these management roles.
When a mailbox is put on in-place hold, copy-on-write is used when updating or removing messages from the mailbox. This is to preserve original copies of modified messages and to prevent tampering. Copies of original messages are stored in the recoverable items\versions folder.
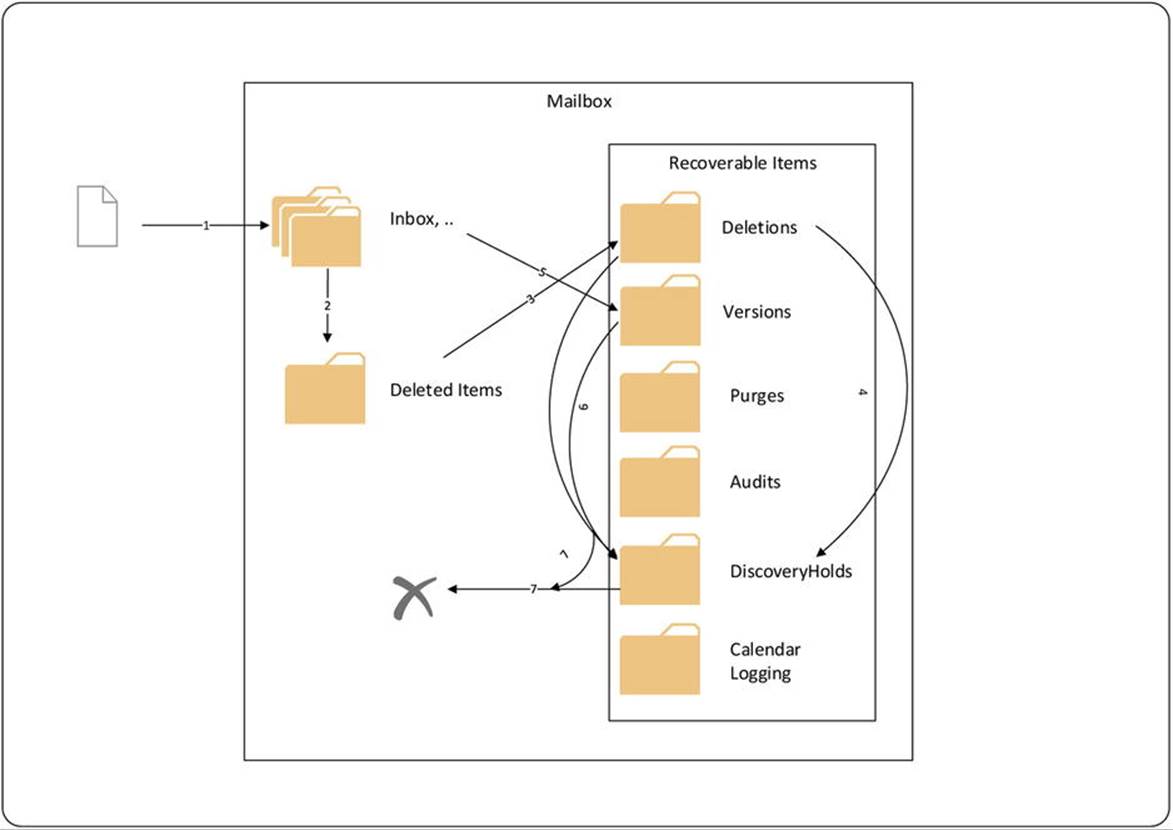
Figure 9-12. How in-place hold and copy-on-write works
Here ’s how in-place hold and copy-on-write works is as follows:
1. A message is delivered to the mailbox. The message can be stored in the inbox or any of the other folders.
2. When the user deletes a message, it is moved to the deleted items folder.
3. When the deleted items folder is emptied, the messages are removed from the deleted items folder, or the user hard-deletes a message (shift-delete), and those messages are moved to the recoverable items\deletions folder. The contents of this folder are displayed when the user selects Recover Deleted Items from Outlook or the Outlook WebApp.
4. Messages from the recoverable items\deletions folder are purged when the user removes those messages from the recoverable items folder in Outlook or Outlook Web Access. When the mailbox is on in-place hold, messages are moved to the recoverable items\discoveryholds folder instead of getting purged.
5. When the user edits a message, a copy of the original message is stored in the versions folder using copy-on-write.
6. When the mailbox is on in-place hold, expired messages from the recoverable items\deletions folder and recoverable items\versions folder are moved to the recoverable items\discoveryholds folder if they are touched by any current in-place hold query. The managed folder assistant is responsible for keeping track of messages in relation to any in-place hold queries.
7. Expired messages will be purged from the recoverable items\deletions and recoverable items\versions folders when the mailbox is no longer on in-place hold. Messages not touched by any current in-place hold query are also purged from the recoverable items\discoveryholds folder when they expire.
Not listed above is that when a user shift-deletes an item, it will go straight to the recoverable items\deletions folder.
To get a sense of how this looks under the hood, you can use tools like MFCMAPI, available from http://mfcmapi.codeplex.com. Note that to be able to view the recoverable items in MFCMAPI, you need to go to Tools ![]() Options and check the following options:
Options and check the following options:
· Use the MDB_ONLINE flag when calling OpenMsgStore
· Use the MAPI_NO_CACHE flag when calling OpenEntry
![]() Warning Low-level utilities like MFCMAPI can be powerful tools providing lots of insight, but they can also operate on the low-level structures and contents of your Exchange data and create inconsistencies or corruption. Tools like these offer great power to administrator, and consequently using them comes with great responsibility.
Warning Low-level utilities like MFCMAPI can be powerful tools providing lots of insight, but they can also operate on the low-level structures and contents of your Exchange data and create inconsistencies or corruption. Tools like these offer great power to administrator, and consequently using them comes with great responsibility.
From MFCMAPI, you can open up the mailbox via Session Logon (selecting an Outlook profile), double-click the Mailbox store entry, and expand the root container.
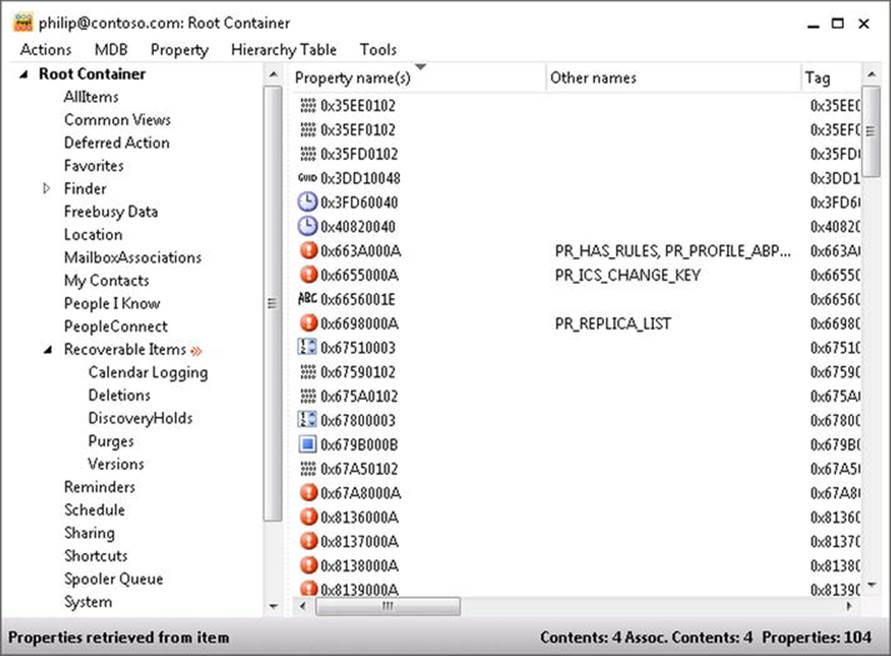
Figure 9-13. Recoverable items folder in mailbox on in-place hold
Within the recoverable items folder, you will find the actual aforementioned deletions, versions, and discoveryholds folders, among others, and you can inspect their contents.
![]() Note You can’t change messages in the versions folder; when you try to save an edited item, the save attempt will fail. You can remove messages from the versions or discoveryholds folders, but these will end up in the purges folder. Messages can’t be removed from the purges folder, thereby preventing (malicious) removal or alteration of original |messages.
Note You can’t change messages in the versions folder; when you try to save an edited item, the save attempt will fail. You can remove messages from the versions or discoveryholds folders, but these will end up in the purges folder. Messages can’t be removed from the purges folder, thereby preventing (malicious) removal or alteration of original |messages.
Enabling in-Place Hold
To define an in-place hold from the Exchange Admin Center, you perform the following steps:
1. Open up the Exchange Admin Center.
2. Navigate to Compliance Management ![]() In-Place eDiscovery & Hold.
In-Place eDiscovery & Hold.
3. Select New.
4. Enter a name and optionally a description, and select Next.
5. Select Specify to indicate which mailboxes to search. Use the + sign to add mailboxes to put on hold. When done, select Next.
6. Choose whether you want to search all content or enter some search criteria, like keywords or a specific date range. When finished entering the criteria, select Next.
7. Check Place for putting on hold the content matching the search query into the selected mailboxes. You can specify if you want to keep the records indefinitely or only for a certain number of days following message receipt or creation. Select Finish to save the query definition and activate the in-place hold.
![]() Note If an in-place archive is configured for the primary mailbox and the mailbox is put on in-place hold, the in-place hold will be applied to the in-place archive as well.
Note If an in-place archive is configured for the primary mailbox and the mailbox is put on in-place hold, the in-place hold will be applied to the in-place archive as well.
To put a mailbox on in-place hold using the Exchange Management Shell, you use the same cmdlet as you would use for in-place discovery, new-mailboxsearch, additionally specifying the parameter inplaceholdenabled while setting it to $true. Since in-place hold leverages in-place eDiscovery, you have all the query options of new-mailboxsearch at your disposal.
The simplest form of in-place hold is a mailbox hold, for which you need only specify the mailboxes to be put on hold. For example, to put the mailbox of a user named Philip on hold, use the following:
New-MailboxSearch -Name HoldQuery1 -SourceMailboxes Philip -InPlaceHoldEnabled $true
![]() Note Use of switches and Boolean parameters is not always consequent, despite serving the same purpose. For example, when you want to enable creation of an in-place archive, you specify New-Mailbox .. –Archive; but when you want to put a mailbox on hold, you need to setInPlaceHoldEnabled to $true.
Note Use of switches and Boolean parameters is not always consequent, despite serving the same purpose. For example, when you want to enable creation of an in-place archive, you specify New-Mailbox .. –Archive; but when you want to put a mailbox on hold, you need to setInPlaceHoldEnabled to $true.
The fact that a mailbox is put on hold doesn’t manifest itself in any way for the end user. If it’s required and deemed acceptable, you could send the user a notification or utilize the RetentionComment and RetentionURL mailbox settings to put a notice on the account settings section in Outlook; for example,
Set-Mailbox –Identity Philip –RetentionComment 'Your mailbox is put on In-Place Hold' –RetentionUrl 'http://intranet.contoso.com/faq/mailboxhold'
This message and its clickable URL will be displayed on the Outlook account page, as shown in Figure 9-14.
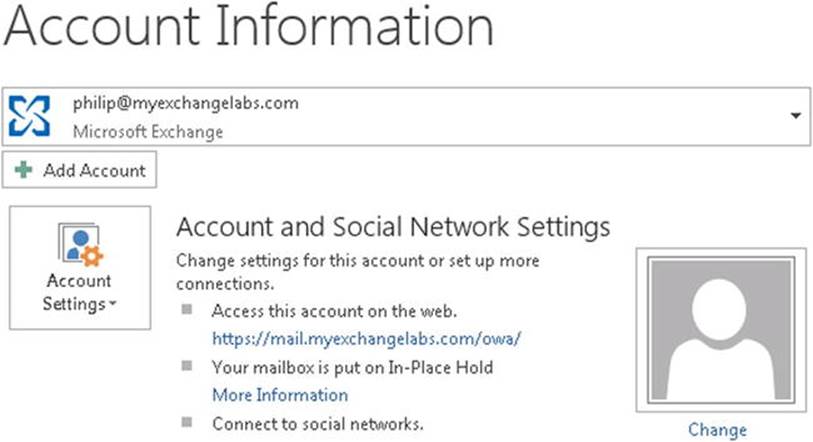
Figure 9-14. Outlook notification of in-place hold
You can clear the message by setting these properties to $null:
Set-Mailbox -Identity Philip -RetentionComment $null -RetentionUrl $null
Disabling in-Place Hold
To disable in-place hold, you set the InPlaceHoldEnabled attribute of the related in-place discovery search to $true, as follows:
Set-MailboxSearch –Name HoldQuery1 –InPlaceHoldEnabled $false
When an in-place hold is lifted, the mailbox and its messages will again fall under the applicable retention policy regime. Any messages stored in the recoverable items\versions folders as part of the in-place hold will get removed by the managed folder assistant.
![]() Caution When an in-place hold is removed, it may release messages from being placed on hold, thus possibly expiring and removing those messages if they no longer match any other current in-place hold query. After an in-place hold is lifted, the managed folder assistant purges all messages from the discoveryhold, versions, and purges folders.
Caution When an in-place hold is removed, it may release messages from being placed on hold, thus possibly expiring and removing those messages if they no longer match any other current in-place hold query. After an in-place hold is lifted, the managed folder assistant purges all messages from the discoveryhold, versions, and purges folders.
Note that this doesn’t remove the underlying search; to remove the discovery search definition, use Remove-MailboxSearch, for example,
Remove-MailboxSearch –Name HoldQuery1
Messaging Records Management
In the world of ever-growing mailbox sizes, organizations require controls to manage the volume of email stored within their corporate environments. When these mailboxes are left unmanaged and unrestricted, there could be disruption of email services and higher storage costs. Additionally, organizations may have a legal obligation to store certain electronic communications for a given period of time. This makes email management crucial in many organizations.
Messaging records management (MRM) is the feature of Exchange Server 2013 that deals with the organization and management of email by using an established set of rules. Messaging records management was introduced with Exchange Server 2010, based on its managed folders and is now known as MRM 1.0. The MRM version introduced in Exchange Server 2010 SP1 and later, and also in Exchange Server 2013, is MRM 2.0. In MRM 2.0, mailboxes are managed by definition of the retention policies that have been assigned to those mailboxes. Those retention policies consist of retention policy tags that identify the rules that could be applied to the mailbox or elements of the mailbox. A retention policy tag can be part of one or more retention policies. The retention policies are enforced by the managed folder assistant. Let’s discuss these elements next.
Retention Policy Tags
A retention policy tag defines what retention setting is to be used for a message or folder to which that tag is assigned. There are three types of retention tags:
· Default Policy Tag (DPT). This is assigned to items that do not otherwise have a tag assigned. A retention policy can have only one DPT.
· Retention Policy Tag (RPT). This tag is assigned to default well-known folders, such as inbox, deleted items, calendar, and so on.
· Personal Tag. This tag can be assigned by users using Outlook or Outlook Web Access to apply retention settings to specific items or folders.
![]() Note Personal tags are a premium feature and require an Enterprise CAL or Exchange Online Archiving License.
Note Personal tags are a premium feature and require an Enterprise CAL or Exchange Online Archiving License.
To create a retention policy tag using the EAC, you do the following:
1. Open the Exchange Admin Center.
2. Navigate to Compliance Management ![]() Retention Tags.
Retention Tags.
3. Click the + sign and select one of the following options:
· Applied automatically to entire mailbox (default) to create a default policy tag.
· Applied automatically to a default folder to create a retention policy tag.
· Applied by users to items and folders (personal) to create a personal tag.
4. Depending on type of tag you choose, you are now asked to complete the creation of the retention policy tag by providing details such as name, retention period, and action to take.
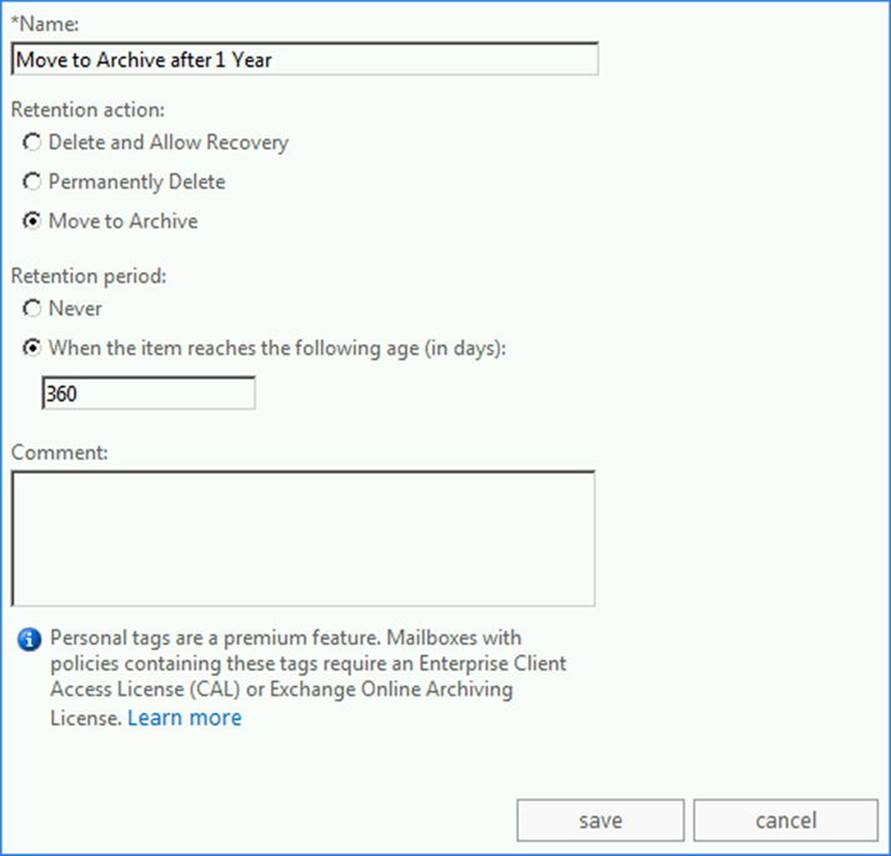
Figure 9-15. Creating a retention policy tag using EAC
To apply a retention policy to a folder or an item, you select the object in Outlook or Outlook Web Access, and right-click to select one of the Assign Policy options in the popup menu.
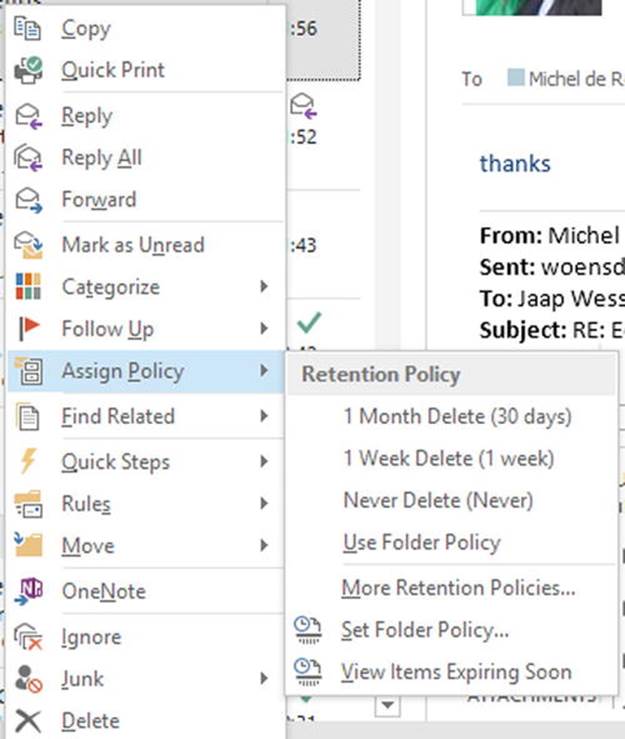
Figure 9-16. Applying a retention policy tag using Outlook
![]() Tip You also have the option to configure localized names and comments on a tag. These are picked up and displayed in Outlook when the user has matching language settings. OWA does not support localized tags or comments.
Tip You also have the option to configure localized names and comments on a tag. These are picked up and displayed in Outlook when the user has matching language settings. OWA does not support localized tags or comments.
A retention tag is defined by the following:
1. Name Identifies the tag; LocalizedRetentionPolicyTagName can be used to specify localized tag names. Use the format <LANGUAGECODE>:“Localized Name” to configure, for example, LocalizedRetentionPolicyTagName nl-NL:'Archiveren na 1 jaar'.
2. Type Defines to which items the tag applies. Valid options are:
· Well-known folders: calendar, contacts, deleted items, drafts, inbox, junk mail, journal, notes, outbox, sent items, tasks, recoverable items. Items with this tag apply to items in the corresponding mailbox folder.
· All. This tag is considered a default policy tag and items with this tag apply to all items.
· RssSubscriptions. Items with this tag apply to the mailbox folder for RSS feeds.
· SyncIssues. Items with this tag apply to the mailbox folder where synchronization issues are stored.
· ConversationHistory. Items with this tag apply to the mailbox folder where Lync IM conversations are stored.
· Personal. Items with this tag are personal tags.
3. AgeLimitForRetention Specifies the age limit after which the action defined by retention action should be performed.
4. RetentionEnabled Set to $true if the tag is enabled.
5. RetentionAction Defines the action to take when retention limit has been reached. Possible actions are:
· MarkAsPastRetentionLimit. Items with this tag are marked as passed the retention limit. This will only result in a visual clue in Outlook—that is, a notice that the item has expired will be shown and it will appear in strikethrough font.
· DeleteAndAllowRecovery. Items with this tag will be soft-deleted and moved to the deleted items folder.
· PermanentlyDelete. Items with this tag will be hard-deleted and cannot be recovered. When the mailbox is on hold, those items can be found using in-place discovery.
· MoveToArchive. Items with this tag will be move to the archive (when configured). You can use this tag only for all, personal, and recoverable item types.
6. Comment Used to specify a comment for the tag; LocalizedComment can be used to specify localized comments. Use the same format as with LocalizedRetentionPolicyTagName to create localized information.
7. MessageClass Used to limit the tag to certain items. Currently only one message class is supported: UM voice mail messages. To select these, specify MessageClass IPM.Note.Microsoft.Voicemail* as the message class. The default message class value is *, which means the tag applies to all items.
A default policy tag is created by establishing a policy tag with the All type. For example, to create a default policy tag that moves items to the archive after a year, you use the following command:
New-RetentionPolicyTag -Name 'Default 1 year move to archive' -Type All -AgeLimitForRetention 365 -RetentionAction MoveToArchive
To create a retention policy tag for a well-known folder, you specify the type. For example, to create a policy to soft-delete calendar items after two years, you use the following command:
New-RetentionPolicyTag –Name 'Delete Calendar Items after 2 year' –Type Calendar –AgeLimitForRetention 730 –RetentionAction DeleteAndAllowRecovery
To create a personal tag, you use the Personal type. For example, to create a personal tag that can be used to tag items that should never be processed for retention, you use the following command:
New-RetentionPolicyTag –Name 'Never Move to Archive' -Type Personal -RetentionEnabled $false -RetentionAction MoveToArchive
To configure a localized string for an existing policy tag, you can use Set-RetentionPolicyTag -Name '1 Week Delete' LocalizedRetentionPolicyTagName nl-NL:'Na 1 Week verwijderen'.
Assigning Personal Tags
Personal tags can be assigned by end users using Outlook 2010 or later, Outlook Web Access, or programmatically (Exchange Web Services). To assign a personal tag, you follow these steps:
1. Open up Outlook or Outlook Web Access.
2. Right-click the folder or item you want to assign a personal tag to and select Assign Policy.
3. Pick a personal tag from the list. You may also see the following options:
· Use Folder Policy, which is to revert to the folder retention policy.
· Set Folder Policy, to set the parent folder retention policy.
· View Items Expiring Soon, to show items that will expire within the next 30 days.
![]() Tip You can adjust the window of expiring items to return using a registry key. Assuming N is the number of days, for Outlook 2010, you set HKCU\Software\Policies\Microsoft\Office\14.0\Outlook\ExpiringSoon=N (DWORD); for Outlook 2013, you setHKCU\Software\Policies\Microsoft\Office\15.0\Outlook\ExpiringSoon=N (DWORD).
Tip You can adjust the window of expiring items to return using a registry key. Assuming N is the number of days, for Outlook 2010, you set HKCU\Software\Policies\Microsoft\Office\14.0\Outlook\ExpiringSoon=N (DWORD); for Outlook 2013, you setHKCU\Software\Policies\Microsoft\Office\15.0\Outlook\ExpiringSoon=N (DWORD).
You can automatically apply personal tags to items using inbox rules. For example, you can create a rule to automatically apply the “1 Year Delete” tag to electronic newsletters to have them automatically removed from your mailbox by the managed folder assistant after a year.
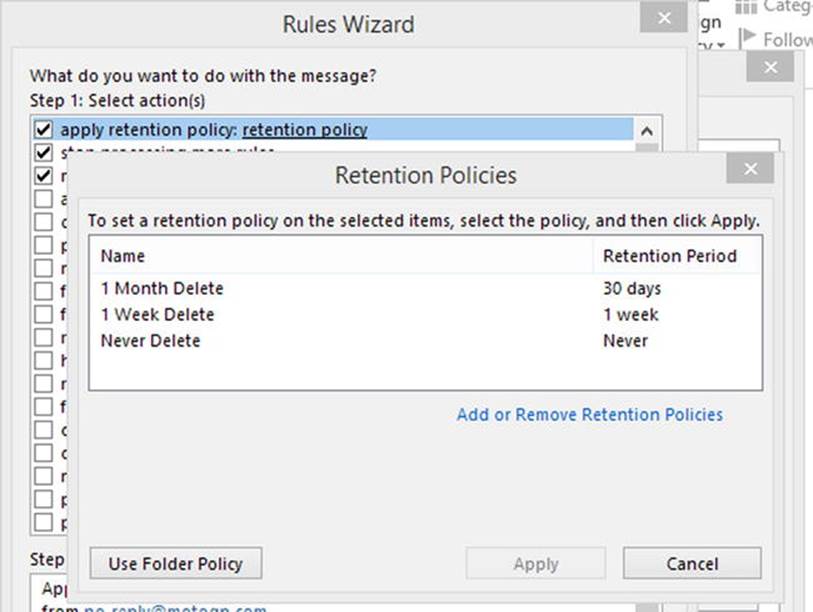
Figure 9-17. Applying retention policy tags using inbox rules
By default, the following retention tags are available:
· Default: 2 year move to archive
· Personal: 1 year move to archive, five-year move to archive, or never move to archive
· 1 Week Delete
· 1 Month Delete
· 6 Month Delete
· 1 Year Delete
· 5 Year Delete
· Never Delete
· Recoverable Items: 14 days move to archive
Understanding System Tags
The tags mentioned earlier are in fact non-system tags, which implies that there also is something called “system tags.” Indeed, system tags are used by Exchange internally for automatic management of, for example, arbitration mailboxes.
You can retrieve a list of retention tags, including system tags, by using the Get-RetentionPolicyTag including the –IncludeSystemTags parameter, as shown in Figure 9-18.
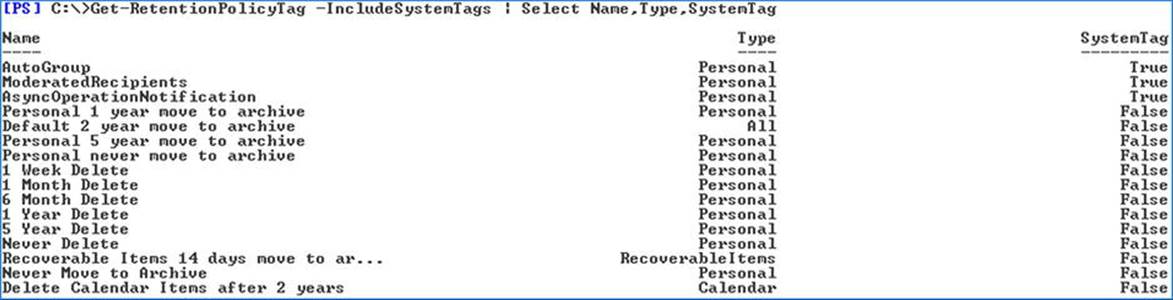
Figure 9-18. Retrieval results showing retention policy tags including system tags
System tags can be queried just like regular retention tags, as shown in Figure 9-19. It is generally recommended you leave these retention tags as is.

Figure 9-19. Retrieval of system tag properties
Retention Policies
A retention policy is a collection of retention tags assigned to a mailbox. A default policy tag is applied to the assigned mailbox overall, and a retention policy can only contain one default policy tag. Retention policies can also contain retention policy tags that are applied to the related folder in the assigned mailbox. Finally, the user of the mailbox can select those personal tags made available by assigning a retention policy containing those personal tags to that mailbox, thus explicitly overriding any existing retention settings.
In an Exchange Server 2013 deployment, by default there are two retention policies available:
· Default MRM Policy. This is the default retention policy assigned to mailboxes. Note that it contains the default two-year move to archive retention policy tag, which configures the mailbox to automatically move its contents to the in-place archive when such an archive is configured for the mailbox.
· ArbitrationMailbox. This policy is by default assigned to system mailboxes and contains, for example, the retention policy tag autogroup, which deletes items after 30 days.
To see which retention policy tags are part of a retention policy, inspect the RetentionPolicyTagLinks attribute:
Get-RetentionPolicy –Name 'Default MRM Policy' | Select RetentionPolicyTagLinks
To create a retention policy using EAC, you do the following steps:
1. Open the Exchange Admin Center.
2. Navigate to Compliance Management ![]() Retention Policies.
Retention Policies.
3. Select the + sign.
4. In the new retention policy dialog, enter the name of the policy to create. In the retention tags section, use the + and – signs to add or remove retention tags.
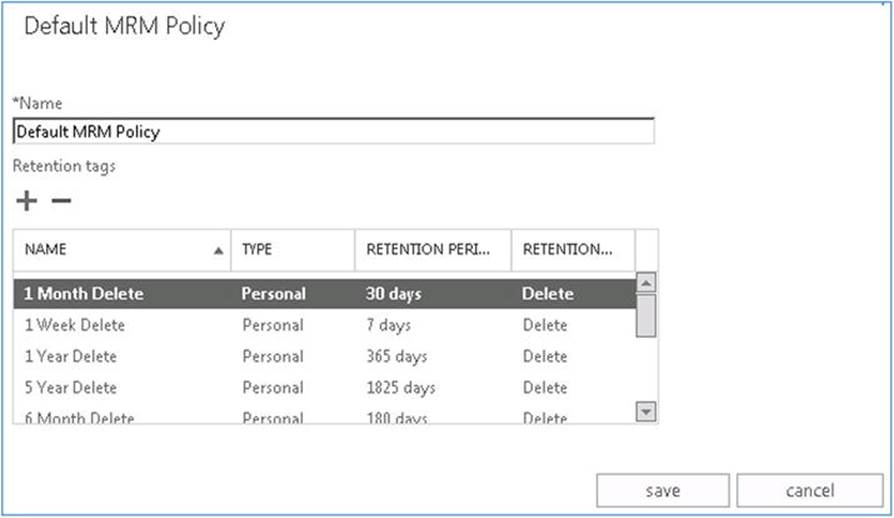
Figure 9-20. Creating a retention policy
To create a new retention policy using the Exchange Management Shell, use New-RetentionPolicy and provide retention policy tags as a parameter, separating tags using a comma (thus, providing the tags as an array), as follows:
New-RetentionPolicy –Name 'Contoso MRM Policy' –RetentionPolicyTagLinks 'Default 1 year move to archive','Never Delete'
To add a retention policy tag to a retention policy, you need to add it as an element:
Set-RetentionPolicy –Name 'Contoso MRM Policy' –RetentionPolicyTagLinks @{Add='1 Week Delete'}
Should you need to remove a retention policy tag from a retention policy, you can remove the element:
Set-RetentionPolicy –Name 'Contoso MRM Policy' –RetentionPolicyTagLinks @{Remove='1 Week Delete'}
![]() Warning Don’t use Set-RetentionPolicy “Contoso MRM Policy”–RetentionPolicyTagLinks “1 Week Delete,” as this would overwrite any current retention policy tags entries with the value specified.
Warning Don’t use Set-RetentionPolicy “Contoso MRM Policy”–RetentionPolicyTagLinks “1 Week Delete,” as this would overwrite any current retention policy tags entries with the value specified.
Assigning a Retention Policy
For a retention policy and its tags to become effective or available in case of personal tags, it needs to be assigned to a mailbox. To assign a retention policy to a mailbox using EAC, you do the following steps:
1. Open the Exchange Admin Center.
2. Navigate to Recipients ![]() Mailboxes.
Mailboxes.
3. Select the mailbox you want to assign a retention policy to and click the Edit icon.
4. Select the Mailbox Features section.
5. Select the desired retention policy in the dropdown listbox of the same name.
6. Click Save to save the new setting.
![]() Tip If you select multiple mailboxes, you can use the Bulk Edit option. Select More Options. . . and click Update below the Retention Policy heading. You will then see a dialog where you can pick a retention policy that you want to apply to the mailboxes you have selected.
Tip If you select multiple mailboxes, you can use the Bulk Edit option. Select More Options. . . and click Update below the Retention Policy heading. You will then see a dialog where you can pick a retention policy that you want to apply to the mailboxes you have selected.
When using the Exchange Management Shell, the Set-Mailbox cmdlet is used to configure a retention policy. For example, to apply the Contoso MRM Policy retention policy to Philip’s mailbox, you enter:
Set-Mailbox –Identity Philip –RetentionPolicy 'Contoso MRM Policy'
If you want to assign the retention policy to a certain group of people, you can utilize PowerShell’s ability to pipe objects to Set-Mailbox. For example, if you want to clear retention policy on smailboxes starting with P, you assign each onethe retention policy value $null, as follows:
Get-Mailbox –Identity P* | Set-Mailbox–RetentionPolicy $null
Managed Folder Assistant
The managed folder assistant (MFA) is responsible for enforcing retention policies on items in mailboxes. It is a background process that checks items in each mailbox it processes against the policy that has been configured on the mailbox (dpt), folder (rpt), and personal tags level. The process is throttled to limit the number of resources and cycles consumed.
You can monitor MFA activity by looking in the application event log for Event ID 9018, generated by the MSExchange mailbox assistants. It will mention what database was processed by the MFA, how many mailboxes were processed, and how long it took. If the MFA couldn’t complete a work cycle, it will also mention how many mailboxes couldn’t be processed.
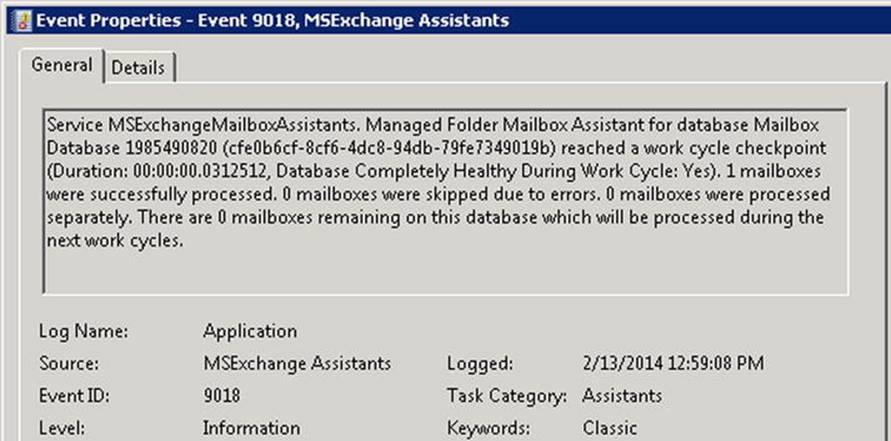
Figure 9-21. Managed folder mailbox assistant work cycle log
![]() Note The managed folder assistant will resume processing where it left off, so there’s no problem if the MFA can’t complete a work cycle at a particular time. However, retention policy application and executing retention policy actions might be delayed for unprocessed mailboxes.
Note The managed folder assistant will resume processing where it left off, so there’s no problem if the MFA can’t complete a work cycle at a particular time. However, retention policy application and executing retention policy actions might be delayed for unprocessed mailboxes.
By default, the MFA is configured to process mailboxes continuously. This behavior can be overridden by setting the ManagedFolderAssistantSchedule parameter using the Set-MailboxServer cmdlet. If you want to limit the running time of MFA during which it applies retention policies to folders, you configure ManagedFolderAssistantSchedule. You can use the following values when configuring those start and stopping times:
· Full or abbreviated name of the day.
· Integer representing day number, where 0=Sunday and 6=Saturday.
· Format is DD.HH:MM-DD.HH:MM, where DD=day, HH=hours, MM=minutes.
· Specify multiple entries separated by a comma.
There must be a minimum of 15 minutes between the stop and start times.
You can also customize the interval after which the MFA should check for new mailboxes to process. The default is one day, but there might be circumstances when you would like to change this interval. You can do so by means of adjusting the ManagedFolderWorkCycleCheckpoint setting.
For example, to configure the MFA to run each work day from 2 AM until 6 AM and check for new mailboxes every other day, you would use the following command:
Set-MailboxServer -ManagedFolderAssistantSchedule 'Mon.2:00 AM-Mon.6:00 AM', 'Tue.2:00 AM-Tue.6:00 AM','Wed.2:00 AM-Wed.6:00 AM', 'Thu.2:00 AM-Thu.6:00 AM', 'Fri.2:00 AM-Fri.6:00 AM' –ManagedFolderWorkCycleCheckpoint 2.00:00:00
In addition, you can configure the MFA to use a different schedule for processing mailboxes. This is configured on a per-server basis using the Set-MailboxServer cmdlet with the ManagedFolderWorkCycle parameter. For example, to configure the MFA on server AMS-EXCH01 to process mailboxes every seven days, use Set-MailboxServer with the ManagedFolderWorkCycle parameter:
Set-MailboxServer AMS-EXCH01 –ManagedFolderWorkCycle 7
![]() Note ManagedFolderWorkcCycle and ManagedFolderWorkCycleCheckpoint are specified as time span parameters that should be in the format dd.hh:mm:ss, where dd=days, hh=hours, mm=minutes, and ss=seconds. However, input is flexible so you can also set the daily interval by specifying the number of days or an interval of a number of hours, <hours>:00:00.
Note ManagedFolderWorkcCycle and ManagedFolderWorkCycleCheckpoint are specified as time span parameters that should be in the format dd.hh:mm:ss, where dd=days, hh=hours, mm=minutes, and ss=seconds. However, input is flexible so you can also set the daily interval by specifying the number of days or an interval of a number of hours, <hours>:00:00.
Needless to say, adjusting the work cycle will impact the frequency of which retention policies are checked and enforced on mailboxes hosted on the mailbox server with the adjusted ManagedFolderWorkCycle setting.
You can also manually start the MFA to perform a work cycle. To manually trigger the MFA, use the Start-ManagedFolderAssistant and specify the mailbox you want the MFA to run against. For example, to run the MFA for Philip’s mailbox, you would use the following command:
Start-ManagedFolderAssistant –Identity Philip
Transport Rules
One of the critical components in an Exchange infrastructure is the transport service, which is responsible for processing messages traveling within or entering or leaving an Exchange organization. In Exchange Server 2007, the Hub Transport server role was introduced to transport messages, accompanied by the optional Edge Transport server for handling messages entering or leaving the organization. In Exchange Server 2013, the Hub Transport functionality is split between the Front End Transport service, hosted on the Client Access server, and the Transport service, which is hosted on the Mailbox Server.
Part of an organization’s compliance and security requirements could be that messages transported within the organization or messages entering or leaving the Exchange infrastructure must comply with certain rules. Here is where the Exchange transport rules can come into play. An example of such a restriction is an ethical wall, also known as a Chinese wall, whose purpose is to prevent conflict of interest and disclosure of valuable information.
![]() Note Transport rules can be used to accomplish lots of other goals as well, such as adding disclaimers. They are building blocks for features like data loss prevention and information rights management. If you’re interested in these areas, consider employing the transport rules to achieve your ends.
Note Transport rules can be used to accomplish lots of other goals as well, such as adding disclaimers. They are building blocks for features like data loss prevention and information rights management. If you’re interested in these areas, consider employing the transport rules to achieve your ends.
Basically, transport rules are rules that define operations for messages that satisfy certain conditions. Examples of such rules are dropping or redirecting messages or applying information rights management templates. To manage transport rules you need to be assigned an Organization Management or Records Management role. Transport rules are organization-wide unless their specific conditions narrow the scope, and they are processed by the transport rule agent.
Creating a Transport Rule
Let’s assume you’re working for a law firm where lawyers representing client A (distribution list RepCaseAClientA) may not exchange messages with lawyers representing client B (distribution list RepCaseAClientB). So, you want to create an ethical wall between the users in those groups via a transport rule. To create a transport rule using EAC, you do the following:
1. Open the Exchange Admin Center.
2. Navigate to Mail Flow ![]() Rules
Rules
3. Select the + sign and select Create a New Rule from the popup menu to create a transport rule from scratch.
4. Enter a name—for example, EW_CaseAClientAClientB.
5. Configure the predicate: “Apply this rule if. . .” as “The sender and the recipient . . . the message is between members of these groups,” selecting RepCaseAClientA and RepCaseAClientB.
6. Configure: “Do the following” as “Block the message. . .” as “Reject the message with an explanation and enter a message to return to the sender.” Note that the message will be returned in a delivery service notification (DSN) message using a default return code of 5.7.1, a common code for access-denied types of DSN messages.
7. Optionally, configure: “Audit this rule with severity level” if you want to generate audit log entries when the rule is triggered.
8. Click Save to save and activate the rule.
To create a transport rule using the Exchange Management Shell, use the New-TransportRule cmdlet. For example, to institute the same transport rule, use the following command:
New-TransportRule -Name 'EW_ EW_CaseAClientAClientB' -BetweenMemberOf1 RepCaseAClientA -BetweenMemberOf2 RepCaseAClientB –RejectMessageReasonText 'Communications between reps of ClientA and ClientB restricted' -Mode Enforce
By using the RejectMessageEnhancedStatusCode parameter, you can override the default DSN status code of 5.7.1 for rejected messages.
![]() Caution Transport rules are stored in Active Directory. Therefore, you may experience delays when implementing changes and you should consider replication latency before those changes will be propagated to Mailbox servers throughout organization.
Caution Transport rules are stored in Active Directory. Therefore, you may experience delays when implementing changes and you should consider replication latency before those changes will be propagated to Mailbox servers throughout organization.
When a user in one group tries to send a message to a member in the other group, he will receive a 5.7.1 delivery service notification message indicating failure. The explanation will be shown and the diagnostic information will indicate that a transport rule has governed rejection of the message, as shown in Figure 9-22.
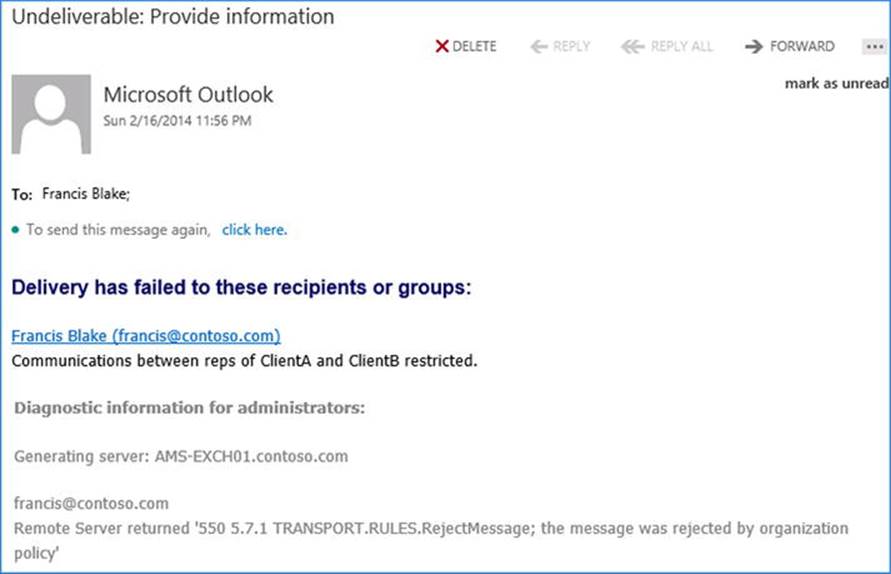
Figure 9-22. Notification message of ethical wall delivery service
Another example of using transport rules for compliance is with regard to a corporate disclaimer. For such disclaimers, you can select to have the disclaimer applied only to messages sent outside of the organization. To accomplish this, you use the scope NotInOrganization(displayed in EAC as Outside the organization. Possible scope options for sender (FromUserScope) or receiver (SendToScope) are:
· InTheOrganization. The sender or receiver is located in Active Directory or the domain name is an accepted, non-external relay domain name using an authenticated connection.
· NotInTheOrganization. The domain name of the sender or receiver isn’t an accepted domain or is an external relay accepted domain.
· ExternalPartner (ToUserScope only). The domain name of the receiver is configured to use a domain secure security setting.
· ExternalNonPartner (ToUserScope only). The domain name of the receiver is not using a domain secure security setting.
A complication with disclaimers is that inserting text in the body of a message may invalidate any signed or encrypted messages. Because only a signed or encrypted message can be excluded (not both), you can leverage the Exchange message classification to tag the message, using transport rules to tag that encrypted or signed message. In the disclaimer transport rule, you can then select to not apply the rule to tagged messages.
![]() Note If your company policy is to disallow sending signed or encrypted messages externally, you can replace the action of adding the disclaimer by an action that will drop the message, quarantine it, or forward it for moderation.
Note If your company policy is to disallow sending signed or encrypted messages externally, you can replace the action of adding the disclaimer by an action that will drop the message, quarantine it, or forward it for moderation.
Message classifications can only be created from the Exchange Management Shell, using the New-MessageClassification. In this example, you would use the label SignedOrEncrypted, as follows:
New-MessageClassification 'SignedOrEncrypted' –DisplayName 'Signed or Encrypted Message' –SenderDescription 'Signed or Encrypted Message' –PermissionMenuVisible:$false
![]() Note PermissionMenuVisible determines if the message classification can be assigned to messages in Outlook or Outlook Web App. Setting this parameter to $false disables this option.
Note PermissionMenuVisible determines if the message classification can be assigned to messages in Outlook or Outlook Web App. Setting this parameter to $false disables this option.
You create the transport rules that will tag messages using this message classification. First, you create a transport rule that applies the message classification SignedOrEncrypted (ApplyClassification) to encrypted messages (MessageTypeMatches “Encrypted”), as follows:
New-TransportRule -Name 'Tag Encrypted Messages' –Enabled $true –MessageTypeMatches 'Encrypted' –ApplyClassification 'SignedOrEncrypted'
Next, you create a transport rule that applies the message classification SignedOrEncrypted to signed messages (MessageTypeMatches “Signed”), as follows:
New-TransportRule –Name 'Tag Signed Messages' –Enabled $true –MessageTypeMatches 'Signed' –ApplyClassification 'SignedOrEncrypted'
Finally, you create the transport rule that applies the disclaimer to outgoing messages:
New-TransportRule –Name 'Disclaimer' -Enabled $true -SentToScope 'NotInOrganization' -ExceptIfHasClassification 'SignedOrEncrypted' -ApplyHtmlDisclaimerLocation 'Append' -ApplyHtmlDisclaimerFallbackAction 'Wrap' -ApplyHtmlDisclaimerText '<P>This email and any files transmitted with it are confidential and intended solely for the use of the individual or entity to whom they are addressed.</P>'
The ApplyHtmlDisclaimerFallbackAction parameter specifies where to put the disclaimer text. In the example, it is appended to the message. By setting ApplyHtmlDisclaimerFallbackAction to Wrap, the message will be wrapped in a new message containing the disclaimer. The parameter ApplyHtmlDisclaimerText specifies the text to use for the disclaimer. Note that the disclaimer text can be HTML, allowing you to use HTML IMG tags, which reference externally hosted images for embedding, or to use a link to point to an online disclaimer.
If you want to use disclaimers for internal communications as well, you will face an additional challenge. As the message passes each Transport service, a disclaimer is added, thereby potentially resulting in multiple disclaimers. Of course, you can add an additional exception that will check the body of the message for disclaimer text fragments. A different and perhaps more elegant approach, though, is to insert a sentinel in the message header after a disclaimer has been appended, and add the condition to exclude messages containing the sentinel.
To implement such a condition and transform the disclaimer created earlier in a global disclaimer, you use the following command, where you set the SentToScope to $null to make it apply to all messages:
Set-TransportRule -Identity 'Disclaimer' –SetHeaderName 'X-Disclaimer' –SetHeaderValue '1' –ExceptIfHeaderContainsMessageHeader 'X-Disclaimer' –ExceptIfHeaderContainsWords '1'
Now, when you receive a message with a disclaimer, you can see “proof” in the header, which will contain an entry X-Disclaimer: 1, as shown in Figure 9-23. That is, the header will contain an additional header entry, X-Disclaimer, which will be set to 1 for messages subject to the rule you just created.

Figure 9-23. Disclaimer added to message using transport rules
As a result, the message will now contain only a single disclaimer, as shown in Figure 9-24.
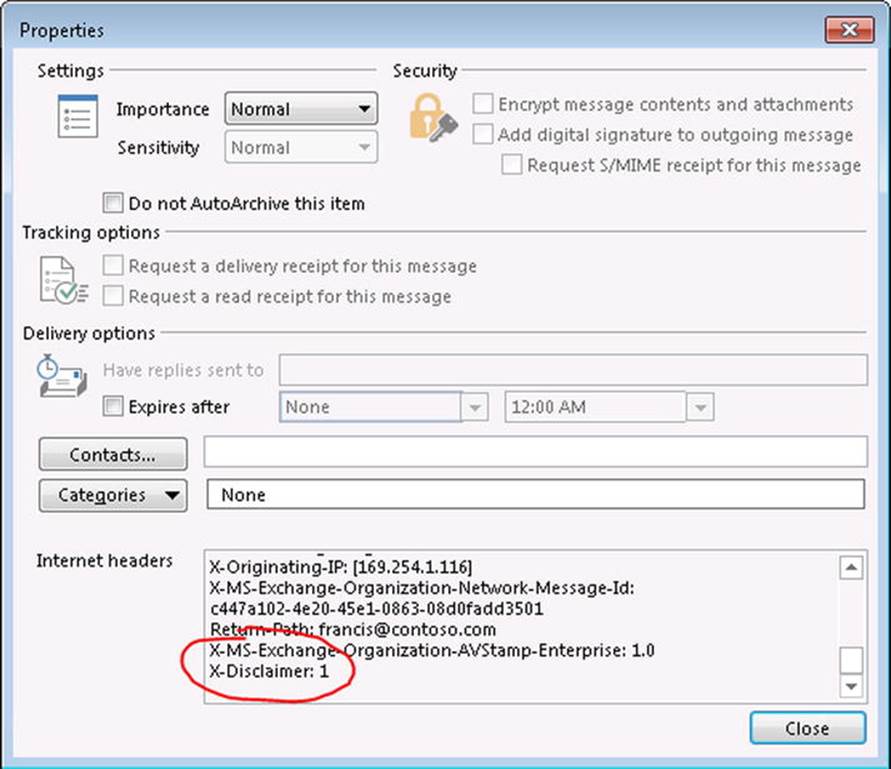
Figure 9-24. Message header sentinel
Priority Rankings for Transport Rules
When you have multiple transport rules configured, the way they are ordered becomes important. For instance, if you have configured one transport rule to tag messages and another transport rule to process the tagged messages, the tagging needs to take place first.
To query the current list of transport rules and their assigned priority, use the Get-TransportRule cmdlet, with results as shown in Figure 9-25.

Figure 9-25. Retrieving a list of transport rules
The priority property determines the order in which the rules are applied, starting with 0. As you can see in Figure 9-25, the rules to tag messages are first and second, and the rule taking actions based on those tags comes next.
![]() Tip When you have lots of rules, you can speed up the overall processing by the transport rule agent of the message by setting the StopRuleProcessing property of a transport rule to $true. When conditions are met and with this property set to $true, additional transport rules with lower priority won’t be evaluated.
Tip When you have lots of rules, you can speed up the overall processing by the transport rule agent of the message by setting the StopRuleProcessing property of a transport rule to $true. When conditions are met and with this property set to $true, additional transport rules with lower priority won’t be evaluated.
When you want to reassign the priority for a transport rule, you can use the Set-TransportRule cmdlet with the –Priority parameter. For example, if you created the disclaimer rule from the example first, it will have a higher execution priority than the tagging rules, as rules are assigned priorities based on their order of creation. To reset the priority of a transport rule with the identity of disclaimer to 2, you use the following command:
Set-TransportRule –Identity Disclaimer –Priority 2
If you assign a priority that is already in use, it will insert the rule on that position and the priorities of the other rules will shift one position down.
Journaling
Some organizations may be required to record all inbound and outbound email messages from a compliance perspective. Exchange Server 2013 can help fill that requirement by leveraging the transport rules discussed above. When considering the transport rule options, you may have spotted that one possible action a transport rule can perform is copying to a certain recipient. That, in combination with rules that define the conditions under which to journal messages, makes up the journaling option in Exchange Server 2013.
In Exchange Server 2013, all email is handled by Mailbox servers, or by the Transport service to be exact. The journaling agent is a transport agent that processes messages on Mailbox servers, either when they are submitted or when they are routed. Exchange provides the following journaling options:
· Standard journaling Configured on the mailbox database and can be used to journal all messages that are either received by or sent through mailboxes hosted on that mailbox database.
· Premium journaling Can utilize rules, allowing you to journal based on criteria such as the recipient, distribution group, or internal vs. external messages.
![]() Note Premium journaling requires an Enterprise CAL license.
Note Premium journaling requires an Enterprise CAL license.
So far, a journal rule, or even journaling in general, may sound like just an implementation of a transport rule, but there is a difference. While transport rules can be used to forward messages, journaling generates integral copies of the original messages in the form of journal reports,including the original messages as an attachment with the original header information. This makes journal reports suitable as evidence, as contrasted with forwarded messages retrieved by means of a transport rule. See Figure 9-26 for a sample journal report.

Figure 9-26. Journal report
A journal report for an externally sent message may differ from that for an internal message. This is because internal messages contain more information in the header regarding source and destination. The information provided in journal reports contains:
· Sender This is the SMTP address of the sender of the message.
· Subject This is the subject of the journaled message.
· Message-ID This is the internal message ID generated by Exchange when the message is submitted in the organization by the Transport service.
· To These are the SMTP addresses of the message recipients. This list includes recipients indicated as TO, CC, or BCC addresses. If groups are expanded, it will also be mentioned at this line.
Options for Journaling Rules
When you’re defining a journal rule, there are three parameters you need to consider:
1. The scope of the messages to be journaled. Possible scope options are internal messages only, external messages only, or all messages.
2. The recipients you want to journal. These can be an Exchange mailbox, distribution group, mail user, or contact. By being specific in whose messages to journal, you can minimize the required storage but still comply with legal and regulatory requirements for evidence collection.
3. The mailbox where the journal reports should be sent.
![]() Tip To reduce the amount of storage needed to maintain journal reports, you can omit voice mail and missed-call notifications from UM-enabled users. This is an organization-wide setting and can be enabled using Set-TransportConfig –VoicemailJournalingEnabled $false. Or, you can enable journaling of voice mail and missed-call notification messages using Set-TransportConfig –VoicemailJournalingEnabled $true. To retrieve the current setting, use Get-TransportConfig | Select VoiceMailJournalingEnabled.
Tip To reduce the amount of storage needed to maintain journal reports, you can omit voice mail and missed-call notifications from UM-enabled users. This is an organization-wide setting and can be enabled using Set-TransportConfig –VoicemailJournalingEnabled $false. Or, you can enable journaling of voice mail and missed-call notification messages using Set-TransportConfig –VoicemailJournalingEnabled $true. To retrieve the current setting, use Get-TransportConfig | Select VoiceMailJournalingEnabled.
The journaling mailbox is a configured mailbox where the journal reports are collected. The configuration of this journaling mailbox itself depends on the policies that have been set by the organization or by regulatory or legal requirements. For example, you can define a retention policy on the mailbox so there will be some form of automatic housekeeping on the mailbox itself. Also, you can make sure the quota setting doesn’t prevent the journal mailbox from receiving journal reports, as the size of that journal mailbox can grow quiet big depending on the number of journal reports generated. So, make sure your journal mailboxes are properly managed.
![]() Note You can utilize multiple journal mailboxes for different journal rules. On a side note, you cannot utilize a mailbox hosted in Office 365 for journaling.
Note You can utilize multiple journal mailboxes for different journal rules. On a side note, you cannot utilize a mailbox hosted in Office 365 for journaling.
In addition, the journal mailbox needs to be treated as a special, secured mailbox, as it may contain sensitive information. It is recommended that you configure your journal mailboxes as follows, where Journal Box 1 is the name of the journal mailbox in this example:
$ExRcpt= (Get-OrganizationConfig).MicrosoftExchangeRecipientEmailAddresses | select -ExpandProperty SmtpAddress
Set-Mailbox –Identity 'JournalBox1' –-RequireSenderAuthenticationEnabled $true -HiddenFromAddressListsEnabled $true -AcceptMessagesOnlyFromSendersOrMembers $ExRcpt
Doing this will lock the mailbox and not allow external senders to send messages to it, will hide it from the address books so users won’t see it, and will only allow Exchange to send messages to that mailbox.
![]() Note (Get-OrganizationConfig).MicrosoftExchangeRecipientEmailAddresses will return the SMTP addresses of the named Microsoft Exchange recipients. It will contain an entry in the formatMicrosoftExchange329e71ec88ae4615bbc36ab6ce41109e@domain for each configured accepted domain. Note that the primary address is used as sender for internal DSN messages.
Note (Get-OrganizationConfig).MicrosoftExchangeRecipientEmailAddresses will return the SMTP addresses of the named Microsoft Exchange recipients. It will contain an entry in the formatMicrosoftExchange329e71ec88ae4615bbc36ab6ce41109e@domain for each configured accepted domain. Note that the primary address is used as sender for internal DSN messages.
![]() Warning If you ever decide to change the primary SMTP address of a Microsoft Exchange recipient by configuring it directly or indirectly through email address policies, make sure you adjust the AcceptMessagesOnlyFromSendersOrMembers setting accordingly.
Warning If you ever decide to change the primary SMTP address of a Microsoft Exchange recipient by configuring it directly or indirectly through email address policies, make sure you adjust the AcceptMessagesOnlyFromSendersOrMembers setting accordingly.
Besides establishing the journaling mailbox, you can also define an alternative journal recipient, often used in cases when Exchange encounters problems delivering the journal report to the configured journal recipient. The alternative journal recipient will receive NDRs with the journal report attached, allowing you to resend the original message if the journaling mailbox becomes available again. If there is no alternative journaling recipient configured, Exchange will just requeue the journal report.
Journal reports do not generate NDR reports unless an alternate recipient is configured. If an alternate journal recipient is configured, it will receive an NDR with the original journal report. If no alternative journal recipient is configured, Exchange will re-queue the journal report indefinitely and those messages will never expire.
The alternative journal recipient is an organization-wide setting, collecting journal reports for all unavailable journal recipients. Because it collects journal reports for all failing journal recipients, it might grow very fast when an outage hits multiple original journal recipients. Also, because it possibly collects NDRs of journal reports for all journal recipients, be sure to check with your legal department to see if sending all those journal reports to an alternative journal recipient is allowed under existing regulations and applicable laws.
![]() Note Multiple journaling reports could be generated if the number of recipients exceeds the ExpansionSizeLimit setting in %ExchangeInstallPath%\EdgeTransport.exe.config, which could happen after group expansion. The default value is set to 1,000 recipients. Multiple journal reports are also generated when a message is bifurcated—that is, the message is split as it gets routed to different destinations.
Note Multiple journaling reports could be generated if the number of recipients exceeds the ExpansionSizeLimit setting in %ExchangeInstallPath%\EdgeTransport.exe.config, which could happen after group expansion. The default value is set to 1,000 recipients. Multiple journal reports are also generated when a message is bifurcated—that is, the message is split as it gets routed to different destinations.
Creating a Standard Journal Rule
To create a standard journal rule using EAC, you do the following, as shown in Figure 9-27:
1. Open the Exchange Admin Center.
2. Navigate to Servers ![]() Databases.
Databases.
3. Select the database you want to enable journaling on and click the Edit icon.
4. Select Maintenance.
5. For selecting the journal recipient, click Browse and select the journal mailbox you want to use for collecting journal reports generated for mailboxes hosted on this database.
6. Click Save to confirm.
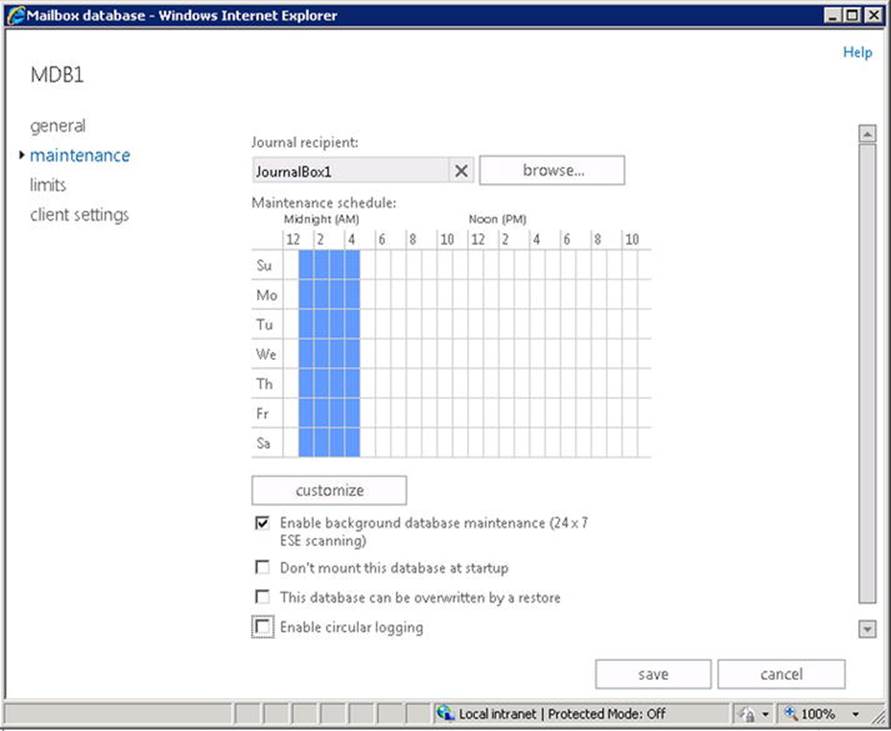
Figure 9-27. Configuring standard journaling
To accomplish this using the Exchange Management Shell, use the Set-MailboxDatabase cmdlet. For example, to enable standard journaling to database MDB1 using journaling mailbox Journal Box 1, use the following command:
Set-MailboxDatabase –Identity MDB1 –JournalRecipient JournalBox1
To check which mailbox database has been configured for standard journaling, use the following command:
Get-MailboxDatabase | Where { $_.JournalRecipient } | Select Identity,JournalRecipient
To disable standard journaling, set the JournalRecipient to $null; for example,
Set-MailboxDatabase –Identity MDB1 –JournalRecipient $null
Creating a Premium Journal Rule
To create a premium journal rule using EAC, you do the following, as shown in Figure 9-28:
1. Open the Exchange Admin Center.
2. Navigate to Compliance Management ![]() Journal Rules.
Journal Rules.
3. Select the + sign to add a journal rule.
4. Configure “Send journal reports to. . .” with the SMTP address of the journal report recipient.
5. Enter a name for the journal rule at Name.
6. At “If the message is sent to or received from. . .,” configure the recipient, which can be a user or distribution group for which you want to generate journal reports. You can also generate journal messages for all recipients by selecting “Apply to all messages.”
7. Finally, at “Journal the following messages. . .” you can specify the scope of the journal rule. This can be global (all messages), messages generated within the Exchange organization (internal messages only), or messages with an external recipient or sender SMTP address (external messages only).
8. Click Save to save the rule.
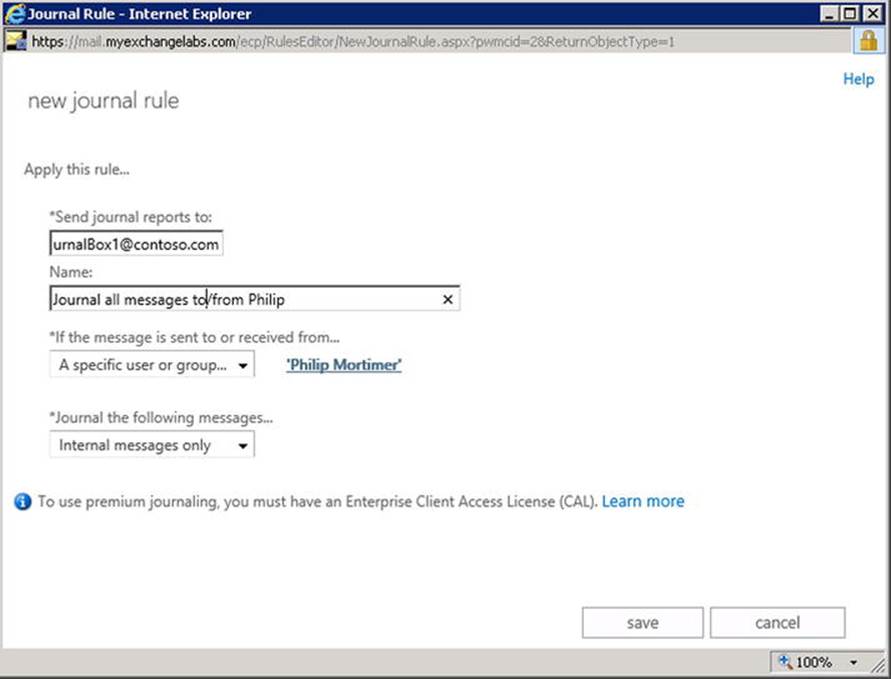
Figure 9-28. Journal rule creation
The cmdlet to create a journal rule is New-JournalRule. To create the journal rule in the example above, you would use the following command:
New-JournalRule –Name 'Journal all messages to/from Philip' –JournalEmailAddress JournalBox1@contoso.com –Recipient philip@contoso.com –Scope Internal –Enabled $true
Possible options for the scope are global, internal, or external.
If you want to see which journal rules are in configured, use Get-JournalRule, as shown in Figure 9-29.
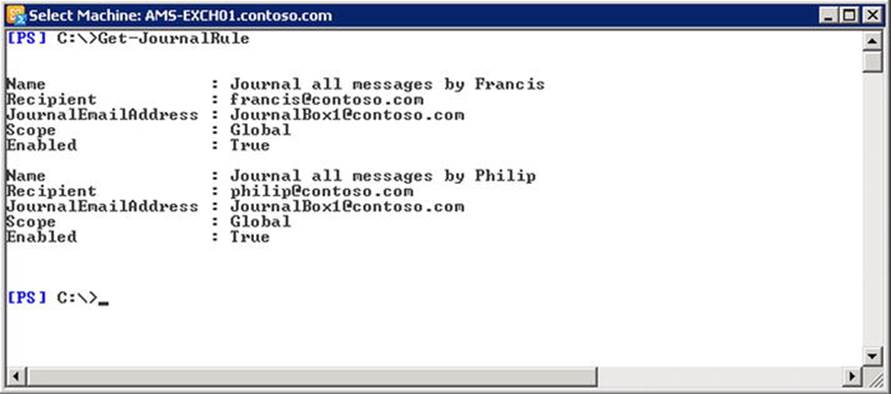
Figure 9-29. Get-JournalRule output
If you want to remove a journal rule, use the Remove-JournalRule cmdlet, as in this command:
Remove-JournalRule –Name 'Journal all messages by Philip'
Configuring an Alternative Journal Recipient
The alternative journal recipient is an organization-wide setting and is configured using the Set-TransportConfig cmdlet using the JournalingReportNdrTo parameter. You can also configure it from the EAC via Compliance Management ![]() Journal Rules
Journal Rules ![]() Send Undeliverable Journal Reports To. . . option, using Select Address to pick a recipient. For example, to configure the alternative journaling recipient to AlternativeJournalingBox@contoso.com, you use the following command:
Send Undeliverable Journal Reports To. . . option, using Select Address to pick a recipient. For example, to configure the alternative journaling recipient to AlternativeJournalingBox@contoso.com, you use the following command:
Set-TransportConfig –JournalingReportNdrTo AlternativeJournalingBox@contoso.com
To remove the alternative journaling recipient, set it to $null.
![]() Warning When an alternative journaling recipient is configured, you must make sure either the original journal recipient or the alternative journal recipient is available. If the alternative journal recipient is configured, messages that cannot be delivered to the original journal recipient are not requeued and the related NDR, which Exchange will try to deliver to the alternative journal recipient, will be lost.
Warning When an alternative journaling recipient is configured, you must make sure either the original journal recipient or the alternative journal recipient is available. If the alternative journal recipient is configured, messages that cannot be delivered to the original journal recipient are not requeued and the related NDR, which Exchange will try to deliver to the alternative journal recipient, will be lost.
Data Loss Prevention (DLP)
Part of compliance is not only having the instruments to verify that an organization or its employees are operating within applicable regulations and laws, but also providing the controls to manage sensitive data and prevent data leakage, such as credit card information. With email being used to send business reports as well as those invitations for dinner to family, users could be unaware of the sensitivity of the information they are sending or ignorant of the potential business impact of sending certain information over the public network which is the Internet.
An Exchange feature that focuses on managing or preventing the exposure of sensitive information is data loss prevention (DLP). For this purpose, DLP policies can be seen as a package of transport rules that prevent users from sending sensitive information by filtering those messages. Alternatively, you can use policy tips to notify users that they might be sending sensitive information. Policy tips are similar to mail tips, and they are shown as a notification in Outlook.
![]() Caution Policy tips require Office 2013 Professional Plus. Policy tips do not work when you install Outlook 2013 separately. Also, policy tips are not supported on Office 2010 or earlier versions of Office. Exchange Server 2013 Service Pack 1 adds support for policy tips to Outlook WebApp and OWA for Devices.
Caution Policy tips require Office 2013 Professional Plus. Policy tips do not work when you install Outlook 2013 separately. Also, policy tips are not supported on Office 2010 or earlier versions of Office. Exchange Server 2013 Service Pack 1 adds support for policy tips to Outlook WebApp and OWA for Devices.
Exchange Server 2013 Service Pack 1 introduced document fingerprinting, which can be used to identify sensitive material in your organization. By uploading sensitive text-based forms used by your organization, you can create DLP policies to match those forms. For example, you can add HR documents and create a DLP policy to prevent messages containing those HR documents from leaving the Exchange organization.
![]() Note Data loss prevention is a premium feature that requires an Enterprise CAL when used with on-premises Exchange Server 2013.
Note Data loss prevention is a premium feature that requires an Enterprise CAL when used with on-premises Exchange Server 2013.
Creating the DLP Policies
There are two ways to create a DLP policy in Exchange Server 2013. The first method is to use a template. This template can be an Exchange-supplied one or one provided by a third-party or yourself. After creating a DLP policy using a template, you can then customize the transport rules.
![]() Note To be able to create DLP policies, the user needs to be a member of the Compliance Management group.
Note To be able to create DLP policies, the user needs to be a member of the Compliance Management group.
You can see which templates are available by using the Get-DlpTemplate cmdlet, as shown in Figure 9-30.
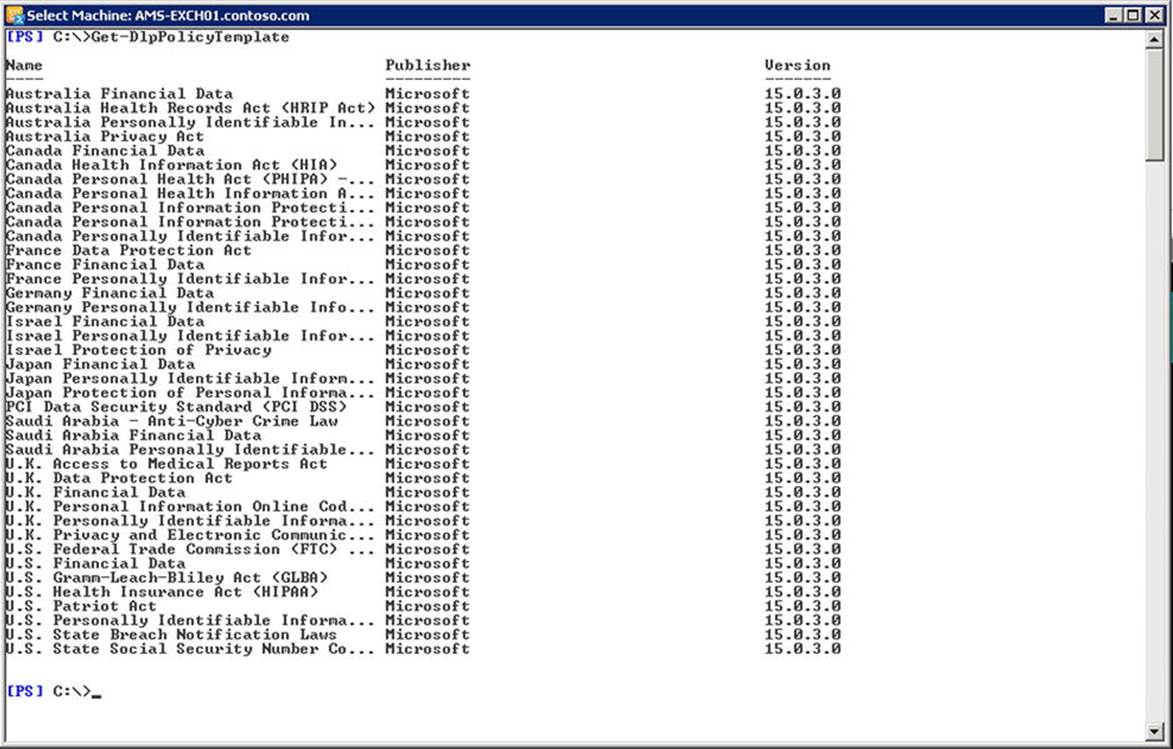
Figure 9-30. Retrieving available DLP policy templates
To create a template-based DLP policy using EAC, you do the following:
1. Open the Exchange Admin Center.
2. Navigate to Compliance Management ![]() Data Loss Prevention.
Data Loss Prevention.
3. Select the + sign and select New DLP policy from the list of templates.
4. Enter a name for the DLP policy, optionally a description. Then, in “Choose a template,” you pick the template to use as a basis for your DLP policy.
5. When expanding “More options,” you can choose to test the DLP policy first by selecting “Test DLP policy with Policy Tips” or “Test DLP policy without Policy Tips.” This is especially helpful when customizing DLP policies, as an improperly configured DLP policy could result in unwanted behavior, like blocking the mail flow of valid messages. You can also initially disable the DLP policy, which is recommended if you need to customize it, as the DLP policy becomes effective after saving it, potentially affecting mail flow.
6. Click Save to create the policy.
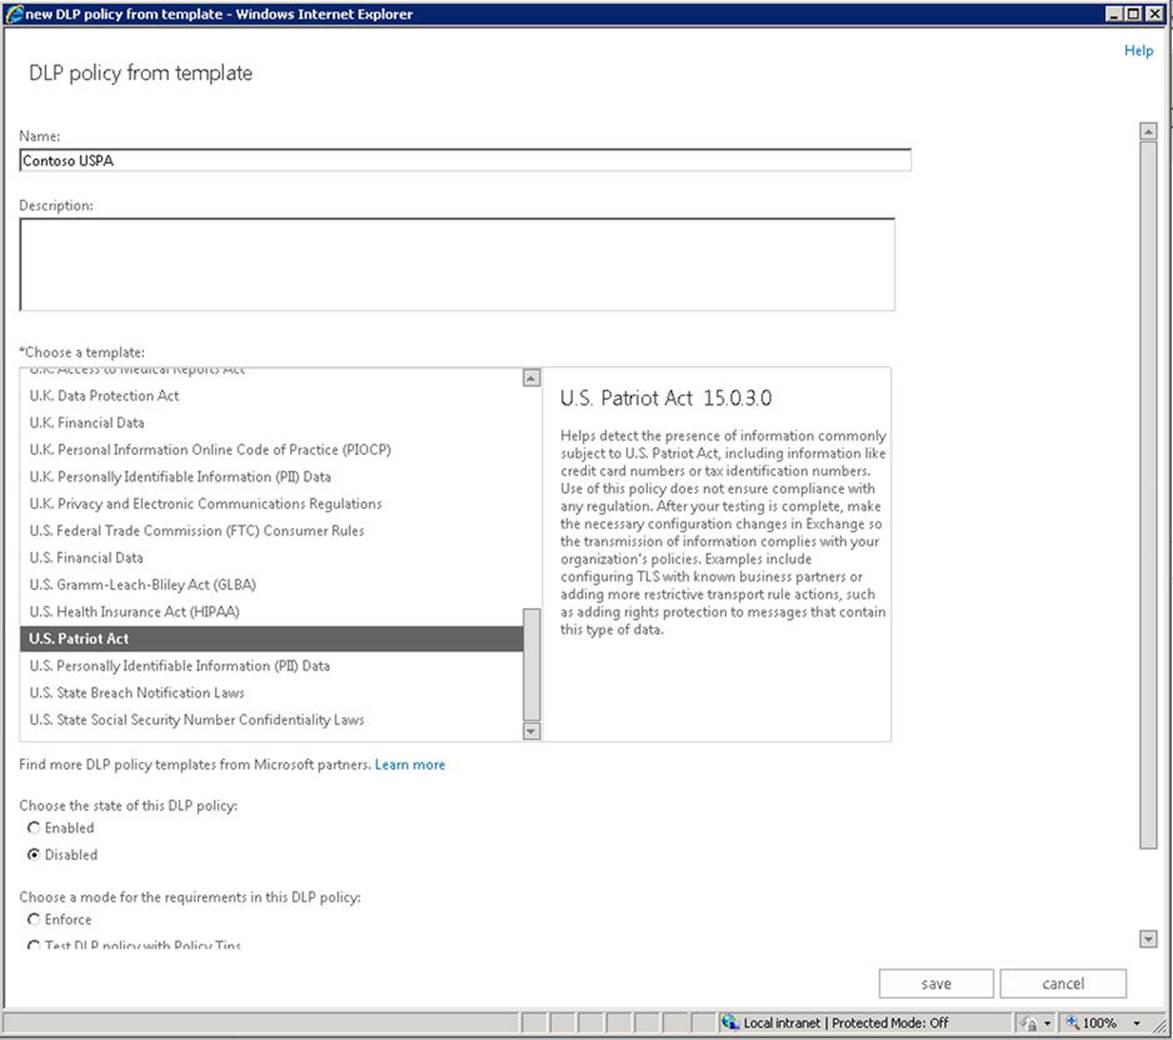
Figure 9-31. Creating a DLP policy using a template
If you are happy with the template, you can leave the DLP policy as is. When you want to inspect or customize the DLP policy, in EAC you do the following:
1. In Compliance Management ![]() Data Loss Prevention, select the DLP policy.
Data Loss Prevention, select the DLP policy.
2. Click the Edit button.
3. Select Rules.
4. You will now be presented a list of rules contained in the DLP policy. You can turn them on or off individually or edit them to customize each rule.
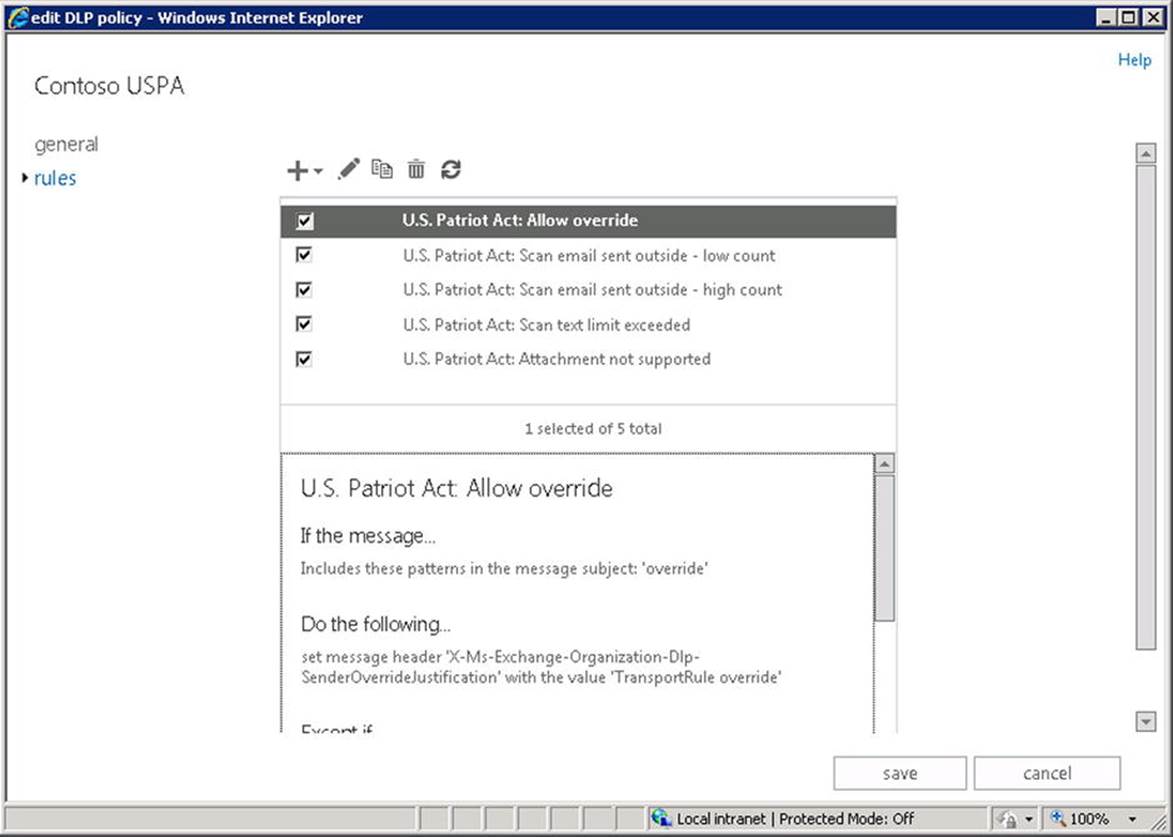
Figure 9-32. Editing DLP policy
5. When you select Edit, you will have the option to inspect or customize the underlying transport rule that is part of the DLP policy. When testing DLP policy rules, you can temporarily add an action “Generate incident report” (new in Exchange Server 2013 SP1), which you can use to generate reports for matching messages and have those reports sent to the recipients specified. Depending on the selected information to report, these reports can contain information like sender, recipients, detected classifications, and matching rules. When specified, the reports will also contain the justification provided by the sender when overriding the policy. This is helpful information when debugging your DLP policy rules or when collecting statistics on justifications to see if the policy perhaps requires adjustment.
6. When you have finished, click Save to store your customized transport rule.
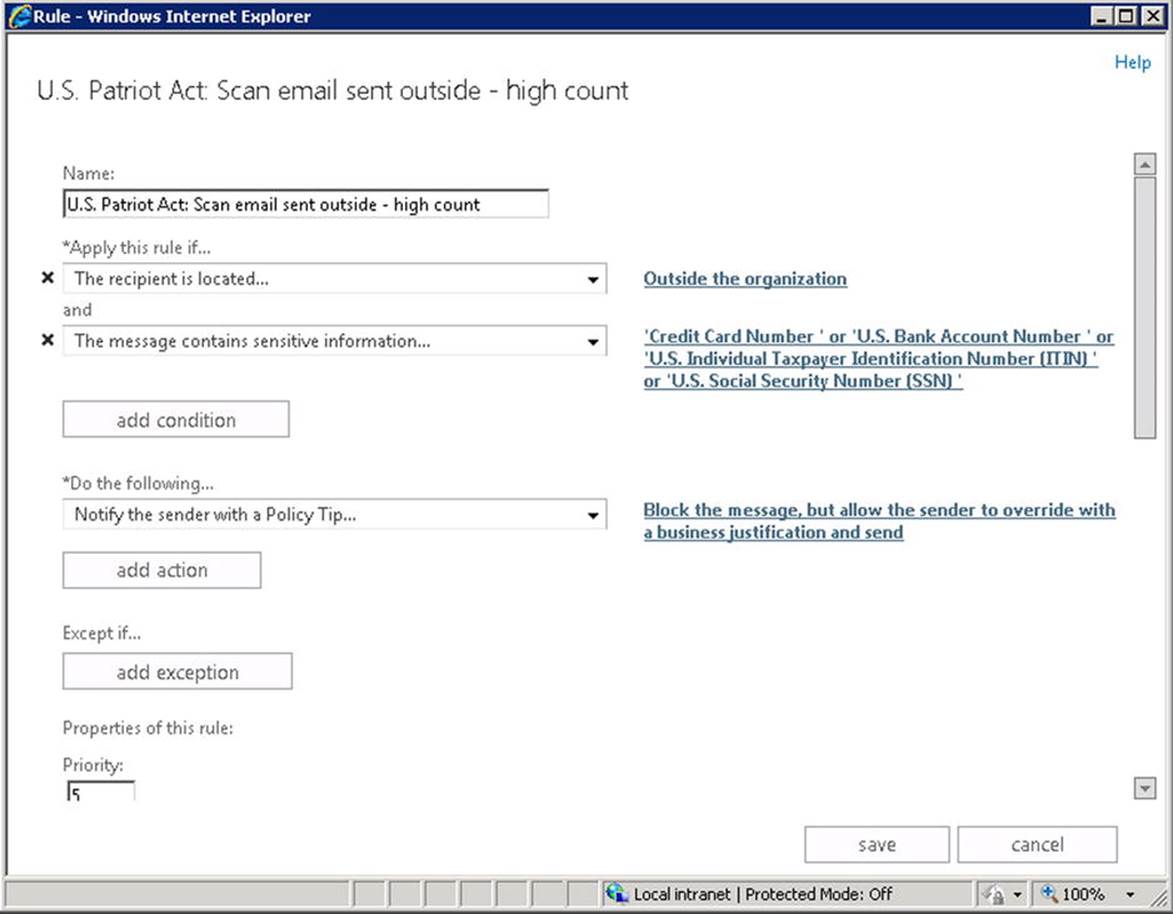
Figure 9-33. Editing DLP policy rule
If you want to create a DLP policy using the Exchange Management Shell, use the New-DlpPolicy cmdlet, specifying a name and the template to use as a basis for your DLP policy. You can also specify mode (audit, audit and notify, or enforce—the latter will block sending messages with detected possible sensitive information without notification) and the initial state (enabled or disabled) of the transport rule. For example, to create a new DLP policy named Contoso USPA based on the U.S. Patriot Act template, you use the following command:
New-DlpPolicy –Name 'Contoso USPA' –Template 'U.S. Patriot Act' –Mode AuditAndNotify –State Enabled
You can view the list of current DLP policies using Get-DlpPolicy, as shown in Figure 9-34.

Figure 9-34. Viewing the configured DLP policies
You can use the Get-TransportRule cmdlet to retrieve the collection of transport rules that belong to a DLP policy, or you can access them from the EAC ![]() Mail Flow
Mail Flow ![]() Rules. To get the transport rules part of a DLP policy in Exchange Management Shell, use the DlpPolicyparameter in conjunction with the Get-TransportRule cmdlet. For example, to retrieve the transport rules that are part of a DLP Policy named Contoso USPA, use the following command:
Rules. To get the transport rules part of a DLP policy in Exchange Management Shell, use the DlpPolicyparameter in conjunction with the Get-TransportRule cmdlet. For example, to retrieve the transport rules that are part of a DLP Policy named Contoso USPA, use the following command:
Get-TransportRule –DlpPolicy 'Contoso USPA'
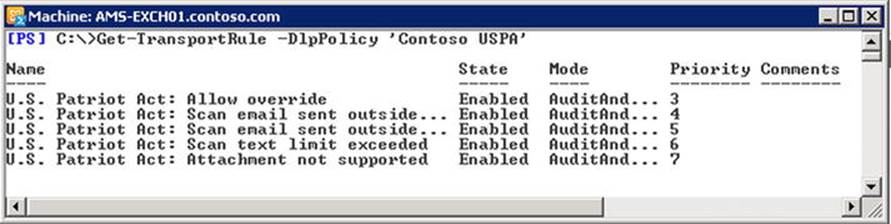
Figure 9-35. Retrieving DLP policy transport rules
![]() Note Regular transport rules can be distinguished from transport rules that are part of a DLP policy, in that their DLP policy attribute is not set and their DlP ID is configured as 00000000-0000-0000-0000-000000000000. For DLP policy rules, the DlP ID matches the Immutable ID attribute of the DLP policy.
Note Regular transport rules can be distinguished from transport rules that are part of a DLP policy, in that their DLP policy attribute is not set and their DlP ID is configured as 00000000-0000-0000-0000-000000000000. For DLP policy rules, the DlP ID matches the Immutable ID attribute of the DLP policy.
You can customize policy tips with localized messages or a URL, which you can use to direct users to a page explaining the communications compliance standards. To add these custom elements, go to EAC ![]() Compliance Management
Compliance Management ![]() Data Loss Prevention, and select “Manage policy tips.”
Data Loss Prevention, and select “Manage policy tips.”
To create custom policy tips using Exchange Management Shell, use the New-PolicyTip cmdlet. The Name parameter defines what policy tip you want to override, where locale is a supported language locale, as follows:
· <Locale>\NotifyOnly To customize the message used for notifications in <Locale>.
· <Locale>\RejectOverride To customize the message used for notifications in <Locale> when the user is still allowed to send the message.
· <Locale>\Reject To customize the message used when used for notifications in <Locale> and when the sending of the message is prevented.
· Url To add a link to a URL for policy tips. There can be only one URL policy tip. The URL will be accessed when the sender clicks the link in “Learn more about your organization’s rule,” which will be shown in the policy tip.
For example, to customize the Dutch locale notification when users are notified of possibly sending a message with sensitive information, you could use:
New-PolicyTipConfig -Name 'nl\RejectOverride' -Value 'Uw bericht bevat mogelijk gevoelige informatie'.
![]() Note If the transport rule is configured to only notify users and you configure a custom policy tip for “en\RejectOverride,” your custom notification message will not be displayed. You will need to configure a notification message for all three possible modes.
Note If the transport rule is configured to only notify users and you configure a custom policy tip for “en\RejectOverride,” your custom notification message will not be displayed. You will need to configure a notification message for all three possible modes.
To configure a compliance URL to show with the policy tip, you use:
New-PolicyTipConfig -Name 'Url' -Value 'http://compliance.contoso.com'
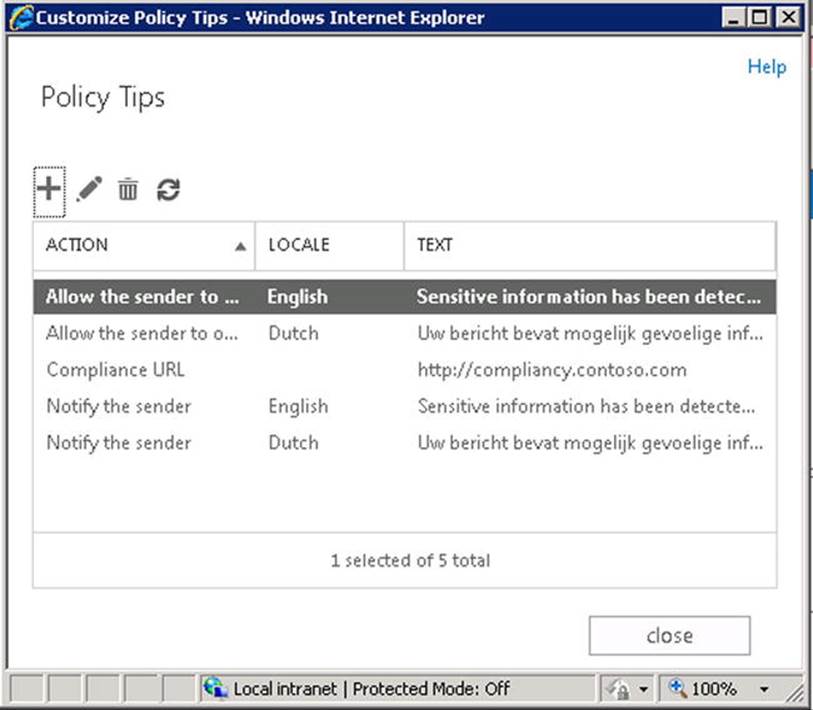
Figure 9-36. Customizing the policy tips
To retrieve the current set of customized policy tips, use Get-PolicyTipConfig.
Optionally, you can use the locale parameter to only return the custom policy tips for a given locale; for example, Get-PolicyTipConfigLocale –Locale nl.
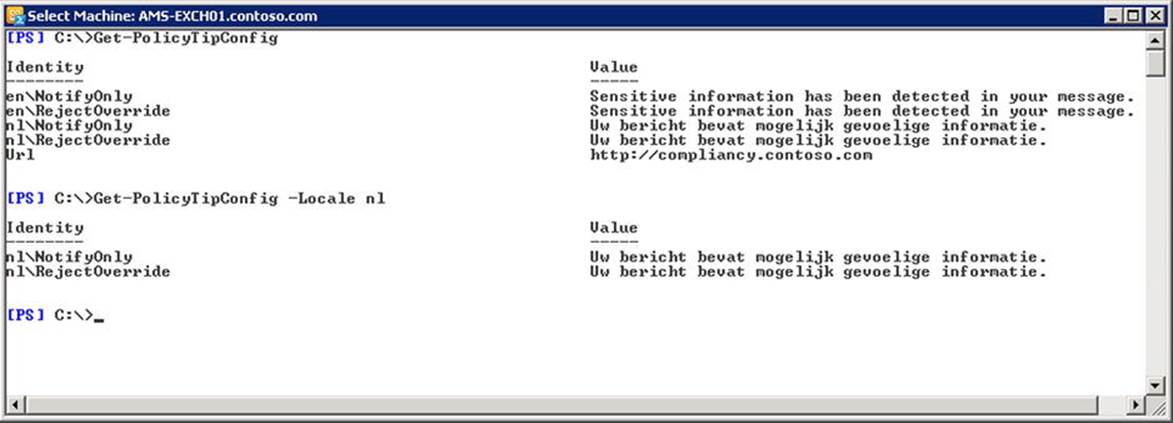
Figure 9-37. Using Get-PolicyTag to list customized policy tips
The way DLP policy tips manifest themselves to users is similar to how mail tips operate. A small notification bar is shown when sensitive information is detected and the DLP policy and related DLP policy rules are configured to generate a notification, as shown in Figure 9-38.
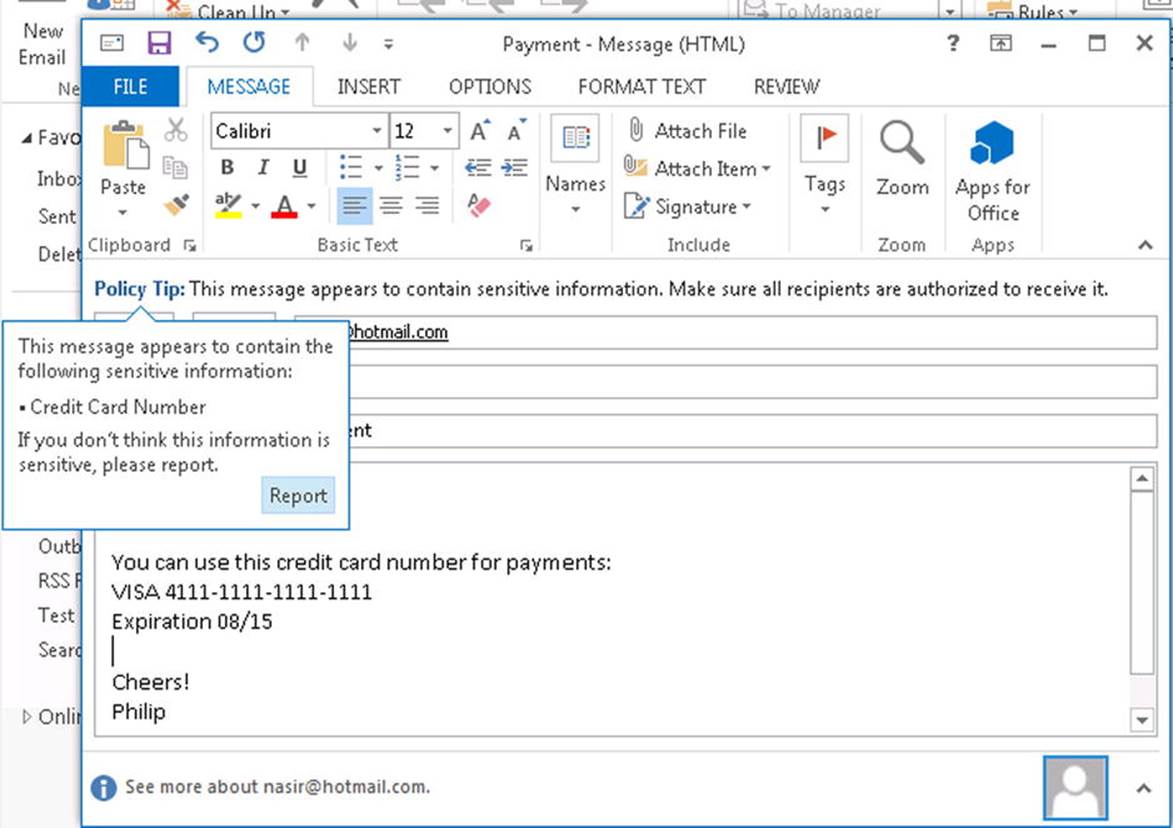
Figure 9-38. DLP policy tip shown in Outlook 2013
When such a message is sent—when allowed by the DLP Policy—and you have configured to generate incident reports for DLP policy rules, the configured recipients will receive a report as well as a copy of the message attached. The information in the report depends on the selected fields and may include such items as matching rules and data classifications that were detected, including the number of occurrences.
![]() Note Currently, policys tips in OWA will not be shown unless the DLP policy mode is set to Enforced. When the mode is set to one of the test options, policy tips will not be displayed in OWA. This bug will be fixed in a future release.
Note Currently, policys tips in OWA will not be shown unless the DLP policy mode is set to Enforced. When the mode is set to one of the test options, policy tips will not be displayed in OWA. This bug will be fixed in a future release.
All rules that are evaluated and have resulted in a hit are mentioned in the report. The report shown in Figure 9-39 also mentions that a disclaimer was added by a rule called “Disclaimer using ApplyHtmlDisclaimer and SetHeader actions.”
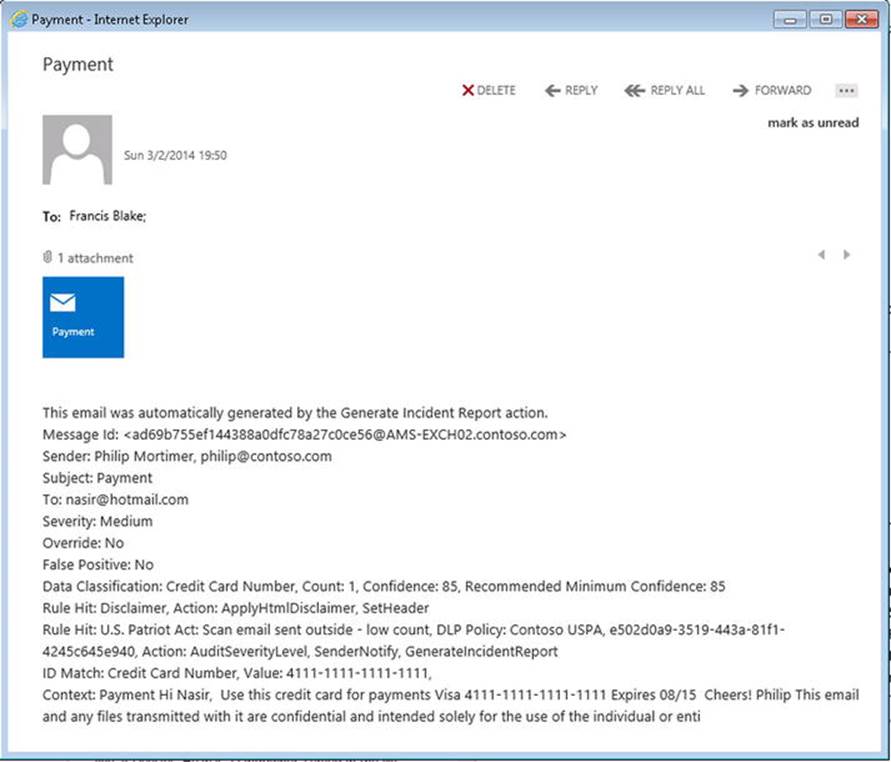
Figure 9-39. DLP policy rule incident report
If you want to adjust a DLP Policy, use the Set-DlpPolicy cmdlet; for example,
Set-DlpPolicy –Identity 'Contoso USPA' -Mode Enforce -State Enabled
When you want to remove a DLP policy, you use Remove-DlpPolicy; for example,
Remove-DlpPolicy –Identity 'Contoso USPA'
![]() Note Unfortunately, Exchange Server 2013 does not contain built-in reports for DLP-related incidents. Office 365 does, though, and you can find them at Exchange admin center
Note Unfortunately, Exchange Server 2013 does not contain built-in reports for DLP-related incidents. Office 365 does, though, and you can find them at Exchange admin center ![]() Compliance Management
Compliance Management ![]() Data Loss Prevention
Data Loss Prevention ![]() Reports. You can generate information on DLP policy matches for sent mail, received mail, and DLP rule matches for sent or received mail.
Reports. You can generate information on DLP policy matches for sent mail, received mail, and DLP rule matches for sent or received mail.
Importing and Exporting DLP Policies and Templates
As mentioned earlier, you can import DLP policy templates or you can import or export a DLP policy collection from XML files. Either way, you can quickly implement a customized DLP policy in an Exchange environment. You can duplicate the DLP policies from a test environment to your production environment. The DLP policy settings are stored in an XML file.
![]() Warning When you import a DLP policy collection, that collection of policies will overwrite any existing DLP policies defined in your Exchange organization.
Warning When you import a DLP policy collection, that collection of policies will overwrite any existing DLP policies defined in your Exchange organization.
To import a DLP policy template file, you use the Import-DlpPolicyTemplate cmdlet. For example, to import a DLP policy from a file named C:\ContosoTemplate.xml, you would use the following command:
Import-DlpPolicyTemplate -FileData ([Byte[]]$(Get-Content -Path 'C:\ContosoTemplate.xml' -Encoding Byte -ReadCount 0))
You can also import a DLP policy template from the EAC, via Compliance Management ![]() Data Loss Prevention, and clicking the arrow next to the + sign and selecting the import policy option.
Data Loss Prevention, and clicking the arrow next to the + sign and selecting the import policy option.
Alternatively, you can create a new DLP policy directly from a file-based template using New-DlpPolicy with the TemplateData parameter; for example,
New-DlpPolicy –Name 'DLPPolicy' –TemplateData ([Byte[]]$(Get-Content -Path 'C:\ContosoTemplate.xml' -Encoding Byte -ReadCount 0))
![]() Tip Besides importing DLP policy template files from third parties, you can develop your own template file. For more information on developing your own DLP policy template files, see http://bit.ly/ExchangeDevDLPTemplate.
Tip Besides importing DLP policy template files from third parties, you can develop your own template file. For more information on developing your own DLP policy template files, see http://bit.ly/ExchangeDevDLPTemplate.
You can also import or export the complete collection of DLP policies. To export the current DLP policy collection, use Export-DlpCollection. For example, to export the DLP policy collection to a file named C:\ContosoDLP.xml, you would use the following command:
Set-Content -Path 'c:\ContosoDLP.xml' -Value (Export-DlpPolicyCollection).FileData -Encoding Byte
The XML file will contain all DLP policies, all DLP policy settings, and the related transport rules.
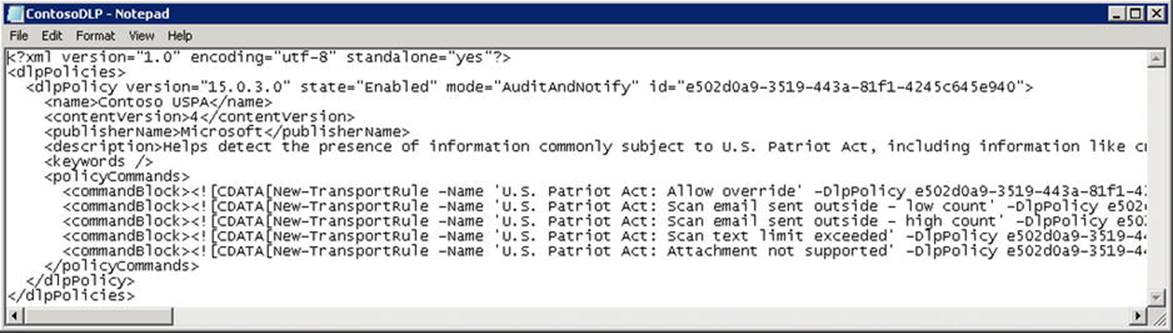
Figure 9-40. DLP policy collection XML file
To import a file containing a DLP policy, you use the Import-DlpPolicyCollection cmdlet. For example, to import the DLP policy collection settings stored in C:\ContosoDLP.xml, you would use the following command:
Import-DlpPolicyCollection -FileData ([Byte[]]$(Get-Content -Path 'C:\ContosoDLP.xml' -Encoding Byte -ReadCount 0))
![]() Caution Export-DlpPolicyCollection seems to contain a bug, as it exports the New-TransportRule cmdlets to create the related DLP policy rules, but it forgets to state some mandatory values. For example, it does not save theAttachmentProcessingLimitExceeded value in the XML file, after which Import-DlpPolicyCollection will complain because no value is specified for the AttachmentProcessingLimitExceeded parameter. Try correcting the cmdlets in the XML file and then retry the importing when you encounter this obstacle.
Caution Export-DlpPolicyCollection seems to contain a bug, as it exports the New-TransportRule cmdlets to create the related DLP policy rules, but it forgets to state some mandatory values. For example, it does not save theAttachmentProcessingLimitExceeded value in the XML file, after which Import-DlpPolicyCollection will complain because no value is specified for the AttachmentProcessingLimitExceeded parameter. Try correcting the cmdlets in the XML file and then retry the importing when you encounter this obstacle.
Customizing Your DLP Policy
An alternative to using a template to create a DLP policy is to create a custom DLP policy when you have specific requirements. That DLP policy will be empty after creation, so you need to add your own transport rules to it.
To create a custom DLP policy using EAC, you do the following:
1. Open the Exchange Admin Center.
2. Navigate to Compliance Management ![]() Data Loss Prevention.
Data Loss Prevention.
3. Click the arrow next to the + sign and select New for setting a custom policy.
4. Enter a name, optional description, and initial state for the policy.
5. Click Save to save the empty DLP policy definition.
You can now start adding rules to it by clicking the Edit icon and selecting the rules section, where you can add your custom rules.
If you want to add a custom rule using Exchange Management Shell, you use New-DlpPolicy; for example,
New-DlpPolicy -Name 'CustomDLP' -State Enabled -Mode AuditAndNotify
After you’ve established that, you can start adding custom transport rules to the DLP policy using the New-TransportRule cmdlet with the DlpPolicy parameter to attach the transport rules to the DLP policy.
In addition, you can use the mode to determine how the rule operates. Choices for mode are Audit (rule is evaluated but actions are skipped), AuditAndNotify (audit with policy tips), or Enforce (audit and notify plus actions are performed). For example, to create a transport rule to generate policy tips for all messages in which a credit card number is detected, and further attach it to a DLP policy named 'CustomDLP, ’ you would use the following command:
New-TransportRule –Name 'CustomDLP : All Messages with Credit Card Number' –DlpPolicy 'CustomDLP' –Mode AuditAndNotify –MessageContainsDataClassifications @{'Name'='Credit Card Number'} -SetAuditSeverity Medium –NotifySender NotifyOnly
Here’s a short explanation of the DLP-specific parameter used in this example:
· DlpPolicy is used to specify the DLP policy to attach the rule to.
· NotifySender is a DLP-specific parameter that determines how a user is notified when entering DLP policy-violating information. It needs to be specified together with the MessageContainsDataClassifications parameter. The Options for NotifySender are:
· NotifyOnly notifies the sender that message is sent.
· RejectMessage notifies the sender that message is rejected.
· RejectUnlessFalsePositiveOverride notifies the sender; sender can send message marking it as a false positive.
· RejectUnlessSilentOverride message is rejected unless sender overrides policy restriction.
· RejectUnlessExplicitOverride message is rejected unless sender overrides, allowing sender to specify justification.
· If any of the reject options are selected for NotifySender, you can specify a rejection status code and reason using the RejectMessageEnhancedStatusCode and RejectMessageReasonText parameters.
· The parameter MessageContainsDataClassifications is a new predicate in Exchange Server 2013 SP1 and can be is used to specify rules for searching for sensitive information. In the example, it was used to filter messages for the classification “Credit Card Number.”
You can also define thresholds for the minimum and maximum numbers of occurrences, as well as for the confidence level, which is a percentage indicating how sure the DLP engine is that the information is a match. For example, something that looks like a credit card number near something else that looks like an expiration date is more likely to be credit card information than something that looks like a series of numbers. Note that when the parameter is omitted, as in the example, a default minimum of 1 occurrence and 100 percent maximum confidence level is set.
· Not shown in the example but other DLP-specific predicates are ExceptIfHasClassification (to exclude one specific data classification), ExceptIfHasNoClassification (to apply the rule to messages without a classification). PredicatesHasSenderOverride and ExceptIfHasSenderOverride can be used to control rule evaluation whether or not the sender has selected to override DLP policy for the message.
You can verify the creation of the DLP policy rule using Get-TransportRule with the DlpPolicy parameter.
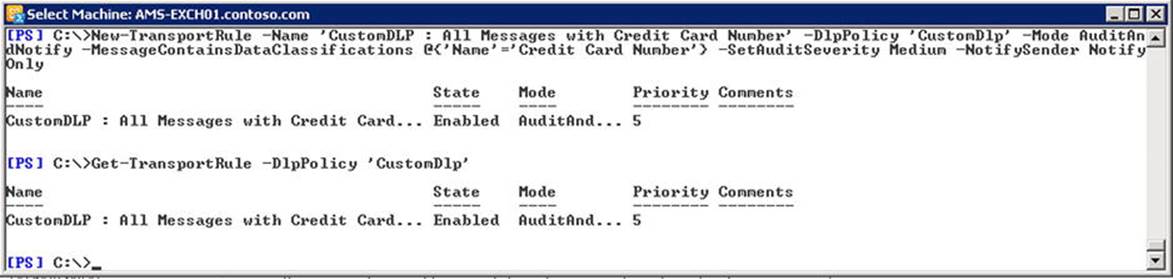
Figure 9-41. Creating a custom DLP policy rule using New-TransportRule
![]() Note For more information on creating your own sensitive information, or even your own template containing these definitions, see http://bit.ly/ExchangeSensitiveInformation. To get a list of currently defined types of sensitive information, use Get-DataClassification|Sort Name.
Note For more information on creating your own sensitive information, or even your own template containing these definitions, see http://bit.ly/ExchangeSensitiveInformation. To get a list of currently defined types of sensitive information, use Get-DataClassification|Sort Name.
The list of default-available data classifications in Exchange Server 2013 SP1 is shown in Figure 9-42.
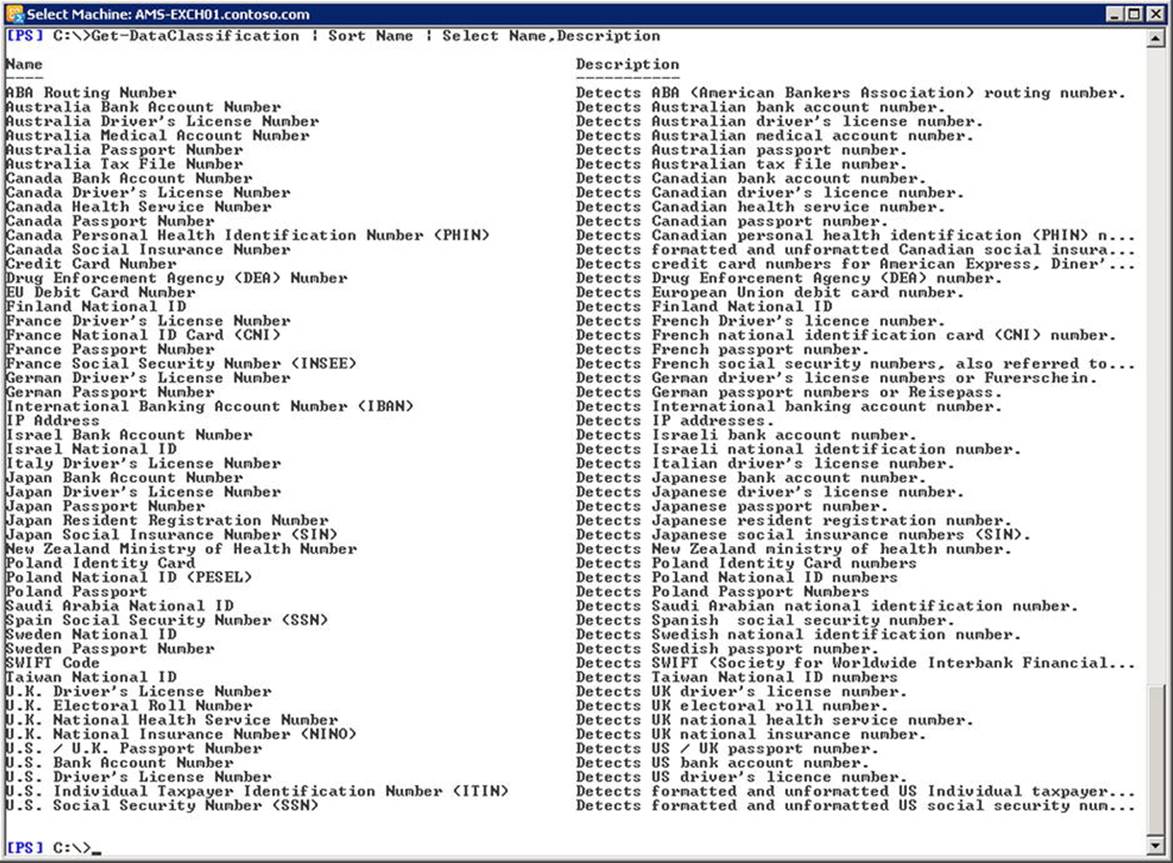
Figure 9-42. List of default available data classifications
DLP Document Fingerprinting
A new feature in Exchange Server 2013 SP1 is DLP document fingerprinting. This fingerprinting allows you to enhance DLP by customizing your sensitive information types by uploading particular documents. These documents should represent the information you are trying to protect—for example, HR documents or tax forms. You can then create DLP policy rules to detect these types of documents and take appropriate action.
![]() Note Documents uploaded for document fingerprinting are not stored in Exchange Information Store. Instead, a hash is generated using the contents of the document used by the DLP engine for detecting matching information. The hashes are stored with the data classification object in Active Directory. There could be one or more document fingerprints per data classification.
Note Documents uploaded for document fingerprinting are not stored in Exchange Information Store. Instead, a hash is generated using the contents of the document used by the DLP engine for detecting matching information. The hashes are stored with the data classification object in Active Directory. There could be one or more document fingerprints per data classification.
To create document fingerprints using EAC, you do the following:
1. Open the Exchange Admin Center.
2. Navigate to Compliance Management ![]() Data Loss Prevention.
Data Loss Prevention.
3. Select Manage Document Fingerprints.
4. In the document fingerprints window, select the + sign to create a new document fingerprint.
5. In the new document fingerprint window, enter a name for the kind of document fingerprint you are creating and a mandatory description.
6. In the document list section, select the + sign to add a new document for which you want to create a fingerprint. The document fingerprinting supports the same file types as transport rules. For a list of supported file types, seehttp://bit.ly/ExchangeTransportRulesFileTypes.
7. When you are done uploading the documents to fingerprint, click Save.
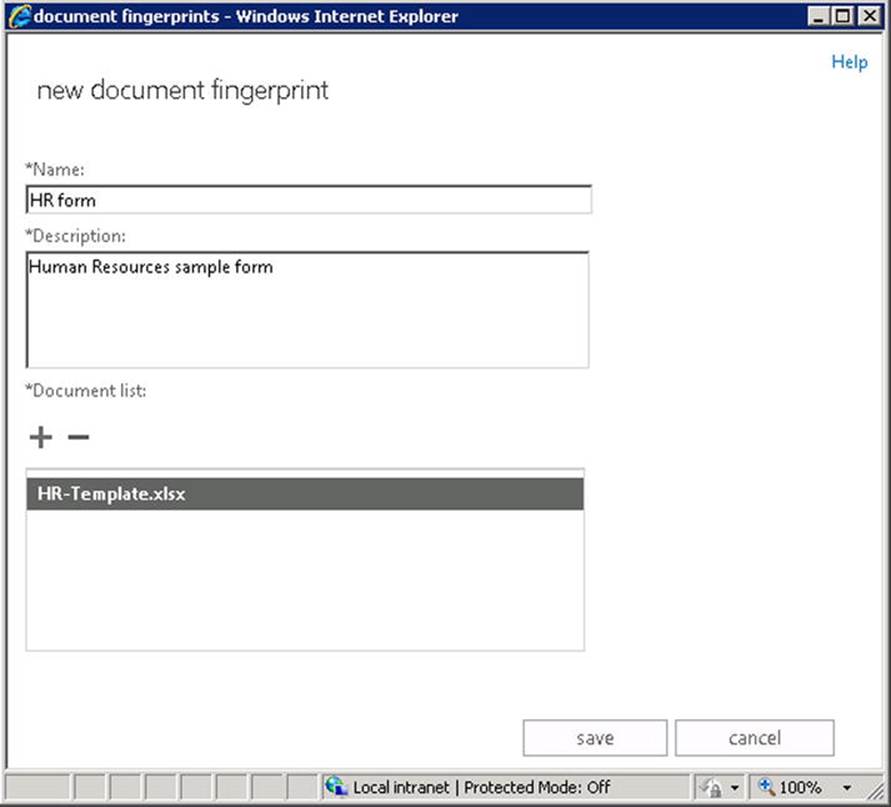
Figure 9-43. Creating a document fingerprint
![]() Tip You can add multiple documents to a single document fingerprint. This allows you to create a single fingerprint for the same type of information in various formats—for example, .docx and .pdf—or different versions of the document. You can also configure a localized name to display in supported clients for the fingerprint via Edit document fingerprints
Tip You can add multiple documents to a single document fingerprint. This allows you to create a single fingerprint for the same type of information in various formats—for example, .docx and .pdf—or different versions of the document. You can also configure a localized name to display in supported clients for the fingerprint via Edit document fingerprints ![]() Language settings—for example, EN/‘HR Documents’ and DE/‘HR Documents’
Language settings—for example, EN/‘HR Documents’ and DE/‘HR Documents’
If you want to create a new document fingerprint using Exchange Management Shell, use New-FingerPrint to create the document fingerprint after which you can provide that information to New-DataClassification to create the data classification holding one or more document fingerprints.
For example, to create a new data classification “HR Form” using the document fingerprints of the files c:\HR-Template-EN.doc and c:\HR-Template-NL.doc, you use the following commands:
$Fingerprint1= New-Fingerprint –FileData (Get-Content 'C:\HR-Template-v1.doc' –Encoding Byte) –Description 'HR document v1'
$Fingerprint2= New-Fingerprint –FileData (Get-Content 'C:\HR-Template-v2.doc' –Encoding Byte) –Description 'HR document v2'
New-DataClassification –Name 'Contoso HR documents' –Fingerprints $FingerprintEN, $FingerprintNL –Description 'Message contains HR documents'
You can validate the classification using Get-Classification; for example,
Get-Classification –Identity 'Contoso HR documents'
If you want to add a fingerprint to an existing data classification, you use Set-DataClassification, as follows:
$FingerprintPDF= New-Fingerprint –FileData (Get-Content 'C:\HR-Template.pdf' –Encoding Byte) –Description 'HR document PDF'
$Fingerprints= (Get-DataClassification –Identity 'Contoso HR documents').Fingerprints + $FingerprintPDF
Set-DataClassification –Identity 'Contoso HR documents' –Fingerprints $Fingerprints
Changes made to a DLP policy may not take effect immediately. Outlook 2013 caches DLP policies in two local XML files that are refreshed every 24 hours. The files are located in the folder %UserProfile%\AppData\Local\Microsoft\Outlook and their file names start with PolicyNudgeClassificationDefinitions (cached data classifications) and PolicyNudgeRules (cached rule information). Keep this in mind when implementing policy changes in production or when you are testing DLP policies. Luckily, there is a workaround.
![]() Note Outlook will use the locally cached DLP policy information to evaluate the message and attachments against document fingerprints or other DLP Policy rules, using the same DLP engine as Exchange. This means attachments are not send over the network for evaluation.
Note Outlook will use the locally cached DLP policy information to evaluate the message and attachments against document fingerprints or other DLP Policy rules, using the same DLP engine as Exchange. This means attachments are not send over the network for evaluation.
To force Outlook 2013 to download the latest DLP policies, close Outlook 2013 and remove the following entry from the registry:
HKEY_CURRENT_USER\SOFTWARE\Microsoft\Office\15.0\Outlook\
PolicyNudges\LastDownloadTimesPerAccount
After removal, start Outlook 2013. When you create a message, the updated DLP policies will be downloaded.
![]() Caution Document fingerprinting doesn’t work for password-protected files or files containing solely images. Also, documents won’t be detected if they do not contain all the text used in the document employed to create the document fingerprint. Use documents or forms with blank fields, for example, to create the fingerprints.
Caution Document fingerprinting doesn’t work for password-protected files or files containing solely images. Also, documents won’t be detected if they do not contain all the text used in the document employed to create the document fingerprint. Use documents or forms with blank fields, for example, to create the fingerprints.
Now, you need to create a DLP policy rule in which you specify this data classification data to match your sensitive information contents. In EAC, this is a matter of editing the DLP policy, selecting the rules, clicking the + sign to create each new rule, and in the rule options window, selecting “The message contains sensitive information as. . . Apply this rule if. . .” using the data classification holding the document fingerprints.
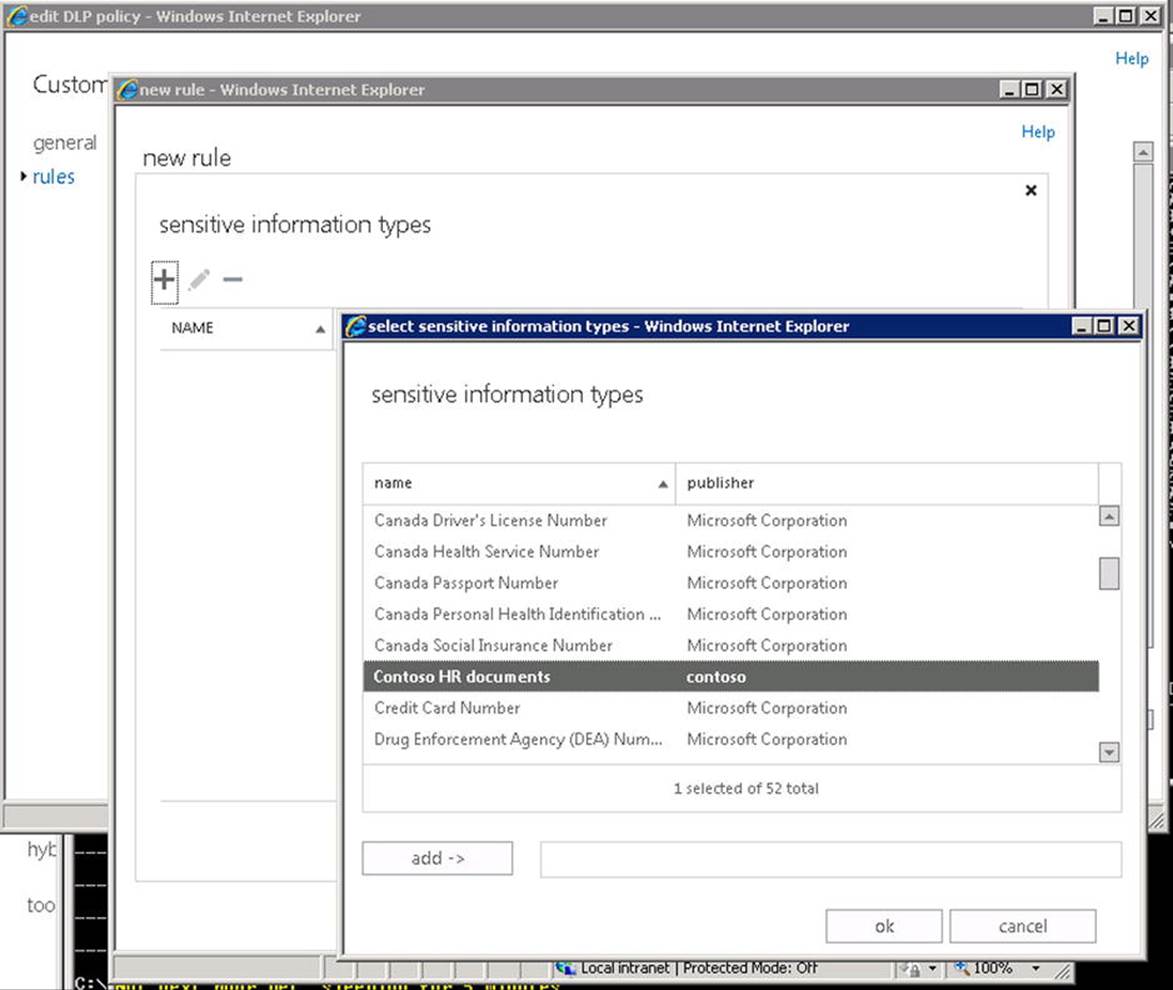
Figure 9-44. Creating a DLP policy rule using document fingerprints
To create such a DLP policy in the Exchange Management Shell, use the New-TransportRule you would also use to create a custom DLP policy rule; for example,
New-TransportRule –Name 'CustomDLP: HR docs' -MessageContainsDataClassifications @{'Name'='Contoso HR documents'} -NotifySender 'RejectUnlessExplicitOverride' -RejectMessageReasonText 'Delivery not authorized, message refused' -SetAuditSeverity 'Medium' -Mode 'AuditAndNotify' -DlpPolicy 'CustomDLP'
Now, when a user tries to send a message using a document with an attachment that matches the document fingerprint, the sender will get a policy tip, as shown in Figures 9-45 and 9-46.

Figure 9-45. DLP pingerprint policy tip in Outlook
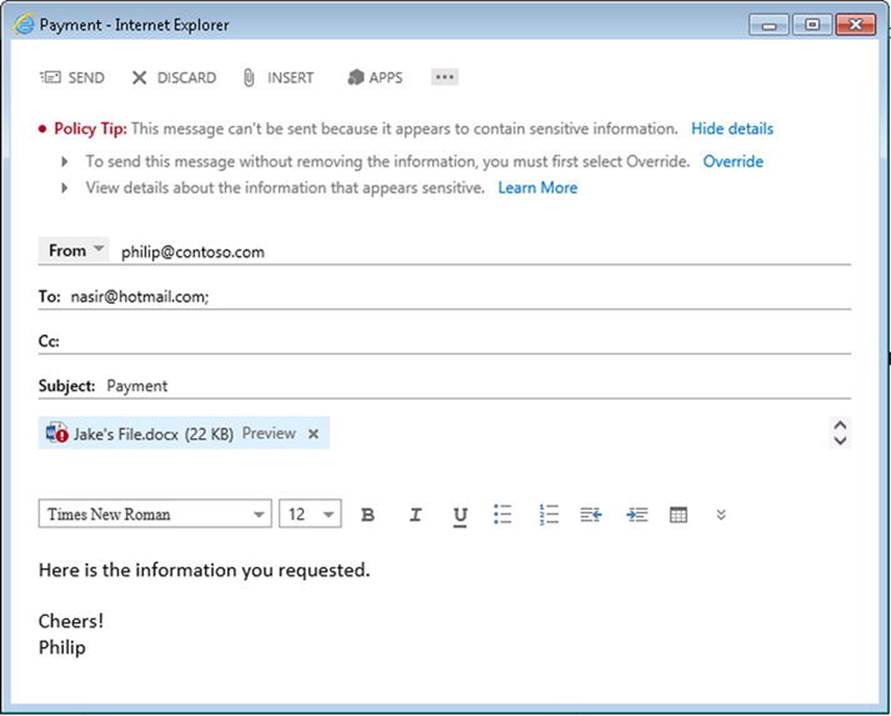
Figure 9-46. DLP fingerprint policy tip in Outlook WebApp
Note that in this example NotifySender is set to “RejectUnlessExplicitOverride.” This causes the message to be rejected using the message configured with RejectMessageReasonText unless the sender chooses to override this, providing a mandatory business justification, as shown in Figure 9-47.
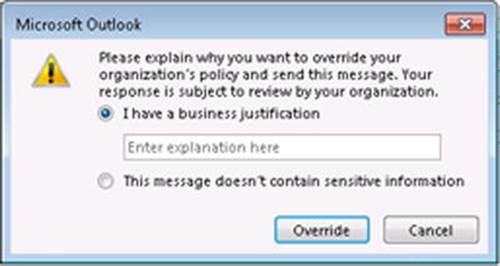
Figure 9-47. Overriding DLP reject providing a business justification
![]() Tip If you don’t see the override confirmation link in Outlook, check if you have set the DLP policy mode to Enforced. In Test mode, these interactions will not be displayed.
Tip If you don’t see the override confirmation link in Outlook, check if you have set the DLP policy mode to Enforced. In Test mode, these interactions will not be displayed.
Auditing
Administrators in an Exchange organization have power, and with power comes responsibility. From a compliance perspective, organizations may require tracking of administrative changes,such as monitoring who made changes to a certain receive connector, or auditing the access to high-profile mailboxes.
The following auditing options are available in Exchange Server 2013:
· Administrator audit logging This allows organizations to audit administrative changes in their Exchange organization.
· Mailbox audit logging This allows organizations to audit mailbox access and changes.
Administrator Audit Logging
The administrator audit logging feature, which was introduced with Exchange Server 2010, allows auditing of who did what and where in the Exchange organization. Exchange Server 2013 can audit all changes performed by administrators in the Exchange Management Shell. Actions performed in the Exchange Admin Center are also logged because EAC constructs and runs cmdlets in the background.
![]() Tip In Exchange Server 2013, you can view the last 500 commands that were executed on your behalf from EAC by opening up the Show Command Logging window, as shown in Figure 9-48.
Tip In Exchange Server 2013, you can view the last 500 commands that were executed on your behalf from EAC by opening up the Show Command Logging window, as shown in Figure 9-48.
Figure 9-48. Enabling Command Logging from EAC
“Changes” here means that view-only cmdlets like Get-* and Search-* won’t be logged. Use of the cmdlets Set-AdminAuditLogConfig, Enable-CmdletExtensionAgent, and Disable-CmdletExtensionAgent is always logged, however. The cmdletsDisable-CmdletExtensionAgent and Enable-CmdletExtensionAgent are logged because they can be used to turn the administrator audit log agent on or off. The administrator audit log agent is responsible for evaluating cmdlets against the auditing configuration and logging entries.
Administrator audit logging entries are stored in the Microsoft Exchange system mailbox, SystemMailbox{e0dc1c29-89c3-4034-b678-e6c29d823ed9}. You can access this mailbox—for example, if you want to move it to a different database—by using Get-Mailbox with theArbitration parameter; for example,
Get-Mailbox -Arbitration –Identity 'systemMailbox{e0dc1c29-89c3-4034-b678-e6c29d823ed9}'
If you want to move the system mailbox to a database named ‘MDB2’, for instance, you would use the following command:
Get-Mailbox -Arbitration –Identity 'systemMailbox{e0dc1c29-89c3-4034-b678-e6c29d823ed9}' | New-Moverequest –TargetDatabase 'MDB2'
If you are concerned about the amount of logged data in the system mailbox after enabling administrator audit logging, you can check the size of the system mailbox, as follows:
Get-Mailbox -Arbitration –Identity 'systemMailbox{e0dc1c29-89c3-4034-b678-e6c29d823ed9}' | Get-MailboxStatistics | Format-Table TotalItemSize
![]() Caution When you are in a co-existence scenario of Exchange Server 2013 with Exchange Server 2010, you need to move the system mailbox to Exchange Server 2013. If you do not, Exchange Server 2013 tasks will not be logged in the audit log and audit log searching will not work.
Caution When you are in a co-existence scenario of Exchange Server 2013 with Exchange Server 2010, you need to move the system mailbox to Exchange Server 2013. If you do not, Exchange Server 2013 tasks will not be logged in the audit log and audit log searching will not work.
Administrative auditing logging is a global setting enabled by default in Exchange Server 2013. It can be disabled using the following:
Set-AdminAuditLogConfig –AdminAuditLogEnable $False
To enable administrative audit logging, you use:
Set-AdminAuditLogConfig –AdminAuditLogEnable $True
If you want to view the current administrative audit logging settings, you use Get-AdminAuditLogConfig, as shown in Figure 9-49
:
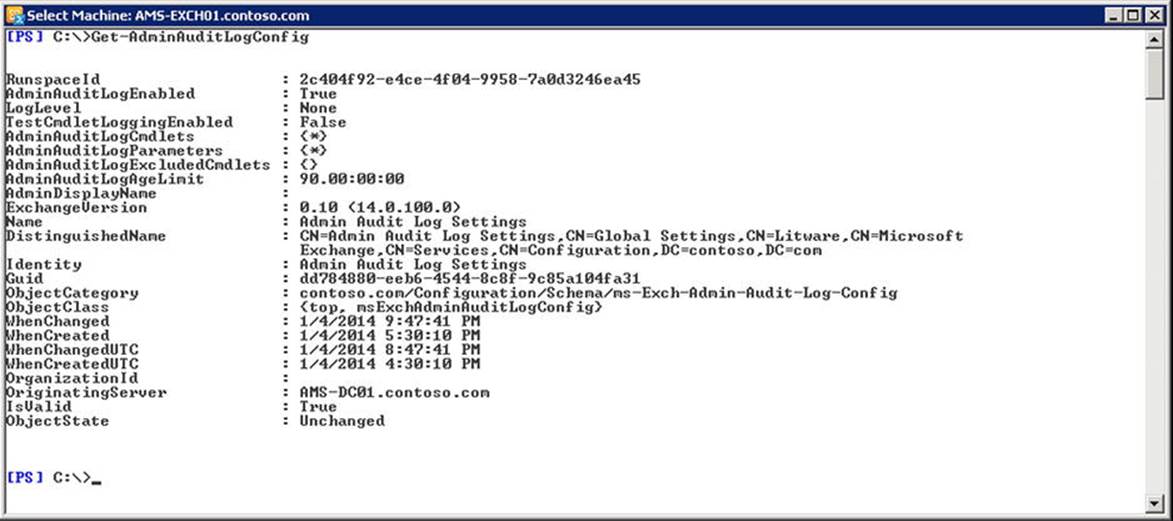
Figure 9-49. Administrator audit logging settings
As you can see from Figure 9-49, there are additional options for administrator audit logging. There are options to restrict logging to certain cmdlets or parameters, for example. These administrator audit logging options are explained next.
![]() Caution The administrator audit logging setting is stored in Active Directory, and depending on replication, it may not immediately be applied. Also, for any current Exchange Management Shell session, it may take up to one hour for the new setting to become effective.
Caution The administrator audit logging setting is stored in Active Directory, and depending on replication, it may not immediately be applied. Also, for any current Exchange Management Shell session, it may take up to one hour for the new setting to become effective.
Administrator Audit Logging Options
To restrict logging to only specific cmdlets or only if specific parameters are used, you use Set-AdminAuditLogConfig in combination with the AdminAuditLogConfigCmdlets and AdminAuditLogConfigParameters parameters. For example, to log only the cmdletsNew-Mailbox and Remove-Mailbox, you would use:
Set-AdminAuditLogConfig –AdminAuditLogCmdlets 'New-Mailbox','Remove-Mailbox'
You can also choose to exclude certain cmdlets from being logged using the AdminAuditLogExcludeCmdlets parameters; for example,
Set-AdminAuditLogConfig –AdminAuditLogExcludeCmdlets 'set-Mailbox'
You can restrict logging when certain parameters are used. For example, to log only the name, identity, Windows email address and email addresses parameters, you would use:
Set-AdminAuditLogConfig –AdminAuditLogParameters 'Name', 'Identity', 'WindowsEmailAddress', 'EmailAddresses'
To cover a set of related cmdlets or parameters, you can use wild cards. For example, to log only cmdlets related to the mailbox and only those parameters containing “address,” you would use:
Set-AdminAuditLogConfig –AdminAuditLogCmdlets '*-Mailbox' -AdminAuditLogParameters '*Address*'
The default values for AdminAuditLogCmdlets and AdminAuditLogParameters are *, which causes any cmdlet in combination with any parameter to be logged. If you want to reset these values to their default, you use:
Set-AdminAuditLogConfig –AdminAuditLogCmdlets '*' –AdminAuditLogParameters '*' –AdminAuditLogExcludeCmdlets $null
By default, administrative audit logging is restricted to a 90-day period. After 90 days, the log entries are deleted. You can increase or decrease this limit by using the AdminAuditLogAgeLimit parameter, specifying the number of days, hours, minutes, and seconds that entries should be kept. The format to specify this parameter is dd.hh:mm:ss. For example, to set the limit to 180 days, you use:
Set-AdminAuditLogConfig –AdminAuditLogAgeLimit 180.00:00:00
Administrative audit logging only logs information like the cmdlet ran, when it ran, the context, and any specified parameters and values. By configuring the log level to Verbose, it will also log the previous values of any changes attributes: Set-AdminAuditLogConfig –LogLevel Verbose. To return to the default logging, you set the log level to None.
By default, test cmdlets are not logged. To log the test cmdlets, set TestCmdletLoggingEnabled to $true; for example,
Set-AdminAuditLogConfig –TestCmdletLoggingEnabled $true
To disable it again, set TestCmdletLoggingEnabled to $false.
Custom Logging Entries
In addition to the administrator audit logging cmdlets, you can create custom entries in the administrator audit log. This can be useful when you want to create markers for when to run scripts or for maintenance stop and starting events, for example.
To create a custom administrative audit log entry, use the Write-AdminAuditLog cmdlet, with the Comment parameter to pass the message to log. For example, to log the start of a scheduled maintenance cycle, you could use:
Write-AdminAuditLog –Comment 'start of scheduled maintenance'
![]() Caution The maximum size of the comment text is 500 characters.
Caution The maximum size of the comment text is 500 characters.
Auditing Log Searches
Logging information for auditing purposes would be useless if there were no ways to search through or retrieve the logged information. To search the administrator audit log using EAC, navigate to Compliance Management ![]() Auditing, and select to view the administrator audit log or to export the administrator audit log when you want to perform a search and then send the results to a mailbox.
Auditing, and select to view the administrator audit log or to export the administrator audit log when you want to perform a search and then send the results to a mailbox.
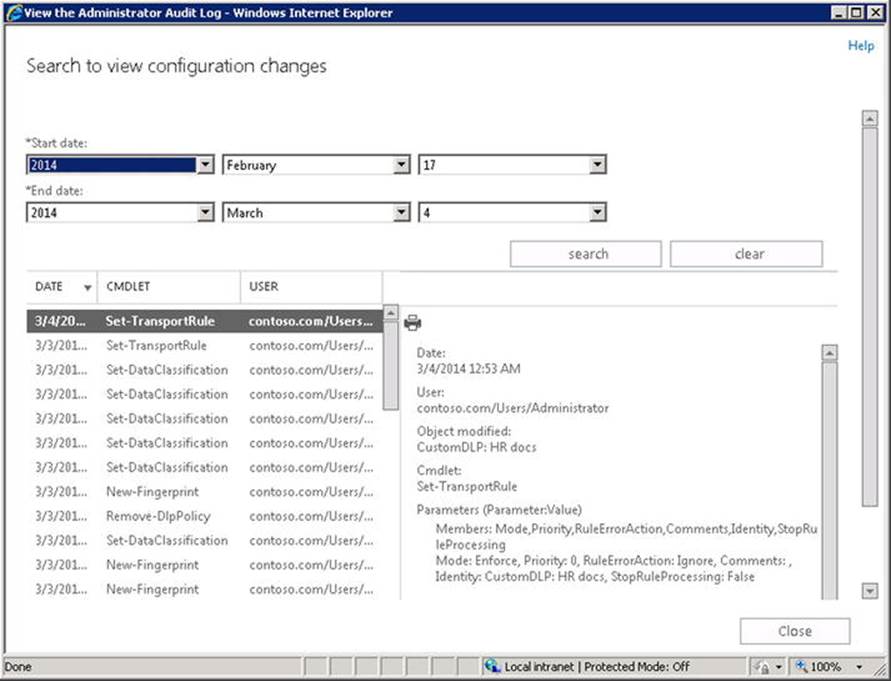
Figure 9-50. Inspecting the administrator audit log
EAC is a bit limited when it comes to searching the audit log, as you can only further specify the start and end dates for reports on the administrator audit log. When you want to check the administrative audit log using the EMS using additional search criteria, Exchange provides two cmdlets:
· Search-AdminAuditLog Use this cmdlet to search through the administrator audit log entries based on search criteria. These searches are synchronous.
· New-AdminAuditLogSearch This cmdlet is similar to Search-AdminAuditLog, but instead of returning the audit log entries, it can be used to send the results to a recipient. These searches run asynchronously in the background.
The search criteria you can specify with Search-AdminAuditLog and New-AdminAuditLogSearch are as follows:
· Cmdlets To specify which cmdlets you want to search for in the administrator audit log.
· Parameters Too specify which parameters you want to search for in administrator audit log.
· StartDate and EndDate To restrict the search in the administrator audit log to a certain period. When running an export using New-AdminAuditLogSearch, a start date and end date are mandatory.
· ObjectIds To specify the names of the changed objects to search for. This can be the name any Exchange-related configuration item, such as mailboxes, aliases, database, send connector, and the like.
· UserIds To search for cmlets in the administrator audit log ran by specific users.
· IsSuccess To restrict the search to successful or failed events.
· ExternalAccess When used in Exchange Online or Office 365, using $true will return audit log entries generated by Microsoft service administrators; using $false will return audit log entries generated by the tenant administrators.
· StatusMailRecipients Specifies the SMTP addresses of the recipients who should receive the audit log report. This parameter is only valid when using New-AdminAuditLogSearch.
· Name Specifies the subject of the email. This parameter is only valid when using New-AdminAuditLogSearch.
![]() Note It can take up to 15 minutes for Exchange to generate and deliver the report. The raw information in XML format attached to the report generated by New-AdminAuditLogSearch can have a maximum size of 10 MB.
Note It can take up to 15 minutes for Exchange to generate and deliver the report. The raw information in XML format attached to the report generated by New-AdminAuditLogSearch can have a maximum size of 10 MB.
For example, to search the audit log for entries where the Remove-TransportRule cmdlet was used on an object (in this case, transport rule) named ‘HR Documents’ since March 3, 2014, 3:15, you would use the following:
Search-AdminAuditLog –Cmdlets Remove-TransportRule -ObjectIds 'HR Documents' -StartDate '3/3/2014 3:15'

Figure 9-51. Using Search-AdminAuditLog to search the administrator audit log
![]() Tip As with many cmdlets, only the first 1,000 entries are returned. When necessary, use -ResultSize Unlimited to return all matching audit log entries.
Tip As with many cmdlets, only the first 1,000 entries are returned. When necessary, use -ResultSize Unlimited to return all matching audit log entries.
To return all cmdlets run by administrator against objects named Philip, you would use:
Search-AdminAuditLog –UserIds Administrator –ObjectIds Philip
To return all audit log entries where the New-ManagementRoleAssignment or Remove-ManagementRoleAssignment cmdlets were run, you would use:
Search-AdminAuditLog –Cmdlets New-ManagementRoleAssignment, Remove-ManagementRoleAssignment
To run the same query against the past 24 hours and send the results to a recipient named philip@contoso.com, you would use:
New-AdminAuditLogSearch –Name 'ManagementRoleAssignment Changes'
–Cmdlets New-ManagementRoleAssignment, Remove-ManagementRoleAssignment
-StatusMailRecipients philip@contoso.com -StartDate (Get-Date).AddDays(-1) –EndDate (Get-Date)
You can also search for specific parameter usage and or use ExpandProperty to get an overview of all changed values using parameters. For example, if you want to show changes in the circular logging settings of mailbox databases in the last seven days, you would use:
Search-AdminAuditLog –Cmdlet Set-MailboxDatabase -StartDate (Get-Date).AddDays(-7)
-EndDate (Get-Date) | Select RunDate,CmdletName -ExpandProperty CmdletParameters
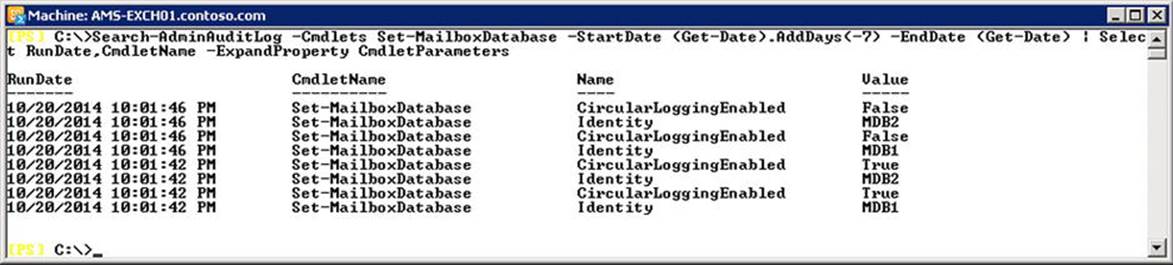
Figure 9-52. Using Search-AdminAuditLog to search the administrator audit log
You can retrieve a list of current searches using Get-AuditLogSearch. This will return both administrator audit log searches and mailbox audit logging searches. You can optionally specify “created after” and “created before” to limit the time span of the items returned. The returned information contains the name, the name of the job or email subject, and the recipients of the report. The time span used for the report is returned as an UTC time stamp in StartDateUtc and EndDateUtc. The attribute ‘Type’ can be used to differentiate between administrator audit log searches (“Admin”) and mailbox audit log searches (“Mailbox”):
Get-AuditLogSearch | Format-Table Name, Type, CreationTime, StartDateUtc, EndDateUtc, StatusMailRecipients –AutoSize
This cmdlet will return a list of current audit log searches, similar to the output shown in Figure 9-53.
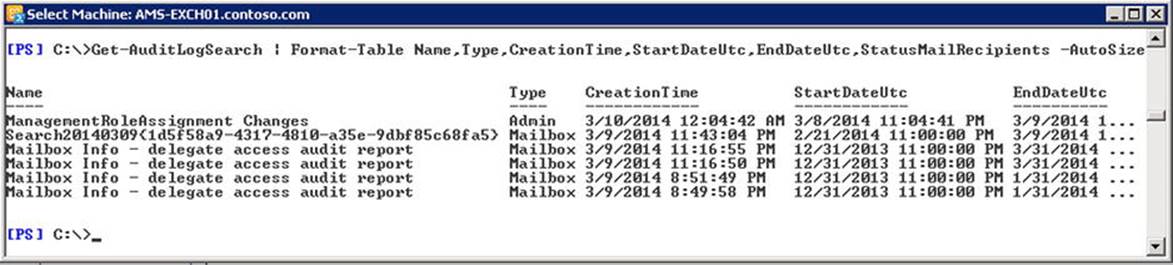
Figure 9-53. Retrieving a list of audit log search jobs
As shown in Figure 9-52, the audit log entries are returned as a set of objects. The structure of the returned administrator audit log entries is as follows:
· ObjectModified Contains the object modified.
· CmdletName Contains the cmdlet ran.
· CmdletParameters Contains the parameters specified with the cmdlet.
· ModifiedProperties Is only populated when the log level is set to Verbose. When set, this field will contain the modified properties of ‘ObjectModified’.
· Caller Contains the user account that ran the cmdlet.
· Succeeded Reports if the cmdlet ran successfully.
· Error Contains the error message if the cmdlet did not run successfully.
· RunDate Contains the time stamp when the cmdlet ran.
· OriginatingServer Indicates which server ran the cmdlet.
As you can see, the CmdletParameters, as well as the ModifiedProperties when applicable, will by default only display the parameter name or the name of the attribute changed. To see the related value, expand the CmdletParameters or ObjectModified attribute.
For example, to find the last logged New-TransportRule cmdlet and view what parameters and configuration values were used, you can use the following commands:
$LogEntry= Search-AdminAuditLog –Cmdlets New-TransportRule | Sort StartDate -Desc | Select –First 1
$LogEntry
$LogEntry.CmdletParameters
In Figure 9-54, you can see that TransportRule was last used on March 3, 2014, by “Administrator” to set the mode to Audit and Notify and to set Notify Sender to Reject Unless Explicit Override.
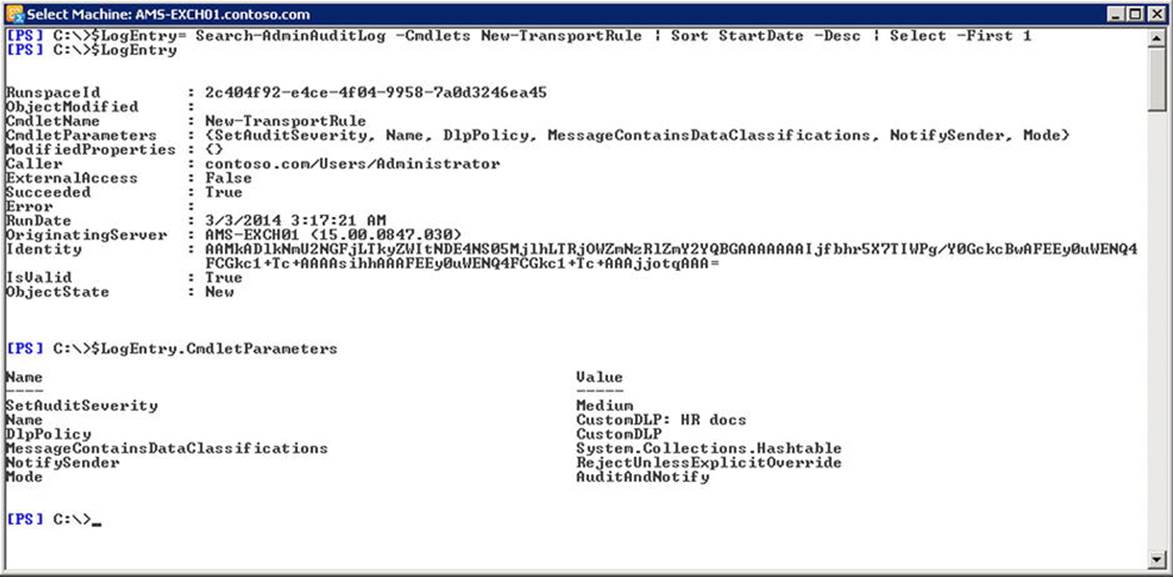
Figure 9-54. Inspecting the audit log entry using SearchAdminAuditLog
Mailbox Audit Logging
Along with the auditing administrative changes, an organization might require tracking the access or changes made to individual mailboxes, especially mailboxes potentially containing sensitive information from a business or privacy perspective. This also applies to non-personal mailboxes, which are mailboxes attached to a disabled user account and which are used by multiple mailbox users commonly referred to as “delegates.”
Mailbox audit logging can audit access and changes performed by the mailbox owners, delegates, and administrators. After enabling the mailbox audit logging, you can additionally limit the audit log to record only log certain operations—for example, creation, movement, or deletion of messages. You can also specify the logon type to audit—for instance, owner, delegate, or administrator.
You cannot enable mailbox audit logging using EAC. To enable mailbox audit logging from the EMS, use the Set-Mailbox cmdlet, setting AuditEnabled to $true; for example,
Set-Mailbox –Identity 'Info' –AuditEnabled $true
To verify that the auditing is enabled and see what has been the logged use, check the audit attributes of the mailbox, as follows:
Get-Mailbox –Identity 'Info' | Select Name, Audit*
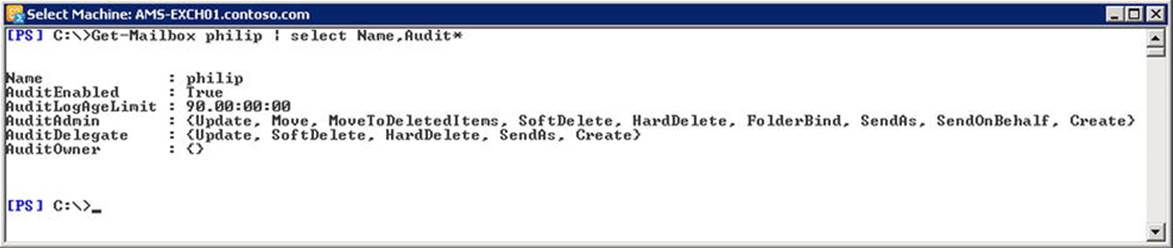
Figure 9-55. Verifying the mailbox audit logging settings
To disable mailbox audit logging, you use:
Set-Mailbox –Identity 'Info' –AuditEnabled $false
Mailbox Audit Logging Options
As seen earlier when verifying the mailbox audit logging settings, there are several options that can be used to determine what is logged per type of logon—that is, owner, delegate, or administrator. Not all actions can be logged for all logon types. Table 9-1 lists the mailbox audit logging options.
Table 9-1. Mailbox Audit Logging Options
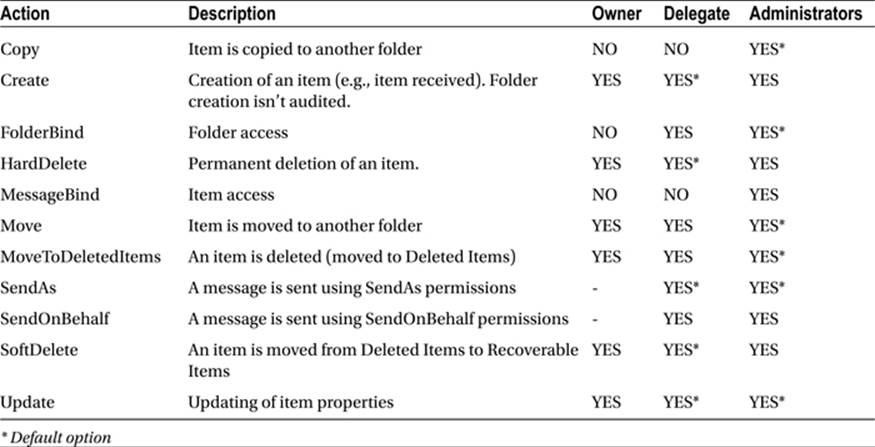
To log a specific action for a certain logon type, use the parameter AuditOwner for logging owner actions (this includes delegates with full access mailbox permissions), AuditDelegate for logging actions performed by delegate, and AuditAdmin for logging actions performed by administrators.
![]() Note FolderBind operations are consolidated. Only the first occurrence of FolderBind per folder in a three-hour time span generates a mailbox audit log entry.
Note FolderBind operations are consolidated. Only the first occurrence of FolderBind per folder in a three-hour time span generates a mailbox audit log entry.
For example, to enable mailbox audit logging on a shared mailbox called ‘Info’ and only log Send As actions for delegates, you would use:
Set-Mailbox –Identity 'Info' -AuditEnabled $true -AuditDelegate SendAs -AuditAdmin None -AuditOwner None
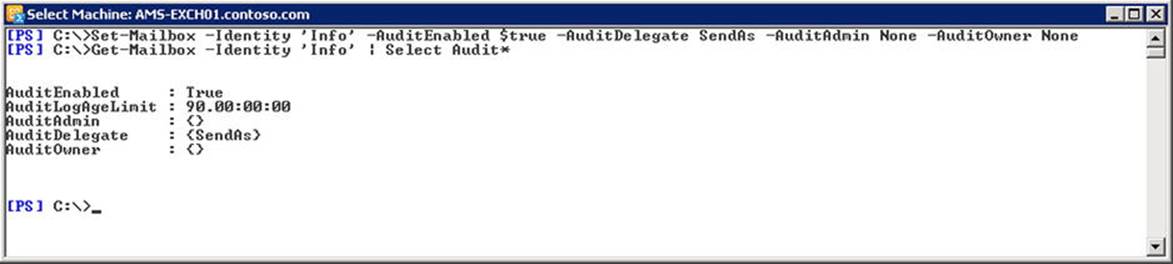
Figure 9-56. Configuring mailbox audit logging
When mailbox audit logging is enabled, the audit log entries are stored in the mailbox itself, in the audits folder located in the recoverable items folder. When a mailbox is moved, the recoverable items are also moved, including any existing audit log entries.
The default retention period of mailbox audit log entries is 90 days. You can adjust that retention period by using Set-Mailbox with the AuditLogAgeLimit parameter. For example, to set the retention period of the mailbox audit log for Philip’s mailbox to 180 days, you would use:
Set-Mailbox –Identity Philip –AuditLogAgeLimit 180
![]() Note If the mailbox is on in-place hold, the mailbox audit logs entries will not be removed after the retention period.
Note If the mailbox is on in-place hold, the mailbox audit logs entries will not be removed after the retention period.
If you are concerned about the amount of logged audit data in the mailbox after you have enabled the mailbox audit logging, you can use the following commands to check the size of the folder mailbox:
Get-Mailbox -Identity Info | Get-MailboxFolderStatistics –FolderScope RecoverableItems |
Where { $_.Name –eq 'Audits' } | Select FolderSize
In this command, Get-MailboxFolderStatistics retrieves statistical information on the folders. By using FolderScope, you can configure it to look into a specific well-known folder. As mentioned earlier, the mailbox audit log entries are stored in the recoverable items folder in a subfolder named “audits.” So, you set the scope to Recoverable Items to only return that folder. Next, you use Where to filter the folder name “audits,” of which you display its FolderSize property.
Searches of the Mailbox Audit Logging
To search a mailbox audit log using EAC, you navigate to Compliance Management ![]() Auditing. Exchange EAC provides two options for generating mailbox audit log reports:
Auditing. Exchange EAC provides two options for generating mailbox audit log reports:
· Run a non-owner mailbox access report. This option allows you to generate a report on non-owner access to mailboxes. You can select the search period, the auditing-enabled mailboxes to investigate, and the type of access.
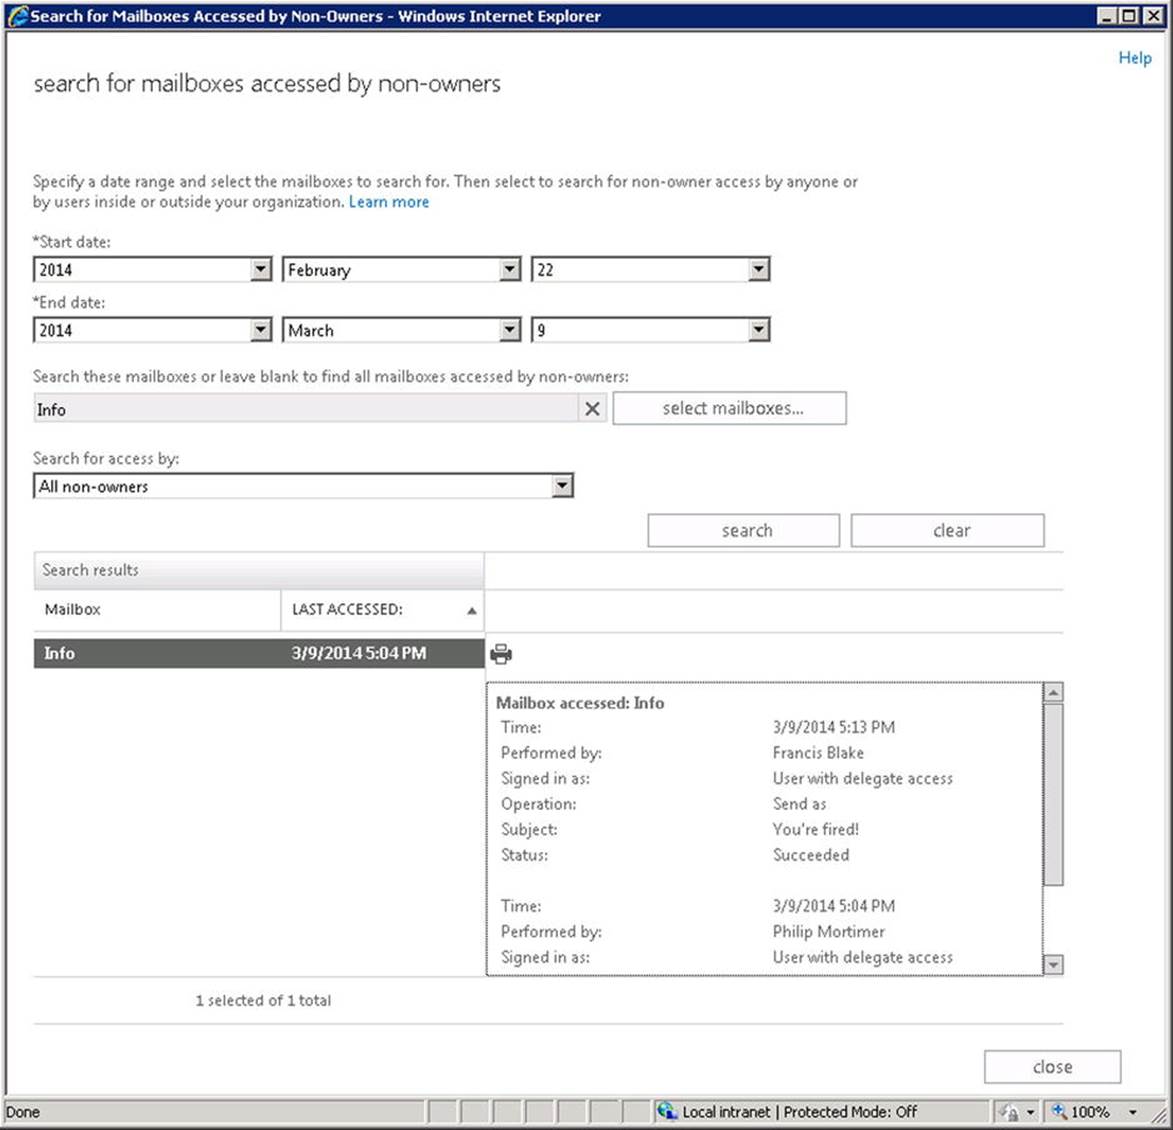
Figure 9-57. Report of mailboxes accessed by non-owners
· Export mailbox audit logs. This option allows you to export the mailbox audit logs and send them as an attachment to selected recipients.
As with administrator audit logging, the searching and reporting options are limited when managed through EAC. In the EMS, mailbox audit logging provides the following cmdlets for searching and reporting:
· Search-MailboxAuditLog. Use this cmdlet to search the mailbox audit logs based on search criteria. These searches are synchronous.
· New-MailboxAuditLogSearch. This cmdlet is similar to Search-MailboxAuditLog but instead of returning the audit log entries, it can be used to send the results to a recipient. These searches run asynchronously in the background.
![]() Note These cmdlets are similar in usage and purpose to the administrator audit logging searching cmdlets, Search-AdminAuditLog and New-AdminAuditLogSearch.
Note These cmdlets are similar in usage and purpose to the administrator audit logging searching cmdlets, Search-AdminAuditLog and New-AdminAuditLogSearch.
The search criteria you can specify with SearchMailboxAuditLog and New-MailboxAuditLogSearch are the following:
1. Identity To specify the mailboxes to search for audit log entries. This parameter is only available when using Search-MailboxAuditLog.
2. Mailboxes To specify the mailboxes to search for audit log entries. When neither identity nor mailboxes is specified, all mailbox auditing enabled mailboxes will be searched.
3. LogonTypes To specify the logon types to search. Valid logon types are:
· Admin for administrator logon types.
· Delegate for delegate logon types, including users with Full Access.
· External for Microsoft service administrators in Exchange Online or Office 365.
· Owner for primary owner.
4. ShowDetails to retrieve details of each audit log entry. This parameter is mandatory when LogonTypes is set to Owner and can’t be used together with the mailboxes parameter. This parameter is only available when using Search-MailboxAuditLog.
5. StartDate and EndDate to restrict the search in the administrator audit log to a certain period. When running an export using New-AdminAuditLogSearch, the start date and end date are mandatory.
6. ExternalAccess to search for audit log entries generated by users outside of your organization such as Microsoft service administrators in Exchange Online or Office 365.
7. StatusMailRecipients specifies the SMTP addresses of the recipients that should receive the audit log report. This parameter is only available when using New-MailboxAuditLogSearch.
8. Name specifies the subject of the email. This parameter is only available when using New-MailboxAuditLogSearch.
When used without specifying parameters, Search-MailboxAuditLog will return all auditing-enabled mailboxes, as follows:
Search-MailboxAuditLog
To see what auditing information is returned by mailbox audit logging, let’s pick a single audit log entry while specifying ShowDetails to include detailed information, as follows:
Search-MailboxAuditLog –ShowDetails –ResultSize 1
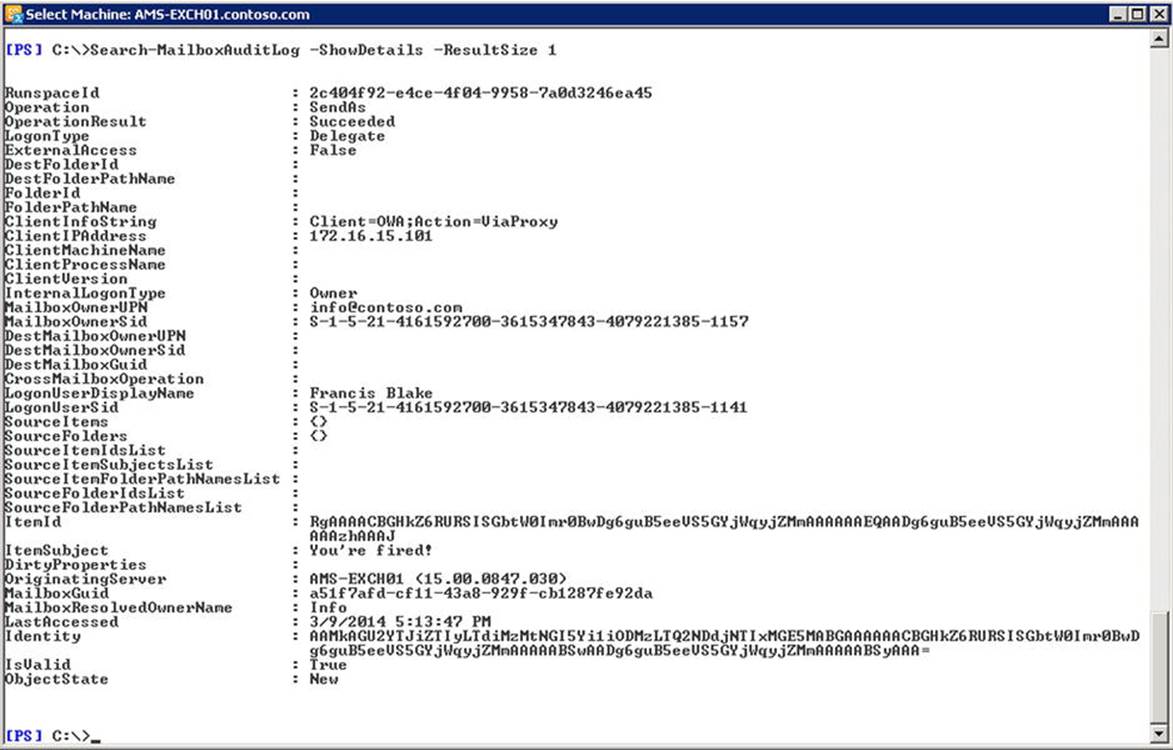
Figure 9-58. Audit information returned Search-MailboxAuditLog -ShowDetails
As you can see, a lot of information is available per audit log entry. You may notice a few unpopulated fields, which are due to the operation. In this example, folder names are not logged for SendAs operations. Here’s a short list of some of the important fields:
· LastAccessed Contains the time stamp when the operation was performed.
· Operation Is one of the actions Copy, Create, FolderBind, HardDelete, MessageBind, Move, MoveToDeletedItems, SendAs, SendOnBehalf, SoftDelete, or Update.
· OperationResult Shows if the operation succeeded, failed, or partially succeeded.
· LogonType Shows who performed the operation, whether the owner, a delegate, or administrator.
· FolderPathName Contains the folder name that contains the item.
· ClientInfoString Contains information about the client or Exchange component that performed the operation.
· ClientIPAddress Contains the IPv4 address of the client computer used.
· InternalLogonType Contains the type of logon performed by the non-owner.
· MailboxOwnerUPN Contains the UPN of the mailbox owner.
· DestMailboxOwnerUPN Contains the UPN of the destination mailbox owner for cross-mailbox operations; CrossMailboxOperation contains information about whether the operation is acrossmailboxes.
· LogonUserDisplayName Contains the display name of the logged on user who performed the operation.
· ItemSubject Contains the subject line of the item affected.
· MailboxResolvedOwnerName Contains the display name of the mailbox.
For example, to search all auditing-enabled mailboxes for log entries generated for non-owner access by delegate or administrator logon types, you could use:
Search-MailboxAuditLog –LogonTypes Delegate,Admin -ShowDetails | Format-Table LastAccessed, MailboxResolvedOwnerName, Operation, LogonType, LogonUserDisplayName, ClientIPAddress, ItemSubject -AutoSize
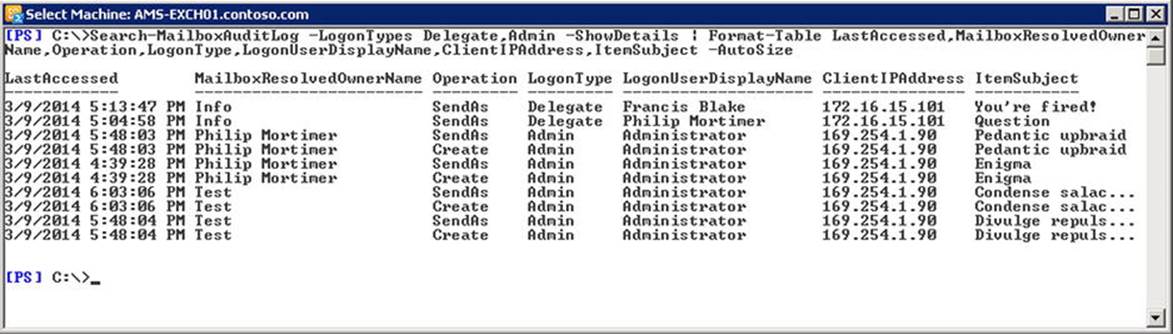
Figure 9-59. Using Search-MailboxAuditLog to search mailbox audit log entries
![]() Note Use ResultSize to limit the number of entries when using Search-MailboxAuditLog.
Note Use ResultSize to limit the number of entries when using Search-MailboxAuditLog.
In this example, you query the mailbox ‘Info,’ which is mailbox auditing enabled, for non-owners’ access to a specific folder. Because you can not specify the operations to search for directly as a Search-MailboxAuditLog parameter, you can pipe the output through Where-Object, where you filter entries so that only objects where the operation is FolderBind (i.e., folder access) and the folder path name is ‘\Inbox.’ Of the objects returned, you then select certain fields for displaying:
Search-MailboxAuditLog -Identity 'Info' –LogonTypes Delegate, Admin -ShowDetails | Where { $_.Operation –eq 'FolderBind' -and $_.FolderPathName –eq '\Inbox' } | Format-Table LastAccessed, InternalLogonType, LogonType, LogonUserDisplayName, FolderPathname

Figure 9-60. Using Search-MailboxAuditLog to search for folder access by delegate
When required, you can narrow your search to a certain period by specifying the start date and end date as well.
In addition to Search-MailboxAuditLog you can use New-MailboxAuditLogSearch to gather mailbox audit log information in the background and have it sent as an email attachment to specific recipients. The parameters you can use are similar to those you can use withSearch-MailboxAuditLog, only you can’t use identity for reporting on a specific mailbox; you need to specify the message subject (name) and recipients (status mail recipients).
That said, to create a background mailbox audit log query on delegate access to a mailbox called ‘Info’ from January 1, 2014 to February 1, 2014, you could use:
New-MailboxAuditLogSearch –StartDate '1/1/2014' –EndDate '4/1/2014' -Mailboxes 'Info' –ShowDetails –LogonTypes Delegate –Name 'Mailbox Info - delegate access audit report' -StatusMailRecipientsphilip@contoso.com
You can use Get-AuditLogSearch to list current audit log searches. The generated export of audit information in XML format and the accompanying email message will look similar to those shown in Figure 9-61.
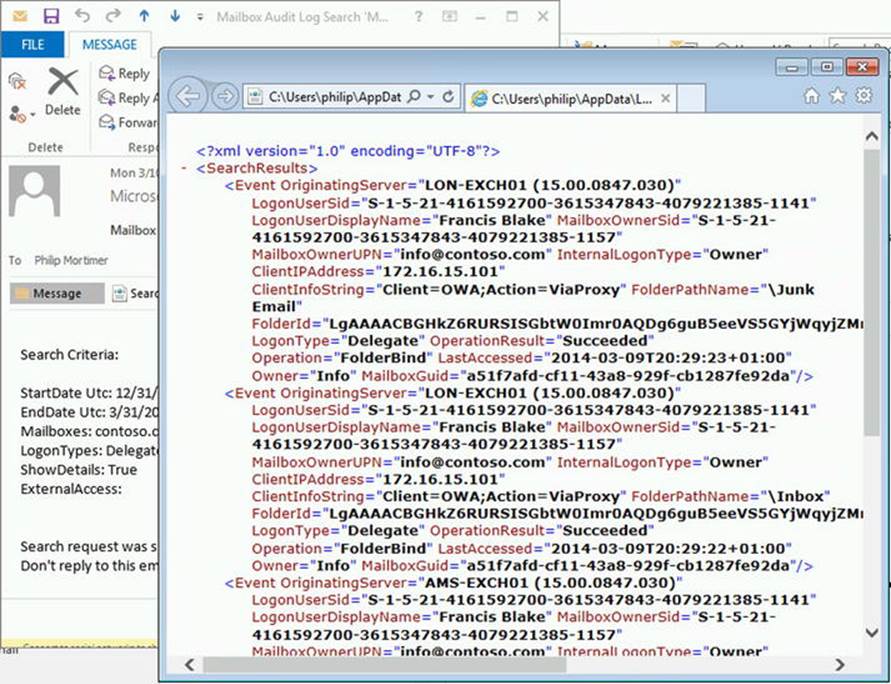
Figure 9-61. Mailbox audit log information report with attached XML formatted data
As visible, the XML contains the same elements as the Search-MailboxAuditLog output, allowing organizations to perform additional processing or reporting using the information contained in the XML file. For example, when you store the attached XML file locally, you can import it using PowerShell by using:
[xml](Get-Contents .\SearchResults.xml)
![]() Note Do not try to import an XML file using Import-CliXml. The purpose of Import-CliXml is to import serialized powerShell objects, usually generated using the Export-CliXml cmdlet.
Note Do not try to import an XML file using Import-CliXml. The purpose of Import-CliXml is to import serialized powerShell objects, usually generated using the Export-CliXml cmdlet.
A simple query to retrieve the information contained in SearchResults.xml and select certain information from audit log events is as follows:
[xml](Get-Contents .\SearchResults.xml) | Select –ExpandProperty SearchResults | Select –ExpandProperty Event | Format-Table LastAccessed, LogonType, Operation, LogonUserDisplayName, FolderPathName –AutoSize
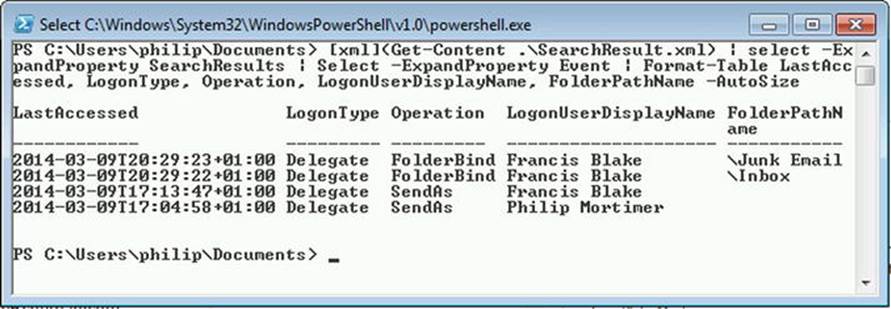
Figure 9-62. Sample of using SearchResults.xml with audit information
Bypass of Mailbox Audit Logging
Applications may implicitly use administrator permissions when processing mailboxes, generating excessive amounts of audit log information for mailboxes that have mailbox auditing enabled for MessageBind or FolderBind operations. Examples of such applications are backup or archiving solutions. Audit log information generated by these applications are likely not of interest to the organization with regard to compliance, and are viewed only as creating “noise” in the mailbox audit logs while also claiming valuable system resources in the process.
To create exceptions for these types of applications, Exchange Server 2013 can be configured to bypass mailbox auditing using mailbox auditing bypass associations. These bypass associations can be assigned to user or computer accounts. The cmdlet to configure bypass associations isSet-MailboxAuditBypassAssociation. To configure bypass for an account named ‘BesAdmin,’ for example, you would use:
Set-MailboxAuditBypassAssociation -Identity 'BesAdmin' –AuditBypassEnabled $true
To remove the bypass association for ‘BesAdmin,’ you set AuditBypassEnabeld to $false:
Set-MailboxAuditBypassAssociation -Identity 'BesAdmin' –AuditBypassEnabled $false
To retrieve the accounts currently associated with mailbox auditing bypass, you use:
Get-MailboxAuditBypassAssociation | Where { $_.AuditBypassEnabled } | Select Name
![]() Caution When configuring mailbox auditing bypass associations, bear in mind that some organizations need to closely monitor these bypass associations, as these accounts will not generate mailbox audit log information. Alternatively, organizations can leverage role-based access control to restrict those configuring bypass associations using the Exchange Management Shell. You can also monitor the msExchBypassAudit attribute of user objects in Active Directory.
Caution When configuring mailbox auditing bypass associations, bear in mind that some organizations need to closely monitor these bypass associations, as these accounts will not generate mailbox audit log information. Alternatively, organizations can leverage role-based access control to restrict those configuring bypass associations using the Exchange Management Shell. You can also monitor the msExchBypassAudit attribute of user objects in Active Directory.
Message Classification
A little-known, and therefore little-used, feature available in Exchange is message classification. This feature was introduced with Exchange Server 2007 and Outlook 2007. Message classification allows you to add metadata to messages using Outlook, such as the intended audience. Those classifications can be used in transport rules, for example, to act on messages depending on their classifications—as in blocking certain mail flow of “internal use only” messages or applying IRM templates. Unfortunately, classifications made available in Outlook are not easy to manage, but more on that in a short while.
Message classifications cannot be managed from EAC. To create a message classification, you use the New-MessageClassification cmdlet; for example,
New-MessageClassification –Name 'InternalUseOnly'
–DisplayName 'Internal Use Only' –SenderDescription 'This message is for internal use only'.
This cmdlet will create a message classification of Default\InternalUseOnly with a display name of ‘Internal Use Only.’ The text visible at the top of the message will be “This message is for internal use only.”
![]() Tip You can specify a separate recipient description to show the receiver of the message. When the recipient description is not specified, Sender Description will be used instead.
Tip You can specify a separate recipient description to show the receiver of the message. When the recipient description is not specified, Sender Description will be used instead.
You can view the current defined message classifications using Get-MessageClassificiation, as shown in Figure 9-63.
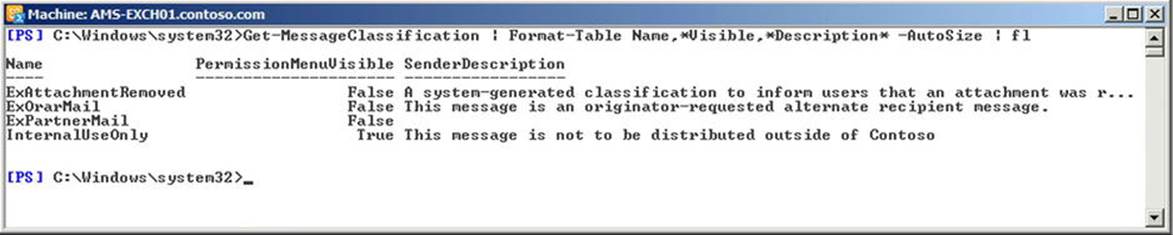
Figure 9-63. Viewing the message classification definitions
As you may spot, there are three additional message classifications: ExAttachmentRemoved, ExOrarMail, and ExPartnerMail. These are built-in message classifications that are not selectable, as their PermissionMenuVisible is set to $False, nor can they be changed or removed.
The identity of the example classification is Default\InternalUseOnly. Default is to indicate it is the default InternalUseOnly classification picked for display name and description information. You can also create localized versions of message classifications by specifying the locale parameter while using the same name; for example,
New-MessageClassification –Name 'InternalUseOnly' –Locale nl-NL
–DisplayName 'Intern Gebruik' –SenderDescription 'Dit bericht is uitsluitend bestemd voor intern gebruik'.
![]() Tip When you want to use the same classification between organizations or between Exchange on-premises and Exchange Online, keep the classification IDs in sync. The ID is stored in the header field “X-MS-Exchange-Organization-Classification” when messages leave or enter the organization. You can set this ID when creating classifications or by Set-MessageClassification using the ClassificationID parameter (looks like a GUID in the Export-OutlookClassifications XML file); for example,
Tip When you want to use the same classification between organizations or between Exchange on-premises and Exchange Online, keep the classification IDs in sync. The ID is stored in the header field “X-MS-Exchange-Organization-Classification” when messages leave or enter the organization. You can set this ID when creating classifications or by Set-MessageClassification using the ClassificationID parameter (looks like a GUID in the Export-OutlookClassifications XML file); for example,
Set-MessageClassification–Identity 'InternalUseOnly' –ClassificationID '733d2e24-6f92-4b3e-acad-dc3674b91927'
The identity of this classification will be nl-NL\InternalUseOnly. To view all message classifications including localized ones, use Get-MessageClassification with –IncludeLocales; for example,
Get-MessageClassification –IncludeLocales
After creating the classifications, they are selectable from the Set Permissions option:
The receiver, as well as the sender, of an email will see the configured description at the top of the message, upon opening it, as shown in Figure 9-65.
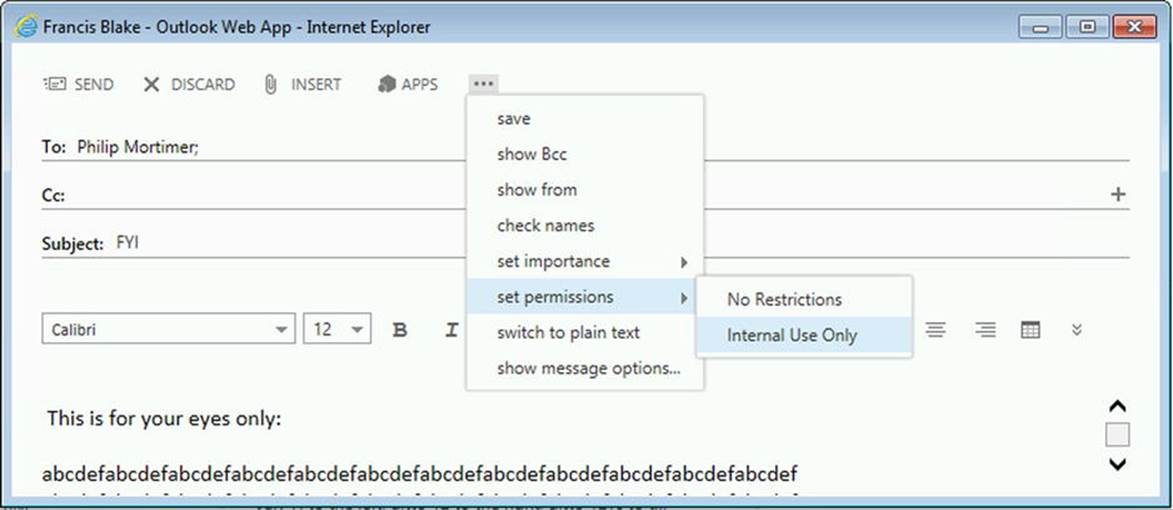
Figure 9-64. Assigning the message classification using Outlook WebApp
To remove an existing classification, use Remove-MessageClassification; for example,
Remove-MessageClassification –Identity 'Default\InternalUseOnly'
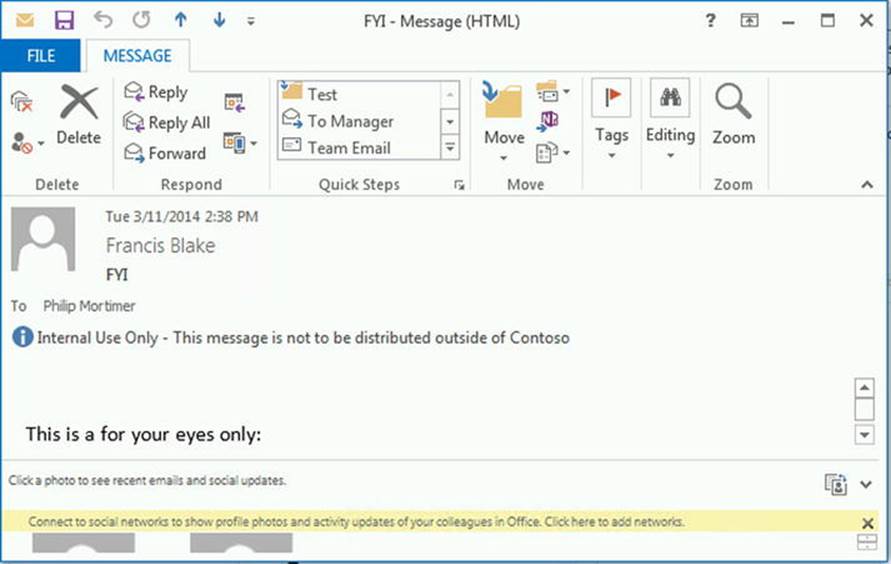
Figure 9-65. Message classification descrption in Outlook
Outlook and Classifications
Before you can use these classifications from Outlook, you need to export classifications from Exchange to an XML file, distribute those XML files to clients, and configure several registry keys so that Outlook picks up the XML file. The steps are as follows:
1. From the Exchange Management Shell, run the Export-OutlookClassification.ps1 script from the Exchange scripts folder; for example,
& 'C:\Program Files\Microsoft\Exchange Server\v15\Scripts\Export-OutlookClassification.ps1' | Set-Content 'C:\ProgramData\Microsoft\Office\OutlookClass.xml'
2. The Exchange Server 2013 SP1 version of the Export-OutlookClassifications.ps1 script will also export built-in classifications. To prevent them from becoming options in Outlook, edit the XML file and remove the ExAttachmentRemoved, ExOrarMail, and ExPartnerMail classification items.
3. Copy the XML file to a location on the client that is readable by users.
4. On the client, make the following registry changes. For example, C:\ProgramData\Microsoft\Office\OutlookClass.xml as the location of the classification XML file. Note that 15.0 is for configuring Outlook 2013; use 14.0 for Outlook 2010 and 12.0 for Outlook 2007.
[HKEY_CURRENT_USER\Software\Microsoft\Office\15.0\Common\Policy]
'AdminClassificationPath'='C:\\ProgramData\\Microsoft\\Office\\OutlookClass.xml'
'EnableClassifications'=dword:00000001
'TrustClassifications'=dword:00000001
5. Restart Outlook. Now, when composing a message, you will see the message classification options appear under Options ![]() Permission Level.
Permission Level.
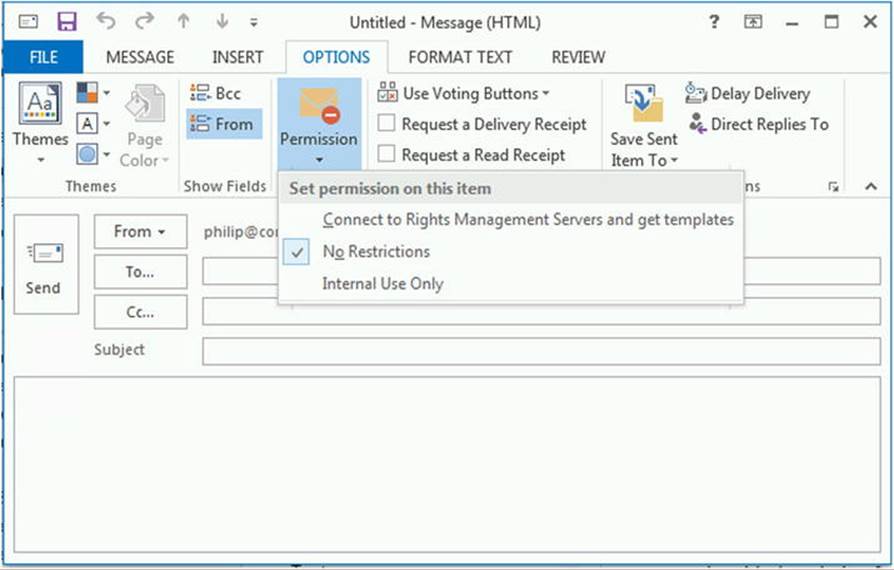
Figure 9-66. Assigning message classification using Outlook
Classifications and Transport Rules
As explained earlier, you can use transport rules to act upon message classifications. As a small example, create a transport rule that will apply an RMS template on messages with the classification InternalUseOnly. To select messages with this specific classification, use theHasClassification predicate:
New-TransportRule –Name 'RMS Confidential to InternalUseOnly'
–HasClassification 'InternalUseOnly'
–ApplyRightsProtectionTemplate 'Contoso-Confidential'
Information Rights Management
Apart from wanting to have control over the retention of information and the flow of communications, an organization may need to control what receivers of those messages can do with the information. For example, an organization may want to disallow forwarding, printing, or exporting of messages. This is where information rights management (IRM)comes into play.
![]() Caution Though IRM offers advanced technologies to protect information, it cannot protect information from being reproduced using third-party screen-capture software, cell phones, or cameras. However, high-risk environments could be covered by having workplaces where, for example, cell phones are prohibited.
Caution Though IRM offers advanced technologies to protect information, it cannot protect information from being reproduced using third-party screen-capture software, cell phones, or cameras. However, high-risk environments could be covered by having workplaces where, for example, cell phones are prohibited.
The purpose of IRM is to provide protection of messages, certainly online but also offline when users are traveling and carrying that information with them. As shown with regard to message classifications, you can enable users to mark information as “Internal Use Only” or other categories that can determine how the information should be treated. However, the sender has no control over the information, nor if the recipient treats the information according company policies; the recipient can, willfully or inadvertently, forward messages to an external email address.
Thus, IRM features were introduced with Exchange Server 2007 but they required a separate service, the Windows Rights Management Service (RMS). The IRM features were enhanced in Exchange Server 2010, allowing leverage use of the Active Directory Rights Management Services(AD RMS) role that came with Windows Server 2008 instead. A welcome feature in Exchange Server 2010 was, for example, the support for RMS in Outlook WebApp on non-Microsoft browsers. Exchange Server 2013 goes a step further yet; it allows you to not only utilize AD RMS but also use a cloud-based RMS service, Azure Active Directory Rights Management (AADRM). This section will focus on on-premises use of AD RMS.
AD RMS protects information such as messages or documents by attaching an extensible rights markup language (XrML)-based certificate or license. This XrML file contains the rights-authorized users for the content. To access the information, AD RMS-enabled applications must procure a use license for the authorized user from the AD RMS service. Exchange Server 2013 will, by means of the prelicensing transport agent on the Mailbox servers, automatically attach usage license information to the protected messages. This not only prevents clients from having to converse with the AD RMS server but also allows for offline viewing of protected contents.
![]() Note AD RMS is supported by Outlook 2010 and up, Outlook WebApp, Windows Phone, and its predecessor Windows Mobile 6, but also many non-Windows devices. Devices supporting Exchange ActiveSync 14.1 and up (more specific supporting the RightsManagementInformaton tag) can create, read, reply to, or forward IRM-protected messages without requiring the user to connect to a computer and activate it for IRM, which was the case with Windows Mobile 6.x. Exchange ActiveSync 14.1 was introduced with Exchange Server 2010 Service Pack 1.
Note AD RMS is supported by Outlook 2010 and up, Outlook WebApp, Windows Phone, and its predecessor Windows Mobile 6, but also many non-Windows devices. Devices supporting Exchange ActiveSync 14.1 and up (more specific supporting the RightsManagementInformaton tag) can create, read, reply to, or forward IRM-protected messages without requiring the user to connect to a computer and activate it for IRM, which was the case with Windows Mobile 6.x. Exchange ActiveSync 14.1 was introduced with Exchange Server 2010 Service Pack 1.
Exchange Server 2013 is also capable of reading IRM-protected information by means of the RMS decryption transport agent on the Mailbox servers. This transport agent decrypts received or submitted messages, enabling, for example, transport rules to check conditions against IRM-protected messages.
Configuring the Active Directory Rights Management Services
Essentially, the process of setting up a basic AD RMS server consists of the following steps:
1. Determine your AD RMS requirements. Also, if you want to add multiple AD RMS servers to the AD RMS cluster, you need Microsoft SQL Server; otherwise, you can utilize Windows Internal Database for storing information. You create prerequisites like the AD RMS service account, which can be a standard account or managed service account.
2. Determine on which server you will host the AD RMS cluster. It is best practice to run AD RMS on dedicated servers and not install it on a domain controller or an Exchange server.
3. Add the Active Directory Rights Management Services role.
For more information on configuring and managing AD RMS, visit http://bit.ly/ADRMSVC.
After installation of AD RMS, there remain some post-configuration steps to be performed so as to enable AD RMS support on Exchange Server 2013:
1. Grant, read, and execute permissions to the AD RMS certification pipeline (ServerCertification.asmx) to the Exchange servers group and AD RMS service. By default, this file is located in'$env:SystemDrive\inetpub\wwwroot\_wmcs\certification' on the AD RMS server. For example, when the default location is used and the AD RMS service is named ADRMSSVC, you use the following command:
$File= 'C:\inetpub\wwwroot\_wmcs\certification\ServerCertification.asmx'
$Acl= Get-Acl -Path $File
$ExPerm= New-Object System.Security.AccessControl.FileSystemAccessRule(
'Exchange Servers','ReadAndExecute', 'Allow')
$SvcPerm= New-Object System.Security.AccessControl.FileSystemAccessRule(
'AD RMS Service Group','ReadAndExecute', 'Allow')
$Acl.AddAccessRule( $ExPerm)
$Acl.AddAccessRule( $SvcPerm)
Set-Acl -Path $File -AclObject $Acl
![]() Note If you receive an error message when running Set-Acl, stating that it attempted to perform an unauthorized operation, use the following alternative: [System.IO.File]::SetAccessControl( $File, $Acl)
Note If you receive an error message when running Set-Acl, stating that it attempted to perform an unauthorized operation, use the following alternative: [System.IO.File]::SetAccessControl( $File, $Acl)
2. Add the federation mailbox FederatedEmail.4c1f4d8b-8179-4148-93bf-00a95fa1e042 to an AD RMS super-users group on the AD RMS cluster. This allows decryption of messages in transport and journals the reports and IRM in Outlook WebApp and Exchange Search. For example:
New-ADGroup –Name 'ADRMSSuperUsers' –Security Security –GroupScope Global
Add-ADGroupMember –Identity 'ADRMSSuperUsers'
–Members FederatedEmail.4c1f4d8b-8179-4148-93bf-00a95fa1e042
![]() Caution Members of the super-users group can decrypt any IRM-protected contents. Monitor and auditing of this group is, therefore, highly recommended.
Caution Members of the super-users group can decrypt any IRM-protected contents. Monitor and auditing of this group is, therefore, highly recommended.
3. On the AD RMS cluster, using the Active Directory Rights Management Services console, you configure the super-users group via Security Policies ![]() Super Users. On that node, you perform “Enable Super Users.” Then, you open up the properties dialog of the super-users node and configure the distribution group created earlier as the super-user group.
Super Users. On that node, you perform “Enable Super Users.” Then, you open up the properties dialog of the super-users node and configure the distribution group created earlier as the super-user group.
4. Depending on whether you configured AD RMS to use an https connection in conjunction with a self-signed certificate, you must export that self-signed certificate from the AD RMS cluster and import it on the Exchange Mailbox servers. After installation, this self-signed certificate will be valid for communications between Exchange and the AD RMS cluster.
5. Exchange must be configured for IRM, and internal recipients must IRM-enabled for them to be able to access the AD RMS templates, which are used for IRM-protected contents. To enable IRM for internal recipients, you use:
Set-IRMConfiguration –InternalLicensingEnable $true
To inspect the current IRM configuration settings, you use Get-IRMConfiguration, as shown in Figure 9-67.
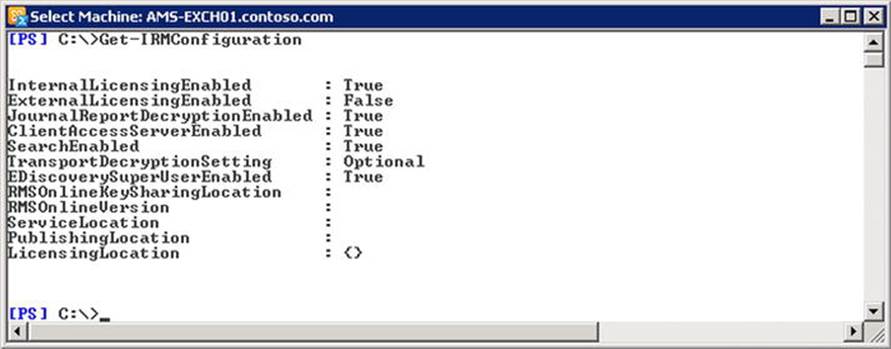
Figure 9-67. Checking current IRM configuration settings
As you might notice, the TransportDecryptionSetting is initially configured as Optional, meaning Exchange will deliver the message even if it cannot decrypt the message. If you do not want that, use Set-IRMConfiguration; in this case, you set TransportDecryptionSetting to Mandatory; for example,
Set-IRMConfiguration -TransportDecryptionSetting Mandatory
![]() Note When the transport decryption is set to mandatory, failure to decrypt a message will result in an NDR.
Note When the transport decryption is set to mandatory, failure to decrypt a message will result in an NDR.
The other switches you may need to adjust according to the requirements of your organization are as follows:
· JournalReportDecryptionEnabled Determines if the journaling agent is allowed to attach a decrypted copy of an IRM-protected message to the journal reports.
· ClientAccessServerEnabled Determines if IRM functionality is available on Client Access servers for Outlook WebApp and Exchange ActiveSync.
![]() Note When Exchange ActiveSync is enabled for IRM, it is recommended you use the ActiveSync policy settings Require Password and Require Device Encryption, and that you disallow non-provisionable devices.
Note When Exchange ActiveSync is enabled for IRM, it is recommended you use the ActiveSync policy settings Require Password and Require Device Encryption, and that you disallow non-provisionable devices.
· SearchEnabled Determines if Exchange search is allowed to index IRM-protected messages.
· EDiscoverSuperUserEnabled Determines if IRM-protected messages in the discovery mailbox can be accessed by members of the discovery management role group.
![]() Note You cannot export IRM-protected messages from a discovery mailbox to another mailbox or PST file. Those messages can only be accessed using Outlook WebApp.
Note You cannot export IRM-protected messages from a discovery mailbox to another mailbox or PST file. Those messages can only be accessed using Outlook WebApp.
6. To verify that IRM is working properly, use Test-IRMConfiguration with two valid email addresses; for example,
Test-IRMConfiguration –Recipient philip@contoso.com
–Sender francis@contoso.com
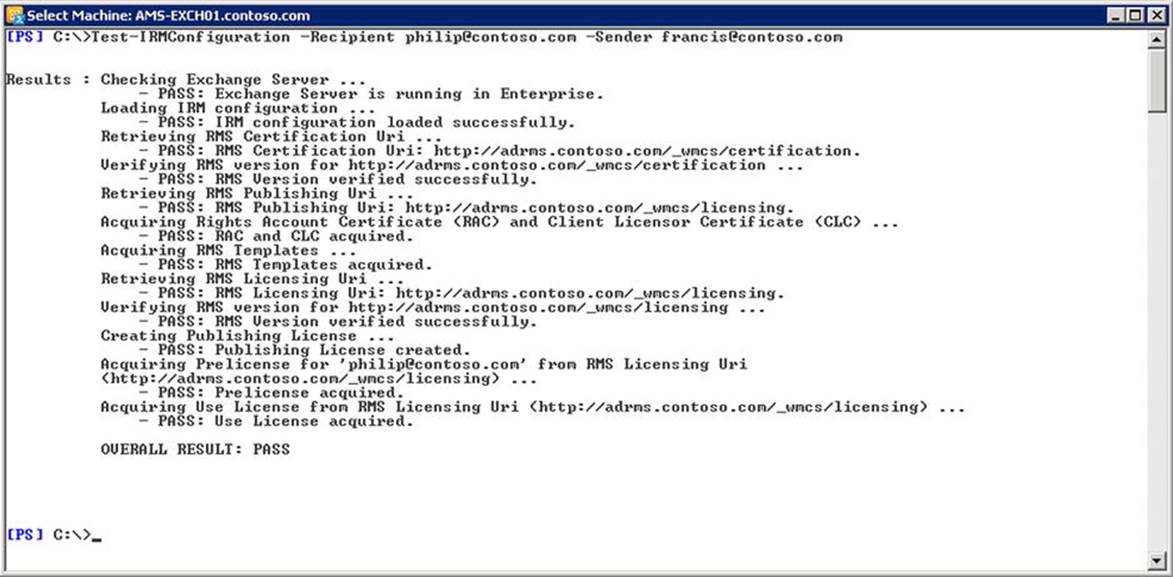
Figure 9-68. Verifying the IRM configuration
Choosing AD RMS Templates
Once you have verified that IRM is set up properly, you can check the default set of RMS templates. Exchange 2013 provides, by default, one “Do Not Forward” RMS template. You can view the current set of RMS templates using Get-RMSTemplate:
Get-RMSTemplate

Figure 9-69. Viewing the RMS template definitions
You can create custom AD RMS templates depending on the needs of your organization. Per template, you can specify the Active Directory-based user or group that is allowed to use it, or you can specify that anyone can use it if it should be made generally available.
Some ideas for AD RMS templates are the following:
· Company-wide or department-only confidential for limiting accessibility to a selection of recipients within an organization.
· View-only when you want recipients to be able to only view messages but not reply, forward, or print the message.
· Prohibit print, where you allow all functions except the printing option.
· Prohibit reply to all, where you allow all functions except the reply to all option.
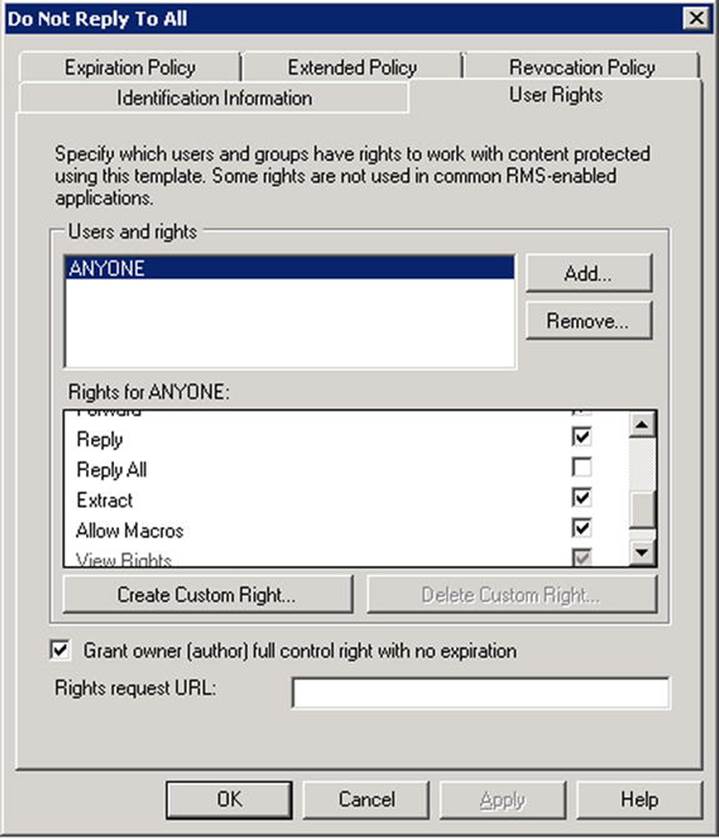
Figure 9-70. RMS template properties
For more information on creating and managing your own AD RMS templates, visit http://bit.ly/ADRMSTemplates.
Protecting Messages Using IRM
Outlook users can apply IRM-protection to messages using AD RMS templates. Despite this being a client-driven IRM-protection, Exchange can access the information provided it is using the same AD RMS infrastructure. When using Outlook 2010 or later, IRM protection can be automatic, using Outlook protection rules.
Before Outlook can use RMS to view or protect messages, though, Outlook needs to retrieve and configure the RMS templates. When you create a message and open up the Options ![]() Permission menu, you will see that, apart from any available message classifications, Outlook provides the option to “Connect to Rights Management Servers” and get templates. Select it to download the RMS templates.
Permission menu, you will see that, apart from any available message classifications, Outlook provides the option to “Connect to Rights Management Servers” and get templates. Select it to download the RMS templates.
Figure 9-71. Outlook retrieving RMS templates
After Outlook has retrieved the RMS templates, the RMS templates appear as options in the permission Options ![]() Permission button or the File
Permission button or the File ![]() Set Permissions menu. In Outlook WebApp, these options are located below
Set Permissions menu. In Outlook WebApp, these options are located below ![]() Set Permissions.
Set Permissions.
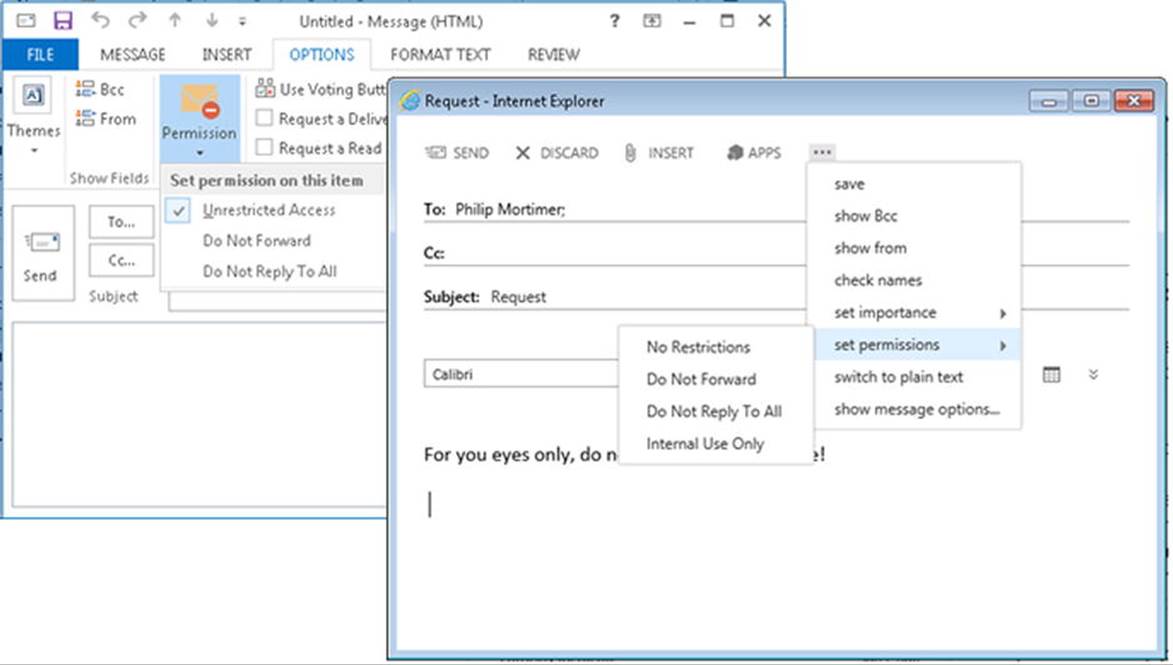
Figure 9-72. Outlook and Outlook WebApp displaying IRM options
When an IRM-protected message enters your inbox, it will be accompanied by a Stop icon to indicate its protected status. When recipients open IRM-protected messages, they are limited in their options to further process the information. For example, the Reply All and Forward options are disabled in the screen captures shown in Figure 9-73.
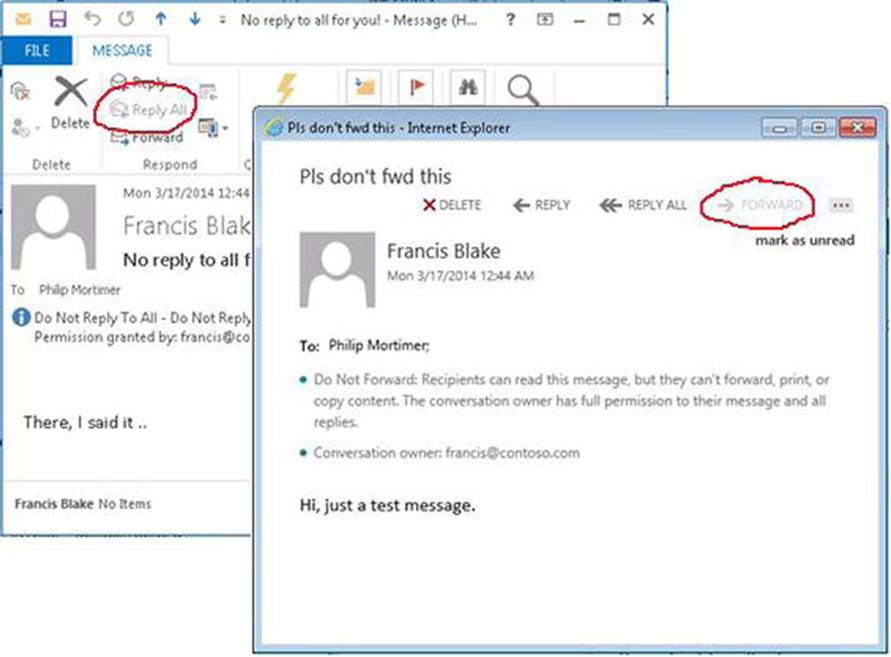
Figure 9-73. Outlook and Outlook WebApp displaying IRM-protected messages
![]() Note Messages keep their original IRM-protected status, even when forwarded or responses are made on those messages.
Note Messages keep their original IRM-protected status, even when forwarded or responses are made on those messages.
Outlook 2013 uses RMS Client v2 for AD RMS support and automatic RMS template distribution. For earlier versions of the RMS client used by previous versions of Office, IT administrators had to deploy these templates to clients using other methods. By default, RMS Client v2 caches RMS templates for seven days in %LOCALAPPDATA%\Microsoft\MSIPC\Templates. For Outlook, you can adjust this setting to a different number of days by using the following registry key:
[HKEY_CURRENT_USER\Software\Classes\Local Settings\Software\Microsoft\MSIPC]
'TemplateUpdateFrequency'=dword:00000001
You can also trigger immediate updating by Outlook of the RMS templates by removing the following registry key:
HKEY_CURRENT_USER\Software\Classes\Local Settings\Software\Microsoft\
MSIPC\<AD RMS CLUSTER NAME>\Template
Outlook Protection Rules
In addition to Outlook and AD RMS, you can use a complementary feature of Exchange, called Outlook protection rules. Outlook protection rules allow administrators to automatically apply IRM-protection to messages before they leave the client, where ransport protection rules can automatically IRM-protect messages when they enter the transport pipeline.
![]() Tip You can also create Outlook protection rules without using predicates. These Outlook protection rules will apply to all messages.
Tip You can also create Outlook protection rules without using predicates. These Outlook protection rules will apply to all messages.
Outlook protection rules have a limited choice of predicates when compared to transport protection rules. To create an Outlook protection rule, use the New-OutlookProtectionRule cmdlet with the following parameters:
· Name Specifies the name of the Outlook protection rule.
· ApplyRightsProtectionTemplate Specifies the AD RMS template to apply.
· FromDepartment Filters the sender’s department as configured in Active Directory.
· SentTo Specifies one or more SMTP recipients. SendTo will not accept wild cards. When multiple recipients are specified, messages sent to any of the recipients are considered a match.
· SendToScope Filters on the message destination. Options are InOrganization to match on messages sent to internal recipients or use All for message sent to any recipient.
· UserCanOverride Determines if the user is allowed to override an Outlook protection rule. The default value is $true, allowing the user to override. If the user overrides, Outlook will add an X-MS-Outlook-Client-Rule-Overridden header in the message.
· Priority Determines the order of processing; lower numbers are processed first.
For example, to configure an Outlook protection rule to apply the “Do Not Reply To All” RMS template to messages sent to an internal recipient, use the following:
New-OutlookProtectionRule –Name 'Auto Do Not Reply To All'
–SentToScope InOrganization
–ApplyRightsProtectionTemplate 'Do Not Reply To All'
To configure an Outlook protection rule to apply the “Do Not Forward” template to message sent to an internal recipient from the HR department, use the following:
New-OutlookProtectionRule –Name 'Do Not Forward from HR'
–SentToScope InOrganization –FromDepartment 'HR'
–ApplyRightsProtectionTemplate 'Do Not Forward'
You can disable or enable Outlook protection rules at creation time by setting the Enable parameter to $true or $false, or you can toggle them using Enable-OutlookProtectionRule and Disable-OutlookProtectionRule; for example,
Disable-OutlookProtectionRule –Identity 'Do Not Forward from HR'
To display an overview of the configured Outlook protection rules, use Get-OutlookProtectionRule, as shown in Figure 9-74.

Figure 9-74. Displaying configured Outlook protection rules
To remove an Outlook protection rule, use Remove-OutlookProtectionRule, as follows:
Remove-OutlookProtectionRule 'Auto Do Not Reply To All'
Transport Protection Rules
Transport protection rules are similar to Outlook protection rules. Both can protect messages by applying RMS templates based on predicates. Transport protection rules are applied by the Transport service on the Mailbox Servers by the transport rules agent, whereas the Outlook protection rules are applied to applicable messages in Outlook as they are sent.
To create or reconfigure a transport rule to apply an AD RMS template to certain messages, you specify the ApplyRightsProtectionTemplate with the name of the AD RMS template. Transport rules are more versatile than Outlook protection rules and also can operate on external messages. For example, you could choose to automatically IRM-protect messages received from a selected partner with whom you have set up a mandatory secure SMTP connection, thereby allowing only certain groups of employees to access those messages.
For example, assume you want to apply an RMS template ‘Do Not Forward’ to messages sent by users from the HR department to other users in the organization. You can open EAC and navigate to Mail Flow ![]() Rules to create this transport rule, clicking the arrow next to the + sign and selecting “Apply Rights Protection” to the messages; or you can create one from scratch.
Rules to create this transport rule, clicking the arrow next to the + sign and selecting “Apply Rights Protection” to the messages; or you can create one from scratch.
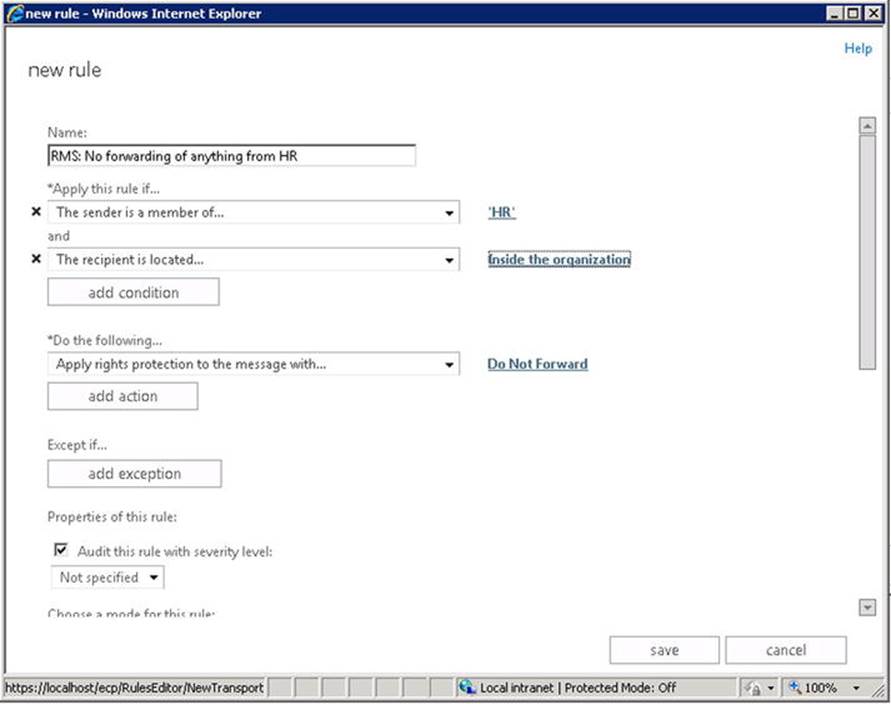
Figure 9-75. Applying an RMS template using transport rules
Alternatively, you can use the New-TransportRule cmdlet, as follows:
New-TransportRule -Name 'RMS: No forwarding of anything from HR'
-SentToScope 'InOrganization' -FromMemberOf 'HR@contoso.com'
-ApplyRightsProtectionTemplate 'Do Not Forward' -Mode 'Enforce'
You can also apply RMS templates in combination with data classification—for example, to protect messages with the ‘Do Not Forward’ template when a credit card is detected, and notify senders using a policy tip about sending possibly sensitive information, you can use:
New-TransportRule -Name 'Do not forward credit card numbers'
-SentToScope 'InOrganization' -Mode 'Enforce' -NotifySender 'NotifyOnly'
-MessageContainsDataClassifications @{'Name'='Credit Card Number'}
-ApplyRightsProtectionTemplate 'Do Not Forward'
In Figure 9-76, you can see that the user sent a message containing a credit card number and received a policy tip that she was about to send sensitive information. After the message was sent, the recipient received an IRM-protected message to which the ‘Do Not Forward’ was applied.
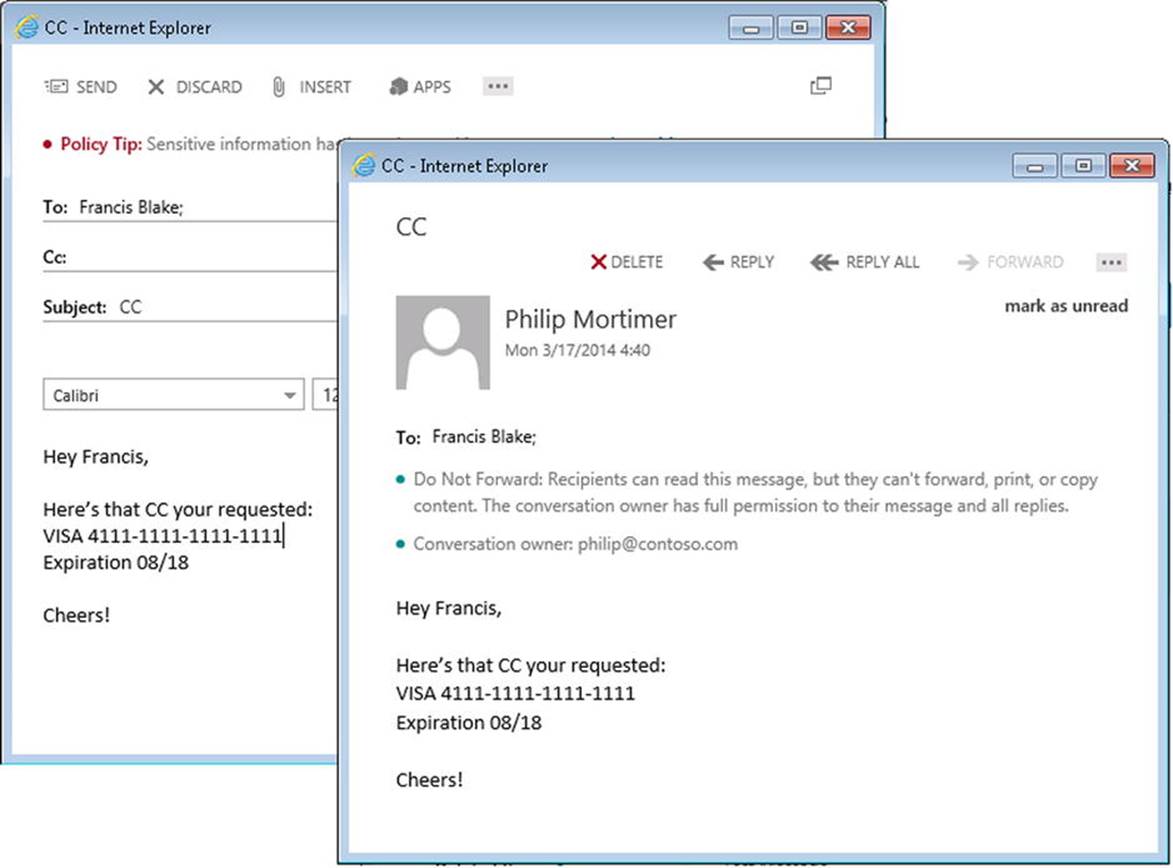
Figure 9-76. Transport Rules applying IRM to sensitive information
Of course, data classification can also consist of document fingerprints. These fingerprints allow you to automatically protect messages that match documents with certain fingerprints; not only can you protect information sent from a specific department but you can also protect messages with attached documents whose fingerprints match documents belonging to that department, even when they are sent by other users. However, this power could potentially lead to unwanted blocking of communications, so test these limits before you implement them. In any event, the combination of message classification, DLP fingerprinting, and IRM can be powerful tools in document and/or information protection for an organization.
Summary
This chapter surveyed the compliance features in Exchange 2013 and showed how these features can help organizations meet their business requirements stipulated by laws or regulations. In-place archiving, in combination with managed records management, can be helpful in monitoring the contents of the primary mailbox by using retention policies to automatically offload contents into the in-place archives or to remove them after a certain period.
In-place discovery can be used to search for information, allowing organizations to create exportable sets of content using discover mailboxes for external investigations. When required, organizations can make their mailboxes immutable by using in-place hold for legal investigations or other purposes. To investigate activities related to mailboxes, organizations can leverage their mailbox auditing to log mailbox access or specific operations on mailboxes, or even on specific folders.
Transport rules automatically process messages or control mail flow. Data loss prevention helps organizations control leakage of sensitive information, and Exchange Server 2013 Service Pack 1 makes this feature more powerful by adding document fingerprinting and support for additional clients. Information rights management can be used to protect contents, controlling how recipients can handle the information.
Finally, regarding the Exchange environment itself, organizations can use administrator auditing to log or report changes in the Exchange environment.
All materials on the site are licensed Creative Commons Attribution-Sharealike 3.0 Unported CC BY-SA 3.0 & GNU Free Documentation License (GFDL)
If you are the copyright holder of any material contained on our site and intend to remove it, please contact our site administrator for approval.
© 2016-2026 All site design rights belong to S.Y.A.