Pro Exchange 2013 SP1 PowerShell Administration: For Exchange On-Premises and Office 365 (2014)
Chapter 2. Installing Exchange Server 2013
Now that we’ve covered some of the new functions of Exchange Server 2013 SP1 and have provided some background information, it’s time to move on to actually installing Exchange 2013 SP1 and getting it working. This chapter covers the design of an Exchange Server 2013 environment and the process of installing Exchange Server 2013 SP1.
The first section is about designing your Exchange 2013 environment. The Exchange 2013 role requirements calculator will be used to a design an environment for our 1,500-user fictitious company called Contoso.
Installing Exchange Server 2013 can be done in a clean and fresh Active Directory by what is called a green-field installation, covered in the second part of this chapter. While this is certainly useful, chances are you already have an existing, earlier version of Exchange Server running. In this case, you have to upgrade the environment, which is covered in the third part of this chapter.
The last part covers the update process of your Exchange Server 2013 environment with cumulative updates.
Designing Exchange Server 2013
When you want to deploy Exchange 2013 for a larger number of users you have to make a proper design of your Exchange Server environment. You have to do an inventory of all business and legal requirements and write these down in a design document. Together with the user requirements, such as the number of users (i.e., mailboxes), the mailbox sizing, and so on, you create a design of your Exchange 2013 environment based on the proper design decisions. If you fail to do so, most likely you will run into sizing issues when you run your Exchange 2013 environment.
Business, legal, and user requirements include answers to the following questions:
· What is the typical mailbox size?
· Do you have to create backups?
· If you will have backups, how long do you need to keep these backups and do you need to store the backups at an off-site location?
· What’s the average message size used by your users?
· What are the normal business hours?
· What does your service-level agreement (SLA) look like? In your SLA you will define your answers to such questions as the following:
· Is there a need for 24x7, or will 5x12 do as well?
· How long does it take to create a backup and, more important, how long does it take to restore data?
· How long does it take to restore a mailbox, a mailbox database, or an entire Exchange 2013 server?
· Are there guaranteed delivery times for messages?
· What is the user concurrency? That is, how many users are online at the same time?
These are questions you need to answer when designing a proper Exchange 2013 environment. They are a different kind of question from the ones you, as an Exchange administrator, are accustomed to answering, such as “How much memory do I need in my server?” or “How about the disk configuration of my Exchange 2013 server?”
In our fictitious contoso.com company we have 1,500 users, we anticipate a 2 GB mailbox for each user, and we don’t need any high availability at this point. (High availability will be discussed in Chapter 5.)
Exchange 2013 Server Role Requirements Calculator
One of the best tools to determine the sizing of your Exchange 2013 server is the Exchange 2013 Server Role Requirements Calculator. This is basically a spreadsheet created by the Microsoft Exchange product group that determines the sizing of an Exchange 2013 environment based on the requirements you have to enter as input. You can download the Exchange 2013 Server Role Requirements Calculator at http://bit.ly/ExCalculator.
When you open the calculator, you will see an Excel spreadsheet with eight tabs. The first tab is where you enter the requirements that will be used as input for the actual design.
Important requirements you have to enter here are, for example:
· Which Global Catalog server architecture to use: The choice is between a 32-bit Global Catalog server and a 64-bit Global Catalog server. A 64-bit Global Catalog server gives better performance owing to more efficient processor usage and the possibility of addressing more internal memory. Windows Server 2008 R2 and later are available only as 64-bits versions. Windows Server 2003 R2 is available as 32-bit and 64-bit versions.
· If you are using a multi-role configuration: Starting with Exchange 2010, Microsoft recommends using multi-role servers. These are Exchange servers whereby multiple roles are installed in one box. In Exchange 2013, this means that one server holds both the Mailbox server role and the Client Access server role. More information regarding this recommendation can be found on the Exchange Team blog at http://bit.ly/MultiRole. Though the article was written for Exchange 2010, it also applies to Exchange 2013.
· If you are virtualizing your Exchange servers: As explained in Chapter 1, virtualizing your Exchange 2013 servers is not a problem as long as the virtualization solution is validated in the SVVP program and the virtualization vendor supports running Exchange 2013 in its solution.
· How many Mailbox servers you’ll use: This is a tricky matter; the number you choose depends on the number of mailboxes you will be hosting on your Mailbox server. You have to start somewhere, and as a rule of thumb I always start with approximately 2,500 mailboxes on one Mailbox server, so for 10,000 mailboxes I start with four Mailbox servers. Depending on the sizing that comes out of the Requirements Calculator, I can always adjust the number of Mailbox servers.
· How many mailboxes in your environment: This is a hard number to ascertain for setting your requirements, but when you’re designing your Exchange 2013 environment, keep future growth in mind.
· How many messages sent and received per mailbox each day: This number is also known as the usage profile and it might be quite difficult to ascertain.
· How large the mailbox size: In our contoso.com environment we set this to 2 GB. Quite a lot of people still have doubts about large mailboxes, but Exchange 2013 does not have trouble with 25 GB mailboxes. If you’re running Outlook 2010, though, you have to realize that when running cached mode, the OST file in Outlook can grow very large. As a result, performance on a user’s workstation, especially when it’s a laptop with a 5400 rpm hard disk, can be seriously impacted.
· The backup architecture: A traditional backup is VSS based, whether it is a hardware VSS solution or a software VSS one. There’s a backup server running in your network and backup clients on your Exchange servers. Microsoft System Center DPM is an example of this, but there are a lot more from Symantec, IBM, HP, and others. The Exchange Native Data Protection is another way of safeguarding your information, sometimes also referred to as a “backup-less” environment.
In our contoso.com environment, the requirements fed into the Requirements Calculator are listed in Table 2-1.
Table 2-1. Requirements Used as Input for the contoso.com Exchange Server Configuration
|
Requirement |
Value |
|
Server multi-role configuration |
Yes |
|
Server role virtualization |
Yes |
|
High availability deployment |
No |
|
Number of Mailbox servers |
1 |
|
Number of mailboxes |
1500 |
|
Total send/receive messages per mailbox per day |
100 |
|
Average message size |
75 KB |
|
Mailbox size limit |
2 GB |
|
Backup methodology |
Software VSS backup/restore |
|
Backup frequency |
Weekly full /daily incremental |
|
System and boot disk |
320 GB, 10k rpm SAS |
|
Database disk |
2 TB 7200 rpm 3½ SAS disk |
|
Log disk |
2 TB 7200 rpm 3½ SAS disk |
|
Restore volume |
2 TB 7200 rpm 3½ SAS disk |
|
Processor cores/server |
8 |
These are the most important settings for the first page of the Requirements Calculator; all other requirements can be left at their default settings at this point. A screenshot of the first tab of the Requirements Calculator is provided in Figure 2-1.
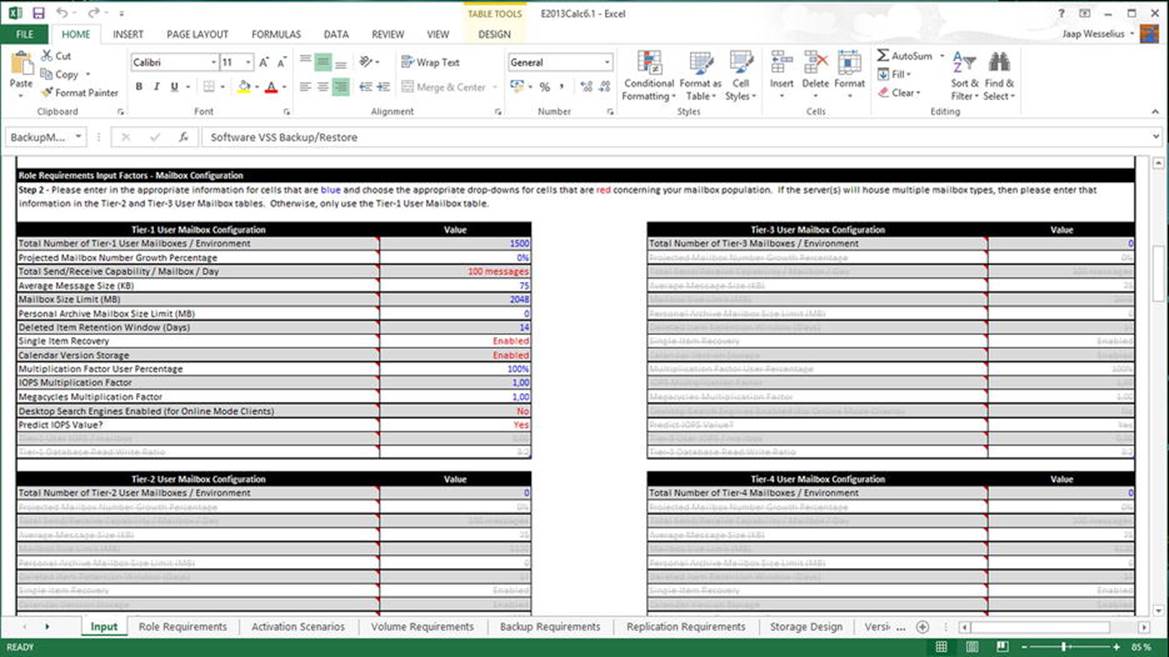
Figure 2-1. Entering the data into the Requirements Calculator
When you’ve entered all data into the Requirements Calculator, you can navigate to the second tab for viewing the Role Requirements. On this sheet, you’ll find the sizing of the Exchange 2013 servers, based on the input you’ve just entered.
You’ll find the number of mailboxes, the number of mailbox databases, the IOPS generated, and the amount of memory needed in the Exchange server, just to name a few. In our example, the most important results are listed in Table 2-2.
Table 2-2. Calculated Requirements of Our contoso.com Exchange Environment
|
Requirement |
Value |
|
Number of mailboxes |
1,500 |
|
Number of mailboxes per database |
83 |
|
Transaction logs generated per mailbox per dag |
20 |
|
IOPS profile per mailbox |
0.07 |
|
Number of mailbox databases |
18 |
|
Available database cache per mailbox |
8.19 MB |
|
Recommended RAM configuration |
48 GB |
|
Server CPU megacycle requirements |
87 66 |
|
Database space required (per database) |
183 GB |
|
Log space required (per database) |
7 GB |
|
Database space required (per server) |
3287 GB |
|
Log space required (per server) |
121 GB |
|
Total database required IOPS (per server) |
121 |
|
Total log required IOPS (per server) |
24 |
The megacycles estimate is based on the measurement of Intel E5-2650 2 GHz processors (2x8 core arrangement). A 2 GHz processor core equals 2000 megacycles of performance throughput, so at least five processor cores are needed in this environment.
As you can see, Exchange 2013 needs quite some resources according to the Requirements Calculator; on the other hand, it could be said that this calculation is a worst-case scenario in which all resources are stressed to the max. In real life, the resources used by Exchange 2013 are probably much less, but when your design is according to the Requirements Calculator, you know it is fully supported. When you assign fewer resources to your Exchange 2013 server, especially memory, there’s a serious risk of experiencing performance issues.
So, 18 mailbox databases are used by this Exchange 2013 server. The fourth tab in the Requirements Calculator (Volume Requirements) shows the number of mailbox databases and the volumes used where the mailbox databases are stored. Since Exchange 2013 supports multiple mailbox databases on one volume, only three volumes are used and the mailbox databases are spread across these three volumes.
The seventh tab in the Requirements Calculator (Storage Design) tells you how many disks are used for each volume. For the mailbox database, six disks are used, two disks are in a RAID-1 configuration (mirroring) and are used by a volume. The transaction log files of all mailbox databases are stored on a separate volume, also consisting of two disks in a RAID-1 configuration.
A special volume is used for restore purposes. If you want to restore one or more mailbox databases from backup, a special volume is used for this. In our example, three disks in a RAID-5 configuration are used to create this restore volume.
So, in total, this Exchange 2013 server is using 11 physical disks of 2 TB each for storing 1,500 mailboxes of 2 GB in size. The server itself is using two disks in a RAID-1 configuration for the Operating System and the Exchange 2013 server software. A graphic representation of this distribution is shown in Figure 2-2.
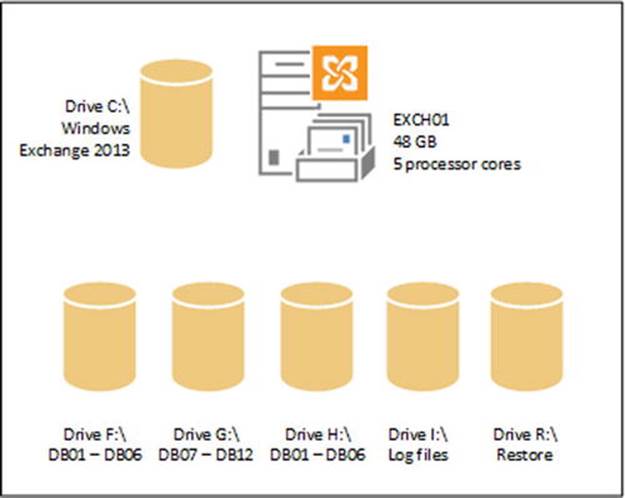
Figure 2-2. The Exchange 2013 server design for a 1,500-mailbox contoso.com environment
When designing your Exchange 2013 Mailbox server, note that this is the time to start thinking about drive letters. When you only have three physical disks in your environment, you can assign drive letters like F:\, G:\, and H:\ to these disks. Things get more complicated when you have 15 disks in your server, however. In this case, you don’t want to assign drive F:\ to drive T:\ to these disks. Instead, you use Mount Points on your server. That is, when disks are formatted they are not assigned a drive letter and instead are mounted in a directory on the C:\ drive—for example, C:\MountPoints. If you have multiple disks on your server, then, these are available via C:\MountPoints\Disk1, C:\MountPoints\Disk2, C:\MountPoints\Disk3, and so on. This method gives you much more flexibility than simply using drive letters; it also makes available a feature called Auto Reseed, as this uses Mount Points. Auto Reseed is part of the Exchange 2013 high-availability solution, discussed in detail in Chapter 5.
Microsoft has an excellent white paper on sizing Exchange 2013, called “Ask the Perf Guy: Sizing Exchange 2013 Deployments”; it can be found at http://bit.ly/ExSizing.
Green-Field Installation of Exchange 2013
When you are installing Exchange 2013, you must meet a number of requirements regarding hardware, the operating system where Exchange Server will be installed, and the version of Active Directory Directory Services (ADDS) that will be used. There’s also some prerequisite software that needs to be installed in advance, including Windows Server roles or features.
Hardware Requirements
Exchange 2013 has the following hardware requirements, but please note that these requirements seem to have been established by a marketing department. As we’ve seen in the previous section, the normal hardware requirements are a bit different, depending on the expected usage. The following are the bare-minimum requirements—just enough to start Exchange Server:
· X64 architecture-based processor (Intel Itanium IA-64 is not supported).
· 8 GB of RAM for the Mailbox server.
· 4 GB of RAM for the Client Access server.
· 8 GB of RAM for the combined Mailbox and Client Access servers.
· At least 30 GB of free space where Exchange 2013 will be installed. (Add 500 MB for every UM language pack. All disks have to be formatted with the NTFS file system.).
· An additional hard disk of 500 MB where the Transport Queue database is stored, although this is stored by default on the system and bootdisk (i.e., C:\ drive).
For a full and up-to-date overview of all Exchange 2013 requirements, visit the Microsoft TechNet site at http://bit.ly/ExRequirements.
![]() Note The numbers listed above are the bare minimum for Exchange 2013, as published by Microsoft. These are sufficient to start an Exchange 2013 server, but for a regular production server you need to design your server as discussed in the first section of this chapter.
Note The numbers listed above are the bare minimum for Exchange 2013, as published by Microsoft. These are sufficient to start an Exchange 2013 server, but for a regular production server you need to design your server as discussed in the first section of this chapter.
Software Requirements
Exchange 2013 SP1 can be installed on the following Windows operating systems:
· Windows Server 2012 R2 Datacenter Edition
· Windows Server 2012 R2 Standard Edition
· Windows Server 2012 Datacenter Edition
· Windows Server 2012 Standard Edition
· Windows Server 2008 R2 Datacenter Edition
· Windows Server 2008 R2 Enterprise Edition
· Windows Server 2008 R2 Standard Edition
![]() Note Exchange Server 2013 RTM is supported on the same Windows operating systems, except for Windows Server 2012 R2 Datacenter and Standard Edition. Both versions of Exchange 2013 can be installed only on Windows Server with the full GUI. The Windows Server core is not supported on any version of Exchange 2013.
Note Exchange Server 2013 RTM is supported on the same Windows operating systems, except for Windows Server 2012 R2 Datacenter and Standard Edition. Both versions of Exchange 2013 can be installed only on Windows Server with the full GUI. The Windows Server core is not supported on any version of Exchange 2013.
The Exchange 2013 Management Shell can be installed on the following Windows operating systems:
· Windows Server 2012 R2 Datacenter Edition
· Windows Server 2012 R2 Standard Edition
· Windows Server 2008 R2 SP1 Standard Edition
· Windows Server 2008 R2 SP1 Enterprise Edition
· Windows Server 2008 R2 RTM Datacenter Edition
· Windows Server 2012 Standard Edition
· Windows Server 2012 Datacenter Edition
· Windows 8.1 64-bit version (except home edition)
· Windows 7 SP1 64-bit version (except home edition)
When it comes to Active Directory, the following requirements can be identified:
· Schema master Windows Server 2003 SP2 or later
· Global Catalog server Windows Server 2003 SP2 or later
· Domain controller Windows Server 2003 SP2 or later
· Active directory Forest Functional Level at Windows Server 2003 or higher
A number of DNS namespace scenarios are supported in Exchange 2013, although these requirements haven’t changed in years. The following namespaces can be used with Exchange 2013:
· Contiguous namespace: This is a normal namespace where all domain names in the environment are contiguous. For example, a root domain would be contoso.com and the child domains would be emea.contoso.com, na.contoso.com, or asia.contoso.com. Go one level deeper, and it would be prod.emea.contoso.com, and rnd.na.contoso.com.
· Non-contiguous namespace: This is a namespace where the different trees in an Active Directory forest do not have similar names. For example, one tree in the Active Directory forest can be contoso.com, while another tree in the same Active Directory forest can be Fabrikam.com, and a third tree can be FourthCoffee.com. They form separate domain trees in one forest. A special example of a non-contiguous namespace is where one tree would be contoso.com and another tree would be contoso.net. In this scenario, you would run into problems with the NetBIOS name of these domains. By default, the NetBIOS name of the domains would be contoso, but since you cannot have two identical NetBIOS names in one network, you have to another NetBIOS name for the second contoso domain.
· Single-label domain: A single-label domain is a domain name that does not contain a DNS suffix—for example, no .com, .net, .org, or .corp. A normal domain name would be contoso.com, but a single-label domain would be contoso. A single-label domain is supported by Exchange 2013, but the use of single-label domains is not recommended by Microsoft.
· Disjoint namespace: A disjoint namespace is a namespace where the primary DNS suffix of a server does not match the DNS name of the Active Directory domain. For example, you can have an Exchange server called LON-EXCH01 with a primary DNS suffix corp.contoso.com in the Active Directory domain emea.contoso.com.
For a complete overview of supported DNS namespaces and additional resources, you can check the support for DNS namespace planning in the Microsoft server products article at http://bit.ly/DNSNameSpace.
![]() Note Installation of Exchange 2013 on domain controllers is supported but not recommended. The recommended way of installing Exchange 2013 is on a member server in an Active Directory domain.
Note Installation of Exchange 2013 on domain controllers is supported but not recommended. The recommended way of installing Exchange 2013 is on a member server in an Active Directory domain.
Exchange 2013 SP1 installation
It is my personal recommendation that you install Exchange Server 2013 on the latest available version of Windows server that’s being supported. For Exchange 2013 SP1, this means Windows Server 2012 R2 and Exchange 2013 RTM on top of Windows Server 2012. Both versions of Windows Server 2012 are more scalable than Windows Server 2008 R2, and their support lifecycle is better. Windows Server 2012 R2 will be supported for 10 years after the time of this writing. Also, upgrading an underlying operating system on an Exchange 2013 server is not supported, so when you are installing Exchange 2013 on Windows Server 2008 R2, there’s no way to upgrade the operating system later on.
However, not all companies have raised Windows Server 2012 R2 to the company standard, and many are still running Windows Server 2008 R2 as their default operating systems. In this section, I start with installation of Exchange 2013 SP1 on Windows Server 2012 R2. When needed, I make some remarks regarding previous versions of the Windows server operating system. This book is a PowerShell administration book, so I start with the unattended setup of Exchange 2013 SP1; the GUI setup will be discussed later in this section.
Installing Exchange Server 2013 is relatively easy and consists of the following steps:
· Preparing Windows Server and installing prerequisite software.
· Preparing all partitions of Active Directory.
· Installing Exchange 2013.
· Performing post-configuration steps.
Preparing Windows Server
When installing Exchange Server 2013 SP1 on top of Windows Server 2012 R2, the following prerequisite software is needed on the Windows server:
· .NET Framework 4.5, which is available at http://bit.ly/NETFramework45
· Management Framework 3.0, which contains PowerShell 3.0 and is available at http://bit.ly/ManagementFramework
· Unified Communications Managed API 4.0, which is available at http://bit.ly/ManagedAPI
· Internet Information Server
The first two items are included in Windows Server 2012 and Windows Server 2012 R2 by default, so there’s no need to install these manually. However, you have to download the Unified Communications Managed API 4.0 and install this on all Exchange 2013 servers.
One step not listed above is the installation of the Remote Server Administration Tools (RSAT). These are needed only on the first server where Exchange 2013 will be installed, because those tools are used to make the modifications to Active Directory. But installing RSAT also installs tools like Active Directory Users and Computers or Active Directory Sites and Services, and these can be useful on other servers as well.
To install the Remote Server Administration Tools, open a PowerShell window and enter the following commands:
Import-Module ServerManager
Install-WindowsFeature RSAT-ADDS
This is shown in Figure 2-3.
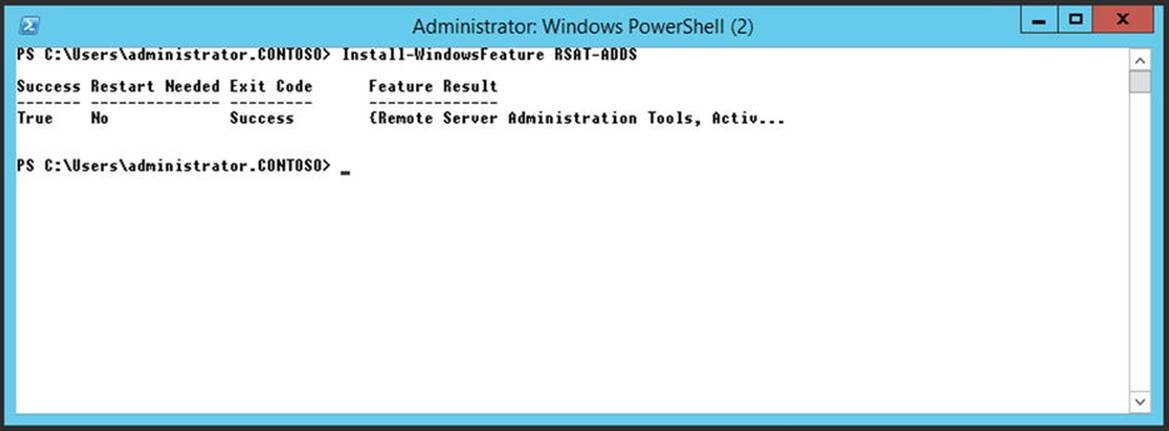
Figure 2-3. Installing the Remote Server Administration Tools on Windows 2012 R2
Internet Information Server can be installed using PowerShell. Import the Server Manager module in PowerShell and add the Windows Server Roles and Features. For a multi-role server, the following commands can be used:
Import-Module ServerManager
Install-WindowsFeature AS-HTTP-Activation, Desktop-Experience, NET-Framework-45-Features, RPC-over-HTTP-proxy, RSAT-Clustering, RSAT-Clustering-CmdInterface, RSAT-Clustering-Mgmt, RSAT-Clustering-PowerShell, Web-Mgmt-Console, WAS-Process-Model, Web-Asp-Net45, Web-Basic-Auth, Web-Client-Auth, Web-Digest-Auth, Web-Dir-Browsing, Web-Dyn-Compression, Web-Http-Errors, Web-Http-Logging, Web-Http-Redirect, Web-Http-Tracing, Web-ISAPI-Ext, Web-ISAPI-Filter, Web-Lgcy-Mgmt-Console, Web-Metabase, Web-Mgmt-Console, Web-Mgmt-Service, Web-Net-Ext45, Web-Request-Monitor, Web-Server, Web-Stat-Compression, Web-Static-Content, Web-Windows-Auth, Web-WMI, Windows-Identity-Foundation
For a dedicated Client Access server, use the following commands:
Install-WindowsFeature AS-HTTP-Activation, Desktop-Experience, NET-Framework-45-Features, RPC-over-HTTP-proxy, RSAT-Clustering, Web-Mgmt-Console, WAS-Process-Model, Web-Asp-Net45, Web-Basic-Auth, Web-Client-Auth, Web-Digest-Auth, Web-Dir-Browsing, Web-Dyn-Compression, Web-Http-Errors, Web-Http-Logging, Web-Http-Redirect, Web-Http-Tracing, Web-ISAPI-Ext, Web-ISAPI-Filter, Web-Lgcy-Mgmt-Console, Web-Metabase, Web-Mgmt-Console, Web-Mgmt-Service, Web-Net-Ext45, Web-Request-Monitor, Web-Server, Web-Stat-Compression, Web-Static-Content, Web-Windows-Auth, Web-WMI, Windows-Identity-Foundation
![]() Note For troubleshooting purposes, I always install the Telnet client on every Exchange server. This can be achieved by adding the Telnet-Client to the Windows features list mentioned above.
Note For troubleshooting purposes, I always install the Telnet client on every Exchange server. This can be achieved by adding the Telnet-Client to the Windows features list mentioned above.
Figure 2-4 shows the command executed successfully for a multi-role server and the warning that a reboot is needed.
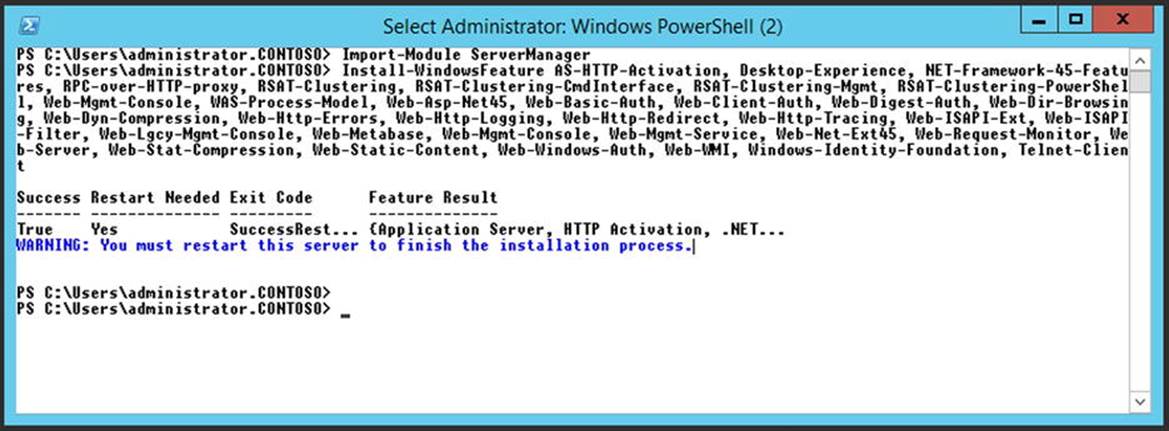
Figure 2-4. Installing prerequisites Server Roles and Features in a PowerShell window, including the Telnet client feature
When installing Exchange Server 2013 on Windows Server 2008 R2, the process is similar, but the following three additional hotfixes need to be added to the list of prerequisite software:
· Knowledge Base article KB974405 (“Windows Identity Foundation”), available at http://bit.ly/IdentityFoundation
· Knowledge Base article KB2619234 (“A hotfix is available to enable the association cookie/GUID that is used by RPC over HTTP to also be used at the RPC layer in Windows 7 and in Windows Server 2008 R2”), available at http://bit.ly/CookieGUID
· Knowledge Base article KB2533623 (“Insecure library loading could allow remote code execution”), available at http://bit.ly/InsecureLibrary
If you have been working with Exchange 2013 RTM, you might remember there was a prerequisite warning about the Office 2010 Filter Pack software. This software was not used by Exchange 2013 RTM (the warning was erratic), and was replaced by the Exchange 2013 FAST search technology. In Exchange 2013 SP1, this warning message is no longer shown.
The last piece of prerequisite software that needs to be installed is the Unified Communications Managed API 4.0 Runtime. This is relatively straightforward. You download the software, start the setup application, and follow the wizard. You then reboot the server when needed. Once the preparation of Active Directory is installed, part of the unattended installation can be started.
It is possible to download and install the Unified Communications Managed API 4.0 runtime using PowerShell by entering the following command:
Start-BitsTransfer -Source http://download.microsoft.com/download/2/C/4/2C47A5C1-A1F3-4843-B9FE-84C0032C61EC/UcmaRuntimeSetup.exe -Destination c:\temp
c:\temp\UcmaRuntimeSetup.exe /q
The second command is not actually a PowerShell command, it just executes the setup application and runs it quietly without user interaction.
Unattended Installation of Exchange 2013
Installing Exchange 2013 can be achieved using the GUI mode of the setup application, or it can be done by using the unattended option of the setup application. My personal preference is to use the unattended setup. It is much more granular, the multiple installations are consistent, and there’s no interaction with the server. You start the unattended setup, and after half an hour or so your Exchange server is up and running.
Unattended setup consists of the following steps:
· Preparing the Active Directory Schema partition.
· Preparing the Active Directory Configuration partition.
· Preparing the Active Directory Domain partition.
· Installing the actual Exchange 2013 software.
But before diving into this, let’s take a closer look at the setup applications and the setup switches that are available for performing an unattended setup.
The Exchange 2013 Setup Application
If you want to install multiple Exchange 2013 servers, and you want to minimize your console interaction, it is possible to do an unattended installation. Also, for example, if your IT organization has multiple departments for Active Directory administration and Exchange Server administration, the unattended setup can be useful because it offers a granular way of configuring Active Directory and installing Exchange 2013.
The unattended installation is the same setup application as found on the installation media (setup.exe), but it is started from a command prompt and includes multiple setup switches.
![]() Note In Exchange 2013, the setup application is started using setup.exe. In Exchange 2007 and Exchange 2010, the setup application is started using setup.com.
Note In Exchange 2013, the setup application is started using setup.exe. In Exchange 2007 and Exchange 2010, the setup application is started using setup.com.
Setup Switches
For installing Exchange 2013, the setup.exe application has a number of switches that can be used while executing the command. Table 2-3 lists these switches, with descriptions of their purposes.
Table 2-3. Exchange 2013 Setup Switches
|
Switch |
Description |
|
/IAcceptExchangeServerLicenseTerms |
Mandatory switch for legal reasons |
|
/PrepareSchema |
Prepares the schema for Exchange 2013 |
|
/PrepareAD |
Prepares the configuration partition in Active Directory and creates the Exchange 2013 organization in Active Directory |
|
/OrganizationName |
Defines the name of the configuration, used for preparing Active Directory. Used in conjunction with the /PrepareAD switch in a new Exchange environment |
|
/PrepareDomain |
Prepares the current domain for implementation of Exchange 2013 |
|
/PrepareAllDomains |
Prepares all domains in the Active Directory forest for implementations of Exchange 2013 |
|
/Mode |
Indicates installation mode, like Install, Uninstall, or Upgrade |
|
/Roles |
Defines the server roles that need to be installed, like Client Access or Mailbox |
|
/InstallWindowsComponents |
Installs the Windows roles and features needed for Exchange 2013 |
|
/Targetdir |
Indicates the directory where the Exchange binaries will be installed |
|
/Sourcedir |
Indicates the directory where the installation files can be found |
|
/Domaincontroller |
Names a specific domain controller to be used during installation |
|
/Answerfile |
Indicates a file containing more specific configuration settings |
|
/EnableErrorReporting |
Enables or disables error reporting during setup |
|
/CustomerFeedbackEnabled |
Enables or disables the customer feedback option |
|
/AddUMLanguagepack |
Adds a specific unified messaging language pack |
|
/RemoveUMLanguagepack |
Removes a specific unified messaging language pack |
|
/NewProvisionedServer |
Provisions an Exchange Server object in Active Directory |
|
/RemoveProvisionedServer |
Removes an Exchange Server object from Active Directory |
|
/Mdbname |
Names the mailbox database that will be created during setup |
|
/Dbfilepath |
Locates the initial mailbox database |
|
/Logfolderpath |
Locates the mailbox database log files and checkpoint file |
|
/ActiveDirectorySplitPermissions |
Configures a split permissions model |
|
/DoNotStartTransport |
Does not start the Transport service (SMTP) during setup to prevent “strange” routing problems |
Not all options are mandatory when installing Exchange 2013 unattended, but the more options you use, the more granular will be your setup application. I discuss some of these options in the following sections when preparing the Active Directory containers and installing the actual Exchange 2013 servers.
Prepare the Active Directory Schema Partition
The first step in an unattended installation is to update the schema. You do this by using the setup application with the /PrepareSchema switch. When it comes to permissions, make sure that the account you use for executing this step is a member of the Schema Administrators and Domain Administrators security groups in Active Directory. To make the necessary changes to the schema partition, open a command prompt and enter the following command:
Setup.exe /PrepareSchema /IacceptExchangeServerLicenseTerms
This is shown in Figure 2-5.
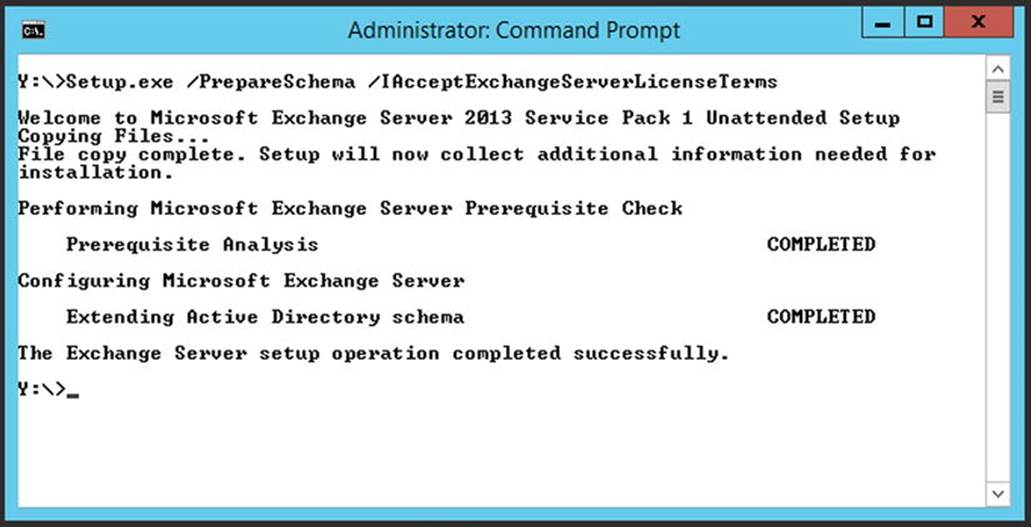
Figure 2-5. Preparing the Active Directory schema for Exchange 2013
You can check the version of the Active Directory schema by using the following PowerShell commands. This will bind the Active Directory to the variable called $root and use this variable to bind to the schema partition. From there the rangeUpper property, which holds the version of the Active Directory schema, is requested:
$root = [ADSI]"LDAP://RootDSE"
$Version = [ADSI]("LDAP://CN=ms-Exch-Schema-Version-Pt," + $root.schemaNamingContext)
$Version.rangeUpper
Every version of Exchange Server has its own value for the rangeUpper attribute, and this value even changes with the service pack. Table 2-4 lists all the values up until Exchange 2013 SP1.
Table 2-4. Schema Values for Exchange Server Versions
|
Exchange Server Version |
Corresponding Value for rangeUpper Attribute |
|
Exchange Server 2000 |
4397 |
|
Exchange Server 2000 SP 3 |
4406 |
|
Exchange Server 2003 RTM |
6870 |
|
Exchange Server 2003 SP 2 |
6936 |
|
Exchange Server 2007 |
10628 |
|
Exchange Server 2007 SP 1 |
11116 |
|
Exchange Server 2007 SP 2 |
14622 |
|
Exchange Server 2007 SP 3 |
14625 |
|
Exchange Server 2010 |
14622 |
|
Exchange Server 2010 SP 1 |
14726 |
|
Exchange Server 2010 SP 2 |
14732 |
|
Exchange Server 2010 SP 3 |
14734 |
|
Exchange Server 2013 |
15137 |
|
Exchange Server 2013 CU1 |
15254 |
|
Exchange Server 2013 CU2 |
15281 |
|
Exchange Server 2013 CU3 |
15283 |
|
Exchange Server 2013 SP1 |
15292 |
|
Exchange Server 2013 CU5 |
15300 |
|
Exchange Server 2013 CU6 |
15303 |
After preparing the Active Directory schema partition, you have to wait until this update is replicated to all domain controllers in the entire organization. Once finished, you can continue with the next step.
Prepare Active Directory Configuration Partition
As explained in Chapter 1, the Exchange 2013 information is primarily stored in the Active Directory configuration partition.
Before Exchange 2013 can be installed, the configuration partition needs to be changed as well. This can be achieved by using the setup application with the /PrepareAD option. Since we create a new Exchange 2013 organization in this example, the /OrganizationName option followed by the name of the Exchange organization needs to be entered as well. The entire command to prepare the Active Directory configuration partition will be:
Setup.exe /PrepareAD /OrganizationName:CONTOSO /IacceptExchangeServerLicenseTerms
For this command to complete successfully you need to be logged on as a member of the Enterprise Admins group because this group will have sufficient permissions in the configuration partition. Preparing the configuration partition is shown in Figure 2-6.
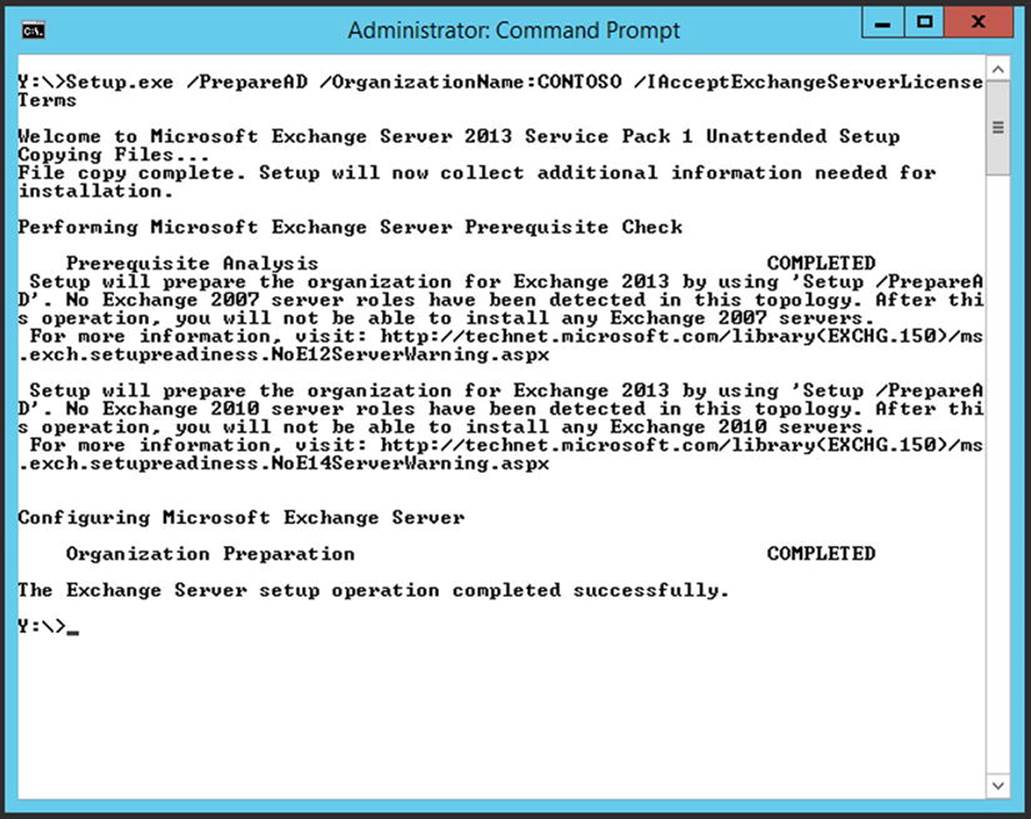
Figure 2-6. Preparing the Active Directory configuration partition for Exchange 2013
When you use ADSIEdit and open navigate to CN=Microsoft Exchange, CN=Services, CN=Configuration, DC=Contoso, DC=com (i.e., the Exchange organization leaf in the Active Directory configuration partition), you’ll see the newly created Exchange organization CONTOSO. This is shown in Figure 2-7.
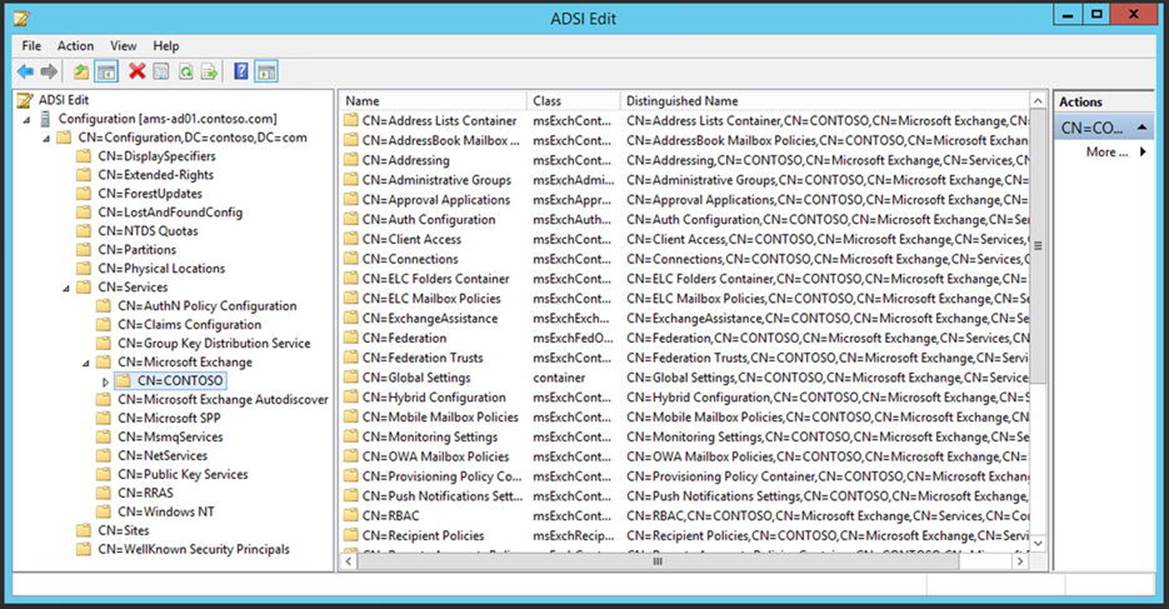
Figure 2-7. The newly created Exchange configuration in the configuration partition
When you open Active Directory Users and Computers, you’ll see a new organizational unit (OU) in the root domain called “Microsoft Exchange Security Groups” and this OU contains 17 new universal security groups (USGs), all related to Exchange 2013. These groups will be the basis of Role Based Access Control, which will be explained in Chapter 10. Figure 2-8 shows the 17 USGs in the Microsoft Exchange Security Groups container.
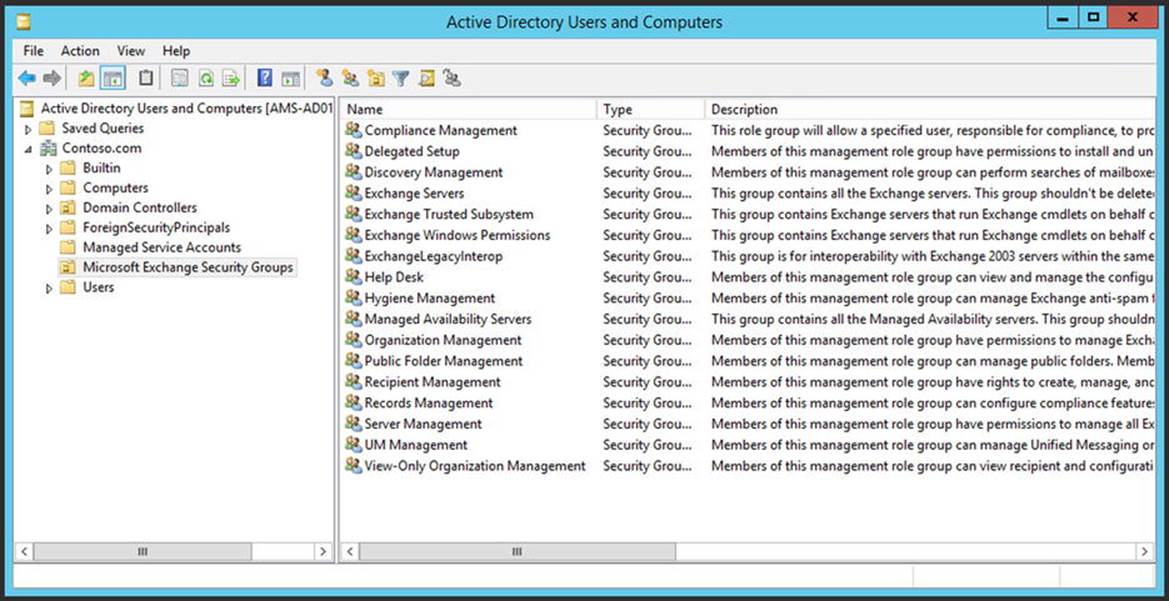
Figure 2-8. The newly created Exchange 2013 universal security groups
Once the configuration partition is prepared and the Exchange organization is created, we can continue with preparing the Active Directory domain (or domains). You can do this when the configuration partition is replicated to all domain controllers in the entire forest.
The preparation of the Active Directory domain is achieved using the setup application with the /PrepareDomain option. You can use the /PrepareAllDomains option if you have multiple domains in your Active Directory forest and want to prepare them in one step. The command to prepare the Active Directory domain will be like this:
Setup.exe /PrepareDomain /IAcceptExchangeServerLicenseTerms
To run this command, the account you’re using must be a member of the Domain Admins security group in the domain where the command is executed. If you use the /PrepareAllDomains option, the account you’re using must be a member of the Enterprise Admins security group. The command to prepare the Active Directory domain is shown in Figure 2-9.
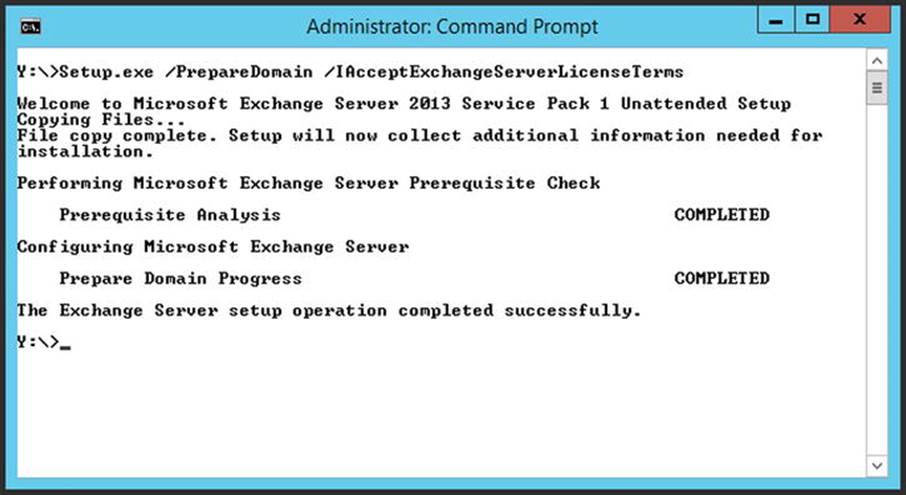
Figure 2-9. Preparing the Active Directory domain for Exchange 2013 SP1
The /PrepareDomain option creates a Microsoft Exchange System Objects container in the root domain in Active Directory and sets permission on this container for the following security groups:
· Exchange servers
· Exchange organization administrators
· Authenticated users
In this container, a security group called Exchange Install Domain Servers is created. Please note that you have to enable the View Advanced Features option in Active Directory Users and Computers to make this container visible. This is shown in Figure 2-10.
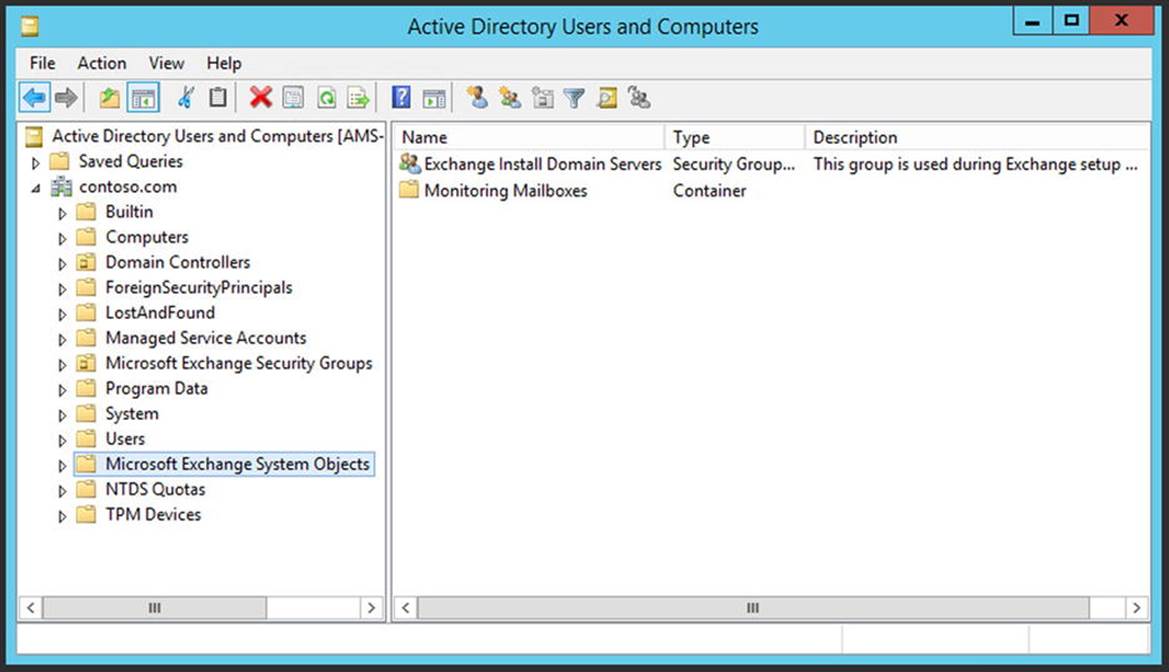
Figure 2-10. The Microsoft Exchange System Objects container in the Active Directory root domain
I’ve hardly ever seen these steps fail in the initial installation phase. If they do fail, it’s most likely a permissions error or a replication error, which can be solved easily and the installation option tried again.
When the Active Directory domain is prepared and the information is replicated to all domain controllers in the entire forest, you can continue with installing the actual Exchange 2013 servers.
Install Exchange 2013
Once all Active Directory partitions are prepared, the actual Exchange 2013 servers can be installed. The easiest, most granular, and most consistent way to do this is to use the unattended setup. As you’ve seen in the first part of this section, the setup application accepts various options. For example, to install an Exchange 2013 server that:
· Is a multi-role server—that is, it contains both the Mailbox server role and the Client Access server roles
· Has an additional drive F:\ that will hold the mailbox database and its transaction log files
· Has a mailbox database called MDB01
You can use a command like this, also shown in Figure 2-11:
Setup.exe /Mode:Install /Roles:Mailbox,ClientAccess /Mdbname:MDB01 /DbFilePath F:\MDB01\MDB01.edb /LogFolderPath F:\MDB01\LogFiles /IacceptExchangeServerLicenseTerms
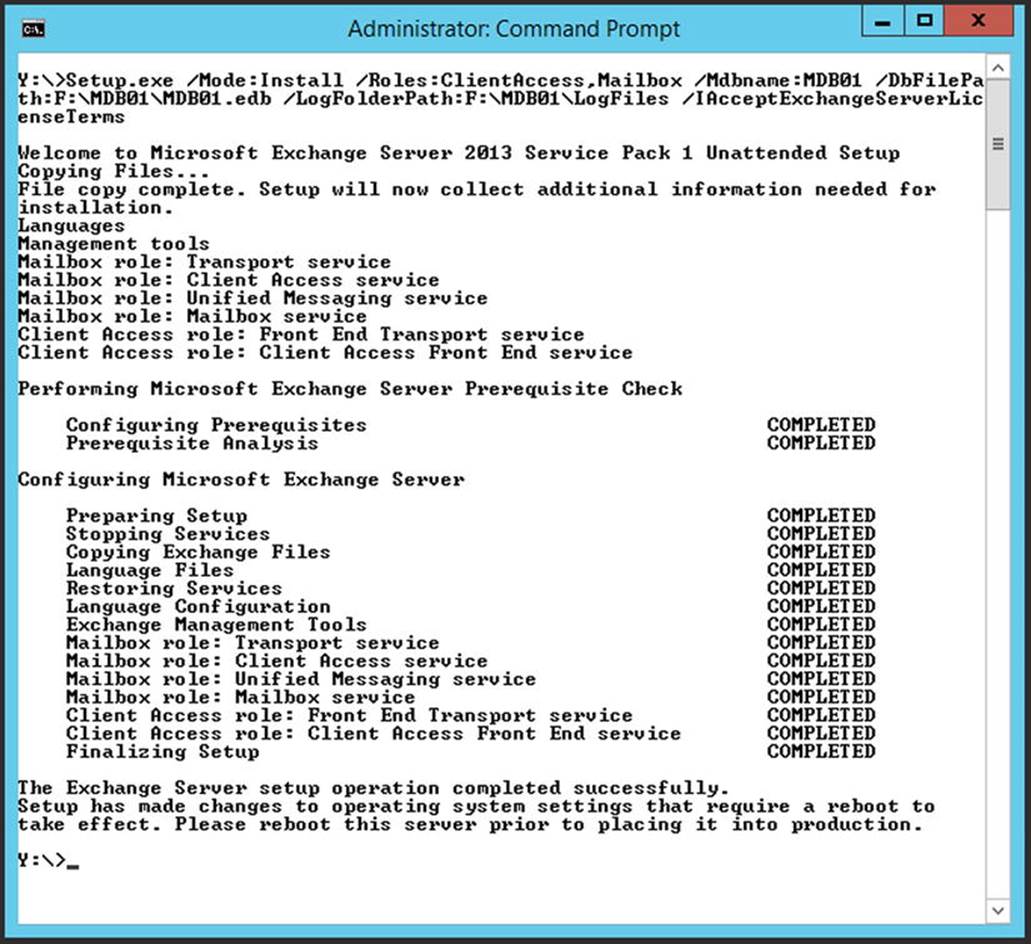
Figure 2-11. Installation of an unattended multi-role Exchange 2013 server
After the setup has finished, you reboot the server and continue with the post-installation tasks, as described in the next section.
Scripted Installation
The unattended installation of Exchange 2013 is a perfect candidate for scripting. Co-author Michel de Rooij wrote an installation script to be run on Windows Server 2008 R2 and Windows 2012 that will download, install, and configure the prerequisite software, prepare the Active Directory when needed, and install the Exchange servers—all from the command line! You can download his installation script from the Microsoft Technet gallery on http://bit.ly/UnAttendedSetup.
Post-Installation Tasks
After the initial installation of Exchange 2013, there is still quite some more work to be done before you have the server fully operational. Tasks that still need to be performed are:
· Creating accepted domains
· Creating an email address policy
· Configuring SSL certificates
· Configuring connectors
· Configuring Outlook Anywhere
· Enabling MapiHttp
Let’s investigate each of these topics.
Accepted Domains
An accepted domain in Exchange 2013 is an SMTP domain for which an Exchange 2013 server is responsible. This means that it’s going to accept mail for this SMTP domain, but it can also be used to send email. The initial accepted domain that’s configured on the server is the domain name that’s used in the Active Directory domain; in our example, this is the domain contoso.com. If this is the only domain that’s going to be used, you’re fine; but maybe you want to add additional SMTP domains?
When you want to create another accepted domain—for example, Fabrikam.com— you open the Exchange Management Shell and enter the following command:
New-AcceptedDomain -Name Fabrikam -DomainName Fabrikam.com -DomainType Authoritative
The command and its output are shown in Figure 2-12.
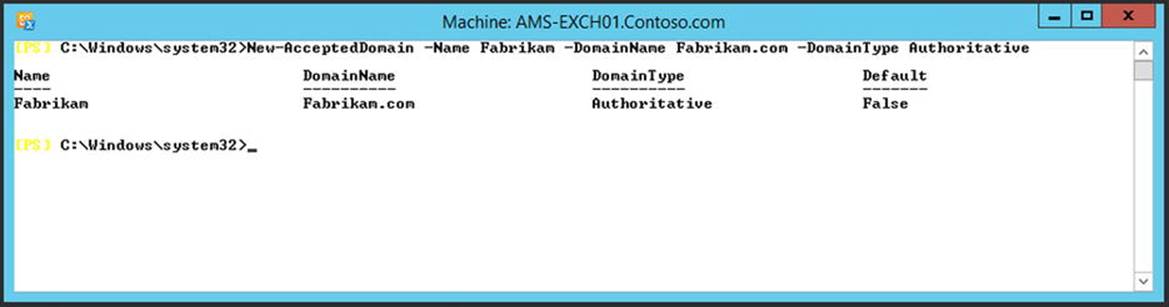
Figure 2-12. Using the Exchange Management Shell to create an accepted domain
Email Address Policies
An email address policy is a policy in Exchange 2013 that is responsible for assigning email addresses to recipients according to a predefined set of filters and formats. When a new recipient is created and it fits into such a filter, the accompanying email address is automatically assigned to the new recipient based on the defined format.
By default, there’s one email address policy that filters all recipients and assigns the default accepted domain to all these new recipients. To create a new email address policy using the fabrikam.com SMTP domain, for users in the Fabrikam OU under the Accounts organizational unit, you open the Exchange Management Shell and enter the following command:
New-EmailAddressPolicy -Name Fabrikam -IncludedRecipients AllRecipients -RecipientContainer "contoso.com/accounts/fabrikam" -EnabledEmailAddressTemplates "SMTP:%l@fabrikam.com"
This policy stamps an SMTP email address on each user that’s within the reach of this policy with a format of %l@fabrikam.com, where %l means the user’s logon name in Active Directory.
To apply this newly created email address policy, you can use the following command:
Update-EmailAddressPolicy -Identity Fabrikam
Figure 2-13 shows the process completed successfully.
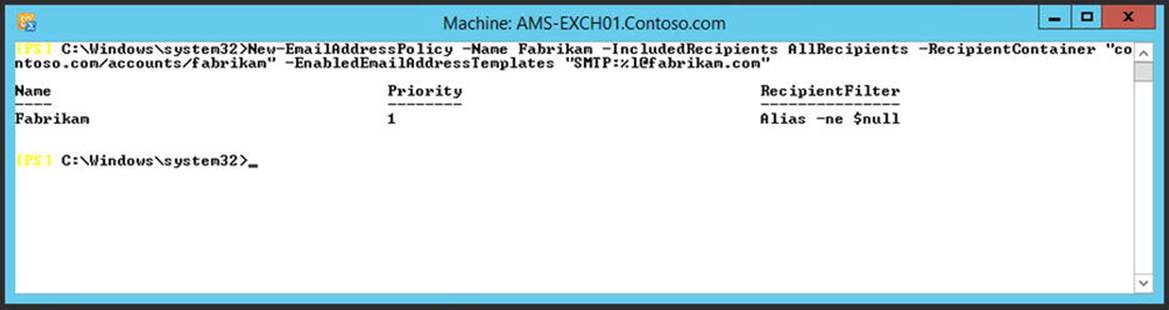
Figure 2-13. Creating and applying an email address policy using the Exchange Management Shell
SSL Certificates
By default, a self-signed certificate is installed on each Exchange server during installation of Exchange 2013. This self-signed certificate has the NetBIOS name of the server as its common name and the fully qualified domain name (FQDN) of the server configured in the Subject Alternative Name field of the certificate (see Figure 2-14).

Figure 2-14. The self-signed certificate of Exchange 2013
The self-signed certificate works fine for testing OWA and the EAC, but it will cause headaches when you try to use it for Outlook Anywhere or other Web services of the Client Access server. To avoid these headaches you should always use a valid SSL certificate. Requesting an SSL certificate is next topic’s subject.
Requesting an SSL Certificate Using EMS
To use the Exchange Management Shell to request, install, and configure an SSL certificate is a bit more complex. To do this, use the following commands:
$Data = New-ExchangeCertificate -FriendlyName "Contoso SSL Certificate" -GenerateRequest
-SubjectName "c=US, o=Contoso, cn=webmail.contoso.com" -DomainName webmail.contoso.com,autodiscover.contoso.com -PrivateKeyExportable $true
Set-Content -path "\\ams-ad01\mgmtshare\SSLCertRequest.req" -Value $Data
![]() Note The universal security group Exchange Trusted Subsystem needs write permissions on the file share where the request will be stored.
Note The universal security group Exchange Trusted Subsystem needs write permissions on the file share where the request will be stored.
You can use the contents of the SSLCertRequest.req file to request an SSL certificate from a certificate authority (CA). This can be an Active Directory certificate authority or a third-party certificate authority like Digicert or Comodo. A full list of Unified Communications certificate partners is in Microsoft knowledgebase article 929395, which can be found at http://bit.ly/UCCerts.
After ordering the certificate from your certificate authority, you store the new certificate on the same share and continue with the following commands:
Import-ExchangeCertificate –Server AMS-EXCH01 -FileData ([Byte[]]$(Get-Content -Path "\\ams-ad01\management\certnew.cer" -Encoding byte -ReadCount 0)) | Enable-ExchangeCertificate
-Server AMS-EXCH01 -Services IIS
This step actually consists of three commands:
1. The Import-ExchangeCertificate, which imports the SSL certificate (the .cer file) that was returned from the CA into local certificate store of the Exchange 2013 server.
2. The Get-Content cmdlet, which actually reads the .cer file from disk and sends it as byte data to the Import-ExchangeCertificate cmdlet.
3. The Enable-ExchangeCertificate cmdlet, which receives its input from the Import-ExchangeCertificate cmdlet. This cmdlet enables the newly imported SSL certificate to be used with the Internet Information Service.
Importing an Existing SSL Certificate
There’s also the possibility that you already have a valid and usable SSL certificate, perhaps from another deployment or another server, and you have exported it to a .pfx file (certificate export file). If so, then you can copy the .pfx file to the management share on the network share we used earlier.
If you want to import an existing SSL certificate on the Exchange 2013 server, you can use the following command:
Import-ExchangeCertificate –Server AMS-EXCH01 -FileData ([Byte[]]$(Get-Content -Path "\\ams-ad01\management\webmail_contoso_com.pfx" -Encoding byte -ReadCount 0)) -Password:(Get-Credential).password | Enable-ExchangeCertificate -Server AMS-EXCH01 -Services IIS
The -Password:(Get-Credential).password parameter shows a Windows popup in which you enter the password while exporting the certificate. The output of the Import-ExchangeCertificate command is piped directly to the Enable-ExchangeCertificatecommand to assign the IIS service to the imported SSL certificate.
Connectors
In Exchange 2013, connectors are used for sending and receiving messages. These are called send connectors and receive connectors.
Send Connector
An Exchange server by default is unable to send messages to any other server except other Exchange servers in the same organization. To achieve this functionality, a send connector has to be created. The send connector is a connector in Exchange 2013 with a namespace, cost, permissions, and one or more source Transport servers. For example, the Exchange server uses this to route messages to the Internet.
To create a new Internet send connector using the Exchange Management Shell, use the following command:
New-SendConnector -Name "Internet Send Connector" -Internet -AddressSpaces "*"
-DNSRoutingEnabled:$TRUE -SourceTransportServers "AMS-EXCH01"
Receive Connectors
Besides send connectors, Exchange 2013 also has receive connectors. A receive connector is configured as part of the Front End Transport service on the Client Access server, as well as on the Transport service of the Mailbox server and is capable of receiving SMTP messages. There are default receive connectors for receiving messages from other SMTP hosts, and there are client receive connectors used so that authenticated clients can send SMTP messages. The latter may sound strange, but the Exchange 2013 server is actually receiving messages from the client and, when needed, routes those messages to the Internet.
An out-of-the-box Exchange 2013 Client Access server has the following receive connectors:
· Client proxy <<ServerName>> Listening on port 587, this receive connector is used by clients like Outlook Express or Mozilla Thunderbird that want to use SMTP to send email. This port needs users to authenticate so as to use the service.
· Default <<ServerName>> Listening on port 25, this is the SMTP service listening “on the Internet” for SMTP messages to arrive from other hosts. This is unauthenticated access, but it is not possible to use this port to relay SMTP messages to other environments. Only messages destined to internal accepted domains are accepted.
· Outbound proxy front end <<ServerName>> This connector, which is only available on the Exchange 2010 Client Access server accepts messages from a send connector on a back-end server, with the front-end proxy option enabled.
The Exchange 2013 Mailbox server has the following receive connectors:
· Client proxy <<ServerName>> Listening on port 465, this connector receives the client’s messages from the Client Access server.
· Default <<ServerName>> Listening on port 25, this is the receive connector used by the Mailbox server to receive SMTP connections from the Client Access server, SMTP messages from other Mailbox servers in the Exchange organization, or messages from down-level Exchange Hub Transport servers. If an Edge Transport server is used, this port receives SMTP messages from this server. The port is not used to receive message from external (i.e., the Internet) hosts.
If there’s a multi-role Exchange 2013 server, the connections are a bit different. It’s not possible to combine both default receive connectors, as both use the same TCP port 25. When installing an Exchange 2013 multi-role server, the default receive connector for the Mailbox server is configured to use port 2525 instead.
When installing Exchange 2013 out of the box, there’s no need to configure anything on the receive connector; it just works. You configure the firewall to forward SMTP to TCP port 25 on the Exchange 2013 Client Access server, and you’re ready to go.
Outlook Anywhere
On the Exchange 2013 Client Access server, Outlook Anywhere is enabled by default. The only step an administrator needs to take is to install a valid (third-party) SSL unified communications certificate and to configure an external hostname—that is, the name of the proxy server that the Outlook clients connect to. In a typical deployment, this is the same FQDN as used for OWA—that is, webmail.contoso.com.
Installing and configuring the SSL certificate has been explained earlier in this section. To configure Outlook Anywhere on the Client Access server, you open the Exchange Management Shell and enter the following command:
Get-OutlookAnywhere -Server AMS-EXCH01 | Set-OutlookAnywhere
-ExternalHostname webmail.contoso.com -ExternalClientsRequireSsl:$true
-ExternalClientAuthenticationMethod:Basic -InternalHostName webmail.contoso.com
-InternalClientsRequireSsl:$true -InternalClientAuthenticationMethod:Basic
MapiHttp
MapiHttp is the new protocol for Outlook that was introduced in Exchange 2013 SP1. For Outlook, you need to use Outlook 2013 SP1 as well, but it might be possible that this new protocol will be introduced in a future service pack or cumulative update for Outlook 2010.
MapiHttp is enabled on an organizational level, so it’s turned on or off for the entire environment. To enable MapiHttp for Exchange 2013 SP1, you open the Exchange Management Shell and enter the following command:
Set-OrganizationConfig -MapiHttpEnabled $true
Please note that it can take up to three hours for the changes to take effect.
Virtual Directories
When you’re deploying Exchange 2013, all virtual directories on the server are configured with their local FQDN, followed by the short name of the virtual directory—that is, https://ams-exch01.contoso.com/owa. While this works fine if there’s only one Exchange server, it becomes challenging when multiple Exchange servers are installed. In this more complex scenario, you use one namespace spanning multiple Exchange servers. For example, you would use https://webmail.contoso.com/owa to cover all Client Access servers in your organization, both internally and externally.
Microsoft recommends that you use one namespace for both external URLs and internal URLs for all virtual directories. This means that webmail.contoso.com on the Internet points to your public IP address on the Internet; but at the same time, webmail.contoso.com points to the private IP address on the internal network. This is called a “split-brain DNS” configuration.
In Exchange 2013, the following directories need to be configured:
· OWA virtual directory
· ECP virtual directory
· EWS (web services) virtual directory
· Activesync virtual directory
· OAB (offline address book) virtual directory
· PowerShell virtual directory
· MapiHttp virtual directory
To begin, you open the virtual directory by double-clicking it and then changing both the internal and external URLs according to Table 2-5.
Table 2-5. Virtual Directory Settings (note from author: I don’t understand what’s happening with this formatting)
|
Virtual Directory |
Internal URL |
External URL |
|
OWA virtual directory |
https://webmail.contoso.com/owa |
https://webmail.contoso.com/owa |
|
ECP virtual directory |
https://webmail.contoso.com/ecp |
https://webmail.contoso.com/ecp |
|
Activesync virtual directory |
https://webmail.contoso.com/Microsoft-Server-ActiveSync |
https://webmail.contoso.com/Microsoft-Server-ActiveSync |
|
EWS virtual directory |
https://webmail.contoso.com/ews/exchange.asmx |
https://webmail.contoso.com/ews/exchange.asmx |
|
OAB virtual directory |
https://webmail.contoso.com/oab |
https://webmail.contoso.com/oab |
|
PowerShell virtual directory |
https://webmail.contoso.com/powershell |
https://webmail.contoso.com/powershell |
|
MapiHttp virtual directory |
https://webmail.contoso.com/mapi |
https://webmail.contoso.com/mapi |
When you look closely at Table 2-6, you’ll notice that the Autodiscover virtual directory is not mentioned. This is correct because there is no need to set the internal URL and external URL property of this virtual directory. Autodiscover functionality and how to configure Autodiscover are discussed in more detail in Chapter 3.
You can change these virtual directory settings using EMS commands like Set-OWAVirtualDirectory, Set-ECPVirtualDirectory, or Set-MAPIVirtualDirectory. I find it easier to combine the Set- commands with the corresponding Get- command; for example:
Get-OWAVirtualDirectory –Server AMS-EXCH01 | Set-OWAVirtualDirectory –InternalURL https://webmail.contoso.com/owa -ExternalURL https://webmail.contoso.com/owa
or
Get-MAPIVirtualDirectory –Server AMS-EXCH01 | Set-MAPIVirtualDirectory –InternalURL https://webmail.contoso.com/mapi -ExternalURL https://webmail.contoso.com/mapi
You can combine the commands to configure all virtual directories in one small script whereby the script takes the domain name as a parameter and where all the URLs are automatically constructed. Such a script would look like this:
<#
.SYNOPSIS
Change_vdir_Settings.ps1
Jaap Wesselius
mail@jaapwesselius.com
THIS CODE IS MADE AVAILABLE AS IS, WITHOUT WARRANTY OF ANY KIND. THE ENTIRE
RISK OF THE USE OR THE RESULTS FROM THE USE OF THIS CODE REMAINS WITH THE USER.
.PARAMETER DomainName
Specifies the domainname being used to construct all URL's
.EXAMPLE
.\Change_vdir_Settings.ps1 contoso.com
#>
$ServerName = $env:COMPUTERNAME
$Domain = $args[0]
$Server = "webmail"
$External = "$Server.$Domain"
$AutoD = "autodiscover.$Domain"
Write-Host "The following FQDN will be used for configuring the virtual directories: $External"
Write-Host "The following FQDN will be used for configuring autodiscover: $AutoD"
Set-OWAVirtualDirectory -Server $ServerName -ExternalURL https://$External/owa
-InternalURL https://$External/owa
Set-ECPVirtualDirectory -Server $ServerName -ExternalURL https://$External/ecp -InternalURL https://$External/ecp
Set-ActiveSyncVirtualDirectory -Server $ServerName -ExternalURL https://$External/Microsoft-Server-ActiveSync -InternalURL https://$External/Microsoft-Server-ActiveSync
Set-WebServicesVirtualDirectory -Server $ServerName -ExternalURL https://$External/ews/exchange.asmx -InternalURL https://$External/ews/exchange.asmx
Set-OABVirtualDirectory -Server $ServerName -ExternalURL https://$External/OAB -InternalURL https://$External/OAB
Set-PowershellVirtualDirectory -Server $ServerName -ExternalURL https://$External/Powershell
-InternalURL https://$External/Powershell
Set-ClientAccessServer -Server $ServerName -AutoDiscoverServiceInternalUri https://$AutoD/autodiscover/autodiscover.xml
Set-OutlookAnywhere -Server $ServerName -ExternalHostname $External
-ExternalClientsRequireSsl:$true
Set-MAPIVirtualDirectory -Server $ServerName –InternalURL https://$External/MAPI -ExternalURL https://$External/MAPI -IISAuthenticationMethods Ntlm, OAuth, Negotiate
Write-Host "Do not forget to issue an IISRESET command."
You can download this script from the Apress website, copy it to the server’s local hard drive, and execute it from the Exchange Management Shell; for example, \change_vdir_settings.ps1 contoso.com.
Now, all your virtual directories will be configured with the correct internal and external URLs. Also, the Autodiscover service connection point will be correctly configured.
Installation and Configuration of Exchange 2013 Using the GUI
The main focus of this book is on administering your Exchange 2013 environment using PowerShell or the Exchange Management Shell. However, if you’re a novice Exchange 2013 administrator, you might want to install and configure your first Exchange 2013 server using the Graphical User Interface (GUI) and then learn how to use PowerShell for managing your Exchange 2013 environment as you read through this book. Therefore, this section can help you easily install and configure your first Exchange 2013 server.
Install Exchange 2013
The installation and configuration steps of the prerequisite software are no different from those explained earlier in this chapter, so there’s no need to review those here. When you run the GUI setup, it will automatically make the changes to Active Directory, so there’s no need to run setup separately to achieve this result.
Now, to install Exchange 2013, you follow these steps:
1. Log on to the server as a member of the Enterprise Admins security group. Besides being a member of this security group, you also need to make sure the account is a member of the Schema Admins security group. You need to be a member of these groups in order to write to the configuration partition and the schema partition.
2. Navigate to the installation media. This can be a physical DVD, an ISO image mounted to a virtual machine, or the extracted binaries on a fileshare on the network. Start the setup application by double-clicking setup.exe.
3. Note that Microsoft has made significant changes to the Exchange Server setup process. The first window that’s shown asks whether the setup application needs to check for updates. If updates are available, the setup application will download them and automatically install them. Leave the default settings (Connect to the Internet and Check for Updates), and click Next to continue and follow the wizard.
4. Setup will now start copying the files needed to install Exchange 2013. When the introduction screen appears, click Next to continue.
5. Read the license agreement, and if you agree with the terms, select I Accept the Terms in This License Agreement, and click Next to continue.
6. The window for recommended settings asks you to select whether or not you want to use the recommended settings. There’s not much information on this screen, but when you select Use Recommended Settings, it enables the error reporting and the Customer Experience Improvement Program (CEIP), which collect information on your hardware and how you use Exchange Server. If you agree with this, select Use Recommended Settings; if not, select Don’t Use Recommended Settings. Click Next to continue.
7. The next screen, shown in Figure 2-15, is the most important in the installation process, as it’s here that you select which server roles to install. Select the Mailbox role and the Client Access role to have both installed on the server. Note the checkbox for Automatically Install Windows Server Roles and Features That Are Required To Install Exchange Server. This makes it possible to automatically install these prerequisites instead of installing them manually. Since this box is checked by default, leave it this way. Click Next to continue.
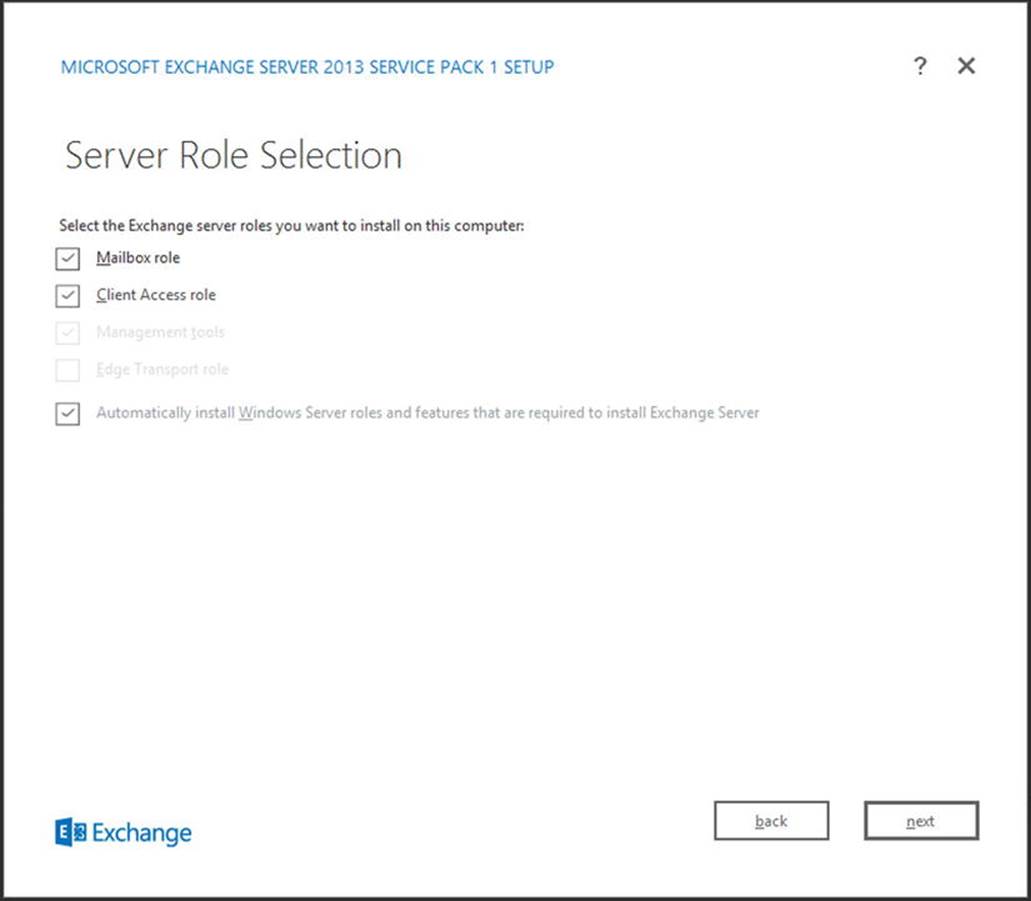
Figure 2-15. Server role selection window during setup
8. If you want to install only the Mailbox server, make sure only the Mailbox server role is selected. If you want to install a dedicated Client Access server, make sure only the Client Access server role is selected.
9. On the Installation space and location screen, you can change the location where the Exchange 2013 files are installed, if needed. Click Next to continue.
10.Since this is the first Exchange 2013 server in your environment, the name of the Exchange Organization needs to be entered. This is similar to the /OrganizationName discussed in the previous section. Enter the name of the new organization—in this example, this is CONTOSO. This is shown in Figure 2-16. In this same screen, there’s also the option to configure your Active Directory for a split permissions security model. This is covered in more detail in Chapter 10; for now, just leave this checkbox unchecked. Click Next to continue.
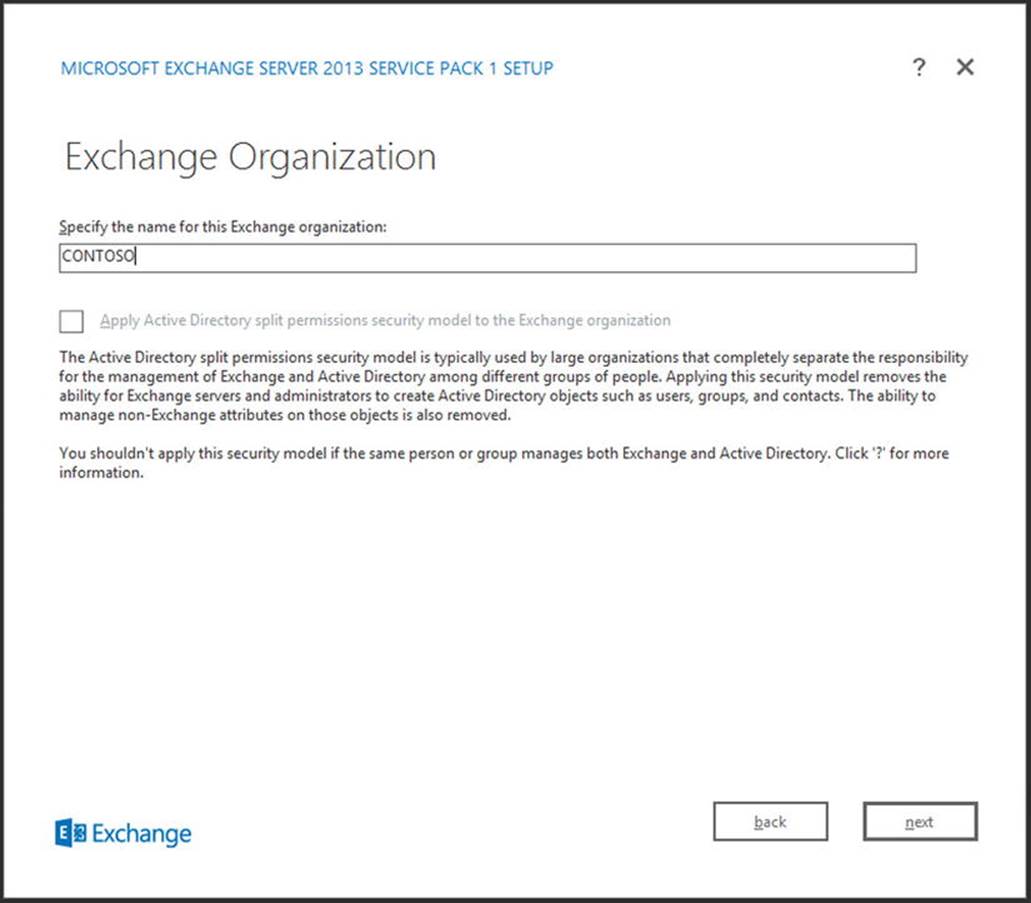
Figure 2-16. Enter the name of the Exchange organization
11.Exchange 2013 comes with a default anti-malware solution. It is not as complete as, for example, the earlier Forefront protection for Exchange Server, but it can certainly help keep your messaging environment clean. By default, the anti-malware is enabled; you can disable it if you want to use another (third-party) solution, but check with your anti-malware vendor first. Internet access is required to download the latest anti-malware updates. Click Next to continue.
12.The setup program has now gathered enough information to proceed with the installation and will perform a readiness check. In a green-field scenario you’ll get a warning message that setup is going to perform an organization change using the /PrepareAD option and that no Exchange 2007 servers have been detected in this topology. If you think about this message, it makes sense and therefore you can continue with the installation process by clicking the Install button. Now it’s time to wait. . . .
The setup consists of 15 different steps. The screen is updated with every step, and within every step, the progress is indicated by a blue bar, as shown in Figure 2-17.
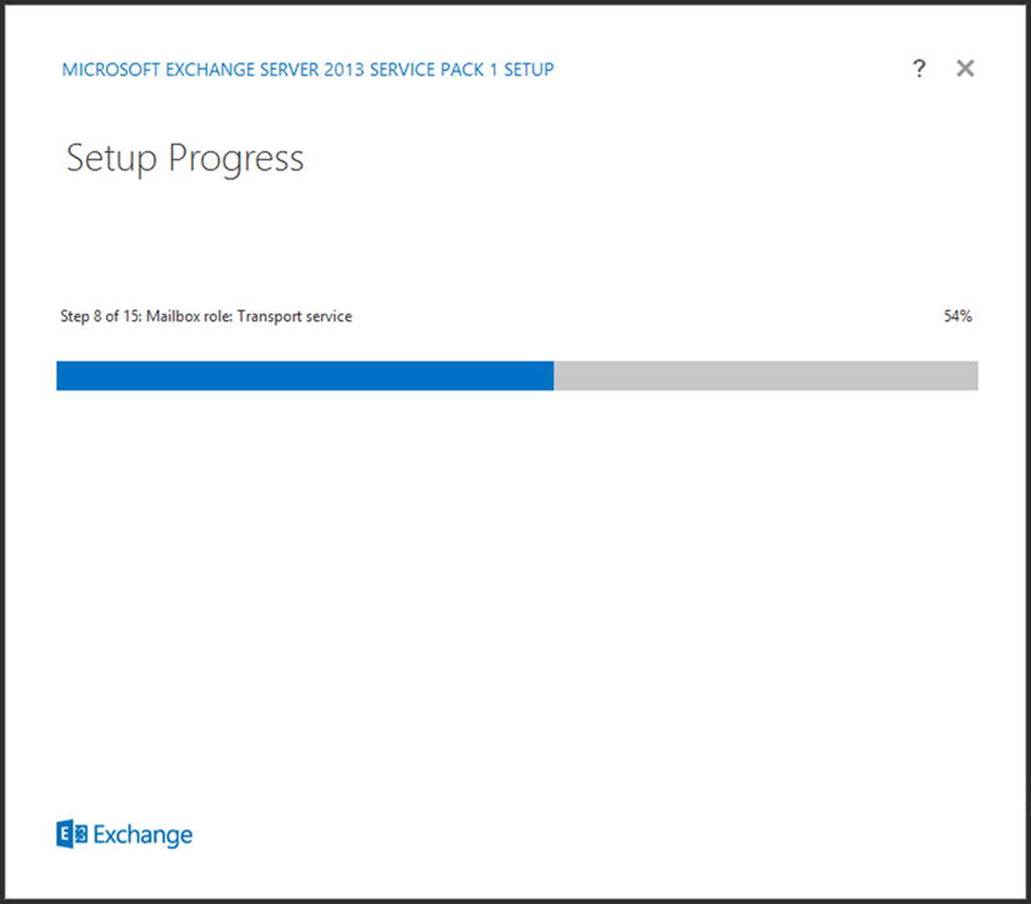
Figure 2-17. The blue bar indicating progress in the setup application
13.When setup is completed, you’re given the option of selecting Launch Exchange Administration Center After Finishing Exchange Setup. Doing so will start the Exchange Admin Center (EAC), so that you can continue the post-configuration tasks. But whether you select this or not, click the Finish button to finish the setup application.
Post-Installation Tasks Using the Exchange Admin Center
Similar to an unattended setup of Exchange 2013, you have to perform some post-installation tasks using the GUI (i.e., the Exchange Admin Center). Again, the tasks that need to be performed are:
· Creating accepted domains
· Creating an email address policy
· Configuring SSL certificates
· Creating a send connector
· Configuring a receive connector
Let’s cover each of these topics.
Accepted Domains
When you need to create another accepted domain—for example, Fabrikam.com—you follow these steps:
1. Log on to the new Exchange 2013 server as an administrator, open a browser, and navigate to the Exchange Admin Center (EAC)—that is, https://localhost/ecp.
(For now you can ignore the SSL security warning; this is caused by the self-signed certificate, combined with the fact that you are accessing the server using the localhost name.)
2. On the logon page, use the domain administrator account to log on to the EAC. If this account is not the account that was used to install Exchange 2013, make sure that this account is also a member of the Organization Management security group in Active Directory.
3. To configure an accepted domain, select Mail Flow in the Features pane and then select the Accepted Domains tab.
4. Click the + icon to start the new accepted domain wizard. Give the new accepted domain a display name (this is just a cosmetic name; it’s how the accepted domain will show up in the EAC), like “Fabrikam,” and then enter the actual SMTP domain name—that is,fabrikam.com. Leave the new accepted domain as an authoritative domain and click Save to continue.
Email Address Policies
To create a new email address policy using the fabrikam.com SMTP domain, for users in the OU=Accounts organizational unit, you can follow these steps:
1. Assuming you’re still logged on to the EAC, select Mail Flow from the Features pane and then the Email Address Policies tab, next to Accepted Domains. In the wizard, click the + icon to add a new email address policy.
2. Give the policy a name. As with the accepted domain, this is only for display purposes; enter something like “Fabrikam.”
3. Click the + icon to select an SMTP domain. This is one of the accepted domains available on the Exchange 2013 server. Use the drop-down box to select the accepted domain fabrikam.com, which was configured in the previous section.
4. Select the proper format of the email address that will be assigned to users. When chosen, click Save to continue with the wizard.
5. By default, a new email address policy will be used for all recipients, but in the wizard it’s also possible to select other recipients, such as mail users, resource mailboxes, or mail-enabled groups.
6. Scroll down and click the Add a Rule button. Here, you select a predefined set of rules that can be used to filter recipients. For example, you can select an organizational unit in Active Directory, or recipients with a certain value in the “company” attribute, or those with one of the 15 custom attributes. In our example, we select Recipient Container, and in the popup, we click on the correct container—that is, Accounts. Click OK to continue and click Save to finish the wizard.
SSL Certificates
Requesting an SSL certificate in EAC is a bit easier than using PowerShell, but storing the request file and the certificate on a file share are mandatory here as well. Use these steps to request an SSL certificate using EAC:
1. Assuming the EAC is still open in your browser, navigate to the Servers option in the Features pane and then click the Certificates tab.
2. Click the + icon to start a new certificate request. Select Create a Request for a Certificate From a Certification Authority and click Next to continue.
3. Enter a friendly name for the certificate—something like “Contoso SSL certificate” and click Next to continue.
4. A wild-card certificate is fully supported, but since we want to use a unified communications SSL certificate with a subject alternative name, leave this blank and click Next to continue.
5. Use the Browse button to select a Client Access server for this certificate and click Next to continue. This is an important step if you have multiple Client Access servers. If you request a new SSL certificate, the private key of this particular server is used. When you receive the certificate from the CA, it is important to finish the request on this same Exchange server to make sure the proper private key is used in the SSL certificate. If you try to finish the certificate request on another server, you’ll end up with a certificate without a private key. Needless to say, this is useless for an Exchange 2013 server!
6. In the next screen, there’s the option to specify an FQDN for every service offered by Exchange 2013. The most important ones are the FQDN for OWA (webmail.contoso.com) and the FQDN for Autodiscover (autodiscover.contoso.com). Scroll down to make sure you covered all the services. For services not used, or when using the same FQDN as OWA, you can empty the field using the small pencil icon. When done, click Next to continue.
7. When there are multiple accepted domains in the Exchange environment, the wizard will show them all, and there’s the option to add them to the certificate as well. For a simple scenario, remove all additional names until only the autodiscover.contoso.comand webmail.contoso.com are left.
Figure 2-18 shows the names Contoso.com and Fabrikam.com that you need to remove.
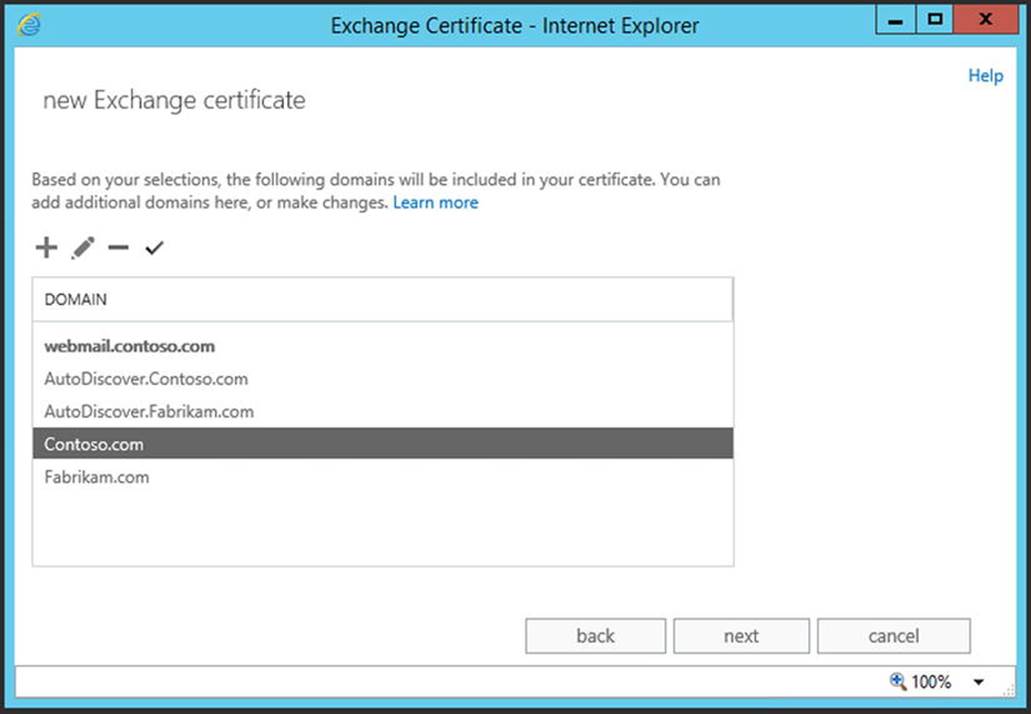
Figure 2-18. Removing additional names from the certificate request
8. Click Next to continue.
9. Fill in the required information, such as organization name, country, city, and so on, as shown in the WHOIS database where all the Internet domain details are stored. If there’s a mismatch, the certification authority will most likely push back the certificate request. Click Next to continue.
10.Enter the location where the request file will be stored (see Figure 2-19). This location is a UNC path like \\ams-fs01\management\certrequest.req. Don’t forget to enter the filename of the request file as well.
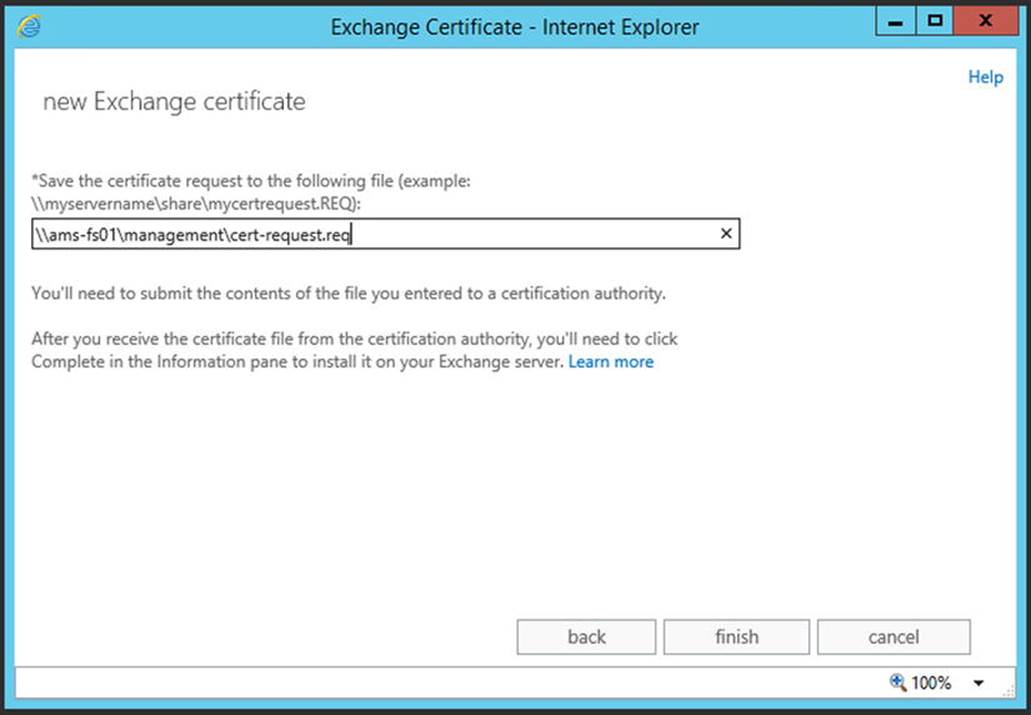
Figure 2-19. Location of the request file, entered in UNC format
![]() Note The universal security group Exchange Trusted Subsystem needs Full Control permissions on the file share where the request will be stored.
Note The universal security group Exchange Trusted Subsystem needs Full Control permissions on the file share where the request will be stored.
11.Click Finish to save the request file and end the new Exchange Certificate wizard.
The request file is a text file with a lot of characters in a fully random order, not readable by a normal human being. The content of this request file is used to request the SSL certificate from a certification authority (CA).
12.Once processed by the CA, the certificate is returned. Store this file in the same location or in another location that is accessible over the network, and return to the EAC.
13.In the EAC, select Servers in the left-hand menu and select Certificates in the top menu. Select the Contoso SSL Certificate request created earlier; you’ll see that its status is “Pending request.”
14.In the right-hand pane under Status, click Complete. In the popup screen, enter the location where the file that was returned by the CA is stored—that is \\ams-fs01\management\webmail-contoso.com-cer and click OK.
The certificate is now imported onto the Exchange Server. If all goes well, it should be listed as “valid” and it’s almost ready to use. The last step to accomplish this is to assign services like IIS to the certificate.
15.To assign services to the certificate, make sure it is selected in the EAC and then click on the pencil icon in the top menu. In the certificate details in the left-hand pane, select Services. Select the IIS service and click Save to continue.
The certificate should now have IIS listed as the assigned service (see Figure 2-20).
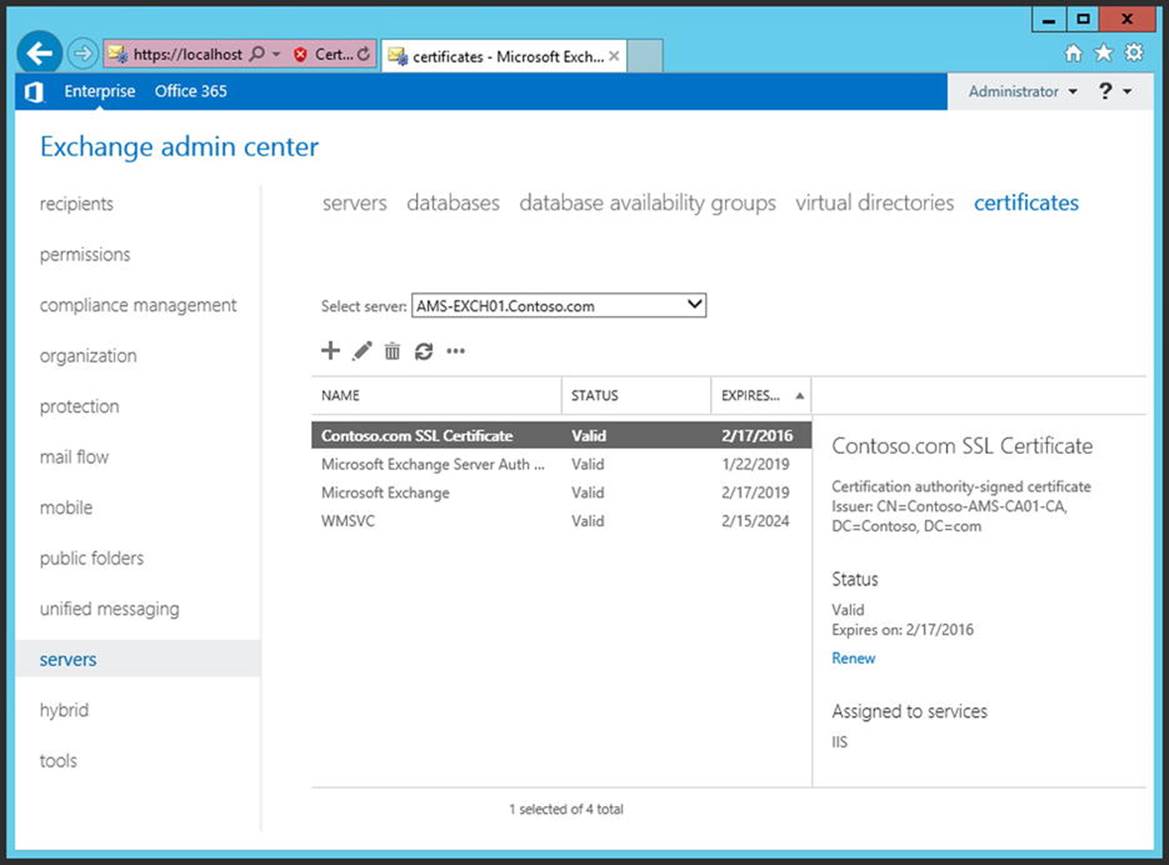
Figure 2-20. IIS as now assigned to the new certificate
Importing an Existing SSL Certificate
There’s also the possibility that you already have a valid and usable SSL certificate, possibly from another deployment or another server, and you have it exported to a .pfx file (certificate export file). If so, you copy the .pfx file to the management share on the network share we used earlier.
1. Log on to the EAC, select Servers in the Features pane and click the Certificates tab.
2. Click on the three dots just above the list of certificates and select Import Exchange Certificate.
3. In the Import Exchange Certificate wizard, enter the location where the .pfx file is stored. This is a UNC path like \\ams-fs01\management\exported-certificate.pfx and enter the password used while exporting (see Figure 2-21). Click Next to continue.
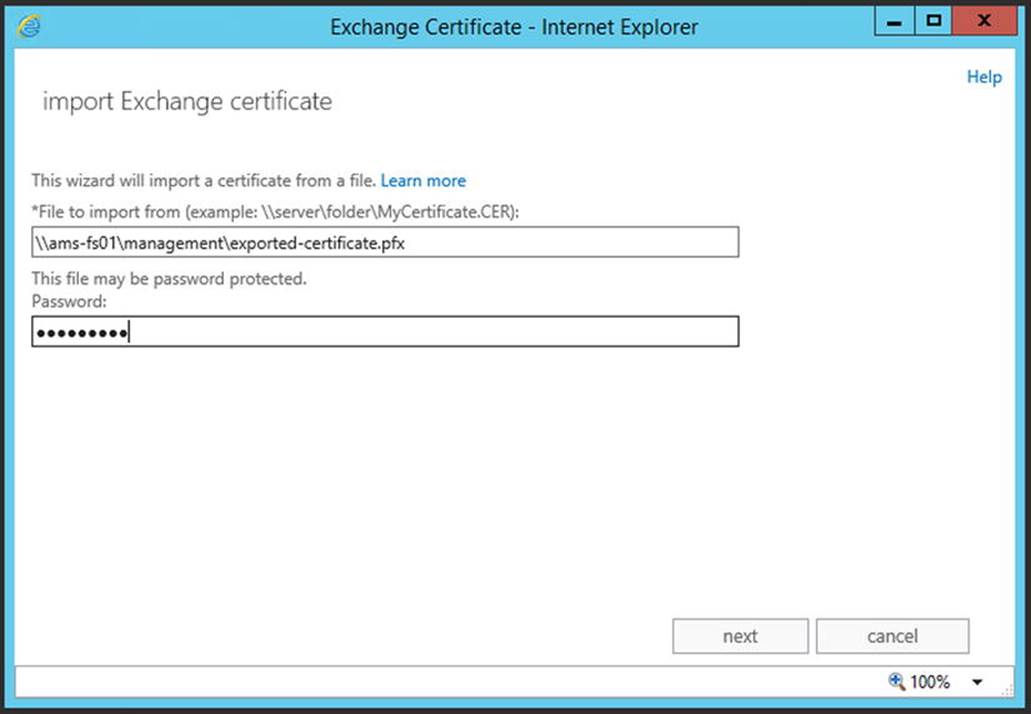
Figure 2-21. Importing an existing SSL certificate in Exchange 2013
4. Click on the + icon to add the Exchange 2013 server that you want to import the SSL certificate onto and click Finish to close the window. The SSL certificate is now imported and Exchange services can now be assigned to the SSL certificate, just as when you create new SSL certificates.
Connectors
In Exchange 2013, connectors are used for sending and receiving messages. These are called send connectors and receive connectors.
Send Connector
An Exchange server is by default not able to send messages to any other server. To achieve this function, however, a send connector has to be created. The send connector is a connector in Exchange 2013 with a namespace, cost, permissions, and one or more source Transport servers. The Exchange server uses this to route messages, for example, to the Internet.
To create a new connector that will send messages to the Internet, use the following steps:
1. Log on to the EAC and select Mail Flow in the Features pane and then click the Send Connectors tab.
2. Click on the + icon to start the new send connector wizard. Enter a name for the send connector—something like “Internet send connector”—and click the Internet radio button. Click Next to continue.
3. There are two ways the connector can send messages:
a. Use MX, which means the Exchange Hub Transport service uses the MX records found in public DNS and then accesses the destination SMTP host directly.
b. A smart host, which means all messages are delivered to one SMTP host, typically an Internet service provider, which in turn delivers the message to the destination SMTP host.
4. In our example we use MX, which is selected by default. Click Next to continue.
5. The address space for an Internet connector is typically an asterisk (*), which basically means all external SMTP domains. Click the + icon, type * in the FQDN field, and click Save, then click Next to continue.
6. A send connector also needs a source transport server. This is a Mailbox server (which also holds the Hub Transport service) that will deliver the messages to the Internet. Click the + icon and select an Exchange server that will act as the source transport server. Choose Add to add the source server to the list, and click OK. Click Finish to close the new send connector wizard and save all the information (see Figure 2-22).
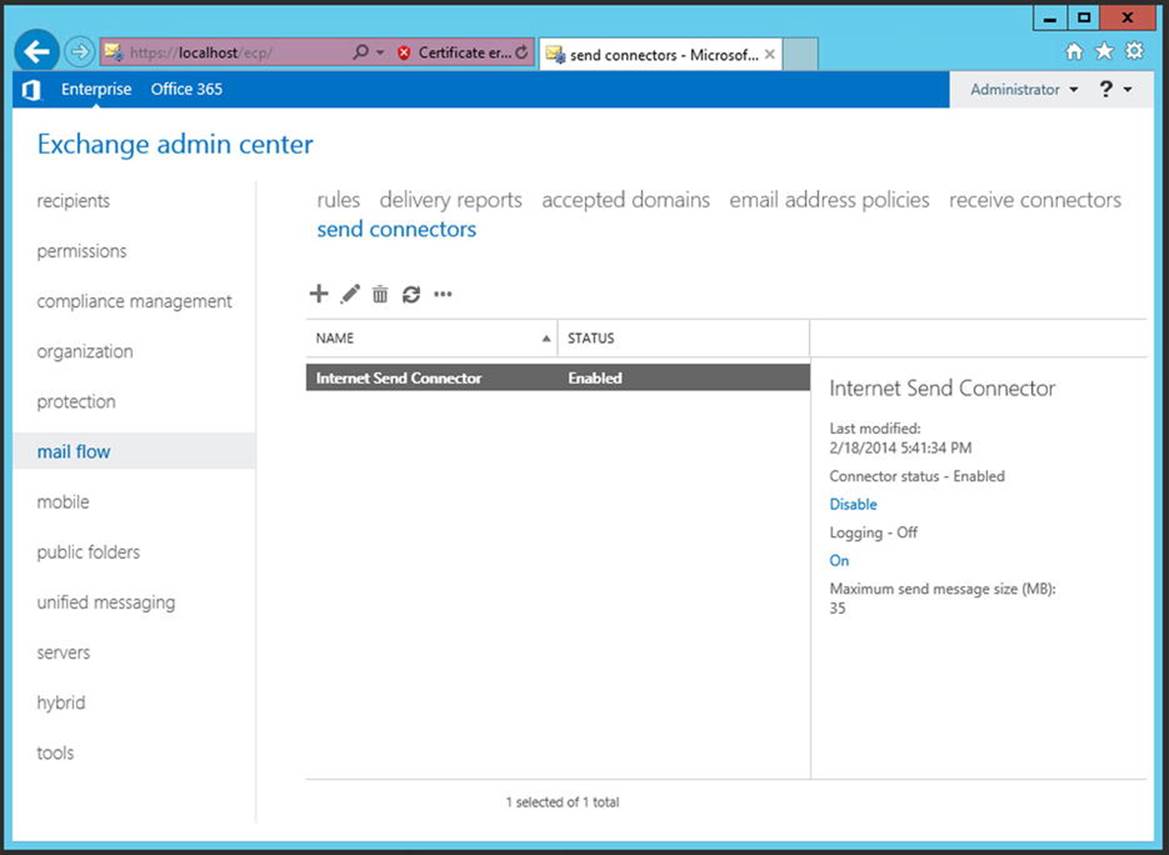
Figure 2-22. The Internet send connector, now ready to use
Receive Connector
Just as when installing Exchange 2013 unattended, there’s no need to configure anything on the receive connector; it just works. You configure the firewall to forward SMTP to port 25 on the Exchange 2013 Client Access server, and you’re ready to go.
Outlook Anywhere
Exchange 2013 does not have the option to configure Outlook Anywhere using the EAC, so you’re stuck to configure this using EMS. To configure Outlook Anywhere on the Client Access server, open the Exchange Management Shell and enter the following command:
Get-OutlookAnywhere -Server AMS-EXCH01 | Set-OutlookAnywhere
-ExternalHostname webmail.contoso.com -ExternalClientsRequireSsl:$true-ExternalClientAuthenticationMethod:Basic -InternalHostName webmail.contoso.com-InternalClientsRequireSsl:$true -InternalClientAuthenticationMethod:Basic
MapiHttp
Just as with Outlook Anywhere, there’s no way to configure MapiHttp using the EAC, so again you have to use EMS to enable this. To configure MapiHttp, open an EMS window and enter the following command:
Set-OrganizationConfig -MapiHttpEnabled $true
Please note that it can take up to three hours for the changes to take effect.
External URLs
As designed, all virtual directories in Exchange 2013 are configured with their local FQDN—that is, https://ams-exch01.contoso.com/owa. While this works fine if there’s only one Exchange server, it becomes challenging when multiple Exchange servers are installed. In this scenario, you would use one namespace spanning multiple Exchange servers. For example, use https://webmail.contoso.com/owa to cover all Client Access servers in your organization.
Microsoft recommends that you use one namespace for both external URLs and internal URLs for all virtual directories. This means that webmail.contoso.com on the Internet points to your public IP address on the Internet; but at the same time, webmail.contoso.com points to your private IP address on the internal network. This is called a “split-brain DNS” configuration.
In Exchange 2013, the following directories need to be configured:
· OWA virtual directory
· ECP virtual directory
· EWS (web services) virtual directory
· Activesync virtual directory
· OAB (offline address book) virtual directory
· PowerShell virtual directory
· Autodiscover virtual directory
· Mapi virtual directory
In the EAC, click on the Servers in the Features pane and click the Virtual Directories tab. All virtual directories will be shown here (see Figure 2-23). If there are multiple servers, you can use the Select Server drop-down box to select a particular Exchange server to configure.
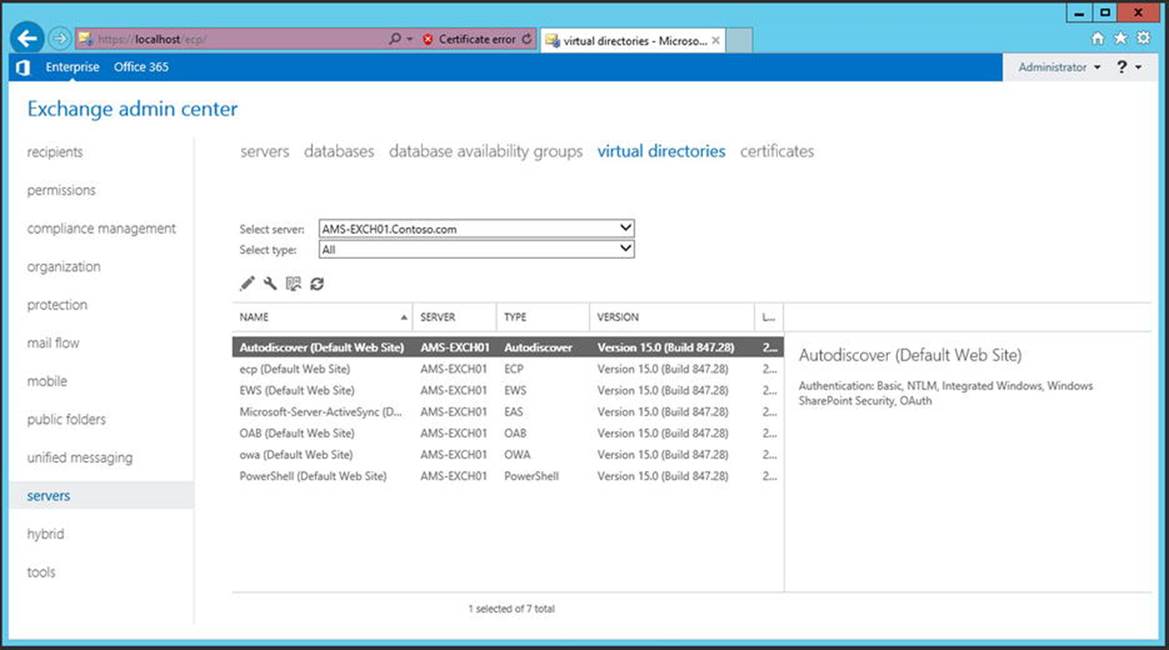
Figure 2-23. Using the EAC to configure the virtual directories
![]() Note Unfortunately, the MapiHttp virtual directory cannot be configured using the EAC so you have to switch to EMS to configure this. At the time of this writing it is unknown if this will be changed by Microsoft in a later cumulative update or service pack.
Note Unfortunately, the MapiHttp virtual directory cannot be configured using the EAC so you have to switch to EMS to configure this. At the time of this writing it is unknown if this will be changed by Microsoft in a later cumulative update or service pack.
To configure the virtual directories for use on the Internet, select Servers in the Features pane and click the Virtual Directories tab. Click on the wrench icon in the toolbar. In the Configure External Access Domain window, use the + icon to select one or more Client Access servers to configure. In the text box shown in Figure 2-24, you would enter the externally accessible domain name, such as webmail.contoso.com. When done, click Save and wait for the wizard to finish the configuration of the external domain name.
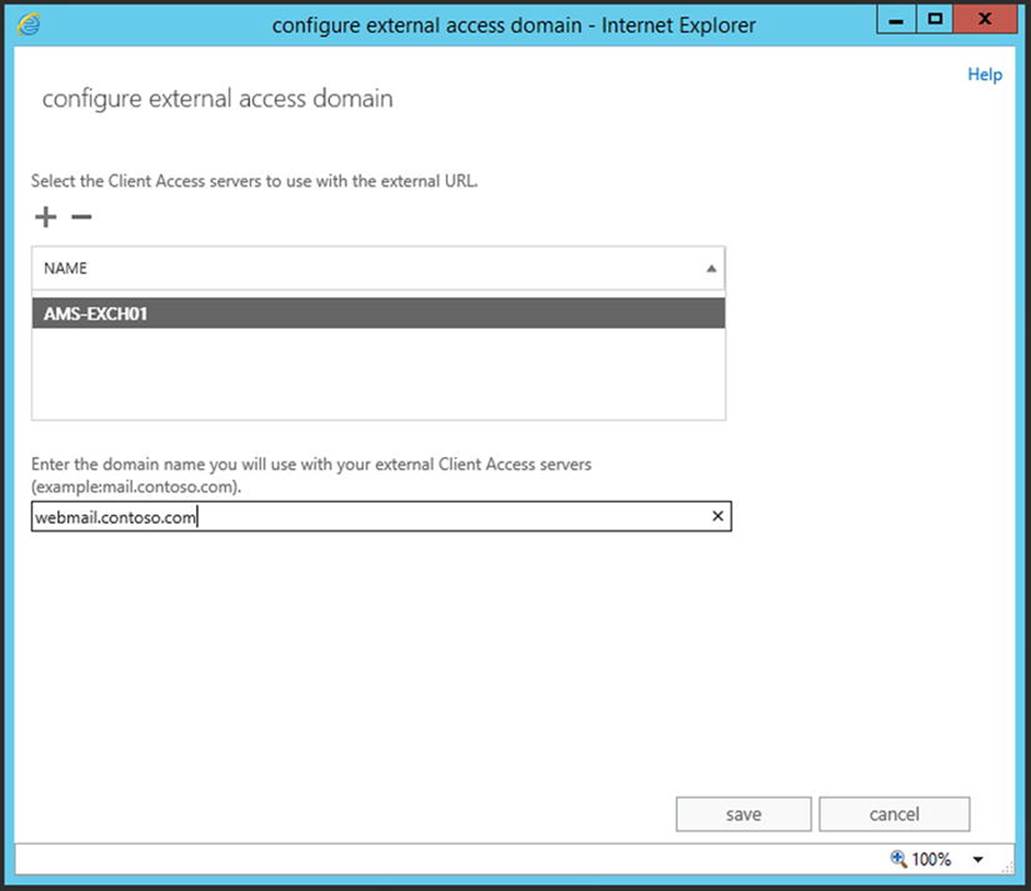
Figure 2-24. Configuring the external virtual directories
In EAC, it is unfortunately not possible to use a similar wizard to configure the virtual directories for internal usage, so these have to be configured manually, step by step.
To begin, open the virtual directory by double-clicking it and then changing both the internal and external URLs according to Table 2-6.
Table 2-6. Virtual Directory Settings
|
Virtual Directory |
Internal URL |
External URL |
|
OWA virtual directory |
https://webmail.contoso.com/owa |
https://webmail.contoso.com/owa |
|
ECP virtual directory |
https://webmail.contoso.com/ecp |
https://webmail.contoso.com/ecp |
|
Activesync virtual directory |
https://webmail.contoso.com/Microsoft-Server-ActiveSync |
https://webmail.contoso.com/Microsoft-Server-ActiveSync |
|
EWS virtual directory |
https://webmail.contoso.com/ews/exchange.asmx |
https://webmail.contoso.com/ews/exchange.asmx |
|
OAB virtual directory |
https://webmail.contoso.com/oab |
https://webmail.contoso.com/oab |
|
PowerShell virtual directory |
https://webmail.contoso.com/powershell |
https://webmail.contoso.com/powershell |
|
Autodiscover virtual directory |
https://autodiscover.contoso.com/autodiscover |
https://autodiscover.contoso.com/autodiscover |
Making all these changes manually using the EAC is quite some work and it’s prone to error, so it’s better to use the Exchange Management Shell to make all the settings, as explained in the unattended setup section earlier in this chapter. The change_vdir_settings.ps1PowerShell script as outlined in the unattended section is a nice tool to configure this.
Service Connection Point
Outlook 2007 and higher use a service connection point in Active Directory for Autodiscover purposes. (Autodiscover will be discussed in detail in Chapter 3.) The service connection point can only be configured using EMS. Use the following command to configure the service connection point:
Get-ClientAccessServer -Identity AMS-EXCH01 | Set-ClientAccessServer -AutoDiscoverServiceInternalUri https://autodiscover.contoso.com/autodiscover/autodiscover.xml
This setting is included in the change_vdir_settings.ps1 script.
Although very basic, your server is now fully configured to be used as a production server. If you want more information regarding recipients like mailboxes, public folders, or distribution groups, these will be discussed in Chapter 4.
Coexistence with Previous Versions of Exchange Server
The previous section was about installing a brand-new Exchange Server 2013 SP1 environment, called a green-field installation. While there’s nothing wrong with this, the chances are you already have an older Exchange environment running in your organization. If this existing environment is based on Exchange Server 2007 or Exchange Server 2010, then it is possible to create a coexistence scenario into which the new Exchange Server 2013 SP1 can be installed, and you can gradually transition your mailboxes to Exchange Server 2013 SP1.
If your existing environment is based on Exchange Server 2003, however, then you’ll run into difficulties. A coexistence scenario between Exchange 2003 and Exchange 2013 is impossible, blocked by hardcoding in the setup application. In this case, you will have to either (1) upgrade Exchange Server 2003 to Exchange Server 2010 and then move on to Exchange Server 2013 SP1; or (2) build a brand-new Active Directory with a green-field Exchange Server 2013 SP1 and perform an interorg migration; that is, you move your user accounts and mailboxes to the new environment using a tool like Active Directory Migration Toolkit (ADMT) or a third-party migration tool. Migrating from Exchange Server 2003 using these options is beyond the scope of this book.
Here, we cover how to transition from either Exchange Server 2007 or Exchange Server 2010 to Exchange Server 2013 SP1. In the preparation and installation phases, the transitions from Exchange Server 2007 or Exchange Server 2010 to Exchange Server 2013 are similar. The differences occur when you start to implement Exchange Server 2013 SP1. That is, proxying and redirection differ greatly in an Exchange Server 2010/2013 scenario compared to an Exchange Server 2007/2013 scenario.
Therefore, we deal initially here with both scenarios up to the point when things start to be different, then each scenario is discussed individually. Also, when I talk about “previous versions of Exchange Server,” I am referencing both Exchange Server 2007 and Exchange Server 2010 unless otherwise noted.
![]() Note Creating a coexistence scenario with Exchange Server 2007 or Exchange Server 2010 is possible only with Exchange Server 2013 RTM CU1 or higher. So when implementing Exchange 2013 SP1, this should not be a problem.
Note Creating a coexistence scenario with Exchange Server 2007 or Exchange Server 2010 is possible only with Exchange Server 2013 RTM CU1 or higher. So when implementing Exchange 2013 SP1, this should not be a problem.
Transition to Exchange Server 2013
Transitioning from Exchange Server 2007 or 2010 is relatively easy because Exchange 2013 is simply introduced into the current Exchange Server environment. This saves you the hassle of building a new Active Directory environment, moving all your resources to that new Active Directory, and working around any problems that might occur when you’re keeping both directories in sync during the coexistence phase.
I deliberately say “relatively easy” because it still takes quite some time to accomplish this task and to work around some difficulties caused by incompatibilities between the previous versions and Exchange 2013. Just as in the past, it’s not possible to have the Exchange 2013 Client Access server (CAS) work directly with an earlier version’s Mailbox server. Even worse, an Exchange 2013 CAS won’t work directly with an Exchange Server 2007 CAS (like proxying requests). As a result, in the coexistence scenario, all client requests need to be redirected to the 2007 CAS (except for Autodiscover). The client in this case creates a new connection with the 2007 CAS and continues working. This is the reason you need an additional namespace with a name like legacy.contoso.com. (This is discussed in more detail later on in this chapter.) If you have been working with Exchange Server for a long time, this requirement will probably sound familiar, as the same situation existed when you upgraded from Exchange Server 2003 to Exchange Server 2010.
Upgrading from Exchange Server 2010 to Exchange Server 2013 works better in this case. When you access an Exchange 2013 CAS while trying to retrieve information from an Exchange 2010 Mailbox server, the request will be proxied to the Exchange 2010 CAS, so there’s no need for Exchange 2013 to redirect the request to the other CAS. In this case, the client keeps its connection with the Exchange 2013 CAS, and this server is responsible for communication with the Exchange 2010 CAS.
The upgrade steps to move from Exchange Server 2007 or Exchange Server 2010 to Exchange 2013 are as follows:
1. Preparing Active Directory.
2. Installing the first Exchange 2013 Mailbox server.
3. Installing the first Exchange 2013 Client Access server.
4. Configuring namespaces and client access redirection (only needed for Exchange Server 2007).
5. Changing client access to contact Exchange 2013 CAS directly.
6. Changing SMTP routing from the previous version of Exchange Server to Exchange 2013.
7. Moving resources from the previous version of Exchange Server to Exchange Server 2013.
8. Decommissioning the previous version of Exchange Server.
The first three steps are similar to the steps as described in the previous section so I won’t go into detail about these here. Instead, I’ll discuss the specific prerequisites when it comes to creating the coexistence scenario and then move on to the fourth step in the process.
Prerequisites
The prerequisites for introducing Exchange 2013 SP1 in an existing environment are similar to those described in the green-field scenario. The Domain Controllers need to be at least Windows Server 2003 R2 SP2, while the Forest Functional Level (FFL) and the Domain Functional Level (DFL) must both be at least at Windows 2003 level.
When you’re running Exchange 2007, all your servers in the environment should be at least running Exchange 2007 Service Pack 3 and Update Rollup 10 or higher. If you’re running Exchange 2010, all your servers in the environment should be at least Exchange 2010 Service Pack 3 or higher.
When these requirements are met, you can prepare the Active Directory for the introduction of Exchange 2013 SP1 using the following commands:
Setup.exe /PrepareSchema /IAcceptExchangeServerLicenseTerms
Setup.exe /PrepareAD /IAcceptExchangeServerLicenseTerms
Setup.exe /PrepareDomain /IAcceptExchangeServerLicenseTerms
Or, if you are using multiple Active Directory domains, you can replace this last command with the following command for easy deployment:
Setup.exe /PrepareAllDomains /IAcceptExchangeServerLicenseTerms
![]() Note Please note the absence of the /OrganizationName in the second command. This is because an Exchange organization already exists in Active Directory so there’s no need for a new organization name.
Note Please note the absence of the /OrganizationName in the second command. This is because an Exchange organization already exists in Active Directory so there’s no need for a new organization name.
When Active Directory is fully prepared, you can introduce the first Exchange 2013 SP1 server into the existing organization. Please refer to the previous section to determine which method of installation fits your situation best.
Configuring the Namespaces and Coexistence
When installing Exchange Server 2013 into an existing Exchange Server 2010 or Exchange Server 2007 environment, you have to configure what are called namespaces. A namespace is a name that clients use to access the Exchange services, like webmail.contoso.com orautodiscover.contoso.com. As you will see in the following sections, there are differences in how Exchange Server 2007 and Exchange Server 2010 handle namespaces.
Namespaces and Coexistence with Exchange Server 2007
When you are installing Exchange 2013 into an Exchange Server 2007 environment, namespaces are extremely important because they determine how a particular client accesses the platform. Clients use these namespaces to make a distinct difference between accessing Exchange 2013 and accessing Exchange Server 2007. They use a technique called redirection to switch from Exchange 2013 to Exchange Server 2007.
Namespaces with Exchange Server 2007
In the original Exchange Server 2007 environment, two namespaces are typically used:
· webmail.contoso.com Used for all HTTPS-based services, including Outlook Anywhere
· autodiscover.contoso.com Used by external Outlook clients for discovering the internal Exchange configuration
In Exchange 2013, this namespace planning is not very different, but since Exchange Server 2007 and Exchange 2013 are not compatible, we have to come up with a solution for the coexistence scenario whereby both Exchange Server 2007 and Exchange 2013 are accessible. Needless to say, this does not work with a single namespace.
When Exchange 2013 is initially installed into an existing Exchange Server 2007 environment, nothing happens with regard to clients. At one point, the client access is changed from the Exchange Server 2007 CAS to the Exchange 2013 CAS. When the mailbox is located on an Exchange 2013 Mailbox server, this is fine, but when the mailbox is still located on the Exchange Server 2007 Mailbox server, things don’t go so well. The client request is redirected from the 2013 CAS to the 2007 CAS to be processed there. You will see this happen in OWA, where the URL in the navigation bar changes from the 2013 CAS to the 2007 CAS.
Since the FQDN webmail.contoso.com is pointing to the 2013 CAS, a new FQDN has to be created to access the old 2007 CAS. Microsoft typically uses the FQDN legacy.contoso.com for this (see Figure 2-25).

Figure 2-25. Coexistence scenario with Exchange Server 2007
In Figure 2-25, the three scenarios are clearly visible.
1. The solid line is the original situation, in which clients connect via webmail.contoso.com and autodiscover.contoso.com to the 2007 CAS. The CAS retrieves the information from the 2007 Mailbox server.
2. The dotted line is the coexistence scenario. Clients connect using webmail.contoso.com and autodiscover.contoso.com to the Exchange 2013 CAS. Requests for webmail.contoso.com are now redirected to the 2007 CAS using thelegacy.contoso.com FQDN. The 2007 CAS retrieves the information from the 2007 Mailbox server and returns the information directly to the clients.
3. The dashed line is the final situation. Clients connect to the Exchange 2013 CAS using the webmail.contoso.com and autodiscover.contoso.com FQDN, and the requests are proxied directly to the Exchange 2013 Mailbox server.
Unfortunately this is not identical for all protocols:
· Outlook Web App is redirected from the Exchange 2013 CAS to the 2007 CAS. This conforms with the three bullets mentioned above.
· Outlook Anywhere is not redirected, but the client requests (HTTPS) are proxied from the Exchange 2013 CAS to the 2007 CAS. This server retrieves the information from the 2007 Mailbox server and the information is returned to the clients through the 2013 CAS.
· Exchange activesync and Exchange web services are proxied from the Exchange 2013 CAS to the 2013 Mailbox server, and then proxied to the 2007 CAS.
· POP3 and IMAP4 are proxied from the Exchange 2013 CAS to the 2007 CAS.
· Autodiscover is a bit different. In an Exchange Server 2007/2013 coexistence scenario, the Autodiscover requests are sent to the Exchange 2013 CAS, which proxies them to (1) the 2013 Mailbox server if the user’s mailbox exists on Exchange 2013; or (2) a down-level Client Access server if the user’s mailbox exists on a previous version of Exchange Server. This is true both for internal clients who get the 2013 CAS from the service connection point (SCP) and for external clients who construct the URL based on the user’s SMTP address.
Outlook clients in an Exchange Server 2007 environment on the internal network connect directly to the Mailbox server where the mailbox is hosted. When Exchange 2013 is introduced into the existing Exchange Server 2007 environment, this does not change the way Outlook clients connect to the Exchange Server 2007 mailbox. But as soon as the mailbox is moved to the 2013 Mailbox server, the Outlook client automatically switches to Outlook Anywhere and starts to connect to the 2013 CAS.
![]() Note There’s a distinct difference between proxying and redirection. In a proxy situation, the client keeps the connection with the Exchange 2013 server, which forwards the request to the Exchange 2007 server. This server returns the information to the Exchange 2013 server, which returns the information to the client. Thus, connection with the Exchange 2013 server never gets lost. In a redirection situation, the connection with the Exchange 2013 server is closed after the authentication request and the client sets up a new connection with the Exchange 2007 server.
Note There’s a distinct difference between proxying and redirection. In a proxy situation, the client keeps the connection with the Exchange 2013 server, which forwards the request to the Exchange 2007 server. This server returns the information to the Exchange 2013 server, which returns the information to the client. Thus, connection with the Exchange 2013 server never gets lost. In a redirection situation, the connection with the Exchange 2013 server is closed after the authentication request and the client sets up a new connection with the Exchange 2007 server.
Coexistence with Exchange Server 2007 and SSL Certificates
When configuring the Exchange 2007 CAS for coexistence scenario with the Exchange 2013 CAS, know that the SSL certificates need to be changed. The webmail.contoso.com and autodiscover.contoso.com names are used on the SSL certificate on the 2013 CAS, and thelegacy.contoso.com name is used on the SSL certificate on the 2007 CAS.
The easiest and cheapest way to achieve this is to use one SSL certificate on both Client Access servers, whereby:
· webmail.contoso.com is used as the common name (CN).
· autodiscover.contoso.com is added to the subject alternative names (SAN) field.
· legacy.contoso.com is added to the subject alternative names (SAN) field.
An advantage of using the same SSL certificate on both the 2007 CAS and the 2013 CAS is that the moment of switching the FQDN from Exchange 2007 to Exchange 2013 is fully independent of the SSL certificate activities.
To request a new SSL certificate on the Exchange 2013 server, you open EMS and enter the following commands:
$Data = New-ExchangeCertificate -FriendlyName "Coexistence SSL Certificate" -GenerateRequest
-SubjectName "c=US, o=Contoso, cn=webmail.contoso.com"
-DomainName webmail.contoso.com,autodiscover.contoso.com,legacy.contoso.com
-PrivateKeyExportable $true
Set-Content -path "\\ams-ad01\mgmtshare\SSLCertRequest.req" -Value $Data
After ordering the certificate from your certificate authority, you store the new certificate on the same share and continue with the following commands:
Import-ExchangeCertificate –Server AMS-EXCH01 -FileData ([Byte[]]$(Get-Content
-Path "\\ams-ad01\management\certnew.cer" -Encoding byte -ReadCount 0)) |
Enable-ExchangeCertificate -Server AMS-EXCH01 -Services IIS
When you check the new certificate, using either the certificates MMC snap-in or your browser, and you navigate to the Exchange 2013 CAS, you’ll see all entries, similar to those shown in Figure 2-26.
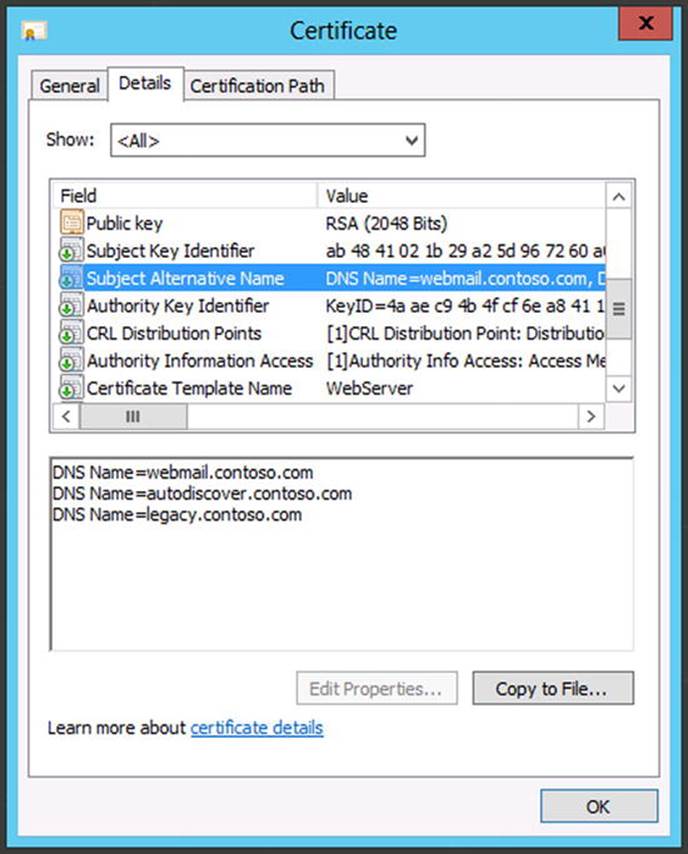
Figure 2-26. The new SSL certificate with the subject alternative names entries
The final step is to export this SSL certificate on the Exchange 2013 CAS and import it on the 2007 CAS. Don’t forget to assign the services on the 2007 CAS to the newly imported SSL certificate.
Exchange Server 2007 and Virtual Directories
Now that there are two separate and different Exchange CAS servers, you need to take special care when it comes to configuring the virtual directories that are part of those Client Access servers.
In Exchange 2013, all virtual directories should point to the Exchange 2013 server, so this is no different from a normal green-field installation. All mailboxes that have been moved to Exchange 2013 will use these settings (see Table 2-7).
Table 2-7. Virtual Directory Settings on the Exchange 2013 Client Access Server
|
Virtual Directory |
Internal URL |
External URL |
|
OWA virtual directory |
https://webmail.contoso.com/owa |
https://webmail.contoso.com/owa |
|
ECP virtual directory |
https://webmail.contoso.com/ecp |
https://webmail.contoso.com/ecp |
|
Activesync virtual directory |
https://webmail.contoso.com/Microsoft-Server-ActiveSync |
https://webmail.contoso.com/Microsoft-Server-ActiveSync |
|
EWS virtual directory |
https://webmail.contoso.com/ews/exchange.asmx |
https://webmail.contoso.com/ews/exchange.asmx |
|
OAB virtual directory |
https://webmail.contoso.com/oab |
https://webmail.contoso.com/oab |
|
PowerShell virtual directory |
https://webmail.contoso.com/powershell |
https://webmail.contoso.com/powershell |
|
Mapi virtual directory |
https://webmail.contoso.com/mapi |
https://webmail.contoso.com/mapi |
|
Outlook Anywhere |
Webmail.contoso.com |
Webmail.contoso.com |
To configure a virtual directory—for example, the OWA virtual directory—you can use a command like this in EMS:
Get-OWAVirtualDirectory –Server AMS-EXCH01 | Set-OWAVirtualDirectory –InternalURL https://webmail.contoso.com/owa -ExternalURL https://webmail.contoso.com/owa
And repeat this command for other virtual directories using these commands in EMS:
· Set-EPCVirtualDirectory
· Set-ActiveSyncVirtualDirectory
· Set-WebServicesVirtualDirectory
· Set-OABVirtualDirectory
· Set-PowershellVirtualDirectory
· Set-MAPIVirtualDirectory
There’s no need to configure the Autodiscover virtual directory with the –InternalURL and –ExternalURL properties. These are available on the virtual directory, but they not used by Exchange 2013.
As with the previous sections in this chapter, you can best use the PowerShell Change_vdir_settings.ps1 script to configure all settings with just one command.
On the new 2013 CAS, Outlook Anywhere has to be configured as well. Remember that Outlook Anywhere is enabled by default on Exchange 2013, as all Outlook clients on Exchange 2013 use Outlook Anywhere. The internal hostname and the external hostname need to be configured as well as the SSL requirement parameter:
Set-OutlookAnywhere -Identity van-cas2013\rpc* -InternalHostname webmail.contoso.com -InternalClientsRequireSSL $true -InternalClientAuthenticationMethod Basic -ExternalHostname webmail.contoso.com -ExternalClientsRequireSSL $true -ExternalClientAuthenticationMethod Basic
When a mailbox has not been moved to the Exchange 2013 Mailbox server, the 2013 CAS will detect this during the initial client request when the user is authenticated. The request will either be redirected or it will be proxied to the 2007 CAS, depending on the protocol being used.
The virtual directories on the 2007 CAS (see Table 2-8) either should point to the legacy URL when the request is redirected or should point to the 2013 CAS when the request is proxied or handled by the 2013 Mailbox server.
Table 2-8. Virtual Directory Settings on the Exchange Server 2007 Client Access Server
|
Virtual Directory |
Internal URL |
External URL |
|
OWA virtual directory |
https://legacy.contoso.com/owa |
https://legacy.contoso.com/owa |
|
ECP virtual directory |
n/a |
n/a |
|
Activesync virtual directory |
https://webmail.contoso.com/Microsoft-Server-ActiveSync |
https://webmail.contoso.com/Microsoft-Server-ActiveSync |
|
EWS virtual directory |
https://legacy.contoso.com/ews/exchange.asmx |
https://legacy.contoso.com/ews/exchange.asmx |
|
OAB virtual directory |
https://legacy.contoso.com/oab |
https://legacy.contoso.com/oab |
|
PowerShell virtual directory |
https://legacy.contoso.com/powershell |
https://legacy.contoso.com/powershell |
|
Autodiscover virtual directory |
https://autodiscover.contoso.com/autodiscover |
https://autodiscover.contoso.com/autodiscover |
![]() Note When enabling Outlook Anywhere on Exchange Server 2007 in a coexistence scenario, you’ll find the same settings apply as when enabled in a pure Exchange Server 2007 scenario. The Outlook clients who have a mailbox on Exchange Server 2007 and access 2013 CAS are proxied to the 2007 CAS.
Note When enabling Outlook Anywhere on Exchange Server 2007 in a coexistence scenario, you’ll find the same settings apply as when enabled in a pure Exchange Server 2007 scenario. The Outlook clients who have a mailbox on Exchange Server 2007 and access 2013 CAS are proxied to the 2007 CAS.
Please note that it is not possible to manage Exchange Server 2007 settings from the EMS running on the Exchange 2013 environment, nor is it possible from the EAC. Exchange Server 2007 settings should be managed from the 2007 Exchange Management Console or the 2007 Exchange Management Shell. Since you are reading this, you should be familiar with Exchange Server 2007 and how to configure the virtual directories in the 2007 Exchange Management Console or the 2007 Exchange Management Shell, so I won’t go into detail here.
![]() Note Don’t make changes to the Exchange 2007 virtual directories yet, because that will immediately change the client behavior. Make these changes at the moment when you are actually changing the access method, as explained in the next section, when all clients access the 2013 CAS and are redirected to the 2007 CAS.
Note Don’t make changes to the Exchange 2007 virtual directories yet, because that will immediately change the client behavior. Make these changes at the moment when you are actually changing the access method, as explained in the next section, when all clients access the 2013 CAS and are redirected to the 2007 CAS.
Making the Change for Clients
If all servers have been installed and configured, it’s time to change how these clients access the Exchange platform. This is an important moment because one mistake here can potentially have an impact on all clients.
I’ve said before that Outlook clients connect directly to the 2007 Mailbox server, and this does not change when you make the change to the 2013 CAS. While this is true, Outlook clients use Autodiscover and the Exchange web services at the same time, and these protocols are impacted by a change to the 2013 CAS.
For internal clients, it is just a matter of changing the internal DNS records for webmail.contoso.com and autodiscover.contoso.com to the 2013 CAS and of creating a new record for legacy.contoso.com pointing to the 2007 CAS. If there are multiple CAS in a load-balanced array, you have to change the IP address from the old load-balanced array to the new load-balanced array.
For external clients, the forwarding address on the firewall needs to be changed from the 2007 CAS to the 2013 CAS. If the Microsoft Threat Management Gateway (TMG) 2010 is used, more steps are involved. In this case, you do the following:
1. Import the new SSL certificate that includes the legacy.contoso.com domain name to the TMG server, and bind it to the web listener that’s used by the Exchange servers.
2. Create a new web publishing rule in the TMG console for publishing the legacy.contoso.com Exchange 2007 server. The existing web listener can be used for this new web publishing rule.
3. Change the web listener for webmail.contoso.com so that it now points to the 2013 CAS. If the self-signed certificate is used on the CAS, make sure it is imported in the trusted root certification authority’s store on the TMG server so that the self-signed certificate is trusted. This certificate is only used for communication between the TMG server and the CAS.
![]() Note It is possible to create the legacy web publishing rule before making the actual network changes. This way you have the possibility of testing the new legacy rule.
Note It is possible to create the legacy web publishing rule before making the actual network changes. This way you have the possibility of testing the new legacy rule.
4. Clients will use the webmail.contoso.com FQDN to connect to the 2013 CAS.
5. When the mailbox is still on Exchange Server 2007, the client will be redirected to 2007 CAS and the client will use the legacy.contoso.com FQDN to connect to the legacy CAS. Since one web listener is used by both web publishing rules, one authentication is sufficient.
Figure 2-27 outlines how clients connect in a coexistence scenario with Exchange Server 2007:
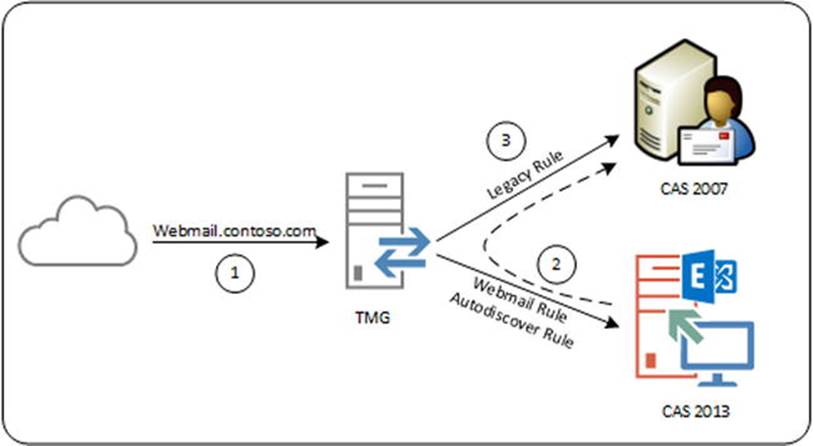
Figure 2-27. TMG rules in a coexistence scenario
![]() Note Make sure that the authentication settings on the TMG publishing rules match the authentication settings on the virtual directories in Exchange Server 2007 and Exchange Server 2013.
Note Make sure that the authentication settings on the TMG publishing rules match the authentication settings on the virtual directories in Exchange Server 2007 and Exchange Server 2013.
When these changes are made, the last step is to change the virtual directories on the 2007 CAS using the 2007 Exchange Management Console or the 2007 Exchange Management Shell, according to settings shown in Table 2-8. Then, you’re ready to go.
A client will now use the http://webmail.contoso.com/owa URL to connect to the Exchange 2013 CAS and the Exchange 2013 logon form is presented. This is the first change for users! When the user’s mailbox is on the Exchange 2013 Mailbox server, the mailbox is shown directly after authentication. When the user’s mailbox is still on Exchange Server 2007, TMG redirects the request to the 2007 CAS, which will automatically authenticate the request and the client is shown the Exchange 2007 mailbox (see Figure 2-28).
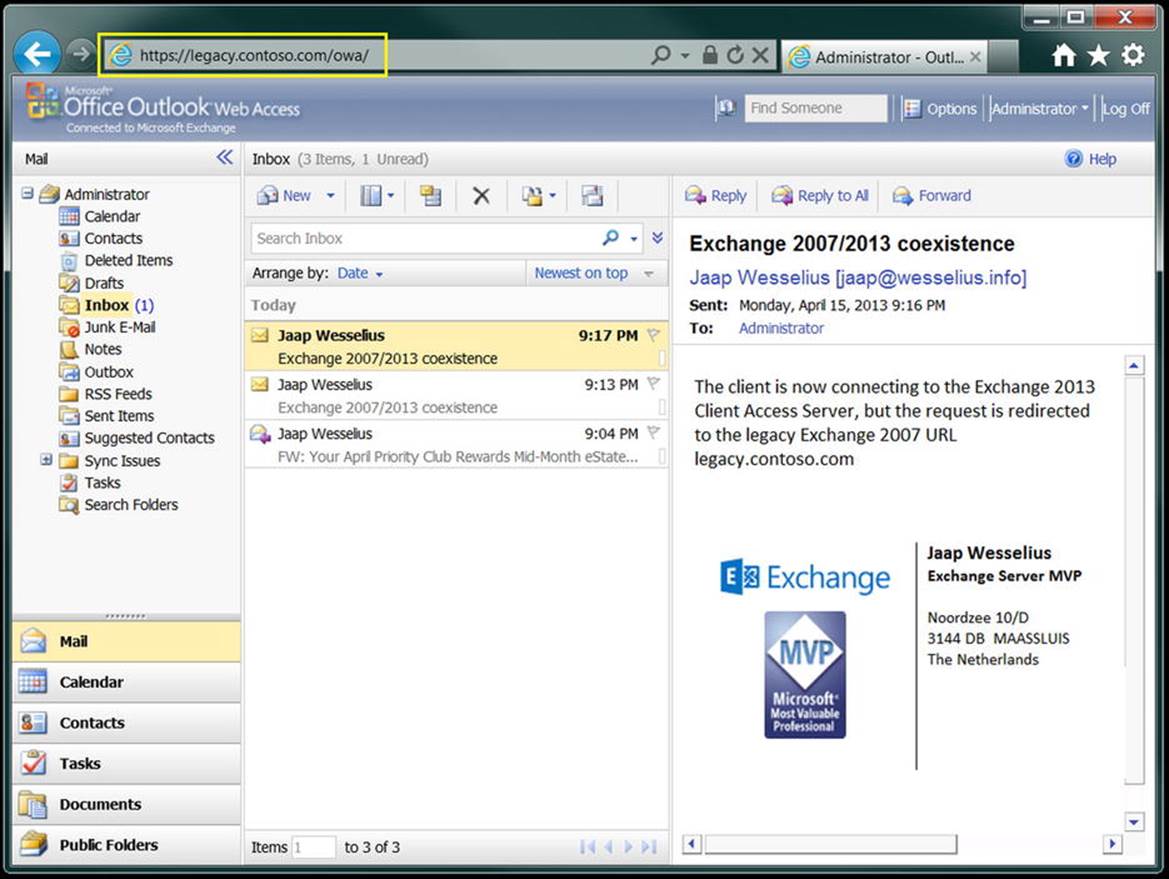
Figure 2-28. The mailbox is still on Exchange Server 2007; note the legacy URL in the navigation bar
Once you’ve made this change, you’ve finished one the most important steps in the transition, and it’s time to relax a bit and enjoy the Exchange 2013 CAS. Moving mailboxes is the next step in the transition process, and this will be explained after we’ve covered namespaces and coexistence with Exchange Server 2010.
![]() Note Make absolutely sure that the legacy.contoso.com namespace is configured as identical to the webmail.contoso.com namespace regarding proxy settings, the cookie/popup blocker, and the Trusted Sites setting.
Note Make absolutely sure that the legacy.contoso.com namespace is configured as identical to the webmail.contoso.com namespace regarding proxy settings, the cookie/popup blocker, and the Trusted Sites setting.
Namespaces and Coexistence with Exchange Server 2010
Life is a little easier when you’re installing Exchange 2013 into an existing Exchange Server 2010 environment. Exchange 2013 works quite well with Exchange Server 2010, making use of an additional namespace unnecessary. There’s only one namespace, so there’s not a lot of change needed.
Namespaces with Exchange Server 2010
In a typical Exchange Server 2010 environment, two namespaces are used:
· webmail.contoso.com Used for all HTTPS-based services, including Outlook Anywhere.
· autodiscover.contoso.com Used by external Outlook clients for discovering the internal Exchange configuration.
The namespace planning is identical in a native Exchange 2013 environment. Also, the Exchange 2013 CAS works smoothly with the 2010 CAS. Requests that hit the 2013 CAS for a mailbox running on Exchange Server 2010 are automatically proxied to the 2010 CAS (see Figure 2-29). For the end user, this is a seamless experience; his connection is set up to the 2013 CAS, and this connection is preserved as long as his session is kept alive. So, in this scenario there’s no need for an additional namespace, as was needed for the Exchange Server 2007/2013 coexistence.
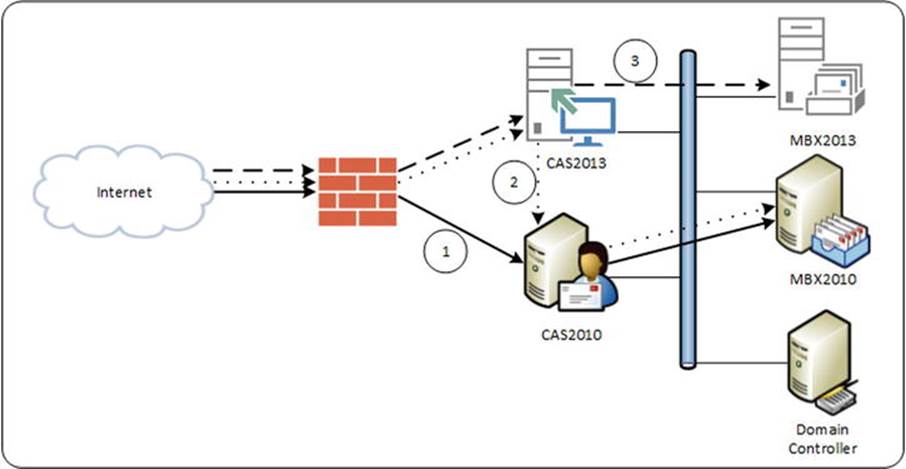
Figure 2-29. Coexistence scenario with Exchange Server 2010
Figure 2-29 shows what happens in an Exchange Server 2010/2013 coexistence scenario:
1. The solid line is the original situation, where clients connect via webmail.contoso.com and autodiscover.contoso.com to the Exchange Server 2010 CAS. The CAS retrieves the information from the 2010 Mailbox server.
2. The dotted line is the coexistence scenario. Clients connect using webmail.contoso.com and autodiscover.contoso.com to the 2013 CAS. Requests are proxied to the 2010 CAS, which retrieves the information from the 2010 Mailbox server and returns the information via the 2013 CAS to the client. No connection is set up between the client and the 2010 CAS, and this is fully transparent for the end user.
3. The dashed line is the final situation. Clients connect to the 2013 CAS using the webmail.contoso.com and autodiscover.contoso.com FQDN, and the requests are proxied directly to the 2013 Mailbox server.
In an Exchange Server 2010/2013 coexistence scenario, the following are true for all protocols:
· Outlook Web App is proxied from the 2013 CAS to the 2010 CAS when the mailbox is still on the 2010 Mailbox server. The interface for those mailboxes is still 2010 and will not benefit from the new 2013 Outlook Web App features.
· Autodiscover requests are proxied to the 2010 CAS when the user mailbox is still on the 2010 Mailbox server. This is true for both internal and external clients. Internal clients get the 2013 CAS via the service connection point (SCP) while external clients construct the URL from the SMTP email address of the user.
· Outlook Anywhere connections (HTTPS) from Outlook clients are proxied from the 2013 CAS to the 2010 CAS as long as the mailbox is on the 2010 Mailbox server.
· Exchange activesync and Exchange web services are proxied from the 2013 CAS to the 2010 CAS as long as the mailbox is running on the 2010 Mailbox server.
· POP3 and IMAP4 are proxied from the 2013 CAS to the 2010 CAS.
So, all requests are proxied from the 2013 CAS to the 2010 CAS. If there are multiple 2013 Client Access servers, they are load-balanced using a layer-4 load balancer. If there are multiple 2010 Client Access servers, though, there’s no need for a load-balancer solution on Exchange Server 2010. The 2013 CAS picks a (healthy, available) 2010 CAS randomly from Active Directory so the load is automatically distributed across all 2010 Client Access servers in this particular site.
Outlook clients in an existing Exchange Server 2010 environment connect to the RPC ClientAccess service running on the Exchange Server 2010 Client Access server. If multiple Exchange 2010 Client Access servers are used, a load-balanced array of Client Access servers is used—the CAS array. When Exchange 2013 is introduced into the existing Exchange Server 2010 environment, nothing changes in the way internal Outlook clients connect to the CAS array. Only if the mailbox is moved from Exchange Server 2010 to Exchange 2013 does the Outlook client no longer connect to the CAS array; instead, the client starts using Outlook Anywhere and then connects to the 2013 CAS.
Coexistence with Exchange Server 2010 and SSL Certificates
In an Exchange Server 2010/2013 coexistence scenario, there’s no need to worry about SSL certificates. The existing SSL certificate on the 2010 CAS in a typical environment should have domain names webmail.contoso.com and autodiscover.contoso.com. At one point, the clients connect to the 2013 Client Access servers using the same domain names, so it’s just a matter of exporting the SSL certificate from the 2010 CAS to the 2013 CAS.
Client requests are proxied to the 2010 CAS, but the information is only encrypted using the SSL certificate; the SSL certificate is not used for server authentication. Since the 2010 CAS is a member of the same Active Directory environment, it is automatically trusted by the 2013 CAS.
To use an existing SSL certificate from the 2010 CAS, you follow these steps:
1. On the 2010 CAS, you use the Exchange Management Console to export the SSL certificate to a .pfx file and store this .pfs file on a network share—for example, \\ams-fs01\management\exported-certificate.pfx.
2. On the Exchange 2013 server, you open EMS and enter the following command to import the .pfx file:
Import-ExchangeCertificate –Server AMS-EXCH01 -FileData ([Byte[]]$(Get-Content
-Path "\\ams-ad01\management\exported-certificate.pfx" -Encoding byte -ReadCount 0)) |
Enable-ExchangeCertificate -Server AMS-EXCH01 -Services IIS
Exchange Server 2010 and Virtual Directories
Now that there are two separate and different Client Access servers, you need to take special care when it comes to configuring the virtual directories that are part of those Client Access servers.
In Exchange 2013, all virtual directories should point to the Exchange 2013 server, so this is no different from a normal green-field installation. All mailboxes that have been moved to Exchange 2013 will use these settings (see Table 2-9).
Table 2-9. Virtual Directory Settings on the Exchange 2013 Client Access Server
|
Virtual Directory |
Internal URL |
External URL |
|
OWA virtual directory |
https://webmail.contoso.com/owa |
https://webmail.contoso.com/owa |
|
EAC virtual directory |
https://webmail.contoso.com/ecp |
https://webmail.contoso.com/ecp |
|
Activesync virtual directory |
https://webmail.contoso.com/Microsoft-Server-ActiveSync |
https://webmail.contoso.com/Microsoft-Server-ActiveSync |
|
EWS virtual directory |
https://webmail.contoso.com/ews/exchange.asmx |
https://webmail.contoso.com/ews/exchange.asmx |
|
OAB virtual directory |
https://webmail.contoso.com/oab |
https://webmail.contoso.com/oab |
|
PowerShell virtual directory |
https://webmail.contoso.com/powershell |
https://webmail.contoso.com/powershell |
|
MAPI virtual directory |
https://webmail.contoso.com/mapi |
http://webmail.contoso.com/mapi |
|
Outlook Anywhere |
webmail.contoso.com |
webmail.contoso.com |
Just as in the previous sections, the best way to configure the virtual directories is to use the change_vdir_settings.ps1 PowerShell script to minimize the risk for errors. This script will set all the virtual directories and configure Outlook Anywhere as well.
![]() Note As with Exchange Server 2007, make sure the internal URL is resolvable as well when making changes. When this is not resolvable, a warning message will be shown.
Note As with Exchange Server 2007, make sure the internal URL is resolvable as well when making changes. When this is not resolvable, a warning message will be shown.
If a mailbox has not been moved to the 2013 Mailbox server, the 2013 CAS will detect this when the user is authenticated during the initial client request, and the request will be proxied to the 2010 CAS. In this situation, the same settings (see Table 2-10) are used, as all client requests are proxied from the 2013 CAS to the 2010 CAS. For the client, what happens on the Exchange Server level is fully transparent, so the same virtual directory settings apply as for mailboxes that are already on Exchange 2013. In the original environment, the namespaces used were the same as in the coexistence scenario, so if all is correct, there’s no need to change anything on the Exchange Server 2010 virtual directory settings.
Table 2-10. Virtual Directory Settings on the Exchange 2013 Client Access Server
|
Virtual Directory |
Internal URL |
External URL |
|
OWA virtual directory |
https://webmail.contoso.com/owa |
https://webmail.contoso.com/owa |
|
ECP virtual directory |
https://webmail.contoso.com/ecp |
https://webmail.contoso.com/ecp |
|
Activesync virtual directory |
https://webmail.contoso.com/Microsoft-Server-ActiveSync |
https://webmail.contoso.com/Microsoft-Server-ActiveSync |
|
EWS virtual directory |
https://webmail.contoso.com/ews/exchange.asmx |
https://webmail.contoso.com/ews/exchange.asmx |
|
OAB virtual directory |
https://webmail.contoso.com/oab |
https://webmail.contoso.com/oab |
|
PowerShell virtual directory |
https://webmail.contoso.com/powershell |
https://webmail.contoso.com/powershell |
![]() Note Outlook Anywhere in a coexistence scenario is similar to Outlook Anywhere in a native Exchange 2010 environment, so no additional changes are necessary.
Note Outlook Anywhere in a coexistence scenario is similar to Outlook Anywhere in a native Exchange 2010 environment, so no additional changes are necessary.
Please note that it is not possible to manage Exchange Server 2010 settings from the EMS running on the Exchange 2013 environment. Exchange Server 2010 settings should be managed from the 2010 Exchange Management Console or 2010 Exchange Management Shell.
Making the Change for Clients
If all servers have been installed and configured, it’s time to make the change in how clients access the Exchange platform. This is an important moment; one mistake here can potentially have an impact on all clients.
Although this change is important, the effect is different for every client. Outlook clients, for example, will connect to the Exchange 2010 CAS array, and this will not change when the switch to the 2013 CAS is made. But those same Outlook clients also use Autodiscover and the Exchange web services, and these protocols are impacted during the change.
For internal clients, it is just a matter of changing the internal DNS records for webmail.contoso.com and autodiscover.contoso.com to the 2013 CAS. If there are multiple Client Access servers in a load-balanced array, you have to change the IP address from the old load-balanced array to the new load-balanced array. However, this is the case only for HTTP services; the CAS array IP address should not be changed, of course.
For external clients, the forwarding address on the firewall needs to be changed from the 2010 CAS to the 2013 CAS.
If Microsoft Threat Management Gateway (TMG) 2010 is used, an additional step is needed. The web listener for webmail.contoso.com needs to be changed so that it now points to the 2013 CAS. If the self-signed certificate is used (which shouldn’t be the case if you have been following the steps in this book) on the CAS, you need to make sure it is imported in the trusted root certification authority’s store on the TMG server so that the self-signed certificate is trusted. This certificate is used only for communication between the TMG server and the CAS. Figure 2-30 outlines how clients connect with an Exchange Server 2010/2013 TMG coexistence scenario:
1. Clients use the webmail.contoso.com FQDN to connect to the 2013 CAS.
2. When the mailbox is still on Exchange Server 2010, the client request is proxied to Exchange Server 2010 CAS. For the client, this step is fully transparent.
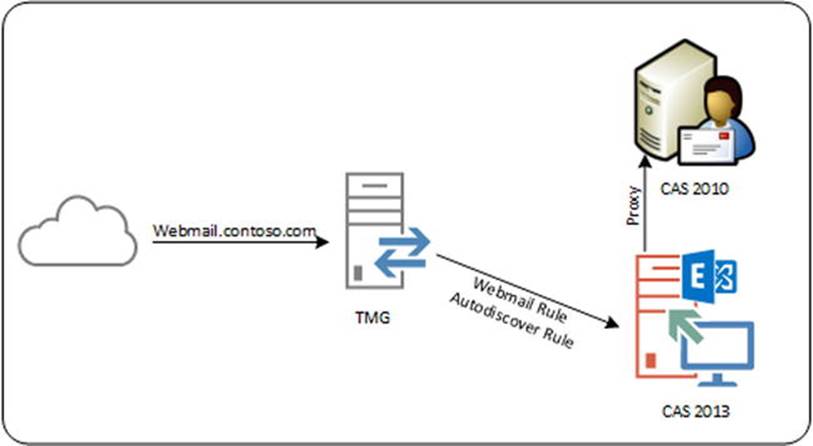
Figure 2-30. TMG in an Exchange 2010/2013 coexistence scenario
![]() Note Make sure that the authentication settings on the TMG publishing rules match the authentication settings on the virtual directories in both Exchange Server 2010 and Exchange Server 2013.
Note Make sure that the authentication settings on the TMG publishing rules match the authentication settings on the virtual directories in both Exchange Server 2010 and Exchange Server 2013.
The client now uses the webmail.contoso.com FQDN to connect to the 2013 CAS and the Exchange 2013 logon form is presented. As with the Exchange 2007 coexistence scenario, this is the first change for users! When the user’s mailbox is on the 2013 Mailbox server, the mailbox is shown directly after authentication. When the user’s mailbox is still on Exchange Server 2010, the request is proxied to the 2010 CAS and the mailbox data is retrieved. No second logon attempt is needed. The end user with his mailbox doesn’t see any difference at this point until his mailbox is moved to Exchange 2013.
SMTP Mail in a Coexistence Scenario
During the coexistence phase, SMTP mail flow has to be changed from the previous version of Exchange Server to Exchange 2013. It does not matter when the mail flow is changed, however. It can be changed in the beginning of the transition process, halfway through the process, or just before the previous version of Exchange Server is decommissioned. The Edge Transport server from the previous versions can also play a role in the Exchange 2013 environment.
Changing the SMTP Mail Flow
Initially, SMTP messages are delivered to the previous Exchange Hub Transport servers, and inbound SMTP messages are delivered to the recipients’ mailboxes. When mailboxes are moved to Exchange 2013, the previous Hub Transport server sends inbound messages using SMTP to the Exchange 2013 Mailbox server, where they are delivered to the recipients’ mailboxes.
Specifically, an inbound SMTP message is delivered to the 2013 Client Access server, which proxies the inbound SMTP connection to a 2013 Mailbox server. An inbound SMTP message intended for a recipient still on Exchange Server 2007 is sent from the 2013 Mailbox server using SMTP to an old Exchange Server Hub Transport server. From there it is delivered to the recipient’s mailbox. Needless to say, if the mailbox is moved to Exchange 2013, the Hub Transport service on the 2013 Mailbox server delivers the message to the 2013 Mailbox server hosting the recipient’s mailbox.
Is there a guideline or best practice for when to change the mail flow? I don’t know. I have seen customers change the SMTP mail flow as their first step in the transition process so that they know their platform is running fine. At the same time, I have seen customers change the mail flow after the last mailbox move, a step that concludes their transition process. It depends on your own preferences.
Using an Edge Transport Server
In the previous versions of Exchange Server there was an additional server role called the Edge Transport server, a server typically located in the perimeter network. The Edge Transport server role was not available at the initial release of Exchange 2013, but it has been reintroduced with Exchange 2013 SP1.
The Edge Transport server is responsible for SMTP message hygiene. The MX records on the public DNS point to the Edge Transport servers, and therefore these Edge Transport servers accept messages from the Internet. They apply a set of anti-spam rules to the inbound messages, ensuring that only legitimate messages are sent to the internal Exchange organization. After cleaning, the messages are delivered to the internal Exchange Hub Transport server, which delivers the messages to the recipients’ mailboxes. The Edge Transport server is tied to the internal Hub Transport server using the Edge subscription, a mechanism whereby information from the internal Exchange structure is pushed to the Edge Transport server.
In Exchange 2013 SP1, the process is similar; the difference is that the Edge 2013 is now tied to the Exchange 2013 Mailbox server.
In a coexistence scenario with an Exchange 2007 Edge server or an Exchange 2010 Edge server, mail continues to be delivered to the Exchange Server’s Hub Transport server, and this server delivers the messages to an Exchange 2013 Mailbox server when the recipients’ mailboxes are moved to Exchange 2013.
The good news is that the previous Exchange Edge Transport servers continue to work with the 2013 Mailbox server, including the Edge synchronization. The only thing you have to do is to create a new Edge subscription.
Another option is to introduce a new Exchange 2013 Edge Transport server into your organization and decommission the previous Edge Transport server. Here are the two options.
Continuing with the Previous Edge Transport Server
If you opt for the first option—using the previous Edge Transport server with the Exchange 2013 Mailbox server—it’s just a matter of removing the existing Edge subscription between the Edge server and the previous Exchange Hub Transport server, then creating a new Edge subscription between the Edge Transport server and the 2013 Mailbox server. Mail from the Internet will then be delivered to the Exchange 2010 Edge Transport server and sent to the Exchange 2013 Mailbox server (see Figure 2-31).
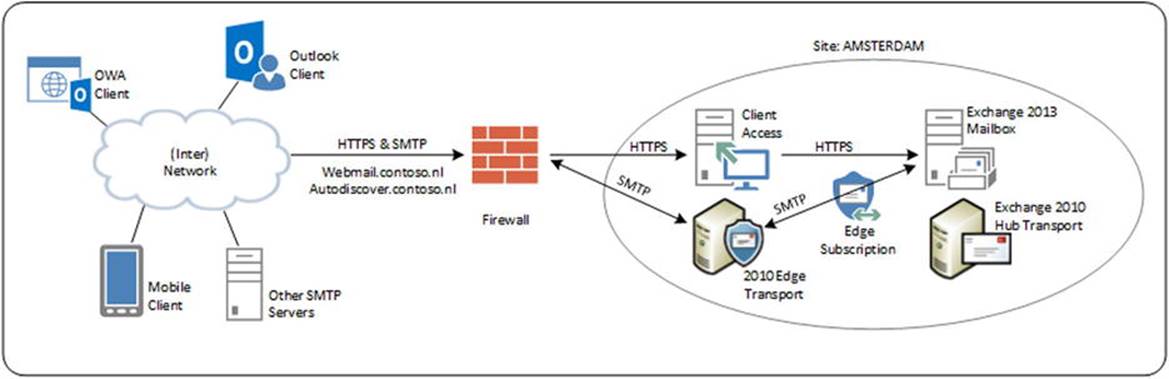
Figure 2-31. The 2010 Edge Transport server in an Exchange 2013 environment
![]() Note The previous Edge Transport server needs to be at Exchange Server 2007 SP3 RU10 or Exchange Server 2010 SP3 level for coexistence to work.
Note The previous Edge Transport server needs to be at Exchange Server 2007 SP3 RU10 or Exchange Server 2010 SP3 level for coexistence to work.
To change the Edge synchronization from an Exchange 2007 or 2010 Hub Transport server to a new Exchange 2013 Mailbox server, you have to remove the existing Edge subscription and create a new one, then bind it to the Exchange 2013 Mailbox server.
To remove an existing Edge Subscription, open EMS and enter the following command:
Get-EdgeSubscription –Identity <<Name>> | Remove-EdgeSubscription
In this command, <<Name>> is the NetBIOS name of the previous Edge Transport server. Please note that at this stage you don’t have any connection left between the previous Edge Transport server and the internal Exchange organization so you have to quickly to minimize downtime.
To create a new Edge Subscription, log on to the previous Edge Transport server, open EMS, and enter the following command:
New-EdgeSubscription –FileName C:\Temp\Edge01.xml
A warning message is shown, basically saying the subscription file is valid for 1440 minutes (which equals 24 hours). (If the subscription file is not processed within this time frame, a new subscription has to be created.) Enter “Y” to confirm your knowledge of the warning message, and the subscription file will be created.
Copy the Edge01.xml subscription file to a directory on the local disk of the 2013 Mailbox server. On this server, open the EMS and enter the following commands:
New-EdgeSubscription -FileData ([byte[]]$(Get-Content -Path "C:\Temp\edge01.xml"
-Encoding Byte -ReadCount 0)) -Site "Default-First-Site-Name" -CreateInternetSendConnector $true
-CreateInboundSendConnector $true
Start-EdgeSynchronization
The first command is an instruction to read the contents of the subscription file, import it, and bind it to the Mailbox server in the Active Directory site. Also, an Internet send connector and an inbound send connector are created. The second command starts the Edge synchronization process. It’s as easy as that.
![]() Note The Exchange 2010 Edge Transport server should be able to resolve the Exchange 2013 Mailbox server, and vice versa. This can be achieved using DNS, but using a HOSTS file for resolving an Edge Transport server is quite common as well.
Note The Exchange 2010 Edge Transport server should be able to resolve the Exchange 2013 Mailbox server, and vice versa. This can be achieved using DNS, but using a HOSTS file for resolving an Edge Transport server is quite common as well.
Introducing a new Exchange 2013 Edge Transport Server
The second option when working with Edge Transport servers is to introduce a new Exchange 2013 Edge Transport server next to the existing Edge Transport server.
You install a brand-new Exchange 2013 Edge Transport server in the perimeter network and make sure you have Internet connectivity (at least on port 25), and that name resolution works fine, both to the Internet and to the internal network, then you install the Exchange 2013 Edge Transport server role.
![]() Note Installing and configuring the Exchange 2013 Edge Transport server role is explained in detail in Chapter 6.
Note Installing and configuring the Exchange 2013 Edge Transport server role is explained in detail in Chapter 6.
When the Exchange 2013 Edge Transport server is installed, you can create a new Edge Subscription. Log on to the Exchange 2013 Edge Transport server, open EMS, and enter the following command:
New-EdgeSubscription –FileName C:\Temp\Edge01.xml
When the file is created, you copy it to the local hard disk of the Exchange 2013 Mailbox server. On this server, you open EMS and enter the following commands:
New-EdgeSubscription -FileData ([byte[]]$(Get-Content -Path "C:\Temp\edge01.xml"
-Encoding Byte -ReadCount 0)) -Site "Default-First-Site-Name" -CreateInternetSendConnector $true
-CreateInboundSendConnector $true
Start-EdgeSynchronization
This will create the subscription between the Exchange 2013 Edge Transport server and the Exchange 2013 Mailbox server, and initiate the synchronization process. You now have a situation as shown in Figure 2-32.
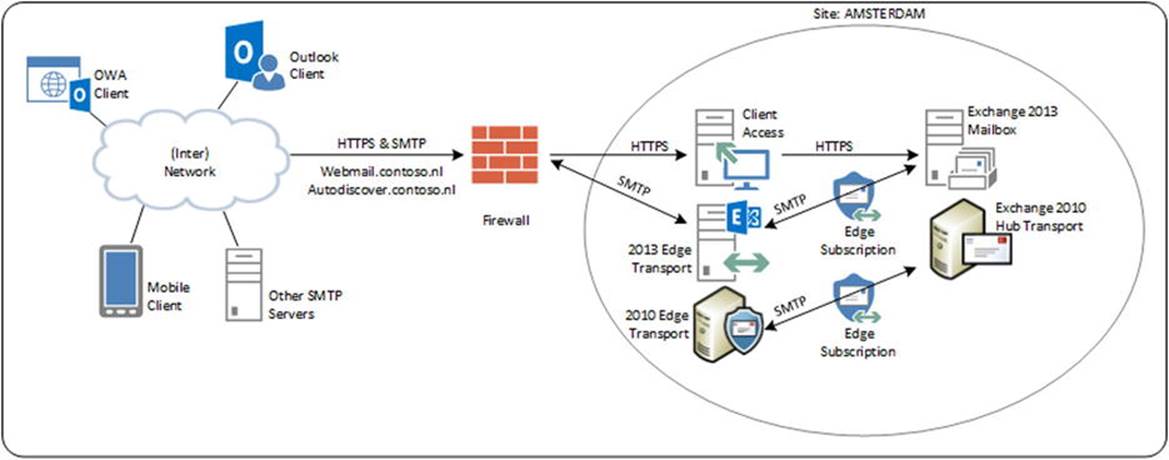
Figure 2-32. Introducing a new 2013 Edge Transport server next to the downlevel Edge Transport server
When you have rerouted incoming SMTP traffic from the firewall to the Exchange 2013 Edge Transport server, you can decommission the downlevel Edge Transport server. To remove the Edge Subscription between the downlevel Hub Transport server and the downlevel Edge Transport server, you log on to the downlevel Hub Transport server, open EMS, and enter the following command:
Get-EdgeSubscription –Identity <<Name>> | Remove-EdgeSubscription
where <<Name>> is the NetBIOS name of the downlevel Edge Transport server. When the old Edge Subscription is removed, you can remove the downlevel Edge Transport server.
Moving Resources to Exchange 2013
The most important step in this transition process is to move the mailboxes and other resources from the previous version of Exchange Server to the new Exchange 2013. “Other resources” in this respect are the address lists and the offline address book.
Moving Mailboxes to Exchange 2013
Moving the mailboxes to Exchange 2013 is an online process, which means the client stays connected to the mailbox until the very last step of the migration. Even when the contents are moved to Exchange 2013, the user can continue to work. This is called an online migration. When the migration process for a mailbox is finished, the user receives a message that the Outlook client needs to be restarted. At that point, the migration is finished and the user starts to connect to the Exchange 2013 environment.
The reason for restarting the Outlook client is basically that the client was connected to a particular Mailbox server in Exchange Server 2007 or to the CAS array in Exchange Server 2010. This was reflected in the Outlook profile where the server was shown. In Exchange 2013, though, this is no longer the case and the mailbox is no longer connected to that particular Mailbox server. You can see this in the Outlook profile, where there is no longer a server or CAS array shown; instead, the GUID of the mailbox is followed by the end user’s primary SMTP address.
The process responsible for moving the Mailboxes is the Mailbox Replication service (MRS), a service that’s running on the Exchange 2013 CAS or, better, on every 2013 CAS (see Figure 2-33).
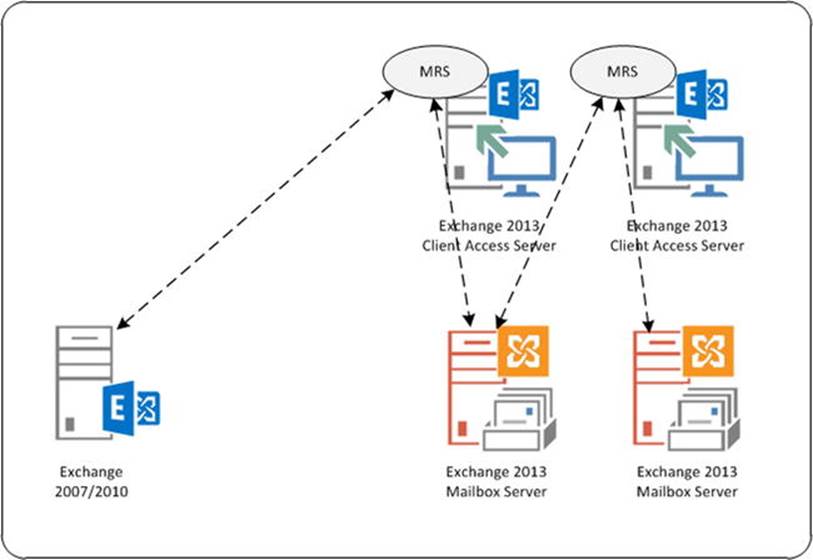
Figure 2-33. The Mailbox Replication service
When a mailbox needs to be moved from one mailbox database to another mailbox database, the actual mailbox move is initiated with a move request. With a move request, a flag is set in the system mailbox of the source mailbox database, and this flag is picked up by the MRS. The MRS then creates a copy of that mailbox in the target mailbox database, and it starts moving the mailbox data from the source to the target. This is an online and fully transparent mechanism; the recipient can be online and won’t notice anything about moving data. When the MRS is about to finish the migration of data, the source mailbox is closed and all remaining data is written into the target mailbox; the properties in Active Directory are updated as well.
When the source mailbox is:
· Exchange Server 2007 or Exchange Server 2010: The user gets a warning message that the administrator has made changes to the mailbox that require the user to restart Outlook.
· Exchange 2013: The user won’t notice anything. The source mailbox is closed, the Active Directory properties are updated, and there’s no need to restart Outlook.
The MRS is running on every Exchange 2013 Mailbox server, so if there are five Mailbox servers, there are also five instances of MRS running in the Exchange environment. It is possible to tune the MRS on the 2013 Mailbox server. By default, very few mailboxes are moved concurrently, so as to prevent the Mailbox server from becoming overwhelmed as mailboxes are moved. This otherwise tremendous amount of traffic might impact users when mailboxes are being moved during business hours.
The configuration of the MRS is stored in a config file located in the C:\Program Files\Microsoft\Exchange Server\V15\Bin directory, called MSExchangeMailboxReplication.exe.config. When you open this file and scroll to the end, there’s a section called “Mailbox Replication Service Configuration,” where all the default, minimum, and maximum values are stored. There’s also a section called “MRSConfiguration,” where the actual settings are stored. You can changes the values stored in this config file, but don’t be surprised if your Exchange servers are overwhelmed with move requests; it’s best to leave the default values.
New in Exchange 2013 is the concept of “batch moves” whereby mailboxes are moved in (large) batches. Using these batches, it is possible to:
· Set email notifications.
· Set prioritization of mailbox moves.
· Set automatic retry options when mailbox moves fail.
· Set options for finalizing move requests.
· Use incremental syncs to update migration changes.
The move-request finalization is an interesting feature that was also available in Exchange Server 2010. It makes it possible to move mailboxes from a source mailbox database to a target mailbox database, but without finalizing the actual move. When the move is around 90 percent finished, the movement of mailbox data stops and the source and the target are kept in sync. It is then possible to finalize the actual move at a later time—for example, during off-business hours—so that the user doesn’t receive the (disruptive) message about restarting the Outlook client at an inconvenient time.
![]() Note Moving mailboxes is a “pull” mechanism, so the move process is initiated from the Exchange 2013 Mailbox server. To initiate a move request, the EAC or the 2013 Exchange Management Shell can be used.
Note Moving mailboxes is a “pull” mechanism, so the move process is initiated from the Exchange 2013 Mailbox server. To initiate a move request, the EAC or the 2013 Exchange Management Shell can be used.
To initiate a mailbox move for a user called joe@contoso.com, you log on to an Exchange 2013 server, open EMS, and execute the following command:
New-MoveRequest –Identity joe@contoso.com –TargetDatabase MDB01
You can also get a list of mailboxes on the previous Exchange Mailbox server—for example, based on a mailbox database called Mailbox Database 01—and use the pipeline feature to move all mailboxes to a mailbox database called MDB; for example,
Get-Mailbox –Database "Mailbox Database 01" | New-MoveRequest –TargetDatabase MDB01
You can monitor the move of the mailboxes with the Get-MoveRequest command, if needed you can add the Get-MoveRequestStatistics command, like this:
Get-MoveRequest | Get-MoveRequestStatistics
This will give you a quick overview of all move requests that are currently available, and whether their status is queued, in progress, or completed. To get an overview of all move requests that are running at a particular moment, you can make a selection based on the status of the move request, like this:
Get-MoveRequest | Where {$_.Status –eq "InProgress"}
Exchange Server 2010 has a mailbox for discovery search purposes. To move this mailbox, you need to use the EMS on Exchange 2013 with the following command:
get-mailbox –id discovery* | New-MoveRequest –TargetDatabase MDB01
Exchange Server also uses system mailboxes and arbitration mailboxes for approval functionality—for example, when messages need to be moderated before they are sent out. Messages that need moderation are stored temporarily in these mailboxes. The mailboxes are hidden, but they can be migrated only by using the EMS.
To retrieve a list of all system mailboxes on Exchange Server 2010, execute the following command in EMS:
Get-Mailbox –Server EX2010SRV –Arbitration
This action will return all system mailboxes on Exchange Server 2010. To move these mailboxes, you simply pipe the output of the Get-Mailbox command into the New-MoveRequest command:
Get-Mailbox –Server EX2010SRV –Arbitration | New-MoveRequest –TargetDatabase MDB01
If you don’t specify a target database, Exchange 2013 will select a mailbox database automatically, based on the availability of mailbox resources. (This process will be explained in Chapter 4.)
When the regular mailboxes, the discovery mailbox, and the system mailboxes are moved to Exchange 2013, then the mailbox databases on the previous version of Exchange Server should be empty and ready for removal.
Moving Address Lists to Exchange 2013
When all the mailboxes are moved to Exchange 2013, it’s time to move your other resources. Regular address lists reside in Active Directory, so when moving them to Exchange 2013, there’s no need to pay extra attention; they will be used automatically by Exchange 2013.
Since the address lists were created in the previous version of Exchange Server, they should also be managed with the previous EMS or the Exchange Management Console. But to make them “ready” for Exchange 2013, just touch the address lists and store them without changing any values. To do this, use the Get-AddressList | Set-AddressList command in the 2013 Exchange Management Shell. The commands will show something like this on the console:
[PS] C:\Windows\system32>Get-AddressList | Set-AddressList
WARNING: The command completed successfully but no settings of '\All Contacts' have been modified.
WARNING: The command completed successfully but no settings of '\All Groups' have been modified.
WARNING: The command completed successfully but no settings of '\All Rooms' have been modified.
WARNING: The command completed successfully but no settings of '\All Users' have been modified.
WARNING: The command completed successfully but no settings of '\Public Folders' have been modified.
[PS] C:\Windows\system32>
Moving the Offline Address Book to Exchange 2013
A nice feature for Outlook clients is that they can work offline, also referred to as cached mode. When working in cached mode, clients need an address book, and so the offline address book (OAB) is used. This is a list of addresses aggregated in files that can be downloaded by the Outlook client for offline use. This way, clients can use the address lists at all times, even when they are not connected to the network.
Exchange 2010 uses an offline address book called Default Offline Address Book. Its format is version 3 or version 4, and it’s distributed to clients using public folders (especially for Outlook 2003 clients) or web distribution—that is, it’s a virtual directory on the Exchange 2010 CAS.
Exchange 2013 uses a new offline address book. It is based on version 4 and exclusively uses web distribution. The name of Exchange 2013’s offline address book is Default Offline Address Book (2013). You can use the 2013 Exchange Management Shell to view the available offline address books via the Get-OfflineAddressBook command:
[PS] C:\Windows\system32>Get-OfflineAddressBook
Name Versions AddressLists
---- -------- ------------
Default Offline Address Book {Version3, Version4} {\Default Global Address List}
Default Offline Address Book (Ex2013) {Version4} {\Default Global Address List}
[PS] C:\Windows\system32>
Outlook clients will automatically detect the new default offline address book, so there’s no need to change anything here.
If you have custom offline address books in your organization, you cannot move them to Exchange Server 2013. Instead, you have to recreate them on Exchange Server 2013 using the New-OfflineAddress book command in the EMS. (This is covered in more detail in Chapter 4.)
When all the mailboxes are moved to Exchange 2013, the previous version’s default offline address book is no longer needed and can be removed using the previous Exchange Server’s Management Console. You will find the old default offline address book by opening the Management Console, expanding the Organization Configuration, and selecting the Mailbox option. In the Results pane, select the tab for the Offline Address Book and remove that address book by right-clicking it.
![]() Note Migrating public folders from a previous version of Exchange 2013 and migrating Unified Messaging (UM) from a previous version of Exchange 2013 to Exchange 2013 are also part of the transitioning process. (This is discussed in more detail in Chapters 4 and 8.)
Note Migrating public folders from a previous version of Exchange 2013 and migrating Unified Messaging (UM) from a previous version of Exchange 2013 to Exchange 2013 are also part of the transitioning process. (This is discussed in more detail in Chapters 4 and 8.)
Decommissioning the Previous Exchange Server
When all resources have been moved or removed, you can decommission the previous Exchange Server. This is not really a big deal at all, and it involves the following steps:
1. Make sure the old Hub Transport server is not responsible anymore for any mail traffic. This not only includes SMTP from and to the Internet but also third-party appliances or (custom) applications that might have been using the Hub Transport server for receiving or relaying messages. Caution: You don’t want to remove the previous Exchange Server version and find out that your multifunctional devices cannot send out messages anymore. To achieve this, you have to enable SMTP logging on both the receive connector and the send connector, and check the corresponding log files. By default, you can find these log files at the following locations:
· SMTP receive: C:\Program Files\Microsoft\Exchange Server\V14\TransportRoles\Logs\ProtocolLog\SMTPReceive
· SMTP send: C:\Program Files\Microsoft\Exchange Server\V14\TransportRoles\Logs\ProtocolLog\SMTPSend
2. Remove the mailbox databases from the previous Exchange Server by using the Exchange Management Console or the Exchange Management Shell on the old Exchange Server.
3. Remove the previous Exchange Mailbox server role. This can be done by opening the control panel on the particular server and selecting “Uninstall Exchange Server.” Uncheck the mailbox server roles and the Exchange management tools option in the setup application. This will remove the Mailbox server role for this particular server.
4. Remove the previous Exchange CAS and Hub Transport server roles. Again, this can be achieved by opening the control panel and uninstalling the Exchange Server. Uncheck the Client Access server role, the Hub Transport server role, and the Exchange management tools to completely remove these from the downlevel Exchange Server.
When all of these steps are successfully executed, the previous Exchange Server is now fully removed and only the Exchange 2013 servers remain in the Exchange organization.
![]() Important Note Decommissioning the previous version is not simply a matter of turning it off. Now this may sound silly, but it happens frequently in a virtualized server environment. It’s tempting to turn off the virtual machines and just delete them, but this is absolutely wrong. When you do this, all information regarding previous versions of Exchange Server remains in Active Directory; from an Exchange 2013 point of view, “they” are still there (but not responding, of course). This can lead to erratic behavior. So, fully uninstall the previous Exchange Server!
Important Note Decommissioning the previous version is not simply a matter of turning it off. Now this may sound silly, but it happens frequently in a virtualized server environment. It’s tempting to turn off the virtual machines and just delete them, but this is absolutely wrong. When you do this, all information regarding previous versions of Exchange Server remains in Active Directory; from an Exchange 2013 point of view, “they” are still there (but not responding, of course). This can lead to erratic behavior. So, fully uninstall the previous Exchange Server!
Patch Management
Early in 2013, Microsoft announced a major change in the Exchange Server servicing model. Up until Exchange 2013, Microsoft had released a service pack every 12 to 18 months. A service pack is a collection of fixes and patches that were released during that period. The service pack can also contain new features and functions for the product. For Exchange Server, a service pack is a full install of the product, which means you can download, for example, Service Pack 3 for Exchange Server 2010, and install the full product for this version.
Between issuance of service packs, Microsoft released update rollups for Exchange Server on a regular basis—typically every three or four months. An update rollup also contains a collection of fixes and patches, but only rarely will one include new feature and functions. For example, Exchange Server 2010 Service Pack 2 Update Rollup 4 contained new options for calendar and task-retention policies.
Update rollups are version-specific, which means they are released for specific versions and service pack—for example, for Exchange Server 2010 Service Pack 1 or for Exchange Server 2010 Service Pack 2. Needless to say, these update rollups are not interchangeable. Also important to note is that an update rollup is not a full version of the product, just a collection of hotfixes. The size of these update rollups is typically between 60 and 70 GB.
To speed the deployment process and to react quickly to customer demand and market changes, Microsoft has changed its strategy for updates. Starting with Exchange Server 2013, Microsoft will release a cumulative update (CUs) on a quarterly basis. A cumulative update is a collection of fixes and patches from the past period, and can contain new features and functions, but the most important change is that it’s a full product with a normal setup application. Because of this setup application, Microsoft can present major changes in a cumulative update—even schema updates can be included in a cumulative update. Using these cumulative updates, Microsoft can respond quickly to market demand, both on-premises and in Office 365 in Microsoft’s data centers.
Cumulative updates are numbered sequentially. After Exchange 2013 RTM, there have been three CUs— CU1 to CU3. Also, CU4 is available, instead called SP1. The numbering continues, so after SP1, there is CU5 and later as available. Again, please note that these CUs are full versions of the product, so there’s no need to install Exchange 2013 RTM or SP1 before installing the CU. You can install a CU directly.
Installing a Cumulative Update
As explained, a cumulative update is a full product. It is possible to install an Exchange 2013 server from scratch using a cumulative update or to upgrade a previous release to the latest software level. Installation of a new Exchange Server 2013 server from a cumulative update does not differ from what was explained earlier.
If you have language packs for Unified Messaging (UM) installed on your Exchange 2013 server, you need to uninstall these first before you can upgrade the server. To remove the additional language packs, open a command prompt, navigate to the installation media, and enter the following command:
setup.exe /RemoveUMLanguagePack: <UmLanguagePackName>
When the language pack is removed, you can continue upgrading the server. In the command prompt window, navigate to the installation media and enter the following commands:
Setup.exe /PrepareSchema /IAcceptExchangeServerLicenseTerms
Setup.exe /PrepareAD /IAcceptExchangeServerLicenseTerms
Setup.exe /PrepareDomain /IAcceptExchangeServerLicenseTerms
Setup.exe /Mode:Upgrade /IAcceptExchangeServerLicenseTerms
The first three command might not be required for each CU, but it’s a best practice to make them part of your upgrade procedure because they could be required.
The last command is shown in Figure 2-34.
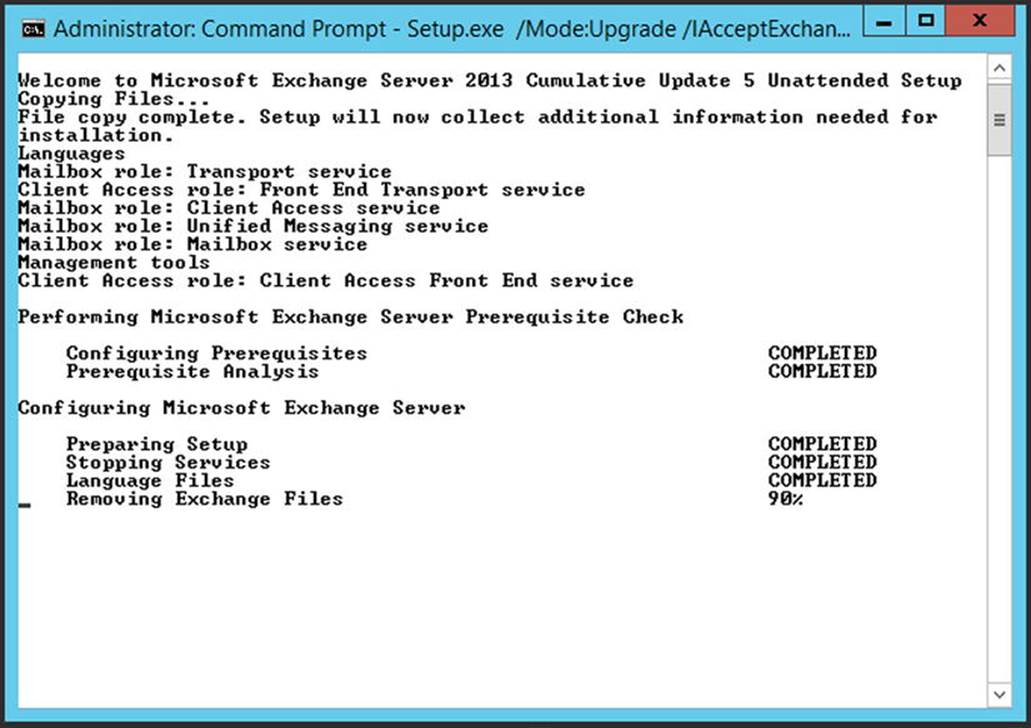
Figure 2-34. Installing CU 5 on an existing Exchange 2013 server. Note the “Removing Exchange Files” message on the console
Of course, it is also possible to upgrade a server to a newer cumulative update using the GUI setup; you just follow these steps:
1. To install a cumulative update, download it first from the Microsoft location and extract the download. Log on to the Exchange 2013 server as with an administrator account that’s a member of the Enterprise Admins security group and the Schema Admins security group. Please note that it is possible that a cumulative update contains schema changes, but the setup will take care of that. When logged on, you navigate to the extracted cumulative update and start the graphic setup application setup.exe.
2. The setup application does have the option to automatically check for updates on the Microsoft site. If you want you can do this; otherwise select the Don’t Check for Updates Right Now radio button.
3. The setup application is initialized and the appropriate installation files are copied to the right location on Exchange Server. After initializing, the upgrade window is shown; click Next to continue.
4. On the license agreement window, select the I Accept the Terms in the License Agreement radio button and click Next to continue. The prerequisite check will automatically be started.
5. When blocking issues are found, they are reported in the prerequisite analysis window, including the steps needed to fix them. If nothing is found, click Install to start the actual upgrade. Note: If you have the Unified Messaging configured for use with different (i.e., non-U.S.) language packs, the upgrade will fail. As noted above, the additional language packs need to be uninstalled before using the setup.exe /RemoveUMLanguagePack: <UmLanguagePackName> command.
6. The upgrade is multi-step process from changing the Active Directory to uninstalling the old binaries and installing the new binaries to reconfiguring the services (see Figure 2-35). Except for changes made, for example, in config files or customization to OWA, all old configuration settings should be preserved.
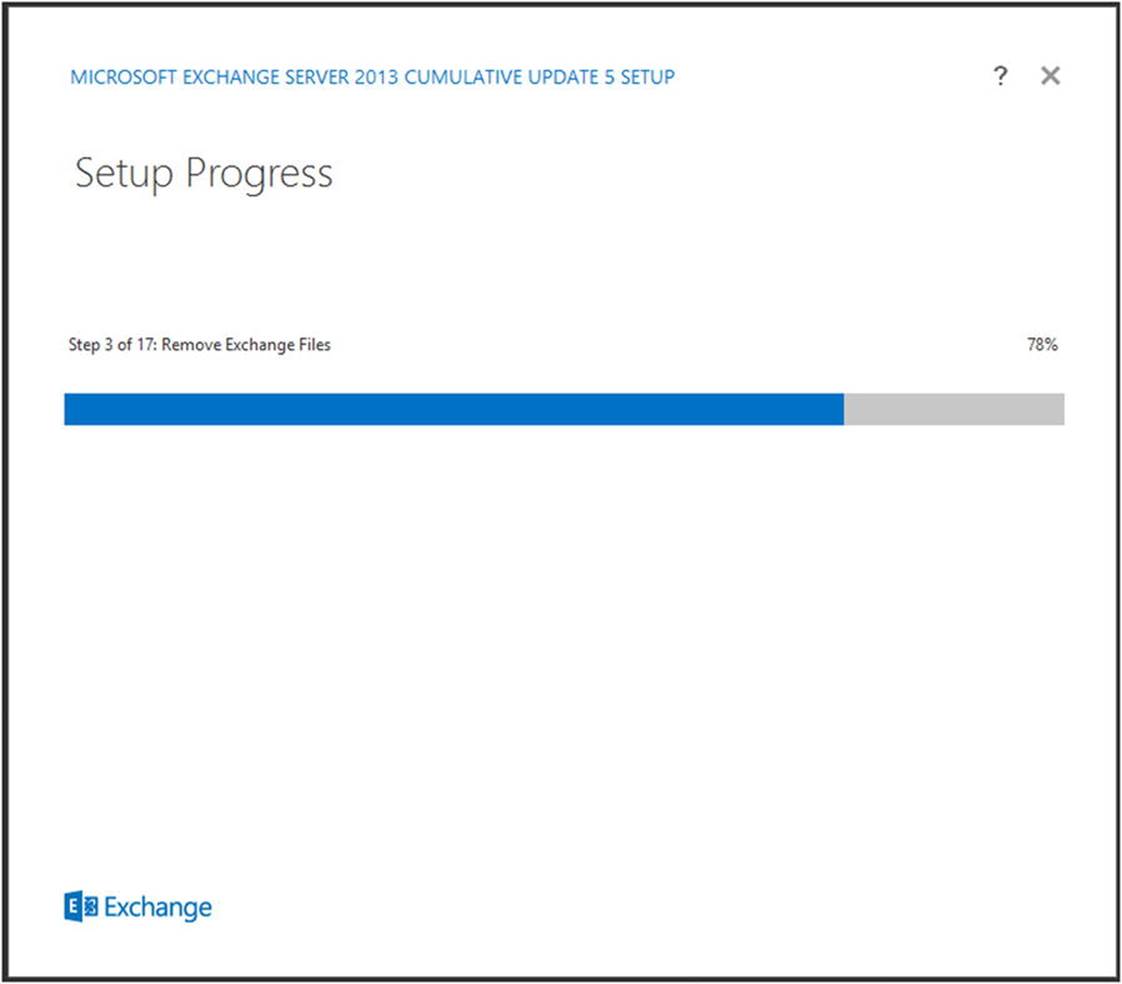
Figure 2-35. Upgrading to Exchange 2013 CU 5
7. After some time, the upgrade will be finished and a “Setup Completed” page will be shown. You reboot the server, and the Exchange 2013 server is up to date again. (If you’ve had to remove the UM language pack, you have to reinstall the new UM language pack for the new cumulative update.)
Summary
Installing Exchange 2013 is not that difficult, and the process does not differ much from previous versions of Exchange Server. Depending on the Exchange 2013 server role, you install the proper prerequisite software and install the new Exchange Server.
My personal preference is to use an unattended setup. This way there’s no interaction via the console and you get a consistent deployment when installing multiple Exchange servers. Other than that, it’s a great method for using installation scripts.
Before installing Exchange 2013, though, you need to make a proper design. To do this, you can use the Exchange 2013 Server Role Requirements Calculator, which can be downloaded from the Microsoft website. Based on the input requirements, the calculator determines the best configuration for your Exchange servers. This configuration might look like serious overkill, but when you assign fewer resources to your Exchange 2013 server, especially memory, you risk serious performance issues.
Not everybody is deploying a fresh, green-field Exchange 2013 environment, however. You can also build a coexistence scenario with Exchange 2007 or Exchange 2010, whereby Exchange 2013 is integrated into these versions. You have to take care about namespaces, especially with Exchange 2007, as well as with SSL certificates and proxy or redirection, before you can move resources from the previous Exchange version to Exchange 2013.
Once all your resources have been moved to Exchange 2013, you can decommission the previous version of Exchange Server. This means it has to be uninstalled properly, using the control panel in Windows. Just turning of the previous Exchange Server (which can easily happen when using virtual machines) is not a proper procedure; Exchange 2013 will think these servers are still around.
The next two chapters will cover the details of the Exchange 2013 Client Access server and the Exchange 2013 Mailbox server.
All materials on the site are licensed Creative Commons Attribution-Sharealike 3.0 Unported CC BY-SA 3.0 & GNU Free Documentation License (GFDL)
If you are the copyright holder of any material contained on our site and intend to remove it, please contact our site administrator for approval.
© 2016-2026 All site design rights belong to S.Y.A.