Pro Exchange 2013 SP1 PowerShell Administration: For Exchange On-Premises and Office 365 (2014)
Chapter 4. Exchange 2013 Mailbox Server
The primary role of the Mailbox server is to host mailbox databases where the recipient mailboxes are hosted. But in Exchange Server 2013, there’s more done besides hosting those mailboxes. The Hub Transport service is also running on the Mailbox server, and this service is responsible for all SMTP message routing in the Exchange organization. The Unified Messaging (UM)service is also part of the Mailbox server role, and there’s a Client Access service (CAS) running on the Mailbox server as well. As explained in the previous chapter, the Client Access server is a stateless protocol proxy, proxying user requests to the Mailbox server; this is the server where all processing takes place. But in Exchange 2013, the business logic was moved from the Client Access server to the Mailbox server. This is the reason you’ll find the Autodiscover section in this chapter instead of in Chapter 3.
An important part of the Mailbox server is hosting the mailbox databases where all the mailboxes are located. The database technology used in Exchange 2013 is the first part of this chapter, including the management tasks related to the mailbox database technologies. Also important are the various types of recipients, like mailboxes, distribution groups, or contacts; this is the third major section of this chapter.
The Transport service is the successor to the Hub Transport server role in down-level Exchange versions and is part of the Mailbox server role in Exchange 2013. A description of this is also included in this chapter. The Unified Messaging service is not covered in this chapter; it will be discussed in detail in Chapter 8.
The Mailbox Server Role
The Exchange 2013 Mailbox Server role is similar to the earlier Mailbox server role in Exchange Server 2010. It is responsible for processing all mail items, storing those items in the mailbox database, and showing them in the user’s inbox.
All mail items are stored in a mailbox, and all mailboxes are stored in a mailbox database. This mailbox database is stored by default on the local hard disk of the Mailbox server, in the C:\Program Files\Microsoft\Exchange Server\V15\Mailbox\<<database name>> directory. Figure 4-1 shows this configuration for a mailbox database called Mailbox Database 0833106092.
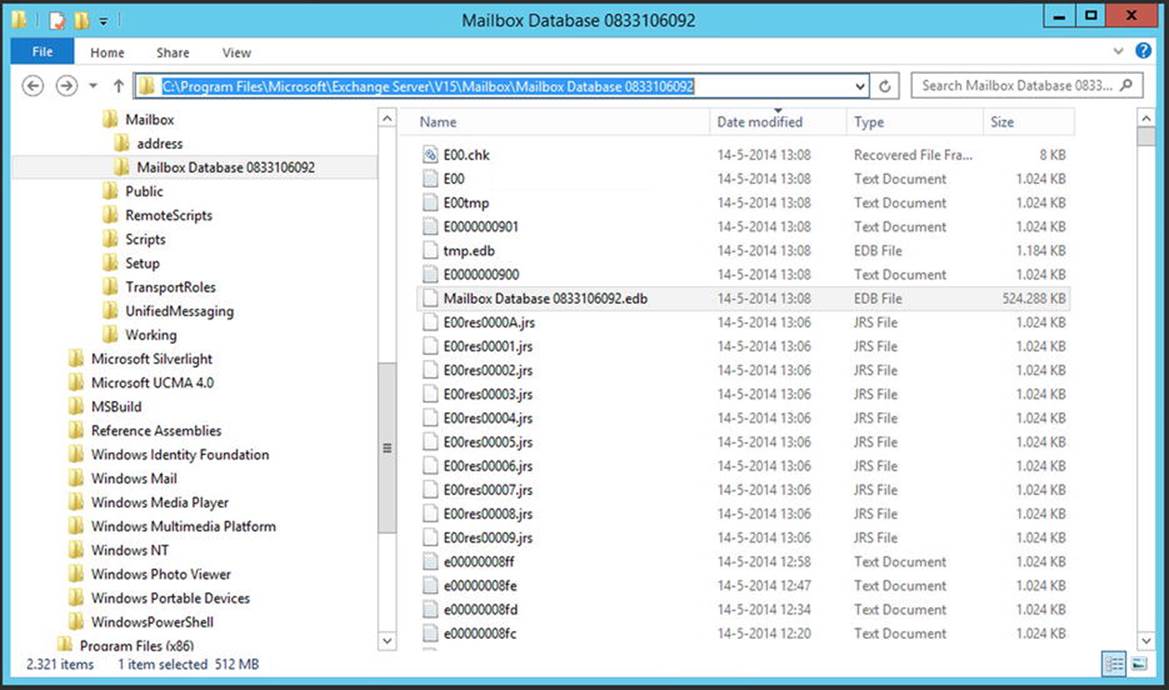
Figure 4-1. Mailbox database files on disk
The following files are available, as can be seen in Figure 4-1:
· The file Mailbox Database 0833106092.edb is the actual mailbox database where all the individual mail items are stored.
· Tmp.edb is a temporary file used by Exchange Server.
· E00 and subsequent log files are log files used for the transactional processing of information.
· E00.chk is a checkpoint file that keeps track of the transactions still in the log files, as well as those that are already written to the mailbox database. This file is not visible in Figure 4-1.
· E00res00001.jrs - E00res0000A.jrs are temporary log files reserved by Exchange Server in case of disk-full problems.
· E00tmp.log is a temporary log file used by Exchange Server.
All these files belong together, and they make up one mailbox database. One Exchange 2013 Enterprise Mailbox server can host up to 100 mailbox databases. Exchange 2013 now fully supports multiple mailbox databases on one physical disk if you have multiple copies of the mailbox databases in a database availability group (DAG).
![]() Note In Exchange 2013 Enterprise RTM and Enterprise CU1, the number of mailbox databases was limited to 50. In Exchange 2013 Enterprise CU2, this maximum was increased to 100. The maximum number of mailbox databases on an Exchange 2013 Standard, however, is limited to 5, independent of any cumulative update.
Note In Exchange 2013 Enterprise RTM and Enterprise CU1, the number of mailbox databases was limited to 50. In Exchange 2013 Enterprise CU2, this maximum was increased to 100. The maximum number of mailbox databases on an Exchange 2013 Standard, however, is limited to 5, independent of any cumulative update.
When you install a Mailbox server, a new mailbox database is automatically created on the system disk, as shown in Figure 4-1. When you create additional mailbox databases, they have a preference for this system disk as well. However, using this disk for those additional mailbox databases is not a good idea. It is best practice to move the initially created mailbox database and subsequently created mailbox databases to dedicated volumes that are capable of handling the load generated in processing the mailbox items.
The Mailbox Database
The mailbox database is the primary repository of the Exchange Mailbox server information; it’s where all the Exchange data is stored. In theory, the mailbox database can be 16 TB, which is the NTFS size limit of a file, but it is normally limited to a size you can handle within the constraints of your service level agreement (SLA). The recommended maximum database size for a normal Exchange 2013 Mailbox server is 2 TB when you have multiple copies of the mailbox database in a database availability group. If this is not the case, the maximum recommended size is 200 GB—but in practice it is limited by your backup and restore solution and by the accompanying SLA.
The mailbox database in Exchange 2013 is an extensible storage engine (ESE) database. ESE is a low-level database technology, sometimes also referred to as a JET database. The ESE database has been used since Exchange Server 4.0. The Active Directory database, the WINS database, and the DHCP database also are ESE databases.
The ESE database processing follows the “acid” principle:
· Atomic – A transaction is all or nothing; there is no “unknown state” for a transaction.
· Consistent – The transaction preserves the consistency of the data being processed.
· Isolated – A single transaction is the only transaction on this data, even when multiple transactions occur at the same time.
· Durable – The committed transactions are preserved in the database.
Transactions are part of everyday life. Suppose you go to the bank to transfer money from your savings account to your checking account. The money is withdrawn from your savings account and then added to your checking account, and both actions are recorded and maybe even printed on paper. Yet this can be seen as one transaction. You don’t want the transaction to end with the first step, in which the money is withdrawn from your savings account but it’s not yet added to your checking account.
The same principle goes for Exchange Server. Suppose you move a message from your inbox to a folder named “Book Project” From a transaction point of view, it starts by adding the message to the Authoring folder, then it updates the message count for this folder, deletes the message from the inbox, and updates the message count for the inbox. All these actions can be seen as one transaction.
The data within a database is organized as a balanced tree, or B-tree. This binary arrangement can be easily envisioned as an upside-down tree where the leaves are at the bottom and the root at the top, as illustrated in Figure 4-2. The actual mail data is stored in the leaves. The mid-level pages contain the pointers. The upper level is the root. This B-tree design is an efficient way of storing data because it requires only two or three lookups to find a particular piece of data, and all the pointers can be kept in memory.
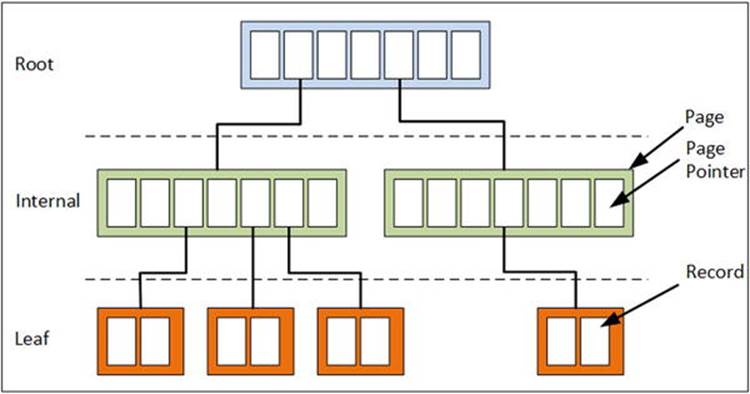
Figure 4-2. A balanced tree setup
Exchange actually uses an enhanced version of a B-tree, called the B+ tree. This B+ tree contains pointers between the pages, so every page in a leaf has a pointer to the next page and to the previous page, making it even more efficient. This arrangement is also referred to as an indexed sequential access method (ISAM) database.
One of the functions of ESE is to balance the tree. It’s not hard to imagine that when lots of data is added to the database, the tree becomes unbalanced. When this happens, though, ESE reorganizes the tree by splitting and merging the pointer pages.
Similarly, when a page becomes full, ESE splits the page into two adjacent pages. If this happens, an additional key is put into the secondary key’s parent page. The process continues until the parent page becomes full as well. Then, the parent page is split and the new secondary page’s parent page is updated with a new key.
It can happen that the root level becomes full, and then the root level needs to be split also. If this happens, an additional layer of pages is inserted into the tree and the tree now has four layers instead of three. A balanced tree with four layers is shown in Figure 4-3. Obviously, a four-layer tree has many more leaves, containing more data.
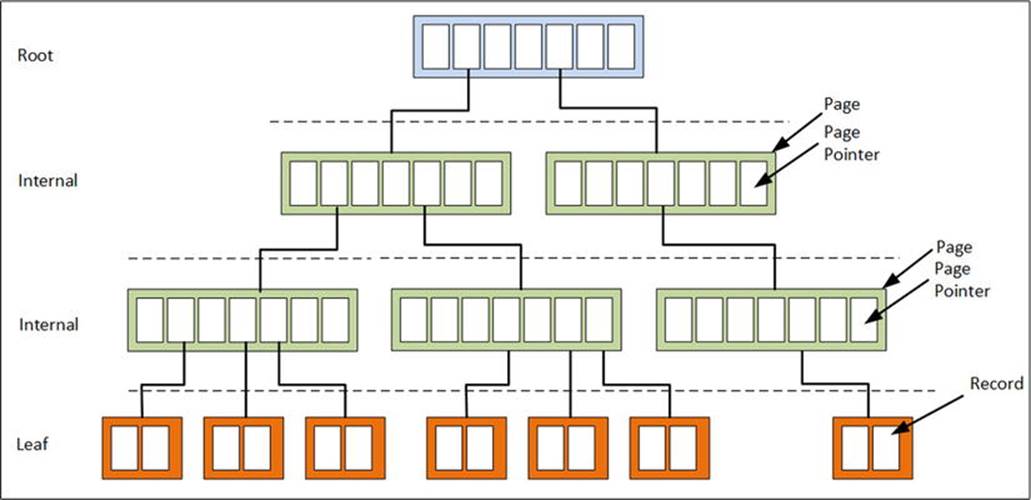
Figure 4-3. A balanced tree after a tree split
If data is removed from the mailbox database, the leaves are emptied and the parent pages become available again. When too many adjacent parent pages become available, ESE can merge those pages. Eventually, when lots and lots of merges happen, even up to the root level, ESE can remove an entire layer of pages, thereby shrinking the tree. Note that this happens inside the database. The tree can shrink, but the size of the database will never shrink! ESE pages are freed up and filled as a continuous process; once they are freed up, they are reorganized, as explained in a later section regarding online defragmentation.
To read data from a particular leaf, ESE starts at the root level and follows the tree down to the leaf. To reach the data, only three or four read actions are needed. Since most of the pages and pointers are stored in memory, this happens extremely fast—even in a 250 GB database, for example. ESE stores over 1,600 page pointers in a 32 KB page, making it possible to create a tree with a minimal number of parent/child levels.
One or more trees in a database make up a table. There are several kinds of tables in Exchange Server:
· Mailbox table
· Folders table
· Message table
The tables hold the information that appears in the inbox. The tables consist of columns and records; the columns are identified as MAPI properties, and the records contain the actual information.
Database Pages
A page is the smallest unit of data in an Exchange environment. It consists of a header, pointers to other pages, checksum information to ensure that the page is not corrupted, and data from Exchange Server regarding messages, attachments, or folders. A database file can consist of millions of pages. For Exchange 2010 and 2013, the size of a page is 32 KB. The total number of pages can easily be calculated by dividing the total size of the database by this page size of 32 KB. If, for example, the size of a database is 250 GB, it consists of 250 GB times 32 KB, or approximately 8.2 million pages.
Each page is sequentially numbered. Whenever a new page is created, it gets a new, incremented number. When the pages are read from the database and altered, they also get new page numbers before being written to the log file and flushed to the database file. Needless to say, this sequential number must be very large. In fact, it’s a 64-bit number, which means that 18 quintillion changes can be made to a database!
One question that’s asked sometimes is if it’s possible to read the actual pages to see if there’s any content there, especially in a disaster recovery scenario when data seems to have been lost.
I’m afraid it’s not that simple. It’s true; there is content in all these pages, but it’s not readable without sophisticated tools. It is possible to check the contents of individual pages inside a mailbox database using the ESEUTIL tool, but as shown in Figure 4-4, there’s not much readable information there.
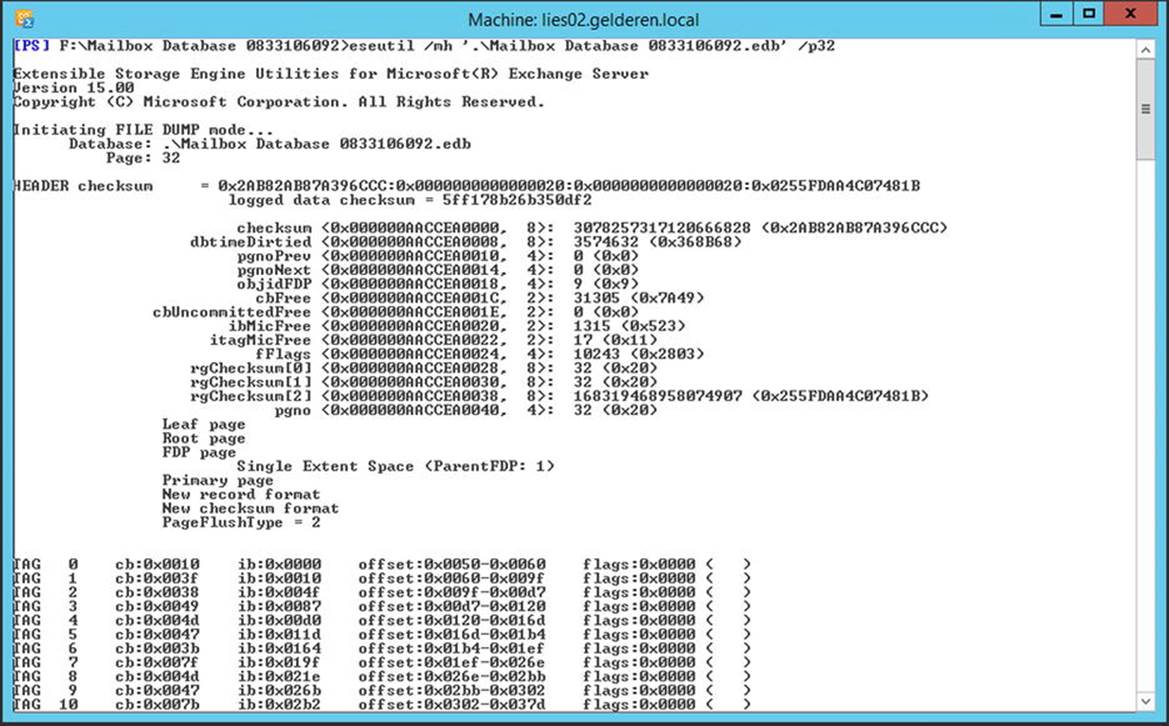
Figure 4-4. The contents of a page inside a mailbox database are not readable
![]() Note Special recovery tools like Kroll Ontrack PowerControls are able to open a mailbox database file (i.e., the actual Mailbox Database 033106092.edb file to retrieve content from the mailbox database without running an Exchange server. These tools have logic to read all the tables and convert them to actual mailbox content. This will be discussed in detail in Chapter 7.
Note Special recovery tools like Kroll Ontrack PowerControls are able to open a mailbox database file (i.e., the actual Mailbox Database 033106092.edb file to retrieve content from the mailbox database without running an Exchange server. These tools have logic to read all the tables and convert them to actual mailbox content. This will be discussed in detail in Chapter 7.
Transaction Log Files
Mailbox items are processed by the Mailbox server in what are termed “transactions.” A transaction can be:
· The creation of a new message or a new calendar item.
· The storage of a message received from SMTP in the mailbox.
· The creation of a new folder in the mailbox.
· The deletion of a message in the mailbox.
· The renaming of a folder in the mailbox.
· The creation of new mailbox database.
And so on.
All processing—that is, the creation of transactions—takes place in the server memory, in particular in the log buffers, the ESE cache (this is where the pages reside), and the version store. The version store is a small part in memory, tied to the ESE cache, that’s used by ESE to keep track of all transactions while they are created. When something goes wrong with a transaction, ESE can create a new transaction and keep track of the various versions of those transactions, hence the name.
The log buffers, each 1 MB in size, contain the contents of a log file that’s currently being created. When transactions are created, they are stored in a particular log buffer, and this log buffer represents a log file that belongs to a certain mailbox database.
When a log buffer is filled with transactions, the entire log buffer is flushed to disk (i.e., written to a log file), the log file is closed, and a new log buffer and accompanying transaction log file is created. If you look back at Figure 4-1, you’ll see these transaction log files identified asE00.log, E00000008ff.log, E0000000900.log, and E0000000901.log. At this point no changes are made to the mailbox database and all pages are kept in memory. This mechanism is called write ahead logging, so the data in the log files is always ahead of the data in the mailbox database. A graphic representation of this techology can be seen in Figure 4-5.
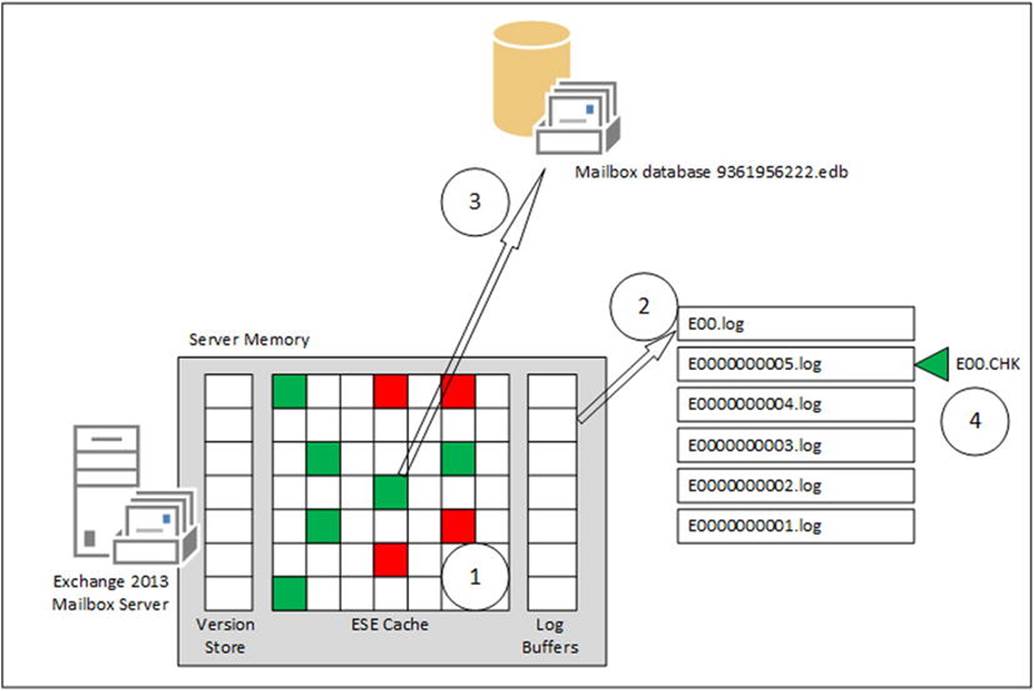
Figure 4-5. The mailbox database, server memory, and log files
Transactional logging is a sequential process, so subsequent transaction log files are numbered accordingly. Note that a hexadecimal notation is used, so after writing a transaction log file that ends with the number 9, the letter A is added. Only after writing a transaction log file ending with the letter F (the sixth letter of the alphabet) does Exchange Server start a new sequence.
The name of a log file can be split into two parts:
· The prefix This is the first three characters of the name—in this example, E00. Every mailbox database has its unique set of log files, and the prefix is what differentiates one from another. The first mailbox database has prefix E00, while mailbox database number 100 has prefix E99. In contrast to the sequential numbering of the transaction log files, the prefix is in decimal notation.
· The number This is an eight-character hexidecimal number that’s generated sequentially, starting with 0x00000001 and theoretically ending with 0xffffffff. This hexidecimal number is not only used in the filename of the log file but also inside the log file as a sequence number. In ESE terms, it is called the lGeneration number.
The log file that’s currently in use—that is, the log file where the contents of the log buffer will be flushed to—is a log file called E00.log (or any other prefix, of course). You might see a log file called E00TEMP.log occasionally; that’s a log file that’s pre-created by ESE. When the log buffers are flushed to the log file (i.e., E00.log), the log file is stored with a file name based on the prefix and its lGeneration number; in Figure 4-4, this would be E0000000006.log. The E00TEMP.log will then be renamed E00.log to save time during this processing of the log file.
By storing the transactions in a transaction log file, you safeguard the data against server failures, such as a power failure. In fact, the transaction log file can be used for recovery purposes. When a server fails, or a mailbox database fails, the information can be recovered and reconstructed because it has been stored in the transaction log files. For this reason it is not a good idea to manually delete the transaction log files from your server (unless you have no other option), as doing so will destroy your recovery options.
Transaction log files are automatically removed from the Exchange Mailbox server when you run a backup solution, as will be explained in Chapter 7.
Checkpoint File
As explained earlier, database pages remain in server memory after the transactions are flushed to the transaction log file. After some time, these pages are then stored in the mailbox database. At this point, they can also be removed from the server’s memory. To keep track of which transactions are stored in the transaction log file and which are stored in the mailbox database, you need a checkpoint file.
The checkpoint file is an 8 KB file stored in the same location as the transaction log file, but it contains only a pointer. This pointer “points to” the page in the transaction log file that has just been stored in the mailbox database. All pages in the transaction log file that are older than the pointer in the checkpoint file are stored in the mailbox database; all pages that are newer, therefore, remain in the server’s memory and in the transaction log file. In case of a problem—for example, when the Exchange server is rebooted unexpectedly—the Exchange Server reads the location in the checkpoint file and knows which information is stored where, and thus it knows how it can start recovering information. This is a simple and safe solution for trouble-free processing of database information.
The amount of data that’s still in server memory and not flushed to the mailbox database, and thus the amount of data "above" the checkpoint, is called the checkpoint depth. In Exchange 2013, the checkpoint depth can be 100 MB; this means that 100 MB of data can be located in server memory but hasn’t been flushed to the mailbox database, and so it is safely stored in the log files.
The checkpoint depth is per database; each database has its own set of log files, its own checkpoint file, and thus its own checkpoint depth. This means when you have, for example, 25 mailbox databases, you can have 25 × 100 log files, or 2.5 GB of mailbox data in server memory that’s not been flushed to the mailbox database (but that is stored in the transaction log file, though!).
Why is this important to know? There are two reasons you want to know this:
1. Exchange Server uses this technique for recovery purposes when mounting a mailbox database, after restoring a mailbox database from a backup, or by using the ESEUTIL tool.
2. Mailbox data is dynamic, as data can be in server memory, in the mailbox database, or in the transaction log file. The backup application needs to be aware of this process so it can interact with the Exchange server while creating the backup. Needless to say, a regular file-level backup is not going to work when you are backing up mailbox databases.
How This All Fits Together
A mailbox database that is running (i.e., it is mounted) is always in an inconsistent state. That is, there’s mailbox data spread across the Exchange server’s memory, the transaction log file, and the mailbox database. This inconsistent state is also known as dirty.
A graphic representation can be seen in Figure 4-6. Clearly visible in this Figure is the part of the Mailbox databases that has been flushed to the transaction log files (and thus not yet to the mailbox database) and its relation to the checkpoint file.
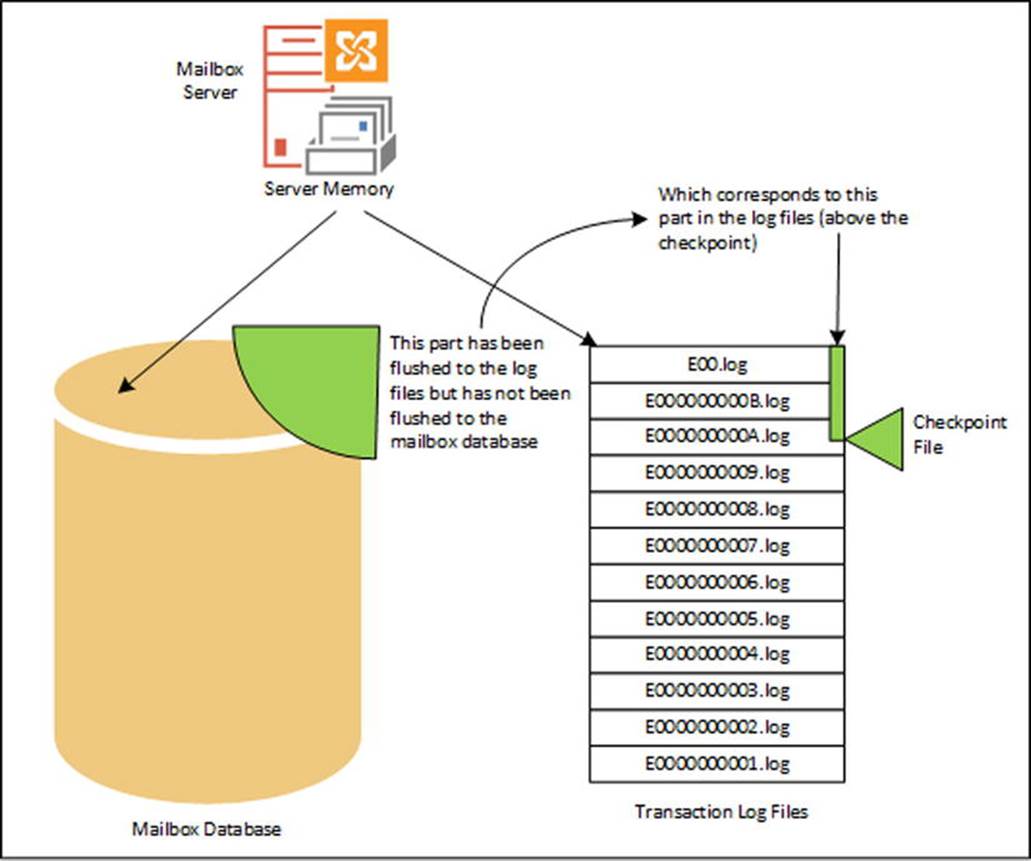
Figure 4-6. The data that’s not in the database is safely stored in the log files
When you have a mailbox database on disk that’s not mounted and is in a dirty shutdown state—for example, after a crash of the server—you need the corresponding transaction log file where the pages are stored that had not been previously written to the mailbox database. Only if you have these transaction log files is it possible to recover and bring the mailbox database to a consistent state. If you have a mailbox database in a dirty shutdown mode and you do not have the appropriate transaction log files, you’re in trouble. The only thing that’s left to do is to repair the mailbox database using the ESEUTIL tool, which will cause some data loss.
When a database is properly dismounted, it is brought into a consistent state. All data in server memory is flushed to the mailbox database, the checkpoint is moved to the last correct location, and all files are then closed. This is called a clean shutdown of the database.
Header Information
The transaction log files needed to get the database into a consistent state, and thus in a clean shutdown mode, are recorded in the header of the mailbox database. The header of the database is written into the first page of the database file, and it contains information regarding that mailbox database. The header information can be retrieved using the ESEUTIL tool. Just enter the following command in the directory where the database file resides:
ESEUTIL /MH " Mailbox Database 0833106092.edb "
This will result in an output such as:
Extensible Storage Engine Utilities for Microsoft(R) Exchange Server
Version 15.00
Copyright (C) Microsoft Corporation. All Rights Reserved.
Initiating FILE DUMP mode...
Database: Mailbox Database 0833106092.edb
DATABASE HEADER:
Checksum Information:
Expected Checksum: 0x055ea355
Actual Checksum: 0x055ea355
Fields:
File Type: Database
Checksum: 0x55ea355
Format ulMagic: 0x89abcdef
Engine ulMagic: 0x89abcdef
Format ulVersion: 0x620,20
Engine ulVersion: 0x620,20
Created ulVersion: 0x620,20
DB Signature: Create time:04/23/2014 20:56:12.168 Rand:3896134121 Computer:
cbDbPage: 32768
dbtime: 3186602 (0x309faa)
State: Dirty Shutdown
Log Required: 3426-3439 (0xd62-0xd6f)
Log Committed: 0-3440 (0x0-0xd70)
Log Recovering: 0 (0x0)
GenMax Creation: 05/23/2014 14:17:49.174
Shadowed: Yes
Last Objid: 12342
Scrub Dbtime: 0 (0x0)
Scrub Date: 00/00/1900 00:00:00
Repair Count: 0
Repair Date: 00/00/1900 00:00:00.000
Old Repair Count: 0
Last Consistent: (0xC45,AF,90) 05/21/2014 09:16:44.995
Last Attach: (0xC46,2,268) 05/21/2014 09:30:06.635
Last Detach: (0x0,0,0) 00/00/1900 00:00:00.000
Last ReAttach: (0xC72,2,0) 05/21/2014 10:59:47.386
Dbid: 1
Log Signature: Create time:04/23/2014 20:56:12.090 Rand:4000563479 Computer:
OS Version: (6.2.9200 SP 0 NLS ffffffff.ffffffff)
Previous Full Backup:
Log Gen: 0-0 (0x0-0x0)
Mark: (0x0,0,0)
Mark: 00/00/1900 00:00:00.000
Previous Incremental Backup:
Log Gen: 0-0 (0x0-0x0)
Mark: (0x0,0,0)
Mark: 00/00/1900 00:00:00.000
Previous Copy Backup:
Log Gen: 0-0 (0x0-0x0)
Mark: (0x0,0,0)
Mark: 00/00/1900 00:00:00.000
Previous Differential Backup:
Log Gen: 0-0 (0x0-0x0)
Mark: (0x0,0,0)
Mark: 00/00/1900 00:00:00.000
Current Full Backup:
Log Gen: 0-0 (0x0-0x0)
Mark: (0x0,0,0)
Mark: 00/00/1900 00:00:00.000
Current Shadow copy backup:
Log Gen: 0-0 (0x0-0x0)
Mark: (0x0,0,0)
Mark: 00/00/1900 00:00:00.000
cpgUpgrade55Format: 0
cpgUpgradeFreePages: 0
cpgUpgradeSpaceMapPages: 0
ECC Fix Success Count: none
Old ECC Fix Success Count: none
ECC Fix Error Count: none
Old ECC Fix Error Count: none
Bad Checksum Error Count: none
Old bad Checksum Error Count: none
Last checksum finish Date: 00/00/1900 00:00:00.000
Current checksum start Date: 00/00/1900 00:00:00.000
Current checksum page: 0
Operation completed successfully in 0.15 seconds.
There’s quite a lot of information to retrieve from the mailbox database header:
· DB Signature A unique value of creation date and time, plus a random integer that identifies this particular database. This value is also recorded in the transaction log file and the checkpoint files, and this ties them together. In this example, the DB signature is “Create time:04/23/2014 20:56:12.168 Rand:3896134121,” which means the mailbox database was created on April 23, 2014, at 8:56 p.m.
· cbDbPage The size of the pages used in this database; in Exchange 2013, the page size is 32 KB.
· Dbtime (Part of) the number of changes made to this database.
· State The state of the database—that is, whether it is in a consistent state or not. The database in this example is in a dirty shutdown. (I killed the Exchange Store Worker process using Task Manager to get in this state.) It needs a certain number of transaction log files to get to a clean shutdown state.
· Log Required If the database is not in a consistent state, these log files are needed to bring it into that consistent state. To make this database a consistent state again, the log files E0000000D62.log through E0000000D6F.log are needed. Exchange Server will perform the recovery process automatically when mounting a database, so under normal circumstances no administrator intervention is needed at this point, but it also possible to manually recover from a dirty shutdown using the ESEUTIL tool.
· Last ObjID The number of B+ trees in this particular database. In this example there are 12,342 B+ trees in the database.
· Log Signature A unique value of date, time, and an integer that uniquely identifies a series of log files. As with the database signature, this ties together the database file, the log files, and the checkpoint file.
· Last Attach The date and time when the database was last mounted. “Mounting” is actually attaching the mailbox database to a stream of log files, hence the entry label ”Last Attach.”
· Last Detach The date and time when the database was last dismounted, or detached from the stream of log files. In this example, the database was never dismounted; I only crashed it.
· Backup information Entries used by Exchange Server to keep track of the last full or incremental (VSS) backup that was made on this particular database.
The same kind of information is logged in the header of the transaction log file (ESEUTIL /ML E00.LOG) and in the header of the checkpoint file (ESEUTIL /MK E00.CHK). As these files are grouped together, you can match the files using the header information; for example:
ESEUTIL /ML E00.log
The output is something like the following:
Extensible Storage Engine Utilities for Microsoft(R) Exchange Server
Version 15.00
Copyright (C) Microsoft Corporation. All Rights Reserved.
Initiating FILE DUMP mode...
Base name: e00
Log file: e00.log
lGeneration: 3440 (0xD70)
Checkpoint: (0xD62,30,0)
creation time: 05/23/2014 14:17:49.174
prev gen time: 05/23/2014 14:17:49.111
Format LGVersion: (8.4000.4.5)
Engine LGVersion: (8.4000.4.5)
Signature: Create time:04/23/2014 20:56:12.090 Rand:4000563479 Computer:
Env SystemPath: F:\Mailbox Database 0833106092\LogFiles\
Env LogFilePath: F:\Mailbox Database 0833106092\LogFiles\
Env Log Sec size: 4096 (legacy, unknown actual)
Env (CircLog,Session,Opentbl,VerPage,Cursors,LogBufs,LogFile,Buffers)
( off, 1000, 100000, 16384, 100000, 2048, 256, 16383)
Using Reserved Log File: false
Circular Logging Flag (current file): off
Circular Logging Flag (past files): off
Checkpoint at log creation time: (0xD62,1,0)
1 F:\Mailbox Database 0833106092\Mailbox Database 0833106092.edb
dbtime: 3437800 (0-3437800)
objidLast: 13613
Signature: Create time:04/23/2014 20:56:12.168 Rand:3896134121 Computer:
MaxDbSize: 0 pages
Last Attach: (0xC46,2,268)
Last Consistent: (0xC45,AF,90)
Last Lgpos: (0xd70,93,0)
Number of database page references: 246
Integrity check passed for log file: e00.log
Operation completed successfully in 0.172 seconds.
When you look at this output and compare it to the output of the mailbox database header, you’ll notice that the mailbox database signature mentioned in the transaction log file is identical to the mailbox database signature in the mailbox database header. This means these files are tied together. Of course, the transaction log file was created recently, but in this header information you’ll also find information regarding the location of the checkpoint file on disk as stored in the Env SystemPath property. Also, the location of the transaction log files is recorded in theEnv LogFilePath property.
The last part to have a closer look at is the checkpoint file. As we now know, it references a page in one transaction log file. To look at the header information of the checkpoint file, this command is used:
ESEUTIL /MK E00.CHK
This generates output like the following:
Extensible Storage Engine Utilities for Microsoft(R) Exchange Server
Version 15.00
Copyright (C) Microsoft Corporation. All Rights Reserved.
Initiating FILE DUMP mode...
Checkpoint file: e00.chk
LastFullBackupCheckpoint: (0x0,0,0)
Checkpoint: (0xD62,30,0)
FullBackup: (0x0,0,0)
FullBackup time: 00/00/1900 00:00:00.000
IncBackup: (0x0,0,0)
IncBackup time: 00/00/1900 00:00:00.000
Signature: Create time:04/23/2014 20:56:12.090 Rand:4000563479 Computer:
Env (CircLog,Session,Opentbl,VerPage,Cursors,LogBufs,LogFile,Buffers)
( off, 1000, 100000, 16384, 100000, 2048, 256, 16383)
1 F:\Mailbox Database 0833106092\Mailbox Database 0833106092.edb LogOff VerOn RW
dbtime: 3437801 (0-3437801)
objidLast: 13613
Signature: Create time:04/23/2014 20:56:12.168 Rand:3896134121 Computer:
MaxDbSize: 0 pages
Last Attach: (0xC46,2,268)
Last Consistent: (0xC45,AF,90)
Operation completed successfully in 0.47 seconds.
This checkpoint file was created during creation of the mailbox database, as can be derived from the signature of the mailbox database. If you examine these examples closely, you’ll find that the three files are closely related.
Single-Instance Storage
Up until the 2007 version, Exchange Server had a feature called single instance storage (SIS). Using SIS, Exchange Server stored items in the mailbox database only one time per mailbox database. When an item had to be delivered to multiple mailboxes, it was stored only once and the other mailboxes contained a pointer to this particular item. In the early days, when expensive 9 GB SCSI disks were used, this method could save valuable disk space and would increase performance dramatically. It made sense, since writing a large item takes much more time than writing a pointer.
Microsoft started to move away from SIS beginning with Exchange Server 2007, and Exchange Server 2010 and 2013 do not use SIS at all. Newer disk technology and improved ESE technology make it possible to use large 3 TB SATA disks (or larger) without impacting disk performance—that is, of course, if the disk subsystem is not overcommitted. Microsoft’s getting rid of SIS made it possible for the Exchange developers to create a less complex mailbox database structure, which in turn lowered the IOPS requirements.
Is this a bad development? No, it hasn’t led to “exploding” mailbox databases, as a lot of people feared. Over the years, Microsoft has improved its compression techniques in the mailbox database, which balances the loss of SIS.
Microsoft Exchange Information Store
While ESE is just the database engine, it stores the transactions in the transaction log file and in the mailbox database, as explained in the previous sections. If you open this database file with some sort of binary editor, however, there’s absolutely no readable information. The same is true for the transaction log file—no readable information.
The Information Store is the process running on the Mailbox server that’s responsible for the logical part of the database processing. It transforms the information read from the mailbox database into something readable, like your inbox, the folders in the inbox, or the individual message items. In essence, this process hasn’t changed since the original release of Exchange Server 4.0 in 1997. Of course, there have been improvements, such as the introduction of the 64-bit version of Exchange 2007, increasing the number of mailbox databases or expanding the page size to 8 KB in 2007 and to 32 KB in 2010, but the overall concept hasn’t changed.
In Exchange 2013, however, the Information Store process has been completely rewritten in managed code—in other words, it is now a .NET application. More interesting, for every mailbox database that is mounted on an Exchange 2013 Mailbox server, a new Information Store worker process is spawned and responsible for this particular database (see Figure 4-7). The huge advantage of this system is that all mailbox databases and the accompanying processes are fully independent of each other. That is, if you have an Exchange 2013 Mailbox server with 25 mailbox databases mounted, and one of those databases crashes, including the Information Store, the other 24 mailbox databases are not affected. (This is in contrast to earlier versions of Exchange Server, where all mailbox databases were dismounted if such a scenario took place.) Besides a new Information Store worker process, an additional search instance is started, minimizing the risk of affecting other mailbox databases in the event of a problem.
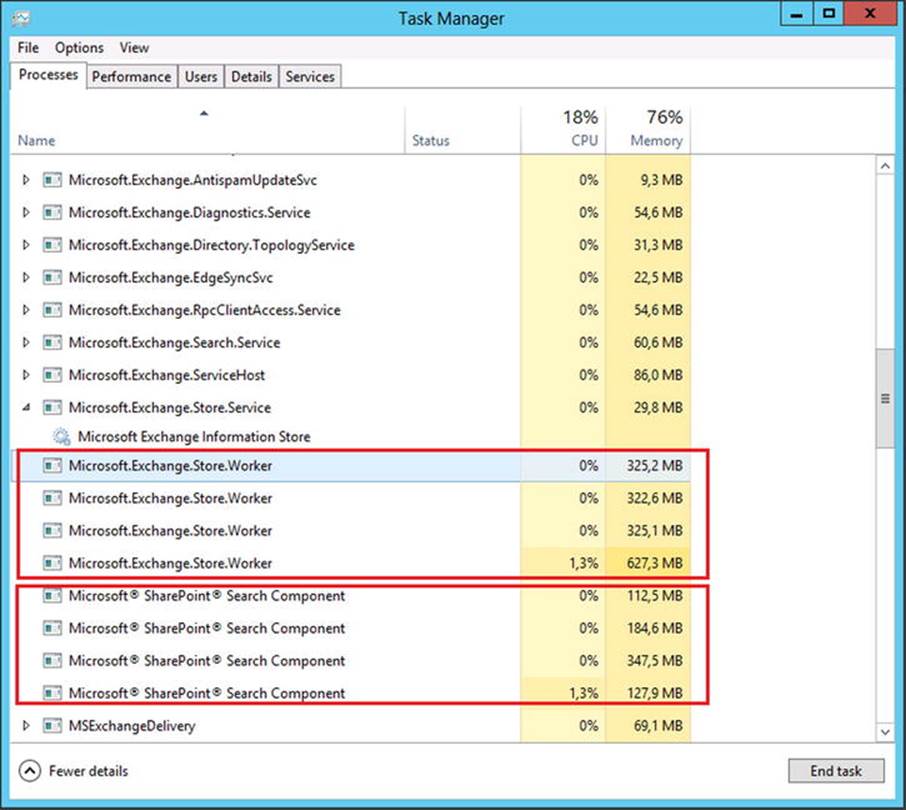
Figure 4-7. Multiple databases means multiple Information Store worker processes
Database Caching
For optimal performance, the Information Store wants to do only one thing: cache as much information as possible. Reading and writing in memory is much faster than reading and writing on disk. The more information that is kept in the server’s memory, the better the server’s performance will be.
The amount of memory assigned to a particular mailbox database is determined at the start time of the Information Store process. This also means that when additional mailbox databases are added, the server’s memory used for database caching needs to be redistributed. This is the reason a warning message such as “Please restart the Microsoft Exchange Information Store service on server <<name>> after adding new Mailbox databases” appears (see Figure 4-8).
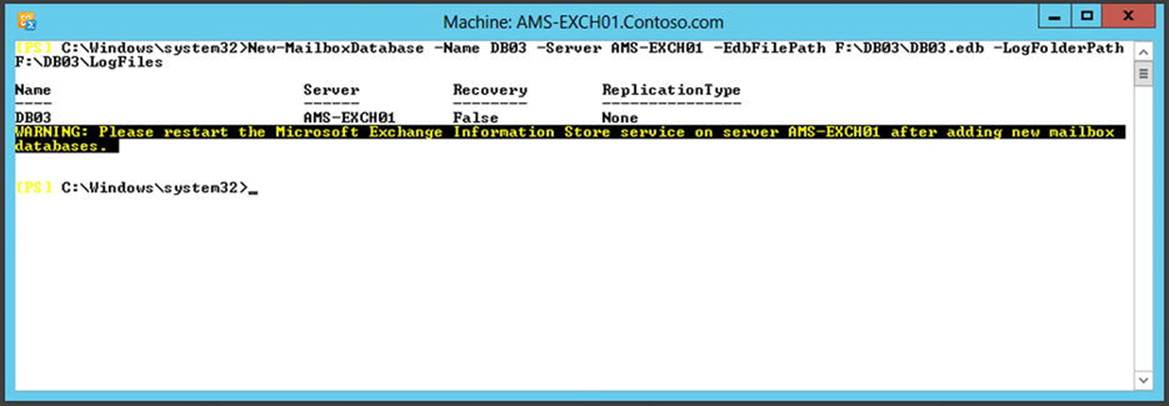
Figure 4-8. The Information Store needs to be restarted after adding a mailbox database
Managing the Mailbox Databases
When you install an Exchange 2013 Mailbox server, its default behavior is to create a mailbox database on the system disk, typically in the directory C:\Program Files\Microsoft\Exchange Server\V15\Mailbox\. The name of the new mailbox database is “Mailbox database,” followed by a random number, so we get something like “Mailbox Database 0833106092,” as we’ve seen in the previous section.
![]() Note This random numbering can be avoided by using the /MdbName, /DbFilePath, and /LogFolderPath options during unattended setup. This was explained more in detail in Chapter 2.
Note This random numbering can be avoided by using the /MdbName, /DbFilePath, and /LogFolderPath options during unattended setup. This was explained more in detail in Chapter 2.
Although this mailbox can be used in a production environment, most likely it does not fit into your company’s naming convention and it is not stored in a proper location. Therefore, things you might want to do after the initial installation are:
1. Rename the mailbox database to match your company’s naming convention.
2. Move the mailbox database and the accompanying log files to a more suitable location—for example, an external disk, whether it be direct attached storage (DAS) or some sort of SAN storage solution. Be aware that you can only do this before you create a DAG with additional mailbox database copies!
3. Enable circular logging when you are using a DAG.
4. Change quotas for the mailbox database or change the retention times for deleted items.
5. Assign an Offline Address Book (OAB) to a mailbox database.
To Rename a Mailbox Database
Renaming a mailbox database in Exchange 2013 is not a big deal; it’s just a matter of one PowerShell command. To change a mailbox database name from Mailbox database 0833106092 to AMS-DB01, enter the following command in EMS:
Get-MailboxDatabase -Identity "Mailbox database 0833106092" |
Set-MailboxDatabase -Name "AMS-DB01"
![]() Note In the previous example, the logical name of the mailbox database is renamed as they show up in EMS or in EAC. The actual EDB file or the directory on disk is not renamed. To rename these, you need to move the EDB file to another directory.
Note In the previous example, the logical name of the mailbox database is renamed as they show up in EMS or in EAC. The actual EDB file or the directory on disk is not renamed. To rename these, you need to move the EDB file to another directory.
To Move a Mailbox Database
It is strongly recommended that you move mailbox databases to a separate location, preferably a dedicated disk. In Exchange 2013, you can have up to four mailbox databases per disk. To move a mailbox database named AMS-DB01 and its log files to a different location, just enter the following command in EMS:
Move-DatabasePath -Identity AMS-DB01 -EdbFilePath F:\AMS-DB01\MD01.edb
-LogFolderPath F:\AMS-DB01\LogFiles
An interesting option is the -ConfigurationOnly parameter. Normally when you use the Move-DatabasePath cmdlet, the mailbox database settings in Active Directory are changed and the mailbox database and its log files are moved to the assigned location. When the -ConfigurationOnly parameter is used, though, the settings are changed in Active Directory, but the actual file move does not occur. This can be useful in a disaster-recovery scenario, where a particular mailbox database is recovered in another location and the Mailbox server needs to use this particular mailbox database. This will be explained in more detail in Chapter 7.
To Enable Circular Logging
As explained earlier in the chapter, circular logging is a technique whereby only a very limited number of transaction log files are kept on the server. Normally, transaction log files are kept until a backup has successfully run, but when circular logging is enabled, the transaction log files are removed from the server once all the transactions have been successfully committed to the mailbox database and shipped to the passive copies of that mailbox database when using a DAG.
In a single-server scenario, circular logging is not recommended because of its lack of recovery options, but in a DAG environment circular logging poses less risk of data loss. Recovery options are provided by the DAG itself, so if a mailbox database is lost, another server in the DAG takes over.
To enable circular logging on a mailbox database named AMS-DB01, enter the following command in EMS:
Set-MailboxDatabase -Identity AMS-DB01 -CircularLoggingEnabled:$TRUE
If you enable circular logging on a server that’s not a DAG member, you’ll get a warning message that the circular logging will become active only when the mailbox database is dismounted and mounted again. When the Mailbox server is a DAG member, the circular logging option is applied immediately and there’s no need for remounting the mailbox database.
To disable the circular logging, the -CircularLoggingEnabled option should be set to $FALSE.
To Change Quota Settings
When a new mailbox database is installed, the default quotas are set on the mailbox database. Quotas are limits set on a mailbox; if they are not explicitly set on the mailbox itself, the mailbox database quotas are enforced on the mailboxes.
The following quota settings are set by default:
· Issue Warning at 1.9 GB This value determines when Exchange starts sending warning messages to the user about the fact that he’s reaching his mailbox limit. By default this limit is 100 MB lower than the next limit, whereby the user cannot send email anymore.
· Prohibit Send at 2.0 GB This value determines when the user cannot send email anymore.
· Prohibit Send and Receive at 2.1 GB This value determines when the user cannot send email but at the same time cannot receive email either. By default this value is 100 MB higher than the previous limit—the Prohibit Send quota. Some customers prefer to leave this quota setting open, especially on mailboxes that receive email from customers, so as to prevent bouncing back email to the customers.
While these settings are sufficient for the majority of users, they can be extended to a very large level. In Exchange 2013, a mailbox of 100 GB is not a problem at all on a server level; the only thing you have to be aware of is that the storage sizing must be able to accommodate these large mailboxes.
To change the default quota settings on a mailbox databases called AMS-DB01 to 20 GB, you can use the following command in EMS:
Set-MailboxDatabase -Identity AMS-DB01 -IssueWarningQuota 19GB -ProhibitSendQuota 20GB -ProhibitSendReceiveQuota 22GB
![]() Note Having a 20 GB mailbox on an Exchange server is not a problem, but complications may arise when using Outlook 2010 and when running Outlook in cached mode. If so, Outlook will create an OST file that matches the size of the mailbox, so 20 GB of mail data will be downloaded to the client and stored on the local hard disk. When running a laptop with a 5400 rpm hard drive, this for sure will give problems. A solution is to use an SSD disk in the laptop, or use Outlook 2013 where the size of the OST file can be controlled by the end user.
Note Having a 20 GB mailbox on an Exchange server is not a problem, but complications may arise when using Outlook 2010 and when running Outlook in cached mode. If so, Outlook will create an OST file that matches the size of the mailbox, so 20 GB of mail data will be downloaded to the client and stored on the local hard disk. When running a laptop with a 5400 rpm hard drive, this for sure will give problems. A solution is to use an SSD disk in the laptop, or use Outlook 2013 where the size of the OST file can be controlled by the end user.
Exchange periodically sends warning messages to users who have almost hit their quota (the Issue Warning), or who have hit their quota and cannot send (the Prohibit Send), or have hit their quota and cannot send and receive (the Prohibit Send and Receive limit). The frequency of these warning messages is set using the QuotaNotificationSchedule property on a mailbox database, which you can check using EMS:
Get-MailboxDatabase -Identity AMS-DB01 | fl Name,QuotaNotificationSchedule
Besides the name of mailbox database, it will also show the quota notification schedule, which by default is set to this:
QuotaNotificationSchedule : {Sun.1:00 AM-Sun.1:15 AM, Mon.1:00 AM-Mon.1:15 AM, Tue.1:00 AM-Tue.1:15 AM, Wed.1:00 AM-Wed.1:15 AM, Thu.1:00 AM-Thu.1:15 AM, Fri.1:00 AM-Fri.1:15 AM, Sat.1:00 AM-Sat.1:15 AM}
Mailboxes inherit their quotas from the mailbox database where they reside. It is possible to override these limits by setting the quotas directly on the mailbox. The quota can be higher or lower than the mailbox database setting.
To Assign an Offline Address Book
When a mailbox database is created, an Offline Address Book (OAB) is not assigned to it. In a typical environment this is not needed, but there are situations where you can put one set of mailboxes in one mailbox database and another set of mailboxes in another mailbox database, and then you can assign a specific OAB to a specific mailbox database, and thus to the mailboxes in these databases.
You can use the following command to assign an Offline Address Book called Custom Department OAB to a mailbox Database called AMS-MDB01:
Set-MailboxDatabase -Identity AMS-MDB01 -OfflineAddressBook "Custom Department OAB"
To Create a New Mailbox Database
If you have a larger environment, then it’s likely that you will need some additional mailbox databases besides the default mailbox database. When you have multiple mailbox databases, you can spread your mailboxes across these mailbox databases. Even better, when provisioning the mailboxes, you do not assign a mailbox database; Exchange Server will look for a mailbox database to host this new mailbox.
Creating a new mailbox database using PowerShell is fairly easy; just enter a command similar to the following:
New-MailboxDatabase -Name AMS-MDB03 -Server AMS-EXCH02
-EdbFilePath F:\AMS-MDB03\AMS-MDB03.edb -LogFolderPath F:\AMS-MDB03\LogFiles
This command creates a new mailbox database called AMS-MDB03, which is hosted on Mailbox server AMS-EXCH02. The mailbox database file and the accompanying transaction log files are located in the F:\AMS-MDB03 directory. After creation of the mailbox database, you can mount it using the following command:
Mount-Database -Identity MDB03
![]() Note When you create a new mailbox database, this information is stored in Active Directory. The information needs to be replicated across all domain controllers. It can happen that, when creating a new mailbox database using the EMS, this information is not replicated across all domain controllers when you enter the Mount-Database command. If that happens, the Mount-Database command will fail and an error will be shown on the console. Nothing to worry about; just wait a couple of minutes and retry the Mount-Database command. However, this can be prevented by using the –DomainController option when using the Mount-Database command.
Note When you create a new mailbox database, this information is stored in Active Directory. The information needs to be replicated across all domain controllers. It can happen that, when creating a new mailbox database using the EMS, this information is not replicated across all domain controllers when you enter the Mount-Database command. If that happens, the Mount-Database command will fail and an error will be shown on the console. Nothing to worry about; just wait a couple of minutes and retry the Mount-Database command. However, this can be prevented by using the –DomainController option when using the Mount-Database command.
To Delete a Mailbox Database
For some reason, you may want to delete a mailbox database. Before a mailbox database can be deleted, however, all the mailboxes in it need to be either deleted or moved to another mailbox database. When the mailbox database is empty (and you’ve made a backup, just in case), you can remove it. You can use the following PowerShell command to remove a mailbox database:
Remove-MailboxDatabase -Identity AMS-MDB01 -Confirm:$false
When the mailbox database is deleted, it is only deleted from Active Directory. The files themselves still exist on the Mailbox server and have to be manually deleted.
But one day you’ll run into the following snag. Suppose you’ve moved all the mailboxes to another mailbox database and you want to delete the mailbox database. An error message says:"This mailbox database contains one or more mailboxes, mailbox plans, archive mailboxes, public folder mailboxes, or arbitration mailboxes."
When you check again, the mailbox database looks empty because nothing shows up in EAC and nothing is shown when you enter a Get-Mailbox -Database AMS-MDB01 command in ESM. This situation is caused by system mailboxes in this particular mailbox database, and these system mailboxes are not shown by default. They can only be shown in the ESM by using the Get-Mailbox -Database MDB01 -Arbitration command. To move these mailboxes to another mailbox database called MDB02, you can use the following command in ESM:
Get-Mailbox -Database AMS-MDB01 -Arbitration | New-MoveRequest
-TargetDatabase AMS-MDB02
When these system mailboxes are moved and the mailbox database is really empty, it is possible to remove the mailbox database.
Online Mailbox Database Maintenance
Maintenance is a broad term and describes several tasks. Discussed here are (1) the Deleted Items retention settings; and (2) Online mailbox maintenance in the Exchange environment.
Deleted Items Retention Settings
When items are removed from the mailbox database (messages, folders, mailboxes), they are not immediately deleted from the mailbox or the mailbox database; they are kept in the background for a particular amount of time called the retention time, and it is set by default to 14 days for individual mailbox items and 30 days for mailboxes.
The Deleted Items retention time and the Mailbox retention time are properties of a mailbox database and can be retrieved using the following command:
Get-MailboxDatabase –Identity AMS-DB01 | select MailboxRetention,DeletedItemRetention
The retention time is shown as a time span: dd.hh:mm:ss, where d=days, h=hours, m=minutes, and s=seconds. Figure 4-9 shows the default retention time settings.
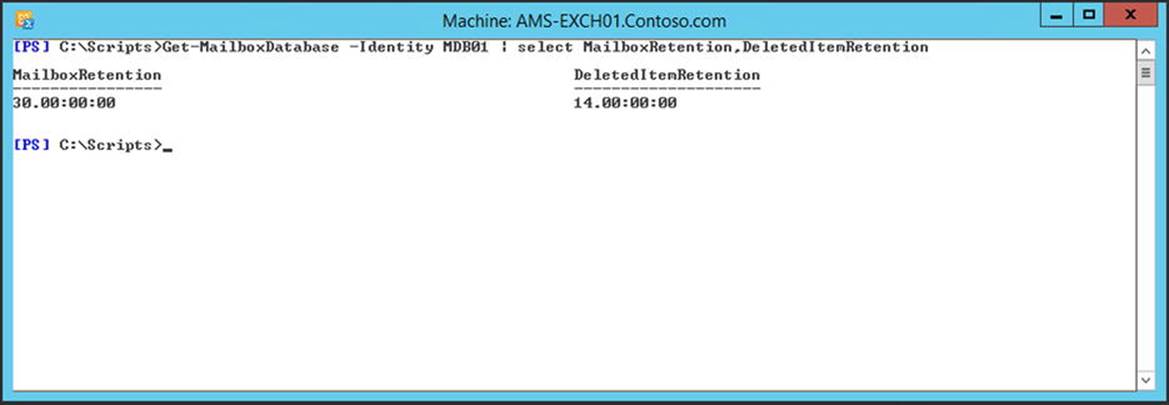
Figure 4-9. The default retention time settings of a mailbox database
Changing the retention times of a mailbox database is similar to retrieving these settings, but instead of using “Get,” you use “Set” in the PowerShell command.
To change the Deleted Items retention time to 90 days, for example, you use the following command:
Set-MailboxDatabase –Identity AMS-DB01 –DeletedItemsRetention 90.00:00:00
When deleted items are past their retention time they are permanently deleted from the mailbox database. When this happens there’s no way to get these items back.
There’s an option in Exchange that only deletes these items permanently after they have been backed up. This option called RetainDeletedItemsUntilBackup and is set to FALSE by default, so you have to set it explicitly. To set this in combination with the 90 days Deleted Items retention time we set in the previous example, you can use the following PowerShell command:
Set-MailboxDatabase –Identity AMS-DB01 –DeletedItemsRetention 90.00:00:00 –RetainDeletedItemsUntilBackup $TRUE
So what actually happens? When a user deletes a message and purges it from the Deleted Items folder in his mailbox, or when an administrator deletes a mailbox, it is actually moved to the Recoverable Items folder. This is a special location in the mailbox database, not visible for users, where items are stored for as long as stipulated by the retention time.
Online Mailbox Maintenance
Online mailbox maintenance is a process in Exchange Server that maintains the internal structure of the mailbox database and it consists of two parts:
1. Content maintenance Responsible for purging deleted items, purging indexes, purging deleted mailboxes, and checking for orphaned messages. This part focuses on content maintenance—that is, it is responsible for purging old content and keeping the mailbox database as accurate as possible.
2. ESE maintenance Keeps track of all database pages and indexes inside the mailbox database and performs checksum checks of all individual pages inside the database. It reads all pages in the database and performs a checksum check on each page to see if the page is valid. Single-bit errors can be fixed on the fly by ESE maintenance. ESE maintenance also performs online defragmentation (also known as OLD) to optimize the internal structure of the mailbox database. Online defragmentation reads all pages and indexes in the database and reorganizes these pages. The idea is to free up pages inside the database so new items can be written in the free space inside the database, preventing unnecessary growth of the database.
Content maintenance can finish in a couple of hours, even on the largest mailbox databases. By default, content maintenance runs from 1 a.m. until 5 a.m. on the Mailbox server. This maintenance schedule is also a property of a mailbox database and can be retrieved using the following PowerShell command:
Get-MailboxDatabase | Select MaintenanceSchedule
This is shown in Figure 4-10.
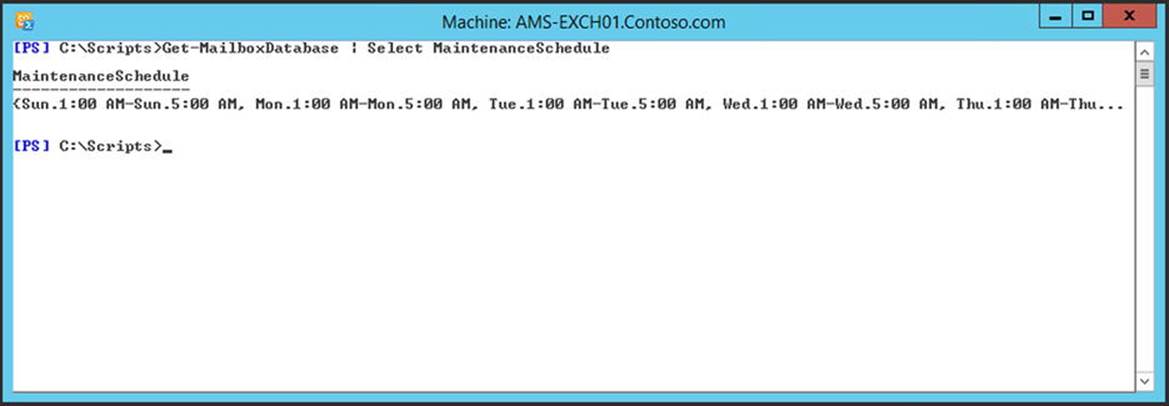
Figure 4-10. The online maintenance schedule of a mailbox database
If you want to change this time span, you have to use all different times as input for the Set-MailboxDatabase command using the –MaintenanceSchedule parameter; for example:
Set-MailboxDatabase -Identity AMS-DB01 -MaintenanceSchedule "Sun.00:00 AM-Sun.04:00 AM","Mon.00:00-Mon.04:00","Tue.00:00-Tue.04:00","Wed.00:00-Wed.04:00","Thu.00:00-Thu.04:00","Fri.00:00-Fri.04:00","Sat.00:00-Sat.04:00"
If you run this command, the time spans are set, but you are also presented a warning message that this parameter is being deprecated. For now this works, but it is unknown if the next version of Exchange Server still supports the –MaintenanceSchedule parameter.
The second part of online maintenance is the ESE maintenance. This is a 24/7 background process. By default, it is enabled and it is recommended that you leave this enabled. If for some reason you want to disable ESE maintenance, you can set the –BackgroundDatabaseMaintenance parameter to FALSE; for example:
Set-MailboxDatabase –Identity AMS-DB01 –BackgroundDatabaseMaintenance $FALSE
![]() Note To prevent overwhelming the Mailbox server with checksum requests, and therefore possibly influencing client requests, ESE maintenance is a throttled process.
Note To prevent overwhelming the Mailbox server with checksum requests, and therefore possibly influencing client requests, ESE maintenance is a throttled process.
Managing the Mailboxes
There are multiple types of mailboxes available in Exchange 2013:
· User Mailboxes Regular mailboxes used by individuals to send and receive email messages.
· Resource Mailboxes Mailboxes that are not assigned to human beings but to resources, like a conference room or a beamer in an office; as such they can be scheduled for meeting purposes.
· Linked Mailboxes Regular mailboxes, tied to user accounts in another Active Directory forest and not to user accounts in the same Active Directory forest as the Exchange 2013 servers.
· Public Folder Mailboxes Replacements for the traditional public folders in down-level versions of Exchange Server. Since there are so many changes in public folders, there’s a complete section on these later in the chapter, called “Modern Public Folders.”
Although they are all mailboxes, there are differences between them, as outlined next.
To Create a User Mailbox
There are a few ways to create new user mailboxes in Exchange 2013:
· Create a new mailbox and corresponding user account in Active Directory.
· Mailbox-enable an existing user account.
· Use bulk management—for example, import user accounts from a CSV file or an Excel spreadsheet.
Let’s look at these more closely.
New Mailbox/New User Account
It is possible to create a new user account and corresponding mailbox with the New-Mailbox command; for example:
New-Mailbox –Name "John Brown" –FirstName John –LastName Brown –Alias JBrown –DisplayName "John Brown IV" –OrganizationalUnit "FourthCoffee" –Database MDB01 –UserPrincipalName jbrown@contoso.com
This command is shown in Figure 4-11.
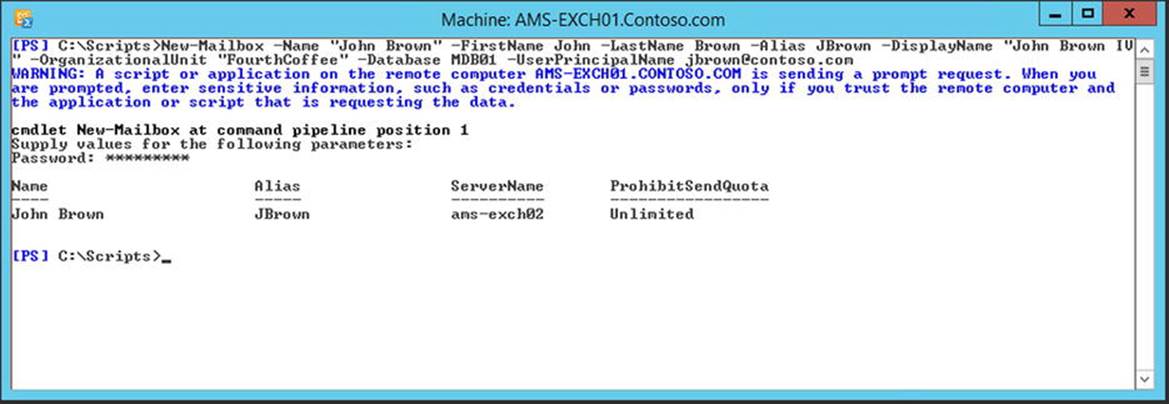
Figure 4-11. Creating a new mailbox with PowerShell
This command will create a new user account called “John Brown” in the OU=Accounts Organizational Unit in the contoso.com Active Directory. His user principal name will be set to jbrown@contoso.com and his mailbox will be created in the AMS-MDB01 mailbox database.
It is not possible to enter a password on the command line because passwords are only accepted as a secure string in Active Directory; therefore, you are prompted for a new password for this user account.
To work around this, you can use the ConvertTo-SecureString function in PowerShell. This will convert a clear text string like P@$$w0rd1 into a secure string that will be accepted by PowerShell when creating a new user. The command for creating a new user with a mailbox and for setting the password will be something like this:
New-Mailbox -Name "Marina Baggus" -OrganizationalUnit FourthCoffee -Password (ConvertTo-SecureString -String 'P@$$w0rd1' -AsPlainText -Force) -Database MDB01 -FirstName Marina -LastName Baggus -DisplayName "Marina Baggus" -UserPrincipalName "Marina@baggus.nl"
In the example above, a mailbox database is explicitly set. It is also possible to omit the –Database option when creating a new mailbox. If you do this, the Mailbox server automatically determines the best location for the new mailbox.
The algorithm used here first determines which mailbox databases are available in Active Directory and are not excluded for provisioning. Then it looks at the number of mailboxes in each mailbox database and picks the mailbox database with the lowest number of mailboxes.
Mailbox-Enabling an Existing User
It is possible that an account in Active Directory already exists; it could have been created by the Active Directory team, for example. If so, you can mailbox-enable this user account—that is, add a mailbox to it.
If you have an existing user account in Active Directory called “Samuel Smith” and you want to assign a mailbox to him located in the Mailbox Database 0833106092 database, you can enter the following PowerShell command:
Get-User -Identity samuel | Enable-Mailbox -Alias Samuel -Database "Mailbox Database 0833106092
Personally, I’d like to use a Get-User cmdlet first to see if it retrieves the correct user account from Active Directory. If it does, I repeat the command and pipe it into the Enable-Mailbox cmdlet.
Bulk Managing the User Accounts
If you have a lot of mailboxes that need to be created, you can use a PowerShell script to do this. This PowerShell script can read the accounts from a CSV or XLSX file and import it into Active Directory and create the mailboxes. Especially when you have a lot of mailboxes to create, this is a convenient way to use PowerShell.
Suppose you have a number of Mailboxes to create in your environment; a CSV that is supplied to you can be formatted as follows:
FirstName,LastName,DisplayName,Alias,Password,OU
Michael,McDonald,"M. McDonald",MichaelM,Pass1word,"Contoso.com/Accounts/Contoso/Users"
John,Doe,"J. Doe",JohnD,Pass1word,"Contoso.com/Accounts/Contoso/Users"
Kim,Akers,"K. Akers",KimA,Pass1word,"Contoso.com/Accounts/Contoso/Users"
Liesbeth,Gelderen,"L. van Gelderen",Liesbeth,Pass1word,"Contoso.com/Accounts/Contoso/Users"
In contrast to the earlier command where a new Mailbox was created a user password is supplied in clear text in this CSV file. The New-Mailbox cmdlet cannot work with a clear text password but using a script we can convert this clear text to a secure string.
A PowerShell script that reads this CSV file can be like this:
$Database="Mailbox Database 0833106092"
$UPNsuffix="contoso.com"
Param{
[string]$Users
}
ForEach ($user in $users)
{
$sp = $NULL
$upn = $NULL
$sp = ConvertTo-SecureString –String $user.password -AsPlainText -Force $user.password
$upn = $user.FirstName + "@"+ $upnSuffix
New-Mailbox -Password $sp -Database $Database -UserPrincipalName $UPN -Alias $User.alias -Name $User.DisplayName -FirstName $User.FirstName -LastName $User.LastName -OrganizationalUnit $user.OU
}
The first three commands are obvious. The variables are created where the mailbox database is defined, the user principal name is created, and an array is created containing all the accounts.
The second step is a function that converts the clear text password into a secure string that is accepted by the New-Mailbox cmdlet.
The last step is a loop where a new user account and mailbox are created for every user in the array. Script execution is shown in Figure 4-12.
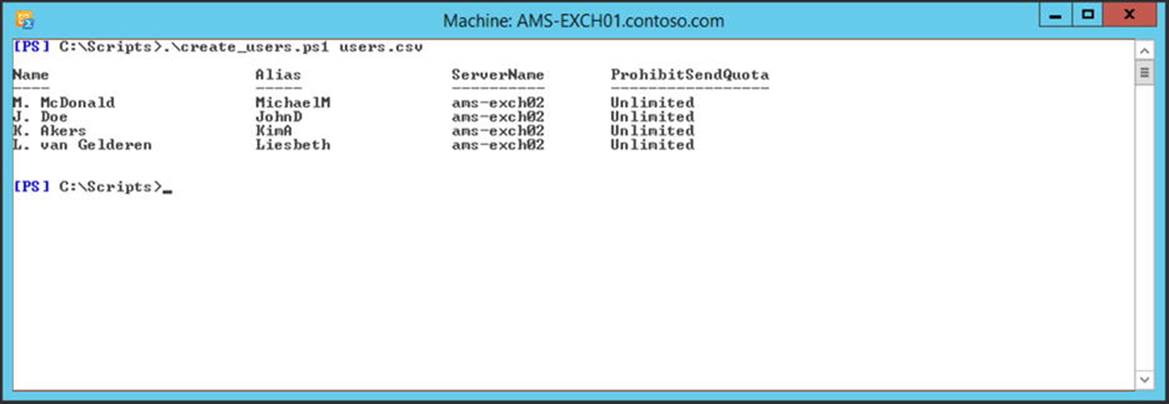
Figure 4-12. Creating new users using a PowerShell script can be very efficient
To Set Additional Mailbox Properties
When the new mailbox is created, you can set additional properties for the mailbox; for example:
· Set properties like Company or Department
· Set quota setting on a mailbox
· Set regional configuration properties
· Assign a policy to the mailbox
· Add additional email address
· Create an archive mailbox
· Implement cmdlet extension agents
Setting Properties
Properties like Company or Department are not Exchange-specific and therefore you cannot use the Set-Mailbox cmdlet to set these. Instead, you can use the Set-User cmdlet to set them; for example:
Set-User –Identity JBrown –Company "Fourth Coffee" –Department "Sales"
Setting Quotas
In a previous section I explained that quota settings are put on a mailbox database. It is also possible to put quota settings on a mailbox, and these quota settings will override the mailbox database quotas. To change the quota settings for all users in, say, the FourthCoffee Organizational Unit, you can use the following command:
Get-Mailbox -OrganizationalUnit "FourthCoffee" | Set-Mailbox -IssueWarningQuota 10GB
-ProhibitSendQuota 11GB -ProhibitSendReceiveQuota 15GB -UseDatabaseQuotaDefaults $false
It is important to set the UseDatabaseQuotaDefaults property to $false. If you don’t do this, the mailbox database quota settings are not overridden.
Setting Regional Configurations
The first time you log on to OWA, you are requested to set the time zone and to select a language. In a typical environment, these will be identical across all mailboxes. An exception could be if you are living in a dual-language country like Belgium. You would set the default Time zone to “W. Europe Standard Time” and set the language to French or Dutch, depending on the location of the user. For example, Brussels based users you would set it to:
Set-MailboxRegionalConfiguration –Identity Pascal –Language fr-FR –LocalizeDefaultFolderName $TRUE –Timezone "W. Europe Standard Time"
And for Antwerp based users you would set it to:
Set-MailboxRegionalConfiguration –Identity Johan –Language nl-NL –LocalizeDefaultFolderName $TRUE –Timezone "W. Europe Standard Time"
![]() Tip If you want to get the time zone you’re currently in, you can use the TZUTIL utility. Run this in a command prompt and it will show you the current time zone of the Windows machine you’re logged on to.
Tip If you want to get the time zone you’re currently in, you can use the TZUTIL utility. Run this in a command prompt and it will show you the current time zone of the Windows machine you’re logged on to.
Assigning an Address Book Policy
An Exchange-specific address book policy can be assigned to a mailbox using the Set-Mailbox cmdlet. If you have an address book policy called “Fourth Coffee ABP” and you want to assign it to the JBrown mailbox, you can use the following command:
Set-Mailbox –Identity JBrown –AddressBookPolicy "Fourth Coffee ABP"
![]() Note Address book policies are discussed in more detail later in this chapter.
Note Address book policies are discussed in more detail later in this chapter.
Adding Email Addresses
Adding email addresses to a mailbox is a little more difficult because the EmailAddress property of a mailbox is a multivalued property; that is, this particular property can have more than one value.
If you add a value to a property, the original value is overwritten, which is something to be avoided when using multivalued properties. To change a multivalued property, add an Add or Remove option to the value. For example, to add two additional email addresses to John’s mailbox, you can use the following command:
Set-Mailbox –Identity JBrooks –EmailAddresses @{Add="John.Brooks@contoso.com", "John.A.Brooks@contoso.com"}
Removing a value from a multivalued property is similar; you would use:
Set-Mailbox –Identity JBrooks –EmailAddresses @{Remove=John.A.Brooks@contoso.com}
Creating an Archive Mailbox
An archive mailbox is a secondary mailbox connected to a user’s primary mailbox. To create an archive mailbox, you can use the Enable-Mailbox cmdlet with the –Archive option. For example, to enable the archive mailbox to John Brook’s mailbox, you can use the following command:
Enable-Mailbox –Identity JBrooks –Archive
Exchange Server will automatically provision the archive mailbox in one of the available mailbox databases; it uses the same algorithm when creating a normal mailbox. If you want to set the mailbox database manually, you can use the –ArchiveDatabase option; for example:
Enable-Mailbox –Identity JBrooks –Archive –ArchiveDatabase AMS-DB10
Using Cmdlet Extension Agents
Not directly related to the creation of new mailboxes but interesting enough to discuss here are the cmdlet extension agents. Using cmdlet extensions, it is possible to expand the functionality of PowerShell cmdlets and tailor them to your organizational needs.
An example of such an extension could be the automatic creation of an archive mailbox whenever a normal user mailbox is created. The scripting agent configuration is stored in the file called ScriptingAgentConfig.xml, which is stored in a directory C:\Program Files\Microsoft\Exchange Server\V15\Bin\CmdletExtensionAgents on the Exchange 2013 Mailbox server.
![]() Note There’s a ScriptingAgentConfig.xml.sample file located in this directory that you can use as a reference.
Note There’s a ScriptingAgentConfig.xml.sample file located in this directory that you can use as a reference.
To create a cmdlet extention that’s executed when the new-mailbox cmdlet has finished (“onComplete”), and create a new archive mailbox in the same mailbox database as the original user mailbox, you create a ScriptingAgentconfig.xml that contains the following code and store this file in the directory, as mentioned above:
<?xml version="1.0" encoding="utf-8" ?>
<Configuration version="1.0">
<Feature Name="MailboxProvisioning" Cmdlets="New-Mailbox">
<ApiCall Name="OnComplete">
If($succeeded) {
$Name= $provisioningHandler.UserSpecifiedParameters["Name"]
If ((Get-Mailbox $Name).ArchiveDatabase -eq $null) {
$ArchiveDatabase= (Get-Mailbox $Name).Database
Enable-Mailbox $Name -Archive -ArchiveDatabase $ArchiveDatabase
}
}
</ApiCall>
</Feature>
</Configuration>
To enable the cmdlet extension agent, you run the following PowerShell command on each Mailbox server:
Enable-CmdletExtensionAgent "Scripting Agent"
The actual provisioning of the mailbox and the archive mailbox takes place on the Mailbox server, so you have to copy the XML files to all Exchange 2013 Mailbox servers in your Exchange environment because you never know where a specific command is executed.
When you run the new-mailbox command, an archive mailbox is automatically created. It is now shown when the mailbox is created, but when you request the properties after creating it, they are shown as displayed in Figure 4-13.
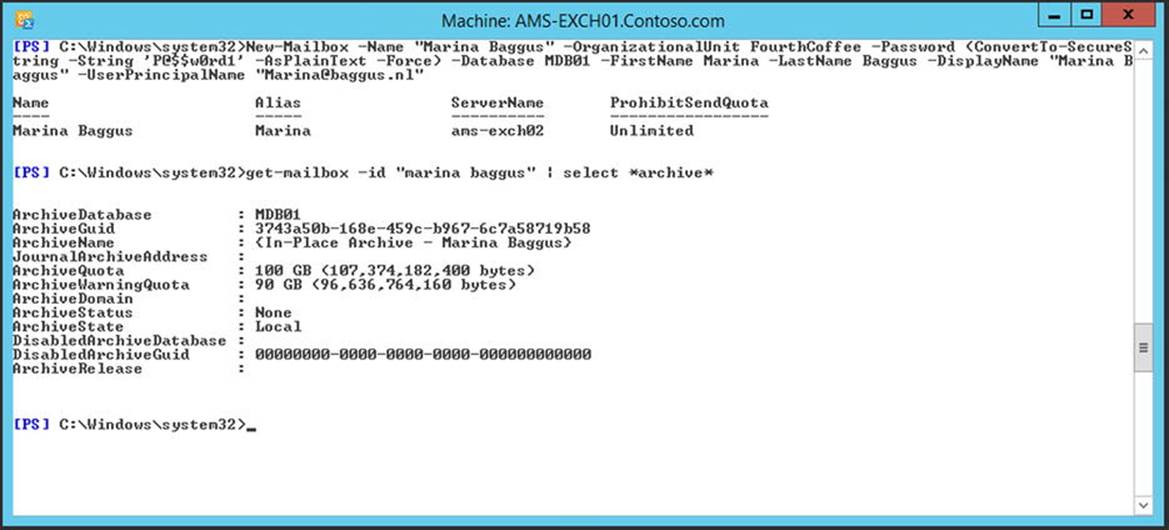
Figure 4-13. With the cmdlet extention, an archive mailbox is automatically created
To Use Mailbox Delegation
Another important item to be aware of is the mailbox delegation, a feature that’s widely used in a manager and assistant scenario where the manager needs to grant his assistant access to his mailbox. There are three types of mailbox delegation in the EAC:
· Send As permission The assistant can send a message from the manager’s mailbox. The recipient will see only the manager as the sender of the email message.
· Send on Behalf permission The assistant can send email on behalf of the manager. The recipient of the message will see that the message was sent on behalf of the manager, and the sender of the message will be shown as “Assistant on behalf of manager.”
· Full Access permission The assistant has full access (read, write, edit, and delete) to all items in the manager’s entire mailbox.
For example, if Cindy McDowell is a manager at Contoso and John Doe is her assistant, you can follow these commands to set the different permissions:
· To grant the Send As permission to user John on Cindy’s mailbox using the EMS, you can use the following command:
Add-ADPermission -Identity Cindy -User John -ExtendedRights "Send As"
· To grant the Send on Behalf permission to user John on Cindy’s mailbox using the EMS, you can use the following command:
Set-Mailbox -Identity Cindy -GrantSendOnBehalfTo John
· To grant Full Access permissions to user John on Cindy McDowell’s mailbox using the EMS, you can use the following command:
Add-MailboxPermission -Identity Cindy -User John -AccessRights FullAccess
-InheritanceType all
Now John can use his own mailbox, but when he sends a message he can select his manager (i.e., Cindy McDowell) in the From field. When he does, and he sends a message to Michael McDonald, Michael sees in his mailbox the sender information as shown in Figure 4-14.
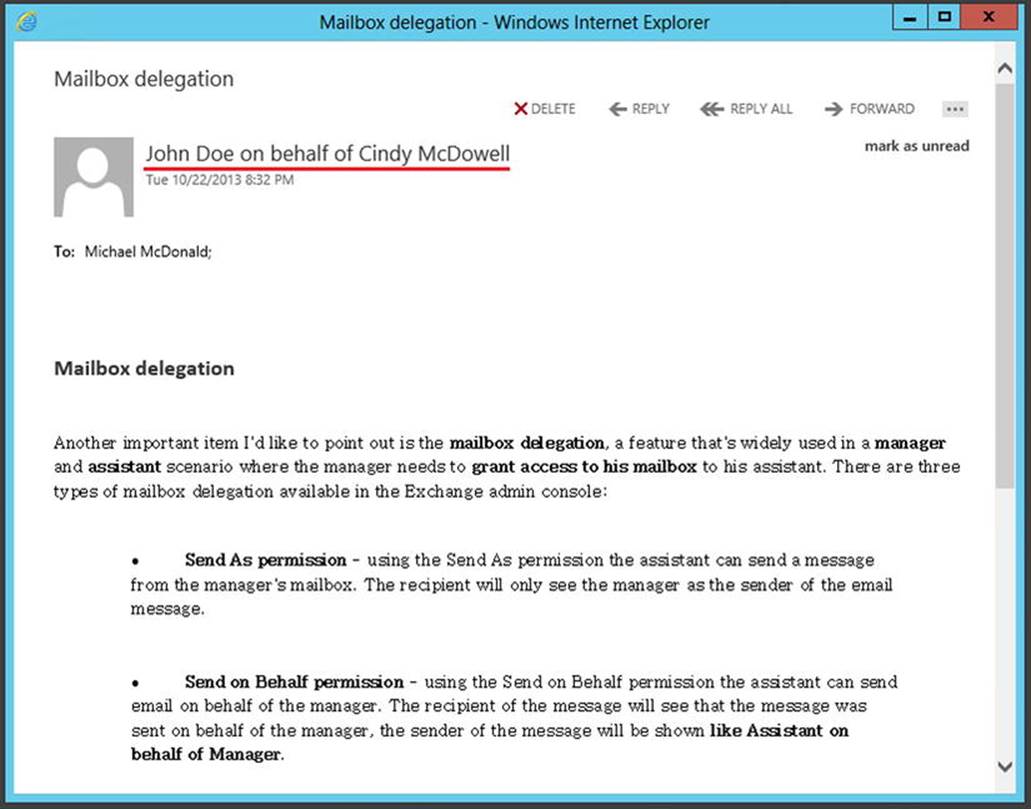
Figure 4-14. The message Michael sees when John sends a message on behalf of his manager
![]() Note When a user is granted Full Access permission to a mailbox, this user cannot send email messages from the mailbox he’s been granted permission to. To achieve this, the user also needs the Send As or Send on Behalf permission.
Note When a user is granted Full Access permission to a mailbox, this user cannot send email messages from the mailbox he’s been granted permission to. To achieve this, the user also needs the Send As or Send on Behalf permission.
To Create a Resource Mailbox
A resource mailbox is a normal mailbox with the exception that it does not belong to a normal user; instead, it belongs to a resource. In Exchange 2013, there are two types of resource mailboxes:
· Room Mailbox Represents a (conference) room in your office.
· Equipment Mailbox Represents some sort of equipment, like a beamer, that’s not tied to a conference room.
A resource mailbox represents something that can be booked by regular users when scheduling meetings. Since these resources cannot log on to the mailbox, the accompanying user account in Active Directory is disabled. They also do not require any user licences.
However, they are quite useful. It is possible to use a resource mailbox to schedule meetings, such as a conference room, thereby indicating when this resource is available. Like a regular email, this meeting request is sent to the resource mailbox, but in contrast, the request is automatically accepted when the resource is available. The response, whether the meeting is accepted or not, is sent back to the sender to confirm that availability. To create this type of room mailbox—say, with a capacity of 20 persons—you use the following command:
New-Mailbox -Room -UserPrincipalName ConfRoom2ndFloor@contoso.com -Alias ConfRoom2ndFloor -Name "Conference Room 2nd Floor" -ResourceCapacity 20 -Database "MDB01" -OrganizationalUnit FourthCoffee -ResetPasswordOnNextLogon $true -Password (ConvertTo-SecureString -String 'P@$$w0rd1' -AsPlainText -Force)
Creating an equipment mailbox is similar; the only difference is that there is less to configure. There’s no location, no phone number, and no capacity to enter, but otherwise the process is the same. To create an equipment mailbox for a Sony Beamer, you can use the following command:
New-Mailbox -Equipment -UserPrincipalName SonyBeamer@contoso.com -Alias SonyBeamer -Name "Sony Beamer" -Database "MDB01" -OrganizationalUnit FourthCoffee -ResetPasswordOnNextLogon $true -Password (ConvertTo-SecureString -String 'P@$$w0rd1' -AsPlainText -Force)
To Create a Shared Mailbox
A shared mailbox is a mailbox that has a user account, but the user account is disabled. As such, a user cannot log on to a shared mailbox directly. To access a shared mailbox, a user must have appropriate permission (Send As or Full Access) to use this mailbox. Once the user has Full Access, he or she can log on to his or her own mailbox and open the shared mailbox as a secondary mailbox.
A shared mailbox for the Contoso Sales Department could be created using the following command:
New-Mailbox -Shared -UserPrincipalName Sales@contoso.com -Alias Sales -Name "Sales" -DisplayName "Contoso Sales Department" -Database "MDB01" -OrganizationalUnit contoso -ResetPasswordOnNextLogon $true -Password (ConvertTo-SecureString -String 'P@$$w0rd1' -AsPlainText -Force)
To grant all users in the Contoso Organizational Unit Full Access permission for this shared mailbox, you could use the following command:
Get-Mailbox –OrganizationalUnit Contoso | ForEach { Add-MailboxPermission -Identity Sales –User $_.Identity -AccessRights FullAccess -InheritanceType all }
To grant all users in the Contoso Organizational Unit Send As permission for this shared mailbox, you could use the following command:
Get-Mailbox –OrganizationalUnit Contoso | ForEach { Add-ADPermission -Identity Sales –User $_.Identity -ExtendedRights "Send As" }
To check if this command was successful, you can use the following command:
Get-Mailbox –Identity Sales | Get-MailboxPermission | Select Identity, User, AccessRights
This command will show a list of all users who have permission on this particular mailbox, as shown in Figure 4-15.
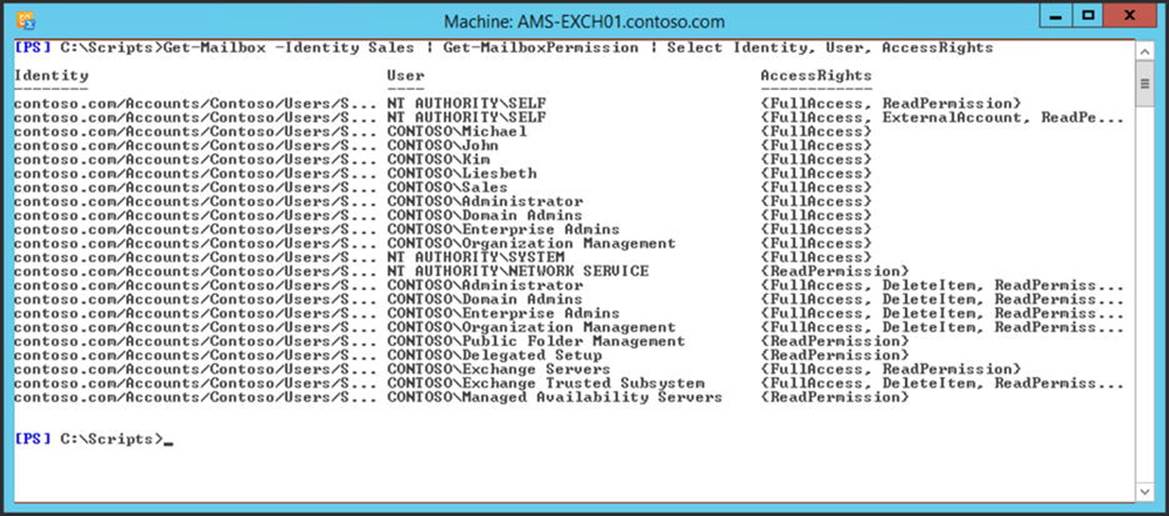
Figure 4-15. All users who have permissions on the sales mailbox
To Create a Linked Mailbox
A linked mailbox differs from a regular mailbox in that it does not have an active user account in Active Directory. Instead, it is used by a normal user, and that user is created in another Active Directory forest. There’s a forest “trust” between the forest holding the user account and the forest holding the mailboxes. Thus, the user account is linked to the mailbox. The forest that holds the Exchange servers, and thus the mailboxes, is sometimes also referred to as a resource forest.
A regular mailbox always has an accompanying user account, but when a linked mailbox is used, this accompanying user account is disabled. For this scenario, you need some sort of provisioning process. This is the means by which the user account in forest A and the mailbox in forest B are linked, as can be seen in Figure 4-16. Note that the Active Directory forest A does not have any Exchange servers installed, and thus the user accounts do not have any Exchange-related properties. Since there’s a trust relationship, users in forest A can log on and seamlessly access their mailboxes in forest B.
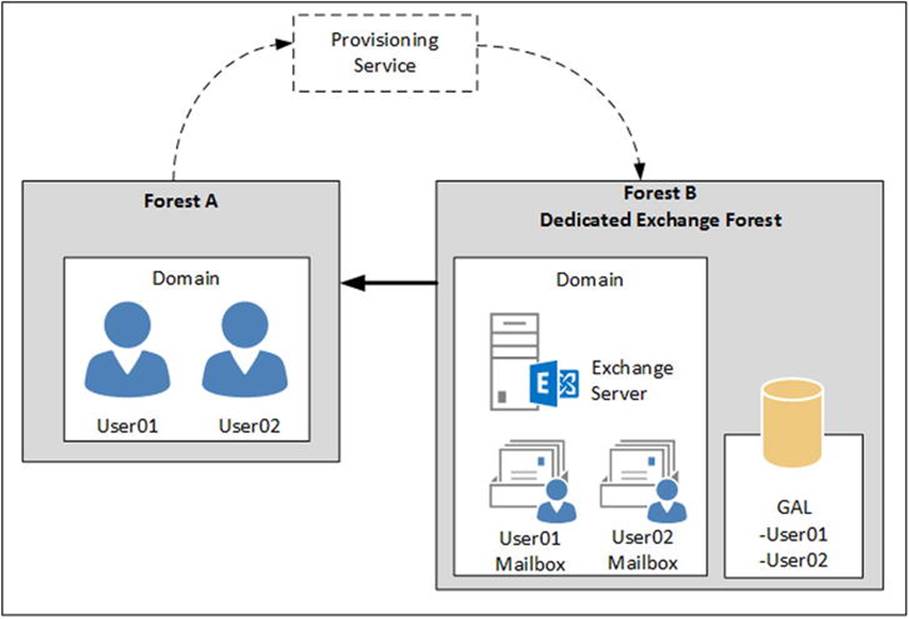
Figure 4-16. A linked mailbox scenario consists of an account forest A and an Exchange forest B
The advantage of this arrangement is that it makes it possible to have multiple, fully separated Active Directory forests where the user accounts reside, but have only one Exchange forest with all the mailboxes of all the (trusted) Active Directory accounts.
You may want to implement linked mailboxes if you have multiple Active Directory forests holding user accounts governed by strict security policies that do not allow multiple departments in one Active Directory forest. Using linked mailboxes makes it possible to create one Exchange environment for multiple, fully separated departments. While this might seem strange from an Active Directory point of view, when viewed from an Exchange perspective it is a fully supported scenario.
To Remove a Mailbox
Mailboxes need to be created and at some point mailboxes need to be removed as well. When it comes to removing mailboxes, there are two options:
1. The mailbox is disabled In this case, the mailbox is deleted and the values of the Exchange-related properties are removed from the user account. Important to note here is that the user account in Active Directory continues to exist, so the user can still log on to Windows and Active Directory and can continue to access other resources on the network. A resource mailbox has a disabled user account associated with it, and as such a resource mailbox cannot be disabled.
2. The mailbox is removed In this case, the mailbox is deleted, including the user account, from Active Directory. An archive mailbox cannot be deleted; it can only be disabled.
When a mailbox is deleted, it remains in the mailbox database until the retention time for the deleted mailbox expires. Up until this point, this mailbox is referred to as a disconnected mailbox.
To disable a mailbox, the following command can be used:
Disable-Mailbox –Identity "J. Doe"
When you perform this command, a confirmation is requested, as can be seen in Figure 4-17. You can avoid this question by adding the –Confirm:$false option to the Disable-Mailbox cmdlet.
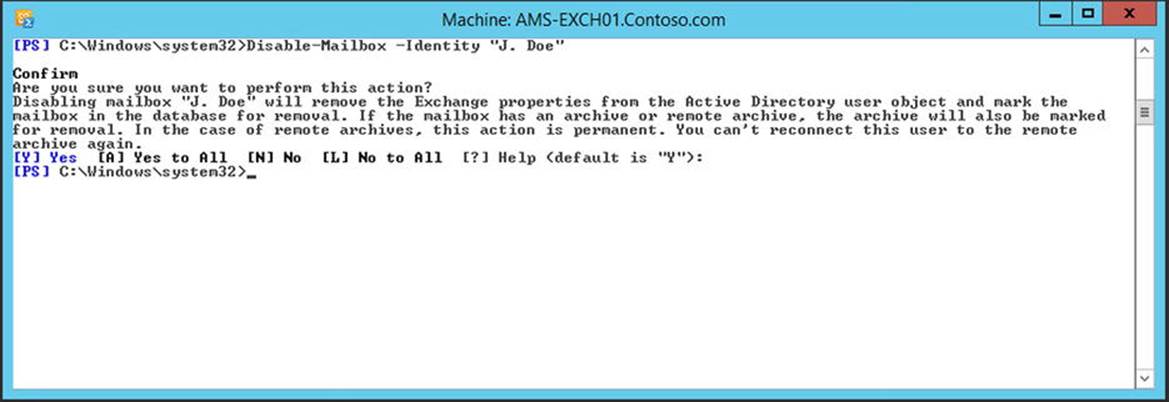
Figure 4-17. Disabling a mailbox-enabled user
Removing a mailbox is similar to disabling a mailbox. To remove a mailbox and its accompanying user account, you enter the following command:
Remove-Mailbox –Identity "John Brown" –Confirm:$false
To check if the mailbox has been deleted (or actually disconnected), you can run the following commands:
Get-MailboxDatabase | Get-MailboxStatistics | Where { $_.DisplayName -eq "J. Doe" } | fl DisconnectReason,DisconnectDate
Get-MailboxDatabase | Get-MailboxStatistics | Where { $_.DisplayName -eq "John Brown" } | fl DisconnectReason,DisconnectDate
When a mailbox is properly deleted, the DisconnectReason property will show “Disabled.” Another value for the DisconnectReason is “SoftDeleted.” A mailbox is soft deleted when it is moved from one mailbox database to another mailbox database. Just as when removing a mailbox, the source mailbox is deleted in the source mailbox database, and it remains there until the retention period expires.
Modern Public Folders
Public folders have been around since the first version of Exchange Server, back in 1996. These are another repository of information where messages, appointments, or contacts can be stored and shared among recipients. Starting with Exchange Server 2007, Microsoft decommissioned the public folders, a decision that was not popular with Exchange customers; after endless debate, Microsoft decided to restore and completely redesign the public folders for Exchange Server 2013. This has resulted in the modern public folders.
Some Background on Public Folders
From their start, public folders were a repository for information; it was even possible to store office documents in these public folders, although the negative side effect of this capability was the problem of ever-growing public folders.
These public folders used to have their own databases, called public folder databases. The databases were the same as mailbox databases, using the same ESE database technology and managed by the same Information Store. Only the database schema and the information inside the database were different. The public folder databases also had their own replication mechanism, making it possible to create multiple databases with the same information and thus offering database redundancy. And to make these folders even more compelling, they used a multi-master replication technology, so that it was possible to make changes to documents on different servers, with the two copies in sync.
The public folders consisted of two parts:
· The hierarchy This is the structure of the items kept in the public folder database, or how and where the individual items are stored in the folders. The hierarchy is similar to a directory structure on a local hard disk, with all its folders and subfolders. In public folders, you can set permissions on the folders, making it possible to create a departmental information solution—for example, where only employees of the accompanying department can view the information contained in the designated folder.
· The content This is the actual information that is stored in the public folders.
The hierarchy is an entity in itself, and the entire folder structure is stored in the hierarchy. The hierarchy is then replicated across all public folder databases, including all public folders and their permissions. When a new public folder database is created, the hierarchy needs to be replicated to this new database before the database can be used.
There are two types of folders in a traditional public folder database:
· System folders These are system-generated folders that contain free/busy information and the Offline Address Book. The system folders are used by older Outlook clients—Outlook 2003 and earlier. Without the system folders, these older Outlook clients would not even be able to get started! When using Outlook 2003 or earlier, the calendaring information is stored locally and published every 15 minutes to the free/busy folder on the Exchange server. The Offline Address Book is generated once a day, typically in the middle of the night, and stored in the Offline Address Book folder. Outlook clients then download a copy of the Offline Address Book during business hours.
· Public folders These are the normal public folders where recipients can store information, where permissions are set, and whose contents can be replicated across multiple public folder databases.
Public folder replication is set on a per-folder basis; this means that data from one server—say, Public Folder A—can be replicated to a second Exchange server, while data from another server—say, Public Folder B—can be replicated to a third Exchange server, making it possible to create a flexible, distributed, and powerful information solution.
For accessing public folder information, Outlook would connect directly to the Exchange 2010 Mailbox server hosting the public folder database, whereas the same Outlook client would connect to the RPC Client Access service running on the Exchange 2010 CAS to retrieve information from the inbox. So one Outlook client connects in two different ways. Using the RPC Client Access service running on multiple Exchange 2010 CAS servers created a redundant connection mechanism, something that was not possible for the public folders. There can be multiple copies of a particular public folder on multiple public folder databases, but there is no automatic failover mechanism built into the “old” public folder solution. However, this situation was corrected in Exchange Server 2010 SP2 RU2, when an alternative server tag was introduced. This alternative server tag introduced a public folder failover function.
The bad thing is that there wasn’t much development involving public folders after the early 2000s. As mentioned earlier, by Exchange Server 2007, Microsoft had started to decommission the public folders. However, in the development phase of Exchange 2013, Microsoft decided to reinstate the public folders. At that point, they decided to completely rewrite the public folder architecture and bring it back to life.
Public Folders in Exchange Server 2013
The basic idea behind the public folders has not changed. There still is a hierarchy containing the public folder structure, and there still is the actual content that is stored in the public folders. However, the completely redesigned public folders no longer use a separate public folder database; the public folders are now stored in mailbox databases. This makes it possible to do the following:
· Use the Client Access server to access the public folder information, offering redundancy on the way clients connect to public folders.
· Use the database availability group (DAG) for redundancy on the public folder and mailbox database level, as discussed in the next part of this chapter.
The hierarchy in Exchange Server 2013 public folders is now stored in a new type of mailbox: the public folder mailbox. If new public folders are created, they are stored in the hierarchy in this public folder mailbox. It is possible to create multiple hierarchies in an Exchange 2013 environment, but there’s only one primary or master public folder mailbox (also referred to as the primary hierarchy mailbox). The public folder mailbox is stored in a normal mailbox database, which can be identified during creation of the public folder database. For redundancy, this mailbox database can be located in a database availability group, but it is important to note that there’s only one writeable copy of the public folder mailbox.
Once the hierarchy mailbox is created, the public folders can be created and permissions can be assigned to these new public folders.
To Create Public Folders
Initially, nothing is configured regarding public folders so the first step is to establish the public folder settings on the organizational level in Exchange 2013, and then create a new hierarchy located in a public folder mailbox. By default, the sizing quotas for public folders are set to unlimited, and the deleted items retention and moved item retention are set to 14 days. Organizational settings can be set only using the EMS, so to change these settings and reflect your company’s standards, open the EMS and enter a command similar to this:
Set-OrganizationConfig -DefaultPublicFolderIssueWarningQuota 1.9GB
-DefaultPublicFolderProhibitPostQuota 2.3GB -DefaultPublicFolderMaxItemSize 200MB
-DefaultPublicFolderDeletedItemRetention 30.00:00:00 -DefaultPublicFolderMovedItemRetention 30.00:00:00
The first step to create a public folder infrastructure is to create a primary hierarchy mailbox:
New-Mailbox -PublicFolder -Name MasterHierarchy -OrganizationalUnit "contoso.com/accounts/service accounts" -Database MDB01
When the public folder mailbox is created, you can create content public folders. To create a new top-level public folder called “Contoso” you can use the following command:
New-PublicFolder -Name Contoso -Path \ -Mailbox MasterHierarchy
To create a new public folder called “Marketing”and mail-enable this public folder, you can use the following commands:
New-PublicFolder -Name Marketing -Path \Contoso
Enable-MailPublicFolder -Identity \Contoso\Marketing
By default, users do not have permissions on public folders, so to grant user MichaelM full access to the Marketing public folder, you can use the following command:
Add-PublicFolderClientPermission -Identity \Contoso\Marketing -User MichaelM -AccessRights PublishingEditor
Public folders appear in Outlook as did the legacy public folders. There’s a stub on the Exchange 2013 Mailbox server so that the new public folders are fully transparent for users.
Distribution Groups
In Active Directory, there are two types of groups:
· Security Group – Used for granting permissions to users or other groups that are members of this group.
· Distribution Group – Used for distributing email to users or other groups that are members of this group.
Before Exchange 2013 can use these groups, the groups have to be mail-enabled. When a group is mail-enabled, all Exchange-related properties are set and you can start using the group for distributing email messages.
![]() Note Both a Security Group and a Distribution Group can be mail-enabled. As such, you can use a Security Group for mail-related purposes. On the other hand, a Distribution Group cannot be used for granting permission to resources, as you can with a Security Group. If you want to grant permission to a Distribution Group, you have to first convert it to a Security Group using the Active Directory Users and Computers (ADUC) MMC snap-in.
Note Both a Security Group and a Distribution Group can be mail-enabled. As such, you can use a Security Group for mail-related purposes. On the other hand, a Distribution Group cannot be used for granting permission to resources, as you can with a Security Group. If you want to grant permission to a Distribution Group, you have to first convert it to a Security Group using the Active Directory Users and Computers (ADUC) MMC snap-in.
In Exchange, it is possible to create a new Distribution Group, as well as to mail-enable a Distribution Group or Security Group that exists in Active Directory.
In Active Directory, there are three types of groups:
· Domain local groups
· Global groups
· Universal groups
When it comes to Exchange 2013, only universal groups are used. The primary subject of this section is the Universal Distribution Group.
To Create a New Distribution Group
To create a new Distribution Group in Active Directory and automatically mail-enable it, you can use the following command:
New-DistributionGroup -Name "Management" -OrganizationalUnit FourthCoffee
To create a new Security Group in Active Directory and automically mail-enable it, you can add the –Type Security option to the previous command:
New-DistributionGroup -Name "Management" -OrganizationalUnit FourthCoffee -Type Security
To Mail-Enable an Existing Group
An existing group in Active Directory (either Distribution Group or Security Group) can be mail-enabled as well. To do this, you can use the following command:
Enable-DistributionGroup -Identity AllEmployees -Alias AllEmployees
If the existing group in Active Directory has a non-universal group scope, an error message is displayed saying “You can’t mail-enable this group because it isn’t a universal group. Only a universal group can be mail-enabled.”
So, before an existing group can be mail-enabled, its group scope needs to be converted to universal. This can be achieved using the following command:
Set-ADGroup –Identity AllEmployees –GroupScope Universal
Once converted, the group can be mail-enabled, as shown in Figure 4-18.
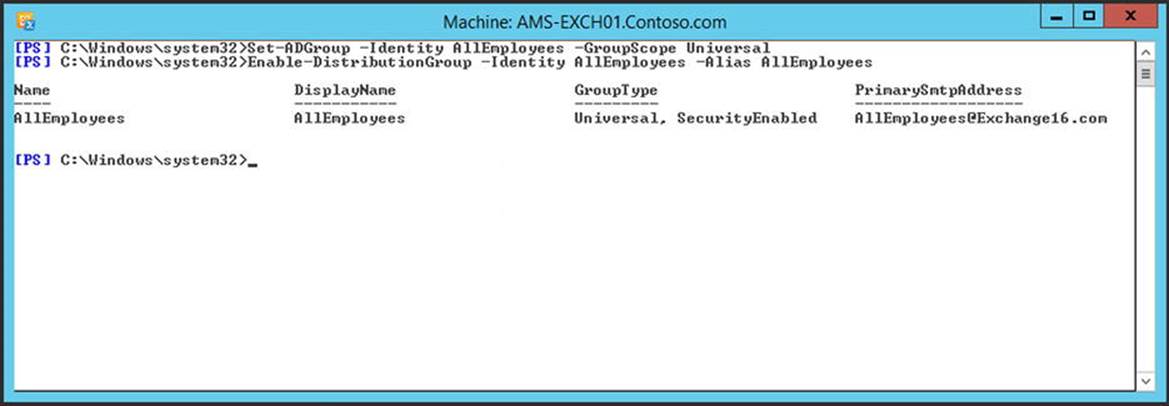
Figure 4-18. An existing group can be mail-enabled when its group scope is converted to universal
To Manage Distribution Group Membership
Adding or removing a member to a Distribution Group is pretty straightforward. To add a member to a Distribution Group, just enter the following command:
Add-DistributionGroupMember –Identity AllEmployees –Member "John Doe"
Removing a member from a Distribution Group is similar:
Remove-DistributionGroupMember –Identity AllEmployees –Member "John Doe"
Instead of adding mailboxes as members of a Distribution Group, it is possible to add other Distribution Groups as a member, a process called nesting. The commands are identical. To add a Distribution Group called HR to the AllEmployees Distribution Group, you can use the following command:
Add-DistributionGroupMember –Identity AllEmployees –Member "HR"
To Set Membership Approval
Users can decide whether or not they are members of a Distribution Group. This can be useful for special-interest groups, but not for company-wide Distribution Groups. You don’t want users to leave a Distribution Group like “All Employees” or to join certain Distribution Groups like “HR,” for example.
Distribution Group membership approval has the following options:
· Open – Anyone can join or leave the Distribution Group without approval of the group manager.
· Closed – No one can leave or join the group. All requests will automatically be rejected.
· Owner Approval – The group manager has to approve a request to joint the group. This option is for joining only.
![]() Note Mail-enabled Security Groups are closed.
Note Mail-enabled Security Groups are closed.
The New-DistributionGroup cmdlet has the –MemberJoinRestriction and the –MemberDepartRestriction options to control group membership behavior. To create a new Distribution Group called “All Employees” where no users can automatically join or leave, you can use the following command:
New-DistributionGroup -Name "All Employees" -OrganizationalUnit FourthCoffee
-MemberDepartRestriction Closed –MemberJoinRestriction Closed
An interesting option is the ApprovalRequired. When this is used and a user wants to join the Distribution Group, a request message is sent to the manager or owner of the Distribution Group. For example, suppose we create a Distribution Group called “Exchange Authoring,” with the ApprovalRequired set for the join restriction:
New-DistributionGroup -Name "Exchange Authoring" -OrganizationalUnit FourthCoffee
-MemberDepartRestriction Closed –MemberJoinRestriction ApprovalRequired –ManagedBy Contoso\Jaap
Now, when user John Lee wants to join this Distribution Group, a message is sent to the manager of the group, as shown in Figure 4-19.
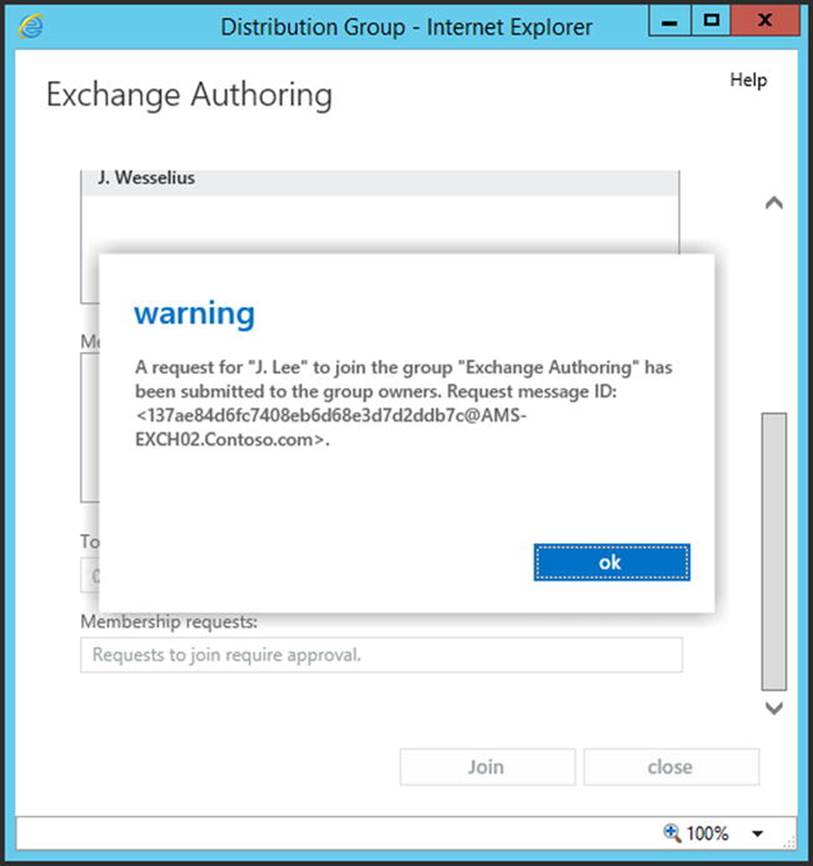
Figure 4-19. A membership request is sent to the Distribution Group’s manager
The manager of this group receives the message and can either approve or reject the request, as shown in Figure 4-20.
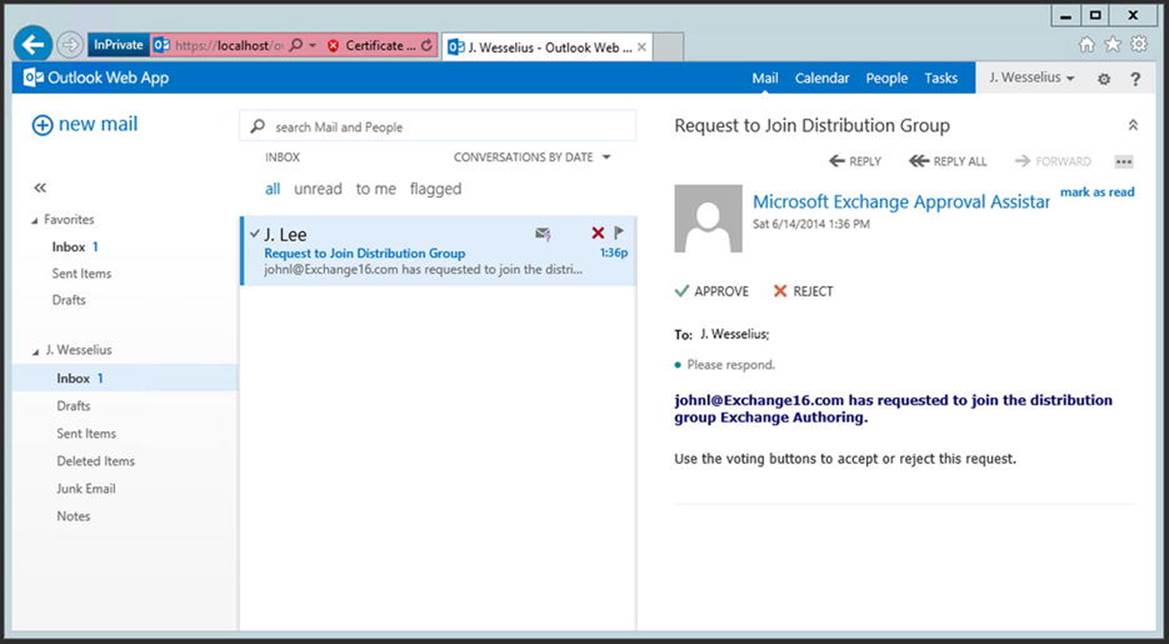
Figure 4-20. The manager of the group can either approve or reject the request
Group membership for a regular Distribution Group is static: you have to manually add or remove members. For large organizations, this can be quite some administrative work. Instead of using regular Distribution Groups, you can use Dynamic Distribution Groups.
Dynamic Distribution Groups
A Dynamic Distribution Group is similar to a regular Distribution Group, but group membership is dynamically determined, based on certain properties of the mailboxes.
For example, you can create a Dynamic Distribution Group called “All Employees” that contain all recipients (i.e., mailboxes, public folders, contacts, and other distribution groups) that have the value “Contoso” in their company attribute:
New-DynamicDistributionGroup -Name "All Employees" -IncludedRecipients AllRecipients -ConditionalCompany "Contoso"
Set-DynamicDistributionGroup -Identity "All Employees" -ManagedBy Contoso\Jaap
When the New-DynamicDistributionGroup is used, you cannot set the –ManagedBy option, although this option is shown on the console when the group is created. You have to use the Set-DynamicDistributionGroup cmdlet to set this option, as shown in Figure 4-21.
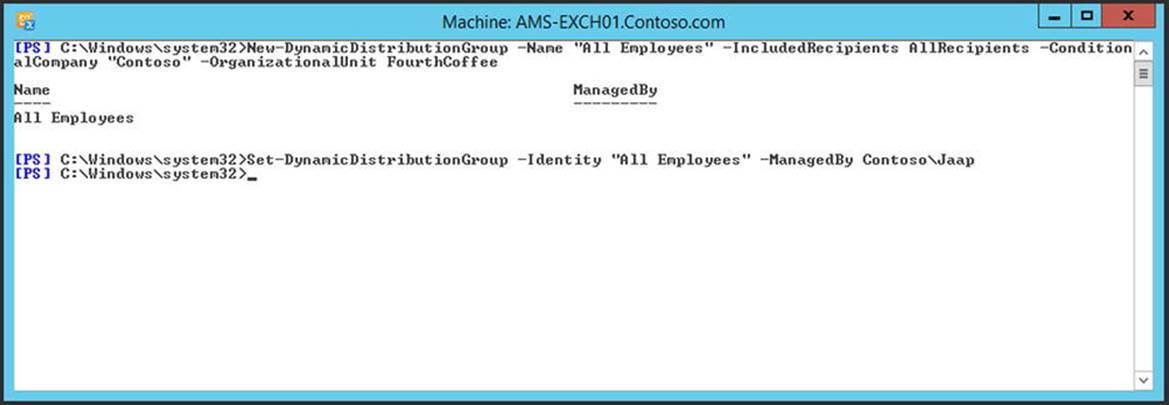
Figure 4-21. Creating a new Dynamic Distribution Group
It is possible to include fewer recipients by using only the mailbox users in the –IncludedRecipients option and using the department filter instead of the companyfilter; for example:
New-DynamicDistributionGroup -Name "HR Employees" -IncludedRecipients MailboxUsers -ConditionalDepartment "HR"
Set-DynamicDistributionGroup -Identity "HR Employees" -ManagedBy Contoso\Jaap
More granularity can be achieved by filtering on the custom attributes. In a migration scenario, you can stamp CustomAttribute1 with a value “Migrated_To_2013” after a successful mailbox migration to Exchange 2013. To create a Dynamic Distribution Group that contains only mailboxes that are migrated to Exchange 2013, you can use something like this:
New-DynamicDistributionGroup -Name "Migrated Mailboxes" -IncludedRecipients MailboxUsers - ConditionalCustomAttribute1 "Migrated_To_2013"
Set-DynamicDistributionGroup -Identity "Migrated Mailboxes" -ManagedBy Administrator
To check which mailboxes are members of a Dynamic Distribution Group, you have to use the recipient filter functionality. Load the group into a variable and retrieve the recipients by using the filter, like this:
$HREmp = Get-DynamicDistributionGroup "HR Employees"
Get-Recipient -RecipientPreviewFilter $HREmp.RecipientFilter
This will provide a list of all recipients who are members of this Dynamic Distribution Group, as shown in Figure 4-22.
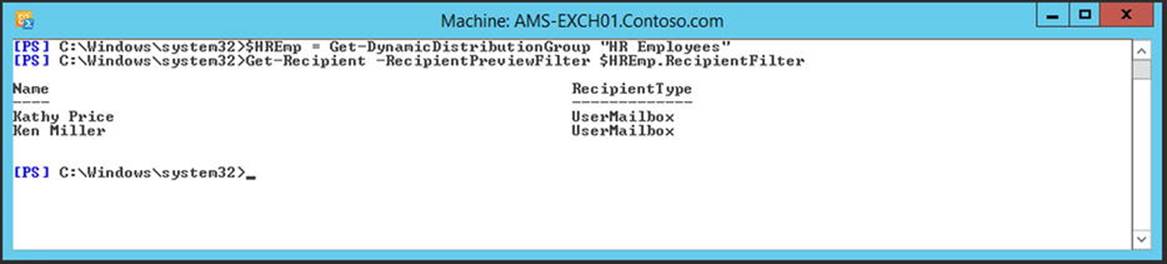
Figure 4-22. Check the mailboxes that are members of a Dynamic Distribution Group
Moderated Distribution Groups
A Moderated Distribution Group is a Distribution Group where messages that are intended for this group are first sent to a moderator, and the moderator approves or rejects the message. After approval, the message is sent to all members of the Distribution Group.
To use the moderation function, the Distribution Group has to be enabled for moderation by employing the –ModerationEnabled option and using the –ModeratedBy option to set the moderator. These options are available on the New-DistributionGroup and the Set-DistributionGroup.
To enable moderation on a Distribution Group called “Finance” and set user Steve Johnson as the moderator, for example, you can use the following command:
Set-DistributionGroup –Identity Finance –ModerationEnabled:$TRUE –ModeratedBy "Steve Johnson"
When a user named Jacky Graham, who is a member of the Finance Distribution Group, tries to send a message to members of this Distribution Group, a mail tip appears indicating the moderation of this Distribution Group, as shown in Figure 4-23.
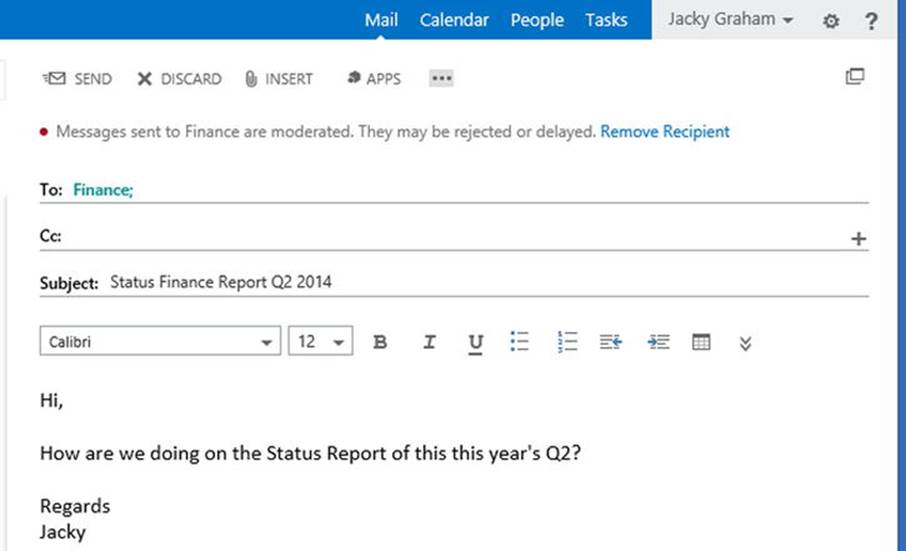
Figure 4-23. A mail tip is shown, indicating moderation of the message
When Jacky Graham sends the message, a confirmation message is first sent to the moderator, who finds an approval request when he logs onto his mailbox, as shown in Figure 4-24. When Steve Johnson approves the message, it is delivered to members of this Distribution Group.
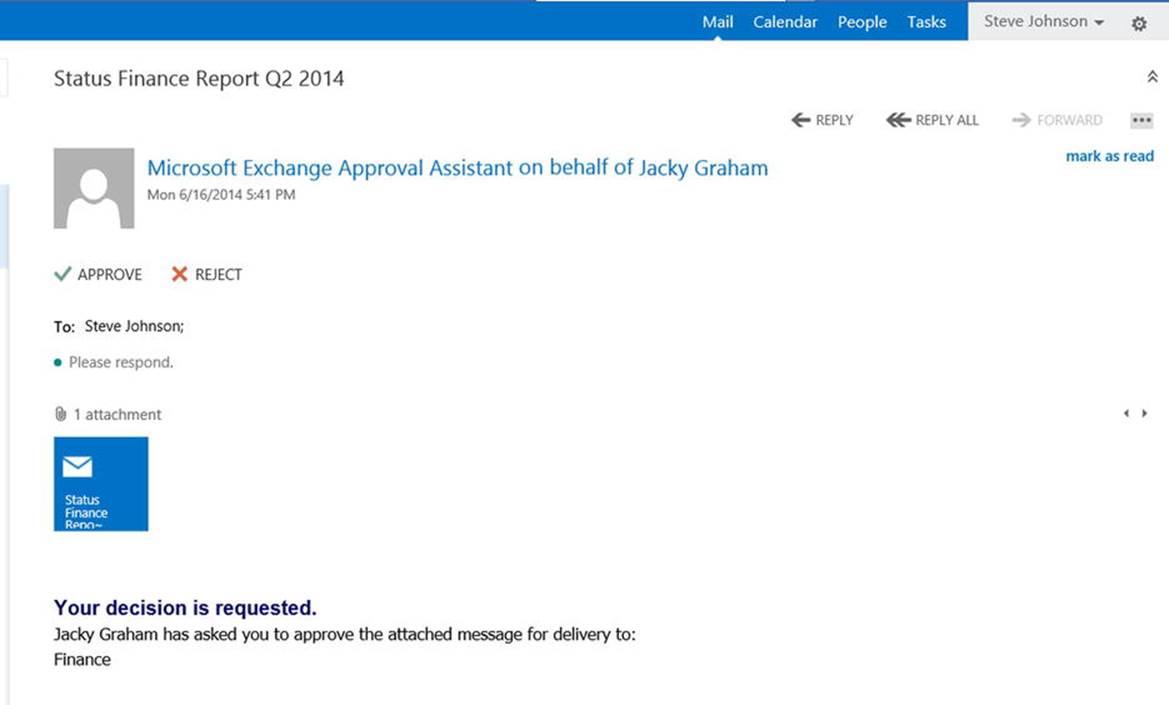
Figure 4-24. The moderator can either approve or reject the message sent to the Finance Distribution Group
If the moderator rejects the message, the sender of that message receives confirmation that the message was rejected.
![]() Note A moderator can also be an entire Distribution Group. In that case, the first member who reponds will approve or reject the message.
Note A moderator can also be an entire Distribution Group. In that case, the first member who reponds will approve or reject the message.
The Expansion Server
When a message is sent initially to a Distribution Group, it has only one recipient—the Distribution Group itself. The Transport service running on an Exchange 2013 Mailbox server has to determine the individual that message has to be forwarded to. This process is known as expansion.
Distribution Group membership is static, based on the memberOf property of the mailboxes. Since a Dynamic Distribution Group has no membership the way a regular Distribution Group has, and thus there are no properties set, an Active Directory query is used for retrieving the members of a Dynamic Distribution Group.
An Expansion server is an Exchange 2013 Mailbox server that’s responsible for expanding the Distribution Groups when it is processing messages. By default, no Expansion server is set for a Distribution Group, so any Mailbox server to which an email is delivered can perform the expansion.
Setting a dedicated Expansion server on a Distribution Group can be useful in a multi-site environment. Suppose Contoso.com has a Distribution Group in the UK with lots of members; it would make sense to use a Mailbox server at the local site for expansion purposes. This way, a message sent to this Distribution Group is dispatched to the UK before being expanded.
It the Expansion server is set, the Mailbox server accepting the message doesn’t do any processing; it just routes the message to the Expansion server. If this server is, for some reason, not available, the message will not be delivered until the Expansion server again becomes available.
You can set the ExpansionServer property on a Distribution Group by using the following command:
Set-DistributionGroup –Identity "All Employees" –ExpansionServer AMS-EXCH02
![]() Note This command can be used for both Distribution Groups and Dynamic Distribution Groups.
Note This command can be used for both Distribution Groups and Dynamic Distribution Groups.
To Remove a Distribution Group
A Distribution Group can be removed as well as disabled. As with disabling mailboxes, disabling a Distribution Group retains the group in Active Directory but removes all Exchange properties, whereas removing a Distribution Group deletes the group from Active Directory as well.
To disable a Distribution Group, you can use the following command:
Disable-DistributionGroup –Identity "All Employees" –Confirm:$FALSE
To remove a Distribution Group, you can use the following command:
Remove-DistributionGroup –Identity "All Employees" –Confirm:$FALSE
Contacts
A contact in Active Directory is not a security principal, as is a user account. It cannot be used to log on to the network and access network resources, as you can with a normal user account. Instead, a contact in Active Directory can be compared to a business card in a Rolodex: you can use it to store contact information.
In Exchange 2013, a contact can also be mail-enabled, and as such it becomes a recipient. However, a mail-enabled contact in Exchange 2013 does not have a mailbox; it does have an external email address. For internal purposes, it might also have a local address, but when message are sent to this local address, theyare routed to the contact’s external address.
A mail-enabled contact also appears in the Exchange 2013 address lists, and thus it can be selected as a recipient by clients.
To create a mail-enabled contact, you can use the following command:
New-MailContact –ExternalEmailAddress Beau@hotmail.com –Name "Beau Terham" –OrganizationalUnit FourthCoffee –FirstName Beau –LastName Terham
When a contact already exists in Active Directory, it can be mail-enabled using the following command:
Enable-MailContact –Identity "Greg McGain" –ExternalEmailAddress Greg@TailSpinToys.com
When a user checks the All Contacts address list, all mail-enabled contacts show up, as indicated in Figure 4-25. The contact can be selected for receiving an email message or for scheduling a meeting with the person, depending on the icon selected.
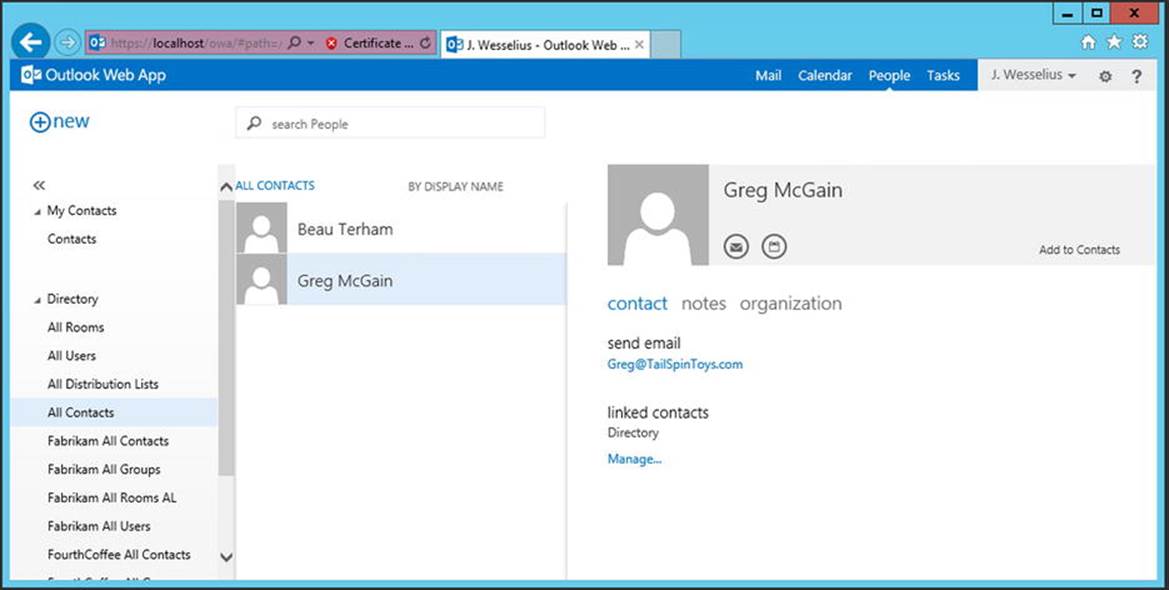
Figure 4-25. The mail-enabled contacts are listed in the All Contacts address list
Mail-enabled contacts can be removed or disabled. When removed, the accompanying contact in Active Directory is deleted as well; when just disabled, the accompanying contact in Active Directory is preserved.
To disable a mail-enabled contact, you can use the following command:
Disable-MailContact –Identity "Beau Terham" –Confirm:$FALSE
To remove a mail-enabled contact, and remove the accompanying contact from Active Directory as well, you can use the following command:
Remove-MailContact –Identity "Greg McGain" –Confirm:$FALSE
Address Lists
In Exchange 2013, an address list is a collection of recipients. There are several types of default address lists created during installation of the first Exchange 2013 servers, and there are custom address lists that can contain specific recipients in your Exchange 2013 environment. To create a segregated address list in your Exchange environment, you can use address book policies. All three types of address lists are discussed next.
Default Address Lists
There are multiple types of default address lists:
· All Users – An address list that contains all mailbox-enabled users in the Exchange environment.
· All Rooms – An address list that contains all resource mailboxes of the type “Room” in the Exchange environment.
· All Distribution Lists – An address list that contains all mail-enabled Distribution Groups in the Exchange environment. This includes both Distribution Groups and Security Groups.
· All Contacts – An address list that contains all mail-enabled contacts in the Exchange environment.
· Default Global Address List (GAL) – An address list that contains all recipients in the Exchange environment.
· Public Folders – An address list that contains all public polders in the Exchange environment.
Address lists are dynamically generated, so clients need to be online with the Exchange server to view the various address lists. To overcome this obstacle, especially for Outlook clients, there’s an Offline Address Book (OAB) that contains the information in the Default Global Address List. Outlook clients can download this OAB to use when they are not connected to the network and thus are not connected to the Exchange server.
Custom Address Lists
It is possible to create custom address lists, tailored to the needs of your organization. Very large organizations with large departments can especially benefit from having custom address lists. One example that comes to mind is a large university, where custom address lists exist for every department’s faculty. Similarly, large corporations use multiple customer address lists.
For example, suppose Contoso.com has three large departments: FourthCoffee, TailSpinToys, and Fabrikam. A manager might want to create an address list for each department. Custom address lists can be based on organizational units in Active Directory, but it is recommended that you use an Active Directory attribute to differentiate the address lists. To create address lists based on department attribute, you can use the following commands:
New-AddressList -Name "FourthCoffee All Users Address List" -ConditionalDepartment FourthCoffee
-IncludedRecipients MailboxUsers
New-AddressList -Name "Fabrikam All Users Address List" -ConditionalDepartment Fabrikam
-IncludedRecipients MailboxUsers
New-AddressList -Name "TailSpinToys All Users Address List" -ConditionalDepartment TailSpinToys
-IncludedRecipients MailboxUsers
The –ConditionalDepartment and -IncludedRecipients options are automatically converted to a recipient filter, as shown in Figure 4-26.
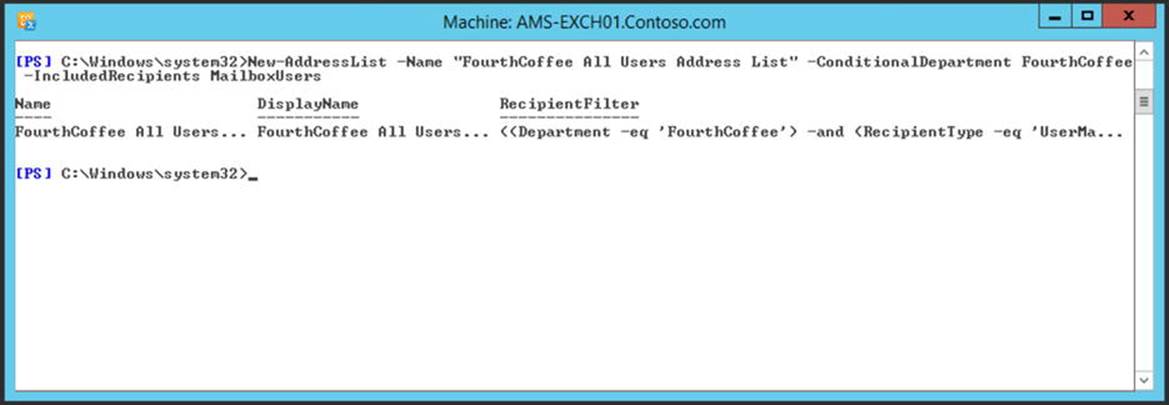
Figure 4-26. Creating an address list for the FourthCoffee Department
Checking the membership of an address list is similar to checking the membership of a Dynamic Distribution Group. You read the address list and filter out the recipients:
$AL = Get-AddressList "FourthCoffee All Users Address List"
Get-Recipient -RecipientPreviewFilter $AL.RecipientFilter
All members in the address list are shown on the console, as can be seen in Figure 4-27.
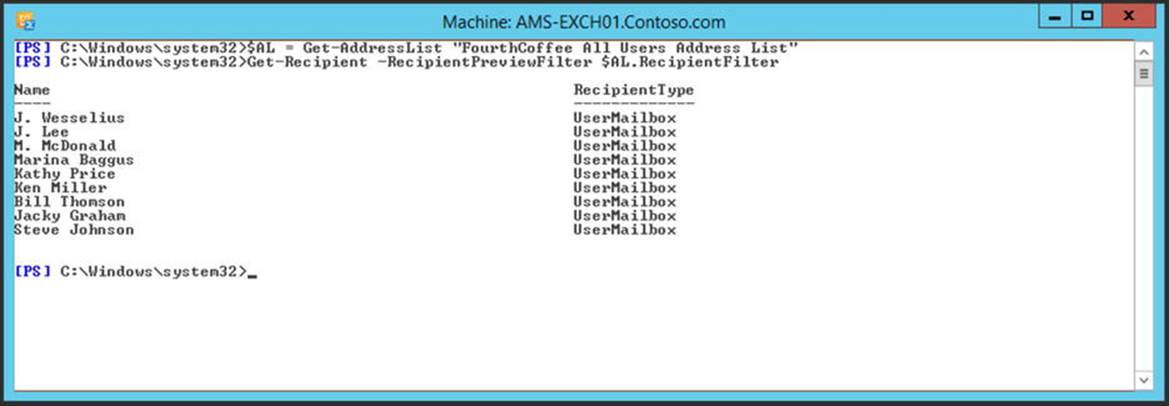
Figure 4-27. Members of a custom address list
The newly created custom address lists haven’t been applied or updated yet; this means they exist in Active Directory, are shown in a client like OWA, but they do not return any mailboxes yet. To apply these new address lists, you enter the following commands:
Update-AddressList -Identity "FourthCoffee All Users Address List"
Update-AddressList -Identity "Fabrikam All Users Address List"
Update-AddressList -Identity "TailSpinToys All Users Address List"
Now, when a user in the FourthCoffee Department checks the FourthCoffee address list, he will see all users with this department property correctly displayed, as shown in Figure 4-28.
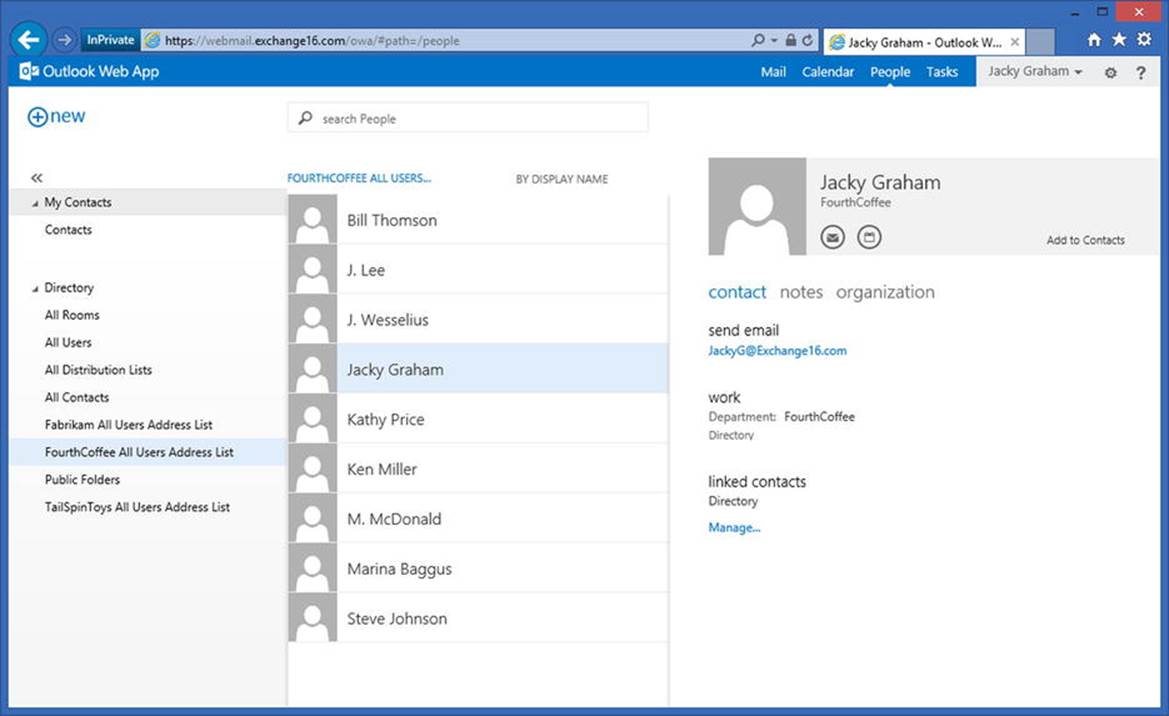
Figure 4-28. The department address list shows the correct recipients
It is possible to create address lists that contain other recipients than mailboxes; you can do this using the –IncludedRecipients option. The following values are available for the –IncludedRecipients option:
· None
· MailboxUsers
· MailUsers
· Resources
· MailGroups
· MailContacts
· AllRecipients
Instead of using the –IncludedRecipients option, you can use the –RecipientFilter option. Using the –RecipientFilter option gives you more flexibility because you can also build powerful filters.
For example, to create an address list that contains all “room” mailboxes in your organization that have an alias and for which the department attribute is set to “FourthCoffee,” you can use the following command:
New-AddressList -Name "FourthCoffee All Rooms AL" -Container "\" -DisplayName "FourthCoffee All Rooms AL" -RecipientFilter "((Alias -ne '`$NULL') -and (Department -eq 'FourthCoffee') -and ((RecipientDisplayType -eq 'ConferenceRoomMailbox') -or (RecipientDisplayType -eq 'SyncedConferenceRoomMailbox')))"
![]() Note The –RecipientFilter option cannot be used with the -ConditionalCompany, -ConditionalDepartment, -ConditionalStateOrProvince, or -IncludedRecipients options.
Note The –RecipientFilter option cannot be used with the -ConditionalCompany, -ConditionalDepartment, -ConditionalStateOrProvince, or -IncludedRecipients options.
If you need to create address lists that span multiple departments, the standard –ConditinalDepartment (or department property) won’t work. However, you can use a custom attribute for the search filter in an address list, which gives you even more flexibility. The downside of doing this is that you need to stamp this custom attribute during provisioning, of course.
To create an address list that’s targeted to all employees across all departments, you can stamp the CustomAttribute1 with “Finance” and create the following address list:
New-AddressList –Name "Contoso Finance Employees" –DisplayName "Contoso Finance Employees Address List" -RecipientFilter "((Alias -ne '`$NULL') -and (objectClass -eq 'user') -and (CustomAttribute1 -eq 'Finance'))"
Offline Address Book
As mentioned in the beginning of this section, address lists are only available for online clients. For Outlook clients who can work offline, the Offline Address Book (OAB) is available.
The OAB is a collection of address lists that is generated typically once a day, available for download on the Exchange server. For this download, there’s a virtual directory called “OAB” available on the Client Access server.
To create a dedicated Offline Address Book for the FourthCoffee Department, and that includes the "FourthCoffee All Users Address List" and the "FourthCoffee All Rooms AL" address lists (created in the previous section), you can use the following command:
New-OfflineAddressBook –Name "FourthCoffee OAB" -AddressLists "\FourthCoffee All Users Address List","FourthCoffee All Rooms AL" –VirtualDirectories "AMS-EXCH01\OAB (Default Web Site)"
–GeneratingMailbox "CN=SystemMailbox{bb558c35-97f1-4cb9-8ff7-d53741dc928c},CN=Users,DC=Contoso,DC=com"
The arbitration mailbox, as defined in the –GeneratingMailbox option, is the mailbox responsible for generating the OAB. If you omit the –GeneratingMailbox option, the OAB is created but it is never generated and thus is not available for download.
Address Book Policies
In the previous section, we created multiple address lists based on all kinds of filtering techniques and properties. While this works fine, it has one drawback: all address lists are visible for everybody in the organization. As long as someone has a mailbox and can log on to it, he is able to view all the address lists.
There are large companies that want to segregate their address lists so that every department or division has its own address lists and only users included in those address lists can view their own address lists and cannot view the address lists of other departments.
In Exchange 2003 and Exchange 2007, this was possible by explicitly granting or denying permissions on objects in Active Directory. While this worked great in these versions of Exchange, it is not feasible in Exchange 2010 and Exchange 2013. To achieve such segregation of adddress lists, Microsoft introduced the address book policy (ABP). The ABP is applied to a mailbox and represents a view on the address lists. That is, via the ABP you define which address lists are available for particular mailboxes.
Suppose that FourthCoffee Department has the following address lists:
· FourthCoffee Global Address List
· FourthCoffee All Rooms
· FourthCoffee All Users
· FourthCoffee All Contacts
· FourthCoffee All Groups
· FourthCoffee OAB
To create an ABP that includes all these address lists, you can use the following command:
New-AddressBookPolicy –Name "FourthCoffee ABP" –GlobalAddressList "\FourthCoffee Global Address List" –OfflineAddressBook "\FourthCoffee OAB" –RoomList "\FourthCoffee All Rooms" –AddressLists "\FourthCoffee All Users","\FourthCoffee All Groups","\FourthCoffee All Contacts"
When the ABP is created, it can applied to a particular mailbox:
Set-Mailbox –Identity JackyG –AddressBookPolicy "FourthCoffee ABP"
Now, when user Jacky Graham logs in to her mailbox and checks the address lists, she will see only the FourthCoffee Department address lists, as shown in Figure 4-29.
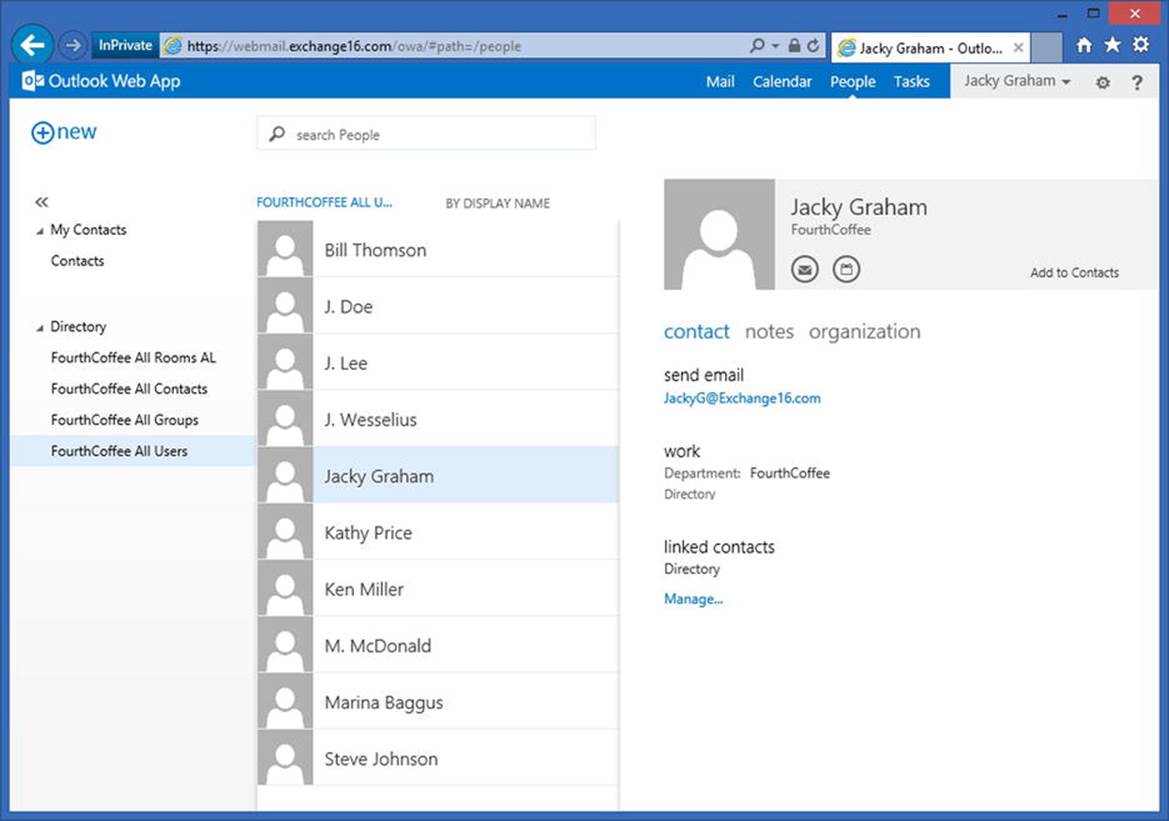
Figure 4-29. After applying the ABP, only the proper address lists are visible
![]() Note Using address book policies is the only supported and properly functioning way to achieve segregation of address lists.
Note Using address book policies is the only supported and properly functioning way to achieve segregation of address lists.
The Transport Service
One of the major changes introduced in Exchange 2013 is that the Hub Transport service no longer exists as a separate server role, as it had in Exchange Servers 2007 and 2010. It is now integrated into the Exchange 2013 Mailbox server role. Thus, the Hub Transport service on the Mailbox server is responsible for routing messages, both on the internal network and to the Internet. Outbound messages to the Internet can be routed through the Front End Transport service (FETS) running on the Exchange 2013 Client Access server, or through an Exchange Edge Transport server.
In Exchange 2013 SP1, the Edge Transport server is reintroduced, but Exchange 2007 or Exchange 2010 Edge Transport servers can be used as well, in combination with Exchange 2013. Edge Transport servers are discussed in detailed in Chapter 6.
Inbound messages are routed via the Exchange 2013 Client Access server and from the Client Access server proxied to a Mailbox server. Exchange 2013 does have some anti-spam features, but they are pretty limited. Exchange 2013 also comes with a default anti-malware engine, but this is limited as well.
The Transport Pipeline
The complete, end-to-end mail delivery process, from accepting external SMTP messages on the Exchange 2013 Client Access server to delivering the actual message to the mailbox, is called the transport pipeline (see Figure 4-30 for a graphic view of the pipeline). The transport pipeline consists of several individual components:
· Front End Transport service (FETS) FETS is running on the Exchange 2013 Client Access server and is responsible for accepting SMTP messages from external SMTP hosts. FETS can also be configured as a front-end proxy on send connectors to proxy all messages through the Exchange 2013 Client Access servers.
· Transport Service The Transport service runs on the Exchange 2013 Mailbox server and is responsible for processing all inbound and outbound SMTP messages. It receives messages on the receive connector from the FETS, from the Transport server running on other Exchange 2013 Mailbox servers, or from any down-level Hub Transport servers. When the messages are received, they are queued in the submission queue.
· The submission queue also receives messages from the pickup directory and from the replay directory. When messages are properly formatted (in an .EML format), you can drop them into the pickup directory and they will be automatically processed.
· From the submission queue, the messages are sent to the categorizer. This is the process whereby the Transport server determines whether the message has to be delivered locally or remotely, whether it is on an internal Exchange server or an external one on the Internet. When categorized, the messages are delivered to a send connector. It is important to note that the Transport server never communicates directly with the mailbox databases.
· Mailbox Transport Service The Mailbox Transport service is also running on the Exchange 2013 Mailbox server and consists of two parts:
· Mailbox Transport Submission Service. This is responsible for picking up messages from a user’s drafts or outbox folder. Remote procedure calls (RPC) are used to communicate with the Information Store to pick up messages and then the SMTP is used to deliver messages to the local Transport server or to the Transport server running on other Exchange 2013 Mailbox servers in the organization.
· Mailbox Transport Delivery Service. This is responsible for receiving messages from the Transport server and delivering those messages to the user’s inbox or underlying folder. Messages are accepted from the local Transport server or from the Transport server running on other Exchange 2013 Mailbox servers in the organization. Next, RPC is used to communicate with the Information Store to deliver the messages to the inbox and the SMTP is used to communicate with the Exchange 2013 Transport server.
The Transport service running on an Exchange 2013 Mailbox server can work with other Exchange 2010 Mailbox servers (naturally), but also with any down-level Hub Transport servers. The Mailbox Transport server only works with the Transport server running on the Exchange 2013 Mailbox server in the same Active Directory site.
Figure 4-30. The transport pipeline in Exchange 2013
The transport pipeline is the complete Transport service, on both the Exchange 2013 Mailbox server and the Client Access server. In regard to the transport pipeline, there are topics to address here, such as the routing destinations, delivery groups, queues and how to manage them, and some redundancy features, like shadow redundancy and safety net.
Routing Destinations
When a message arrives at the Hub Transport service on an Exchange 2013 Mailbox server, it has to be categorized—that is, the recipient or recipients need to be determined. Once Exchange 2013 knows the list of recipients, the server knows where to route the message.
The destination for a message is called the routing destination. Routing destinations can be:
· A mailbox database containing a mailbox or a public folder.
· A connector responsible for sending a message to another Active Directory site with an Exchange server or to an external SMTP server.
· A Distribution Group Expansion server, or an Exchange server that’s responsible for extracting recipients from a Distribution Group if the message is destined for a Distribution Group.
Delivery Groups
The concept of delivery groups was created in Exchange 2013. A delivery group is a collection of Exchange 2013 Mailbox servers (holding the Hub Transport service) or a collection of Exchange 2010 Hub Transport servers. These servers are responsible for delivering SMTP messages within this group of servers. The following delivery groups can be identified in Exchange 2013:
· Routable DAG. These are all the Exchange 2013 Mailbox servers that are members of a DAG. The mailbox databases in this DAG are the routing destinations of the delivery group. A message can be delivered to one particular Exchange 2013 Mailbox server in a DAG, and this Mailbox server is responsible for routing the message to the Exchange 2013 Mailbox server that holds the active copy of the mailbox database in the DAG. Since the DAG can span multiple Active Directory sites, the routing boundary for the routable DAG is the DAG itself, not the Active Directory site.
· Mailbox Delivery Group. This is a collection of Exchange 2010 or Exchange 2013 Mailbox servers in one Active Directory site that is not a member of a DAG. In a mailbox delivery group, the routing boundary is the Active Directory site itself. Mailboxes located on Exchange 2013 Mailbox databases are processed by the Hub Transport service running on the Exchange 2013 Mailbox servers in that Active Directory site. Mailboxes located on Exchange 2010 Mailbox databases are processed by the Hub Transport servers in that Active Directory site.
· Connector Source Server. This is a collection of Exchange 2010 Hub Transport or Exchange 2013 Mailbox servers that act as the source server for a particular send connector. These are only the source servers of a particular send connector; Exchange servers that are not defined as source servers of the send connector, but that are in the same Active Directory site, are not part of this delivery group.
· Active Directory Site. This is an Active Directory site that’s not the final Active Directory site—that is, the message is in transit through this particular Active Directory site. For example, it can be a hub site or a connecting Active Directory site for an Exchange 2007 or 2010 Edge Transport server. An Exchange 2013 Mailbox server cannot contact an Exchange 2010 Edge Transport server that has an Edge subscription to an Exchange 2013 Mailbox server in another site, so the message has to pass through this Active Directory site in order to be relayed via the Exchange 2010 Edge Transport server.
· Server List. This is one or more Exchange 2013 Mailbox servers or Exchange 2010 Hub Transport servers that are configured as Distribution Group Expansion servers.
Queues
Generally speaking, in Exchange Server, a queue is a destination for a message, as well as a temporary storage location on the Exchange server. For every destination there’s a queue, so there are queues for other submissions, for message delivery to the mailbox, for routing to other Exchange servers in the organization, or for routing to an external destination.
![]() Note Queues are a Transport service feature and thus they exist on Exchange 2013 Mailbox server, but also on Exchange 2007 and 2010 Hub Transport service, as well as on Exchange 2007 and 2010 Edge Transport service.
Note Queues are a Transport service feature and thus they exist on Exchange 2013 Mailbox server, but also on Exchange 2007 and 2010 Hub Transport service, as well as on Exchange 2007 and 2010 Edge Transport service.
When messages arrive at the Transport service, they are immediately stored on the local disk of the Exchange server. The storage technology used is the extensible storage engine (ESE), which is the same engine as used for the mailbox databases. The mailqueue database and its accompanying log files and checkpoint file can be found on C:\Program Files\Microsoft\Exchange Server\V15\TransportRoles\data\Queue (see Figure 4-31). The ESE database has circular logging enabled. This means that log files no longer needed are automatically deleted and, as such, there’s no recovery method, such as replay of log files.
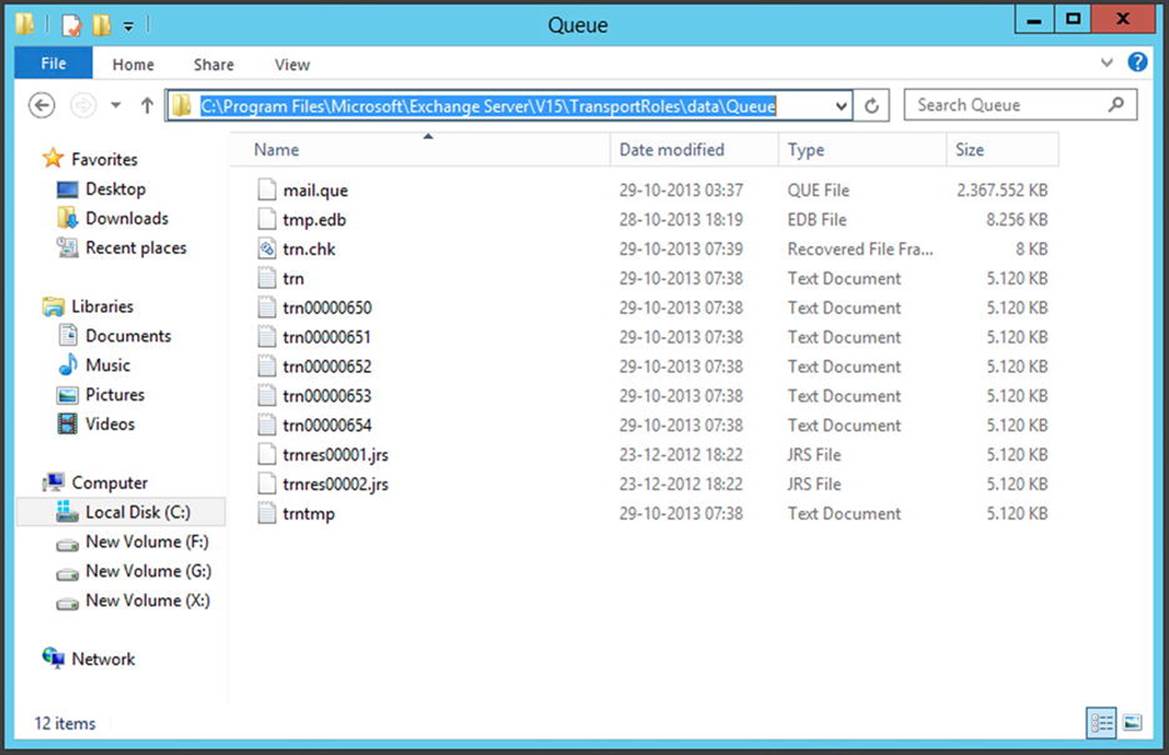
Figure 4-31. The mailqueue database is a normal ESE database
It is possible to change some of the configuration options of the mailqueue database. When Exchange Server 2013 is installed in the default location, all configuration settings are stored in the EdgeTransport.exe.config file, which can be found in C:\Program Files\Microsoft\Exchange Server\V15\bin. Most settings in this file can be left at their default values, but it is possible to change the location of all mailqueue-related files and directories to another disk. The advantage of doing this is that, if there’s unexpected growth in these files, that won’t affect the normal system and boot drives. If these fill up, there’s always the possibility that the services running on this particular server will gradually stop working; worse, the entire server might stop working. Needless to say, this is an undesirable situation for Exchange Server.
If you open the EdgeTransport.Config.Exe file and browse through the file, you’ll see the following keys:
· QueueDatabasePath
· QueueDatabaseLoggingPath
· IPFilterDatabasePath
· IPFilterDatabaseLoggingPath
· TemporaryStoragePath
By default, these keys point to the location %ExchangeInstallPath%TransportRoles\data\, but by changing the values to, for example, D:\TransportRoles\data\<variable>, another disk can be used.
To automate this process, Microsoft has created a script called Move-TransportDatabase.ps1, which is located in the $ExScripts directory. To use this script to move the mailqueue database to another location, use the following commands:
CD \$ExScripts
.\Move-TransportDatabase.ps1 -queueDatabasePath 'D:\TransportRoles\data\Queue'
-queueDatabaseLoggingPath 'D:\TransportRoles\data\Queue'
-iPFilterDatabasePath 'D:\TransportRoles\data\IpFilter'
-iPFilterDatabaseLoggingPath 'D:\TransportRoles\data\IpFilter'
-temporaryStoragePath 'D:\TransportRoles\data\Temp'
Shadow Redundancy
There’s one type of queue that always raises questions. At first look, there are always messages in this queue, and they don’t seem to disappear that quickly. Shadow queues, also referred to as shadow redundancy, are there for message redundancy: messages are stored in shadow queues until the next hop in the message path that moves toward delivering the message reports a successful delivery. Only then is the message deleted from the shadow queue.
Imagine an Exchange 2013 Mailbox server in New York that’s sending messages to the Internet, but has no Internet connection of its own. There are also two Exchange 2013 Mailbox servers in Amsterdam, and Amsterdam has its own Internet connection. A network connection exists between the two locations.
1. The Exchange 2013 Mailbox server in New York sends an SMTP message to Exchange 2013 Mailbox server (A) in Amsterdam, AMS-EXCH02. As soon as the message is delivered in Amsterdam, it is stored in the shadow queue on the server in New York.
2. Exchange 2013 Mailbox server (A) in Amsterdam sends the message to server (B) in Amsterdam, AMS-EXCH01. As soon as the message is accepted, it is stored in the shadow queue on server (A).
3. Server (A) knows the message was successfully delivered and reports back to the server in New York. At this moment the message can safely be deleted from the New York shadow queue because there still is a backup message, but now it’s on server (A).
4. Server (B) sends the message to the Edge Transport server in the perimeter network, and when delivered, server (B) reports back to server (A), who can now delete the message from its shadow queue.
Sending a message from the Exchange server to the Internet is difficult, of course, because not all SMTP servers on the Internet support shadow queues. If not supported, the messages are automatically deleted from the sender’s shadow queue after a period of time.
Shadow queue redundancy is built into Exchange 2013 when messages are in transit. If one server fails, for whatever reason, and the server is no longer available, the previous Exchange server in the message path can retry delivering the message via a different available path.
![]() Note The shadow queue function was available in Exchange Server 2010 as well.
Note The shadow queue function was available in Exchange Server 2010 as well.
Don’t confuse the shadow queues with Exchange 2010’s Transport Dumpster. While the Transport Dumpster also offers redundancy for SMTP messages, its primary purpose is to offer redundancy for messages that are delivered to Mailboxes in a DAG. The Transport Dumpster evolved into Safety Net, which is explained a little later in this chapter.
Managing Queues
Most of Exchange 2013 Mailbox server queues exist for only a limited time. When the Transport server cannot deliver a message, the message stays in the queue until the server can successfully deliver the message (it keeps trying) or until the message expires; the default message expiration time is two days.
These queues can be managed by using the Queue Viewer, which is a graphic tool, or by using the EMS. The Queue Viewer can be found in the toolbox, an MMC snap-in that’s automatically installed during the installation of Exchange Server. Caution: The toolbox in Exchange 2013 has the same icon as the EMC in Exchange Server 2010, so don’t let this fool you. Open the Exchange toolbox and select “Queue Viewer” under mail flow tools. The Queue Viewer shows the queues on the server currently operating, but if you select “Connect to Server” in the actions pane, you can use it to view information on other Exchange 2013 Mailbox servers as well (see Figure 4-32).
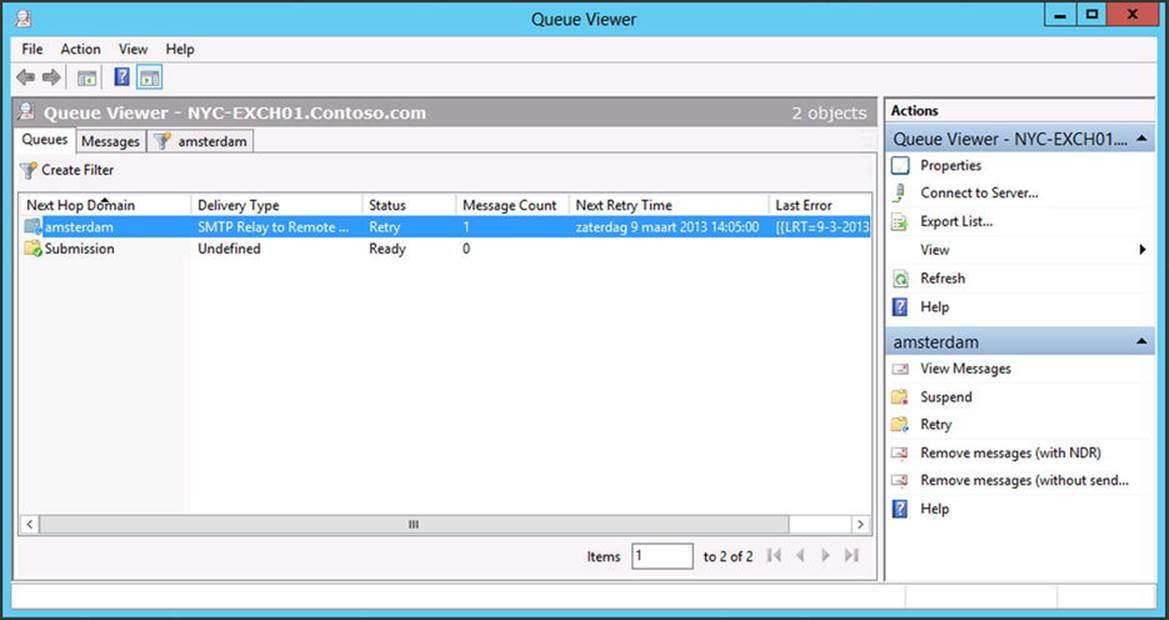
Figure 4-32. A message is stuck in the queue on the New York server, destined for the Amsterdam server
The Queue Viewer is an incredibly valuable tool for troubleshooting purposes. It shows messages that are in a queue, of course, but if you open the message, it also shows the reason why the messages cannot be delivered. The tool also gives you the option of suspending a queue or removing messages from a queue, either with or without generating a nondelivery report (NDR).
It is also possible to manage the queues using the EMS. This method is more complex, but it offers many more granular options. The basic command to get queue information is the Get-Queue cmdlet. The Get-Queue cmdlet will show the queues on the server where the cmdlet is executed (see Figure 4-33). Using the identity of the queue, you can obtain more information by using the Get-Queue -Identity NYC-EXCH01\6 cmdlet, for example. The actual error is not shown when using this cmdlet, but you can use the Get-Queue -Identity NYC-EXCH01\6 | FL cmdlet for all information regarding the queue, or the Get-Queue -Identity NYC-EXCH01\6 | select Identity,DeliveryType,Status,MessageCount,NexthopDomain,LastError to show the actual error message the transport service is experiencing.
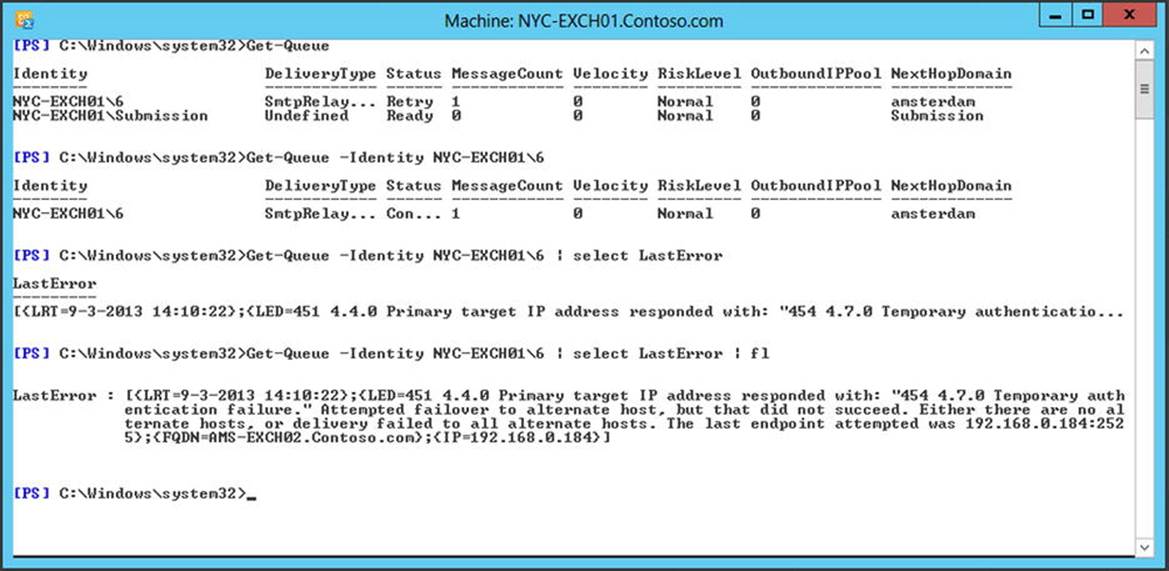
Figure 4-33. Use the Get-Queue cmdlet to get information about messages stuck in the queue
The Get-Queue cmdlet will only show results from the Exchange server where the cmdlet is executed. You can also use the Get-TransportService cmdlet to get a list of all Transport services running on all Exchange 2013 Mailbox servers, and pipe this output into the Get-Queue cmdlet: Get-TransportService | Get-Queue. This will show all queues on all Transport services in the organization.
![]() Note In the example in Figure 4-33, the message is not delivered owing to authentication problems. All servers are running in a Hyper-V environment, and you have to be careful with time synchronization complications. In the example, it turned out that some servers had major time differences because they were synchronizing against their Hyper-V host instead of against the PDC emulator. This situation sometimes also results in problems with the EMS (WinRM won’t function correctly) or with the Server Manager.
Note In the example in Figure 4-33, the message is not delivered owing to authentication problems. All servers are running in a Hyper-V environment, and you have to be careful with time synchronization complications. In the example, it turned out that some servers had major time differences because they were synchronizing against their Hyper-V host instead of against the PDC emulator. This situation sometimes also results in problems with the EMS (WinRM won’t function correctly) or with the Server Manager.
When a message cannot be delivered, it will stay in the queue and it can stay here for up to two days, which is the default wait time. When this happens, there’s no need for any concern; Exchange will keep trying to deliver the message. Also, the number of messages in a queue can vary over time; for example, you could have 20 to 30 messages in a queue for an Internet send connector. But the messages have to be delivered after some time, of course. If there’s a steady increase in the number of messages in a queue, or if many queues are created and the messages get stuck in there, then it’s time to dig deeper into the cause of the excessive queuing. (Chapter 6 will cover this more in detail.)
Safety Net
Safety Net is a new redundancy feature in Exchange 2013 for the Transport service and is the successor of the Transport Dumpster in Exchange Server 2007 and 2010. The Transport Dumpster was developed to provide message redundancy when these messages were delivered to the mailbox. The messages were kept on the Hub Transport server, and when a database in a DAG failed for some reason and a message was not replicated to the passive copy, the missing message was retransmitted to the passive copy. This would result in minimum data loss.
Safety Net provides the same function for Exchange 2013. As such, Safety Net stores in a queue the messages that were successfully delivered to the mailboxes. Safety Net is still associated with the Transport service, but now it stores information on the Mailbox server. The difference between Safety Net and the Transport Dumpster is that Safety Net does not require a DAG. It also stores copies of messages for Mailbox servers that are not DAG members.
Another major change is that Safety Net is redundant by itself; there’s a primary Safety Net and a shadow Safety Net. The primary Safety Net exists on the Mailbox server where the message originates, while the shadow Safety Net exists on the Mailbox server where the message is delivered. As soon as the message is delivered, it is stored in the Safety Net queue. Messages are kept in the Safety Net queue for 48 hours, which is the default time.
Safety Net and shadow redundancy are complementary. That is, shadow redundancy is responsible for messages in transit, while Safety Net is responsible for messages that have been delivered to mailboxes. The cool thing is that Safety Net is a fully automated feature; there’s no need for any manual action. All coordination is done by the Active Manager, who is also responsible for failover scenarios in the DAG.
When something untoward happens, the Active Manager requests a resubmission from Safety Net. For large organizations, these messages most likely exist on multiple Mailbox servers so (a lot of) duplicate messages can occur. Exchange 2013, however, has a mechanism that detects duplicate messages; it finds and eliminates those duplicate message, preventing the recipient from receiving multiple copies. Unfortunately, resubmitted messages from Safety Net are also delivered to mail servers outside the Exchange organization. Since these servers don’t have the duplicate-message detection mechanism, external users can receive multiple identical messages.
When the primary Safety Net is not available, Active Manager tries requesting a resubmit for 12 hours. If unsuccessful after this time, Active Manager then contacts the other Mailbox servers and requests a resubmit of messages for the particular mailbox database. Either way, no messages should be lost during a failover, whether the failover is planned or not.
Autodiscover
Autodiscover was introduced in Exchange 2007 to support Outlook 2007, and it has been developed into one of the most important parts of the Exchange environment. If you don’t have a proper Autodiscover implementation, you will experience all kinds of nasty problems, ranging from not being able to check free/busy information when scheduling a meeting, to not being able to download an Offline Address Book, to not being able to set the out-of-office message using the Outlook client, to not being able to connect at all.
Autodiscover is most visible for end users when they set up their Outlook client. Users have only to enter their names, their email addresses, and their Active Directory passwords, and the Outlook client will configure itself automatically. It actually discovers all the information regarding the Exchange Server implementation and uses this information to configure the Outlook profile. But not only does it do this on the initial setup, it also performs this action on a regular basis to check for any changes in the Exchange environment.
Autodiscover works by an XML request sent from the Outlook client to the Client Access server. The Client Access server checks Active Directory for the location of the user’s mailbox. If the mailbox is on an Exchange 2013 Mailbox server, the request is proxied to this Mailbox server and the Mailbox server retrieves the user’s mailbox settings using the Autodiscover server.
If the mailbox is still on a down-level Exchange server, the request is proxied to a down-level Client Access server, where the request is processed. Handling on the down-level Client Access server is similar to handling on the Exchange 2013 Mailbox server, shown in Figure 4-34.
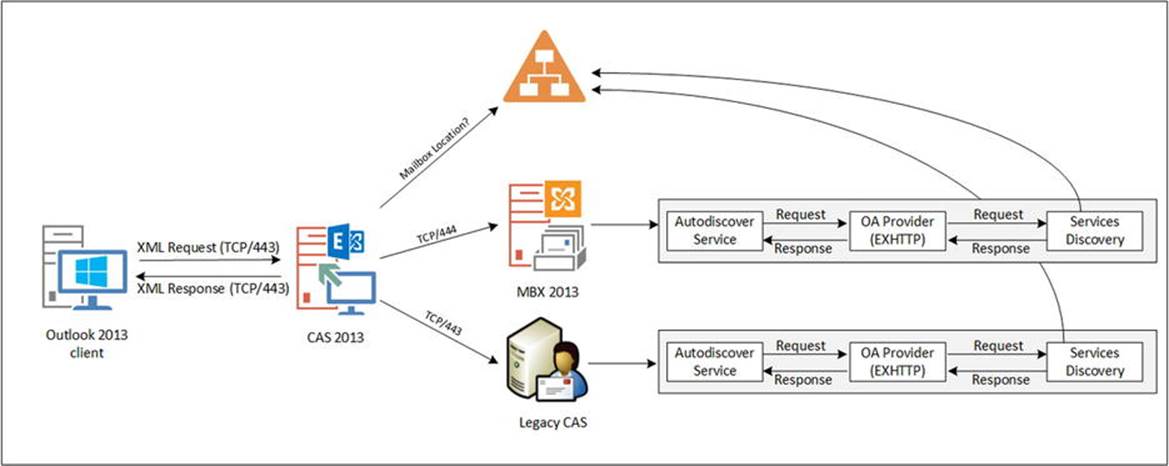
Figure 4-34. Autodiscover information flow
Important to note is that, in a coexistence scenario, the Autodiscover request is always sent to the Exchange 2013 Client Access server. After the user’s mailbox location is checked, the request is proxied to the appropriate server.
How does the Outlook client discover which Client Access server to send its request to? The answer is twofold:
· Domain-joined Outlook clients who are actually logged on to the Active Directory domain retrieve this information directly from Active Directory.
· Non-domain-joined Outlook clients, or domain-joined Outlook clients who cannot access Active Directory (when working at home, for example), build the Autodiscover URL based on the user’s SMTP address.
Both scenarios are covered next.
Domain-Joined Clients
When a Client Access server is installed, a computer object is created in Active Directory. Besides this computer object, a service connection point (SCP) is also created in Active Directory. For every Client Access server that’s installed, a corresponding SCP is created. So, if you have six Client Access servers, you also have six SCPs.
An SCP has a well-known GUID (Global Unique Identifier) that’s unique for the type of application that’s using the SCP. In the case of Exchange Server, this application is Outlook. All service connection points created by installing Client Access servers have the same well-known GUID, and Outlook clients query Active Directory for this GUID. This GUID is stored in the keywords attribute together with the Active Directory site name where the Client Access server is installed, as shown in Figure 4-35.
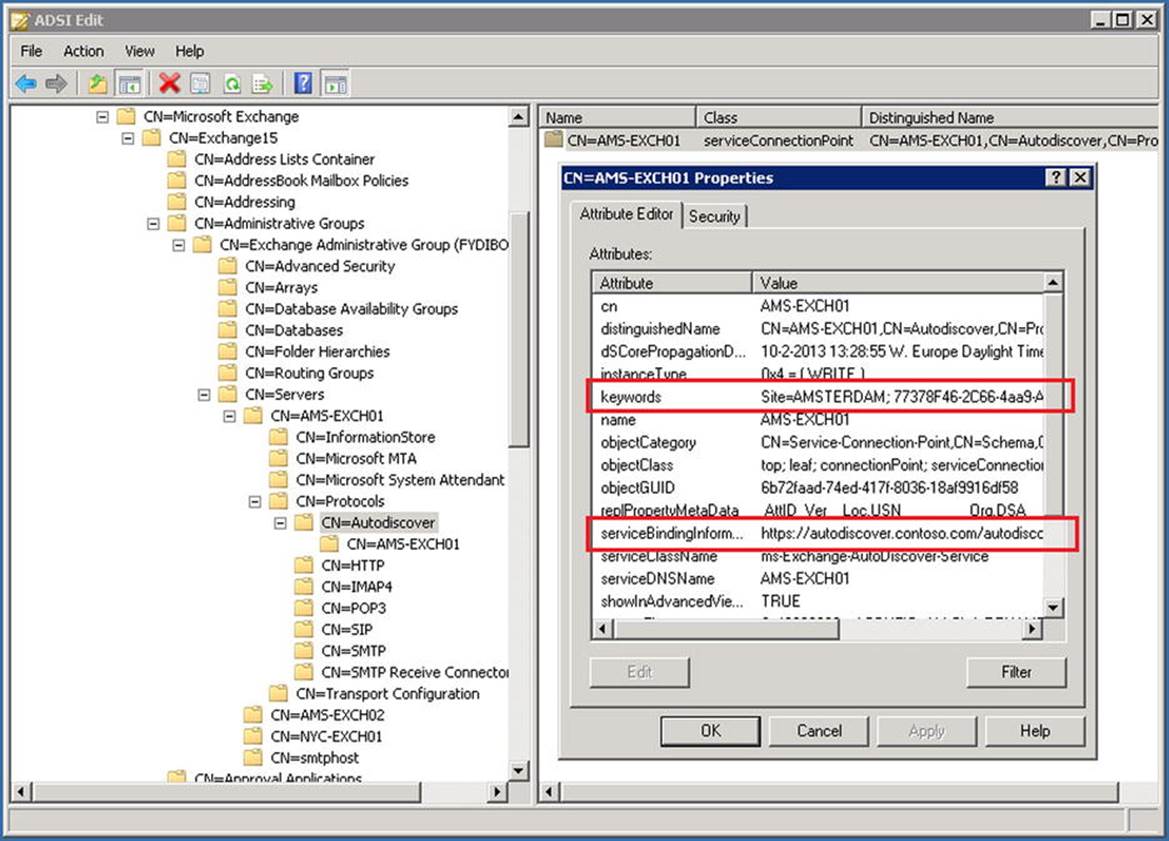
Figure 4-35. The service connection point in Active Directory, with keywords and ServiceBindingInformation properties
Once found, the serviceBindingInformation attribute is retrieved and, by default, this value contains the FQDN of the Client Access server—for example, ams-exch01.contoso.com. If there are multiple Client Access servers in the Exchange environment, a virtual IP (VIP) on the load balancer should be created. This VIP should be the IP address of a load-balanced FQDN (for example, autodiscover.contoso.com), and it should contain all Client Access servers. Clients connect to this VIP instead of to an individual Client Access server, and all client requests are distributed across all Client Access servers.
The Outlook client retrieves the Autodiscover FQDN from Active Directory and sends an HTTP post command to this URL. The Client Access server then accepts the request and proxies it to the Mailbox server. The Mailbox server gathers all the required information and returns this as an XML package to the Outlook client. The Outlook client then can use the XML package to configure its profile (when it’s a new setup) or reconfigure its profile (when changes are detected in the Exchange environment).
This process happens always, not only during the initial setup of the Outlook client; the request is sent once an hour to determine if there are any changes in the Exchange configuration. Since it is an HTTP request that’s secured on the server, the SSL certificates come into play. Theautodiscover.contoso.com needs to be in the certificate as well, next to the webmail.contoso.com name.
The Autodiscover URL is configurable only by using the Exchange Management Shell. You open the shell and enter the following command:
Get-ClientAccessServer -Identity AMS-EXCH01 | Set-ClientAccessServer -AutoDiscoverServiceInternalUri https://autodiscover.contoso.com/autodiscover/autodiscover.xml
If all the Client Access servers need to be configured with this URL, the following command can be used:
Get-ClientAccessServer | Set-ClientAccessServer -AutoDiscoverServiceInternalUri
https://autodiscover.contoso.com/autodiscover/autodiscover.xml
![]() Note If there are no Outlook clients connecting via the Internet, or there are only domain-joined clients, or if you want to use service records (SRV records) in the public DNS, it is possible to configure the Client Access server with webmail.contoso.com for the Autodiscover URL.
Note If there are no Outlook clients connecting via the Internet, or there are only domain-joined clients, or if you want to use service records (SRV records) in the public DNS, it is possible to configure the Client Access server with webmail.contoso.com for the Autodiscover URL.
Autodiscover will retrieve all information from the Exchange environment, as well as other information such as virtual directories for OWA, EAC, MAPI, Offline Address Book downloads, or Exchange web services. These web services are used for retrieving free/busy information or for setting the out-of-office information.
Therefore, if there are problems with Autodiscover, most likely these will result in not being able to check for free/busy information when creating a meeting request or in setting the out-of-office message in Outlook. And to make it more confusing, if this is the case, the free/busy information is visible in OWA and you can set the out-of-office message in OWA as well.
In 99 percent of cases, any complications with Autodiscover are caused by SSL certificate errors. When using a browser to connect to a Client Access server and a certificate error arises, it is possible to continue despite the error message.
It is possible to verify the Autodiscover functionality from within Outlook. When Outlook is running, check the system tray for the Outlook icon. Control-right-click this Outlook icon and select “Test Email AutoConfiguration” (see Figure 4-36).
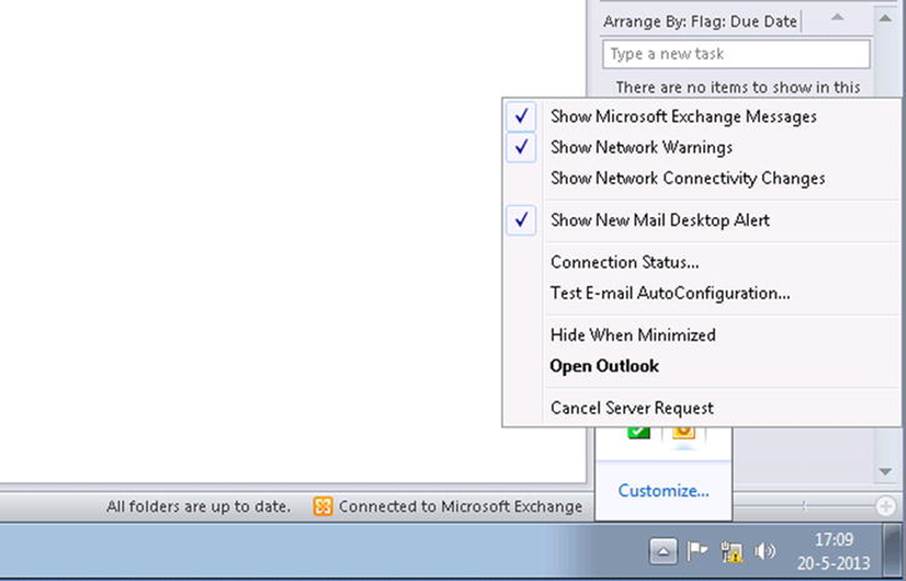
Figure 4-36. Testing Autodiscover from within the Outlook client
You then enter the email address and password, clear both the “Use Guessmart” and the “Secure Guessmart Authentication” check boxes, and click the Test button. The Outlook client will perform an Autodiscover check against the Exchange Server and display the information as shown in Figure 4-37.
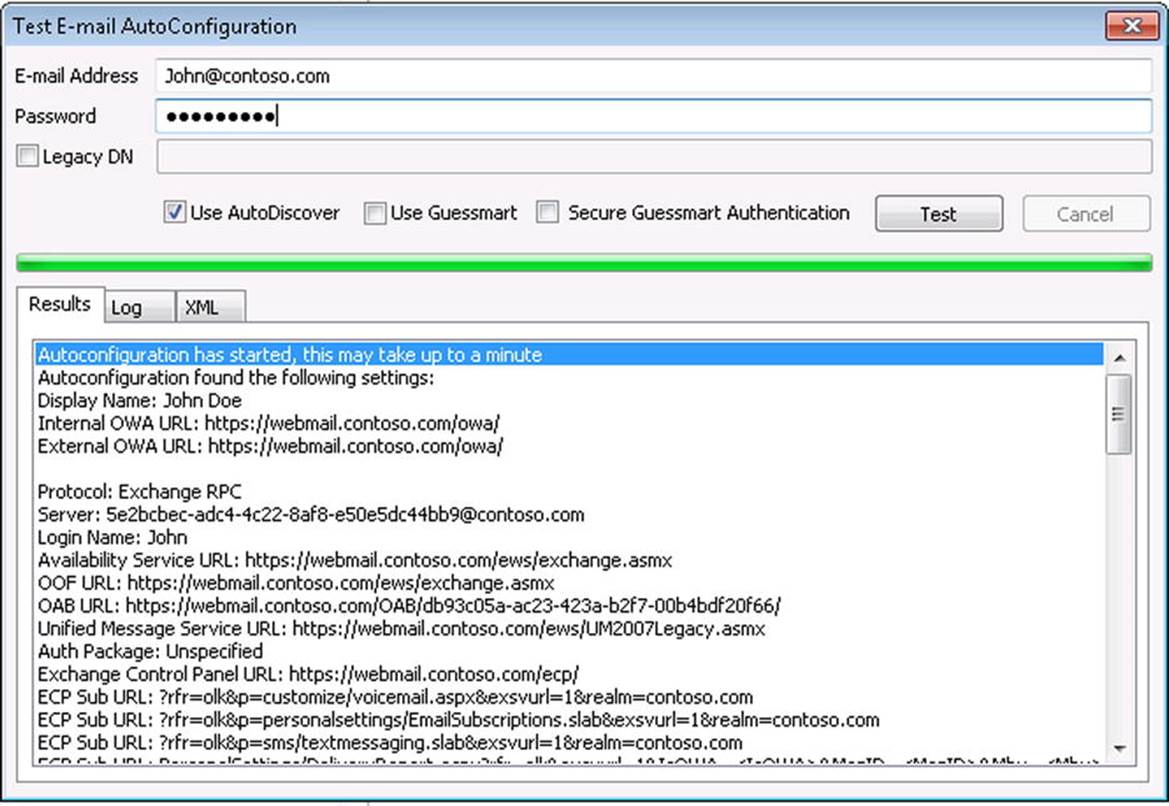
Figure 4-37. Autodiscover information returned from the Autodiscover check
There are three tabs visible:
· Results: The returned information is shown in a readable format.
· Log: The various options are shown for how the Outlook client tried to retrieve the information.
· XML: The raw XML data that is returned from the Exchange server is shown.
This utility is extremely useful when troubleshooting the Exchange environment.
Non-Domain-Joined Clients
Non-domain-joined clients, or domain-joined clients who do not have access to Active Directory, use a different approach for getting Autodiscover information.
Initially, Outlook will construct an FQDN based on the right-hand part of the email address. So if the user’s email address is john@contoso.com, Outlook will start looking at https://contoso.com/autodiscover/autodiscover.xml to try to get to the Client Access server.
Once the URL is constructed, Outlook will automatically send an HTTP XML post request to the Autodiscover URL and will get all the necessary information as it does for an internal Outlook client. If this doesn’t work, Outlook will fall back to the same URL, but with an Autodiscover prefix, like https://autodiscover.contoso.com/autodiscover/autodiscover.xml.
For external clients, it is crucial to have the SSL certificate correctly set up with an FQDN webmail.contoso.com and an autodiscover.contoso.com domain name in the certificate. There’s no easy way to get around this unless you implement a solution based on SRV records in public DNS. Any Outlook client who has no access to Active Directory will automatically try to connect to the Client Access server using a self-constructed URL autodiscover.contoso.com. This is hard-coded in the Outlook application!
The built-in Outlook test utility, as shown in Figure 3-12, also works when Outlook is operating via the Internet; but Microsoft alternatively offers a remote test tool called remote connectivity analyzer (RCA), which can be reached viahttps://www.testexchangeconnectivity.com/ (see Figure 4-38). This tool will automatically check the Exchange configuration via the Internet using the normal Autodiscover options.
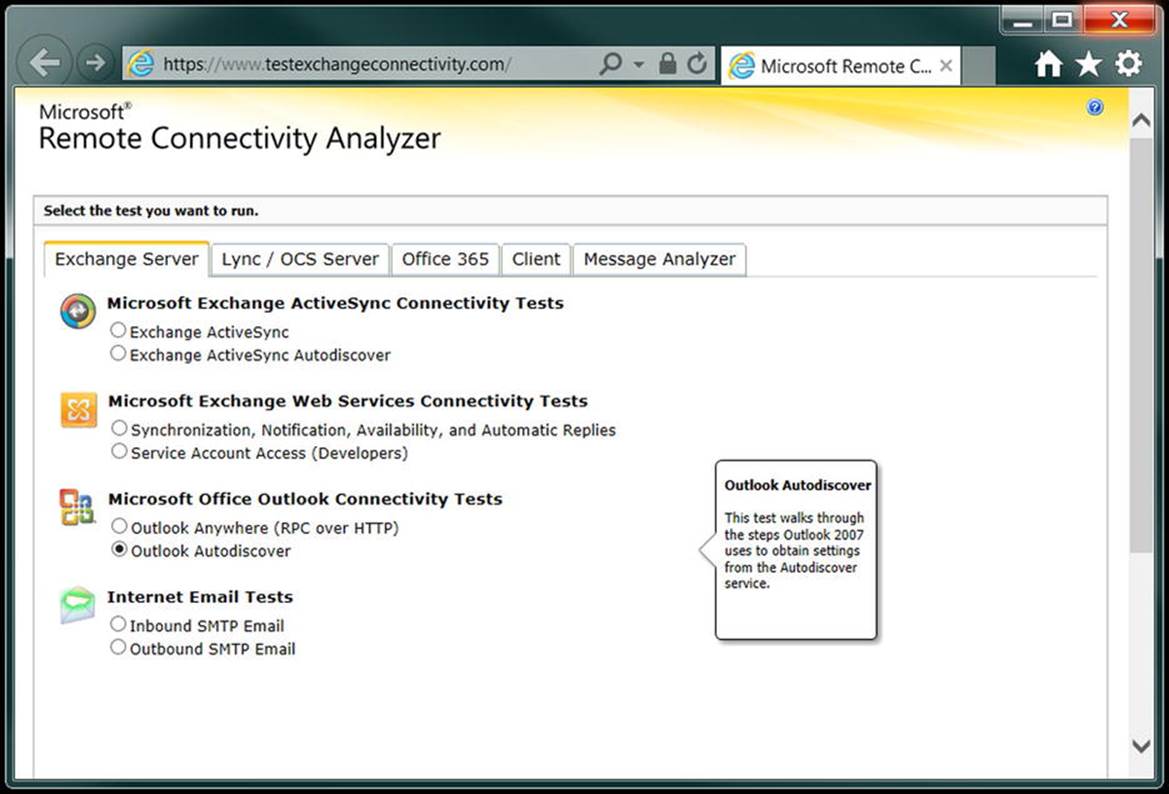
Figure 4-38. The remote connectivity analyzer
To use this tool, select Outlook Autodiscover on the Exchange Server tab and click Next (not visible in Figure 4-38). Enter the email address, user name, and password; select the “I Understand that I Must Use the Credentials of a Working...” check box and enter the verification string. Click “Perform Test” and the RCA will start testing the Exchange environment using the various Autodiscover methods; the results are shown in seconds.
There are multiple methods for retrieving Autodiscover information, and these are shown as a red circle with a white cross in it, or a green circle with a white checkbox in it. When one method fails, Outlook (and RCA) will automatically continue with the next available option. There’s no need to panic when you see the red circle; only when you only see red circles and no green ones is it time to start worrying. One failed and one successful test can be seen in Figure 4-39.
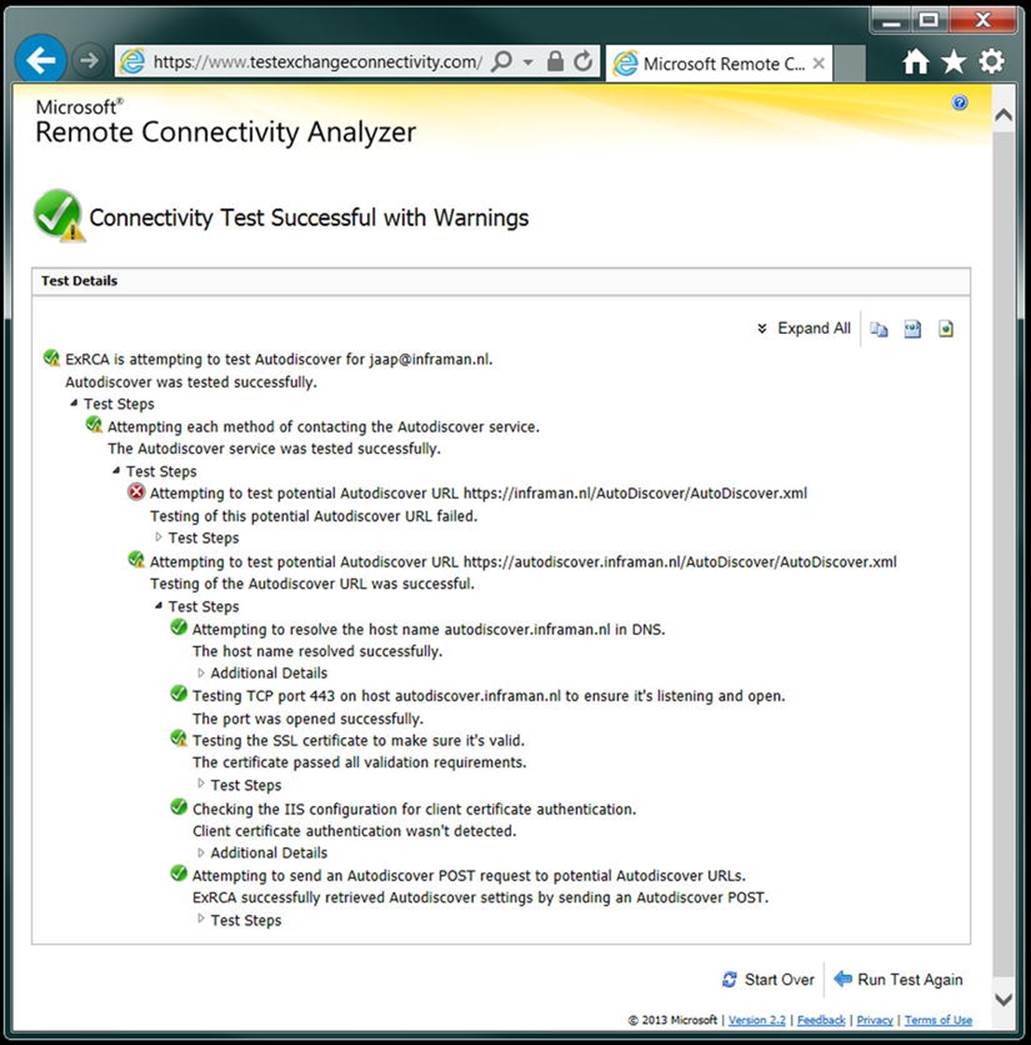
Figure 4-39. The RCA results
![]() Note The remote connectivity analyzer is a publicly available tool to test your Exchange environment. Since it has to access your Exchange environment from the Internet, your Client Access server needs to be accessible from the Internet. It also needs a valid and trusted third-party UC certificate on the Client Access server. Important: it does not work with the default self-signed certificate.
Note The remote connectivity analyzer is a publicly available tool to test your Exchange environment. Since it has to access your Exchange environment from the Internet, your Client Access server needs to be accessible from the Internet. It also needs a valid and trusted third-party UC certificate on the Client Access server. Important: it does not work with the default self-signed certificate.
Remember that the Exchange 2013 Autodiscover process works for Outlook 2007 clients (with Service Pack 3 and the November 2012 Public Update or later; earlier versions of Outlook are not supported at all by Exchange 2013) connecting from an internal network, as well as those connecting from the external network.
If you check the IIS log files, which can be found by default on %SystemDrive%\inetpub\logs\LogFiles\W3SVC1, you’ll see numerous entries like:
2012-12-29 09:05:31 192.168.0.55 POST /autodiscover/autodiscover.xml - 443 CONTOSO\jaap 80.101.27.11 Microsoft+Office/14.0+(Windows+NT+6.1;+Microsoft+Outlook+14.0.6129;+Pro) - 200 0 64 156
Using the IIS log files, it is possible to troubleshoot your Autodiscover process. Shown here are, for example, the URI that’s used, the port number, the account, the source IP address, the client (okay, I’m still running Windows 7 and Office 2010 on my laptop), and that the request returned a “200” response, which is okay.
Autodiscover Redirect
As we’ve seen in the previous section, Outlook automatically constructs an Autodiscover FQDN based on the user’s primary SMTP address, and this FQDN needs to be on the Exchange 2013 Client Access server’s SSL certificate. While this works fine if you have only one or two primary SMTP domains in your Exchange organization, things become challenging when you have more SMTP domains.
One of my clients is a worldwide publisher, and over the years it has acquired several hundred small publishing companies all over the globe, each with its own identity. It’s not hard to imagine that an SSL certificate with so many domains is difficult to work with. Most third-party SSL certificate vendors support up to 20 or 25 domain names on an SSL certificate. This is a practical limitation set by these vendors. When you have a lot of domain names in your SSL certificate, it takes a lot of time to validate all those domain names—plus, the cost of such an SSL certificate skyrockets. It’s not possible to predict the maximum number of domain names on an SSL certificate, but Digicert, for example, will support up to approximately 100 domain names.
Suppose in the contoso.com Exchange 2013 environment there are two other SMTP domains hosted, Fabrikam.com and FourthCoffee.com, and the Exchange 2013 Client Access server has only the webmail.contoso.com and the autodiscover.contoso.com domain names on the SSL certificate.
For this scenario, Microsoft has developed the Autodiscover Redirect option. What happens is that the Exchange 2013 Client Access server has an additional website (listening on port 80) with an FQDN called autodiscoverredirect.contoso.com. Internally, in IIS, requests for this site are automatically redirected to autodiscover.contoso.com. The additional domains (Fabrikam.com and FourthCoffee.com) do have an Autodiscover record in public DNS, but it does not contain a regular A record; instead, it contains a CNAME record pointing to the autodiscoverredirect.contoso.com site on the Exchange 2013 Client Access server.
When a user with a primary SMTP address Todd@Fabrikam.com opens his Outlook, Outlook wants to connect automatically to autodiscover.fabrikam.com. This attempt will fail because the Client Access server will not respond on port 443 to this request. The next step is that Outlook will try the redirect option. Autodiscover.fabrikam.com is resolved to autodiscoverredirect.contoso.com and Outlook will try to connect on port 80 (regular HTTP) to the Exchange 2013 Client Access server. The request is accepted, and a 302/Redirect is returned and the client request is redirected to https://autodiscover.contoso.com/autodiscover/autodiscover.xml. This is a valid name, has a valid IP address, and has a valid domain name on the SSL certificate. As a result, the Autodiscover request succeeds and a valid XML package is returned from the Exchange 2013 Client Access server to the Outlook client.
This can be seen in Figure 4-40, but since Contoso.com and Fabrikam.com are not publicly available domain names, the exchange16.com and inframan.nl domain names are used instead.
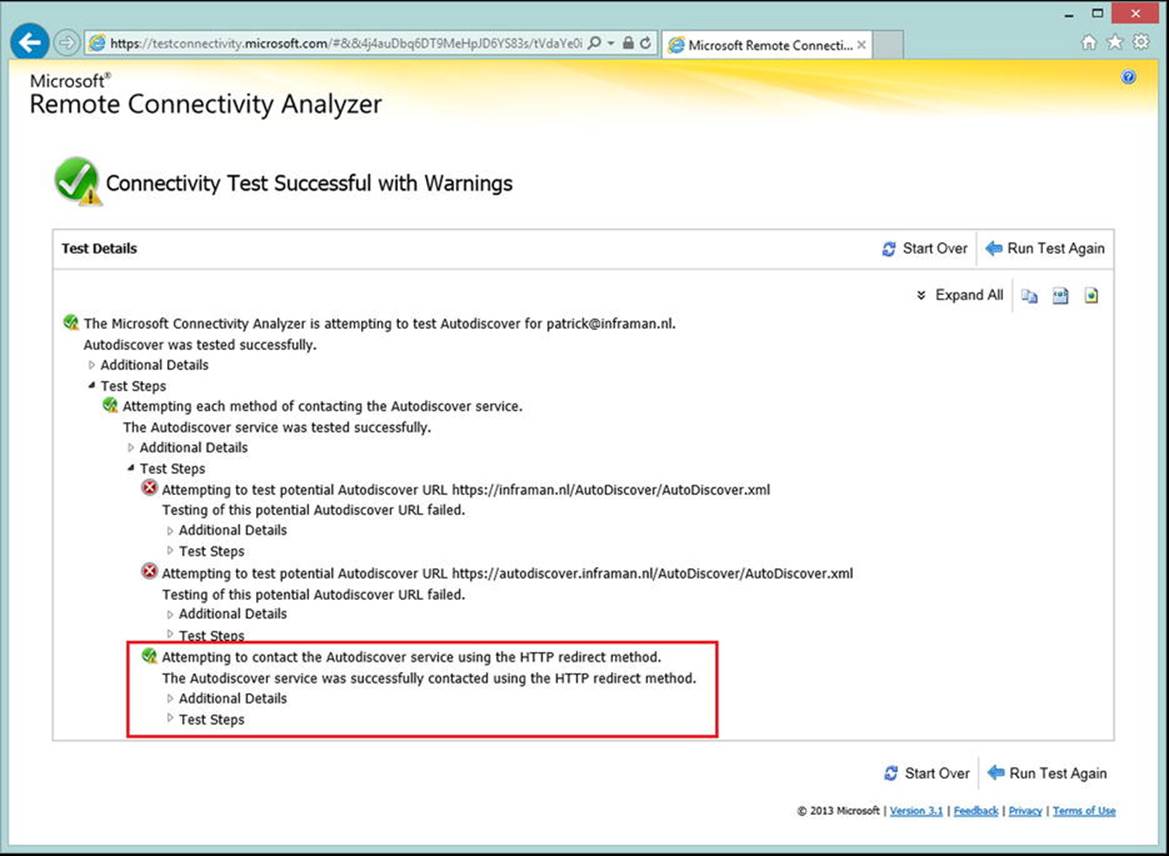
Figure 4-40. The autodiscoverredirect option in the RCA
Clearly visible in Figure 4-40 is that the tests for https://inframan.nl/Autodiscover/Autodiscover.xml and https://autodiscover.inframan.nl/Autodiscover/Autodiscover.xml fail but succeed on the HTTP redirect method. Just as in the earlier examples, there’s no need to panic because of the red circles with the white crosses; as long as there’s one green circle, you’re fine.
![]() Note In my lab environment I will be using the domain Exchange16.com as the base domain, so I’ll have autodiscover.exchange16.com and autodiscoverredirect.exchange16.com. The additional domain I’m hosting on this environment is inframan.nl; our user there is patrick@inframan.nl.
Note In my lab environment I will be using the domain Exchange16.com as the base domain, so I’ll have autodiscover.exchange16.com and autodiscoverredirect.exchange16.com. The additional domain I’m hosting on this environment is inframan.nl; our user there is patrick@inframan.nl.
To implement the Autodiscover redirect method, you have to:
1. Add an additional IP address to the Client Access server.
2. Create an additional website on the Client Access server.
3. Set the bindings and the IP addresses correctly.
4. Set the redirection on the additional website to the original (Autodiscover) site.
The following commands can be used in the Exchange Management Shell:
Remove-WebBinding -Name 'default web site' -BindingInformation "*:443:"
New-WebBinding -Name "Default Web Site" -IPAddress "176.62.196.244" -Port 443 -Protocol https
New-Item -ItemType Directory -Path $env:systemdrive\Inetpub\AutodiscoverRedirect
New-Item -ItemType Directory -Path $env:systemdrive\Inetpub\AutodiscoverRedirect\Autodiscover
New-WebSite -Name AutodiscoverRedirect -Port 80
-PhysicalPath "$env:systemdrive\inetpub\AutodiscoverRedirect" -IPAddress "176.62.196.243"
New-WebVirtualDirectory -Name Autodiscover -Site AutodiscoverRedirect
-PhysicalPath "$env:systemdrive\inetpub\AutodiscoverRedirect\Autodiscover"
Set-WebConfiguration system.webServer/httpRedirect "IIS:\sites\autodiscoverredirect\autodiscover"
-Value @{enabled="true";destination="https://autodiscover.exchange16.com/autodiscover/autodiscover.xml"; exactDestination="false";httpResponseStatus="Found"}
![]() Note This script can also be downloaded from the Apress website.
Note This script can also be downloaded from the Apress website.
I can imagine you want to use the GUI when making this kind of infrastructural change to you Exchange environment. If so, you can use the following steps to implement the Autodiscover redirect method:
1. Configure an additional IP address on the Client Access server.
2. In IIS Manager, bind the default website to the original IP address of the Client Access server for port 443, as shown in Figure 4-41. Before you continue, make sure the Client Access server keeps working with this new binding.

Figure 4-41. Configure one IP address to the default website
3. In Windows Explorer, create two additional directories C:\Inetpub\AutodiscoverRedirect and C:\Inetpub\AutodiscoverRedirect\Autodiscover.
4. In IIS Manager, create a new website, name it AutodiscoverRedirect and use the C:\Inetpub\Autodiscover as its physical path. Make sure the binding of this website is set to the additional IP address we configured earlier, as shown in Figure 4-42.
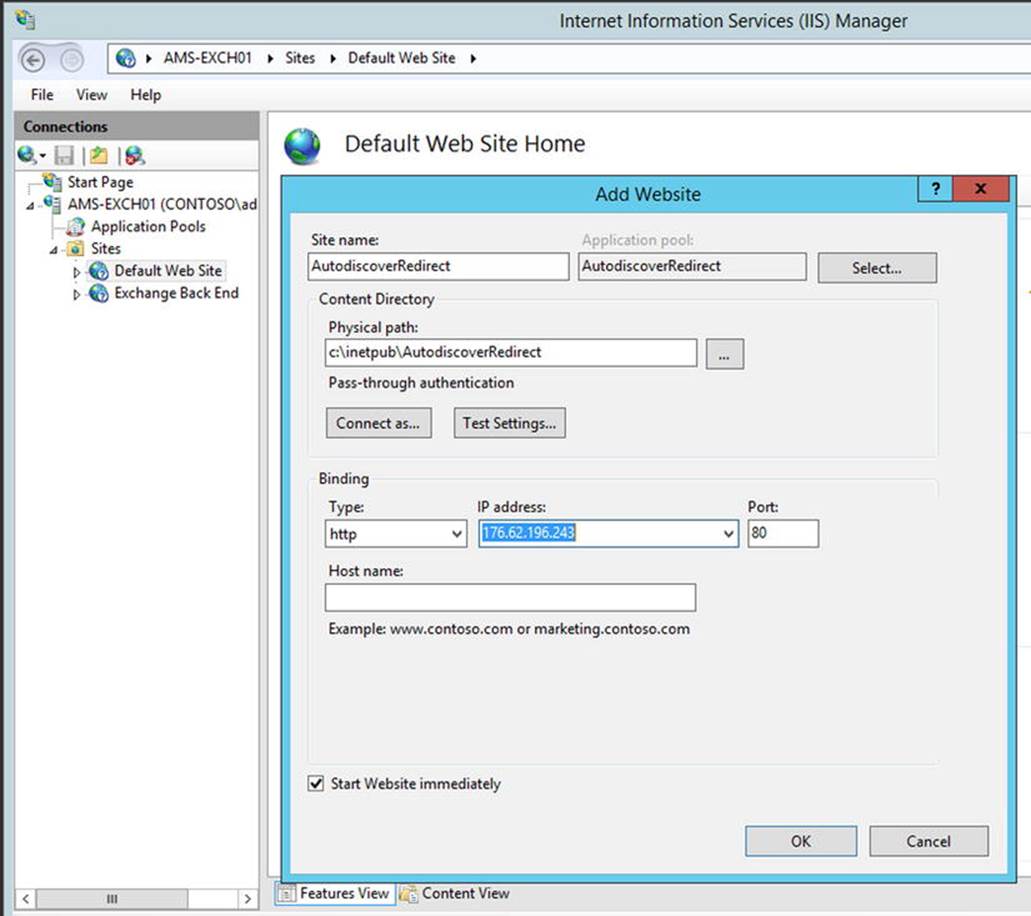
Figure 4-42. Configure an additional IP address to the autodiscoverredirect website and bind it to port 80
5. In the AutodiscoverRedirect website in IIS Manager, you’ll see an Autodiscover virtual directory show up. Select this Autodiscover virtual directory, and in the details pane, double-click “HTTP Redirect.”
6. In the HTTP Redirect window, check the “Redirect” request to this destination and enter the normal Autodiscover URL, like https://autodiscover.exchange16.com/autodiscover/autodiscover.xml, as shown in Figure 4-43.

Figure 4-43. Configure the redirect option to use the original Autodiscover website
The only thing left is to create a DNS record for autodiscoverredirect.exchange16.com, which should point to the additional IP address. The autodiscover.inframan.nl DNS record should be a CNAME record and point toautodiscoverredirect.exchange16.com.
Now, when you test this configuration using the RCA, you should see similar results to those as shown in Figure 4-40.
Autodiscover SRV Records
If you don’t want to configure the additional website on your Exchange 2013 Client Access server—for example, because you don’t have enough public IP addresses—you can always use service records (SRV) in public DNS to access the Exchange 2013 Client Access server.
For the domain names used in the previous section, you would create an SRV record for the inframan.nl domain, pointing to the Autodiscover FQDN in the original domain exchange16.com. This service record will be _autodiscover._tcp.inframan.nl and it will point to autodiscover.exchange16.com on port 443.
Depending on your hosting provider, entering a SRV record in public DNS can be challenging, but in my environment it would look like that shown in Figure 4-44.
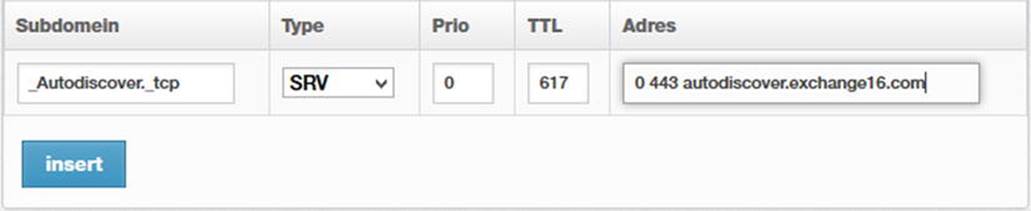
Figure 4-44. Entering the Autodiscover SRV record in public DNS
When using NSLOOKUP (on the client) to check the SRV entry, you’ll see something similar to that shown in Figure 4-45.
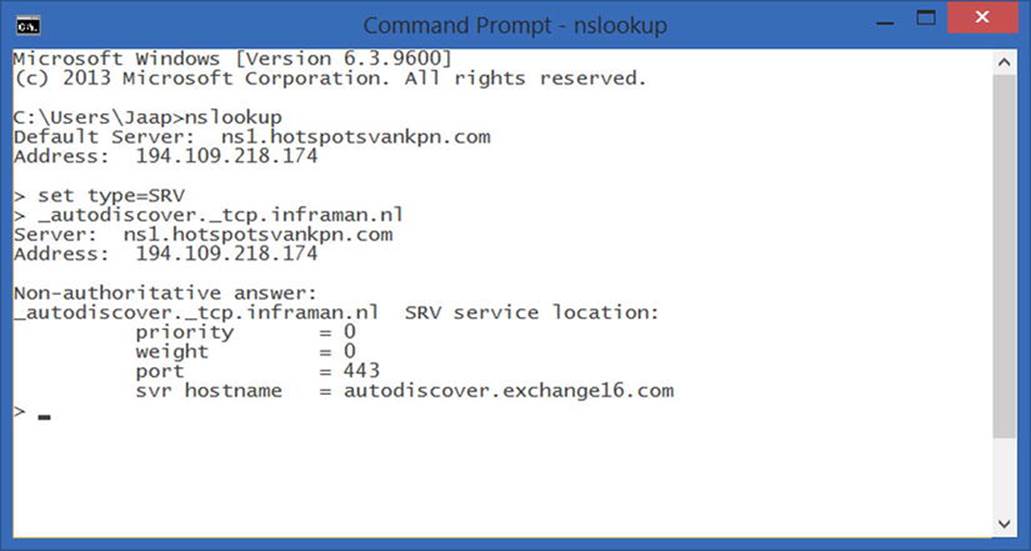
Figure 4-45. Resolving the Autodiscover SRV record in DNS
Now, when checking with the RCA, you’ll see that the Autodiscover redirect options fail, but that the SRV option succeeds, as shown in Figure 4-46.
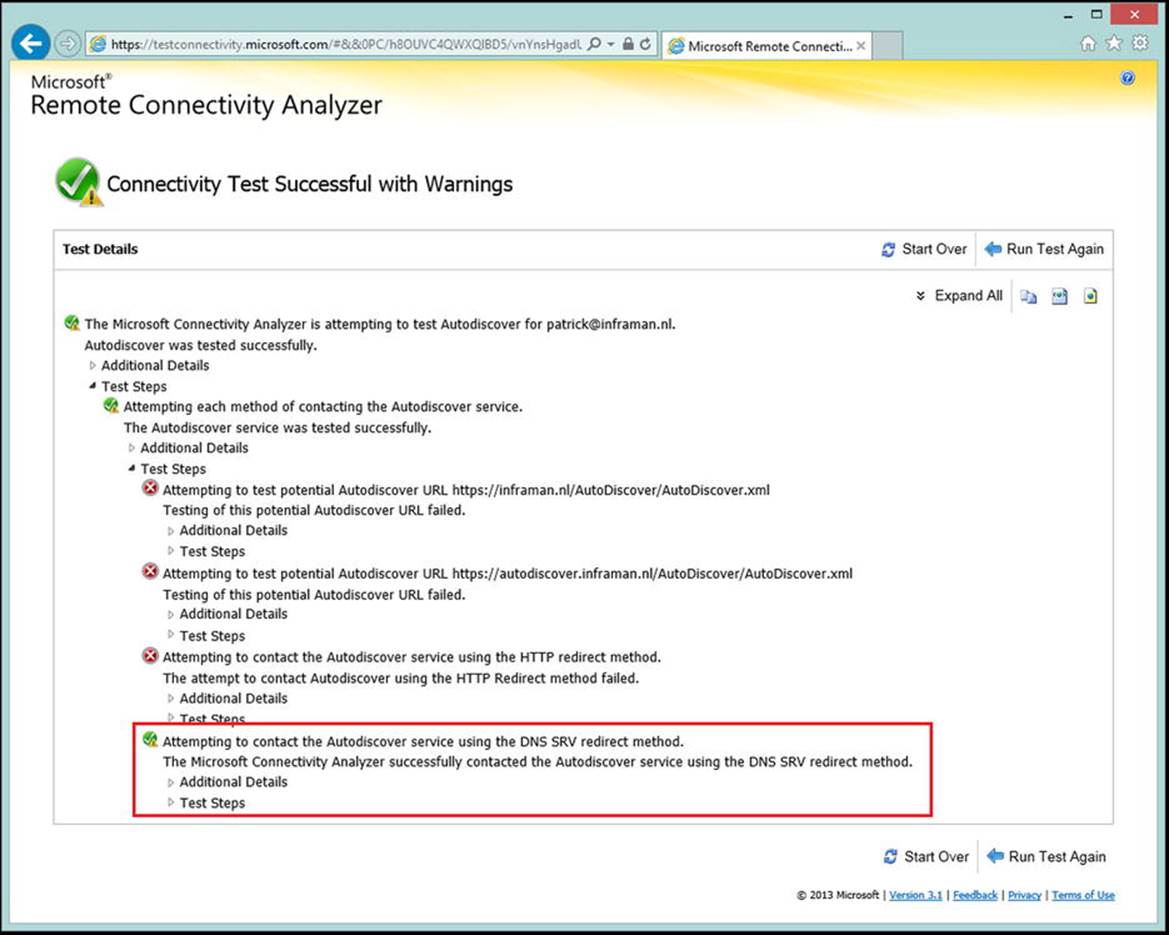
Figure 4-46. The Autodiscover SRV records test in the RCA
It is even more interesting that, instead of using the autodiscover.exchange16.com, it is now possible to use the webmail.exchange16.com FQDN in the SRV record. This way, Autodiscover no longer uses the autodiscover.exchange16.com entry and it is now possible to use a standard SSL certificate and not a UC certificate. This standard certificate only contains the name webmail.exchange16.com. If configured this way, the RCA reveals the following information, as shown in Figure 4-47.
Figure 4-47. Autodiscover SRV records configured with only one FQDN
![]() Note The SRV records solution only works with a client that supports these kinds of records. Mobile clients, for example, do not support this.
Note The SRV records solution only works with a client that supports these kinds of records. Mobile clients, for example, do not support this.
Summary
The Exchange 2013 Mailbox server hosts almost all functions in an Exchange environment:
· Mailbox Service Responsible for storing all mail data in mailbox databases. This can be in mailboxes or in public folders stored in mailbox databases.
· Transport Service Responsible for routing SMTP messages, not only to and from the Internet but also within the Exchange 2013 Mailbox server or between various Exchange 2013 Mailbox servers.
· Unified Messaging Service Responsible for offering voicemail functions with mailboxes. This feature will be covered in detail in Chapter 8.
The Exchange 2013 Mailbox server always needs an Exchange 2013 Client Access server. Clients connect to this server, and then the Client Access server proxies the client’s request to the appropriate Mailbox server. An exception is SIP traffic originating from the Lync server; this is redirected from the Client Access server to the appropriate Mailbox server; however, all processing takes place on the Exchange 2013 Mailbox server.
Exchange 2013 Mailbox servers can be single servers without any database redundancy, or they can be installed in a database availability group (DAG). A DAG consists of a maximum of 16 Mailbox servers and can host multiple copies of mailbox databases. If one Mailbox server fails, other Mailbox server in the DAG can take over its functions, offering a seamless experience for users. Combine this with the redundancy features in the Transport service—like shadow redundancy and Safety Net—and you get a serious, high-availability messaging infrastructure.
All materials on the site are licensed Creative Commons Attribution-Sharealike 3.0 Unported CC BY-SA 3.0 & GNU Free Documentation License (GFDL)
If you are the copyright holder of any material contained on our site and intend to remove it, please contact our site administrator for approval.
© 2016-2026 All site design rights belong to S.Y.A.