Professional Team Foundation Server 2013 (2013)
Part IV
Team Foundation Build
Chapter 18
Using Team Foundation Build
What's in this chapter?
· Getting to know the build automation features provided by Team Foundation Server
· Understanding the Team Foundation build architecture
· Installing a build controller and build agent
· Working with builds
· Understanding the build process
· Editing build process parameters
· Building both .NET and Java projects with Team Foundation Server
This chapter introduces the build automation capabilities of Team Foundation Server, the core concepts, and how to install the build server functionality. You will learn how to create your own builds based on the standard build process templates, along with how to use and manage them.
Note
For information on customizing the standard build process, see Chapter 19.
Introduction to Team Foundation Build
The build automation capabilities of Team Foundation Server have probably undergone the most significant change since the initial release of Team Foundation Server 2005. Originally, the build functionality extended MSBuild to allow for a basic level of build automation integrated with Team Foundation Version Control and work item tracking.
In the 2008 release, the build system came of age in its own right as a fully enterprise-ready build automation system. That release introduced new first-class concepts into Team Foundation Server, such as the build definition and build agent, and it also had flexible build triggering functionalities provided out of the box. However, the build process was still tightly tied to MSBuild.
The 2010 release introduced even more features into the build automation area. The biggest change was the introduction of Windows Workflow Foundation as the main build orchestration mechanism. The actual compilation of solutions is still handled by the specialized build language (such as MSBuild for .NET solutions, but also Ant or Maven for Java-based projects). However, the rest of the process is governed by a build process template written using Windows Workflow Foundation.
Note
For more information on these build languages, see Chapter 17.
Other notable features new in the 2010 release include gated check-in support, private builds, build notifications, common build customization properties, integration with Symbol and Source servers, enhanced build deletion capabilities, and the introduction of a new concept called the build controller.
For customers who run their own on-premises Team Foundation Server, the 2012 release of Team Foundation Build was largely a refinement of existing functionality. One of the notable features is the ability to increase the efficiency of the gated check-in process by configuring it to build multiple check-ins at the same time.
For the 2012 release, a lot of effort was put into re-architecting how the build controllers and agents communicate with Team Foundation Server. In previous releases, the Team Foundation Server reached out to the build servers to try and establish a connection and initiate builds. This became a problem when the build server was behind a firewall or otherwise not routable location.
Team Foundation Server 2013 brings additional refinements, such as the inclusion of Server Drop Folders, which allow the build to push the outputs of compilation onto the Team Foundation Server instance rather than to a local file share.
With the introduction of the Visual Studio Online service, the product team needed to allow customers to run their own build servers with the hosted service. This necessitated a move to a polling-based messaging architecture for build server communication. Essentially, the Team Foundation Server maintains a message queue for each build server, and the build servers poll the queue continuously to keep in sync.
Team Foundation Build Architecture
Figure 18.1 shows several of the logical components that are critical in the Team Foundation Build architecture. A build is defined by a build definition, which describes the build in detail, including what should be built, how, and when. More information about build definitions, as well as how to create and manage them, is provided later in this chapter.

Figure 18.1 Team Foundation Build logical architecture
The build definition belongs to a team project in Team Foundation Server. When the application tier determines that a build for the build definition should be performed, it sends a build request message to the queue for that build controller.
The build controller then downloads the Windows Workflow–based build process template defined for the build definition and executes it. By default, this causes a build to be queued on the next available build agent in the controller's pool of agents. When the selected build agent polls the build controller during the next polling interval, it picks up the build request from its queue.
A build agent is the actual machine that performs the build. Each build agent has a build controller as a parent, but one build controller can have multiple build agents that it can use for the build. Each build controller must be assigned to a single project collection.
The build agent executes the main part of the build process as described in the build definition's process template—including calling MSBuild to perform the actual compilation and test steps.
Once the build agent has successfully executed the build, the default build process template then archives the build results (such as the website, executable files, assemblies, and so on) to a Windows-based file share or the server drop location. It will also publish any symbols to the symbol server (if configured).
All the information about the resulting build (including the build number, status, and information on the individual build's progress for a particular build definition) are called the build details. These details are displayed in a build report.
Note that the build controller and build agent processes are hosted by the build service. The build controller and build agent may live on the same machine. However, it is recommended that they do not reside on the same machine as the Team Foundation Server application tier in a production configuration. Executing a build is very CPU- and disk I/O-intensive. Therefore, the operation of builds could affect the performance of your application tier if running on the same machine, which could reduce the productivity of your entire development group.
Setting Up the Team Foundation Build Service
This section details how to set up the build service to enable build automation. This is useful for those administering a Team Foundation Server instance. If you already have a build controller for your project collection, you may wish to skip this section and go straight to the section “Working with Builds” to discover how to create new build definitions and manage them.
Note
The build service for Team Foundation Server is installed from the Team Foundation Server media. This section briefly touches on installing the build service; but, for the most recent information on how to install and configure the build service, as well as the list of supported hardware and software, see the “Team Foundation Server Installation Guide.” The guide is included in the install media for Team Foundation Server, but the latest version is published at http://aka.ms/tfsInstallGuide. Microsoft continues to update the “Installation Guide” download to include extra guidance or any new issues that surface. Therefore, it is always worth working from the downloaded version. After you download the “Installation Guide,” you cannot view its contents unless you right-click the .chm file, click Properties, and then click Unblock. As an alternative, you can double-click the .chm file to open the Open File-Security Warning dialog box, clear the “Always ask before opening this file” check box, and then click Open.
As discussed, for production use, we recommend that you install the build service on a separate machine from the application tier. However, a build machine (any machine running the build service in either the build controller or build agent role—or both) is well-suited to installation in a virtual machine. In the case of a build agent machine, it is particularly important that the virtual machine has fast disk access and plenty of CPU resources allocated.
Hosting the build agent in a virtual machine has several advantages that come along with the technology, such as the ability to rapidly add machines to the available pool of build agents for a controller and manage those agents across the physical hardware hosting them. Because a build process requires access to the machine to run any code that may execute as part of the build and test scripts, running in virtualization also provides for a degree of isolation between build agents to ensure that the actions of one build do not affect the outcome of another. Another benefit of virtualization worth mentioning is that the build agent can easily be restored to a known clean state at any time—again, ensuring a clean build environment.
You must have local administrative permission to install the build controller or agent services on a machine. As part of the installation, you must provide a service account under which the installed services will run. This user is often referred to as the TFSBUILD user.
If standard builds are required, and the policy in your company permits it, it is recommended to use the Network Service account. This will avoid issues encountered when using a real domain user account such as expiring passwords, and so on. The Network Service option is available only when running the build services as a Windows service in a domain environment where the build agent and the application tier machine are in the same domain or have a trusted domain relationship.
If you need to manually add a Network Service account to a group such as the Project Collection Build Service Accounts, the format to use is DOMAIN\MACHINE_NAME$, where DOMAIN is the build server's domain name, and MACHINE_NAME is the machine name of the build server.
If the user performing the installation is also part of the Project Collection Administrators group on the project collection to which you will be attaching the build service, this installation process will automatically add the TFSBUILD user to the appropriate Build Services group in the project collection. Otherwise, you must manually add the TFSBUILD user to the group. (See the “Team Foundation Server Installation Guide http://aka.ms/TFS2013InstallGuide” for more information.)
Just as with the Team Foundation Server installation, setting up the build service is done in two parts: installation followed by configuration.
Installing Team Foundation Build
From the Team Foundation Server installation media, navigate to the tfs_server.exe file and run it. You will then be prompted for the installation directory and to accept the License Terms before you can click Install Now.
The installation will then proceed. Depending on the prerequisites required, you may be forced to do a reboot as part of the installation process. Note that the install will add prerequisites (such as .NET) to do a basic build. However, if you wish to perform more-advanced operations (such as a test impact analysis), you must install a suitable version of Visual Studio (such as Visual Studio Ultimate or Visual Studio Premium) onto the build agent machine as well.
Configuring the Team Foundation Build Service
Once the installation has completed, the Team Foundation Server Configuration Center Wizard will be displayed. If you wish to configure the build service after installation, you can access it by running the Team Foundation Server Administration Console from the Start menu. Click Build Configuration ![]() Configure Installed Features
Configure Installed Features ![]() Configure Team Foundation Build Service, and click Start Wizard.
Configure Team Foundation Build Service, and click Start Wizard.
Regardless of whichever way you get into it, you will be presented with the Welcome screen, which you should read before clicking Start Wizard. After reading the next Welcome screen and opting to send any setup information to Microsoft, click Next to go to the Select a Team Project Collection screen of the wizard, as shown in Figure 18.2.
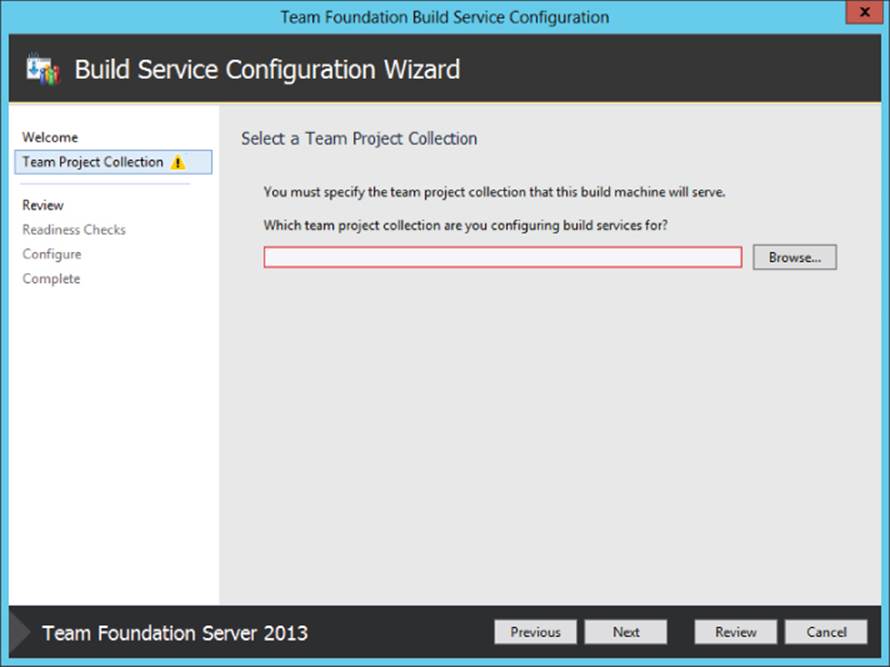
Figure 18.2 Build Service Configuration Wizard
Here you must define the project collection to which the build service is bound. Note that this can be one (and only one) project collection per build service instance. If you have many project collections in your organization, but want them to share the same build hardware, you should use virtualization to host several virtual machines running the build controllers for each project collection.
Click the Browse button shown in Figure 18.2 to select the server and project collection. If the server drop-down in the Connect to Team Project Collection dialog box shown in Figure 18.3 is empty, or does not display the server you need to talk to, clicking the Servers button will allow you to add a new server instance first, and then select the project collection.
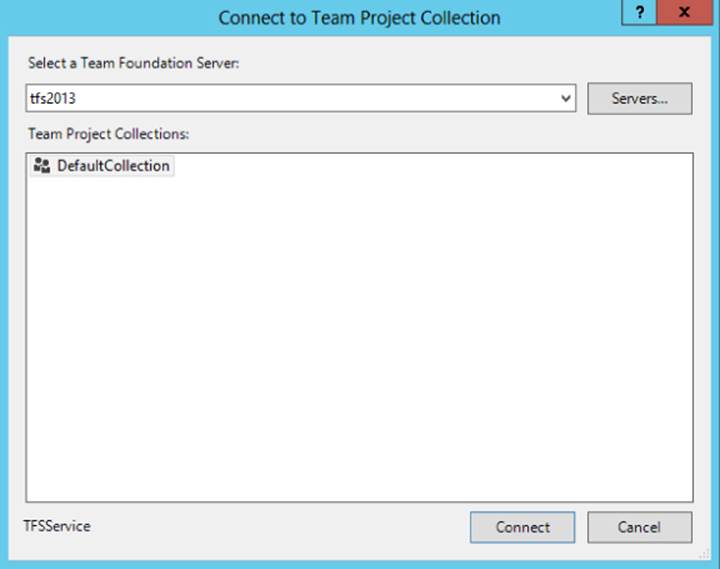
Figure 18.3 Connect to Team Project Collection dialog box
Clicking the Connect button in the dialog box shown in Figure 18.3 will then populate the selected project collection in the Build Service Configuration Wizard, and it will allow you to proceed to the Configure Team Foundation Build Service screen shown in Figure 18.4 by clicking Next.
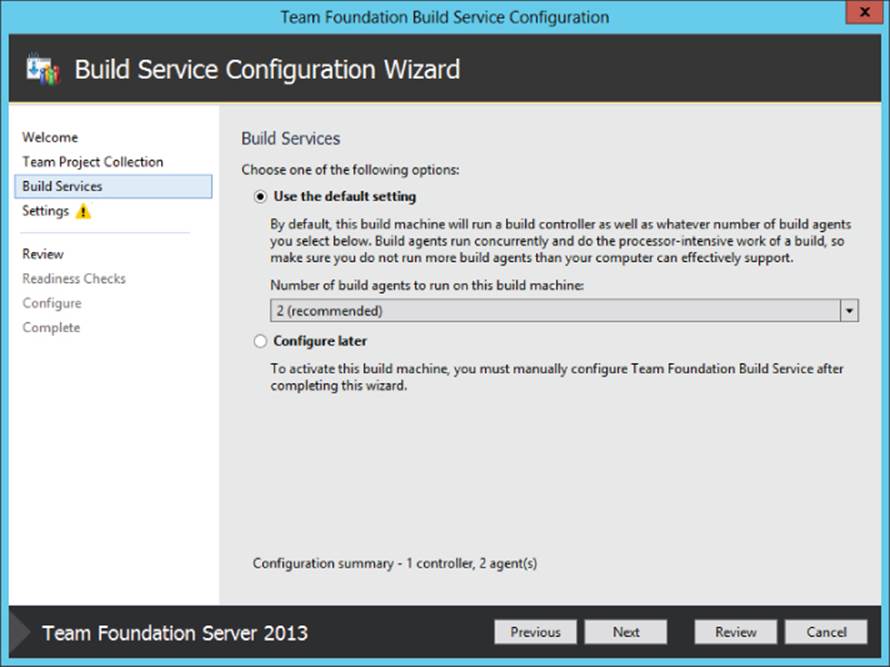
Figure 18.4 The Build Services screen of the Build Service Configuration Wizard
Depending on the number of processors that you have available, you may wish to configure multiple build agents to run on the same machine under the build service. This allows for parallel building of projects on the same machine. However, you should be sure that your build server has sufficient CPU resources and fast enough disks to ensure that it can perform adequately in this way. The default setting (and likely most appropriate for a virtualized build server) is to have one build agent per CPU. A dual core virtual machine is shown in Figure 18.4, which is why two agents are shown as the default.
Note that, if you have selected a project collection that already has a build controller, the Configure Team Foundation Build Service screen will look as shown in Figure 18.5. In that instance, if you wanted to add the current machine as a build agent to the selected build controllers pool, you could do so, or you could replace the existing controller with this current machine.
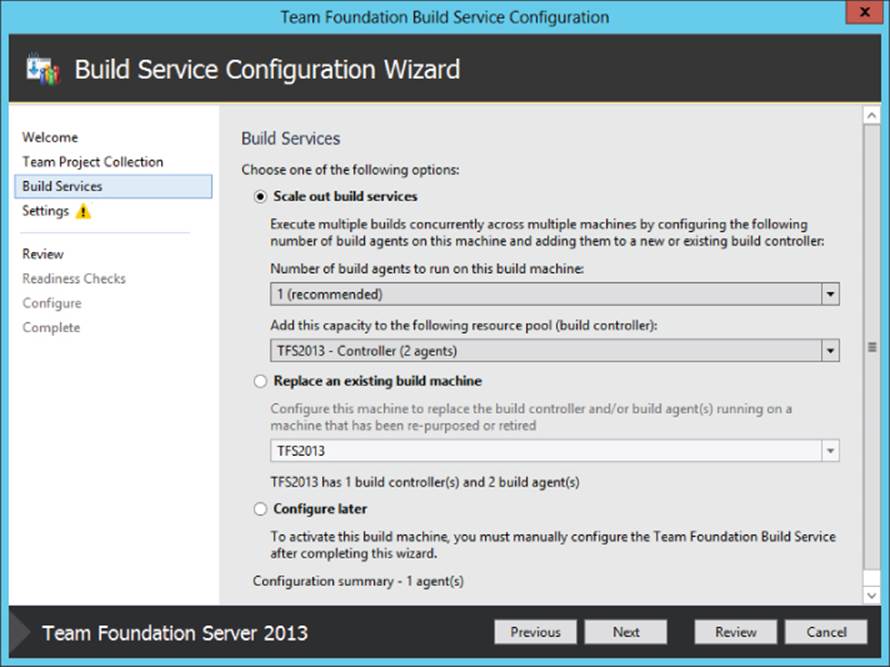
Figure 18.5 The Build Services screen of the Build Service Configuration Wizard
Either way, you will now need to provide a build service account (the TFSBUILD user), as shown in Figure 18.6.
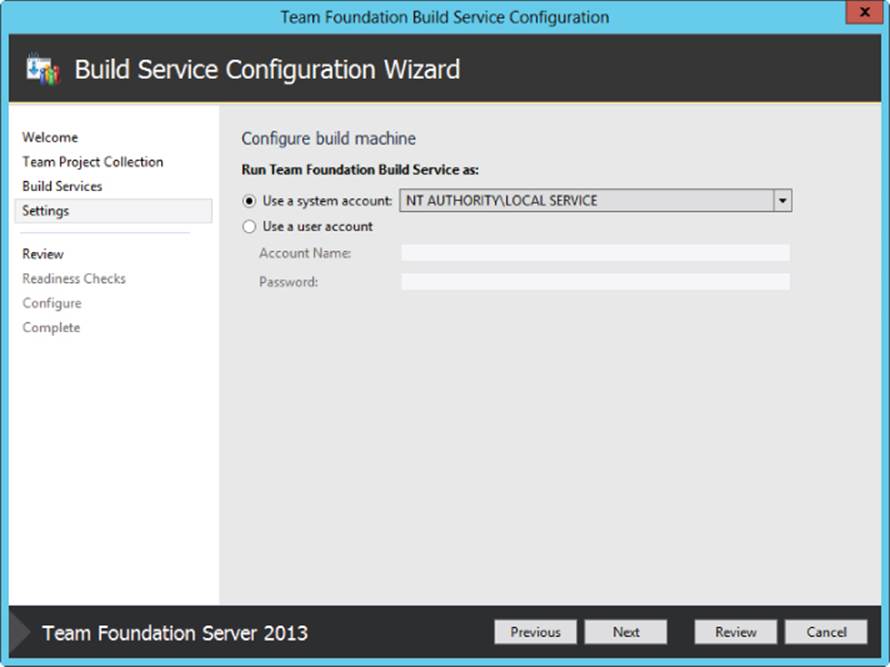
Figure 18.6 Configure build machine screen
Click Next to proceed to the review page, where you can check the configuration about to occur. Clicking Next will perform the readiness checks. If you need to correct any errors, do so and then click the link at the bottom of the dialog box that says “Click here to rerun Readiness Checks.” Once everything has passed, click Configure to actually begin the build agent configuration process. When this has completed successfully, finish the wizard and your configuration will be complete.
You will now be presented with the Team Foundation Server Administration Console. Viewing the Build Configuration screen shown in Figure 18.7 will allow you to check the status of the build service and the defined controller and agent(s).
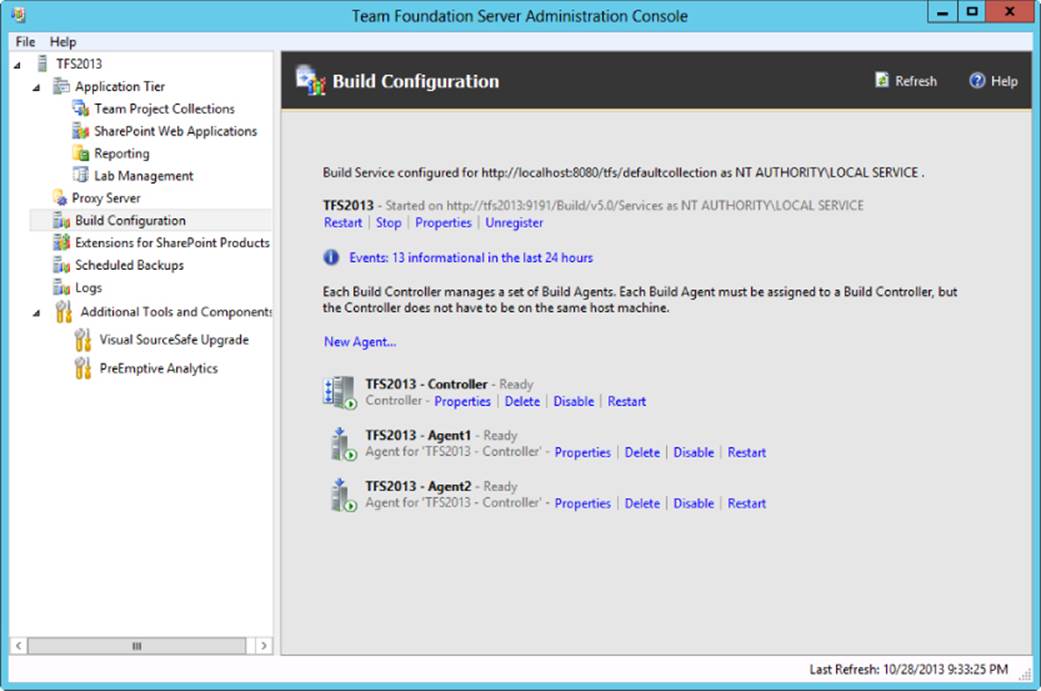
Figure 18.7 Build Configuration screen
The top part of the Build Configuration screen shown in Figure 18.7 controls the actual build service hosting the build controller and/or build agent(s). You can control the service from here by starting, stopping, or restarting it. The same could also be done using the usual Windows Services section of Server Manager in Windows Server and selecting the Visual Studio Team Foundation Build Service Host 2013 service, or by issuing the typical net start “TFSBuildServiceHost.2013” commands from an Administrative command line. For example, you might need to restart the build service to pick up any changes such as modifications to system environment variables.
More useful is the capability to unregister the build service and adjust the build service properties. Unregistering will remove the build service from the project collection and remove the associated build controller and agents if you wish to decommission the build machine. Once the build service is stopped, clicking the Properties link will display the Build Service Properties dialog box, as shown in Figure 18.8.
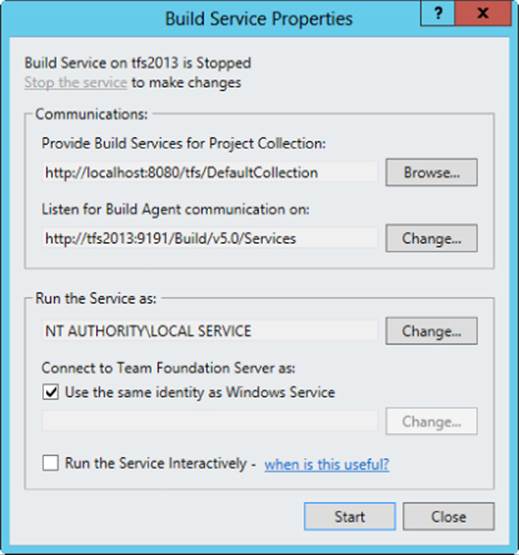
Figure 18.8 Build Service Properties dialog box
In the dialog box, as shown in Figure 18.8, you can change the project collection to which the build services are connected, which is useful if the URL to access the project collection changes because of a move of that collection to a new application tier. You can also specify the web service endpoint for the build services. By clicking Change, you can adjust the configuration to a different port, force SSL, and optionally require client certificate authentication in the instances where you want a cryptographically secure link between the application tier machine and the build service.
The Build Service Properties dialog box also allows you to specify that the build service host process be run as an interactive process, rather than a Windows service, if a session with a desktop login is required (such as when running coded UI tests).
Running the Build Service Host as an Interactive Process
It is sometimes necessary to run the build service host as an interactive process with a real domain user account. The most common example is when you require the build agent to interact with a running application through the desktop, such as when you want to run coded UI tests without a full test agent. Several steps are available to ensure this kind of configuration is as reliable as possible.
The first is to configure the build service host to run as an interactive service using the Build Service Properties dialog box, as shown in Figure 18.8.
Next, you should configure the build service user as an auto-logon account for the server. This will ensure that when the machine reboots because of Windows updates requiring restarts or other events, it will go straight to an interactive session for the build user. For more information, see http://aka.ms/KB324737.
You should then ensure that the screen saver is disabled for the build user account to prevent it from locking the session.
Note that all these options degrade the security of the build agent machine because anyone with physical access to the machine would then be able to interact with it as the logged-on build user. Therefore, any build agent configured in this way should be placed in an environment with the appropriate level of physical security.
For more information on coded UI tests and test agents, see Chapter 26.
Additional Software Required on the Build Agent
To perform basic compilation and unit tests of many project types in Visual Studio, no additional software is required on the build agent after installing the build service. However, you must install a suitable Visual Studio edition for other types of projects and activities. For example, to build an ASP.NET Web Application project or a C++ project, you must have Visual Studio 2013 installed on the build agent computer.
Additionally, you may need to install third-party component libraries if they are required to be in the Global Assembly Cache (GAC) by your projects. If your build process requires additional functionality to be present (such as the Build Extensions power tool, along with Java and Ant or Maven to build Java projects), these must also be installed.
Working with Builds
Now that you have configured a build controller and build agent, you can go about automating the build of your project. This section focuses primarily on building Visual Studio projects and managing the build automation from within the Visual Studio IDE. For information on building Ant or Maven projects, see the section “Building Ant and Maven Projects with Team Foundation Server” later in this chapter. Many of the tools and windows are identical (or at least very similar) in Eclipse for Java-based projects, so the following is still relevant.
This discussion assumes that you have a project that cleanly builds in Visual Studio, that you are sharing the source for the build in version control with the rest of your team, and that you want to automate in the build process for that project.
Creating a Build Definition
As previously mentioned, the build definition defines how, what, when, and where to perform your build. You create a new build definition in Visual Studio from the Builds page, and then select New Build Definition or right-click the Builds node in Team Explorer for the team project and select New Build Definition, as shown in Figure 18.9.
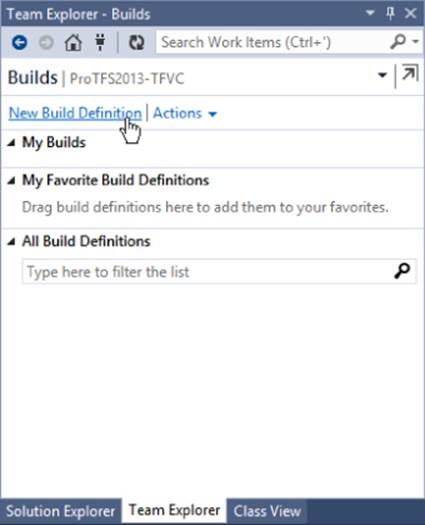
Figure 18.9 New Build Definition link in Team Explorer
This will then show the build definition editor. In Visual Studio, it will show in the main document (see Figure 18.10), and in Eclipse it is a new modal dialog box. The build definition editor is divided into two parts. The area on the left shows the various sections of the build definition, and the area on the right is the form for that section.
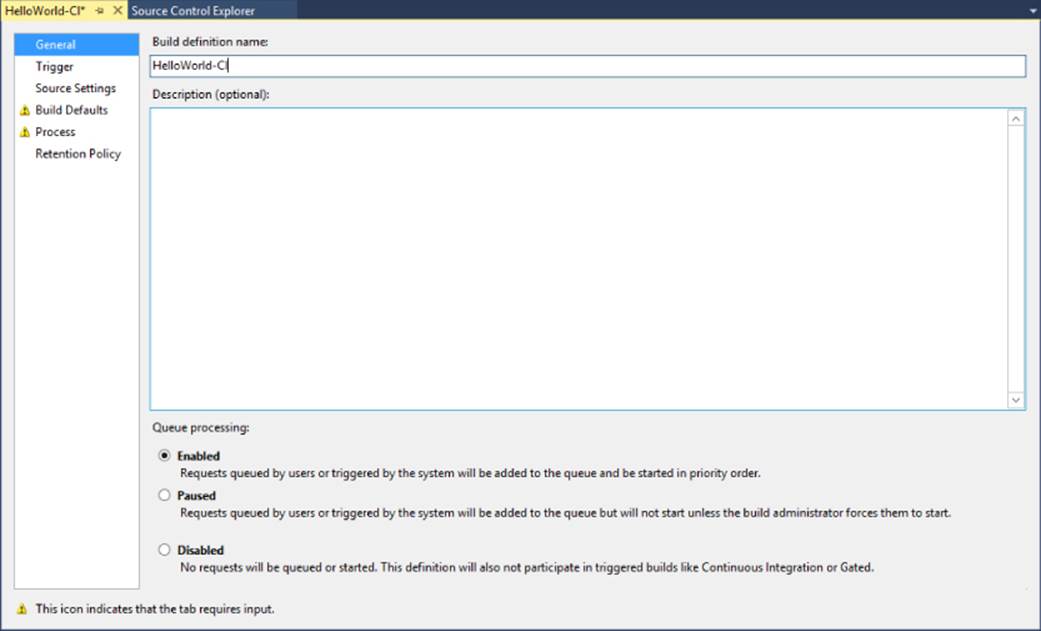
Figure 18.10 General section
Note that when you first create the build definition, a number of warning triangles appear on the left-hand side of the dialog box. This is completely normal and just indicates which sections have data that must be filled out before proceeding. However, it is a good practice to go through every section and fill in the relevant data because the defaults are not always what you might want.
Note
In Visual Studio, if you have the solution open for which you wish to automate the build, when you create the new build definition, it will default a number of values into the build definition form for you (such as the build definition name, the workspace template, and which solution to build). You can still edit these as you go through the form, but having the solution open before creating the new build definition can save you some time.
General Section
The General section shown in Figure 18.10 allows you to set the build definition name and description, and you can optionally disable or pause the build definition. It is easy to rename a build definition at any point in the future, so do not worry too much at this point about what naming convention to use if you do not have one already.
For the description of the build, it is a good practice to provide a short (one-line) description of what the build is for, as well as contact details for the build owner or “build master.” The first three lines of the build descriptions are displayed in other dialog boxes in Team Foundation Build without scrolling, and they are, therefore, quite useful to add data to in order to make your development system more discoverable and easy to use for new team members.
Trigger Section
The Trigger section controls when the build should be run. As shown in Figure 18.11, there are a number of triggers defined that can allow a build to run. Note that these are the only built-in triggers in Team Foundation Server, and they are not extensible. Therefore, if they do not meet your needs, you must create your mechanism for queuing the build using the extensibility APIs for Team Foundation Server. For an example of using the extensibility API to queue a build, see the blog post at http://aka.ms/TfsBuildApiExample.
Note
See Chapter 29 for more details on Team Foundation Server extensibility.

Figure 18.11 Trigger section
However, the following built-in trigger types are very comprehensive, and they cover the vast majority of build scenarios:
· Manual
· Continuous Integration
· Rolling Builds
· Gated Check-in
· Schedule
Manual
The Manual trigger was the only trigger available in Team Foundation Server 2005. When a build is manually triggered, it will be run only when the build is explicitly queued by a user in Visual Studio, Eclipse, by the tfsbuild.exe command, or by other code using the extensibility APIs for Team Foundation Server.
Manual builds are useful when first creating the build definition to ensure that everything is working correctly before turning to one of the other triggers. They are also commonly used for a QA build—that is, a build performed when the team wishes to push code to a QA environment. The QA build might perform additional automated tests and documentation activities that take a significant amount of time, and they would be overkill for a standard development build but only necessary when creating a build that may be used in production. Any build definition can always be manually triggered as desired, regardless of the configured trigger type.
Continuous Integration
The Continuous Integration trigger monitors every check-in affecting the build files and causes a new build to be queued. The folders and files that trigger the build are determined by the Workspace definition examined later in this chapter. Because check-ins to Team Foundation Server are denoted by the changeset number as a single atomic transaction, by performing a build for every check-in, it is easy to see which check-in caused a problem (“Who broke the build?”).
For systems that have a lot of check-ins, it is essential that the continuous integration build runs as quickly as possible to provide feedback as to whether the build is “good” or not so that the feedback loop is maintained and developers get into the habit of ensuring that their check-ins always result in good builds. If a build agent is busy building the previous check-in, the build controller will look for the next available build agent or keep the builds in a queue until a build agent is available.
The state of the version control repository at the point of time represented by the changeset that triggered the build is what is used when performing the build. Therefore, it doesn't matter if the build for changeset 17 runs after the build for changeset 19 because of build agent availability or build priorities—the builds will represent the state at exactly that point in time.
Because of the precise nature of continuous integration builds—and the clear way in which they indicate which check-in broke the build—they are the preferred trigger to use for a standard development automated build.
Note
To prevent a check-in from triggering a build, insert the text ***NO_CI*** anywhere in the comment string. This special string indicates the check-in should be ignored by the build system triggers.
Rolling Builds
A Rolling Build trigger is similar to the build trigger called Continuous Integration by Team Foundation Server. However, it will group together several check-ins to ensure that the build controller never has a large queue of builds waiting to be processed. Optionally, a time interval can be specified to control the minimum duration that must have passed before a new build is triggered. This is the type of trigger that was first used by the continuous integration build servers such as CruiseControl or CruiseControl.NET.
Rolling builds reduce the number of builds performed and, therefore, can guarantee a time in which the results of a particular check-in will be known. However, the grouping of check-ins from several developers can make it difficult to identify which change was responsible for any build failure.
A build definition with a Rolling Build trigger can also be used in conjunction with a continuous integration build. Both can build the same resources. However, the continuous integration build can be responsible for providing a quick check on quality for the build, whereas the Rolling Build can perform additional activities such as running a full UI automation pass, generating code documentation, packaging the build into MSI installers and ISO images ready for distribution, or even deploying the build into a test environment ready for evaluation.
Gated Check-In
The Gated Check-in trigger was new to Team Foundation Server 2010. It is similar to a Continuous Integration trigger, but with a twist. When a check-in is performed into the area covered by a Gated Check-in build definition, the developer is presented with the dialog box shown in Figure 18.12.

Figure 18.12 Gated Check-in dialog box
Any check-ins are first automatically stored as a shelveset. The build server then merges the code as it was before the check-in was attempted with the code stored in the shelveset. Only when the build is successful are the changes then committed to the version control repository by the build controller on behalf of the person performing the check-in (but with the addition of ***NO_CI*** appended to the end of the check-in comment to ensure a subsequent build is not required). If the merge of the shelveset with the latest version of source control is not possible because of a merge conflict, then the build will fail. If the build fails for any reason, then no code is checked in, but the shelveset is kept on the server for remediation.
Team Foundation Server 2012 provided the ability to accumulate gated check-in submissions. This feature is useful if your build server can't keep up with the number of submissions. When this feature is enabled, the server will merge and build a number of submissions as part of a single build execution. However, if a combination of multiple submissions fails, the server will attempt to build them as individual submissions. This allows the valid check-ins to be committed and the invalid check-ins to be rejected without manual intervention.
The user will be notified of the check-in build completion via the build notification tool running in the system notification area on Windows or via the Gated Check-ins view in Eclipse. At this point, the user may reconcile his or her workspace—that is, remove the pending changes that were committed as part of the build from the current pending changes list.
If more than one build definition is affected by a gated check-in, the user will be prompted to select the one he or she wishes to use to validate the build in the Gated Check-in warning dialog box shown in Figure 18.12.
Because gated check-ins require the code to be automatically merged as part of the build process, this has two important effects:
· The actual code checked in may differ slightly from the code submitted as part of the shelveset.
· Even though Team Foundation Server has built-in agent pooling capabilities, only one build of a gated check-in may be executed at a time to prevent merge conflicts.
Gated check-ins are useful in organizations that have very large numbers of developers working in the same codebase where traditional gated continuous integration builds are failing too often because of human error. (Even the best developer might break the build once or twice a year; but, if you have 300 developers checking into the same tree, that means the build breaks at least every day.)
More commonly, gated check-ins are used when organizations wish to ensure that code committed to the main codebase meets certain requirements, such as code quality, test coverage, and so on. These factors can sometimes be determined by deploying custom check-in policies to every developer machine. However, that may require significant overhead and make for a very complex check-in experience. Gated check-ins move all the check-in validation to a centralized server infrastructure.
Schedule
The Schedule trigger can define a time on a weekly schedule that a build is queued—that is, a daily, nightly, or weekly build. Note that only a single time may be provided for each build definition, and that time is used on the chosen days of the week repeated weekly. This time should be selected so that it does not conflict with any ongoing backup or other maintenance jobs in the network, and ideally it should also be selected so that, when the build is due to complete, there are people available to help fix the build if any errors have occurred.
The time in which the build is run is converted to the time zone for the application tier when the build definition is saved, but it is always displayed in the local time zone of the user editing the build definition. Therefore, there can be some confusion around periods when daylight savings is in operation in one of those times zones and not the other.
If a more complex schedule is required (such as every second Thursday or the last Tuesday of the month), it may be preferable to create a build definition using a Manual trigger, and then set up a Windows Scheduled Job to run on the defined schedule that will queue the build using the tfsbuild.exe command line.
Managing Builds from the Command Line with tfsbuild.exe
Visual Studio Team Explorer installs a number of command-line tools, one of which is the tfsbuild.exe command. The command can be used to perform a limited number of Team Foundation Build tasks and is also useful in scripting scenarios where full access to the Team Foundation extensibility APIs is not required.
For example, to trigger a build, a command similar to the following could be used:
tfsbuild start http://vsalm:8080/tfs/DefaultCollection
AdventureWorks “My Build Definition”
In this example, http://vsalm:8080/tfs/DefaultCollection is the URL for the team project collection, AdventureWorks is the name of the team project, and My Build Definition is the name of the build definition for which you wish to queue a build.
For more information on the tfsbuild command, open a Developer Command Prompt for VS2013 and type TFSBuild help, or visit http://aka.ms/TfsBuildExe.
Workspace Section
The Workspace section shown in Figure 18.13 allows you to define the working folder mappings that should be used for your build. This determines not only where the files should be placed on the disk to perform the build, but also which files are relevant to the build definition and, therefore, should be included in any build label or monitored as part of the build trigger.
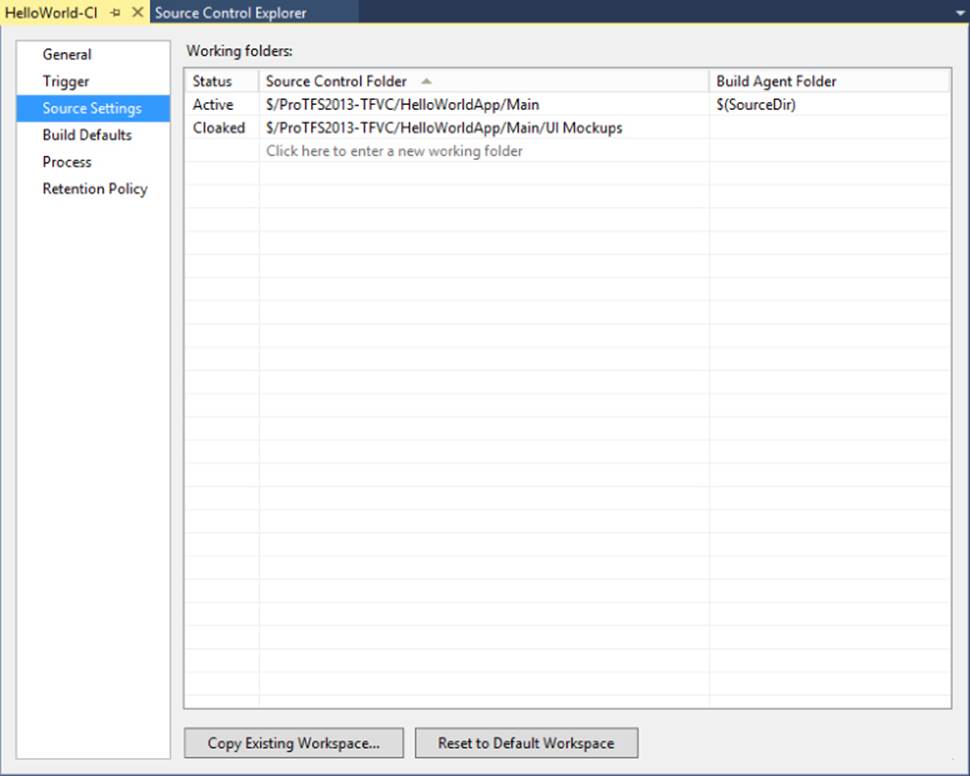
Figure 18.13 Workspace section
The default working folder mapping is usually given as the root of the team project (for example, $/AdventureWorks) mapped to the sources directory represented by the environment variable $(SourceDir). This is almost always too broad of a mapping and covers many files that should not be part of your build. It has the effect of triggering builds when they should not be and slowing down the build process (because files outside the area of a source that you are interested in must be downloaded).
The working folder mappings should be altered to include an active mapping with as fine of a granularity as possible (usually the folder containing the solution to be built inside the branch you wish to build, as shown in Figure 18.13). Also, any files or folders that should not trigger a build should be cloaked.
In the example in Figure 18.13, a directory containing a series of UI mockup images is excluded from the build because, while they are checked in alongside the source tree, the files do not make up part of the software being built. (They are for reference by the development team during development and would take a significant amount of time to download in each build because of their large size.)
Note
For more information on working folder mappings and cloaked mappings, see Chapter 6.
Build Defaults Section
In the Build Defaults section shown in Figure 18.14, you select which controller you wish to be responsible for the build definition by default, and select where you want the results of the build to be staged after they have been built (the drop location).
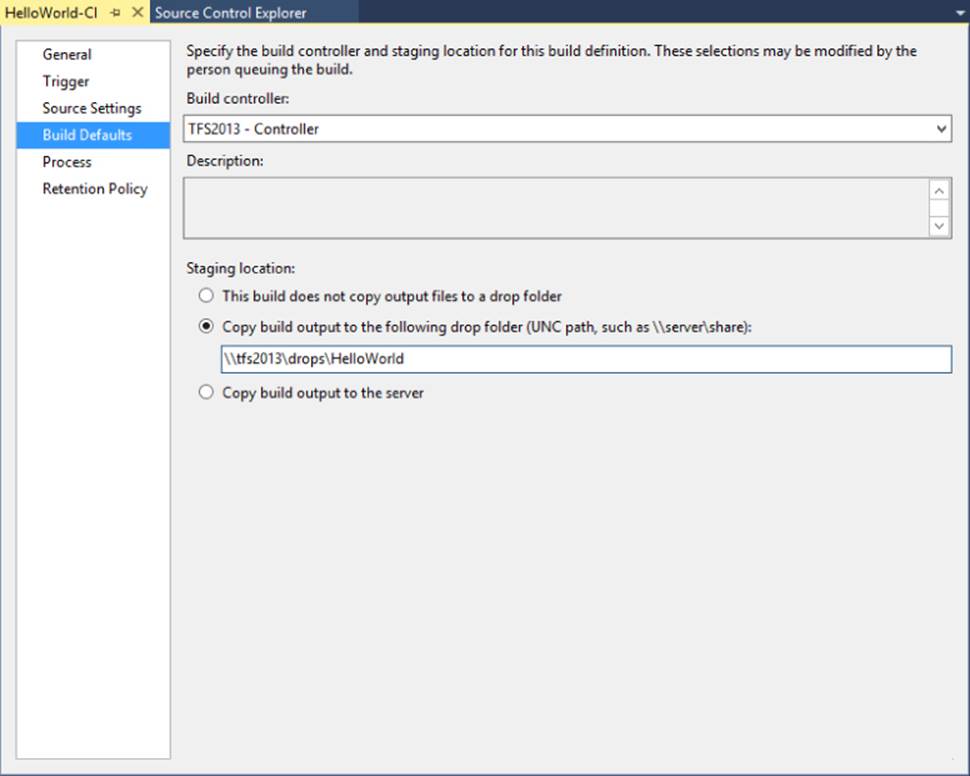
Figure 18.14 Build Defaults section
Installing the build service host registers the build controller with the server. If there are no build controllers present in the drop down, you do not have one installed for your current project collection. See the section “Setting Up the Team Foundation Build Service” earlier in this chapter for details on how to do this.
The Description field shows the description assigned to the build controller (useful for conveying information about who owns the controller or what it should be used for), and it is read-only in this section. To edit the description, see the Build Controller Properties dialog box from the Team Foundation Server Administration Console.
The drop location must be a UNC path to a Windows file share on the network. The build agent machine must have network access, and the user running the build service must have permission to write to that location, because files are copied directly from the build agent to the drop location as part of the build. There is a 260-character limit to the full path of all files copied to the drop location, so you should ensure that the server name and path are reasonably short, leaving you the maximum space for your output. However, you should put builds in directories in the drop location that correspond to the build definition to help keep them organized. If your build does not have any output, you can select the first option, which allows the build definition to be valid without filling in a drop location. You can also have the build outputs stored in a special location in Team Foundation Server known as the Server Drop. This feature, new in Team Foundation Server 2013, is handy if you don't have the ability to configure a drop location that can be accessed through a UNC path.
Process Section
The Process section determines which of the registered build process templates should be used for the build definition and what properties should be passed into that Windows Workflow process when it is started, as shown in Figure 18.15.
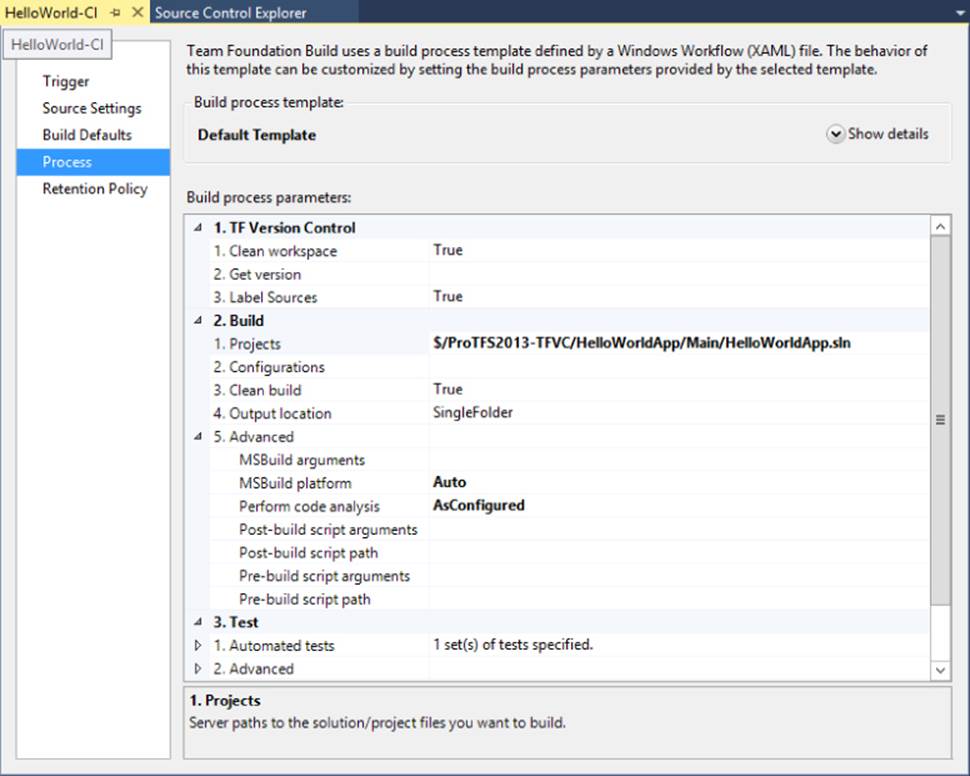
Figure 18.15 Process section
Each process can define a number of customizable properties to control how the build behaves. Properties that are mandatory but not populated are marked with a warning triangle when the build definition is created. If the build definition was created while a solution was open in Visual Studio, this solution will be prepopulated in the Projects area. If this occurs, ensure that this is the correct solution or project that you wish to build.
Note that the Process section is one area that differs greatly when creating Java-based builds from Eclipse using Team Explorer Everywhere. For more information, see the section “Building Ant and Maven Projects with Team Foundation Server,” later in this chapter.
The build process, along with more details on the various properties used by the main process templates that ship out of the box, is described in more detail later in this chapter in the section “Understanding the Build Process.”
Retention Policy Section
The Retention Policy section shown in Figure 18.16 specifies the rules by which builds should be retained automatically and what should be deleted for builds that fall outside of the retention policy.
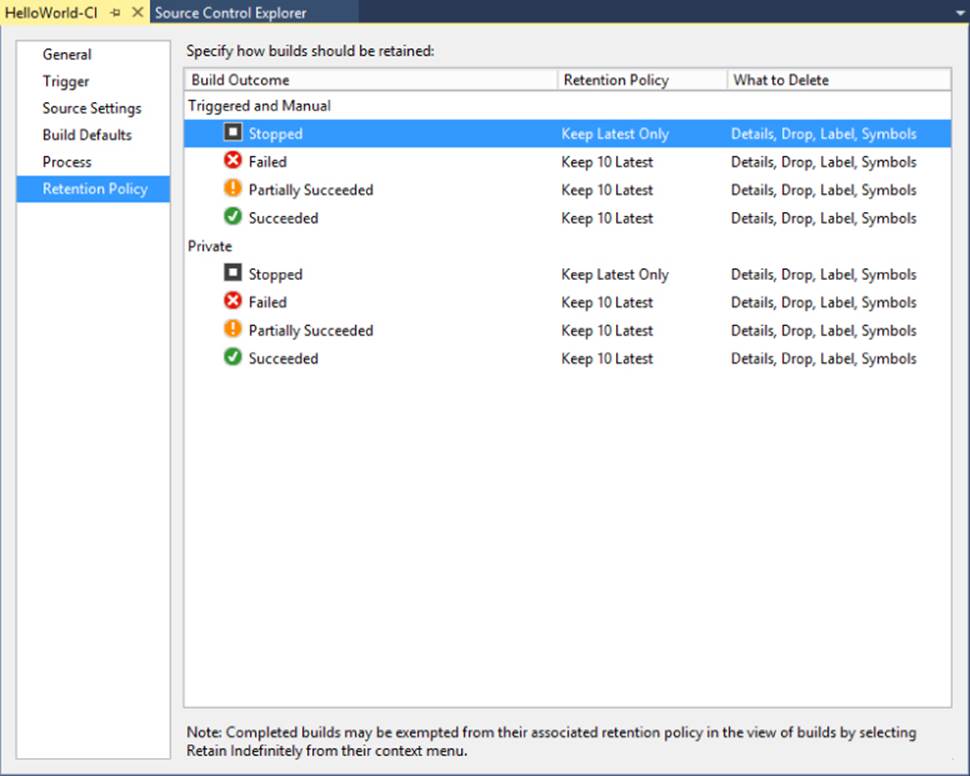
Figure 18.16 Retention Policy section
Once you start building on every check-in, the number of builds created by the system can rapidly increase. However, not all of the builds are relevant for very long once the status (passed or failed) is known. Finding the build that you are looking for can get complicated but also the disk space required to store all the build results grows for each build retained.
With Team Foundation Server, a build may finish in one of four states:
· Succeeded—Everything in the build is good and is what you want to see.
· Partially Succeeded—This is the default state given to a build that has passed compilation but something else has gone wrong during the build (such as unit tests failing). In the case of unit test failures, it is possible to completely fail the build. (See the section “Build Process Parameters” later in this chapter for more information.)
· Failed—A Failed build is one that has completely failed for some reason.
· Stopped—A Stopped build is one that has been terminated manually while it was running.
The retention policy controls how many results you would like to keep by default for each type of build result. At any time, from the context menu of the build details, or from the build report, you can indicate that a particular build should be marked Retain Indefinitely (or Keep Forever). Marking a build as Retain Indefinitely means that it will be excluded from the automatic retention policies.
Separate retention policies are in place for both the team builds triggered (or manually queued) and for the private builds queued by individual developers. More information is given on private builds later in this chapter. Changing the private build retention policy affects all the developers performing private builds for that definition—not just the developer editing the setting.
Warning
For teams making use of Microsoft Test Manager to record fast-forward test executions, deleting test results will destroy the action recordings required for fast-forwarding. Therefore, be careful with the retention policy settings for build definitions used by your test teams. You may alter the retention policy to exclude test results from the items deleted, as shown in Figure 18.16, or mark any builds used by your test teams as Retain Indefinitely. For more information, see Chapter 26.
For each retention policy, you can determine what is automatically deleted by selecting the “What to Delete” column. Selecting <Specify What to Delete> displays the dialog box shown in Figure 18.17, which allows a custom setting to be applied when the build is automatically deleted from that point onward.
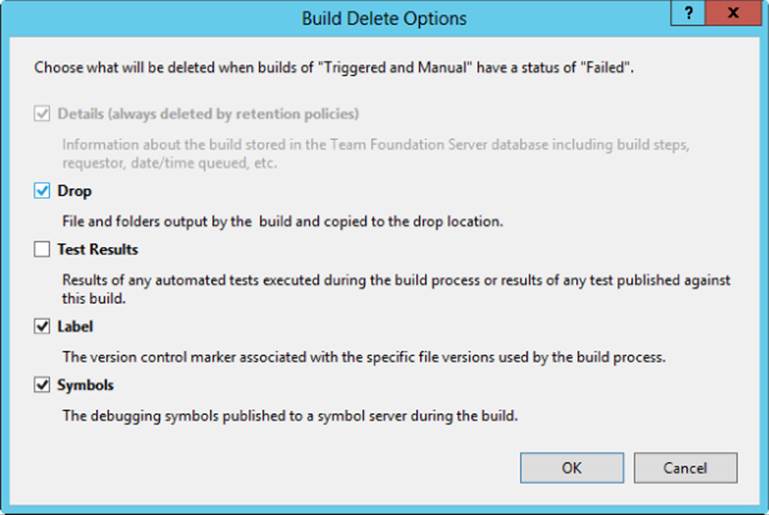
Figure 18.17 Build Delete Options dialog box
For more information on what each of the delete options means, see the section “Deleting Builds” later in this chapter.
Saving the Build Definition
Once you are happy with the settings for the build definition, you can save it by clicking the Save button or pressing Ctrl+S. In Eclipse, click OK to save the changes to the server.
Queuing a Build
When you have created a new build definition, you should manually queue the build the first time to ensure that it is working as desired. The latest successful build for a build definition is used to determine which changesets and work items will be associated with the subsequent build, so this first build will be the baseline by which the next triggered build is compared.
To manually queue a build in Visual Studio, go to Build ![]() Queue New Build. Alternatively, in either Eclipse or Visual Studio, you can right-click on the build definition in the Builds node of Team Explorer and select Queue New Build.
Queue New Build. Alternatively, in either Eclipse or Visual Studio, you can right-click on the build definition in the Builds node of Team Explorer and select Queue New Build.
You will then be presented with the Queue Build dialog box, as shown in Figure 18.18.
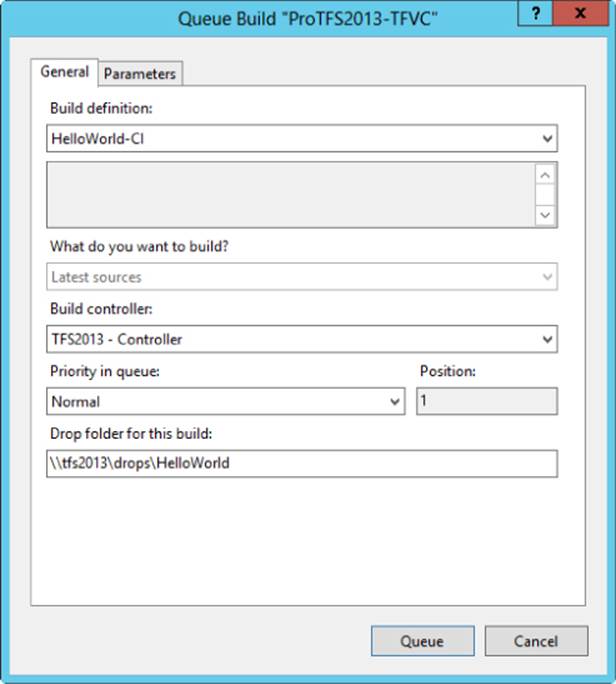
Figure 18.18 Queue Build dialog box
Understanding the Queuing Process
When you manually queue a build, you may specify on which controller you would like this to run (overriding the default, which is used for a triggered build). Additionally, you can set the priority of the queued build and get an indication as to where in the queue this priority would put you when submitting the build.
Builds triggered using one of the build definition triggers are done so with a priority of Normal. You can set this to High, Above Normal, Normal, Below Normal, or Low, depending on the priority of your manual build request. Click Queue to trigger the build at this point.
When manually queuing a build, an additional Parameters tab will be displayed. There you will find a customizable list of properties as defined by the build process template, allowing you to alter the value of that property for this single invocation of the build.
For example, if you wanted to manually queue a build of the source tree based on the label ReadyForTest, you could manually specify the Get Version property for the build to be LReadyForTest@$/ProTFS2013-TFVC (where L specifies that this is a Label version specification, and @$/ProTFS2013-TFVC specifies that this label was in the scope of a Team Project folder called $/ProTFS2013-TFVC in version control), as shown in Figure 18.19.
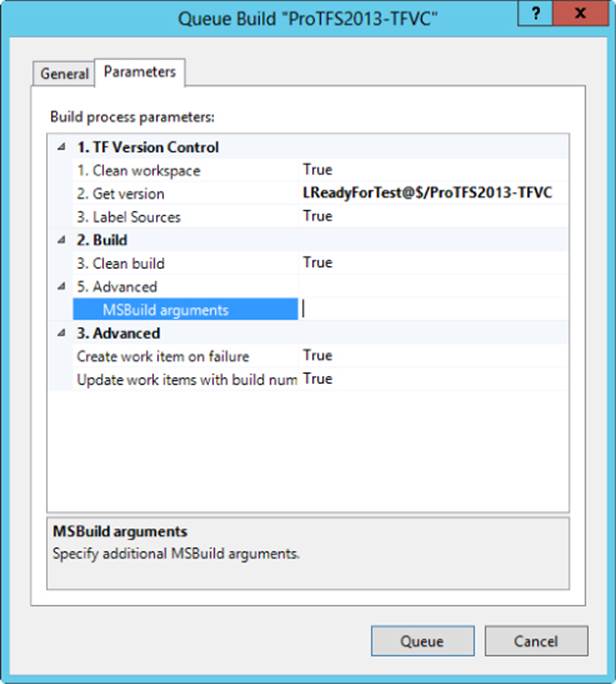
Figure 18.19 Manually queuing a build from a Label
Private Builds
A feature of Team Foundation Server is the ability to request that a build be performed using the latest sources merged with a shelveset specified by the developer as a private build (sometimes called a buddy build). You do this from the Queue Build dialog box when manually queuing a build by changing the “What do you want to build option” to “Latest sources with shelveset,” and then specifying the shelveset, as shown in Figure 18.20.
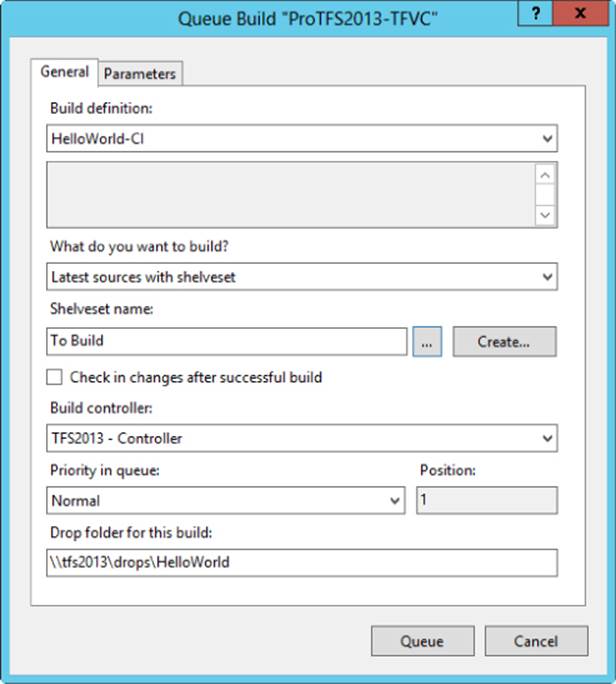
Figure 18.20 Manually queuing a private build
Private builds are useful when you want to ensure that you are including all the changes necessary to successfully perform the build on a different machine before committing the changes to the main source repository. They are also very useful when you want to make use of the build process set up on the server to test and create all the build output, but you are not yet sure if the change you are proposing should be included in the codebase.
A private build is similar to a gated check-in, except that the use of shelvesets is not enforced, and checking in of the code in the shelveset after a successful build is optional.
Private builds (those performed without selecting the check-in option) do not follow the same build numbering scheme defined for the regular team builds and have separate retention policies, as discussed earlier in this chapter. The results of the private build are shown to that developer only and are not displayed to the entire team. However, build alerts may notify of private builds depending on their configuration.
Build Notifications and Alerts
Team Foundation Server exposes a powerful eventing model and extensibility APIs that allow for custom integrations of any imaginable application or device for notification of build results, from standard e-mail alerts to lava lamps, confetti-filled leaf blowers, build status screens, and even talking robotic rabbits. However, there are two main notification systems exposed to the developer out of the box:
· Build notifications tool on Windows
· E-mail alerts
Build Notifications Tool
The notification tool is a small application that runs in the system notification area on Windows. In the 2008 release, this was provided as part of the Team Foundation Server Power Tools but ships with Visual Studio and Visual Studio Team Explorer in the 2010 release and beyond.
Figure 18.21 shows the build notification tool running and displaying a notification to the user as an Outlook style pop-up message in the bottom-right corner of the screen. It can be configured to run on login, but will be run by Visual Studio if a gated check-in is requested. In the case of a gated check-in, if the build is successful, the notification tool will display a dialog box to the users (see Figure 18.22) asking them if they would like to Reconcile their workspaces. The build notification tool works by polling Team Foundation Server at a regular interval, and therefore notifications may take up to two minutes to be displayed to the user after the build has been completed.
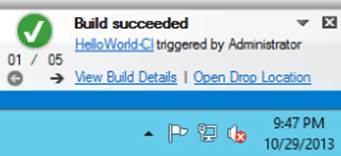
Figure 18.21 Notifi cation tool pop-up
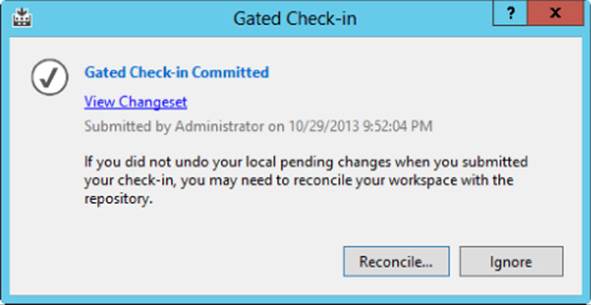
Figure 18.22 Notifi cation prompting for reconciliation of workspace
E-mail Alerts
Basic e-mail alerts can be configured from the Team ![]() Project Alerts menu in Visual Studio once the selected team project has been highlighted in Team Explorer. Using the interface shown in Figure 18.23, e-mail alerts can be enabled when a build quality changes, when any build completes, or when builds are initiated by the developer.
Project Alerts menu in Visual Studio once the selected team project has been highlighted in Team Explorer. Using the interface shown in Figure 18.23, e-mail alerts can be enabled when a build quality changes, when any build completes, or when builds are initiated by the developer.
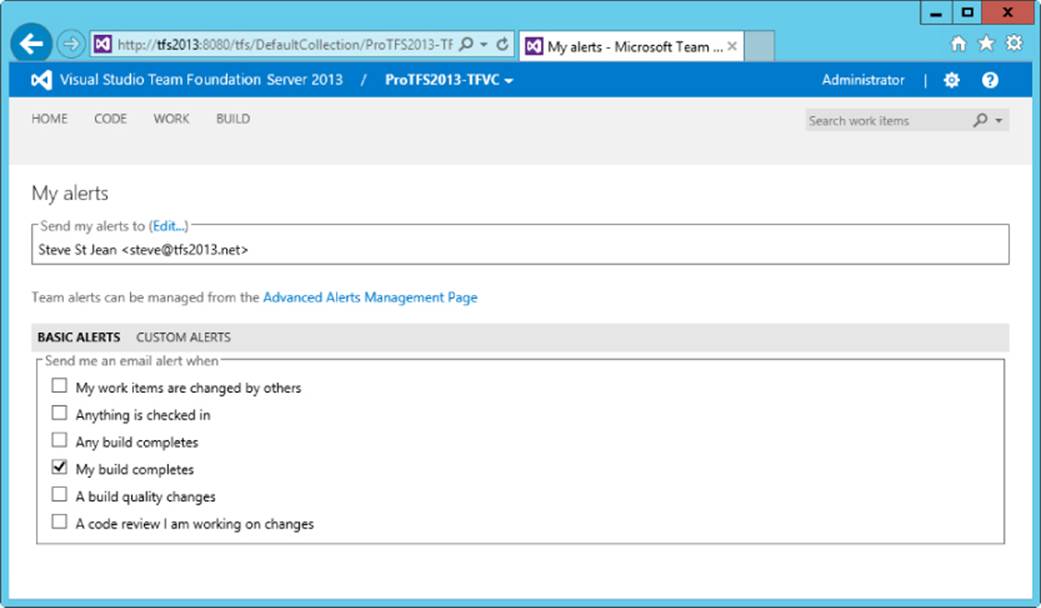
Figure 18.23 Enabling e-mail alerts
E-mails can be sent to any e-mail address, including team distribution lists, provided the Team Foundation Server application tier is configured with the correct SMTP server details to send the messages. However, the e-mail alerts belong to the user who created the alert, and that user must delete or edit the alert through the web interface.
On the Team Foundation Server application tier machine, the BisSubscribe.exe command is available in the Team Foundation Server\Tools folder and can be used to script the creation of project alerts for a team project.
Managing Builds
The main build management activities are performed using the Builds page in Visual Studio or Eclipse, which is accessed by clicking on the Builds link in Team Explorer. Figure 18.24 shows the Build Explorer.
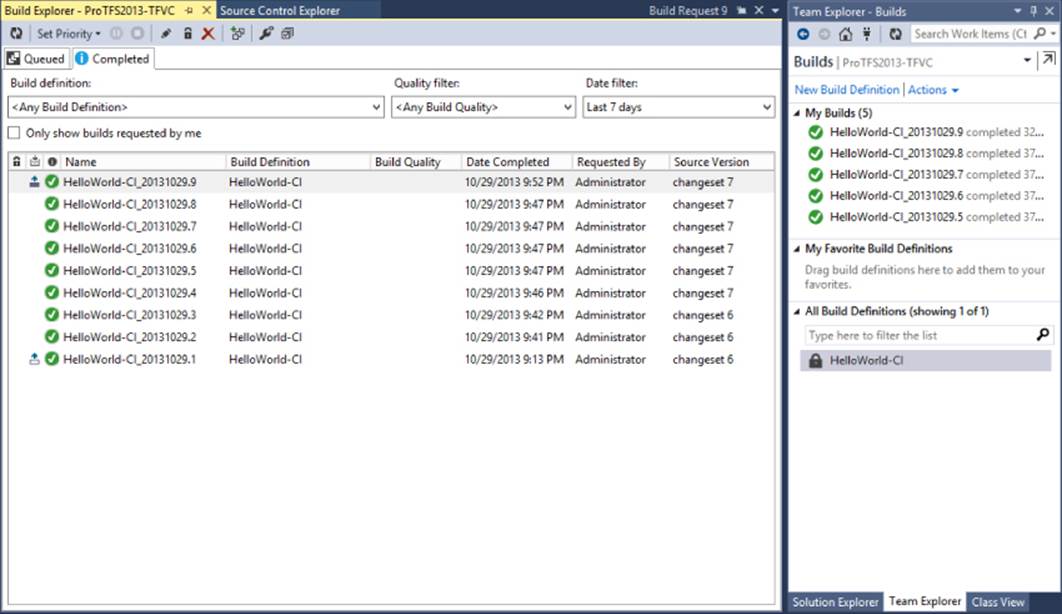
Figure 18.24 Build Explorer
All the build definitions for a particular team project are listed under the All Build Definitions section in Team Explorer. Although there is no way to order the builds into folders, the build definitions can be searched and filtered.
Build Explorer
The Build Explorer allows access to builds that the system is aware of, to those that have run, and to those that are running or are waiting to run. The Build Explorer is organized into two tabs as follows:
· Queued builds
· Completed builds
Queued Builds
From the Queued builds tab shown in Figure 18.25, you can cancel, pause, or change the priority of any build currently waiting to be built. You can also stop builds currently executing. By default, the Queued builds tab will also show you builds that have completed in the past five minutes.
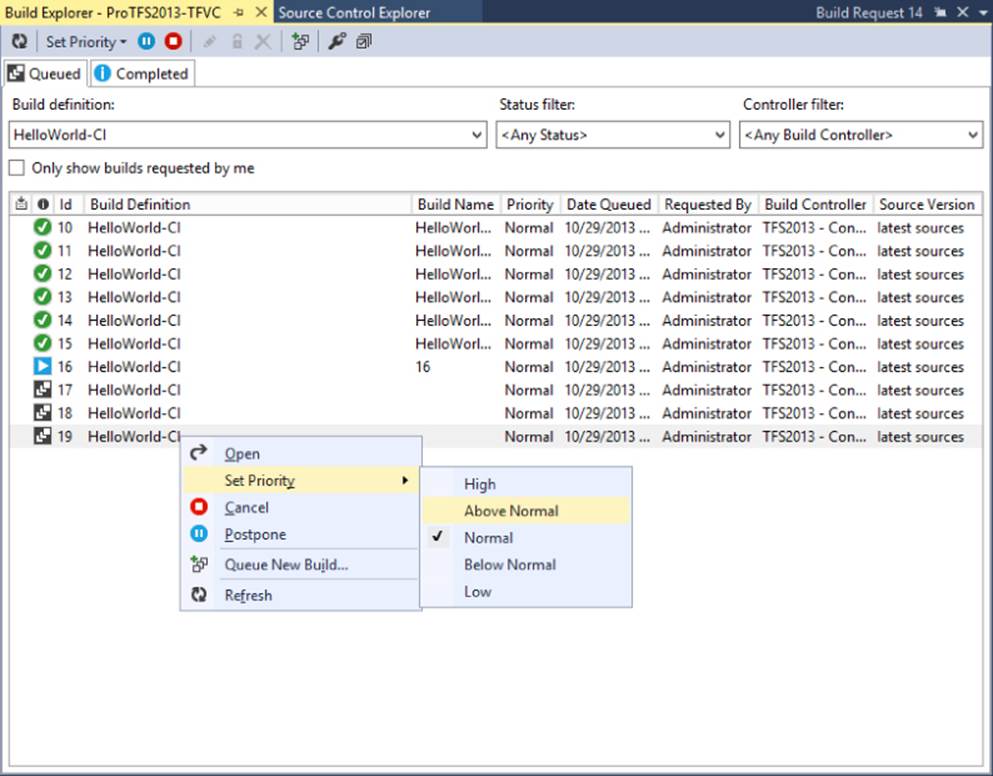
Figure 18.25 Queued builds tab
Completed Builds
The Completed builds tab shown in Figure 18.26 displays builds that have completed (have finished execution and are Successful, Partially Successful, Failed, or Stopped). An icon shows the status of the build, with another icon to the left showing the build reason (scheduled build, continuous integration, rolling build, private build, gated check-in, and so on). Hovering over an icon will display a tooltip with a full description.
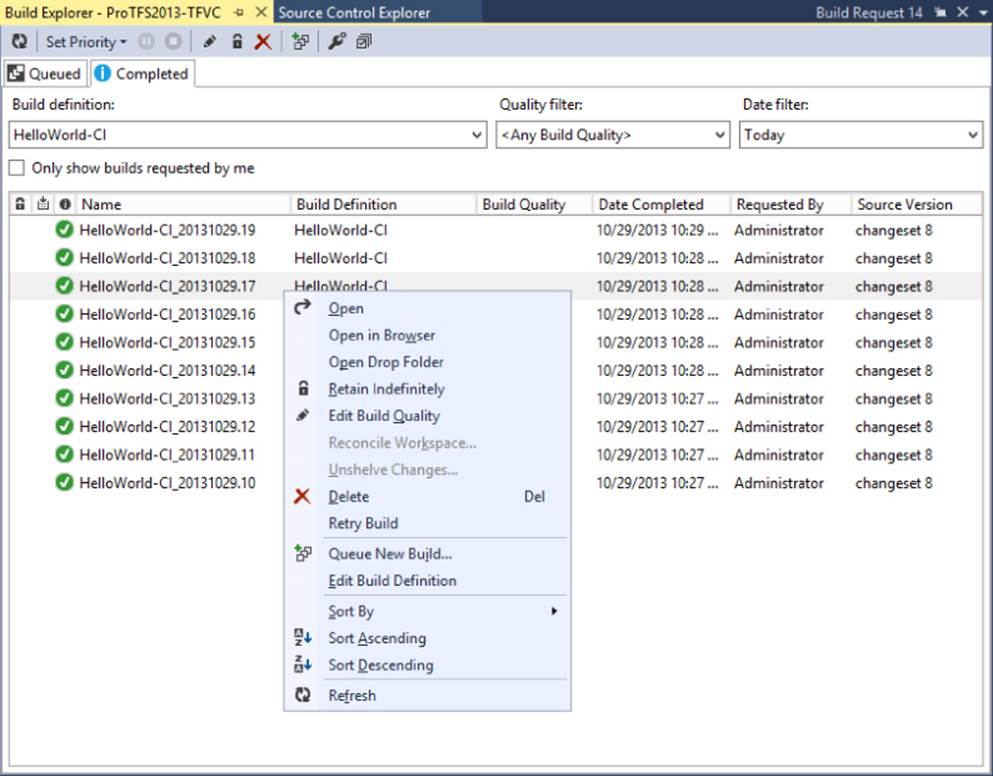
Figure 18.26 Completed builds tab
The builds are filtered by the criteria at the top of the Completed builds tab—by default, showing all builds for that day by everyone on the team. You can constrain the list to show only your builds, or show a greater date range, and so on, by adjusting the options.
The Completed builds tab is where much of the build management is performed for individual build details. You can mark a build to Retain Indefinitely to prevent it from being included in the automatic retention policy rules. You can also delete builds and edit the build quality.
Team Foundation Server 2013 also has the capability of retrying a build. This option will queue the build again with the same parameters as executed in the original build. This functionality is useful if your build fails because of an environmental issue, such as a power failure, rather than a coding issue.
Deleting Builds
If you delete a build, you are presented with the Delete Build dialog box shown in Figure 18.27, which allows you to control the parts of the build you wish to delete.
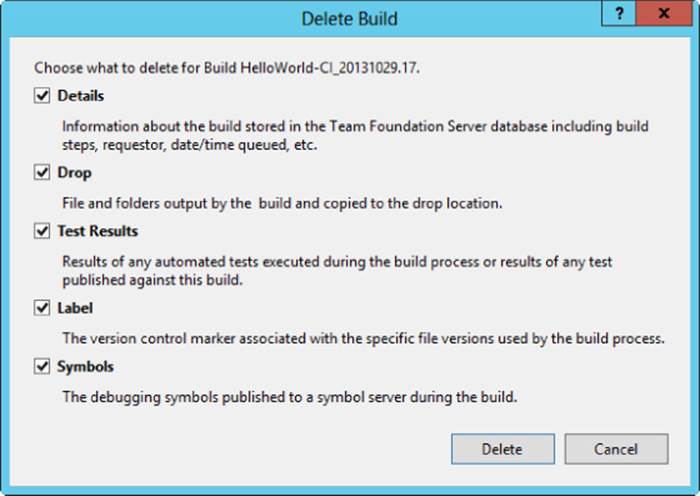
Figure 18.27 Delete Build dialog box
You can delete the following:
· Details—This is the build record in the Team Foundation Server database, and deleting this means that the build no longer shows in the Build Explorer. The build is actually still in the database, just marked as deleted. To completely remove the build record, you must destroy it using the tfsbuild.exe command line.
Note
For more information about this, as well as what information does and doesn't get deleted and why, see Adam Root's blog post at http://aka.ms/DeletedBuilds.
· Drop—These are all the build outputs copied to the network share. These can be very significant in size and, therefore, the most likely thing that you wish to delete. Using this dialog box is a quick way to clean up the drop location without removing the rest of the data for the build.
· Test Results—This includes all the test results from test runs and any associated test data (including video files and action recordings). Be careful when deleting test data because it may impact testers and developers if there are unresolved bugs with test results.
Note
Note For more information, see Chapter 26.
· Label—This is the label associated with the built-in version control. For auditing and tracking purposes, it is common to leave the label for all builds.
· Symbols—If you are using Symbol and Source servers, you may have configured your build to have symbol files stored on a Symbol server that may take up significant space. However, if you have released this build to anyone (including the test team), you might want to keep the symbols around for debugging purposes.
It is worth noting that the “Found in Build” and “Fixed in Build” fields that are used by some of the process templates in Team Foundation Server work item tracking make use of a global list in the work item system. In previous versions of Team Foundation Server, there was no way to automatically delete these build numbers from the global lists. In Team Foundation Server 2012 and later, there is a maintenance job that runs on a weekly basis to clean up the build number global lists and remove entries that no longer exist.
Build Details View
When you double-click a build in the Build Explorer, you can see a report of the build details, as shown in Figure 18.28. This is known as the Build Details View or the Build Report.
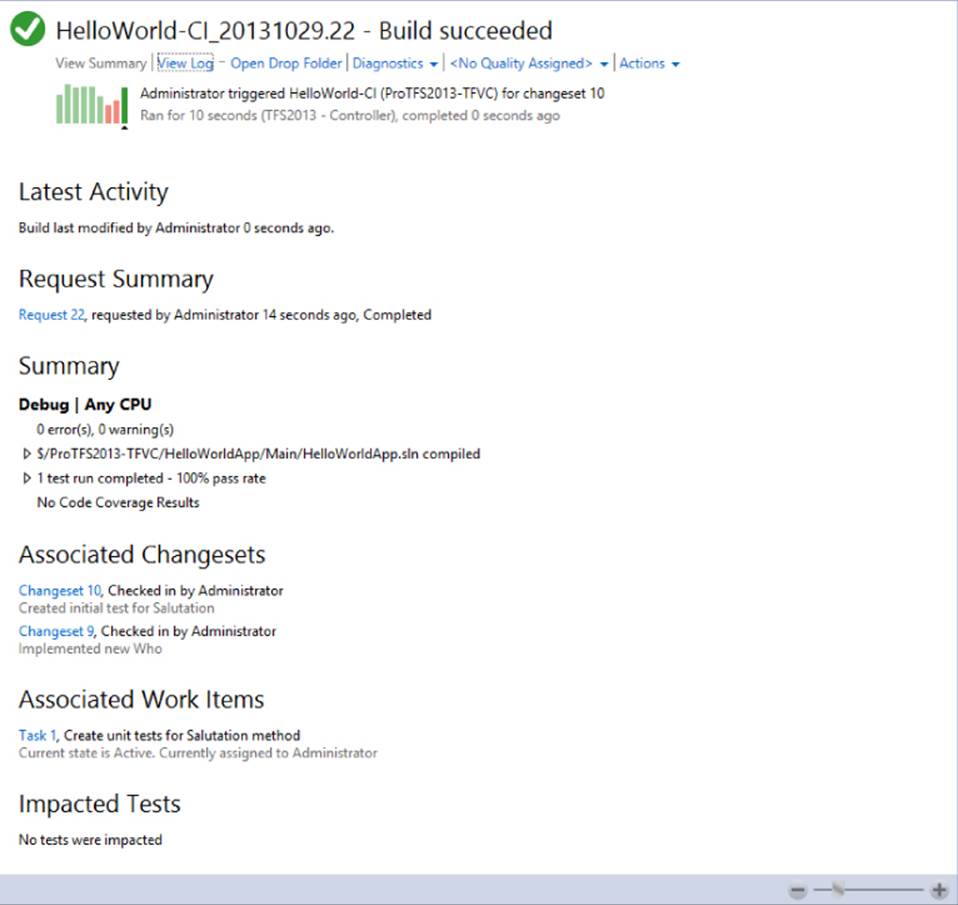
Figure 18.28 Report of the build details
When the build is executing, you will see the build log periodically refreshing to show the latest results of the build. A small bar chart in the top-left corner of the build shows the build duration in comparison with the previous builds to give you an indication of how much longer the build is likely to run.
As the build progresses, more information is added to the build log. If you scroll to the bottom of the build log, the view will maintain that bottom scroll position, and the results will scroll up as the build proceeds further.
The information is displayed in a hierarchical tree, with the duration of each step displayed in the top right-hand side of that node. For steps that create additional log files (such as MSBuild, Ant, or Maven that perform the actual compilation of the code), you can click on the report to download it from the drop location and view it.
Once the build has completed, you will see the build summary view by default (refer to Figure 18.28). This shows all the compilations, test runs, and any unit test results, code coverage, and test impact analysis data. You will also see information regarding the changesets included since the last successful build of that build definition, along with any work items that were associated with those changesets as they were checked in.
In this way, you can see how the full requirement traceability data is being tracked by Team Foundation Server, and why the build automation system completed the feedback loop for the development process. By performing the build, you can see which code was changed, what work items that change was associated with, and what build the changes went into. You can also see which unit tests were run, what the code coverage was, which tests might be impacted by the code that was changed, and so on. All this data is being stored in the Team Foundation Server data warehouse and is available for later analysis.
From the Build Details View, you can open the drop location to view the actual outputs of the build (the website or executable files). You can also mark the build to be retained indefinitely and set the build quality. You can even delete the build from this view.
Managing Build Quality Descriptions
For each build, you can set a build quality from the Completed builds tab or from the build report. The build quality is a text string that allows the team to tag the build with additional metadata, and it is useful for communicating the quality of the build with the rest of the team. For example, you can easily identify builds that have been released or are ready for testing. Note that, in addition to setting the build quality, you may want to mark the build to be retained indefinitely in those cases.
To manage the options available for the build quality, go to Build ![]() Manage Build Qualities in Visual Studio. This displays the Edit Build Qualities dialog box shown in Figure 18.29, which you can use to add new entries and remove ones that are not used.
Manage Build Qualities in Visual Studio. This displays the Edit Build Qualities dialog box shown in Figure 18.29, which you can use to add new entries and remove ones that are not used.
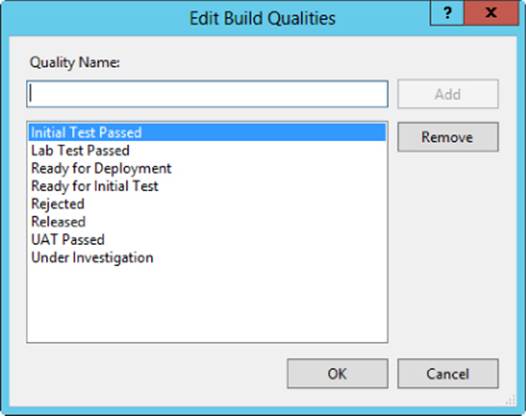
Figure 18.29 Edit Build Qualities dialog box
Managing Build Controllers and Build Agents
The build controllers and agents can be managed from the Team Foundation Administration Console on the build controller machine or application tier. However, the controller and agent properties are also available from Visual Studio by going to Build ![]() Manage Build Controllers, which displays the Manage Build Controllers dialog box. Selecting a build controller and clicking Properties will show you its Properties dialog box (see Figure 18.30), and selecting an agent and clicking Properties will show you its properties (seeFigure 18.31).
Manage Build Controllers, which displays the Manage Build Controllers dialog box. Selecting a build controller and clicking Properties will show you its Properties dialog box (see Figure 18.30), and selecting an agent and clicking Properties will show you its properties (seeFigure 18.31).
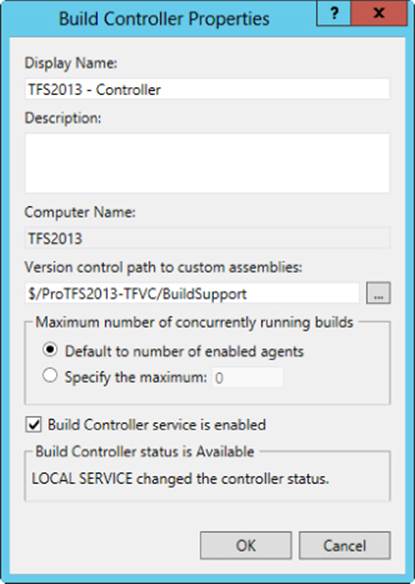
Figure 18.30 Build Controller Properties dialog box
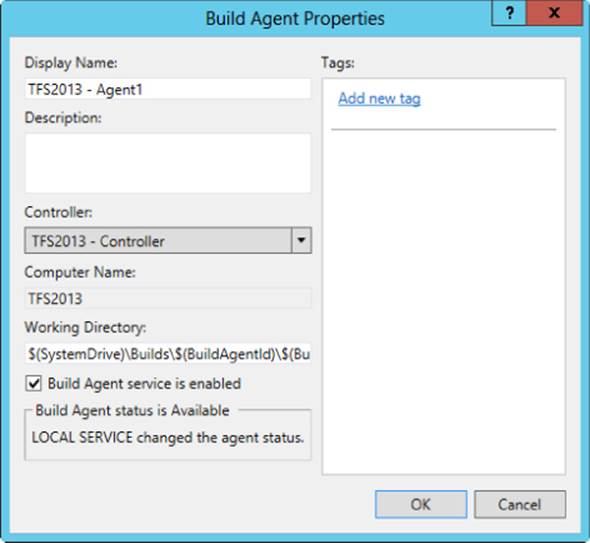
Figure 18.31 Build Agent Properties dialog box
From the Build Agent Properties dialog box, you can add a number of tags to the agent to signify capabilities of that agent, as shown in Figure 18.31. For example, you could use CodeSign if you have the project's code signing certificate installed on that machine, DataCenter1 if it is located in your main data center, or Ireland if it is located remotely.
As part of the build process, you can then filter by these tags to ensure that you are allocated a build agent that meets the requirements necessary for the build. For more information on this, see the section “Understanding the Build Process” later in this chapter.
Minimizing the Build Path
Because of limitations in the way that the tools interact with the file system, there is a 260-character limit on the full path of files that make up the build process. In previous versions of Team Foundation Server, the initial working directory for a build agent was in the build service users profile directory, which significantly reduced the number of characters in the path available for your build files.
In Team Foundation Server 2010, the build working folder was reduced to $(SystemDrive)\Builds\$(BuildAgentId)\$(BuildDefinitionPath), which, for a typical build, is something like C:\Builds\1\Team Project\Build Definition Name\. While this is much improved, you may still run into issues with build path length and need to reduce it further.
The shortest common build path can be created by setting the build agent working directory to something like $(SystemDrive)\B\$(BuildAgentId)\$(BuildDefinitionId), which will create a typical build working folder of C:\B\1\42\, leaving you with some valuable additional characters if you find yourself pushing the 260-character limit. Using the BuildDefinitionId also guarantees that each new working folder created is unique, and it prevents any workspace issues that sometimes happen when deleting and then adding a build definition with the same name for a team project.
Note
Both Visual Studio and Team Foundation Server have shifted to a quarterly update cycle. One of the improvements introduced in the first quarterly update for Team Foundation Server 2012 was an increase in the server path limit from 260 to 400 characters.
This doesn't completely eliminate the problem, as it is only the server path (for example, $/Project/Folder/File.cs), not the local path length.
For more information, refer to Brian Harry's blog post at http://aka.ms/Tfs2012FirstUpdate.
Understanding the Build Process
The end-to-end build process performed by a build is defined in a Windows Workflow XAML file stored in the version control repository and in the Team Foundation Server app tier. The initial build process templates available are defined by the overall Team Foundation Server process template and are created as part of the Team Project creation process. In Team Foundation Server 2013 these templates were moved from a folder under each Team Project's node in version control to a storage location inside the App Tier. Locating and downloading these base templates will be discussed in Chapter 19. Any time after the Team Project is created, base build process templates can be downloaded and modified and new build process templates can be created. In both cases, the process template can be registered with Team Foundation Server and stored in version control. Those files can be modified to adjust the behavior of new builds for that particular process template.
The rest of this section focuses on using the process templates that ship in the box with Team Foundation Server. These include the following:
Note
For more information on customizing the build process templates, see Chapter 19.
· DefaultTemplate (TfvcTemplate.12.xaml)—The default template for all new builds created for Team Foundation Version Control (TFVC) team projects in Team Foundation Server 2013. This is the template that will be the primary focus of discussion in the remainder of this section.
· DefaultTemplate (GitTemplate.12.xaml)—The default template for all new builds created for Git team projects in Team Foundation Server 2013.
· UpgradeTemplate—The build template using the MSBuild-wrapped approach from previous versions of Team Foundation Server and also used for non–.NET compilation projects such as VB6, C++, and also Java-based builds with Ant or Maven. TheUpgradeTemplate is used by any existing build definitions that existed in a Team Foundation Server 2008 instance upgraded to Team Foundation Server 2010, 2012, or 2013. UpgradeTemplate basically performs some simple housekeeping functionality that used to be hard-coded into the build agent process in earlier versions of Team Foundation Server. It then wraps the call to the MSBuild file called TFSBuild.proj that controls the rest of the MSBuild-based build process.
In addition, the LabDefaultTemplate.11 will also be present for use with the Lab Management functionality described in Chapter 26.
As stated previously, all the base build process templates are stored as XAML files in the Team Foundation Server App Tier. In versions prior to 2013, they lived in a folder called BuildProcessTemplates in the root of the team project ($/TeamProject/BuildProcessTemplates). You can still create this folder in your Team Project, store downloaded templates or create new ones here, and register them with the build system for use. You may also store them inside your team project branching structure so that your build definitions version along with the code they build. You may also store the build process templates alongside your code in version control. In this way your templates version along with the code they build.
DefaultTemplate Process
The DefaultTemplate (TfvcTemplate.12.xaml) process (referred to as DefaultTemplate for brevity) as defined in the file TfvcTemplate.12.xaml is used for all new, un-customized build definitions in Team Foundation Server 2013 for team projects that have a centralized version control repository. The DefaultTemplate is greatly simplified from its Team Foundation Server 2012 counterpart. The process is described at a high level in Figure 18.32. To view the process template, you will have to download the process template's XAML file, as described in Chapter 19.
Warning
Chapter 19 describes in more detail how to edit a build process template. However, it is worth noting at this point that, while you can edit the DefaultTemplate from Visual Studio, the best practice is to create a new process template from the Process section of the Build Definition editor based on the DefaultTemplate and edit this file. All builds in the team project sharing the same build process template will be affected by a change to that template. Therefore, it is good to leave the standard unedited DefaultTemplate.xaml file alone in version control to avoid confusing team members who expect the DefaultTemplate to perform the same between systems using Team Foundation Server.

Figure 18.32 DefaultTemplate process
Understanding the Process
On the build controller, the BuildDetail object corresponding to this running instance of the build is populated from the Team Foundation Server application tier machine and stored in a variable for later use. Then the build number is created based on a passed build number format (more on that later). If the build requires a drop folder, the next thing to occur is that a folder corresponding to the build number is created in the drop location specified by the build definition. This is the reason why the user running the build service must have write permission to the drop location network share.
The build controller now must determine on which build agent to execute the actual build. It does this by using the Agent Settings property described later in this chapter to determine which build agents to pick from, and then picks the next available build agent. If this is a gated build, only one build may be executed at a time. Otherwise, the build controller will attempt to run as many builds in parallel as it has spare build agents (unless constrained to a maximum number of concurrent builds in the build controller properties shown in Figure 18.30). Once the agent has been determined, execution passes to the build agent.
The build agent determines where the build directory should be located based on the agent working directory property defined in Figure 18.31. It then determines the name of the Team Foundation Server workspace that it should use on the build agent to download the sources into. Then the build agent initializes the workspace and figures out what the root Sources directory should be, along with the Binaries and Test Results folders—creating them if they do not already exist.
Note that if the build requires a clean workspace, the initialization process would have consisted of deleting the old workspace, creating a new one, and setting up the folder structure again. Equally, if incremental builds are not enabled, the Test Results and Binariesfolders will be cleaned of all contents to ensure that binaries are built fresh for every build.
Once the workspace has been initialized as per the working folder template defined in the build definition, a Get is performed from version control to download the source files to the build agent. If a shelveset is included with the build (for example, for a gated check-in or for a private build), the contents of the shelveset are automerged with the source code at this point. If a label should be created (the default for most builds), the label name is generated (created based on the version of the source downloaded) and is stored in the build details.
A pre-build script will be run, if configured, once before the compilation occurs. Then, for every project and configuration in the build definition, MSBuild is executed to compile the project. Once all of the compilation is complete, a post-build script will run, if configured.
Once compilation is complete, the system will execute a pre-test script. Then the VS Test Runner will run unit tests after which the post-test script is run. The status of the compilation and test phases of the build are also stored in the build details. At this point, if the build has been defined to treat test failures as build failures, the build will fail here if any failed tests have been detected. By default, a build will carry on from this point regardless of test status. If the build had a successful compilation, but any other phase of the build resulted in an error being thrown, the build will complete with a status of Partially Successful.
The changesets included in the build since the last successful build label was created are recorded. Each of the changesets is analyzed to determine which work items were associated with those changesets. These associated work items are recorded in the build details. If any of the bugs were resolved as a result of one of these changesets, the “Fixed in Build” field for the bug will be updated to inform anyone investigating the resolved work item, which build to test that it was indeed fixed.
Next, the tests impacted by the changes included in the build are determined and stored in with the build details. The sources are indexed, and symbols are published to the Symbol server if specified.
Finally, the binaries generated by the build are copied over to the drop folder created by the build controller. If the build is still successful, then any changes that were being built as part of a gated check-in validation are checked in to version control on the triggering user's behalf.
Build Process Parameters
As you may have noticed already, there are lots of variables in the build process that can control how the build performs. These are stored as workflow parameters that are passed into the build as it is queued, based on the parameters defined in the build definition editor and any parameters modified when manually queuing a build.
Figure 18.33 shows the parameters available when editing the build definition.

Figure 18.33 Parameters available when editing the build definition
Parameters are ordered into groups: TF Version Control, Build, Test, Publish Symbols, and Advanced. For more information on a particular parameter, select it in the build definition editor; the help section at the bottom of the Process section will show more information about that parameter, as shown at the bottom of Figure 18.33.
In the Build section of the DefaultTemplate, the items to build are specified. These are made up of the Projects and Configurations.
Configurations
The default Visual Studio build configuration to use is the default build configuration for the selected solution. However, you can override this—for example, if you would like to do a Release build on the build server, but the default in the solution is a Debug build.
To modify the configuration, use the Configurations dialog box displayed when you click the “…” button in the Configurations parameter.
Note
Team Foundation Build typically deals with solution configurations. These allow you to specify a named collection of project-level platforms and configurations that should be built. For more information on solution configurations, see a blog post by Aaron Hallberg (former lead of the Team Foundation Build team at Microsoft) at http://aka.ms/TfsBuildSolConf.
Projects
The Projects parameter was discussed earlier in this chapter when the build definition was created. This parameter describes which MSBuild project files (.vbproj or .csproj files) or Visual Studio Solution files (.sln files) should be built as part of the build definition.
Projects will be executed in the order they are provided in this property. So, if you wish to call a project after performing the build of the solution (for example, a .wixproj file to create an MSI installer using the open source project WiX), specify that second. Clicking the “…” button in the Projects parameter displays the Solutions/Projects dialog box, allows you to add other files to the list, and allows you to control the order.
The server paths to the projects to build are provided. These server paths must be mapped by the working folder template defined in the build definition. Otherwise, the build will fail when the build agent attempts to convert the server path of the file to build into a local path on the build agent to use when running the build.
Automated Tests
Under the Test section of the DefaultTemplate, the Automated Tests parameter provides the tests that will be executed as part of the build. By default, this is set to execute all tests found in an assembly created by the build matching the patterns *test*.dll and*test*.appx—that is, HelloWorldTests.dll would be inspected for tests implemented using the Visual Studio Test Runner.
Clicking the “…” button in the Automated Tests parameter allows you to specify more tests that should be run, as well as their configuration, as shown in Figure 18.34. When editing a particular set of tests, you can control if the build should fail if those tests fail execution.
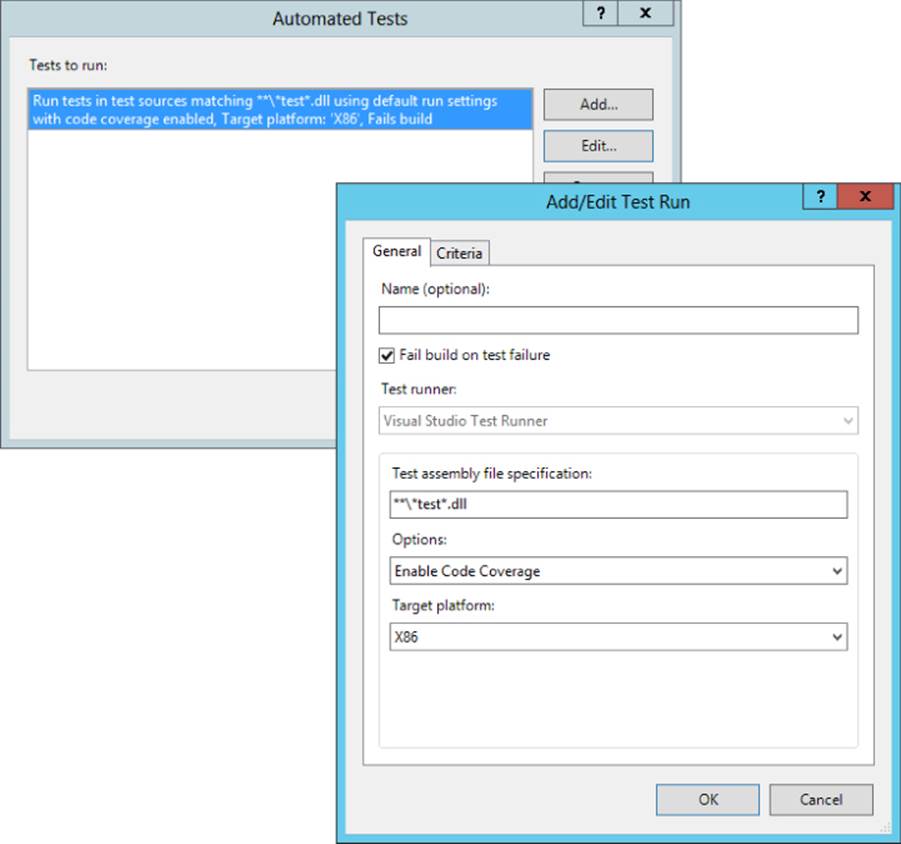
Figure 18.34 Specifying more tests should be run
Tests can be filtered based on the test category or test priority using the Criteria/Arguments tab for the test, as shown in Figure 18.35. By categorizing your unit tests, you could set up your build verification tests differently from your coded UI or integration tests. Build verification tests (signified by a category of BVT) could fail the build, whereas failures in integration tests or coded UI tests (which are more prone to failure from external factors) may be recorded and the build marked as Partially Successful. An example of filtering based on category is shown in Figure 18.35.
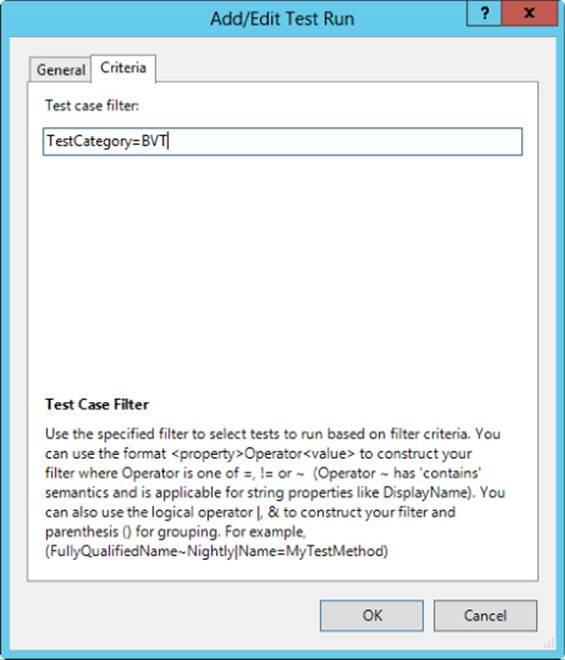
Figure 18.35 Criteria/Arguments tab
Another example of using this functionality is that you may set up a build so that all tests with a priority of 1 or less are run as part of the standard continuous integration build, but all tests are run in an additional build definition triggered as a rolling build set to build no more often than once every 30 minutes. That way, the continuous integration build can give rapid feedback on the approximate build quality, but the rolling build can come along later and do a final check that everything is satisfactory.
Note
The Automated Tests section also specifies the TestSettings file to be used for a test run. In the example shown in Figure 18.33, this is set to $/ProTFS2013-TFVC/HelloWorldApp/Main/TraceAndTestImpact.testsettings. Your Visual Studio solution can contain a number of .testsettings files to control the behavior of the test environment, and to enable configuration settings such as code coverage and test impact analysis as part of the test run. If you have unit tests executing as part of the build, it may be very useful to enable these.
Note
For more information about running third-party unit testing frameworks, such as xUnit.net, NUnit, MbUnit Chutzpah for QUnit, and Jasmine, see the blog post at http://aka.ms/VSUnitTestPlugins.
Code coverage tracks how much of the application code is being tested by the tests under execution. Test impact analysis determines which tests were affected by the changes since the last successful build—which gives an important indication to your testers about the impact of a particular change and which tests should be revisited first when testing a build.
It is best practice to create a new test settings file specifically for your build server settings. That way, developer test settings used locally by the development team and the actual build server test settings are kept separate but are available to the developer team to validate against locally, if needed.
To create a new server test settings file, open the Local.testsettings file in the Solution Items. Then change the name in the General section to Build Server and click the Save As button to save the file as BuildServer.testsettings. If you do not have a .testsettings file, you can right-click the solution and choose Add New Item ![]() Test Settings file.
Test Settings file.
In the Data and Diagnostics section of the Test Settings dialog box, check both the Test Impact options, as shown in Figure 18.36. Note that this is also where IntelliTrace can be enabled to get a rich diagnostic trace of any test failures, as well as many other test settings. Once configured, save the test settings file and check-in to version control. Then edit the TestSettings File parameter for the test assembly to point to the BuildServer.testsettings file.
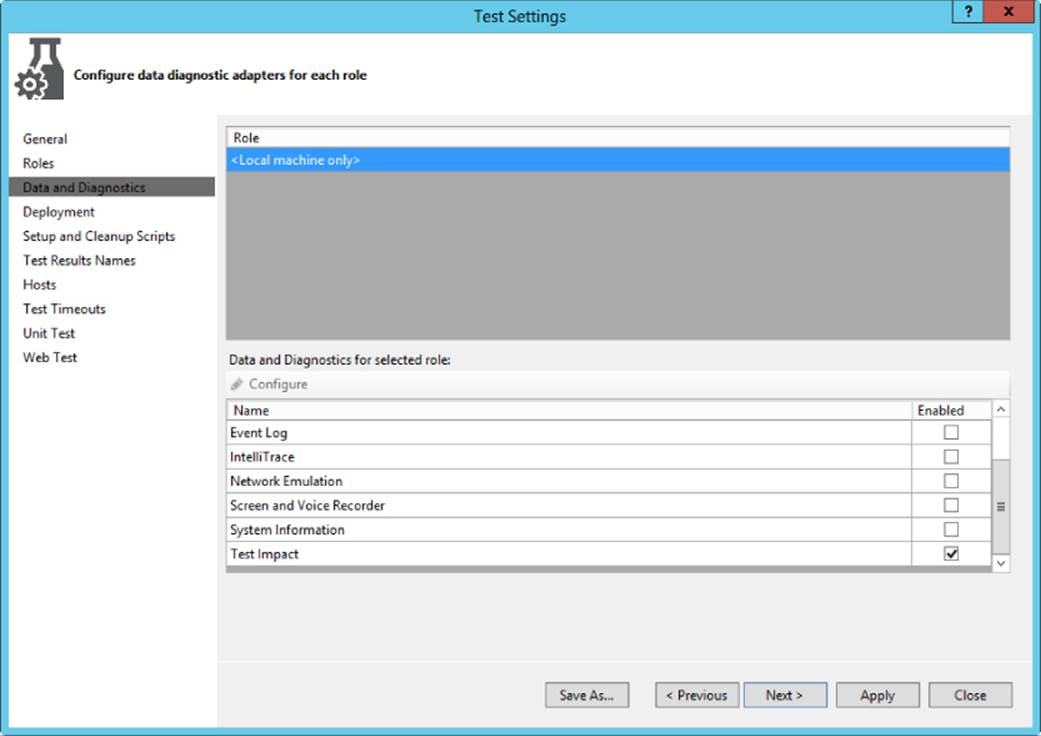
Figure 18.36 Test Settings dialog box
To get Code Coverage, you will need to select Enable Code Coverage in the Options list in the Add/Edit Test Run dialog box, as shown in Figure 18.34.
Specifying Which Assemblies to Measure Code Coverage
In a typical build, you will only want to measure code coverage for your application's assemblies. Unit test assemblies or Framework assemblies tested by other builds would need to be excluded. To tell the build how to exclude these assemblies from measurement, you will need to add a .runsettings file to your solution and specify this file in your build's Run settings file parameter. For more information on Run Settings files, see http://aka.ms/CodeCoverageInBuilds.
Build Number Format
In the Advanced section of the DefaultTemplate, the Build Number Format parameter controls the format used when creating the build number at the beginning of the build process. By default, builds are created with the number format of$(BuildDefinitionName)_$(Date:yyyyMMdd)$(Rev:.r), for example, HelloWorld_20131104.18, where this is the 18th build for the HelloWorld build definition on November 4, 2013. Build numbers must be unique across a team project, and, therefore, this format serves as a good default. However, it is common that users wish to customize the build numbering.
In Team Foundation Server 2013, this is simply a matter of editing the build number format by clicking the “…” button to show the BuildNumber Format Editor. Initially, the dialog box shows the current build number format, along with a preview of what a build number generated with this format would look like. Clicking the Macros button expands the dialog box to show a number of available macros, as shown in Figure 18.37.
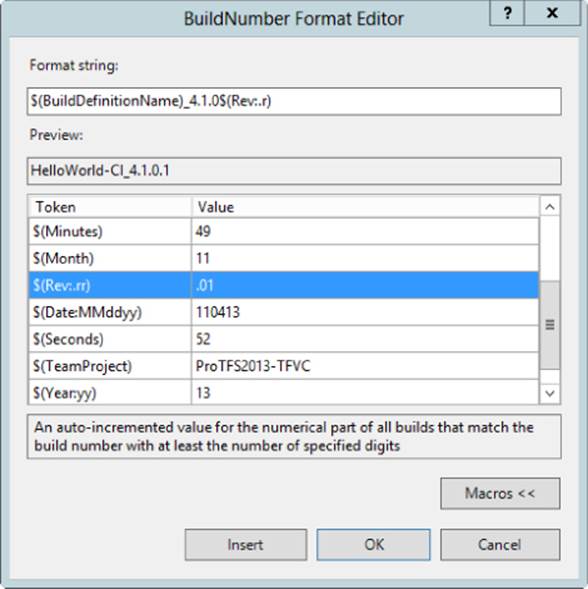
Figure 18.37 BuildNumber Format Editor dialog box
A common number format to use is one that matches the version numbers baked into the product assemblies as part of the build. For example, if the build was for version 4.1.0 of the product (where 4 is the major version, 1 is the minor version, and 0 is the servicing version), and the revision number is incremented for each build, the build number format should be set to $(BuildDefinitionName)_4.1.0$(Rev:.r), as shown in Figure 18.37.
Note
See Chapter 19 for an example of how to then customize the build process template to add this build number into the assemblies as the build is being performed.
Clean Workspace
By default, the Clean Workspace parameter in the TF Version Control section is set to True, meaning that all existing build outputs and sources for that build definition will be deleted at every build. This is the safest option, but it is also the slowest, because it means that all files must be downloaded from version control, and everything built each time, regardless of how little changed between each build.
As discussed in Chapter 6, Team Foundation Server manages workspaces to ensure that files are deleted, moved, and renamed as they are deleted, moved, and renamed in version control, thus ensuring that there are no orphaned files. Therefore, enabling the workspace to be maintained between builds can dramatically improve build performance, especially for continuous integration builds, where the changes between each build are typically small.
If you set the value of the Clean Workspace parameter to False, neither the sources nor the build outputs will be deleted at the start of a build. Only the files that have been modified in version control will be updated, and only the items that have changed will be recompiled.
In a continuous integration build where the scope of changes between builds is typically small, this setting gives a further performance increase. In addition, it can also be useful for ASP.NET-based websites. In that case, you might only subsequently publish the items that have changed between the build output and your website to minimize the upgrade impact of a new version, thus better facilitating continuous deployment.
Clean Workspace Setting in Visual Studio Online
If you are using the Hosted Build Controller provided with your Visual Studio Online account, you will find that this parameter is ignored. By design, you get a new working directory with each build.
Logging Verbosity
In Team Foundation Server 2013, the Logging Verbosity parameter was removed and the system was modified to no longer store build log information in the database. Instead, diagnostic-level logging is always performed and the results are stored in the diagnostic log files. For more information on diagnostic logs, see http://aka.ms/DiagnosticBuildLogs.
Perform Code Analysis
Note
Static code analysis allows you to provide a set of rules that can be checked during a build to ensure that code conventions are being adhered to and common bugs and security issues are avoided. The Managed Code Analysis tool (also known as FxCop) is a tool used by Visual Studio to analyze code against a library of rules. Nearly 200 rules are provided out of the box based on the .NET Framework Design Guidelines. They are organized into a series of rule sets and groups.
Note
Note For more information about the updated Static Code Analysis features for C++, which arrived in Visual Studio 2012, see the MSDN article at http://aka.ms/VS2013CppAnalysis.
By default, the use of code analysis is set at the project level in Visual Studio. However, the Perform Code Analysis parameter in the Build section of the build parameters can set the code analysis to be run Always, Never, or AsConfigured in the Visual Studio project.
If set to Always, then code analysis will force all projects in the solution to be analyzed. If a code analysis Rule Set has not been defined for a particular project, then the default Rule Set (Microsoft Minimum Rules) will be used.
Note
For more information on using static code analysis with Visual Studio projects, see Chapter 20 of the book Professional Application Lifecycle Management with Visual Studio 2013 (Mickey Gousset, Martin Hinshelwood, Brian A. Randell, Brian Keller, and Martin Woodward, Wiley, 2014).
Source and Symbol Server Settings
A Symbol server is a file share used to store the symbols or program database (.pdb) files for your executable binaries in a defined layout. Visual Studio can then be configured with the details of this server. From then on, when debugging code live or using the advanced historical debugging features (IntelliTrace), Visual Studio is capable of taking you directly to the version of the source code that was used to create the binary being debugged.
The configuration of the Symbol server is performed by providing the Windows file location to be used for the Symbol store in the Path to Publish Symbols parameter of the Publish Symbols section of the DefaultTemplate.
Note
For more information on what every developer should know about symbol files, see the blog post by John Robbins at http://aka.ms/PdbFiles.
Agent Settings
The Agent Settings are located in the Advanced section of the build parameters in the DefaultTemplate. In addition to controlling how long a build may execute before being cancelled, and the maximum time a build may wait for an available agent, the Agent Settings provide for a Name and Tag filter. These can be used by the build controller to restrict the selection of agents when determining on which agent the build should execute.
Specifying a full name of a build agent allows you to force it to run on a particular machine. If you adopt a naming convention for your build agents such as TeamXAgent1, then using wildcards for the name filter will allow scoping to a particular set of build agents (for example, TeamX*).
A more flexible way is to use build agent tagging as shown earlier in this chapter in the “Managing Build Controllers and Build Agents” section. In this way, you can tag a build agent with its capabilities, and then use the Tags filter to specify the tags that you require (such as BizTalk to indicate a machine with the BizTalk Server toolkit installed, which is, therefore, suitable for compiling those projects). You can then change the Tag Comparison Operator from the default of MatchExactly to MatchAtLeast, which means that you will accept any build agent that has the BizTalk tag, regardless of the other tags it might have.
Analyze Test Impact
If the .testsettings file provided for the test run indicates that test impact analysis should be performed, the default setting of True for the Analyze Test Impact parameter in the Advanced item of the Test section of the DefaultTemplate means that the analysis will be performed. Setting this to False means that the impact analysis will not be performed, regardless of the .testsettings.
Update Work Items with Build Number
By default, the Update work items with build number parameter in the Advanced section of the DefaultTemplate is set to True. This means that the build system will determine which changesets were committed to the build workspace since the last successful run of this build definition by comparing this build's label in version control with the earlier, successful build's label. It will then select all of the work items linked to those changesets. Finally, it will update those work items with the current build number.
This analysis can take a long period of time and can require several server calls, which will impact the performance of your Team Foundation Server instance. Therefore, if you decide that you do not require that functionality for a particular build definition, you can disable it by setting the value to False.
Create Work Item on Failure
When a build fails, the default behavior is to create a work item assigned to the person for whom the build was running (the person that checked in files, for example, in the case of a Continuous Integration triggered build definition). Set the Create Work Item on Failure parameter in the Advanced section of the DefaultTemplate to False if you do not require work items to be created automatically.
Disable Tests
By default, the tests specified in the Automated Tests setting will be executed unless the Disable Tests parameter in the Advanced section of the DefaultTemplate is set to True. This is usually selected when you want to perform a manual build that runs without tests. This may be done to temporarily expedite the build process.
Get Version
By default, the Latest version of source is used to perform a build. However, you may wish to create a build definition that always builds the files with a particular label—for example, QARelease in the project MyTeamProject. Setting the Get Version parameter in the TF Version Control section of the DefaultTemplate to LQARelease@$/MyTeamProject would force the build definition to get files only with this label. Because labels can be edited in Team Foundation Server, you can now label the versions and files that make up that QA release and know that they will be included in the build once triggered.
An alternative approach to using Get Version in this way would be to have a branch in version control representing the files that were in QA and merge changes into this branch to be included in that build. For more information on branching, see Chapter 10.
Label Sources
By default, the Label Sources parameter in the TF Version Control section of the DefaultTemplate is set to True, which means that the sources in the workspace of the build are labeled at the start of the build process so that the exact versions included in the build can be easily determined. Set this to False if you do not require a label to be created. However, be warned that this also disables much of the change analysis functionality that relies on the last successful build label to determine the differences between builds.
MSBuild Arguments
Use the MSBuild Arguments parameter in the Advanced item of the Build section of the DefaultTemplate to pass an additional command-line argument to MSBuild.exe whenever it is invoked in the build process.
MSBuild Platform
By default, the MSBuild platform used to execute the build process is auto-detected, based on the current operating system of the build agent. However, this parameter in the Advanced item of the Build section of the DefaultTemplate can be set explicitly to, say, x86 if an explicit platform is required (for example, when the project is calling assemblies that are not x64 compatible so you need to force them to be loaded into the correct version of the CLR).
Pre- and Post-Build Script Arguments
Use the Pre-build script arguments property to specify the command-line arguments to be passed to the script file specified in the Pre-build script path property when it is executed. The Post-build script argument parameter specifies the command-line arguments to pass to the script specified in the Post-build script path parameter. These properties are found in the Advanced item of the Build section of the DefaultTemplate.
Pre- and Post-Build Script Path
Use the Pre-build script path property to specify a batch file or PowerShell script to be run before MSBuild compilation of your source code occurs. The Post-build script path property will specify a script file that will be run after MSBuild compilation. These properties are found in the Advanced item of the Build section of the DefaultTemplate.
Pre- and Post-Build Test Arguments
Use the Pre-test script arguments property to specify the command-line arguments to be passed to the script file specified in the Pre-test script path property when it is executed. The Post-test script arguments property specifies the command-line arguments to pass to the script specified in the Post-test script path property. These properties are found in the Advanced item of the Test section of the DefaultTemplate.
Pre- and Post-Test Script Path
Use the Pre-test script path property to specify a batch file or PowerShell script to be run before Visual Studio Test Runner tests your application. The Post-test script path property will specify a script file that will be run after the test runner finishes. These properties are found in the Advanced item of the Test section of the DefaultTemplate.
Output Location
Use the Output location parameter in the Build section of the DefaultTemplate to specify where the build system places build outputs. The default value is SingleFolder, which will place all of the outputs files together into the drop folder. This is the same default behavior as all previous versions of Team Foundation Server. The PerProject setting will put build outputs into folders based on the solution name. The AsConfigured setting will leave the binaries in the build's Sources folder in the same structure that you see when compiling the code on your local dev machine. This parameter is new in 2013.
The AsConfigured Setting Will Require Extra Coding
If you use the AsConfigured setting in the Output Location parameter, Team Foundation Build will not copy your build outputs to the drop folder. You will have to create a post-build script that gathers your outputs and copies them to the location specified by TF_BUILD_BINARIESDIRECTORY so they can be copied to the drop folder.
Building Ant and Maven Projects with Team Foundation Server
A standard build agent may perform basic compilation and test activities for most .NET project types. Visual Studio Ultimate or Visual Studio Premium is required on the build agent to perform advanced .NET builds with features such as code coverage or static code analysis.
It is also possible to execute Java builds from the Team Foundation build agent by installing the Build Extensions Power Tool on the build agent, along with a suitable Java Development Kit (JDK) version as well as Ant and/or Maven. The latest version of the Build Extensions Power Tool can be found at http://aka.ms/TFS2013BuildExtensions.
This Power Tool provides a set of Workflow activities and MSBuild tasks that allow a build definition to call Ant or Maven. The results of the build tool are then interpreted and published back to Team Foundation Server by the build agent, along with any JUnit test results. The data for the Java build process is then available in Team Foundation Server in just the same way as Visual Studio builds are.
The easiest way to create a Java-based build definition is to create it from Eclipse using Team Explorer Everywhere. Right-click the Builds node in Team Explorer and follow the build definition creation process as outlined earlier in the chapter. The only significant difference is that, instead of the Process section described earlier, the build definition in Eclipse requests that a project file be created.
Click the Create button to display the Create Build Configuration Wizard, and then select the Ant build.xml or Maven pom.xml file that you wish to use to perform the build.
Note that this creates a build using the UpgradeTemplate process template, with all the functionality controlled by a TFSBuild.proj file with an MSBuild-based wrapping script. In this way, the build functionality can be easily edited from Eclipse or a cross-platform text editor where a suitable Windows Workflow editor is not easily available.
Summary
This chapter was all about using the build functionality provided by Team Foundation Server. You learned about installation of the build services and about the creation of a build definition. You became familiar with the tools and windows used to manage builds with Team Foundation Server. Finally, the chapter described the build process, provided a detailed examination of the available configuration parameters for the DefaultTemplate, and described how to build Java projects (as well as Visual Studio ones) with Team Foundation Server.
Chapter 19 examines customization of the build process in more detail and presents some examples of common build customizations.
All materials on the site are licensed Creative Commons Attribution-Sharealike 3.0 Unported CC BY-SA 3.0 & GNU Free Documentation License (GFDL)
If you are the copyright holder of any material contained on our site and intend to remove it, please contact our site administrator for approval.
© 2016-2025 All site design rights belong to S.Y.A.