Professional Team Foundation Server 2013 (2013)
Part V
Administration
· CHAPTER 21: Introduction to Team Foundation Server Administration
· CHAPTER 22: Scalability and High Availability
· CHAPTER 23: Disaster Recovery
· CHAPTER 24: Security and Privileges
· CHAPTER 25: Monitoring Server Health and Performance
· CHAPTER 26: Testing and Lab Management
· CHAPTER 27: Upgrading Team Foundation Server
· CHAPTER 28: Working with Geographically Distributed Teams
· CHAPTER 29: Extending Team Foundation Server
Chapter 21
Introduction to Team Foundation Server Administration
What's in this chapter?
· Understanding the architecture of the system
· Getting to know the administration console
· Using the command-line tools
· Getting to know other administration tools
Team Foundation Server is a system with lots of moving parts and lots of integration with other systems. For the person (or persons) entrusted with administering all this, it can seem like quite a daunting task at first. For someone not familiar with developer tools, there are lots of new concepts and different things to consider while administering the server.
Don't be discouraged though! As with many products, the administration tools have evolved over time. There was a huge investment in improving the administrative experience for the 2010 and 2012 releases and continued investment with the 2013 release. The biggest improvement for the 2010 release was the streamlined setup and installation experience. These investments also led to the creation of the Team Foundation Server Administration Console, along with the powerful command-line equivalent TfsConfig.exe.
In Team Foundation Server 2012, perhaps the biggest change for administrators is the shift of security and permissions management to the web interface, which is covered in detail in Chapter 24.
In Team Foundation Server 2013, the Administration Hub in Team Web Access has been updated to include the permissions needed to manage a Git repository. This is also covered in Chapter 24.
Before you get started with learning about Team Foundation Server administration, it's important to understand the different administrative roles in a Team Foundation Server environment.
Administrative Roles
Team Foundation Server has many different administrative roles. Each of these roles has slightly different responsibilities and deals with a different part of the overall system. In smaller organizations, all of these roles may be performed by the same person. In larger organizations with an established IT department, these roles may be performed by many different people and groups.
Infrastructure Administrator
Infrastructure administrators are responsible for anything with a power cord. They manage the physical servers, the networks, and the storage. In some cases, a separate database administrator manages the database servers. In any case, however, the two roles (should) work closely together.
An infrastructure administrator is concerned with reliability, availability, performance, disaster recovery, and security. The infrastructure administrator ensures that the servers are running smoothly and that Team Foundation Server works within the requirements of the organization.
Team Foundation Server Administrator
Team Foundation Server administrators are responsible for configuring and managing the software running on the server. They have the expertise in running software configuration management for the organization, and they often have specialized knowledge about how to operate Team Foundation Server.
This administrator is concerned with the performance of the application and the smooth operation of version control, work item tracking, data warehouse, and any other related applications. Typically, this person acts as a bridge between the development and infrastructure teams. The Team Foundation administrator handles the delicate balance and needs of both groups. Sometimes these administrators coordinate upgrades and patches to the server because it's a critical piece of infrastructure for the teams.
Project Administrator
A server will contain collections that house team projects. For each project, someone who has the ability to change the structure and permissions within that project will perform this role. In some cases, a project administrator might be a project collection administrator who has the ability to create new team projects and manage multiple team projects.
The project administrator role is an important one because it is the closest to the users of the server. People in this role manage groups and permissions for their projects. They have the ability to change the work item type definitions and modify areas and iterations for their projects.
Logical Architecture
Before discussing the administration of Team Foundation Server, it's helpful to understand the architecture of the system. As shown in Figure 21.1, Team Foundation Server contains three logical tiers:
· Client tierFigure 21.1 Logical three-tier architecture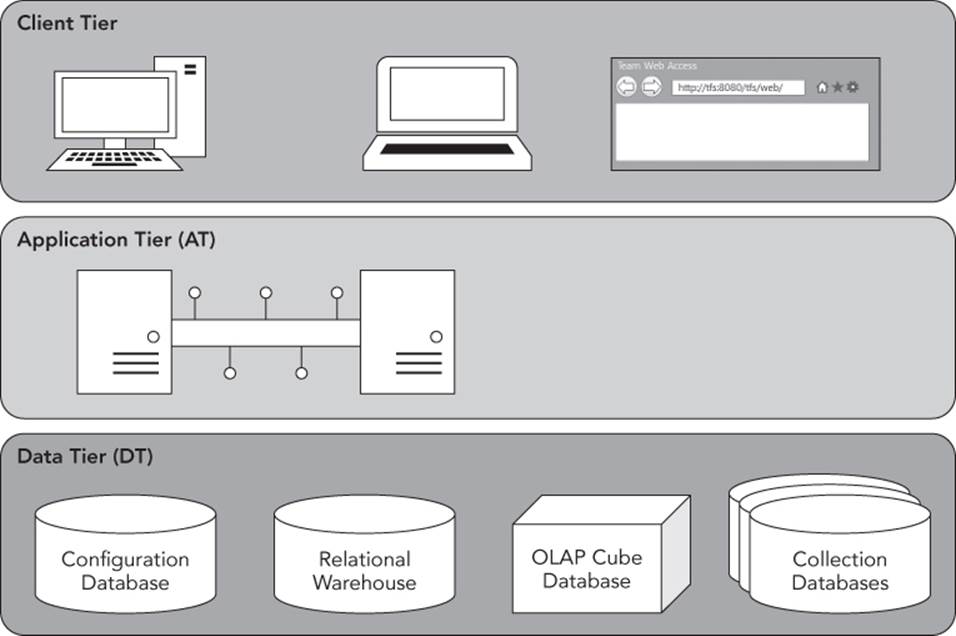
· Application tier (AT)
· Data tier (DT)
These logical tiers might be deployed across two or more computers.
Note
Chapter 22 contains a discussion on the physical architecture for scalability and high availability.
Client Tier
The client tier is any computer that contains tools for accessing the server. An installed application such as Visual Studio Team Explorer or Team Explorer Everywhere can be used as a client. A web browser and the Team Foundation Server web access interface can also be used. Additionally, any application that uses the Team Foundation Server object model or web services is considered a client of the system.
Application Tier
The application tier is commonly referred to as the “AT.” It includes the Team Foundation Server Web Application, which hosts a number of different web services, including the following:
· Version control
· Work item tracking
· Lab management
· Framework services
These all run on Windows Server 2008 R2, 2012, or 2012 R2 running Internet Information Services (IIS) and ASP.NET.
The Visual Studio Team Foundation Background Job Agent (or “job agent,” for short) is a Windows service that executes Team Foundation Server jobs asynchronously. These jobs implement the Run method in ITeamFoundationJobExtension and are loaded as plug-ins.
The job agent runs continuously on each application tier using the same service account as the web application. You should not need to manually stop or start this service. It will restart automatically when a server is restarted.
There is no direct configuration required for the job agent. The jobs are defined and scheduled using either the client or server object models and stored in the Tfs_Configuration database.
The job agent has direct access to the data tier. Because of this, most of the jobs use the server object model to access the data tier directly, as opposed to using the client object model and making web requests.
Data Tier
The data tier is commonly referred to as the “DT.” It includes the databases and data warehouse infrastructure. The data tier runs on SQL Server 2012 with Service Pack 1 or newer and hosts the databases for the system.
Configuration Database
The Tfs_Configuration database stores information central to a Team Foundation Server instance, as shown in Table 21.1.
Table 21.1 Contents of the Configuration Database
|
Component |
Description |
|
Team Project Collection connection strings |
The SQL connection strings for the collections associated with this instance |
|
Registry |
Team Foundation Server has a registry service for storing key and value pairs. This is different from the Windows registry. |
|
Catalog |
The catalog is a hierarchical store that describes team projects and all their properties. |
|
Job history |
History about when a job was executed and the result of the job is recorded here. |
|
Identity cache |
Identities are shared across all team project collections. The identity tables in the configuration database are the master store. |
|
Servicing |
Details about the servicing and patching operations are stored in this database. |
Relational Warehouse and OLAP Cube Database
The Tfs_Warehouse database and Tfs_Analysis cube are the key stores that support the data warehouse and reporting capabilities of Team Foundation Server. These are discussed in more detail in Chapter 15.
Team Project Collections
In Team Foundation Server 2008 and earlier, seven different databases made up a server. In Team Foundation Server 2010, these databases were folded together into a single collection database. Note the following key points:
· These databases are the main store for all data in Team Foundation Server.
· A collection is almost entirely self-contained within a single database.
· A server can have one or more collection databases attached to it.
· One database contains a group of coupled team projects.
· A collection can exist on a different physical SQL server than the configuration database.
Built-In Administration Tools
Team Foundation Server has a number of built-in administration tools. This section examines both the Administration Console and the command-line equivalent.
Team Foundation Administration Console
The Team Foundation Administration Console was added in Team Foundation Server 2010. It's the centralized management tool for server administrators. The tool was originally implemented as a Microsoft Management Console (MMC) snap-in. However, there were limitations with what was possible in this implementation, as well as the version of the .NET Framework that the snap-in could use.
Perhaps the biggest limitation of the tool (and most of the built-in administration tools) is that it must be run on the application tier servers themselves. Although you can use Remote Desktop and tools such as PSExec.exe to connect to the server remotely, the tools must still execute locally on the server. After logging on to your application tier server, navigate to the Team Foundation Server Administration Console icon and the administration console will open.
License Information
When previous versions of Team Foundation Server were released, they were first made available to download as a 180-day trial. The final version wasn't available through licensing programs for a few weeks. This meant that a lot of people installed or upgraded using the time-limited version with the plan to enter their license keys before the trial expired.
However, some people got a rude shock when their trial expired and the server suddenly started refusing commands six months later. One of the reasons this occurred was that it wasn't easy to determine whether you were running a trial license, and when that license might expire.
Figure 21.2 shows how you can see your current license type and when it will expire. To see your current license information, open the Team Foundation Server Administration Console from the Start menu. Select your server name in the tree view on the left. You will then see the licensing information on the right. This screen allows you to enter a product key to upgrade to the full version. The Administration Console will also warn you that your trial is about to expire when you open it.
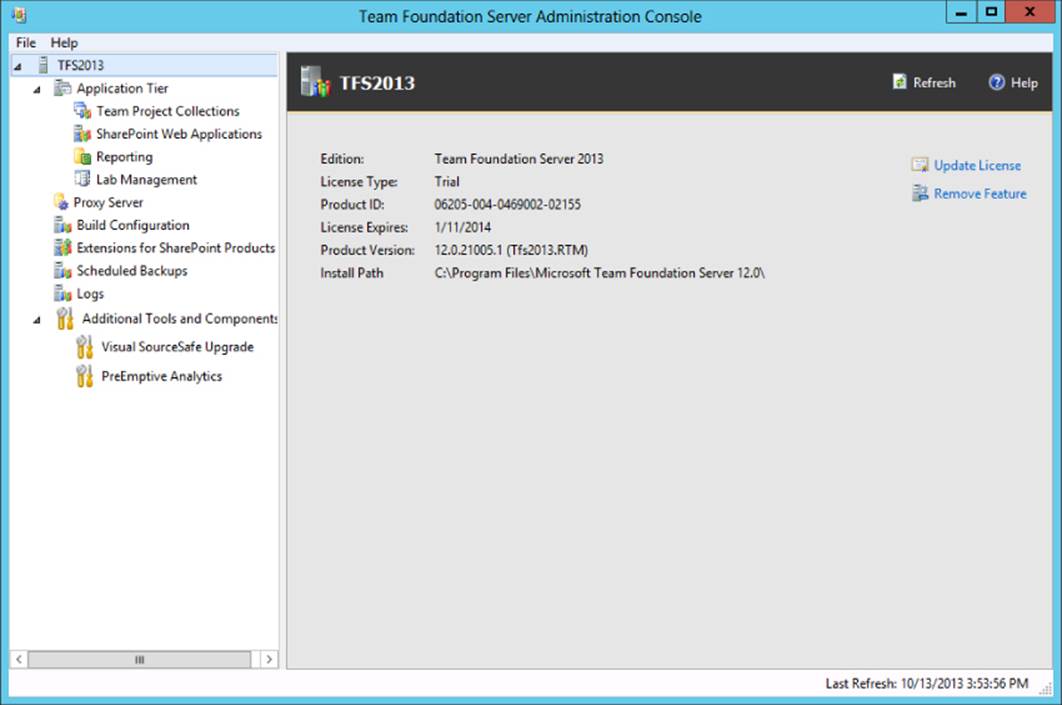
Figure 21.2 License information screen
This dialog box will also show you the version number and installation path of Team Foundation Server on this machine. This can be useful for verifying whether you have the latest version installed.
Managing Application Tiers
Possibly the most commonly used dialog box of the Administration Console, the Application Tier section of the console, contains all the configuration settings pertinent to the installation, as shown in Figures 21.3 and 21.4. From this section, you can perform most of the common administrative tasks. Table 21.2 describes each of the settings.
Table 21.2 Settings Displayed in the Application Tier Section
|
Setting |
Description |
|
Application Tier Summary |
|
|
Service Account |
The user account under which the application pool and job agent are configured to run |
|
Web Site |
The name of the website as it appears in IIS Manager |
|
Application Pool |
The name of the application pool as it appears in IIS Manager |
|
Authentication |
The current authentication mode. It will be either NTLM (Windows Authentication) or Kerberos. |
|
Notification URL |
The URL that users use to connect to the system, and the URL used in the text of e-mail alerts |
|
Server URL |
The URL used for server-to-server communication. This is especially important in environments with multiple application tiers. In this case, you don't want one node making requests to another node that the first node could have handled itself. That is why the default is localhost, and it's recommended for most configurations. |
|
Web Access URL |
The URL that web access should identify itself as. This is used when the Team Explorer client generates web access links, such as in the Open with Microsoft Office Outlook feature. |
|
Machine Name |
The name of the computer that the application tier is running on. Since the Administration Console doesn't allow remote server administration, this is always going to be the same as the computer that the console is open on. |
|
Ports |
The TCP port that the application is currently accepting requests on. By default, this will be 8080. However, it may be port 443 for servers configured with secure SSL (HTTPS). Or, it may be changed to another port that is friendlier with your company's firewall policy. |
|
Virtual Directory |
This is sometimes referred to as the “vdir.” The purpose of adding the virtual directory is to allow other future applications to share the same port and differentiate them by their URLs. |
|
Version |
This is a way to identify which version of Team Foundation is running on this server, as well as the current patch level that's installed. This is useful in two scenarios. First, it is an easy way to check whether you have a service pack or hotfix installed. Second, if you are thinking about moving a collection from another server, this is where you can check that the versions match. |
|
E-mail Alert Settings |
|
|
Enabled |
Show whether TFS will send e-mails when configured alerts are triggered. A value of true means alerts will be e-mailed; false means that they will not be e-mailed. |
|
SMTP Server |
The SMTP Server to which e-mail alerts should be directed |
|
E-mail From Address |
The address to show on the From: line of the e-mailed alert message |
|
Administration Console Users |
|
|
User Names |
The list of individuals who have been granted administrative access to the Team Foundation Server environment, including SharePoint Services, Reporting Services, and SQL Server databases. You can add and remove administrative users by selecting the Add or Remove links. The Reapply link will re-apply the permissions for those users. |
|
Data Tier Summary |
|
|
Data Tier Server |
The SQL Database Server currently running the Tfs_Configuration database for this Team Foundation Server environment |
|
SQL Server Instance |
SQL Server can have multiple instances running on the same server, differentiated by the instance name. This shows the instance that Team Foundation Server is configured to use. |
|
Connection String |
The connection string is the combination of the server name, instance name, and Tfs_Configuration database name, which allow the application to connect to the database. |
|
Database Label |
Databases from multiple Team Foundation Server environments can be hosted on a single SQL server instance. To avoid database name collisions, the databases can be given a label. For example, Tfs_ContosoConfiguration andTfs_ContosoDefaultCollection might represent the databases associated with Contoso's environment on a shared SQL server. |
|
Version |
The server has a version of code it is running, and the Tfs_Configuration database has a version stamp in the extended properties. This shows what that stamp is, and it must match the application tier version. |
|
Application Tiers |
|
|
Machine List |
The list of application tier servers that have ever been associated with this Team Foundation Server environment. If a server has not been active in the last three days, it can be filtered out of the list by selecting the check box.Additionally, if you have an application (not a server plug-in) that uses the server object model, it will show up in this list. |
|
Reporting Services Summary |
|
|
Reporting Services Manager URL |
The URL to the root folder of the web-based report manager |
|
Reporting Services Server URL |
The URL to the root of the Reporting Services web services |
|
Reader Account |
Team Foundation Server uses two reporting data sources, which allow reports to connect to the data warehouse as the account specified here. |
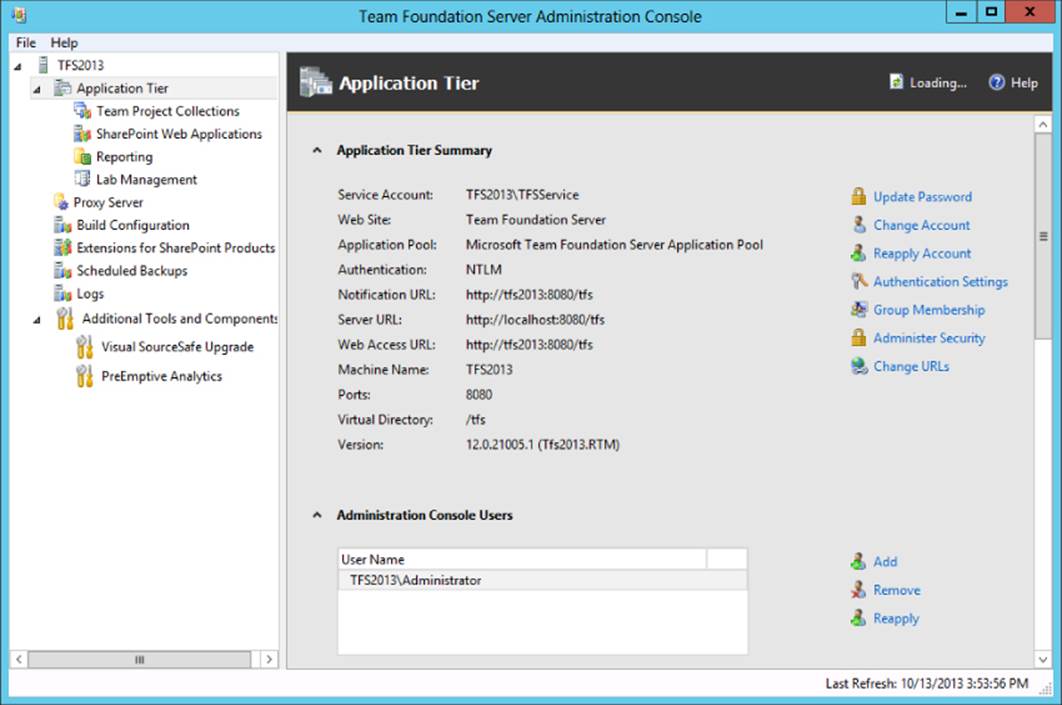
Figure 21.3 Application Tier screen
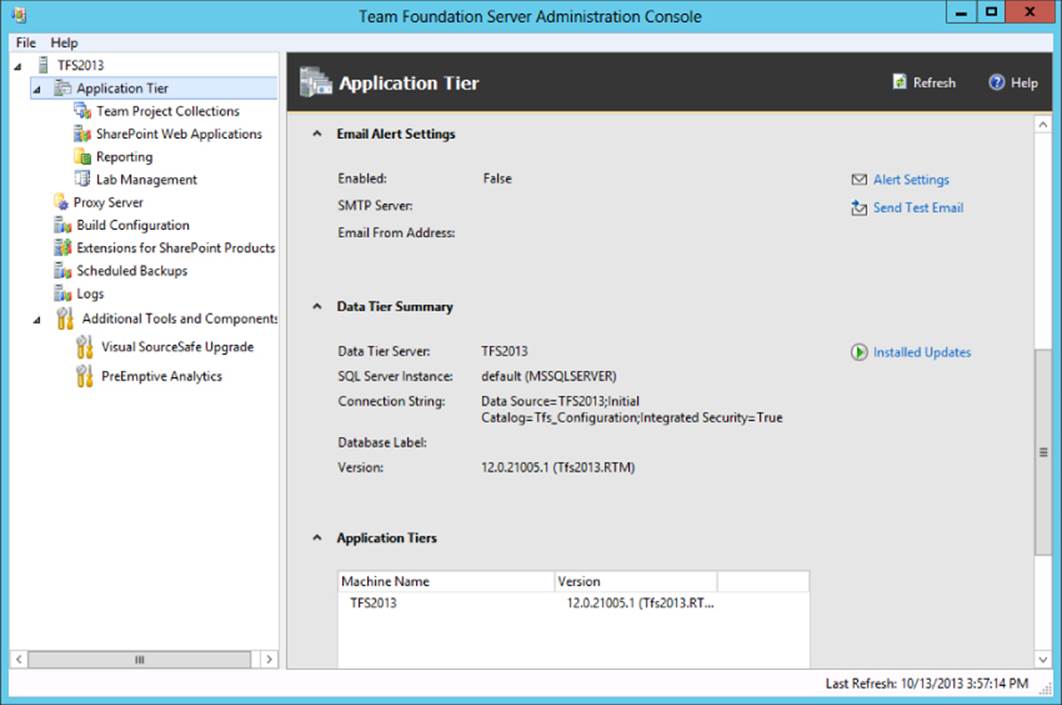
Figure 21.4 Continuation of the Application Tier screen
Update Service Account Password
Team Foundation Server allows you to use a built-in Windows account as the service account, such as NT AUTHORITY\Network Service or NT AUTHORITY\Local Service. These special built-in accounts don't require manual password changes, and they are good choices to minimize the administrative overhead. However, for an environment with multiple application tiers, using a built-in Windows account is not supported, and you'll have to update the password on the server when it is changed.
Some corporate environments have password policies that require passwords to be changed as frequently as every month. This requirement can make changing passwords for applications a common administrative task.
Fortunately, it's simple to do in Team Foundation Server. After clicking the Update Password link in the Administration Console, you are presented with the dialog box shown in Figure 21.5, which allows you to enter the new password and test it to ensure that it's correct.
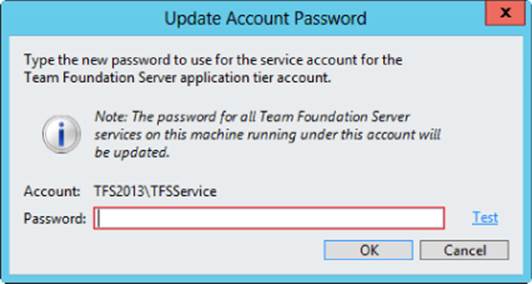
Figure 21.5 Update Account Password dialog box
Once you click OK, the password is verified and then the Administration Console changes the password in all the locations where it's used on the current server.
Note
For more information, see “Change the Service Account or Password for Team Foundation Server” on MSDN at http://aka.ms/Tfs2013ChangePassword.
Change Service Account
Changing the service account that Team Foundation Server runs as is not a common administrative task. Changing it is as simple as clicking the Change Account link in the Administration Console. In the resulting dialog box shown in Figure 21.6, you either select a built-in system account or enter the credentials for a domain account. Similar to changing passwords, it's also possible to verify the credentials before attempting to apply them by clicking the Test link.
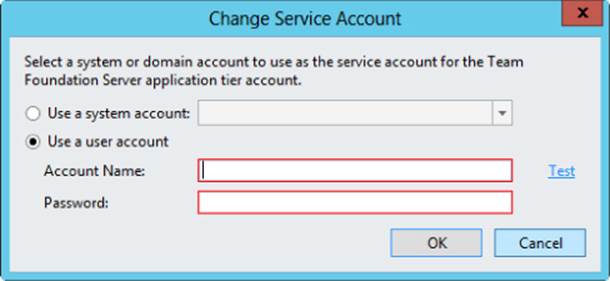
Figure 21.6 Change Service Account dialog box
Reapply Service Account
In some cases, a server may have had its service account configuration changed manually. This means that the service accounts might not match across the different components, and this would put the server in an inconsistent state. To return the server to a consistent state, you can choose the Reapply Account link from the Administration Console. This will set the service account of all components to the specified service account (see Figure 21.7) and reset the correct permissions. Similar to Figure 21.8, you should see all changes that were made, along with the successful completion message.
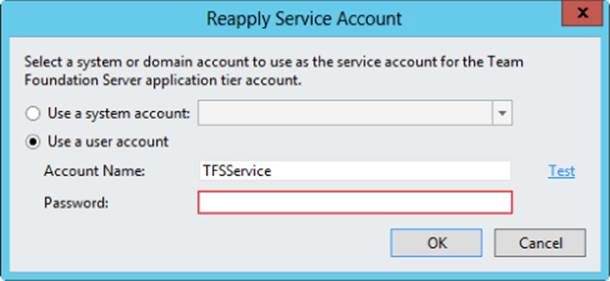
Figure 21.7 Reapply Service Account dialog box
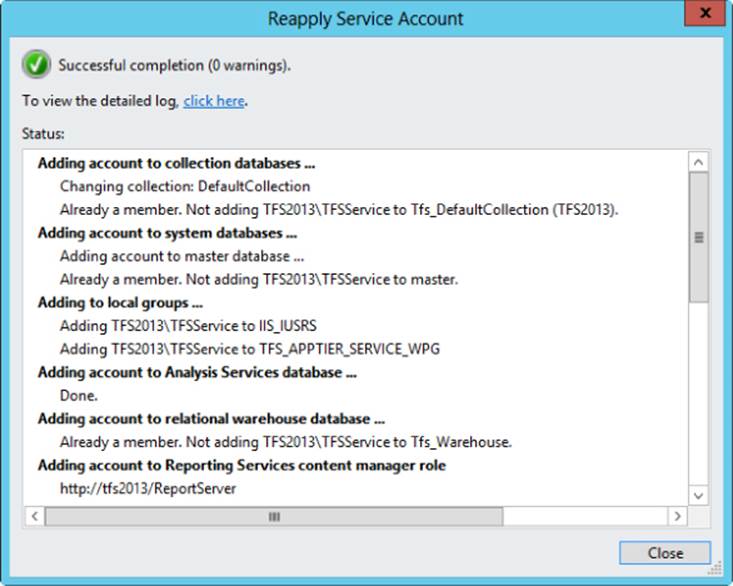
Figure 21.8 Reapply Service Account results dialog box
Change URLs
When Team Foundation Server makes requests to itself, it should use localhost. However, if you are using multiple application tiers, or you have a DNS alias configured for your server, then the Server URL setting may need to be changed.
After clicking the Change URLs link in the Administration Console, you see a dialog box similar to Figure 21.9 that allows you to change the two URLs used by the system.
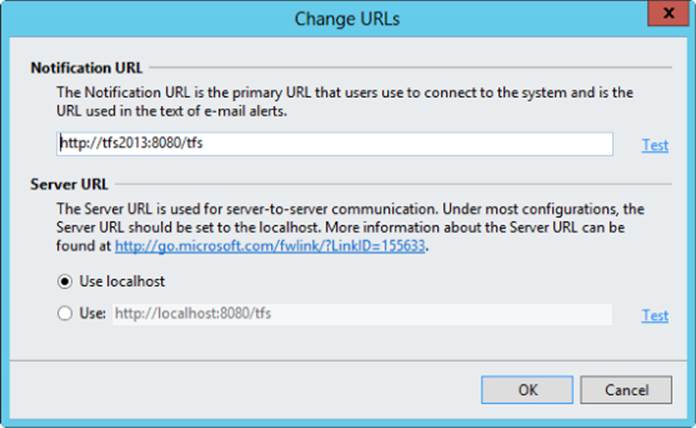
Figure 21.9 Change URLs dialog box
Add Team Foundation Server Administration Console User
Users who aren't Team Foundation Server administrators can be given access to open the Administration Console, as well as to create collections and change service accounts. By default, anyone who is an administrator on the server already is a Team Foundation Server administrator.
By clicking the Add link under Administration Console Users, you can give users administrative access in Team Foundation Server. Figure 21.10 shows you the advanced options available to restrict the permissions.
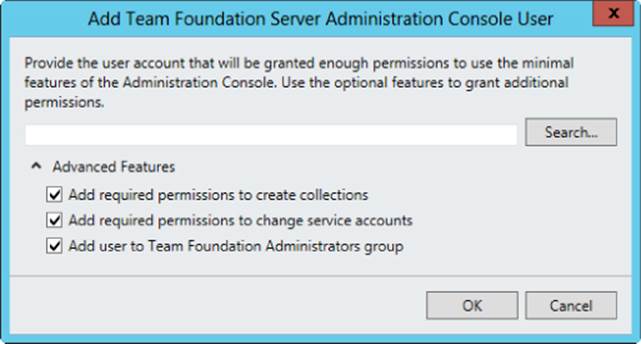
Figure 21.10 Add Team Foundation Server Administration Console User dialog box
Installed Updates
The main Administration Console screen will show you the currently installed version of the server. Server patches are cumulative, which means that every new patch includes all the patches released before it. There are some cases where you might want to know each individual patch that has been installed on a server and when it was installed.
By clicking the Installed Updates link in the Administration Console, you can see all the installed patches, as shown in Figure 21.11.
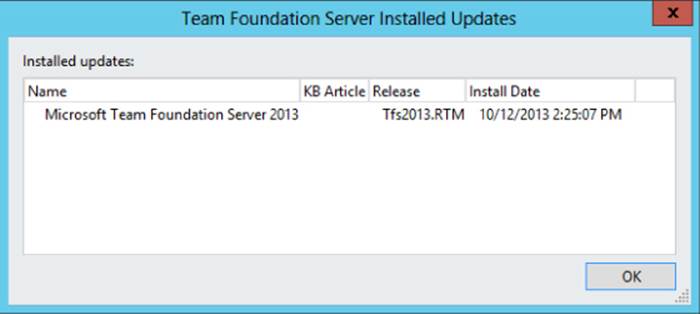
Figure 21.11 Team Foundation Server Installed Updates dialog box
Managing Team Project Collections
The Team Project Collections section is perhaps the second-most used section of the Administration Console. This section of the console allows you to perform all tasks that relate to collections. The tasks range from creating new collections to managing security, moving collections, and viewing collection logs.
To get to the Team Project Collections section of the tool, log on to your application tier server and open the Team Foundation Server Administration Console from the Start menu. The tree in the left pane will show Application Tier and then Team Project Collections. As shown in Figure 21.12, you will see a list of the Team Project Collections available in your environment.
Note
If you are using a Basic or Express configuration of Team Foundation Server, or your application tier is running on a client operating system (such as Windows 7 with SP1, Windows 8, or Windows 8.1), the SharePoint and Reporting tabs described in this section won't be available.

Figure 21.12 Team Project Collections
General Tab
The General tab shows the full URL of the collection that can be used to connect from Microsoft Test Manager and Team Explorer Everywhere. Each collection can (but does not have to) reside on a different SQL Server Instance to the Tfs_Configuration database. The General tab shows the SQL Server Instance that the current collection is hosted on.
As shown in Figure 21.13, you can also view or edit the description of the collection from the General tab, and administer the group membership and permissions for users and groups in the collection.

Figure 21.13 General tab
Stop and Start a Collection
From the General tab of a collection, if a collection is currently running, you can stop it and prevent all new requests by clicking the Stop Collection link. This presents the dialog box shown in Figure 21.14, which allows you to specify a message that users will receive when they attempt to connect to the collection.
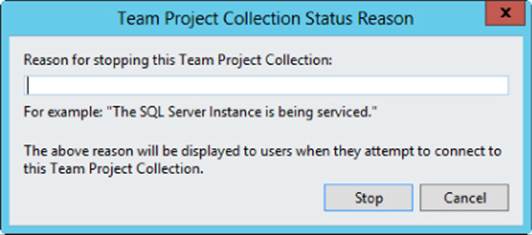
Figure 21.14 Team Project Collection Status Reason dialog box
This is useful if you need to perform maintenance on the underlying SQL server, or for any other reason that you need to take a single collection offline. Once the collection is stopped, you can click the Start Collection link to bring the collection back online and start accepting requests again.
Status Tab
As shown in Figure 21.15, the Status tab displays each of the jobs that have been executed for that collection. You can open the log for any of these jobs by double-clicking the entry.
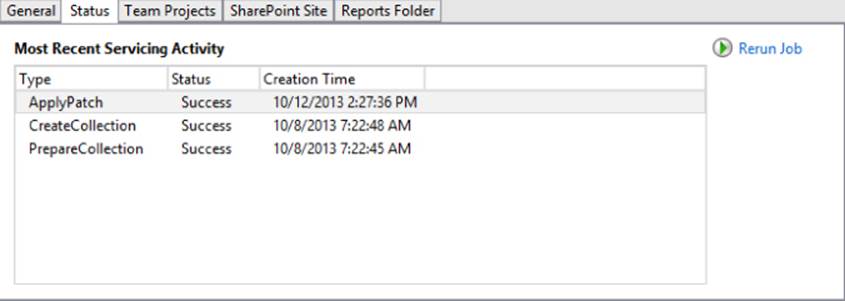
Figure 21.15 Status tab
In some circumstances, a job may fail. This can occur because of an interrupted patch installation, a mismatched server and collection version, or a timeout. In these cases, it is possible to attempt the job again by clicking the Rerun Job link. You can view the current progress of a running job by double-clicking the entry.
When you are performing a server upgrade, it's possible to close the upgrade wizard before all the collections have finished upgrading. Additionally, when you are performing a collection import, the import process is command-line only, and it can be difficult to gauge the progress of the import. In these cases, you can also double-click the job to view the current progress of the upgrade or import job.
Team Projects Tab
This tab displays the list of team projects in the collection, along with their descriptions. Because of the existing implementation of the Project Creation Wizard, it's not possible to add new team projects through the Administration Console. You still must use Visual Studio Team Explorer 2013 to create new team projects in a collection.
From the Team Projects tab shown in Figure 21.16, an administrator can delete a team project. Once a project is selected, the Delete link is available.
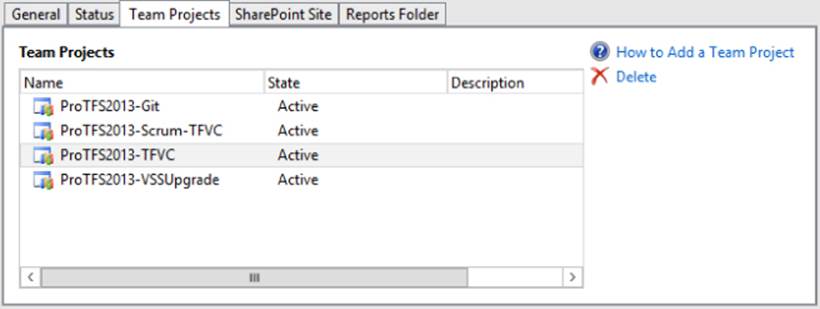
Figure 21.16 Team Projects tab
After clicking the Delete link, you can optionally delete lab management, reporting, and build artifacts that relate to the team project. Figure 21.17 shows the dialog box you would use to do this. Additionally, you can optionally delete the version control workspace associated with the project.
Data May Remain Undeleted After Deleting a Team Project
Deleting a team project can leave remnants of the team project in the system. For example, the team project data will remain in the data warehouse until it is rebuilt. Work item tracking metadata shared between other team projects is not deleted. Version control shelvesets that contain code from other team projects are also not deleted.
For more information on deleting a team project, see “TFSDeleteProject: Deleting Team Projects” on MSDN at http://aka.ms/Tfs2013DeleteProject.
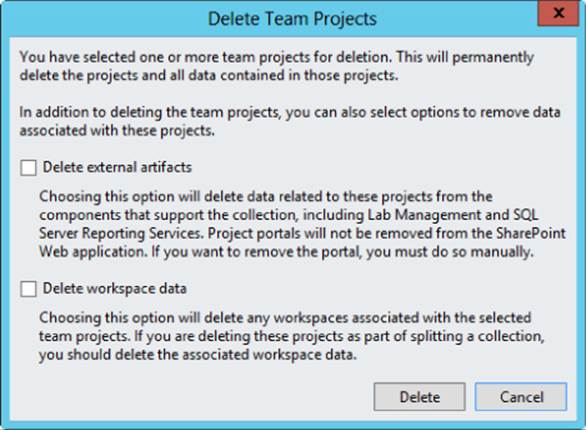
Figure 21.17 Delete Team Projects dialog box
SharePoint Site Tab
Team Foundation Server allows you to configure any SharePoint site for your team project's project portal. As shown in Figure 21.18, this tab shows you the default site location that will be used to create project portals for new team projects. When you create a team project or configure a project portal for an existing team project, this is the URL that will be used by default.
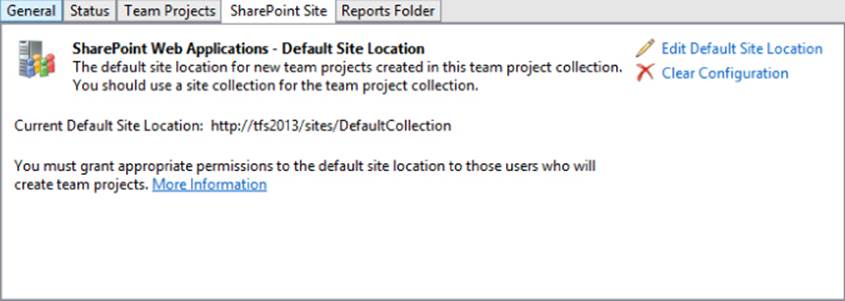
Figure 21.18 SharePoint Site tab
If you don't specify a default site location here, then no default will be provided for new or existing team projects when they are created or modified.
Reports Folder Tab
As shown in Figure 21.19, this tab displays the path under which report folders for team projects will be created by default. If you create or modify a team project, you can specify another folder, but this root path will be used as the default.
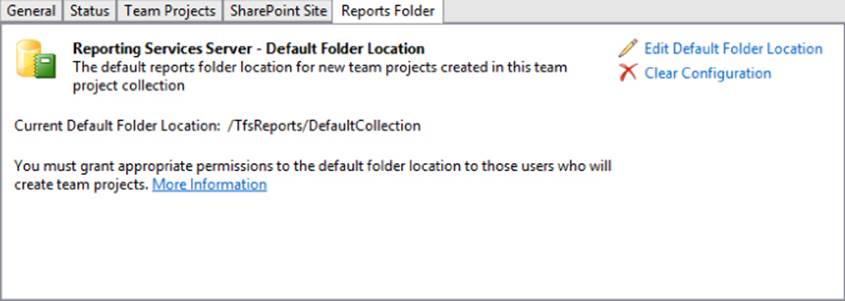
Figure 21.19 Reports Folder tab
Create a Team Project Collection
This is also the section where you create new team project collections. To do so, click the Create Collection link as shown on the right side of Figure 21.12. A dialog box is displayed, as shown in Figure 21.20. After you specify a name for the collection and an optional description, a series of readiness checks are run to confirm that a collection can be created on the specified server.
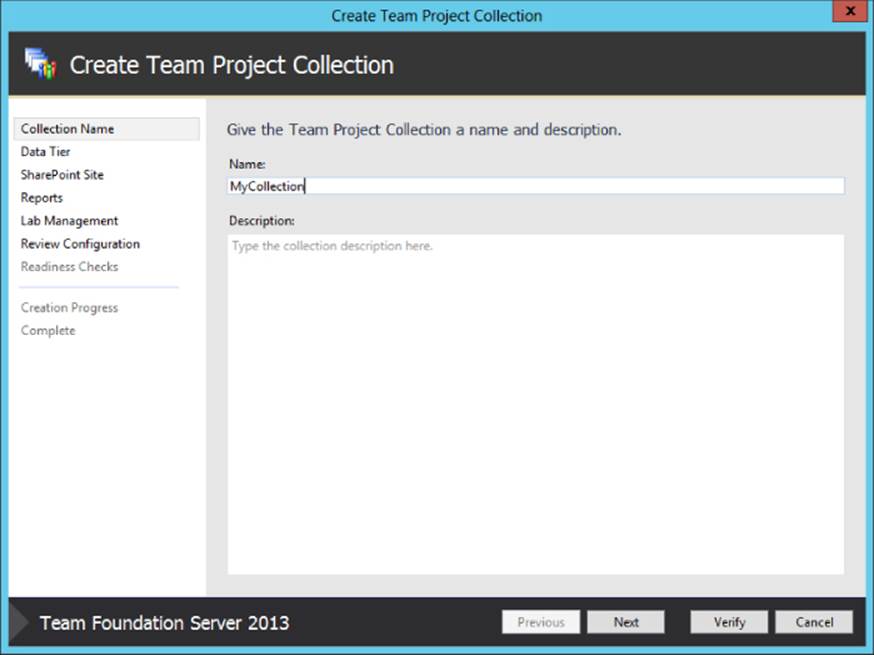
Figure 21.20 Create Team Project Collection name and description screen
Once the checks pass and you proceed with the wizard, you should see green check marks, as shown in Figure 21.21. In the background, a Create Collection job was queued on the server and the collection was created by the background job agent.
Note
For more detailed instructions on this process, see “Create a Team Project Collection” on MSDN at http://aka.ms/Tfs2012CreateTPC. Although these instructions are for Team Foundation Server 2012, the process is unchanged for 2013.
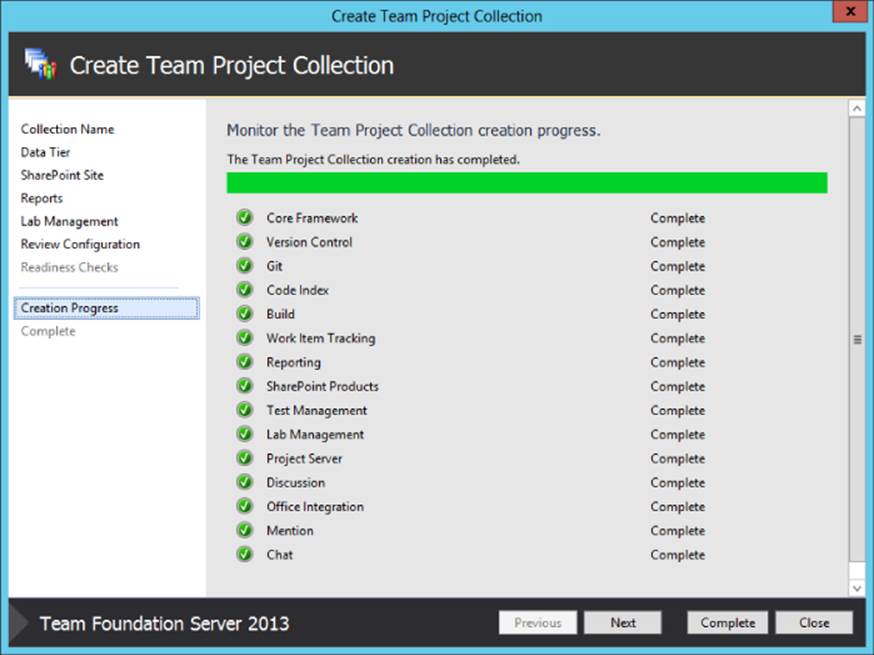
Figure 21.21 Successful creation of a Team Project Collection
Move a Team Project Collection
In Team Foundation Server, it's easy to move a team project collection between two servers of matching versions. To detach a collection, click the Detach Collection link shown in Figure 21.13 on the General tab. To attach a collection, click the Attach Collection” link, shown on the right side of Figure 21.12. Following are the two most common scenarios for detaching a collection:
· You are a consulting company that has been developing a product for a client, and you want to deliver the code and the collection to the client at the end of the project.
· The organizational structure has changed, or the company has been acquired, and you must move the collection to a different Team Foundation Server.
The process is quite safe and relatively straightforward.
Note
For more detailed instructions, see “Move a Team Project Collection” on MSDN at http://aka.ms/TfsMoveTPC. Although these instructions are for Team Foundation Server 2012, the process is unchanged for 2013.
Detach a Team Project Collection
Each collection has shared information (such as identities) stored in the instance's Tfs_Configuration database. Because of this, it's necessary to detach a collection before it can be attached to another server. This detach process copies the shared information into the collection database before disconnecting it from the instance. The database remains online on the SQL server, but it is not associated with the Team Foundation Server anymore.
To start the detach process, click Detach Collection from the General tab for the Team Project Collection node in the Administration Console. For the relatively short duration (typically a few minutes) while the detach operation is in progress, the collection will be offline.
The wizard allows you to optionally specify a message that will be displayed to users who connect during this period, as shown in Figure 21.22. However, once the detach operation finishes, the collection effectively doesn't exist on the server anymore, and this message won't be displayed to users. Instead, they will receive a message indicating that the collection couldn't be found.
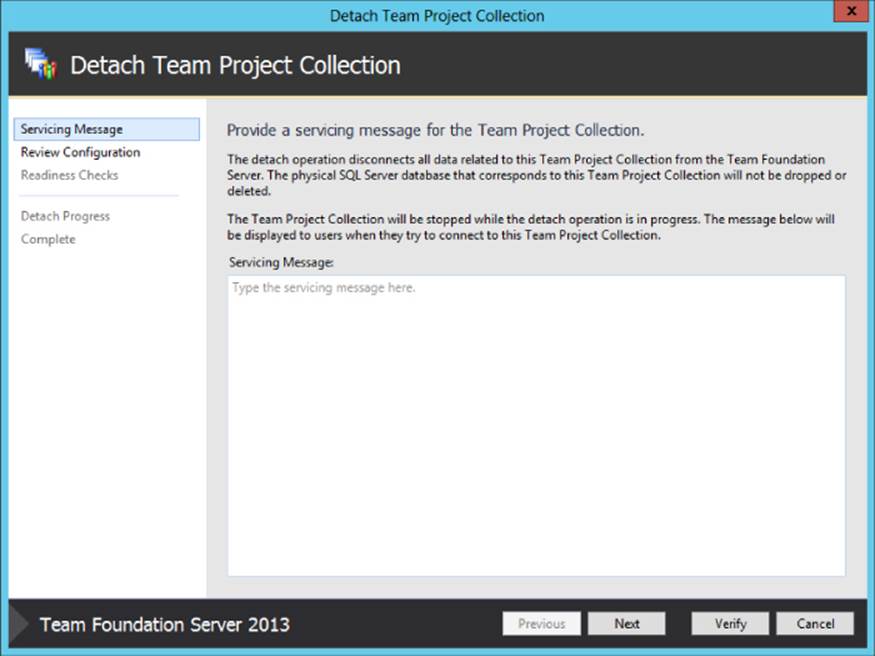
Figure 21.22 Detach Team Project Collection servicing message
Once you proceed with the wizard, the background job agent executes a series of jobs. After a short period, you should receive six green check marks, as shown in Figure 21.23.
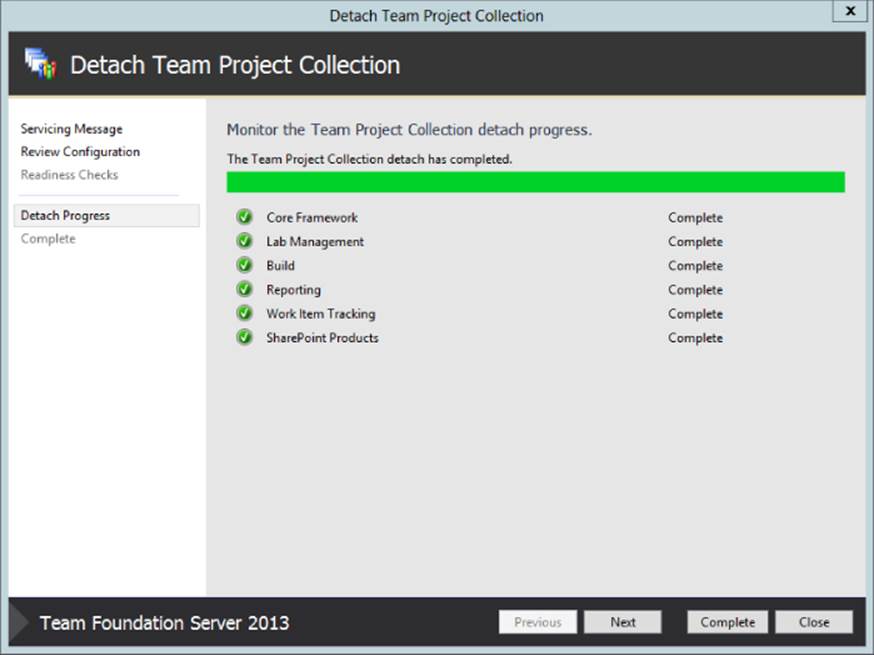
Figure 21.23 Successful detach of a Team Project Collection
Once the database is detached, you can use SQL Server Management Studio to back up the collection database and move it to another SQL server, or provide the backup to another person. Remember to treat this backup with care because anyone with access to the file can restore it to Team Foundation Server, and that person will have administrator access to the collection.
Warning
Detaching a collection requires additional steps beyond just clicking Detach Collection in the Administration Console. To achieve full fidelity, you must save the reports from Reporting Services, delete any Lab Management resources, and rebuild the data warehouse as part of any detach operation.
Attach a Team Project Collection
Before attaching a previously detached collection, you must have already restored the database backup to the SQL server that you want to use. To start the process, click the Attach Collection link from the Administration Console on the Team Project Collections node, as shown in Figure 21.12, earlier in this section. When the dialog box appears, specify the SQL Server instance and verify that you have a backup of the collection database, as shown in Figure 21.24.
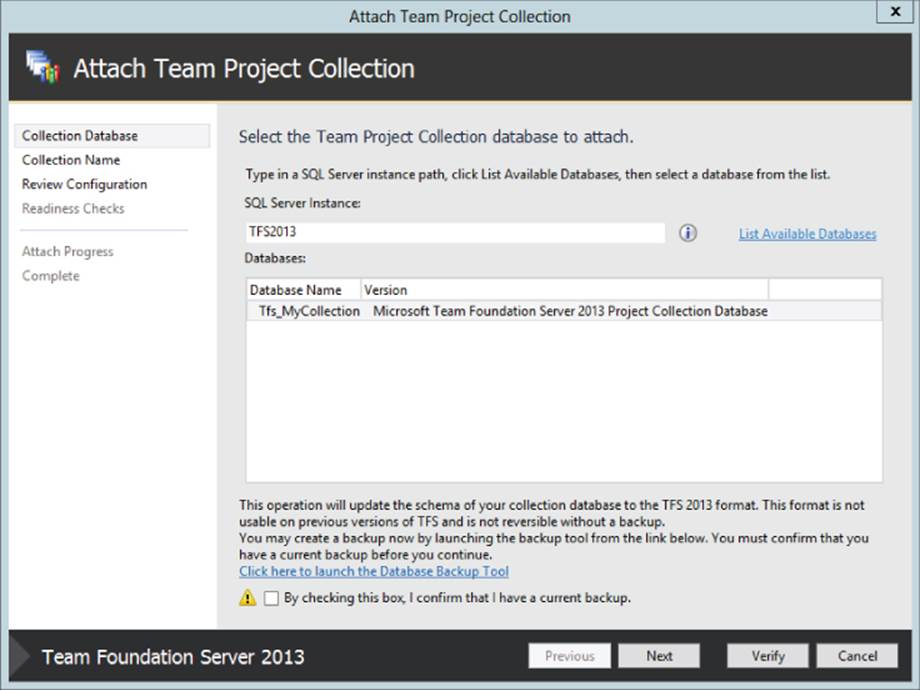
Figure 21.24 Specifying a SQL Server instance and database to attach
Once the collection is verified and you proceed with the wizard, a job is executed on the background job agent. This job copies the shared data out of the collection database and places it in the Tfs_Configuration database, for the instance. As shown in Figure 21.25, once the job is completed, the collection is brought online and users can begin accessing it.
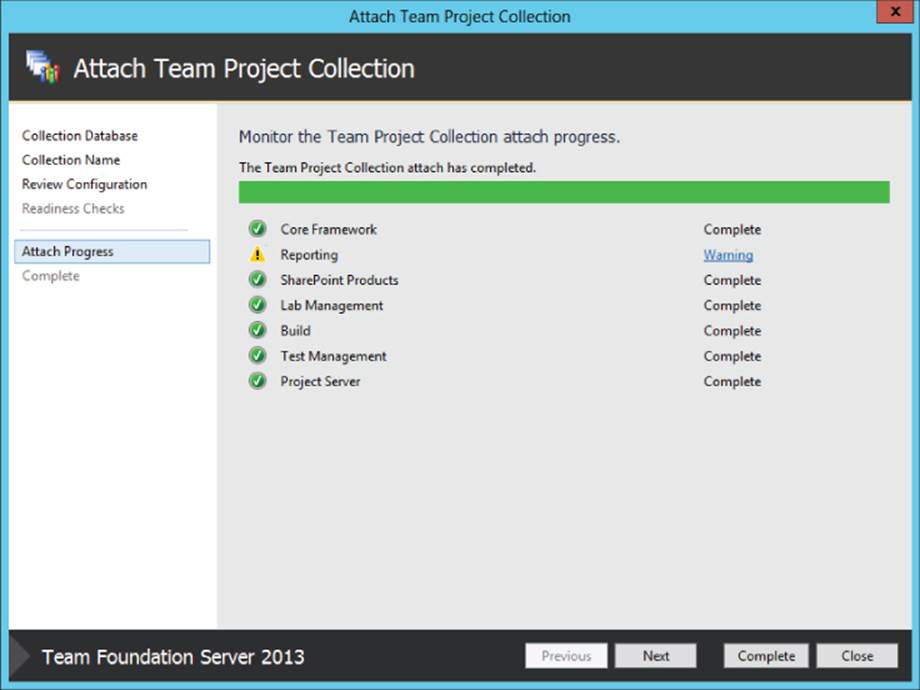
Figure 21.25 Successful attach of a Team Project Collection
All Team Foundation Servers and all collections have unique instance IDs. As part of the attach process, the server will check the instance ID of the collection and ensure that it doesn't conflict with an existing collection on the server. If a conflict is detected, then the new collection's instance ID is automatically changed.
Delete a Team Project Collection
To delete a team project collection, click the Detach Collection link from the Administration Console on the Team Project Collections node, as shown in Figure 21.12. Once the collection has been detached, you can then delete the underlying database from SQL Server.
If you would like to delete a team project collection without first detaching it, this is possible using the TFSConfig.exe command-line tool. Open a command prompt on an application tier server and run the following command:
TFSConfig.exe collection /delete /collectionName:YourCollection
The difference between deleting a collection and first detaching a collection is that a deleted collection cannot be reattached to a server.
Note
For more details, see “Delete a Team Project Collection” on MSDN at http://aka.ms/Tfs2012DeleteTPC. Although these instructions are for Team Foundation Server 2012, the process is unchanged for 2013.
Managing SharePoint Products
As you can see in Figure 21.26, in this section you establish the connection between your Team Foundation Server instance and your SharePoint web applications. If you already have a SharePoint server configured, or you'd like to allow project portals on an additional server, you can add that server here.

Figure 21.26 SharePoint Web Applications section
Managing Reporting
As you can see in Figure 21.27, all the Reporting settings are configured for your Team Foundation Server instance in this section. The main screen shows you the current settings, which you can change by clicking the Edit link.
Note
For a more detailed look at the administration aspects of reporting, see Chapter 15.
For details on the other options available in the Administration Console, see the following chapters and sections in this book:
· “Configuring the Team Foundation Build Service” in Chapter 18.
· “Installing and Configuring Lab Management” in Chapter 26.
· “Team Foundation Server Proxy” in Chapter 28.
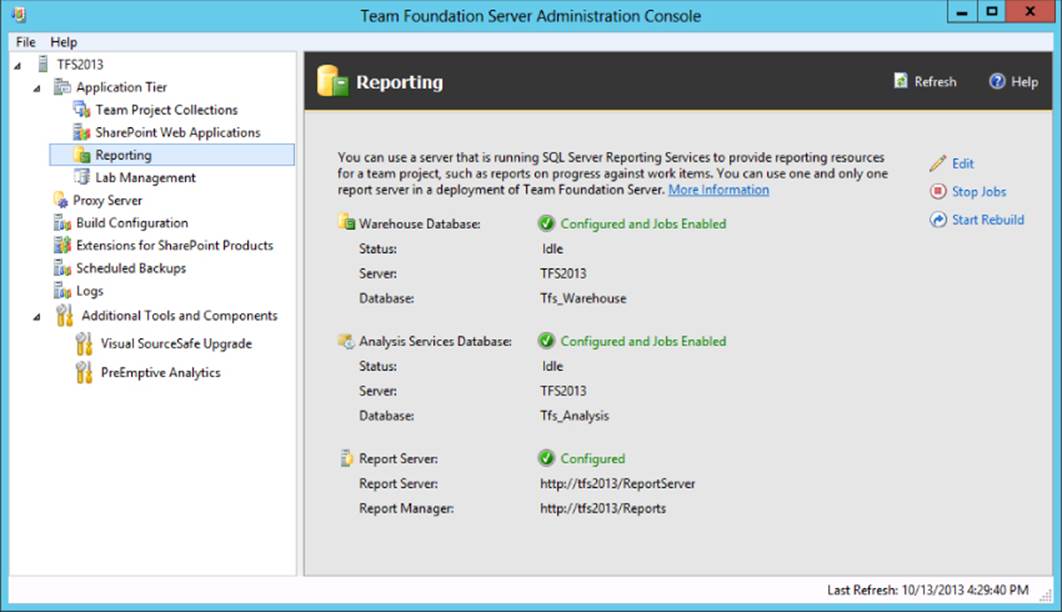
Figure 21.27 Reporting section
Command-Line Configuration Tools
Quite a few command-line configuration tools are available in Team Foundation Server. In Team Foundation Server 2010, a number of disparate administration tools were consolidated into two. For example, the WITImport.exe, WITExport.exe, and WITFields.exe tools are now commands available in the consolidated WITAdmin.exe tool.
Many of the administration tools are examined in other chapters of this book, and you should refer to the following chapters for more details.
· Chapter 13—WITAdmin.exe
· Chapter 24—TFSSecurity.exe and TF.exe Permission
· Chapter 28—TF.exe Proxy
TFSConfig.exe
The TFSConfig.exe tool allows an administrator to perform most server configuration tasks from the command line. When paired with a remote execution tool such as PSExec.exe (which is available at http://aka.ms/PsExec), TFSConfig.exe can help you achieve remote server administration.
Table 21.3 provides an overview of each of the commands available with TFSConfig.exe and what they can be used for.
Note
For more details on this command-line tool, see “Managing Server Configuration with TFSConfig” on MSDN at http://aka.ms/TfsConfig2013.
Table 21.3 Commands Available with TFSConfig.exe
|
Command |
Description |
|
Accounts |
Allows you to update passwords, change service accounts, add new service accounts, remove service accounts, and reset database ownership |
|
Authentication |
Allows you to view or change the current authentication settings (NTLM or Kerberos) for the server |
|
Certificates |
Configures how client authentication certificates are used when Team Foundation Server connects to itself using a secure (HTTPS) connection |
|
ChangeServerID |
Initializes the Team Foundation Server instance and all of its collections with a new instance ID. This command is required when you restore a copy of your server while the original copy remains online. If you don't change the instance ID of the new server, clients will be confused and will communicate with the original server instead of the new server. |
|
CodeIndex |
Manages the Code Indexing Services that support the CodeLens tooling in Visual Studio |
|
Collection |
Attaches, detaches, or deletes a team project collection from the server |
|
ConfigureMail |
Changes the e-mail From address and the SMTP host used by the server to send notifications |
|
Diagnose |
Diagnoses software update problems that might prevent Team Foundation Server from working correctly. This command inspects the system to find any service level (patch) mismatches between the application tier and the collection databases. |
|
Identities |
Lists the status or changes the security identifiers (SIDs) of identities stored by the server. This command is used when you move a server from one domain to another where the user names match, but the SIDs are different. |
|
Import |
Imports databases from either a 2005 or 2008 data tier as a new project collection. This command is used when you want to consolidate multiple instances onto a single instance, and don't want to perform an in-place upgrade first. |
|
Jobs |
Allows you to retrieve the logs or retry a job on a single, or all, collection(s) |
|
Lab |
Configures Lab Management and manages host group and library share assignments for a collection |
|
License |
Used to display or modify Team Foundation Server licensing information. Using this command, you can extend your trial period by an additional 30 days. |
|
PrepareClone |
Prepares an existing configuration database after cloning. This will reset the SharePoint and Reporting Services URLs to the local machine and create the required SQL roles in the master database. |
|
Proxy |
This command can be used to update the Team Foundation Server proxy configuration. For example, you can change the list of servers that the proxy is able to proxy for.The proxy server must be initially configured in either the Team Foundation Server Administration Console or by using the TfsConfig.exe Unattend command. |
|
RebuildWarehouse |
Rebuilds the Analysis Services database and the relational database of the warehouse. Unlike the Start Rebuild link in the Administration Console, you can specify the /analysisServices parameter, which will rebuild only the Analysis Services database without rebuilding the relational database. |
|
RegisterDB |
Changes the database the application tier uses. This command is usually used when you restore a set of databases and want to connect them to a new application tier. |
|
RemapDBs |
Enumerates the databases in the specified SQL instances, and validates that the connection strings match the locations of the found databases |
|
Repair |
Re-creates all stored procedures, functions, indexes, constraints, and tables in the configuration and collection databases. It doesn't repair any of the data, only the structure of the databases.This command was deprecated in Team Foundation Server 2012 and should not be used. |
|
RepairCollection |
As above for Repair, however, it operates only on a single collection. |
|
Settings |
Manages the notification and server URL settings for the server |
|
Setup |
Used for unconfiguring a Team Foundation Server. After running this command, you can open the Administration Console and run the server configuration wizard again. |
|
Unattend |
Used for configuring Team Foundation Server using an unattended configuration file. For example, you can use TfsConfig.exe Unattend/configure /type.basic to configure a server with the essential development services (Source Control, Work Item Tracking, and Test Case Management). |
|
Updates |
Reapplies software updates required to synchronize the service level of the databases for Team Foundation Server to the level of the application tier |
TFSServiceControl.exe
The TFSServiceControl.exe tool is used to stop or start all of the services and application pools that Team Foundation Server uses on a server. If you have multiple application tier servers, you will need to run this command on each server to completely start or stop the environment.
The quiesce option will gracefully stop all related services on the server, and the unquiesce option will start them. For example, you might want to gracefully stop services when you need to perform maintenance on a server.
Operational Intelligence Hub
Starting in Team Foundation Server 2012, Microsoft provided a “hidden” web-based administration interface that provides insight into the activity within the environment as well as the activities of the Background Job Agent called Operational Intelligence. To access the Operational Intelligence hub, browse to http://yourServer:8080/tfs/_oi on your server where you will find the page shown in Figure 21.28. Notice that there are two tabs on this page named Activity Log and Job Monitoring.
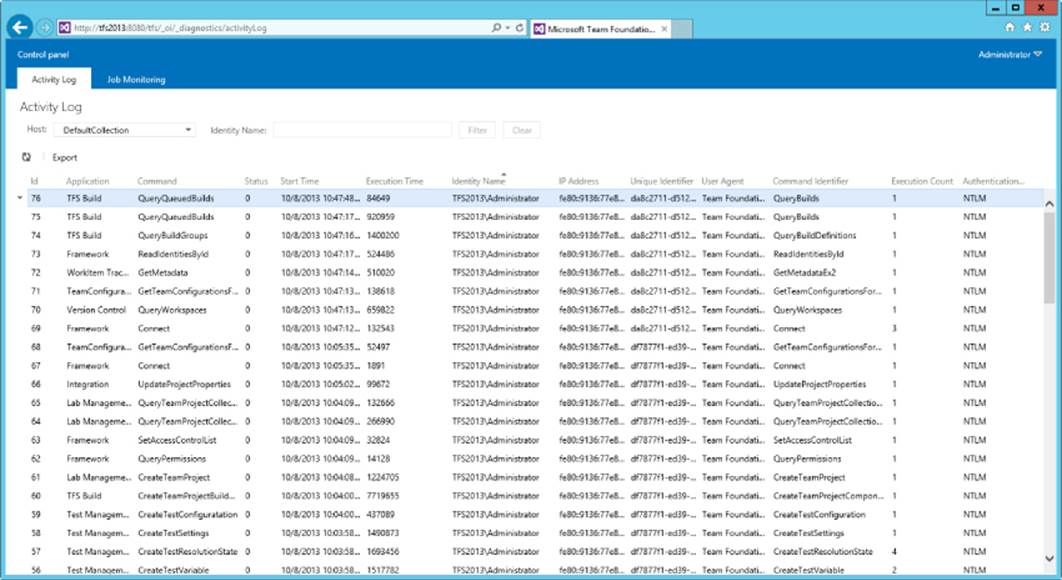
Figure 21.28 Activity Log tab in the Operational Intelligence Hub
Activity Log
The Activity Log shows data from the tbl_Command table in the Tfs_Configuration database and the tbl_Parameter table in each Team Project Collection database. These tables keep track of all of the commands from every user that have been executed against the server in the last 14 days.
Table 21.4 provides an overview of each column in the Activity Log and how each is interpreted.
Table 21.4 Activity Log Columns
|
Column |
Description |
|
Id |
The unique ID of this command execution |
|
Application |
The Team Foundation Server component against which this command was executed. Some common applications are TFS Build, Framework, Lab Management, Test Management, and Work Item Tracking. |
|
Command |
The name of the command given by the server. These command names are not documented anywhere but they are names similar to their corresponding API calls. |
|
Status |
Shows 0 on success, –1 on failure |
|
Start Time |
The Date/Time when the command was received by the server |
|
Execution Time |
The amount of time it took for the command to run. Expressed in microseconds (1 one-millionth of a second) |
|
Identity Name |
The user name of the person or service executing the command |
|
IP Address |
The IPv4 or IPv6 address of the machine where the command originated |
|
Unique Identifier |
A GUID that is used to correlate multiple server-side requests that are generated by a single client-side request |
|
User Agent |
The User-Agent HTTP request header field value from the client. This value gives you the name of the executable making the call if it used the API as well as the version/SKU of the caller. |
|
Command Identifier |
The command the user called. If using the tf command-line tool, then this is the sub-command given, i.e., tf get or tf diff. |
|
Execution Count |
The number of times this command was executed. If multiple calls are made to the same command, they will not be listed separately, but rather the Execution Count will be incremented for each. In Figure 21.28 you can see that the Connect command at Id 69 was executed three times. |
|
Authentication Type |
The authentication method used on this request. Values are NTLM or Kerberos. |
You can view additional details for each Activity Log entry by double-clicking on the entry. This opens the Activity Log Entry dialog box shown in Figure 21.29.
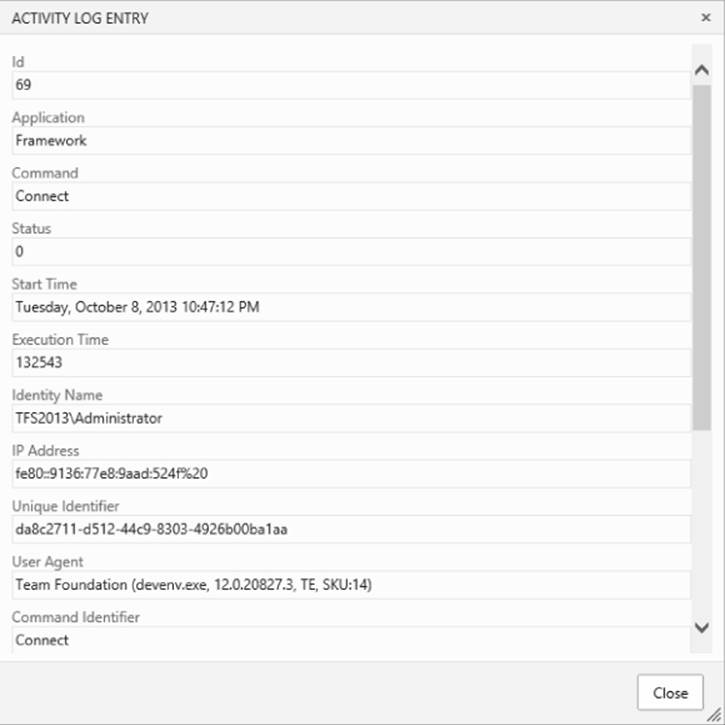
Figure 21.29 Activity Log Entry dialog box
Job Monitoring
The Job Monitoring tab shows information about the background jobs that Background Job Agent runs regularly. As shown in Figure 21.30, there are three sub-tabs, which show Job Summary information, the current Job Queue, and Job History.
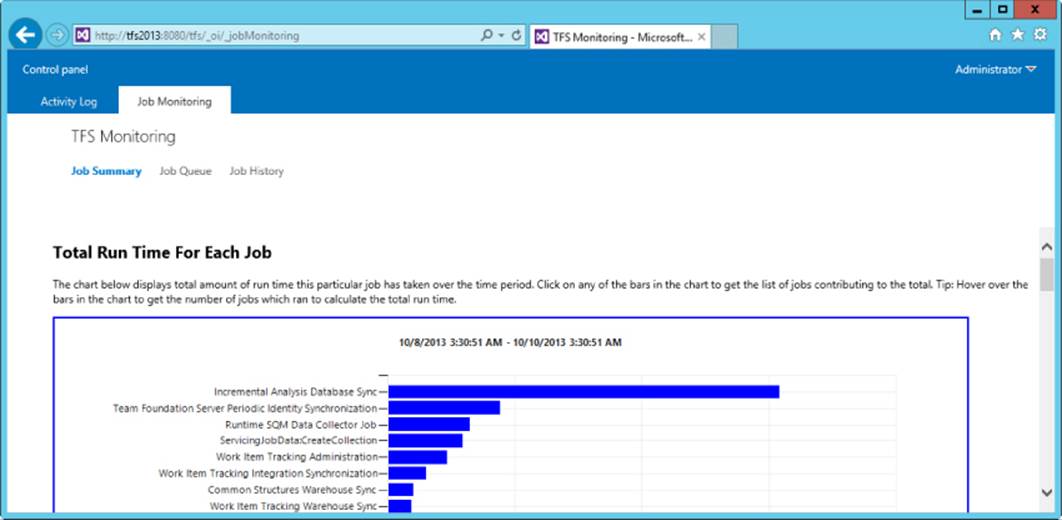
Figure 21.30 Job Monitoring tab in the Administration Hub
Job Summary
The Job Summary tab shows three charts that allow you to see the job activity in your system: Total Run Time for Each Job, Result Counts, and Number of Jobs Run.
The Total Run Time for Each Job chart shows the total amount of time that a particular background job took over the time period shown on the bar chart. You can hover your cursor over a bar to see the number of job runs whose time was calculated into the total run time. You can click on a bar to bring up the Job History tab with specific data about that background job.
The Result Counts chart shows a pie chart of the count of the different result types encountered by the background jobs over the period shown in the chart. Some of the result types shown are Succeeded, Failed, and Blocked. Clicking on a result type section of the chart will bring you to the Job History tab filtered to show the jobs with the selected result type.
The Number of Jobs Run chart is a stacked bar chart that shows the number of times a job has run segmented by the result type for that particular job. If the Synchronize Test Cases job ran ten times, of which six were successful and four failed, then the bar for that job would be ten units long—and six units would be green and four red. Hovering over a bar will show a breakdown of the result types for that job. Clicking on any bar will bring you to the Job History tab filtered by the selected job.
Job Queue
The Job Queue tab provides information about the current state of the job queue. The Job Queue Types chart breaks down the queue by queue type to show jobs that are in progress, queued, scheduled, or waiting to run on an offline or dormant application tier server. Clicking on any bar in the chart will populate the Job Queue Details list with the job queue entries for the selected queue type.
Job History
The Job History tab provides information about past performance of background jobs. The Average Run and Queue Time With Total Number of Jobs chart displays the number of jobs run at each hour overlaid with the average time the jobs waited in the queue and the average run time of those jobs. The Job History list shows the detailed job history results over the period shown in the chart. This list excludes successful jobs to make it easier to navigate.
Other Administration Tools
As with most products, there are gaps in functionality. As with most products, Team Foundation Server 2013 has gaps in functionality. There are many Microsoft-sponsored and non-Microsoft-sponsored utilities available. This section examines the ones released outside Microsoft's normal release cycle, as well as a useful tool developed by another company.
Team Foundation Server Power Tools
Power Tools are extra features developed by Microsoft outside of the normal release cycle. They are always “additive,” which means that they are extensions of the shipping product and don't change any core functionality. Typically, they are used to temporarily address customer pain points and adoption blockers. In an ideal world, all the Power Tool features would eventually make it in to the normal product, but that can take some time.
The Power Tools include some useful utilities for administrators, such as the Process Editor (for managing work item types and fields), the Test Attachment Cleaner (tcmpt.exe), and the Best Practices Analyzer.
Note
The latest version of the Team Foundation Server Power Tools can be downloaded from http://aka.ms/TFS2013PowerTools.
Best Practices Analyzer
Perhaps the most useful Power Tool for administrators is the Best Practices Analyzer (BPA). The BPA is the same tool used by the Microsoft Support team when customers call with a server problem.
The health check scan types have hundreds of rules and alerts built in. These check all the different configuration settings in an environment against expected settings, and generate warnings or errors when something doesn't look correct.
In addition to one other scan that collects statistics of your server, the following are different variations of the health check scan:
· Team Foundation Server Complete Health Check
· Team Foundation Server Framework Health Check
· Team Foundation Server Warehouse Health Check
· Team Foundation Build Health Check
· Visual Studio Lab Management Health Check
· SharePoint Products Health Check
· Project Server Configuration Health Check
· Project Server Synchronization Engine Health Check
· Visual Studio Client Health Check
Team Foundation Server Complete Health Check is the most comprehensive scan, and will take the longest to run. As you can see in Figure 21.31, it enumerates all the servers in an environment (including build agents and lab management components), and it performs the health check scan on them. If you have an environment with more than a few build servers, then this scan type is probably not very useful because it will take a long time to run and scan all your servers.
Warning
If you have build agents in remote locations that have slow network links, the health check may take a much longer time to complete.

Figure 21.31 Microsoft Team Foundation Server Best Practices Analyzer
Additionally, if you are having a problem with a particular component (such as the Warehouse or SharePoint Products), you can just run the health check for those components.
Once the scan completes, you can select each issue and click the “Tell me more about this issue and how to resolve it” link shown toward the bottom of Figure 21.32. This will display the documentation for that particular check and describe the steps to resolve the issue. This is an often overlooked and very valuable resource for diagnosing and troubleshooting Team Foundation Server configuration issues.
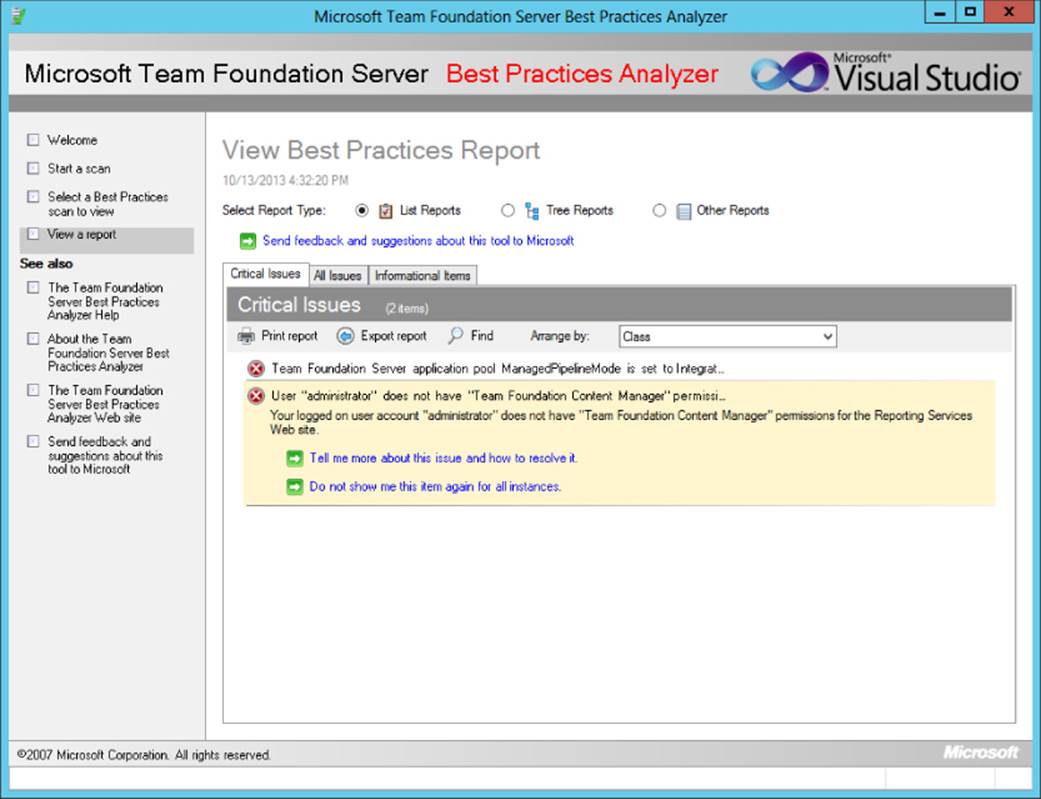
Figure 21.32 View Best Practices Report
It's not very well known, but you can actually run the BPA tool from the command line using the TfsBpaCmd.exe tool. With this functionality, you might consider running it once a week as a scheduled task to proactively detect any server configuration issues.
Note
Chapter 25 covers the usage of the BPA tool in more detail.
Team Foundation Server Administration Tool
Team Foundation Server includes integration with SharePoint Products and SQL Reporting Services. However, this integration isn't as great as it could be for project or server administrators. Permissions between Team Foundation Server and these other systems aren't integrated. This means that you have to manage the permissions and group memberships separately through each system's own administration interface.
Note
Fortunately, this permission integration issue was identified as an early gap for administrators, and the Team Foundation Server Administration Tool was created. This tool will be discussed further in Chapter 24.
Team Foundation Sidekicks
As a Team Foundation Server administrator, you may be required to venture beyond SQL servers, application tiers, collections, and team projects. If you must delete old workspaces or unlock files from users who are on vacation, you can use the tf.exe command-line tools to do so. For those who are not intimately familiar with the client tools, this can be a little tricky, and you would be much more comfortable in a graphical user interface (GUI).
The Attrice Corporation has created a free suite of tools called the Team Foundation Sidekicks. The tools allow server administrators and advanced users to use a GUI to perform many administrative and advanced version control tasks. Figure 21.33 shows an example of the Workspace sidekick.
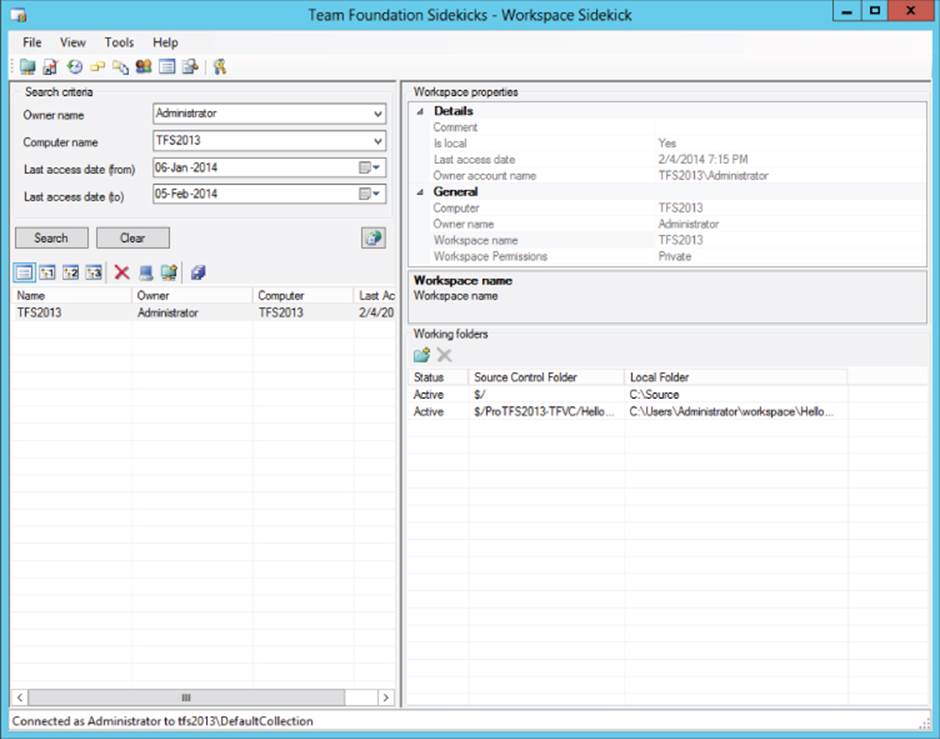
Figure 21.33 Team Foundation Workspace Sidekick
The standalone edition of the tool suite provides a GUI for managing different parts of Team Foundation Server. Table 21.5 provides a brief description of each sidekick.
Table 21.5 Team Foundation Sidekicks Available in the Standalone Version
|
Sidekick |
Description |
|
Workspace Sidekick |
View, search, delete, and modify workspaces. |
|
Status Sidekick |
View pending changes, and unlock locked files and folders. |
|
History Sidekick |
View, search, and compare the history of files and folders, along with their associated branches and merges. |
|
Label Sidekick |
View, search, and compare labels, along with any linked changesets and work items. |
|
Shelveset Sidekick |
View, delete, compare, and download the contents of a shelveset, along with any linked work items and check-in notes. |
|
Permission Sidekick |
View a user's effective global, project-specific, and file permissions. |
|
Users View Sidekick |
Display and search all valid users in the system. |
These sidekicks are a useful addition to any Team Foundation Server administrator's toolkit and will save plenty of time. To download the Team Foundation Sidekicks, please see the Attrice website at http://www.attrice.info/cm/tfs/.
Summary
Along with a brief look at the server architecture, this chapter was all about tools for administrators. The chapter provided a walkthrough of all the different screens and functionality of the Team Foundation Server Administration Console and the new Administration Hub in Team Web Access.
This chapter also provided a brief look at the command-line administration tool TFSConfig.exe, and all its different commands. You learned that from this tool, you can change almost any setting in the server.
You also learned about some additional tools that aren't included in the product but are very useful to a server administrator. You learned that the Best Practices Analyzer is great for identifying server misconfigurations. Finally, you learned that the Team Foundation sidekicks allow you to manage workspaces and shelvesets on behalf of other users as well as other administrative and version control focused tasks.
Chapter 22 covers two important topics for server administrators: scalability and high availability. Along with a look at the physical architecture of the system, Chapter 22 includes guidance from and several lessons learned by the Team Foundation Server administrators supporting the Microsoft Developer Division.
All materials on the site are licensed Creative Commons Attribution-Sharealike 3.0 Unported CC BY-SA 3.0 & GNU Free Documentation License (GFDL)
If you are the copyright holder of any material contained on our site and intend to remove it, please contact our site administrator for approval.
© 2016-2026 All site design rights belong to S.Y.A.