Professional Team Foundation Server 2013 (2013)
Part V
Administration
Chapter 23
Disaster Recovery
What's in this chapter?
· Using the backup-and-restore wizard
· Walking through step-by-step examples of how to back up and restore your Team Foundation Server environment
· Learning about backup plan considerations
Disaster recovery is an important topic, but it is too broad to cover in a single chapter. The purpose of this chapter is to prompt you to think about what your disaster-recovery plan is and how it relates to Team Foundation Server.
Note
For more information, see “Proven SQL Server Architectures for High Availability and Disaster Recovery” at http://tinyurl.com/SQLHADR.
Business Continuity and Recovery Goals
Before discussing disaster recovery in detail, let's establish some goals. You should consult with the team that will be using Team Foundation Server and ask some important questions. The answer to each question has an effect on the cost and complexity of your solution. Following are examples of some questions to ask:
· In the event of a hardware failure (for example, a hard drive crash or a network outage), how quickly must service be restored?
· In the event of a major disaster (for example, a hurricane or an earthquake), how quickly must service be restored?
· If the service is unavailable for a period of time, what is the cost to the business?
· What is an acceptable level of data loss (for example, 15 minutes or 15 hours)?
· How long and how often should backup copies be kept (for example, seven days, seven weeks, or seven years)?
· When can backup media be overwritten? When should backup media be retired? How is backup media retired?
· Where are backups kept (for example, on-site, in another building, another city, or another continent)?
· Who should have access to the backups? Are they encrypted?
The answers to these questions will be different for every organization. At one end of the scale will be the highly regulated financial and engineering industries. At the other end will likely be the small companies and individuals. With different needs and requirements, the costs will be very different depending on the chosen solution.
Defining Responsibilities
Having a robust and reliable disaster-recovery plan is an important responsibility of any Team Foundation Server administrator. In large organizations, this responsibility may fall on a central business continuity team or maybe the database administration team.
As the Team Foundation Server administrator, it is your responsibility to ensure that the implementation of the plan is supported by Team Foundation Server. Backups that were not taken correctly, or that cannot be restored, are a risk to the business and effectively useless. For this reason, it's important to not only have a backup plan but also to regularly test that plan to ensure that it's working for when you need it.
Backing Up Team Foundation Server
Team Foundation Server includes many components. There's the data tier, application tier(s), SQL Reporting Services, SharePoint server, Lab Management environments, file shares for build drops and symbol server repositories, test controllers and agents, and Team Build.
The most important components to back up are the databases on the data tier. These are the “crown jewels” of Team Foundation Server, where the majority of the information is kept. If you are unable to recover at least these databases in the event of a disaster, it's time to look for a new job.
For example, if you are able to recover a collection database, the relational warehouse and Online Analytical Processing (OLAP) cube can be rebuilt from the original data. It takes time, but it's possible. As another example, if you can restore the source control data, then you can re-create a build from that source.
Components to Back Up
Table 23.1 provides an overview of the different components that should be backed up.
Table 23.1 Components to Back Up
|
Component |
Artifacts |
|
Data tier |
Configuration database, collection databases, warehouse database, Reporting Services databases |
|
Application tier |
Configuration settings, user names and passwords, custom controls, SQL Reporting Services encryption key, configuration settings for third-party tools |
|
SharePoint |
SharePoint products configuration databases, site content databases, site collection custom controls, encryption keys, databases |
|
Lab Management |
System Center Virtual Machine Manager (SCVMM) configuration, virtual machines, lab environments, environment and VM templates |
|
Team Build |
Server configurations, custom activities, build-drops file share, symbol server file share |
|
Clients |
No client-side backups required, although you might want to use shelvesets for saving in-progress work to the server |
SharePoint Products
For the officially supported procedures to back up SharePoint products associated with a Team Foundation Server, you should refer to “Overview of backup and recovery in SharePoint 2013” at http://tinyurl.com/SharePointBackup. In particular, if you have any customizations to SharePoint products, you must also back those up so they can be reproduced on a new server.
SQL Reporting Services Encryption Key
SQL Reporting Services uses an encryption key to encrypt data source connection strings, report credentials, and shared data source credentials. You should include the encryption key backup and the associated password to restore the key in your backup plan.
Chapter 11 discussed a method of using a team project designed for administering artifacts for Team Foundation Server, including storing the reporting services encryption key in version control. The team project collection databases are likely to be backed up and restored, so this is a great location for always ensuring that the encryption key is backed up appropriately.
Note
For more information, see “Back Up the SQL Reporting Services Encryption Key” at http://aka.ms/BackupReportingServicesKey. This link points to a Team Foundation Server 2010 article which is applicable to Team Foundation Server 2013.
You Lost the Reporting Services Encryption Key?
An encryption key? That must be important, right? Have you ever wondered what would happen if you didn't back it up and you lost it? Or, even worse, what if you did back it up, but you don't know the password to restore it?
It turns out that it's not the end of the world. If you are unable to restore the encryption key, you will have to use the Reporting Services Configuration Manager to delete the encrypted data. After you delete the encrypted content, you must create the encrypted data again.
Without re-creating the deleted data, the following will happen:
· Connection strings in shared data sources are deleted. Users who run reports get the error, “The ConnectionString property has not been initialized.”
· Stored credentials are deleted. Reports and shared data sources are reconfigured to use prompted credentials.
· Reports based on models (and require shared data sources configured with stored or no credentials) will not run.
· Subscriptions are deactivated.
For more information, see the “Deleting and Re-creating Encryption Keys” article on MSDN at http://aka.ms/RecreateRSEncryptionKey.
Lab Management
If you are using Lab Management in your Team Foundation Server environment, you will need to include backups of your SCVMM environment. You will also want to be sure that any SCVMM Library file shares are included in normal backups because they will contain the environment and virtual machine templates as well as stored environments that your engineering teams will need to get back up and running.
Note
For more information, see “Backing Up and Restoring the VMM Database” at http://aka.ms/BackupSCVMM.
Types of Database Backups
SQL Server has the following recovery modes, which are set on a per-database basis:
· FULL recovery mode—In this mode, each transaction is kept in the transaction log until the log is backed up and a checkpoint is set.
· SIMPLE recovery mode—In this mode, each transaction is written to the transaction log, but it can be overwritten at a later time.
The default recovery mode used by SQL Server for all user databases is FULL. The recovery mode of a database can be changed at any time without impacting currently running commands.
Transaction Log Growing Out of Control?
In FULL recovery mode, without transaction log backups, the log will continue to grow until it reaches the configured limit. If the log is set to AUTOGROW, it will continue growing until the disk is full if no limit is set. When either the database or transaction log is full, users will receive a “Database is full” message when performing operations in Team Foundation Server.
If your database recovery targets are met without doing transaction log backups, then you may want to change your databases to SIMPLE recovery mode. This means that the transaction logs will grow only to the size of your largest transaction.
Full Database Backups
At least one full database backup is required to restore a database. A full database backup includes the entire contents of the database at the time the database backup finished. It does not include any uncommitted transactions. Typically, full backups are performed once a month or once a week, depending on the rate of data change.
Note
For more information, see “Full Database Backups” on MSDN at http://aka.ms/FullSQLDatabaseBackups.
Database Editions and Versions
When you use the built-in native SQL Server backup and restore functions, you should be aware of the version compatibility. For example, a database backup from SQL Server 2012 cannot be restored to a server with a down-level version, such as SQL Server 2008 R2.
Additionally, if you create a backup with compression enabled, it can be restored only on a server that also has compression available. This can be a problem when moving a database from a SQL Server Enterprise instance to a SQL Server Standard instance.
Differential Database Backups
A differential backup includes everything that has changed since the last full backup. This is sometimes referred to as a “diff” or incremental backup. Because a differential backup is only recording differences, it usually takes less time and uses less storage than a full backup.
Over time, as more data changes in the database since the last full backup, the differential backup will become larger. At some point, the differential backup may become larger than the original full backup, and it will be more efficient to run a new full backup. Typically, differential backups are performed once per day.
Note
For more information, see “Differential Database Backups” at http://aka.ms/DifferentialSQLDatabaseBackups.
Transaction Log Backups
When a database is in FULL recovery mode, the transaction log contains all the data changes in the database. By performing transaction log backups (along with full and differential backups), you can later restore a database to a point in time or a specific transaction. Typically, transaction log backups are performed anywhere from every 5 minutes to every 60 minutes, depending on data recovery goals.
Note
For more information, see “Working with Transaction Log Backups” at http://aka.ms/SQLTransactionLogBackups.
Important Considerations
Team Foundation Server has two types of databases: the Tfs_Configuration database and the collection databases. Users who have access to Team Foundation Server have their name, e-mail, and group memberships synchronized with Active Directory. Rather than synchronizing this information with each individual collection, it is stored in the configuration database.
Because of this dependency between the databases, it is vital that the configuration database and collection databases are backed up in a way that they can be restored to a common point in time. Achieving this can become more difficult when your configuration database is on a different server or instance than your collection databases.
If this synchronization between the databases is not maintained, then it is possible that an identity is referenced in a collection database that doesn't exist in the configuration database. Team Foundation Server does not handle this scenario well, and the databases will be in an inconsistent state. Users may lose their permissions to their projects, and other data inconsistencies may be seen.
Note
If you do find yourself in the situation where your configuration and collection backups are out of sync, you should contact Microsoft Support ((http://support.microsoft.com). In some cases, the identity data can be reconstructed to overcome the inconsistencies. However, you should design your backup plan to avoid this situation.
SQL Marked Transactions
The SQL Server solution to ensure synchronization across databases and database servers is to use marked transactions. Establishing a transaction that spans all the databases in the environment provides a common point that can be restored to and ensure synchronization.
New Collections
Each time a new collection is created on a Team Foundation Server instance, a new database will be created. You must ensure that this database is added to your backup plan. It's best if new databases are backed up automatically by your backup scripts so that they aren't accidentally excluded.
Virtualization and Backups
If you are virtualizing your data tier, you can back up the entire virtual machine that your SQL server is running in. But you should consider SQL database backups as well. Not all virtual backup technologies ensure transactional consistency within the database. If transactional consistency is not maintained, then it is not safe to restore from your virtual machine backups, and you may encounter data loss.
In an environment with multiple SQL servers, it's impossible to keep the database backups synchronized without using marked transactions. Additionally, transaction log backups can be run much more frequently than a backup of a virtual machine, and they allow a much finer-grained recovery point.
Also, when using a virtualized SQL Server, avoid using the snapshot features of many virtualization technologies while the server is turned on. Take snapshots only when the system has been shut down completely. Virtualization snapshots that are taken while a server is turned on with SQL Server instances are not supported.
Data Security
One of the most common breaches of data security is mishandled backup media. After you have defined how you are going to run your SQL backups, you must define how you are going to store them to meet your retention and off-site backup requirements.
Because a database backup contains all of your data, it would be a big problem if it weren't adequately protected and an untrusted person was able to restore it. This person could restore the data to another server and use his or her own administrative credentials to access the contents of the databases.
For this reason, it's important to consider the security of your backups in the same way you consider the security of your server itself. Consider using encryption as well as secure transport, handling, and storage of your backups.
Software Versions, Installation Media, and License Keys
In the event of a major disaster or a hardware failure, the backups by themselves are not usually enough to bring the server back online. You will also need software installed to restore those backups to. You should consider the following software in your backup plan:
· Windows installation media and product keys
· Drivers for the server and storage hardware
· Team Foundation Server installation media and product key
· SQL Server installation media and product keys
· Third-party backup software (if you are not using SQL Server backups)
· Service Packs and Updates for Windows, SQL Server, and Team Foundation Server
SQL Server 2012 AlwaysOn Technology
Team Foundation Server 2012 introduced support for the new high-availability feature AlwaysOn in SQL Server 2012. This can be particularly useful in a disaster recovery and high-availability strategy for Team Foundation Server. It enhances the existing SQL Server features of database mirroring and clustering. To find out more information about SQL Server 2012 AlwaysOn, visit http://aka.ms/SQLAlwaysOn. Team Foundation Server has some special steps required if you intend to use a SQL AlwaysOn instance, which are documented at: http://aka.ms/SQLAlwaysOnTFSConfig.
Creating a Backup Plan
Creating a reliable backup plan can be quite a daunting task. Fortunately, the Team Foundation Server team has made it simple by making a backup-and-restore wizard available in the Scheduled Backups section of the Team Foundation Server Administration Console.
The Team Foundation Server backup-and-restore wizard takes care of two of the important backup considerations discussed earlier:
· It configures and uses SQL-marked transactions to keep the databases in sync.
· It automatically adds new collections to the backup plan so that they don't miss out on backups.
To access the Scheduled Backups Wizard, open the Team Foundation Server Administration Console. As shown in Figure 23.1, when you select the Scheduled Backups option for the first time, you get a link to create a scheduled backup and one to restore backed up databases.
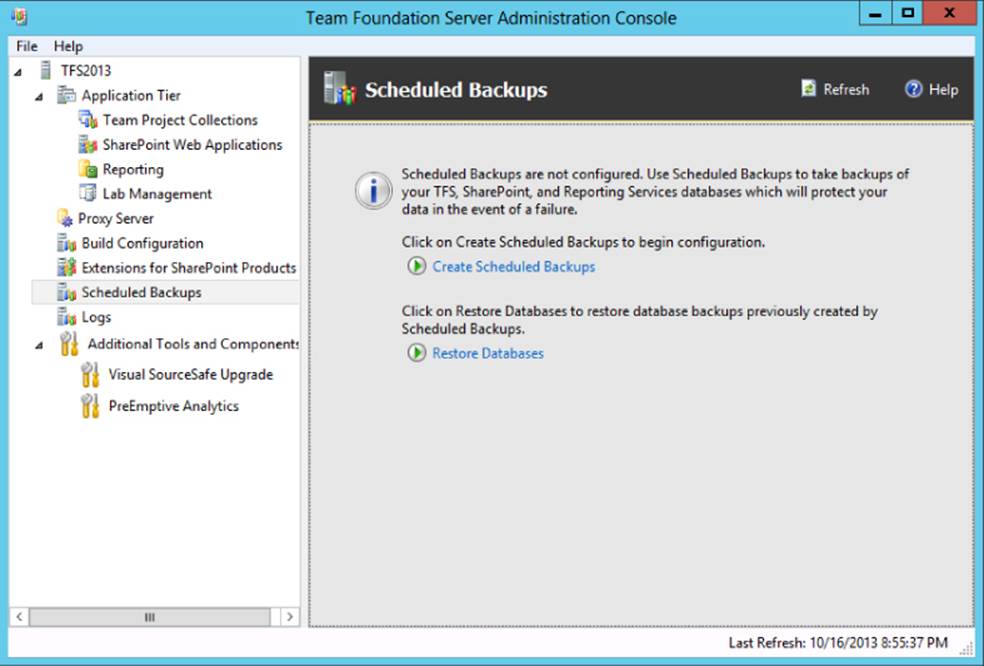
Figure 23.1 Team Foundation Server Administration Console
Once you click the Create Scheduled Backups link, the Scheduled Backups Wizard appears. Figure 23.2, shows that the wizard is very similar to the configuration wizard that you used to configure Team Foundation Server the first time. The left pane shows each of the wizard pages, and the wizard ends with a Review screen before making any changes.
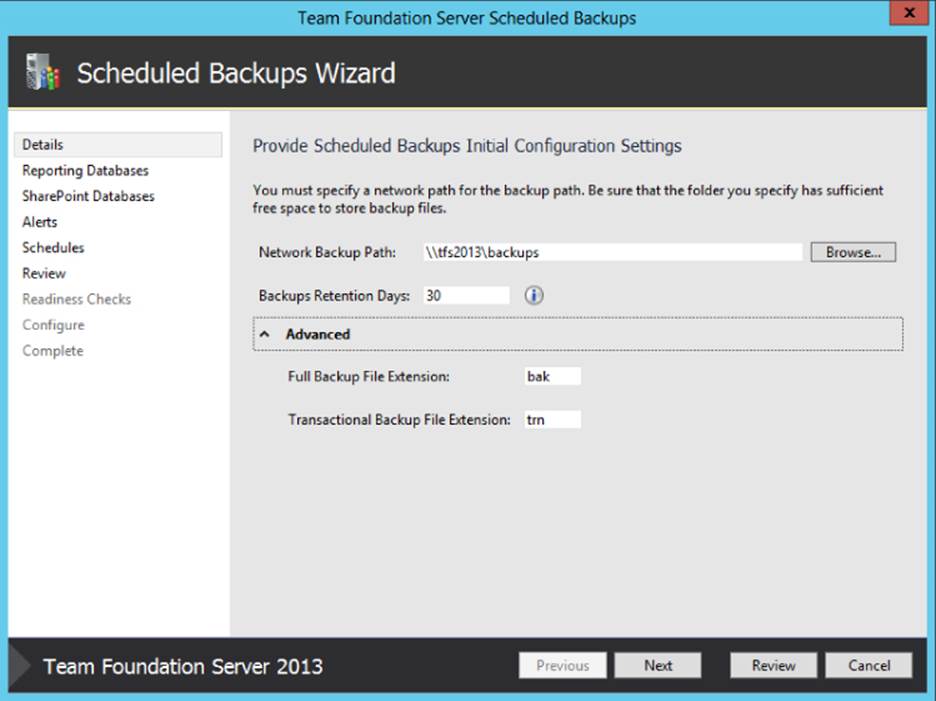
Figure 23.2 Scheduled Backups Wizard
The first step of the wizard allows you to specify a location to store the backups. This is specified as a UNC network path, which means that the share must already exist. When you specify the backup account later in the wizard, it will be given read-and-write access to the share.
Even though the wizard asks for a Network Backup Path, it is possible to back up to the local machine. To do this, you must create a share that is accessible by the backup account, and then specify the local machine as a backup path. For example, in Figure 23.2, the path specified refers to the name of the Team Foundation Server machine itself.
It is also possible to specify the backup retention period. Each time the backup runs, it will delete any backups that are older than this number of days. The default retention period is 30 days. If you expand the Advanced section, you can configure the database and transaction log backup file extensions to match your corporate standards.
If you have Team Foundation Server installed on a server operating system and you are not using the “Basic” configuration of the server, you will have the option to back up the Reporting Services database, as shown in Figure 23.3. This database may be located on the same SQL server as your Team Foundation Server, or on a remote instance.
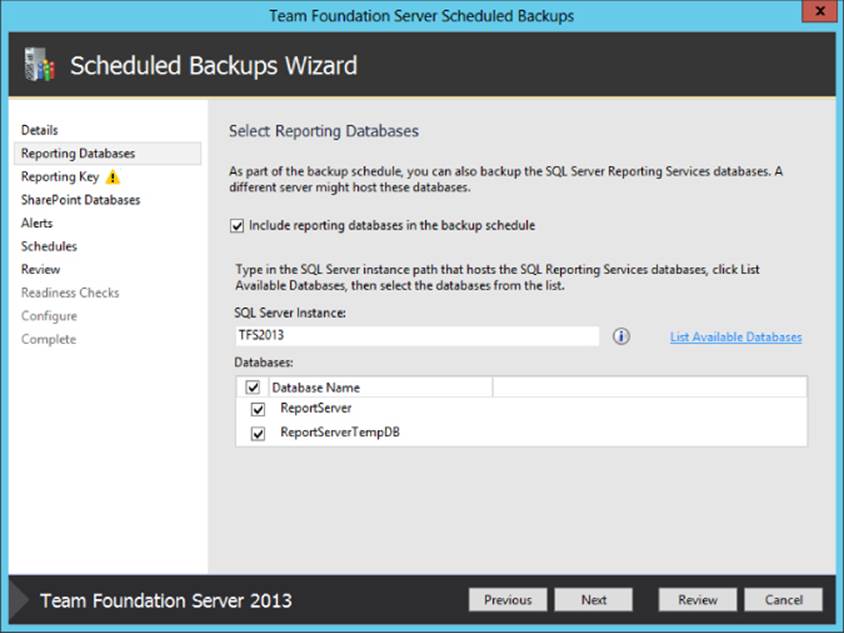
Figure 23.3 Reporting instance database backupFIGURE 23-4: Reporting Encryption Key backup
The backup plan will also automatically back up the SQL Reporting Services encryption key so this screen prompts for a password to use for the key backup file, as shown in Figure 23.4. As with Reporting Services, if you have SharePoint installed, you will have the option to back up the SharePoint databases, as shown in Figure 23.4.
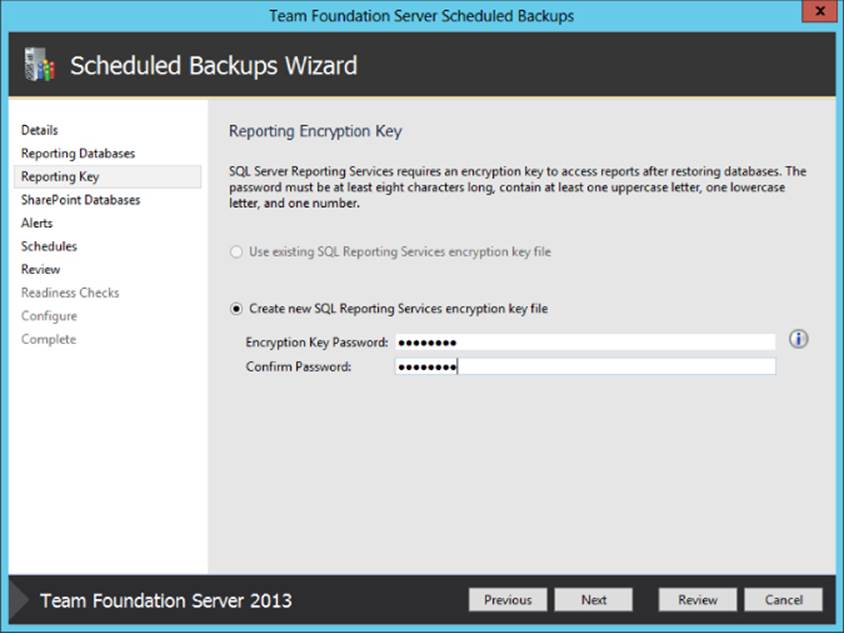
Figure 23.4 SharePoint database backup
As an administrator, you will want to know when the backup fails so you can investigate and fix it. The Alerts page of the wizard (shown in Figure 23.5) allows you to specify whether you receive an e-mail on success, failure, both, or neither. Because the Scheduled Backups Wizard has access to the Team Foundation Server configuration database, it retrieves the e-mail server settings from the instance. If you want to change the e-mail server or the From address, then you must change it in the Team Foundation Server Administration Console before starting the Scheduled Backups Wizard.
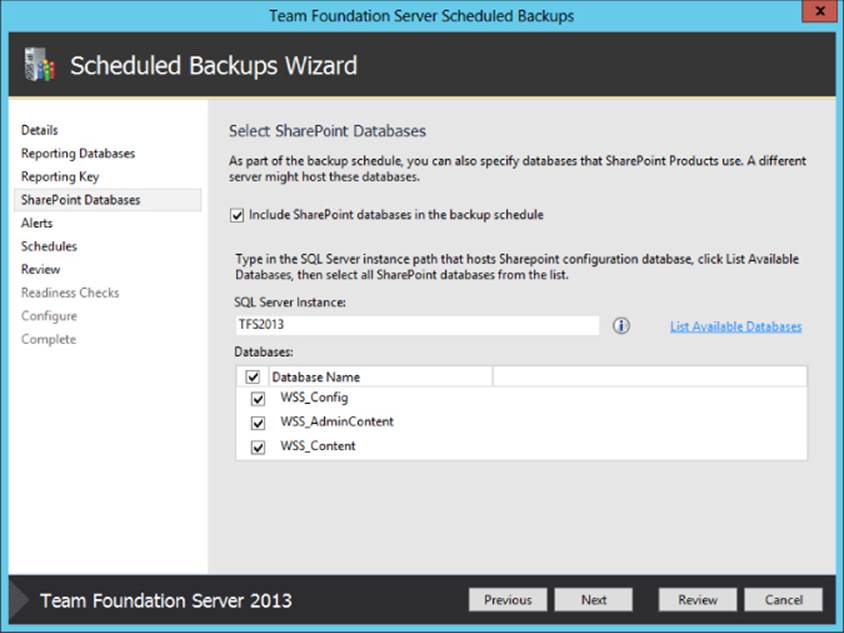
Figure 23.5 Alert configuration screen
The Backup Schedule page allows you to set the schedule and backup types. As discussed earlier in this chapter, there are three different types of SQL Server backups. You can choose one of these three options from the Scheduled Backups Wizard dialog box shown in Figure 23.6:
· If it's acceptable to your business to lose up to a day's worth of data and your database is not very big, the Nightly Full Backups schedule is the simplest option to choose. This will schedule a full database backup to happen once every day.Figure 23.6 Backup schedule screen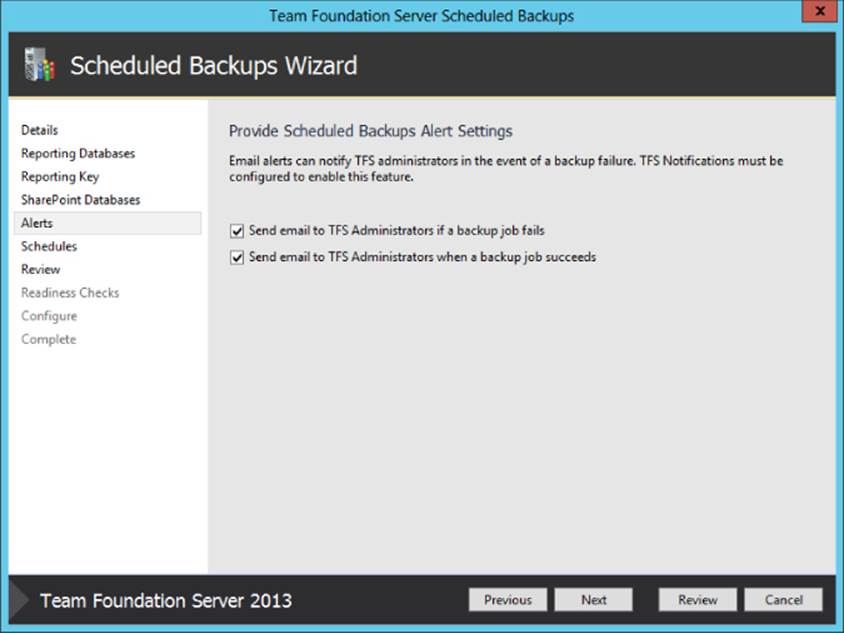
· If you don't use the server very often, or you don't have any need for a regularly scheduled backup, you can choose the Manual Backup Only option.
· If you want the backups to run automatically, but need the flexibility to specify a mix of settings, then select the Custom Schedule option. This option allows you to configure any mix of Full, Differential, and Transactional backup at different times on different or overlapping days.
Similar to the Server Configuration Wizard, the Scheduled Backups Wizard allows you to review and confirm your settings (see Figure 23.7) before any changes are made to your server. Review the settings and, if they are correct, click Verify to start the verification process.
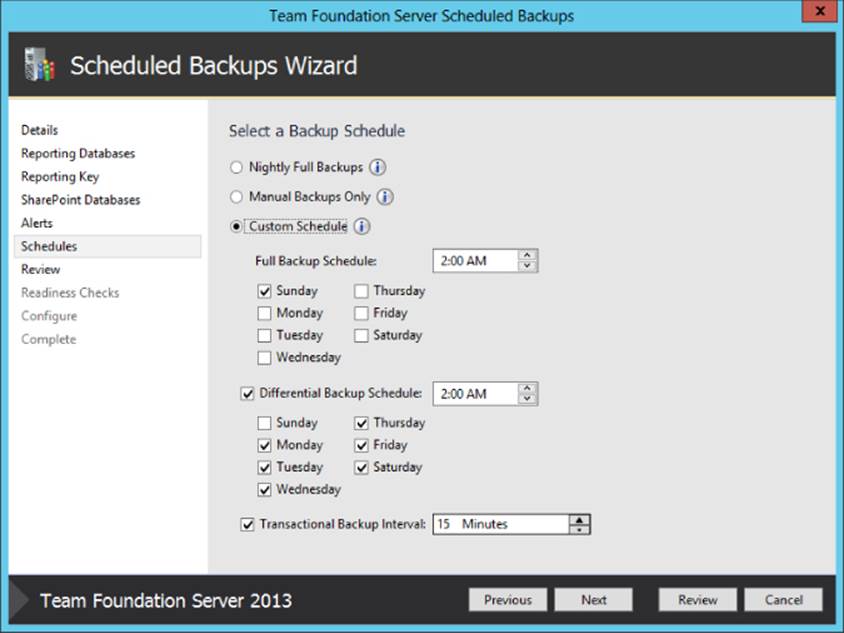
Figure 23.7 Review screen
Without making any changes to the system, the Readiness Checks screen shown in Figure 23.8 verifies that the configuration changes can be made and the backup plan can be set up without any problems. If any of the checks don't pass, then you must address them before you can continue. When you are ready to create the backup plan, click Create Plan.
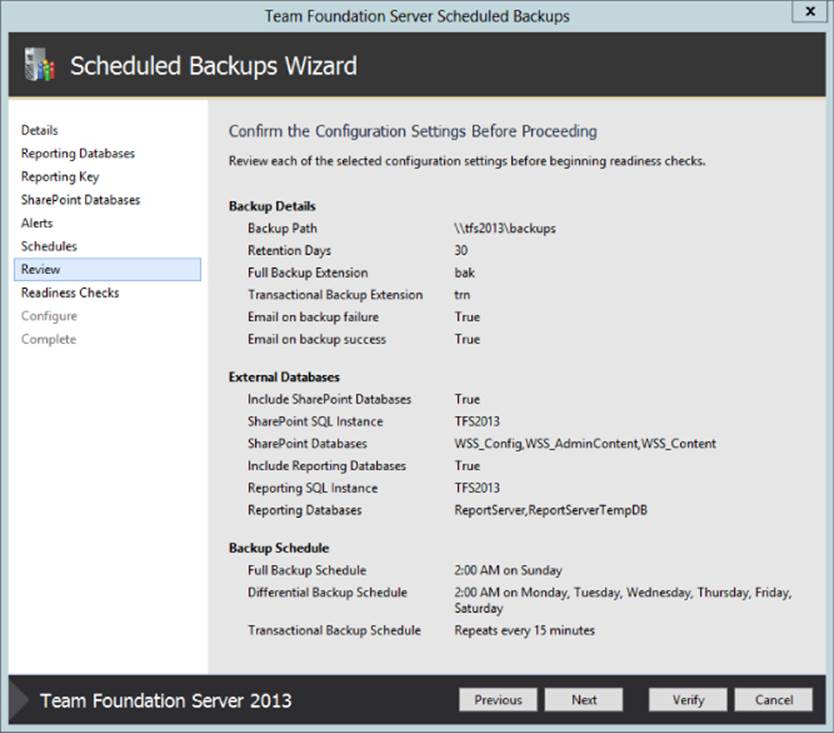
Figure 23.8 Readiness Checks screen
In the final stage of the wizard (shown in Figure 23.9), you set server permissions, create the tables for marked transactions, and create the scheduled tasks.
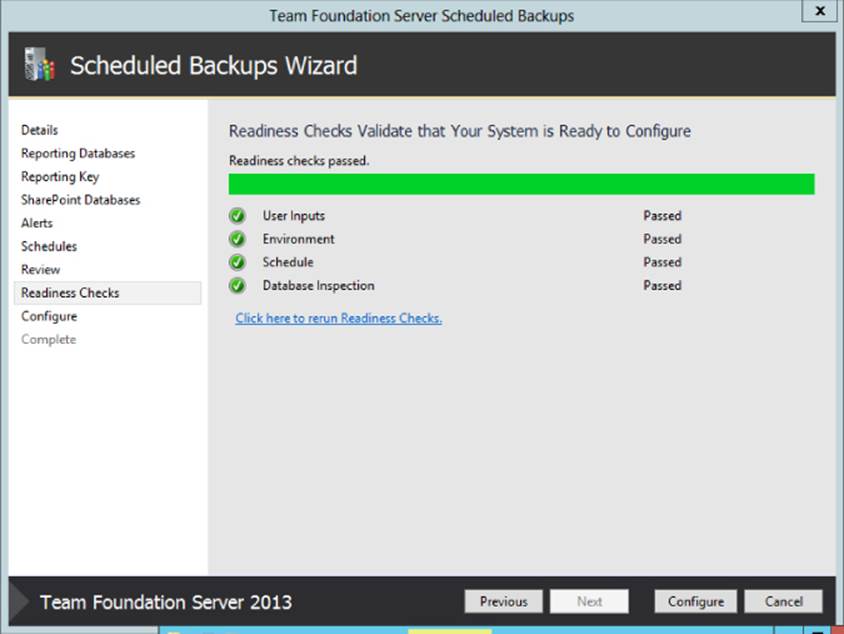
Figure 23.9 Configuration Progress screen
The Team Foundation Server backup plan runs as a scheduled task on the application tier that you ran the wizard from. As part of setting up the backup plan, the wizard will add a table to each database included in the plan. This table is required to establish a marked transaction that spans multiple databases.
Team Foundation Server Backup Plan Details
Once you have configured a backup plan, the Scheduled Backups tab in the Team Foundation Server Administration Console will show the details of the backup plan. The details screen in Figure 23.10 shows configuration settings such as the path that backups are being sent to, along with the databases and SQL servers included in the backup plan.
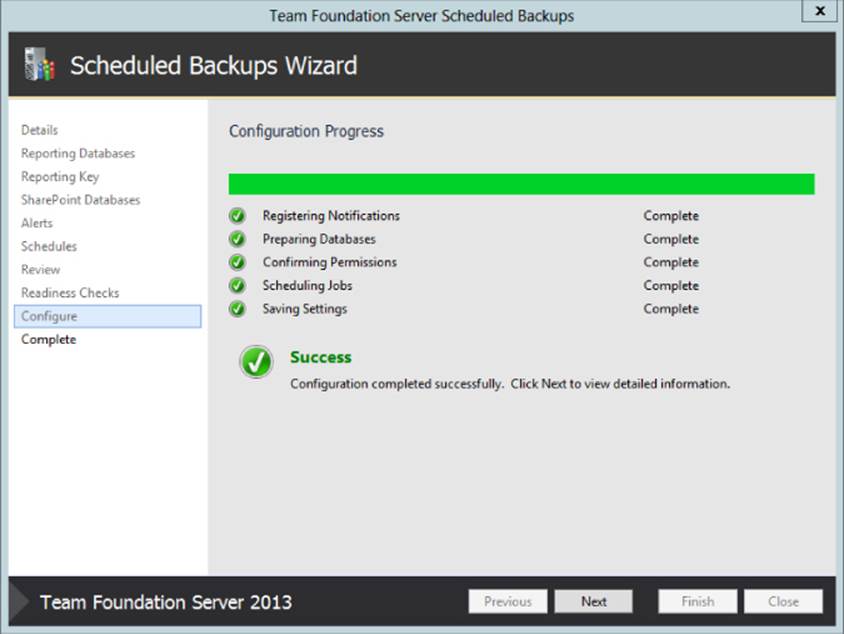
Figure 23.10 Scheduled Backup details
As shown in Figure 23.10, the lower half of the Backup Plan Details screen shows you the scheduled tasks information. This is the same information you will see if you open Task Scheduler from the control panel in Windows. It shows you each of the scheduled tasks that were created as part of the plan, when they are scheduled to run, and when they last ran.
Take Full Backup Now
Once you've created a backup plan, regardless of which schedule option you chose, you can manually take a full database backup at any time. This is done by clicking “Take Full Backup Now” in the Backup Plan Details pane. Once you select it, a dialog box similar toFigure 23.11 will allow you to monitor the progress of the backup. As discussed earlier, for a valid backup, it's required to have a marked transaction that spans all databases in the backup. After completing the full backup, the backup engine will automatically create a marked transaction and perform a transaction log backup that includes the marked transaction.
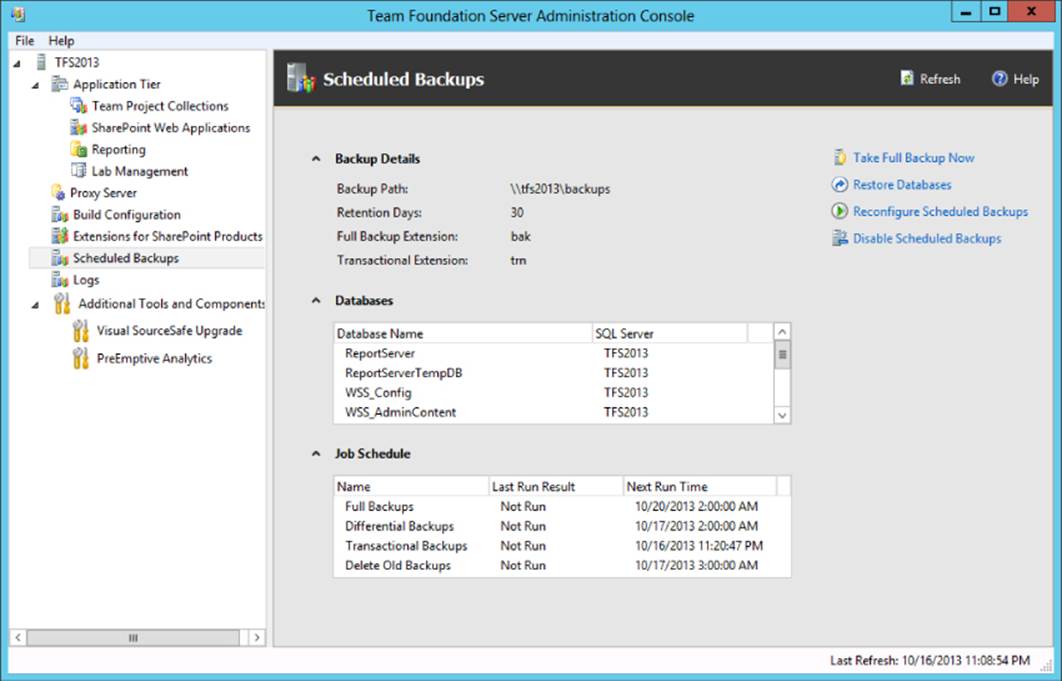
Figure 23.11 Manual backup progress screen
Restoring a Backup to the Original Server
Even with the backup-and-restore wizards, there are a lot of steps to follow when restoring database backups. To restore a backup of Team Foundation Server, you should refer to the official documentation, “Back Up and Restore TFS,” on MSDN athttp://aka.ms/TFS2013BackupRestore.
At a high level, following are the steps from the official documentation that you will need to perform to successfully restore your deployment from a database backup:
1. Stop services that Team Foundation Server uses.
2. Restore Team Foundation databases.
3. Clear the version control cache.
4. Update all service accounts.
5. Rebuild the warehouse.
6. Restart services that Team Foundation server uses.
Stop Services That Team Foundation Server Uses
Team Foundation Server has an application pool and a job agent. If you restore a backup while either of these is running, the restore may fail or you may end up in an inconsistent state.
To safely stop the services, you should use the TFSServiceControl.exe command with the quiesce option in the Tools directory of each application tier. This utility stops the application pool and the job agent. You must run it on every application tier in your Team Foundation Server farm if you have multiple application tier servers.
Note
For more information, see “TFSServiceControl Command” at http://aka.ms/TFSServiceControl.
Quiesce Command Failed?
In certain situations in Team Foundation Server, the quiesce command may fail. If the application pool takes too long to stop, then the TFSServiceControl.exe command may time out and display an error message. Additionally, if the Team Foundation job agent is currently executing a long-running job, the command may also time out.
In either of these situations, you should try to run the quiesce command a second time. If that does not work correctly, then you can run IISReset and use Task Manager to end the TFSJobAgent.exe process.
Restore Team Foundation Databases Using the Restore Wizard
Once you have stopped the Team Foundation services, it's time to restore the databases from backups. The Restore Wizard will not let you overwrite an existing database, so you will need to delete it or move it out of the way first.
Note
If you have SQL Server Management Studio installed, you can use it. For more information, see “How to: Delete a Database” at http://aka.ms/DeleteSQLDatabase. If you are using SQL Server Express, then you will need to download and install SQL Server Management Studio Express from http://aka.ms/SQLManagementStudio before you can delete the database.
To start the wizard, follow these steps:
1. Log on to your Team Foundation Server application tier.
2. Start the Team Foundation Server Administration Console from the Start menu.
3. Select Team Foundation Server Backups.
4. Select the Restore Databases link from the Backup Details pane.
When the wizard starts, as shown in Figure 23.12, you'll see that it has a similar look and feel to the Server Configuration Wizard and the Scheduled Backups Wizard.

Figure 23.12 Select Backup Sets screen
The first page of the Restore Wizard allows you to select a UNC network backup path and a backup set to restore. By default, the backup path is the same as the one that the backup plan is configured for. You may choose a different path if you have a backup stored elsewhere that you want to use. When you select the List Backups link, the wizard will look on the share for any backup sets and display them in the list, as shown in Figure 23.12. Once you have selected the backup set from the date that you want to restore to, click Next.
On the Select Databases to Restore screen shown in Figure 23.13, you can select which databases you want to restore and which SQL server you want to restore them to. By default, the SQL Server field for each database will be the original server that the backup was taken on. If you want to restore a database to a different SQL server, you should enter its name before clicking Next.
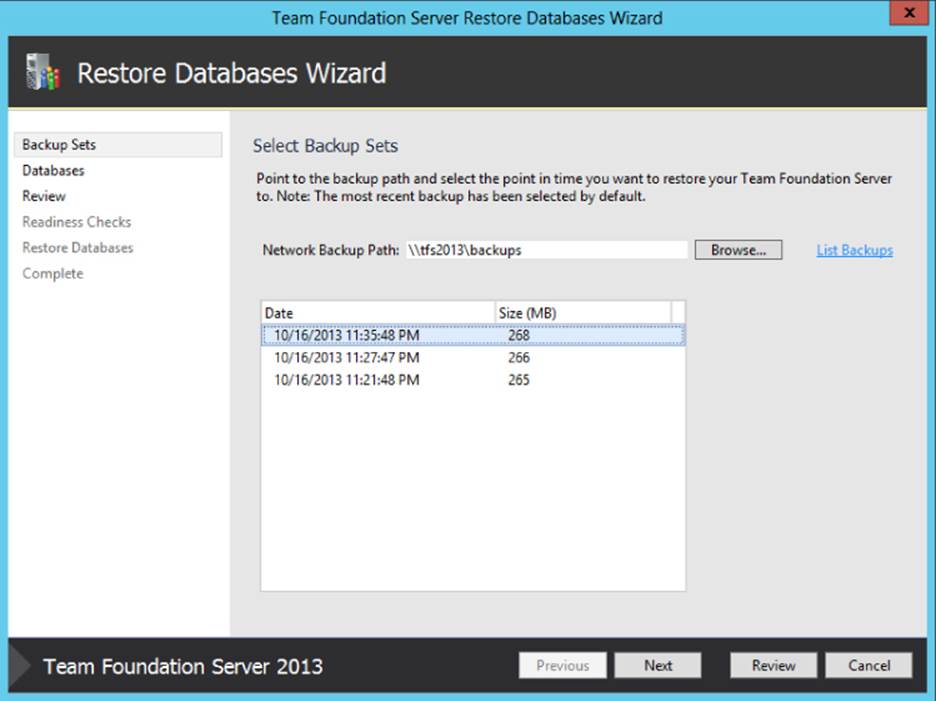
Figure 23.13 Select Databases to Restore screen
Just like the other wizards in Team Foundation Server, the review screen shown in Figure 23.14 allows you to confirm all the configuration settings before making any changes to your server. When you click the Verify button, the wizard will start performing readiness checks.
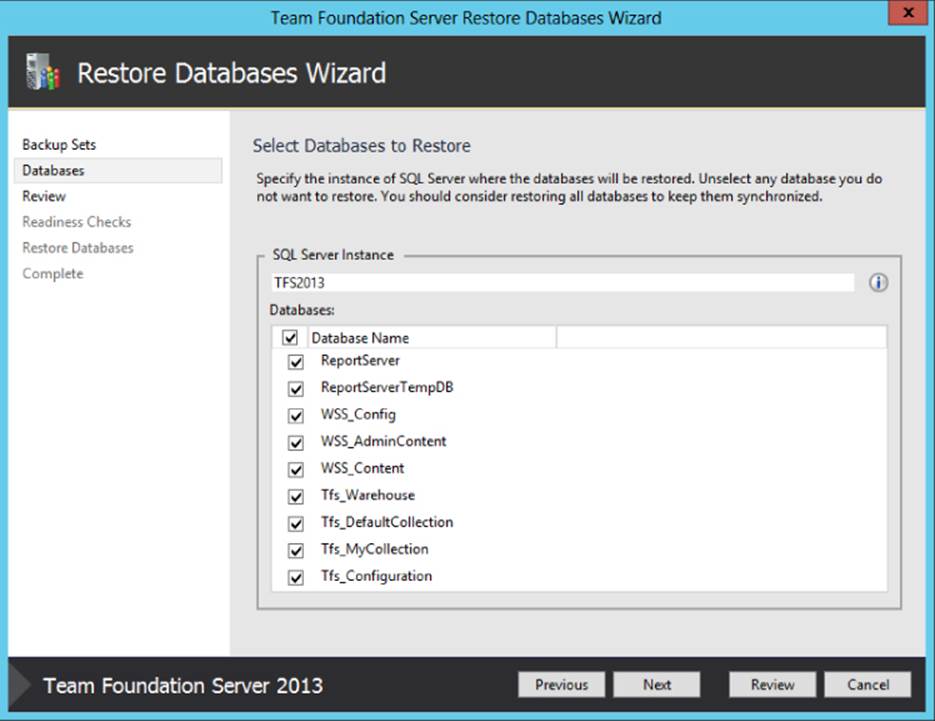
Figure 23.14 Configuration review screen
If the destination databases already exist, or the destination SQL server is not accessible, then the readiness checks will fail. You will need to address the errors and rerun the readiness checks.
Once the readiness checks pass and the configuration details are verified, as shown in Figure 23.15, you can click the Restore button to begin the database restore process.
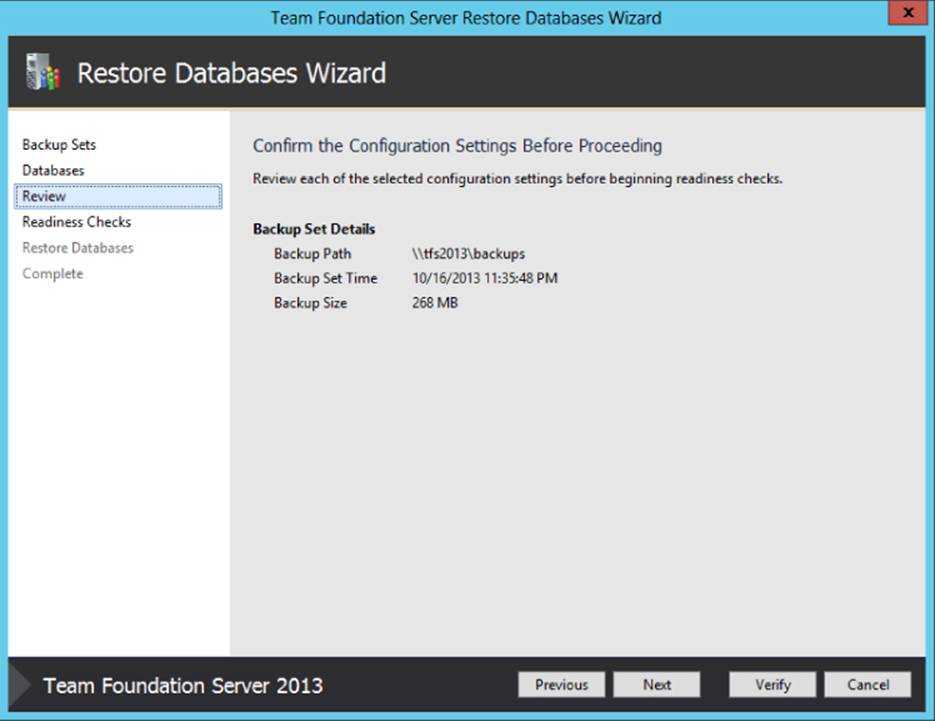
Figure 23.15 Readiness Checks screen
Depending on the size of your backup and the speed of your hardware, the restore process may take some time. Once the restore is completed, as shown in Figure 23.16, you can close the wizard and continue with the other steps required to restore your Team Foundation Server.
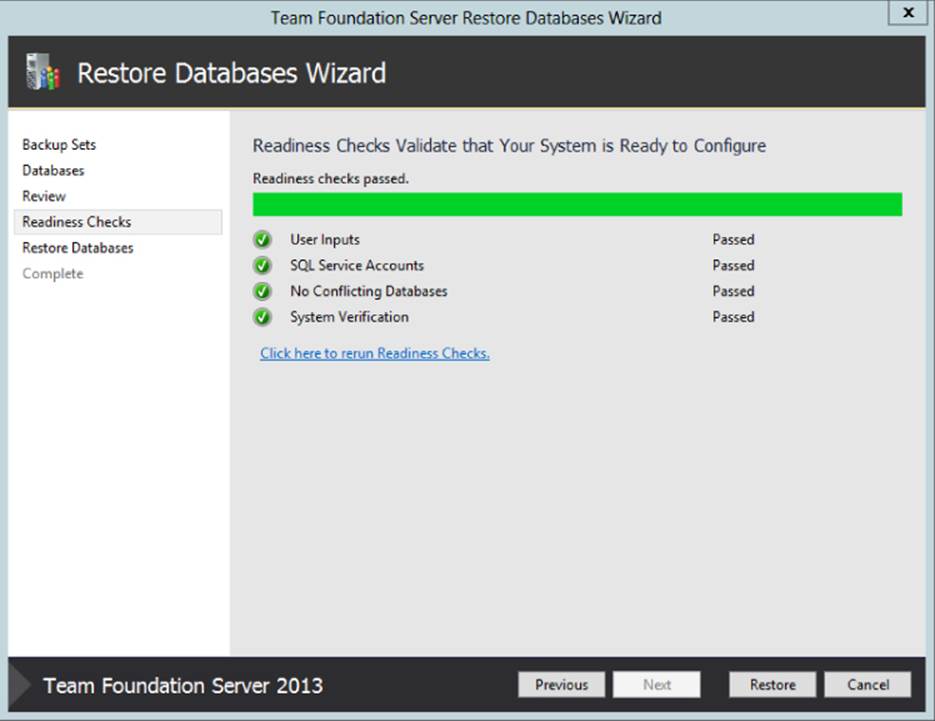
Figure 23.16 Successful restore screen
Clear the Version Control Cache
Each application tier and Team Foundation Proxy server includes a version control cache. The version control cache keeps a copy of every file requested by a user. Each version of each file has a unique FileID assigned when the file is checked in the first time. The version control cache uses this FileID to store the files. If you restore a backup from a different Team Foundation Server or from a previous point in time, it's likely that the FileID of the files in the cache will be different from the ones in the database.
It's very important that you purge each version control cache before starting the server again. If you don't, then users will unknowingly download incorrect files and versions.
Note
For more information on the procedure, you should refer to the KB2025763 article at http://aka.ms/TFSPurgeVersionControlCache. Essentially, it involves deleting the contents of the version control cache directory on each application tier and proxy server.
Purging Large Version Control Caches
On application tiers and proxy servers with a large drive for the version control cache, there will be a large number of cached files. Deleting all of these files individually will take a considerable amount of time and will increase the time it takes to bring the server back online.
There are two ways to mitigate this and allow you to bring the server back online sooner:
· Format the drive—If you have configured the cache directory on a separate partition or a separate drive, the fastest way is to perform a Quick Format of the drive. After formatting the drive, you will need to re-create the top-level cache directory and configure the correct permissions.
· Rename the cache directory—By moving the cache directory out of the way, it allows the server to start with an empty directory. Because renaming a directory is a metadata-only operation on a single folder, it will be done almost instantly. Then you can start deleting the old directory in the background after bringing the server back online.
Update All Service Accounts
Once you restore Team Foundation Server databases, you must ensure that the current Team Foundation Server service accounts have the required access and permissions on the databases. This is done by using the TfsConfig.exe command, which is found in the Tools directory of your application tier.
Note
For more information on this procedure, refer to the “Restore Data to the Same Location” article on MSDN at http://aka.ms/TFSRestoreSameLocation.
Rebuild the Warehouse
If you restored the Tfs_Warehouse relational database to the same point in time as your other databases, then it should be in sync already. The only remaining step is to re-create the Tfs_Analysis analysis services database. You can do this by following these steps:
1. Log on to one of your application tier servers.
2. Open a command prompt.
3. Change directories to \Program Files\Microsoft Team Foundation Server\Tools.
4. Type the following command:
TfsConfig rebuildwarehouse /analysisServices
This will drop the Analysis Services database if it exists and create a new one from the operational store. This is slightly different than selecting the Start Rebuild link from the Reporting view in the Administration Console. That link will drop the relational warehouse as well as the Analysis Services Cube, and your rebuild will take much longer.
Note
For more information, see “Manually Process the Data Warehouse and Analysis Services Cube for Team Foundation Server” at http://aka.ms/TFSWarehouseManualUpdate.
Restart Services That Team Foundation Server Uses
The last step to bring the server back online is to restart the application pool and job agent. Using a similar procedure to when you stopped the services, you can do this by running the TFSServiceControl.exe command with the unquiesce option on each application tier server in your deployment.
Note
For more information, see “TFSServiceControl Command” at http://aka.ms/TFSServiceControl.
Restoring to Different Hardware
If you have suffered a hardware failure, or you just want to move to a new server, you will need to restore backups to the new server. The steps for restoring data to different hardware are not the same as the steps to restore to the same hardware.
For the officially supported procedures, you should refer to the following documents:
· “Restore a Single-Server Deployment to New Hardware” at http://aka.ms/TFSRestoreNewHardware
· “Restore Data to a Different Server or Instance” at http://aka.ms/TFSRestoreDifferentServer
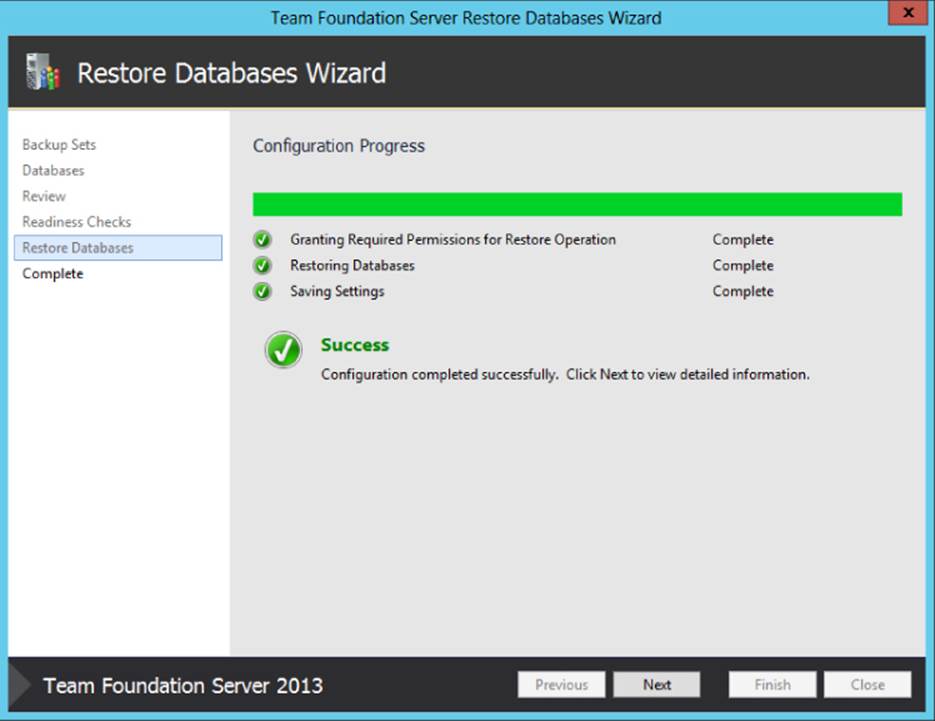
Figure 23.17 Successful restore screen
Summary
This chapter started with the important questions to ask when defining your disaster-recovery plan. It highlighted that it is the responsibility of a Team Foundation Server administrator to make sure that the server is correctly backed up.
The main part of the chapter covered a walk-through with screen-by-screen examples of how to back up and restore your Team Foundation Server environment. It also discussed the important considerations that your backup plan must take into account, such as the use of SQL-marked transactions to synchronize backups.
Chapter 24 examines all things related to security and permissions in Team Foundation Server. The chapter will take a look at all the different places that security can be set, along with some best practices for avoiding a permissions mess.
All materials on the site are licensed Creative Commons Attribution-Sharealike 3.0 Unported CC BY-SA 3.0 & GNU Free Documentation License (GFDL)
If you are the copyright holder of any material contained on our site and intend to remove it, please contact our site administrator for approval.
© 2016-2025 All site design rights belong to S.Y.A.