Professional Team Foundation Server 2013 (2013)
Part V
Administration
Chapter 26
Testing and Lab Management
What's in this chapter?
· Learning about the testing capabilities of Visual Studio 2013
· Understanding the architecture of the software testing components of Visual Studio 2013
· Planning for and administering your Team Foundation Server deployment when used for software testing
Across the Visual Studio 2013 family of products, Microsoft has made significant investments to better support software testing activities. This is arguably the single biggest investment Microsoft made for application lifecycle management since the Visual Studio 2010 release, and many software development and testing organizations have already shown great results by embracing these capabilities.
While many of these enhancements include tooling features outside the scope of a book about Team Foundation Server, there are several testing technologies and workflows that, in one way or another, involve Team Foundation Server. In this chapter, you will become more familiar with the testing capabilities of the Visual Studio product line and the impact that adopting these technologies will have as you plan, implement, and manage your Team Foundation Server deployment.
As you will see in this chapter, there is a high potential for complexity as you begin embracing Visual Studio as your software testing solution. Many factors will influence the complexity of your specific environment, such as which capabilities you want to use, how much you wish to automate, and your organization's network topology. For this reason, every effort has been made in this chapter to provide you with a broad overview of the topics you will need to consider, with links to supporting documentation and blog posts that provide detailed guidance.
What's New in Software Testing?
The Team Foundation Server 2013 and Visual Studio Online releases have introduced a number of advancements in the software testing area, including a load testing service hosted in Windows Azure which allows for quick test ramp-up and near infinite scaling of your load. They have also introduced improvements to the Test Case Management features in Web Access.
New Cloud-Based Load Testing Service
With the release of Visual Studio Online and Visual Studio 2013, Microsoft unveiled Cloud-based Load Testing as an additional service. With this service, you can create a relatively infinite scale load by taking existing load tests created with Visual Studio 2010 or later and running them on the service. You no longer have to worry about acquiring hardware or virtual machines, setting up test controllers or agents, deploying your tests or running your tests. You simply need to connect Visual Studio 2013 to a Visual Studio Online account, open the .testsettings file in your solution, and select the new Run tests using the Visual Studio Team Foundation Service option for the Test run location on the General tab, as shown in Figure 26.1.
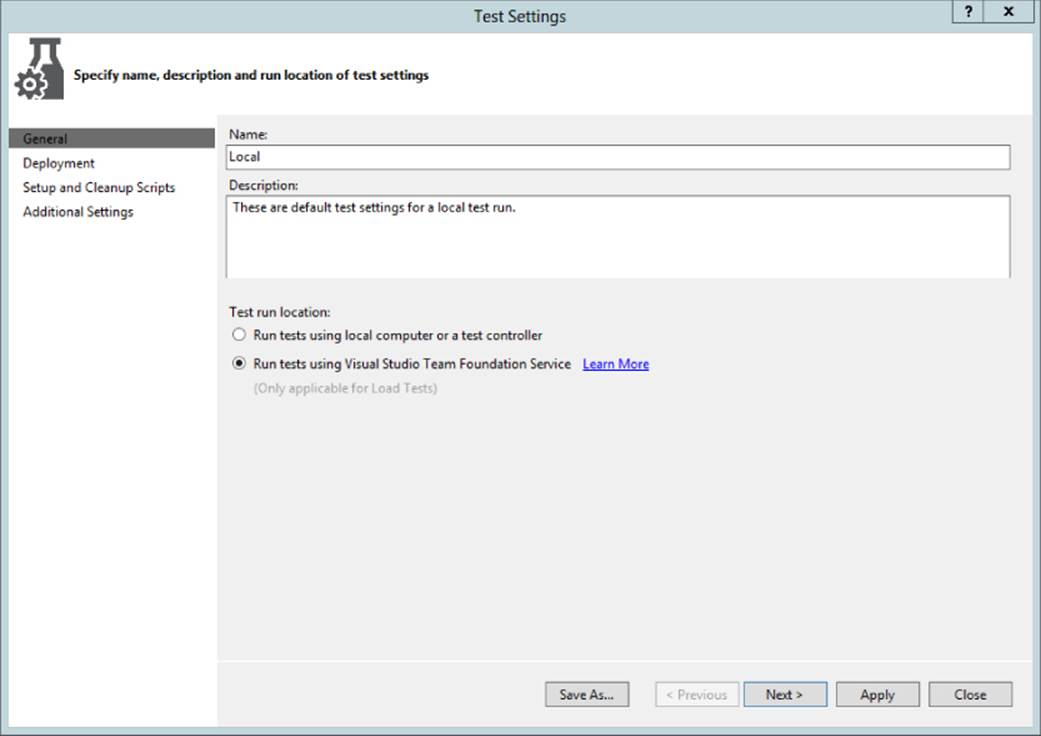
Figure 26.1 Test Settings file in Visual Studio
For more information on Microsoft's Cloud-based Load Testing, please see the Getting Started page at Visual Studio Online, which can be found at http://aka.ms/CloudLoadTesting.
Web-Based Test Case Management
Team Foundation Server 2013 and Visual Studio Online have also added the capability to manage existing Test Plans from within the Web Access user interface. From the new Web Test Manager, you can create edit, delete, move, and rename Test Suites as well as create, edit, delete, and run Test Cases all without the need to install any software locally. We will discuss the features of Web Test Manager later in this chapter.
Software Testing
Note
For more information about how to use the specific testing technologies included across the Visual Studio 2013 family of products, see the companion book Professional Application Lifecycle Management with Visual Studio 2013 by Mickey Gousset, Martin Hinshelwood, Brian A. Randell, Brian Keller, and Martin Woodward (Wiley 2014). Part VI of that book is dedicated to detailing the different testing tools and technologies that can be found throughout the Visual Studio 2013 product line. The book is available at http://aka.ms/ALM2013Book.
It should go without saying that the role of software testing in any development process is to ensure a high level of quality for any software by the time it is released to end users. Numerous studies suggest that software defects discovered in production are exponentially more expensive to identify and correct than if those same defects had been discovered and fixed during the development or testing phases of a project, before release. Hence, it stands to reason that most investments in software testing will more than pay for themselves in the long run.
Note
Steve McConnell's Code Complete, Second Edition (Microsoft Press, 2004) cites data from several interesting studies that exhibit the high cost of quality issues once they are discovered downstream. See Chapter 3, “Measure Twice, Cut Once: Upstream Prerequisites,” for examples. You can find this book at http://aka.ms/CodeCompleteBook.
Many approaches to software testing have been developed over the years to address the variety of defects that can be found in software. The field of software testing can be divided into areas such as functional testing, regression testing, scalability testing, acceptance testing, security testing, and so on. But, in your role as a Team Foundation Server administrator, there are generally two major categorizations of software testing you should be familiar with:
· Manual testing is by far the most common type of testing employed across the software testing field. As the name implies, manual testing involves human labor testers interacting with software, usually in the same way as the end user is expected to, with the purpose of validating functionality and filing bugs for any defects they discover. This can be either with planned test cases or through new Agile techniques and tools such as exploratory testing.
· Automated testing involves writing and running software, which, in turn, inspects the software you are testing. The obvious advantage of automated tests is that they can run quickly, frequently, and involve little or no human interaction. But an investment is usually required to author and maintain automated tests.
It may seem counterintuitive that the software industry—which has a reputation for automating everything from banking to automobile assembly—would rely so heavily on manual testing. But the reality is that early on, as a software project is evolving and undergoing a heavy degree of churn, manual testing provides the flexibility required to adapt to rapid changes. Keeping automated tests up to date under these conditions may be cost-prohibitive.
Manual and exploratory testing also provides the added insurance policy of a set of human eyes analyzing an application and spotting defects that an automated test may not be programmed to look for. Investment in automated tests usually becomes attractive only after an application or set of functionality has matured and stabilized.
Later in this chapter, you will learn more about how the Visual Studio 2013 family of products addresses both manual and automated testing.
Test Case Management
Test case management is a discipline of software engineering much like requirements management, project management, or change management. Effective test case management ensures that the right sets of tests are designed and executed in order to validate that an application behaves as it should. This is based on the explicit set of requirements that have been defined by, or on behalf of, its users. Test case management should also account for implicit requirements—those requirements that may not have been stated up front by a user, but are understood to be important (such as making sure that the user interface is easy to read, text is spelled properly, and the application doesn't crash when Daylight Savings Time goes into effect).
Test case management was a new feature introduced in Team Foundation Server 2010, expanded in Team Foundation Server 2012, and extended to the browser in Team Foundation 2013 and Visual Studio Online. Test plans and their associated artifacts (which you will learn about later in this chapter) can be stored in Team Foundation Server or Visual Studio Online and linked to other artifacts, such as requirements and builds. By centralizing all of these artifacts, Team Foundation Server allows you to track your test plans alongside your implementation.
For any given feature, you can already ask, “How long before this feature is done being coded?” With the addition of test case management to Team Foundation Server, you can now ask questions such as, “How many tests have we written? For last night's build, how many tests have been run? Did those tests pass or fail? For the tests that failed, what types of bugs did we generate?”
Visual Studio 2010 introduced a new product family member—Microsoft Test Manager—which can be used by testers and test leads to manage and execute test plans. You learn more about Microsoft Test Manager later in this chapter.
Team Foundation Server 2013 and Visual Studio Online introduce Web Test Management in Team Web Access. This is a new interface that provides the main set of testing tools from Microsoft Test Manager (MTM) through a web interface.
Lab Management
Gone are the days when the typical installation procedure for an application was to “xcopy deploy” it to the system and launch an executable. Nowadays, most applications require an increasingly complex installation procedure that could involve deploying software packages across multiple machines and requires a long list of prerequisite software.
Conversely, removing a piece of software from a machine isn't always straightforward, and commonly leaves behind unwanted artifacts, making it difficult to clean a test machine for subsequent deployments. This complicates the process of effectively testing your software, especially when this deployment procedure must be repeated to accommodate daily (or even hourly) changes being checked in by your development team.
Advances to virtualization technology have helped to alleviate this problem. Virtualization provides an easy mechanism for staging test environments, creating snapshots of them at some known state (such as when the latest updates and prerequisites have been applied), and restoring them to that known state to prepare to deploy a new build. Although virtualization solves some of these problems today, orchestrating an automated workflow for building, deploying, and testing your software across these virtual environments often requires a great deal of manual effort or expensive automation investment.
Lab Management is designed to address this problem. Lab Management was another new capability introduced in Team Foundation Server 2010 that you will learn about in this chapter. Lab Management provides an out-of-the-box solution for automating a build-deploy-test workflow for your software project with your existing environments or with virtualized environments created during the development and testing life cycle.
Imagine having your software automatically built and deployed to one or more virtual environments, each environment consisting of one or more virtual machines. The deployment could include not only configuring your application, but also deploying the latest database schema and a clean baseline data set used by your manual and automated tests. Each virtual environment might represent a different configuration under which your software needs to be tested. Automated tests are run, defects are noted, and environments are readied for use by manual testers to complete the test pass and scour for additional defects. As bugs are found, snapshots of a virtual environment can be created again so that developers can instantly see a bug for themselves without having to re-create it in their own environments. Testers and developers can even create dedicated temporary environments designed to be used individually and then shut down and deleted when they are no longer needed. The Lab Management capabilities of Visual Studio and Team Foundation Server make all of this possible.
Testing Architecture
In Part I of this book, you learned about the possible configurations for installing and configuring Team Foundation Server. In Part IV, you learned about how build controllers and build agents can be used to provide build automation capabilities to Team Foundation Server. If you intend to use the software testing capabilities covered in this chapter, there are a few other components you should begin to familiarize yourself with. Figure 26.2 shows an example of a topology that uses all of the software testing capabilities covered in this chapter.
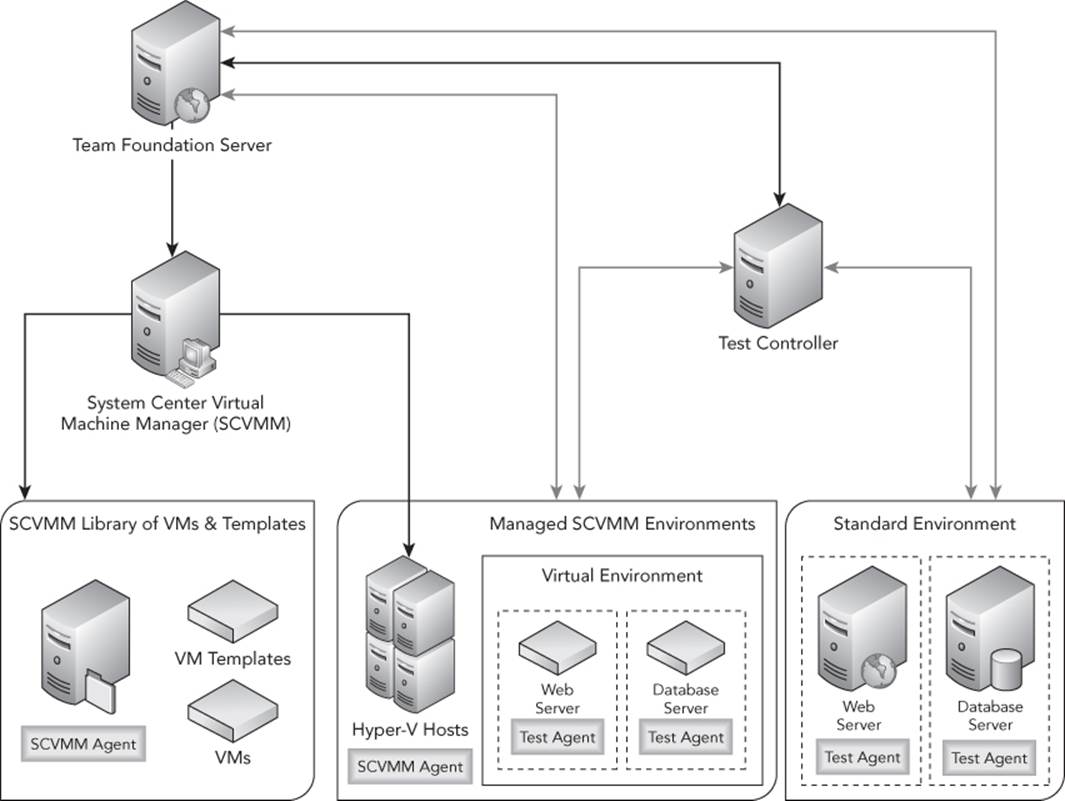
Figure 26.2 Testing architecture in TFS
The first thing to notice is that (not surprisingly) Team Foundation Server is at the heart of this solution. Team Foundation Server is ultimately responsible for orchestrating such activities as test automation, lab deployments, and test result collection, although it does get some help from other servers and services that facilitate these tasks.
The remaining components in the test architecture are as follows:
· A test controller is responsible for orchestrating one or more test agents in order to execute automated tests. A test controller also collects test result data from test agents after a test run has finished. This data can then be stored in Team Foundation Server for reporting and diagnosis purposes.
· System Center Virtual Machine Manager (SCVMM) is required to orchestrate virtual machine (VM) operations (such as deployment, provisioning, snapshots, and state management) across one or more physical Hyper-V host machines. An SCVMM server is required in order to configure SCVMM virtual environments with Lab Management in Team Foundation Server.
· An SCVMM library server is used by SCVMM to store VMs and virtual machine templates (VM templates). Once a VM or VM template is available in a VM library, it can be deployed as a running instance to a physical Hyper-V host. You will learn more about VMs and VM templates later in this chapter.
· An SCVMM virtual environment is a collection of one or more deployed VMs. Lab Management treats a managed environment as a single entity that can be deployed, snapshotted, or rolled back together as a single collection of machines. An SCVMM environment can be used to simulate a real environment, which might contain a web server, a database server, and a client machine with a web browser. SCVMM environments are deployed to physical Hyper-V host servers, which are, in turn, managed and monitored by SCVMM. An SCVMM agent is automatically installed on the Hyper-V hosts, enabling that physical machine to act as a VM host and to communicate with the SCVMM server.
· A standard environment can also play an important role in your testing architecture, especially when virtualization or Hyper-V is not an option (such as to support tests that require special hardware not accessible from a virtual machine). You can create standard environments using the existing machines in your current environments that you are using today. Although standard environments are the quickest way to get started with Lab Management in Team Foundation Server 2013, you will learn more about the capabilities and limitations of standard environments as compared to SCVMM virtual environments later in this chapter.
One important limitation to be aware of in this architecture is that a test controller can be bound to just one team project collection. If your Team Foundation Server deployment includes multiple team project collections that need test controllers, you must install those test controllers on separate servers.
If you are familiar with the test architecture from Team Foundation Server 2010, you will notice there are several simplifications in the architecture for Team Foundation Server 2012. For example, build controllers and build agents are no longer needed for the deployment functionality. Deployment is now handled through the test controller and test agents. In Team Foundation Server 2013, Test Agent deployment was simplified. When you create a Standard or SCVMM environment using Test Manager, any machines running Windows Vista or higher will automatically have Test Agents installed and configured.
Also, there is no longer a separate lab agent needed if you choose to use the network isolation feature with SCVMM virtual environments. Network isolation allows you to establish virtual environments with their own private virtual network, without fear of machine name conflicts or IP address collisions. Each machine in a network-isolated environment is accessible through a special and unique DNS name and is still able to access network resources outside of the environment. This network isolation functionality that used to be in the lab agent has now merged into the consolidated test agent.
Note
Detailed instructions for installing and configuring test controllers and test agents can be found at http://aka.ms/ConfiguringTestControllerAndAgents.
Microsoft Test Manager
Microsoft Test Manager (MTM) was first introduced in the Visual Studio 2010 release. It was built from the ground up to provide software testers and test leads with a dedicated tool for managing and executing test plans. These test plans and associated artifacts are stored in Team Foundation Server. Figure 26.3 shows Microsoft Test Manager, which is included with Visual Studio Premium 2013, Visual Studio Ultimate 2013, and Visual Studio Test Professional 2013 editions.
Note
If you are confused about the differences between the Visual Studio Test Professional product and Microsoft Test Manager, you are not alone. There are more details about the differences available at this blog post: http://aka.ms/MTMvsVSTestPro.
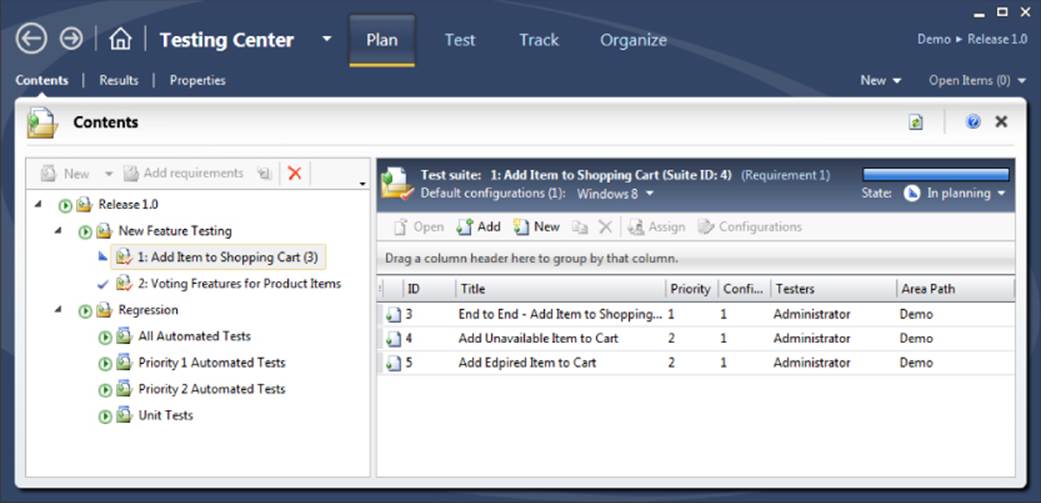
Figure 26.3 Microsoft Test Manager
Team Foundation Server 2013 and Visual Studio Online have extended the Web Access portal to include some of the functionality found in MTM, as shown in Figure 26.4. These new testing features are gathered under the Web Test Management umbrella and will be discussed throughout this chapter.
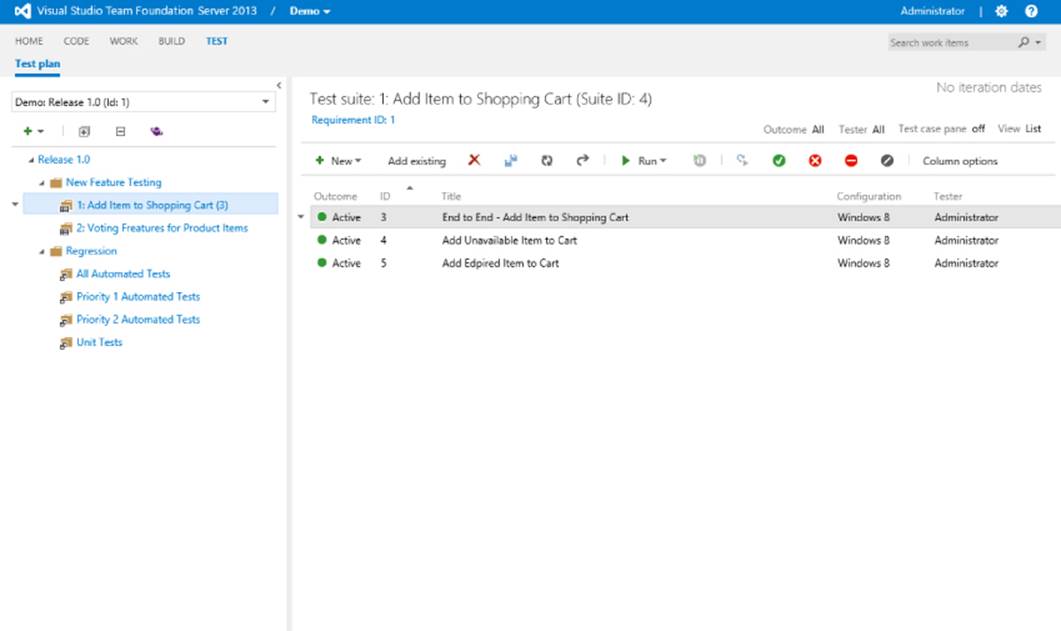
Figure 26.4 Web Test Manager
This section provides a brief overview of the terminology and artifacts used by Microsoft Test Manager and Web Test Management, along with a few key settings that you should be aware of as a Team Foundation Server administrator. The term “Test Manager” will be used to refer to both Microsoft Test Manager and Web Test Manager features. If there is a difference in functionality between the tools, it will be noted.
Note
You can learn much more about Microsoft Test Manager and Web Test Manager from Part VI of Professional Application Lifecycle Management with Visual Studio 2013 (John Wiley & Sons, 2014), available at http://aka.ms/ALM2013Book and from the MSDN Library at http://aka.ms/VisualStudioTesting.
Test Plans
A test plan is used by Test Manager to define and track everything being tested for a given software release. A testing team will usually create a test plan that corresponds to each development iteration or release. This is so that the tests they are designing and running ensure that the features the development team is implementing work as expected.
Test plans can be created and managed in both Microsoft Test Manager and Web Test Manager.
Test Suites
Test suites are used to organize your test cases. There are three types of test suites in Test Manager:
· Requirements-based test suite—This includes any test cases linked to requirement work items via a “Tests” relationship. For any given iteration of an application's development, you will usually want to start by adding to your test plan all of the requirements being implemented in that iteration. By linking test cases with requirements, you can later report against an individual requirement to determine whether it is working as expected.
· Query-based test suite—This allows you to specify a dynamic work item query for selecting test cases. For example, you might want to include all test cases with a priority of 1, even if they are for requirements that were implemented and already tested in earlier iterations. This can help ensure that critical functionality that was working doesn't break (or regress) as development progresses.
· Static test suite—This is a list of test cases that can be added manually to the suite. A static test suite can also be used as a container for other test suites, giving you an option to hierarchically organize your tests. It is the only test suite type that can contain other test suites and can be used to organize a test suite hierarchy in the test plan.
Test Cases
A test case is used to describe a set of actions a tester should perform to validate that an application is working as expected. For example, a simple test case might confirm that a user can visit a web page and create a new user account using a strong password. Likewise, another test case may validate that, if a user tries to create a new account with a weak password, the application prevents the user from doing so. Figure 26.5 shows an example test case in Microsoft Test Manager. For comparison, Figure 26.6 shows the same test case in Web Test Manager.
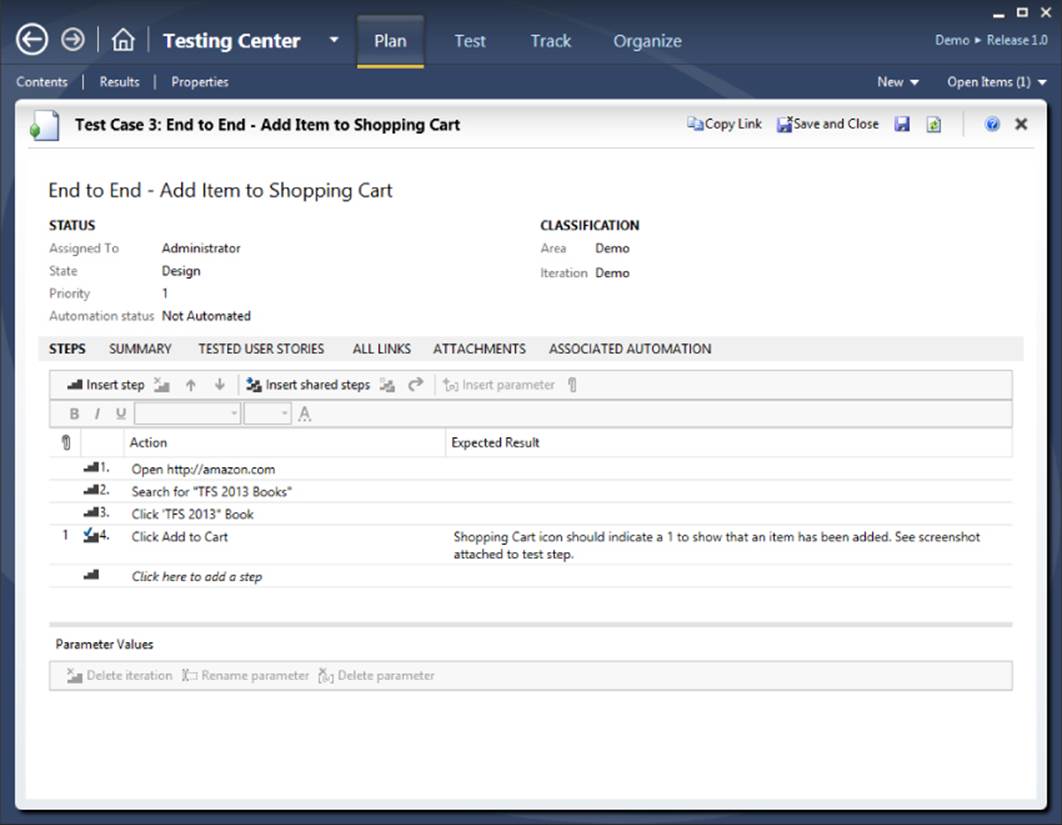
Figure 26.5 Test case work item in Microsoft Test Manager
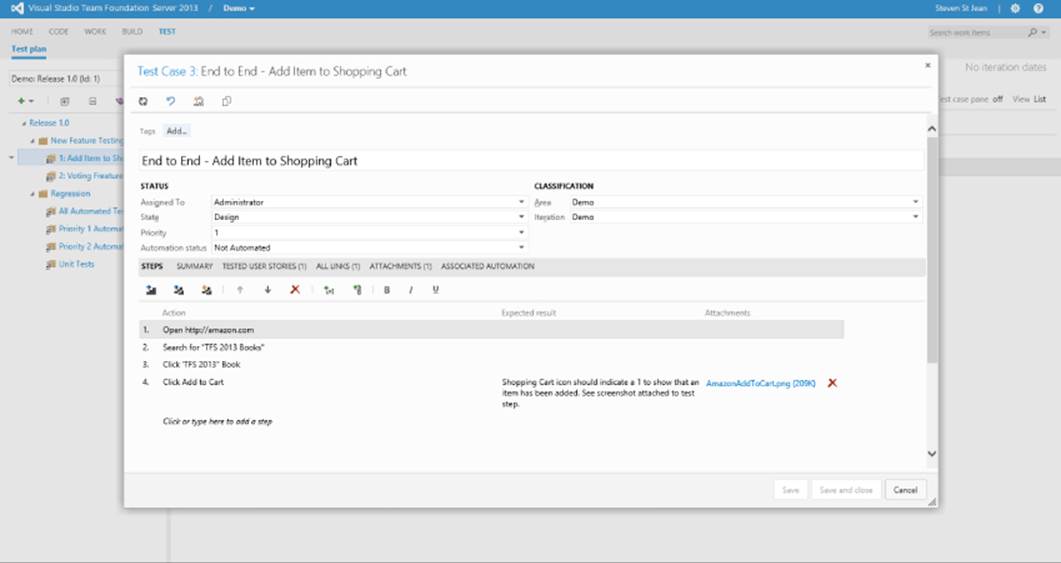
Figure 26.6 Test case work item in Web Test Manager
The structure of a test case should look familiar to you. A test case is stored as a work item in Team Foundation Server. It contains all of the core work item fields (Title, Iteration, Area, Assigned To, and so on). But a test case also has a Steps tab that contains the individual test steps testers should perform when they exercise this test case. A major advantage of a test case being represented as a work item within Team Foundation Server is that it can be linked to other work items (such as the relationship with requirements described earlier) and reported on. The downside to using the work item engine to store test cases is that you do not have the ability to branch a test case when your code branches. In this case you will need to create a copy of the test case if you need to have both the old and new versions of the test case available to support the old and new versions of your application.
A shared step is another work item type that can be used to consolidate a series of test steps that may be shared across multiple test cases. Shared steps allow you to centrally manage changes to commonly used parts of your application (such as user sign-in, account creation, and so on).
Test Runs
Test Manager provides testers with the ability to run test cases from a test plan using the local Test Runner or Web Test Runner. It will guide testers, step by step, through test case execution, alerting them about what they should expect to see in order to validate an application's intended behavior. Testers can even file bugs directly from this interface. Figure 26.7 shows a test case being run in Test Runner, and Figure 26.8 shows the same test in Web Test Runner.
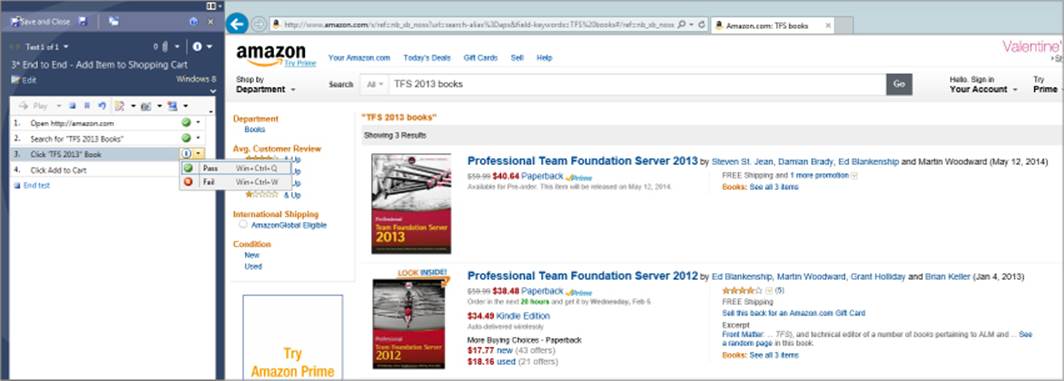
Figure 26.7 Test case execution in Test Runner
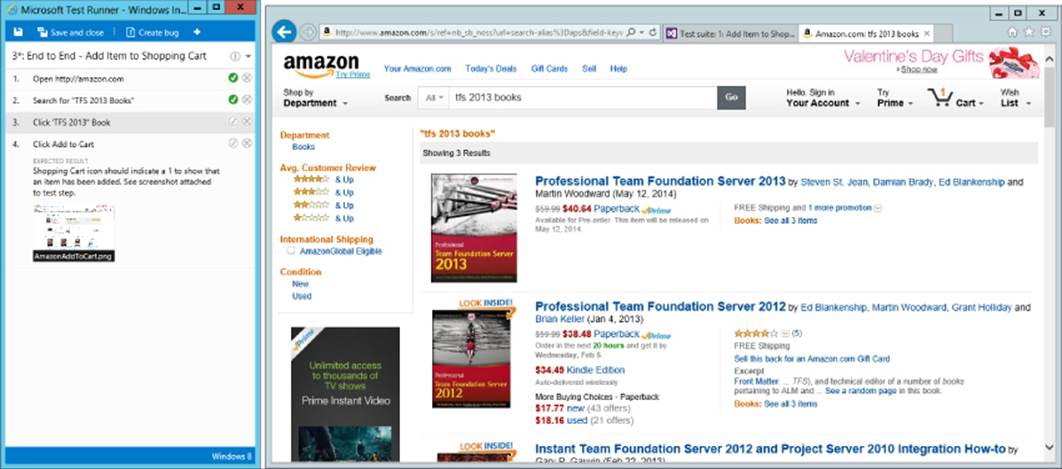
Figure 26.8 Test case execution in Web Test Runner
Exploratory Testing
Agile teams perform a type of testing, called exploratory testing, and do not typically start out with formal manual test cases. The exploratory testing tools, first available in Microsoft Test Manager 2012, allow you to start an exploratory testing session without having test cases defined. Testers are able to track what they are doing and provide comments as they perform ad hoc testing.
The nice thing is that the tester can also create formal test cases during the exploratory testing session because the test runner has recorded the actions that were taken. Additionally, if a bug is found, the tester is able to file rich actionable bugs from the exploratory test runner using those recorded action steps. You will find out more about filing rich actionable bugs using the test runner in the next section.
Exploratory testing features are only available in Microsoft Test Manager.
Actionable Bugs
Many software projects fall prey to an all-too-common scenario in which the tester finds and documents a defect, but the developer is unable to reproduce it. This is known as the “No Repro” scenario, and it is the source of the adage, “It works on my machine.” To address this problem, Microsoft's test architecture is capable of capturing rich data about a test run from each of the machines in the environment being tested, including the local machine. This happens automatically, without any additional work required by testers. When testers file a bug, Microsoft Test Manager can automatically include rich details such as system information (operating system, service pack level, total memory, available memory, and so on), action logs, event logs, and even a video recording that shows exactly what testers did as they ran a test case.
Even if a developer can't reproduce the same problem on his or her machine, the developer can at least get proof that a defect exists, along with a set of data used to look for clues about why the problem occurred in the tester's environment. The set of data that is collected during a test run is configured by test settings.
The collectors that are used to capture this rich data must be installed on the client machine where the tests are running. As such, this rich data is unavailable when using the Web Test Runner.
Test Settings
Test settings can be configured per test plan to describe what information should be collected while a tester is running a test. Collecting the right set of information can be invaluable for developers as they analyze bugs to determine why a problem occurred.
However, as a Team Foundation Server administrator, you should also be aware that test settings have the potential to occupy a lot of disk space. Figure 26.9 shows the test settings configuration dialog box from within Microsoft Test Manager, along with a list of diagnostic data adapters that can be enabled and configured to collect a variety of details from a test run.
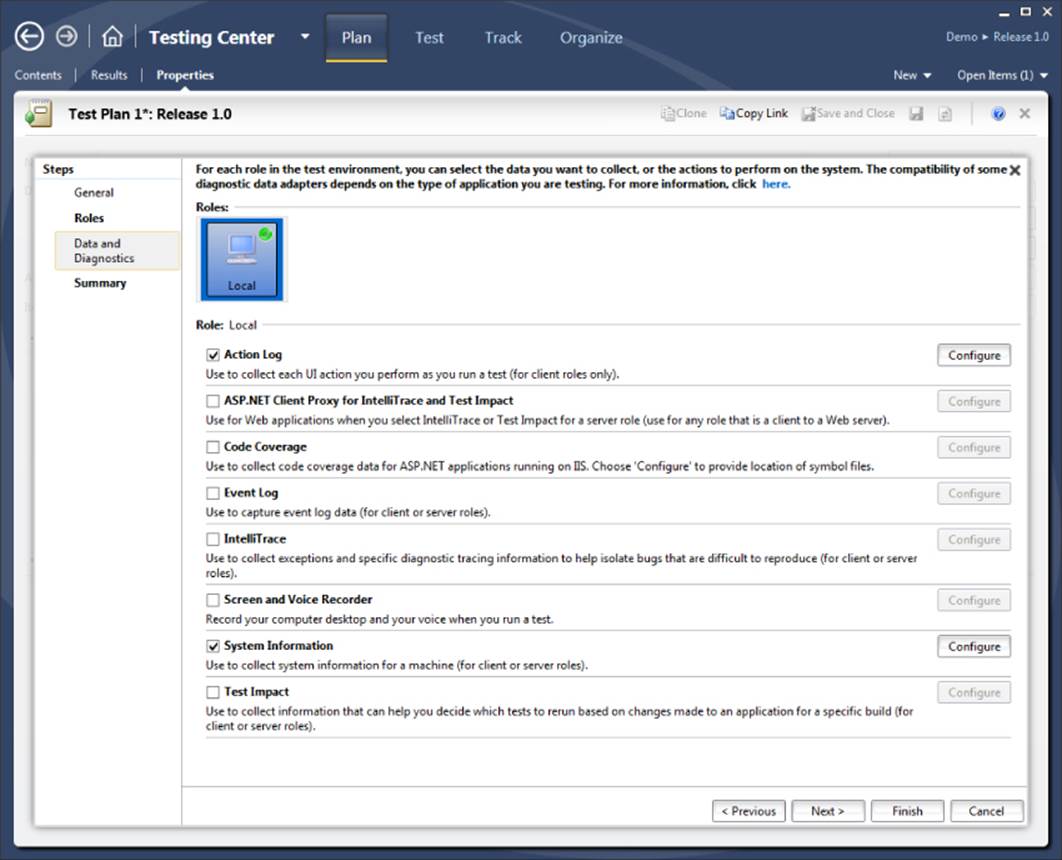
Figure 26.9 Test settings
You can specify the types of diagnostic data adapters to run for each machine in your environment. Some diagnostic data adapters make more sense than others for different machine roles. For example, collecting a video recording on your database server may lead to a pretty boring video.
There is a temptation to want to collect everything, all of the time, from every test run, to avoid missing key pieces of information if a bug is discovered. However, this can impact test run performance, and it could quickly consume all of the available disk space on your Team Foundation Server instance.
Therefore, it's important for test leads and development leads to work together to construct test settings that thoughtfully capture the right information. You can also have multiple test settings, such as one called “Full Diagnostics” and another called “Lightweight Diagnostics.” Testers can run with the Lightweight Diagnostics test settings for the majority of their work, and, if they encounter a bug, they can re-run a test with the Full Diagnostics and add the additional details to the same bug.
The exact amount of disk space required per test setting will vary based on the length of your test runs, the complexity of the application being tested, and the number of machines in a test environment from which you are gathering information. But, generally speaking, from a resource perspective, the two diagnostic data adapters to pay special attention to are IntelliTrace and Video Recorder.
IntelliTrace can provide extremely rich, historical debugging data about .NET applications, which can help developers understand exactly what was happening during the execution of an application. Developers can analyze IntelliTrace files using Visual Studio 2013 Ultimate edition, but testers running Microsoft Test Manager can capture IntelliTrace files during test execution.
Note
You can read more about using IntelliTrace at http://aka.ms/IntelliTrace2013.
Left unchecked, the IntelliTrace files themselves can quickly consume tens or even hundreds of megabytes of disk space. The good news is that the maximum size of an IntelliTrace file can be limited by configuring that particular diagnostic data adapter; and for successful test runs (where a test case passes), IntelliTrace files will be discarded. But, from a resource perspective, this is the most important diagnostic data adapter to pay attention to.
Video recordings can also consume about a megabyte of disk space per minute of test execution. If enabled, video recordings will always be attached to test results if a test case fails. You can optionally configure video recordings to be saved even if a test case passes. This can be useful for auditing third-party testing organizations, to ensure that they are running test cases properly. It can also be useful for capturing ad hoc video “documentation” of your application, which can easily be shared with business stakeholders to show them the progress of your development.
Test settings configuration is only available within Microsoft Test Manager.
Note
You can learn more about configuring test settings at http://aka.ms/Configuring2013TestSettings.
Test Attachments Cleaner
If you are making effective use of the diagnostic data adapters to collect rich, actionable information about your test runs, eventually you will probably want to clean up old test run data in order to reclaim disk space. Microsoft has created the Test Attachments Cleaner to aid with this process. This is a command-line tool that you can configure to clean up test attachments based on age, size, attachment type (such as IntelliTrace files or video files), and so on.
Team Foundation Server administrators can work with their development and test teams to figure out the appropriate retention, and then create a scheduled task to run the test attachment cleaner on a regular basis.
Be careful and realize that, if you do remove a test attachment, any bugs that were created that link to those attachments will no longer have access to the original attachment. For example, if you decide that IntelliTrace and video recordings older than 180 days should be removed, then someone opening a bug after it has been removed using the cleaner will no longer have access to those attachments.
Note
The Test Attachments Cleaner is included with the Team Foundation Server Power Tools available at http://aka.ms/TFS2013PowerTools.
Assigning a Build to a Test Plan
Another challenging aspect of any test team's job is determining which builds they should test. A development team will likely produce several builds during the course of a week, and perhaps even multiple builds during a given day, especially if it is embracing continuous integration. It is usually impractical to expect that a test team will install and test every build. Microsoft Test Manager can help test teams with this process.
Because Team Foundation Server already contains rich information about builds and the work items that have been incorporated into each build (such as which bugs are fixed or which requirements are implemented), this information can be used by a test team to determine which builds are worth testing. Figure 26.10 shows the Assign Build dialog box within Microsoft Test Manager.
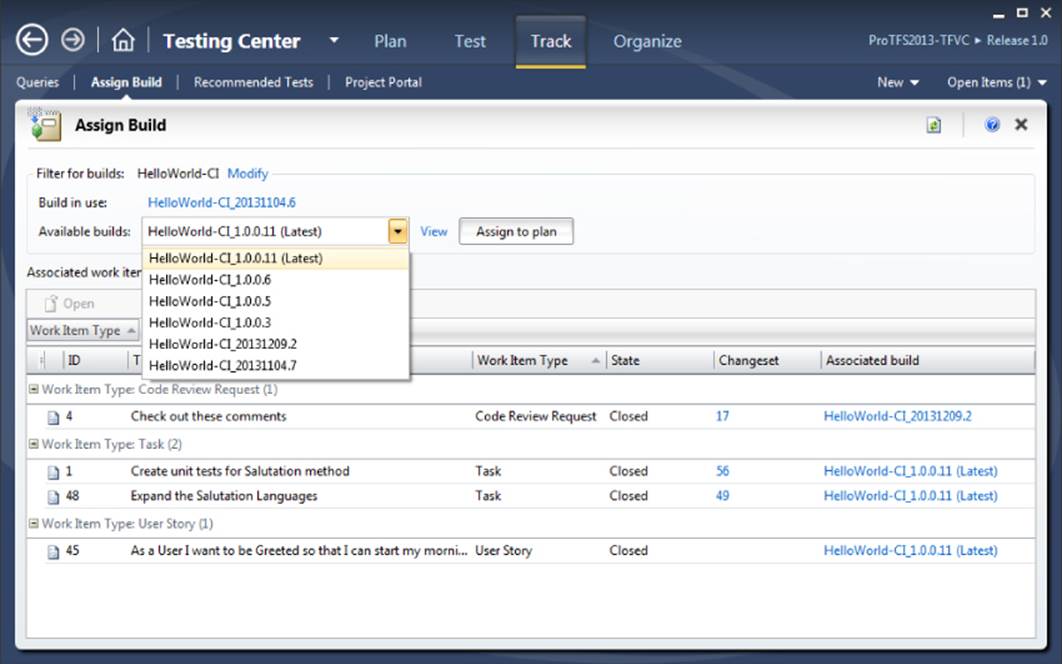
Figure 26.10 Assigning a build to a test plan
Assigning the build can be done from the Test Plan properties window and is typically done by a test lead to indicate to the team which build should be used to test. It is used as the default when testers start a new manual or automated test run but can be overridden for an individual test run as well.
The build currently in use can be compared with newer builds to determine what has changed in a given build and to help determine whether a newer build is worth adopting. For example, maybe a bug has been resolved by a developer but must be validated by a tester. Or, maybe a requirement has been coded and is ready for testing.
Note
The cadence of your builds is something you should think about when configuring your test plans. For example, you probably don't want every single continuous integration build to show up in the list of available builds. Instead, you might consider creating a dedicated build definition that produces nightly or rolling builds, and choose that build definition as the filter for your test plan. If the test team needs a new build before the next scheduled build, it is able to manually queue a new build for that build definition as well. Having a consolidated number of builds on a predictable cadence will also make your build quality reports easier to read.
Analyzing Impacted Tests
Test impact analysis is a powerful feature that can help improve the productivity of testers by allowing them to quickly identify tests to re-run based on changes to code. Test impact analysis can be enabled to run in the background while tests are being executed. This feature records which methods of code are executed while each test is run. These can be automated tests (for example, unit tests, load tests, or coded UI tests), as well as manual tests, but the code you are analyzing must be managed code (that is, based on .NET Framework 2.0 and above).
Microsoft Test Manager can provide testers with a list of impacted tests whenever they select a new build. In order to support this capability, you must be running tests with Microsoft Test Manager's Test Runner, using the Test Impact diagnostic data adapter during your test runs (as configured by your test settings), and your build definition must be configured with test impact analysis enabled as described in Part IV of this book. Test impact analysis data is not captured when testing from the Web Test Runner.
Build Retention
In Part IV of this book, you learned how to define build definitions, trigger a build, delete builds, and set build retention policy. Most of the time, accidentally deleting a build (or inadvertently losing a build because of an aggressive retention policy) does not create much of a problem for a software development team because you can just re-create a build based on an older changeset. But if you are conducting manual testing with Test Manager, improperly deleting a build can cause you to lose the test results run against that build.
When test runs are stored in Team Foundation Server, they are stored along with the associated build they were run against. This can include artifacts such as video recordings, IntelliTrace files, or action recordings (which can be used to partially or fully automate test execution). If a developer needs any of this information to diagnose a problem, and the build was deleted along with the test results, he or she may lose valuable information to help reproduce and debug a problem. Likewise, if testers are using action recordings to fast-forward test execution (a feature of Microsoft Test Manager), deleting test results will destroy the action recordings required for fast-forwarding. These same action recordings can be used to create fully automated, coded UI regression tests as well.
To avoid this problem, be very careful when deleting builds that may have been used by your test team. This is another good reason to follow the build cadence described earlier for the builds you will test with.
You can periodically clean up your irregular continuous integration builds without jeopardizing the test results from the builds that your testing team may have used. You should then disable the retention policy from deleting builds from your testing build definition, or at least configure the retention policy to preserve test results when builds are deleted.
If disk space becomes scarce, you can then use the Test Attachments Cleaner to selectively delete old testing artifacts (such as video recordings and IntelliTrace files) without jeopardizing important test results that may still be useful. Keep in mind that action recordings may be useful long after a feature is considered “done” because a test team may occasionally re-test older features to ensure that nothing has regressed in a recent build.
Custom Work Item Types
You have seen how Microsoft Test Manager uses requirements, test cases, shared steps, and bugs, all of which are stored in Team Foundation Server as work items. But if you want to customize your process template, or use a third-party process template, how does Test Manager know which work item type is the equivalent of a “requirement” or a “bug” and so on? The answer is to use categories to define the roles for each of your work item types in Team Foundation Server.
Note
More information on using categories to define work item roles can be found at http://aka.ms/MTMWITCategories. More information on customizing your process template can be found in Chapter 13.
Test Automation
This chapter has mostly dealt with manual testing, but Visual Studio and Microsoft Test Manager also provide support for automated tests. As mentioned previously, automated tests are beneficial because they have the ability to run quickly and repeatedly, without human interaction, in order to surface regressions that indicate to a development team that (for example) the last change they made to the code broke a feature that was working in last night's build.
Table 26.1 shows several types of automated test types supported by Visual Studio 2013.
Table 26.1 Automated Test Types
|
Test |
Description |
|
Coded UI |
This test provides the ability to author tests that automatically interact with the user interface of an application and verify some expected result, and file bugs if an error is encountered. Coded UI tests typically evolve from test cases that were previously run manually, once the application's user interface (UI) has mostly stabilized. You can even use action recordings from manual test runs as the basis for creating new coded UI tests. |
|
Unit |
These low-level tests verify that target application code functions as the developer expects. |
|
Web performance |
This test is used primarily to test performance of a web application. For example, you may create a web performance test capturing the web requests that occur when a user shops for items on your website. This web performance test could be one of a suite of web performance tests that you run periodically to verify that your website is performing as expected. |
|
Load |
These tests verify that a target application will perform and scale as necessary. A target system is stressed by repeatedly executing a variety of tests. Visual Studio records details of the target system's performance and automatically generates reports from the data. Load tests are frequently based on sets of web performance tests. However, even non-web applications can be tested by defining a set of unit tests or database unit tests to execute. |
|
Generic |
These tests enable calling of alternative external testing systems, such as an existing suite of tests leveraging a third-party testing package. Results of those tests can be automatically parsed to determine success. This could range from something as simple as the result code from a console application to parsing the XML document exported from an external testing package. |
|
Ordered |
Essentially containers of other tests, these establish a specific order in which tests are executed, and they enable the same test to be included more than once. |
Each of these test types is described in detail in Parts V and VI of the companion book Professional Application Lifecycle Management with Visual Studio 2013 (John Wiley & Sons, 2014). As a Team Foundation Server administrator, you should familiarize yourself with how automated tests can be run as part of a build definition, which was described in Part IV of this book. You should also familiarize yourself with test controllers and agents, introduced earlier in this chapter (see the section, “Testing Architecture”). When configuring test agents, some test types (such as coded UI tests) will require you to configure the test agent to run as an interactive process so that it has access to the desktop.
Automated tests can also be run as part of an automated test run or a build-deploy-test workflow in a Lab Management environment. You will learn about Lab Management in the next section.
If you would like to run an automated test through Microsoft Test Manager or in a Lab Management environment, then you need to make sure that the test case work items that represent those automated tests understand which test is the automation for them. Associating the automation with the test case work item is the key step, and you can find out more on how to do this here at http://aka.ms/TestCaseAssociatedAutomation2013.
Note
If you want to run large numbers of tests, such as unit tests, and would like to automate the process of creating and updating the associated automation for a lot of tests, you can use the tcm.exe testcase import command-line utility. Running this command will create test cases and automatically associate unit tests or other coded tests with those test cases. Subsequent runs of this command-line utility will update existing test cases and create new test cases based on any new tests that are found. More information about this functionality is available here at http://aka.ms/ImportTestCasesFromTestAssembly.
Visual Studio Lab Management
Visual Studio Lab Management is a powerful capability of Team Foundation Server that allows you to orchestrate physical and virtual test labs, empower developers and testers to self-provision needed environments, automate build-deploy-test workflows, and enhance developer-tester collaboration. Some Lab Management features are not to users of Visual Studio Online. This section provides an overview of the components required to enable Lab Management, along with their associated capabilities.
This section also provides you with a starting point as you plan your adoption of Lab Management, considerations for maintaining your testing environment, and troubleshooting tips. Several URLs have been provided throughout this section, as well as links to supporting documentation, all of which dive deeper into these topics.
Challenges of Configuring Lab Management
It should be stated up-front that configuring the virtual lab aspect of Visual Studio Lab Management (especially for the first time) can be overwhelming and even frustrating at times. While the Lab Management technology is capable of doing a lot of heavy lifting for you, there are always going to be areas that you must customize for your own environment, to suit your individual process, and to meet the requirements of your existing IT infrastructure. Stick with it because the benefits of Lab Management often far outweigh the initial investment. You can read about some teams that have already adopted Lab Management and their results at http://aka.ms/LabManagementCaseStudies.
Configuring Lab Management also requires a mixture of disciplines across development, build engineering, testing, and IT. So be prepared to immerse yourself in the documentation, and then buy some doughnuts and assemble a virtual team with the right level of expertise.
What's New for Lab Management in Team Foundation Server 2013?
There are several improvements in Lab Management since its introduction in Team Foundation Server 2010. This section begins by helping you get acquainted with what's new.
Standard Environments
Standard environments were introduced in Team Foundation Server 2012 to replace the concept of “physical environments” that existed in Team Foundation Server 2010. Standard environments, as opposed to SCVMM environments, allow you to use any machine (whether it is virtual or physical) as an environment in Visual Studio, Team Foundation Server, and Microsoft Test Manager. You are able to take advantage of manual testing and collecting data with the standard environment as well.
Standard environments do have certain drawbacks though—because they are not managed by SCVMM, you are not able to provision machines with Microsoft Test Manager and rollback/snapshot, or perform operations like start and stop with standard environments.
However, creating standard environments out of your current environments are by far the easiest way to get started immediately with Lab Management. You only need to set up a test controller before creating your first standard environment and you are ready to go. This is a great first step for those looking to immediately gain benefits from what is provided in Lab Management. Standard environments are available from Team Foundation Server and Visual Studio Online. You can find out more about how to create a standard environment by visiting http://aka.ms/CreatingStandardEnvironments2013.
System Center Virtual Machine Manager 2012
In addition to support for System Center Virtual Machine Manager 2008 R2, Team Foundation Server 2013 also supports System Center Virtual Machine Manager 2012. There are quite a few improvements included in SCVMM 2012 that are out of scope for this book, but Lab Management will now support clustered host groups, highly available virtual machines in environments, and the new .VHDx hard drive file format. One item to note is that even though Lab Management supports clustered host groups, network-isolated environments must still reside on a single Hyper-V host.
Consolidation of Agents
One of the simplifications that has been made is the need for only one agent: a test agent. Previously, three agents were required for Lab Management: build agent, test agent, and lab agent. All of the functionality from the previous agents have now been consolidated into the single agent install.
Auto-Installation of Agents
Another improvement introduced in Lab Management for Team Foundation Server 2013 was that you no longer need to worry about installing and configuring the test agent on the individual machines that make up an environment. Whenever you create a new standard environment or an SCVMM environment, Lab Management will automatically handle the installation and configuration for you. When new updates are released for the agents, Lab Management will also handle uninstalling and installing the new version of the agents for you. This can dramatically reduce the amount of maintenance required for using Lab Management. For the auto-update of agents, you will want to make sure that your test controller(s) are updated as each new periodic update is released for Visual Studio.
Repairing Environments
Environments and machines can end up in states where they are unreachable or have issues at times. Lab Management now includes several troubleshooting wizards as well as “repair” tools, which attempt to resolve the most common problems that end up occurring.
Installing and Configuring Lab Management
Earlier in this chapter (in the section, “Testing Architecture”), you learned about the components that make up a testing environment that uses standard and SCVMM virtual environments. A solid understanding of these components and how they integrate with one another is important for configuring and administering Lab Management.
When you are ready to move toward enabling SCVMM virtual environments for your own Team Foundation Server setup, you should start with the MSDN Library documentation at http://aka.ms/ConfiguringLabManagement2013. This help topic provides step-by-step instructions for configuring your environment for the first time. Read the documentation end to end before getting started, and be prepared for this to take several hours.
When you are finished, you will have added the Lab Management capability to Team Foundation Server and have configured an SCVMM server, along with a VM library share and one or more VM hosts. You are then ready to begin preparing virtual machines, defining virtual environments, and configuring build definitions to support build-deploy-test workflows.
The remainder of this section covers additional considerations you may need to account for in your environment as well as optimizations and best practices to be aware of, which can save you time and enhance the quality of your Lab Management deployment.
Ports and Protocols
Unless you are the system administrator for your organization's IT department, you may need to request that certain ports and protocols be enabled to support your testing architecture. This becomes especially important if your solution will span multiple networks, such as if your existing test lab infrastructure is separate from your Team Foundation Server instance.
Note
A detailed description of the ports and protocols required to support the testing architecture described in this chapter can be found at http://aka.ms/TFSPorts2013.
Capacity Planning
Many factors will affect the hardware requirements in order for your team to use Lab Management capabilities. These factors include variables such as the following:
· At any given time, how many testers will need access to their own individual virtual environments to run tests?
· At any given time, how many developers will need access to virtual environments (for analyzing bugs reported by testers or initial testing and debugging of new builds)?
· How many VMs are required in each virtual environment? In other words, can the tiers in your software run on a single server, or will your tests involve multiple servers?
· What are the system requirements of each VM in your virtual environments (disk space, memory usage, processing power)?
· How often will you run your build-deploy-test workflow, and how long will you need to retain historical snapshots containing older builds?
· How many VMs and VM templates do you need to store in your VM library, and what is the size of those files?
· Do you need multiple testing environments in order to support geographically distributed teams?
The answers to these questions will begin to form the hardware requirements of your testing environment. This will allow you to calculate the answers to questions such as the following:
· How many VM physical host servers do I need?
· What kinds of servers should I buy?
· How much storage capacity do I need?
Note
The Lab Management product team has compiled guidelines to help you answer these questions. You can access these guidelines at http://aka.ms/LabManagementCapacityPlanning. The Visual Studio ALM Rangers also have included a capacity planning workbook in their Lab Management guidance available on CodePlex: http://aka.ms/ALMRangersLabManagementGuidance.
Managing Host Groups and Library Shares
The basic infrastructure of any Lab Management deployment will consist of an SCVMM server, one or more library shares, and one or more physical host servers running Hyper-V (which are organized along with other VM hosts into host groups). The SCVMM server coordinates the deployment of VMs from a library share to a Hyper-V host by examining the available resources on each Hyper-V host within a host group to determine to which host server a VM should be deployed.
There are several techniques you can use to optimize the performance of your Lab Management deployment. For example, ensuring that your library share is on the same network switch as your VM hosts can substantially reduce the amount of time required to deploy VMs to hosts. Another technique is to allow unencrypted file transfers between your library share and the VM hosts.
Note
The Lab Management team has compiled guidelines to help you better understand the way SCVMM host groups and libraries interact with Team Foundation Server's Lab Management capability. These guidelines also provide best practices for optimizing your host groups and library shares. You can find the guidelines at http://aka.ms/LabManagementHostsAndLibraries.
Creating VMs and VM Templates
Creating VMs and VM templates for your SCVMM library can be a time-consuming (but important) step in building out your Lab Management environment. Depending on the requirements of the software you are testing, you may need to create multiple VM templates that correspond to different operating system editions, languages, browser versions, and so on. You no longer need to pre-install the test agent into the VM template, but it can save on provisioning time when the environments are created using that VM template. Be sure to keep the template up to date with the most recent version of the test agent (and any periodic Visual Studio updates that are released from Microsoft) if you do decide to pre-install the agents. Otherwise, as mentioned earlier in the chapter, Lab Management will now automatically install and configure the agents when an environment is created.
Choosing Between a VM and VM Template
You may be wondering what the difference is between a VM and a VM template, and when you should use each.
A VM can be stored in an SCVMM library by starting with a running VM, shutting it down, saving it to the SCVMM library share, and registering it with the SCVMM server. When it is later deployed from the library to a VM host, it will have the same machine name and other configuration properties as it did when it was originally saved to the library. The obvious downside with this approach is that if you deploy this VM more than once, you may experience machine name conflicts on your Lab Management network. The solution to this is to use VM templates.
A VM template has gone through a sysprep step to essentially remove its machine name, domain memberships, and other uniquely identifying properties. When a VM template is later deployed from the library to a VM host, you can specify its machine name (or use a randomly chosen GUID), domain memberships, and so on. This provides you with protection from machine name collisions, and even allows you to use the same VM template more than once in a given virtual environment.
Generally speaking, you should use VM templates whenever you can. The major exception to this rule is if your test environments require software that is not supported with sysprep. For example, SQL Server 2008 did not support sysprepping. SQL Server 2008 R2 supports sysprepping of some features and SQL Server 2012 supports sysprepping of all features. If you are forced to use VMs, be sure to create virtual environments that use network isolation in Lab Management. This won't prevent machine name collisions within a virtual environment (you will have problems if you have two VMs with the same name in the same virtual environment), but it will provide isolation between different SCVMM virtual environments.
A very good walkthrough is kept up to date on MSDN with information on how to create a virtual machine template for Lab Management and making it available for your developers and testers to use in their environments available here:http://aka.ms/CreatingVirtualMachineTemplates2013.
Working with Virtual Environments
After you have populated your SCVMM library with VMs and/or VM templates, you can use Microsoft Test Manager to define an SCVMM virtual environment. An SCVMM environment consists of one or more VMs or VM templates, and you can use the same VM template twice within a given SCVMM environment. (This will customize the VM template twice, creating two instances of running VMs from the same template.) After you have defined your SCVMM environments, you can then deploy those to SCVMM host groups.
Note
For more information on creating Lab environments, see http://aka.ms/CreatingLabEnvironments.
Determining Virtual Machine RAM
When you are configuring and deploying virtual environments, you can decide how much RAM to assign to each VM within each virtual environment. Remember that the more RAM you assign to each VM, the more RAM will be required by your VM host groups.
If you multiply the number of VMs in each virtual environment by the number of simultaneous virtual environments you need to support, you may discover that trimming even a few hundred megabytes of RAM off of each VM can represent a substantial resource savings for your environment. Therefore, it's important to understand what the minimum RAM requirements can be for the VMs in your test environments without sacrificing the performance or accuracy of your testing efforts.
If you are using machines based on Windows 7 SP1, Windows Server 2008 R2 SP1, Windows 8, and Windows Server 2012, be sure to take advantage of the Hyper-V feature called dynamic memory to support more virtual machines in your virtual lab. Dynamic memory allows you to specify a minimum and maximum amount of memory available for a VM and will provide the VM with more memory as it needs it instead of keeping it static. It can greatly increase your VM density ratio for your Hyper-V host servers.
Defining a Build-Deploy-Test Workflow
Although you can choose to use Lab Management purely for managing a lab of VMs to conduct manual testing, the real power of Lab Management is unlocked when you begin to take advantage of the automation support for building your software, deploying it to an environment, and running your automated tests in that environment. This is known as a build-deploy-test workflow.
Imagine the benefits of this workflow by considering the following hypothetical scenario. The software you create consists of a website, powered by a database, which needs to be accessed by people running multiple supported web browsers. Your web application needs to work with Internet Information Services (IIS) 7 and IIS 8, and you support both SQL Server and Oracle for the database tier.
Just deploying the dozens of machines required to support each of these configurations alone can be time-consuming. After the machines are ready, you must deploy the software, and then run your tests. Now, consider repeating this process every night in order to support the daily changes coming from the development team.
Of course, some organizations have already invested heavily in scripts to automate some or all of this workflow, but the cost of doing so can be quite high. Development and testing teams should not be in the business of maintaining this type of infrastructure—they should be spending their time building and testing great software.
Once you have installed and configured your Lab Management infrastructure, you can easily create a new build definition using Team Build, which allows you to establish a build-deploy-test workflow. You can create multiple definitions to support multiple environments. (For example, you might create one workflow to test a SQL Server deployment with IIS 7 and a separate workflow to test an Oracle deployment with IIS 8.) Imagine arriving to work in the morning and being able to instantly discover that last night's build caused a failure in the account authorization logic, which only occurs with SQL Server 2008 R2 SP2.
This is the type of rapid, iterative feedback that can allow teams to identify and fix bugs well before a release is ever distributed to customers. Figure 26.11 shows an example of a typical build-deploy-test workflow enabled by Lab Management. This workflow can be customized and extended to suit your specific requirements.
Note
To get step-by-step instructions for configuring a build-deploy-test workflow with Team Build and Lab Management, visit http://aka.ms/BuildDeployTestWorkflow2013.

Figure 26.11 Build-deploy-test workflow
Note that, in order to run automated tests as part of a build-deploy-test workflow, you must create automated tests (such as coded UI tests or unit tests), store these tests in Team Foundation Server Version Control, include them in your application's automated build, and associate these tests with test case work items. These test case work items must, in turn, be part of a test plan. Admittedly this will require a bit of up-front work to create these associations, but the end result is that you will get rich reporting data that links your builds with your test plans, test cases, and, ultimately, the requirements being tested.
Note
To learn how to associate automated tests with test cases, visit http://aka.ms/TestCaseAssociatedAutomation2013.
Remember also that the build-deploy-test workflow build process template can help you with manual testing scenarios where you want to deploy out only a new chosen build. Testers or developers can always queue a new build manually and perform only the build and deployment portion of the workflow, which gets their environment ready with a fresh deployment of their chosen build.
Lab Management Permissions
There are several permissions to be aware of when you are configuring Lab Management. You may want to consider using these permissions to govern, for example, who has the ability to modify virtual environment definitions. Because your build-deploy-test workflow will depend on these definitions, it is important that users change them only if they understand the implications of their changes.
Note
To learn about the granular permissions you can assign related to Lab Management activities, visit http://aka.ms/LabManagementPermissions2013.
Geographically Distributed Teams
You may have geographically distributed teams that need to work with Lab Management. But the size of Lab Management artifacts such as VMs can put a heavy strain on wide area networks (WANs).
You should consider co-locating VM hosts and corresponding library shares with the testing teams who need them. If you have multiple teams that need access, consider naming virtual environments appropriately to indicate to users which ones they should be using. (For example, you might prepend your Chicago-based virtual environments with “CHI,” New York-based virtual environments with “NYC,” and so on.) You can even regulate this more tightly by using permissions.
The best way to handle this situation is to create multiple host groups in SCVMM for each location. You can then place the Hyper-V host servers in that location into the SCVMM host group that corresponds with it. You can then expose each of the host groups in Lab Management, and developers and testers are able to choose the location's host group they want to provision their environment in.
You may also want to create additional library servers that exist in each location for use by the host groups. This helps by not copying large files (like VM templates) across the WAN and allows them to be available in each location for the corresponding host group.
VMware
VMware is a popular virtualization technology, and a common query centers on whether the Lab Management infrastructure supports VMware images. The answer is, “It depends on what you want it to do.”
Out of the box, Lab Management capabilities for SCVMM environments will work only with Microsoft's Hyper-V virtualization technology. However, you can create a standard environment out of the machines hosted by VMware, which will let you take advantage of the automated build-deploy-test workflow and use the environment with manual test runs.
However, despite VMware being a virtualization technology, the Lab Management standard environment does not provide any workflow activities for accessing VMware snapshotting capabilities. It is possible to author these activities and integrate them with Team Build's build-deploy-test workflow; but, as of this writing, there are no community projects to support this so you would be faced with writing these activities yourself. Alternatively, there are several free tools available that can be used to help you convert existing VMware images that you might be using into Hyper-V images.
Note
Microsoft has provided more details about the level of support for standard environments with Lab Management at http://aka.ms/CreatingStandardEnvironments.
Advanced Topologies
Your existing IT infrastructure requirements (such as whether you have multiple domains), your Team Foundation Server topology (such as whether you have a single AT/DT server, or a scale-out infrastructure), and other factors can have an impact on how you configure your Lab Management infrastructure. If you believe that your implementation might be nonstandard, you should read about the advanced topologies with which Lab Management has been tested and documented. This is available as a four-part blog series at the following locations:
· http://aka.ms/LabTopology1
· http://aka.ms/LabTopology2
· http://aka.ms/LabTopology3
· http://aka.ms/LabTopology4
Maintaining a Healthy Test Lab
An effective Lab Management infrastructure can be a powerful tool for development and testing teams alike to automate the delivery of their iterative software changes into environments that can be tested and, if defects are discovered, debugged. But this environment will require some level of administration to ensure that it remains healthy and that resources are used effectively. This section highlights a few things to consider as your test lab starts to light up with activity.
Instilling Good Citizenship
Lab Management allows testers to easily deploy multiple virtual environments, often consisting of multiple VMs, across numerous physical VM hosts, with just a few clicks of their mouse. But Lab Management does not have a mechanism to enforce that testers shut down environments they are no longer using. Left unchecked, you may find that your VM hosts are running out of disk space, processing power, or (most likely) RAM. There is no substitute for educating testers about the resource constraints of the environment and instructing them to power down environments that they aren't actively using. If an environment is obsolete, it should be deleted.
Lab Management allows you to pause an environment, which will prevent that environment from consuming any CPU cycles on its VM hosts. But this will not free allocated RAM. If testers wish to retain the state of VMs that they aren't actively using, a better approach is to create a snapshot of the environment. After a snapshot is taken, the environment can be powered off completely. When testers are once again ready to resume working with that SCVMM virtual environment, they can restore it to the previous snapshot, and it will be restored to the state it was in before being powered off.
Finally, Lab Management allows testers to mark an environment as “In Use” to signal that they are actively working with it, or planning on working with it soon. This indicates to other testers that they should not try to connect to that environment. Administrators will then know that running environments not marked “In Use” can probably be powered off if they need to reclaim VM host resources. Of course, testers should also be instructed to unmark environments that they are no longer using. If you notice that a tester has an unusually high number of environments in use, then this may indicate that he or she is claiming more resources than should be necessary.
Managing Snapshots
Snapshots are a great benefit of virtualization that allow you to easily store the state of a VM at any point in time and easily restore that state in the future. Snapshots have several uses in a Lab Management environment.
You can use snapshots to capture the baseline system state of an SCVMM environment before deploying your builds. You can again use snapshots to capture the state of the SCVMM environment after the build has been deployed, but before any of your tests have been run. Finally, if you find a defect, a tester can create a snapshot of an entire SCVMM environment and share a pointer to that snapshot when he or she creates a bug. This way, a developer can easily restore an environment back to the state it was in when the tester found the bug.
Note
You can learn more about using snapshots within Microsoft Test Manager at http://aka.ms/LabManagementSnapshots.
But snapshots also have the capability of consuming hefty amounts of disk space on your Hyper-V host servers. Additionally, Lab Management does not have a built-in retention policy to prune older snapshots—this will need to be done manually. Even if you set a retention policy in your build definition using Team Build, the process of deleting a build from here will not modify any SCVMM environments. Obsolete snapshots will need to be managed by the testers using the environments or by a lab administrator.
Note
Another reason to prune your snapshots is that Hyper-V has a built-in limitation of 50 snapshots per VM. Depending on how you use Lab Management, this limitation could be something to watch for, especially if you build and deploy multiple times per day to the same environment.
While it is possible to manage snapshots via the SCVMM Administration Console, this is not recommended. SCVMM is aware of only individual VMs. It doesn't understand the composition of VMs in entire SCVMM environments because this level of organization is maintained by Lab Management. Therefore, it is best to manage snapshots using Lab Management via the Microsoft Test Manager interface.
Another important consideration regarding snapshots is that of password expiration. Because snapshots can date back many months, password expiration policies can cause authentication to fail if appropriate precautions are not taken to prevent this from happening. The documentation at http://aka.ms/LabManagementSnapshots provides a detailed explanation of this process, along with preventative measures to keep it from impacting your SCVMM environments.
Workflow Customizations
The default build-deploy-test workflow provided with Lab Management is a powerful workflow, but there may be times when you want to customize this to add new activities, or change existing ones. Because the Lab Management workflows are built on Team Build, and Team Build in this release uses Windows Workflow, there are endless possibilities for extending and customizing the built-in workflows.
Note
To read more about customizing the built-in Lab Management workflow, see http://aka.ms/CustomizingLabManagementWorkflow2013. This article also details the Lab Management activities provided out of the box and can easily be added to existing workflows with very little additional work. Also, a blog post at http://aka.ms/LabManagementBDTSnapshot details how to use the Lab Management activities to automatically create a snapshot to reference from a bug if part of a build-deploy-test workflow fails.
Patching of VMs and VM Templates
Many of the snapshots you create as part of your experience using Lab Management will be short-lived. Snapshots are commonly created when a new build is deployed or when a bug is discovered. But a week or two later, older snapshots may be cleaned up in favor of newer builds and as bugs are resolved. However, some VM artifacts—such as the VMs and VM templates in your VM library, or the baseline snapshots of SCVMM virtual environments that you use as part of your build-deploy-test workflows—may last for months, or even years. Usually, you will want to keep these artifacts up to date with the latest security updates and other patches from Windows Update, but manually maintaining all of the VMs in your environment may prove to be very painstaking.
The recommended solution to this is to use the Virtual Machine Servicing Tool available at http://aka.ms/VMServicingTool. This tool can be scheduled to automatically patch your VMs and VM templates with the latest updates from Windows Update. The use of this tool will require that you host and maintain Windows Server Update Services (WSUS) locally. This is a free download from Microsoft that allows you to specify which patches you wish to incorporate into your environments.
Windows Activation
One of the other Windows technologies you may need to become familiar with is Windows Activation. If your developers and testers each have MSDN subscriptions, then you are probably familiar with the benefits of being able to use software included in the MSDN subscription for development and test use, which includes the operating system software. (See http://aka.ms/VisualStudioLicensing). It's a great benefit of MSDN and is important for development and testing environments like those used in Lab Management. However, you will still need to deal with Windows Activation even though each of the MSDN subscribers is licensed for usage.
A couple of decision points are recommended. If you are using virtual machine templates, after the machines are created from those templates the trial period will begin all over. Therefore, if you are using an environment for less than the operating system evaluation period (180 days for some), we recommend that you not activate the machines in an environment and leverage the trial functionality. In this case, you will want to use the Key Management Server (KMS) Client product keys available at http://aka.ms/KMSClientKeys. These special product keys will put Windows in a trial state and force Windows to look for a KMS server if one is available, which will be discussed shortly.
If you need to use environments longer than the operating system evaluation period, then you will want to activate the software. If you happen to be a volume license customer, then you can set up a special kind of activation server within your company, called a Key Management Server (KMS), for use by Lab Management environments. You will need special product keys for the KMS server that are available from the Volume Licensing Service Center at http://aka.ms/VolumeLicensingServiceCenter. To learn more about setting up an internal KMS server, you can read more at http://aka.ms/UnderstandingKMS.
Troubleshooting
As you have seen in this chapter, using the software testing capabilities of Visual Studio and Team Foundation Server 2013 can involve many moving parts, long-running workflows, complex topologies, and many stakeholders from across your development and testing teams. The Lab Management product team diligently manages a list of evolving troubleshooting techniques, along with an active forum, on MSDN at http://aka.ms/TroubleshootingLabManagement.
Summary
In this chapter, you learned about the testing capabilities of Visual Studio 2013 and Visual Studio Online as well as the impact that adopting these tools can have on your Team Foundation Server planning and administration. We covered the new Cloud-based Load Testing Service in Visual Studio Online. You also learned about the architecture of Team Foundation Server when configured in concert with test controllers and agents, SCVMM, Hyper-V host servers, VM libraries, and both standard and SCVMM environments. Finally, you learned some key areas to consider as you build and scale out your Lab Management environment, as well as some tips to maintain this environment over time.
In Chapter 27, you will learn about upgrading from earlier editions of Team Foundation Server to Team Foundation Server 2013.
All materials on the site are licensed Creative Commons Attribution-Sharealike 3.0 Unported CC BY-SA 3.0 & GNU Free Documentation License (GFDL)
If you are the copyright holder of any material contained on our site and intend to remove it, please contact our site administrator for approval.
© 2016-2026 All site design rights belong to S.Y.A.