Professional Team Foundation Server 2013 (2013)
Part I
Getting Started
Chapter 3
Installation and Configuration
What's in this chapter?
· Preparing to install Team Foundation Server 2013
· Installing and configuring Team Foundation Server 2013
· Creating your first team project with Team Foundation Server 2013
Before the 2010 release, installing and configuring Team Foundation Server could have easily consumed an entire weekend or more. Installation errors were difficult to diagnose, configuration was done entirely via the command line, and configuration options were largely inflexible. Thankfully, the 2010 release of Team Foundation Server was a monumental leap forward when it came to installation, configuration, and administration.
There were significant improvements again in Team Foundation Server 2012, and the 2013 release further expedites the installation and configuration process.
Team Foundation Server 2013 provides a GUI-based configuration and administration console, a flexible architecture with options for choosing which components you want to use, robust validation logic before each configuration step, and many more fit-and-finish features.
In this chapter, you will learn how to install and configure Team Foundation Server 2013. Some advanced configuration areas will be reserved for later chapters, but after reading this chapter, you will be able to install and configure a simple Team Foundation Server deployment in a matter of minutes.
What You'll Need
Before starting your installation, you should acquire the installation media for all of the components you will need. It is also a good idea to think about which updates you may need (such as service packs), and which clients and optional components you want to use with Team Foundation Server 2013. You should also download and review the latest Team Foundation Server 2013 Installation Guide, as it is updated periodically.
Team Foundation Server 2013
There are several ways to obtain Team Foundation Server 2013. By far, the most common is via an MSDN subscription. When purchased with an MSDN subscription, all editions of Visual Studio 2013 include one server license and one client access license (CAL) for Team Foundation Server 2013. MSDN subscribers can log in to http://msdn.microsoft.com/subscriptions to download software. Team Foundation Server 2013 can be found as part of the Developer Tools, and then the Visual Studio 2013 category.
Another common way for organizations to obtain Team Foundation Server is via a volume licensing agreement. You may need to contact the volume licensing administrator at your organization to get access software from Microsoft's Volume Licensing Service Center (VLSC). Usually, only a handful of administrators at an organization have access to download software from the VLSC.
Note
Most of the download packages available to MSDN subscribers and volume licensing customers are provided as .iso files. An .iso file is essentially a container of multiple files and directories packaged together as a single file. An .iso file can be mounted as a virtual CD/DVD drive, or it can be burned to physical CD/DVD media. Windows Server 2012 and Windows 8 and 8.1 include support for mounting .iso files, and no additional software is required to be installed. For more details on working with .iso files, see http://aka.ms/UsingMsdnDownloads.
Team Foundation Server 2013 is also available via traditional retail channels. If you purchased Team Foundation Server 2013 via retail, you will receive physical DVD media in the software box.
Team Foundation Server 2013 is also available via a lightweight web installer. From the Microsoft website, you can download a small (< 1MB) bootstrap setup utility and run it. This utility will then download the required packages to a temporary directory and proceed with the installation. With a fast Internet connection, this can be the easiest way to install Team Foundation Server, as it doesn't require downloading and mounting .iso files.
Finally, Microsoft makes a 90-day, fully functional trial edition of Team Foundation Server 2013 available for download. Team Foundation Server 2013 trial edition can be downloaded at http://aka.ms/TFS2013Downloads, along with other trial editions of Visual Studio 2013 (such as Visual Studio Ultimate 2013).
Using a Trial Edition
The trial edition of Team Foundation Server 2013 is a great way to evaluate the product before making a purchasing decision. But you should set a reminder for yourself at least 45 days before the end of the trial so that you can decide whether to make a purchasing decision, or if you decide not to purchase, whether any important data must be migrated off your Team Foundation Server trial deployment.
Depending on the reseller you choose, and the purchasing process used by your organization, it can sometimes take a few weeks to fulfill your purchase. You don't want to find yourself locked out of your development project while you're waiting for an order to be processed.
Upgrading from a trial edition to a paid edition is a simple process that just involves changing the product key. The steps are outlined at http://aka.ms/Tfs2013ChangeKey.
Team Foundation Server 2013 Installation Guide
Before starting your installation, you should download the latest version of the Team Foundation Server 2013 Installation Guide. This guidance is updated on a regular basis by Microsoft, and it contains detailed system requirements, checklists, step-by-step instructions, and other important information required to install and configure Team Foundation Server 2013. This chapter provides additional context and walkthroughs to supplement the Installation Guide, but it is not a replacement for the guide itself.
You can download the latest Team Foundation Server 2013 Installation Guide at http://aka.ms/tfsInstallGuide.
Note
The Installation Guide is provided as a .chm file. Because of security restrictions on viewing .chm files obtained from the Internet, you may have difficulties opening the file. Before viewing this guide, you may have to save it locally, right-click the file, and select Properties. In the properties dialog box, select Unblock followed by OK. You can now double-click the file to open it.
SQL Server 2012
In Chapter 2, you learned about how Team Foundation Server 2013 makes use of SQL Server 2012 to store your data. If you are using an existing deployment of SQL Server, you won't need to download installation media. However, if you are planning to use a separate SQL Server deployment for your Team Foundation Server 2013 instance, you may need to obtain the appropriate SQL Server media.
SQL Server Express 2012 can be used with Team Foundation Server 2013. But you will not be able to take advantage of reporting capabilities with Team Foundation Server 2013 unless you use SQL Server Standard edition (or higher). If you want to use the Express edition, this will be installed for you automatically by Team Foundation Server 2013 (if it isn't already installed).
If you plan to set up a separate instance of SQL Server 2012 Standard edition (or higher), you can obtain this installation media by using the same channels described earlier (MSDN, VLSC, retail, or trial). A limited-use license of SQL Server 2012 Standard edition is included with your license of Team Foundation Server 2013.
Note
As discussed in Chapter 2, Team Foundation Server 2013 supports SQL Server 2012 with SP1 as well as SQL Server 2014. Support for SQL Server 2008 has been dropped with the Team Foundation Server 2013 release.
Note
See the Visual Studio 2013 and MSDN Licensing whitepaper at http://aka.ms/VS2013Licensing to help you understand the licensing implications for each edition of SQL Server. For example, even though you can download SQL Server 2012 SP1 (any edition) or SQL Server 2012 SP1 Enterprise edition via your MSDN subscription, you must license this software separately. Using it with Team Foundation Server 2013 is not included in your MSDN subscriber product use rights.
Operating System
In Chapter 2, you learned about the operating systems supported by Team Foundation Server 2013. Installing and configuring your operating system is beyond the scope of this chapter, but is an important step for you to undertake before you can set up Team Foundation Server 2013.
As you learned in Chapter 2, Team Foundation Server 2013 can be installed on a client operating system (Windows 7 with Service Pack 1, Windows 8, or Windows 8.1). Installing on a client operating system will provide you with most of the capabilities of Team Foundation Server, including source control, work-item tracking, test case management, build automation, and Lab Management. If you wish to use reporting and/or SharePoint integration, or your Team Foundation Server deployment will be used by more than a few users, you should install Team Foundation Server on a supported Windows server operating system.
SharePoint
In Chapter 2, you learned about how SharePoint can be used as a supplemental workspace for your development project. If you wish to use SharePoint Foundation 2013 with Team Foundation Server 2013, this can be automatically installed and configured during your Team Foundation Server 2013 configuration. If you want to use another edition of SharePoint (such as SharePoint Server 2013 or SharePoint Server 2010), you should install and configure this separately.
Client Software
You should also consider which client software you want to use with Team Foundation Server 2013. Chapter 4 covers several types of software clients, such as Visual Studio, Eclipse, Project, and Excel. At a minimum, to complete the exercises in this chapter, you should install Team Explorer 2013.
Note
Team Explorer 2013 can be downloaded at http://aka.ms/TeamExplorer2013. Team Explorer is also included with Visual Studio Professional, Premium, and Ultimate editions, as well as with Microsoft Test Professional. So if you have any of these products installed, you won't need to download and install Team Explorer separately.
Service Packs and Other Updates
Microsoft periodically releases service packs and other updates for the Visual Studio line of products, including Team Foundation Server. Before making Team Foundation Server available to your development team, you may want to think about which updates you need to apply after you have installed and configured the server. By installing updates before bringing the server online, you can minimize potential downtime in the future when the service has active users.
There are several types of updates provided by Microsoft. The most common include the following:
· Service packs—Service packs are by far the most well-tested and supported updates provided by Microsoft. It is highly recommended that you install service packs because they usually fix several bugs, improve stability and performance, and occasionally add or improve features.
· Cumulative updates—Shortly after the Team Foundation Server 2010 Service Pack 1 release, the product team moved to a model of producing cumulative update packages regularly. These cumulative updates are a rollup of all fixes that the team has addressed in response to customer issues. Cumulative updates receive an appropriate level of testing and we recommend that all Team Foundation Server customers apply them when they become available.
· Hotfixes—Hotfixes (also called QFEs, which means Quick Fix Engineering) are provided by Microsoft to address specific issues. Because hotfixes don't receive as much testing as a service pack or cumulative update does, they can sometimes introduce new issues. For this reason, you should consider installing a hotfix only if it addresses a specific issue you have observed in your environment.
Note
Microsoft Support can help you determine if you need a specific hotfix. Hotfixes are usually described by a Microsoft Knowledgebase (KB) article. You can search the Microsoft Knowledgebase at http://support.microsoft.com/search/. Some hotfixes are available for download, and others require that you contact Microsoft Support to obtain access.
· General Distribution Release—A General Distribution Release (GDR) falls somewhere between a hotfix and a service pack. GDRs are also well-tested and supported but generally address a narrower set of issues than a service pack does.
· Feature packs—Feature packs are updates that Microsoft provides, which add or enhance new features to existing products. Some feature packs are available only to customers with MSDN Ultimate subscriptions. This is a way for Microsoft to add extra value to the subscription-based licensing.
· Team Foundation Server Power Tools—While not technically an update, the Microsoft Visual Studio Team Foundation Server Power Tools provide a great set of enhancements and utilities for increasing your productivity. You can download the power tools at http://aka.ms/TFS2013PowerTools.
Once you have the installation media, and have configured your operating system and necessary prerequisites, you can begin to install Team Foundation Server 2013.
Installing Team Foundation Server
Setting up Team Foundation Server 2013 can be divided into two distinct phases: installation and configuration. During the installation phase, the components are copied onto your machine. During the configuration phase, you decide which optional components to enable, which accounts to use for permissions, which SQL Server instance to use, and other such settings.
Note
A common practice within many organizations is to make use of a tool called Sysprep. This tool allows you to generalize an operating system and additional installed software, which makes it easier to deploy to multiple machines. However, not all software is compatible with the sysprepping process. One advantage of the dual-phase setup approach employed by Team Foundation Server is that you can now install it as part of a sysprepped image. Team Foundation Server configuration can then be deferred until after you have specialized your sysprepped image onto specific machines. Sysprepping Team Foundation Server 2013 after you have performed the configuration phase is not supported.
To begin the installation phase, download and run the web installer or load your Team Foundation Server installation media. If you are using an .iso file, this may mean virtually mounting your .iso file as a DVD, as explained earlier, and then running tfs_server.exe.
On the first (and only) preinstallation screen you will be able to change the installation path and accept the license terms, as shown in Figure 3.1. Once you have accepted the license terms, select Install Now. The setup program will then proceed to copy and install all the required files to your machine. This is a much more streamlined installation process than previous versions.
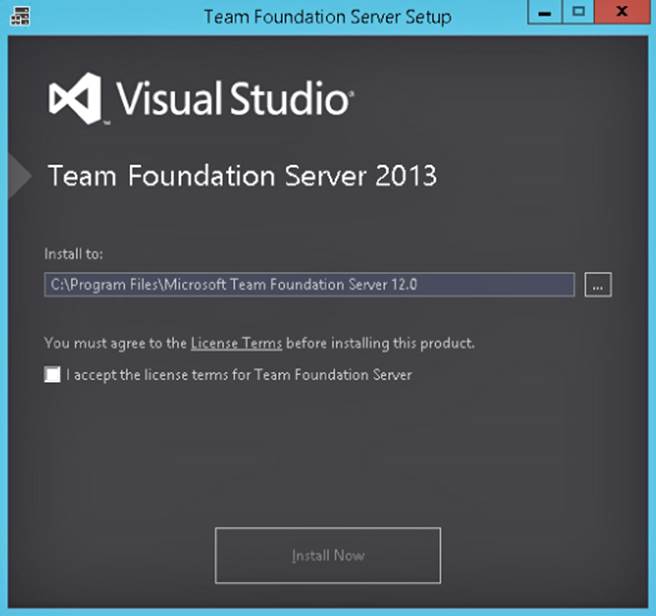
Figure 3.1 Team Foundation Server setup screen
After the installation phase is complete, the Team Foundation Server Configuration Center will be automatically started. If you close this tool, you can always launch it again by navigating to the start screen and choosing Team Foundation Server Administration Console. Then, after the console appears, click the component you want to configure (such as Application Tier or Build Configuration), and click Configure Installed Features.
Next, you will learn about the variety of installation types available to you via the Team Foundation Server Configuration Center.
Installation Types
Team Foundation Server includes several wizards for configuring your server. This provides you with a guided (yet flexible) way of picking the best configuration experience for your desired usage of Team Foundation Server. The individual wizards can be accessed along the left-hand side of the Configuration tool, as shown in Figure 3.2.
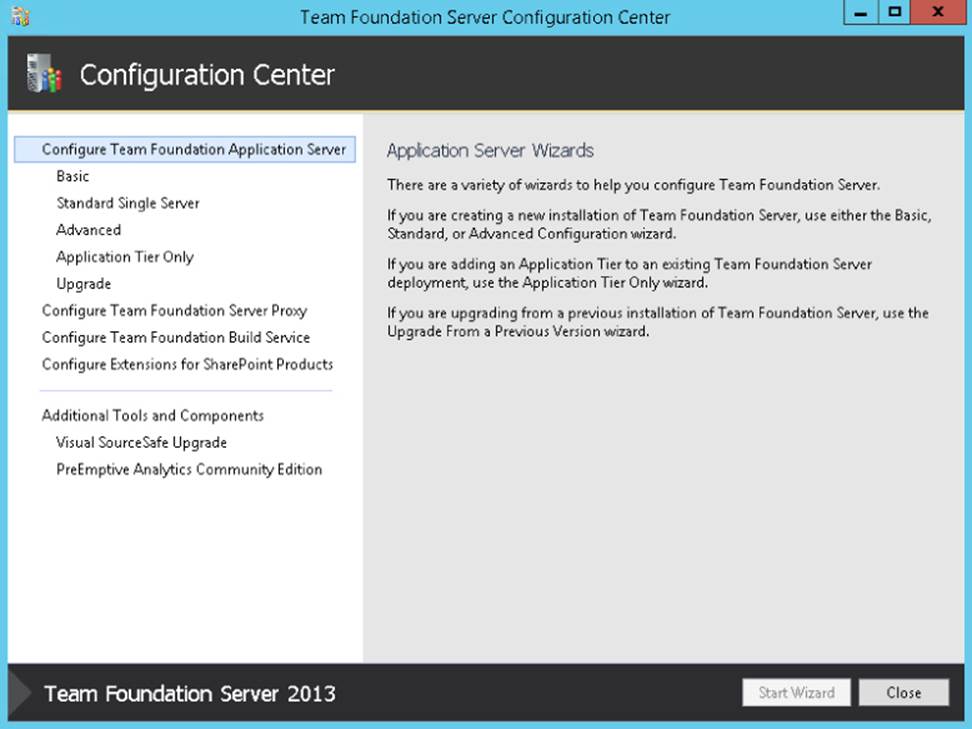
Figure 3.2 Team Foundation Server Configuration Center
The exact wizards available to you will depend on your operating system, and which components (if any) have already been configured (as indicated by a green check mark). Table 3.1 describes the individual wizards.
Table 3.1 Available Wizards
|
Wizard |
Description |
|
Basic |
The Basic Wizard is the quickest and easiest way to get up and running with Team Foundation Server for small teams. The Basic Wizard enables you to use source control, work-item tracking, test case management, and Lab Management. However, Reporting Services and SharePoint integration will not be available using the Basic Wizard. These two components can be added later if you are installing Team Foundation Server on a Windows Server operating system. With the Basic Wizard, you can use an existing SQL Server instance, or let Team Foundation Server install and configure SQL Server 2012 SP1 Express edition for you. |
|
Standard Single Server |
The Standard Single Server Wizard assumes that you are installing Team Foundation Server on a single server. This wizard enables you to use source control, work-item tracking, test case management, Lab Management, reporting, and SharePoint integration. You should not use this wizard if you want to install using remote SharePoint or SQL Server deployments, or if you want to use a version of SharePoint other than SharePoint Foundation 2013. |
|
Advanced |
The Advanced Wizard provides maximum flexibility for your configuration. It also provides the same capabilities of Team Foundation Server as the Standard Single Server Wizard does. But the Advanced Wizard allows you to define remote systems for SharePoint, SQL Server, and SQL Server Reporting Services. This wizard also allows you to configure Kerberos authentication, to use a non-default instance of SQL Server, and to use editions of SharePoint other than SharePoint Foundation 2013. Finally, the Advanced Wizard gives you the option of disabling Reporting Services and/or SharePoint integration altogether, though you can always add these components later. |
|
Application-Tier Only |
The Application-Tier Only Wizard can be used to configure Team Foundation Server in a high-availability environment, as described in Chapter 22. You can employ multiple application tier nodes to provide load balancing and fault tolerance for your deployment. This wizard can also be used if you are moving your Team Foundation Server application tier from one server to another, or in a disaster-recovery scenario, as described in Chapter 23. |
|
Upgrade |
The Upgrade Wizard is used if you are upgrading from a previous version of Team Foundation Server. Upgrading is described in Chapter 27. |
|
Configure Team Foundation Server Proxy |
This wizard can be used to configure this machine as a Team Foundation Server proxy server. More information on configuring proxy servers can be found in Chapter 28. |
|
Configure Team Foundation Build Service |
This wizard can be used if you want to configure this machine as a build controller and/or one or more build agents. Team Foundation Build is detailed in Part IV. |
|
Configure Extensions for SharePoint Products |
This wizard should be used if you are planning on configuring Team Foundation Server to integrate with SharePoint running on a remote machine, or in a remote SharePoint farm. If you are using a farm, you will need to run this wizard on every machine in that farm. |
The rest of this chapter uses the Basic Wizard as an example. If you are new to Team Foundation Server, you may want to consider using the Basic Wizard to set up your first Team Foundation Server deployment on a testing server. When you are ready to configure your actual Team Foundation Server deployment, you should spend some time reading the Team Foundation Server Installation Guide and Part V of this book to familiarize yourself with the various configuration types that are available, and map these to the needs of your development team.
For example, if you have a very large team, you may want to consider configuring Team Foundation Server in a dual-tier environment. If you have a geographically distributed team, you may want to set up Team Foundation Server proxy instances at remote sites. You may want to configure a dedicated build farm with multiple machines running build agents, and so on.
Next, you will begin a simple configuration using the Basic Wizard.
Configuring Team Foundation Server
From the Team Foundation Configuration tool, select the Basic Wizard and click Start Wizard. Click Next to advance past the Welcome page. You will be prompted to indicate which instance of SQL Server you want to use, as shown in Figure 3.3.
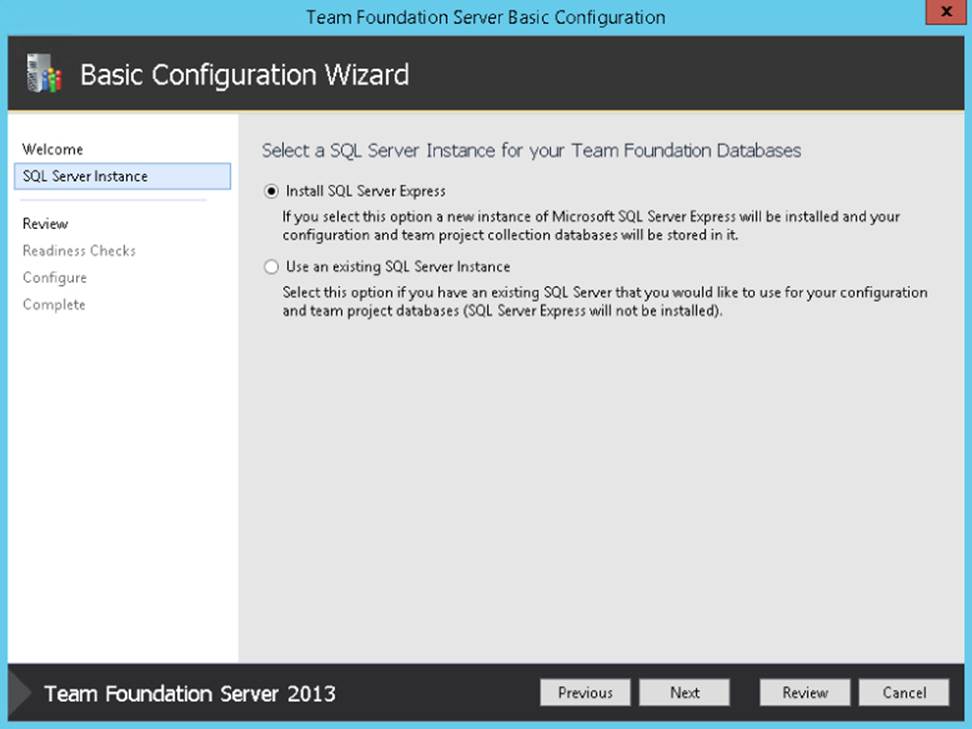
Figure 3.3 SQL Server instance selection page
You can choose an existing instance of SQL Server, or let the Basic Wizard install and configure SQL Server Express for you.
Note
Letting Team Foundation Server install and configure SQL Server Express is a quick way to get up and running, and it should work well for a test server. But for a production server, you should consider taking the time to install and configure SQL Server 2012 SP1 Standard edition (or higher, if you have licensed it separately). This will make it easier to take advantage of capabilities like Reporting Services later on, and it will enable you to avoid the 10GB database size limitation imposed by SQL Server 2012 Express Edition. The Team Foundation Server Installation Guide includes step-by-step instructions for installing SQL Server Standard edition for use with Team Foundation Server.
After selecting your SQL Server instance, click Next. You will be shown a list of the configuration settings you chose, such as those shown in Figure 3.4, and you will be given a chance to go back and make changes. The Basic Wizard has only a few pages, but other wizards have more.
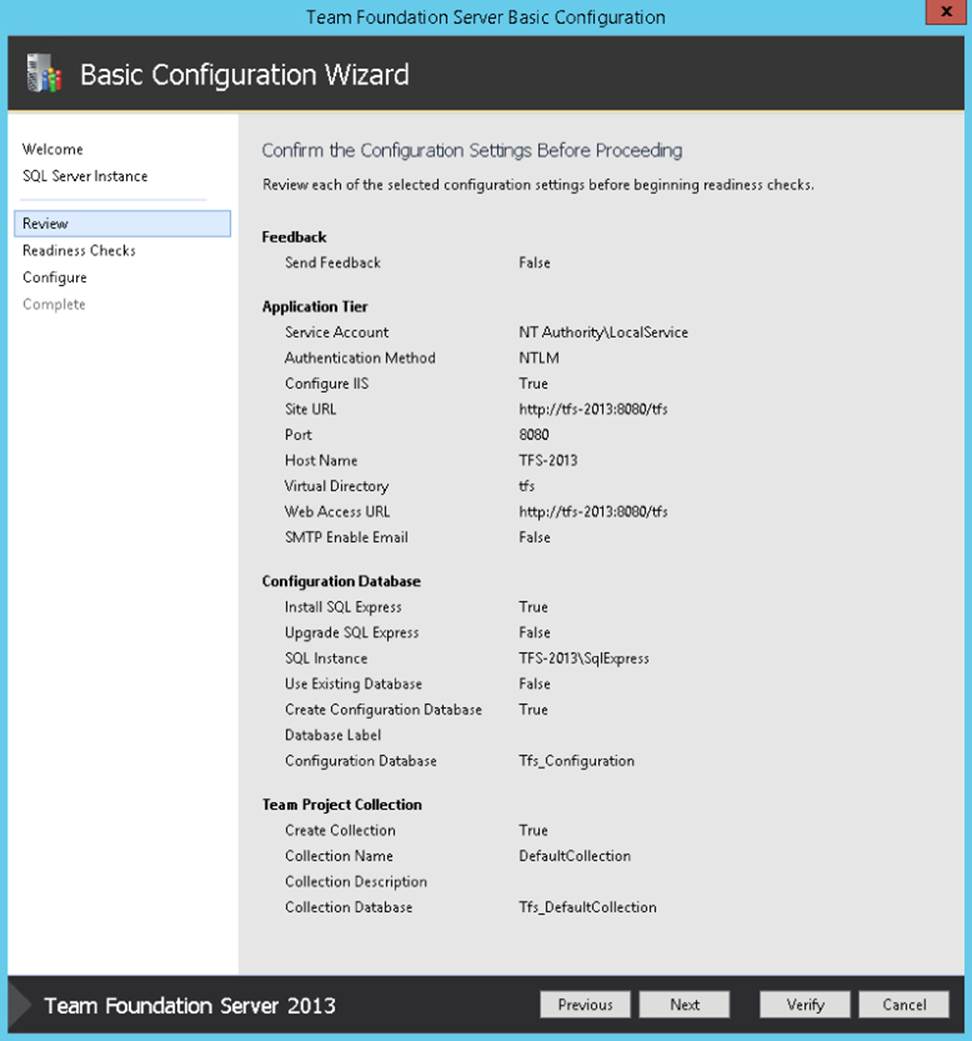
Figure 3.4 Configuration settings review screen
When you are satisfied with your options, click Next. (Clicking Verify will also have the same effect.) The wizard will attempt to verify that the changes you are proposing will be successful if you proceed.
It is worth noting that no changes are being made to your server at this time. This process can be valuable in helping you discover that you may be missing a prerequisite, or it can warn you that certain configuration changes are going to be made for you.
When this step has finished, you will see a screen similar to Figure 3.5. If there are potential problems with your configuration, you will be shown any errors or warnings, usually with information on how to address them.
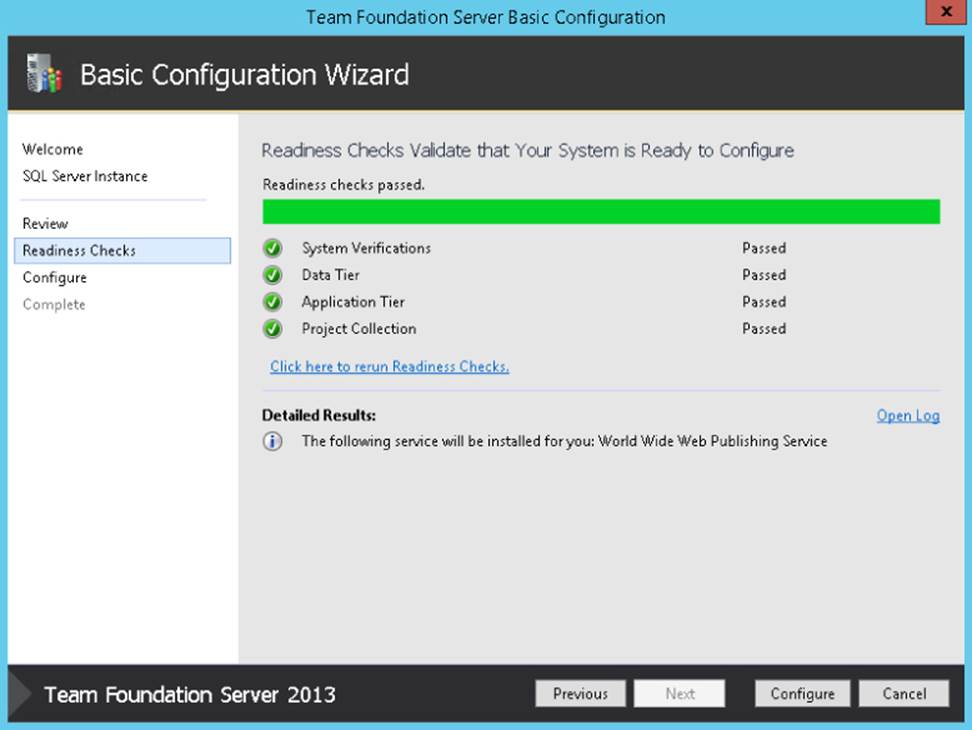
Figure 3.5 Readiness Checks page
Click Configure when you are ready to proceed with your configuration options. The wizard will attempt to configure Team Foundation Server using the options you selected. If you opted to install SQL Server Express as part of the configuration, this process may take several minutes. Otherwise, it should only take a few minutes.
When the configuration is finished, you should see a confirmation screen, as shown in Figure 3.6. Take note of any warnings or errors displayed on this page, as well as any informational notices (such as the message shown in Figure 3.6 indicating that an additional firewall port was opened during configuration). You can also access detailed log information by clicking the link at the bottom of this page of the wizard. Click Close when you are finished.
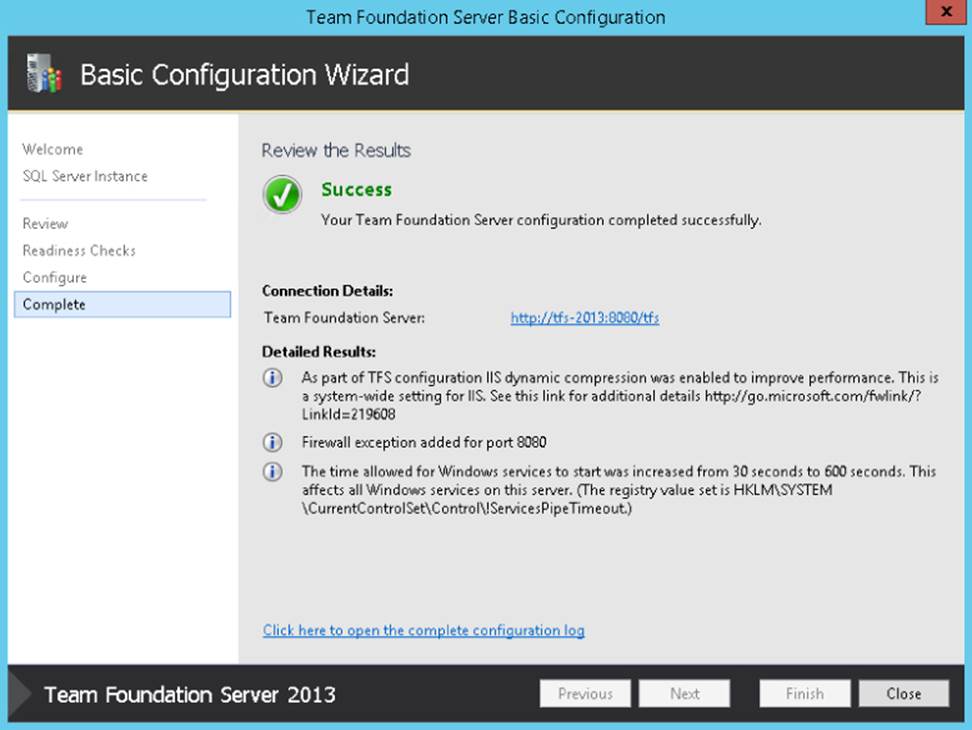
Figure 3.6 Configuration results page
At the conclusion of this step, you will have successfully configured an instance of Team Foundation Server 2013 on your machine. This instance is now running as a service, and you can begin to interact with it, or further configure it. You can even launch subsequent wizards from the Team Foundation Configuration Center, such as to configure a build controller and agent.
The Team Foundation Server Administration Console (shown in Figure 3.7) can now be used to monitor your server, to stop or start services, and to make additional configuration changes. Some common configuration changes include configuring a Simple Mail Transfer Protocol (SMTP) server (for e-mail alerts), enabling Kerberos authentication, assigning friendly names to the URLs used by clients to connect to Team Foundation Server, or adding a System Center Virtual Machine Manager (SCVMM) server to provide functionality for Lab Management.
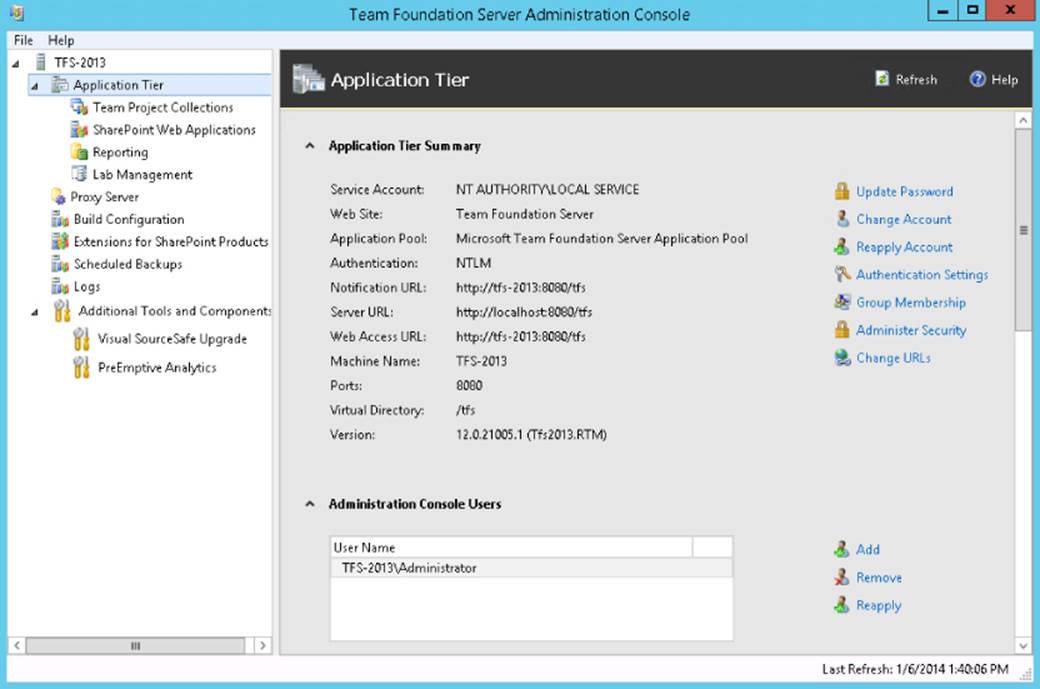
Figure 3.7 Team Foundation Server Administration Console
You may also want to add components that you skipped during the initial configuration, such as Reporting Services or SharePoint integration. The MSDN Library provides detailed instructions on how to perform all of these tasks, and more, athttp://aka.ms/TFS2013Manage.
Now that you have your Team Foundation Server instance deployed, you can create your first team project.
Creating Your First Team Project
A team project is the basic container of work used by Team Foundation Server. You will learn much more about team projects throughout the rest of this book. For now, you just need to know that you'll need to create a team project before you can store any source control, work items, or other artifacts in Team Foundation Server.
To create a team project with Team Foundation Server 2013, you must use Team Explorer 2013. Team Explorer 2013 is an add-on for Visual Studio 2013 that allows you to work with source control, work items, build definitions, and more, without ever leaving Visual Studio. Team Explorer also installs the necessary add-ins to work with Team Foundation Server 2013 from within Excel and Project. You will learn more about clients that can access Team Foundation Server 2013 in Chapter 4.
If you don't already have Team Explorer 2013 installed, you can either install it by itself (see the download link in the section, “What You'll Need,” earlier in this chapter), or install Visual Studio Professional 2013 (or higher) and Team Explorer will be included automatically.
After Team Explorer 2013 is installed, launch Visual Studio 2013 from the Start screen.
Note
Even if you installed Team Explorer 2013 standalone, instead of as part of Visual Studio Professional 2013 (or higher), you will still access Team Explorer 2013 from within the Visual Studio 2013 shell. This is why you access Team Explorer 2013 by opening Visual Studio 2013 from the Start screen.
If the Team Explorer window is not already visible within Visual Studio, you can enable it by clicking View ![]() Team Explorer. Team Explorer is shown in Figure 3.8. If this is the first time you have used this Team Foundation Server instance, you may be prompted to set up your Workspace mappings. You can do this now, or wait until you have a Team Project set up.
Team Explorer. Team Explorer is shown in Figure 3.8. If this is the first time you have used this Team Foundation Server instance, you may be prompted to set up your Workspace mappings. You can do this now, or wait until you have a Team Project set up.
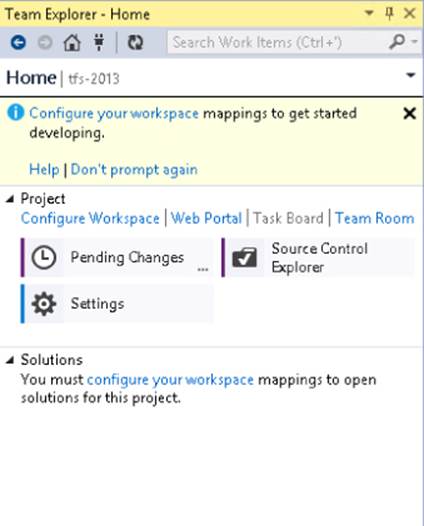
Figure 3.8 Team Explorer window
If you installed Team Explorer on the same machine as your Team Foundation Server 2013 deployment, your server name may already be populated for you (indicated by localhost or the computer name, as shown in Figure 3.8).
If you installed Team Explorer on a different machine, you should add your Team Foundation Server host manually by clicking the Select Team Projects link (near the top of the Team Explorer window). From the Connect to Team Foundation Server dialog box, click Servers to add a new server. Click Add and supply the address of your Team Foundation Server. You can find this in the Team Foundation Server Administration Console under Application Tier ![]() Server URL (such as http://tfs:8080/tfs).
Server URL (such as http://tfs:8080/tfs).
After you have added your server, click OK to close the first window, then click Close to close the next window, and then select the server you want to connect to in the drop-down box for “Select a Team Foundation Server.” If you used the Basic configuration, you will have a single team Project Collection called DefaultCollection. Select this collection and click Connect.
Note
A team Project Collection provides a way of grouping together one or more team projects. You learn more about team Project Collections later in this book.
Click File ![]() New
New ![]() Team Project to launch the New Team Project Wizard shown in Figure 3.9. Provide a name for your team project and, optionally, a description. Click Next when finished.
Team Project to launch the New Team Project Wizard shown in Figure 3.9. Provide a name for your team project and, optionally, a description. Click Next when finished.
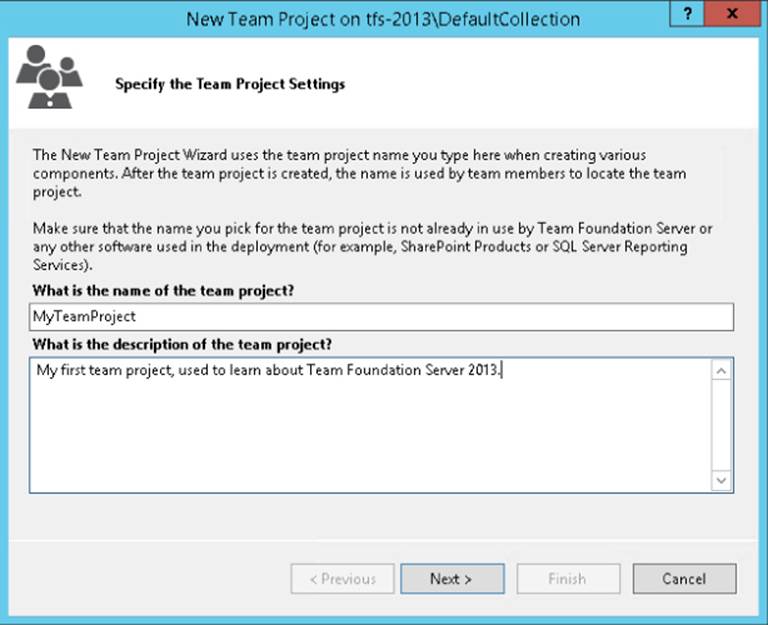
Figure 3.9 New Team Project Wizard
You will then be prompted to select the process template that you want to use for this new team project, and afterward, you will be asked how you want to configure source control for your project. For now, you can accept the default options and click Finish. The wizard will spend a few minutes creating your team project.
When you are finished, the Team Explorer window will display your team project, as shown in Figure 3.10. The appearance will differ depending on which source control option you chose in the previous wizard. You can now begin creating work items, source control, build definitions, and so on for this team project.
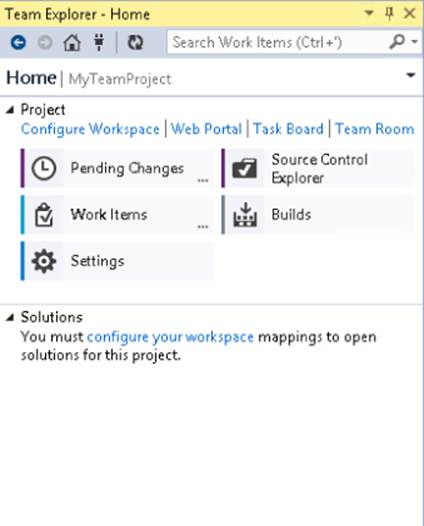
Figure 3.10 New team project
Configuring Friendly DNS Names
If you have followed the previous steps, then you now have a Team Foundation Server deployment that you can share with your team. You can start adding users to security groups (as explained in Chapter 24), and these users can begin connecting to your server. However, as mentioned in Chapter 2, there's one additional configuration step that you may want to take before advertising the address of your server, and that is to consider assigning friendly DNS names to the endpoints.
Refer to Chapter 2 for instructions on how to configure friendly DNS names for your Team Foundation Server endpoints. You can perform this step at any time in the future, but doing so now (before your server is being used) means your clients will only ever need to use these names.
Summary
In this chapter, you learned how to install and configure a simple Team Foundation Server 2013 instance. Along the way, you learned about the incremental improvements Microsoft has made to installation and configuration in this release, such as a lightweight web installer. You also learned how to create a team project, which will become the basic container of work for your software development project.
In Chapter 4, you will learn more about the various client applications you can use to work with Team Foundation Server.
All materials on the site are licensed Creative Commons Attribution-Sharealike 3.0 Unported CC BY-SA 3.0 & GNU Free Documentation License (GFDL)
If you are the copyright holder of any material contained on our site and intend to remove it, please contact our site administrator for approval.
© 2016-2025 All site design rights belong to S.Y.A.