Professional Team Foundation Server 2013 (2013)
Part I
Getting Started
Chapter 4
Connecting to Team Foundation Server
What's in this chapter?
· Understanding the basic Team Foundation Server architecture
· Understanding Team Foundation Server URLs
· Getting to know Team Foundation Server roles and security
· Connecting to Team Foundation Server from various development tools
· Understanding Team Explorer concepts, tools, and windows
At this point, you should now have a working Team Foundation Server Project Collection—either one that you have installed yourself using the instructions in Chapter 3 or one that has been provided for you. This chapter teaches you how to connect to an instance from the various products that can talk to Team Foundation Server; you also learn about some common troubleshooting techniques if you are unable to connect. But first, some more information on the Team Foundation Server architecture would be useful.
Team Foundation Server Architecture
Figure 4.1 shows the major logical servers available in a Team Foundation Server installation. The main Team Foundation Server application is hosted on the application tier. The initial contact from the client machine on your desktop is made to this application tier (AT) machine. From this, the client machine obtains all the other connection information to allow it to talk to the other components involved in a typical Team Foundation Server installation (the SharePoint portal, Analysis Services for reports, and so on).
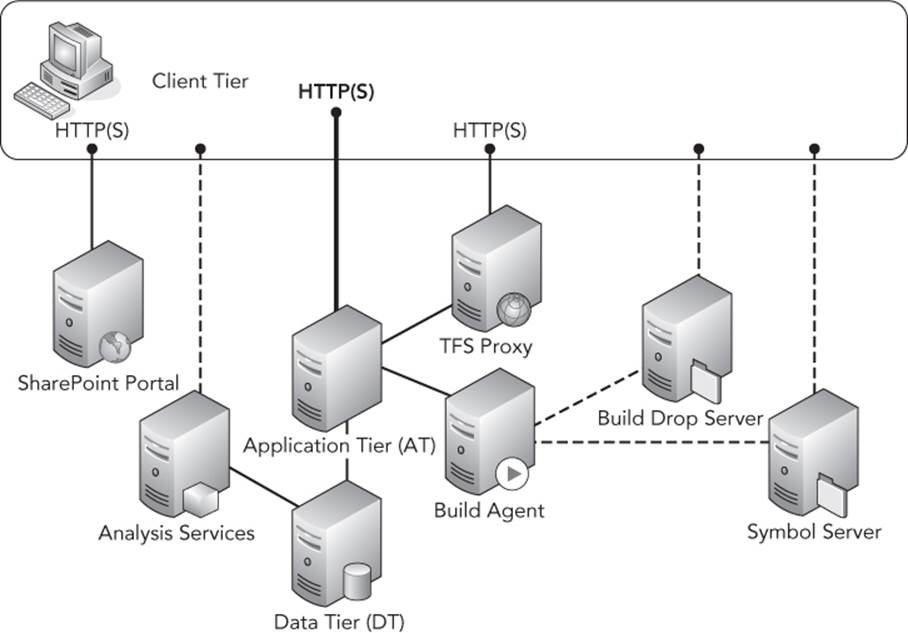
Figure 4.1 Logical architecture of a Team Foundation Server installation
Note
For more detailed information on Team Foundation Server architecture and administration, see Chapter 21.
Communication between the client and the application tier is performed using the Team Foundation Server Web Service Protocol. This is made up of a set of web services to which the client connects using the HTTP or HTTPS protocol, depending on how the application tier was configured. Authentication of the client connection is performed using Windows Integrated Authentication (also known as NTLM), Kerberos, or, if over an SSL/TLS encrypted connection, then Basic Authentication may be used.
For an on-premises Team Foundation Server, Windows Integrated Authentication is the typical form of authentication, unless the server has been explicitly configured otherwise. For Visual Studio Online, Internet identities (for example, Microsoft Account) and claims-based authentication are used. If using distributed version control, Basic Authentication will be used for Git operations.
On a Windows-based client machine, the client's default credentials for that server are used—usually the same credentials used to log in to the Windows machine in a domain environment. This provides for a seamless, single sign-on (SSO) capability.
You normally use the same credentials to talk to Team Foundation Server that you use to log in to your Windows workstation, and all the actions you perform against Team Foundation Server are audited against these credentials. On non-Windows machines, the credentials (domain, user name, and password) can be provided to allow authentication, or Kerberos can be configured if you require SSO infrastructure in your heterogeneous environments.
The majority of client/server communication in a Team Foundation Server instance is over HTTP or HTTPS. This is true for all the version control, work item tracking, SharePoint, and Reporting Services data. The exceptions to this are for connecting directly to the data warehouse running in Analysis Services from an analytics client (such as Microsoft Excel) or when communicating with the build drop location or Symbol server.
Note
See Chapter 18 for more information on builds and Symbol servers.
In addition to the application tier machine address, clients may also need to be configured with the address of a Team Foundation Server Proxy if used for remote development. A Team Foundation Server Proxy provides a way to cache requests for files from version control and test attachments. If two developers in a remote site request the same version of the same file, then the proxy server allows for the second developer to be served the file from the local proxy, rather than having to download the files over the wide area network (WAN) a second time.
Note
For more information on the Team Foundation Server Proxy and working with geographically distributed teams, see Chapter 28.
Addressing Team Foundation Server
A Team Foundation Server instance is referred to by the URL at which the actual application hosting Team Foundation Server is located. Figure 4.2 shows the basic makeup when connecting to Team Foundation Server.
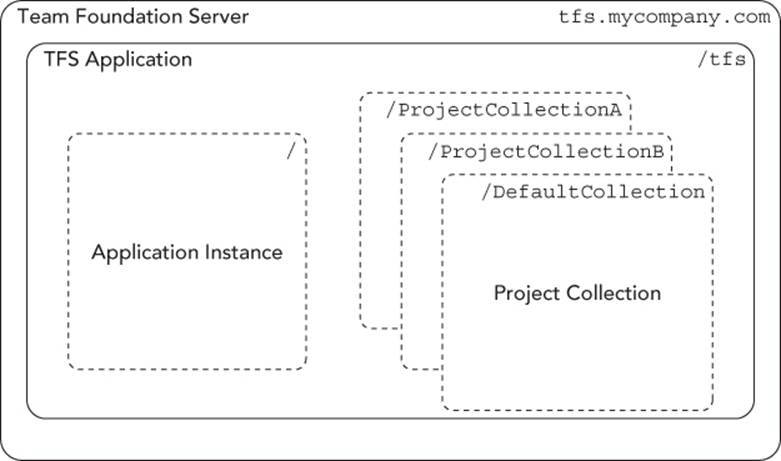
Figure 4.2 Team Foundation Server URL scheme
The URL is in the following format:
<protocol>://<serverName>:<port>/<virtualDirectory>/<collectionName>
The following is an explanation of the individual parts of the URL:
· protocol—This is the means used to connect to Team Foundation Server (HTTP or HTTPS).
· serverName—This is the Domain Name Server (DNS) name pointing to your Team Foundation Server application tier instance (or the network load balancer in front of it, if you are using a high-availability architecture). Note that the DNS name can be a friendly name that has been created in your organization to help locate the server. It doesn't have to be the actual machine name of your application tier. Also, if you ever plan on accessing the connection from outside of your company network (over the Internet), ensure that you use the fully qualified domain name such as tfs.mycompany.com.
· port—This is the port used to connect to the application tier. In a default installation, this is port 8080. The port can be omitted if it is the standard port for the protocol (that is, port 80 for HTTP or port 443 for HTTPS).
· virtualDirectory—This is the path in which the Team Foundation Server application was installed. By default, this is tfs. The virtualDirectory was added in Team Foundation Server 2010. In previous versions, the application was always installed at the root of the website that was hosting the application. However, in the 2010 release, this was moved down into the tfs folder to make it easier to host Team Foundation Server on the same default website as other applications on the server (such as SharePoint and the Reporting Services sites). This makes it significantly easier to have Team Foundation Server running on the standard port 80 or port 443, which, in turn, makes it much easier to make accessible over the Internet.
Note
See Chapter 3 for more information on installation.
· collectionName—This is the name of the project collection to which you are connecting. By default, Team Foundation Server has at least one project collection created—usually called DefaultCollection. However, as discussed in Chapter 3 and covered in depth in Chapter 21, multiple project collections can be created. In a graphical client such as Visual Studio or Eclipse, providing the URL of the Team Foundation Server instance is sufficient, and the user interface will then present the available project collections on that instance that are available for you to connect to. However, for many command-line tools, the full URL to your project collection is required. If the collectionName is missing, the server will assume that the collection marked as default is the desired one and will direct requests to it. If no collection is marked as default, then the URL will result in an error.
Following are some example URLs to connect to Team Foundation Server:
· http://vsalm:8080/tfs
· http://vsalm:8080/tfs/DefaultCollection
· http://vsalm:8080/tfs/AdventureWorks
· https://tfs.codeplex.com/tfs/TFS01
· https://mycompany.visualstudio.com/
· https://tfs.mycompany.com/tfs
Note that most of these URLs are not valid directly in a web browser. They are used as the root of the URL that the Team Foundation Server client uses to locate and communicate with the web services of that server instance. However, if you specify only thevirtualDirectory part of the URL, or if the special name of web is used, this will redirect you to a web-based client for Team Foundation Server called Team Web Access (for example, http://vsalm:8080/tfs/, or https://tfs.mycompany.com/tfs/).
Note
See the section “Accessing Team Foundation Server Through a Web Browser” later in this chapter for more information on Team Web Access.
Introducing Team Foundation Server Security and Roles
The significant functionality that Team Foundation Server has in relation to security, groups, and permissions can be very daunting at first. However, at its core, there are a few simple concepts to initially be aware of with Team Foundation Server security:
· Users
· Groups
· Permissions
Note
For detailed information about Team Foundation Server security, see Chapter 24.
Users
The on-premises version of Team Foundation Server uses Windows accounts for security. There is no separate concept of a Team Foundation Server user—just a Windows user who has permission to use Team Foundation Server resources. If Team Foundation Server is in an Active Directory environment (the preferred configuration), domain users can be granted permission to use Team Foundation Server. Local users may also be used (users defined locally to that machine in what is considered “Workgroup mode”).
When you install Team Foundation Server, the user who installs and configures the product is required to have administrative permissions on the server. By default, that user is also granted the permissions of a Team Foundation Server administrator within the product.
The user details (user name, display name, e-mail address, and so on) are all taken from the Windows user details. Authentication of the users is performed using Windows authentication. This means that there is no separate infrastructure required to create or administer users specifically for Team Foundation Server. Existing user creation systems inside the company can be used, along with the handling of password policies, password resets, and so on.
Groups
Team Foundation Server has two types of groups that you must be concerned with:
· Windows security groups (domain, distribution, or local groups)
· Team Foundation Server groups
As you will learn in Chapter 24, the Windows security groups are basically a collection of users maintained by the Windows security systems. For example, to complete the installation of Team Foundation Server as described in Chapter 3, the user must be in the local Administrators group on the server.
Team Foundation Server has its own group structure maintained in the server. Within the system, there are three levels of groups:
· Server groups
· Team project collection groups
· Team project groups
Server groups impact the Team Foundation Server instance and are one of the few things in Team Foundation Server that cross the boundary between project collections. The default groups (detailed in Chapter 24) have hard-coded names that cannot be changed or removed from the server (for example, Team Foundation Administrators or Team Foundation Valid Users).
A user who is a member of the server group has permissions at the Team Foundation instance level. For example, users in the Team Foundation Administrators group can create new project collections. Users in the Team Foundation Valid Users group can connect to the Team Foundation Server instance and view which project collections are available (but they might not have permission to actually connect to a particular project collection). Modifications of the server groups must be performed using the Team Foundation Server Administration Console, as introduced in Chapter 3.
Team project collection groups are created as part of the collection creation process. The default groups and their members are detailed in Chapter 24. However, they control who is an administrator for the project collection, who can connect and use it, and so on.
Finally, team project groups control who can do what inside a particular team project. The main groups are as follows:
· Project Administrators—Members can perform all operations in the team project, including the assignment of security permissions to other users.
· Contributors—Members can add, modify, and delete items within the team project. You typically want your main development group for a team project to be a contributor.
· Readers—Members have read-only access to data in the team project.
· Build Administrators—Members have the ability to manage all aspects of test environments, configurations, and test runs.
A Team Foundation Server group membership is made up of Windows users and groups, or other Team Foundation Server groups. At each level, custom groups can be created and allocated certain permissions.
Permissions
Each user or group in Team Foundation Server can be allocated one or more of nearly 100 separate permissions available on the server controlling each aspect of the product. Each permission has an explicit Allow or Deny state.
Typically, when getting started with Team Foundation Server, you should stick with controlling access to the server by placing a user in one of the team project groups. Members of those groups then inherit a default set of permissions from, and get assigned into, other groups (such as the Team Foundation Valid Users group), allowing them to connect to the Team Foundation Server instance.
Note
For more information about fine-grained control of users' permissions over the default Team Project Administrator, Contributor, or Reader, see Chapter 24.
Team Explorer
Visual Studio Team Explorer is the client interface to Team Foundation Server. It provides the functionality necessary to be able to connect to and work with Team Foundation Server. All Visual Studio editions now include the Team Explorer client as part of the default installation. Team Explorer Everywhere is also available to provide the client-side interface in the Eclipse IDE and cross-platform environments (on Mac, UNIX, or Linux machines).
Visual Studio Team Explorer is also available as a separate installation on the Team Foundation Server installation media, on the Team Explorer Everywhere media, or as a separate download. If installed on a machine without Visual Studio installed, it will install a cut-down version of Visual Studio (known as Visual Studio Shell), and, inside that, it will provide all the rich client-side functionality to work with Team Foundation Server.
Use of Team Explorer and Team Explorer Everywhere is covered by the Client Access License (CAL) required for a specific user to connect to Team Foundation Server, regardless of the number of machines from which the user connects.
Understanding Team Explorer in Visual Studio
By now, you should have provisioned a Team Foundation Server instance with a project collection and team project created by doing one of the following:
· Installing one yourself (following the instructions in Chapter 3)
· Downloading a trial virtual machine (VM) from Microsoft
· Signing up to Visual Studio Online
· Leasing a hosted Team Foundation Server solution from a hosting provider
You must now connect to your Team Foundation Server instance from the machine that you want to use for development.
Connecting to Team Foundation Server 2013 from Visual Studio 2013
The most common initial route is to attempt to connect to Team Foundation Server 2013 from Visual Studio 2013. Luckily, there are many ways to get connected.
You can click Team ![]() Connect to Team Foundation Server, or, from the Start page in Visual Studio, click the Open from Source Control link on the left-hand side. An alternative to Team Explorer is to click View
Connect to Team Foundation Server, or, from the Start page in Visual Studio, click the Open from Source Control link on the left-hand side. An alternative to Team Explorer is to click View ![]() Team Explorer, use Projects
Team Explorer, use Projects ![]() Connect to Team Projects in the header drop-down, and then click the Select Team Projects link.
Connect to Team Projects in the header drop-down, and then click the Select Team Projects link.
Whatever way you use to connect, you are then presented with a rather dauntingly empty Connect to Team Project dialog box, as shown in Figure 4.3.
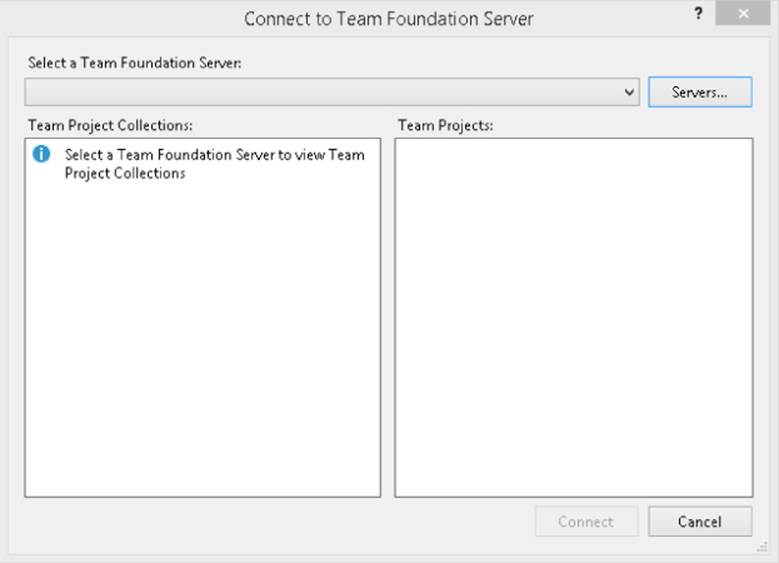
Figure 4.3 Connect to Team Project dialog box
Typically, at this point, the drop-down to select a Team Foundation Server will also be empty. To add your server to the list, click the Servers button. This presents yet another empty dialog box—the Add/Remove Team Foundation Server dialog box. Click the Add button.
Finally, you can enter the details of the Team Foundation Server instance to which you wish to connect. Enter the name of your Team Foundation Server instance (vsalm or tfs.mycompany.com). At the bottom of the dialog box shown in Figure 4.4, you will be given a preview of the URL that will be used to connect to the Team Foundation Server.
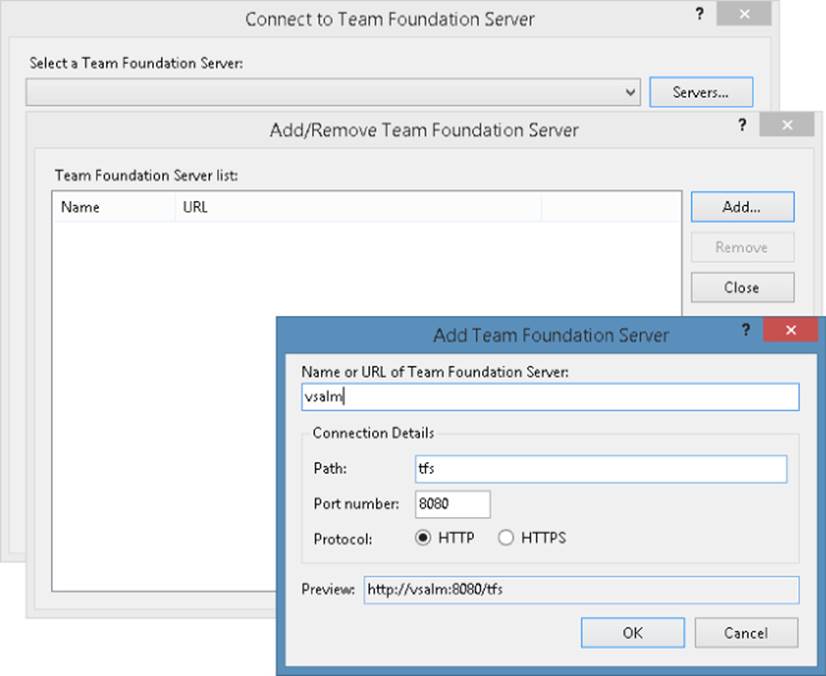
Figure 4.4 Add Team Foundation Server dialog box
For a default install of Team Foundation Server, this URL will be correct, as long as you have typed in the correct name for the server. However, if the URL is not correct (for example, you need to use HTTPS instead of HTTP, or perhaps you need to connect on a different port), you must alter the settings accordingly. Alternatively, if you have the URL that you should use to connect to your server, type it into the Name box at the top of the dialog box, and all the appropriate settings will be picked up.
Click OK to add the server to the list, and then click Close to get back to the Connect to Team Project dialog box. The dialog box should now be populated and a bit more welcoming. The example shown in Figure 4.5 is a more typical view of the dialog box once a few team projects and an additional team project collection have been created.
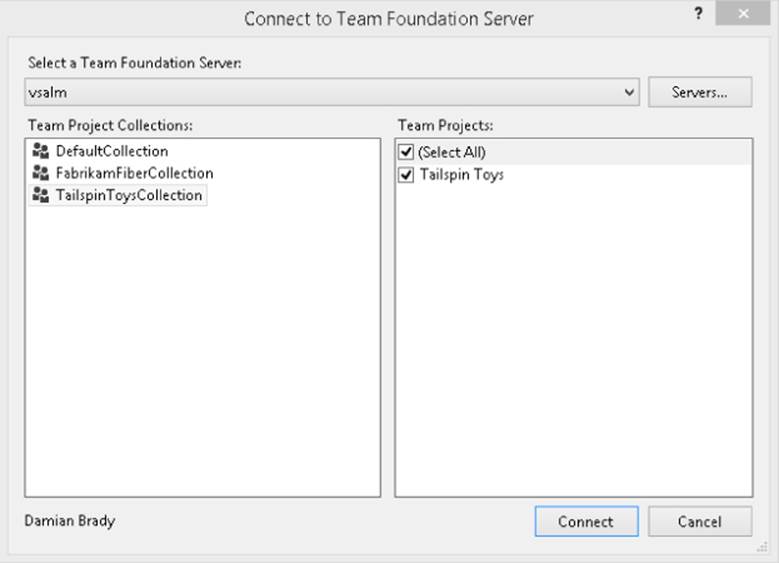
Figure 4.5 Populated version of the Connect to Team Project dialog box
Selecting a project collection on the left-hand side of the Connect to Team Project dialog box shown in Figure 4.5 gets Visual Studio to request the team projects available on that project collection. If you check the team project (or projects) check box and then click Connect, you control which team projects are displayed in Team Explorer. Note that while you are selecting the team projects at this point, it is actually the project collection that you are connecting to.
Storing Your Team Foundation Server Password on Windows
On Windows-based systems, the default credentials for that site are used when connecting to Team Foundation Server. These are usually your Windows login credentials, which provide for a seamless SSO experience inside a domain.
However, sometimes you must log in to Team Foundation Server using a different set of credentials. This is especially true in the case where your Team Foundation Server is being hosted over the Internet in a different domain from the one you are logged in to. In situations in which the default credentials are not appropriate, Team Explorer will prompt you for your user name and password using the standard Windows authentication prompt.
You can also store these credentials so that they are always used for that server by Windows. On Windows 7 and later, click Start (or press the Windows key on your keyboard), and then type Credential Manager. Once there, add the Team Foundation Server instance that contains your project with the domain, user name, and password that you should use. You can also manage network passwords using the command-line tool CMDKEY.exe.
Team Explorer
Once connected, you should now see Team Explorer inside Visual Studio, as shown in Figure 4.6. If you do not see Team Explorer, go to View ![]() Team Explorer.
Team Explorer.

Figure 4.6 Team Explorer inside Visual Studio
The Team Explorer View has five buttons along the top:
· Forward and Back—Enables you to navigate between the different sections of Team Explorer
· Home—Returns Team Explorer to the home screen from which all other screens can be accessed
· Connect—Takes you to the Connect page in Team Explorer where you can choose which Team Project to work with
· Refresh—Re-requests the data in the Team Explorer view from Team Foundation Server. The data can take a while to populate
At the top of the Team Explorer View, you see the team project to which you are connected. You can be connected to only one team project and therefore one project collection at a time from Visual Studio, and you must use the Team ![]() Connect to Team Foundation Server link or the Connect page in Team Explorer to swap connections.
Connect to Team Foundation Server link or the Connect page in Team Explorer to swap connections.
Directly underneath the Team Project is an information section that will appear whenever an action is required. Under that are links and tiles that provide shortcuts to Team Web Access and pages within Team Explorer.
The links available to you will depend on the current state of your workspace. With Team Foundation Server 2013, at a minimum you will see a link to the Web Portal, the Task Board, and the Team Room.
Under these links are tiles for the major areas of Team Explorer. The first of these tiles is for the My Work section. This section is available only if you have Visual Studio Ultimate, Premium, or Test Professional edition installed.
After My Work are links to the different pages that represent the different parts of the system. The different pages or contexts available in Team Explorer are:
· My Work—Manage, suspend, and resume your work in progress and request a code review (see Chapter 6 for more information).
· Pending Changes—Work with pending changes, shelvesets, conflicts, and perform other version control tasks (see Chapters 6 and 7 for more information).
· Source Control Explorer—View and manage the source code tree for the project collection (see Chapter 11 for more information).
· Work Items—Add work items and view and manage work item queries (see Chapter 12 for more information).
· Builds—Create, modify, manage, and organize build processes (see Chapter 18 for more information).
· Settings—Manage the configuration of team projects and team project collections (see Chapter 21 for more information).
Note
For a detailed explanation of compatibility between versions of the client and server, along with what was addressed in each version, see the article at http://tinyurl.com/Tfs2013Compat.
Prior Visual Studio Versions
Before Visual Studio 2005, the source control programming interface popularized by Visual Studio was MSSCCI (Microsoft Source Code Control Interface, pronounced “miss-key”). The MSSCCI specification was originally designed for the Visual Studio integration with Visual SourceSafe (VSS) but was implemented by other development tool manufacturers, and implemented by other version control tool vendors.
When Team Foundation Server 2012 was released, the product team decided not to issue a compatibility patch for Visual Studio 2005. This incompatibility carries through to Team Foundation Server 2013. There is, however, an updated MSSCCI provider that works for this combination.
The Team Foundation Server team also makes an MSSCCI provider available on the Visual Studio Gallery at http://aka.ms/TfsMSSCCI. The MSSCCI provider requires that the corresponding version of Team Explorer be installed on the machine. A 64-bit version of the MSSCCI provider is also available.
Connecting to Team Foundation Server from Eclipse and Cross-Platform
As part of the Team Foundation Server 2013 release, Microsoft updated Team Explorer Everywhere. Team Explorer Everywhere contains two major components:
· Team Foundation Server plug-in for Eclipse
· Team Foundation Server cross-platform command-line client
While the full name of the product is actually Team Explorer Everywhere 2013 for Team Foundation Server 2013, it can work against the 2013, 2012, and 2010 versions of the server. Therefore, we recommend that you upgrade and install the latest version of Team Explorer Everywhere regardless of the Team Foundation Server version you currently have installed.
Unusually for a product in the Microsoft Visual Studio organization, Team Explorer Everywhere is written in Java and is supported across the major platforms, including Windows, Mac OS X, and forms of UNIX (such as Linux, HP-UX, Solaris, and AIX).
Team Foundation Server Plug-In for Eclipse
The plug-in for Eclipse provided as part of Team Explorer Everywhere installs as a standard Repository Provider plug-in inside development environments based on Eclipse 3.4 and above. This not only includes the latest versions of the standalone Eclipse IDE, but also tools such as Rational Application Developer, Adobe FlexBuilder, MyEclipse, and so on, as well as tooling to support embedded development. By providing the functionality as a standard plug-in to Eclipse written using 100 percent Java technologies like the rest of the Eclipse IDE, the plug-in is very easy to install and use for developers used to other version control providers in Eclipse.
As shown in Figure 4.7, Team Explorer Everywhere provides more than just version control capabilities to Eclipse. The entire Team Explorer 2013 experience as described earlier in this chapter is provided to Eclipse developers, meaning that all parts of a development organization can be peers when using Team Foundation Server to manage the development life cycle. Team Foundation Server treats source code or any other file as just a file. From a version control point of view, all code is created equal as far as Team Foundation Server is concerned.
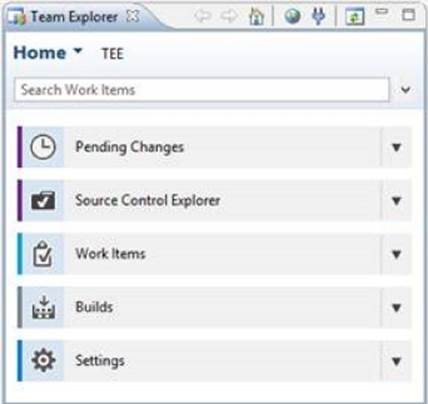
Figure 4.7 Team Explorer Everywhere within Eclipse
The plug-in for Eclipse is installed from the Team Explorer Everywhere media, or via a download of the plug-in update site archive.
Note
To install the Team Foundation Server plug-in for Eclipse, simply use the following update site in Eclipse (or install from the Eclipse Marketplace). This will ensure that you always have the latest released version of the plug-in installed:http://dl.microsoft.com/eclipse/tfs.
If you would like to run the latest public pre-release version of the Eclipse plug-in, you can use the update site at http://dl.microsoft.com/eclipse/tfs/preview instead.
For further information on getting started with version control using the Eclipse integration, see Chapter 6. Building Java applications using Team Foundation Server is also covered in Chapter 18.
Cross-Platform Command-Line Client for Team Foundation Server
Team Explorer Everywhere also provides you with the ability to perform version control operations with many UNIX and Linux style operating systems using the cross-platform command-line client for Team Foundation Server (tf), as shown in Figure 4.8.
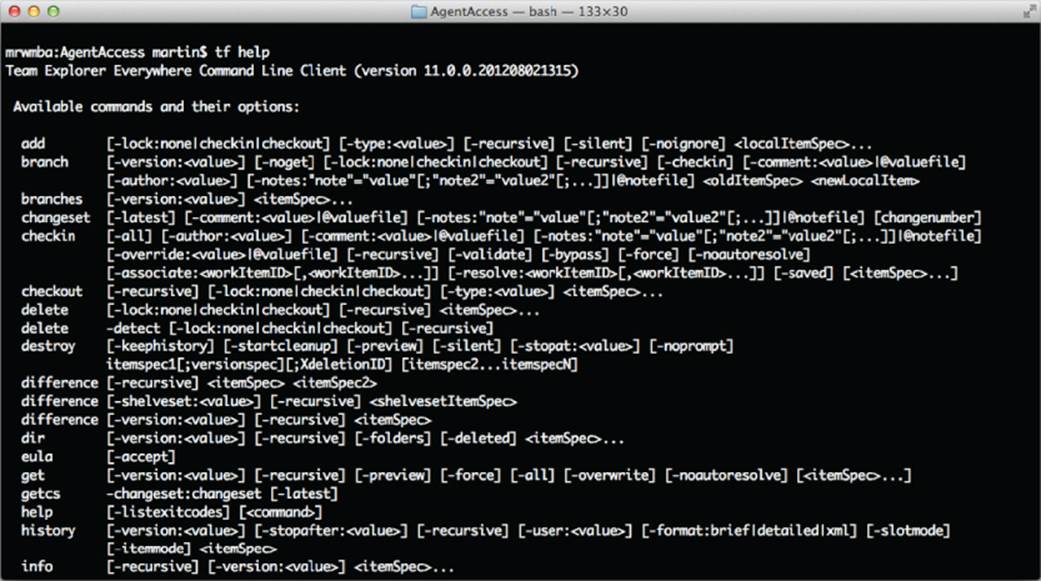
Figure 4.8 Cross-platform command-line client on Mac OS X
The command syntax is very similar to the version control command-line tool (tf.exe) installed on Windows as part of the Team Explorer installation. This allows for tools and scripts to be written against both flavors of the tool.
Use Hyphens for Maximum Portability
The Team Foundation Version Control command line accepts a number of parameters for each command. In most of the documentation and examples, parameters are prefixed by a forward slash character (/collection:TeamProjectCollectionUrl). However, in many UNIX shells, the forward slash character is an escape character. This means that, to actually pass a forward slash through to the tf command, you would need to escape it (usually with another forward slash).
To avoid this confusion, all versions of the command-line client are capable of accepting a hyphen or a forward slash to prefix a parameter. For example, -collection:TeamProjectCollectionUrl is a valid way to pass in the collection URL on both Windows and in all UNIX shells.
Therefore, if you are writing a script or a tool that makes use of the command line, use hyphens to ensure that the tool can run more easily on all platforms.
Alternate Ways to Connect to Team Foundation Server
Besides installing Team Explorer or Team Explorer Everywhere, there are many other ways of connecting to Team Foundation Server. On the server itself, there is the Team Foundation Server Administration Console. But from the client, there are many different connectivity options, depending on what you want to do.
Accessing Team Foundation Server through a Web Browser
In Team Foundation Server 2013, an easy-to-use web-based client called Team Web Access (TWA) is installed by default on the application tier machines, and it is available under a special web directory under the virtualPath (http://vsalm:8080/tfs/web). This web-based client was completely rewritten in Team Foundation Server 2012. As shown in Figure 4.9, TWA is ideal for users who do not wish to install a dedicated Team Foundation Server client. It requires no additional software to be installed on the client machine, other than a modern web browser (the site works in Firefox, Safari, and Chrome, as well as Internet Explorer). It is also used in many places to provide a link that can be used to point to data in Team Foundation Server—for example, when passing around a link to a work item or shelveset.
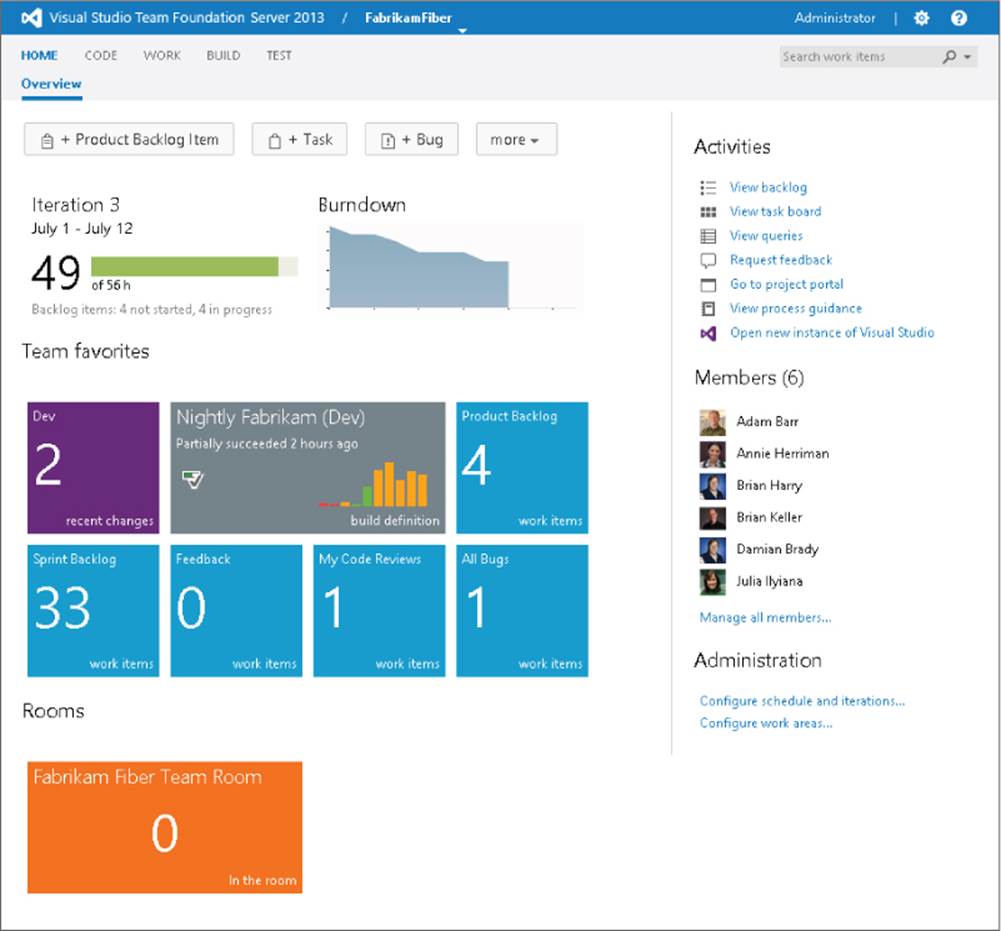
Figure 4.9 Team Web Access
At a high level, the following functionality is provided by TWA:
· Managing and prioritizing features, the Product Backlog, Sprint Backlog, and Task Boards
· Creating and editing work items and work item queries
· Managing areas, iterations, teams, groups, and security
· Managing e-mail alert subscriptions
· Read-only access to version control (including Source Control Explorer) as well as shelvesets, and the capability to compare and comment on versions of files in version control
· Queuing and managing build definitions
· Managing and running test cases and test suites
· Communicating via Team Rooms
When you initially browse to TWA, you are prompted to select which Team Project Collection, Team Project, and Team that you wish to connect to. In subsequent visits, you will see recent Team Projects and Teams listed for convenience.
Using Team Foundation Server in Microsoft Excel
As part of the Team Explorer installation process, team support is added to Microsoft Excel as a new tab on the Ribbon bar. This allows for the capability to add and edit work items directly from Excel spreadsheets, as shown in Figure 4.10.
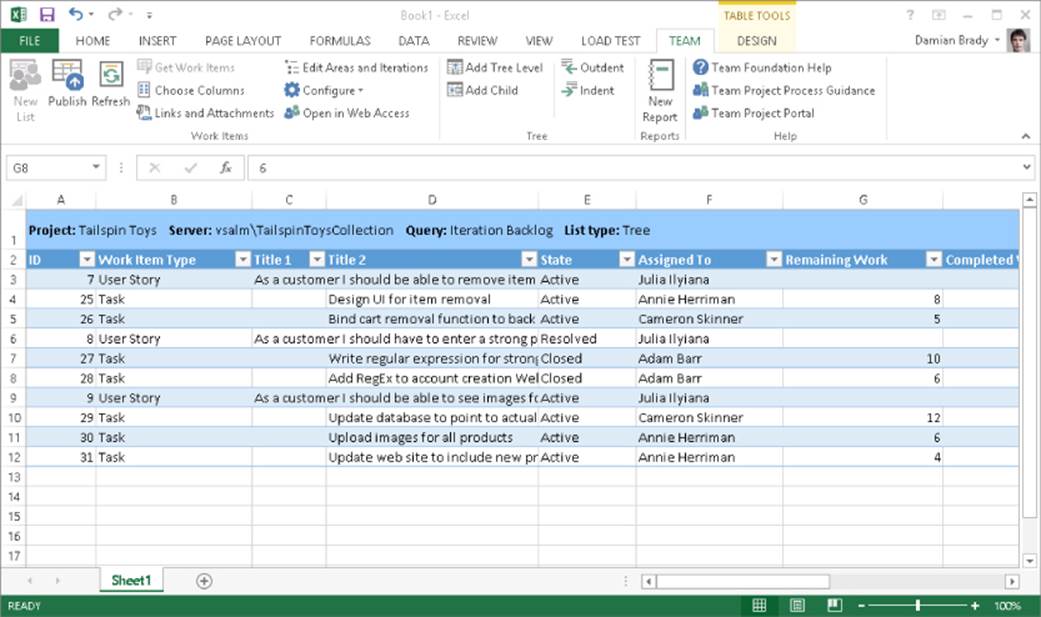
Figure 4.10 Adding and editing work items directly from Excel spreadsheets
To connect to Team Foundation Server from Excel, go to the Team Ribbon and click New List. Select the query that you would like to use as the basis of data to load into Excel. Or, if you would like to create a bunch of new work items, select Input List.
Usually, starting with a query is the easiest way, because you can still add and edit work items from it. You may add additional fields from the work item into the spreadsheet by clicking the Choose Columns button and adding additional columns into the list.
Note that if you select a hierarchical query—for example, a query that shows parent/child relationships such as an Iteration Backlog query in the standard Iteration folders created as part of an Agile process template—then you will have multiple Title columns for each level in the hierarchy, as shown in Figure 4.10. Adding a work item as a child of another is as simple as creating a new row and placing the title for that work item in the Title 2 column. If you need an additional column, or wish to quickly insert a new line to create the child node, click the Add Child button in the Team Ribbon.
To open an existing query as an Excel spreadsheet, you can right-click any work item query in Team Explorer and select Open in Microsoft Excel.
You can also easily generate several reports in an Excel workbook that analyze current status and historical trends based on the criteria specified in a flat (that is, not hierarchical) query. Right-click the query and select Create Report in Microsoft Excel. This will then connect Excel directly to Analysis Services to show the data directly from the Team Foundation Server data warehouse.
Note
For more information on creating Team Foundation Server reports using Excel, see the MSDN documentation at http://tinyurl.com/Tfs2013ExcelReports.
Note
For more information on reporting, see Chapter 15.
Using Team Foundation Server in Microsoft Project
In addition to providing Excel integration, the installation of Team Explorer also installs a Team Ribbon into Microsoft Project, as shown in Figure 4.11. This provides the capability to add and edit work items directly in Microsoft Project and to view data about the progress of the work items.

Figure 4.11 Team Ribbon in Microsoft Project
Because of the enhanced linking capabilities introduced in Team Foundation Server 2010, predecessors and successors can be created easily using Microsoft Project linked to work items, allowing you to control which work items depend on each other.
Team Foundation Extensions for Project Server
Introduced as a feature pack for Team Foundation Server 2010 Service Pack 1, the integration with Project Server now requires an installation of Extensions for Project Server. By enabling data flow between Team Foundation Server and Project Server, project managers can access up-to-date project status and resource availability across agile and formal software teams who work in Team Foundation Server. For more information, see the MSDN documentation athttp://tinyurl.com/Tfs2013ProjectServer.
Windows Explorer Integration with Team Foundation Server
As part of the Team Foundation Server Power Tools (http://aka.ms/TFS2013PowerTools), Windows Shell Extensions can optionally be installed. Once it is installed, when you browse a folder that is mapped in a Team Foundation Server workspace, files and folders are decorated depending on the status (whether or not the files are checked out).
Right-clicking the file or folder provides access to some basic version control operations under the Team Foundation Server menu (see Figure 4.12) that can be very useful when working with Team Foundation Server outside of Visual Studio or Eclipse.
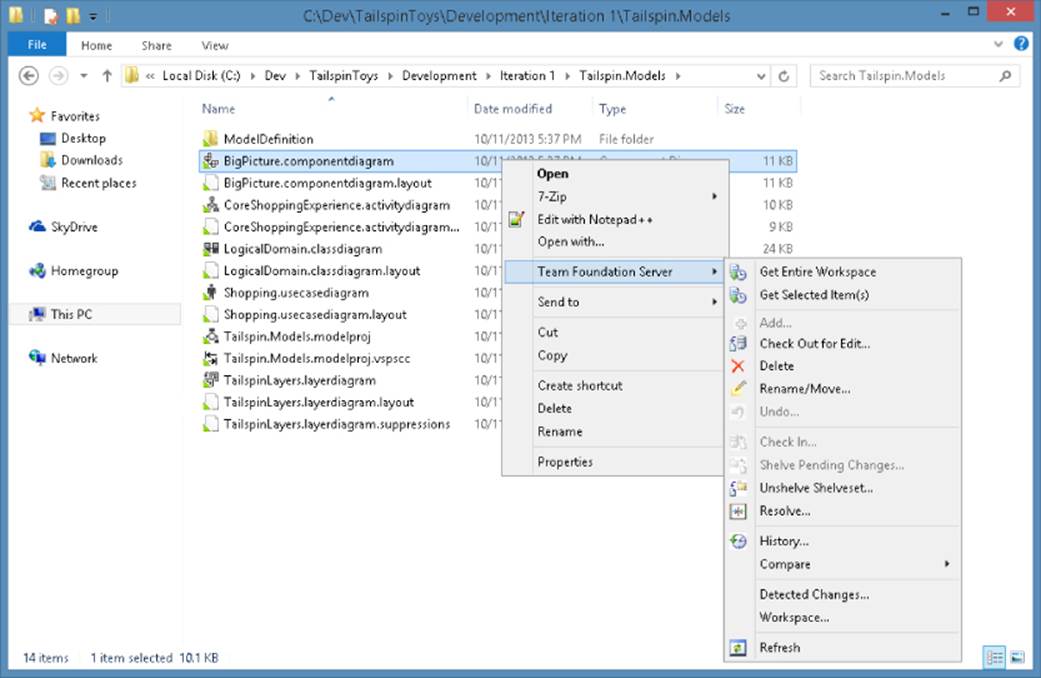
Figure 4.12 Windows shell extensions
Connecting Microsoft Test Manager to Team Foundation Server
Microsoft Test Manager is the dedicated interface for testers working with Team Foundation Server. It is installed as part of Visual Studio Test Professional, Visual Studio Ultimate, and Visual Studio Premium 2013.
The first time you start the application, you will be prompted to provide details about your Team Foundation Server instance. You are then able to select the Project Collection, Team Project, and Test Plan to which you wish to connect.
After the initial connection, your preference will be remembered, and you will automatically be connected to that Test Plan. To change Test Plan, or to connect to a different project or project collection, click the name of the Test Plan in the top right-hand corner of the screen, as shown in Figure 4.13.
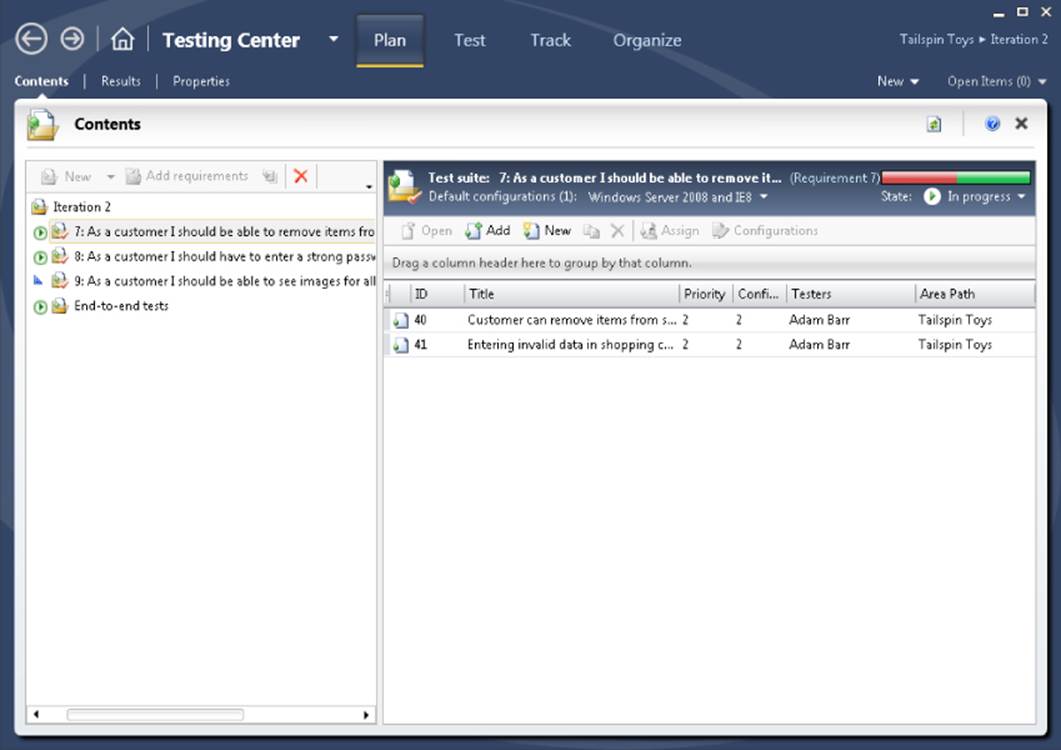
Figure 4.13 Microsoft Test Manager
Access to Team Foundation Server via Third-Party Integrations
Team Foundation Server supports a rich and vibrant third-party ecosystem through its powerful extensibility mechanisms, as outlined in Chapter 29. The same .NET object model installed as part of the Team Explorer integration is available for use by other third-party applications installed on your machine.
Integrations are available in other parts of Microsoft Office (such as Word and Outlook) from partners using these APIs. Also, many development tools and projects now integrate with Team Foundation Server using the extensibility hooks provided by Microsoft, or by wrapping calls to the version control command-line client.
Summary
In this chapter, you learned how to get connected to Team Foundation Server from your desktop machine. You learned about the architecture of a typical Team Foundation Server installation and how the Team Foundation Server URL is used to provide the connection information to the server. The discussion also highlighted the basic access control and permissions system used by Team Foundation Server.
Finally, you learned about the client software for Team Foundation Server (Team Explorer) and how to begin using this interface to access the functionality provided by the server.
The rest of this book examines that functionality in detail. Chapter 5 begins that examination with a general discussion about version control and how to share your source code with the rest of the team.
All materials on the site are licensed Creative Commons Attribution-Sharealike 3.0 Unported CC BY-SA 3.0 & GNU Free Documentation License (GFDL)
If you are the copyright holder of any material contained on our site and intend to remove it, please contact our site administrator for approval.
© 2016-2026 All site design rights belong to S.Y.A.