Professional Team Foundation Server 2013 (2013)
Part II
Version Control
Chapter 6
Using Centralized Team Foundation Version Control
What's in this chapter?
· Understanding Team Foundation Version Control
· Learning what's new in Team Foundation Server 2013
· Using the Source Control Explorer
· Using the My Work experience
· Requesting and responding to code reviews
· Viewing the history of files and folders
· Using the version control command line
· Using Team Foundation Version Control in Eclipse and on non-Windows platforms
· Understanding version control security and permissions
· Working with Team Foundation Server for Visual SourceSafe users
· Using Team Foundation Server for Subversion users
Version control is one of the primary reasons that people adopt Team Foundation Server. Most professional developers have had some prior experience with a version control system. The first thing you must come to terms with is that every version control system is different. While change can be unsettling at first, there are clear benefits in moving to Team Foundation Server's centralized version control system, called Team Foundation Version Control.
Team Foundation Version Control is a robust, powerful, and scalable version control infrastructure that you can rely on to support the needs of your software development efforts. From teams of 1 to teams of 5,000 or more, Team Foundation Server is a mission-critical system supporting many organizations today. Team Foundation Version Control was built from scratch by Microsoft, and is not based on its previous version control offering, Visual SourceSafe (VSS).
Team Foundation Server stores all its version control data in a SQL Server database alongside the work item and build information. Team Foundation Server's version control systems are designed to work using Internet-based protocols. Centralized version control works great over high-latency network connections, such as those found in the typical enterprise wide area network (WAN), or over the public Internet. It provides highly flexible security and permission capabilities tied into an integrated authentication model.
This chapter first examines the fundamental concepts that you must understand to come to grips with the centralized version control model used by Team Foundation Server. Then we explain the common version control tool windows, along with how to access common version control operations and get started using Team Foundation Server Version Control on your first project.
In this chapter, you will look at the use of the version control command line and review special considerations to take into account when using Team Foundation Version Control cross platform. You will learn how to configure version control security and permissions in Team Foundation Server, and how to configure common settings for source control. Finally, you will see a short guide to Team Foundation Server for developers familiar with Microsoft VSS or Apache Subversion (SVN).
Note
As noted in Chapter 5, version control goes by many names, including “source control,” “revision control,” and so on. This book mostly uses the term “version control” to indicate that Team Foundation Server can handle much more than source code, including everything that you use to create your product (such as build scripts, website images, and original artwork) that you wish to version alongside your source. However, the terms “version control” and “source control” can be used interchangeably. Even in Team Foundation Server, you will see references to both terms.
But first, let's review getting started with Team Foundation Server Version Control. If you have used Team Foundation Server before or in previous versions, then feel free to skip that section and jump straight to “Learning What's New in Team Foundation Server 2013 Version Control.”
Getting Started with Team Foundation Server Version Control
Before diving into the details of Team Foundation Server version control, you will add a Visual Studio 2013 solution to version control. First, create a simple solution that you want to share with your team. Use a simple HelloWorld console application (although you could use any of your own applications). You must ensure that you are connected to Team Foundation Server. For more information on this, see Chapter 4, but, basically, in Visual Studio, go to Team ![]() Connect to Team Foundation Server, and then click Select Team Projects. Click the Servers link to configure server details, and then choose the project collection and team projects that you wish to connect to. Then click Connect.
Connect to Team Foundation Server, and then click Select Team Projects. Click the Servers link to configure server details, and then choose the project collection and team projects that you wish to connect to. Then click Connect.
Now add the solution to version control. Right-click the solution in Solution Explorer and select Add Solution to Source Control. You should see the screen shown in Figure 6.1.
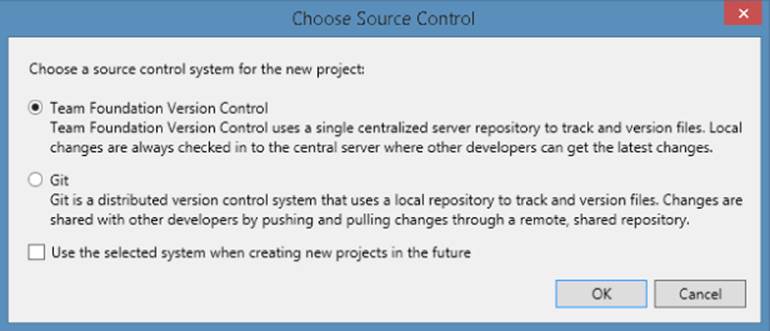
Figure 6.1 The Choose Source Control dialog box
Choose Team Foundation Version Control and click OK. You should be shown a new dialog box asking you to choose the Team Project to add your solution to, as shown in Figure 6.2.
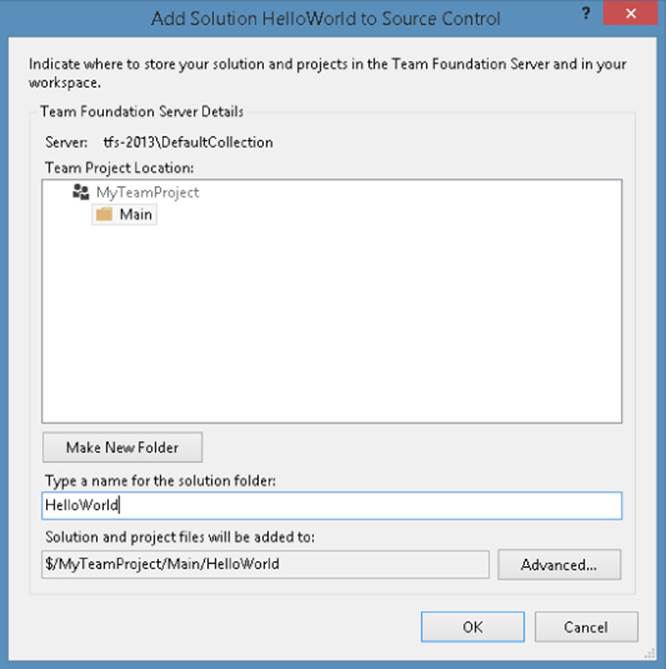
Figure 6.2 Add to Source Control dialog box
Note
If this is the first source code being added to your team project, then we recommend you reject the default of placing of your solution directly under the team project in version control. Instead, make a new folder called Main and place your solution in it—that is, $/MyTeamProject/Main/HelloWorld. This will put you in a good position should you want to adopt a branching strategy later on in your project development. Create the Main folder even if you have no idea what a branch is yet. Chapter 10 explains all about branching, and this folder will come in handy then.
You are nearly there. To commit your changes so that other people on the team can see your project, you need to check in the files. To do this, open the Pending Changes page in Team Explorer (View ![]() Other Windows
Other Windows ![]() Pending Changes) and click the Check In button. You can provide a comment for your changes if you wish, as shown in Figure 6.3.
Pending Changes) and click the Check In button. You can provide a comment for your changes if you wish, as shown in Figure 6.3.
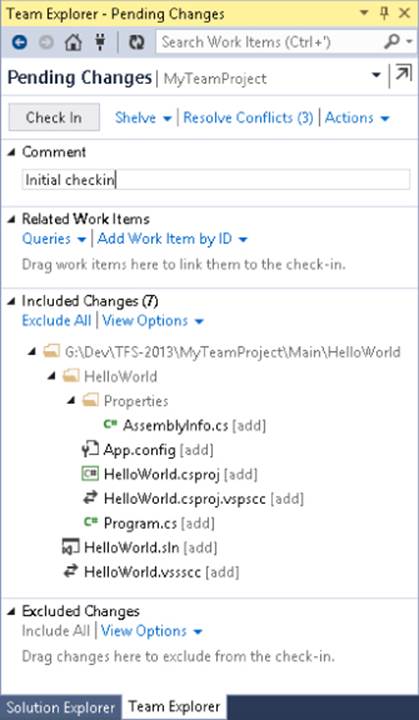
Figure 6.3 Pending Changes view
And there you have it. Your changes are now in Team Foundation Version Control. If you look in Solution Explorer, you will see a little padlock next to your files, as shown in Figure 6.4.
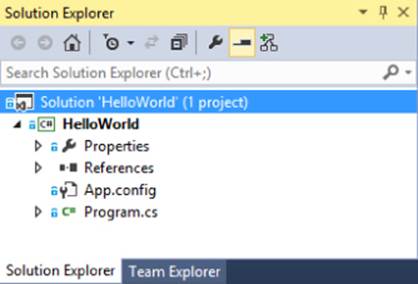
Figure 6.4 Version controlled files in Solution Explorer
If you right-click the files, you will see new menu options available, such as Get Latest, Check Out for Edit, and Compare, along with a Source Control submenu to allow you to View History, Undo Changes, and Shelve Changes. All of these commands and more will be explained later in this chapter, but first you will step back a little and review some concepts at the core of Team Foundation Server Version Control.
Note
In Visual Studio, you can have a number of different version control providers. While Team Foundation Server is installed by default in Visual Studio 2013, if you have been using a different version control tool previously, you may not see the Team Foundation Server functionality. To switch to Team Foundation Server for version control, go to Tools ![]() Options
Options ![]() Source Control, and ensure that your current source control plug-in is set as Visual Studio Team Foundation Server.
Source Control, and ensure that your current source control plug-in is set as Visual Studio Team Foundation Server.
Learning What's New in Team Foundation Server 2013 Version Control
The Team Foundation Server 2013 product has seen a large number of changes including the introduction of Git repositories and general availability of a hosted Team Foundation Service. However, with respect to centralized version control, there have been relatively few changes since Team Foundation Server 2012. The biggest improvements related to Team Foundation Version Control for Team Foundation Server 2013 are in the UI.
The Team Explorer window in Visual Studio has undergone a lot of usability improvements and now represents a clean, easy-to-navigate way of working with Team Foundation Server. The layout of the Team Explorer windows has been completely reengineered to give you easy access to your projects. The Home page gives you one-click access to any Solutions you have in your Workspaces, and the Connect page lets you quickly navigate between Team Projects.
Similarly, there have been great improvements in the Code Explorer in Team Web Access. Web Access gives you very fine-grained visibility of changesets, with rich diff tools for file comparison right in the browser. Lightweight code commenting even gives you the ability to comment on changes directly in the browser.
A big drive in the previous Team Foundation Server 2012 release was to reduce friction in version control operations. This was done throughout the product from big new concepts, such as Local Workspaces, to moving UI that would have popped up in a modal window in the past into modeless experiences in the editor area or in the new Team Explorer.
In Team Foundation Server 2013, Microsoft has continued to make improvements around source control UI, while keeping the underlying Team Foundation Version Control functionality stable. If you are familiar with Team Foundation Server 2012, you will already be comfortable with the current version. If you're coming from an earlier version of Team Foundation Server or another version control system, you will find the Team Foundation Server Version Control Concepts section of this chapter very useful.
Team Foundation Version Control balances simplicity in day-to-day work with powerful functionality supporting the requirements of an enterprise version control system. But, to understand Team Foundation Server Version Control, you need to have a firm grasp of some fundamental concepts.
Team Foundation Server Version Control Concepts
You can just dive in and start using Team Foundation Server Version Control with very little effort or training. However, at some point, you might bump into a couple of areas that prove confusing unless you understand the basics of how Team Foundation Server sees the world when it comes to centralized version control. The first fundamental concept you must understand is the notion of the workspace.
Workspace
One of the first problems with the term “workspace” is that it can be a somewhat overloaded term. For example, to Eclipse developers, the term “workspace” can mean the Eclipse workspace, which is entirely different from the Team Foundation notion of workspace, even though they both conceptually contain source code. To others familiar with version control systems, such as Polytron Version Control System (PVCS), or ClearCase, the term “workspace” also means something similar, but again quite different from Team Foundation Server. For SVN developers, the concept of a “workspace” is completely foreign, and they might assume that this is just the working copy (it is, but also more than just that).
A workspace can be thought of as the container that bridges the gap between your local computer and the Team Foundation Server repository. As shown in Figure 6.5, the workspace contains several important pieces of information.
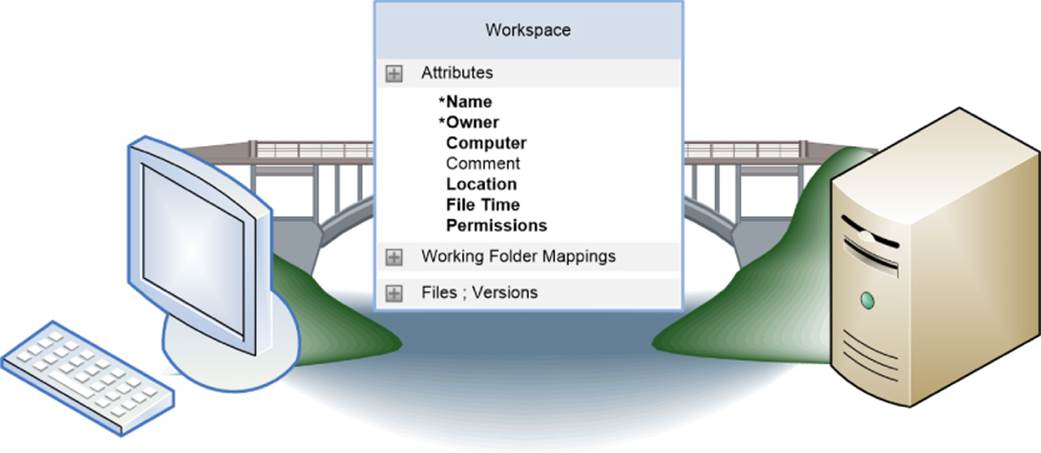
Figure 6.5 Workspace in Team Foundation Server
Workspaces are identified by a name and the hostname of the computer the workspace is for. The name can be up to 64 characters in length, and you can also provide a comment that may be a useful reminder if you have multiple workspaces on the same computer. The workspace also contains the working folder mappings that indicate which folders on your local machine map to which folders on the server.
Changing the Computer Name or Owner for a Workspace
The owner and computer name of the workspace are not editable in Visual Studio or Eclipse. However, you may occasionally need to edit these. To do this, use the tf workspaces /updateComputerName:OldComputerName or tf workspaces /updateUserName:OldUserName commands.
Note that the updateCompterName option does not move the workspace from one machine to another. You are telling Team Foundation Server that the hostname of the machine that this workspace is on has changed for some reason (that is, it was renamed or restored from a backup). Similarly, the updateUserName option doesn't change the owner of the workspace. It tells Team Foundation Server that your name has changed from, say, DOMAIN\dbrady to DOMAIN\damianb.
Under the hood, Team Foundation Server actually stored the Windows security identifier (SID) of the account. The update call simply tells the server to update its cache with the current user name for that same SID.
The version control system needs to store information in the workspace, such as which version of which files you have downloaded locally, which files you are in the process of editing, and so on. In Team Foundation Server 2013, the workspace state information can be stored in either of two locations, locally on disk or on the server. This leads to the terms Local Workspaces and Server Workspaces. In Team Foundation Server 2010 and below, the workspace state was always stored on the server (i.e., in what is now called a Server Workspace), but the default for new workspaces in Team Foundation Server 2012 and 2013 is a Local Workspace.
Note
If you've upgraded an existing Team Project from Team Foundation Server 2010 or earlier, Server Workspaces will remain the default for that project.
Local Workspaces
Local Workspaces were new to Team Foundation Server in the 2012 version and are available only from compatible clients, such as Visual Studio 2012 and 2013, or Team Explorer Everywhere, for Team Foundation Server 2012 or 2013. If you want to use a Local Workspace, you must be talking to a 2012 version of the server (or higher) and be using one of the newer clients. If you need to work on files from an older client, such as Visual Studio 2010 or Visual Studio 2008, at the same time as working on those files from a newer client, you will need to use a Server Workspace as described later in this section.
In a Local Workspace, state about that workspace is stored on the local disk. All the information is stored inside a folder called $tf (or .tf on UNIX-based file systems). The folder resides at the root of your workspace folder mappings. If there is no common root folder then it will reside at the root of the first active working folder mapping.
Warning
Because a Local Workspace stores information in a local data store that only Visual Studio 2012 and above knows how to read, Local Workspaces are invisible to Visual Studio 2010 and below.
If you want to share a workspace between Visual Studio 2012 or 2013 and an earlier version of Visual Studio, you will have to convert your Local Workspace to a Server Workspace.
In addition to storing the state information locally, Local Workspaces have a number of important differences to the way they work. The primary benefits of Local Workspaces are that you can edit files when offline from Team Foundation Server and that you can edit files outside of Visual Studio or Eclipse without performing an explicit check-out operation first.
To achieve this, when you perform actions, such as a check-in operation, or see what files you have pending changes for, the Team Foundation Server client will scan the contents of your Local Workspace and compare the contents of it with a copy of the last downloaded versions of those files (which are stored in a compressed form in the $tf folder). In this way, it can tell which files were edited, which files have been deleted locally, and which files have been added.
Edits are automatically added to your Pending Changes list; however, adds and deletes of files performed outside of Visual Studio or Eclipse are classified as Detected (or candidate) Changes. They are displayed to you, but not automatically added to your pending changes list in case you did not mean to add or delete that file from the version control repository. Handling Detected Changes is discussed later in this chapter.
If you perform rename or move operations outside of Visual Studio or Eclipse, then when the disk scanner runs it has no way to tell that these files are related and sees that as an Add and Delete of a file (add with the new name/path and delete with the old name/path). Therefore, in the Detected Changes experience, you are able to associate those two changes and promote them as a Rename.
Because no server communication is required before editing a file locally, you cannot prevent a user from editing the file when placing a lock on it. Locks are still available with a Local Workspace, but they function like a Check In lock in Server Workspaces—that is, a lock prevents someone from checking in their changes to that file.
The other downside of Local Workspaces is that as they store a local copy of files to enable you to compare and undo while off-line and because a scan of the disk is required to tell you which files you have edited, there is a tradeoff between the number of files in your Local Workspace and performance. Depending on the speed of your local hard drive, you may notice performance degradation in certain version control operations when working on workspaces containing more than 100,000 files; however, those scenarios are rare and the performance degradation is linear depending on the number of files you have locally.
Because Local Workspaces make it so easy to edit and work with files under version control, they became the default mode of working for all new workspaces created by Visual Studio 2012 and above, and Team Explorer Everywhere for Team Foundation Server 2012 and above. You can easily convert from Local to Server and vice-versa from the Edit Workspace dialog box in Visual Studio 2013 by going to File ![]() Source Control
Source Control ![]() Advanced
Advanced ![]() Workspaces
Workspaces ![]() Edit
Edit ![]() Advanced.
Advanced.
Server Workspaces
Server Workspaces are the mode of operation familiar to users of older versions of Team Foundation Server and the only option available when using older versions of Visual Studio, such as Visual Studio 2010 or Visual Studio 2008. If you had an existing workspace and upgraded the server to Team Foundation Server 2012 or 2013 from an earlier release, then that workspace would initially also be a server workspace.
With a Server Workspace, the information about the state of your workspace is stored on the server. The server remembers which versions of which files you have downloaded to your local computer, and also stores those files that you are in the process of changing, and any files that you have decided to lock so that others cannot edit those files at the same time as you do.
Using the workspace to remember the files and versions downloaded is one of the ways that Team Foundation Server can optimize performance for large workspaces. When you ask the server to Get Latest, it already knows what versions you have of all the files, so it can send you only the ones that have been modified. Additionally, because a Server Workspace stores the files you are currently working on, Team Foundation Server has the capability of highlighting this fact to others in your team who are also using Server Workspaces so that they know that someone else is currently editing a file that they were about to modify.
But, those benefits come at a tradeoff in terms of usability for developers. One of the most common aspects of Server Workspaces that people often find confusing (and frustrating for some developers using older versions of Team Foundation Server) is the fact that you must always tell the server when you do something to a file or folder in your workspace (such as editing the file, renaming it, or adding a file into a folder).
This mode of operation works well if you are always in Visual Studio or Eclipse and are always connected to your Team Foundation Server, as the IDE integrations automatically perform all the necessary version control operations on behalf of the user. But, it can lead to confusion when a developer drops out of the IDE and tries to work with the files.
For example, developers might open an image file in an external editor and get frustrated when they are unable to save the file because it is read-only, making them switch over to Visual Studio to explicitly check out the file.
Another common complaint with Server Workspaces is that developers might have deleted a file locally in Explorer, realized their mistake and then gone to Visual Studio to do a Get Latest to retrieve the latest version of that file only to be told by Visual Studio that “All files are up-to-date” and the deleted file has not been restored. This makes sense when you understand Server Workspaces, as you never told Team Foundation Server that you were deleting the file so it still assumes you have it. The file is easily recoverable by going to Get Specific Version and performing a Force Get; however, that requires a deeper understanding of Server Workspaces and the intricacies of Team Foundation Server workings than many developers wish to have when all they want to do is edit their files and check in their changes.
For this reason, Local Workspaces is the default when creating a new workspace in Visual Studio 2012 or 2013 against Team Foundation Server 2012 or 2013. However, Server Workspaces still exist for backward compatibility and for those users who prefer the functionality they offer or require the scalability in terms of the number of files in the workspace that a Server Workspace can provide.
Working Folder Mappings
As mentioned previously, part of the information contained in the workspace is the working folder mappings. At the simplest level, a working folder mapping says which folders on your local machine map to which folders in the repository. For example, if you were to map C:\Local\MyTeamProject to $/MyTeamProject and then download the files to your local machine by performing a Get Latest, you would have a copy of the latest versions of all the files from the server in your local directory.
Note
.NET (and, therefore, Team Foundation Server) imposes a 260-character limit for the full file path, which stems from a limitation of certain APIs in Windows around file handling. Conventions for source code can result in long folder and file names. This is especially true for Java projects, but can be true with many large Visual Studio solutions. Therefore, a useful tip is to store source code in a folder off the root of a hard drive (such as C:\source) on Windows, or at a suitable mount point in UNIX file systems. This way, you will have more characters available for the files in your local path.
With Team Foundation Server, working folder mappings are stored in your Team Foundation Server workspace. They are not shared between other people using the repository (unlike PVCS, for example). Viewing the current set of working folder mappings is very easy, as explained in the following:
· With Visual Studio, go to File ![]() Source Control
Source Control ![]() Advanced
Advanced ![]() Workspaces. Select your workspace and click Edit.
Workspaces. Select your workspace and click Edit.
· With Eclipse, right-click on the project in Package Explorer and go to Team ![]() Manage Workspaces. Select your workspace and click Edit.
Manage Workspaces. Select your workspace and click Edit.
Note
Alternatively, you can use the tf workfold command or the Team Foundation Sidekicks tool, available at http://www.attrice.info/cm/tfs/.
Figure 6.6 shows the working folder mappings from Visual Studio. The example shows a fairly complex working folder mapping layout—it is much more usual to see an example with only one or two active working folder mappings. The figure demonstrates some additional working folder mapping features available in Team Foundation Server. Figure 6.6 also shows all the Advanced options of the workspace, which are usually hidden until the user presses the Advanced button. Take a closer look at the working folder mappings.
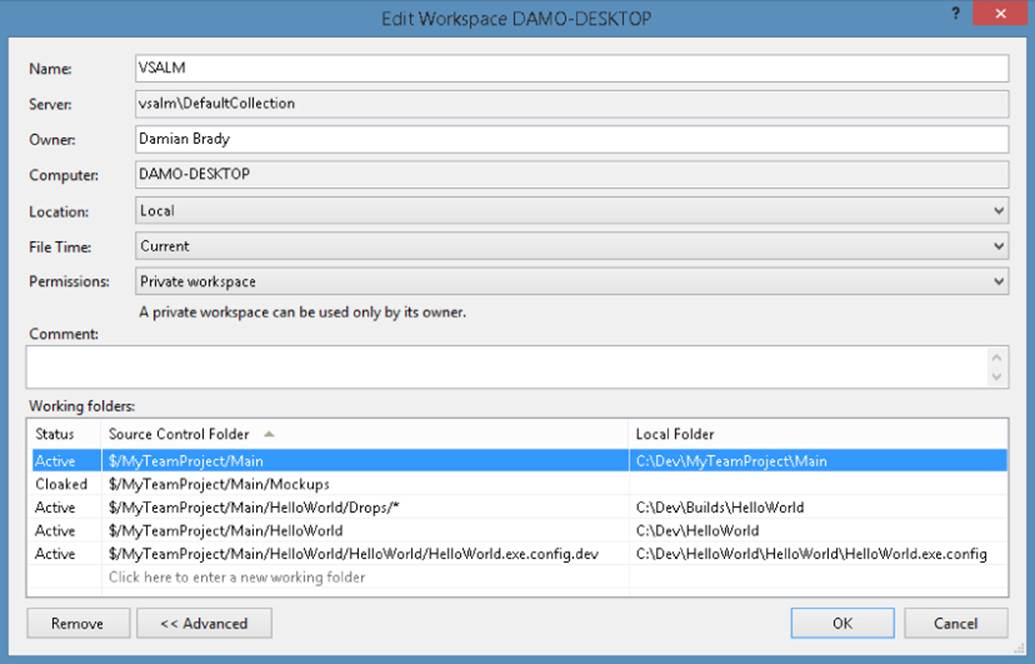
Figure 6.6 Working folder mappings in Visual Studio
Active Working Folder Mappings
The first working folder mapping is straightforward. This maps the contents of $/MyTeamProject/Main to C:\Dev\MyTeamProject\Main recursively. If you create this working folder mapping and then perform a Get from $/MyTeamProject/Main/HelloWorld, the contents of that folder would be downloaded to C:\Dev\MyTeamProject\Main\HelloWorld.
Cloaked Working Folder Mappings
The second mapping in Figure 6.6 is not an Active mapping, but is cloaked. A cloaked working folder mapping tells the server that you do not wish to download the contents that are cloaked. In other words, you do not want them to appear in your local file system, nor do you want to get any files in that folder if the contents of that folder are changed on the server.
In Figure 6.6, you see a cloaked working folder mapping that is a child of the previous Active recursive mapping for $/MyTeamProject/Main. This means that the large graphic files contained in the $/MyTeamProject/Main/Mockups folder are not downloaded to the local machine, saving bandwidth and disk space.
Copying Complex Working Folder Mapping Configurations
A typical working folder mapping configuration can be quite simple. However, some version control trees require a more complex folder mapping to be used, which you may want to share with the team or copy to another workspace on a different machine. To copy the working folder mappings from another workspace, you have several options.
From the Edit Workspace dialog box shown in Figure 6.6, you can copy and paste working folder mappings between different instances of the dialog box. You can even copy the mappings, paste them into a text editor, such as Notepad, to perform a mass edit of them, and then copy/paste those back into the working folder mappings section.
From the command line, you can create a new workspace using the following command:
tf workspace /new /template:workspacename[;workspaceowner]
In this way, you can specify an existing workspace to use as a template for your new workspace, taking the working folder mappings from that existing workspace. The workspaceowner is optional. If you do not provide it, the server will look for a workspace with that name belonging to your user. However, you can use the workspaceowner field to copy a working folder mapping set used by a colleague.
Recursive Working Folder Mappings
By default, a standard working folder mapping, as detailed previously, is applied recursively. When you map a folder to a location in the version control repository, a mapping is implicitly created for all subfolders. However, you can override the implicit mapping, as was done in the fourth line in Figure 6.6.
If you do not want a working folder mapping to be recursive, then you can use an asterisk as a wildcard to say that you wish to map only the server folder and its immediate files to your Local Workspace, as shown in the third line of Figure 6.6.
Mapping Individual Files
Despite the name, working folder mappings do not only apply to folders. They can actually apply to any path in version control, including individual files. For example, in Figure 6.6, the file called HelloWorld.exe.config.dev is being called HelloWorld.exe.config in the Local Workspace.
Workspace Permissions
With Team Foundation Server 2005 and 2008, the owner of the workspace was set at the time the workspace was created, and could only be used by the owner of the workspace. With Team Foundation Server 2010, these restrictions were removed. Changing the owner is simply a case of editing the owner field in the Edit Workspace dialog box (see Figure 6.6). To control who can use the workspace, the owner can select from one of three permission profiles for his or her workspace: Private workspace, Public workspace (limited), or Public workspace.
Under the hood, a workspace actually has four permissions:
· Read—The Read permission exists but was not enforced in the shipping product. In theory, it would control who would have the ability to see that the workspace exists, what mappings it had, and what pending changes exist in the workspace. However, when Team Foundation Server 2010 was released, any valid users were able to view these properties just as they could do in the 2008 and 2005 releases.
· Use—The Use permission is more interesting. It dictates who is allowed to change the state of the workspace—to get files, check out files, and so on.
· CheckIn—The CheckIn permission is separated out so that, in certain cases, other people can use the workspace, but only the owner can check in those changes.
· Administer—The Administer permission controls who can change the mappings, name, owner, comment, computer, and so on, as well as who can delete the workspace and change the workspace permissions.
With Visual Studio, these permissions are set by choosing one of the three permission profiles mentioned previously. A private workspace is the default, and the behavior is similar to that familiar to users of Team Foundation Server before the 2010 release. Only the owner can use the workspace. The permissions for that workspace are owner: Read, Use, CheckIn, and Administer.
A public workspace (limited) means that any valid user may use the workspace, but only the owner is allowed to perform check-ins or change the properties of the workspace. In this case, the permissions for the valid users would be valid-user: Read,Use. If the owner sets a workspace to be a public workspace, then all valid users essentially have the same rights as the owner (that is, valid-user: Read, Use, CheckIn, and Administer). It also means that any valid user would also be allowed to change the owner of the workspace, and then set the workspace permissions back to Private, so this should be used with caution.
Public workspaces can be useful when different developers are sharing the same machine to make changes in parallel. With a public workspace, you can maintain a proper audit history to see which users actually checked in the changes from that particular machine. The limited public workspaces can also be used when you have requested that colleagues help you make some changes on a machine in your workspace, but you want them to do it under their own logon credentials and have a guarantee that they will not be able to check in those changes for you.
The Edit Workspace dialog box only allows you to pick from one of the three permission profiles. If you have more complex workspace permission requirements (such as sharing a workspace between a few specified users, rather than with all valid users), you can actually have full control using the .NET object model.
Get
Thus far in this chapter, you have seen the term “Get Latest” a few times already without explicitly knowing what it means. To download the files from a Team Foundation Version Control repository to your local file system, you perform what Team Foundation calls a Get. Note that this is a different term from the one used by SVN or CVS to perform this action (referred to in those systems as check-out). The term “check-out” means something else in Team Foundation Server, which you will learn about shortly.
When you get files from version control you can do one of two things:
· Get Latest—This downloads the latest versions of all the files as of the time you asked to start getting them.
· Get Specific Version—You can find Get Specific Version under the Advanced menu in source control. This downloads a version that you have specified by date, label, changeset number, or simply the latest version. This specification of the version is called aversionspec in Team Foundation Server.
File Modification Times
By default, with Team Foundation Server the modification time of the files in your workspace on your local machine is left as the current local time on your machine when you happened to perform the Get from version control that resulted in downloading a new version of the file. In Team Foundation Server 2012 and 2013, you can change this behavior by editing the File Time property in the workspace, as shown in Figure 6.6. If you change the File Time to be Checkin, then the next time you perform a Get, the modification of the file will be the time that version of the file was checked into Team Foundation Server (adjusted to local time on the computer). This can be useful if you have processes that you run locally that use the file's modification time to help it understand if it needs to include the file or not (for example, when running robocopy to deploy only change files to an ASP.NET site or running make or other timestamp-dependent build processes).
In Team Foundation Server, you get files only when you specifically tell the server that you want to. This means that you can ensure that you know the state of your files; but, again, this can be a little different from what VSS users expect who are used to getting the latest file as they perform a check-out.
VersionSpecs
In the Get dialog box shown in the following figure, there is a section for Version. Here, you specify what Team Foundation Server understands as a version specification, or versionspec. A versionspec specifies the version that you want to work with, and can be specified using one of the following types: changeset, label, date, workspace, or latest.
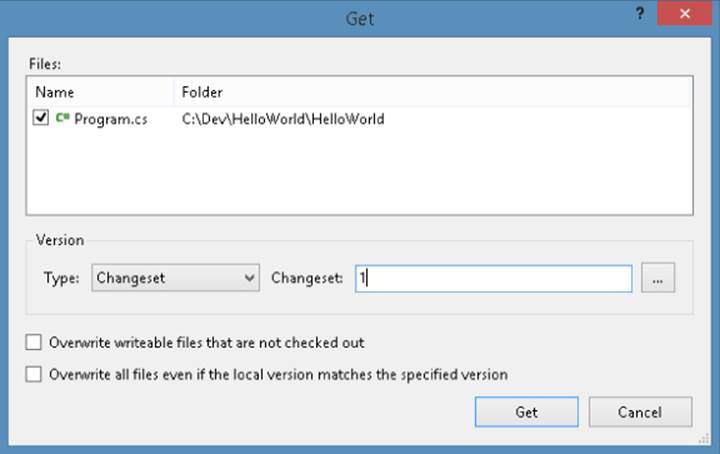
You learn more about changesets later in this chapter, but in brief, changesets are the fundamental unit of versioning in Team Foundation Server. Changesets have a numeric ID associated with them. A changeset versionspec is denoted by C123456 to Team Foundation Server, where 123456 is the ID of the changeset.
A label versionspec says you want a version that belongs to a particularly named label. It is denoted by myLabel where myLabel is the label name.
Date versionspecs are denoted with a D, and then, in the command line, you can pass any date format supported by the .NET Framework on any of the date formats for the local computer (for example, D2008-04-22T22:15).
A workspace versionspec means the version most recently downloaded into the workspace. This is denoted by a W, meaning the current workspace (or WworkspaceName;workspaceOwner) when specifying a workspace written as a string.
Finally, the latest version is a versionspec in its own right denoted by L when written as a string. When you use the Get Latest command in Visual Studio or Eclipse, you are actually telling the client to perform a Get of versionspec L.
Certain commands (for example, when viewing the history of a file) can accept ranges of versionspecs denoted by the tilde character (∼). Different types of versionspecs can be mixed in those instances. For example, D2004-04-11T18:37∼L would say you wanted a range of versions beginning with April 11, 2004 at 6:37 p.m. up until the latest version.
Check-Out
With a Server Workspace in Team Foundation Server, the initial files destined for your workspace would be marked read-only in your local file system. Before you start editing the files, you must check out the files from Team Foundation Server to let the server (and others on your team) know that you are editing the files. This happens automatically for you if you are editing files from within Visual Studio as soon as you start typing in the files. But you must do it explicitly if you want to edit the files outside Visual Studio when using a Server Workspace.
If you are using a Local Workspace (which is the default), there is no need to explicitly check out a file. If a file has been modified on your local file system, compared with the version you last did a Get for, then the file is marked as having a pending edit, and it can still be said by some that it is “checked out.”
When you have finished with the file and want to commit it back to the repository, you perform a check-in.
As mentioned previously, the term “check out” is used by many version control systems, but means different things, depending on the system. In VSS, “check out” means “give me the latest version of the file and lock it so that no one else can edit it.” In SVN (and also CVS), “check out” means “get the latest version.”
Locks
By default, with both Local and Server Workspaces, Team Foundation Server does not automatically lock a file on check-out. That is, more than one person can edit a file at the same time. The first person to check in a file does so as normal. Subsequent people will be prompted to merge their changes with the other modifications that have been made since getting the previous version of the file if it was no longer the latest. This behavior is extremely useful in ensuring that teams can develop on the same code base in parallel (especially with files such as a Visual Studio .vbproj or .csproj that must be edited every time someone on the team adds or renames a file in the project).
However, there are times when you wish to temporarily prevent someone from making changes to a particular file or folder in source control. For this reason, Team Foundation Server provides two types of locks that you can place on a file in your workspace: acheck-out lock or a check-in lock.
Check-Out Lock
Available only when working with a Server Workspace, a check-out lock will be familiar to users of older version control systems such as VSS or PVCS. It prevents other users from checking out the locked file while you hold the check-out lock. A check-out lock may not be placed on a file if other users already have that file checked out in their workspaces.
As an example, you might use a check-out lock when you are making some major or complex revisions to a file and you want to ensure that no one else makes any changes to that file until you are done because you do not want the additional complexity of having to merge their changes into yours before you check in.
One disadvantage of a check-out lock occurs when someone is using a Local Workspace. They do not have to explicitly check out the file to modify it, which means that a check-out lock will not be applied. Similarly, if a lock has been applied by someone else, the current user will not be prevented from editing the file. For those people using Server Workspaces, they cannot easily make that file editable in their Local Workspace, or work on it while you have the lock held. Therefore, you are reducing the ability of your team to work in parallel on the same codebase.
Check-In Lock
Check-in locks are available for both Local and Server Workspaces. With a check-in lock, other users can still edit the file on which you have placed the lock, but they will be unable to check it in until you have released the lock. Check-in locks can be placed on files that others have checked out, but, by placing the check-in lock on the file, you are guaranteeing that you will have the right of first check-in.
Using Locks Effectively
With any locks, you must ensure that your team communication is effective to explain why you need to lock the file. Locking should be used only where necessary because it reduces the ability of your team to work in parallel, and so can reduce productivity if overused.
In Source Control Explorer, you can see locks that other users might have on a file. If there are multiple changes, you might need to right-click the item, select Advanced ![]() Properties, and then look at the Status tab. However, it does not tell you what type of lock they have. To determine this information, you can use the tf status /format:detailed command.
Properties, and then look at the Status tab. However, it does not tell you what type of lock they have. To determine this information, you can use the tf status /format:detailed command.
Note that locking should be used only to temporarily lock a particular file or folder. The lock is held as part of the locking user's workspace. If you wish to restrict the ability of developers to edit a file or folder for a longer term (for example, if you want to restrict access to a branch in your codebase that represents the state of the code in production), then you should consider using version control permissions as detailed later in this chapter.
You can unlock a file at any time using the unlock command, but locks are also automatically released when you check in any changes related to that item in version control.
Check-In of Pending Changes
As you make changes to the files in your workspace, you are building up a list of pending changes. Any changes you make (edits, adds, deletes, undeletes, renames, moves, branches, merges, and so on) are stored as pending changes in your workspace.
In Team Foundation Server, when you wish to commit your list of changes to the server, you perform a check-in, as shown in Figure 6.7.
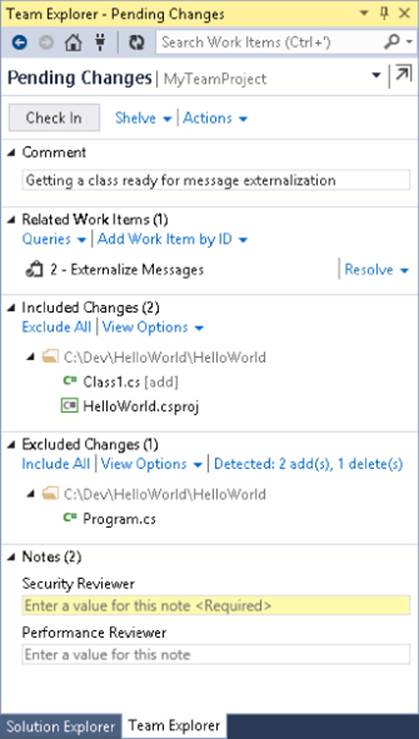
Figure 6.7 Pending Changes in Team Explorer
Unlocking Files of Other Users
Occasionally, you will need to remove the lock placed on a file by another user in your system—for example, when that person has left the company, or is unavailable for a long period of time. To perform this operation, you need the UnlockOtherpermission in version control, which is granted to team project administrators by default.
If you have permission, you can easily unlock individual files using the command-line tf lock /lock:none command, from the Team Foundation Server Sidekicks tool, or from the Team Members Team Foundation Server Power Tool in Visual Studio.
If you need to remove locks because the users have left the company and they will no longer be working on the codebase, then the easiest way is to delete their workspaces. This will not only remove the locks contained in the workspaces, but also free up the resources associated with keeping track of that user's workspace. To do this, use the command-line tf workspace /owner:FormerUserName to find the workspaces belonging to that user and then the tf workspace /delete WorkspaceName;FormerUserNamecommand, or the Team Foundation Sidekicks utility available from http://www.attrice.info/cm/tfs/.
A check-in is performed as a single atomic transaction. During the check-in operation, the server first checks to see if you are able to perform the check-in for these files (that is, you have the “Check in” permission for the files set to Allow), that there are no check-in locks on the files, and that you are attempting to check in a change of the latest version of the file. If, for some reason, the check-in cannot occur (for example, because someone else has edited a file while you had it checked out and has committed the changes), then the entire check-in operation will fail. You will be informed of the reason, along with instructions on how to take corrective action. This is a different behavior from systems such as VSS that do not have the notion of an atomic check-in.
Assuming you are able to check in the files, the modified files are uploaded to the server and committed to the version control repository, along with any comment that you may have provided with the change. Once a set of changes has been committed, it is known as a changeset. (Changesets are examined in more detail shortly.)
Related Work Items
While performing a check-in, it is best practice to also associate the change with a work item (such as a bug, task, feature, requirement, user story, and so on). In this way, you can easily get end-to-end traceability of requirements on through to changes of code, and into builds, which is a key feature of Team Foundation Server.
Commenting on Your Check-Ins
As is common with version control systems, when performing a check-in to Team Foundation Server, you can provide a comment to summarize your change. It is a best practice to add a comment, and with Team Foundation Server, you can actually enforce this by using a check-in policy. In previous versions of Team Foundation Server, the Changeset Comments Policy was available as part of the Team Foundation Server Power Tools, but in Visual Studio 2012 and 2013 and Team Explorer Everywhere for Team Foundation Server 2012 and 2013, it now ships as standard. Adding comments means that when you look at the history later, it is easy to quickly see why changes were made.
When providing comments, you should concentrate on why you were making the change, not what. For example “edited HelloWorld.cs” or “Fixed bug 1234” are not particularly useful comments because you could easily get that information from looking at the details of the changeset. Instead, the comment “Refactored code into more discrete methods to make it easier to test and maintain” would be much more useful.
Note
For more information on work items, see Part III (Chapters 12 through 16) of this book.
Included and Excluded Changes
When checking in files, the changes that you wish to be included in the check-in operation are listed in the Included Changes section of the Pending Changes page. You can exclude changes by dragging them from the Included Changes section over to the Excluded Changes section or by right-clicking on the files and selecting Exclude. When you exclude a file from being checked in, this is remembered in future Visual Studio sessions. This might be useful, for example, if you have edited a web.config file to switch on some debugging to help you with a bug that you are trying to fix, but you do not want to accidentally check that file in.
With excluded changes, you can drag-and-drop them back into the Included Changes section or right-click on them and select Include if you want to check them into a future changeset. Alternatively, you can right-click Perform an Undo to restore the file back to the version it was before you started editing it.
Detected Changes
In the Excluded Changes section in Figure 6.7, you can also see an area for Detected Changes. This is important, as it shows changes that the Local Workspace disk scanner has detected that have occurred outside Visual Studio, for which you might wish to pend changes. Clicking on the Detected Changes link will show the Promote Candidate Changes dialog box (see Figure 6.8).
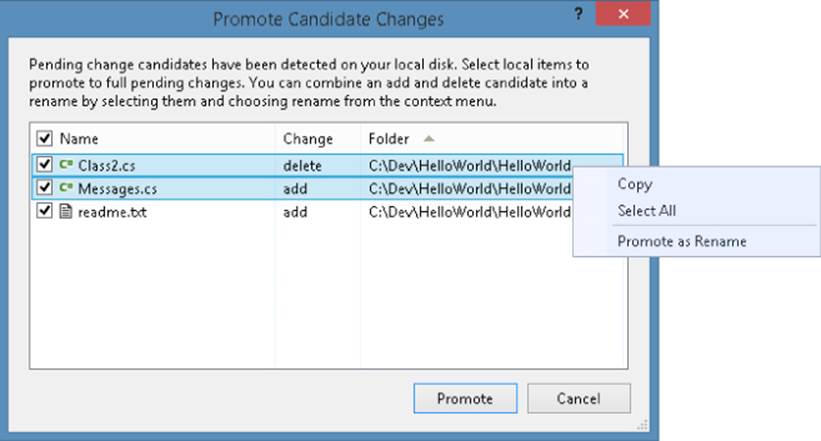
Figure 6.8 Promote Candidate Changes dialog box
In the example shown in Figure 6.8, three changes have been detected that occurred outside of Visual Studio. The file readme.txt was added into a folder covered by the working folder mappings and Class2.cs was renamed to Messages.cs. As discussed earlier in this chapter, if renames are performed inside Visual Studio or Eclipse, then the appropriate rename pending change will be created and stored in the history for that file. However, if the files were renamed outside of Visual Studio or Eclipse, then this will show up as an add and a delete of the file. To tell Team Foundation Server that this is a rename and therefore maintain the full history, you can select both changes, right-click, and select Promote as Rename, as shown in Figure 6.8.
Ignoring Files
If the Local Workspace disk scanner has detected files that you never wish to be part of version control, you can specify that they be ignored by right-clicking on the file and selecting the appropriate option, as shown in Figure 6.9.
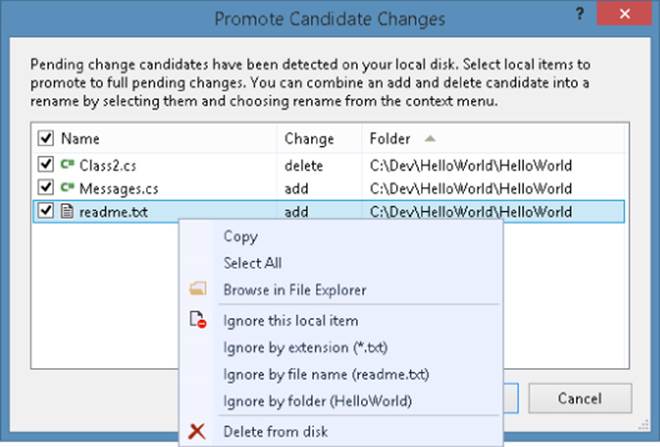
Figure 6.9 Ignoring changes from the Promote Candidate Changes dialog box
This will create a file called .tfIgnore containing the details of the filename (or pattern) that should be ignored. Once checked in, other team members will inherit these ignore settings, which allows you to ensure that they do not accidentally add the files that you have said should be ignored by Team Foundation Server.
.tfIgnore File Syntax
The syntax of the .tfIgnore file allows for more complex ignore patterns than are possible to configure using the menu options in the Promote Candidate Changes dialog box. The .tfIgnore file is a text file and the settings in it apply recursively to all folders below it in the workspace unless the pattern is prefixed by the \ character. Wildcards such as * and ? are allowed, and you can begin the ignore pattern with a path to make it more specific (but wildcard patterns are not permitted in the path portion, just in the filename portion of the pattern). A hash (#) character at the start of the line allows you to create a comment for documentation purposes. An exclamation point (!) means that you would like to specifically include files of that pattern when they might otherwise be ignored because of the project collection global exclusion patterns or by a .tfIgnore file higher up in the folder hierarchy.Finally, to make it easier to apply a .tfIgnore pattern cross-platform, a path separator character can be either a forward slash (/) or a backward slash (\) character and they are interpreted as path separators on Windows and UNIX file systems alike.
Because of the similarity of the .tfIgnore file syntax to similar files for other version control systems, such as .cvsIgnore, .svnIgnore, or .gitIgnore, it is often possible to convert ignore file patterns designed for one system to the other just by copying the file and renaming it.
The following is an example of a .tfIgnore file:
# An example .tfIgnore file
# Excludes all files ending in .txt in Alpha\Beta
# and all its subfolders.
Alpha\Beta\*.txt
# Excludes all files ending in .cpp in this folder only.
\*.cpp
# Excludes all files ending in .cpp in this folder
# and all subfolders.
*.cpp
# If “Contoso” is a folder, then Contoso and all its children are
# excluded. If it is a file, then only the “Contoso” in this
# folder is excluded.
\Contoso
# Include .dll's in the \lib folder inside this project
!\lib\*.dll
Check-In Notes
While checking in files, it is often useful to capture metadata about the change from the person committing the check-in. For example, who performed a security review of the changes or a reference to a third-party ticketing system? In other version control systems, this is often implemented by the developers adopting a convention when providing check-in comments. However, Team Foundation Server provides a mechanism for capturing structured data about a check-in—the check-in notes.
In the Pending Changes page of Team Explorer, you have direct access to the check-in notes to capture data about the check-in, as shown in Figure 6.7. Check-in notes are all text-based responses and other than a simple check to enforce that a value has been entered, no other validation is available. A check-in note could be many lines (in fact, up to 2GB of data). However, typically it is just a single name or value.
To configure the check-in notes for a team project in Visual Studio, go to Team ![]() Team Project Settings
Team Project Settings ![]() Source Control. Click the Check-in Notes tab, as shown in Figure 6.10.
Source Control. Click the Check-in Notes tab, as shown in Figure 6.10.
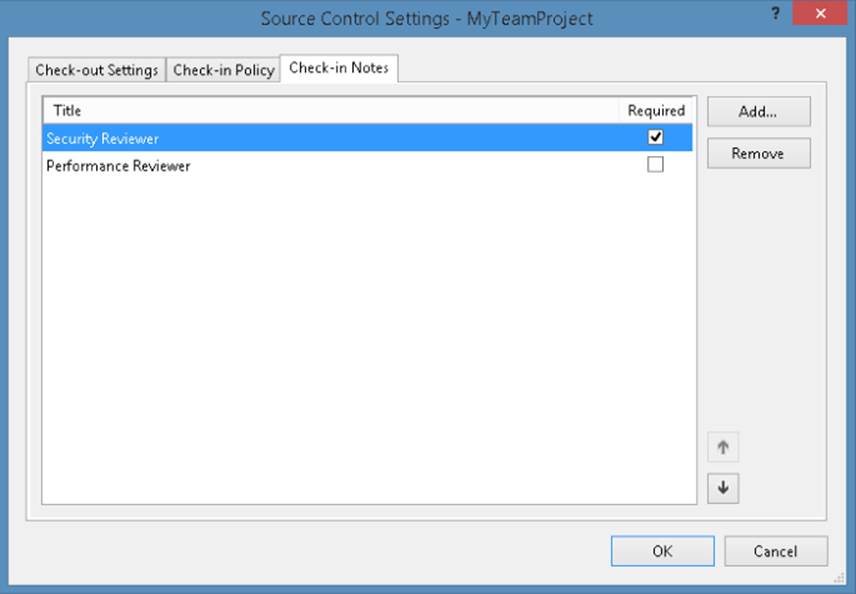
Figure 6.10 Check-in Notes tab
From the Check-in Notes tab, you can add, edit, remove, and reorder check-in note titles, as well as make any check-in note field mandatory. If a check-in note is required, then, when a user attempts to perform a check-in without providing a value for that field, the user will be prompted for a value before being allowed to check in.
Check-in Policies
A check-in policy is a piece of code that runs in the client performing the check-in, which validates if the check-in is allowed to occur. For Visual Studio, this code is written in .NET. In Eclipse or the cross-platform command-line client, the check-in policy is written in Java. Figure 6.11 shows the check-in policies available in a standard installation of Visual Studio 2013.
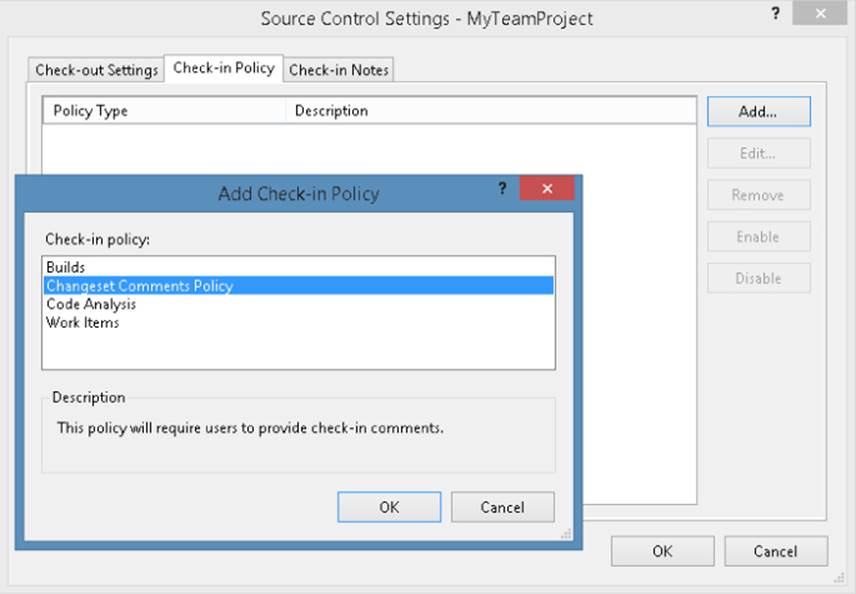
Figure 6.11 Check-in policies for Visual Studio 2013
Additional check-in policies are available as part of the Team Foundation Server 2013 Power Tools. Also note that the check-in policies enforced by Team Explorer Everywhere in Eclipse and the cross-platform command-line client must be configured from a Team Explorer Everywhere client by a user with appropriate permission. This is because those clients use a separate (Java-based) implementation for check-in policies. Once configured by the administrator in Visual Studio and in Eclipse, the check-in policies will be in effect for all users checking in affected files to that team project.
If a user attempts to perform a check-in that fails validation of the check-in policy, the user will be warned about the policy failure, as shown in Figure 6.12.
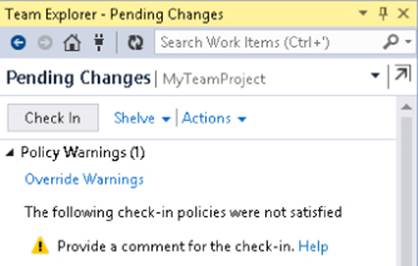
Figure 6.12 Policy Failure warning
If necessary, it is possible to override the policy by clicking the Override Warnings link and entering a comment.
Undo Pending Changes
Even the best developers sometimes make mistakes and wish that they could simply revert their changes instead of checking them in. In Team Foundation Server, this is accomplished by performing an Undo Pending Changes. This will allow you to select which changes you wish to undo, and those files will be rolled back to the previous version that you downloaded into your workspace (not the latest version on the server, because that could be different).
If the change you are undoing is the addition of a file (called an add), the pending add is removed from your list of pending changes. However, the file is not automatically deleted from the disk, allowing you to go back to add that file if you have mistakenly undone the change.
Note that undoing a pending change reverts the state of the file back to the point at which you last checked it in. If you want to actually undo a change that you have already checked in, you should look at the rollback command covered later in this chapter.
Changeset
When you perform a check-in, all the information about that single atomic check-in operation is stored as a changeset. The changeset is the fundamental unit of versioning in Team Foundation Version Control. It is represented by a number—the changeset ID, which is a unique incrementing number across the entire Team Project Collection. The only way that a change to the contents of a version control repository can occur is by creating a changeset. In fact, this is true even when creating the version control repository. When you create a team project collection, one of the things that the setup process does is check in the root of the version control repository $/ as changeset 1.
Removing Source Control Files from Your Local File System
You can see that changeset numbers are the unique unit of versioning in Team Foundation Server by noting how to remove a file from your local file system when using a Server Workspace without deleting it from version control.
Occasionally, you will have a file in your workspace that you do not want locally for some reason, but you want to leave it in version control. The obvious course of action is just to go out to the file system and delete it from the disk. This works fine with the new Local Workspaces in Team Foundation Server 2013, but with a Server Workspace it would cause problems. In that case, it is because you have not told Team Foundation Server that you have deleted it locally, so if you perform a Get Latest on the folder, because the server thinks you already have that file version in your Server Workspace, it doesn't send the file to you again until someone makes a change to that file.
However, if you perform a Get Specific Version on the file or folder and set the changeset to 1, the file will be deleted locally and will show in Source Control Explorer as Not Downloaded. Performing a Get Latest on the file will download it again.
Why does this work? Because changeset 1 is the changeset that was created when the team project collection was created, and the root of the version control repository ($/) was checked in. By saying that you want to get the version of the file at changeset 1, you are telling the server you want to get that file as it was at a point in time, which is represented by changeset 1. The file didn't exist at changeset 1, and so it is deleted from your local file system.
You'll be glad to know that if you are using Local Workspaces, which are the default in Team Foundation Server 2013, then you don't have to deal with any of these peculiarities; just delete the file locally and do a Get when you want it back. However, understanding the behavior helps understand changesets in Team Foundation Server regardless of which workspace type you use.
The changeset contains all the information about the change—what adds, edits, renames, deletes, branches, merges, and so on, occurred at that instant—along with the additional information of what work items were associated with the change, any check-in notes, and check-in policy compliance. The date of the changeset, and who checked it in, are also tracked by the server for auditing purposes. Note that this is different from VSS, where the date on the client machines actually could affect the date of that file in the version control repository.
Changeset IDs increment across the whole Project Collection. For example, a check-in to $/TeamProjectA/FileX.txt could be changeset 25, and the next check-in might affect $/TeamProjectB/FileY.txt, making that changeset 26. Therefore, if you view the history of a single file, you will see the IDs of the changesets in which changes occurred to that file. Files are not individually versioned as they are in VSS, but their version is the ID of the changeset in which they were altered, as shown in Figure 6.13.
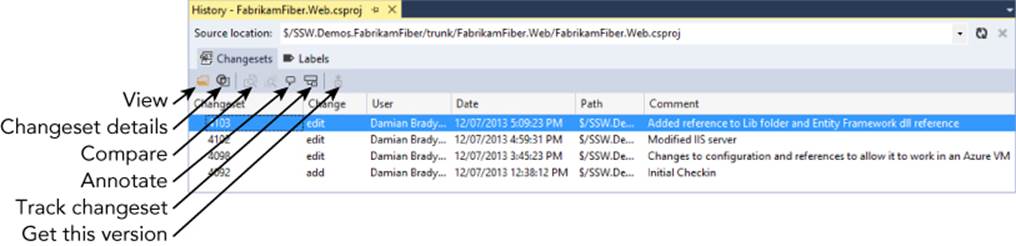
Figure 6.13 History view in Visual Studio 2013
The changes that occurred in a changeset are immutable—you cannot go back in time and rewrite history. However, the owner of a changeset (or an administrator) is able to edit the changeset comment and check-in notes after the event. In addition, a work item may be linked to a particular changeset at any point after the changeset is created, and that work item would show up in the associated work items channel when viewing the changeset details.
Rolling Back a Changeset
Occasionally, a change will be committed to the repository that needs to be reverted. In Team Foundation Server 2010, rolling back a change was only available from the command line. However, since Team Foundation Server 2012 you have been able to roll back a change from the history view by right-clicking, or from the changeset details page in Team Explorer.
Shelvesets
Sometimes, when you work on a set of files, it is useful to store the changes on the server without committing those changes to the main code line that the rest of the team is working on. Perhaps because you want to save progress on a particularly large change, you might want to share a set of changes with a colleague on a different machine. Team Foundation Server provides a simple mechanism to help in those instances—the shelveset.
A set of pending changes can be saved to the server in a shelveset—a process called shelving. A shelveset is uniquely identified by the owner and a name given to the shelveset.
Shelvesets share much in common with changesets. They can contain the same metadata (work item associations, check-in notes, comments, and so on). However, they are not versioned in the same way. If the same person saves a set of changes to a shelveset with the same name, the contents of that shelveset will be overridden with the contents of the new shelveset. In addition, shelvesets can be deleted. Unlike when a file is deleted in version control, if you delete a shelveset, the contents of that shelveset are gone. A shelveset cannot be undeleted. Therefore, a shelveset is a temporary store of data on the server, but one whose lifetime is controlled by the owner of the shelveset.
To get the contents of a shelveset into a workspace, you first find the shelveset and then you unshelve it. To find a shelveset belonging to you or another user, go to the Pending Changes page in Team Explorer and select Find Shelvesets from the Actions menu. You can unshelve into different workspaces, on different computers. You can e-mail the name of a shelveset to a team member, and that person can find it by your user name, look at the details, compare the files in it with other versions, and even unshelve the contents into their workspace, provided they have suitable working folder mappings for the shelved files.
For many instances, judicious use of shelvesets can be a quick and easy way of passing around and storing version control data with your team, and can reduce the need for temporary private branches of code. However, shelvesets do take up some resources on the server, so you should delete old shelvesets when no longer needed.
Shelvesets are used by the My Work feature covered later in this chapter and the gated build and buddy build features discussed in Chapter 18.
Branches
Generally speaking, a branch in Team Foundation Server can be thought of as a folder that contains a copy of the source tree from another area in the tree taken at a point in time. A branch is useful when parallel areas of development are required.
Note
For more information about branching concepts, see Chapter 5. For more detail and best practices on how to branch and merge with Team Foundation Server, see Chapter 10, and for some examples of using branching in common version control scenarios see Chapter 11.
In Team Foundation Server 2005 and 2008, a branch was exactly that—a folder. However, in Team Foundation Server 2010, branches were promoted to be a first-class citizen. As shown in Figure 6.14, a branch has a unique icon in source control to distinguish it from regular folders. It also can contain additional metadata (such as the owner), and description, as well as the relationships between it and other branches.
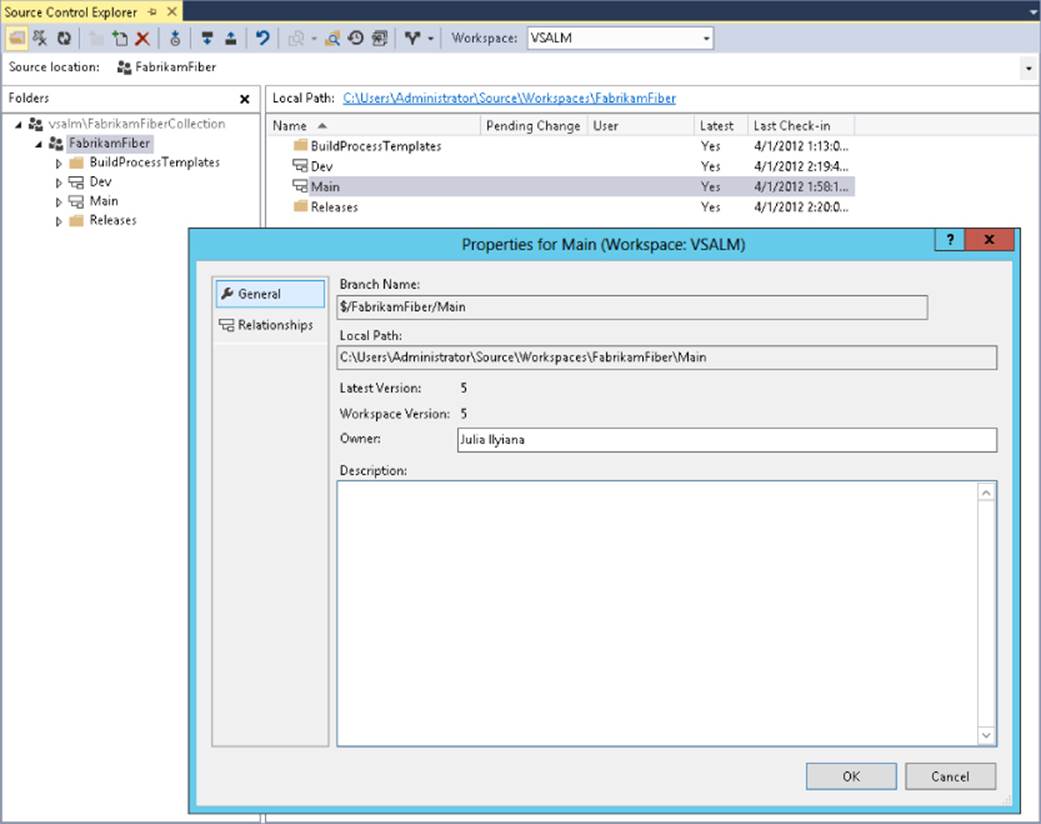
Figure 6.14 Information displayed for a branch
You can convert an existing folder to a full branch object very easily by right-clicking the folder in Source Control Explorer and selecting Branching and Merging ![]() Convert to Branch. If you created a Main folder when adding your solution to version control at the beginning of this chapter, then convert this to a full branch now.
Convert to Branch. If you created a Main folder when adding your solution to version control at the beginning of this chapter, then convert this to a full branch now.
Using Source Control Explorer
The Source Control Explorer (see Figure 6.15) provides a view of your current Team Foundation Version Control workspace. You can show the Source Control Explorer by clicking the link in the Team Explorer home page or in Visual Studio by going to View ![]() Other Windows
Other Windows ![]() Source Control Explorer.
Source Control Explorer.

Figure 6.15 Source Control Explorer
Apart from the files and folders, the Source Control Explorer contains several useful areas. In Visual Studio 2013, the toolbar for the source control editor is inside the control—not part of the main Visual Studio toolbars. In addition to shortcuts to a variety of actions, the toolbar also contains the Workspace selection drop-down menu, which shows you which workspace you are currently viewing in Source Control Explorer, and allows you to quickly switch between workspaces or manage workspaces.
Be Careful When Switching Workspaces
In Visual Studio 2013, a lot has been done to reduce friction and also to allow you to be very productive with version control without having to understand the concept of workspaces. Therefore, you often have just a single workspace when starting out with Team Foundation Server. However, if you do create additional workspaces, be cautious that switching the workspace you are looking at in Source Control Explorer does not affect the workspace viewed in the Pending Changes page (which is switchable separately in the Pending Changes page when you have multiple workspaces available).
The Source Location shows the server path that you are currently navigating. You can type in or paste a server path if you know exactly where you want to browse. When you press Enter, you will navigate to that area. If you click the drop-down arrow, you can navigate up the folder hierarchy from your current location. The Local Path shows which folder maps to the server path being viewed. If a mapping is present, Local Path is clickable, and doing so will open a Windows Explorer window showing that local path.
From Source Control Explorer, you can view, add, delete, and undelete files, as well as check in, check out, branch, merge, view history, view properties, and perform all other version control operations. Think of Source Control Explorer as your master control area for Team Foundation Version Control.
Managing Solution Source Control Bindings
The mapping between a solution in Visual Studio and the version control settings is stored in the .sln file. If you wish to customize the bindings, or remove them entirely, then go to File ![]() Source Control
Source Control ![]() Change Source Control while editing a file in the solution.
Change Source Control while editing a file in the solution.
If you used the VSS upgrade wizard to import a VSS repository into Team Foundation Server, you should find that your bindings for the solution have been automatically converted for you. If not, you can use the tfpt bind command in the Team Foundation Server Power Tools to do this in an automated way. Or you can fix the bindings the first time you open the solution by removing the old bindings and adding the new ones in the Source Control dialog box.
However, if you manually moved your source over from the latest version from VSS or any other version control system, you might have to modify the bindings the first time you open the solution. Equally, if you have been provided with a copy of some source code that was previously checked into a Team Foundation Server repository that you do not have access to, then you can use this dialog box to remove the bindings.
Chapter 9 provides more information on migrating from legacy version control systems.
Viewing History
To view the history of a file or folder, in Source Control Explorer, right-click the file or folder, and select View History from the context menu. This opens a new document tab in Visual Studio.
The new History window is now a tabbed document window in Visual Studio. This allows you to open multiple History windows for research, something that was not possible in Visual Studio 2010 or below. The History window also provides a view of both the changesets associated with the file or folder, as well as any labels.
You have several options when you click the Changeset tab. You can select a changeset and click the View button to view the file version for that particular changeset. You can click the Changeset Details button to view the details for a particular changeset, including all the files that make up the changeset and any associated work items. You can compare two different versions of a file or folder to see the differences. Clicking the Annotate button allows you to see, line by line, who made what changes to a particular file.
You can select a changeset and click the Get This Version button. This will replace the current version of this file in your workspace with the selected version, enabling you to easily return to an earlier version of a file. Finally, you can right-click a file version and click Rollback Entire Changeset. The effect of this is to revert all the changes that were made in that changeset. Note that this applies not just to this file, but to all files in the selected changeset.
The History window also allows you to track the changes across multiple branches, merges, and renames.
Note
Chapter 10 provides more information on branching and merging.
Labeling Files
A label is a marker that can be attached to files and folders. This marker allows all the files and folders labeled together to be retrieved as one collective unit. Labeling was available in previous versions of Visual Studio, but it had some issues. Labeling an item could sometimes be a tedious and complex process, and labeling a large number of files could be very slow.
To create a new label, in Source Control Explorer, right-click the file or folder you want to label, and from the Advanced context menu, select Apply Label. This opens the New Label window, as shown in Figure 6.16.
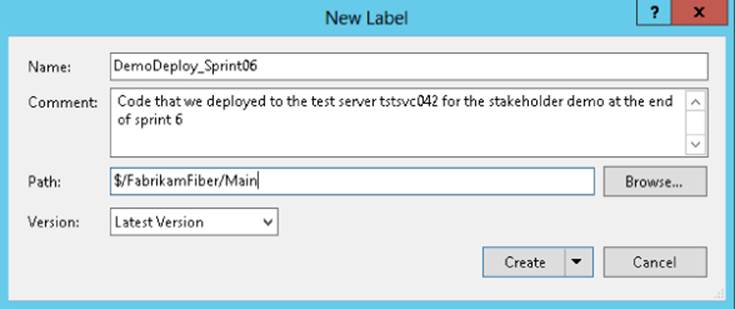
Figure 6.16 New Label window
In this window, you can enter the label name and a comment. You can also select the version that you want to label. You can choose to label by Changeset, Date, Label, Latest Version, or Workspace Version. Click the Create button to create the label.
Notice that the Create button is a drop-down arrow. Clicking the arrow provides you with two options. You can create the label as is, or you can create the label and then edit it. If you select Create and Edit, the label will be created, and you will be presented with a new tab, as shown in Figure 6.17.
Figure 6.17 Using Create and Edit to create a label
This tab allows you to make multiple changes to the label. You can add new files to the label. You can change the version of an individual file that the label is currently applied to. And you can remove files from the label. All of this is made easily accessible by using a tree-view control.
Note
In Team Foundation Server, labels can be edited at any point after they are created by any user who has the “Administer shelved changes” permission set to Allow. This is very different from VSS, where labels are fixed once created, and more like the tagging behavior in SVN. Because of this reason, labels in Team Foundation Server should not be used for strict auditing purposes.
Recovering When Things Go Wrong
Occasionally, you can get your workspace into a confusing state. This was more common with Server Workspaces when you were initially learning Team Foundation Server and were doing a lot of changes outside of the IDE. However, even with Local Workspaces things can sometimes get confusing when you get started.
Once you understand Team Foundation Version Control, you will find that this never happens to you. However, until you understand how the server thinks about version control, the following tips can help you get your workspace back into a state that is more understandable. If you find that you have a development workflow that requires you to take any of the following steps as part of a normal day, then you are doing something wrong, and you should look again at how you are using Team Foundation Version Control.
Get Specific, Force Overwrite, Force Get
The Get Specific Version dialog box has options to “Overwrite writable files that are not checked out” and “Overwrite all files even if the local version matches the specified version.” These two options can help you if you are using a Server Workspace, but have been editing files outside of Visual Studio or Eclipse and you want to replace them with the server version.
The default behavior when doing a Get is to warn you when you attempt to download a new version of a file that is writable locally, and not to download it. This is to prevent overwriting of changes that you may have made locally and wanted to keep.
If you force a Get, you will download all files again, even if the server thinks you already have a copy in your workspace. This allows you to recover from the situation where you have deleted a file locally in a Server Workspace but have not told Team Foundation Server, and so it will normally not send the file to you when you perform a Get because it thinks you have it. The Force options are almost never required when using a Local Workspace.
Detect Local Changes in Eclipse
You can detect local changes in the Team Foundation Server plug-in for Eclipse, available as part of Team Explorer Everywhere. You can do this by selecting Detect Local Changes from the Actions menu in Team Explorer, or by right-clicking a project in Package Explorer. If you have a Local Workspace, a full disk scan will be performed to detect changes. Even when used with a Server Workspace, your Local Workspace will be compared with the server version, and the plug-in will attempt to check out files that you have changed.
Re-Create the Workspace
If all else fails, then the nuclear option is to go to the Manage Workspaces dialog box (File ![]() Source Control
Source Control ![]() Workspaces in Visual Studio), delete your workspace, and create it again. Move any files that were in your local working folders to a temporary directory, and start all over again.
Workspaces in Visual Studio), delete your workspace, and create it again. Move any files that were in your local working folders to a temporary directory, and start all over again.
This is the Team Foundation Server equivalent of rebooting your version control state. When you delete a workspace, all information about what files you have downloaded, what locks you might have invoked, and what files you had checked out is removed. Therefore, this option should not be taken lightly but is guaranteed to get you back into a known good state.
Keeping on Task with My Work
If you have Visual Studio Ultimate 2012 or 2013, or Visual Studio Premium 2012 or 2013 installed, then you will see the My Work section in Team Explorer. This feature was added to Visual Studio 2012 and was designed to help you switch context between activities, thus allowing you to suspend and resume tasks and bring along all the information and tool windows you need to work on those tasks.
A common problem with development is how long it takes you to get “into the zone” when solving a problem or developing a feature. For example, imagine that you are working on a new complex task; you have it partially implemented, but the code is nowhere near finished yet. You have a set of files open in Visual Studio, a bunch of tool windows just in the position you are working, and a set of breakpoints and watches that you have set up to help you solve the exact problem you are working on. But then an urgent bug fix is found that needs your immediate attention, or maybe colleagues are requesting that you do a code review so that they can get their work checked in and move onto the next task. Getting back to where you were before the interruption can take a long time, not just getting your brain back into gear, but also all the mechanics of getting the files open again, and the windows and breakpoints set up how you wanted them.
The My Work page in Visual Studio aims to help you get back into the zone as quickly as possible and stay in the zone as much as possible by centralizing all your activities together. This makes it easier for you to switch contexts when the inevitable interruptions occur and also makes it even easier to keep your team up to date with what you are working on.
As previously stated, the My Work page is available only if you have Visual Studio Ultimate 2012 or 2013, or Visual Studio Premium 2012 or 2013 installed on your machine. If you have one of those versions installed then you will see My Work is the first tile of your Team Explorer home page. Clicking the link will take you to the My Work page shown in Figure 6.18.
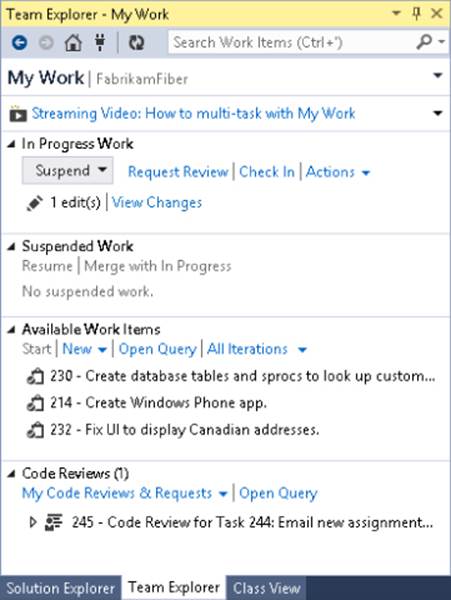
Figure 6.18 My Work page in Team Explorer
Note that the My Work page automatically picks up what your team context is from Team Explorer and shows you work items assigned to you in the Available Work Items section. If you compare the available work items in Figure 6.18 with the agile planning task board view on the web, as shown in Figure 6.19, you can see the same three tasks assigned to Damian Brady.
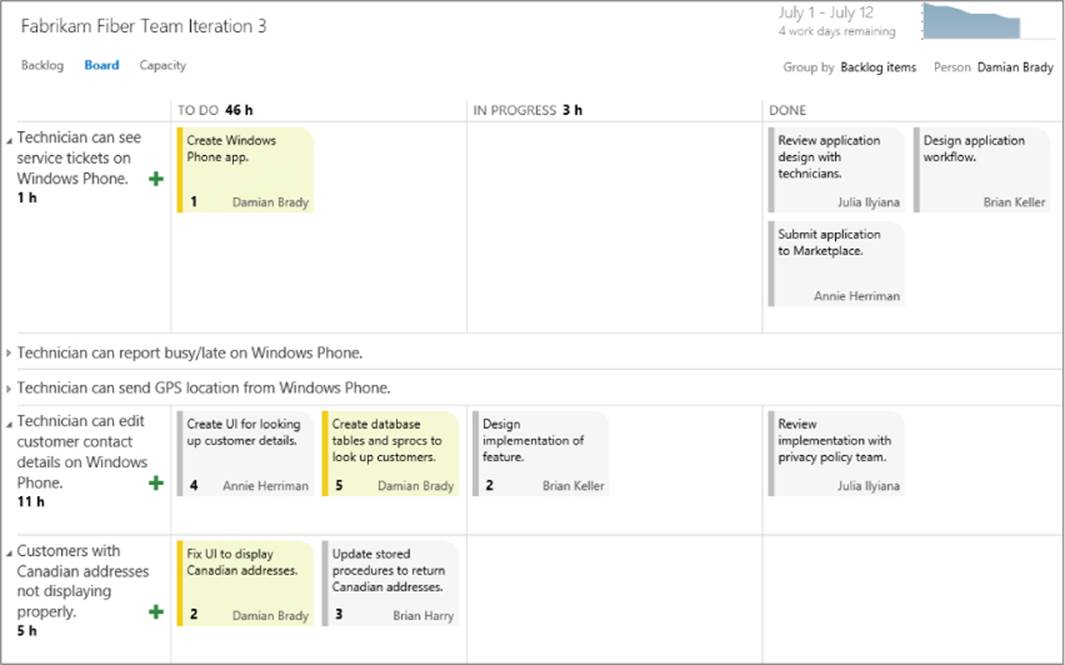
Figure 6.19 Agile task board displaying work to do
Note
The Agile planning tools are covered in detail in Chapter 14.
In this example, start work on Task 214, which is to create a Windows Phone application. To track what you are working on (and also to let the team know that you are working on it), you drag the task from Available Work Items up to In Progress Work. You could also right-click the task in the Available Work section and select Add to In Progress. The My Work page will now look as shown in Figure 6.20.
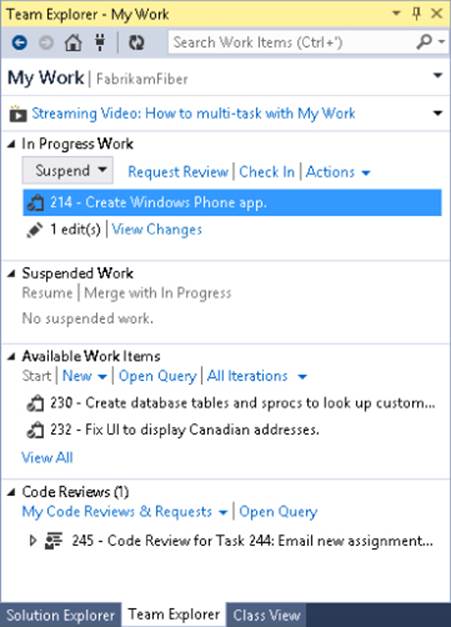
Figure 6.20 My Work updated
When you move the work item from Available to In Progress, Visual Studio updates the status of the work item accordingly. This makes it easy for you to remember what you are currently working on, but also allows your team members to see what is happening when they check in with the task board, as shown in Figure 6.21, where the highlighted task has moved over to the In Progress column.
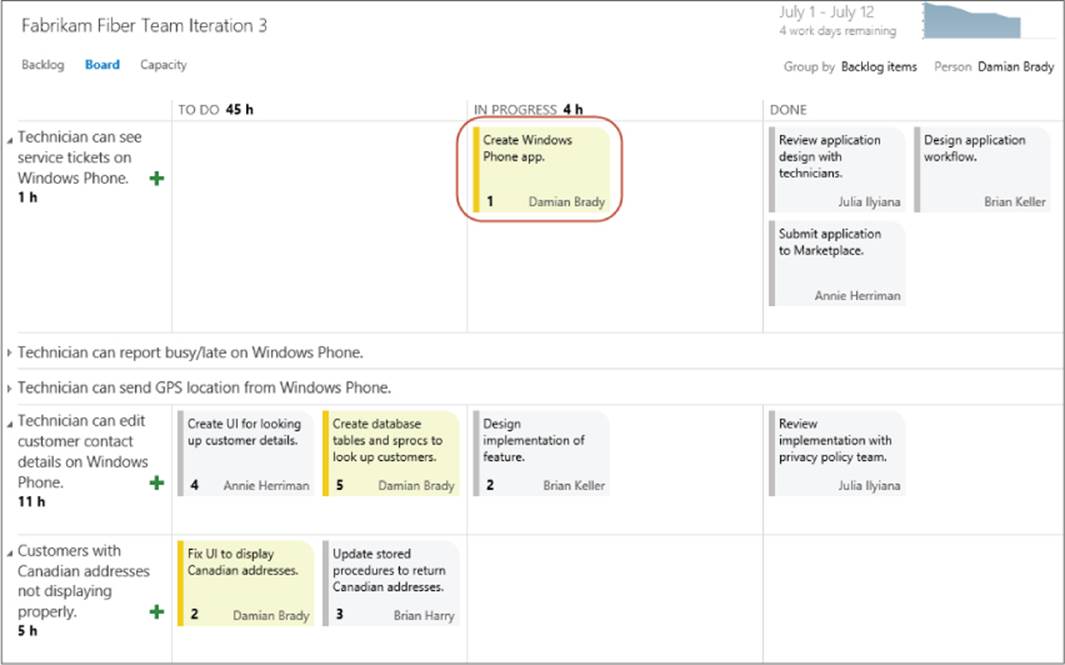
Figure 6.21 Task automatically updated in task board
Limited Synchronization of In Progress Work
Moving work items between states on the boards in Team Web Access is distinct from moving them between sections in My Work. In Visual Studio, you are identifying the items you are working on right now, while the State of a work item represents its state in the sprint as a whole. A work item may be In Progress without anyone actively working on it.
Moving from Available to In Progress in My Work will change the status of your work item to In Progress; however, moving it back to Available or suspending work will not reset the value to To Do. Similarly, moving a work item to In Progress on the board will not move it to In Progress in Visual Studio.
This limited synchronization makes sense if you consider that a single developer may have a number of workspaces or Visual Studio instances running in different locations, each of which is being used for working on different tasks. Indeed, a team member may not be using Visual Studio at all in the case of designers or database specialists.
As you start to make changes for your task, the state of your version control changes are shown in the My Work page along with a View Changes link to take you to the pending changes page to see more information, as shown in Figure 6.22.
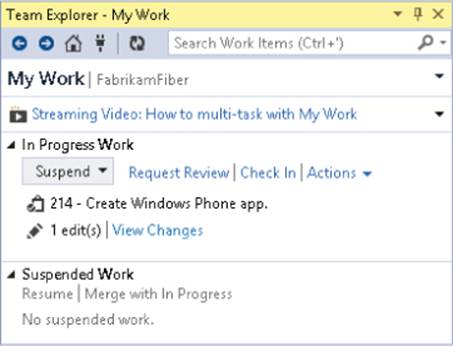
Figure 6.22 Work in progress in Visual Studio
Then a coworker drops by your desk and asks you to take a quick look at the code review that she just sent, as she needs to get the fix checked as soon as possible. You want to suspend your current work so that you can go do the code review and then come back to your task later. Simply press the Suspend button in the My Work page.
When you press the Suspend button, it will create a new shelveset for you containing your changes in version control. The shelveset will, by default, have the title of the first work item you added to your In Progress Work section, but you can edit the name before pressing the Suspend button again, as shown in Figure 6.23.
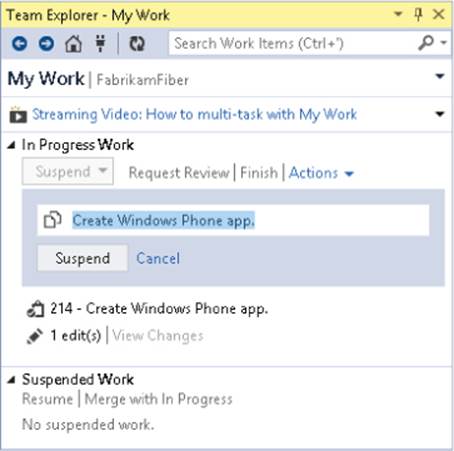
Figure 6.23 Suspending work
In addition to creating the shelveset, Visual Studio also stored the windows that you had open, the position of your tool windows and breakpoints, and so on as properties on that shelveset.
Next, you will do the code review as requested and send over your comments. A step-by-step guide to the code review process in Visual Studio appears later in the chapter.
Once you have finished reviewing your coworker's code, you are ready to pick up where you were. Returning to the My Work page in Team Explorer, you see that your Suspended Work section contains what you were last working on, as shown in Figure 6.24, which is very handy in case you had forgotten. Select the suspended work and press Resume.
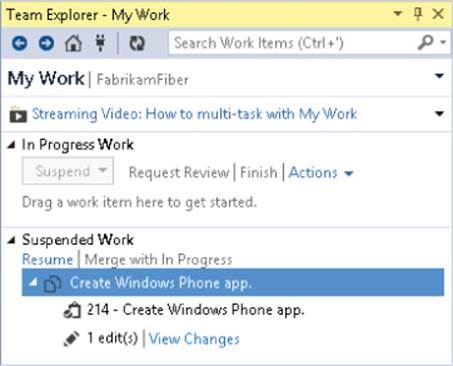
Figure 6.24 Resuming suspended work
This quickly unshelves the changes, restores the files that you had open, opens tool windows, and restores your breakpoints.
Note that if you forget to resume your work immediately, but instead do what many people do and just come back to your desk and start working on something else, you can select the suspended work and merge it with the current work in progress (thanks to the changes in Team Foundation Server 2012 to support merge on unshelve and all the automerge improvements).
When the task is complete, you can press the Check In link directly in the My Work page. That will take you to the Pending Changes page to review your changes, enter a comment, and check in. Note that if you are associating a work item on check-in as Resolving the work item, then when you perform the check-in, the work item will automatically be moved onto its next state, which in your case is Done.
The work item is then updated in the team task board, and a link is created between the changeset created and the work item you associated the change with. All this happened simply and easily by using the My Work page.
Note
The My Work page is so useful that you might find yourself going there a lot. A quick keyboard shortcut to get to the My Work page from anywhere in Visual Studio is Ctrl+0, then M. For a complete list of keyboard shortcuts in Team Explorer seehttp://aka.ms/TEKeys2013.
Managing Code Reviews
Code reviews are formal or informal reviews of code by a lead or peer developer before a developer checks in his or her source code changes. Following are some examples of what code reviewers look for when they review the code:
· Best practices
· Potential bugs
· Performance
· Security threats
· Following internal coding standards
· Previous code review suggested changes
Visual Studio Premium 2013 and Visual Studio Ultimate 2013 contain a code review feature that, in conjunction with Team Foundation Server 2013, allows a rich code review experience.
Note
While the Premium 2013 and Ultimate 2013 editions of Visual Studio contain a rich code review experience, code reviews can still be carried out by developers not using one of those Visual Studio SKUs by using Team Foundation Server shelvesets to pass around the files to be reviewed and by making use of Check-In notes to record the code reviewer for a particular changeset.
Note
Team Foundation Server 2013 introduces a feature called lightweight code comments for commenting on changes from within the browser. In Team Web Access, team members can add notes to an entire changeset or shelveset, a single file, or even to individual lines within a file. Users can reply to comments, creating a hierarchy of messages like a message board.
Requesting a Code Review
You can request a code review of your current pending changes from the Home page of Team Explorer from the My Work page, as shown in Figure 6.25, or from the Actions menu in the Pending Changes page of Team Explorer. Alternatively, if you would like to request a code review of changes already committed to the repository, then you can right-click a changeset in the History view and request a review from there, as shown in Figure 6.26.
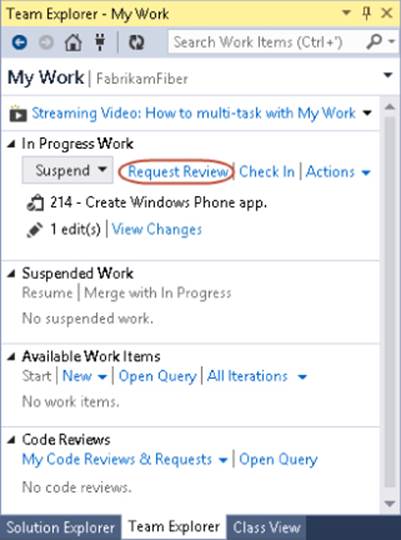
Figure 6.25 Requesting a code review from the My Work page
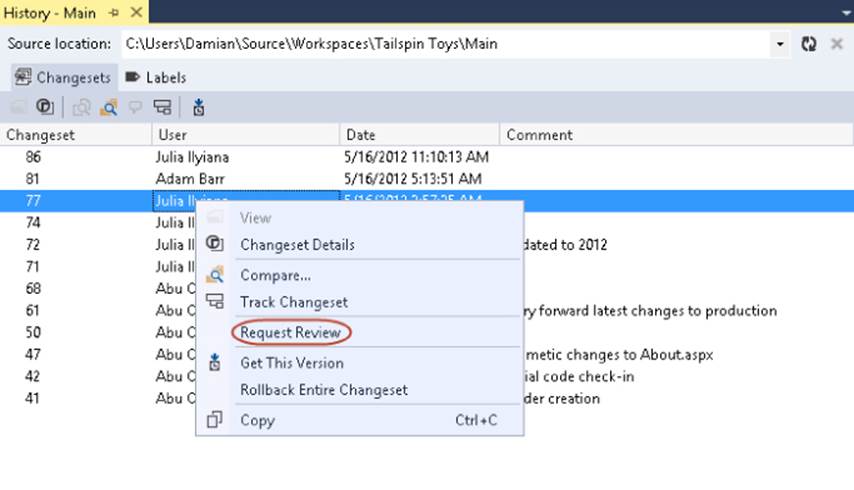
Figure 6.26 Requesting a code review of a changeset from the History view
Regardless of how you request the code review, you will be taken to the New Code Review page of Team Explorer, as shown in Figure 6.27. Here, you enter the name of the people you want to perform your review (you must provide at least one name, but you may request several reviewers). You also provide a title for the code review (which is taken from the Changeset comment or any currently associated work items by default). Then you can specify an area path for your code reviews—by default, these are scoped to the Team Project, but if you have areas defined for the different elements of your project, then you might want to have reviews categorized by these areas. Finally, you can add a description about what it is in particular you want the reviewers to focus on and press Submit Request. Behind the scenes, a new Code Review Request work item is created to help track the status of your review with a Code Review Response work item to track the responses. If this is a review of pending changes (as opposed to a review of a checked-in changeset), then a new shelveset will be created in Team Foundation Server containing your selected changes.
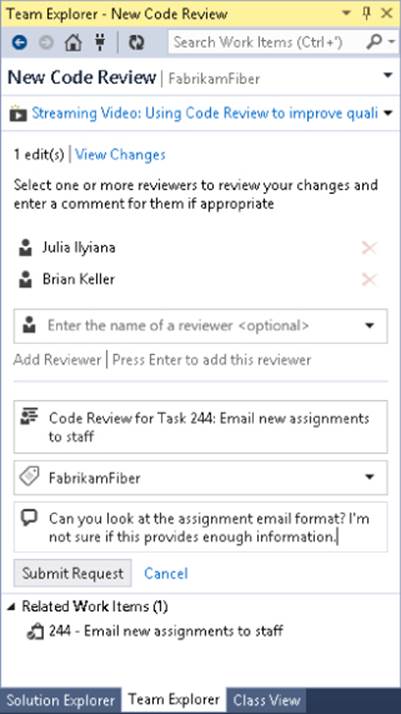
Figure 6.27 Creating a New Code Review request
Performing a Code Review
Your team members will see your Code Review requests appear in their own My Work view, as shown in Figure 6.28, from where they can open them. Selecting the link below the Code Reviews section heading in the My Work page allows you to filter the reviews to show code reviews that you have initiated, your reviews and requests for reviews sent to you, incoming code review requests, and recently finished or recently closed reviews.
Note
You may want to configure an e-mail alert so that team members are notified on new Code Review requests by e-mail as soon as they are created or when someone leaves comments for them on a requested review. That way, if users are not in Visual Studio or not using the My Work page, they will know about a Code Review request. You can edit alerts by going to Team ![]() Project Alerts in Visual Studio or by viewing the page directly in Web Access.
Project Alerts in Visual Studio or by viewing the page directly in Web Access.
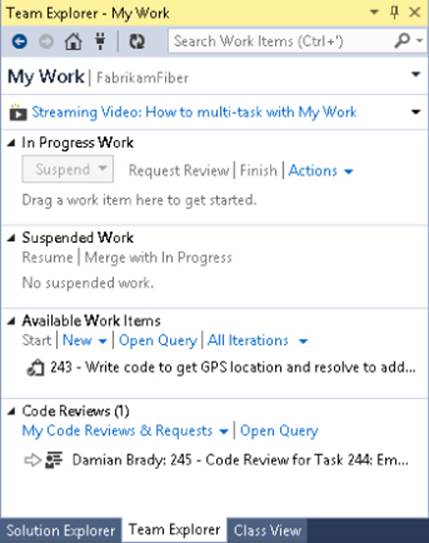
Figure 6.28 Code Review requests in the My Work Page
Incoming requests are indicated by the arrow next to them, as shown in Figure 6.28. You can open a Code Review request by double-clicking it, which will show you the Code Review page in Team Explorer, as shown in Figure 6.29. You can see the details of the code review, the reviewers, related work items, files, and any comments left by other reviewers.
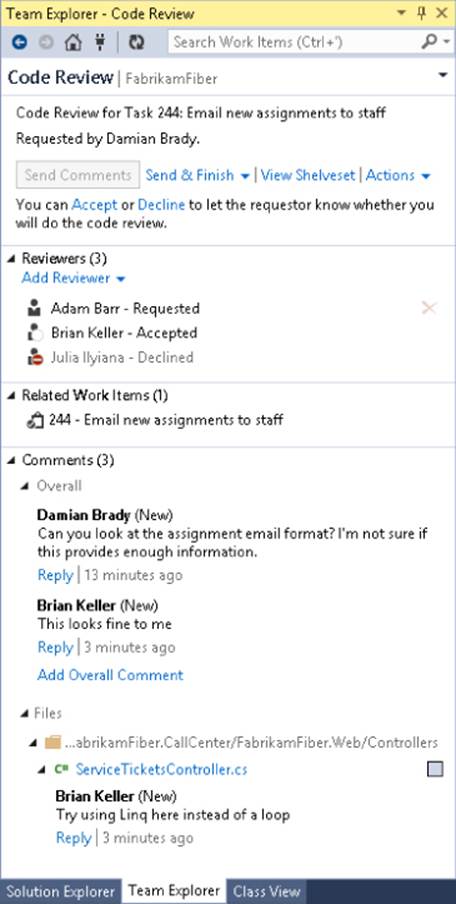
Figure 6.29 Incoming Code Review page in Team Explorer
The first thing you should do is use the links at the top of the code review, as shown in Figure 6.29, to indicate whether you Accept or Decline the Code Review request. This step is completely optional but is useful to let others on your team know that you are signing up to do the code review. If you decline the request, then you should provide a comment as to why you don't need to review it. You may also want to add additional reviewers if you think that someone else on the team should give a second opinion on the changes.
Once you have accepted the code review, you can inspect each file in the review. Clicking a file will open it in the diff view. From here you can select an area of code, right-click, and leave a comment on particular line ranges. You can right-click a particular file in the Code Review page and select Add File Comment to leave an overall comment for the entire file. You can also use the check boxes against the files in the Code Review page to indicate that you have reviewed that file, also shown in Figure 6.30.
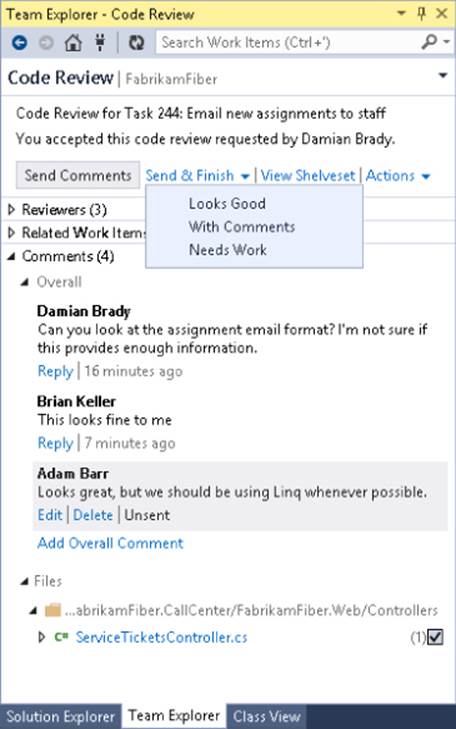
Figure 6.30 Conducting a code review in Visual Studio
Finally, you can leave an overall comment on the review and then click the Send and Finish link shown in Figure 6.30 to indicate whether the code review is good (i.e., can be checked in) or needs work before being checked in (and possibly another code review).
Completing the Code Review
As you receive code review comments, you will see them arrive in the My Work page in Team Explorer. You may also want to sign up for e-mail alerts so that you are notified when you get code review comments back. From the Code Review page in Team Explorer, shown in Figure 6.31, you can view the shelveset that contains the code review changes and easily unshelve the changes back into your workspace. Doing so allows you to make any changes as appropriate based on the comments from your team before checking the code in. For each comment provided, you may reply to that user if you need to have further discussion on a point. You can also use the check marks on the right side of the page to keep track of when you have completed all the changes you want to make to files based on the feedback.
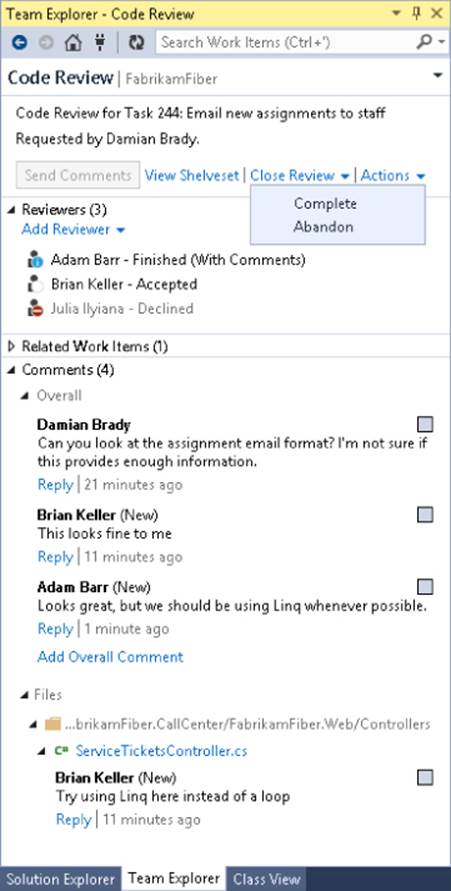
Figure 6.31 Reviewing Code Review responses
Finally, assuming the code review is now complete, you can close the review as Complete or Abandoned. Use Abandoned if the comments that came back indicated that you needed to rethink your changes and will be sending those for another code review, or mark as Complete if you have responded to all the comments and taken action as appropriate.
Team Foundation Server Version Control in Eclipse
So far, this chapter has mostly focused on the experience when performing version control operations inside Visual Studio 2013. However, Team Foundation Server is available inside a number of environments, not just older versions of Visual Studio (such as Visual Studio 2012, Visual Studio 2010, and Visual Studio 2008, which have Team Foundation Server integration), but also even older versions or IDEs that support the Microsoft Source Code Control Interface (MSSCCI) API for version control.
Team Explorer Everywhere is available to help you connect to Team Foundation Server from within Eclipse or from UNIX-based operating systems such as Mac OS X, Linux, Solaris, AIX, or HP-UX. With the 2012 release of Team Foundation Server, Microsoft made Team Explorer Everywhere available free of charge to anyone with the appropriate license to connect to a Team Foundation Server (i.e., anyone who has a Team Foundation Server Client Access License). Previously, Team Explorer Everywhere was available as a separate commercial tool from Microsoft and before that from a partner company called Teamprise. But, because of the popularity of Team Foundation Server for use in enterprises for their Eclipse and cross-platform development, as well as their .NET development, the decision was made to increase the investment in those integrations and make it part of the core Team Foundation Server offering.
Team Explorer Everywhere is an implementation of the Team Foundation Server protocol written entirely in Java, using the same web services that the .NET implementation uses. Therefore, the Team Explorer Everywhere clients run anywhere that Eclipse and Java run, not just on Windows, but on Mac, Linux, and many common UNIX platforms. Microsoft is fully committed to keeping Team Explorer Everywhere and Eclipse up to date so that developers in Eclipse can be full contributors to a software development team using Team Foundation Server.
While many of the experiences in working with Team Foundation Server in Eclipse are similar to working inside Visual Studio 2013, as shown in Figure 6.32 (especially the Source Control Editor, work item tracking, and build automation functionality), there are a few differences because of the way that version control tools typically integrate with an Eclipse environment.
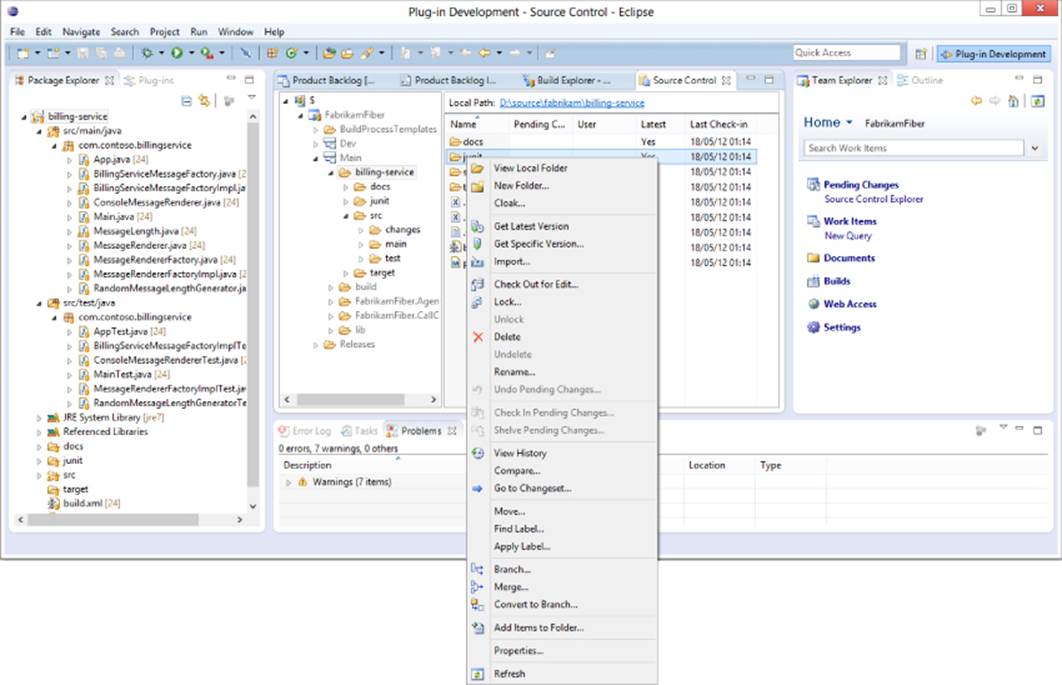
Figure 6.32 Working in Eclipse
Eclipse Workspaces Versus Team Foundation Server Workspaces
Unfortunately, the word “workspace” in the Eclipse and Team Foundation Server worlds means different, yet slightly overlapping, things. A Team Foundation Server workspace was defined earlier in this chapter. The Eclipse workspace contains a set of Eclipse projects, along with the set of user preferences for that instance and other configuration data.
However, the set of projects in an Eclipse workspace maps well into the concept of working folder mappings in a Team Foundation Server workspace. To reduce the complexity of dealing with multiple concepts called “workspace,” the Team Foundation Server plug-in for Eclipse allows for only one active Team Foundation Server workspace per Eclipse workspace. In Team Explorer Everywhere for Team Foundation Server 2013, you can easily switch which Team Foundation Server workspace is the active one from the Pending Changes page in Team Explorer.
Installing the Team Foundation Server Plug-In for Eclipse
To install the Team Foundation Server plug-in from the media, go to Help ![]() Install New Software in Eclipse. This displays the Available Software wizard. Click the Add button to add an Eclipse update repository, and then enter the location ashttp://dl.microsoft.com/eclipse/tfs. Then click OK.
Install New Software in Eclipse. This displays the Available Software wizard. Click the Add button to add an Eclipse update repository, and then enter the location ashttp://dl.microsoft.com/eclipse/tfs. Then click OK.
Select the check box for the Team Foundation Server plug-in for Eclipse. Optionally, you can uncheck the setting for “Contact all update sites during install to find required software.” This works because a typical Eclipse-based product contains the requirements for Team Explorer Everywhere, and not checking external update sites will reduce the installation time.
Alternative Installation Methods
The recommended way to install Team Explorer Everywhere in Eclipse is via the Eclipse marketplace or the Eclipse update site given previously. However, you can also download Team Explorer Everywhere from the Microsoft Download Center or from MSDN.
Go through the rest of the wizard and accept the license terms. Once you click Finish, the Team Foundation Server plug-in should be installed, and you will be prompted to restart Eclipse (which you should do).
This will add the Team Explorer view to Eclipse, and a Team Foundation Exploring perspective that you can use to connect and work with Team Foundation Server resources.
Sharing Eclipse Projects in Team Foundation Server
Now that you have the Team Foundation Server integration installed, the next thing you want to do is add your Eclipse project into Team Foundation Server so that it is shared with the rest of the team. This is done in a similar way to the “Add solution to source control” functionality in Visual Studio.
However, in Eclipse, version control providers make this functionality available by right-clicking the project in Eclipse and selecting Team ![]() Share Project. This displays a list of version control repository types. As shown in Figure 6.33, Team Foundation Server will now be available in that list.
Share Project. This displays a list of version control repository types. As shown in Figure 6.33, Team Foundation Server will now be available in that list.
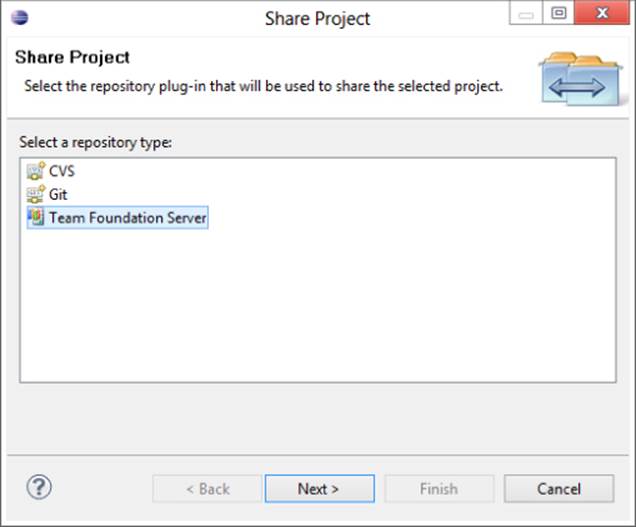
Figure 6.33 Team Foundation Server displayed as a repository type
Select Team Foundation Server. On the next screen, you will be prompted to select your Team Foundation Server. If you have not set up an existing Team Foundation Server connection, then you will be prompted for the name or fully qualified URL for your Team Foundation Server instance.
Note that if your Team Foundation Server instance is not installed at http://server_name:8080/tfs, you will want to ensure that you share your Team Foundation Server address with the development team using the fully qualified URL (that is,https://fabrikam.tfspreview.com) instead of the hostname to ensure that the right connection settings are used.
Once you have selected the server, you will be asked to pick the project collection and team project in which you wish to share your Eclipse project, as shown in Figure 6.34.

Figure 6.34 Sharing a project with Team Foundation Server
Then, on the following page in the wizard, you will be prompted to select which Team Foundation Server workspace to use to share your project. Note that you may wish to use multiple Team Foundation Server workspaces on the machine to keep your Eclipse workspaces separate, or your Eclipse and Visual Studio workspaces separate. However, a single workspace can safely be shared by both Visual Studio and Eclipse on the same machine, should you have both applications installed.
If you have never connected to the Team Foundation Server project collection from this machine before, a new private workspace will have been created for you by default. Select the workspace you require (or add a new one and then select it) and click Next.
You will then be presented with the page shown in Figure 6.35, which asks you where to place your project in the version control repository. Put your project into a folder called Main if you think you might want to use the branching features of Team Foundation Server in the future.
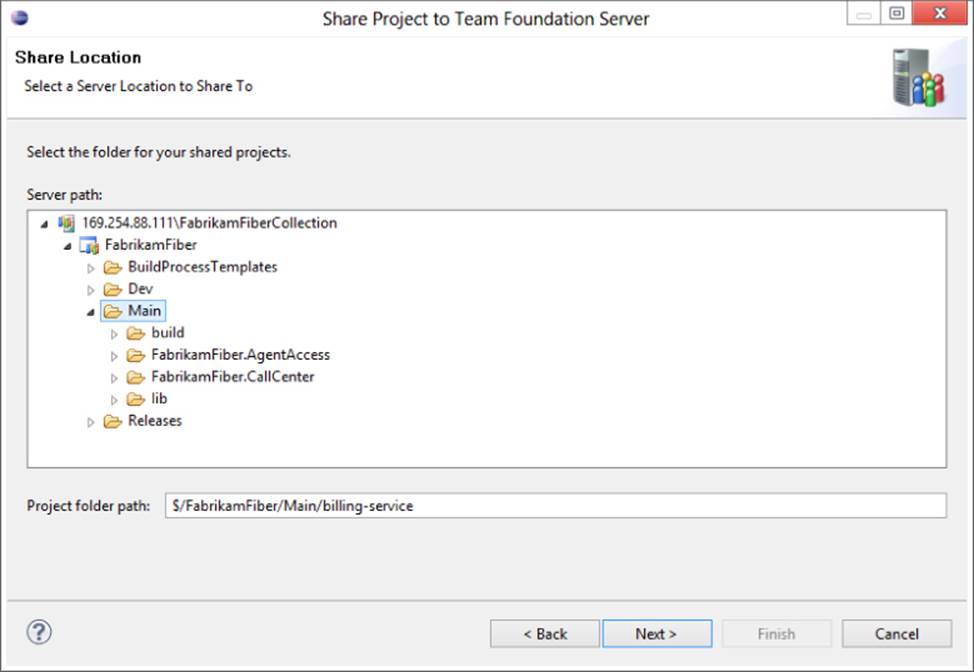
Figure 6.35 Choosing where to share a project in version control
The final page in the Share Project Wizard will confirm the details of the sharing, allowing you to review the details before you click Finish. Note that the plug-in will automatically create any required working folder mappings.
Once shared, the project resource in Package Explorer will be decorated, indicating that they are under Team Foundation Server version control; however, they are not available on the server for others to use until you have checked in the files that you are sharing.
You can check in your files from the Pending Changes page in Team Explorer or by right-clicking your project and selecting Team, Check-in. The Pending Changes page in Team Explorer should have been opened for you as soon as you finished sharing the project; however, if you ever lose the Team Explorer window from your perspective, go to Windows ![]() Show View
Show View ![]() Other
Other ![]() Team Foundation Server
Team Foundation Server ![]() Team Explorer. You can position the Team Explorer window where it most makes sense to your workflow.
Team Explorer. You can position the Team Explorer window where it most makes sense to your workflow.
Once you have navigated to the Pending Changes page, check your project into Team Foundation Server by clicking the Check In button, as shown in Figure 6.36.
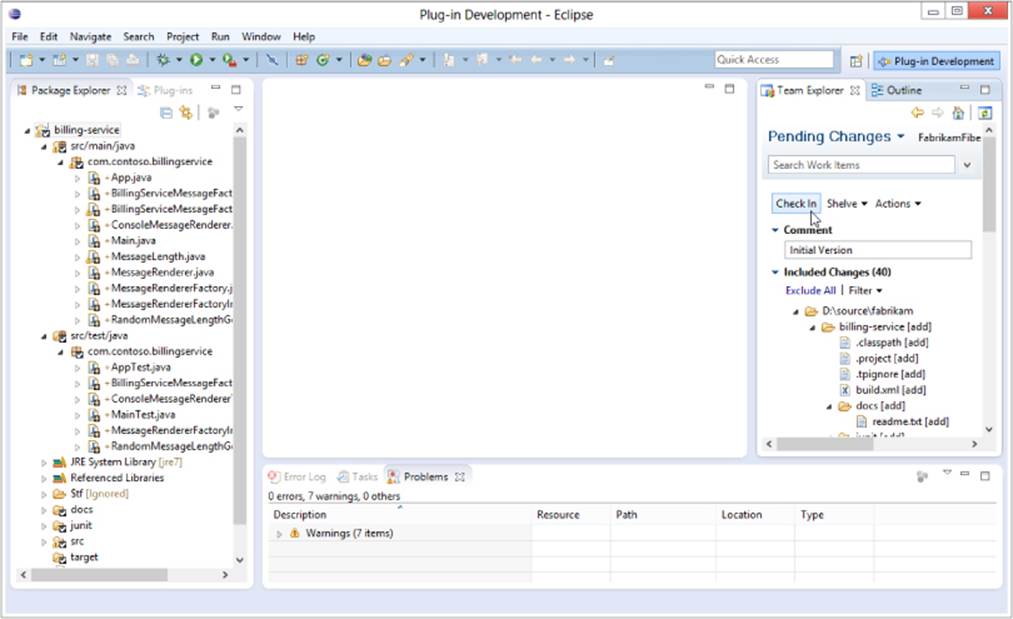
Figure 6.36 Check In button in Pending Changes page
Once you have checked in your files, you can work with the rest of your team using Team Foundation Server just as the .NET developers would in Visual Studio. In Eclipse, the version control functionality is available by right-clicking a file and selecting Team from the context menu.
Importing Projects from Team Foundation Server
If someone else on your team has already added the Eclipse project to Team Foundation Server, you will want to download the project locally to work on it. In Eclipse, this is accomplished by importing the project into your Eclipse workspace. You can run the Import Wizard by connecting to Team Foundation Server through the Team Foundation Server Exploring Perspective, performing a Get on the files using Source Control Explorer, and then right-clicking the project folder and selecting Import from the context menu.
A simpler way to run the Import Wizard is to go to File ![]() Import in Eclipse. Under the Team node, you will find Team Foundation Server if you have the plug-in correctly installed. Connect to the Team Foundation Server project collection and select your workspace in the same way as detailed previously when you looked at the Share Wizard. Then you need to select which project to import, as shown in Figure 6.37.
Import in Eclipse. Under the Team node, you will find Team Foundation Server if you have the plug-in correctly installed. Connect to the Team Foundation Server project collection and select your workspace in the same way as detailed previously when you looked at the Share Wizard. Then you need to select which project to import, as shown in Figure 6.37.
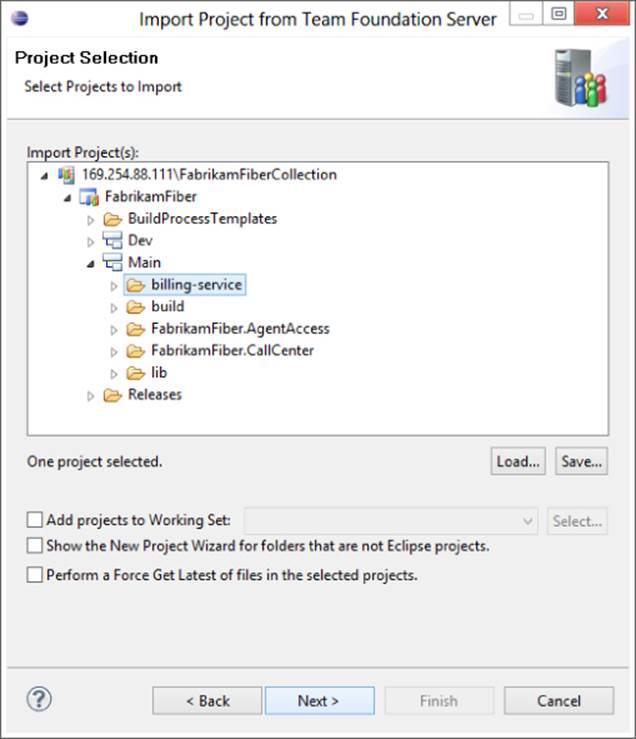
Figure 6.37 Selecting projects to import
You should select the folder that directly contains the Eclipse project (i.e., the one containing the .project file). Note that if you have multiple projects to import, you can Shift-click to select a range, or Ctrl-click the individual projects (Command-click on the Mac). With Team Explorer Everywhere, it is recommended that you share your Eclipse .project files with Team Foundation Server. However, if you do not, you will want to check the “Show the New Project Wizard for folders that are not Eclipse projects” option on this dialog box so that you can define your project settings.
Finally, you will be given a confirmation page explaining which projects you will be importing before you click Finish to download the files to your local machine.
Now that you have a project in the workspace, right-clicking a file managed by Team Foundation Server and selecting the Team menu will show the available version control functions.
Differences between the Eclipse and Visual Studio Clients
Microsoft is fully committed to supporting the needs of Eclipse developers using Team Foundation Server, but there are some differences between the functionality available in one client over the other. For example, Eclipse developers are often familiar with the notion of synchronize (a perspective allowing you to easily see the differences between your Local Workspace and the server repository), and so the Team Foundation Server plug-in for Eclipse provides this capability. The closest alternative in Visual Studio would be a folder compare.
However, the Eclipse integration is designed to provide support for development activities in Eclipse, and so some Team Foundation Server administration activities (such as creating new team projects) are not supported outside of Visual Studio.
Team Foundation Server Version Control from the Command Line
You can manipulate the version control repository from the command line by using the tf command (which is short for “Team Foundation”). In fact, the command-line tool offers much more flexibility and functionality.
Note
In Visual Studio 2013 in Windows 8 and above, the command-line tools are not added to your start page by default. This means using the global search in Windows will not find them unless you add them to your start page manually.
On Windows platforms, the command line ships as part of Visual Studio Team Explorer, which is installed as part of Visual Studio 2013. From a VS2013 command prompt, you can use the tf help command to see the available functionality. On non-Windows platforms, the command-line client is available as part of Team Explorer Everywhere. Unzip the command-line client and put the tf command in your path. You can then use the tf help command to get a list of the commands available.
Note
The majority of the documentation for the command-line client describes arguments prefixed by a forward-slash character (/). However, certain UNIX shells use the / character as an escape character, meaning that if you wanted to use it on the command line, you would have to escape it (that is, use //). Therefore, both the Windows and cross-platform versions of the tf command support the hyphen character (-) as a prefix to arguments. For example, the following commands are identical on Windows:
tf checkin /comment:”This is a test”
tf checkin -comment:”This is a test”
The cross-platform and Windows clients are broadly compatible with mostly the same commands and arguments supported across versions, allowing for reuse of scripts and integrations using the command-line interface. However, they do come from two different implementations of the command-line interface. The Windows version is written in .NET, and the cross-platform implementation is in Java. Therefore, there are some small differences. However, the majority of functionality is the same with both clients.
Getting Help
As mentioned previously, you can use the tf help command to see a list of commands available. To see the syntax for a single command, type tf help command, where command is the name of the command you want to see more about.
Note
Consult the MSDN documentation online at http://aka.ms/TFS2013cmd for more information regarding use of the tf command line.
Using the Command Line
Following is an example that shows a very basic way of working with the command line to demonstrate how it works. Assuming you have never connected to Team Foundation Server before, the first thing you must do is create a workspace on your local computer.
tf workspace -new -collection:http://servername:8080/tfs/
defaultCollection -login:user@DOMAIN,Passw0rd MyWorkspace
In this example, MyWorkspace is the name of your workspace and http://servername:8080/tfs/defaultCollection is the URL to your team project collection. You are passing in your credentials with the command. Note that if you do not provide any credentials when you are working on Windows, or you are using Kerberos on non-Windows platforms, you will connect with the credentials of the currently authenticated user. If you are trying to connect to a hosted TFS instance on visualstudio.com from a non-Windows system, then you will need to have enabled basic authentication in your user profile and use those credentials. Once you have created the workspace, the credentials used are cached in the current user's profile, unless told otherwise.
Next, you create a working folder mapping:
tf workfold -map -workspace:MyWorkspace $/TeamProject/Main/Path.
Here you are creating a working folder mapping in MyWorkspace between the server path $/TeamProject/Main/Path and the current directory (.).
Now, you download the code:
tf get
Then you can edit the files (using the text editor of your choice—in this case, vi, but you might choose Notepad on Windows). Note that as you are using Local Workspaces by default in Team Foundation Server 2013, you do not need to explicitly check out the file first.
vi myfile.txt
Then you want to check the status of your pending changes to make sure the list of edits that you want to make is correct.
tf status
The status command will perform a full disk scan and automatically pend any edits that you have made. If you created or deleted any files, these will be shown as candidates, but you have to explicitly add or delete them using the tf add or tf delete commands if you want to check those changes in. Next, you check in the pending changes in MyWorkspace:
tf checkin -comment:”Making changes from the command line”
Your changes have now been checked in and a changeset has been created. You can look at those changes from any of the other version control clients by performing a Get to download the changes you just committed using the command line.
Team Foundation Version Control Power Tools and Third-Party Utilities
The functionality provided by Team Foundation Server is so rich, and the extensibility through the Team Foundation Server .NET or Java-based API's so straightforward, that a number of Power Tools and third-party utilities have been created to expose that functionality in easier-to-use ways. While there are too many to mention them all here, the following sections detail some of the more invaluable ones that should be in every Team Foundation Server power user's arsenal.
Microsoft Visual Studio Team Foundation Server Power Tools
The Team Foundation Server Power Tools are created by the Team Foundation Server team itself at Microsoft, and provide a number of great features that might not have been ready to put into the final release at the time it was published, or were not considered necessary for the majority of users. Many of the features originally delivered in Power Tools (such as Annotate, folder diff, rollback, and so on) appeared first in the Power Tools before arriving in the full product in a later release.
Note
The Power Tools are available free from http://aka.ms/TFS2013PowerTools
The main Power Tools install some extensions into Visual Studio, as well as a new command-line client on Windows called tfpt. The Power Tools include the following, which are of particular interest in the version control area:
· Windows shell extensions—This is a TortoiseSVN-like extension to both Windows Explorer and the common file dialog boxes, which allow many basic source control operations from Windows without having to run Visual Studio or the command-line tool.
· Command-line (tfpt) tool—tfpt help shows a list of the commands available, including tf online, which will compare your local working folder with what the server thinks you have in your workspace. It will also help you manage adds, edits, deletes, and so on for files that you might have changed outside of Visual Studio or while offline and using a Server Workspace. Another useful command is tfpt scorch, which will ensure that your local working folders match exactly what the server thinks you should have—any additional files are deleted, while any modified files are re-downloaded and replaced.
Team Foundation Server MSSCCI Provider
The MSSCCI provider enables integration of Team Foundation Server version control with products that support the older MSSCCI API originally created for VSS but adopted by many IDE developers. The MSSCCI provider is developed by the team at Microsoft responsible for Team Foundation Server.
Note
The MSSCCI provider is available as a free download from http://aka.ms/MSSCCI2013
Because this provider was created long after the original developers probably created the tool using the API, and because it is for a version control system very different from the ones that the developers of the IDE would have tested against, your mileage may vary. Many people use this in lots of different development environments. However, the download page for the MSSCCI provider states that it is tested against the following products:
· Visual Studio 2005
· Visual Studio .NET 2003
· Visual C++ 6 SP6
· Visual Basic 6 SP6
· Visual FoxPro 9 SP2
· Microsoft Access 2007
· SQL Server Management Studio
· Enterprise Architect 7.5
· PowerBuilder 11.5
· Microsoft eMbedded VC++ 4.0
Version Control Security and Permissions
Team Foundation Server is highly configurable, and contains a very fine-grained and flexible security model. This is especially true for version control.
Before you start using the version control features widely in your team, you should determine which individuals will take on the responsibility of being an administrator. The majority of the developers on the team would typically be classified as contributors. The way you organize your roles should be determined by a matter of convenience and organizational requirements.
Note
For more information on security and privileges, see Chapter 24.
Version control has a very flexible permissioning model that can control exactly what is permissible at the folder and even file level. You can view the security settings for a file or folder by right-clicking it in Source Control Explorer from Visual Studio, and selecting Advanced ![]() Security.
Security.
Figure 6.38 shows the Security dialog box and the inherited security settings. To alter the settings for the folder or branch, select the setting to toggle between explicit allow or deny, or to allow if the inherited permission would allow that action. To disable inherited permissions for that item, turn the Inheritance off, as shown in Figure 6.38.
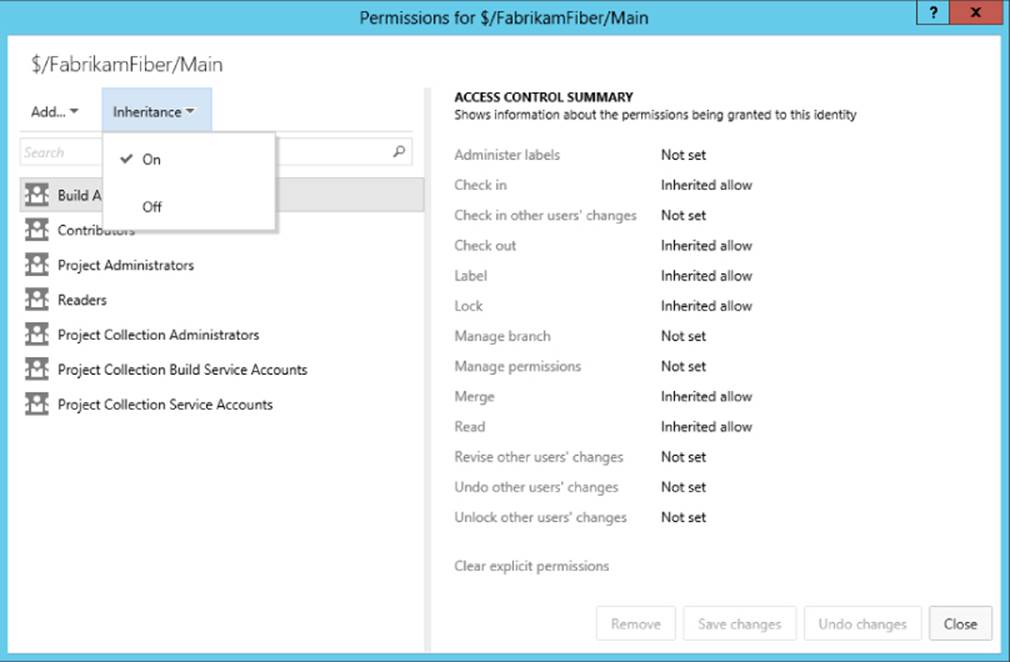
Figure 6.38 Settings in Security tab
Switching Version Control to Team Foundation Server
Chapter 9 details your options for moving the code from your old version control system into Team Foundation Server. However, in addition to bringing your code over, you must also ensure that your developers are comfortable with Team Foundation Server's version control capabilities. Regardless of the version control system you used in the past, Team Foundation Server is going to behave differently from what you are used to.
The first thing to understand is that Team Foundation Server is much more than just version control. The true value of Team Foundation Server comes from the tight integration between version control, work item tracking, build, and test data, all stored in the same SQL Server database, allowing you to track the progress of your entire Application Development Lifecycle.
In terms of the version control capabilities, however, there are differences that usually trip up unsuspecting developers who have previously used the most common version control systems outside of Team Foundation Server (in particular, VSS and SVN).
Working with Team Foundation Version Control for Visual SourceSafe Users
Team Foundation Version Control was designed to feel familiar to VSS users. Similar terms and concepts, such as Get, check-out, check-in, and so on, are used to describe similar actions. However, despite these similarities there are some fundamental differences between VSS and Team Foundation Server.
Speed, Reliability, and Scalability
One of the first things you will notice about Team Foundation Server is that operations such as check out, get latest, or even just navigating down into folders are significantly faster than in other version control systems, especially if you have been using VSS over a WAN. Team Foundation Server was designed for modern, Internet-style protocols and stores all of its data in a SQL Server database. By contrast, a VSS repository is a collection of files stored in a network folder accessed by using standard Windows file-sharing protocols, which do not scale well over high-latency networks.
Because Team Foundation Server uses a real SQL Server database for storage, the reliability of that store is very high. With VSS, there is no atomic check-in process, and the transfer of data to the repository is non-transactional. Therefore, if there was a loss of connectivity between the VSS client and the network share during a version control operation, the integrity of the affected files (and, thus, the repository as a whole) could be affected. This data integrity issue does not affect Team Foundation Server because of the difference in architectures.
VSS was recommended for teams of 20 or fewer developers, whereas Team Foundation Server can scale to thousands of active users. By using flexible architectures, Team Foundation Server can scale well when server resources become the limiting factor, or when you want to ensure server up-time.
Note
Chapter 22 provides more information about scalability and high availability with Team Foundation Server.
Versions
As discussed earlier in this chapter, Team Foundation Version Control determines file versions based on the changeset in which they were modified. Therefore, file versions do not increment individually. The first time VSS users look at the history of a file and see a nonsequential series of numbers in the history is often the first time that they realize they are talking to a fundamentally different version control tool. With Team Foundation Server, the date and time of the change is recorded by the server, not the client, so issues around dates and times caused by an incorrect clock on a VSS client disappear.
Pinning and Sharing
Team Foundation Server does not have an exact equivalent to the pinning and sharing features of VSS. Frequently, these were used as basic branch support, whereas Team Foundation Version Control now has full branch and merge capabilities, encouraging more robust software engineering practices.
Note
Chapter 10 provides information on branching and merging.
Labels and History
In VSS, labels could be thought of as a point in time in the repository, and labels appear in the History view. All changes before that point in time were included in the label. The closest equivalent to this in Team Foundation Version Control is the changeset, which is the fundamental unit of versioning in the repository. If you record the changeset at which a build is performed, you know exactly which versions of files it contains.
In Team Foundation Version Control, labels are more flexible. Now you can pick and choose which version of a file is included in that label—and you can edit that later on. You can think of a label in Team Foundation Version Control as tagging which file versions make up that label. Because labels are so different in Team Foundation Version Control, they do not show up as points in time in the standard view of a file's history, but are instead shown on a separate tab in the History view.
Team Foundation Server stores and displays history differently than VSS. In VSS, when you create a new file inside a folder, it creates a new version of the parents in addition to the new child. The same is true for renames, deletes, and updates.
In Team Foundation Version Control, this is just recorded on the child item, and no new version is created for the parents. The most noticeable effect of this is that the “Last Check-in” time of a parent folder does not change when a change is made inside the folder or to one of its children. To determine when the last changes were made to a folder in Team Foundation Version Control, you right-click the folder and select View History, which is a significantly faster operation than its VSS counterpart.
Keyword Expansion
VSS has a feature called keyword expansion where source code could include certain keywords such as $Author: $, $Revision: $, or $Date: $, and the appropriate data would be inserted into the tag on every check-in to version control. This was especially useful when no integration into VSS was available inside the IDE, and so finding out any of this information was often a fairly slow task in the separate VSS client application, or when viewing a printout of code.
However, keyword expansion did present many issues when comparing the differences between file versions, or when performing merges. Team Foundation Version Control takes a fundamentally different approach, and does not alter the contents of your files as you check them in. Therefore, keyword expansion is no longer supported. VSS users are often surprised by this, but the powerful IDE integration combined with the speed and performance of Team Foundation Server means that this is rarely an issue once you get over the fact that it is not there.
Concurrent Editing of Files
Team Foundation Version Control is capable of supporting multiple developers editing the same file at the same time, and has powerful merge functionality to facilitate and resolve conflicts that might occur as a result. The feature is usually enabled in most team project process templates, and is a boon to developer productivity.
In VSS, check-outs and check-ins occur only when making an edit to a file. In Team Foundation Version Control, a check-out is required for all modifications, including renames, moves, and deletes. The check-in operation will also commit all those changes in a single atomic transaction, including any adds, edits, moves, renames, and deletes. Because of this, it is much easier to maintain a repository that is always consistent.
New Features in Team Foundation Server
VSS developers should familiarize themselves with the many new features offered by Team Foundation Server, as described in this chapter and the rest of this book. Shelving is one such feature that is often overlooked by new developers because equivalent functionality is not available in VSS.
Using Team Foundation Version Control for Subversion Users
With previous versions of Team Foundation Server, moving from Subversion was often the most painful transition for developers because of the difference between that version control model and the one employed by Server Workspaces. However, a Subversion user is going to have a much easier time using and understanding the Local Workspace model that is the new default for Team Foundation Version Control. For that reason, if you are migrating users over from Subversion, it is recommended that you have them in an environment where Local Workspaces are available.
Again, the key difference to understand is that Team Foundation Server is much more than just a version control tool, and comes with very tight integration to work item tracking, build, and test management. It also comes with a slightly different terminology.
Differences in Terminology
SVN (and CVS) users are used to a different set of terms than those used by Team Foundation Version Control, as outlined in Table 6.1.
Table 6.1 Terminology Differences Between SVN and Team Foundation Version Control
|
SVN |
Team Foundation Version Control |
|
Check-out |
Get Latest (and also Map Working Folder) |
|
Update |
Get Latest (or Get Specific Version) |
|
Commit |
Check-in |
|
Revision |
Changeset (see also versionspec) |
|
Add |
Add |
|
Delete |
Delete |
|
Copy |
Branch |
|
Move |
Move, rename |
|
Revert |
Rollback |
|
Status |
Status, pending changes list |
|
Diff |
Compare |
|
Blame |
Annotate |
|
Log |
History |
Shell Extension Functionality
A popular method of accessing SVN from Windows platforms is via the TortoiseSVN Windows Shell Extensions. Equivalent shell extension functionality is available as part of the Team Foundation Server 2013 Power Tools, which, as mentioned earlier, is a separate free download from Microsoft.
Differences in History
Team Foundation Version Control tracks renames as a specific change type, meaning that renames can easily be tracked in history, rather than appearing as a delete and add. Viewing the history for a specific file allows you to view the history before a rename occurred, and also changes that occurred in a previous branch before the file was merged into the current location. In Visual Studio, a full graphical visibility of merge history is available alongside the branch hierarchy, allowing you to easily see in which branches a particular change has been merged.
Administration and Setup
Setup of Subversion is initially driven by a typical installer on Windows, or a package management system on most UNIX-style operating systems. However, the initial configuration of the server for use by the team requires extensive use of the command line and editing of configuration files. Security configuration is more complex, and configuring Subversion to delegate to Windows user accounts for authentication requires work. The Subversion server does run on many platforms, but as a result, can feel a little alien to an administrator used to Windows-based systems.
Setup and administration of Team Foundation Server is performed via a set of wizards and graphical tools on Windows. Initial setup of a basic Team Foundation Server installation providing version control, build, and work item tracking functionality is very straightforward, and will install any prerequisites (such as IIS or SQL Server Express) if not present or no existing full SQL Server installation is available. Team Foundation Server can be installed on client versions of Windows, such as Windows Vista, Windows 7, or Windows 8, but for a large team, we recommend that it be installed on a full server version of Windows. Team Foundation Server can even be installed on editions of Windows Server that include a domain controller such as Windows Server 2012 Essentials.
Note
Chapter 9 provides more detail about the tools and techniques available to help migrate your source code from another version control system into Team Foundation Server.
Summary
This chapter introduced you to all the core concepts in Team Foundation Server's centralized version control (Team Foundation Version Control), and provided some insights on how to get started and use the tooling in day-to-day development. You also learned about where to find settings and configuration for the server, and how to manage security permissions. You learned about the common difficulties people have when switching version control from VSS or SVN.
Note
Chapter 10 provides a more detailed explanation and guidance relating to branching and merging. Chapter 11 provides more detailed walkthroughs of using version control in specific scenarios.
Chapter 7 will introduce you to the new distributed version control system supported by Team Foundation Server.
All materials on the site are licensed Creative Commons Attribution-Sharealike 3.0 Unported CC BY-SA 3.0 & GNU Free Documentation License (GFDL)
If you are the copyright holder of any material contained on our site and intend to remove it, please contact our site administrator for approval.
© 2016-2026 All site design rights belong to S.Y.A.