Professional Team Foundation Server 2013 (2013)
Part II
Version Control
Chapter 7
Distributed Version Control with Git and Team Foundation Server
What's in this chapter?
· Introducing Distributed Version Control concepts
· Learning about Visual Studio integration with Git
· Learning about using Git command-line tools with Team Foundation Server
Version control is one of the primary functions of Team Foundation Server and, as a result, has seen major changes in each release. These changes have improved upon the core version control functionality: providing features, enabling new workflows, and extending the scale of TFS to still greater levels. In each of these changes, up until TFS 2013, the core concept of Team Foundation Version Control as a centralized version control system has remained intact. TFS 2013 breaks from tradition and provides the entirely new concept of a distributed version control tool: Git.
Version control systems can be split into three types. With a check-out/edit/check-in system, such as TFS server workspaces, you are required to explicitly check out a file before you can make changes locally and check the changes back in to the server. TFS enforces this workflow by marking your local files as read-only until the file is checked out. In some configurations, checking out a file implies taking a lock as well, which prevents other developers from checking out the file and eliminates concurrent development and the corresponding potential for merge conflicts.
With an edit/merge/commit system, such as TFS Local Workspaces, you do not have to explicitly check a file out or negotiate with the server before you make changes. Instead, your files are writable on disk and you can simply open the file with your text editor to make changes. Because there is no automatic file locking, other developers can also make changes to the same files you are editing. When that happens, you will have to get their changes and merge them with yours before you can check in your changes.
With a distributed version control system such as Git, the client/server model is discarded in favor of a decentralized model. Instead of checking in directly to a server, you commit the changes to a local repository on your computer before pushing these changes to the server to share them with your team. Having a repository locally enables even more concurrent development for a team of developers and provides more flexibility for branching and merging.
In this chapter, you will look at the concepts of distributed version control, especially how Git manages changes in local repositories and how those changes are synchronized with a server repository. You will learn about new branching and merging workflows, including the “topic branch” workflow. Finally, you will discover how to work with Git repositories from Visual Studio as well as the command line.
Note
For an introduction to using Git in TFS from Xcode, watch Martin Woodward's introduction video at http://channel9.msdn.com/Events/Visual-Studio/Launch-2013/AT110.
Distributed Version Control Concepts
Distributed version control systems were first adopted broadly by open source communities to address the difficulties they had working with a central version control server. Unlike a typical office environment where developers are connected over a fast network connection to the server, open source developers tend to be spread out across the globe and it's unlikely that every contributor has a fast connection to the server. In fact, some contributors may not have reliable network access at all.
To address this problem, distributed version control systems provide a full copy of the repository to every contributor when they “clone” the repository from the server. This clone isn't merely a copy of every file being placed in the working directory, though developers do have that. This repository is a full-fidelity copy, including every file as it existed at each version throughout the lifetime of the project. This allows you to view history, examine previous versions of files, perform diffs and roll back changes without having to connect to a server. You can even commit changes to the local repository.
Unlike a centralized version control system, where checking in changes places them in the server repository for other users to access immediately, committing changes in a distributed system is a process split up into two steps. When you commit, your changes are recorded in your local repository. When you push these changes, they are made available to other developers.
Git
The Git version control system was created by Linus Torvalds when he grew dissatisfied with the existing version control systems used to manage the development of the Linux kernel. He developed Git as a distributed system to allow the many developers working on the kernel to coordinate their changes effectively.
Git, when capitalized, refers to the version control system itself, including the format of the repository and the protocols that tools use to communicate with each other. The reference implementation of this system is a set of tools called git, without capitalization, or sometimes “git core.”
This distinction is important because while git is the reference implementation of the system, it is not the only implementation. Linkable libraries exist for many programming languages including C, C#, Java, and even JavaScript, which allows authors of development tools to easily include Git repository management in their products. This wide support is owed to the simplicity and flexibility of the Git repository format.
Note
Microsoft Visual Studio and Team Foundation Server use the libgit2 and LibGit2Sharp libraries for repository management, which provide a powerful Git library and a helpful .NET object model. These are open source libraries maintained by Microsoft, GitHub, and others in the community. For more information, see http://libgit2.github.com.
Repository
In order to enable this offline, concurrent development strategy, the repository format of a distributed version control system differs from the repository format of a centralized version control system. In a centralized tool, such as Team Foundation Version Control, each new changeset builds on the last. Although two developers can make changes concurrently, their check-ins are serialized.
Figure 7.1 illustrates the results of concurrent changes by Alice and Bob. Both developers retrieved changeset 3 and started making changes. Bob checked his changes in first, as changeset 4. When Alice went to check her changes in, she was forced to get Bob's changes, merge them with her own, and then continue checking in to produce changeset 5.
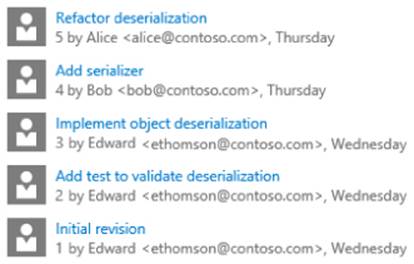
Figure 7.1 Concurrent changes checked in to Team Foundation Version Control
If Alice and Bob were using a distributed version control tool, however, they would both be able to commit changes to their local repositories independently. Figure 7.2 shows the starting point for these changes: Again, each developer will begin working at the same time, making their changes against changeset 3.

Figure 7.2 Starting history for both developers
Again, Bob will make a change and commit it, producing changeset 4 (see Figure 7.3).
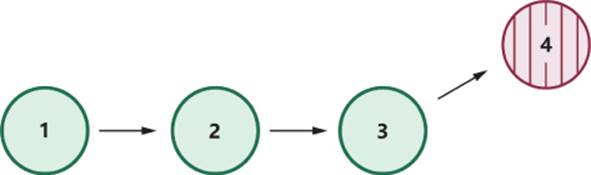
Figure 7.3 Bob's history after a single commit
Alice will also make a change, but unlike in the centralized version control system, she does not need to merge her changes with Bob's in order to commit. In fact, she cannot merge her changes with Bob's because he has only committed his changes, he has not yet published them. Instead, she commits changeset 5, which contains only her changes, as illustrated by Figure 7.4.
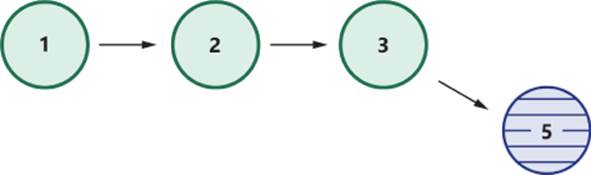
Figure 7.4 Alice's history after a single commit
Once Bob does publish his change, Alice will be able to take it and “pull” it into her repository. Once she does, she can merge her commit with Bob's to produce a new commit that reflects both changes. Instead of merging before the commit, she merges their changes after the commit, and history appears as Figure 7.5.
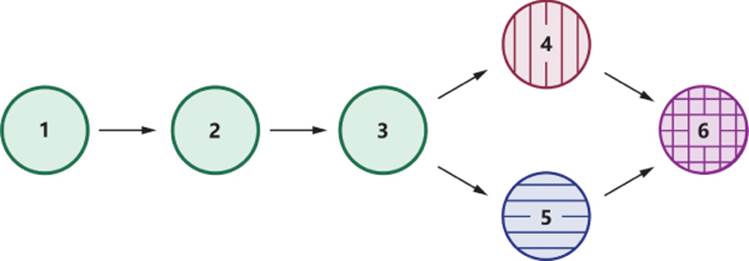
Figure 7.5 Alice's history after merging commit 5 from Bob
Note
These examples use simple integers to represent the commits in order to simplify the presentation. Later you will learn how Git creates commit IDs that are unique to the repository.
Because each Git repository contains the full history, including all the files, care should be taken to organize them into small, manageable units. A TFVC repository is meant to scale to large collections of applications, often from many teams. A Git repository should instead contain a single application at most. Many applications may need to be split along logical component boundaries to ensure that the repositories and working directory remain small.
Graph
Unlike Team Foundation Version Control, which requires changes to occur in a linear fashion, you can see that distributed version control systems allow changes to be made in two repositories at the same time. The repository history diverges as each developer makes a commit in their local repository before merging back together when the changes are integrated. This divergence takes place at the repository level itself: Instead of treating history as a linear flow, Git models history internally as a graph.
Some tools will display this internal representation in a graphical view, like the tool shown in Figure 7.6.
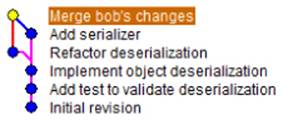
Figure 7.6 Viewing history as a graph
Most tools, however, do not display the actual history graph because it can become very complex with many contributors. These tools will instead simplify the history to provide a list of commits in reverse chronological order, like the one in Figure 7.7 from Visual Studio.

Figure 7.7 Viewing history with reverse chronological sorting
Commit
A commit is a snapshot of the repository at a point in time, similar to a changeset in Team Foundation Version Control. Unlike TFVC, however, you cannot simply use monotonically increasing integers to represent the commit ID because there is no central server to assign these numbers. Two repositories could not simply use the “next” integer for a commit ID, or else two different repositories would create a commit ID 4 as the new commit based on commit ID 3. Having two commits with ID 4 in the universe of repositories would be confusing and make merging repositories very difficult.
Instead, Git generates commit IDs based on the contents of the commit itself, applying the SHA1 hash algorithm to the data to produce a unique identifier. This 160-bit hash value is represented as a string of 40 hexadecimal characters. For example:
661ebb2c07ca7630240cd0c1a7487461d90d3825
This is certainly a more difficult ID to work with than, say, the number 4. Fortunately, you do not usually need to talk about a commit with its full ID; instead, you can talk about the “abbreviated commit” with its first few characters. Often, seven characters is enough to refer to a unique ID in the repository, so most tools would allow you to refer to this commit as:
661ebb2
Branches
You've seen that the Git history model allows for parallel lines of development to occur between different repositories. This concept is very similar to the process of working in different development branches. In fact, branches in Git are implemented on top of the history model as simple pointers to commits in the graph. As a result, branches in Git differ from branches in Team Foundation Version Control: Instead of a branch being applied to folders inside the repository, a branch applies to the entire repository.
If, in the previous example, Alice and Bob had each created a new branch for their changes and named it after themselves, Alice's repository would show both her branch and Bob's, as in Figure 7.8.
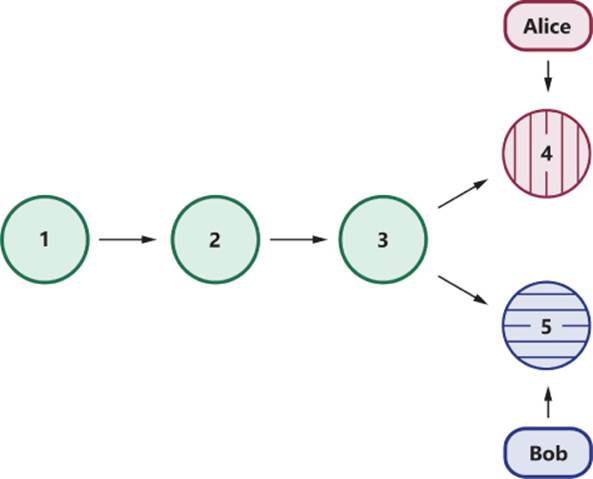
Figure 7.8 Alice's history with branches
When Alice went to merge Bob's branch into hers, her branch would then advance to point to the new commit which reflects the merge of their changes (see Figure 7.9).
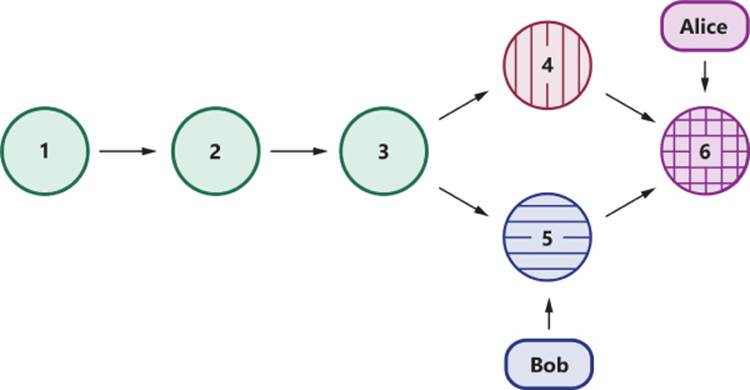
Figure 7.9 Alice's history after merging Bob's branch
Topic Branches
Because Git represents branches as a simple pointer to a commit, you can create branches quickly and with little overhead. This is in contrast to a centralized version control system where creating branches often requires an administrator to set up the branch, and users need to manage their working folder mappings to include it. The complexity of creating branches often discourages you from doing so, except for features that are so large that the work needs to be split up over multiple changesets and are destabilizing enough that it would disrupt other developers.
A distributed version control system, on the other hand, encourages you to create “topic branches” for any work you perform, whether it's a complex feature that will take weeks to complete or a simple one-line bugfix. By creating a branch, you can keep your work isolated from the main line, or “master,” branch, and merge it when you are ready. In longer-lived topic branches, you should take regular merges from the master branch in order to keep up to date and make your merge back to master simpler.
When everybody works in a topic branch system, you see short-lived branches diverging from the master branch before being merged back in, as illustrated in Figure 7.10.
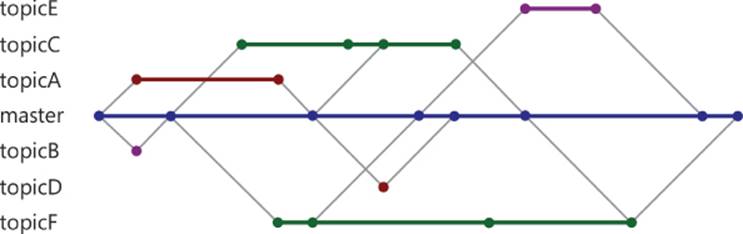
Figure 7.10 Typical branch graph in a topic branch
Although this branching structure may look confusing, you generally only need to worry about the master branch and the topic branch that you're directly working on. When you look only at the relationship between the topicF branch and the master branch, as inFigure 7.11, you see a simpler view that shows how the topic branch was created from master, how commits were made in both branches, and how the merges occurred between them.

Figure 7.11 The topicF branch and master
HEAD
Git has a special branch called “HEAD,” which does not usually point to a commit as a regular branch would, but instead points to another branch. Git uses this to track the branch that you are currently working on. If we extend Alice's repository to show HEAD, we would see it pointing to the “Alice” branch, as in Figure 7.12.
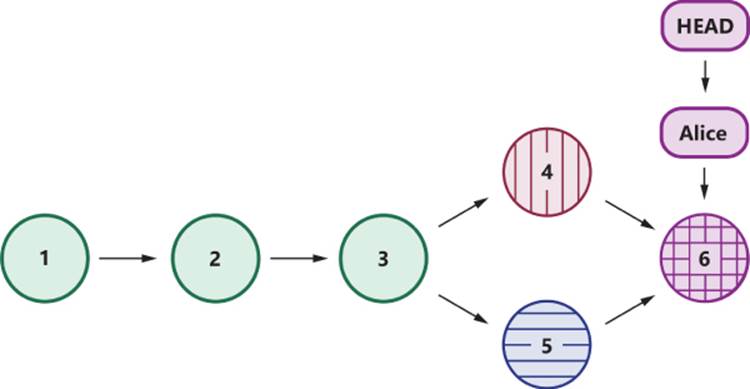
Figure 7.12 Alice's history depicting HEAD
Because the current branch is maintained as a simple pointer, Git makes it very easy to switch branches: The HEAD pointer is simply updated to the new branch and the working directory is updated with the changes. You will see this workflow in the section “Branching and Merging” later in this chapter.
Note
It is possible for HEAD to point to a commit instead of a branch. When this occurs, you are not working on a branch and are instead said to have a “detached HEAD.”
Working Directory
The working directory, as you might expect, is similar to a working folder in Team Foundation Version Control and contains the files as they exist in the current branch. You can add, edit, and delete files in the working directory as you would expect, and commit them when you are finished.
Unlike working folders in Team Foundation Server, however, a working directory applies to the entire repository. This allows you to easily switch from one branch to another within the same working directory. Checking out a new branch is as simple as updating the files on disk that have changed and does not require any changes to working folder mappings.
Because there are no working folder mappings, however, you cannot use them to limit the size and scope of what you have on your local disk. Instead, you are encouraged to create a repository for a single, small component and use multiple repositories if you need multiple components. This will benefit your working directory as well as the size of your repository's history.
Index
Git introduces a new concept called the index, which contains the changes that will be included in the next commit. The index is sometimes also called the “stage,” and you are said to stage your changes when you add them to the index. The index is similar to the pending changes list but with an important distinction: When you stage a file, it is the contents at the time you stage it that will be included in the next commit. If you modify that file further without staging it again, the new changes will not be committed.
This distinction allows you fine-grained control over your commits, though it can be confusing when you transition to Git from another version control system. Because of this added level of complexity, Visual Studio's Git integration does not display the index and instead shows the Included Changes list and Excluded Changes list similar to Team Foundation Version Control.
You will need to use the index when you work with the git command line. You will see how to add and remove files from the index in the section “Using Git Command-Line Tools” later in this chapter.
Although this is not a comprehensive guide to Git or distributed version control, understanding these concepts should provide you with the knowledge to begin using the Git version control system. In the next sections, you will discover how to use Visual Studio to manage your Git repository and how to work with Git from the command line.
Microsoft Visual Studio Integration
Beginning with Visual Studio 2013, Visual Studio adds Git repository management capabilities and brings the most commonly used functions directly into Team Explorer. This provides a similar interface to version control operations, whether you're using Git or Team Foundation Version Control, so existing TFS users should be able to get started with Git quickly.
In this section, you learn how to get started with a Git repository in Visual Studio and how to make changes to files in the working directory and commit them. You learn how to create and manage branches and how to merge changes from one branch into another. Finally, you learn how to publish your changes to other developers, and fetch and merge their changes into your repository.
Getting Started with a Repository
As you learned earlier in this chapter, when you work with a Git repository, you make changes in your working directory and then commit those changes to the Git repository that exists locally. Often, this local repository is a copy of an existing repository from a version control server, but if you are just getting started with a new project, you will also want to start with a new repository. Visual Studio provides the ability to get started either way, by cloning an existing repository or initializing a new one.
Cloning a Git Repository Hosted in Team Foundation Server
Like other features of Team Foundation Server, Git repository management is located in Team Explorer. To clone a Git repository, navigate to the Team Explorer ![]() Connect page, and then click Select Team Projects.
Connect page, and then click Select Team Projects.
If you have not connected to your Team Foundation Server before, click Servers to set your server up. Once connected, a list of the Team Projects on your server will be displayed (see Figure 7.13). Select the Team Project that contains your Git repository and click Connect. The remote Git repository will then be added to the Connect page.
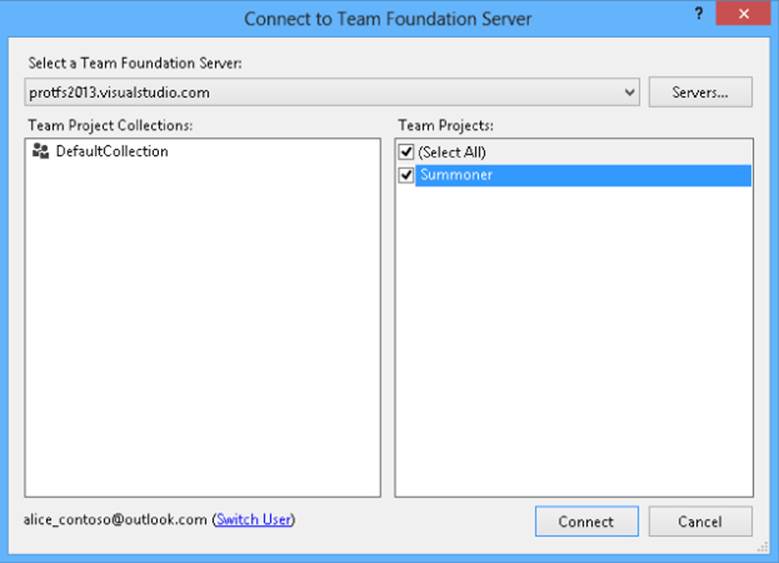
Figure 7.13 Connect to Team Foundation Server dialog box
Once the Team Project has been added to the Connect page, you can right-click the project and select Clone. You will be prompted to enter the local path to clone to, as shown in Figure 7.14. Once you enter the working directory path and click Clone, the repository will be downloaded from the server and checked out into the working directory you specified.
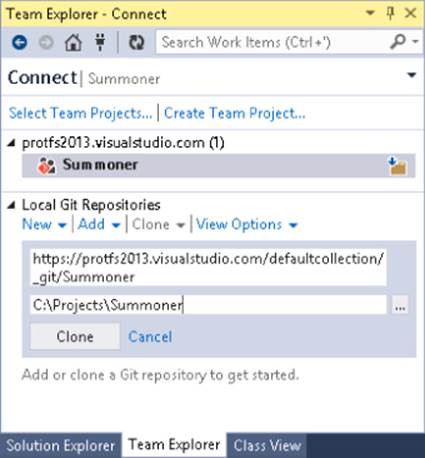
Figure 7.14 Clone a Team Project
Cloning a Git Repository Hosted Outside TFS
Although Team Foundation Server 2013 provides easy-to-use Git repository hosting, there are many options for hosting your repositories. Some hosting providers, like CodePlex, provide free hosting for open source projects in publicly readable Git repositories, while others, like Visual Studio Online, provide hosting only for private repositories. Some providers, like GitHub, provide hosting for both public and private repositories.
Note
Because distributed version control systems work on a peer-to-peer basis, the only thing that makes a repository authoritative is convention. When you and your peers agree to publish your changes to a repository, you have decided to make that repository the “server repository.” As a result, it's very easy to set up a simple Git repository server on your local network just by exposing a file share.
Unfortunately, when you set up your own server repository, you often miss out on the features that are included when you use a hosting platform, such as integrated work item tracking and continuous integration. It is often more convenient to use a product or a hosting provider that can offer these amenities to you. Hosting your repositories in Team Foundation Server provides many unique capabilities like push auditing, unified management, and Active Directory integration. You can learn more about these features at http://www.edwardthomson.com/blog/hosting-git-repositories-in-tfs.
To clone a remote Git repository hosted in a different provider, navigate to Team Explorer ![]() Connect page. In the Local Git Repositories section, click Clone and in the text box, enter your Git server URL. In the second text box, you should enter the local path for your working directory. When you click the Clone button, the repository will be downloaded and checked out to the working directory you specified.
Connect page. In the Local Git Repositories section, click Clone and in the text box, enter your Git server URL. In the second text box, you should enter the local path for your working directory. When you click the Clone button, the repository will be downloaded and checked out to the working directory you specified.
Warning
In Visual Studio 2013, Git repositories cannot be accessed using the SSH protocol. Visual Studio does support both file shares and HTTP or HTTPS repositories. If you were instructed to clone using SSH, contact your server administrator for instructions on using HTTPS instead.
Most of the features you will learn about in subsequent sections are available to you regardless of the Git server you use, but some features are available only when your repositories are hosted in TFS. The features that are only available with TFS servers will be noted explicitly.
Initializing a New Repository
Because Git repositories are frequently transferred from a local computer to the server, and from one developer to another, they are necessarily very lightweight. As a result, creating a new repository is a quick and simple operation.
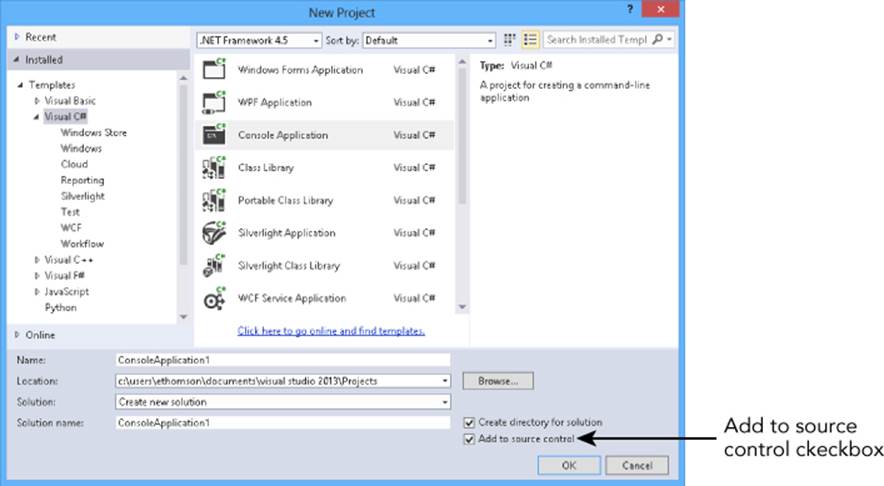
To create a Git repository for an existing Visual Studio Solution, navigate to Solution Explorer. Right-click on the solution and select Add to source control. In the Choose Source Control dialog box, shown in Figure 7.15, select Git.
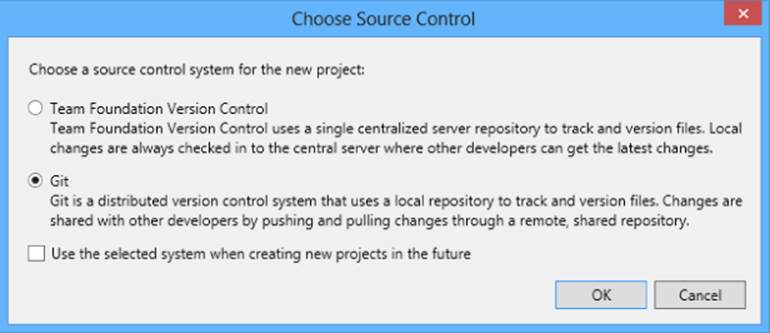
Figure 7.15 Choose Source Control dialog box
You can also create a repository in a new, empty directory that is not associated with a solution by navigating to the Team Explorer ![]() Connect to Team Projects page. In the Local Git repositories section, click New and enter the path where you want to create a working directory. When you click Create, your working directory and Git repository will be created, and the new repository will appear in the list of Local Git Repositories (see Figure 7.16).
Connect to Team Projects page. In the Local Git repositories section, click New and enter the path where you want to create a working directory. When you click Create, your working directory and Git repository will be created, and the new repository will appear in the list of Local Git Repositories (see Figure 7.16).
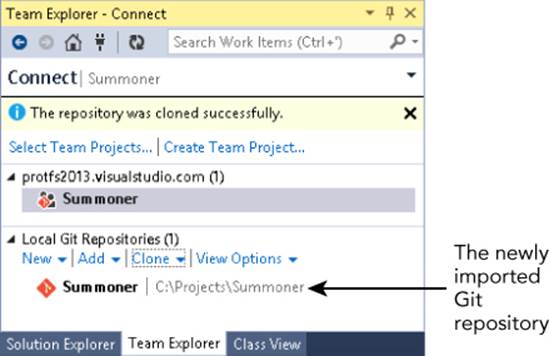
Figure 7.16 A newly created Git repository
You can begin making changes to the files in your repository and commit them immediately. You will learn how to share this Git repository with other developers in the section “Synchronizing with the Server.”
Opening a Repository
All the repositories that you've worked with previously appear in the Team Explorer Connect page under the Local Git Repositories section. Repositories appear here when you clone or initialize them with Visual Studio, when you select Open from the Team Explorer Connect page, and when you open a Visual Studio solution that is inside a Git working directory.
Creating a Git Repository When Creating a New Project
You can create a Git repository at the same time you create a new solution by clicking Add to source control in the New Project Wizard (see the following figure). The Select Version Control dialog box will open as soon as your solution is created.
New Project Wizard with Add to source control selected
To start working with a Git repository, simply find it in the list and double-click it. The Team Explorer Home page will then open with this repository selected. If your repository contained a Visual Studio Solution, that solution will appear in the Solutions section of the Home page (see Figure 7.17). Double-clicking the Solution will open it. As you make changes to the files in your working directory, you will see these changes reflected throughout Visual Studio: in editor windows, in Solution Explorer, and in Team Explorer.
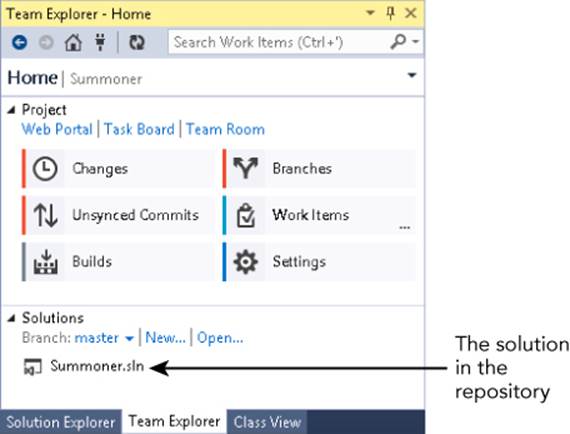
Figure 7.17 Team Explorer Home with Solution imported
Making Changes in a Working Directory
In order to commit changes to a repository, you start by editing the files directly in the working directory. Once you are happy with the working directory changes, you can commit them to the repository and, ultimately, publish these changes with your peers.
Included and Excluded Changes
Git does not require you to perform any special operations before you begin making changes to a file such as checking it out or locking it. You only need to open that file, make your changes and save the file. Git will scan your repository's working directory to determine what files have changed.
When you first change a file, it will appear in the Team Explorer Changes page in the Included Changes section (see Figure 7.18). Files listed in this section will be included in the next commit you perform. If you want to make changes to a file but not include it in the next commit, you can right-click on a file in the Included Changes list and select Exclude. This will move the file to the Excluded Changes list, which is useful if you are making simple, temporary changes that you will undo in the future or if you want to split the changes you are making over several commits. When you are ready to include the file, you can right-click on it and select Include to move it back to the Included Changes list.
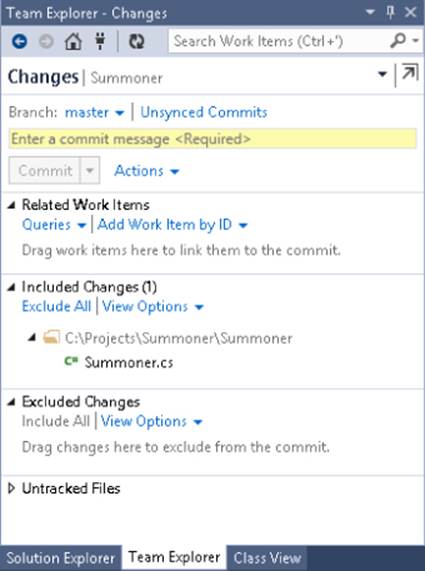
Figure 7.18 An edited file in the Included Changes list
Note
Conveniently, you can make changes outside of Visual Studio, with any text editor you like, and those files will be reflected in the Changes list. Visual Studio listens for file system events that occur within your Git working directory and updates the Changes list accordingly.
New files that are added to the working directory are not immediately managed by Git; instead of appearing in the Included Changes list, added files appear in the Untracked Files list. This is to prevent new files from being inadvertently added to the repository without your knowledge.
When a new file appears in the Untracked Files list, you can add it to the repository by right-clicking on it and selecting Add. The file will be moved to the Included Changes list and will be included in your commit.
Ignoring Files
Generally, you want to promote items in the Untracked Files list to be Included Changes. If you have files in your Untracked Files list that you do not want tracked by your version control tools, such as local configuration files, you probably want these to be ignored completely by Git so that they do not clutter your view of the repository.
Git uses a file called .gitignore to manage the list of ignored files. When Git detects a new file in your working directory, it compares the name against the contents of the .gitignore file. If the filename matches a line in the ignore file (wildcards are allowed), it will not be reported as a new file.
To ignore an untracked file in Visual Studio, simply right-click on its name in the Untracked Files list and select Ignore This Local Item. Its filename will be added to the .gitignore file and you will not be notified of its presence again.
There are often many files in your working directory that you want to ignore, such as build output, temporary files written by text editors, and the Visual Studio user preferences file. When you initialize a new repository with Visual Studio, a default .gitignore will be set up in your repository for you so that you do not have to configure their ignore settings in every repository you create.
If you created your repository outside of Visual Studio, you should download this default .gitignore from https://github.com/github/gitignore/blob/master/VisualStudio.gitignore and add it to your repository.
Undoing Changes
Sometimes you make a change in your working directory that you do not want to commit: Whether you've made a temporary change to help test other changes, or if you've decided to abandon the changes you were making, it's very easy to undo them and replace them with the version from HEAD.
To examine the changes that you've made to a file, find the file in the Team Explorer Changes page, right-click on it and select Compare With Unmodified. This will open the file in the Diff Editor, which shows the file as it exists in HEAD on the left and the working directory version of the file on the right, as shown in Figure 7.19.
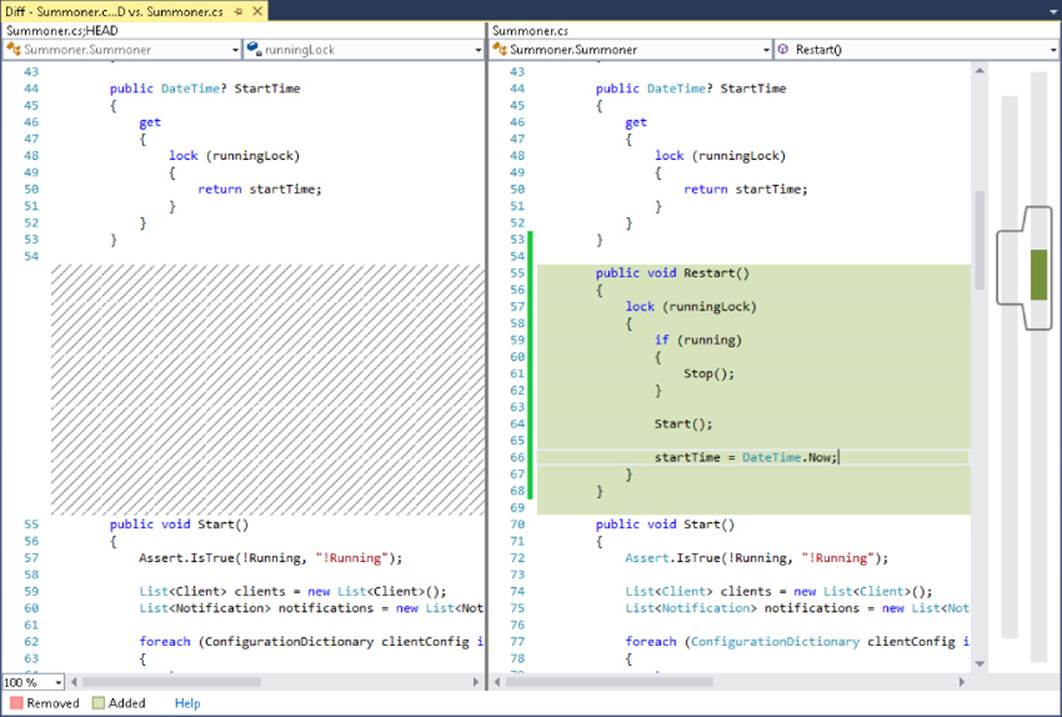
Figure 7.19 Changes to be committed, in the diff viewer
From within the Diff Editor, you can directly edit the contents of the working directory copy on the right-hand side. This lets you back out small changes to areas of the file, bringing the contents from the origin version, one line or one region at a time.
If you want to undo all the changes you've made to a file, you can right-click on the file in the Team Explorer Changes page and select Undo. Any changes you've made locally will be lost and the file contents will be replaced with the version of the file in HEAD.
Renames
In the previous section, “Distributed Version Control Concepts,” you learned that Git commits are stored as snapshots of the repository at the time of the commit. Commits are not stored as a list of “deltas” or changes from the previous commit, they simply reflect the entire state of the repository. This means that there's no way to represent that a file in your Included Changes is a rename.
Despite that, you can select a file in Solution Explorer and change its name and this rename is reflected in the Included Changes list, as you can see in Figure 7.20.
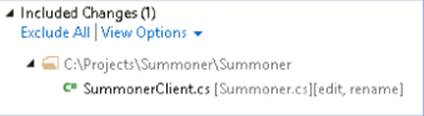
Figure 7.20 Team Explorer showing a rename in the Included Changes list
Instead of instructing the version control system to perform a rename, as in Team Foundation Version Control, Git simply detects that the rename occurred when it examines the working directory for changes. Any files that are newly added in the working directory are compared to the previous version of any files that were deleted. If an added file is similar to a deleted file, Git does not display this change as an add and a delete; it shows it as a rename.
Git can even take this a step further and detect similar files in complex renaming situations such as a “circular rename”:
1. Rename File1.cs to a temporary filename like temp.
2. Rename File2.cs to File1.cs.
3. Rename temp to File2.cs.
In this situation, you haven't added or deleted files, so comparing the working directory to the contents of HEAD would suggest only that File1.cs and File2.cs have changed. Git will analyze these changes, however, comparing the modified versions in the working directory to the previous versions to determine whether the files were “rewritten.” If a file is very dissimilar to its previous version, it will be treated as if the file was deleted and re-added for the purposes of rename detection. This allows Git to detect even complex rename cases, as shown in Figure 7.21.
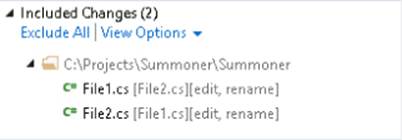
Figure 7.21 Circular renames in Git
Committing Changes
An advantage of working in a distributed version control system, and committing directly to a local repository, is that you can commit your changes without publishing them to other developers. For example, if you are fixing several bugs, you can fix each bug in a discrete commit, which allows your version control history to accurately reflect your changes, and allows reviewers to examine each change independently.
Reviewing Your Changes
Although committing locally allows you to create several independent commits before publishing them to your peers, each of these commits should still be of high quality and able to stand on its own. To help maintain quality, you should review your changes before you commit them.
Open the Team Explorer Changes page to see what changes are about to be committed. Examine the items in the Included Changes list to make sure that it is the complete list of changes that you want included. Make sure that the files in the Excluded Changes list and the Untracked Changes list should not be included in the commit. To get more detailed information about the changes, right click on a file and select Compare with Unmodified to open the file in the Diff Editor.
Associating Work Items
Team Foundation Server embraces the notion of integration between version control and work item tracking and that performing work on source control should be linked to a development task or a bug. As a result, Visual Studio provides work item tracking integration with Git commits, just like with TFVC.
Note
Integrated work item tracking is only available when your Git repository is hosted in Team Foundation Server.
You can associate work items with your commit from within the Team Explorer Changes page, in the Related Work Items Section located directly above the Included Changes list. Click the Queries button to display your work item queries, and then select the work item query to run. In the Query Results Editor, navigate to the work item you want to associate your commit with, and double click it to add it to the list of associated work items. Alternately, if you know the ID of the work item that you want to associate, you can simply click Add Work Item by ID and enter the ID in the text field.
When you commit this change, the work item link is stored with the commit in your local repository. When you push the commit to the server, the work item will be updated to reflect your changes and will be linked with the commit.
Committing
When you have reviewed your changes and associated work items, you are ready to provide a commit message that describes your changes and save the commit. By convention, the first line of the commit message is a brief summary of the changes in the commit. If you want to provide additional information, leave a blank line before writing a detailed description. When you are done, simply click the Commit button to update your repository.
Branching and Merging
Branching is a critical component of software development that allows you to create parallel lines of development for your software. You can have a stable development branch that reflects the current version that contains bug fixes only, while another branch reflects the next version and contains unstable or less mature new feature work.
Creating a Branch
To create a new branch, start by navigating to Team Explorer ![]() Branches. The Branches page shows all the branches that exist in your local repository, with the current branch displayed in bold. Click the New Branch option to expose the branch creation options, shown in Figure 7.22, and enter the name of your new branch in the branch name text box.
Branches. The Branches page shows all the branches that exist in your local repository, with the current branch displayed in bold. Click the New Branch option to expose the branch creation options, shown in Figure 7.22, and enter the name of your new branch in the branch name text box.
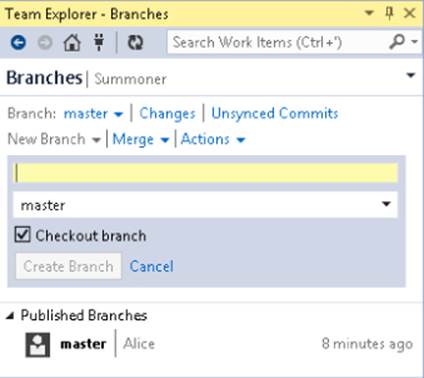
Figure 7.22 Branch creation options
Your new branch will be created from the current branch by default. In a topic branch workflow, you should select the master branch to create your branch from. Select the Checkout branch option in order to switch to your new branch immediately so that as soon as you click Create, you will be working on that new branch. If you have changes in the working directory when you create the branch then they will remain as changes to be committed in the new branch.
Switching Branches
Because Git branches at the repository level, switching branches is trivial because there are no working folder mappings to change. When you switch branches in Git, the working directory contents are simply updated with the contents of the branch you're switching to. To switch branches, navigate to the Team Explorer Branches page, right-click the branch and select Switch.
You can switch branches even if you have changes in your working directory, provided none of those files are also changed in the target branch. Your local changes remain in the Team Explorer Changes page, and will be applied to the new branch during your next commit.
If you have made changes to files that have also changed in the branch, you will receive an error message, like the one you see in Figure 7.23. You will need to either commit or undo your changes to switch branches.
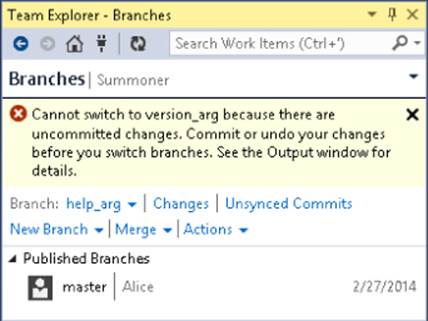
Figure 7.23 Confl icting changes prevent switching branches
Merging Branches
Branches provide a helpful way to isolate parallel lines of development, but this isolation isn't helpful unless you can easily take the changes from one branch and apply them to another. For example, you may have a stable branch that contains the current version of your software and only receives bug fixes. After you have fixed a bug in the stable branch, you want to take that change and merge it into your development branch so the bug is fixed there, too. Similarly, if you are working with a topic branch strategy, you want to merge your topic branch into the master branch once the topic is finished and ready to be included broadly.
To perform a merge, open the Team Explorer Branches page and click the Merge button. In the source branch combo, select the branch that contains the changes that you want to merge; in the target branch combo, select the branch that should receive those changes. In a topic branch strategy, you would select your topic branch as the source and your master branch as the target, as shown in Figure 7.24.
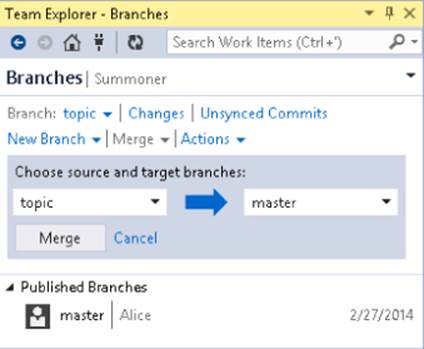
Figure 7.24 Merging changes from “topic” to “master”
When you click Merge, your working directory will switch to the target branch and any changes from the source branch will be merged. If a file has only changed in the source branch, and not the target, that file will simply be brought over into the target. If a file has changed in both branches, Git will try to automerge those changes by taking the modified regions in the source file and the modified regions in the target file to produce a new file that contains both changes (see Table 7.1).
Table 7.1 The Results of an Automerge
|
Common Ancestor |
Source Branch |
Target Branch |
Automerge Result |
|
Line one |
Changed in source |
Line one |
Changed in source |
|
Line two |
Line two |
Line two |
Line two |
|
Line three |
Line three |
Line three |
Line three |
|
Line four |
Line four |
Line four |
Line four |
|
Line five |
Line five |
Changed in target |
Changed in target |
If both branches contain changes to the same file, with changes in the same regions, the file cannot be automerged. This file will be marked as a conflict and you will have to resolve the conflict manually and commit the merge when you are done.
Merging Branches in Git Versus TFVC
Although merging branches is generally similar between Git and TFVC, Git does have two advantages that make merging more convenient.
· Git allows you to merge any two branches, unlike Team Foundation Version Control, which maintains a branch hierarchy and requires that merges move up and down that hierarchy. The following figure shows a branch hierarchy in TFVC: In this hierarchy, you cannot merge changes directly from the Working branch to the Grandparent branch without first merging those changes to the Parent branch. Git has no such restriction.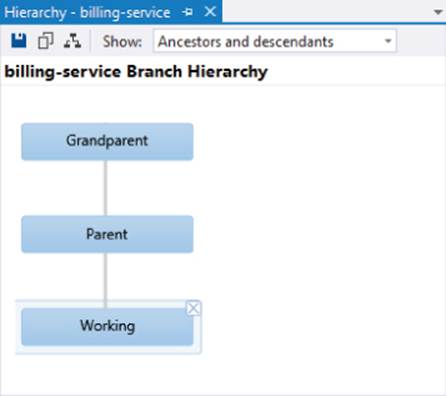
Branch hierarchy
· Because Git encourages workflows that branch and merge regularly, merges tend to occur more frequently. As a result, merges are smaller and have fewer conflicts.
Resolving Conflicts
When merging two branches produces conflicts, the Team Explorer Changes page will provide a message at the top of the page notifying you that your merge did not complete and you must resolve the conflicts to continue. Clicking the Resolve the conflicts link (seeFigure 7.25) takes you to the Resolve Conflicts page.
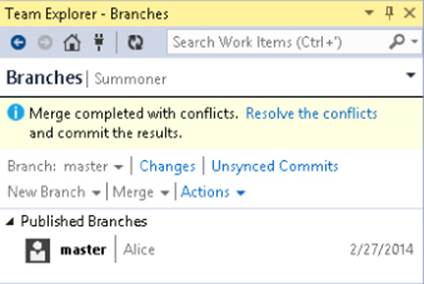
Figure 7.25 Conflict notification in the Team Explorer Changes page
Clicking the Resolve the conflicts link (shown in Figure 7.25) takes you to the Resolve Conflicts page. The Resolve Conflicts page lists each conflict that exists in the working directory, and you must resolve each of them to complete the merge. Select a conflict to show the conflict resolution options (see Figure 7.26).
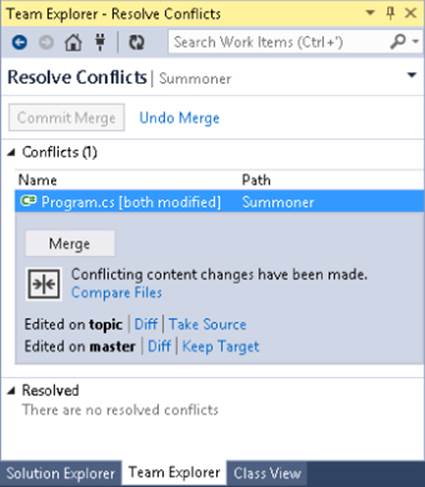
Figure 7.26 Conflict resolution options
To see the changes that led to the conflict, you can click the Compare Files button. This will open the Diff Editor with the file in the source branch on the left and the target branch on the right, allowing you to see the regions that conflicted directly. To look at only the changes that occurred in one of the branches, click the Diff button next to the source or target branch.
If you want to take the changes from the source branch, overwriting the changes that occurred in the target branch, you can click Take Source. Similarly, if you want to keep the changes from the target branch, overwriting the changes that occurred in the source branch, you can click Keep Target.
More often, however, you want to merge the changes in the branches manually. Click the Merge button to open the file in the Merge Editor, shown in Figure 7.27. The Merge Editor shows you the file as it exists in the source branch on the left and the file as it exists in the target branch on the right. The file below these branched versions contains the result of the merge. You must edit the file in the bottom row to include the source and target changes, as appropriate. Once you have finished, save the file to accept your changes and resolve the conflict.
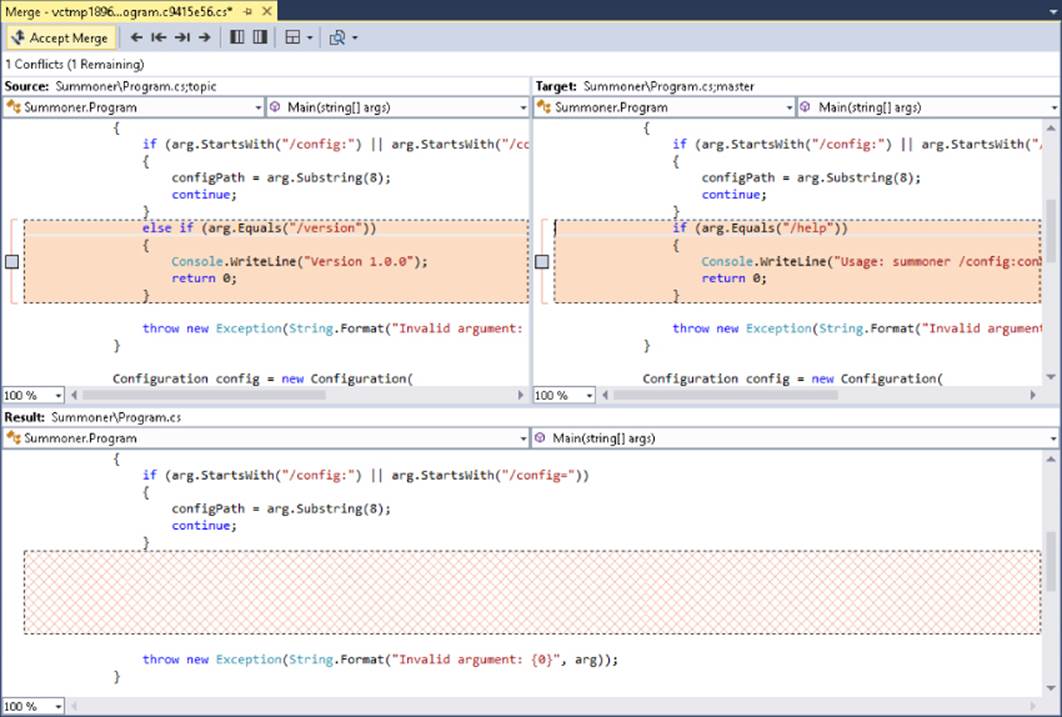
Figure 7.27 Merge Editor resolving a conflict
Once all conflicts have been resolved, the Conflicts list empties and indicates that there are no conflicts remaining. Any time you have a merge with conflicts you should perform a build and test pass locally before committing your changes. Once you have validated the merge results, click the Commit Merge button.
Note
The Diff Editor included in Visual Studio provides powerful three-way merging functionality for resolving conflicts, but like text editors, merge tools can be a personal preference. Visual Studio reads the Git merge.tool configuration settings, so if you prefer to use your own merge tool, you can configure it according to the git-mergetool documentation, available at https://www.kernel.org/pub/software/scm/git/docs/git-mergetool.html.
Synchronizing Changes with the Server
Downloading changes from other developers and publishing your changes are crucial parts of working with other developers on a project. In a typical collaborative workflow you will pull changes from the server into your repository and merge them with any changes you made before pushing your changes to the server.
Pulling Changes from the Server
Pulling changes from the server downloads any commits that your peers have made and merges those changes into your local repository.
An advantage of the topic branch workflow is that you are not working directly in the master branch, so you can pull the changes from the server's master branch into your own without worrying about merge conflicts. This will keep your master branch in sync with the remote but not force you to merge the changes with your topic branch until it is convenient.
To pull changes from the server, first switch to the master branch. Then navigate to Team Explorer ![]() Unsynced Commits. At the top of the Unsynced Commits page is the Incoming Commits list, which shows all the changes that are new on the server and will be merged into your local repository, as shown in Figure 7.28.
Unsynced Commits. At the top of the Unsynced Commits page is the Incoming Commits list, which shows all the changes that are new on the server and will be merged into your local repository, as shown in Figure 7.28.
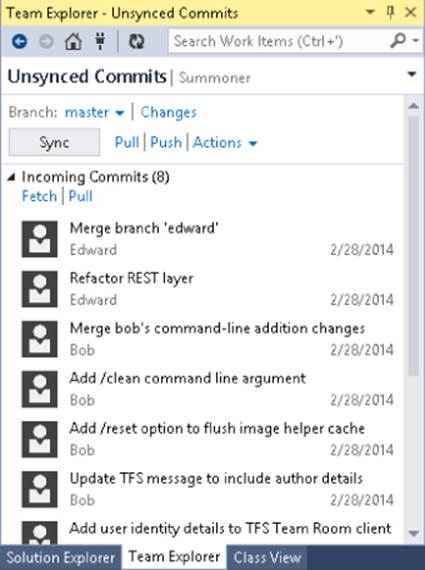
Figure 7.28 Incoming changes
When you have reviewed the incoming changes, click Pull to merge them into your master branch. In a topic branch workflow, this will generally complete without conflicts, so you can switch back to the topic branch that you're working on and merge the changes from your master branch when it's convenient.
Examining Changes
To see the changes that were pulled into your branch, go to the Team Explorer Branches page, right-click on the master branch and select View History. This will open the History Editor, displaying the commits in reverse chronological order, as shown in Figure 7.29.
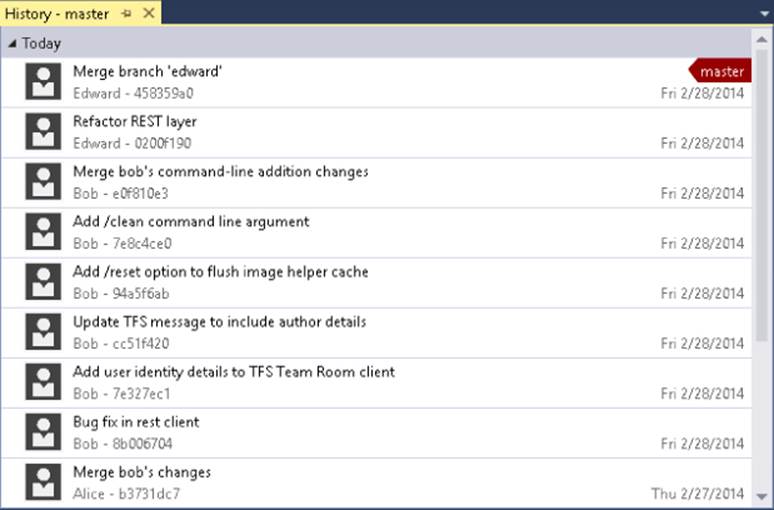
Figure 7.29 History view
To see more detailed information about one of the changes, double-click on it to open the commit details in Team Explorer. This will show you the complete commit details as well as the list of files that were modified in this commit (see Figure 7.30). You can double-click on any file to open the file in the Diff Editor, with the previous version on the left and the contents of that commit on the right.
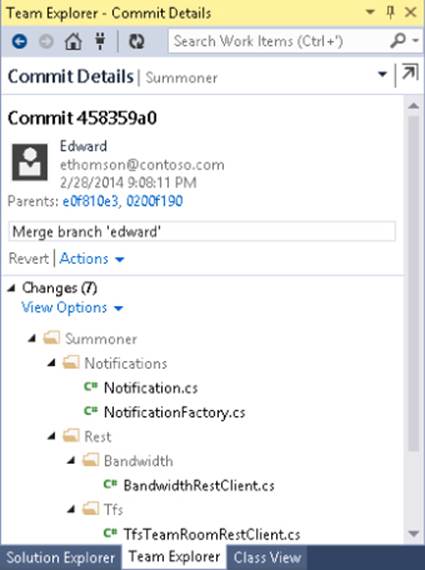
Figure 7.30 Commit details
If, however, you know the file that changed but not the commit that contained the change, you can view the changes that were made in a particular file. If you have the file open in an Editor window, right-click in the window and select Source Control ![]() History. Otherwise, you can navigate to the file in Solution Explorer, right-click on the file and select View History. This gives a list of every commit that has changed the current file, but not what was changed.
History. Otherwise, you can navigate to the file in Solution Explorer, right-click on the file and select View History. This gives a list of every commit that has changed the current file, but not what was changed.
For a more in-depth view of the changes, you can view the “annotated history” of a file by right-clicking on the file and selecting Source Control ![]() Annotate. This will add a new column on the right side of the Editor window, which shows the last commit that changed each line (see Figure 7.31). The annotated history view is useful in determining what commit introduced a bug or a change in behavior, and it can be helpful in quickly identifying the author who made the change along with providing more information. Unsurprisingly, annotated history is also frequently called the “blame” history.
Annotate. This will add a new column on the right side of the Editor window, which shows the last commit that changed each line (see Figure 7.31). The annotated history view is useful in determining what commit introduced a bug or a change in behavior, and it can be helpful in quickly identifying the author who made the change along with providing more information. Unsurprisingly, annotated history is also frequently called the “blame” history.
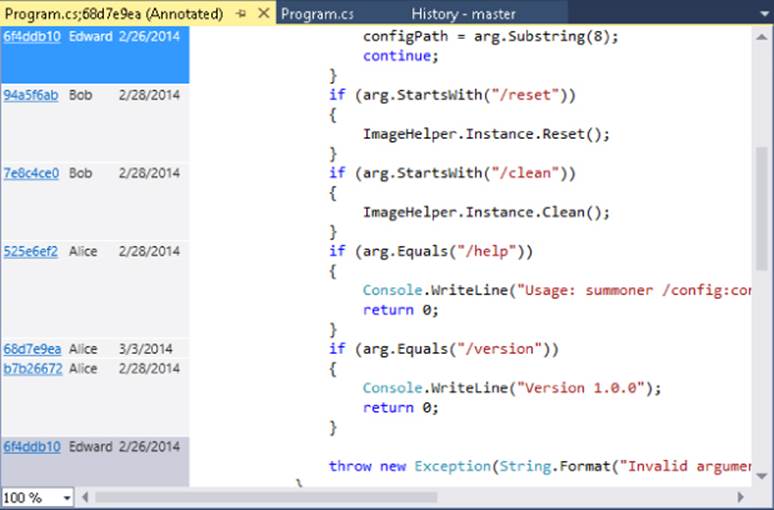
Figure 7.31 Annotated history
Pushing
Pushing your changes to the server uploads the commits that you've made in your local branch and then sets the server's branch to point to the same commit that your local branch points to. The server will not merge any changes for you; instead, you must merge any changes on the server with your local branch before you push it. The server enforces that you have performed the merge to ensure that you do not accidentally overwrite any changes on the server.
Visual Studio allows you to pull any changes on the server, merge them with your local branch, and then push the results back up to the server in a single step called “synchronizing.” Synchronizing is most useful when you have finished making changes in your topic branch and are ready to merge it into the master branch and push it to the server. First, switch to the master branch and perform the merge from your topic branch to master. Then, navigate to Team Explorer ![]() Unsynced Commits and press the Sync button. Your master branch will be synchronized with the server and the changes from your topic branch will now be merged.
Unsynced Commits and press the Sync button. Your master branch will be synchronized with the server and the changes from your topic branch will now be merged.
For a new repository that you want to publish to a server for the first time, you will not be able to synchronize. Instead, when you navigate to Team Explorer ![]() Unsynced Commits, you will be prompted for the remote server URL. Enter the Git repository URL that was provided when you created the repository and click Publish, as shown in Figure 7.32.
Unsynced Commits, you will be prompted for the remote server URL. Enter the Git repository URL that was provided when you created the repository and click Publish, as shown in Figure 7.32.
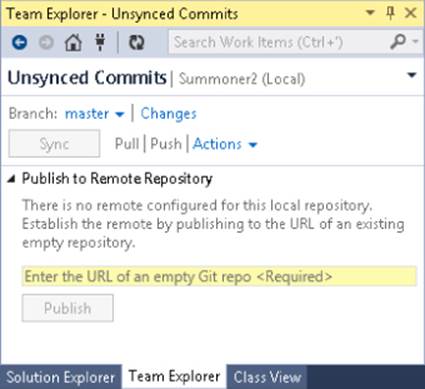
Figure 7.32 Publishing a new repository to the server
Note
When you create a new Git repository in Team Foundation Server, it provides you with the Git repository URL to get started, as shown in the following figure.
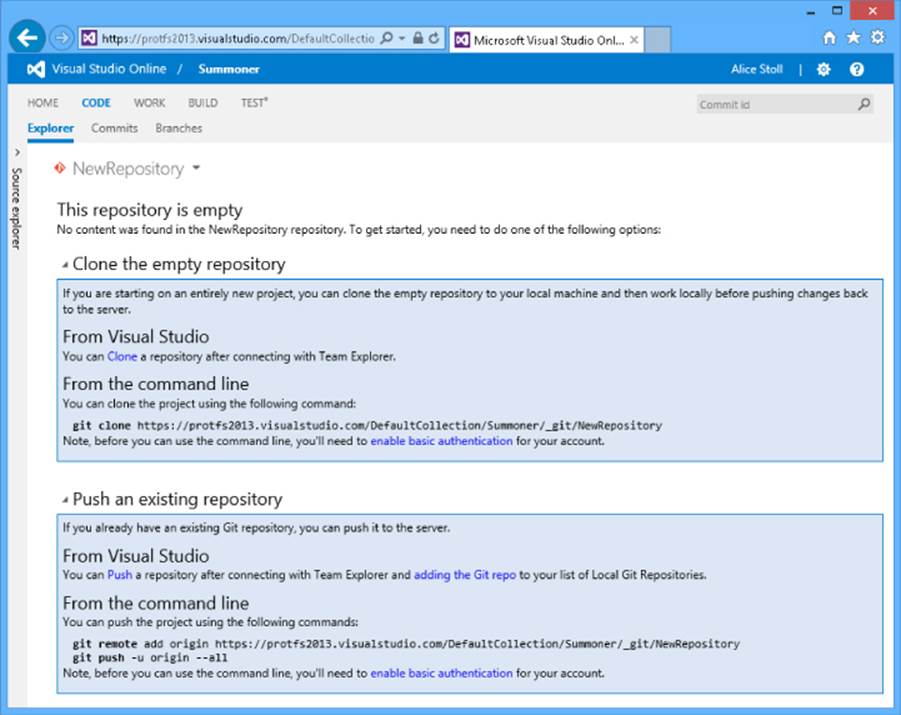
Creating a new Git repository
Using Git Command-Line Tools
You saw in the previous section that Visual Studio provides straightforward access to working with Git repositories but, like TFVC, not all version control operations are available in Visual Studio. If you want to perform more advanced Git repository operations, or if you just prefer a text-based interface to a graphical user interface, you will want to use the command-line tools.
The command-line tools, Git for Windows, are a version of the git core utilities developed to manage the Linux kernel repository. The original git core tools remain primarily targeted at running in Unix environments and as a result are written in a mixture of languages including Bourne shell scripts, Perl, and Python, and expect to be able to invoke standard Unix utilities that are not typically available on a Windows system.
The Git for Windows project takes the git core tools, packages them with a minimal set of the Unix utilities, and provides a helpful installer to handle setting up this environment for you. Git for Windows also includes an alternate command-line environment, Git Bash, which provides a Unix-like command-line experience. You are not required to use Git Bash, however; you can perform these operations directly from a command prompt or from PowerShell.
Warning
You may see Git for Windows referred to as “msysgit,” although this is not generally correct. Git for Windows is the name of the project that provides the git core tools for Windows users in an easy-to-use installer. msysgit is actually the environment used to develop and build Git for Windows itself.
In this section, you learn how to install Git for Windows and how to use some of the most commonly used commands. You will also discover the posh-git interface for PowerShell, which can be helpful when working from the command line.
Note
This section is not a comprehensive tutorial of the git core tools; it is meant to provide an introduction to how they work and how to use them alongside Visual Studio. Even if you prefer to use the interface in Visual Studio, understanding how the command-line tools work is helpful to understanding how the Git version control system works. For more information on using the git command-line tools, refer to Pro Git by Scott Chacon, available at http://git-scm.com/book.
Installing Git for Windows
Visit http://msysgit.github.io/ to download the latest version of Git for Windows in a helpful self-extracting installer. The installer will offer you many options that allow you to make expert-level configuration settings. You can simply accept the defaults because they are generally safe, but two options deserve explanation.
Note
Martin Woodward provides a detailed explanation in his article “Setting Up the Perfect Git Command Line Environment on Windows” at http://www.woodwardweb.com/git/setting_up_the.html.
Setting Your PATH Environment Variable
By default, Git for Windows will modify your PATH environment variable to include the git command-line tool so that you can use it from either a command prompt or PowerShell. If you choose to not modify the PATH, you will have to use the Git Bash environment to use git. If you choose to include the entire set of Git for Windows tools in the PATH, you will have Unix tools available at the command line, some of which override Windows tools of the same name. These options are only suggested if you are very familiar with Unix.
Setting Your Line Ending Conversion
Git supports line ending conversion to support development in heterogeneous environments. Typically, Windows uses two characters to represent the end of a line, using a carriage return (ASCII 13) and a line feed (ASCII 10) character, while Unix uses a single newline character (ASCII 10). Most modern applications can read and write files in either format but some legacy applications expect a particular format.
This line ending conversion is optional, but recommended. You should select the “Checkout Windows-style, commit Unix-style” option, even if you are only working on Windows and never collaborating with developers on Unix platforms. Some Git tools perform line-ending conversion by default and do not honor this configuration setting; they will expect the repository to contain Unix-style line endings always.
If you were to configure Git to always write Windows-style line endings, but use one of these deficient tools that did not honor this configuration, it would lead to inconsistent settings in both your repository and your working directory.
Working with Git for Windows
One the installation has finished, you can start working with the git command-line tools as soon as you open a new command shell or a new instance of PowerShell. You will see the examples illustrated with command shell, but you should use whichever you prefer. If you are a PowerShell user, make sure to see the section “Using Posh-Git” later in this chapter.
Cloning Git Repositories Hosted in Team Foundation Server
If you have cloned a repository using Visual Studio and you want to work with the git core tools, you do not need to clone a repository again. You can simply open the working directory in a command prompt and run the git commands in your working directory. If you would prefer to clone using the command line instead, you must first discover the URL of the server repository by opening Team Web Access.
In a web browser, navigate to the Team Project that contains the Git repository you want to clone; then navigate to the Code page, and select the Git repository to clone. Click the Clone button, shown in Figure 7.33, to open a text field that contains the URL of the server repository.
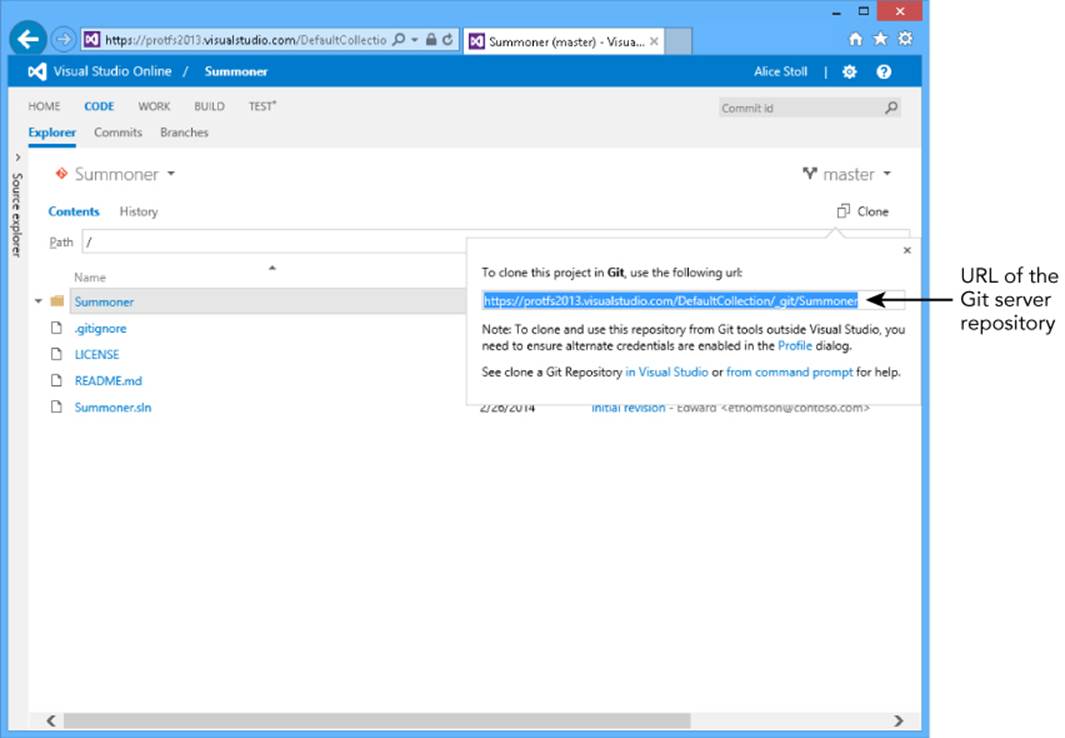
Figure 7.33 The server repository URL in Team Web Access
Once you have copied the URL of the server repository, you can simply run the git clone command.
git clone http://servername:8080/tfs/DefaultCollection/_git/Project C:\Project
In this example, the server repository located at http://servername:8080/tfs/DefaultCollection/_git/Project will be cloned to a new local working directory, C:\Project.
Note
When you are prompted for your user name and password, you can simply press Enter twice to provide your Active Directory credentials to your Team Foundation Server. If you are using TFS hosted in Visual Studio Online, you should instead enter your Alternate Credentials, as described at http://aka.ms/VSOAlternateCredentials.
Making Changes in the Repository
As you learned previously, Git does not require you to notify the version control system before you start making changes in the working directory. However, the git core tools do not have the Include Changes and Excluded Changes list, as you saw in Visual Studio, so you will need to update the Git index to reflect your changes after you have made them.
Making Changes and Staging Them for Commit
As you make changes in the working directory, you can use the git status command to look at the working directory and report the changes you've made. New files in the working directory will be reported as “untracked” and modified and deleted files will be reported as “unstaged changes.” None of these changes have been added to the index and these changes will not be included in the upcoming commit. Figure 7.34 shows the status of a Git repository with unstaged changes.
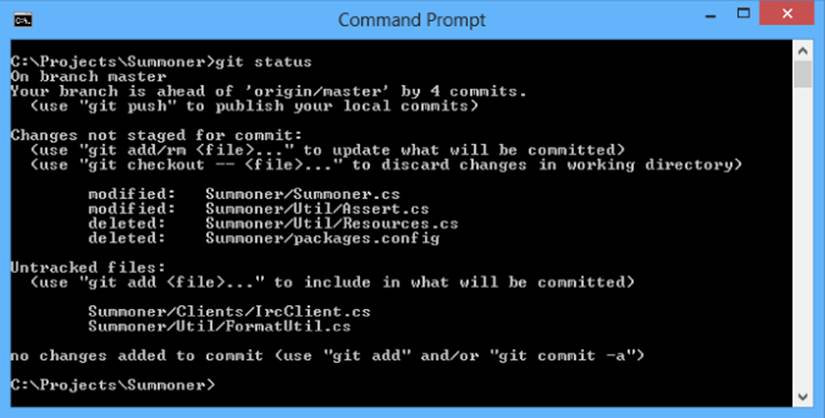
Figure 7.34 Git repository status with unstaged changes
If you want to prepare these changes to be committed, you need to “stage” them. To stage new files or modified files, add them to the index with the git add command. To stage deletions of removed files, use the git rm command. Figure 7.35 shows the status of a git repository with a mix of staged and unstaged adds, modifications, and deletes. The staged changes will be included in the next commit; the unstaged changes will remain unstaged.
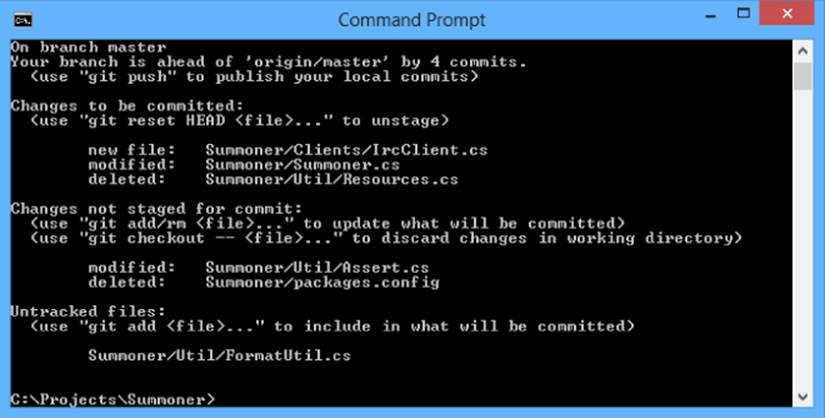
Figure 7.35 Git repository status with staged and unstaged changes
Note
You can use the shorthand command git mv, which renames the source file to the target file on disk, removes the source filename from the index, and adds the target filename to the index.
As you learned earlier, you do not have to use git mv because Git repositories detect renamed files using heuristics instead of storing rename information in the repository. There is no difference between using git mv and simply renaming the file yourself, staging the deletion of the source file with git rm and staging the addition of the target with git add.
Reviewing Your Changes and Committing Them
When you have finished making changes and are ready to commit them, you should first review them for accuracy.
Check the status of your repository to ensure that you have staged all the changes you want included; review the list of unstaged changes carefully, making sure that there are no files that should be included in the upcoming commit. Because you can stage incremental file changes to the index, occasionally you may stage changes to a file and then edit that file further, which will cause you to have both staged and unstaged changes to the same file. In this case, you should review the changes on a line-by-line basis.
To see this deeper comparison of the changes that you have staged, you can compare the staged changes against the HEAD commit.
git diff --staged
This will show you each line that you have changed and staged for commit, easily decorated to identify the changes. Added lines will be prefixed with a “+” while removed lines will be prefixed with a “-”. Unchanged lines have no prefix, and are provided for context (see Figure 7.36).
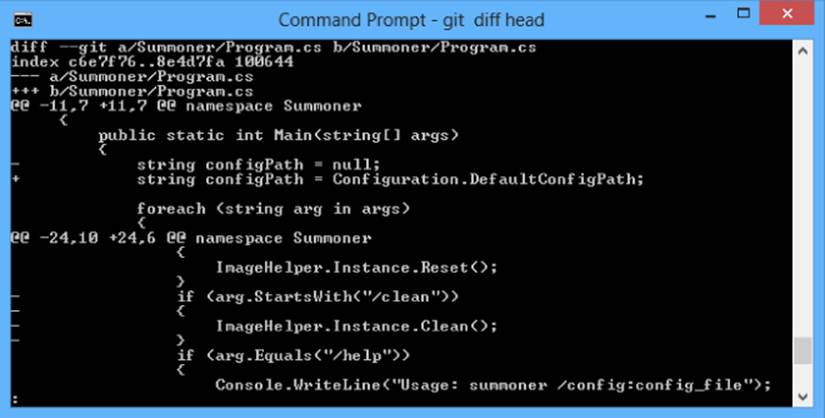
Figure 7.36 Output of git diff showing changes in a single file
When you have reviewed your changes and are ready to commit them, simply run the following:
git commit
You will be prompted to enter a commit message that describes the changes that you're making. Again, the first line should be a brief summary of the change, followed optionally by a blank line and additional details. When you have finished, save the file and exit your text editor, and your changes will be committed.
Viewing History
You learned earlier that Git stores its history in a graph, but in the examples you've seen, history has been portrayed as a flattened list of commits, sorted reverse chronologically. To see the actual graph, with history diverging and merging, you can use the git logcommand as shown in Figure 7.37. Specify the --graph option to display the graph format, the --decorate option to show labels on the commits that indicate the location of the branches, and the --oneline option to show a compact display, with one commit per line.
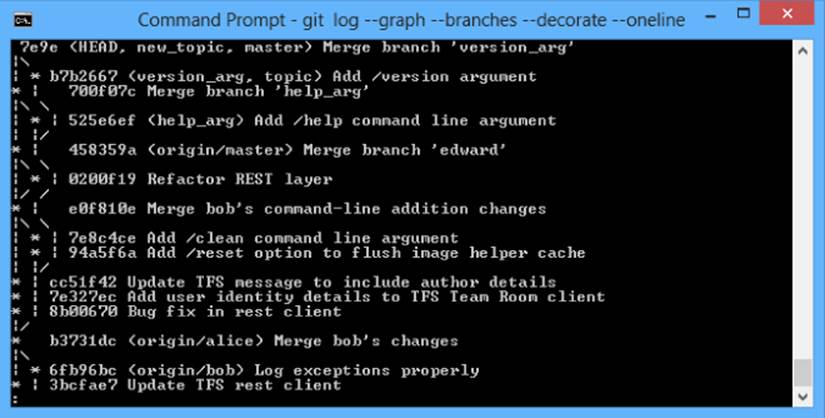
Figure 7.37 Git log with graph visualization
Branching and Merging
Creating a branch with the git command-line tools is simple and quick, just like creating a branch in Visual Studio. To create a new topic branch based on the master branch, you use the git branch command:
git branch new_topic master
Once created, you can switch to the topic branch:
git checkout new_topic
Note that you can also perform this branch creation and branch switching from within Visual Studio. In fact, Visual Studio will watch the git repository and update Team Explorer as you create branches and switch to them. You can see Team Explorer updated to reflect the new branch in Figure 7.38.
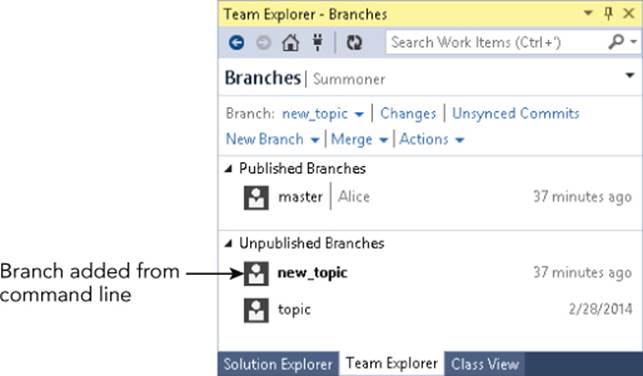
Figure 7.38 Team Explorer showing the new branch
After you have made changes and committed them in your topic branch and you are ready to merge the topic branch into master, you need only to switch to the master branch and merge the topic branch in.
git checkout master
git merge topic
If the merge is successful, it will complete immediately and produce a new commit. However, if any merge conflicts occurred, you will be notified that you must resolve them before continuing.
You can edit each file manually and stage the resolved file, or you can resolve the conflicts in Visual Studio, using the helpful Diff Editor that you've already seen. Visual Studio will even detect the conflicts as soon as the merge produces them, and allow you to resolve them from the Team Explorer Resolve Conflicts page.
Once you have staged a resolution for all your conflicts, you can git commit the results to complete the merge. You can then synchronize your changes with the server to publish your topic branch to your peers.
Synchronizing with the Server
When working with Visual Studio, you pull changes from the server, merge them with your own, and then push your changes to the server. This is the same workflow you should follow when working from the command line.
Pulling Changes from the Server
In order to retrieve changes from the server, merging the changes in the server's master branch into your master branch, first switch to the master branch using git checkout master, and then use the git pull command.
git pull origin
In this example, the argument “origin” refers to the name of the Git server. Because git provides peer-to-peer access to other repositories, you can actually configure many remote repositories that you share changes with. By convention, “origin” is the remote repository that you first cloned from.
As in Visual Studio, the pull command both fetches the new commits on the server and merges them into your repository. The git pull command is actually a combination of the fetch and merge command. If you are on the master branch, locally, this is the equivalent of:
git fetch origin
git merge origin/master
Warning
A variation on the git pull workflow is to “rebase” your changes on top of the upstream changes. This can be accomplished by:
git pull origin --rebase
which is the equivalent of:
git fetch origin
git rebase origin/master
Instead of performing a merge commit, this takes your local changes that have not been pushed upstream and re-applies them on top of the upstream changes. As a result, the repository history does not appear to diverge and merge; it appears like a straight line. This may be visually appealing, but it obscures the actual direction that development took and if a bad merge occurs, it can hide the source. As a result, you should generally merge the server's changes unless your development team has a convention to the contrary.
Pushing Your Changes
To publish your changes to the server, you use the git push command to upload a branch to the server.
git push origin master
In this example, as with the pull command, the argument “origin” refers to the name of the Git server. The argument “master” refers to the name of the branch you wish to push; the changes in your master branch will be pushed to the server's master branch.
If there are other changes on the server that you do not yet have in your repository, your push will fail. You will be prompted to merge those changes into your repository and push again. To retrieve the server's changes and merge them into your repository, use thegit pull command. After resolving any conflicts, you can push your newly merged changes to the server.
Using Posh-Git
Posh-Git is a set of PowerShell scripts that provide user interface enhancements when you're using the git command-line client. Posh-Git provides two simple, but powerful, features: an extension to your shell's prompt that provides a brief report of your repository's status, and command-line completion for git commands and branches.
Installing posh-git is simple: Download the latest version from http://dahlbyk.github.io/posh-git/, extract the Zip file, and run the included install.ps1 script from a PowerShell prompt. The installer updates your startup profile so that posh-git will be loaded by default every time you start PowerShell; to rerun your startup profile to take advantage of posh-git immediately, follow the instructions provided in the installer.
Now, you can simply change directories into your git repository. As soon as you enter the working directory, your prompt will change to include additional information about your repository status. In a working directory with no changes, you will simply see the prompt include the name of the currently checked out branch.
C:\Projects\Summoner [topic]>
Switching branches by using the git branch command updates the prompt immediately to reflect this change. The color of the branch name indicates its relation to your server repository, as shown in Table 7.2.
Table 7.2 Posh-Git Remote Branch Indicators
|
Color |
Status |
|
Blue |
Your branch is “up to date” with the server's branch; your local branch points to the same commit as the server's branch. |
|
Green |
Your branch contains new commits that you can push to the server. |
|
Red |
The server's branch contains new commits that you can pull. |
|
Yellow |
Both your branch and the server's branch contain new commits since the last time you synced. You should pull commits from the server and then you can push your commits. |
If you have any staged or unstaged changes in your working directory, a summary of the status will be displayed in your prompt after the branch name. For example, if you add a file to the working directory and stage a change to an existing file, the prompt will indicate those changes.
C:\Projects\Summoner [topic +0 ~1 -0 | +1 ~0 -0 !]>
The first group of status indicators shows the staged changes in the working directory; the second group of indicators shows the unstaged changes in the working directory. Table 7.3 explains the status indicators in detail.
Table 7.3 Posh-Git Working Directory Status Indicators
|
Section 1: Staged change indicators |
|
|
+ |
Number of new files in the working directory that are staged for addition |
|
~ |
Number of modified files in the working directory that have staged changes |
|
- |
Number of deleted files in the working directory that are staged for removal |
|
Section 2: Unstaged change indicators |
|
|
+ |
Number of untracked files in the working directory that are new and not staged |
|
~ |
Number of modified files in the working directory that are not staged |
|
- |
Number of deleted files in the working directory that are not staged |
|
! |
Number of unresolved conflicts |
Having these indicators in your prompt is an exceptionally helpful way to have a constant, unobtrusive view of your repository status.
Posh-Git also provides command-line completion for git commands. This lets you type git ch and press Tab, and posh-git will complete this to git checkout. You can type git stat and press Tab, and posh-git will complete this to git status. Similarly, posh-git provides command-line completion for git branches. You can type git checkout ma and posh-git will complete this to git checkout master (provided you don't have any other branches that start with “ma”).
If you're a PowerShell user, posh-git will quickly become an indispensable part of your Git workflow. If you're not a PowerShell user, the simple utility of posh-git may make you reconsider.
Summary
In this chapter, you learned about Git, the concepts of distributed version control systems and how they differ from centralized version control. You learned how Git integrates into Visual Studio and how to take advantage of common version control operations with Git, including making changes and committing them, pushing your changes to other users, pulling changes from the server, and branching and merging with the topic branch workflow strategy. You have also learned some basics about how to work with Git repositories from the command line.
In Chapter 8, you will learn how you can work with Team Foundation Server Version Control from heterogeneous environments.
All materials on the site are licensed Creative Commons Attribution-Sharealike 3.0 Unported CC BY-SA 3.0 & GNU Free Documentation License (GFDL)
If you are the copyright holder of any material contained on our site and intend to remove it, please contact our site administrator for approval.
© 2016-2026 All site design rights belong to S.Y.A.