Managing Microsoft Hybrid Clouds (2015)
Chapter 4. Building an Infrastructure on Microsoft Azure
Now that we know what is running under the hood of Microsoft Azure, we can start building our infrastructure on Azure and connect to it from an on-premises environment. In this chapter, you will learn how to build virtual machines, enable two-way authentication, perform automation, and do a lot more.
This chapter covers the following topics:
· Purchasing Microsoft Azure
· Creating an account
· Understanding various IP configurations in Azure
· The current and new Azure Management Portal
· Creating storage, network, and virtual machines
Getting started with Microsoft Azure
In Chapter 2, An Introduction to Microsoft Cloud Solutions, you learned there are a couple of ways to try Microsoft Azure for free. Anyone with a valid credit card can try Azure for free for 1 month, including $200 credit.
A credit card is only used as proof of address. You will not be charged as long as you do not convert your trial to a paid subscription.
MSDN subscribers receive $75 free credit that renews each month. For the first month, you will even receive $150 credit.
For permanent subscription-based usage of Microsoft Azure, there are several ways to purchase:
· Pay using a credit card directory to Microsoft. This is a pay-as-you-go model as the customer pays exactly for the consumed resources.
· Alternatively, customers can use the invoice payment method. In some cases, payment by credit card is not possible. A spending cap on the credit card could limit the amount of Azure resources to be consumed. Instructions on using an invoice are available at http://Azure.microsoft.com/en-us/pricing/invoicing/.
· As part of an Enterprise Agreement, large enterprises can make an upfront monetary commitment. This means they pay a certain amount of money upfront. This allows the customer to use any Azure resource during a whole year. The credit is only valid for 1 year, and remaining credit does not roll over to the next year! If a customer's usage exceeds their commitment, they will be billed in-arrears for that usage, either quarterly or annually depending on whether that additional use is more than 50 percent beyond their original commitment.
· You can also purchase tokens from any Microsoft partner as part of Open Licensing. This license type is used by organizations that have 250 devices or less. They can purchase tokens worth $100 from a Microsoft Partner. This Microsoft Partner is then able to add the value of the token to the customer's Azure subscription.
This ability to purchase Azure in Open Licensing was added on 1st August, 2014 to offer Microsoft Partners a billing relationship between them and customers and develop new business models.
There is a big difference between purchasing resources from Amazon or from Microsoft. For Amazon, customers have to make a choice. For example, they purchase capacity upfront for compute resources. If the available compute capacity is not consumed 100 percent, the customer cannot consume a different resource like storage without having first to purchase storage resources.
This is different for Microsoft Azure. Customers purchase Azure resources upfront, but it is up to the customer on which service the credits are spent: compute, mobile services, disaster recovery, storage, and so on. This is much more flexible than the Amazon model.
Microsoft Azure is billed by Microsoft directly to its customers. There is no organization like a partner or a reseller between. However, this might change in the future. Microsoft does provide partners with a so-called kick-back free when a partner helps a customer to use Microsoft Azure.
Subscribing to Microsoft Azure is very simple and takes just a few minutes. Requirements are a credit card, a mobile phone for verification purposes, and an e-mail address. Then, perform the following steps:
1. Create a Microsoft account. A Microsoft account is a single-sign-on account that allows you to log on to many Microsoft sites. Previous names for Microsoft accounts were Microsoft Wallet, Microsoft Passport, .NET Passport, Microsoft Passport Network, and most recently Windows Live ID.
2. If your organization has a corporate account on Microsoft Office 365, you can use that account.
3. To create a Microsoft account, go to https://signup.live.com/signup.aspx?lic=1. The e-mail address that is chosen will be used as the account name to log in to Microsoft Azure.
4. After registering a Microsoft account, go to www.microsoftazure.com and select Free trial. The registration process is very simple. You will have to fill in a mobile phone number to receive a verification code through an SMS text message. You will also have to provide your credit card details. Microsoft will not charge your credit card during the trial period.
When you have consumed the free $200 worth of credit, your services like virtual machines will be stopped. So you won't get any unwanted surprises when you forget to cancel your free trial or forget to stop virtual machines because of the spending limit, which is the standard in place. You can however choose to disable the spending limit. This ensures your Cloud Services will remain operational, but can incur certain costs to be charged to your credit card.
5. When the trial has ended and you want to continue using Azure, you can simply upgrade your subscription. Several options are possible, such as pay–as-you-go and plans in which you pay in advance.
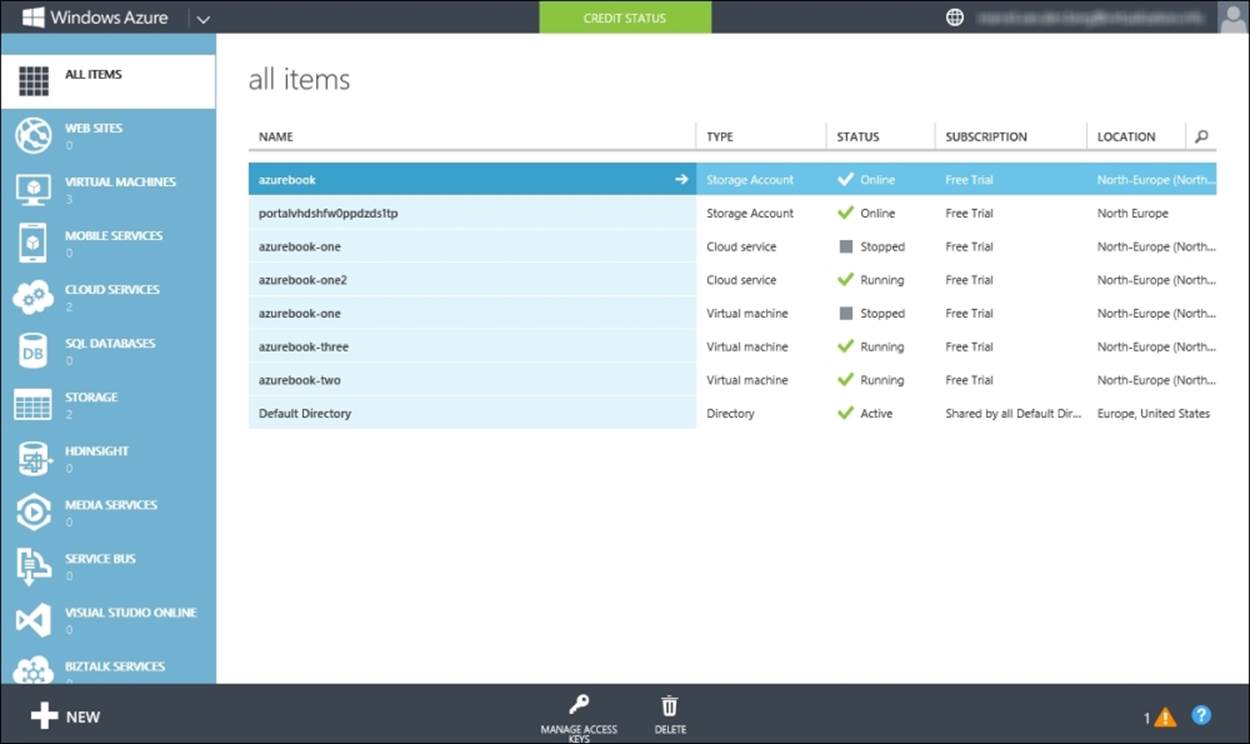
6. After finishing the registration process, you will be presented with the Azure Management Portal. This is an HTML5-based portal that allows you to manage your Microsoft Azure environment.
The portal can be accessed using the URL https://manage.windowsAzure.com. The portal looks like the following screenshot:
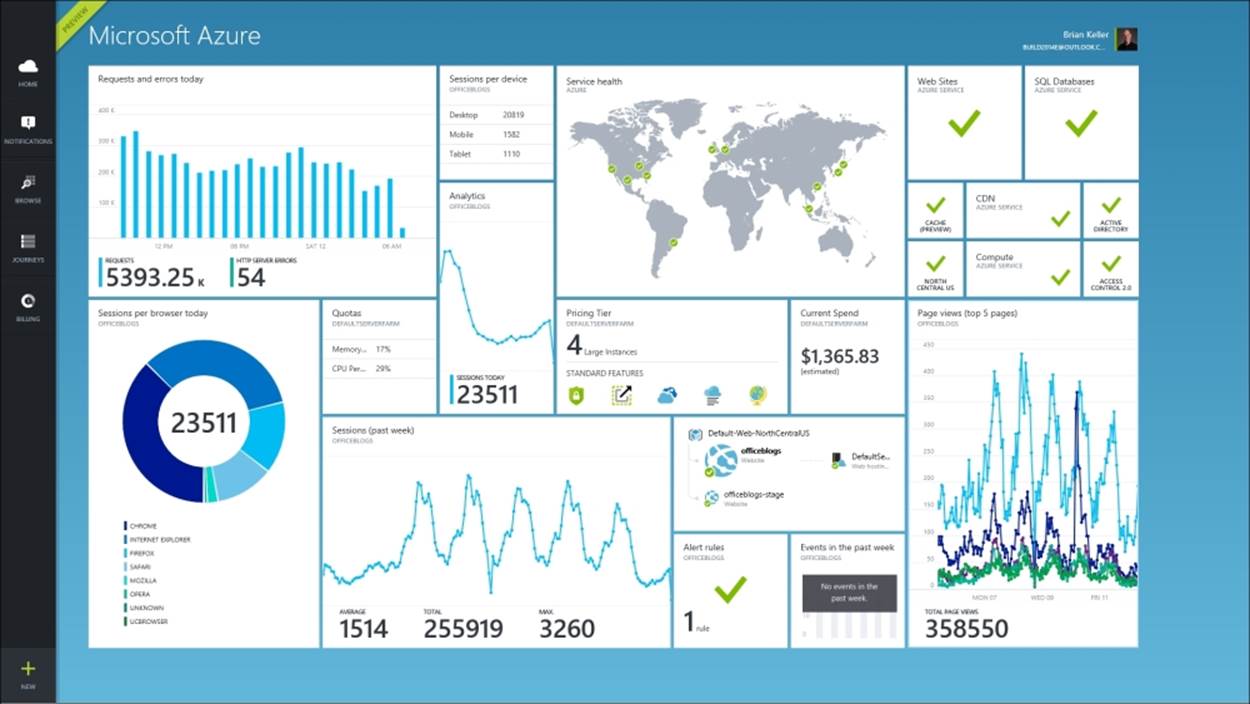
The new Azure Management Portal
Microsoft is working on a new Azure Management Portal. At the time of writing this book, the portal was available as a preview.
The new portal offers much more information and features and can look a bit busy compared to the old management portal. The main reason to create a new portal was to show the relationship between various Azure resources that are combined from a single application. Think about Azure Website, storage accounts, and virtual machines that are all used as components for an application.
Another reason for a new portal is DevOps. DevOps is a new way of working in IT which allows for much shorter development cycles. In DevOps, new versions of applications are deployed frequently. This requires close cooperation between the developers of the application and the operations team. The new dashboard enables this.
The new portal is accessed using http://portal.azure.com.
The new portal offers features not available in the current portal, like:
· Customization of the interface: You can size tiles and add windows to create your own dashboard with information like costs, performance, and health of services.
· Cost overview: The portal allows for a better overview of costs associated to your subscription. It allows you to get an estimate of the costs.
· Deployment: New features are available to deploy applications using resource groups.
· Console access: You can now access the console of a virtual machine using your browser while logged on to the Azure portal.
· Role-Based Access Control (RBAC): This allows much more granular control of which users have access to which resources. In the old Azure Management Portal, access control was very limited. RBAC was introduced in January 2015 available as a preview feature.
The following screenshot shows the new Azure Management Portal:
This book will focus on the current (January 2015) Azure Management Portal.
Creating a virtual machine
Now that we have access to the Microsoft Azure Management Portal, we are ready to create virtual machines to run our applications on.
It is very tempting to start creating virtual machines by selecting VIRTUAL MACHINES from the left pane and clicking on New in the bottom-left corner of the screen. This is a good way to explore Microsoft Azure. Within a few minutes, you will have your first virtual machine up and running.
You can access the virtual machine in Windows Azure using RDP for Windows Server or over SSH for Linux-based virtual machines. Be sure the connection at your office location allows you to connect through random ports to the Internet when you do not have a VPN into the Microsoft Azure cloud. By default, the RDP port number for virtual machines in Microsoft Azure is randomized, so you will not connect through the default port 3389.
However, if you are going to build an infrastructure that will run production workloads, it is very important to first create some supporting components for the infrastructure. Also, think about a naming convention for components like virtual networks, filenames, and virtual machines. This will save you lots of sorting out during troubleshooting and will make system management much easier.
Besides having a naming convention, you should know the restrictions of Microsoft Azure. When you have just starting building, it could be difficult to rollback some decisions you made in an earlier stage without nasty consequences such as downtime.
Use the following workflow to create a new virtual machine:
1. Determine your naming convention for components like affinity groups, virtual machines, and so on.
2. Determine which subscription to use.
3. Create an affinity group.
4. Create a storage account by selecting the affinity group created in the previous step.
5. Create a virtual network.
6. Create a Cloud Service.
If your application has several virtual machines, it will take some time to deploy these manually using the Azure Management Portal. Alternative methods are using PowerShell and Azure Automation.
The new Azure Management Portal allows for more advanced methods of deploying complete applications using application templates.
The portal offers some predefined application templates like one to deploy a complete SharePoint Server farm. With SharePoint Server Farm, the Microsoft Azure Preview Portal automatically creates a pre-configured SharePoint Server 2013 farm for you.
More information can be found at http://azure.microsoft.com/en-us/documentation/articles/virtual-machines-sharepoint-farm-azure-preview/.
Understanding the restrictions of Microsoft Azure
Currently, Microsoft Azure has a number of restrictions you should be aware of. Understanding these will save you a lot of time and annoyances later on. Note that these restrictions might be solved by Microsoft by the time this book has been published:
· Azure does not provide high availability for single instance virtual machines. If your application depends on the availability of a single virtual machine, you might experience unwanted downtime when Microsoft is updating Azure hosts. We discussed this inChapter 3, Understanding the Microsoft Azure Architecture, in the section discussing update domains. You learned that Microsoft Azure is a so-called best effort type of cloud. If possible, always have at least two instances for applications that require maximum availability.
· It is not possible to add a virtual machine to a virtual network once created.
· It is not possible to move a virtual machine from one virtual network to another.
· It is not possible to renew the IP configuration (for example, by using ipconfig/renew) for a running virtual machine. To apply a new IP configuration assigned by a virtual network, restart the virtual machine. Best practice is to make sure your own managed DNS server is created first.
· It is not possible to use granular user rights in Microsoft Azure. Any user with access to a Microsoft Azure subscription has full administrative rights on all resources in that subscription.
· No support for remote console and .VHDX virtual disk format.
Some of these restrictions can be worked around by deleting the virtual machine and retaining the virtual disks. Then, create a new virtual machine and ensure that the required configuration is set.
Determining the naming convention for Azure components
One of the most important initial steps is to determine a naming convention for VMs, networks, and accounts to ensure a consistent usage of object naming, which will make management easier. Use this naming convention, for example, to differentiate between virtual machines in your on-premises data center and the virtual machines you have running in Azure.
Note that some components, such as a storage account, require a unique name for all of Azure. So, it is possible you might find out another Azure customer already claimed a name for a storage account.
I strongly advise you to first design a naming convention for the different components in Azure. By doing this before deploying virtual machines, you will have a much better understanding of location of virtual machines, storage account, disk types, and so on.
The following table shows all naming objects and restrictions in length and the allowed characters:
|
Object |
Minimum length |
Maximum length |
Characters allowed |
Uniqueness |
|
Availability set |
3 |
15 |
The name can contain only letters, numbers, hyphens, and underscores. The name must start with a letter and must end with a letter or a number. |
Per subscription |
|
Virtual machine DNS name |
3 |
15 |
The name can contain letters, numbers, and hyphens. The name must start with a letter and end with a letter or number. |
For Azure |
|
VM endpoint |
3 |
15 |
The name can contain only letters, numbers, hyphens, spaces, and underscores. The name must start with a letter and end with a letter or a number. |
Per VM |
|
Cloud Service |
1 |
63 |
The name can contain letters, numbers, and hyphens. The first and last character in the field must be a letter or number. Trademarks, reserved words, and offensive words are not allowed. |
For Azure |
|
Storage account |
3 |
24 |
Only lowercase letters and numbers are allowed. |
Per subscription |
|
Virtual network |
1 |
63 |
A name is required. The name can contain only letters, numbers, and hyphens. The name must start with a letter. |
Per subscription |
|
Local network |
1 |
63 |
The name can contain only letters, numbers, and hyphens. The name must start with a letter. |
Per subscription |
|
Disk |
1 |
100 |
The name can contain only letters, numbers, hyphens, and underscores. The name must start with a letter and end with a letter or a number. |
Per storage account |
|
VHD blob |
1 |
1024 |
A blob name can contain any combination of characters, but reserved URL characters must be properly escaped. |
Per container |
|
Affinity group |
1 |
63 |
The name must start with a letter or number. Name can contain letters, numbers, and dashes. |
|
|
Container |
3 |
63 |
The name can contain letters, numbers, and the dash sign. It must start with a letter or number. |
Per storage account |
|
Image name |
1 |
100 |
The name can contain only letters, numbers, periods, hyphens, and underscores. Start the name with a letter and end it with a letter or a number. |
Per subscription |
|
VHD filename |
1 |
256 |
The name can contain only letters, numbers, periods, hyphens, and underscores. |
Per storage container |
Explaining Azure subscriptions
An Azure subscription is always attached to a Microsoft account or Organizational account. A subscription is a contract with Microsoft in which the consumption of cloud resources and optional support has been purchased.
Each account can manage up to 50 subscriptions. Each subscription can have a different so-called plan. A plan is an agreement about payment. It can be pay as you go, in which the customer pays at the end of the month for the consumed resources. Microsoft also has plans for customers committing themselves to Azure for a couple of months. Subscriptions can have one of the three available levels of support.
The person who creates the account is the account administrator for all subscriptions created in that account. That person is also the default service administrator for the subscription. The account administrator cannot be changed by the customer. A call to Microsoft support is needed to change the account administrator.
Each subscription has a service administrator. That person is able to change the name of the subscription, end the subscription, contact Microsoft support, change the payment method, and download billing details.
The service administrator is also authorized to purchase additional services from the Azure Store. The Store has services not offered natively by Microsoft but offers additional features such as sending e-mail or analyzing logfiles.
Each subscription is also connected to a user directory. This directory holds the user information for Azure.
Each subscription can have up to 200 co-administrators. This role has the same privileges as the service administrator. The only difference is the co-administrator is allowed to associate subscriptions to Windows Azure directories. It is recommended to add at least one co-administrator. This is for backup reasons in case the service administrator account is not useable anymore.
To add a co-administrator, open the Azure Management Portal. Go to Settings, select Administrators, and click on the Add button at the bottom of the screen. Then, fill in your e-mail address and select a subscription type.
Microsoft Azure offers an account center and a management portal. The account center is used for management of subscriptions while the management portal is used for technical management of Azure, such as provisioning of virtual machines and management of other Azure services.
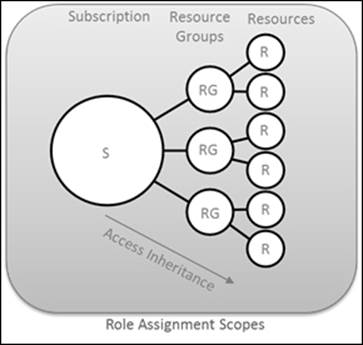
Azure Resource Groups
A feature that is currently (January 2015) in preview is Azure Resource Groups.
Resource Groups are used for the management of Azure resources. Previously it was very hard to understand how different Azure resources depend on each other. There could be a website that is using a particular storage account. Without a proper naming convention and documentation, there was no way to quickly understand how these two were related.
This is solved by using Azure Resource Groups. Resource Groups are managed using the Azure Resource Manager, which is part of the new Azure Management Portal.
Resource Groups can be used for lifecycle management. Groups of resources can be managed as a single entity. It is very easy to deploy, update, and delete a single Resource Group.
Resource Groups also allow you to set much more fine-grained access control than just the subscription level as is currently possible. Resource Groups are part of the new Azure Role-based Access Control feature.
Billing is made much more easy. Previously, when an Azure subscription was used by several departments, it was a lot of work to figure out which department had to be charged for costs associated to the consumption of Azure resources.
Now an Azure subscription can be organized in Resources Groups. Each department is assigned a different Resource Group. Consumption of resources in a Resource Group can be easily billed.
A single Azure subscription can have multiple Resource Groups. A single Resource Groups has multiple resources. Resources can be an Azure Website, an Azure SQL database, Azure Team Project, a MySQL database, storage accounts, virtual networks, and virtual machines.
A resource like a VM can only be part of a single Resource Group.
Not all Azure services can be added as a resource to a Resource Group. Service Bus and Cloud Services are examples of resources that today cannot be managed.
Another restriction in the preview is that you are not able to move resources to another Resource Group as well as not being able to rename Resource Groups.
Adjusting the subscription name
When you registered for Azure Microsoft Azure, you might have used the free trial offer or the MSDN offer.
In both cases, the Azure subscription has a generic name such as Free trial. Especially when using several subscriptions for different purposes, it makes sense to rename the subscription. The name of the subscription is used in billing. So, a name like Project new Website on your bill makes more sense than a name like MSDN subscription.
To change the name of the subscription, perform the following tasks:
1. In the Azure Management Portal, select the account name in the right upper corner of the screen.
2. Select View my bill.
3. Double-click on the subscription name you would like to change.
4. Scroll down and select Edit subscription details.
5. Fill in a new name and click on the checkmark.
Microsoft Azure accounts
To access Azure services, you obviously need an account. An account can be one of the following types:
· An organizational account: This can either be a Windows Azure Active Directory account or an Active Directory account used in your organization. Examples of accounts are <peter@contoso.onmicrosoft.com> or <peter@acme.com>.
· A Microsoft account: This is an account used to access Microsoft services like TechNet. A Microsoft account is the new name for what used to be called a Windows Live ID. You can use any e-mail address as an account name.
The preferred access to Microsoft Azure is by using organizational accounts. These are sourced from Microsoft Azure Active Directory, which means that the administrator has control over the accounts.
Also, organizational accounts can be configured to use multifactor authentication. This enables your users to require more than just a password but also an additional proof of identity. This can be a smart card, a pin code, or a smart phone.
Management of accounts can be pretty complex. Microsoft uses cookies to track whether you are logged in and which account you used. If you have issues with being authorized, one way to solve it is to delete all cookies in your browser or use another browser and try again.
Understanding Azure directories
Each Azure subscription has a directory associated to it. The directory stores information about users who have access to the Azure portal. The directory is part of Windows Azure Active Directory (WAAD), which is a multitenant version of Active Directory available in Windows Server.
When a subscription is created, a directory named Default Directory is created. The directory has two default roles:
· Global administrator
· User
Other roles shown in the multifactor authentication window of the directory are as follows:
· Sign-in allowed users
· Billing administrators
· Password administrators
· Service administrators
· User management administrators
· Global administrator
In WAAD, only the global administrator role is used. The other roles in Microsoft Azure Active Directory are used by Office 365.
Windows Azure Active Directory Premium
Windows Azure Active Directory Premium is built on top of Windows Azure AD and provides a set of capabilities to facilitate companies with extended possibilities in the field of identity and access management.
It offers features that were formerly only available in an on-premises tool called Forefront Identity Manager (FIM), similar to a user self-service portal for resetting passwords, group-based provisioning, and security reports.
It is expected that WAAD Premium will continue to grow and embrace a new identity and access management requirements of the cloud era.
Determining the Azure subscription to use
The usage of Azure resources is based on subscriptions. It makes sense to use different Azure subscriptions for different purposes.
Microsoft does billing per Azure subscription. It can be useful to create a unique Azure subscription for each software development project your company provides or for each department. This way, chargeback is much easier to process by the financial department, who receive the monthly credit card charge.
Another reason to use multiple subscriptions is to isolate Azure deployments. If you use one subscription for running multiple environments like test/dev and production, each user with access to that subscription has full administrator access to all virtual machines and virtual networks. This is particularly true when using App Controller.
Note that this isolation also means there is no network traffic possible between virtual machines that are a member of two different Azure subscriptions.
Subscriptions have some technical limitations you should be aware of (refer to the Appendix, Configuration Maximums for an overview of a lot more configuration limits):
· A single subscription has by default a maximum of 20 cores available. When all the cores are assigned to virtual machines, creation of additional virtual machines will fail. If you require more cores, you can fill in a support request using the Azure Management Portal. The maximum is 10,000 cores.
· A single subscription has a maximum of 200 Cloud Services.
· A single subscription has a maximum of 100 storage accounts.
A complete overview of configuration limits is listed at http://azure.microsoft.com/nl-nl/documentation/articles/azure-subscription-service-limits/.
Adding more administrators to a subscription
The Microsoft account that was used to register the subscription becomes the administrator by default. This user role is named service administrator or service owner.
It is likely that your Azure infrastructure needs more than just a single administrator who is able to use the Azure Management Portal. The next section will teach you how to add additional users to the co-administrators user role.
When adding administrators, make sure you add those users to the directory that has an Active Directory. If not, the added administrator might get an error after authentication like this: We were unable to find any subscriptions associated with your account.
Only users who are either the Service Administrator or a co-administrator on the subscription can sign in to the management portal.
Deciding the most appropriate Azure region for placement
As described in Chapter 3, Understanding the Microsoft Azure Architecture, Microsoft Azure is located in many regions spread out over the world.
You might be wondering what the best region is to create virtual machines and services in. There are many reasons to decide for a particular region like:
· Compliance: Some countries and organizations (like governments) put restrictions on the storage of data. They do not allow data to cross the national border or the border of, for instance, the European Union. This, in turn, restricts the choice of the datacenter.
· Performance: To have the best performance, it is best to be located as close as possible to the datacenter.
Note that the Western European region is housed in datacenters located in or near Amsterdam, the Netherlands. Dublin, which is further west than Amsterdam, houses the North Europe region. This can be a bit confusing.
There is a very useful website called Microsoft Azure Speed Test (http://azurespeedtest.azurewebsites.net/) that shows the latency between your web browser and the Microsoft Azure Blob Storage Service of all regions.
By using Azure Speed Test, you can determine the best location for running your application or storing your company data.

Creating an affinity group
In Chapter 3, Understanding the Microsoft Azure Architecture, you learned about affinity groups.
Using affinity groups, we can make sure compute and storage are close together to keep latency as low as possible. This is necessary because Azure datacenters are huge, and without these affinity groups, the virtual machines could reside on opposite sides of the datacenter. This could result in a performance penalty. With affinity groups, Microsoft promises to keep virtual machines as close together as possible.
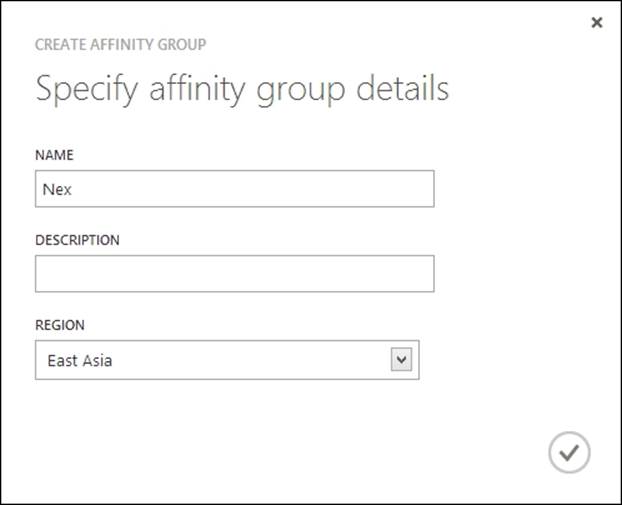
Perform the following steps to create a virtual machine:
1. The first step in the process of creating a virtual machine is to create an affinity group.
2. To do so, go to the Settings menu item in the left window of Azure Management Portal. Then, select Affinity Groups in the menu bar.
3. Next, select Add an affinity group.
4. You will be presented with a window in which you give a name to the affinity group, a description, and select the region.
5. Fill in the fields and click on the checkmark.
Creating a storage account
The next step in creating a virtual machine for the first time is the creation of a storage account.
A storage account is automatically created when we create a virtual machine for the first time using the wizard. However, this automatically created storage account will get a randomly generated storage account name. This is not very useful for administration. It is better to use a storage account named ContosoNorthEurope001 than portalvhdfdfwedwd.
To manually create a storage account and have control over its naming, perform the following steps:
1. Select the Storage menu in the left window of Azure Management Portal.
2. Then, select Create a storage account.
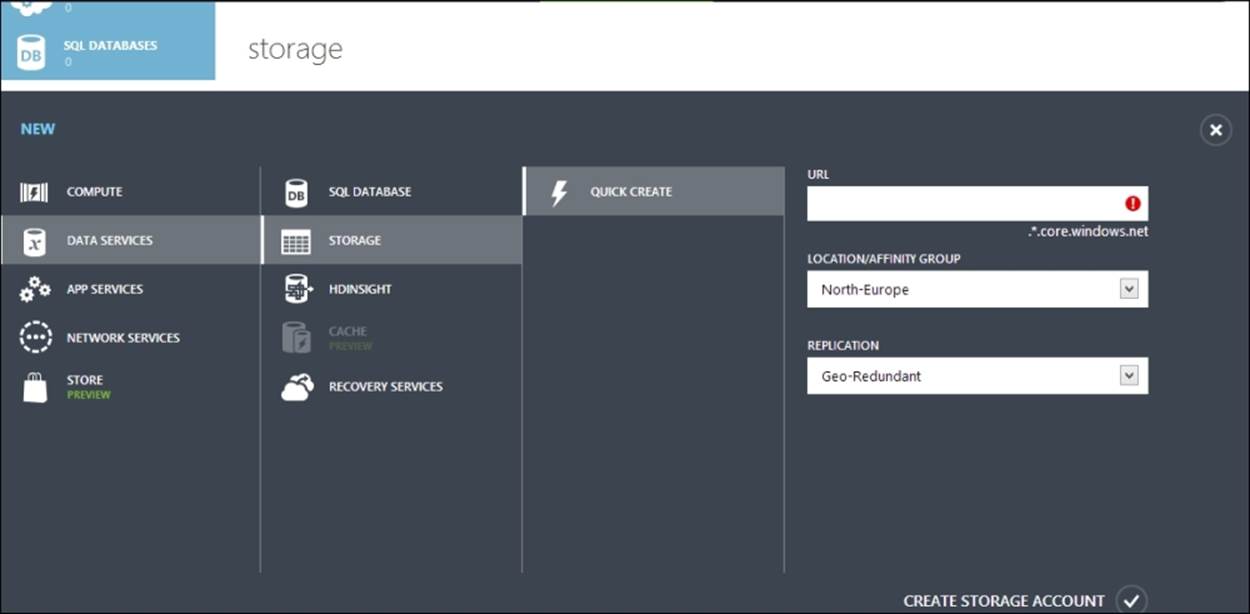
3. In the URL field, type in a descriptive name. This name has to be unique for all Microsoft Azure customers. It is highly advisable to use a naming convention for the URLs of your storage accounts.
4. Next, select the affinity group or the region you want to create your storage account in.
5. The last step is the selection of the replication type:
· Locally Redundant means that each block of data is stored on three different locations in the same region.
· Geo-Redundant is the default choice. It means the data is additionally replicated to the region paired to the one you selected in the previous step. The replicated data is stored in three different locations in the paired region. Costs for geo-redundant replication are higher than for locally redundant.
· The third option is Read-Access Geo-redundant. If the primary region is unavailable, read access to the data stored at the secondary region shall be available.
6. Select Create storage account as the final step for creating the storage account.
Creating Azure networks
The Microsoft Azure Management Portal allows you to create several components that are required for on-site connectivity with Microsoft Azure and for more control over intra-virtual machines networking traffic of Azure virtual machines.
The networks menu consists of the following components:
· Virtual networks: This allows creation of IP subnets, site-to-site (S2S) VPN connections, and point-to-site (P2S) VPN connections
· Local networks: This allows configuration of the public facing IP address of the on-site VPN device for P2S and S2S connections
· DNS servers: This allows registration of non-Microsoft managed DNS servers
Creating a virtual network
Virtual networks, or VNets as Microsoft likes to call them, are an important component of Azure. The understanding of virtual networks in Microsoft Azure is very important. The purpose of a virtual network is as follows:
· To connect to virtual machines over a site-to-site or P2S VPN connection, just as if the virtual machine was part of the internal network.
· To be able to assign customer-defined IP addresses and DNS configuration to virtual machines. This way, the administrator has control over IP subnets and IP address allocation.
· To enable network connections between virtual machines in different Cloud Services.
Note
If you create an Azure Cloud Service first and a Virtual Network later, you will not be able to add a virtual machine to an existing Cloud Service.
Only when a virtual machine is assigned to a virtual network during the creation of the virtual machine are you able to assign a specific IP subnet to the virtual machines.
Virtual Networks can be used to connect to other Virtual Networks located in a different region. Also, connections between Virtual Networks can cross Azure subscriptions.
This allows high availability and disaster recovery scenarios. Previously, without cross Virtual Network connectivity, network traffic between multiple Virtual Networks had to be routed via an on-premises network. Now, with cross Virtual Network connectivity, network traffic remains within the Azure network.
Customers can use cross Virtual Network connectivity to replicate databases to another region, for example. Think about SQL Always On with Availability Groups spreading across multiple Azure regions.
For Virtual Network to Virtual Network connectivity, dynamic routing VPNs are required.
Virtual networks are also used to apply DNS configuration to virtual machines. The virtual machine that is started first after creation of a new virtual network will always be assigned an IP address ending with .4. The first three numbers are assigned by the Azure fabric to Azure internal devices.
This assignment of x.x.x.4 to the first virtual machine in a virtual network is useful in situations where you want to be sure that a specific virtual machine always obtains the same fixed IP address. An Active Directory server is such an example.
Several methods are available to create a virtual network:
· Manual using the Azure Management Portal
· Importing an XML configuration file
· Using PowerShell
· Using the Azure Command-line Interface
When using a manual creation, two different options are available in the Azure Management Portal. Either Select Networks in the left pane and then select create a virtual network or select the plus sign in the bottom-left corner of the screen.
Understanding virtual network gateways
To connect a Virtual Network to an on-premises network or to another Azure Virtual Network, you need to configure a gateway.
The gateway is a virtual appliance which is automatically deployed and configured by Azure. Microsoft will make sure it is redundant.
A gateway comes in two flavors:
· The standard gateway, which is limited to 10 site-to-site connections
· The High Performance gateway, which is limited to 30 site-to-site connections
The High Performance gateway is a different SKU and has a different price tag.
To set up a gateway, PowerShell is used. The commandlet is Get-AzureVNetGateway and you need to use either Default or HighPerformance as the value for the –GatewaySKU parameter.
The following code shows how to create a High Performance gateway:
PS D:\> New-AzureVNetGateway –VNetName MyAzureVNet –GatewayType DynamicRouting –GatewaySKU HighPerformance
The type of gateway can be changed using PowerShell as well.
This cmdlet example changes the gateway for MyAzureVNet from Default to High Performance. You also change the gateway SKU from High Performance back to Default:
PS D:\> Resize-AzureVNetGateway –VNetName MyAzureVNet –GatewaySKU Default
Creating a local network
The purpose of a local network is to define the IP address of the VPN device that is located on-site. This allows cross-premises connectivity.
Using your own DNS servers
In many scenarios, it is required to have virtual machines assigned specific, customer-managed DNS servers. When a virtual machine is not part of a virtual network, it will receive a DNS server provided by Azure. DNS is managed by Microsoft staff.
If you are running your own DNS server, you will need to create a virtual network first. Follow this procedure to create your own DNS server:
1. Create a virtual network.
2. Create a subnet that the virtual machine that will have the DNS role will be part of. In this example, we call this tier1.
3. Create the virtual machine as the first virtual machine in subnet tier1.
4. As the first virtual machine in a subnet, it will receive x.x.x.4 as its IP address.
5. Register this IP address and the FQDN of this server in Register DNS.
Note
The command for a renewal of IP configuration in Windows Server, ipconfig /renew, will result in an error. For some reason, the client in Azure thinks that this request cannot reach the DHCP server.
If you changed the IP address of the DNS server in the virtual network, you will need to restart the virtual machine to apply the new DNS server reference.
Deleting a virtual network
A virtual network can only be deleted when it is not in use. First, you need to delete all virtual machines that are a part of the virtual network. Microsoft Azure does not have a feature to move virtual machines to another virtual network at this moment.
If you want to keep the instance, delete the virtual machine and keep the virtual disks. Then, create a new virtual machine by using the existing virtual disks. If a gateway is part of the virtual network, delete this as well. Then, the virtual network itself can be deleted.
Creating a Cloud Service
In the previous chapter, you learned about Cloud Services. A Cloud Service is a collection of virtual machines that share the same public IP address and domain. All virtual machines that are part of the same Cloud Service are able to connect to each other over the internal Azure network. Network traffic is isolated inside a Cloud Service. This means that virtual machines part of a Cloud Service by default cannot communicate with virtual machines that are part of another Cloud Service.
However, when multiple Cloud Services are combined into a virtual network, all virtual machines in all Cloud Services can communicate to each other.
Cloud Service is a term used in the Platform as a Service (PaaS) offering of Microsoft Azure. Cloud Services in PaaS allow control over the guest operating system.
Cloud Services can have two versions: a staging deployment and a production deployment. Each deployment has a set of virtual machines which offer the same sort of application functionality as a web server or application server.
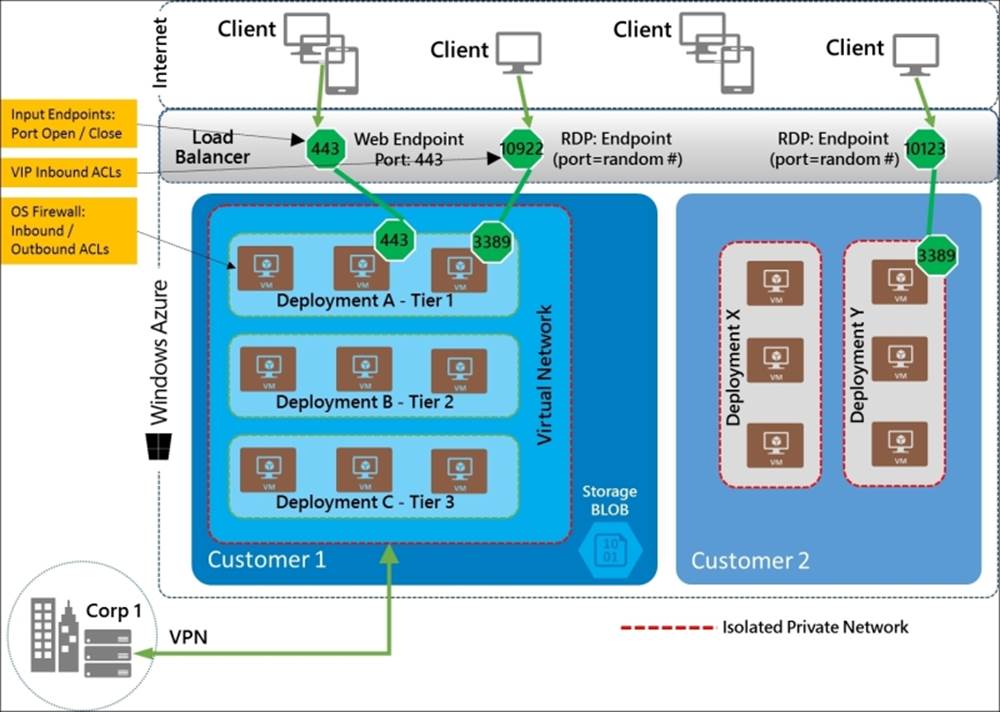
The main purpose of a Cloud Service is as follows:
· Enable network connectivity between virtual machines part of the same Cloud Service: Virtual machines part of the same Cloud Service can connect to each other over the network.
· Enable scale-out: When demand increases, additional virtual machines can automatically be started.
· Enable high availability: Virtual machines that are part of the same availability set in a Cloud Service are placed on different hosts.
· Treat a set of virtual machines as one entity: All virtual machines within a Cloud Service can be deleted with a few mouse clicks.
· Enable release management: A Cloud Service is mostly used in a PaaS environment. A Cloud Service serves applications and is particularly useful in multi-tier applications. A single Cloud Service can have two versions: staging or production. Staging is used in the development phase of an application. When the development stage is ready for production, it can easily be switched into production. This change will switch the Virtual IP Address of the Cloud Service.
A Cloud Service does not offer much administrative control over the network configuration. For instance, it does not allow us to control the IP subnet being used to allocate IP addresses to virtual machines, and a Cloud Service cannot be connected to your on-premises network over VPN.
Basically, virtual machines that are part of the same Cloud Service are treated as one. Scaling out is done at a Cloud Service level. All members of a Cloud Service can be deleted at once with a few clicks.
Once a virtual machine has been created, it cannot be moved to another Cloud Service easily. If you want to move a virtual machine to a Cloud Service, you should delete the virtual machine while retaining the VHD files. Then, create a new virtual machine and make it a part of a Cloud Service and use the existing virtual hard disks.
Availability sets can be created to ensure higher availability of virtual machines. An availability set is part of a Cloud Service, which means an availability set created in a Cloud Service cannot be used in another Cloud Service.
Now, let's create a Cloud Service by performing the following steps:
1. In Azure Management Portal, select Cloud Services in the left pane.
2. Press NEW in the bottom-left part of the screen.
3. Choose Quick create.
4. Fill in the URL. This URL is used to access services running on virtual machines in the Cloud Service.
5. Choose a region or affinity group.
6. Click on Create Cloud Service.
Deleting a Cloud Service
Cloud Services are deleted by selecting Cloud Services in the left pane of Azure Management Portal. You will be presented with three options:
· Delete the Cloud Service and its deployments: This action will completely remove the Cloud Service, its Virtual IP Address (also called VIP; it is a public IP address assigned to a Cloud Service), all virtual machines with attached disks, and associated VHDs.
· Delete all virtual machines: Virtual machines are deleted as well as the VIP of the Cloud Service. You'll keep the attached disks, their associated VHD files, and the Cloud Service.
· Delete all virtual machines and attached disks: All virtual machines, attached disks, and associated VHD files will be deleted. Also, the VIP will be deleted. The Cloud Service will not be deleted.
Creating a virtual machine
You have made it to the point where it really gets exciting. It is now time to create a virtual machine on Microsoft Azure.
Virtual machines in Azure can be created using several techniques:
· Using the Azure Management portal
· Using PowerShell
· Using the Azure Command-line Interface
· Using System Center App Controller
· Using third-party automation tooling like Puppet and Chef
Whatever method is chosen to create a virtual machine, the operation is performed by the Red Dog Front End (RDFE). You learned about the RDFE in the previous chapter. It comes into play after the image has been chosen and the administrator name, password, and so on have been set. This creates an ISO file that contains the bits to install Linux or Windows Server. Customization is added to the ISO. Then the RDFE instructs the Fabric Controller to select a host to deploy the virtual machine to. Then, a VHD is created, a virtual machine is created, the ISO is connected to the virtual machine, and the guest operating system boots from the ISO. The installation of Windows or Linux is performed, and after a couple of minutes, the virtual machine is ready to be used. To install a virtual machine using Azure Management Portal, perform the following steps:
1. Select New in the bottom-left corner of the screen. Then, go to Compute | Virtual Machine | From Gallery.
2. You are now presented with a long list of images. Make your choice. In this example, we are going to choose Windows Server 2012 R2 Datacenter Edition.
3. Select the release date. Microsoft offers various versions of Windows Server. The difference is the patch level. The most recent version has the most recent patches preinstalled by Microsoft. In some situations, you might need a version without some patches.
4. Type in a name for the virtual machine according to your naming convention, choose the size, define an account for administrative rights, and set the password.
5. Click on the right arrow.
6. In the next screen, select a Cloud Service or create a new one. Select the virtual network you created in the previous paragraph. Select a storage account you created earlier and select an availability set if that is applicable.
7. Click on the right arrow.
8. Configure the endpoints if you want. The default two endpoints are sufficient in our case.
9. Click on the checkmark button.
That's it! The virtual machine is being provisioned. This will take several minutes.
After the virtual machine is ready for use, you can select it. Click on the Connect button in the lower toolbar. This will present you with the .rdp file that can be used to initiate a remote desktop connection to the virtual machine.
Virtual machine extensions
In the first half of 2014, Microsoft added a very interesting new feature that allows better management of virtual machines. This is enabled by installing the VM agent. This agent, which is available on both Windows and Linux, is installed by default during provisioning. You can disable the installation if you want to.
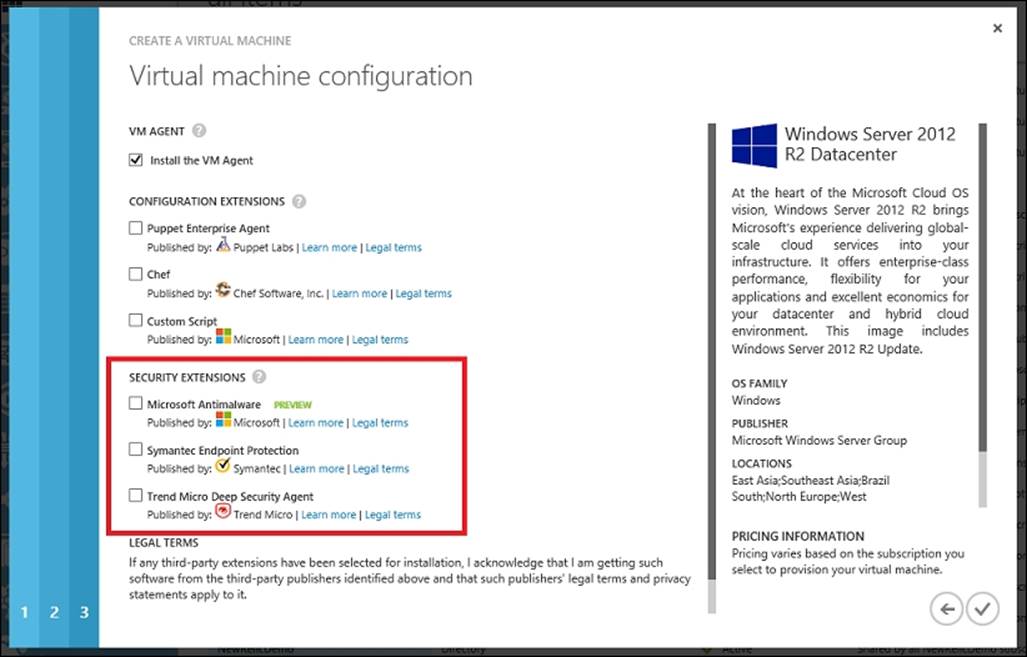
The agent uses extensions (software modules) that deliver all kinds of functionalities. Extensions can be added to instances of web roles, worker roles, and virtual machines. Extensions are made available by Microsoft and by third parties like Symantec.
Roughly, three types of extensions are available:
· VM access extensions
· Configuration extensions
· Security extensions
VM access extensions
The first available extension is BGinfo. This shows all kinds of useful configuration information of the virtual machine on the desktop once logged in.
A very useful extension is one which allows administrators to reset the password of an administrative account. This can be done using PowerShell scripting. This feature is not available yet in the Azure Management Console.
You might think, "Hey, that does not sound very secure!" Note that to be able to connect to Azure using PowerShell, you will need to upload a certificate. However, any administrator that has access to PowerShell will now be able to reset the administrator password.
Another useful use case is resetting the network configuration. If an administrator made a mistake in the IP configuration such that RDP connections are not possible anymore, remote access to the virtual machine is not possible anymore. The VM agent can be used as an out-of-band management port that allows constant access to the virtual machine in all circumstances.
If you have installed a virtual machine before the VM Agent feature was made available by Microsoft, you can download an MSI installer from Microsoft at http://go.microsoft.com/fwlink/?LinkID=394789&clcid=0x409.
Configuration extensions
Configuration extensions or agents allow us to configure the virtual machine after it has been provisioned. At the moment, there are three ways to configure the virtual machine:
· Using a PowerShell script
· Using Puppet
· Using Chef
We will discuss Puppet later in this chapter.
Security extensions
There are three security extensions available:
· Microsoft Antimalware: This is an agent that will identify, block, and remove malicious software.
· Symantec Endpoint Protection: This installs an Antivirus, Antispyware, and Proactive Threat Protection 60-day free trial version.
· Trend Micro Deep Security Agent: This provides anti-malware protection, a firewall, an intrusion prevention system, and integrity monitoring.
The agent is installed to C:\WindowsAzure and extensions are installed in C:\Packages.
When an extension needs to be added, you need to know some details about the extension, such as the name, version, and publisher of the extension. This can be obtained by using the PowerShell cmdlet Get-Azure VMAvailableExtension.
Deploying Linux images using VM Depot
Microsoft offers supported Windows Server and Linux images through the Azure image gallery. The selection of Linux-based images in which applications are preinstalled is limited.
However, VM Depot is a great library full of community-created Linux-based images. VM Depot is managed and offered by Microsoft Open Technologies. This is a separate organization that focuses solely on open source.
Note that most of the images are submitted by the open source community. There is no check on what kind of software is running in the operating system.
The home page for VM Depot is at http://vmdepot.msopentech.com. You can browse which images are available. You can also see what command to use for deployment of the image to Microsoft Azure. Examples of images available in VM Depot are as follows:
· WordPress on Ubuntu
· GitLab on Ubuntu
· Nagios on CentOS
· RubyStack on Ubuntu
Most of the images are based on Ubuntu.
There are two methods to create a virtual machine based on a VM Depot image:
· Using the Azure Management Portal
· Using the Azure command-line interface
Using the Azure Management Portal to deploy VM Depot images
Perform the following steps in order to use the Azure Management Portal to deploy VM depot images:
1. Open Azure Management Portal.
2. Select Virtual Machines in the left pane.
3. Select Images in the top menu.
4. Select Browse VM Depot in the lower menu bar.
5. Select the image you are interested in and click on the right arrow.
6. Now, select the Azure region where you want to store the image. If the region has an associated storage account, select the storage account. Otherwise, create a new storage account.
7. Click on the checkmark. Next, the image is copied from VM Depot to the selected Azure region. This can take a while.
8. The image is stored as a VHD file in a container named communityimages.
9. The image needs to be registered as an image. To do that, while in the Virtual Machines part of the portal, select the Images menu. Then, select the image you just downloaded and click on the Register button on the lower menu bar.
Change the name if appropriate. The URL name cannot be changed. Click on the checkmark when you are done.
To create a new virtual machine using the image we downloaded and registered, perform the following steps:
1. Click on the New button in the lower menu
2. Navigate to Compute | Virtual machine | From gallery
3. Then select My images screentext
4. Select the image you downloaded
5. Click on the right arrow
6. Fill in the required fields
Naming convention for VHD files
Now that the virtual machine is ready to use, let's have a closer look at the disks.
The filenames of the virtual disk files are not shown in the Azure Management Portal. For management of virtual machines, it can be very useful to have some sort of naming convention and know what .vhd belongs to which virtual machines.
When a virtual machine is created, Azure will use the following naming convention for VHD files:
<name of Cloud Service>-<name of the virtual machine>-<date of creation>.vhd
When a virtual machine is created in the Azure Management Portal, there is no control over the naming of the VHD file that is used for the system disk (C:) and the temporary disk (D:).
Understanding IP addresses
Networking is a very important component to understand how Microsoft Azure works. This section will describe how IP addresses are assigned, and how we can access virtual machines from the Internet and from our own internal network.
You noticed that when deploying a virtual machine from the Azure Management Portal, there is no option to fill in an IP address. Each virtual machine in Microsoft Azure has its IP configuration assigned by DHCP. This DHCP server is managed by Microsoft. You should not change the IP configuration of the guest operating system. If you manually set IP addresses, this will work for a while, until the virtual machine is assigned a new host and the IP configuration is reset by the Fabric Controller.
Microsoft Azure uses software-defined networking. This means the logic of Azure responsible for networking needs to know which virtual machine has which IP configuration.
That is why the IP addresses are set by DHCP. A virtual machine gets an IP address assigned for its complete life cycle. So, you do not have to worry that the IP address changes after a while.
Virtual IP
Applications running on virtual machines that need to be accessed from the Internet are reachable using the virtual IP address (VIP) of the Cloud Service the virtual machine is part of. The VIP is a public IP address registered and owned by Microsoft.
The following image shows how virtual machines part of a Cloud Service are accessed using a VIP. The VIP in the following image is 1.2.3.4:
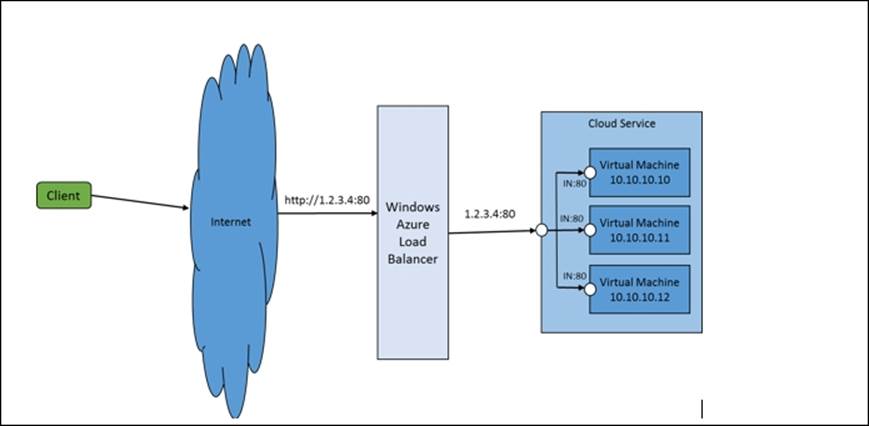
There are a couple of ways to determine the VIP. First, select a virtual machine, select Dashboard in the upper menu, and scroll down till you see Public virtual IP (VIP) address on the right-hand side of the screen.
Alternatively, select the Cloud Service, select Dashboard in the upper menu, and again scroll down till you see the VIP.
The VIP is glued to the Cloud Service as long as there is a minimum of one virtual machine running. If the one and only virtual machine is stopped, the VIP of the Cloud Service might change.
As all the VIP addresses are registered in the name of Microsoft, they are often registered as US-located IP addresses. Another example is that when some US datacenter IP addresses are looked up, you might see these are located in Brazil.
That is caused because US-located IPv4 address ranges are not available anymore. So Microsoft has to use IPv4 address space assigned to a non-US region to address services which may be in a US region. Microsoft is working with IP geo-location database companies to solve this issue.
This could raise issues when accessing certain websites. For example, when watching online movies or television programs, you might notice that you are not allowed to watch them because the website believes you are located in a different country.
You can also use this to your advantage, for example, to watch Netflix from regions that are not available for watching Netflix yet.
IPv6 will solve this issue. The official statement on IPv6 support of Azure is that foundational work to enable IPv6 in the Azure environment is well underway. However, Microsoft is unable to share a date when IPv6 support will be generally available at this time.
A complete list of IP address ranges that are used in Azure datacenters can be downloaded here:
http://www.microsoft.com/en-us/download/details.aspx?id=41653
Dynamic IP
Each virtual machine you deploy on Microsoft Azure gets an internal IPv4 address assigned by a Microsoft managed DHCP server. This dynamic IP address is known as the Dynamic IP (DIP). Do not change the DHCP address assigned to manually set a static IP address.
Since May 2014, it is possible to set a static IP address on the network adapter of a virtual machine. This can be done using PowerShell. What happens is that a reservation is made in the DHCP server for that virtual machine. So, DHCP is still used to retrieve the IP address.
The DIP can only be used for communications between virtual machines inside the same Cloud Service. When a virtual network is used, a private IP subnet can be used. The first three IP addresses are reserved for inner workings within Azure and for that reason cannot be used. So, for example, when you select a private IP subnet of 192.168.0.x with a subnet mask of 255.255.255.0, the first server in this subnet will get 192.168.0.4 as its IP address.
Assign a static IP address to a virtual machine
In certain configurations, you really want to be able to set a static (fixed) IP address to a virtual machine. This is possible using PowerShell.
Four new commandlets were added in PowerShell for Azure 0.7.3
· Get-AzureStaticVNetIP
· Set-AzureStaticVNetIP
· Remove-AzureStaticVNetIP
· Test-AzureStaticVNetIP
The guest operating system still has to be set to use DHCP. However, there is some sort of permanent reservation made in the Azure fabric when Set-AzureStaticVNetIP is used.
Some things to consider are:
· Setting a fixed IP address to a VM can only be done using PowerShell. It is not possible using the Azure Management Portal.
· It is required that the VM is part of an Azure Virtual Network.
To specify a static IP upon the creation of the virtual machine, use the following PowerShell code:
New-AzureVMConfig -Name $vmname -ImageName $img –InstanceSize Small | Set-AzureSubnet –SubnetNames $sub | Set-AzureStaticVNetIP -IPAddress 192.168.4.7 | New-AzureVM –ServiceName $vmsvc1 –VNetName TestVNet
It is also possible to set a static IP to a previously created virtual machine. To apply the static IP, the virtual machine will have to be rebooted:
Get-AzureVM -ServiceName StaticDemo -Name VM2 | Set-AzureStaticVNetIP -IPAddress 192.168.4.7 | Update-AzureVM
Assign a static public IP address to a virtual machine
Virtual machines that are part of a Cloud Service can be accessed using the public IP address of that Cloud Service. However, sometimes it is desired that an individual virtual machine is directly accessible over the Internet without using a load balancer, for example, when using passive FTP. Another example is when access to external resources originating from an Azure virtual machine is based on the originating source IP address.
Microsoft offers public facing IP addresses in a feature called instance-level public IP (PIP). Instance-level public IP addresses cost around € 3/ $ 3.36 per month. You can assign up to 5 instance-level IP addresses per subscription.
The following image shows two virtual machines. These are accessible using the VIP: port number as well as using the public IP address (PIP) assigned to each VM.
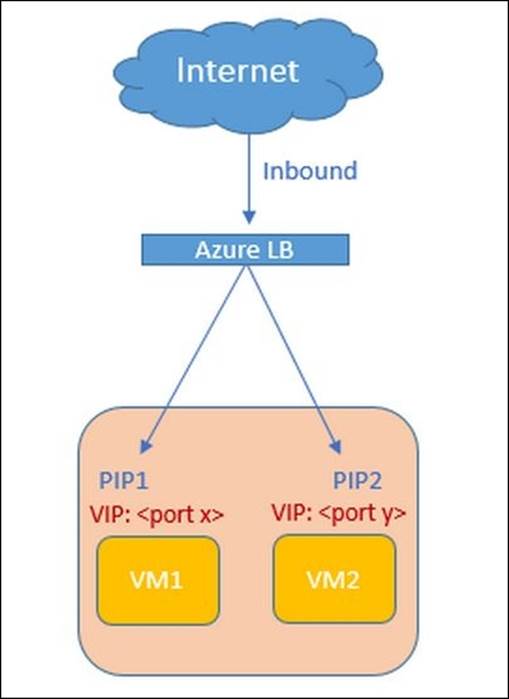
Just like with many other features of Azure, you need to configure PIP using PowerShell.
As of January 2015, a PIP is not supported for multi-NIC virtual machines.
To request a PIP for a new virtual machine, use the PowerShell code shown as follows:
New-AzureVMConfig -Name "FTPInstance" -InstanceSize Small -ImageName $images[50].ImageName | Add-AzureProvisioningConfig -Windows -AdminUsername narayan -Password abcd123 | Set-AzurePublicIP -PublicIPName "ftpip" | New-AzureVM -ServiceName "FTPinAzure" -Location "North Central US"
Using Reserved IP addresses for a Cloud Service
In this chapter, we explained the virtual IP address of a Cloud Service. If you want to keep the public IP address of a Cloud Service, you can use a Reserved IP address. The advantage of a Reserved IP address is:
· The IP address will be available in your Azure subscription even if you have deleted all Cloud Services
· The IP address will be available even when all virtual machines of a Cloud Service have been stopped or deallocated
· To make sure all outgoing traffic has a static IP address
Each subscription gets 5 Reserved Public IP addresses for free. Each additional IP address costs about € 3 per month.
You can use PowerShell or REST APIs to request Reserved IP from a particular region. To create a Reserved IP, use the PowerShell code shown as follows:
New-AzureReservedIP – ReservedIPName "MyReservedIP" –Label "ReservedLabel" –Location "Japan West"
To get an overview of all Reserved IP's in your subscription, use the following code:
Get-AzureReservedIP
Managing network traffic to virtual machines
Azure offers two methods to control which type of network traffic is allowed to enter or exit a virtual machine:
· Network Security Groups
· Endpoints
Managing Network Security Groups
Network Security Groups (NSG) allow for the segmentation of a Virtual Network and control of the inbound and outbound traffic of a virtual machine. Previously, when NSGs were not available, administrators had to use either the firewall of the operating system or endpoints to control inbound and outbound traffic. Both are managed on the VM level, which means a change on network inbound or outbound traffic had to be configured at each individual virtual machine.
However, an NSG cannot be used to control network traffic from the Internet to Virtual Networks. NSGs are used to control traffic inside Virtual Networks, between Virtual Networks, and between on-premises networks and Azure Virtual Networks.
One of the use cases for NSG is where customers who are using Office 365 require single sign-on for user accounts located in Microsoft Active Directory running in Azure. In this configuration, several server roles are required like ADFS, Web Application Proxy servers (WAP), AAD Sync, and AD domain controllers. It is not wise to make Active Directory domain controllers accessible over the Internet. Using NSGs, network traffic can be segmented.
Using NSGs also enables you to deploy multi-tier applications in Azure. Such an application has multiple frontend servers (like Webservers) that are accessible over the Internet. Application servers and backend servers like databases require a more strict security, which means those servers are not accessible directly from the Internet. To control network traffic, NSGs can be used.
A Network Security Group consists of rules. A single rule has 5 tuples (source IP, source port, destination IP, destination port, protocol). Rules have a number applied. The lower the number, the high its priority.
Each NSG has a couple of default rules which cannot be deleted. The first default rule is 'deny all outbound traffic' and 'deny all inbound traffic' with a number of 65500. All default rules have a number in the 65xxx range.
Some characteristics of Network Security Groups are as follows:
· Each Azure subscription can be a maximum of 100 Network Security Groups.
· Each Network Security Group can have as many as 200 rules. This is a soft limit. On request, Microsoft can increase this limit.
· Management of Network Security Groups is limited to using PowerShell and RESTapi only.
· Any change made on the Network Security Group is immediately applied to all VMs in the subnet.
· Can be applied to regional virtual networks only.
· Can be applied to a virtual machine or to a subnet.
· Can only be applied to the primary NIC of a virtual machine. In the future, Microsoft will support Network Security Groups for multiple NICS.
An alternative way to control inbound and outbound traffic per Virtual Machine is using endpoints. You can either use Endpoints or a Network Security Group for a VM, not both.
Managing endpoints
To enable network connections between the virtual machine and the Internet, Microsoft Azure uses endpoints. Endpoints are basically mappings or Network Address Translations in Azure firewalls that connect the Virtual IP port number to the DIP port number.
When a Windows Server virtual machine has been created, only a port allowing RDP traffic and a port for PowerShell are opened; this means port 3389 and port 5986 on the inside of a virtual machine. For security reasons, these ports are randomized on the VIP side. This means when you want to make a remote desktop connection to the virtual machine from the Internet, you must be able to connect to a large number of ports, which can prove to cause difficulties in the field because of closed outgoing ports on firewalls.
If additional ports need to be mapped, you will need to manually add endpoints. Endpoints can easily be created in the Azure Management Portal as well as by using PowerShell.
To create or modify endpoints, perform the following steps:
1. Select the virtual machine you would like to modify the endpoint for.
2. Select the Endpoints menu item at the top of the screen.
3. Either press Add or Edit in the lower screen.
To add some security and be able to define which computers have access to Azure virtual machines, you can set access control lists to endpoints.
Access control lists (ACLs) can be used to permit or allow certain ranges of IP addresses for connections to an endpoint of a virtual machine. By default, each system connected to the Internet is able to connect to a virtual machine's endpoint. ACLs are an additional layer of security. You can allow for instance only developers pcs access to virtual machines. All other traffic is denied access.
ACLs are created using rules. Each rule denies or allows a subnet access to an endpoint of a virtual machine. You can specify a maximum of 50 rules per endpoint.
When an ACL is created using one or more rules, what happens is that the host in the Azure datacenter that is running the virtual machine will filter packets bound for the virtual machine. A lowest takes precedence rule is used, which means a lower listed rule shown in the GUI (or the lower rule number) will take precedence over a higher listed rule (or higher rule number).
Using ACLs, you are able to deny or permit network traffic to a virtual machine endpoint. You will not be able to control network traffic to the Azure Management Portal. To enable ACLs, perform the following steps:
1. Select the virtual machine for which you would like to set an ACL on the endpoint.
2. Select Endpoints from the top menu.
3. Select the endpoint you would like to set an ACL on.
4. Click on the Manage ACL button in the lower menu bar.
5. You will see the following screenshot. It shows two rules:
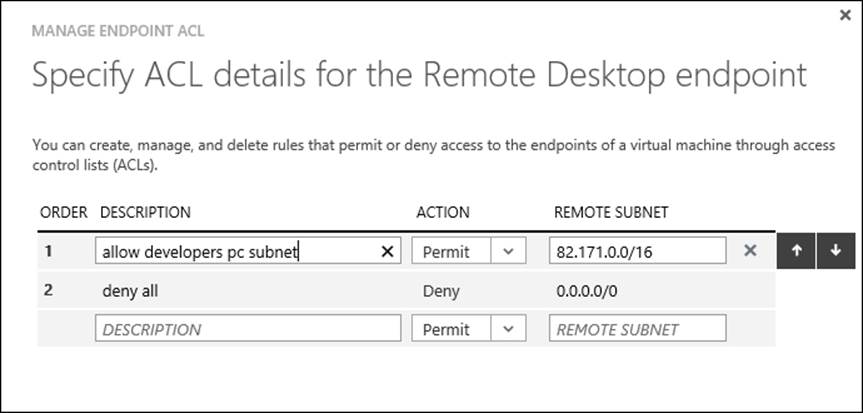
The second deny all rule denies all network traffic on the RDP endpoint of a virtual machine. The first rule allows clients with an IP in subnet 82.171.x.x/16 to connect to the RDP endpoint. By using this rule, we are sure only clients in a subnet managed and owned by our organization can access virtual machines.
Testing virtual machine endpoints
After having added one or more endpoints, you might want to test whether a network connection to your service is possible. Obviously, this can be done by trying to reach the application.
If you are running a web server on port 80, you can test it by using a browser and type in the URL of your web server. You might get an error. If you are unsure what causes the error, try to probe the network port that is used by the application.
This can be done by using the Telnet command. Suppose you have an application running on an Azure virtual machine that uses port 8080. You, in your role as an IT professional, want to make sure that network connection to the application is functional.
Take any client with an Internet connection and execute the following command:
telnet <dns name of Azure service> 8080
If there is a response, you are sure network connectivity is possible and the problem is caused by the application.
Setting DNS server configuration
When using your own DNS servers in Microsoft Azure, you should make sure servers and clients are querying your managed DNS servers. As you learned earlier, static IP addresses and IP configuration is not supported. We are required to set IP addresses and DNS for our virtual machines dynamically via the Microsoft managed DHCP services.
If we cannot manually set the DNS server addresses and have no control over DHCP, how are we able to define DNS servers? The answer is Azure Virtual Networks. When configuring virtual networks, we can set one or more DNS server names and IP addresses. Any virtual machine part of that virtual network will automatically have those DNS servers set in its IP configuration.
Deployment and configuration using Puppet
In the first half of 2014, Microsoft made it very easy to install either a Puppet Enterprise agent or a Chef agent during provisioning of a new virtual machine.
If you are used to managing Windows Server, you might not have heard of a tool called Puppet. This is becoming an increasingly popular tool especially because of interest in DevOps.
Puppet is an open source deployment and configuration management tool used mainly in Linux environments. It allows you to automatically deploy servers and configure them using a set of policies. Using this method, servers can be configured in a uniform manner.
Puppet uses a Puppet Master Server that holds a set of tasks to be performed by Puppet nodes. Each node has an agent installed. This agent has a configuration file that gets its input from so-called "Puppet manifests."
Puppet manifests contain instructions on what should be done on a server. The instructions are written in a very easy-to-read language called domain-specific language. This is a so-called declarative language. Puppet language does not say how to do something, but only instructs the computer what to do.
Puppet is available as a free Standard edition and a commercial Enterprise edition. The latter is free for a maximum of 10 nodes. Both versions are functionally equal. The only difference is that Puppet Enterprise has the possibility for commercial support.
Agents contact the Puppet Master over HTTPS and ask what to do. The master creates a so-called "Catalog" that has instructions. This is sent to the agent.
There are Puppet agents available for Linux and Windows Server operating systems. The Puppet Master Server can only run on Unix or Linux.
Microsoft Open Technologies released an Azure Puppet Module that allows provisioning of Linux and Windows Server virtual machines as well as virtual networks. The module is available in the Puppet Labs Forge athttp://forge.puppetlabs.com/msopentech/windowsAzure.
Service healing
Service Healing is an important Azure characteristic.
Microsoft Azure constantly checks the health of the nodes and virtual machines (instances). Both the software and the hardware of nodes are monitored by the Fabric Controller. If a problem occurs, for instance, a cooling fan malfunction, the host agent will inform the Fabric Controller about this. The Fabric Controller will then move virtual machine from the problematic node to other nodes. As Microsoft Azure does not have the ability of Live Migration like in Hyper-V, the virtual machines will be shut down, reallocated to a different node, and then restarted. The fault node is marked "out for repair" so that Microsoft staff can replace the node. This process is called service healing.
When a virtual machine is restarted, the IP configuration will be reset. As you learned earlier, it is not wise to manually set the IP address of virtual machines. This will work until the virtual machine is reallocated to a different node.
The result of service healing is:
· The virtual network adapter in the virtual machine will change
· The MAC address of the virtual network adapter will change
· The processor/CPU ID of the virtual machine will change
· The IP configuration of the virtual network adapter will not change as long as the virtual machine is attached to a virtual network and the virtual machine's IP configuration is defined as part of the virtual network or the virtual machine itself (not the guest operating system)
Installing additional software
The advantage of the Azure Virtual Machines services is the ability to have control over the virtual machine operating system. Also, the persistent state means that after reboot and service healing, the state remains the same as before the reboot. This is very useful. When a virtual machine restarts, software installed on it will remain available. The only exception is the content of the temporary drive D:, which will be lost after service healing.
It is likely that you want to install your own software on an Azure virtual machine. Microsoft offers a lot of software out of the box like SQL Server, SharePoint, and even Oracle software. These are available as images from the Azure Management Portal.
There are several options to upload and install your own software:
· Download from within the guest operating system using a browser
· Upload using FTP or file shares
· Upload a VHD disk which includes the application installation software
In the next section, you will learn how to create a VHD locally, upload the VHD, and attach it to a virtual machine running in Azure.
Creating a VHD to upload installation files
The first step for being able to upload installation software to Azure is to create an empty VHD file locally. This VHD will be used as the storage media for our installation files. Keep in mind that currently only uploading of VHD files to Azure is supported. The newer VHDX file types are not supported.
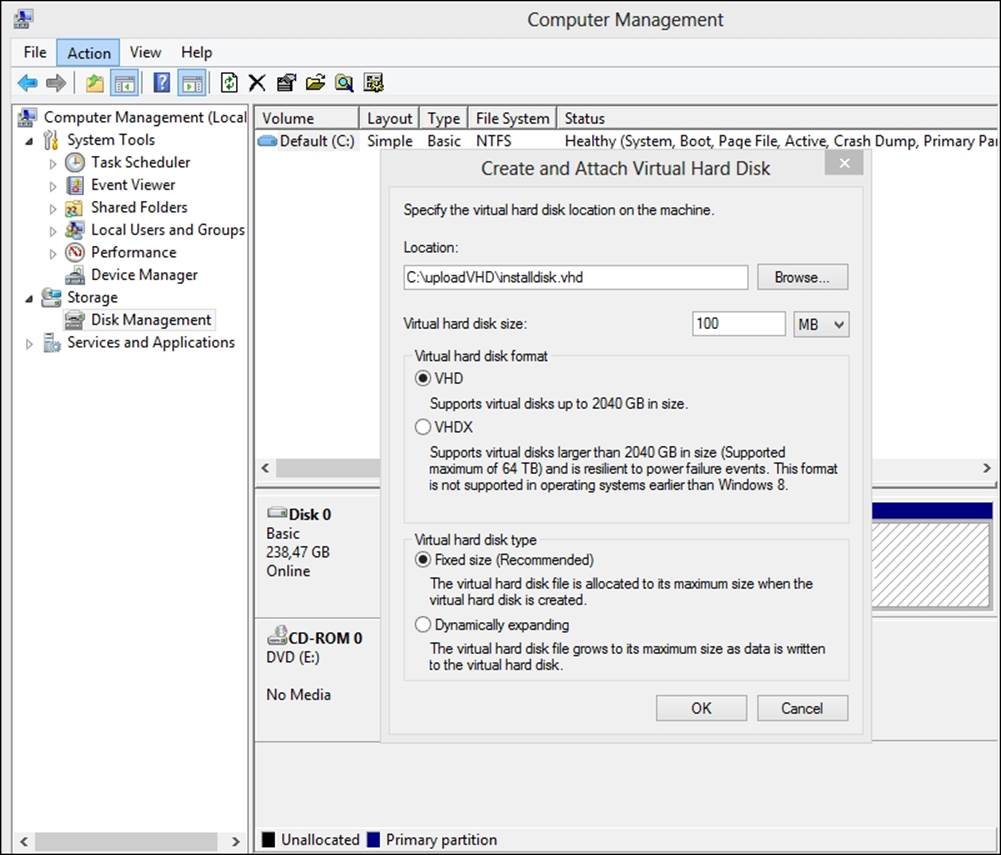
Creation of a VHD file can be done in several ways, for example, using Hyper-V Manager on Windows 8. It is a little easier to create an empty VHD using Disk Management in Windows 7, Windows 8, and Windows Server 2008 R2 and later:
1. Go to Disk Management under Computer Management.
2. From the Action menu, select Create VHD.
3. Select a location to store the VHD.
Tip
Give the VHD file a descriptive name, for example, WindowsServer2012R2UK.vhd.
It is possible that you would want to reuse this VHD for future installation, so a descriptive filename will help to remember the content of the VHD.
4. Set the size of the VHD. The size of the VHD file is not important as long as it is large enough to hold your installation files. The upload mechanism will skip unwritten disk space in the VHD.
5. Make sure Virtual disk format is VHD as VHDX is not yet supported by Microsoft Azure.
6. Also, make sure Virtual hard disk type is set to Fixed size.
7. Click on OK.
8. Position the mouse cursor over the newly created disk. Depending on the number of the disk, the disk number will be different than the one shown in the following screenshot:
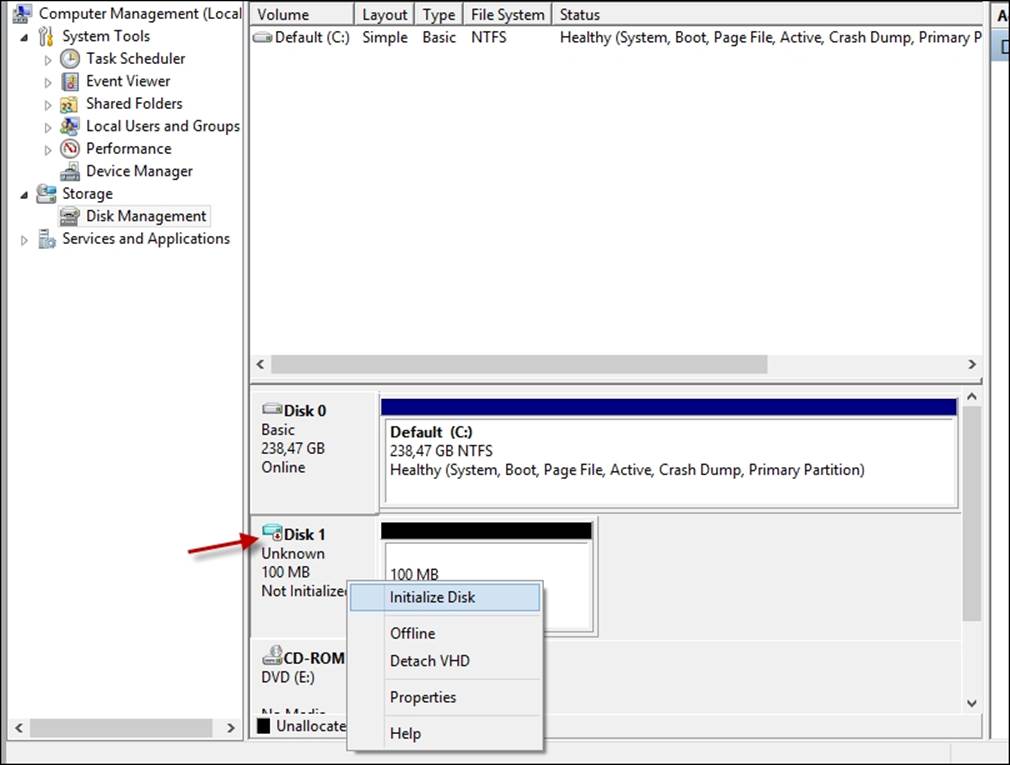
9. Click on the right mouse button and select Initialize Disk.
10. Keep the default values and click on OK.
11. Position the mouse cursor over the newly created disk, click on the right mouse button, and select New simple volume.
12. Click on Next, change the settings if you want, and click on Finish.
13. You now have a new drive displayed in Windows Explorer. Copy the required installation software to this new drive.
14. When finished copying, go to Computer Management | Disk management.
15. Position the mouse cursor over the disk containing the installation software. Click on the right mouse button and select Detach VHD.
16. Now, we are ready to upload the VHD to Microsoft Azure and attach the VHD to a virtual machine.
Uploading files to Microsoft Azure
In this section, you will learn how to upload virtual disk files and other files to Microsoft Azure. The main reasons behind uploading VHD files are:
· You created a customized virtual machine on-site and want to upload this to Azure
· You created a VHD containing software to be used in Microsoft Azure
Several tools are available for uploading files to Microsoft Azure:
· Use System Center App Controller
· Use PowerShell
· Use third-party solutions
I prefer using Cerebrata Azure Explorer to upload files to Microsoft Azure. The software is free to use and not limited by time. Cerebrata is very useful if you are not using System Center App Controller on-site. To use App Controller to upload files, you need to install SQL Server and SCVMM first. To upload files into a demo environment, a tool such as Cerebrata is much easier.
Let's get started with installing Azure Explorer and start learning how to use it.
The software can be downloaded from http://www.cerebrata.com/labs/Azure-explorer.
Installation is very simple and requires just a few clicks. After starting Azure Explorer, you need to configure an Azure storage account. This allows use access to the Azure blob storage.
The account name and access key is required. To find out these, perform the following steps:
1. Go to Azure Management Portal.
2. Select Storage in the left pane.
3. Select the storage account you want to use.
4. Click on Manage access Keys in the bottom bar.
5. You will be presented with a screen showing the storage account name, primary key, and secondary key.
6. Now, select Cerebrate Azure Explorer.
7. Select Azure Storage Accounts in the left pane.
8. Click on the right mouse button and select Add Account.
9. Copy and paste the account name and primary key into the respective fields.
10. Click on Test connection. You should get a window saying FS: ST.
11. Click on OK.
12. In the left pane, select the newly created storage account and open the folder named vhds.
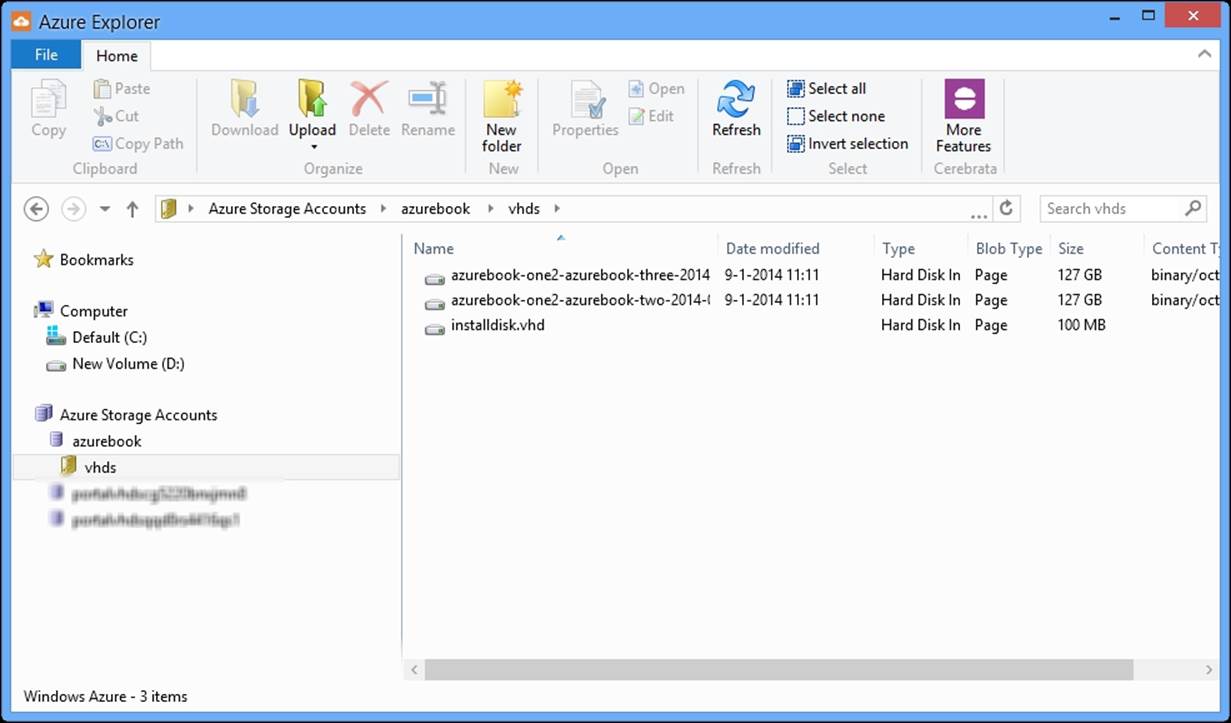
13. Place the mouse cursor over the right window, click on the right mouse button, and select Upload.
14. Select Page blob.
15. Browse to the folder on your on-site system where you created the VHD file that contains the installation software.
16. Click on Open.
17. The .vhd file will now be sent to Microsoft Azure Storage.
Another way of uploading a VHD to Azure is by using PowerShell. However, there are some prerequisites you need to upload a VHD with PowerShell. These prerequisites are:
· The Azure PowerShell module
· A management certificate (can be self-signed)
· A VHD file
The next thing to do is to create a storage account in Azure, which you will target with your PowerShell command. After creating the storage account and writing down the URL of this service, you will need to prepare the connection to Azure from PowerShell.
You can accomplish this with the Get-AzurePublishSettingsFile command and importing this into the local store of your computer. The last step is to upload the VHD file to Azure with the Add-AzureVHD powershell command. This command will perform a check of the checksum of the VHD, after which the file is uploaded to the previously defined storage account.
For more information, please visit http://www.windowsazure.com/en-us/documentation/articles/virtual-machines-create-upload-vhd-windows-server/.
Connecting the VHD to a virtual machine
The last step is to connect the VHD file to a virtual machine:
1. Open Azure Management Portal using a web browser.
2. Select VIRTUAL MACHINES in the left pane.
3. Select the virtual machine you want to attach the uploaded VHD to. Do not to select the name of the virtual machine in the NAME column.
4. Click on Disks in the upper menu.
5. Then, click on CREATE in the lower menu:
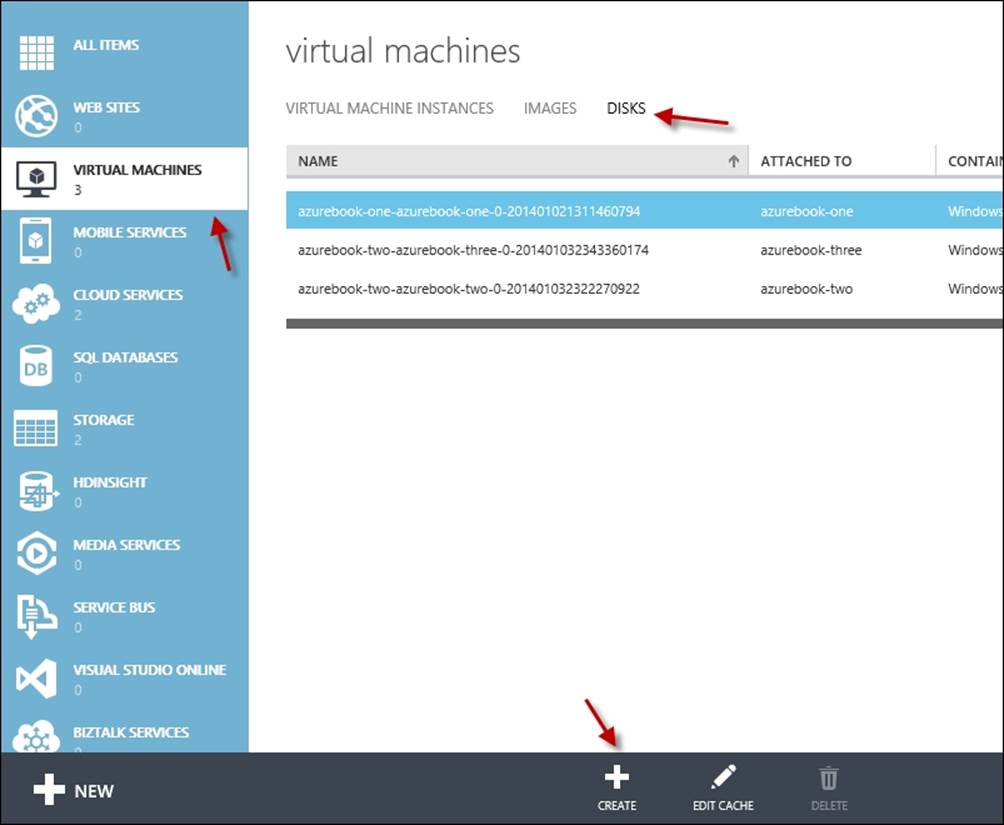
6. In the Name field, type in a descriptive name.
7. Click on the VHD URL button, select the Azure storage account in the left pane, browse to the VHD folder, and select the VHD you just uploaded.
8. Click on OPEN. Do not select The VHD contains an operating system.
9. Click on the checkmark button.
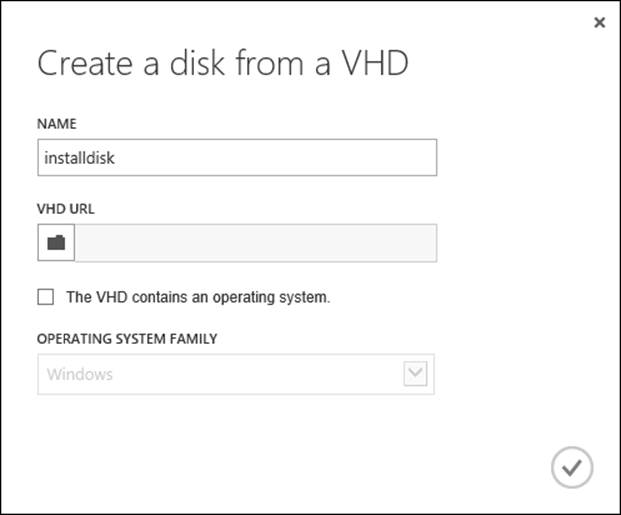
10. After the disk has been created, make sure the correct virtual machine is selected.
11. Click on Attach in the lower menu.
12. Select Attach disk.
13. Select the correct available disk.
14. Leave the default Host cache preference as NONE.
15. Click on the checkmark button.
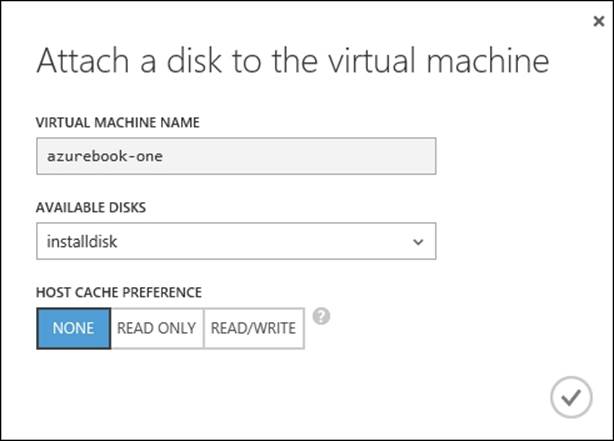
16. Now, start a remote session to your virtual machine. In Windows Server 2012 R2, the disk is automatically connected. If not, go to Computer Management | Disk Management and select Refresh disks in the Actions menu.
You now have an extra disk containing the installation software you prepared in the previous steps.
17. If you do not want to use the disk, simply select the virtual machine in Azure Management Portal and select Detach Disk in the lower menu bar.
Summary
In this chapter, you learned how to purchase a Microsoft Azure subscription and how to create an account. You also learned how to create your first virtual machine in Microsoft Azure. The importance of understanding the function of Virtual Networks is clear now. Apart from being created manually, virtual machines can be created by PowerShell or even by using a command-line interface. PowerShell is a very powerful tool for managing large numbers of virtual machines.
In the next chapter, you are going to learn how to connect our on-premises infrastructure to Microsoft Azure using a VPN connection. To provide non-IT staff access to clouds running on-premises, in Azure, or in a service provider environment, we use System Center App Controller.
All materials on the site are licensed Creative Commons Attribution-Sharealike 3.0 Unported CC BY-SA 3.0 & GNU Free Documentation License (GFDL)
If you are the copyright holder of any material contained on our site and intend to remove it, please contact our site administrator for approval.
© 2016-2026 All site design rights belong to S.Y.A.