Mastering Hyper-V 2012 R2 with System Center and Windows Azure (2014)
Chapter 10. Remote Desktop Services
Up to this point in the book I have focused on the core technologies of virtualization, and for examples I primarily have used server operating system workloads. Historically this has been the principal usage for machine virtualization. You can, however, use virtualization with a client operating system to offer virtualized desktops.
This chapter looks at the Windows Server Remote Desktop Services (RDS) that enable remote access to operating systems, both server and desktop, with the primary goal of providing users with a desktop experience. As I will explain, there are a number of ways to achieve this, and I will focus on where Hyper-V is critical.
In this chapter, you will learn to
· Explain the types of desktop virtualization provided by RDS
· Describe the benefits of RemoteFX and its requirements
· Articulate the other technologies required for a complete virtualized desktop solution
Remote Desktop Services and Bring Your Own Device
Remote Desktop Services is a core role of Windows Server; it was called Terminal Services before Windows Server 2008 R2 but was renamed to better reflect the range of its functionality. If you are familiar with Terminal Services, you know Terminal Services was focused on providing a complete desktop to remote users that was hosted on a server operating system. Each connected user had their own Windows session on the server operating system, which provided them with a level of isolation from other users connected to the same server operating system. The remote connection was enabled through the Remote Desktop Protocol (RDP). RDP is a core part of all Windows operating systems and is also what enables Remote Desktop to a desktop operating system remotely. Terminal Services, or Remote Desktop Session Host (RDSH) as it is now known, provides a desktop to the remote user including the Start menu, desktop icons, Internet Explorer, and the various applications installed on the server operating system, which could include Microsoft Office and line-of-business (LOB) applications. To the end user, there is really no difference in experience from a desktop operating system; however, actions that affect all users such as reboots and application installations are blocked in a session virtualization environment. Figure 10.1 shows a typical session virtualization solution with Remote Desktop Session Host. In this example, the session host is running as a virtual machine on a Hyper-V server, but it could also be running on a physical host directly. As you can see, many different users connect for their own desktop. As I cover later in this chapter, while RDSH provides a desktop environment, other technologies are required to give the users a full experience such as profile, applications, and their data.
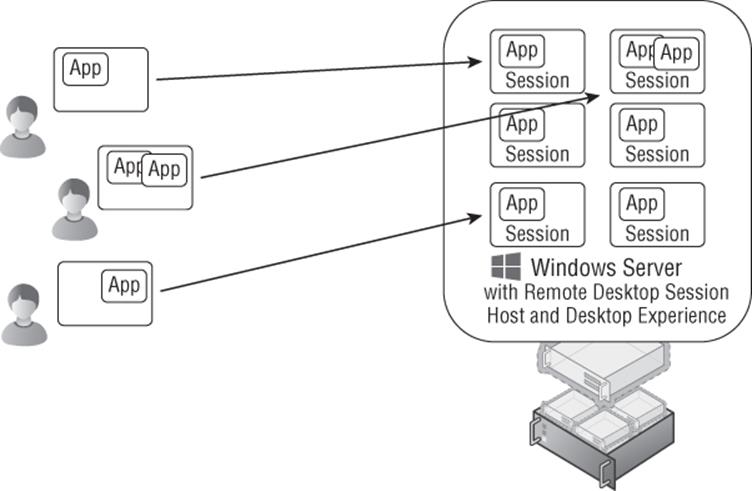
Figure 10.1 Session virtualization using Remote Desktop Session Host
Enabling a Rich Desktop Experience Using RDSH
I've talked about configuration levels for the operating system, which could be Server Core for most server uses. For a session host that is providing an environment for a user, the full graphical experience is required. At a minimum this requires the Server Graphical Shell configuration level, which provides the graphical shell, Windows Explorer, Internet Explorer, and more. For the complete desktop experience of a client operating system, you will also want to enable the Desktop Experience configuration level, as shown in Figure 10.2. This adds features such as themes, Windows Media Player, and photo tools.
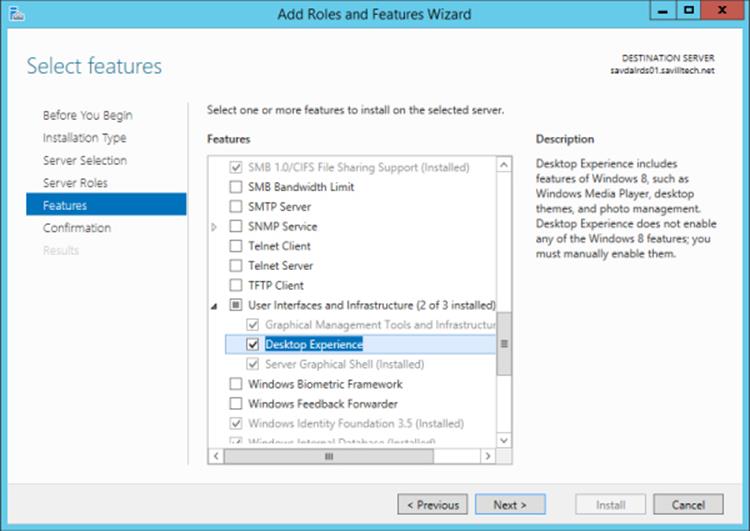
Figure 10.2 Enabling the Desktop Experience configuration level
This is really the only time you should enable the Desktop Experience configuration level because it consumes more resources on the server operating system. However, there are some applications that require Desktop Experience, specifically for the graphical codecs it includes.
While Remote Desktop Services provides a complete desktop with the Start menu (or Start screen for Windows Server 2012/Windows 8 and newer), sometimes end users don't want a complete desktop. Instead, they want a specific application displayed on their device, such as a line-of-business application or an office application. This is especially true when using a smaller device such as a phone or tablet. Imagine trying to interact with the complete Windows desktop on a 4-inch iPhone compared to just launching a specific Windows application. Another example is where a user is already running a Windows desktop but has to run a specific application remotely. In these cases, the users just want the application's window to be displayed on their existing desktop or device without a completely separate desktop in order to launch applications from a website or some kind of local application catalog. Windows Server 2008 introduced the ability to publish applications in addition to a full desktop, which allowed just the application window to be sent to the user's local device.
For a long time, this type of session virtualization was the most popular way to provide a virtualized desktop. Recently, Virtual Desktop Infrastructure (VDI) has been getting a lot of attention and is being touted as the best solution by many vendors. A VDI solution differs from session virtualization because each end user connects to a separate client operating system running in a virtual machine, as shown in Figure 10.3. This gives a greater level of isolation for each user since the users are now running in their own isolated operating system; therefore, it is a good fit for power users and developers who need to customize the operating system or reboot it. The downside is that a VDI solution uses up far more resources because each VDI desktop is a complete desktop environment with the memory, processor, and desk utilization that accompany that.
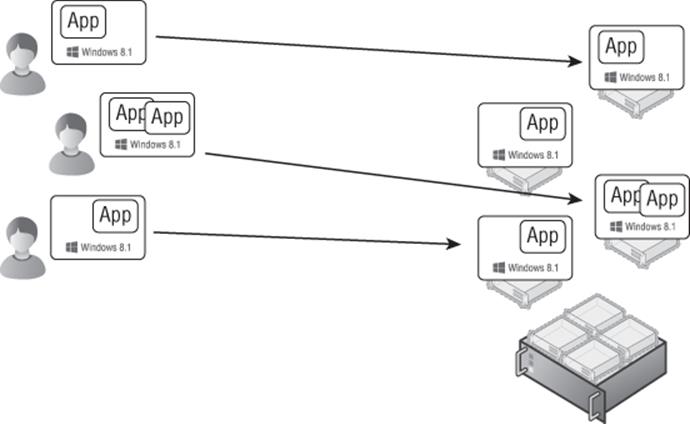
Figure 10.3 VDI solution in action
There are two modes for a VDI deployment: pooled and personal desktops. Most VDI deployments will leverage a pooled deployment for the majority of VDI users. Pooled VDI is a configuration where a number of virtual machines running the client OS are grouped together into a pool. As a user connects, the user is automatically assigned one of the VMs not currently in use. Once the user has logged off, the VM is placed back into the pool. Because a user potentially (and probably) gets a different VM each time they connect, it is essential you have solutions to maintain the user's profile and data between logons. After a user logs out, the VM in the pool is reset to a clean state in case anything was changed by the previous user.
Pooled desktops should be the default for all users, but there may be certain users who need the same client OS instance every time they connect. Maybe they are modifying the OS in some way, or perhaps they have an application that needs to be installed because it can't be virtualized. Whatever the reason, you have the capability to statically assign a VM to a particular user so they always get the same client OS. This is known as a personal desktop. A pooled desktop environment allows a gold image to be used as the template for all the VMs in the pool, and because no user state is stored in the VMs in the pool, there is no need to patch or maintain the VMs in the pool. The only maintenance required is to patch and manage the gold image, which will then refresh all the VMs in the pool. This is not possible for a personal desktop because the VM is maintained for the specific user between logons and therefore must be patched just like a regular desktop. It also may lay dormant if not used by the user but will still consume resources. It is therefore far more preferable to use pooled VMs over personal VMs where you use VDI.
It won't come as any surprise to you to learn that vendors that push VDI as the best solution for every scenario are those virtualization vendors that don't have a session virtualization solution, so that is their only way to expand into the desktop market. Vendors that have both VDI and session virtualization such as Microsoft and Citrix take a more balanced approach. I will give more guidance later in this chapter on when to use each type of desktop virtualization because certainly most organizations will need some of each.
Whether session virtualization or VDI is used, the end result is virtualization of the desktop, or simply virtual desktops. So, why do people even want these virtual desktop solutions? The following are some of the most common reasons:
· Disaster recovery situations where the normal work office for the users is not available because of some disaster or for some other reason. Consider a huge blizzard where workers cannot leave their homes. With a virtual desktop environment available, users can connect to the virtual desktop, and their complete desktop environment is available.
· Contract users with their own computers who need a corporate desktop environment. Rather than rebuild their computers, just give them access to a desktop in the corporate virtual desktop environment.
· Users who need to use many different devices and require a consistent desktop experience. This could include users who use shared devices such as in hospital environments.
· High-security situations where data cannot leave the datacenter, which requires the user's desktop to also be housed in the datacenter. It's not practical to sit users in the actual datacenter, so remotely accessing the desktop that is co-located in the datacenter is the best of both worlds.
· Certain applications that access huge amounts of data that is stored in the datacenter. Sending the data over the network may be impractical or give poor performance, so hosting the desktop in the datacenter with the application effectively running on the same local network gives great performance.
· Critical desktops that need high resilience. Consider that with virtual desktops the desktop operating system is actually running on server hardware, which means server-class performance and server-class high availability and redundancy including RAID-based storage.
· Remote developers who need to be able to customize their operating system environment and reboot.
· CEOs who need to bring in their iPad and access Windows applications.
· Bring Your Own Device (BYOD), where organizations allow users to bring their own computers into the office (and may even give them money each year to buy a device). Installing the corporate image on these devices does not make sense, so a virtual desktop can give the users a desktop.
BYOD has become the driving force behind the huge interest in desktop virtualization because many organizations are looking at ways to enable their users to work from any device and from anywhere. Microsoft has made huge strides in its Remote Desktop Services solution that minimize the need to leverage third-party solutions such as those from Citrix and Quest, although they still have a place in certain scenarios.
In the rest of this chapter, I will look at the key components of Microsoft Remote Desktop Services and how it's used to deliver a virtual desktop solution.
Microsoft Desktop and Session Virtualization Technologies
To offer a virtual desktop solution, whether session virtualization or VDI, there are a number of components required to complete the solution and enable connectivity from the end users:
· Machine virtualization to host the virtual machines, for example, Hyper-V
· Virtualization management to enable the creation of virtual machines and stopping/starting them as needed in addition to passing information back to the VDI components
· Client platform to actually run inside the virtual machines, meaning Windows 8 or Windows 8.1
· Access protocol to actually communicate with the virtual desktop OS, which is Remote Desktop Protocol for native Windows
· Connection Broker to decide which virtual desktop a user should be connected to, which could be via session virtualization or VDI, and to remember which desktop a disconnected user was last using for reconnections
· Gateway capability for users connecting from outside of the corporate network and avoiding the need for VPN connections or technologies like DirectAccess
· Licensing
I will step you through the typical process of connecting to a hosted desktop in a Microsoft VDI implementation and demonstrate the actual Microsoft role services used and how they interact. In Figure 10.4, I walk through the major steps required for VDI functionality, from the initial user contact all the way to a usable VDI session with an empty Windows 8 operating system. If using session virtualization, the flow is similar except that the endpoint for the virtual desktop is a session host instead of a virtual machine; in addition, step 6 in the flow is not performed.
1. Users need to find the remote desktops they can connect to, which can be desktop virtualization sessions (Remote Desktop Session Host), published applications, and the VDI sessions. While a RDP file can be created and deployed to users using various methods, a more dynamic approach is to use the Remote Desktop Web Access role service, which presents a browser-based list of available connections that the user can choose from.
2. To create the list of published applications and connections that are presented to the user, the Remote Desktop Web Access server communicates with the Remote Desktop Connection Broker, which has knowledge of the VDI pools, personal desktops, and other published connections and applications through its own communications with configured RemoteApp sources.
3. To ascertain the exact access a user has, the Connection Broker communicates with Active Directory, which also provides any personal desktop configurations.
4. No matter what the exact method, be it Remote Desktop Web Access, RemoteApp, and Desktop Connections, or a deployed RDP file, the users now have an RDP file that can be used to initiate the connection. If the user is outside the corporate network, a direct RDP connection would be blocked by most organizations' firewalls. So, traditionally, the user would need to initiate a virtual private network (VPN) secure connection or use DirectAccess. But you have an alternate solution that does not require any end-useraction or additional client-side software. Windows Server 2008 introduced TS Gateway, which allows the RDP traffic to be encapsulated in HTTPS (port 443) packets, which is the RD Gateway component.
5. The user needs an initial RDP connection point since their VDI client VM destination will not be known yet unless the user has a personal desktop configured. The RD Connection Broker acts as the connection point for the user's RDP connection and then redirects the client to the true endpoint, the VDI session. The RD Connection Broker knows what the RDP target should be for the requesting client.
6. The RD Connection Broker communicates with the Remote Desktop Virtualization Host role service that is enabled on the Hyper-V boxes to check the state of the VMs, start the VM if required, and gather any needed information such as IP address of the client VM OS. This information is then passed back to the RD Connection Broker, to the RD Session Host in redirection mode, and then back to the client.
7. The client now makes an RDP connection to the destination client VM via the RD Gateway (if connecting from outside the corporate network), and the connection is complete. The logon process for the user would now be complete.
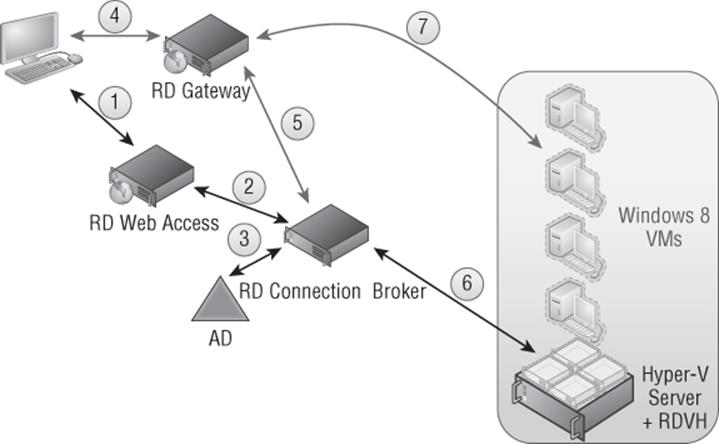
Figure 10.4 The full VDI implementation has many components to give a rich capability set while being invisible to the end user.
One part I haven't mentioned is the role of System Center Virtual Machine Manager, which while not a requirement definitely helps in the management of the virtual machines and helps automate the bulk creation and updating of virtual machines. I will spend a little time looking at each component in a bit more detail. It should go without saying, but all of the roles can be virtualized on Hyper-V, and it is common practice to do so.
RD Web Access
The RD Web Access role provides the initial entry point for users; it provides a web-based interface to select the desired VDI or published desktop/application target. While not absolutely required, this helps give a simple-to-use portal that supports form-based authentication, provides single sign-on, and differentiates between public and private computers for credential caching. The Web Access portal utilizes HTTPS to protect the credentials that are passed and could be made available to the Internet through publishing enabled by gateway services such as Microsoft User Access Gateway.
Although not directly part of RD Web Access, Windows 7 introduced RemoteApp and Desktop Connections, which allows a feed from RD Web Access to populate the same content shown in the website directly into the Start menu, avoiding the need to use the website. The standard URL is https://<RD Web Access server>/RDWeb/Feed/webfeed.aspx.
This was continued in Windows 8 and extended with the new modern Remote Desktop application. The Remote Desktop application enables easy access to the feeds provided by RD Web Access. The Manage RemoteApp and Desktop Connections setting in the application enable a new connection to be added, as shown in Figure 10.5. The web feed URL or the user's email address can be specified. Behind the scenes, when an email address is entered, the domain part of the email address is extracted and then used to perform a DNS lookup for _msradc.<domain from email>. The record in DNS is a TXT type record that must be created by administrators, and the value of the DNS record is the URL of the RD Web Access feed.
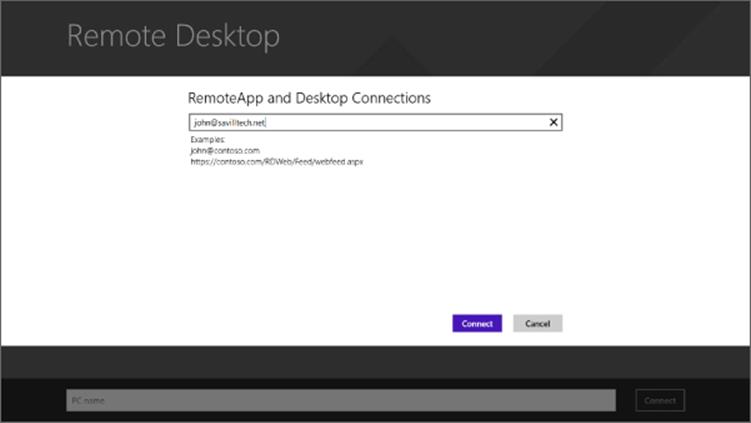
Figure 10.5 Adding a new connection
RD Connection Broker
The updated Connection Broker in Windows Server 2008 R2 was one of the major components that allows an all-Microsoft VDI solution and gives Remote Desktop Services the ability to balance and track connections to nonsession hosts, specifically the ability to manage connections to client operating systems. It's important to note that the Connection Broker still helps balance connections to session hosts as well. Additionally, Windows 2008 R2 introduced the ability for the Connection Broker to balance RemoteApps and support servers with different published applications, allowing a sum view of all the different applications gathered from all servers in the farm to be displayed to the user. This removes the need for all servers to have the same applications. The Connection Broker is the brains of the virtual desktop environment and communicates and controls the other components; it works particularly closely with the RD Session Host in redirection mode, which is why they are frequently placed on the same OS instance. However, when you start having more than 250 simultaneous connections, you may need to consider breaking the roles onto separate servers.
Windows Server 2012 also enabled the Connection Broker to act as the initial entry point for the incoming RDP connection, which previously required a dedicated RD Session host in redirection mode. This has removed the need to ever have an RD Session Host in a redirection part. Prior to Windows Server 2012, the RD Session Host in redirection mode was required because when you have a large session host server farm, to avoid users having to connect to different session hosts, the initial entry point is always a designated session host that does nothing more than talk to the broker and then redirect the RDP connection to the right RDP endpoint. This is the same concept in a VDI environment; you still need an initial RDP connection point for the RDP clients, which is exactly what the RDSH in redirection mode provides. It then redirects the RDP client to the right client OS VM that will be providing their desktop OS. By moving the functionality into the Connection Broker, it is one less component to have to deploy.
The Connection Broker is also in charge of cleaning up the VDI instance once the user logs off. This is achieved by the actual creation of a checkpoint, RDV_Rollback, when the VM instance is created from the template, which is in a clean state before a user logs on. Once a user logs off, the RDV_Rollback checkpoint is applied to the VM instance, reverting the VM to the pre-user logon state and making it ready for the next logon. In Windows Server 2008 R2, the RDV_Rollback checkpoint had to be manually created, but this is done automatically in Windows Server 2012 and newer.
RD Virtualization Host
The RD Virtualization Host role service is installed on any Hyper-V host that will be participating in a VDI pool. It enables the Connection Broker to communicate with the Hyper-V hosts, start/stop VMs, and gather information from within to enable client connections. The RD Virtualization Host role also enables the use of RemoteFX.
RD Gateway
The RD Gateway allows RDP traffic to be encapsulated in HTTPS packets, allowing secure RDP connection through corporate firewalls without having to open up firewall ports or use additional VPN solutions. Figure 10.6 shows a high-level overview.
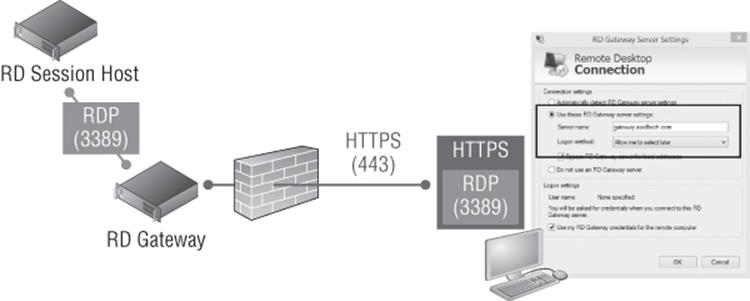
Figure 10.6 How RD Gateway works
The RD Gateway is placed in the DMZ (or, more securely, behind some kind of firewall/proxy), and the clients connect to the RDP destination via the RD Gateway, which is accomplished by adding the RD Gateway server as part of the RDP file configuration that is given to the client. The client encapsulates the RDP traffic in HTTPS and sends it to the RD Gateway, which extracts the RDP and forwards it to the RDP destination. When traffic comes back from the RDP destination bound for the client, the RD Gateway encapsulates it in HTTPS and sends it to the client. With this technology, users outside the corporate network can still access all RDP resources without additional steps or software. Users who are on the corporate network would bypass the RD Gateway and communicate directly with the RDP destination.
Using RD Gateway, you can configure who can connect through the RD Gateway service, what they can connect to, the supported RDP settings such as device redirection, and so on. This allows access from outside the organization without the use of a separate VPN-type technology while still maintaining control of the levels of access. RD Gateway can be used with any RDP connection, which means it can be used with session virtualization, VDI, and application publishing.
Requirements for a Complete Desktop Virtualization Solution
Everything I have talked about so far is about providing an operating system environment for the end users, but what the users actually care about is accessing applications and the related data in a familiar environment. This requires much more than just an operating system. Additionally, you must provide the following:
· Access to a user's data
· A consistent set of user customizations, that is, their profile
· Access to a user's applications
Many organizations already have solutions to protect and provide access to user data. The most important data actually resides in collaboration solutions such as SharePoint, and with features like SkyDrive Pro, it's possible to have a local cache on a user's machine that is a local copy of the data stored in the user's SharePoint area. For unstructured data such as that stored on a user's home drive, it is possible to use work folders (introduced in Windows Server 2012 R2) and the more traditional offline files with folder redirection.
Folder redirection allows well-known folders such as Documents to be redirected to a corporate file server but also cached locally using offline files/client-side caching to make the data available even when the machine is not connected to the corporate network. These technologies are mature and should be used at a minimum for the Documents and Desktop user folders. By redirecting these locations to a central file server, the user's data is always available, no matter which device a user is connected to. Granular controls are available to manage which data is redirected to a corporate file server and which data stays local to a machine and therefore will not roam with the user.
While providing access to data is a no-brainer for most organizations, providing a consistent user experience by making the user's profile move between different machines, known as roaming profiles, is a different story. While roaming profiles have existed in Windows for many versions, they have a history of problems. Roaming profiles in Windows 7 and newer are a fairly solid solution, but they have numerous limitations. For instance, you cannot use a single roaming profile between Windows XP and Windows 7 machines. You won't use a single profile between client and server operating systems. In addition, application settings don't work well between locally installed applications and those that are virtualized with solutions such as App-V. The root problem is that roaming profiles work by synchronizing predominantly a single file, ntuser.dat, which contains the registry of the user, and this synchronization occurs at logon and logoff with some limited synchronization periodically. This means for many settings to synchronize, the user must log off, which is a problem if the user is utilizing many devices simultaneously or needs to use different types of devices or connections that differ for certain parts of the profile.
Microsoft provides an alternate solution for roaming the user's settings, called User Experience Virtualization (UE-V), which is available as part of the Microsoft Desktop Optimization Pack (MDOP). UE-V is enabled on a per-application basis in addition to basic desktop settings. The locations in the registry and the file system for the user settings for each application are defined and therefore should be captured and virtualized by UE-V. This allows granularity in which application settings should be roamed between user environments, and each application has its own setting store, enabling much more flexible synchronization of settings. Let's imagine a user has two logon sessions, their local Windows 8 PC and a Windows 2012 R2 Remote Desktop Services session, and walk through the experience of using roaming profiles. I should point out that sharing a profile between a Windows 8 desktop and a 2012 R2 RDS server is not recommended, but it helps you see the problem.
1. In the Windows 8 session, the user launches PowerPoint, customizes the environment, and then closes PowerPoint.
2. In the 2012 R2 session, the user launches PowerPoint and none of the customizations made on the Windows 8 session are available. The user sets different customizations and then logs out of 2012 R2 session, at which point roaming profiles replicate the new profile.
3. The user logs out of the Windows 8 session, and the profile overwrites that of the 2012 R2 session.
With UE-V, which has been configured to virtualize settings for Microsoft Office, this is what happens:
1. In the Windows 8 session, the user launches PowerPoint. As the application launches, the UE-V service hooks into the application, pausing the start, and checks for any updates to the settings package for PowerPoint from the UE-V remote repository, which is just a file share. If there is an updated settings package, it synchronizes it using offline files to a local cache, and the application starts using the settings in the settings package exposed by the UE-V service. The UE-V service provides the technology to inject the user's application settings that are stored in the registry and file system onto their current OS as the application starts and then saves them back to the UE-V settings package when the application closes. This allows the abstraction of the application settings from the OS without any changes being needed by the application. The user now customizes the environment and then closes PowerPoint. As the application is closed, UE-V saves the updated settings to the settings package for the application and writes to the remote repository.
2. In the 2012 R2 session the user launches PowerPoint, and once again UE-V hooks into the application and pulls down and presents the user's customizations. Now the user sees the changes made in the Windows 8 session for PowerPoint and can get on with their work. If they make changes to the application settings, then on application close, those changes would be saved to the remote repository.
This demonstrates how UE-V really changes the user experience. Roaming profiles replicate changes only at logon and logoff. UE-V replicates application settings when the application launches and is closed. For desktop settings such as the theme (desktop background, sounds, and so on) and accessibility configurations, the changes are replicated at logon, logoff, lock, unlock, connect, and disconnect. Internet Explorer 9 (and newer) is supported and is treated like any other application; settings are replicated as the application is opened and closed. UE-V also works seamlessly with a mix of locally installed applications and virtualized applications with App-V, giving a single configuration for an application, no matter how it is implemented for user. For power users, there is a PowerShell cmdlet that enables an individual application settings to be rolled back to the default configuration. This is useful if a user has completely corrupted their settings for an application. The default configuration is created the first time an application is launched for a user and stored away in case a settings rollback is required.
From a platform perspective, UE-V 2.0 is supported on Windows 7, Windows 8, Windows 8.1, Windows Server 2008 R2, Windows Server 2012, and Windows Server 2012 R2, which means a single application configuration for any session on any supported platform. As long as the UE-V agent is installed and has the template registered for the applications and desktop, then the user will have a consistent experience.
There is no server infrastructure for UE-V other than a file share to store the settings packages for each user (who would have their own subfolder), or the user's settings packages could be part of their standard Active Directory–specified home drive. The templates that detail what applications should have settings virtualized and that document the various registry and file system locations that make up those settings and need to be intercepted can be registered at the time of the UE-V agent installation or can be stored on a file share where the UE-V agent can be configured to check for updates every 24 hours. This makes UE-V easy to deploy because most of the work will be just deploying the agent, which can be done manually, through an Enterprise Software Deployment (ESD) solution such as System Center Configuration Manager or even through Group Policy.
The final component is to provide the actual applications. One option is to install the applications into the actual operating system such as the RD Session Host or client OS in the VM for VDI; however, this is a lot of overhead and hard to maintain. Another option is to separately run applications on specific farms of session hosts that publish just the applications to the virtual desktop. Another option is to leverage App-V, which like UE-V is part of MDOP and is a great solution not just for virtual desktops but for physical desktops as well.
App-V virtualizes the application separately from the operating system, with each application running in its own virtual environment, or bubble. This bubble contains a virtual file system, registry, and many other system resources that sit on top of the operating system resource. These virtual layers contain the resources specific to the application. This allows the application to run on the operating system without having any footprint on the local resource such as writing to the file system or changing the registry. There is a single cache on each machine that holds the virtualized streams for each App-V application along with application icons and file type associates. The experience to the end user is completely seamless. App-V also streams applications to machines on first use where required; however, for session virtualization and VDI, that is typically not used, and instead a central cache can be shared that is prepopulated with all the virtualized applications.
Figure 10.7 shows a Microsoft technology-complete solution with session virtualization or VDI providing the operating system and other technologies providing the data, profile, and applications. This is not the only possible solution; rather, it's an example of how different technologies work together to create the complete end-user experience. The key point is these technologies can all be used on physical desktops and also enable a single set of technologies to provide a consistent and manageable experience for all the types of desktop in your organization.
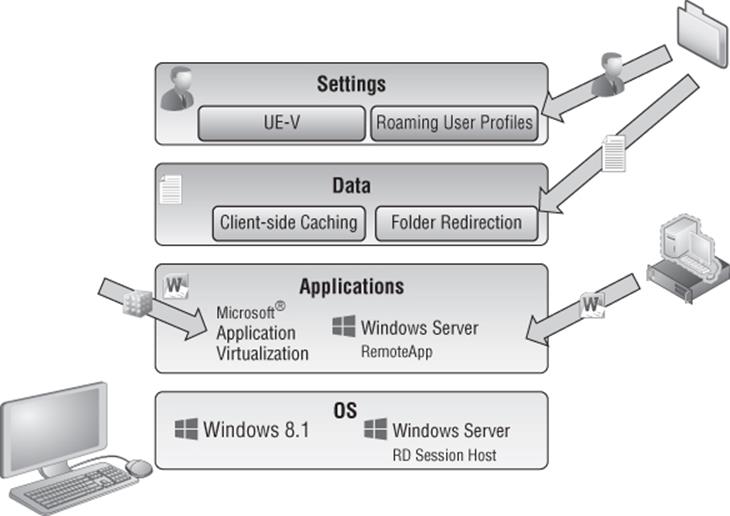
Figure 10.7 Providing the complete user experience
There is another RDS-specific solution for the user profile and parts of the data, called user profile disks. The option to use a user profile disk is available when creating the VDI or session-based pools, also known as collections, and is a VHDX file for each user that uses the pooled virtual desktops. The first time a user connects to the pool, a new VHDX file is created and attached to the virtual machine (if VDI) or the RD Session Host that is hosting the user's session (if session-based). The entire user's profile is stored on the attached user profile disk by default. This means all the user's data and settings are stored on the user profile disk since Documents is part of the user profile area. On subsequent logons by the user, the user profile disk VHDX is attached to the required VM image or RD Session Host, providing the same user profile area and therefore the same user experience and data access. Within the virtual desktop that is using the user profile disk, the VHDX is seen as mounted for the location of the user's profile using the MOUNTVOLcommand.
User profile disks can be enabled when creating a VDI or session-based pool or after the creation of the pool. Granular control of the data stored on the user profile disk is possible as shown in Figure 10.8; a maximum size for the data stored on the VHDX is also shown.
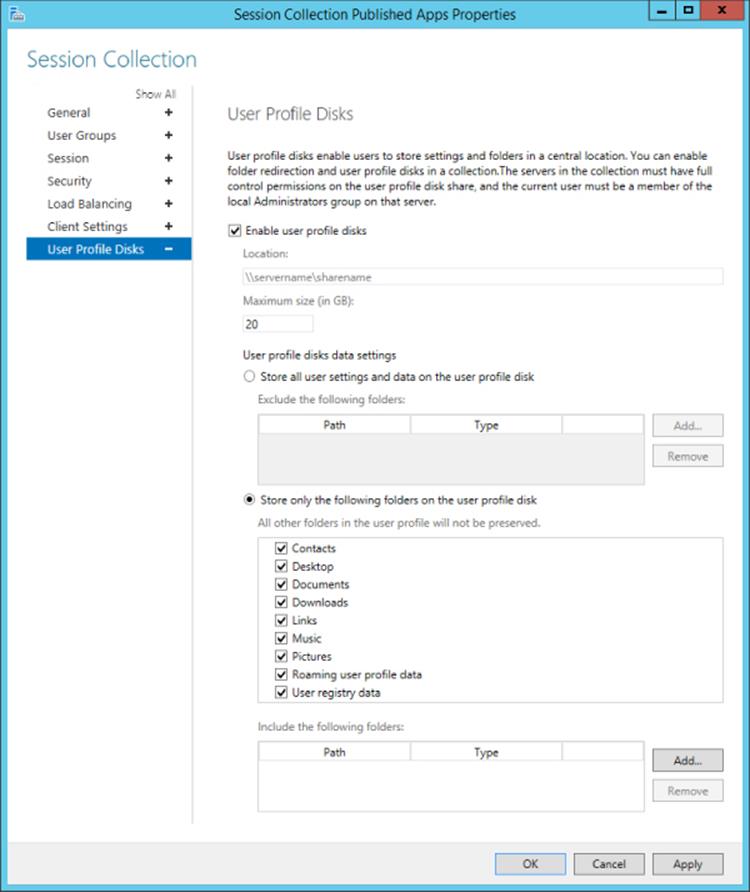
Figure 10.8 User profile disk configuration options
Using user profile disks has some advantages and disadvantages. The big advantage is that they are easy to use and provide users with a consistent profile and data experience without having to use roaming profiles, UE-V, folder redirection, or any other technology. The disadvantage is the user profile disks are specific only to the RDS environment, and the profile/data will not be available to other environments such as a physical desktop. In fact, it's more restrictive than that. When VDI or session-based deployments are created with RDS, specific servers are selected to be part of the deployment, which makes up a specific collection. An environment may have many different collections, which could be VDI or session based for different types of users. The user profile disks are specific to a specific collection defined in RDS, which means they cannot be shared between different RDS collections. Therefore, if users leverage virtual desktops from different collections, they would have a different user profile disk and therefore a different profile for each collection, which would not be a good end-user experience.
I think of user profile disks as a great solution for pilot environments where integration with a normal desktop environment is not required or for production environments where you have a set of users who will leverage only a specific RDS collection or do not need access to their normal profile or data. Outside of that, I think it is better to leverage user state virtualization technologies that are usable across all desktop environments such as the aforementioned roaming profiles, UE-V, and folder redirection.
Creating the VDI Template
One of the most important decisions when using VDI is which operating system you will use in the image. Where possible, a consistent operating system between your physical desktops and the virtual desktops is advantageous because it will avoid additional application testing and different OS configuration and validation exercises. This may not be practical, however. One reason VDI may be attractive is because the physical desktops are all running Windows XP and you need a more modern operating system for some users or applications.
There are three client operating system options for a Windows Server 2012 R2 VDI deployment:
· Windows 7 Enterprise (with the RDP 8.0/8.1 update)
· Windows 8/8.1 Pro
· Windows 8/8.1 Enterprise
Where possible, Windows 8/8.1 Enterprise is the best option because it gives the richest client experience and highest set of functionality. Compared to Windows 8/8.1 Pro, the Enterprise edition has the following additional capabilities:
· RemoteApp: This offers application publishing and enables specific applications running on the operating system to be published and used by users instead of a complete desktop, bringing a far more seamless experience in addition to being more accessible and usable on smaller form-factor devices where a full desktop is not optimal. The Pro edition does not enable RemoteApp.
· RemoteFX Device Redirection: RemoteFX has a number of technologies, one of which enables the redirection of almost any USB device at a port level. Only Enterprise has this feature.
· RemoteFX vGPU: The feature of RemoteFX most people think of is the virtual GPU capability, which enables a physical GPU in a server to be virtualized and made available to virtual machines. Even if a server does not have a GPU or a certain level of graphical capability, it can still be exposed to the virtual machine through a software rastorizer. This enables the virtual machine to see a vGPU and perform local graphics rendering such as with DirectX enabling advanced graphics applications to be executed in the VDI environment. This is enabled only on the Enterprise edition.
· User profile disk: This enables a VHD to be attached to the virtual machine and used for profile and data storage so that a user's experience is consistent even when connecting to different VDI VM instances. This is available only on the Enterprise edition.
Windows 7 Enterprise edition with the RDP 8/8.1 update also has the features listed here. A feature that Windows 8/8.1 (Pro and Enterprise) has that Windows 7 Enterprise does not is support for RemoteFX Multi-Touch, which is far more than just enabling multiple contact points. It enables a “touch frame” that contains rich metadata about the complete set of touch contacts, on-screen location of contacts, bounding rectangles for each contact, and timing information relative to the previous frame. RemoteFX Multi-Touch supports up to 256 active contacts, which for most people will be plenty. Practically speaking, the reason for so many contacts is in multitouch-monitor scenarios, where up to 16 monitors are supported for RDP. Windows 7 and Windows 8 have a very different Start experience, plus Windows 8 and 8.1 support the new fully immersive modern applications. This means for the most complete user experience you should use Windows 8.1 Enterprise edition for your VDI environment where possible.
For the 32-bit vs. 64-bit decision, I generally recommend using whatever version you use on your physical desktops in the organization to avoid a large amount of additional software testing. Obviously, if you have 64-bit desktop applications and if you need more than 4 GB of memory, you will need to use the 64-bit version of Windows. The one downside of 64-bit Windows is it uses around 2 GB of additional disk space per virtual machine, but that is really the only difference in overhead. Memory and processor are about equal.
Once you decide on the version of operating system, there are many steps to optimize the image that will be the gold image and template for all the VM instances that will be created for the VDI collection. You will likely be running hundreds of instances of this VM template, so you want to optimize it as much as possible. Microsoft has a number of great resources to help with this. I recommend the following:
· http://download.microsoft.com/download/6/0/1/601D7797-A063-4FA7-A2E5-74519B57C2B4/Windows_8_VDI_Image_Client_Tuning_Guide.pdf: This is a great tuning guide that talks about OS considerations and customizations, services to disable, and software such as malware usage. This is a mandatory read.
· http://blogs.technet.com/b/jeff_stokes/archive/2013/04/09/hot-off-the-presses-get-it-now-the-windows-8-vdi-optimization-script-courtesy-of-pfe.aspx: This is a great script to automate most of what is discussed in the previous reference. It also has some guidance at the start of the script for actions to be performed on the image. Although it is for Windows 8, it works for Windows 8.1 as well.
You may also choose to install certain applications into the image. Generally I recommend keeping the image as light as possible, meaning don't install many applications into the image because each application update will require an update to the image. Instead, use technologies such as App-V and RemoteApp to deliver the applications. There may still be times you have to install applications into the image, but try to keep these to a minimum. You must not install modern applications into the reference image because you have to run Sysprep at the end of the image creation process and modern applications are currently not understood by Sysprep, which means the applications will have to reinstall anyway during the template's deployment in the VDI collection.
On this same theme, don't use a Microsoft account when creating the reference image. Use a local account because you also don't want to join the reference image to the domain, which would be removed during the Syspres process and can confuse things.
Once the image is how you want it, the next step is to prepare it to be used by an RDS collection. This involves generalizing it, which is achieved by running Sysprep. The command to be used in the OS is as follows:
Sysprep /generalize /oobe /shutdown /mode:vm
Windows 8 introduced the /mode:vm switch, which should be used when preparing a Windows 8 virtual machine (VM) that is being used as part of a VDI deployment. When Sysprep runs, it performs several actions, including removing unique information such as the SID and GUID; but it also resets the hardware information. In a VDI environment where all the duplicates are running on the same hypervisor as the source VM, there's no need to reset the hardware information. Not resetting the hardware is what the /mode:vmswitch enables. This speeds up the startup of the duplicates on first boot.
I recommend an extra step before running Sysprep. Over time you will want to update the template, including adding patches. There are ways to patch the virtual machine without starting it, and I walked through some options in Chapter 5. Still, it's useful to be able to start the virtual machine, but remember it is not possible to continually run Sysprep on an operating system. Instead, I recommend doing the following:
1. Complete the customization of your reference image and shut down the virtual machine.
2. Create a checkpoint and label it Reference Pre-Sysprep.
3. Start the virtual machine and run Sysprep, which will then shut down the virtual machine and is ready for duplication.
If at any point in the future you need to boot the image to modify it, you apply the pre-Sysprep checkpoint, make the changes needed, shut down the VM, delete the original checkpoint, and create a new pre-Sysprep checkpoint (you want to save this state because it has the updates applied but is pre-Sysprep allowing this to be used for future changes), boot the virtual machine, and then run Sysprep again. The important part is that the checkpoint is updated with the updates but is always before the Sysprep action. Don't worry about having the checkpoint; when a virtual machine is used by the VDI collection creation, the virtual machine is exported to the target collection, the latest state is used, and the checkpoints are ignored. What is important is that the virtual machine should have no checkpoints that were taken while the virtual machine was running because this causes problems for the collection creation because the detection will show the virtual machine as running, even though it isn't.
You will now have a virtual machine template that will be referenced when creating a VDI collection. Don't forget to use dynamic memory for the virtual machine because this will give the most efficient use of memory and the greatest density of virtual machines on the server. Make sure the virtual machines have at least 1024 MB of memory.
One great feature in Windows Server 2012 R2 Hyper-V and the file services is that data deduplication is supported for virtual machines that are used in a VDI scenario. Remember that the free Microsoft Hyper-V Server is a great solution in VDI scenarios because the included Windows Server guest OS licenses with Windows Server Standard and Datacenter are not required, so using the free Microsoft Hyper-V Server makes great sense.
Even though the VDI collection automatically uses differencing disks for each VM instance in the collection to save space, the use of data deduplication will further save disk space and some guidelines will say to not use differencing disks at all and instead rely entirely on data deduplication. Note that while data duplication is supported for VDI environments only, it is not blocked for other purposes. You should be careful if you decide to use data deduplication for other workloads because some workloads may not behave as expected if deduplicated.
Deploying a New VDI Collection Using Scenario-Based Deployment
I will focus on a pooled scenario in this walk-through because it's by far the most common VDI deployment. The process is intuitive with minimal changes required. If you do need some personal VDI images, the personal VDI assignment is configured through the Active Directory Users and Computers MMC snap-in via the Personal Virtual Desktop tab. A user can be assigned only one personal desktop, and a VM can be assigned to one user as a personal desktop. A personal desktop must not be in a VDI pool. Make sure the personal desktop name exactly matches the name of the VM. The name needs to be the FQDN, which means you need to give the VMs the name of the FQDN of the client OS. When using personal virtual desktops, you need to ensure the name of the virtual machine in Hyper-V matches the fully qualified domain name of the OS within the virtual machine.
If I had walked through deploying VDI in Windows Server 2008 R2, this would be a very different section. I would direct you to the 50-page Microsoft “quick-start” guides that require huge amounts of complicated configuration. Windows Server 2012 completely changed this with the new scenario-based deployments available in Server Manager. Remote Desktop Services deployment is now performed through Server Manager where all the different servers that will participate in the scenario are deployed through the single wizard to a best-practices configuration. While it is still possible to manually deploy each server role and configure them manually, it's strongly discouraged and offers no advantage. The management of Remote Desktop Services is also through Server Manager for nearly all actions (except for licensing management and troubleshooting).
Server Manager supports deployment for all the major scenarios, including session virtualization with application publishing, VDI with pooled desktops, and VDI with personal desktops. The scenario deployment also features two types of deployment. The quick-start installs all the required components on a single server and is designed to be used in a test or pilot-type scenario or small environment. The standard deployment option allows multiple servers to be selected for a more production-ready deployment. The easiest way to understand the scenario-based deployment is to walk through a deployment. For a session virtualization deployment, the entire process can be performed through Server Manager, but for VDI there are some extra steps because of the additional configurations required. The basic process to use RDS scenario deployments is as follows:
1. Launch Server Manager.
2. From the Manage menu select the Add Roles And Features action.
3. Click Next on the introduction page of the Add Roles And Features Wizard.
4. The installation type must be selected. Select the Remote Desktop Services installation option, which performs the scenario-based deployment instead of the standard role or feature-based installation. Click Next.
5. The type of deployment must be selected: Standard deployment or Quick Start. I will use a Standard deployment so multiple servers can be selected. Click Next.
6. The next step is to select the type of deployment. In this case I will select a virtual machine–based desktop deployment.
7. Complete the remaining configurations by selecting the servers to be used for the required RDS roles, which are RD Connection Broker, the RD Web Access, and RD Virtualization Host. You can find the full walk-through at http://technet.microsoft.com/en-us/library/hh831541.aspx.
Once RDS is deployed on the various required servers, to complete the environment, the next step is to deploy the actual VDI collection. This is all performed through Server Manager.
1. In Server Manager navigate to Remote Desktop Services ⇒ Collections.
2. From the Tasks menu select Create Virtual Desktop Collection, which will launch the Create Collection Wizard.
3. Click Next on the introduction screen.
4. Enter a name for the collection and an optional description and click Next.
5. Select the Pooled Virtual Desktop Collection option and leave the Automatically Create And Manage Virtual Desktops option selected. Click Next.
6. Select the virtual machine that will act as the gold image for the VDI collection. Remember, this virtual machine must be shut down and has been sysprep'd, as shown in Figure 10.9.
7. When the virtual machine template is deployed to the many VM instances in the collection, the VM instances are customized. You can specify an unattended answer file that exists or complete settings through the wizard by leaving the default Provide Unattended Installation Settings option selected. Click Next.
8. Select the time zone, domain, and organizational unit the VMs in the VDI collection should use and click Next.
9. The next screen, as shown in Figure 10.10, specifies the users who can use the collection, the number of virtual desktops to be created in the collection, and a prefix and suffix for the VM instances. Configure the options you require and click Next.
10.The next step allows the Hyper-V hosts to be selected that will host the VDI VM instances and click Next.
11.The storage location to be used for the VM instances can be selected, which can be a local location on the Hyper-V hosts, a SMB file share, or a cluster shared volume. Note that even if you have an alternate storage location configured for virtual machines on the Hyper-V host, this location is not used unless you specify a location explicitly in this wizard. By default the VDI collection VMs will be created in the location C:\ProgramData\Microsoft\Windows\RDVirtualizationHost\<collection name>. By default the option to automatically roll back the virtual desktop when the user logs off will be selected, which creates the RDV_Rollback checkpoint that is applied when users log off; this checkpoint reverts the VM to a clean state. Click Next.
12.Select the option to use user profile disks and specify the share (making sure the computer accounts of the servers in the collection have full control for the share).
13.A summary of the configurations selected are shown. Click Create.
14.The progress will be displayed, which includes creating the virtual desktop template image, importing on the target, and then creating the new virtual machines that are part of the VDI collection. The exact duration will depend on the size of the image and your storage subsystem.
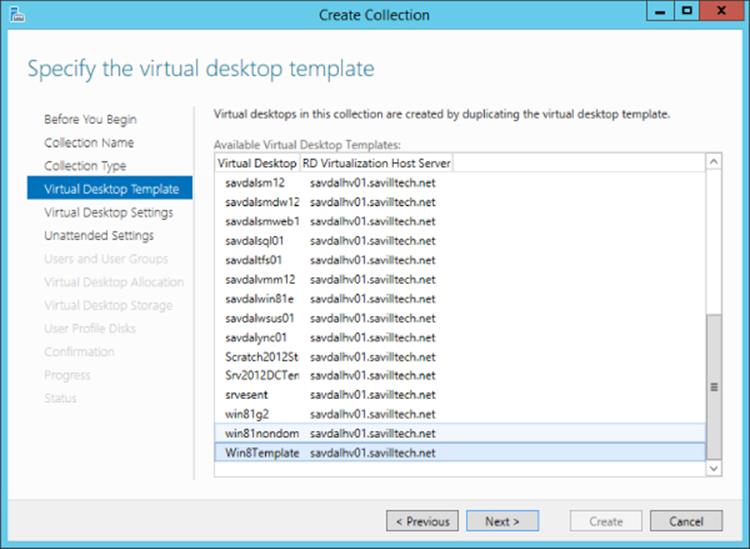
Figure 10.9 Selecting the virtual machine to be the reference image for the VDI collection
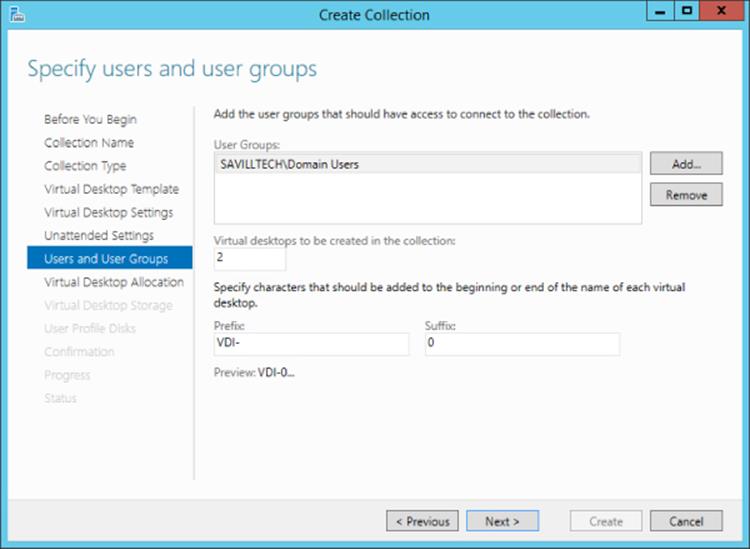
Figure 10.10 Configuring the options for the VDI VM instances
Once the deployment is complete, the collection will show in Server Manager, and the virtual machines will display in Hyper-V Manager, as shown in Figure 10.11. Note that for the VDI virtual machines the RDV_Rollback checkpoint was automatically created. What is more interesting is to look at the file system on the Hyper-V host to understand exactly what happened.
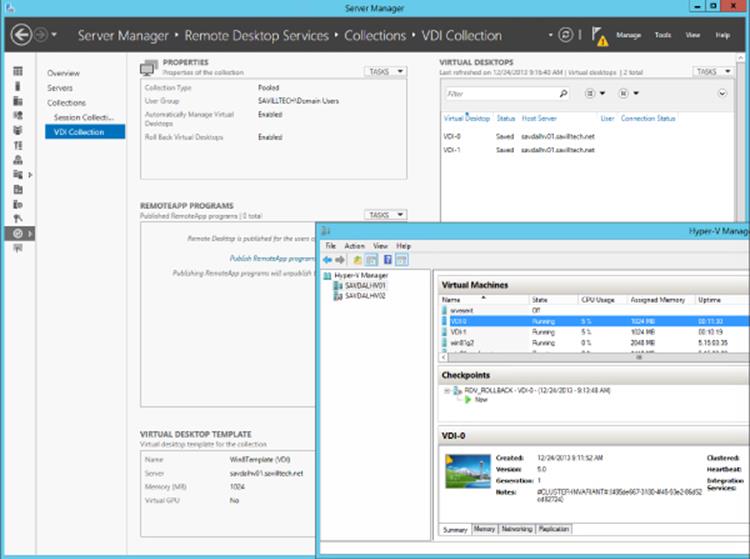
Figure 10.11 The deployed VDI collection
Figure 10.12 shows the file system objects related to my collection. You can see the copy of the actual reference virtual machine and its storage and then folders for each of the virtual machines. Notice the size of the VHDX files. The VHDX file in the IMGS subfolder is the original VHDX file that was exported from the reference virtual machine, so it has the same original size, 13 GB. For each of the virtual machines, VDI-0 and VDI-1, there are two virtual hard disk files. The first is the VDI-n.VHDX file, which is the original virtual machine checkpoint state, RDV_Rollback, and then there is an AVHDX file, which is the current state of the virtual machine that has the differences from the checkpoint state (this is normal).
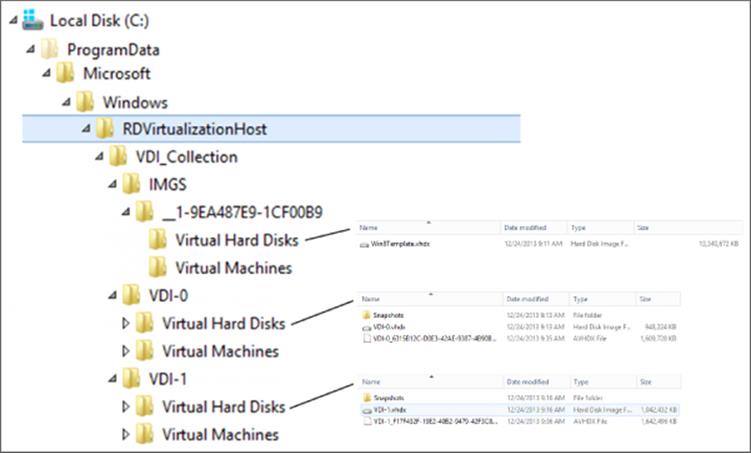
Figure 10.12 The deployed VDI collection file system content for the virtual hard disks
But why is the main VHDX file for each virtual machine only 1GB in size compared to the 13GB of the main image? The answer is that the RDS VDI collection is being efficient with storage and actually creates differencing disks for each virtual machine in the VDI collection instead of a complete copy of the original image. This can be seen using the Get-VHD PowerShell cmdlet on one of the VM instance VHDX files, as shown here:
PS C:\> get-vhd "C:\ProgramData\Microsoft\Windows\RDVirtualizationHost\VDI_Collection\VDI-0\Virtual Hard Disks\VDI-0.vhdx"
ComputerName : SAVDALHV01
Path : C:\ProgramData\Microsoft\Windows\RDVirtualizationHost\VDI_Collection\VDI-0\Virtual Hard Disks\VDI-0.vhdx
VhdFormat : VHDX
VhdType : Differencing
FileSize : 970981376
Size : 136365211648
MinimumSize : 136365211648
LogicalSectorSize : 512
PhysicalSectorSize : 4096
BlockSize : 2097152
ParentPath : C:\ProgramData\Microsoft\Windows\RDVirtualizationHost\VDI_Collection\IMGS\__1-9EA487E9-1CF00B9\Virtual Hard Disks\Win8Template.vhdx
DiskIdentifier : 0d4018ab-5299-4511-898a-6ae821e0afc0
FragmentationPercentage :
Alignment : 1
Attached : True
DiskNumber :
Key :
IsDeleted : False
Number :
Notice the VHDX is a type of differencing and that its parent is the VHDX file in the IMGS subfolder. Each VM still has around 2 GB of customizations, which if you have 100 VM instances adds up to a lot of storage. This is where using data duplication will help reduce disk overhead.
The VDI collection will be available through RD Web Access, as shown in Figure 10.13; so will the other published desktops and applications. This gives a consistent experience for end users.
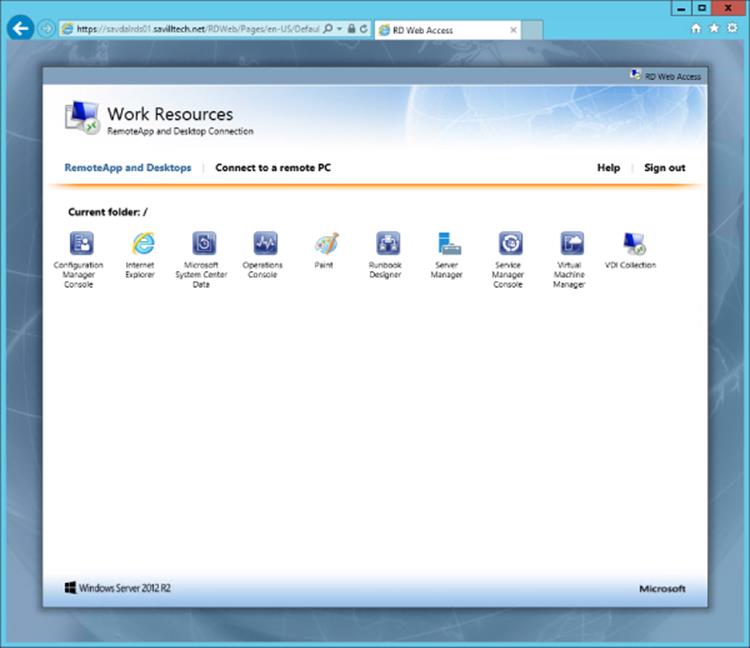
Figure 10.13 Seeing the VDI collection in RD Web Access
If you ever update the template virtual machine, you can refresh the deployment VM instances by selecting the Recreate All Virtual Desktops task for the collection and selecting the updated reference VM. This can also be done using the Update-RDVirtualDesktopCollection PowerShell cmdlet. Microsoft has a good blog on this at http://blogs.msdn.com/b/rds/archive/2012/10/29/single-image-management-for-virtual-desktop-collections-in-windows-server-2012.aspx.
As you can see, it's really quite simple to deploy VDI with Remote Desktop Services. Deploying session virtualization uses the same process, except no virtual machines are required. The same wizard is used to deploy, and the same Connection Broker can be used for multiple session virtualization collections and VDI collections. I walk through a session host deployment in the video at http://youtu.be/_dkxyr03Er4.
Using RemoteFX
Windows 2008 R2 Service Pack 1 introduced two huge technologies. The first was dynamic memory, and the second was RemoteFX, which was aimed squarely at VDI environments. The goal of RemoteFX was to provide a consistent experience to end devices no matter what the capabilities of that device actually were.
Normally the Remote Desktop Protocol leverages client-side capabilities for Windows Media playback such as WMV files and for desktop composition such as Aero glass and Flip 3D (which are now gone in Windows 8). If the client device does not support media redirection, then the user experience is very basic. Additionally, because the remote operating system is in a virtual machine with no graphical hardware, many types of application technologies cannot run, such as DirectX, Silverlight, Flash, and so on. This also limited the use of many types of business applications such as videoconferencing.
RemoteFX consisted of three technologies originally: GPU virtualization, enhanced codec, and USB port-level redirection. The technologies associated with RemoteFX have grown since Windows Server 2008 R2, but together they give a great desktop experience remotely. In Windows Server 2008 R2 SP1, the RemoteFX technology was supported only in LAN environments, but this has been extended to WAN scenarios in Windows Server 2012 (there are obvious limitations to graphical fidelity if the connection is too slow).
The virtualization of the GPU in the server allows virtual GPUs to be made available to the virtual machines running on the Hyper-V server. The virtual GPUs can be leveraged by Windows 7 SP1 Enterprise/Ultimate and Windows 8/8.1 Enterprise guest operating systems running in those virtual machines. Windows 7 SP1 included the updated integration services, which allows the guest OS to see the virtualized GPU and use it without additional software installation. This means the virtual client operating system guest now sees a full-featured GPU, which allows advanced graphics to be rendered on the server side. Then the screen output is sent to the RDP client for display, which includes server-side rendering of Aero effects, multimedia, and other types of media and applications not previously possible such as Flash, Silverlight, and DirectX applications as well as enhanced capabilities in applications such as PowerPoint and Internet Explorer. Because all the rendering is performed on the Hyper-V server within the VM, the client capabilities do not matter anymore. You can connect from a full, rich client or a basic thin client; the experience and graphical fidelity will be the same because all the graphical processing can be done on the server side. The only requirement is that the end client must support RDP 8/8.1 for the best experience with Windows Server 2012 R2.
Once a client VM is RemoteFX enabled and is connected to a RemoteFX-capable client, it will appear as if the VM actually has a GPU and an amount of graphical memory based on the RemoteFX configuration for the VM. Running DXDiag on the client will show the presence of a WDDM graphics driver and the Microsoft RemoteFX Graphics Device along with support for DirectDraw, Direct3D, and AGP Texture acceleration, as shown in Figure 10.14. The actual version of DirectX 3D supported is 11.1 for Windows Server 2012 R2. While there is OpenGL support in RemoteFX, the version of OpenGL supported is very old and is essentially limited to the OpenGL provided out of the box in Windows, version 1.1. This OpenGL does not leverage the GPU but rather the CPU only, making its usage very restricted.
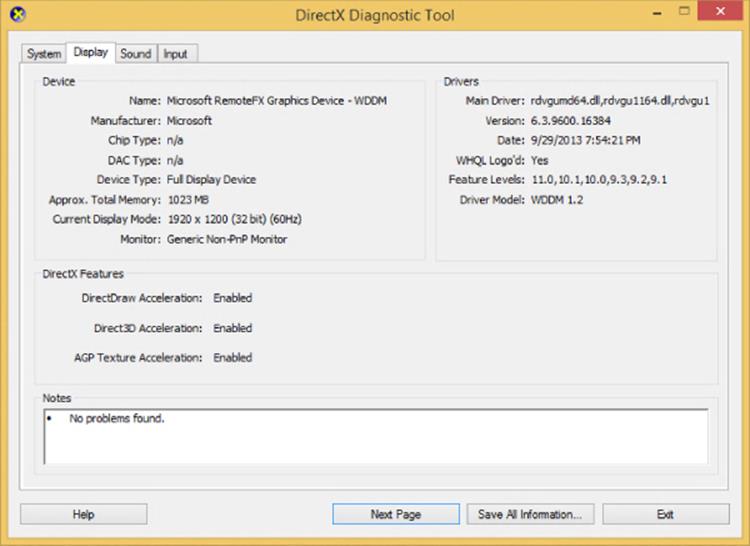
Figure 10.14 A RemoteFX vGPU–enabled virtual machine
Because the GPU is virtualized, you don't need a discrete GPU for every VM that will be RemoteFX enabled. Just like CPU virtualization where a single logical CPU (such as a core) can be mapped to many virtual CPUs, a GPU can be virtualized to up to 12 virtual GPUs, allowing great scalability. One key consideration when you virtualize the GPU is the amount of graphical memory each VM will need. You can't overcommit GPU memory to achieve the 12:1 ratio. You would need to ensure the graphics card has sufficient video RAM for all the VMs.
The requirement of a GPU in the Hyper-V server in the Windows 2008 R2 SP1 implementation of RemoteFX was a challenge for many environments that traditionally did not have powerful GPUs in their servers. Windows Server 2012 introduces a basic software rasterizer that allows RemoteFX capabilities in VDI and session-based environments that do not have physical GPUs for some types of graphical capability; however, for rich graphics rendering, you will still require a physical GPU to virtualize.
To use RemoteFX vGPU, the graphics card must support DirectX 11.0 or newer and must have a WDDM 1.2 driver or newer. Microsoft has a good blog at http://blogs.msdn.com/b/rds/archive/2013/11/05/gpu-requirements-for-remotefx-on-windows-server-2012-r2.aspxthat walks through some of the GPUs it has tested and recommend. The Hyper-V server must also use processors that support Secondary Level Address Translation (SLAT) because of the additional overhead of graphics drivers.
Once all the requirements are met, the GPU is enabled for RemoteFX use through the Hyper-V settings in the Physical GPUs section. Figure 10.15 shows my environment that leverages an AMD FirePro V5900 card.

Figure 10.15 Enabling a GPU for use with RemoteFX
Virtual machines can then have a RemoteFX 3D video adapter added to it via the Add Hardware option in the virtual machine's settings. Note that a RemoteFX 3D video adapter is compatible only with generation-one virtual machines; it will not be listed as available for a generation-two virtual machine. When adding the RemoteFX 3D video adapter, you will be prompted to select the maximum number of monitors that may be connected and the maximum resolution for the monitors connected, as shown in Figure 10.16. This configuration controls the display settings when connecting and the graphic memory allocated to the virtual machine.
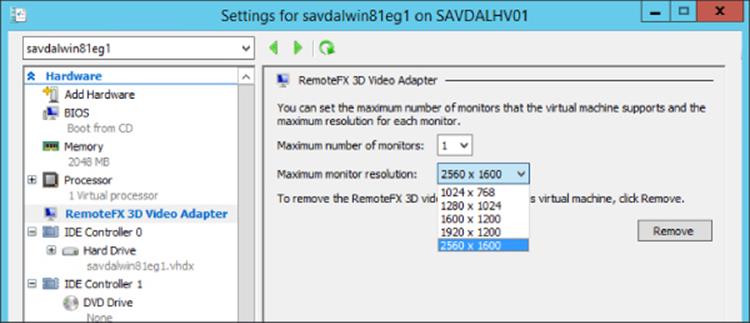
Figure 10.16 RemoteFX 3D video adapter options for a virtual machine
The new graphical capabilities mean a lot more screen update data and therefore bandwidth. The second part of the RemoteFX technology package is a new codec that was designed to efficiently encode and decode the display updates associated with the more intensive RemoteFX-enabled workloads. This was the only part of RemoteFX that was available to Remote Desktop Session Hosts in Windows Server 2008 R2 before RemoteFX was more widely available in Windows Server 8. The RemoteFX codec has been greatly enhanced since its original version. Consider a typical highly graphically intense workload. In Windows 7 this workload may have resulted in around 50 Mbps of network traffic. With the Windows 8 changes this same workload resulted in around 5 Mbps of traffic which was reduced a further 50 percent in Windows 8.1 to around 3 Mbps of traffic. That is a huge change and be a driving factor to migrate to the newest version of Remote Desktop Services.
The final piece of the RemoteFX technology is often overlooked; however, it really completes the ability to have a full-featured remote desktop experience by enabling the redirection of basically any USB device from the local client to the remote session. Prior to the RemoteFX USB redirection feature, there have been advancements in the type of devices that could be redirected to a remote session. We have keyboard, mouse, microphone, smartcard, disk, imaging devices with in-box functionality, and a few others that can be redirected; however, they are all redirected by abstracting the device into one of the supported high-level RDP redirection device types, which means you can access these devices on the remote session without needing any drivers on the remote OS installed. This also means you may miss device-specific functionality, and many types of USB device cannot be redirected that don't fall into these high-level types such as multifunction printers, advanced communication devices, scanners, and barcode readers.
The RemoteFX USB redirection solves this by redirecting at the USB port level in a similar way to how RDP handles the redirection of serial and parallel ports. With the RemoteFX USB redirection, the actual USB request blocks (URBs) are intercepted from the client and sent to the remote session, which means basically any type of USB device can be redirected using the RemoteFX USB redirection feature. But this does not mean you no longer want to use the RDP high-level device redirection for devices supported by the RDP high-level redirection. The RemoteFX USB redirection is designed to supplement the RDP high-level device redirection to add support for devices that don't work with the standard RDP redirections, and there are some good reasons for that.
For the RDP high-level supported device redirections such as input (keyboard/mouse), audio, drive, smart card, port, printer (Easy Print), and Plug-and-Play, optimized protocols are used for each of the redirection types to minimize bandwidth usage and ensure the best responsiveness and experience for that type of device. Additionally, the RDP high-level device redirections don't require extra drivers in the remote sessions, and multiple remote sessions can access the same local device simultaneously. Because of these optimizations, the RDP high-level device redirections can be used in both LAN and WAN environments.
Now consider the RemoteFX USB redirection where you are redirecting at the USB port level to the remote session. Because the port is being redirected, no device/load-specific optimizations can be made, and the driver for the device must be installed in the remote session since on the remote session it will look like the device has been plugged in to a virtual USB port, so it needs the driver to use the device. Also, because you are redirecting at a port level, only one session can access a device at a time, and that includes the local client, so if you redirect a device using RemoteFX USB redirection from your local client, no other session can see the device, nor can your local client. Make sure you don't try to use RemoteFX USB to redirect your keyboard. RemoteFX USB redirection is also optimized for LAN environments and cannot be used on WAN connections like the rest of RemoteFX.
Although the RemoteFX USB redirection is not using any GPU resources, it was tied to the RemoteFX experience in Windows Server 2008 R2 SP1, and the RemoteFX USB redirection could not be used with RDSH or a non-RemoteFX-enabled Windows VDI virtual machine. In Windows Server 2012, this restriction was removed, enabling the RemoteFX USB redirection to be used even when RemoteFX GPU virtualization was not used, such as in session host scenarios.
Remote Desktop Protocol Capabilities
A protocol must be used between the client and the server for the Remote Desktop connection. That server could be an RD Session Host, a client OS running inside a virtual machine that is part of a VDI collection, or even just a regular desktop that someone wants to remotely connect to. Windows uses the Remote Desktop Protocol (RDP) that with Windows Server 2012 R2 and Windows 8.1 is currently at version 8.1. Updates for previous versions of operating systems are often available. For example, an RDP 8.0 update for Windows 7 SP1 (which natively supports RDP 7.1) is available and can easily be found by searching for RDP 8.0 and Windows 7. As RDP is updated, so too is the Remote Desktop Client (RDC) that is provided as part of Windows.
RDP has improved greatly with each new version that typically corresponds to new versions of the Windows operating system. For the best experience, the client should support the same version as the server; otherwise, the only features available will be those of the lowest common version. For example, if a Windows 7 SP1 box running RDP 7.1 connects to a Windows Server 2012 R2 session host that supports RDP 8.1, the actual usable features will be limited to those supported by RDP 7.1. It is for this reason it is a good idea to always update the RDP client to the latest possible version on your clients. To verify the RDP version supported by your Remote Desktop Client, start the client (mstsc.exe) and look at About as shown in Figure 10.17.
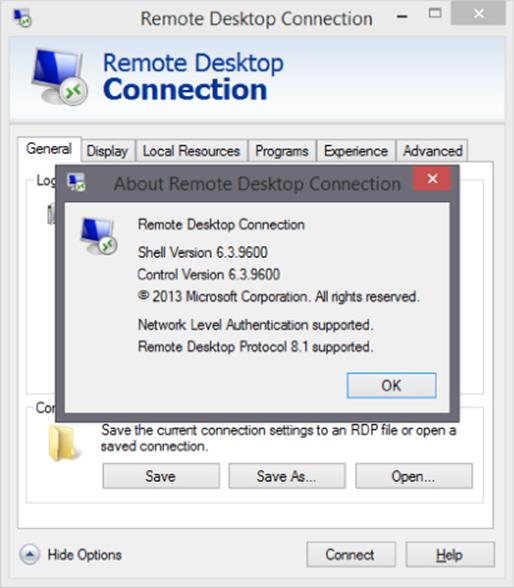
Figure 10.17 Showing the supported version of RDP
Initially RDP just had to handle the sending of changes to the display as bitmap updates and passing the keyboard and mouse input. Today, the reality is that a remote desktop could be a user's primary workspace, so RDP has had to evolve to offer a lot more. As RDP has evolved, so too has the built-in Remote Desktop Client (RDC), which provides the remote connections over RDP. As enhancements to RDP are made, the RDC is updated to take advantage of the new capabilities. Often the RDC will be updated for the version of Windows that offers the new RDP features, but sometimes a new version of the RDC is created for older versions of the operating system, allowing the older operating systems to be able to connect to newer operating systems and take advantage of new features.
RDP supports a number of virtual channels, which allows different types of traffic and use scenarios for RDP to be enabled, including third parties creating additional capabilities on top of RDP. Up to 64,000 separate virtual channels are available for an RDP connection. The new RemoteFX technology takes advantage of RDP virtual channels to offer its functionality.
Looking at the RDP capabilities today, it quickly becomes apparent that a full desktop experience is possible using an entirely remote session while still accessing local devices including printers. Key capabilities include the following:
· Full keyboard, mouse, and touch redirection including keyboard hooking, allowing special Windows key combinations to be redirected to a remote session.
· Support for 32-bit color and desktop composition, enabling a full Aero Glass experience (no Aero Glass for Windows 8 and newer).
· True multimonitor support, enabling discrete displays to be selected for use in a remote session. Prior to RDP 7.0, while multiple monitors could be used, they were treated as a single display with a combined dimension, which meant dialog boxes would be displayed in the center of a dual display environment. Treating each display separately resolves this.
· Multimedia redirection, enabling certain types of media, such as those that typically would be played in Windows Media Player, to be redirected and played natively on the client device if the client device has the capability. This gives cleaner media playback and saves bandwidth. For example, if I played a WMV file in a remote session, the actual WMV primitive is sent over RDP to the local client and rendered locally.
· Progressive rendering of images, enabling a lower-quality version of the image to initially display and then increasing in quality as bandwidth allows. Other items on the screen such as text would still be rendered with full fidelity including font smoothing.
· Bidirectional audio, enabling sounds to be sent to the local client and from the local client. This enables capabilities such as Voice over IP applications.
· Print redirection. The RD EasyPrint functionality driverless printing is available in remote sessions (this also works for Windows 7 target machines and newer).
· Reduction of bandwidth and fully configurable experience settings to optimize the experience based on the type of connection, including a great WAN experience.
· Full encryption where required using 56- or 128-bit keys, enabling FIPS compliance where needed and Network Level Authentication (NLA) to ensure authenticity of both the server and the client.
· Clipboard, drive, port, device, and smart card redirection. Certain types of device can be redirected to a remote session in an abstracted fashion, which avoids a driver having to be installed for the specific hardware on the remote server. Devices with in-boxes such as cameras are great examples.
· Port-level USB redirection with RemoteFX, enabling any USB device to be redirected to a remote session. However, because the redirection is at a port level, the driver for the USB device must be present on the remote server, and the device is available to only one remote session at a time and is no longer available to the local client.
· RDP 8.0 added automatic network detect, removing the need to manually select the type of network in the Remote Desktop Client.
· RDP 8.0 added UDP and TCP support to provide the best possible experience over different types of networks.
· RDP 8.0 added multitouch support with up to 256 touch points (and of course RemoteFX Multi-Touch offers a richer experience where available).
· RDP 8.0 adds the ability to have nested RDP sessions.
· RDP 8.1 provides dynamic monitor and resolution changes, which supports automatic changing of the display in the remote session as the display of the local client changes, for example, rotating a table or adding a second display.
· RDP 8.1 improved transparent window and moves/resizes of RemoteApps on the local device.
To summarize, as you look at RDP, it is not a basic protocol anymore. It has a huge array of features, it works very well over WAN connections, and, even better, Microsoft now provides RDP clients not just for Windows (including the nice-to-use modern Remote Desktop application). Microsoft provides RDP clients for Mac, iOS, and Android. These clients all support RD Gateway and application publishing.
· iOS: https://itunes.apple.com/us/app/microsoft-remote-desktop/id714464092
· Android: https://play.google.com/store/apps/details?id=com.microsoft.rdc.android
· Mac: https://itunes.apple.com/us/app/microsoft-remote-desktop/id715768417?mt=12
Figure 10.18 shows the published applications from an iOS device on my network. Note that the applications are the same as those you saw in the RD Web Access site earlier in this chapter and the same ones you would see on a Windows client.
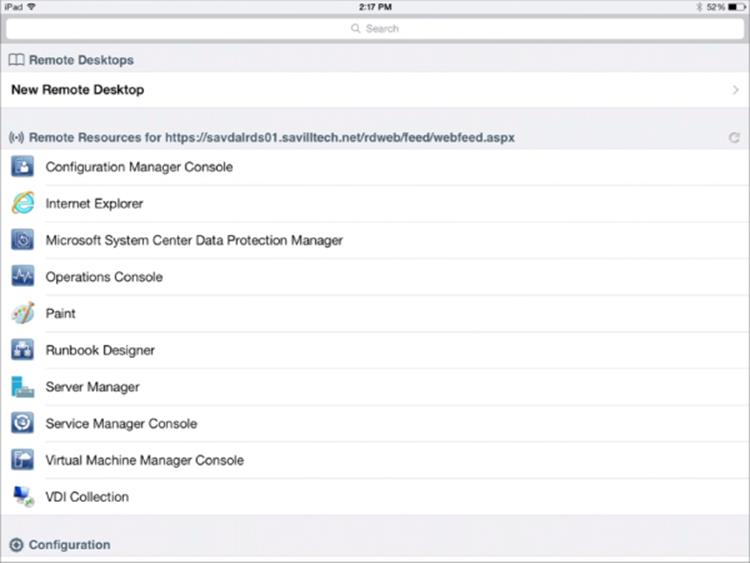
Figure 10.18 A view of published applications on an iOS device using the Microsoft client
Choosing the Right Desktop Virtualization Technology
Earlier in this chapter I talked about how VDI was pushed by a number of vendors and is very much the “in thing” right now, but often using session-based desktops is a better solution. How do you decide where to use each type of technology? There is no right answer, and every environment is different. I will share my insights about where VDI and session virtualization work best, but there are always different opinions. In reality, most companies I work with will have a mix of session virtualization and VDI. The key is no matter what approach, or combination of approaches, is used, the same user state, data, and application virtualization can be used for all of them, and the physical desktops in the organization give the user a consistent experience across every device they will ever use—physical, session, or virtual.
I'll quickly recap the key difference between session virtualization and VDI. Figure 10.19 shows session virtualization on the left and VDI on the right. With session virtualization, each user connects to their own session on a shared server operating system such as Windows Server 2012 R2, and with VDI each user connects to their own desktop operating system such as Windows 8.1 running inside a virtual machine running on a machine virtualization platform such as Microsoft Hyper-V. As the figure shows, to the end user it looks exactly the same.
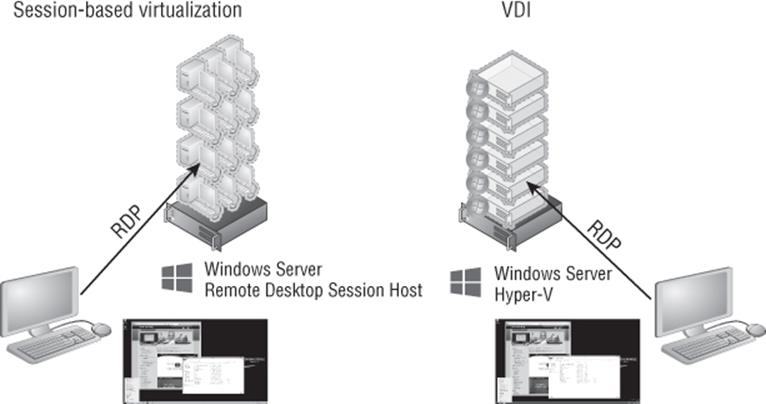
Figure 10.19 Session-based virtualization and VDI high-level overview
To help you make the right decision, I will cover what is the same and then what is different about using session virtualization and VDI. I want to explore both from the user's experience and from the infrastructure/management perspective. Both factors must be evaluated to help guide organizations the right way.
What is the same is the desktop environment. While with session virtualization, the user is connecting to a server operating system and with VDI the user connects to a client operating system, under the covers both the server and the client OS share a huge amount of code, so the actual desktop experience will look and feel the same. The users have the same Start screen, same capabilities, and same ability to run the same applications, and each user can still have a unique IP address (a feature of RDS that enables IP virtualization, giving each session or a specific application within the session a unique IP address, is required for some applications). The same RDP protocol is used to connect to both environments, which means the same client devices can be used. User settings and data virtualization plus application virtualization can and should be used with both session virtualization and VDI.
The key difference is that with session virtualization each user has their own session on a shared operating system, while with VDI each user has their own operating system instance. Fundamentally, the difference is in the level of isolation users have from other users. I think of session virtualization as being many people sharing an office, each having their own cubicle, but because they share a room, they have to behave, can't sing loudly, or run about changing the office because it would affect the other users sharing that office. They can do their work in the cubicle and customize their cubicle with pictures on the cubicle walls. I think of VDI as each user having their own heavily padded office; the users can run around, bouncing off the walls screaming, and they won't affect users in other offices.
This means that session virtualization is a good fit for task-based workers who run things like Internet Explorer, Office, and line-of-business applications but don't need to customize the operating system. They can still perform customizations of their desktop wallpaper, shortcuts, and applications. A user in session virtualization needs to be locked down so they can't install and uninstall applications or reboot the operating system, which would affect everyone else on the server.
VDI is a good fit for power users, for developers, or for users who run applications that will not run on a server operating system. Basically, if the user needs to modify the actual operating system or reboot the operating system, then VDI must be used. If you ever hear someone talking about using VDI but needing to heavily lock down the environment because it's being used for task workers who shouldn't change the OS, then they should probably be using session virtualization instead. If there are applications that run only on a client operating system, which is very rare, then VDI would also have to be used.
This is why often you will see a mix of session virtualization and VDI being used, specifically, session virtualization for most of the user population and VDI for those power users. The next question is “Well, wouldn't VDI work for everyone? Why use two solutions if VDI works for all?” That really brings us to the other differences between session virtualization and VDI.
Session virtualization uses a server operating system that hosts large numbers of sessions for many concurrent users. This could be hundreds of users on each session host depending on the applications being run and the amount of memory needed. Each session may use a couple of hundred megabytes of memory, assuming a fairly heavy application workload for each user. If I have a server with 64 GB of RAM, I can probably get around 300 users on that box. That's one operating system instance with 300 users.
With VDI, I take the same piece of hardware. I run a hypervisor on it and then create lots of virtual machines, and each virtual machine runs a full client operating system (which has CPU and memory requirements). Then I run the applications on that client OS. Hypervisors have some great memory technologies to get the most from the box, only assigning memory as the OS needs it. Typically a client OS will need around 700 MB of memory just to log on and then additional memory as applications run, so let's say a very low 1 GB of memory per virtual machine. Remember that realistically the actual memory needed could rise to 2 GB. On that same server, removing memory for the OS, that may be 62 virtual machines.
On the same server, with session virtualization, I get five times more users than with VDI, and in some environments I see ten times more users on a session-based environment than the same VDI environment. That's a huge difference in bang for the buck for the same hardware. There are other differences that also make VDI more expensive.
The licensing is also different because with session virtualization an RDS Client Access License is required, but with VDI there are numerous licenses needed depending on the exact solution.
So, the issue is not that session virtualization has capabilities beyond VDI but rather that VDI is more expensive, requires more hardware, and needs more management than session virtualization. This means, where possible, use more session virtualization and save VDI for where it's actually needed.
I've heard of organizations talking about moving to VDI to save money. I've never found this to be the case. If an organization has a poorly managed desktop environment, moving it to the datacenter with VDI will mean a poorly managed VDI and a bigger mess. The move to VDI normally introduces a whole new infrastructure that makes the environment more managed, which in reality could have been used to clean up the physical desktop environment without purchasing all the hardware for the VDI servers.
What is interesting is when I talk to clients who need to enable BYOD scenarios or overseas contractors, they always talk VDI; they never think of session virtualization. The reason is simply there are some companies that only have VDI solutions and don't have a session virtualization solution. Therefore, VDI is the solution for everything. If you only sell a hammer, then a hammer is the right tool for everything. Take time to understand your requirements and identify the right solution based on the factors I've discussed. To summarize, start with a normal desktop operating system that is well managed. If that is not an option, then think session virtualization. If session virtualization is not an option because the users are power users, the users are developers, or the applications will not run on a server OS or run multiple instances on one OS, then use VDI. Remember, you don't have to pick one solution. Use a well-managed desktop environment for corporate assets that can run a modern desktop OS, and use session virtualization and VDI where it fits best. You will likely have all three.
Notice many times I talk about a well-managed desktop environment. Most companies have good desktops and laptops that can run Windows 8, so just adopting session virtualization or VDI to cut down on the management of the machine is a huge waste of all the resource available on those desktops and laptops. Get the right management infrastructure in place to patch the client operating systems, set up good processes to deploy new operating systems, and use the user settings and data/application virtualization to simplify the environment, and the desktops in your environment will actually become far less of a help-desk headache.
This does not mean you should never consider using session virtualization or VDI for your desktops in the organization. What if your organization has not done a desktop refresh for six years and the machines are running Windows XP but on 128 MB of memory with a Pentium II processor? That hardware will not run Windows 7; in fact, it's probably barely running Windows X. I had an experience with a company in just this position that wanted to move to a modern OS but had nowhere near enough budget to refresh 5,000 desktop machines. They set up a farm of remote desktop session hosts and replaced Windows XP with Windows Fundamentals for Legacy PCs, which allows the machine to basically act as an RDP client, and configured the OSs to connect to the new farm of remote desktop session hosts. Each desktop got a new widescreen monitor, keyboard, and mouse, and now when the users logged on, they got a Windows 7 desktop experience (even though it was actually Windows Server 2008 R2; they couldn't tell) and thought they had new PCs. They had no idea they were using session virtualization and RDP. This is one scenario where session virtualization can really save on hardware budget.
I should once again stress that whenever I talk about session virtualization, VDI, and RDP, there are great partners such as Citrix and Quest that build on the Microsoft solutions by offering their own session virtualization and VDI solutions, so look at what Microsoft provides in the box with Windows Server 2012 R2, and if that does not meet your needs, then look at the partner offerings.
The Bottom Line
1. Explain the types of desktop virtualization provided by RDS. Windows Server 2012 R2 provides two main types of desktop virtualization: session-based desktops and VDI-based desktops. There are two types of VDI deployments: pooled and personal.
1. Master It When should VDI be used over session-based virtualization?
2. Describe the benefits of RemoteFX and its requirements. RemoteFX brings a number of technologies such as USB port-level redirection and improved codecs that with Windows Server 2012 are available separately from GPU virtualization, which is the other primary RemoteFX technology that allows a physical GPU to be virtualized and assigned to VDI virtual machines running client operating systems. Using RemoteFX vGPU enables virtual machines to have local graphical resources, which enables the ability to run rich graphical applications, specifically those that leverage DirectX. To use RemoteFX vGPU, the graphics card must support DirectX 11 or newer and have a WDDM 1.2 driver or newer. The processor must also support SLAT.
1. Master It Is RemoteFX vGPU a good solution for OpenGL applications?
3. Articulate the other technologies required for a complete virtualized desktop solution. The complete user experience comprises a number of layers. The operating system provided by VDI or session virtualization is just the foundation for the user experience. The users need access to their profiles, their data, and their applications. To provide data access, the most common technology is folder redirection. For a user's profile, while historically roaming profiles were used, a better and more granular solution is UE-V, which provides application-level setting replication. For the applications, technologies such as App-V and RemoteApp can be leveraged, while specific core applications could be installed on the RD Session Host or VDI virtual machine template.
1. Master It Why is it best to minimize the number of applications installed in the VM VDI template image?
All materials on the site are licensed Creative Commons Attribution-Sharealike 3.0 Unported CC BY-SA 3.0 & GNU Free Documentation License (GFDL)
If you are the copyright holder of any material contained on our site and intend to remove it, please contact our site administrator for approval.
© 2016-2026 All site design rights belong to S.Y.A.