Mastering Hyper-V 2012 R2 with System Center and Windows Azure (2014)
Chapter 6. Maintaining a Hyper-V Environment
Once the Hyper-V environment is deployed and virtual machines are created, it is critical to ensure that your Hyper-V environment stays healthy, optimized, and available. In future chapters I will dive into details on technologies such as clustering to provide high availability, but this chapter will look at key processes and technologies that must be implemented to keep the environment running smoothly.
Every environment at some point will have performance challenges, and the final part of this chapter will dive into details of troubleshooting performance problems for the four key resources: computer, memory, network, and storage.
In this chapter, you will learn to
· Explain how backup works in a Hyper-V environment
· Identify where to use checkpoints and where not to use them
· Understand the benefits of service templates
Patch Planning and Implementation
In the previous chapter I talked about some key processes and actions you must take on your Windows Server 2012 R2 Hyper-V servers. One of them was patching, and in this section, I want to dive into some additional detail, consider some options, and also cover some other factors that need to be considered in your patch solution planning.
In a virtual environment there are at least two workloads you have to consider patching:
· The Hyper-V host itself. The hypervisor itself would be updated via updates sent to the host.
· The virtual machines that are running on the Hyper-V hosts, including updates to Integration Services for Hyper-V (although this should not update frequently between versions of Hyper-V). The virtual machines may be running Windows operating systems but also Linux. I will focus on Windows updating, but you would also need processes to ensure that all workloads are updated. Virtual machines that are offline for long periods of time may also need to be patched, which can be accomplished using the same processes discussed in Chapter 5. “Managing Hyper-V,” related to patching templates, such as using Deployment Image Servicing and Management (DISM).
I said at least two workloads because you most likely will need to ensure that items such as the management infrastructure (for instance, System Center) are patched and that firmware in hardware is kept up-to-date (for example, that updated drivers from vendors are downloaded and applied). These are not considerations specific to Hyper-V. They apply to any infrastructure, but it's especially important to ensure that your Hyper-V environment is patched and stable because it's not responsible for one operating system but instead is hosting possibly hundreds of operating systems.
If you already have a patching solution for your Windows-based servers, most likely that same solution can be leveraged to patch your Hyper-V servers. What is important is that patches are tested in a test environment prior to implementation in production, and also that care be taken when applying patches that require reboots. Remember, if the Hyper-V host reboots, then all virtual machines on the host will shut down for stand-alone hosts or be moved to other hosts in a clustered environment. It's therefore important to have the ability to define specific maintenance windows for your Hyper-V hosts, delaying reboots until that maintenance window is reached. In a cluster environment, you would make sure the maintenance windows are staggered to ensure that all hosts don't apply patches and reboot at the same time. There are better solutions for cluster environments, though, which I will touch on later in this chapter.
If you have stand-alone Hyper-V hosts in Windows Server 2012, it would be possible to perform a Shared Nothing Live Migration of virtual machines between hosts, or if SMB is used for the storage, then only the memory and state would need to be migrated. This would avoid any downtime to the virtual machines for planned outages; however, it would be an automated process you would need to create leveraging PowerShell or another automation solution. Additionally, if you have virtual machines that need to be protected from unavailability (e.g., unscheduled outages), then really the hosts should be clustered anyway. Generally if you have virtual machines on a stand-alone host, you should expect to have some periods of unavailability.
Microsoft maintains all updates on its Microsoft Update servers, and by default computers can connect to these servers, find the list of updated patches, download them, and apply them. This process works fine for a few machines, but if you have hundreds of servers, it's inefficient to have every machine downloading the updates over the Internet connection. This process will be slow and consume your Internet connection, which likely could be used more productively for other workloads. Additionally, if machines update directly from Microsoft Update using the built-in update component of Windows, the administrator of the organization has no ability to approve patches prior to their deployment.
Leveraging WSUS
Windows Server Update Services (WSUS) is a role of Windows Server that acts as a local source for updates for machines within your organization. At a very high level, the process when leveraging WSUS is as follows:
1. Enable the WSUS role on a server and specify when synchronization with the Microsoft Update servers will occur.
2. Configure the WSUS server for the updates that should be downloaded, such as, for example, only critical and security updates and only for Windows Server 2012 R2.
3. Create computer groups in WSUS that will be the targets for patch deployment.
4. Specify whether any types of updates should be automatically approved. Any updates that are not automatically approved need to be manually approved by a WSUS administrator before they are deployed to specified computer groups.
5. Optionally, use Group Policy to automatically configure machines to use the WSUS server and to be part of a specific computer group. I document this at the following location:
6. http://windowsitpro.com/windows-8/group-policy-settings-wsus
Machines will now utilize the WSUS server for available patches and also download them from the WSUS server instead of the Internet (although it is also possible to configure WSUS clients to pull updates from Microsoft Update if required). In very large organizations, it's actually possible to chain WSUS servers so a downstream WSUS server pulls approved updates from another WSUS server and then distributes them.
Configuring machines to pull down patches from Microsoft Update or a WSUS server via Group Policy is one option, but there are other enterprise solutions, such as System Center Configuration Manager, which actually leverages WSUS to ascertain that patches are available but then allows them to be packaged and targeted to different groups of servers at specific times with very granular tracking and reporting.
Patching Hyper-V Clusters
The technologies I've been talking about are not specific to Hyper-V, which is logical since Hyper-V is a role within Windows Server and therefore its patch mechanisms are the same as for any other Windows Server machine. The good news is that the same patch deployment solution can be used for the Hyper-V hosts and for the virtual machines running Windows Server. There are, however, some solutions specific to Hyper-V patching and specific to patching clusters.
If You Care about VM Availability, Don't Use Stand-Alone Hyper-V Hosts
As I have already mentioned, there are not really any special solutions to patch a stand-alone Hyper-V host. If you are deploying stand-alone Hyper-V hosts, then you don't really care about the availability of the virtual machines, so there are no special technologies in-box to patch stand-alone hosts and use Shared Nothing Live Migration to move VMs prior to the reboot and bring the VMs back. If you had that hardware available, you would have clustered them already, considering an SMB 3.0 file share can be used for the storage if a SAN is not available; you could even use a clustered external storage enclosure connected to both hosts and clustered storage spaces to provide shared access. The only time you should have an unclustered Hyper-V host is if you have a location with only one Hyper-V server.
Consider a clustered Hyper-V environment with shared storage and the ability to move virtual machines between hosts. In your Hyper-V environment, you are already using Server Core to minimize the number of patches that are applicable and therefore reducing the number of reboots. However, there will still be reboots required for patching and other purposes. Utilizing the ability to move virtual machines between nodes with no downtime using Live Migration prior to reboots actually makes the actual impact of a Hyper-V node reboot in a cluster zero for the virtual machines. This means no loss of availability for the virtual machines, and only some minor administrative effort. This is why when you hear people hung up on having to patch Hyper-V, it's generally overblown as a real issue. Yes, you might need to patch, and there are times you need to reboot, but it has no impact on the availability of the virtual machines, which is what you care about in a virtual environment. The ideal process in a clustered environment is as follows:
1. The nodes in the cluster are scanned to ascertain which patches are required.
2. One node is placed in maintenance mode, drained of all virtual machines, which are Live Migrated to other hosts in the cluster.
3. The node has patches applied and rebooted.
4. The node is checked to ensure that no additional patches are needed, and if not, is brought out of maintenance mode.
5. Virtual machines are moved back to the node, and the process is repeated for the next node, and so on.
Most administrators who manage clusters are familiar with this process and perform it manually. SCVMM 2012 introduced the ability to patch an entire Hyper-V cluster using exactly the process just described. Each node is drained, patched, and rebooted for a complete cluster patch with no downtime to virtual machines with a click of a button. SCVMM leverages a WSUS server in the environment for the actual patch library, which does not have to be uniquely used by SCVMM. It could be a WSUS used for other purposes, such as, for example, by SCCM. Once the WSUS server is added to the SCVMM fabric, as shown in Figure 6.1, the SCVMM instance will be aware of all the updates known to the WSUS server. The next step is to create a baseline in the Library workspace ⇒ Update Catalog and Baselines ⇒ Update Baselines, which can then be assigned to specific host groups. Once a baseline is assigned, a scan can be performed on the host group via the Fabric workspace, which will show the compliance of each scanned node, and the details of the compliance can be viewed as shown in Figure 6.2. The administrator can click the Remediate button to patch the entire cluster. There's very little administrative work. It is important to note that SCVMM patches only Hyper-V hosts (even nonclustered) and notthe actual virtual machines running on the hosts. You still require another patch strategy to patch the virtual machines.
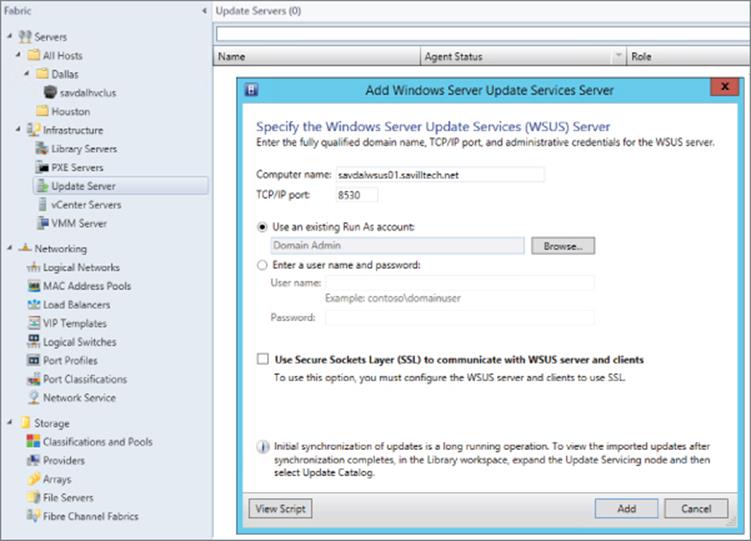
Figure 6.1 Adding a WSUS server to SCVMM
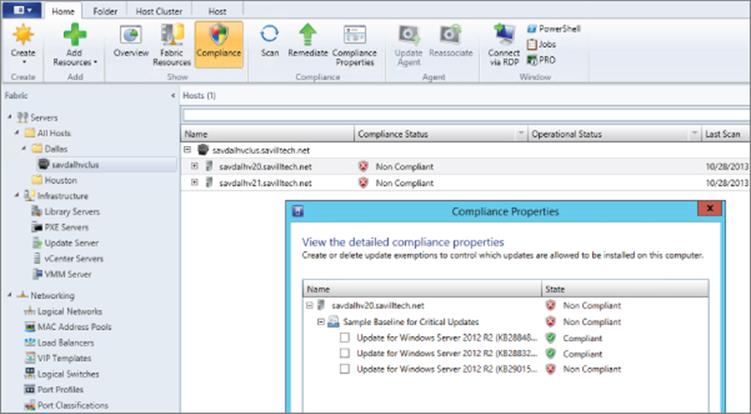
Figure 6.2 Viewing the compliance details for a noncompliant node
The SCVMM 2012 ability to patch an entire Hyper-V cluster with one click was a welcome feature and removed the need for many custom PowerShell and Orchestrator solutions, but Windows Server 2012 actually minimized the need to even use SCVMM. Windows Server 2012 introduced a native one-click patching of an entire cluster to the Failover Clustering feature. Once again, this Cluster-Aware Updating (CAU) leveraged WSUS and could patch not only Hyper-V clusters but any type of cluster with no downtime to the workloads running in the cluster. I will cover this in detail in Chapter 7, “Failover Clustering and Migration Technologies.”
The key takeaway is that patching your Hyper-V cluster does not mean there is any downtime to your virtual machines.
Remember that all of the previous processes relate to the Windows operating system. You still need other processes to download drivers from the hardware vendor because even if there are drives built into Windows, for many types of hardware it's better to use drivers directly from the vendor.
Malware Configurations
I briefly touched on antivirus recommendations in previous chapters, and there are two main schools of thought. One is that the Hyper-V server is running in Server Core configuration level, so it has no web browser, has limited vulnerabilities and a limited attack surface, is patched regularly, is never locally connected to because all management is remote, has a firewall enabled, and really does nothing but manage virtual machines. The chance of the server being infected is slight, so many people will say just don't run malware protection. Additionally, it's possible that malware protection could actually introduce problems because it runs at a very low level within the operating system. The Microsoft best practice are to run no additional applications on the Hyper-V host, and strictly speaking, this would include malware protection.
I personally lean a little more toward defense in depth. I prefer to have many layers of protection, which means malware support on the host. However, it's critical that any malware solution does not interfere with the Hyper-V processes or the resources of virtual machines. At the time of this writing, this means that exceptions should be configured in the malware solution to not scan the following:
· Default virtual machine configuration directory (C:\ProgramData\Microsoft\Windows\Hyper-V)
· Custom virtual machine configuration directories
· Default virtual hard disk drive directory (C:\Users\Public\Documents\Hyper-V\Virtual Hard Disks)
· Custom virtual hard disk drive directories
· Custom replication data directories, if you are using Hyper-V Replica
· Checkpoint directories
· Vmms.exe (Note that this file may have to be configured as a process exclusion within the antivirus software.)
· Vmwp.exe (Note that this file may have to be configured as a process exclusion within the antivirus software.)
Failure to correctly exclude Hyper-V resources will result in problems with virtual machines starting and functioning correctly, as documented at http://support.microsoft.com/kb/961804/en-us. There is a great malware exception article for more Microsoft solutions at
http://social.technet.microsoft.com/wiki/contents/articles/953.microsoft-anti-virus-exclusion-list.aspx
While the risk of infection is low, if an infection did hit your Hyper-V server, the impact would be large. There may also be audit problems for hosts with no malware protection. It's really an environment choice to be made after weighing the pros and cons. If you have great processes in place to patch your systems regularly, if they are running Server Core, and if people don't log on locally, you would probably be fine without malware. If you don't have a good patch strategy, if you are not running Server Core, and if administrators do log on to the servers and browse the Web, then malware protection is probably a good idea! If you do opt to use malware protection, ensure that you have processes in place to keep its signatures updated and that it is supported to run on Hyper-V. Microsoft provides enterprise malware protection with System Center Endpoint Protection.
What is important is that you still run malware protection within the virtual machines. You need malware protection running in the guest operating systems configured to whatever guidelines exist for the workload. Even if you run malware protection on the Hyper-V host, this does not protect the virtual machine guest operating system. There are special scenarios that need to be considered, such as, for example, VDI environments where there are many desktops that are created and deleted very quickly that have different malware protection requirements than regular, long-term servers. Investigate the different solutions available and tailor your solution based on the different services offered.
Backup Planning
When virtualization is used in an environment, there is often a decision to be made as to whether backups will be taken from the virtualization host of the virtual machines or if backup agents should still run within the virtual machines and backups will be taken from inside the virtual machines. There is no “right” answer to which is the best approach, but what is running inside the virtual machines and where you take the backup can have a big impact on the granularity of any restore operations that are performed.
Windows Server has long standardized on the Volume Shadow Copy Service (VSS), which provides facilities that allow application vendors to write special VSS writers, which are application-specific modules used to ensure that application data is ready for backup and are registered with the operating system on which the application is installed. All VSS Writers registered on an operating system are called during a shadow copy backup initiated by a VSS-aware backup program. The VSS writers ensure that all data on disk for the application is in an application-consistent state and that other writers are quiesced (which means paused during the operation) while the backup is taken, maintaining the integrity of the on-disk data being backed up. An application-consistent backup means that the data is in a suitable state to be restored and used without corruption problems.
If a backup was taken at the Hyper-V host level of all the virtual machine assets, primarily the VHD files, then ordinarily the virtual machine would know nothing of the backup being taken at the host level, so the data backed up would likely not be in an application-consistent state. Hyper-V Integration Services includes a Backup (volume snapshot) service, and this allows the Hyper-V host to notify each virtual machine when a VSS backup is taken. The process then looks like the following and assures that backups of the virtual machines are in an application-consistent state.
1. The backup software (the VSS requestor) on the Hyper-V server makes a request for a VSS snapshot and enumerates the VSS writers (for example, the Hyper-V VSS writer) on the system to ascertain the data that can be backed up with VSS.
2. The Hyper-V VSS writer (in conjunction with the VSS coordination service) forwards the VSS snapshot request to each guest operating system via the Backup integration service.
3. Each guest operating system thinks it is receiving a native VSS request and proceeds to notify all VSS writers on the guest to prepare for a snapshot.
4. Each VSS writer in the guest operating systems writes any information to disk that relates to its service (for example, Exchange and SQL) and notifies the VSS coordinator that it is ready for a snapshot and tells it which data to back up (although this part is ignored because we'll be backing up the entire VHD from the Hyper-V host).
5. The Backup integration service for each VM tells the Hyper-V VSS writer that it is ready for a snapshot to be taken, and the Hyper-V VSS writer notifies the backup application via the VSS coordinator that it is ready for a snapshot.
6. The backup software takes a VSS snapshot of the file system containing the virtual configuration files and the virtual hard disks, and all data on the virtual hard disks is consistent thanks to the VSS request being passed into the virtual machines. Once the snapshot is taken, the VSS writer notifies the Hyper-V guests that the snapshot is complete and they continue their normal processing.
It should be noted that only VHD/VHDX content will be backed up using this method. If a virtual machine has pass-through storage, has iSCSI storage connected through the guest OS iSCSI Initiator, is connected to storage via fibre-channel, or is a shared VHDX, then that content would not be backed up via a backup at the Hyper-V server level through the Hyper-V VSS writer and would instead need to be backed up from within the guest virtual machine. The preceding scenario describes an online backup, also known as a Child VM Snapshot, where the guest operating system meets the following requirements:
· The integration services are installed with the Backup integration service enabled.
· The operating system supports VSS.
· NTFS file systems with basic disks (not dynamic) is used.
If you have guest operating systems that use dynamic disks, that use non-NTFS partitions, that don't have the integration services installed, or that don't have the Backup integration service enabled or it's just not supported (Windows 2000), then an offline backup will be taken of the virtual machine, also known as a Saved State backup. This is because virtual machines that can't support an online backup actually are placed into a saved state during the VSS snapshot, which actually means there is a period of downtime for the virtual machine during the backup. Operating systems that have to use saved state include Windows 2000, Windows XP, and Windows NT 4. Windows 2003, 2008, Vista, and above all support the online backup method with no virtual machine downtime.
Prior to Windows Server 2012 R2, a Linux system had to be backed up using an offline backup. Windows Server 2012 R2 introduces a number of new features for Linux virtual machines, one of which is live backup of Linux VMs. This is achieved through a new file-system snapshot driver that runs inside the Linux guest virtual machine. When a backup is performed on the Hyper-V host, the file-system snapshot driver is triggered in the guest, which enables a file-system-consistent snapshot to be taken of the VHDs that are attached to the Linux VM. It should be noted that this is a different experience from that available for Windows VMs, which provide file-system-consistent and application-consistent backups because applications have VSS writers that ensure that application data is consistent on the disk. This is because there is not a standardized VSS infrastructure in Linux, so there's no way to ask applications to make their data ready for a backup.
If you have guest operating systems that can't use the Hyper-V pass-through VSS capability, then perform backups within the virtual machine. There are also times when backing up within the virtual machine gives a better level of functionality, depending on the backup application. Suppose I want to use System Center Data Protection Manager (DPM), which is the Microsoft premium backup and recovery solution for Microsoft workloads. When you have the DPM agent on the virtual server in the main DPM administrator console, the level of granularity you have for what to protect would be at a virtual machine level. You can select which virtual machines to protect, but that's all you get. You can't go into detail about what to protect within the virtual machine. During a restore operation, you would be able to restore only the entire virtual machine or files from the VM, but nothing application aware such as restoring a SQL database or Exchange mailbox.
If you deploy the agent into the actual guest operating systems, you will have the full granularity of knowledge that comes with DPM. For example, if the virtual machine was running SQL Server, you would be able to select the actual databases to protect with the ability to capture the transaction logs and so on. The restore granularity would be the same, enabling the restore of just a specific database. Likewise, if I backed up a SharePoint server from within the SharePoint VM, I would be able to perform item-level recovery.Figure 6.3 shows an example where I have two virtual machines protected at the host level and two other virtual machines have the DPM agent installed locally, which allows me to protect application-aware workloads such as Exchange mailboxes and SQL databases.
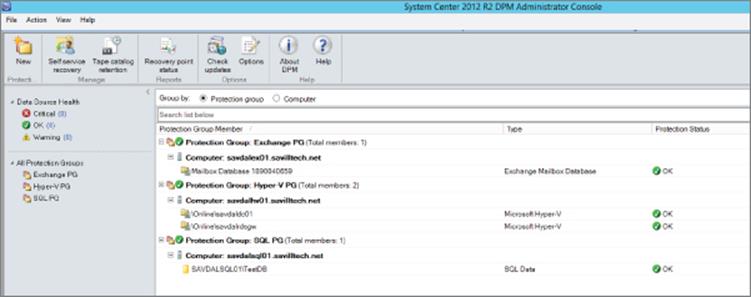
Figure 6.3 Example view of protection using DPM
This means that for the best functionality, sometimes performing backups from within the guest OS give the best results, especially if your backup software has application-specific modules. Make sure you regularly test restoring the backups you take. Many times I have seen companies try to restore a backup when it's really needed and it fails or the right information was not actually being backed up.
No matter what other technologies are used, such as replication, multiple instances of applications, or even snapshots, none of these are replacements for backups. Backups should always be taken regularly for complete protection for all types of failure.
Defragmentation with Hyper-V
On a physical system that uses hard disk drives (HDDs), it is common to defragment the file system. This is required because files can become fragmented, which means instead of a file being stored contiguously on the disk, it is broken up into many different pieces, or fragments, over the disk. This can affect performance because when data needs to be read, there are many seek operations (moving the disk head to the data location on disk). This will slow down operations compared to all the data being stored contiguously on disk, in which case the data can be read efficiently. Performing a disk defragmentation optimizes the disk by moving all the pieces of files so they are contiguous on the disk and therefore can be accessed efficiently. Files become fragmented for many reasons. Typically, when a file grows, if there is not empty space at the end of the file's current position, additional space must be allocated elsewhere on the disk. This would be very common with a dynamic VHDX/VHD that grows as data is written. Note that the problem with fragmentation is the seeking of the data. If you are using solid-state drives (SSDs), there is no seek time and therefore fragmentation does not incur a performance penalty. Moving data can actually decrease the life span of a SSD, so defragmentation is typically not performed or recommended. Windows 2012 and above automatically disables defragmentation on a SSD.
Consider local HDDs in a system. If you are using a fixed-size VHDX, it is likely not highly fragmented because it does not grow and therefore defragmentation should not be often required. If you use dynamic VHDX, the disk will most likely fragment over time and so performing a defragmentation will improve performance. The only caveat is to remember that a VHDX file contains a file system that itself contains files, so even if the VHDX file is not fragmented, when the VHDX file is used by a virtual machine, the content will be randomly accessed throughout the VHDX because the OS accesses various files, but defragmenting will still make it as contiguous as possible and certainly won't do harm.
If your storage is not local HDDs but a SAN, your virtual hard disks will be split over multiple disks anyway, there will be other optimizations in place on the SAN, and typically defragmenting is not recommended. Similarly, defragmenting a tiered volume that uses different types of storage is not recommended because this would touch different blocks of the disk and potentially interfere with the automatic tiering that optimizes performance.
The final type of defragmentation is performing a defragmentation within the actual virtual machine for its file system that is contained in the virtual hard disk. There is no definite answer here. My thinking on this is that fragmentation within the virtual hard disk is another level of fragmentation, but its effect will depend on the underlying storage. If the underlying storage is SSD or a SAN, I would not defragment. If the underlying storage is local HDD, a defragmentation within the VM would optimize the data within the virtual hard disk and therefore improve storage performance, which means I would defragment when necessary. Obviously, if you defragment within the virtual machine but not on the actual file system containing the virtual hard disk, you are likely not achieving any optimization because the actual virtual hard disk could still be fragmented on the actual physical drives.
Defragmentation can be performed using the Optimize Drives utility or using the defrag.exe utility. Very detailed information can be viewed about a volume using the /a and /v switches, as shown in this example:
PS C:\> defrag d: /A /V
Microsoft Drive Optimizer
Copyright (c) 2013 Microsoft Corp.
Invoking analysis on Data (D:)…
The operation completed successfully.
Post Defragmentation Report:
Volume Information:
Volume size = 1.81 TB
Cluster size = 4 KB
Used space = 470.11 GB
Free space = 1.35 TB
Fragmentation:
Total fragmented space = 6%
Average fragments per file = 1.05
Movable files and folders = 100184
Unmovable files and folders = 4
Files:
Fragmented files = 742
Total file fragments = 3155
Folders:
Total folders = 5552
Fragmented folders = 53
Total folder fragments = 248
Free space:
Free space count = 6505
Average free space size = 219.19 MB
Largest free space size = 604.87 GB
Master File Table (MFT):
MFT size = 316.50 MB
MFT record count = 324095
MFT usage = 100%
Total MFT fragments = 2
Note: File fragments larger than 64MB are not included in the fragmentation statistics.
You do not need to defragment this volume.
Sysinternals has a tool, Contig, that shows the fragmentation of individual files and can even defragment individual files. It is available for download, along with documentation, at the following location:
http://technet.microsoft.com/en-us/sysinternals/bb897428
Using Checkpoints
One fairly overlooked feature of Hyper-V is the checkpoint feature, which prior to Windows Server 2012 R2 was called snapshots. Checkpoints allow point-in-time views of a virtual machine to be saved. A checkpoint can be created when the virtual machine is turned off or when it's running. If a checkpoint is taken when a virtual machine is running, the current memory and device state is saved in addition to the virtual hard disk state, which is also taken when a snapshot is taken of a stopped virtual machine. When a checkpoint is taken, a number of files are created:
· XML file: Contains the information of the files and VM configuration associated with the checkpoint.
· VSV file: This contains the state of devices associated with the virtual machine. It is created only if a checkpoint is taken of a running virtual machine.
· BIN file: This contains the memory content of the virtual machine. It is created only if a checkpoint is taken of a running virtual machine.
· AVHDX file: To capture the state of the virtual hard disks, the differencing VHD capability is used. The current virtual hard disk state is frozen and marked read-only; this is what the checkpoint points to. A new differencing disk is created that uses the existing VHDX as the parent, and all future disk writes are written to the new differencing AVHDX file. Note that if the original file was a VHD, then a AVHD file is created.
Entire hierarchies of checkpoints can be created, and each checkpoint can be custom named, making it easy to understand what each checkpoint represents. Checkpoints can then be applied to a virtual machine. Applying a checkpoint reverts a virtual machine back to the state it was in when the checkpoint was created.
Checkpoints with Fixed virtual Hard Disks
A fixed virtual hard disk preallocates all space at creation time, but if a checkpoint is created, a differencing virtual hard disk is created for future writes. This means a dynamic virtual hard disk is being used for writes and will therefore consume additional space that may not have been originally planned. There is also a small performance penalty as the dynamic differencing disk grows.
To create a checkpoint using Hyper-V Manager, select the virtual machine and select the Checkpoint action. This can be performed on a running virtual machine or on one that's shut down. For a running virtual machine, the creation may take a few seconds because the contents of the memory and configuration state must be saved. By default, the checkpoint will be named <VMname> - ( <date - time>), as shown in Figure 6.4, which shows a virtual machine with two checkpoints. They can be renamed simply by selecting and choosing the Rename action. Renaming the checkpoints is useful so you'll understand at a later time what the state of the virtual machine was at the point of checkpoint.
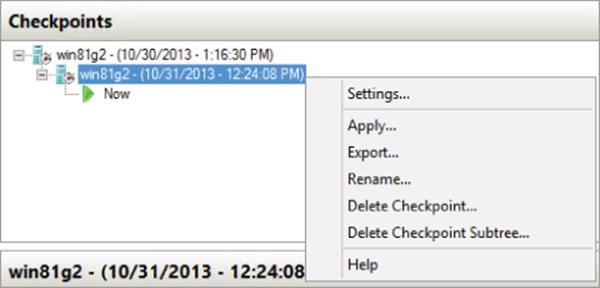
Figure 6.4 A VM with two checkpoints
Checkpoints can be deleted via the Delete Checkpoint action and an entire subtree of multiple parent-child checkpoints can be deleted via the Delete Checkpoint Subtree action. What happens when you delete a checkpoint depends on where it is in the hierarchy of checkpoints and where the current Now state of the virtual machine is. If you delete a checkpoint that is on a different branch from the Now state and has no child checkpoints, its differencing virtual hard disk will just be deleted along with any state and configuration files. If you delete a checkpoint that is part of the Now branch or it has child checkpoints, when you delete the checkpoint, its state files will be deleted but the contents of its differencing virtual hard disk will be merged into its child object, which could be the Now state or another checkpoint. There is an exception. If you delete a checkpoint that has multiple child snapshots, the differencing virtual hard disk is kept; to remove it would require its content to be merged into each child virtual hard disk, which would actually mean additional space would be used up and that's likely not the experience administrators would expect. While the way in which a checkpoint deletion is handled differs, what is consistent is that the checkpoint is no longer usable.
You may wonder how you get different branches of checkpoints. The key is that you can apply a specific checkpoint and then create new checkpoints from that point. This would create different branches, as shown in Figure 6.5. If you perform a Revert action on a virtual machine, you will be prompted to create a new checkpoint of the current state of the virtual machine to avoid losing its state.
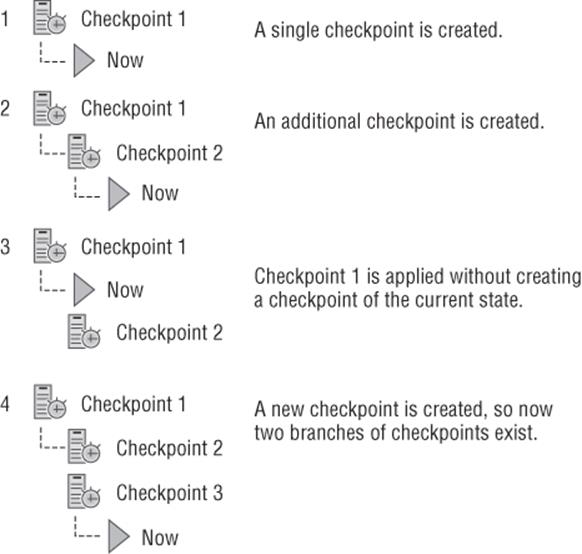
Figure 6.5 Example of checkpoint life cycle
Checkpoints can also be managed from PowerShell, but the naming is inconsistent. To create a checkpoint, use the Checkpoint-VM cmdlet as follows:
Checkpoint-VM -Name "TestVM10" -SnapshotName "Before change"
To list or apply a checkpoint, use the Get-VMSnapshot and Restore-VMSnapshot cmdlets. The following command finds the checkpoint for a VM and applies it:
Get-VM -Name "TestVM10" | Get-VMSnapshot | Restore-VMSnapshot
One great feature introduced in Windows Server 2012 was that the merging of differencing files that is required when a checkpoint is deleted was performed live while the virtual machine was still running. Prior to Windows Server 2012, the merging of differencing files related to a checkpoint deletion did not occur until the virtual machine was stopped.
Windows Server 2012 R2 introduced an even more powerful feature, or two, to be precise. First, checkpoints can be exported while the virtual machine is running, which previously was not possible. Additionally, an export of the Now state of a virtual machine (that is, the running state) is possible, which effectively creates a clone of the virtual machine. This is useful in debugging situations where a problem is occurring on a virtual machine, and instead of having to debug the virtual machine, it is possible to create an export/clone of its current state and then debug that clone state. The export of the live state includes a copy of the storage, the configuration, and the memory dump—all without any impact to the availability of the virtual machine.
How checkpoints should actually be used is something often discussed. They are not replacements for backups, but rather, checkpoints that are useful for development and testing environments. Imagine in a testing or development environment the ability to save the state of an operating system, make some changes, and then revert back to a state before the changes were ever made. For a developer, the ability to freeze a system at the point of a problem and be able to keep reverting back to that problem state again and again is invaluable.
The use of checkpoints in production environments is generally discouraged because their usage can cause problems, and as checkpoint hierarchies grow, there is some performance degradation. A virtual machine can have up to 50 checkpoints. Checkpoints are specifically hazardous and known to cause problems for some types of services, such as Active Directory domain controllers. Taking a checkpoint of a domain controller and then reverting the domain controller back to that checkpoint can result in replication problems, duplicate security identifiers, and therefore security vulnerabilities prior to Windows Server 2012.
Windows Server 2012 introduces “virtualization safe” Active Directory when it's running on Hyper-V 2012 or above. Prior to Active Directory running on Windows Sever2012 Hyper-V, there was a huge problem using snapshots with domain controllers. Directory services expect time to always go forward and need some way to track it, such as a logical clock, and Active Directory uses an update sequencer number (USN), which is incremented each time a new object is created along with other incremental values, such as the relative ID (RID). Look at Figure 6.6. Imagine you have a domain controller and at USN 2 a snapshot is created, and then the DC continues using USNs up to number 6 for created users. Then an administrator applies the snapshot that was created, which puts the domain controller back to USN number 2. The domain controller has no clue it has been put back in time, so it carries on back at USN number 2, creating objects with the same security IDs, which causes problems with security and the domain controller will no longer replicate correctly with the rest of the domain. We have divergence. This is a terrible problem for organizations and one of the biggest causes of Active Directory issues for Microsoft customers. Even though it's stated in many articles to never use snapshots with domain controllers, it still happens.

Figure 6.6 Update sequence number problems when applying a snapshot to a domain controller
Windows Server 2012 fixes this through the use of a VM-generationID, which is provided by the Windows Server 2012 Hyper-V hypervisor. This VM-generationID is changed anytime something happens to a virtual machine that affects its point in time, such as applying a snapshot or duplicating the virtual machine. Active Directory stores the VM-generationID in the AD database, and every time an operation is performed, such as creating or changing an object, the VM-generationID stored in the AD database is compared against the VM-generationID provided by the hypervisor. If the VM-generationIDs do not match, it means something has happened to the VM in logical time, and at this point the Active Directory service stops AD actions to protect Active Directory and performs the following:
· Discards the RID pool.
· Resets the invocation ID, which is a database identifier and is reset to ensure no replication problems with other domain controllers. When the invocation ID is reset, there is no USN reuse problem because USNs are paired with the invocation ID.
· Reassert the INITSYNC requirement for flexible single-master operation (FSMO) roles, which forces the domain controller to replicate with another domain controller that holds a copy of the partition in which the FSMO role is maintained.
These actions allow the domain controller to continue functioning without any risk to ongoing replication or security ID duplication. Even with this technology, there is still impact to the domain controller because it has to take corrective actions, so do not start using checkpoints with domain controllers but rather feel more secure that if they are used accidentally, it will not cause problems.
Using Service Templates
In previous chapters I talked about the idea of virtual machine templates, which enable single virtual machines to be deployed. They are useful in typical deployment scenarios for individual workloads that are not dependent on other services, but few server applications work in isolation. Server applications talk to other server applications, and often multiple instances of server applications are required for availability and load balancing needs.
Multitiered services can be deployed manually using templates by creating eight virtual machines, four for the web front-end tier, two for the middle tier, and two for the backend storage/database tier, for example. When it comes time to update a service, each virtual machine would need to be manually updated because once a normal virtual machine is deployed, there is no ongoing relationship between the virtual machine and the template. This means a virtual machine is not refreshed if the virtual machine template from which it was created is updated.
Service templates provide a new capability, introduced in SCVMM 2012, that allows complete services to be defined in SCVMM. The capability and service template introduced in 2012 can be one-, two-, or three-tiered applications by default, as shown in Figure 6.7, but addition tiers can be added if required. The virtual machine template for each tier can be specified in addition to which applications should be deployed, such as an IIS site using Web Deploy for the front end, a regular application for the middle tier, and a database application using SQL DAC for the backend tier. SCVMM 2012 introduced the concept of Server App-V, which allowed server applications to be virtualized, allowing abstraction from the underlying operating system and simple deployment and migration. This feature has been deprecated in SCVMM 2012 R2 because it was not widely adopted and there are currently other initiatives to provide a better type of functionality, which means it's not a technology to invest in.

Figure 6.7 The default tiering options for a new service template. You'll see that a three-tier application is also available if you scroll down.
Web applications (Web Deploy) and database applications (SQL DAC) are considered first class in service templates because service templates understand the metadata of these types of application and can enable parameters to perform the configuration when the application is deployed, such as by the end user. Other types of application install are fully supported through the service template Generic Command Execution (GCE) feature because many organizations are not using SQL DAC, Server App-V, or maybe even Web Deploy yet. By using GCE, you can run both pre- and post-scripts for any type of application installation. The customization of non-first-class applications would need to be through the application's native unattended configuration capabilities or scripting and would not integrate with the service deployment interface in the same way first-class applications do. Standard Windows Server roles and features can also be added through standard virtual machine guest OS definitions.
A minimum, maximum, and initial number of instances of each tier are specified, which allows for easy scale out and scale in, depending on utilization. Service instances created from a service template maintain a link back to the template and that template becomes read-only, so it becomes the source of truth for how the service looked, and if an update is required, a new version of the service template is created and that updated service template is applied to deployed instances. The deployment of the new service template version will update the services while maintaining application state through the Server App-V state backup and restore feature.
The use of services enables fewer OS images to be managed by the IT department because of the abstraction of the actual services, roles, features, and applications needed on the operating system, which traditionally may have been part of the OS image. Services also enable the related VMs to be treated as a single unit. Another very nice bonus feature is that if SCVMM is integrated with Operations Manager, then Operations Manager will understand the service definition and show the VMs as part of a service.
A four-stage life cycle is the focus for service templates, as I've already alluded to:
· Create the service template.
· Customize the deployment at the deployment time of the service template.
· Deploy the service to environments.
· Update the service template to a new version and apply it to running instances of the service.
When an update to an existing instance of a service is made, there are three update types. First is a settings-only update mode, which only changes application settings but does not replace the OS image. The second update type is new, an in-place update, where updates to the template settings are applied but the actual OS images are not replaced. This would be used to update applications and modify configuration of the virtual machines in the service. Last is the image-based update, which replaces the actual deployed instance operating system images with the new OS image and performs a reinstallation of applications but maintains the application state. If you have modified a virtual machine configuration that is part of a service, for example, and you changed the memory from 1 GB to 4 GB and then applied an update to the service from a new version of the service template, then any customizations you made to the configuration would be lost. Remember, with services, the service template is always the source of truth. This can be useful, for example, if your service instance has lost some VMs and you want to bring it back within the parameters of the service template. Instances can be refreshed from the service template, which will look for any missing elements of tiers that have less than the minimum number of instances and fix them by deploying additional required VMs.
In addition to allowing the definitions of virtual machine templates to use, applications to install, and various other settings, it is within a service template that you can also utilize load balancers and logical networks. By using the other fabric elements, service templates can enable rich capabilities in a completely automated fashion.
Service templates are created and maintained in the Service Designer, which is shown in Figure 6.8 and consists of the familiar ribbon, a designer canvas (which is the majority of the interface) and a small properties area at the bottom that shows the properties of the currently selected object. Once configurations are made, you run the Save And Validate action, which checks for any problems in the service template definition.
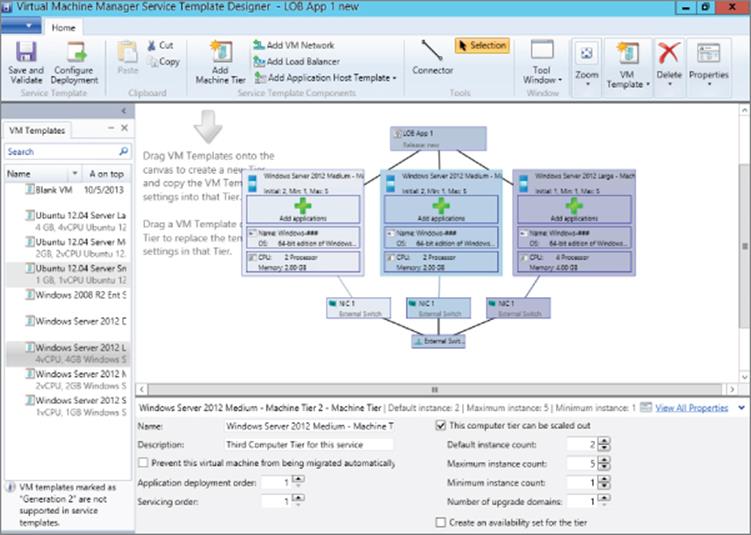
Figure 6.8 The Service Designer
Once a service is deployed within the VMs And Services workspace in SCVMM, it is viewed as a single unit in addition to viewing the individual virtual machines that make up the service. Within the VMs And Services workspace view, you can view the application settings configured for the service, which helps to identify individual instances of deployed services.
One of the great features of using a service template is the easy ability to scale out and scale in as required. Selecting the service within the VMs And Services workspace will expose a Scale Out action that launches a wizard. You can use the wizard to select the tier to be scaled out and then specify the degree of the scale out. Additional VMs will be created based on the scale properties. To scale in, instances of the VM in the tier are deleted.
The best way to really understand the service templates is to just fire up the Service Designer and start playing with the settings and looking at the options available. Even for basic services, the use of a service template is likely to make the management far easier, especially when you want to make the service available for end-user deployment with some deployment time configuration options.
Performance Tuning and Monitoring with Hyper-V
When an operating system is deployed to a physical machine, it is the only operating system using that hardware. If there are performance problems, it's fairly simple to ascertain the cause by using Task Manager and also Performance Monitor. When virtualization is introduced, looking at performance problems becomes more complex because now there is the host operating system (management partition) and all the various virtual machines. Each virtual machine has its own virtual resources, which are actually allocated from the shared resources of the host.
It's important to be proactive and try to avoid performance problems. You can do that by being diligent in the discovery of your environment, understanding the true resource needs of the various workloads running in virtual machines, and allocating reasonable resources. Don't give every virtual machine 64 virtual processors, don't set every virtual machine's dynamic memory maximum to 1 TB, and do consider using bandwidth management and storage QoS on virtual machine resources. Resource leaks can occur, bad code is written, or a user of a virtual machine may perform “tests.” Any number of problems may cause guest operating systems to consume all of the available resources, so only give virtual machines access to resources they reasonably need based on your discovery and analysis. In most cases, additional resources can be added painlessly if they are truly required fairly.
Even with all the planning in the world, there will still be performance problems that you need to troubleshoot. One of the first questions ever asked about using virtualization is about the “penalty”—that is, what performance drop will I see running workloads virtualized compared to running them directly on bare metal? There is no exact number. Clearly, the hypervisor and management partition consumes some resource, such as memory, processor, storage, and limited network traffic, but there is also a performance cost in certain areas caused by virtualization, such as additional storage and network latency, which although very small, does exist (although if this small additional latency is a problem for the highest-performing workloads, there are solutions such as SR-IOV to remove network latency and various options for storage).
Some people will say that for planning purposes, you should consider the worst-case scenario, and I've seen the number 10 percent used commonly, not for Hyper-V specifically, but for any virtualization solution. When planning out the available resources, remove 10 percent of the bare-metal server capability and the 90 percent that's left is what you can expect for virtualized workloads. In reality, I've never seen anything close to this. I commonly see workloads running virtualized on Hyper-V that are on par with a nonvirtualized workload or even exceed what performance you see on the physical hardware, which at first glance seems impossible. How can virtualization improve performance above running directly on bare metal? The reason is that some workloads use only a certain amount of resources efficiently. Once you go beyond a certain number of processors and memory, the additional resources bring diminishing returns. If I have a large server with 256 GB of RAM and 128 processor cores and I install an OS directly on that box and then run an instance of a server application, it may only be able to use 64 GB of memory and 32 cores efficiently. If I use virtualization on that same server and create four virtual machines with an instance of the server application in each, I'll efficiently use all of the processor cores and memory in the server, giving much better overall performance. It's the difference between scaling up (adding more resources to an instance) and scaling out (adding more instances). Remember that even if there is some small performance penalty or, more realistically, some small amount of resource lost that is used by the management partition, the benefits of virtualization outweigh this with greater utilization, faster provisioning, easier management, and so on.
I want to recap the limits of Hyper-V in terms of what the Hyper-V host can leverage and then the limits for each virtual machine. Each Hyper-V host can address the following:
· 320 physical logical processors. (If you have more than this and are using hyperthreading, turn off hyperthreading so Hyper-V can access more of the real cores on the system.)
· 4 TB of physical RAM.
· There are no real limits you will hit for networking or storage.
· Each host can be allocated up to 2,048 virtual processors and can run up to 1,024 virtual machines.
Each virtual machine can be allocated the following:
· 64 virtual processors (assuming the physical host has 64 logical processors, otherwise the limit per VM will be the number of logical processors in the host).
· 1 TB of RAM.
· Up to 256 VHDX files connected via the four possible SCSI controllers, and each VHDX can be up to 64 TB in size. In terms of storage performance, Microsoft has demonstrated IOPS in excess of one million to a VHDX file. Obviously you need a powerful backend storage solution to get one million IOPS, but the point is that even when using virtual hard disks, you can really get any level of performance that is needed without needing direct access via virtual fibre channel, iSCSI, etc.
· Eight network adapters. (An additional four legacy network adapters can be added, but this should not be used due to poor performance and increased overhead.)
It's because of the huge scalability of Hyper-V with Windows Server 2012 and above that there is almost no workload that cannot be virtualized on Hyper-V. Over 99 percent of the world's SQL Server instances could now be virtualized on Hyper-V.
The key tool you will use to troubleshoot performance problems or even just to see the utilization of a Hyper-V host is Performance Monitor. Task Manager is of limited use. It will not show processor utilization by virtual machines because the host OS is just another operating system running on top of the hypervisor. This is also why the management OS can use only 64 processors on a system with more than 64; even the management OS is still accessing processor resources via the hypervisor, but as Figure 6.9 shows, Task Manager does at least show the total number of processors in the Logical Processors field even though the host logical processors are limited to 64. This is not a problem because the host OS does very little processing, while the actual hypervisor can access up to 320. Task Manager will also not show resources by virtual machine, so it's really not a useful tool for troubleshooting the performance of a Hyper-V environment.
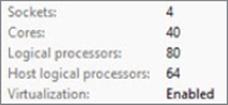
Figure 6.9 Only 64 are processors visible on the Hyper-V host of an 80-processor system
Performance Monitor running on a Hyper-V host has access to very detailed information on not just performance of the management OS but also the resources used for each virtual machine. It shows information for all the different types of resources, including processor, memory, networking, and storage. I will cover the performance counters to use for each of these key types of resources. Remember that while most resource utilization should be consumed by virtual machines, it's always important to view the resource utilization of the host OS as well because the host performs certain functions for the guests that can consume resources and processes may be running on the host that are misbehaving and need to be corrected. When I refer to performance counters, I will refer to the group of the counters first and then the actual counter. For example, Hyper-V Hypervisor Logical Processor is the counter group and % Total Run Time is a counter within that group.
For the processor resource, we can examine the total busy time of each logical processor in the host (used by the host or virtual machines), the processor usage by the actual host OS, and the individual virtual machines.
· Hyper-V Hypervisor Logical Processor – % Total Run Time: The utilization of the actual logical processors as managed by the hypervisor, which is usage by the host OS and all the virtual machines.
· Hyper-V Hypervisor Root Virtual Processor – % Total Run Time: The amount used by just the Hyper-V host OS.
· Hyper-V Hypervisor Virtual Processor – % Total Run Time: The amount of processor used by each virtual processor for each virtual machine. There is a value for each virtual processor, which means if a virtual machine has eight virtual processors, it will have eight values.
If you see overall that the logical processors are consistently over 90 percent busy, then this would show overall that the host is too overloaded. You can look at what is using the processor by looking at the Root Virtual Processor (if it's the Hyper-V host using it) and Virtual Processor counters for each virtual machine (if it's a specific virtual machines). If the Virtual Processor counter for each virtual processor for each virtual machine will also show if it's simply a specific virtual machine that is overloaded, that means it's likely the virtual machine needs additional virtual processors added as opposed to the host being overcommitted in terms of resources.
For the memory resource there are two pieces. First, has the virtual machine been allocated enough memory? That can easily be seen by Hyper-V Manager, which shows the memory status (also visible through the Hyper-V Dynamic Memory VM – Current Pressure performance counter), and if the memory is too low, additional memory can be added through means such as Dynamic Memory, but this assumes that the host has enough memory to even allocate. Looking at Memory – Available MBytes shows the available memory on the host, but to check the amount of memory that can be allocated to virtual machines, look at Hyper-V Dynamic Memory Balancer – Available Memory, which shows memory available over the complete system or for each NUMA node (if NUMA spanning is disabled).
By default, Hyper-V enables NUMA spanning, which allows a virtual machine to be allocated memory across the boundary of the NUMA node of the processor cores being used. While allowing more virtual machines to run, NUMA spanning may also lead to an overall decrease in performance because using memory outside of the NUMA node of the processor is more “expensive” in performance terms. If you disable NUMA spanning (in the Hyper-V settings, select NUMA Spanning and uncheck Allow Virtual Machines To Span Physical NUMA Nodes), then a virtual machine cannot be allocated memory from remote NUMA nodes and would be limited to using memory on its local NUMA node.
If you disable NUMA spanning, then if you look at the performance counter Hyper-V Dynamic Memory Balancer – Available Memory, you will see multiple values, one for each NUMA node. If you have NUMA spanning turned on, you see only a single counter, System Balancer.
Potentially, more memory may be needed in the host if the available memory is low and you are seeing high memory demand from virtual machines.
The overall number of network bytes for each network adapter can be seen by looking at Network Adapter – Bytes Total/sec, and to see how much each virtual network adapter for each virtual machine is using, look at Hyper-V Virtual Network Adapter – Bytes/sec.
Finally, for storage we typically care about the latency of reads and writes, which we can see for each physical disk (or if SMB/iSCSI, etc. the equivalent counter) by looking at PhysicalDisk – Avg. Disk sec/Read and Avg. Disk sec/Write, and this should generally be less than 50 ms. Knowing the queue length can also be useful. You can see the number of IOs waiting to be actioned via the Physical Disk – Avg. Disk Read Queue Length and Avg. Disk Write Queue Length counters; you'll know you have a problem if you see sustained queues.
By looking at all these performance counters together, it should be possible to ascertain the cause of any degraded performance on your system. I actually create a custom MMC console, add all performance MMC snap-ins, and then add my counters and save the customized console so all my counters are easily available, as shown in Figure 6.10.
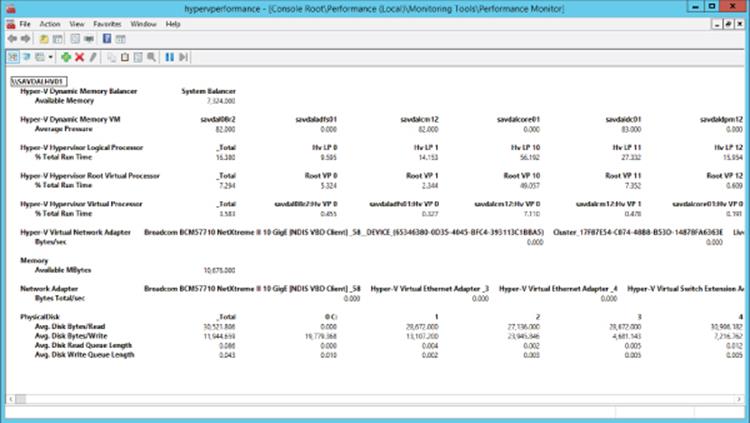
Figure 6.10 A nice view of the key resources for my Hyper-V host using the report graph type
One important point is to benchmark your system. When you first deploy the server, run the counters to see how the machine runs “new” and store the results. Performance Monitor is not just for viewing live data, it can also log the data to a file so you can save the state of a monitoring session, which is a great feature. Then once a server has been running for a while, you can run the same counters again to see how it's performing and look for any signs of performance degradation.
In Chapter 7, I will talk about optimization technologies that will use Live Migration to move virtual machines between nodes in a cluster automatically if the current node cannot adequately handle the requirements of its virtual machines. This provides some breathing room regarding exactly estimating the resource needs of every virtual machine, but it's still important to ensure that the overall cluster has sufficient resources and that it has sufficient resources even if a certain number of nodes fail within the cluster.
Resource Metering
Performance monitoring is useful to troubleshoot performance problems and even see details of virtual machines, but it's a fairly involved process. You will end up with a lot of data if you leave performance monitoring running for a long duration, and it's server specific, which means if a virtual machine was moved between servers using Live Migration or any other migration technology, you would have to start monitoring the virtual machine on the new server and add all the counters together across multiple nodes.
Windows Server 2012 introduced a better option if you want to track the resource utilization of one or more virtual machines, typically for the purpose of billing based on the resource utilization of the virtual machine. Instead of detailed metrics of the resource usage every 5 seconds, the resource metering functionality simply tracks the total and average resource utilizations of a virtual machine, which can then be viewed at any time. The great thing about the resource metering featuring is not just its simplicity but that the metering data persists even if the virtual machine is moved between Hyper-V nodes using any of the migration technologies.
The resource metering metrics that are gathered can be accessed via PowerShell cmdlets or using WMI.
To enable resource metering for a virtual machine, use this command:
Enable-VMResourceMetering -VMName <VM name>
To view the current measurements for a virtual machine in a detailed list format, use the following command:
Measure-VM -VMName <VM name> | fl
The metrics for a virtual machine never resets unless you either disable metering or perform a manual reset. Use this command to perform a manual reset:
Reset-VMResourceMetering -VMName <VM name>
Finally, to disable the metering, use this command:
Disable-VMResourceMetering -VMName <VM name>
To check which virtual machines have metering enabled, run the following command:
Get-VM | Format-Table Name, ResourceMeteringEnable
Here is an example of the output of metering from a Hyper-V 2012 R2 virtual machine. If you used metering in Hyper-V 2012, you will notice new metrics, specifically around storage performance.
PS C:\> Measure-VM -VMName savdalfs01 | fl
ComputerName : SAVDALHV01
VMId : 4c6db747-8591-4287-a8fc-ac55e37dba16
VMName : savdalfs01
HardDiskMetrics : {Microsoft.HyperV.PowerShell
.VirtualHardDiskMetrics,Microsoft.HyperV.PowerShell.VirtualHardDiskMetrics}
MeteringDuration :
AverageProcessorUsage : 115
AverageMemoryUsage : 2352
MaximumMemoryUsage : 2352
MinimumMemoryUsage : 2352
TotalDiskAllocation : 261128
AggregatedAverageNormalizedIOPS : 5
AggregatedAverageLatency : 316
AggregatedDiskDataRead : 49666
AggregatedDiskDataWritten : 87172
NetworkMeteredTrafficReport : {Microsoft.HyperV.PowerShell.VMNetworkAdapterPortAclMeteringReport,
Microsoft.HyperV.PowerShell.VMNetworkAdapterPortAclMeteringReport,
Microsoft.HyperV.PowerShell.VMNetworkAdapterPortAclMeteringReport,
Microsoft.HyperV.PowerShell.VMNetworkAdapterPortAclMeteringReport}
AvgCPU : 115
AvgRAM : 2352
MinRAM : 2352
MaxRAM : 2352
TotalDisk : 261128
Most of the values shown are fairly self-explanatory. Information is given about the average, minimum, and maximum memory usage in addition to the average processor usage, which is measured in megahertz. You may wonder why the processor is shown in megahertz instead of CPU%. The reason is that virtual machines can move between servers, so a percentage of a CPU depends entirely on the server the virtual machine is running on, whereas megahertz is a fairly consistent value no matter which servers the virtual machine is moved between.
You will notice that there seem to be duplicate values related to processor, memory, and total disk allocation. AverageProcessorUsage is the same as AvgCPU, AverageMemoryUsage is the same as AvgRAM, and so on. These are in fact the same values. The reason for two different names is the output from Measure-VM by default will be in a table format and the regular titles such as AverageProcessorUsage would use up a lot of screen space and limit the data that's visible. Therefore, the short names are there to ensure that as much information as possible is shown when viewing in table mode, as in this example:
PS C:\ > Measure-VM -VMName savdalfs01
VMName AvgCPU(MHz) AvgRAM(M) MaxRAM(M) MinRAM(M) TotalDisk(M) NetworkIn- NetworkOut-
bound(M) bound(M)
-------- ---------- --------- -------- --------- ----------- --------- ----------
savdalfs01 113 2352 2352 2352 261128 2206 3478
Also shown is disk information related to IOPS, latency, and read and write information, but there are also cryptic values related to HardDiskMetrics and NetworkMeteredTrafficReport, which don't actually give any useful information. Each of those entries are actually separate reports that have to be viewed as specific report entities. You do this by saving the metering to a variable and then inspecting the separate report elements. Here is an example.
PS C:\> $report = Measure-VM -VMName savdalfs01
PS C:\> $report.NetworkMeteredTrafficReport
LocalAddress RemoteAddress Direction TotalTraffic(M)
------------ ------------- --------- ---------------
0.0.0.0/0 Inbound 2121
0.0.0.0/0 Outbound 3479
::/0 Inbound 88
::/0 Outbound 2
PS C:\> $report.HardDiskMetrics
VirtualHardDisk : Microsoft.HyperV.PowerShell.HardDiskDrive
AverageNormalizedIOPS : 2
AverageLatency : 0
DataRead : 38465
DataWritten : 72908
VirtualHardDisk : Microsoft.HyperV.PowerShell.HardDiskDrive
AverageNormalizedIOPS : 0
AverageLatency : 0
DataRead : 11213
DataWritten : 14302
The resource metering functionality gives a great view into the metrics of a single virtual machine, but if there are 10 virtual machines in a certain group—for example, all the virtual machines for a certain client or all the SQL servers—then to get the total resource for all of the groups' virtual machines, you would have to manually add all the metrics together or write something. This is where the concept of resource pools can be useful. CPUs, memory, storage (VHD, ISO, fibre channel, and virtual floppy disk), and network adapters can be added to a resource pool from a number of virtual machines. Once the resources are added to the resource pool, metering can be enabled for the resource pool and subsequently measured. The one drawback with resource pools is that they are host specific, so if virtual machines are moved between hosts, you would need to ensure that the same resource pools are available on every node, which is why resource pools are typically not widely used.
By default, a number of resource pools, known as Primordial, exist on the system which can be viewed as follows:
PS C:\> Get-VMResourcePool
Name ResourcePoolType ParentName ResourceMeteringEnabled
---- ---------------- ---------- -----------------------
Primordial FibreChannelConnection False
Primordial VHD True
Primordial FibreChannelPort False
Primordial VFD False
Primordial ISO False
Primordial Ethernet True
Primordial Memory True
Primordial Processor True
A new resource pool is created for each of the types of resource, but the same resource pool name is specified, which makes it a single, reportable pool. For example, in the following code snippet, I create a resource pool for a group of virtual machines, GroupA, for the four types of resources and then add virtual machine CPU and memory to each created pool in addition to virtual hard disks and the virtual switch the virtual machines use. In the following example, I actually add new hard disks and network adapters to a VM, but you can also use Set-<resource> -ResourcePoolName to set the pool. Notice that when the VHD resource pool is created, you must specify the path where the VHDs will be stored.
New-VMResourcePool -Name GroupA -ResourcePoolType Processor
New-VMResourcePool -Name GroupA -ResourcePoolType Memory
New-VMResourcePool -Name GroupA -ResourcePoolType Ethernet
New-VMResourcePool -Name GroupA -ResourcePoolType VHD ´
-Paths @("\\savdalfs01\HVShare")
Add-VMSwitch -ResourcePoolName GroupA -Name "External Switch"
Set-VMProcessor -VMName savdal08R2 -ResourcePoolName GroupA
Set-VMMemory -VMName savdal08R2 - ResourcePoolName Group A
Add-VMHardDiskDrive -VMName savdal08R2 -ControllerType SCSI ´
-ResourcePoolName GroupA ´ -Path "\\savdalfs01\HVShare\savdal08R2\data1.vhdx"
Add-VMNetworkAdapter -VMName savdal08R2 -ResourcePoolName GroupA
Additionally, once you create a resource pool for networking and storage, the resource pools will become visible in the Hyper-V Manager GUI (but not for processor and memory), as shown in Figure 6.11.
Figure 6.11 Viewing resource pools in Hyper-V Manager
Once the resource pool is created, it can be enabled for metering using the normal cmdlets, except instead of a virtual machine name (VMName), specify the name of the resource pool (ResourcePoolName), as in this example:
Enable-VMResourceMetering -ResourcePoolName GroupA
If you create a resource pool, run the Get-VMResourcePool cmdlet again. You will see a lot of new entries. Remember, if you use resource pools, by default you would not be able to move a virtual machine configured in a resource pool if the target host does not have the same resource pool defined. I think resource pools are an interesting concept, but they really need to be easily managed across multiple hosts to be a useful feature.
While resource pools are primarily aimed at metering, they can also be used for actual resource allocation. Notice in the Add-VMNetworkAdapter command earlier, I don't specify a switch but rather just a resource pool that has switches added to it. This allows me to easily provision virtual machines on different hosts (providing the resource pool is defined on multiple hosts) and not worry about the actual switch name. I really don't expect many people to use resource pools in this manner. Using SCVMM to manage resource allocation is a much better and more enterprise-ready approach.
Monitoring
I want to close on the concept of monitoring your environment. When you virtualize, as I've said previously, you are putting all your eggs into a much smaller number of baskets, and it's critical that those baskets are healthy and being proactively monitored so not only are you alerted when something breaks, you are notified when something is not performing as expected, when best practices aren't used on something, and when there are signs of impending failure.
When thinking about monitoring, you have to consider not just the Hyper-V host but all the other resources that are required for the host to run and be accessible and for the virtual machines to be able to function. At a minimum, you need to monitor the following:
· The Hyper-V host operating system (including the Hyper-V role-specific intelligence)
· Server hardware
· Storage subsystems (such as SANs)
· Networking equipment
· Active Directory
· SCVMM and its SQL database
It's also a good idea to monitor the OS within the virtual machines to get the best insight.
There are many monitoring solutions available. System Center 2012 R2 includes System Center Operations Manager, which is a powerful monitoring solution for not just Microsoft environments but also for the entire infrastructure. Operations Manager has management packs, which are imported and give insight into each element of the environment. Figure 6.12 is an example view from Operations Manager 2012 R2 of the heath status of a virtual machine. Operations Manager also has a great dashboard view of actual clouds that you define within SCVMM.
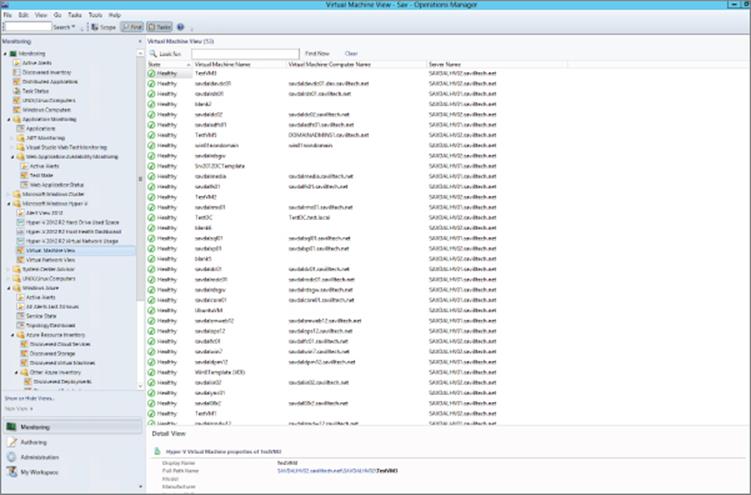
Figure 6.12 Operations Manager view of virtual machines
The Bottom Line
1. Explain how backup works in a Hyper-V environment. Windows features the VSS component that enables application-consistent backups to be taken of an operating system by calling VSS writers created by application vendors. When a backup is taken of a virtual machine at the Hyper-V host level, the VSS request is passed to the guest operating system via the backup guest service, which allows the guest OS to ensure that the disk is in a backup-ready state, allowing the virtual hard disk to be backed up at the host and be application consistent.
1. Master It Is shared VHDX backed up when you perform a VM backup at the host level?
2. Understand how to best use checkpoints and where not to use them. Checkpoints, previously known as snapshots, allow a point-in-time view of a virtual machine to be captured and then applied at a later time to revert the virtual machine back to the state it was in at the time the snapshot was taken. This is useful in testing scenarios but should not be used in production because the effect of moving a virtual machine back in time can cause problems for many services. It can even cause domain membership problems if the computer's AD account password changes after the checkpoint creation.
3. Understand the benefits of service templates. Typically a virtual machine is created from a virtual machine template, which allows a single virtual machine to be deployed. A service template allows a complete, multitiered service to be designed and then deployed through a single action. Additionally, each tier can be configured to scale up and down as workloads vary, which enables additional instances of the virtual machine for a tier to be created and deleted as necessary. Deployed instances of a service template retain their relationship to the original service template, which means if the original service template is updated, the deployed instances can be refreshed and updated with the service template changes without losing application state.
All materials on the site are licensed Creative Commons Attribution-Sharealike 3.0 Unported CC BY-SA 3.0 & GNU Free Documentation License (GFDL)
If you are the copyright holder of any material contained on our site and intend to remove it, please contact our site administrator for approval.
© 2016-2026 All site design rights belong to S.Y.A.