Mastering Hyper-V 2012 R2 with System Center and Windows Azure (2014)
Chapter 8. Hyper-V Replica and Cloud Orchestration
High availability is essential for providing the most resilient infrastructure possible for a Hyper-V environment in order to ensure the availability of virtual machines; however, the ability to provide disaster recovery services to protect against the loss of an entire site is becoming a higher priority for many organizations. Windows Server 2012 introduced a new capability to Hyper-V that provides replication from one Hyper-V server to another, independent of any cluster or storage replication capabilities.
This chapter covers the options for providing disaster recovery for services in an organization and explains how Hyper-V Replica fits into a complete disaster recovery solution. The chapter also presents the options for providing orchestration of disaster recovery failover.
In this chapter, you will learn to
· Identify the best options for providing disaster recovery for the different services in your organization
· Describe the types of failover for Hyper-V Replica
· Explain the automated options for Hyper-V Replica failover
The Need for Disaster Recovery and DR Basics
Modern organizations have various applications that are used internally by partners and by customers. These applications range from ones that are “nice to have” but not essential to doing business to those that would shut down the company if not available. Even the briefest outage of these business-critical applications can cause organizations harm in multiple ways, including the following:
· Financial loss through not being able to perform normal business functions
· Damage to reputation through publically visible outages that erode confidence in the organization for external parties
· Potential compliance gaps to regulatory requirements
It is therefore important to ensure that business-critical applications are always available, both within the primary datacenter through high availability technologies and also in alternate locations through disaster recovery technologies (although often a single technology can be leveraged for both high availability and disaster recovery). To provide disaster recovery, the data related to an application must be available in the alternate location, which means data replication. There must be means to run the application and connect to it, which means compute and network resources are required.
It is important to understand which applications are critical to the organization, and that can be ascertained only with the involvement of the business groups. Once the business-critical applications are identified, you must understand the dependent applications and services of those applications because protecting the business-critical applications without their dependencies would result in a nonfunctional solution in the event of a system outage or disaster scenario.
As an example, consider a typical line-of-business application that may run on one or more application servers. That application may leverage a SQL database that runs on a separate infrastructure, it may publish services through a corporate reverse proxy that is Internet facing, and it may require Active Directory for authentication. For the line-of-business application to be functional, all those dependent services must be available. In fact, when planning for high availability and disaster recovery, it's necessary to protect the applications and services that the target application depends on at the same or higher protection level.
There are many ways to provide resiliency and availability to services locally within a location and between locations, and there is no single “best” technology; rather, it is important to utilize the best availability technology for specific applications and services. Many availability solutions leverage the failover clustering feature that was covered in the previous chapter. A cluster-enabled application is protected from the failure of a node and will either seamlessly transition to another node or restart on another node without any administrator intervention.
Traditionally, a physical location was the boundary for a cluster for the following reasons:
· Cluster applications historically required access to shared storage that was facilitated via SAN storage and connected using technologies such as iSCSI and Fibre Channel. Making shared storage available to a remote SAN was typically not possible because of the latencies introduced with remotely accessing storage, and having a remote site dependent on storage in another remote site defeated the point of having a multisite cluster, which was to protect from a site failure. The solution was to have SAN-level replication, which historically was not available or was prohibitively expensive.
· Nodes in a cluster required a high-quality connection between nodes that was not tolerant to latency. This network was used for heartbeats between nodes to ensure all nodes were healthy and available. Cluster resources required an IP address that could not be changed between locations. Most multisite environments use different IP networks at the different locations, which meant that using clustering in a multisite environment, complex VLAN configurations, and geonetworks were required.
· Clusters used a special quorum disk that provided the foundation for partitioning protection. This quorum disk had to always be available, which typically meant it was located in one physical location.
Windows Server 2008 and a new shift in many datacenter applications removed these barriers for enabling multisite clusters. Key datacenter applications such as SQL Server and Exchange introduced options that did not require shared storage and instead leveraged their own data replication technologies. Failover clustering introduced changes that enabled multiple IP addresses to be allocated to a resource, and whichever IP address was required for the site that the resource was active in was used. Failover clustering also enabled more flexible heartbeat configurations, which tolerated higher latency networks; in addition, the reliance on a quorum disk was removed, offering additional quorum models based on the number of nodes and even a file share located at a third site. Being able to run clusters over multiple locations without shared storage enables certain disaster recovery options that will be discussed.
When designing a disaster recovery solution, there are typically many options available that offer different levels of recoverability. The recovery point objective (RPO) is the point you want to recover to in the event of a disaster. For example, only 30 minutes of data should be lost. The recovery time objective (RTO) is how quickly you need to be up and running in the event of a disaster. For example, the systems should be available within 4 hours in the event of a disaster. It's important to understand the RPO and RTO requirements for your systems when designing your disaster recovery solution. Also, different systems will likely have different requirements.
It is important to be realistic about the capabilities of your organization. An alternative to implementing new disaster recovery solutions for services may be to host the service in a public cloud infrastructure that provides site resiliency as part of the service. Using the public cloud as the disaster recovery location can also be an option.
Create very detailed processes that will be used in the event of a disaster to facilitate the failover. These processes should be updated any time a system changes or a new system is added. Disaster recovery tests should be performed at least every six months. Ensure the disaster recovery plans do not assume any amount of knowledge because the regular IT personal may not be available in the event of a disaster.
Asynchronous vs. Synchronous Replication
As discussed, disaster recovery requires having the application data available in the disaster recovery location. This either requires the data to be stored somewhere that is available to both locations such as in the public cloud or, more commonly, requires the data to be stored in both locations and replication technologies to be used to keep the replica copy of the data synchronized with the primary (live) copy of the data.
The mode of the replication can be either asynchronous or synchronous.
1. Asynchronous Mode This mode allows transactions to be committed on the primary source before the transaction has been sent to the replicas or has been acknowledged. The exact mechanism for asynchronous replication differs, but the key point is the primary source can continue working independently of the replica receiving and acknowledging the data. This gives the best performance on the primary replica (although there is always a slight risk of data loss in a failure situation because data is committed on the primary before it's committed or potentially even sent to the replica).
2. Synchronous Mode
This mode ensures no transactions are committed on the primary source until they are acknowledged on the replica. This ensures there is no risk of data loss, but this will incur some performance impact because of the additional delay while waiting for the acknowledgments from the replica. The higher the latency between the primary and the replica, the greater the performance impact.
Nearly every type of cross-site replication leverages asynchronous as the replication type because of the typical high latency between different locations and the performance impact that synchronous replication across high latency links imposes. Synchronous replication is typically reserved within a datacenter for highly critical data that cannot risk any kind of data loss.
SQL Server is a good example of a workload that leverages both asynchronous and synchronous replication with its AlwaysOn technology. AlwaysOn provides the replication of SQL databases between a primary replica and one or more secondary replicas. Within a datacenter, synchronous AlwaysOn replication may be used; between locations, the asynchronous AlwaysOn replication is typically used. SQL AlwaysOn actually allows switching between replication types, which opens up some interesting failover solutions such as running in asynchronous normally but switching to synchronous prior to failover to ensure no data loss.
Many storage solutions such as SANs offer replication at a storage level from one SAN to another, and very high-end SANs can actually offer a synchronous replication capability. This is typically expensive and is specific to the type of SAN used. The benefit of using SAN-level replication where available is that a cluster can then use the SAN storage in multiple locations as a single logical storage device, enabling clusters to span multiple locations with “shared” storage. Some large organizations leverage this type of SAN replication for their tier 1 workloads.
Introduction to Hyper-V Replica
The news over the past few years has been filled with natural disasters such as Hurricane Sandy that have caused a loss of life and huge impacts to the infrastructure of entire cities. Even if the possibility of this type of disaster is known about weeks in advance, many organizations lack the technologies to enable disaster recovery to alternate locations. In the previous section, I talked about SAN-level replication, which is expensive and has high requirements that are not available to many organizations. Some applications such as SQL, Exchange, and Active Directory have their own replication technologies to enable disaster recovery protection, but many other applications do not have any kind of replication capability. As more and more of the datacenter is using virtualization, organizations are looking for a solution at the virtualization layer to help in disaster recovery planning.
Windows Server 2012 was an enormous release, particularly with regard to virtualization and enabling cloud services. One of the biggest new features was the introduction of Hyper-V Replica. Hyper-V Replica introduces the ability to replicate a virtual machine asynchronously to a second Hyper-V host. The target Hyper-V server, the replica, does not have to be part of a cluster with the primary Hyper-V host (in fact, the replica cannot be in the same cluster as the primary), does not need any shared storage, and does not even require dedicated network infrastructure for the replication. The goal of Hyper-V Replica is to enable disaster recovery capabilities for any Hyper-V environment without steep requirements, and this is achieved through its use of asynchronous replication.
Hyper-V Replica uses asynchronous replication efficiently and at a high level works as follows:
1. When a virtual machine is enabled for replication, a new virtual machine is created on the Hyper-V replica host that matches the configuration of the primary virtual machine, and the replica virtual machine is turned off.
2. The storage of the primary virtual machine is replicated to the replica virtual machine, and a log is started on the primary virtual machine for the VHDs being replicated that stores the writes to the VHDs. The log file is stored in the same location as the source VHD.
3. Once the initial replication of the storage is complete, the log file is closed. A new log file is started to track ongoing changes, and the closed log file is sent to the replica Hyper-V host and merged with the VHDs for the replica VM. The replica VM remains turned off.
4. At a defined time interval, the log file is closed, a new one is created, and the closed log file is sent to the replica and merged.
Note that the only replication is of the virtual hard disks of the virtual machine, not the ongoing configuration of the virtual machine and not the memory. This is why you cannot enable Hyper-V Replica for virtual machines that leverage virtual Fibre Channel, iSCSI, or pass-through storage. The virtual machine must use virtual hard disks for all storage because it is through the VHD implementation that replication is enabled. If you use virtual Fibre Channel or iSCSI, the assumption would be that the SAN is performing some level of replication between the primary and replica locations, which means it would make more sense for that SAN replication to replicate the VHDs of the virtual machine as well as the LUNs attached to the VM using virtual Fibre Channel/iSCSI. You would not want two different replication technologies used that would be out of sync with each other.
Because Hyper-V Replica uses asynchronous replication, there is a period where the replica is missing some of the data from the primary source. Potentially, in an unplanned failure, a certain amount of data may be lost. The exact amount of loss depends on how frequently the replica is updated. In Windows Server 2012, this was every 5 minutes, but in Windows Server 2012 R2, it can be every 30 seconds, every 5 minutes, or every 15 minutes. This possible data loss needs to be compared against the RPO of the application. If the application has an RPO of 5 minutes, then you can replicate at a 5-minute or 30-second interval. If the RPO is 1 minute, then you must replicate at the 30-second interval and also ensure there is sufficient bandwidth to handle the transmission of logs from the source to the replica. The good news is that because the replication is asynchronous, the introduction of the replica does not introduce any performance degradation on the source virtual machine and does not require very fast, low-latency network connections between the source host and the replica host.
The use of asynchronous replication by Hyper-V Replica opens up the use of replication for disaster recovery scenarios to many more scenarios and types of companies. These are some key ones that are often considered:
· Datacenter-to-datacenter replication for tier 1 applications for organizations without SAN-level replication such as small and medium-sized organizations
· Datacenter-to-datacenter replication for tier 2 applications for organizations with SAN-level replication but that don't want to use the SAN-level replication for applications that are not tier 1
· Branch office–to–head office replication to protect applications hosted at the branch location
· Hoster location 1–to–hoster location 2 replication for hosting companies
Small organizations that do not have a second datacenter can replicate to a hoster as the secondary datacenter for DR needs or even to a consulting organizations datacenter for their clients.
There are many more scenarios, including anything that is enabled through the asynchronous replication of a virtual machine. The key point is that with Hyper-V Replica, the ability to replicate virtual machines is now an option for any organization with two locations. As I will cover later in the chapter, it's an option even if an organization has only one location. It is also important to note that Hyper-V Replica is completely agnostic of the underlying storage technology used.
Enabling Hyper-V Replica
Hyper-V Replica is simple to configure, and the easiest way to really understand how Hyper-V Replica works is to walk through its setup options and enable replication for a virtual machine. The first step in using Hyper-V Replica is to configure the replica Hyper-V server to accept requests for it to host a replica. This is performed using Hyper-V Manager. Select Hyper-V Settings from the server's list of actions, and in Hyper-V Settings, select the Replication Configuration list of configurations, as shown in Figure 8.1. Check the Enable This Computer As A Replica Server. Then you have a couple of choices to make.
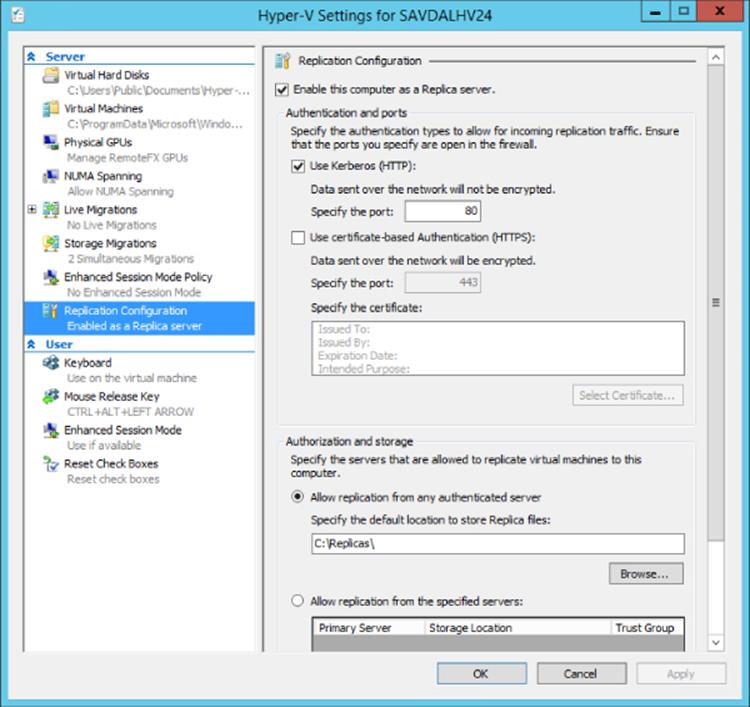
Figure 8.1 Enabling inbound replication for a Hyper-V server
The first choice is to enable the use of Kerberos, which uses HTTP, or certificate-based authentication, which uses HTTPS. Kerberos is the simpler option to configure but requires that the primary and replica Hyper-V servers use Kerberos authentication and therefore are part of the same Active Directory forest or trusted domain. When using Kerberos, the replication of data between the primary and replica is not encrypted and is sent over the standard HTTP port 80. If encryption is required, then the Windows IPsec implementation could be used. The other option is to use certificate-based authentication, which enables the primary and replica to not be part of the same Active Directory forest or even organization and requires a certificate to be specified for use with an added benefit of using HTTPS, meaning all data transferred is now encrypted. Both Kerberos and certificate-based authentication can be enabled; in that case, when a new replication relationship is established, the administrator configuring the replication will be given a choice to use either Kerberos or certificate-based authentication. The option to use certificate-based authentication would be useful if you wanted to replicate to a Hyper-V server that's not part of your organization, such as a host offered by a hosting company as part of an external disaster recovery solution.
The only other configuration choice is to specify which servers the replica server will accept replication requests from and where those replicas will be stored. One option is to allow replication from any authenticated server, in which case a single location is selected where all replicas will be stored. The other option is to specify specific servers that can replicate to the server; in this case, each server can have a different storage location. When specifying specific servers, it is possible to use the wildcard character within the server name (but only one wildcard is supported in the server name); this allows the enablement of a group of servers such as *.savilltech.net for all servers whose fully qualified domain name ends in savilltech.net. The Trust Group setting is simply a tag to allow VMs to move between Hyper-V hosts with same trust group and continue replicating without issue. With Shared Nothing Live Migration, virtual machines can be moved between Hyper-V hosts that are not clustered with no downtime. With this new mobility capability you need to ensure groups of servers have the same trust group tag to enable replication to be unaffected if virtual machines are moved between servers within a trust group.
You can also perform this configuration using PowerShell via the Set-VMReplicationServer cmdlet. For example, to enable replication with the default settings (allow replication from any server and use Kerberos), I use the following:
Set-VMReplicationServer -ReplicationEnabled 1 -ComputerName savdalhv24
Further configuration can be performed using Set-VMReplicationServer. The easiest way to see the options is to view the output of Get-VMReplicationServer, as shown here:
PS C:\> get-vmreplicationserver -computername savdalhv24 | fl
ComputerName : savdalhv24
ReplicationEnabled : True
ReplicationAllowedFromAnyServer : True
AllowedAuthenticationType : Kerberos
CertificateThumbprint :
KerberosAuthenticationPort : 80
CertificateAuthenticationPort : 443
KerberosAuthenticationPortMapping :
CertificateAuthenticationPortMapping :
MonitoringInterval : 12:00:00
MonitoringStartTime : 15:00:00
DefaultStorageLocation : C:\Replicas\
OperationalStatus : {Ok}
StatusDescriptions : {The Replication Service is fully operational.}
AuthorizationEntries : {*}
Key :
IsDeleted : False
RepEnabled : True
KerbAuthPort : 80
CertAuthPort : 443
AllowAnyServer : True
AuthType : Kerb
Additionally, replication entries from specific hosts can be added using the New-VMReplicationAuthorizationEntry cmdlet. Here's an example:
New-VMReplicationAuthorizationEntry -AllowedPrimaryServer <primary server> -ReplicaStorageLocation <location> -TrustGroup <tag if needed>
The final step to complete a server to accept replication is to enable the required firewall exception for the port used: 80 for HTTP and 443 for HTTPS. The firewall exceptions are built into Windows Server but are not enabled even after replication configuration is complete. So, you will need to start the Windows Firewall with Advanced Security administrative tool, select Inbound Rules, and enable either (depending on your authetnication methods) Hyper-V Replica HTTP Listener (TCP-In) or Hyper-V Replica HTTPS Listener (TCP-In), or both.
Once the replica server has been enabled for replication, it is important to also enable the primary Hyper-V server as a replica. This allows the reversal of replication in the event the virtual machine is activated on the replica server and now needs to start replicating to the server that was previously the primary but would now be considered the replica.
One item you do not need to configure as part of the replication configuration is the network to use for the replication traffic. The assumption is this technology is used between datacenters and there would be only one valid path between them; therefore, Hyper-V Replica will automatically choose the correct network to use for the replication traffic.
If you have existing Windows Server 2012 Hyper-V Replica environments to upgrade to Windows Server 2012 R2, you must upgrade the replica Hyper-V server first.
Configuring Hyper-V Replica
Once the Hyper-V hosts are configured to enable the Hyper-V Replica capability, the next step is enabling virtual machines to be replicated. To show how to enable replication, I will initially use Hyper-V Manager, although PowerShell can also be used and would be used in any kind of automated bulk configuration. You select the virtual machine you want to enable replication on and select the Enable Replication action. The Replication Configuration Wizard will launch. Then follow these steps:
1. Specify the replica server that will host the replica and be sure the authentication type to use is selected. A check is performed against the replica server to check the types of authentication that are supported. If both Kerberos and certificate-based authentication are supported on the target replica server and are usable, you will need to select the authentication method to use, typically Kerberos. Additionally, you can select whether the data sent over the network should be compressed, which will save network bandwidth but will use additional CPU cycles both on the primary and replica Hyper-V servers. The option to use compression is enabled by default.
2. Select the actual virtual hard disks that should be replicated. If a virtual machine has multiple virtual hard disks, then the hard disks to be replicated can be selected to ensure only the required virtual hard disks are replicated. For example, you could do this in order to not replicate VHDs containing just a pagefile, although this does cause more management overhead and, given the churn of pagefiles, is typically quite light; so, this is not a mandatory step. Be aware that only VHDs can be replicated; if a virtual machine uses pass-through disks, they cannot be replicated with Hyper-V Replica (another reason to avoid pass-through disks).
3. Identify the frequency of replication, which can be 30 seconds, 5 minutes, or 15 minutes. This step was not present in Windows Server 2012, which supported a 5-minute replication frequency only.
4. Configure the recovery history. By default the replica will have a single recovery point: the latest replication state. An extended recovery history is optional additional hourly recovery points, as shown in Figure 8.2. The additional recovery points are manifested as snapshots on the virtual machine that is created on the replica server; you can choose a specific recovery point by selecting the desired snapshot. Windows Server 2012 R2 increased the number of hourly recovery points from 16 to 24, which provides the ability to have a full day of incremental protection. Windows Server 2012 R2 also improves the mechanics of how the replica works, which now behaves more like a copy-on-write backup because writes written to the replica VHD have the replaced blocks now written to undo logs. This provides performance improvements.
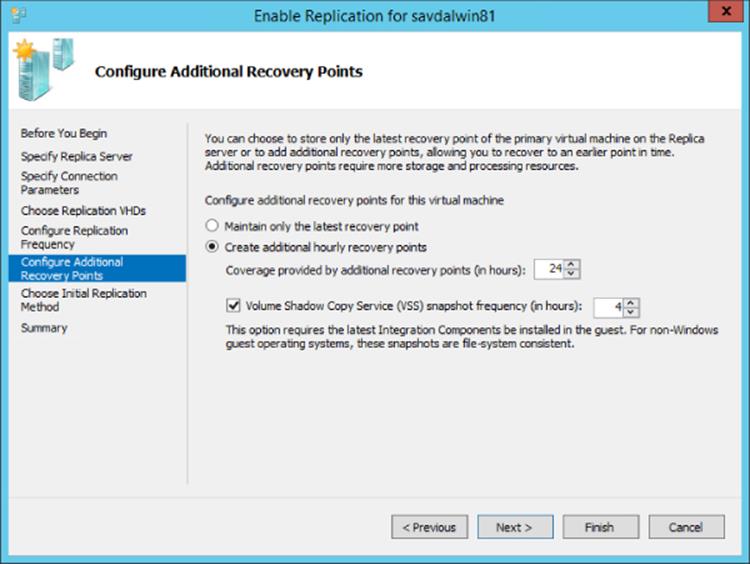
Figure 8.2 Recovery point configuration
An additional option to create an incremental VSS copy at a configurable number of hours is also available. This gives an additional level of assurance in the integrity of the replica at that point in time. The normal log files sent at the replication interval provide the latest storage content, but at that point the disk may have been in an inconsistent state on the source virtual machine. Therefore, when the replica was started, the replica VHD might not have been in a consistent state. The incremental VSS option, when enabled, triggers a VSS snapshot on the source prior to that cycle's replication, which forces the source virtual machine to ensure the disk content is in an application-consistent state (in the same manner as if a backup were taken, the log file was closed and sent to the replica, and then that state was saved as the application-consistent recovery point on the target). If the virtual machine contains an application that has VSS writers, I suggest using the option to create an application-consistent recovery point. The default of 4 hours is a good balance between integrity and the additional work caused by creating a VSS recovery point on the source virtual machine.
Once the recovery point configuration is complete, you need to choose the method to initially replicate the storage. It can be accomplished by any of the following:
· Sending the VHD content over the network.
· Sending the VHD content via external media and specifying a location for the content to be exported to.
· Using an existing virtual machine on the replica server as the initial copy. This can be used if you already restored the virtual machine to the target Hyper-V server or perhaps if you previously had replication enabled and broke the replica but now want to enable again. An efficient bit-by-bit comparison will be performed between the primary and replica to ensure consistency.
The initial replication can be configured to begin immediately or at a later time, such as outside of normal business hours when contention on the network resources would be less. Depending on the choices made, the virtual machine would be created on the replica Hyper-V server in the off state, and the initial replication would begin. Once complete, at the replica time interval the Hyper-V Replica log (HRL) file is closed, sent to the replica, and merged into the replica VHD. The entire time the replica virtual machine is turned off. No memory, processor, or device state is replicated to the replica virtual machine; only disk content is. In the event the replica is activated, it will be turned on and booted similar to a crash-consistent state as if it previously just had been powered down without a clean shutdown. This is one of the reasons performing the periodic VSS snapshot recovery point is useful to ensure disk integrity.
To view the exact replication configuration of a virtual machine once the configuration has been performed, view the settings of the virtual machine. The Replication tab shows all the details of the Hyper-V Replica configuration, including the replica interval and authentication and recovery point configuration.
You can also enable replication using PowerShell with the Enable-VMReplication cmdlet. The only parameters to enable replication are to specify VMName for the virtual machine to be replicated, to specify the replica server using ReplicaServerName and ReplicaServerPort, and to specify the authentication type using AuthenticationType. Once replication is enabled, you need to start the initial replication using Start-VMInitialReplication.
Once the replica virtual machine is created, it is now a separate virtual machine from the primary virtual machine. Any changes in configuration to the primary virtual machine are not reflected in the replica virtual machine. This allows changes to be made on either side, and the replication of the VHD content will continue. Still, if there are changes made to the primary source such as increasing resources like memory or processor, you will need to manually reflect that change on the replica.
The fact the virtual machine on the primary and on the replica are actually separate virtual machines in terms of configuration enables some nice functionality. In most environments, the primary and secondary datacenters will use different IP networks, which means when a virtual machine is started in the disaster recovery site, it needs a new IP address. As part of the Hyper-V Replica functionality, an additional configuration is available on the virtual machine once replication has been enabled, namely, a failover TCP/IP configuration (found under the Network Adapter configuration of the virtual machine). This allows an alternate IPv4 and IPv6 configuration to be specified on each virtual network adapter for the replica virtual machine, which is injected into the virtual machine in the event of a failover, as shown in Figure 8.3. It is important to understand that this process works by Hyper-V updating the virtual machine through the Windows Server Hyper-V integration services running on the virtual machine. This works only on synthetic network adapters, not legacy network adapters, and it requires Windows XP SP2/Windows Server 2003 SP2 and newer to be running on the virtual machine to work. This also works with Linux virtual machines that are running the latest Linux distributions. A good practice is to complete the failover TCP/IP configuration on the primary virtual machine with its normal IP configuration. That way, if the replica is ever activated, replication is reversed, and the virtual machine is then failed back to what was the primary, and the correct IP address for the primary location can automatically be put back.
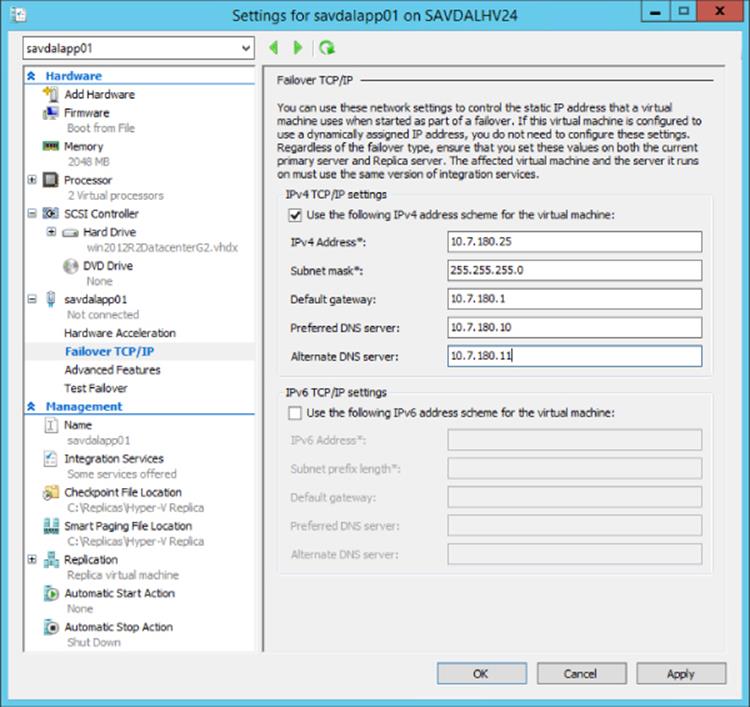
Figure 8.3 Configuring alternate IP configuration to be used during failover
Inject IP Configuration Outside of Hyper-V Replica Using PowerShell
Hyper-V Replica offers the ability to inject an IP address into a virtual machine; you can also use this functionality outside of Hyper-V Replica.
To perform the injection using PowerShell, use the following code, which leverages the Msvm_GuestNetworkAdapterConfiguration class (http://msdn.microsoft.com/en-us/library/hh850156(v=vs.85).aspx). Replace the name of the VM and the IP configuration as needed.
$vmName = "win81g2"
$Msvm_VirtualSystemManagementService = Get-WmiObject ´
-Namespace root\virtualization\v2 ´
-Class Msvm_VirtualSystemManagementService
$Msvm_ComputerSystem = Get-WmiObject -Namespace root\virtualization\v2 ´
-Class Msvm_ComputerSystem -Filter "ElementName='$vmName'"
$Msvm_VirtualSystemSettingData = ($Msvm_ComputerSystem.GetRelated(«Msvm_VirtualSystemSettingData», ´
"Msvm_SettingsDefineState", $null, $null, "SettingData", ´
«ManagedElement», $false, $null) | % {$_})
$Msvm_SyntheticEthernetPortSettingData = $Msvm_VirtualSystemSettingData.GetRelated(«Msvm_SyntheticEthernetPortSettingData»)
$Msvm_GuestNetworkAdapterConfiguration = ($Msvm_SyntheticEthernetPortSettingData.GetRelated( ´
"Msvm_GuestNetworkAdapterConfiguration", "Msvm_SettingDataComponent", ´
$null, $null, "PartComponent", "GroupComponent", $false, $null) | % {$_})
$Msvm_GuestNetworkAdapterConfiguration.DHCPEnabled = $false
$Msvm_GuestNetworkAdapterConfiguration.IPAddresses = @("192.168.1.207")
$Msvm_GuestNetworkAdapterConfiguration.Subnets = @("255.255.255.0")
$Msvm_GuestNetworkAdapterConfiguration.DefaultGateways = @("192.168.1.1")
$Msvm_GuestNetworkAdapterConfiguration.DNSServers = @("192.168.1.10", «192.168.1.11»)
$Msvm_VirtualSystemManagementService.SetGuestNetworkAdapterConfiguration( ´
$Msvm_ComputerSystem.Path, $Msvm_GuestNetworkAdapterConfiguration.GetText(1))
There is a disadvantage to separating the virtual machine between the primary and the replica. If additional virtual hard disks are added to the primary virtual machine, the additional virtual hard disks will not automatically start replicating to the replica. The only way to add the new virtual hard disks for the virtual machine to those being replicated is to break the replication between the primary and the replica and then reestablish replication by selecting the new virtual hard disks as part of the replication set. When reestablishing replication, you can specify to use the existing virtual machine for the initial data, which will optimize the amount of data required to seed the replica.
One key point of Hyper-V Replica is that a virtual machine can have only one replica; this means a single virtual machine cannot have more than one replica. Additionally, in Windows Server 2012 you cannot create a replica of a replica VM, known as extended replication. This is not a problem if you consider the original goal of Hyper-V Replica, which is having a replica of a virtual machine in a disaster recovery location. This is also why the fixed interval of 5 minutes was a good default value. A number of organizations actually used Hyper-V Replica differently. They used Hyper-V Replica within a single datacenter where they could not use clustering or did not want to use it. This is also the reason the 5-minute replication frequency was too restrictive and organizations wanted to replicate more frequently. These same organizations still wanted to be able to have a replica to an alternate site, which required extending replication. As mentioned, the ability to add a replica to the existing replica virtual machine was added in Windows Server 2012 R2. Note you still cannot have more than one replica for a single VM; so, with Windows Server 2012 R2, the primary virtual machine can still have only one replica, but that replica can now have its own replica, as shown in Figure 8.4.
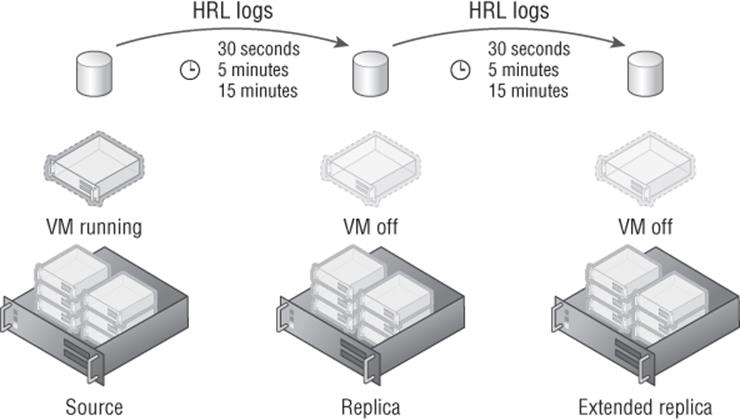
Figure 8.4 Windows Server 2012 R2 Hyper-V extended replication
Note that an extended replica can be used in any situation, not just if you have the main replication within a datacenter. If you have two DR locations, Hyper-V extended replica can be beneficial. I've also seen it when in the primary datacenter the standard Hyper-V Replica feature is used to replicate a virtual machine from one cluster to another cluster and then extended replica is used to replicate to the DR datacenter. The extended replica has its own replication interval that is independent of the primary replica, but its interval cannot be less than that of the primary replica. For example, if the primary replica replicates every 5 minutes, then the extended replica can replicate every 5 minutes or 15 minutes but not at the 30-second interval.
To enable the extended replication, perform the following steps:
1. Open Hyper-V Manager and select the Hyper-V host that hosts the replica virtual machine (note the replica and not the source virtual machine).
2. Right-click the replica virtual machine and select the Extend Replication action from the Replication menu.
3. Click Next on the introduction screen of the Extend Replication Wizard.
4. Select the server that will host the extended replica and click Next.
5. The rest of the configuration is the same as enabling a normal replica: Select the authentication type, the frequency of replication, the additional recovery points, and the initial method of replication.
There is no separate PowerShell cmdlet to enable extended replication. The same Enable-VMReplication cmdlet is used for extended replication by specifying the replica VM. For ReplicaServerName, specify the extended replica Hyper-V server.
Replication can be removed for a virtual machine using the Replication – Remove Replication action or using the Remove-VMReplication PowerShell cmdlet.
Using Hyper-V Replica Broker
If you use failover clustering, there is an additional requirement since a failover cluster consists of multiple Hyper-V hosts. If a failover cluster is the target for Hyper-V Replica, it's important the whole cluster can host the replicated virtual machine and not just a single host. This means the storage of the replica must be on a SMB share or cluster-shared volume. Hyper-V Replica support in a failover cluster is enabled by adding the Hyper-V Replica Broker role to the failover cluster. This will require a name and IP address for the Hyper-V Replica Broker role, which serves as the client access point (CAP) for Hyper-V Replica and will be the name used when selecting the cluster as a target for a replica.
When enabling replication within a cluster, once the Hyper-V Replica Broker role is added, the replication configuration is performed within the Failover Cluster Manager tool. Once the configurations for replication are completed (which are the same as for a stand-alone Hyper-V host), all hosts in the cluster will automatically be configured, unless certificate-based authentication was selected, in which case each host needs its own certificate configured.
You must configure the Hyper-V Replica Broker role in the cluster even if the cluster is not a replica target (although this is highly unlikely since in the event of a failover replication is typically reversed). This means you always need the Hyper-V Replica Broker role for a cluster that is participating in Hyper-V Replica in any way. If the cluster is the replica target, then the broker redirects the replication traffic because the VM may move between hosts in the cluster. If the cluster is the source of the replica, then the broker enables authorization of the primary hosts at a cluster level, and of course the replica is needed if the replication is reversed.
Once the Hyper-V Replica Broker role is created, you should modify its configuration by selecting the Replication Settings action for the broker. Then select to enable the cluster as a replica server and choose the various configurations, which are the same as for a normal replica server, as shown in Figure 8.5. Once replication is enabled, you will need to manually enable the required firewall exceptions on each host because this is not performed by the broker configuration; an example is the Hyper-V Replica HTTP Listener (TCP-In) firewall exception.
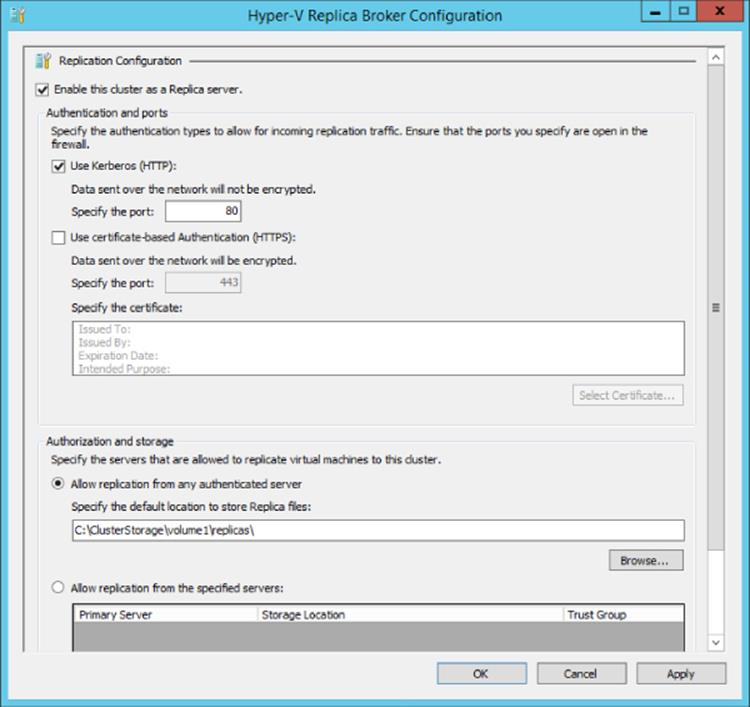
Figure 8.5 Enabling inbound replication for the Hyper-V Replica Broker role
Performing Hyper-V Replica Failover
Once replication is configured, the next step is to perform failovers. But before failing over, it's important to ensure the ongoing health of the replication. In Hyper-V Manager, each virtual machine has a Replication tab as part of its high-level status. This tab shows the mode of replication, the health of the replication, and the time of last synchronization. This same information is available in Failover Cluster Manager for the virtual machine, and you can view more detailed health of the replication state using the Replication – View Replication Health action, as shown in Figure 8.6. The replication health view shows the same basic overview information but also details of the average and maximum size of the transferred data, the average latency, any errors, and the number of replication cycles. It also shows pending replication data. It may be confusing because there is a Replication State entry and a Replication Health entry, but Replication State shows the current state of replication, and Replication Health factors in events over a period of time, which helps identify whether there has been a problem at some point in that evaluation time period. You can find a full list of possible values for Replication State and Replication Health at http://blogs.technet.com/b/virtualization/archive/2012/06/15/interpreting-replication-health-part-1.aspx.

Figure 8.6 Viewing the health of replication
You can also see this health information with PowerShell using Measure_VMReplication. As shown here, the output contains the same basic information as in the replication health graphical interface. If you need a detailed level of monitoring for Hyper-V Replica, one option is to use System Center Operations Manager and the Hyper-V Management Pack, which monitors the health of Hyper-V Replica and many other Hyper-V aspects.
PS C:\> Measure-VMReplication -ComputerName savdalhv21 -VMName savdalapp01 | fl
VMName : savdalapp01
ReplicationState : Replicating
ReplicationHealth : Normal
LastReplicationTime : 12/10
/2013 9:30:17 AM
PendingReplicationSize : 4096
AverageReplicationLatency : 00:00:00
SuccessfulReplicationCount : 223
MissedReplicationCount : 0
If a virtual machine is the replica virtual machine and also has its own extended replica, Measure-VMReplication will return information about its relationship with the primary and extended replica. If you want to view information about only one of the relationships, add -ReplicationRelationshipType and specify either Simple (to view the primary relationship) or Extended (to see the extended relationship).
You can see the actual HRL files used by Hyper-V Replica if you look at the folder containing the VHD files being replicated. It is possible to pause and resume replication, but be careful to not pause replication for too long because this will cause the log files to build up. You can also pause and resume the replication using the Suspend-VMReplication and Resume-VMReplication cmdlets. Once again, you can specify ReplicationRelationshipType for a virtual machine that is the replica of the primary and the source for the extended replica, in other words, the one in the middle.
This can also happen if there is a network break between the primary and replica that stops transmission of the log files. If the size of the log files is greater than 50 percent of the size of the actual VHD file, a resynchronization is required. Resynchronization performs a block-by-block comparison of the source of the replica, with only different blocks being sent over the network. This is deemed more efficient than sending over the accumulated log files, although there is a performance impact during a resynchronization. Other scenarios can force a resynchronization, but they are rare. See http://blogs.technet.com/b/virtualization/archive/2013/05/10/resynchronization-of-virtual-machines-in-hyper-v-replica.aspx, which is a great blog post and worth reading for more information on the exact resynchronization process.
Now that you understand how to view the ongoing health of your Hyper-V Replica environment, you can look at the types of failover you want to perform with Hyper-V Replica. There are three types of failover used with Hyper-V Replica, as detailed here. Depending on the type of failover, the actual failover is triggered from either the primary or replica Hyper-V host by selecting one of the failover actions from the Replication action menu.
1. Test Failover This is triggered on the replica virtual machine, which allows the replica VM to be started on the replica Hyper-V host by creating a temporary virtual machine based on the recovery point selected. Testing is performed to ensure replication is working as planned and as part of a larger site failover test process. During the test failover, the primary VM continues to send log updates to the replica VM, which are merged into the replica VHDs, ensuring replication continues. Once testing is complete, the temporary virtual machine is deleted. When triggering the test failover, you have the option to select the point in time to use for the failover if the virtual machine was enabled to store multiple points in time when replication was enabled, as shown in Figure 8.7. The test failover virtual machine is not connected to the regular network to avoid interfering with normal network communications.
2. Planned Failover This is triggered on the primary virtual machine and is the preferred failover type. This process shuts down the primary VM, replicates any pending changes to ensure no data loss, fails over to the replica VM, reverses the replication (if the option is selected) so changes flow in the reverse direction, and then starts the replica VM, which becomes the primary (while the old primary becomes the replica). Figure 8.8 shows the options for the planned failover that include whether replication should be reversed and whether the virtual machine should be started on the replica side. You should enable the reversal of replication unless there is a specific reason not to, such as if you are using extended replication (this will be discussed later in this section). Note that even though this is a planned failover, the virtual machine is still shut down during the failover, which is different from a Live Migration operation.
3. Unplanned Failover (Failover) This is triggered on the replica virtual machine because the assumption is the failover was not planned and the primary is not available because a disaster has occurred. When this is performed, a replication of pending changes is not possible, and reverse replication has to be manually enabled with a resynchronization required because there is no way to know where the primary and the replica stopped replicating. When starting the reverse replication, choose Do Not Copy The Initial Replication on the Initial Replication page. The VM on the original primary VM can be used, and a block-by-block comparison will be performed to synchronize between the replica VM and the original primary VM. Only the delta content needs to be sent over the network. When performing an unplanned failover, an option to select the point in time is available in the same way as for the test failover.
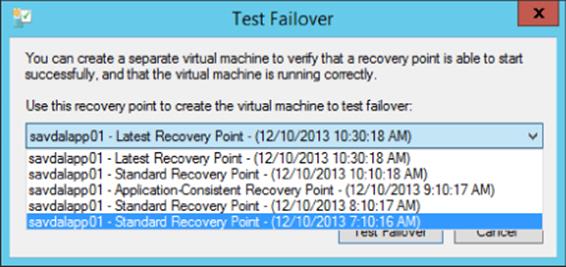
Figure 8.7 Selecting the point in time for the test failover
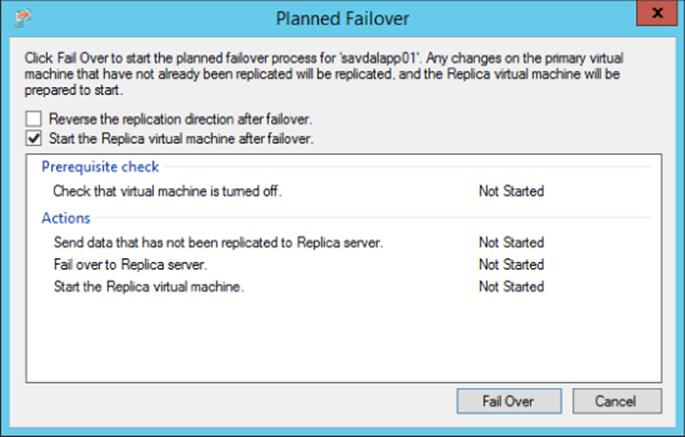
Figure 8.8 Performing a planned failover
In Windows Server 2012 if the option to maintain periodic snapshots of the primary virtual machine was enabled with Hyper-V Replica, then the replica virtual machine would show those point-in-time snapshots in the Snapshots view. This is no longer the case in Windows Server 2012 R2 Hyper-V, which may initially lead you to believe the snapshots are not being maintained for the replica, which is not the case. The various points in time are available and listed when performing a failover with Hyper-V Replica, as previously discussed. You can also see this using PowerShell, as shown here:
PS C:\> Get-VMSnapshot savdalapp01
VMName Name SnapshotType CreationTime
------ ---- ------------ ------------
savdalapp01 savdalapp01 - Standard Replica - (12/2/2013 - 7:08:59 AM) Replica 12/2/2013 7…
savdalapp01 savdalapp01 - Standard Replica - (12/2/2013 - 8:09:00 AM) Replica 12/2/2013 8…
savdalapp01 savdalapp01 - Application-consistent Replica - (12/2/2013 - 9:09:00 AM) AppConsistentReplica 12/2/2013 9…
savdalapp01 savdalapp01 - Standard Replica - (12/2/2013 - 10:09:01 AM) Replica 12/2/2013 1…
To perform a failover using PowerShell, you use the Start-VMFailover cmdlet with different switches depending on the type of failover.
For a test failover, typically you need to list all the snapshots and save to an array, so a specific snapshot can be selected to be used for the test. Next, one of the snapshots in the array is used as part of the test failover. Zero would be the first item in the array, so take care to look at the snapshots to ensure the correct one is selected. This is performed on the replica virtual machine.
$VMSnapshots = Get-VMSnapshot -VMName <vm> -SnapshotType Replica
Start-VMFailover -Confirm:$false -VMRecoverySnapshot $VMSnapshots[0] -AsTest
A planned failover is a bit more involved and involves running commands against the primary VM to prepare it for failover and then activating on the replica VM. On the primary VM, the following commands are run:
Stop-VM <VM>
Start-VMFailover -VMName <VM> –prepare
Next, on the replica VM, the following commands are run to actually perform the failover, reverse the replication, and then start the replica VM.
Start-VMFailover -VMName <VM>
Set-VMReplication -reverse -VMName <VM>
Start-VM <VM>
An unplanned failover is used when the primary has been lost and you need to force the replica to start. If multiple points in times are available, then one of those times can be selected in a similar fashion to the test failover, with the major difference that the -AsTestswitch is not used. Remember to select the right snapshot or don't use a snapshot at all, and use -VMName instead of the -VMRecoverySnapshot parameter.
$VMSnapshots = Get-VMSnapshot -VMName <vm> -SnapshotType Replica
Start-VMFailover -Confirm:$false -VMRecoverySnapshot $VMSnapshots[0]
At this point, you would check that the virtual machine is in the desired state and then complete the failover using this command:
Complete-VMFailover -VMName <VM> -Confirm:$false
The actual failover is invisible to the virtual machine guest operating system. The operating system is aware only of a reboot and likely its IP address change, which is performed by Hyper-V if alternate IP configuration was configured as part of the network adapter configuration. If you performed a planned failover, then the replication is reversed, providing you selected that option. To fail back so the virtual machine is running in the main datacenter, you perform another failover, which will move the virtual machine back to the main datacenter and then reverse the replication to resume the normal operation. This is why even on the primary virtual machine you typically configure its IP configuration in the failover IP section so that when you use Hyper-V Replica to fail back, the correct IP configuration will be injected back into the virtual machine.
There is a complication for the failback scenario if you are using extended replication where you have a replica of the replica. The reason for the complication is that if you have the configuration where A is replicating to B and then the replication is extended from B to C (where A, B, and C are Hyper-V hosts), you cannot reverse replication if you failover from A to B; therefore, B is now replicating to A. This is because B is already replicating to C and a single virtual machine cannot have more than one replica. When performing the initial failover from A to B, you should not select the option to reverse replication. Once you have performed the failover from A to B, you do have a choice on server B. You can choose to continue the replication from B to C or you can select to replicate from B to A, which will halt the replication to C. In many instances, you will select the option to continue replication to C since A is likely not available. To perform the continued replication, select the Resume Extended Replication action. You can also use Resume-VMReplication -VMName <name> -Continue to continue using PowerShell. If you do want to replicate to A, you select the option Reverse Replication, which will break the Hyper-V Replica extended relationship. The virtual machine on C has now become orphaned. With PowerShell, you first need to remove the extended replica and then reverse the replication.
Remove-VMReplication –VMName <name> -ReplicationRelationshipType Extended
Set-VMReplication –VMName <name> -Reverse
Assuming the option to continue replication from B to C was selected, this makes the failover of the virtual machine to run on server A a more complex operation because the virtual machine on server A is no longer receiving updates. The process involves manually performing the following steps:
1. Break the replication relationship between B and C.
2. Set up replication from B to A, which can use the existing virtual machine on server A, and the resynchronization process will be used to minimize data sent over the network.
3. Perform a failover from B to A and reverse the replication, which means A is now replicating to B.
4. Reestablish the extended replica from B to C, and once again the existing virtual machine on server C can be used as the base, and resynchronization is used to minimize data sent over the network.
Sizing a Hyper-V Replica Solution
After understanding the capability of Hyper-V Replica, the first question from my clients is “What is the impact on my storage and network, and what are the requirements?” This is a valid question and is fairly complex. The answer ultimately boils down to the rate of change on the storage of the virtual machines that need to be replicated because Hyper-V Replica works by replicating the changes. The higher the rate of change to the storage of the virtual machine, the greater the size of the Hyper-V Replica log (HRL) files and the more data that needs to be sent over the network from the primary to the replica.
There is also the consideration of the impact on the storage, both on the primary storage hosting the primary VM VHDs, which also store the HRL files, and on the replica storage hosting the replica VM that receives the update files and then has to merge them into the replica VHDs and also maintain snapshots if configured. It is not possible to configure the HRL files to be written to different storage than the actual VHD files, which means the storage containing the VHD will incur whatever storage IO is associated with the log files.
There is a negligible impact for processor and memory, but it is generally not considered as part of your Hyper-V Replica planning, which is focused on the network and storage. The network is fairly simple, and the amount of network bandwidth relates directly to the rate of change of the virtual machine. While compression does decrease the amount of network traffic (and incur some processor overhead) by compressing all the zeros in the data, there is not really any additional consideration. The amount of network traffic relates directly to the rate of change. If you need a higher rate of network compression, then one option is to leverage WAN optimizers such as those from Riverbed, which will provide greater network bandwidth savings.
If you need to throttle the amount of bandwidth used for Hyper-V Replica, you should use network Quality of Service (QoS). QoS could be based on the target subnet (assuming the only traffic to the target subnet is Hyper-V Replica traffic), or you can throttle based on the destination port, which is possible because Hyper-V Replica uses port 8080 for the actual transmission of the log data. For example, here I limit the replica traffic to 200 Kb:
New-NetQoSPolicy "Replication Traffic to 8080" -DestinationPort 8080 -ThrottleRateActionBitsPerSecond 200000
The storage consideration is more complex, specifically on the replica side where the changes have to be merged into the replica VHDs. On the primary side, the additional storage required to host the log files is equal to the rate of change, and the additional IO impact is less than 1.5 times that of the IOPS of the actual workload, so less than 50 percent additional IO. This is achieved by the use of a 32 MB memory buffer to track writes to optimize the actual writes to the log files.
On the replica side, there has been a major change between Windows Server 2012 and Windows Server 2012 R2 related to both the amount of storage and the IOPS. In Windows Server 2012, the IOPS requirement on the replica storage was between one and five times that of the workload, a big range. Windows Server 2012 R2 changes this to between one and two times that of the workload, which is a huge improvement and enabled by the new mechanism to manage changes to the storage. The change in applying the changes also reduces the storage required if recovery points are used. In Windows Server 2012, each recovery point would be around 10 percent of the size of the base VHD, which could be very large. In Windows Server 2012 R2, each recovery point is equal to the actual change between the recovery points, which is a huge improvement.
Actually ascertaining the rate of change for each virtual machine is the key factor for all of these estimates. To help with this, Microsoft has created a capacity planner available at www.microsoft.com/en-us/download/details.aspx?id=39057. Once the capacity planner is downloaded and installed, the application should be executed. The tool asks for the primary Hyper-V server or the broker if it's a cluster and the replica Hyper-V server or the broker of the replica cluster. It will also ask for the estimated WAN bandwidth and a duration to collect data for. Next the tool will display a list of virtual machines running on supported storage such as local and CSV and allow you to select the specific VHDs that you want to gather information for on the change, as shown in Figure 8.9. The tool will then monitor those VHDs for the period of time you specify. Once collection is complete, it will know the rate of change of the VHD and ascertain the actual processor, memory, network, and storage impact for using Hyper-V Replica with those VHDs. A full report is generated that shows the before and after impact to help you plan for the Hyper-V Replica implementation; I definitely recommend using it. Figure 8.10 shows an example of the process in action.
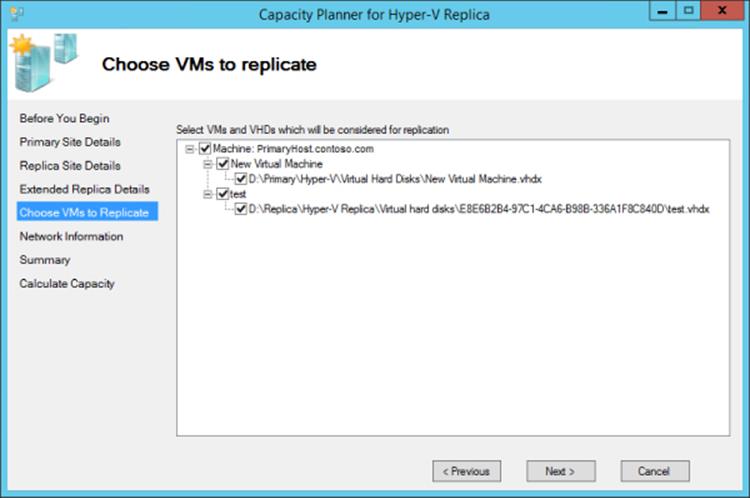
Figure 8.9 Selecting the VHDs to use for the planner

Figure 8.10 Example of the tool in action
Microsoft also has a performance optimization document at http://support.microsoft.com/kb/2767928 that discusses some registry changes you can apply. One key setting is MaximumActiveTransfers, which may be of interest if you are replicating a large number of virtual machines. The default number of active transfers in Windows Server 2012 R2 is six (up from three in Windows Server 2012); however, you may need to increase this per the article instructions if you have a large number of replicated virtual machines.
Using Hyper-V Replica Cloud Orchestration for Automated Failover
Hyper-V Replica is a great technology, but as you have seen, it's very manual. You trigger the failover for each virtual machine. There is no automated or bulk failover capability. Most organizations don't want an automated DR failover because there are too many false positives that could trigger a DR failover. What organizations do want is the ability to perform an orchestrated disaster recovery failover, allowing scripts to be run, VMs to be failed over in a specific order, and all of this performed from a single interface using predefined failover plans.
Like all of Windows Server 2012, PowerShell can be used for every aspect of Hyper-V Replica. You can use it to craft your own solution to perform your Hyper-V Replica DR failover, but that would be a lot of work, and each time you added new virtual machines, you would have to update your process.
Microsoft actually released some Hyper-V Replica runbooks that leverage System Center Orchestrator to enable an orchestrated failover process. They are available from http://blogs.technet.com/b/privatecloud/archive/2013/02/11/automation-orchestrating-hyper-v-replica-with-system-center-for-planned-failover.aspx. While a nice solution, System Center Orchestrator is really focused on Windows Server 2012 and has not been updated for Windows Server 2012 R2; still, it's still a great starting point.
A better solution is provided by the Microsoft Hyper-V Recovery Manager (HRM) solution. You can find details at www.windowsazure.com/en-us/manage/services/recovery-services/configure-a-hyper-v-recovery-vault/. In the following section, I will walk through its main capabilities, its integration with Hyper-V Replica, and SCVMM, as well as how to get started.
Overview of Hyper-V Recovery Manager
Figure 8.11 shows the main architectural view of an HRM-based solution. First notice that HRM is a service provided by Windows Azure and acts as a cloud-based broker and orchestration engine for Hyper-V Replica activities and failovers. The actual replication of the virtual machines is still from the Hyper-V servers in datacenter 1 to the Hyper-V servers in datacenter 2. No virtual machine storage replication happens to Windows Azure, and instead only metadata of the Hyper-V configuration is sent to Windows Azure to enable management.
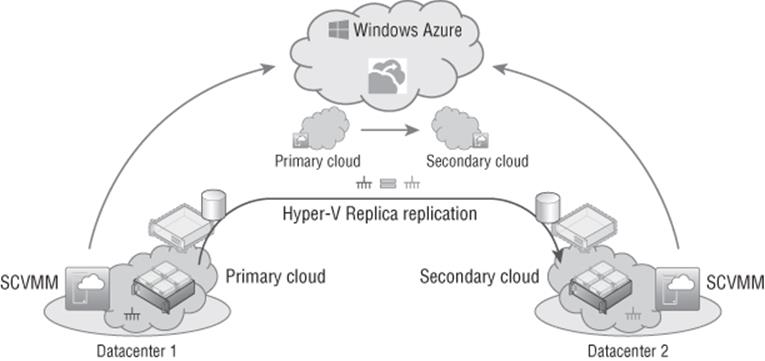
Figure 8.11 HRM architectural overview
The actual communication to HRM is via an SCVMM instance at each datacenter; you enable this by downloading an HRM provider that installs into SCVMM and enables SCVMM to communicate to HRM using HTTPS. A certificate is used for the secure communications that you configure in HRM and in the SCVMM HRM provider, which gives a mutually trusted certificate. A proxy can be configured for the communication from SCVMM to HRM, and the only configuration is outbound HTTPS. HRM never contacts SCVMM; all communication is initiated from SCVMM outbound to HRM.
HRM works at a cloud level. Specifically, in SCVMM at each datacenter you need to create one or more clouds that contain the Hyper-V host groups that will be participating in Hyper-V Replica replication. The clouds within SCVMM are then enabled to send information to HRM by checking the Send Configuration Data About This Cloud To The Windows Azure Hyper-V Recovery Manager option on the General tab of the cloud properties.
Once the clouds are known to HRM, a relationship is created between two clouds. This is a pairing, which tells the primary cloud it has a replication relationship to a target cloud. As part of the pairing of clouds, HRM will trigger workflows on SCVMM that automatically configure the Hyper-V hosts for Hyper-V Replica replication using certificate-based authentication. There is no manual configuration for Hyper-V Replica required on the hosts. Once the cloud relationship is established, a relationship between networks on the primary and replica cloud are configured in HRM. This enables virtual machines to be updated with the correct connectivity when established on the replica Hyper-V server, and a new IP address is injected into the virtual machine from the IP pool of the new network, ensuring continued connectivity.
A recovery plan is then created in HRM that defines groups of virtual machines to be failed over, defines the ordering of failover, and even defines optional scripts to be executed that need to be present on the SCVMM servers. The final step is to enable virtual machines for protection using HRM via SCVMM, which behind the scenes configures the virtual machine to use Hyper-V Replica and makes the replication known to HRM. The option to use HRM can also be made part of a virtual machine template in SCVMM. This makes it easy to let the user deploy virtual machines that will be protected with Hyper-V Replica.
In the event a failover is required, one of the defined recovery plans can be initiated that triggers workflows on the SCVMM servers to perform the orchestrator Hyper-V Replica failovers and reverse replication as required.
As this high-level overview shows, no virtual machine or data ever goes to Windows Azure. All replication is directly between Hyper-V hosts in the organization's datacenters. The HRM service in Windows Azure is simply communicating with the SCVMM instances at each location to help orchestrate the initial configuration of Hyper-V Replica between the hosts, enabling replication for virtual machines and then actually triggering workflows to perform failovers, all from a separate cloud-based location.
Getting Started with HRM
Microsoft has great documentation for Windows Azure that details the steps to implementing HRM. This section walks you through some of the key points involved in using HRM.
At the time of this writing, the HRM is currently in preview, but by the time you read this, it should be a released feature. If not, you will need to request access to the preview, which is linked from the location when trying to actually create a new Hyper-V Recovery Manager vault. Log on to the Windows Azure portal (https://manage.windowsazure.com) and then create a new Hyper-V Recovery Manager vault, as shown in Figure 8.12, via the New action at the bottom of the screen and by selecting Data Services ⇒ Recovery Services ⇒ Hyper-V Recovery Manager Vault – Quick Create. You will need to enter a name for the new vault and select a region that will host it from the drop-down.
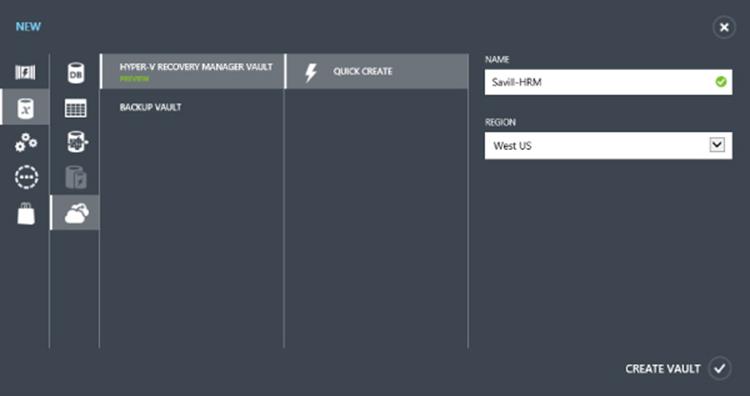
Figure 8.12 Creating a new Hyper-V Recovery Manager vault
Once the HRM vault is created, the next step is to download the provider for SCVMM from the Dashboard page of the vault. The HRM vault is available within the Recovery Services navigation node. Once the provider is downloaded, store this in a location available to your SCVMM servers.
A certificate must be uploaded into the HRM vault that will also be used with the HRM SCVMM provider. This certificate can be an SSL certificate from an external CA or can be self-signed. Microsoft describes in detail the certificate requirements athttp://msdn.microsoft.com/en-us/library/dn169036.aspx, including how to create your own self-signed certificate. You upload the certificate through the Dashboard page of the HRM vault by clicking the Manage Certificate action.
Once the certificate is uploaded to the HRM vault in Windows Azure, the next step is to install the partner certificate that contains the private key onto each SCVMM server. A .pfx file that contains the private key of the certificate can be created by exporting the certificate from the machine that originally created the certificate.
The downloaded HRM provider must be installed on your SCVMM servers, and during the installation of the provider, you will need to specify the same certificate that was uploaded to Windows Azure. The System Center Virtual Machine Manager service on the SCVMM host should be stopped during the installation of the HRM provider; you can stop it by using the Services.msc snap-in. During the provider installation, a proxy can be configured for the connectivity to the Internet and the certificate selected that you imported. Once the certificate is selected, the provider will automatically connect to Windows Azure and show all vaults that are using the equivalent public key certificate, as shown in Figure 8.13. Select the vault; the next step is to enter a friendly name for the SCVMM server, and by default the option to synchronize information about clouds to HRM is selected, which enables all existing clouds to send data to HRM. The SCVMM server will then be registered with the HRM vault, and data will start to be populated into HRM. The installation will prompt to restart the VMM service by default. Remember that all steps performed on the primary SCVMM environment must be repeated on the replica side of the SCVMM environment.
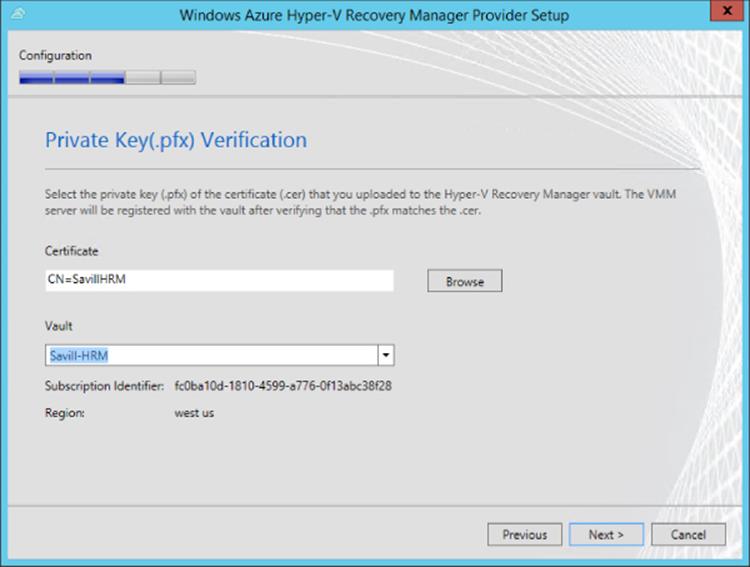
Figure 8.13 Selecting the vault as part of the HRM SCVMM provider installation
All of the clouds for the registered SCVMM servers will be displayed in the Protected Items view, but at this point none of them is actually being protected nor has actually been configured, and the status will show as (Not Configured). If you did not select the option during the provider installation to synchronize information about clouds to HRM for each cloud you want to be managed by HRM, you should open the properties of the cloud and on the General tab check the option Send Configuration Data About This Cloud To The Windows Azure Hyper-V Recovery Manager (available only once the HRM provider is installed). Note that because clouds are the unit of configuration for HRM that includes specific host groups, the host group is the level of granularity for the configuration of the Hyper-V Replica configuration via HRM. You may need to divide your servers into specific host groups to match your goals for configuration.
The next step is to create pairings of clouds, in other words, between the primary and the replica. Within the Protected Items view, click the primary cloud to launch a new screen where you should click the Configure Protection Settings action. This will launch the pairing process. You will need to select the target location, which is named based on the friendly name of the registered SCVMM server. Select the cloud hosted by the target SCVMM instance and then configure values for the copy frequency (which can be only 30 seconds or 15 minutes rather than the default 5 minutes if the servers are running Windows Server 2012 R2), additional recovery point settings, compression, and initial replication settings. These values will be used when enabling virtual machines for replication via SCVMM. Figure 8.14 shows the pairing wizard. When you click Save, a number of workflows will be triggered on the SCVMM instances to configure the Hyper-V hosts within the affected host groups that are part of the selected clouds to enable Hyper-V replication. These workflows include configuring certificate-based authentication and enabling the servers to receive Hyper-V Replica replicas from the required servers.
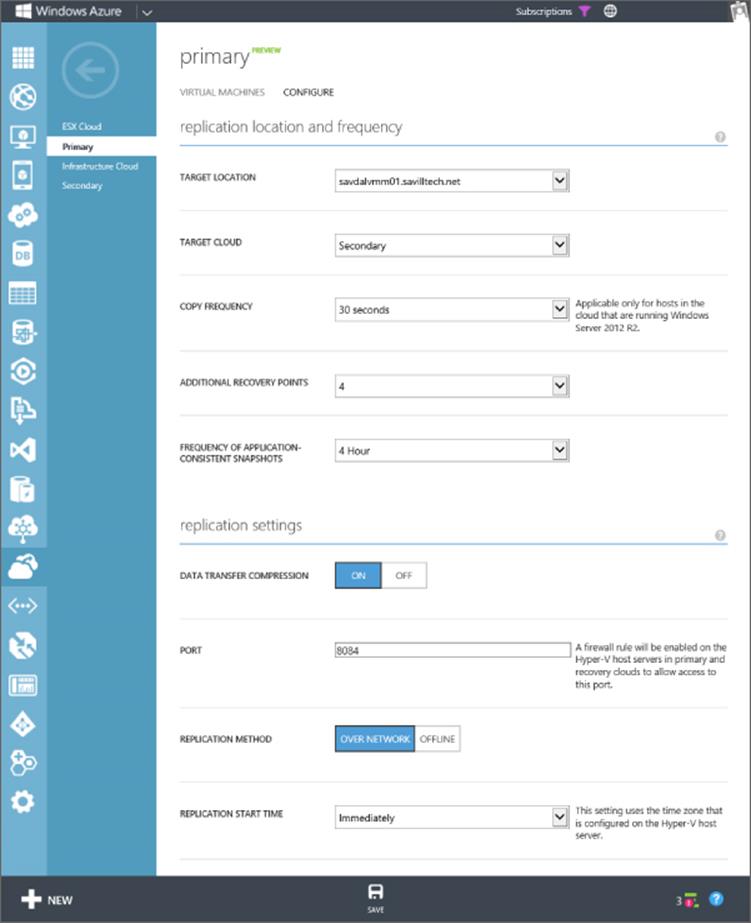
Figure 8.14 Enabling relationship between the two clouds
The next step, under the Resources navigation area, is to create relationships between the networks on the source SCVMM server and the target SCVMM server. This will allow the virtual machine to be reconfigured with the correct network mapping and a new IP address from the IP pool on the target network (if applicable and available) if a failover occurs.
With the cloud and network relationships defined in HRM and those configurations propagated to the SCVMM instances, it will be possible to enable virtual machines to be protected using HRM through the SCVMM management console. You do this through the properties of the virtual machine; under Hardware Configuration – Hyper-V Recovery Manager, check the option Enable Hyper-V Recovery Manager Protection For This Virtual Machine and select the replication frequency (which needs to match those configurations defined in the cloud protection relationships). The replication can also be enabled using the Set-SCVirtualMachine cmdlet with the parameters -DRProtectionRequired $true -RecoveryPointObjective <time in seconds, e.g. 900 for 15 minutes>. You can enable the same option in a virtual machine template, as shown in Figure 8.15.

Figure 8.15 Enabling HRM protection for an SCVMM VM template
The final step is to create recovery plans that contain specific virtual machines placed into groups, along with the order to failover those groups and any scripts that should be executed. Once the recovery plan is created, it can be used in a similar way to a standard Hyper-V Replica failover of a single virtual machine, a test failover, a planned failover, or an unplanned failover. Be careful because these plans will failover every virtual machine that is part of the recovery plan, so they could impact the availability of virtual machines. It's important to also have good processes in place to control access to being able to perform the various types of failover as well as checks that should be performed prior to performing failovers.
A great resource for details on all these steps is available at www.windowsazure.com/en-us/manage/services/recovery-services/configure-a-hyper-v-recovery-vault/. While HRM is not a requirement to use Hyper-V Replica, the reality is that Hyper-V Replica is a fabric feature that replicates virtual machines, and the actual enterprise management and failover orchestration is achieved through HRM and SCVMM. At the time of this writing, HRM does not support the Windows Server 2012 R2 extended replication scenarios that provide a third replica or tertiary replication.
Architecting the Right Disaster Recovery Solution
After reading this chapter, you may think you will just use Hyper-V Replica for all your disaster recovery needs. The reality is that should not be the case. It's a good technology, but there may be better options for specific workloads and applications.
Your first preference should be to use an application's replication and disaster recovery capabilities if it has them because it's always better for the application to be aware of a failover and manage its own data if possible. For example, SQL has its AlwaysOn replication and failover technology, which means if I had data in SQL Server, I would always use AlwaysOn first. Likewise, Exchange has database availability groups and replicates mailboxes. In that case, I would use that technology. Active Directory has multimaster replication, which means I would simply have domain controllers running in my DR location that would replicate from my primary location for normal operation.
If the application is not stateful, such as a website, then I could have instances of the application running in the primary and DR locations and use network load balancing to spread the load. Another option is to update DNS to point to DR instead of primary. Although there are some considerations around caching of DNS records, there are solutions for this.
My next preference would be if the storage had some kind of synchronous replication capability that could be used as if it were a single logical piece of storage that would allow a cluster to be used, treating the replicated SAN as shared storage and enabling any cluster-aware application to leverage the SAN. This could also include virtual machines running on the replicated SAN.
If none of those other options were available, then I would use Hyper-V Replica. That is not to say it's not a great solution, but a hypervisor-level asynchronous replication solution that is not application aware is simply not as rich in its functionality as one that is part of an application. In most organizations, there are a lot of applications that don't have their own replication technology and can't run on a replication SAN, so there is a huge number of virtual workloads that can benefit greatly from Hyper-V Replica.
The Bottom Line
1. Identify the best options to provide disaster recovery for the different services in your organization. When planning disaster recovery, an application-aware disaster recovery should be used first where possible, such as SQL AlwaysOn, Exchange DAG, Active Directory multimaster replication, and so on. If no application-aware replication and DR capability is available, another option is to look at the replication capabilities of the SAN such as synchronous replication. Additionally, replicating at the virtual machine disk level such as Hyper-V Replica provides a replication solution that has no requirements on the guest operating system or the application.
1. Master It Why is Hyper-V Recovery Manager useful?
2. Describe the types of failover for Hyper-V Replica. There are three types of Hyper-V Replica failover. A test failover is performed on the replica server and creates a clone of the replica virtual machine that is disconnected from the network and allows testing of the failover process without any impact to the ongoing protection of the primary workload as replication continues. A planned failover is triggered on the primary Hyper-V host and stops the virtual machine, ensures any pending changes are replicated, starts the replica virtual machine, and reverses the replication. An unplanned failover is triggered on the replica Hyper-V host and is used when an unforeseen disaster occurs and the primary datacenter is lost. This means there may be some loss of state from the primary virtual machine. When possible, a planned failover should always be used.
1. Master It In an unplanned failover how much data could be lost?
3. Explain the automated options for Hyper-V Replica failover. Hyper-V Replica has no automated failover capability. To automate the failover steps, PowerShell could be used, System Center Orchestrator could be used, or for a complete solution Hyper-V Recovery Manager could be used. The key point is the actual decision to failover should not be automatic because there could be many conditions such as a break in network connectivity that could trigger a false failover. The automation required should be the orchestration of the failover once a manual action is taken to decide a failover should occur.
All materials on the site are licensed Creative Commons Attribution-Sharealike 3.0 Unported CC BY-SA 3.0 & GNU Free Documentation License (GFDL)
If you are the copyright holder of any material contained on our site and intend to remove it, please contact our site administrator for approval.
© 2016-2026 All site design rights belong to S.Y.A.