Microsoft Business Intelligence Tools for Excel Analysts (2014)
PART II: Leveraging SQL for Business Intelligence
Chapter 11: Calling Views and Stored Procedures from Excel
In This Chapter
· Importing Views from SQL Server databases
· Running SQL Server stored procedures from Excel
· Creating dynamic connections with VBA
· Creating a data model with multiple SQL data objects
· Loading SQL Server stored procedures directly into Power Pivot
In Chapter 10, we introduced you to SQL Server databases and discovered how to pull data from SQL Server by creating views and stored procedures.
As you start working with SQL Server views and stored procedures, you’ll quickly find the need to bring that data into your reporting models. Luckily, Excel 2013 vastly improves your ability to connect to SQL Server data by providing several methods for integrating external data into your Excel BI solutions.
Importing Data from SQL Server
The option to pull data from SQL Server has been available in Excel for many versions; it was just buried several layers deep in somewhat cryptic menus. This made getting SQL Server data into Excel seem like a mysterious and tenuous proposition for many Excel analysts. With the introduction of the Ribbon in Excel 2007, Microsoft put the Get External Data group of commands right on the Ribbon on the Data tab, making it easier to import data from SQL tables and views.
Using the Get External Data group in Excel allows you to establish an updatable data connection between Excel and SQL. Follow these steps:
1. On the Data tab, select From SQL Server from the From Other Sources drop-down list.
The Data Connection Wizard opens, as shown in Figure 11-1. You use the wizard to configure your connection settings so Excel can establish a link to the server. The first step is to provide Excel with authentication information.

Figure 11-1: Enter your authentication information.
2. Enter the name of your server and username and password. Select the Use Windows Authentication radio button if you use Windows authentication. Click Next when you're done.
Note the two inputs needed in Figure 11-1:
· Server Name: This is the name of the server that contains the database you want to connect to. You get this from your IT department when they give you access. Your server name will be different from the one shown in Figure 11-1.
· Log on Credentials: These are your login credentials. Depending on how your IT department gives you access, you select either Windows Authentication or SQL Server Authentication. Windows Authentication means that the server will recognize you by your Windows login. SQL Server Authentication means that the IT department created a distinct username and password for you. If you're using SQL Server Authentication, you need to provide a username and password.
The next step is to select the database with which you are working, as shown in Figure 11-2. Every SQL Server can contain multiple databases. You’ll need to have your IT department give you the name of the one you’re interested in.
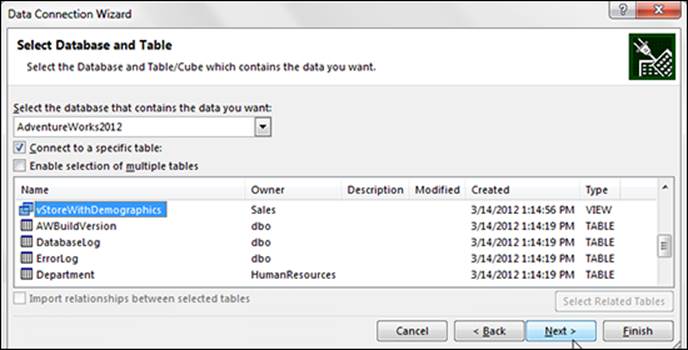
Figure 11-2: Specify your database and then select the table or view you want to analyze.
3. Select the database that contains the data you're using from the drop-down list at the top of the screen. Select the table or view you want to analyze from the box at the bottom. Then click Next.
The next screen in the wizard, shown in Figure 11-3, allows you to enter descriptive information about the connection you've just created.
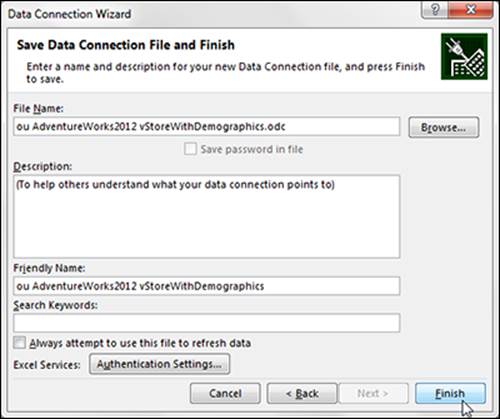
Figure 11-3: Edit descriptive information for your connection.
4. (Optional) Enter descriptive information for the connection.
The fields that you use most often are the following:
· Friendly Name: The Friendly Name field allows you to specify your own name for the external source. Enter a name that is descriptive and easy to read.
· Save Password in File: Select the Save Password in File check box if you want your username and password to be stored in the workbook. This allows your connections to remain refreshable when being used by other people. There are obviously security issues with this option, as anyone can view the connection properties and see your username and password. Only use this option if your IT department set you up with an application account; that is, an account created specifically to be used by multiple people.
5. Click Finish to finalize your connection settings.
The Import Data dialog box opens, as shown in Figure 11-4.
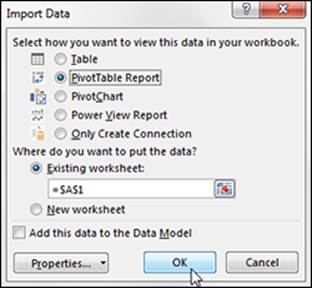
Figure 11-4: Choosing how and where to view your SQL Server data.
6. Choose PivotTable Report to import your data.
7. Click OK.
When the connection is finalized, you can start building your PivotTable.
![]() In most cases, you set up the data connection one time and update it when needed. You can even record an Excel macro to update the data on some trigger or event, which is ideal for automating the transfer of data from SQL Server.
In most cases, you set up the data connection one time and update it when needed. You can even record an Excel macro to update the data on some trigger or event, which is ideal for automating the transfer of data from SQL Server.
 Managing external data properties
When you import external data into a table, you can control a few adjustable properties, which you can find in the Properties dialog box. Click the target table and then click the Properties button on the Data tab to open the External Data Properties dialog box.
Take a moment to familiarize yourself with some useful options in this dialog box:
· Include Row Numbers: This property is deselected by default. Selecting this property creates a dummy column that contains row numbers. The first column of your dataset will be this row number column upon refresh.
· Adjust Column Width: This property is selected by default, telling Excel to adjust the column widths each time the data is refreshed. Deselecting this option will cause the column widths to remain the same.
· Preserve Column/Sort/Filter/Layout: If this is selected, the order of the columns and rows of the Excel range remains unchanged. This way, you can rearrange and sort the columns and rows of the external data in your worksheet without worrying about blowing away your formatting each time you refresh. Deselecting this property will make the Excel range look like the query.
· Preserve Cell Formatting: This is selected by default, telling Excel to keep the applied cell formatting when you refresh.
· Insert Cells For New Data, Delete Unused Cells: This is the default setting for data range changes. When data rows decrease, you may have errors in adjacent cells that reference your external range. The cells these formulas referenced are deleted, so you will get a #VALUE error in your formula cells.
· Insert Entire Rows for New Data, Clear Unused Cells: When the unused cells are cleared instead of deleted, the formula may no longer return an error. Instead, it continues to reference cells from the original range — even though some of them are blank now. This could still give you erroneous results.
· Overwrite Cells For New Data, Clear Unused Cells: The third option should be the same as option two when rows decrease as unused cells are cleared.
Passing Your Own SQL Statements to External Databases
If you’re a seasoned analyst who is proficient at writing your own SQL queries, you can use the connection properties to write your own SQL statements. This gives you more control over the data you pull into your Excel model, and allows you to perform advanced actions like running SQL Server stored procedures.
Manually editing SQL statements
After you’re connected to your external database, you can edit that connection’s properties so that it uses use your own SQL statements. Follow these steps:
1. Click the Connections button on the Data tab of the Ribbon.
The Workbook Connections dialog box opens.
2. Select the connection you want to edit and then click the Properties button.
The Connection Properties dialog box opens, as shown in Figure 11-5.
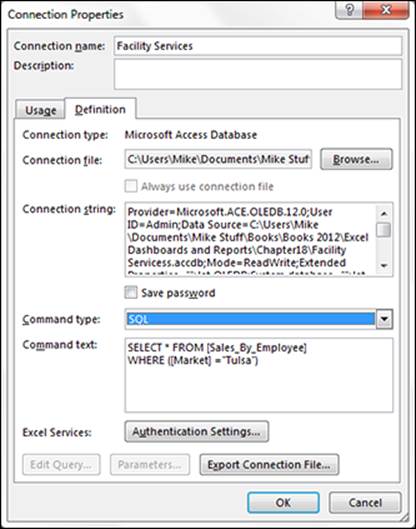
Figure 11-5: On the Definitions tab, select the SQL command type and enter your SQL statement.
3. Click the Definition tab and select SQL from the Command Type drop-down list.
4. Enter your SQL statement in the Command Text box.
The statement you enter here will typically be a Select statement that pulls specific data from one or more tables.
5. Click OK in the Connection Properties dialog box to confirm your change, and then click the Close button on the Workbook Connections dialog box.
Excel automatically connects to the data source and runs your newly added SQL statement. If all goes well, you see your updated data. If Excel encounters an error, a message box opens describing what went wrong.
![]() It’s generally a good idea to test your SQL statement before entering it into Excel. This simply means running the SQL statement on the database server to ensure you get the expected results. See Chapter 9 for a refresher on how to create and run SQL statements on the database server.
It’s generally a good idea to test your SQL statement before entering it into Excel. This simply means running the SQL statement on the database server to ensure you get the expected results. See Chapter 9 for a refresher on how to create and run SQL statements on the database server.
Running stored procedures from Excel
In Chapter 10, you discovered the benefits of creating stored procedures in SQL Server. The ability to manually enter your own SQL statements into a connection enables you to call a stored procedure right from Excel! For example, the SQL statement in Figure 11-6 executes the SP_MarketSummary stored procedure.
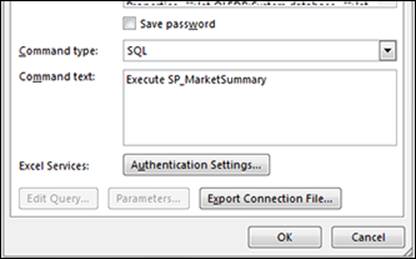
Figure 11-6: Running an SQL Server stored procedure from Excel.
Some stored procedures require parameters (criteria inputs) to run successfully. If your stored procedures require parameters to run, you can simply include them in your SQL statement. Figure 11-7 shows a stored procedure with two parameters: one that passes the required market name, and one that passes the required quarter.
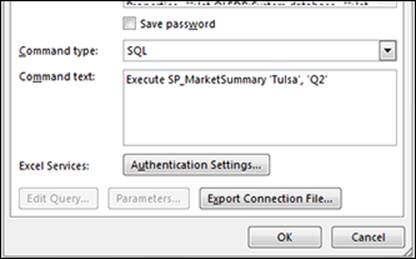
Figure 11-7: Running an SQL Server stored procedure with parameters.
Using VBA to create dynamic connections
You may have noticed that the last few examples have hard-coded the criteria in the SQL statements. For example, in Figure 11-7, Tulsa is specified directly into the SQL statement Where clause. This obviously would cause the data being returned to always be data for Tulsa.
But what if you want to select a market and have the SQL statement dynamically change to respond to your selection? Well, you can use a bit of Excel VBA (Visual Basic for Applications) to change the SQL statement on-the-fly. Follow these steps:
1. Designate a cell in your worksheet that will catch the dynamic selection for your criteria.
For example, in Figure 11-8, cell C2 is where users can select a market. You typically give users a way to select criteria with either a Combo Box or a Data Validation list.
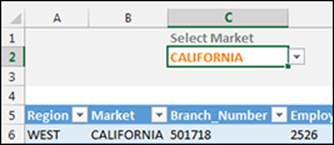
Figure 11-8: Designate a cell that will trap the criteria selection.
2. Click the Connections button on the Data tab.
Take note of the name for the connection you want to dynamically change.
3. Close the Workbook Connections dialog box and press Alt+F11.
The Visual Basic Editor opens.
4. Choose Insert → Module.
5. Enter the following code in the newly created module:
Sub RefreshQuery()
ActiveWorkbook.Connections("Facility Services").OLEDBConnection.CommandText = _
"SELECT * FROM [Sales_By_Employee] WHERE [Market] = '" & _
Range("C2").Value & "'"
ActiveWorkbook.Connections("Facility Services").Refresh
End Sub
This code creates a new macro called RefreshQuery. The RefreshQuery macro points to the correct connection (Facility Services) and specifies the command text for that connection.
The command text is essentially the SQL statement you want the connection to run when triggered. In this example, the command text selects from the [Sales_By_Employee] table and sets the criteria for the [Market] field to the value in cell C2. The code then refreshes the Facility Services connection.
6. (Optional) Place a button on your worksheet to run your macro.
Click the Developer tab in the Excel Ribbon and select Button Form control from the Insert drop-down list.
7. Select your macro and click OK.
![]() The Developer tab is hidden by default in Excel. To enable the Developer tab, choose File → Options → Customize Ribbon. Select the Developer Tab check box, and click OK. The Developer tab now appears on the Ribbon.
The Developer tab is hidden by default in Excel. To enable the Developer tab, choose File → Options → Customize Ribbon. Select the Developer Tab check box, and click OK. The Developer tab now appears on the Ribbon.
You now have a button that allows for the dynamic extraction of data from your external database based on the criteria you specified (see Figure 11-9).
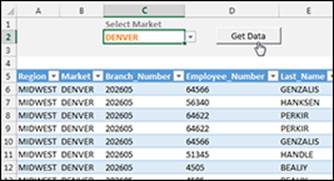
Figure 11-9: You now have an easy-to-use mechanism to pull external data for a specified market.
Creating a Data Model with Multiple SQL Data Objects
In Chapter 2, you discovered the internal Data Model, which allows you to analyze multiple data tables in a single PivotTable. That functionality extends to external datasets. This gives you the power to use a normalized set of tables from an external database in an analysis cube. If you're unfamiliar with the internal Data Model, turn to Chapter 2, which gives you the foundation you need.
To understand the benefit of using external data in a Data Model, follow these steps:
1. On the Data tab, select From SQL Server from the From Other Sources drop-down list.
The Data Connection Wizard opens, as shown in Figure 11-10.
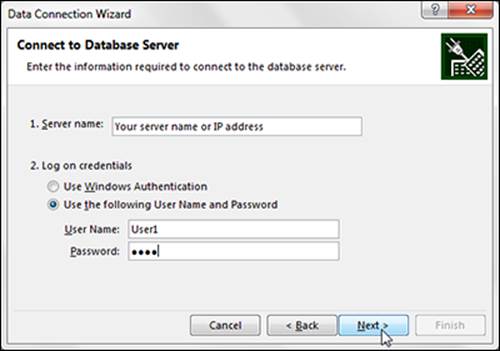
Figure 11-10: Enter your authentication information.
2. Configure your connection settings (server name, username, and password) so Excel can establish a link to the server. Click Next.
The Select Database and Table screen of the wizard appears, as shown in Figure 11-11.
3. Select the database with which you are working, and then select the Enable Selection of Multiple Tables check box.
4. Select all the tables and views you want imported into the workbook Data Model and then click Next.
The Import Data dialog box, shown in Figure 11-12, opens.
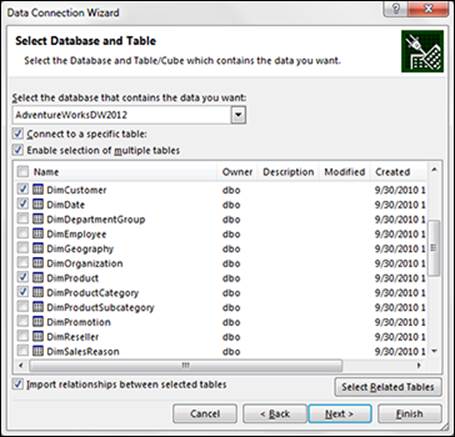
Figure 11-11: Select the Enable Selection of Multiple Tables check box.

Figure 11-12: Remove the check mark next to Import Relationships Between Tables.
5. Click the drop-down arrow next to the Properties button and remove the check mark next to Import Relationships Between Tables.
This ensures that Excel does not error out because of misinterpretations of how the tables are related. In other words, you want to create relationships yourself.
6. Select the PivotTable Report radio button and then click OK to create the base pivot.
7. Click the Relationships button on the Data tab.
The Manage Relationships dialog box opens as shown in Figure 11-13.
8. Create the needed relationships, then click Close.
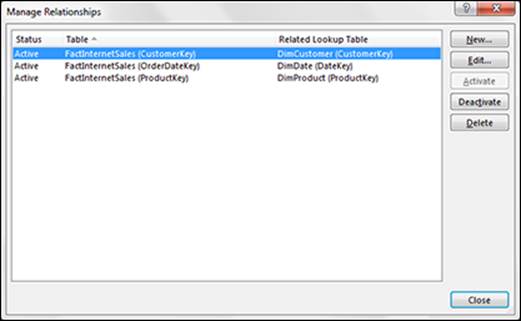
Figure 11-13: Create the needed relationships for the tables you just imported.
In just a few clicks, you've created a powerful platform to build and maintain table PivotTable analysis based on multiple data objects in an SQL Server database (see Figure 11-14).
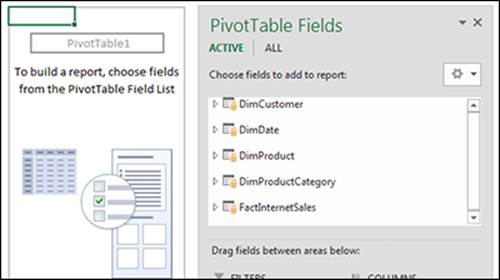
Figure 11-14: You are ready to build your PivotTable analysis based on multiple SQL Server tables and Views.
![]() In addition to pulling from a single SQL Server database, you can add other sources to the Data Model, including Access tables, other SQL Server database tables, Oracle tables, and dynamic text files. If you can create a connection to it, you can add it to the Data Model. The ability to merge disparate data sources into one analytical engine is huge.
In addition to pulling from a single SQL Server database, you can add other sources to the Data Model, including Access tables, other SQL Server database tables, Oracle tables, and dynamic text files. If you can create a connection to it, you can add it to the Data Model. The ability to merge disparate data sources into one analytical engine is huge.
Calling Stored Procedures Directly from Power Pivot
In Chapter 4, you explored some of the ways to pull data from SQL Server directly into Power Pivot. This works great for tables and views, but there is no way to call a stored procedure without writing an SQL statement.
Luckily, Power Pivot gives you the option of writing your own SQL statements. Follow these steps:
1. Open the Power Pivot window and click the From Other Sources button on the Home tab.
The Table Import Wizard opens.
2. Select the Microsoft SQL Server option and click Next.
The Table Import Wizard asks for all the information it needs to connect to your database (see Figure 11-15).
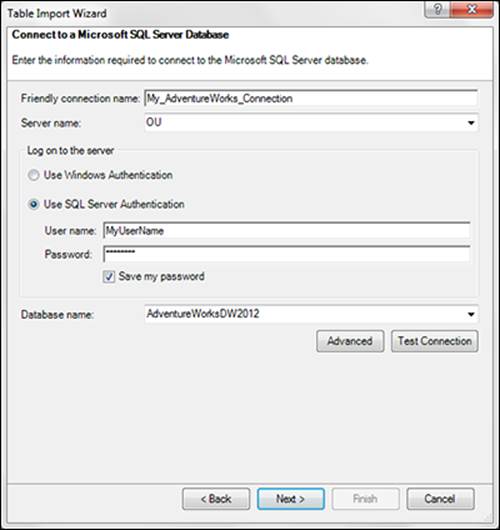
Figure 11-15: Provide the basic information needed to connect to the target database.
3. Provide the following information to connect to your database:
· Friendly Connection Name: The Friendly Connection Name field allows you to specify your own name for the external source. Enter a name that is descriptive and easy to read.
· Server Name: This is the name of the server that contains the database you're trying to connect to. You get this from your IT department when they give you access.
· Log On to the Server: These are your login credentials. Depending on how your IT department gives you access, you select either the Use Windows Authentication or Use SQL Server Authentication radio button. Use Windows Authentication means that the server will recognize you by your Windows login. Use SQL Server Authentication means that the IT department created a distinct username and password for you. If you're using Use SQL Server Authentication, you need to provide a username and password.
· Save My Password: Select the Save My Password check box if you want your username and password to be stored in the workbook. This allows your connections to remain refreshable when being used by other people. There are obviously security issues with this option, as anyone can view the connection properties and see your username and password. You should only use this option if your IT department set you up with an application account; that is, an account created specifically to be used by multiple people.
· Database Name: Every SQL Server can contain multiple databases. Enter the name of the database you are connecting to. You get this from your IT department when they give you access.
4. After you enter all the pertinent information, click Next.
The next screen of the wizard (see Figure 11-16) gives you the choice of selecting from a list of tables and views, or writing your own custom query using SQL syntax.
5. Select the Write a Query That Will Specify the Data to Import radio button and click Next.
6. Enter a valid SQL statement into the SQL Statement box (see Figure 11-17).
Instead of writing a simple Select statement, you can take advantage of an existing stored procedure. In this example, we're calling the SP_GetEmailList stored procedure.
![]() You can also enter a friendly name for your custom query. This name becomes the identifier within Power Pivot for the imported data.
You can also enter a friendly name for your custom query. This name becomes the identifier within Power Pivot for the imported data.
7. Click Finish to start the import process.
Once processing is complete, you’ll see the results of your stored procedure on a new tab in the Power Pivot window. Like all other connections in Power Pivot, your custom query can be refreshed, effectively triggering the stored procedure to run again and return updated results.
Excel connections versus Power Pivot connections
In this chapter, you created a connection via the Excel Ribbon interface and the Power Pivot interface. Although they both seem to be doing the same thing, it’s important to note that Excel connections and Power Pivot connections are two different things.
Excel connections are used to bring data into the Excel workbook. These connections can exist without ever touching the Power Pivot Data Model. You can edit, update, and fully configure Excel connections.
Power Pivot connections are designed to be used in the internal Data Model and not in the Excel workbook. However, Power Pivot connections must be linked to an Excel connection. This means that when you create a connection using Power Pivot, an Excel connection is automatically generated even though the connection was created for the internal Data Model. Because of this dependence on an Excel connection link, Power Pivot connections cannot be edited or configured. So, for example, if you create a custom query to run a stored procedure in Power Pivot, you cannot change the SQL syntax as you would with an Excel connection. You have to delete the connection and rebuild it.
For this reason, it’s often best to create an Excel connection and simply add the connection to the Data Model (versus creating the connection directly in Power Pivot), especially if you're using SQL statements or VBA to dynamically change the connection string. Using an Excel connection enables you to edit and configure as needed.
To add an existing Excel connection to the Data Model, click the Connections button on the Data tab. Choose your Excel connection in the Workbook Connections dialog box, click the drop-down arrow next to the Add button, and select Add to the Data Model.
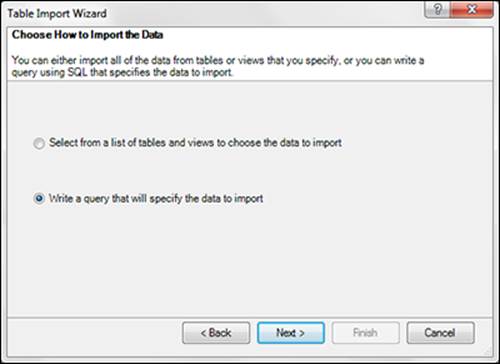
Figure 11-16: Choose to write your own query.
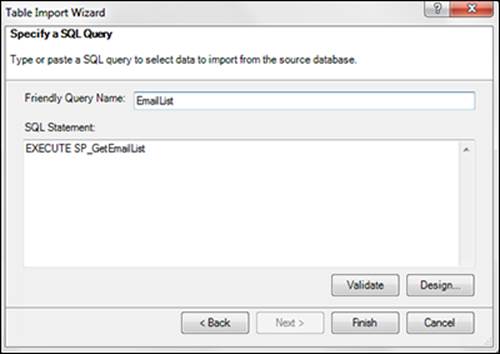
Figure 11-17: Enter a friendly name and the syntax for your custom query.
All materials on the site are licensed Creative Commons Attribution-Sharealike 3.0 Unported CC BY-SA 3.0 & GNU Free Documentation License (GFDL)
If you are the copyright holder of any material contained on our site and intend to remove it, please contact our site administrator for approval.
© 2016-2026 All site design rights belong to S.Y.A.