Windows Internals, Sixth Edition, Part 1 (2012)
Chapter 6. Security
Preventing unauthorized access to sensitive data is essential in any environment in which multiple users have access to the same physical or network resources. An operating system, as well as individual users, must be able to protect files, memory, and configuration settings from unwanted viewing and modification. Operating system security includes obvious mechanisms such as accounts, passwords, and file protection. It also includes less obvious mechanisms, such as protecting the operating system from corruption, preventing less privileged users from performing actions (rebooting the computer, for example), and not allowing user programs to adversely affect the programs of other users or the operating system.
In this chapter, we explain how every aspect of the design and implementation of Microsoft Windows was influenced in some way by the stringent requirements of providing robust security.
Security Ratings
Having software, including operating systems, rated against well-defined standards helps the government, corporations, and home users protect proprietary and personal data stored in computer systems. The current security rating standard used by the United States and many other countries is the Common Criteria (CC). To understand the security capabilities designed into Windows, however, it’s useful to know the history of the security ratings system that influenced the design of Windows, the Trusted Computer System Evaluation Criteria (TCSEC).
Trusted Computer System Evaluation Criteria
The National Computer Security Center (NCSC) was established in 1981 as part of the U.S. Department of Defense’s (DoD) National Security Agency (NSA). One goal of the NCSC was to create a range of security ratings, listed in Table 6-1, to be used to indicate the degree of protection commercial operating systems, network components, and trusted applications offer. These security ratings, which can be found at http://csrc.nist.gov/publications/history/dod85.pdf, were defined in 1983 and are commonly referred to as “the Orange Book.”
The TCSEC standard consists of “levels of trust” ratings, where higher levels build on lower levels by adding more rigorous protection and validation requirements. No operating system meets the A1, or “Verified Design,” rating. Although a few operating systems have earned one of the B-level ratings, C2 is considered sufficient and the highest rating practical for a general-purpose operating system.
Table 6-1. TCSEC Rating Levels
|
Rating |
Description |
|
A1 |
Verified Design |
|
B3 |
Security Domains |
|
B2 |
Structured Protection |
|
B1 |
Labeled Security Protection |
|
C2 |
Controlled Access Protection |
|
C1 |
Discretionary Access Protection (obsolete) |
|
D |
Minimal Protection |
In July 1995, Windows NT 3.5 (Workstation and Server) with Service Pack 3 was the first version of Windows NT to earn the C2 rating. In March 1999, Windows NT 4 with Service Pack 3 achieved an E3 rating from the U.K. government’s Information Technology Security (ITSEC) organization, a rating equivalent to a U.S. C2 rating. In November 1999, Windows NT 4 with Service Pack 6a earned a C2 rating in both stand-alone and networked configurations.
The following were the key requirements for a C2 security rating, and they are still considered the core requirements for any secure operating system:
§ A secure logon facility, which requires that users can be uniquely identified and that they must be granted access to the computer only after they have been authenticated in some way.
§ Discretionary access control, which allows the owner of a resource (such as a file) to determine who can access the resource and what they can do with it. The owner grants rights that permit various kinds of access to a user or to a group of users.
§ Security auditing, which affords the ability to detect and record security-related events or any attempts to create, access, or delete system resources. Logon identifiers record the identities of all users, making it easy to trace anyone who performs an unauthorized action.
§ Object reuse protection, which prevents users from seeing data that another user has deleted or from accessing memory that another user previously used and then released. For example, in some operating systems, it’s possible to create a new file of a certain length and then examine the contents of the file to see data that happens to have occupied the location on the disk where the file is allocated. This data might be sensitive information that was stored in another user’s file but had been deleted. Object reuse protection prevents this potential security hole by initializing all objects, including files and memory, before they are allocated to a user.
Windows also meets two requirements of B-level security:
§ Trusted path functionality, which prevents Trojan horse programs from being able to intercept users’ names and passwords as they try to log on. The trusted path functionality in Windows comes in the form of its Ctrl+Alt+Delete logon-attention sequence, which cannot beintercepted by nonprivileged applications. This sequence of keystrokes, which is also known as the secure attention sequence (SAS), always displays a system-controlled Windows security screen (if a user is already logged on) or the logon screen so that would-be Trojan horses can easily be recognized. (The secure attention sequence can also be sent programmatically via the SendSAS API, if group policy allows it.) A Trojan horse presenting a fake logon dialog box will be bypassed when the SAS is entered.
§ Trusted facility management, which requires support for separate account roles for administrative functions. For example, separate accounts are provided for administration (Administrators), user accounts charged with backing up the computer, and standard users.
Windows meets all of these requirements through its security subsystem and related components.
The Common Criteria
In January 1996, the United States, United Kingdom, Germany, France, Canada, and the Netherlands released the jointly developed Common Criteria for Information Technology Security Evaluation (CCITSE) security evaluation specification. CCITSE, which is usually referred to as the Common Criteria (CC), is the recognized multinational standard for product security evaluation. The CC home page is at www.niap-ccevs.org/cc-scheme/.
The CC is more flexible than the TCSEC trust ratings and has a structure closer to the ITSEC standard than to the TCSEC standard. The CC includes the concept of a Protection Profile (PP), used to collect security requirements into easily specified and compared sets, and the concept of a Security Target (ST), which contains a set of security requirements that can be made by reference to a PP. The CC also defines a range of seven Evaluation Assurance Levels (EALs), which indicate a level of confidence in the certification. In this way, the CC (like the ITSEC standard before it) removes the link between functionality and assurance level that was present in TCSEC and earlier certification schemes.
Windows 2000, Windows XP, Windows Server 2003, and Windows Vista Enterprise all achieved Common Criteria certification under the Controlled Access Protection Profile (CAPP). This is roughly equivalent to a TCSEC C2 rating. All received a rating of EAL 4+, the “plus” denoting “flaw remediation.” EAL 4 is the highest level recognized across national boundaries.
In March 2011, Windows 7 and Windows Server 2008 R2 were evaluated as meeting the requirements of the US Government Protection Profile for General-Purpose Operating Systems in a Networked Environment, version 1.0, 30 August 2010 (GPOSPP) (http://www.commoncriteriaportal.org/files/ppfiles/pp_gpospp_v1.0.pdf). The certification includes the Hyper-V hypervisor, and again Windows achieved Evaluation Assurance Level 4 with flaw remediation (EAL-4+). The validation report can be found athttp://www.commoncriteriaportal.org/files/epfiles/st_vid10390-vr.pdf, and the description of the security target, giving details of the requirements satisfied, can be found at http://www.commoncriteriaportal.org/files/epfiles/st_vid10390-st.pdf.
Security System Components
These are the core components and databases that implement Windows security:
§ Security reference monitor (SRM). A component in the Windows executive (%SystemRoot%\System32\Ntoskrnl.exe) that is responsible for defining the access token data structure to represent a security context, performing security access checks on objects, manipulating privileges (user rights), and generating any resulting security audit messages.
§ Local Security Authority subsystem (LSASS). A user-mode process running the image %SystemRoot%\System32\Lsass.exe that is responsible for the local system security policy (such as which users are allowed to log on to the machine, password policies, privileges granted to users and groups, and the system security auditing settings), user authentication, and sending security audit messages to the Event Log. The Local Security Authority service (Lsasrv—%SystemRoot%\System32\Lsasrv.dll), a library that LSASS loads, implements most of this functionality.
§ LSASS policy database. A database that contains the local system security policy settings. This database is stored in the registry in an ACL-protected area under HKLM\SECURITY. It includes such information as what domains are entrusted to authenticate logon attempts, who has permission to access the system and how (interactive, network, and service logons), who is assigned which privileges, and what kind of security auditing is to be performed. The LSASS policy database also stores “secrets” that include logon information used for cached domain logons and Windows service user-account logons. (See Chapter 4, for more information on Windows services.)
§ Security Accounts Manager (SAM). A service responsible for managing the database that contains the user names and groups defined on the local machine. The SAM service, which is implemented as %SystemRoot%\System32\Samsrv.dll, is loaded into the LSASS process.
§ SAM database. A database that contains the defined local users and groups, along with their passwords and other attributes. On domain controllers, the SAM does not store the domain-defined users, but stores the system’s administrator recovery account definition and password. This database is stored in the registry under HKLM\SAM.
§ Active Directory. A directory service that contains a database that stores information about objects in a domain. A domain is a collection of computers and their associated security groups that are managed as a single entity. Active Directory stores information about the objects in the domain, including users, groups, and computers. Password information and privileges for domain users and groups are stored in Active Directory, which is replicated across the computers that are designated as domain controllers of the domain. The Active Directory server, implemented as %SystemRoot%\System32\Ntdsa.dll, runs in the LSASS process. For more information on Active Directory, see Chapter 7.
§ Authentication packages. These include dynamic-link libraries (DLLs) that run both in the context of the LSASS process and client processes, and implement Windows authentication policy. An authentication DLL is responsible for authenticating a user, by checking whether a given user name and password match, and if so, returning to the LSASS information detailing the user’s security identity, which LSASS uses to generate a token.
§ Interactive logon manager (Winlogon). A user-mode process running %SystemRoot%\System32\Winlogon.exe that is responsible for responding to the SAS and for managing interactive logon sessions. Winlogon creates a user’s first process when the user logs on, for example.
§ Logon user interface (LogonUI). A user-mode process running %SystemRoot%\System32\LogonUI.exe that presents users with the user interface they can use to authenticate themselves on the system. LogonUI uses credential providers to query user credentials through various methods.
§ Credential providers (CPs). In-process COM objects that run in the LogonUI process (started on demand by Winlogon when the SAS is performed) and used to obtain a user’s name and password, smartcard PIN, or biometric data (such as a fingerprint). The standard CPs are %SystemRoot%\System32\authui.dll and %SystemRoot%\System32\SmartcardCredentialProvider.dll.
§ Network logon service (Netlogon). A Windows service (%SystemRoot%\System32\Netlogon.dll) that sets up the secure channel to a domain controller, over which security requests—such as an interactive logon (if the domain controller is running Windows NT 4) or LAN Manager and NT LAN Manager (v1 and v2) authentication validation—are sent. Netlogon is also used for Active Directory logons.
§ Kernel Security Device Driver (KSecDD). A kernel-mode library of functions that implement the advanced local procedure call (ALPC) interfaces that other kernel mode security components, including the Encrypting File System (EFS), use to communicate with LSASS in user mode. KSecDD is located in %SystemRoot%\System32\Drivers\Ksecdd.sys.
§ AppLocker. A mechanism that allows administrators to specify which executable files, DLLs, and scripts can be used by specified users and groups. AppLocker consists of a driver (%SystemRoot%\System32\Drivers\AppId.sys) and a service (%SystemRoot%\System32\AppIdSvc.dll) running in a SvcHost process.
Figure 6-1 shows the relationships among some of these components and the databases they manage.
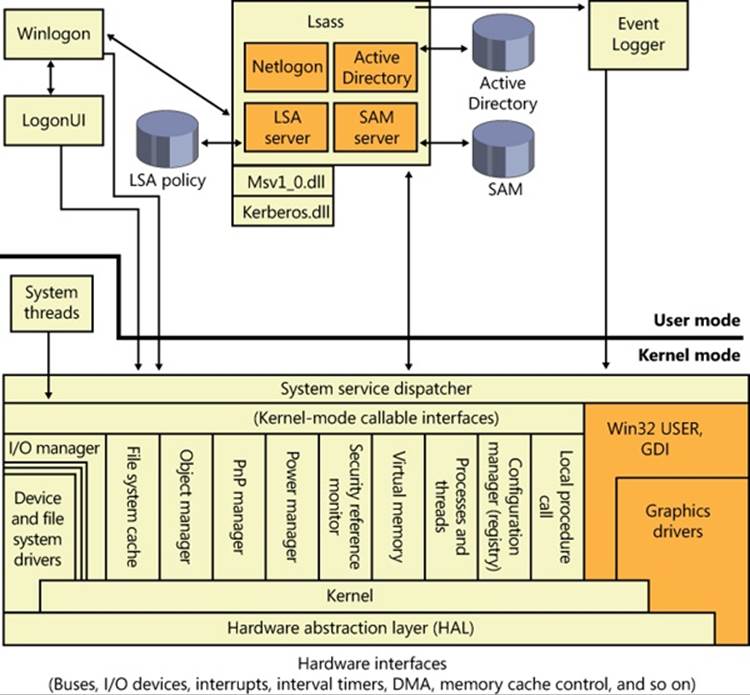
Figure 6-1. Windows security components
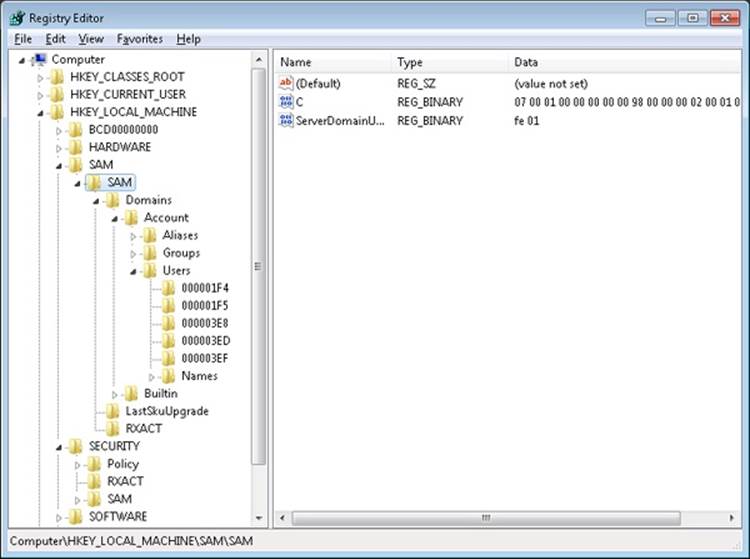
EXPERIMENT: LOOKING INSIDE HKLM\SAM AND HKLM\SECURITY
The security descriptors associated with the SAM and Security keys in the registry prevent access by any account other than the local system account. One way to gain access to these keys for exploration is to reset their security, but that can weaken the system’s security. Another way is to execute Regedit.exe while running as the local system account. This can be done using the PsExec tool from Windows Sysinternals with the –s option, as shown here:
C:\>psexec –s –i –d c:\windows\regedit.exe
The SRM, which runs in kernel mode, and LSASS, which runs in user mode, communicate using the ALPC facility described in Chapter 3. During system initialization, the SRM creates a port, named SeRmCommandPort, to which LSASS connects. When the LSASS process starts, it creates an ALPC port named SeLsaCommandPort. The SRM connects to this port, resulting in the creation of private communication ports. The SRM creates a shared memory section for messages longer than 256 bytes, passing a handle in the connect call. Once the SRM and LSASS connect to each other during system initialization, they no longer listen on their respective connect ports. Therefore, a later user process has no way to connect successfully to either of these ports for malicious purposes—the connect request will never complete.
Figure 6-2 shows the communication paths as they exist after system initialization.
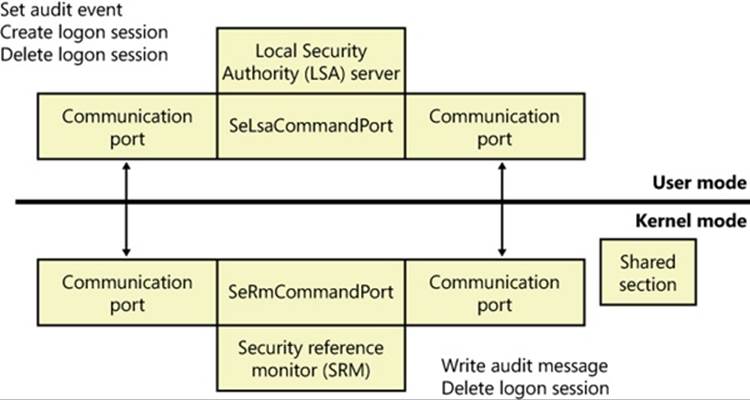
Figure 6-2. Communication between the SRM and LSASS
Protecting Objects
Object protection and access logging is the essence of discretionary access control and auditing. The objects that can be protected on Windows include files, devices, mailslots, pipes (named and anonymous), jobs, processes, threads, events, keyed events, event pairs, mutexes, semaphores, shared memory sections, I/O completion ports, LPC ports, waitable timers, access tokens, volumes, window stations, desktops, network shares, services, registry keys, printers, Active Directory objects, and so on—theoretically, anything managed by the executive object manager. In practice, objects that are not exposed to user mode (such as driver objects) are usually not protected. Kernel-mode code is trusted and usually uses interfaces to the object manager that do not perform access checking. Because system resources that are exported to user mode (and hence require security validation) are implemented as objects in kernel mode, the Windows object manager plays a key role in enforcing object security.
We described the object manager in Chapter 3, showing how the object manager maintains the security descriptor for objects. This is illustrated in Figure 6-3 using the Sysinternals Winobj tool, showing the security descriptor for a section object in the user’s session. Although files are the resources most commonly associated with object protection, Windows uses the same security model and mechanism for executive objects as it does for files in the file system. As far as access controls are concerned, executive objects differ from files only in the access methods supported by each type of object.
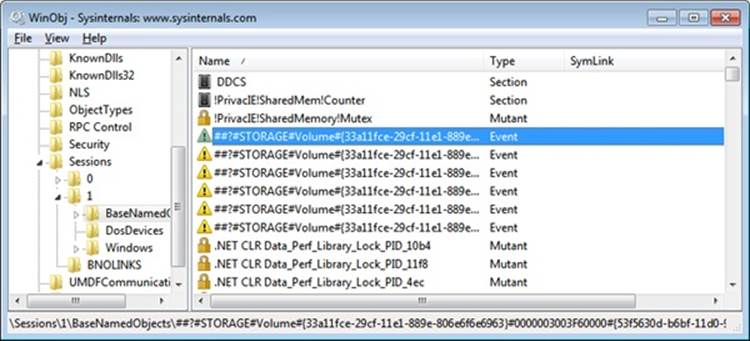
As you will see later, what is shown in Figure 6-3 is actually the object’s discretionary access control list, or DACL. We will describe DACLs in detail in a later section.
To control who can manipulate an object, the security system must first be sure of each user’s identity. This need to guarantee the user’s identity is the reason that Windows requires authenticated logon before accessing any system resources. When a process requests a handle to an object, the object manager and the security system use the caller’s security identification and the object’s security descriptor to determine whether the caller should be assigned a handle that grants the process access to the object it desires.
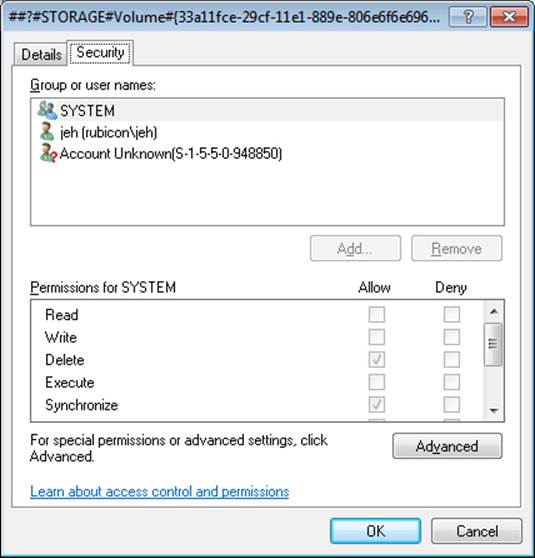
Figure 6-3. An executive object and its security descriptor, viewed by Winobj
As discussed later in this chapter, a thread can assume a different security context than that of its process. This mechanism is called impersonation, and when a thread is impersonating, security validation mechanisms use the thread’s security context instead of that of the thread’s process. When a thread isn’t impersonating, security validation falls back on using the security context of the thread’s owning process. It’s important to keep in mind that all the threads in a process share the same handle table, so when a thread opens an object—even if it’s impersonating—all the threads of the process have access to the object.
Sometimes, validating the identity of a user isn’t enough for the system to grant access to a resource that should be accessible by the account. Logically, one can think of a clear distinction between a service running under the Alice account and an unknown application that Alice downloaded while browsing the Internet. Windows achieves this kind of intra-user isolation with the Windows integrity mechanism, which implements integrity levels. The Windows integrity mechanism is used by User Account Control (UAC) elevations, Protected Mode Internet Explorer (PMIE), and User Interface Privilege Isolation (UIPI).
Access Checks
The Windows security model requires that a thread specify up front, at the time that it opens an object, what types of actions it wants to perform on the object. The object manager calls the SRM to perform access checks based on a thread’s desired access, and if the access is granted, a handle is assigned to the thread’s process with which the thread (or other threads in the process) can perform further operations on the object. As explained in Chapter 3, the object manager records the access permissions granted for a handle in the process’ handle table.
One event that causes the object manager to perform security access validation is when a process opens an existing object using a name. When an object is opened by name, the object manager performs a lookup of the specified object in the object manager namespace. If the object isn’t located in a secondary namespace, such as the configuration manager’s registry namespace or a file system driver’s file system namespace, the object manager calls the internal function ObpCreateHandle once it locates the object. As its name implies, ObpCreateHandle creates an entry in the process’ handle table that becomes associated with the object. ObpCreateHandle first calls ObpGrantAccess to see if the thread has permission to access the object; if the thread does, ObpCreateHandle calls the executive function ExCreateHandle to create the entry in the process handle table. ObpGrantAccess calls ObCheckObjectAccess to initiate the security access check.
ObpGrantAccess passes to ObCheckObjectAccess the security credentials of the thread opening the object, the types of access to the object that the thread is requesting (read, write, delete, and so forth), and a pointer to the object. ObCheckObjectAccess first locks the object’s security descriptor and the security context of the thread. The object security lock prevents another thread in the system from changing the object’s security while the access check is in progress. The lock on the thread’s security context prevents another thread (from that process or a different process) from altering the security identity of the thread while security validation is in progress. ObCheckObjectAccess then calls the object’s security method to obtain the security settings of the object. (See Chapter 3 for a description of object methods.) The call to the security method might invoke a function in a different executive component. However, many executive objects rely on the system’s default security management support.
When an executive component defining an object doesn’t want to override the SRM’s default security policy, it marks the object type as having default security. Whenever the SRM calls an object’s security method, it first checks to see whether the object has default security. An object with default security stores its security information in its header, and its security method is SeDefaultObjectMethod. An object that doesn’t rely on default security must manage its own security information and supply a specific security method. Objects that rely on default security include mutexes, events, and semaphores. A file object is an example of an object that overrides default security. The I/O manager, which defines the file object type, has the file system driver on which a file resides manage (or choose not to implement) the security for its files. Thus, when the system queries the security on a file object that represents a file on an NTFS volume, the I/O manager file object security method retrieves the file’s security using the NTFS file system driver. Note, however, that ObCheckObjectAccess isn’t executed when files are opened, because they reside in secondary namespaces; the system invokes a file object’s security method only when a thread explicitly queries or sets the security on a file (with the Windows SetFileSecurity or GetFileSecurity functions, for example).
After obtaining an object’s security information, ObCheckObjectAccess invokes the SRM function SeAccessCheck. SeAccessCheck is one of the functions at the heart of the Windows security model. Among the input parameters SeAccessCheck accepts are the object’s security information, the security identity of the thread as captured by ObCheckObjectAccess, and the access that the thread is requesting. SeAccessCheck returnsTrue or False, depending on whether the thread is granted the access it requested to the object.
Another event that causes the object manager to execute access validation is when a process references an object using an existing handle. Such references often occur indirectly, as when a process calls on a Windows API to manipulate an object and passes an object handle. For example, a thread opening a file can request read permission to the file. If the thread has permission to access the object in this way, as dictated by its security context and the security settings of the file, the object manager creates a handle—representing the file—in the handle table of the thread’s process. The types of accesses the process is granted through the handle are stored with the handle by the object manager.
Subsequently, the thread could attempt to write to the file using the WriteFile Windows function, passing the file’s handle as a parameter. The system service NtWriteFile, which WriteFile calls via Ntdll.dll, uses the object manager function ObReferenceObjectByHandle to obtain a pointer to the file object from the handle. ObReferenceObjectByHandle accepts the access that the caller wants from the object as a parameter. After finding the handle entry in the process’ handle table, ObReferenceObjectByHandle compares the access being requested with the access granted at the time the file was opened. In this example, ObReferenceObjectByHandle will indicate that the write operation should fail because the caller didn’t obtain write access when the file was opened.
The Windows security functions also enable Windows applications to define their own private objects and to call on the services of the SRM (through the AuthZ user-mode APIs, described later) to enforce the Windows security model on those objects. Many kernel-mode functions that the object manager and other executive components use to protect their own objects are exported as Windows user-mode APIs. The user-mode equivalent of SeAccessCheck is the AuthZ API AccessCheck. Windows applications can therefore leverage the flexibility of the security model and transparently integrate with the authentication and administrative interfaces that are present in Windows.
The essence of the SRM’s security model is an equation that takes three inputs: the security identity of a thread, the access that the thread wants to an object, and the security settings of the object. The output is either “yes” or “no” and indicates whether or not the security model grants the thread the access it desires. The following sections describe the inputs in more detail and then document the model’s access-validation algorithm.
Security Identifiers
Instead of using names (which might or might not be unique) to identify entities that perform actions in a system, Windows uses security identifiers (SIDs). Users have SIDs, and so do local and domain groups, local computers, domains, domain members, and services. A SID is a variable-length numeric value that consists of a SID structure revision number, a 48-bit identifier authority value, and a variable number of 32-bit subauthority or relative identifier (RID) values. The authority value identifies the agent that issued the SID, and this agent is typically a Windows local system or a domain. Subauthority values identify trustees relative to the issuing authority, and RIDs are simply a way for Windows to create unique SIDs based on a common base SID. Because SIDs are long and Windows takes care to generate truly random values within each SID, it is virtually impossible for Windows to issue the same SID twice on machines or domains anywhere in the world.
When displayed textually, each SID carries an S prefix, and its various components are separated with hyphens:
§ S-1-5-21-1463437245-1224812800-863842198-1128
In this SID, the revision number is 1, the identifier authority value is 5 (the Windows security authority), and four subauthority values plus one RID (1128) make up the remainder of the SID. This SID is a domain SID, but a local computer on the domain would have a SID with the same revision number, identifier authority value, and number of subauthority values.
When you install Windows, the Windows Setup program issues the computer a machine SID. Windows assigns SIDs to local accounts on the computer. Each local-account SID is based on the source computer’s SID and has a RID at the end. RIDs for user accounts and groups start at 1000 and increase in increments of 1 for each new user or group. Similarly, Dcpromo.exe (Domain Controller Promote), the utility used to create a new Windows domain, reuses the computer SID of the computer being promoted to domain controller as the domain SID, and it re-creates a new SID for the computer if it is ever demoted. Windows issues to new domain accounts SIDs that are based on the domain SID and have an appended RID (again starting at 1000 and increasing in increments of 1 for each new user or group). A RID of 1028 indicates that the SID is the twenty-ninth SID the domain issued.
Windows issues SIDs that consist of a computer or domain SID with a predefined RID to many predefined accounts and groups. For example, the RID for the administrator account is 500, and the RID for the guest account is 501. A computer’s local administrator account, for example, has the computer SID as its base with the RID of 500 appended to it:
§ S-1-5-21-13124455-12541255-61235125-500
Windows also defines a number of built-in local and domain SIDs to represent well-known groups. For example, a SID that identifies any and all accounts (except anonymous users) is the Everyone SID: S-1-1-0. Another example of a group that a SID can represent is the network group, which is the group that represents users who have logged on to a machine from the network. The network-group SID is S-1-5-2. Table 6-2, reproduced here from the Windows SDK documentation, shows some basic well-known SIDs, their numeric values, and their use. Unlike users’ SIDs, these SIDs are predefined constants, and have the same values on every Windows system and domain in the world. Thus, a file that is accessible by members of the Everyone group on the system where it was created is also accessible to Everyone on any other system or domain to which the hard drive where it resides happens to be moved. Users on those systems must, of course, authenticate to an account on those systems before becoming members of the Everyone group.
NOTE
See Microsoft Knowledge Base article 243330 for a list of defined SIDs at http://support.microsoft.com/kb/243330.
Finally, Winlogon creates a unique logon SID for each interactive logon session. A typical use of a logon SID is in an access control entry (ACE) that allows access for the duration of a client’s logon session. For example, a Windows service can use the LogonUser function to start a new logon session. The LogonUser function returns an access token from which the service can extract the logon SID. The service can then use the SID in an ACE that allows the client’s logon session to access the interactive window station and desktop. The SID for a logon session is S-1-5-5-0, and the RID is randomly generated.
Table 6-2. A Few Well-Known SIDs
|
SID |
Group |
Use |
|
S-1-0-0 |
Nobody |
Used when the SID is unknown. |
|
S-1-1-0 |
Everyone |
A group that includes all users except anonymous users. |
|
S-1-2-0 |
Local |
Users who log on to terminals locally (physically) connected to the system. |
|
S-1-3-0 |
Creator Owner ID |
A security identifier to be replaced by the security identifier of the user who created a new object. This SID is used in inheritable ACEs. |
|
S-1-3-1 |
Creator Group ID |
Identifies a security identifier to be replaced by the primary-group SID of the user who created a new object. Use this SID in inheritable ACEs. |
|
S-1-9-0 |
Resource Manager |
Used by third-party applications performing their own security on internal data (such as Microsoft Exchange). |
EXPERIMENT: USING PSGETSID AND PROCESS EXPLORER TO VIEW SIDS
You can easily see the SID representation for any account you’re using by running the PsGetSid utility from Sysinternals.
PsGetSid’s options allow you to translate machine and user account names to their corresponding SIDs and vice versa.
If you run PsGetSid with no options, it prints the SID assigned to the local computer. By using the fact that the Administrator account always has a RID of 500, you can determine the name assigned to the account (in cases where a system administrator has renamed the account for security reasons) simply by passing the machine SID appended with -500 as PsGetSid’s command-line argument.
To obtain the SID of a domain account, enter the user name with the domain as a prefix:
c:\>psgetsid redmond\daryl
You can determine the SID of a domain by specifying the domain’s name as the argument to PsGetSid:
c:\>psgetsid Redmond
Finally, by examining the RID of your own account, you know at least a number of security accounts (equal to the number resulting from subtracting 999 from your RID) have been created in your domain or on your local machine (depending on whether you are using a domain or local machine account). You can determine what accounts have been assigned RIDs by passing a SID with the RID you want to query to PsGetSid. If PsGetSid reports that no mapping between the SID and an account name was possible and the RID is lower than that of your account, you know that the account assigned the RID has been deleted.
For example, to find out the name of the account assigned the twenty-eighth RID, pass the domain SID appended with -1027 to PsGetSid:
c:\>psgetsid S-1-5-21-1787744166-3910675280-2727264193-1027
Account for S-1-5-21-1787744166-3910675280-2727264193-1027:
User: redmond\daryl
Process Explorer can also show you information on account and group SIDs on your system through its Security tab. This tab shows you information such as who owns this process and which groups the account is a member of. To view this information, simply double-click on any process (for example, Explorer.exe) in the Process list, and then click on the Security tab. You should see something similar to the following:
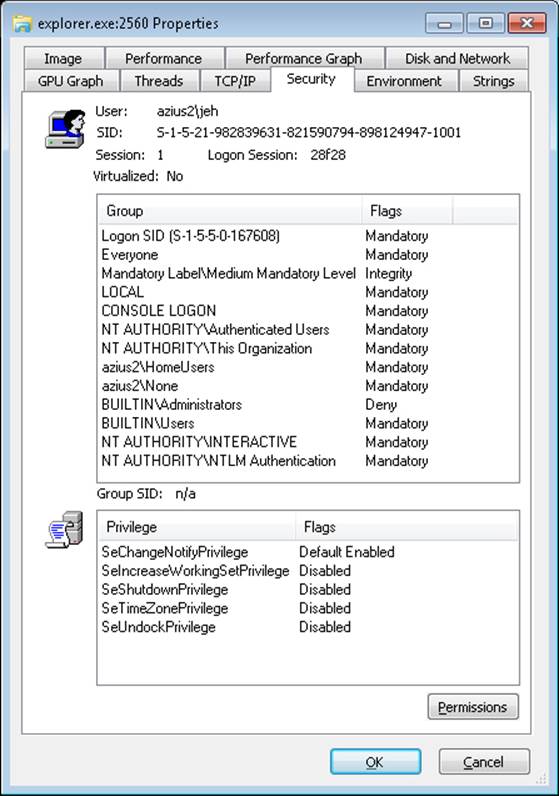
The information displayed in the User field contains the friendly name of the account owning this process, while the SID field contains the actual SID value. The Group list includes information on all the groups that this account is a member of. (Groups are described later in this chapter.)
Integrity Levels
As mentioned earlier, integrity levels can override discretionary access to differentiate a process and objects running as and owned by the same user, offering the ability to isolate code and data within a user account. The mechanism of mandatory integrity control (MIC) allows the SRM to have more detailed information about the nature of the caller by associating it with an integrity level. It also provides information on the trust required to access the object by defining an integrity level for it. These integrity levels are specified by a SID. Though integrity levels can be arbitrary values, the system uses five primary levels to separate privilege levels, as described in Table 6-3.
Table 6-3. Integrity Level SIDs
|
SID |
Name (Level) |
Use |
|
S-1-16-0x0 |
Untrusted (0) |
Used by processes started by the Anonymous group. It blocks most write access. |
|
S-1-16-0x1000 |
Low (1) |
Used by Protected Mode Internet Explorer. It blocks write access to most objects (such as files and registry keys) on the system. |
|
S-1-16-0x2000 |
Medium (2) |
Used by normal applications being launched while UAC is enabled. |
|
S-1-16-0x3000 |
High (3) |
Used by administrative applications launched through elevation when UAC is enabled, or normal applications if UAC is disabled and the user is an administrator. |
|
S-1-16-0x4000 |
System (4) |
Used by services and other system-level applications (such as Wininit, Winlogon, Smss, and so forth). |
EXPERIMENT: LOOKING AT THE INTEGRITY LEVEL OF PROCESSES
You can use Process Explorer from Sysinternals to quickly display the integrity level for the processes on your system. The following steps demonstrate this functionality.
1. Launch Internet Explorer in Protected Mode.
2. Open an elevated Command Prompt window.
3. Open Microsoft Paint normally (without elevating it).
4. Now open Process Explorer, right-click on any of the columns in the Process list, and then click Select Columns. You should see a dialog box similar to the one shown here:
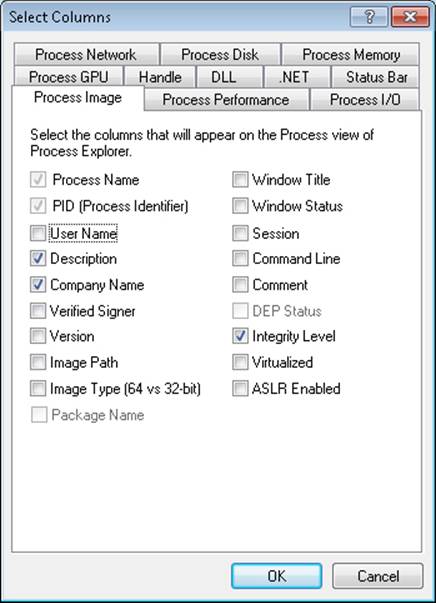
5. Select the Integrity Level check box, and click OK to close the dialog box and save the change.
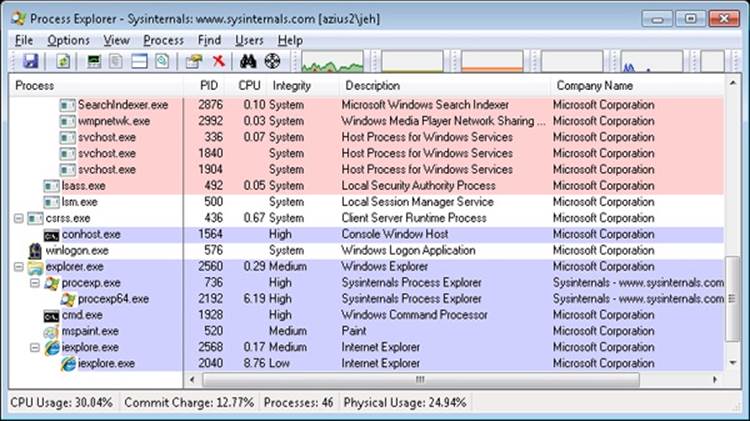
6. Process Explorer will now show you the integrity level of the processes on your system. You should see the Protected Mode Internet Explorer process at Low, Microsoft Paint at Medium, and the elevated command prompt at High. Also note that the services and system processes are running at an even higher integrity level, System.
Every process has an integrity level that is represented in the process’ token and propagated according to the following rules:
§ A process normally inherits the integrity level of its parent (which means an elevated command prompt will spawn other elevated processes).
§ If the file object for the executable image to which the child process belongs has an integrity level and the parent process’ integrity level is medium or higher, the child process will inherit the lower of the two.
§ A parent process can create a child process with an explicit integrity level lower than its own (for example, when launching Protected Mode Internet Explorer from an elevated command prompt). To do this, it uses DuplicateTokenEx to duplicate its own access token, it usesSetTokenInformation to change the integrity level in the new token to the desired level, and then it calls CreateProcessAsUser with that new token.
EXPERIMENT: UNDERSTANDING PROTECTED MODE INTERNET EXPLORER
As mentioned earlier, one of the users of the Windows integrity mechanism is Internet Explorer’s Protected Mode, also called Protected Mode Internet Explorer (PMIE). This feature was added in Internet Explorer 7 to take advantage of the Windows integrity levels. This experiment will show you how PMIE utilizes integrity levels to provide a safer Internet experience. To do this, we’ll use Process Monitor to trace Internet Explorer’s behavior.
1. Make sure that you haven’t disabled UAC and PMIE on your systems (they are both on by default), and close any running instances of Internet Explorer.
2. Run Process Monitor, and select Filter, Filter to display the filtering dialog box. Add an include filter for the process name Iexplore.exe, as shown next:
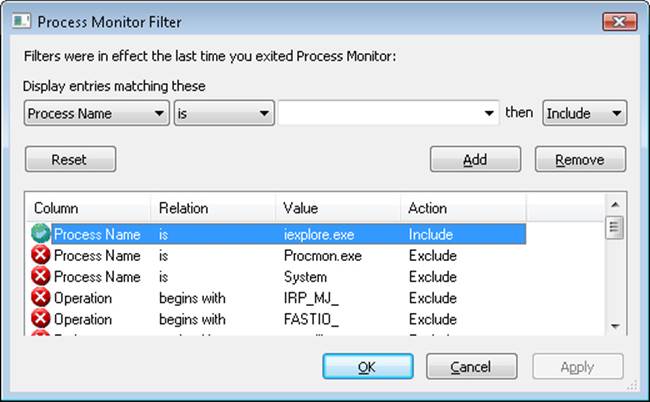
3. Run Process Explorer, and repeat the previous experiment to display the Integrity Level column.
4. Now launch Internet Explorer. You should see a flurry of events appear in the Process Monitor window and a quick succession of events in Process Explorer, showing some processes starting and some exiting.
Once Internet Explorer is running, Process Explorer will show you two new Iexplore.exe processes, the parent Iexplore.exe running at medium integrity level and its child running at low integrity level.
Part of the added protection offered by PMIE is that Iexplore.exe processes that access websites run at low integrity. Because Internet Explorer hosts tabs in multiple processes, if you create additional tabs you might see additional instances of Iexplore.exe. There is one parent Iexplore.exe process that acts as a broker, providing access to parts of the system not accessible by those running at low integrity—for example, to save or open files from other parts of the file system.
Table 6-3 lists the integrity level associated with processes, but what about objects? Objects also have an integrity level stored as part of their security descriptor, in a structure that is called the mandatory label.
To support migrating from previous versions of Windows (whose registry keys and files would not include integrity-level information), as well as to make it simpler for application developers, all objects have an implicit integrity level to avoid having to manually specify one. This implicit integrity level is the medium level, meaning that the mandatory policy (described shortly) on the object will be performed on tokens accessing this object with an integrity level lower than medium.
When a process creates an object without specifying an integrity level, the system checks the integrity level in the token. For tokens with a level of medium or higher, the implicit integrity level of the object remains medium. However, when a token contains an integrity level lower than medium, the object is created with an explicit integrity level that matches the level in the token.
The reason that objects that are created by high or system integrity-level processes have a medium integrity level themselves is so that users can disable and enable UAC: if object integrity levels always inherited their creator’s integrity level, the applications of an administrator who disables UAC and subsequently re-enables it would potentially fail because the administrator would not be able to modify any registry settings or files created when running at the high integrity level. Objects can also have an explicit integrity level that is set by the system or by the creator of the object. For example, the following objects are given an explicit integrity level by the kernel when it creates them:
§ Processes
§ Threads
§ Tokens
§ Jobs
The reason for assigning an integrity level to these objects is to prevent a process for the same user, but one running at a lower integrity level, from accessing these objects and modifying their content or behavior (for example, DLL injection or code modification).
EXPERIMENT: LOOKING AT THE INTEGRITY LEVEL OF OBJECTS
You can use the Accesschk tool from Sysinternals to display the integrity level of objects on the system, such as files, processes, and registry keys. Here’s an experiment showing the purpose of the LocalLow directory in Windows.
1. Browse to C:\Users\UserName\ in a command prompt.
2. Try running Accesschk on the AppData folder, as follows:
C:\Users\UserName> accesschk –v appdata
3. Note the differences between Local and LocalLow in your output, similar to the one shown here:
4. C:\Users\UserName\AppData\Local
5. Medium Mandatory Level (Default) [No-Write-Up]
6. [...]C:\Users\UserName\AppData\LocalLow
7. Low Mandatory Level [No-Write-Up]
8. [...]
9. C:\Users\UserName\AppData\Roaming
10. Medium Mandatory Level (Default) [No-Write-Up]
[...]
11. Notice that the LocalLow directory has an integrity level that is set to Low, while the Local and Roaming directories have an integrity level of Medium (Default). The default means the system is using an implicit integrity level.
12. You can pass the –e flag to Accesschk so that it displays only explicit integrity levels. If you run the tool on the AppData folder again, you’ll notice only the LocalLow information is displayed.
The –o (Object), –k (Registry Key), and –p (Process) flags allow you to specify something other than a file or directory.
Apart from an integrity level, objects also have a mandatory policy, which defines the actual level of protection that’s applied based on the integrity-level check. Three types are possible, shown in Table 6-4. The integrity level and the mandatory policy are stored together in the same ACE.
Table 6-4. Object Mandatory Policies
|
Policy |
Present on, by Default |
Description |
|
No-Write-Up |
Implicit on all objects |
Used to restrict write access coming from a lower integrity level process to the object. |
|
No-Read-Up |
Only on process objects |
Used to restrict read access coming from a lower integrity level process to the object. Specific use on process objects protects against information leakage by blocking address space reads from an external process. |
|
No-Execute-Up |
Only on binaries implementing COM classes |
Used to restrict execute access coming from a lower integrity level process to the object. Specific use on COM classes is to restrict launch-activation permissions on a COM class. |
Tokens
The SRM uses an object called a token (or access token) to identify the security context of a process or thread. A security context consists of information that describes the account, groups, and privileges associated with the process or thread. Tokens also include information such as the session ID, the integrity level, and UAC virtualization state. (We’ll describe both privileges and UAC’s virtualization mechanism later in this chapter.)
During the logon process (described at the end of this chapter), LSASS creates an initial token to represent the user logging on. It then determines whether the user logging on is a member of a powerful group or possesses a powerful privilege. The groups checked for in this step are as follows:
§ Built-In Administrators
§ Certificate Administrators
§ Domain Administrators
§ Enterprise Administrators
§ Policy Administrators
§ Schema Administrators
§ Domain Controllers
§ Enterprise Read-Only Domain Controllers
§ Read-Only Domain Controllers
§ Account Operators
§ Backup Operators
§ Cryptographic Operators
§ Network Configuration Operators
§ Print Operators
§ System Operators
§ RAS Servers
§ Power Users
§ Pre-Windows 2000 Compatible Access
Many of the groups listed are used only on domain-joined systems and don’t give users local administrative rights directly. Instead, they allow users to modify domainwide settings.
The privileges checked for are
§ SeBackupPrivilege
§ SeCreateTokenPrivilege
§ SeDebugPrivilege
§ SeImpersonatePrivilege
§ SeLabelPrivilege
§ SeLoadDriverPrivilege
§ SeRestorePrivilege
§ SeTakeOwnershipPrivilege
§ SeTcbPrivilege
These privileges are described in detail in a later section.
If one or more of these groups or privileges are present, LSASS creates a restricted token for the user (also called a filtered admin token), and it creates a logon session for both. The standard user token is attached to the initial process or processes that Winlogon starts (by default, Userinit.exe).
NOTE
If UAC has been disabled, administrators run with a token that includes their administrator group memberships and privileges.
Because child processes by default inherit a copy of the token of their creators, all processes in the user’s session run under the same token. You can also generate a token by using the Windows LogonUser function. You can then use this token to create a process that runs within the security context of the user logged on through the LogonUser function by passing the token to the Windows CreateProcessAsUser function. The CreateProcessWithLogon function combines these into a single call, which is how the Runas command launches processes under alternative tokens.
Tokens vary in size because different user accounts have different sets of privileges and associated group accounts. However, all tokens contain the same types of information. The most important contents of a token are represented in Figure 6-4.
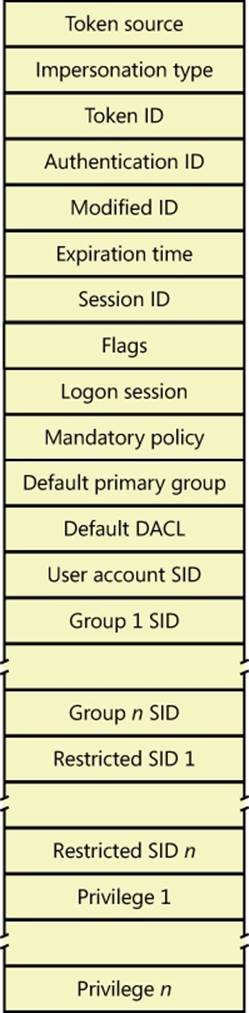
Figure 6-4. Access tokens
The security mechanisms in Windows use two components to determine what objects can be accessed and what secure operations can be performed. One component comprises the token’s user account SID and group SID fields. The security reference monitor (SRM) uses SIDs to determine whether a process or thread can obtain requested access to a securable object, such as an NTFS file.
The group SIDs in a token indicate which groups a user’s account is a member of. For example, a server application can disable specific groups to restrict a token’s credentials when the server application is performing actions requested by a client. Disabling a group produces nearly the same effect as if the group wasn’t present in the token. (It results in a deny-only group, described later. Disabled SIDs are used as part of security access checks, described later in the chapter.) Group SIDs can also include a special SID that contains the integrity level of the process or thread. The SRM uses another field in the token, which describes the mandatory integrity policy, to perform the mandatory integrity check described later in the chapter.
The second component in a token that determines what the token’s thread or process can do is the privilege array. A token’s privilege array is a list of rights associated with the token. An example privilege is the right for the process or thread associated with the token to shut down the computer. Privileges are described in more detail later in this chapter.
A token’s default primary group field and default discretionary access control list (DACL) field are security attributes that Windows applies to objects that a process or thread creates when it uses the token. By including security information in tokens, Windows makes it convenient for a process or thread to create objects with standard security attributes, because the process or thread doesn’t need to request discrete security information for every object it creates.
Each token’s type distinguishes a primary token (a token that identifies the security context of a process) from an impersonation token (a type of token that threads use to temporarily adopt a different security context, usually of another user). Impersonation tokens carry an impersonation level that signifies what type of impersonation is active in the token. (Impersonation is described later in this chapter.)
A token also includes the mandatory policy for the process or thread, which defines how MIC will behave when processing this token. There are two policies:
§ TOKEN_MANDATORY_NO_WRITE_UP, which is enabled by default, sets the No-Write-Up policy on this token, specifying that the process or thread will not be able to access objects with a higher integrity level for write access.
§ TOKEN_MANDATORY_NEW_PROCESS_MIN, which is also enabled by default, specifies that the SRM should look at the integrity level of the executable image when launching a child process and compute the minimum integrity level of the parent process and the file object’s integrity level as the child’s integrity level.
Token flags include parameters that determine the behavior of certain UAC and UIPI mechanisms, such as virtualization and user interface access. Those mechanisms will be described later in this chapter.
Each token can also contain attributes that are assigned by the Application Identification service (part of AppLocker) when AppLocker rules have been defined. AppLocker and its use of attributes in the access token are described later in this chapter.
The remaining fields in a token serve informational purposes. The token source field contains a short textual description of the entity that created the token. Programs that want to know where a token originated use the token source to distinguish among sources such as the Windows Session Manager, a network file server, or the remote procedure call (RPC) server. The token identifier is a locally unique identifier (LUID) that the SRM assigns to the token when it creates the token. The Windows executive maintains the executive LUID, a monotonically increasing counter it uses to assign a unique numeric identifier to each token. A LUID is guaranteed to be unique only until the system is shut down.
The token authentication ID is another kind of LUID. A token’s creator assigns the token’s authentication ID when calling the LsaLogonUser function. If the creator doesn’t specify a LUID, LSASS obtains the LUID from the executive LUID. LSASS copies the authentication ID for all tokens descended from an initial logon token. A program can obtain a token’s authentication ID to see whether the token belongs to the same logon session as other tokens the program has examined.
The executive LUID refreshes the modified ID every time a token’s characteristics are modified. An application can test the modified ID to discover changes in a security context since the context’s last use.
Tokens contain an expiration time field that can be used by applications performing their own security to reject a token after a specified amount of time. However, Windows itself does not enforce the expiration time of tokens.
NOTE
To guarantee system security, the fields in a token are immutable (because they are located in kernel memory). Except for fields that can be modified through a specific system call designed to modify certain token attributes (assuming the caller has the appropriate access rights to the token object), data such as the privileges and SIDs in a token can never be modified from user mode.
EXPERIMENT: VIEWING ACCESS TOKENS
The kernel debugger dt _TOKEN command displays the format of an internal token object. Although this structure differs from the user-mode token structure returned by Windows API security functions, the fields are similar. For further information on tokens, see the description in the Windows SDK documentation.
The following output is from the kernel debugger’s dt nt!_TOKEN command:
kd> dt nt!_TOKEN
+0x000 TokenSource : _TOKEN_SOURCE
+0x010 TokenId : _LUID
+0x018 AuthenticationId : _LUID
+0x020 ParentTokenId : _LUID
+0x028 ExpirationTime : _LARGE_INTEGER
+0x030 TokenLock : Ptr32 _ERESOURCE
+0x034 ModifiedId : _LUID
+0x040 Privileges : _SEP_TOKEN_PRIVILEGES
+0x058 AuditPolicy : _SEP_AUDIT_POLICY
+0x074 SessionId : Uint4B
+0x078 UserAndGroupCount : Uint4B
+0x07c RestrictedSidCount : Uint4B
+0x080 VariableLength : Uint4B
+0x084 DynamicCharged : Uint4B
+0x088 DynamicAvailable : Uint4B
+0x08c DefaultOwnerIndex : Uint4B
+0x090 UserAndGroups : Ptr32 _SID_AND_ATTRIBUTES
+0x094 RestrictedSids : Ptr32 _SID_AND_ATTRIBUTES
+0x098 PrimaryGroup : Ptr32 Void
+0x09c DynamicPart : Ptr32 Uint4B
+0x0a0 DefaultDacl : Ptr32 _ACL
+0x0a4 TokenType : _TOKEN_TYPE
+0x0a8 ImpersonationLevel : _SECURITY_IMPERSONATION_LEVEL
+0x0ac TokenFlags : Uint4B
+0x0b0 TokenInUse : UChar
+0x0b4 IntegrityLevelIndex : Uint4B
+0x0b8 MandatoryPolicy : Uint4B
+0x0bc ProxyData : Ptr32 _SECURITY_TOKEN_PROXY_DATA
+0x0c0 AuditData : Ptr32 _SECURITY_TOKEN_AUDIT_DATA
+0x0c4 LogonSession : Ptr32 _SEP_LOGON_SESSION_REFERENCES
+0x0c8 OriginatingLogonSession : _LUID
+0x0d0 SidHash : _SID_AND_ATTRIBUTES_HASH
+0x158 RestrictedSidHash : _SID_AND_ATTRIBUTES_HASH
+0x1e0 VariablePart : Uint4B
You can examine the token for a process with the !token command. You’ll find the address of the token in the output of the !process command, as shown here:
lkd> !process d6c 1
Searching for Process with Cid == d6c
PROCESS 85450508 SessionId: 1 Cid: 0d6c Peb: 7ffda000 ParentCid: 0ecc
DirBase: cc9525e0 ObjectTable: afd75518 HandleCount: 18.
Image: cmd.exe
VadRoot 85328e78 Vads 24 Clone 0 Private 148. Modified 0. Locked 0.
DeviceMap a0688138
Token afd48470
ElapsedTime 01:10:14.379
UserTime 00:00:00.000
KernelTime 00:00:00.000
QuotaPoolUsage[PagedPool] 42864
QuotaPoolUsage[NonPagedPool] 1152
Working Set Sizes (now,min,max) (566, 50, 345) (2264KB, 200KB, 1380KB)
PeakWorkingSetSize 582
VirtualSize 22 Mb
PeakVirtualSize 25 Mb
PageFaultCount 680
MemoryPriority BACKGROUND
BasePriority 8
CommitCharge 437
lkd> !token afd48470
_TOKEN afd48470
TS Session ID: 0x1
User: S-1-5-21-2778343003-3541292008-524615573-500 (User: ALEX-LAPTOP\Administrator)
Groups:
00 S-1-5-21-2778343003-3541292008-524615573-513 (Group: ALEX-LAPTOP\None)
Attributes - Mandatory Default Enabled
01 S-1-1-0 (Well Known Group: localhost\Everyone)
Attributes - Mandatory Default Enabled
02 S-1-5-21-2778343003-3541292008-524615573-1000 (Alias: ALEX-LAPTOP\Debugger Users)
Attributes - Mandatory Default Enabled
03 S-1-5-32-544 (Alias: BUILTIN\Administrators)
Attributes - Mandatory Default Enabled Owner
04 S-1-5-32-545 (Alias: BUILTIN\Users)
Attributes - Mandatory Default Enabled
05 S-1-5-4 (Well Known Group: NT AUTHORITY\INTERACTIVE)
Attributes - Mandatory Default Enabled
06 S-1-5-11 (Well Known Group: NT AUTHORITY\Authenticated Users)
Attributes - Mandatory Default Enabled
07 S-1-5-15 (Well Known Group: NT AUTHORITY\This Organization)
Attributes - Mandatory Default Enabled
08 S-1-5-5-0-89263 (no name mapped)
Attributes - Mandatory Default Enabled LogonId
09 S-1-2-0 (Well Known Group: localhost\LOCAL)
Attributes - Mandatory Default Enabled
10 S-1-5-64-10 (Well Known Group: NT AUTHORITY\NTLM Authentication)
Attributes - Mandatory Default Enabled
11 S-1-16-12288 Unrecognized SID
Attributes - GroupIntegrity GroupIntegrityEnabled
Primary Group: S-1-5-21-2778343003-3541292008-524615573-513 (Group: ALEX-LAPTOP\None)
Privs:
05 0x000000005 SeIncreaseQuotaPrivilege Attributes -
08 0x000000008 SeSecurityPrivilege Attributes -
09 0x000000009 SeTakeOwnershipPrivilege Attributes -
10 0x00000000a SeLoadDriverPrivilege Attributes -
11 0x00000000b SeSystemProfilePrivilege Attributes -
12 0x00000000c SeSystemtimePrivilege Attributes -
13 0x00000000d SeProfileSingleProcessPrivilege Attributes -
14 0x00000000e SeIncreaseBasePriorityPrivilege Attributes -
15 0x00000000f SeCreatePagefilePrivilege Attributes -
17 0x000000011 SeBackupPrivilege Attributes -
18 0x000000012 SeRestorePrivilege Attributes -
19 0x000000013 SeShutdownPrivilege Attributes -
20 0x000000014 SeDebugPrivilege Attributes -
22 0x000000016 SeSystemEnvironmentPrivilege Attributes -
23 0x000000017 SeChangeNotifyPrivilege Attributes - Enabled Default
24 0x000000018 SeRemoteShutdownPrivilege Attributes -
25 0x000000019 SeUndockPrivilege Attributes -
28 0x00000001c SeManageVolumePrivilege Attributes -
29 0x00000001d SeImpersonatePrivilege Attributes - Enabled Default
30 0x00000001e SeCreateGlobalPrivilege Attributes - Enabled Default
33 0x000000021 SeIncreaseWorkingSetPrivilege Attributes -
34 0x000000022 SeTimeZonePrivilege Attributes -
35 0x000000023 SeCreateSymbolicLinkPrivilege Attributes -
Authentication ID: (0,be1a2)
Impersonation Level: Identification
TokenType: Primary
Source: User32 TokenFlags: 0x0 ( Token in use )
Token ID: 711076 ParentToken ID: 0
Modified ID: (0, 711081)
RestrictedSidCount: 0 RestrictedSids: 00000000
OriginatingLogonSession: 3e7
You can indirectly view token contents with Process Explorer’s Security tab in its process Properties dialog box. The dialog box shows the groups and privileges included in the token of the process you examine.
EXPERIMENT: LAUNCHING A PROGRAM AT LOW INTEGRITY LEVEL
When you elevate a program, either by using the Run As Administrator option or because the program is requesting it, the program is explicitly launched at high integrity level; however, it is also possible to launch a program (other than PMIE) at low integrity level by using Psexec from Sysinternals:
1. Launch Notepad at low integrity level by using the following command:
c:\psexec –l notepad.exe
2. Try opening a file (such as one of the .XML files) in the %SystemRoot%\System32 directory. Notice that you can browse the directory and open any file contained within it.
3. Now use Notepad’s File | New command, enter some text in the window, and try saving it in the %SystemRoot%\System32 directory. Notepad should present a message box indicating a lack of permissions and recommend saving the file in the Documents folder.
4. Accept Notepad’s suggestion. You will get the same message box again, and repeatedly for each attempt.
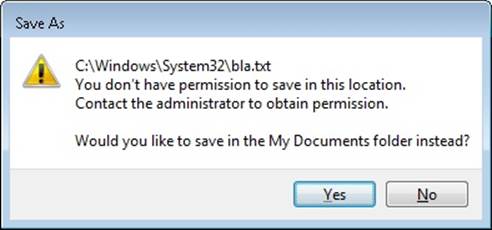
5. Now try saving the file in the LocalLow directory of your user profile, shown in an experiment earlier in the chapter.
In the previous experiment, saving a file in the LocalLow directory worked because Notepad was running with low integrity level, and only the LocalLow directory also had low integrity level. All the other locations where you tried to write the file had an implicit medium integrity level. (You can verify this with Accesschk.) However, reading from the %SystemRoot%\System32 directory, as well as opening files within it, did work, even though the directory and its file also have an implicit medium integrity level.
Impersonation
Impersonation is a powerful feature Windows uses frequently in its security model. Windows also uses impersonation in its client/server programming model. For example, a server application can provide access to resources such as files, printers, or databases. Clients wanting to access a resource send a request to the server. When the server receives the request, it must ensure that the client has permission to perform the desired operations on the resource. For example, if a user on a remote machine tries to delete a file on an NTFS share, the server exporting the share must determine whether the user is allowed to delete the file. The obvious way to determine whether a user has permission is for the server to query the user’s account and group SIDs and scan the security attributes on the file. This approach is tedious to program, prone to errors, and wouldn’t permit new security features to be supported transparently. Thus, Windows provides impersonation services to simplify the server’s job.
Impersonation lets a server notify the SRM that the server is temporarily adopting the security profile of a client making a resource request. The server can then access resources on behalf of the client, and the SRM carries out the access validations, but it does so based on the impersonated client security context. Usually, a server has access to more resources than a client does and loses some of its security credentials during impersonation. However, the reverse can be true: the server can gain security credentials during impersonation.
A server impersonates a client only within the thread that makes the impersonation request. Thread-control data structures contain an optional entry for an impersonation token. However, a thread’s primary token, which represents the thread’s real security credentials, is always accessible in the process’ control structure.
Windows makes impersonation available through several mechanisms. For example, if a server communicates with a client through a named pipe, the server can use the ImpersonateNamedPipeClient Windows API function to tell the SRM that it wants to impersonate the user on the other end of the pipe. If the server is communicating with the client through Dynamic Data Exchange (DDE) or RPC, it can make similar impersonation requests using DdeImpersonateClient and RpcImpersonateClient. A thread can create an impersonation token that’s simply a copy of its process token with the ImpersonateSelf function. The thread can then alter its impersonation token, perhaps to disable SIDs or privileges. A Security Support Provider Interface (SSPI) package can impersonate its clients with ImpersonateSecurityContext. SSPIs implement a network authentication protocol such as LAN Manager version 2 or Kerberos. Other interfaces such as COM expose impersonation through APIs of their own, such as CoImpersonateClient.
After the server thread finishes its task, it reverts to its primary security context. These forms of impersonation are convenient for carrying out specific actions at the request of a client and for ensuring that object accesses are audited correctly. (For example, the audit that is generated gives the identity of the impersonated client rather than that of the server process.) The disadvantage to these forms of impersonation is that they can’t execute an entire program in the context of a client. In addition, an impersonation token can’t access files or printers on network shares unless it is a delegation-level impersonation (described shortly) and has sufficient credentials to authenticate to the remote machine, or the file or printer share supports null sessions. (A null session is one that results from an anonymous logon.)
If an entire application must execute in a client’s security context or must access network resources without using impersonation, the client must be logged on to the system. The LogonUser Windows API function enables this action. LogonUser takes an account name, a password, a domain or computer name, a logon type (such as interactive, batch, or service), and a logon provider as input, and it returns a primary token. A server thread can adopt the token as an impersonation token, or the server can start a program that has the client’s credentials as its primary token. From a security standpoint, a process created using the token returned from an interactive logon via LogonUser, such as with the CreateProcessAsUser API, looks like a program a user starts by logging on to the machine interactively. The disadvantage to this approach is that a server must obtain the user’s account name and password. If the server transmits this information across the network, the server must encrypt it securely so that a malicious user snooping network traffic can’t capture it.
To prevent the misuse of impersonation, Windows doesn’t let servers perform impersonation without a client’s consent. A client process can limit the level of impersonation that a server process can perform by specifying a security quality of service (SQOS) when connecting to the server. For instance, when opening a named pipe, a process can specify SECURITY_ANONYMOUS, SECURITY_IDENTIFICATION, SECURITY_IMPERSONATION, or SECURITY_DELEGATION as flags for the Windows CreateFile function. Each level lets a server perform different types of operations with respect to the client’s security context:
§ SecurityAnonymous is the most restrictive level of impersonation—the server can’t impersonate or identify the client.
§ SecurityIdentification lets the server obtain the identity (the SIDs) of the client and the client’s privileges, but the server can’t impersonate the client.
§ SecurityImpersonation lets the server identify and impersonate the client on the local system.
§ SecurityDelegation is the most permissive level of impersonation. It lets the server impersonate the client on local and remote systems.
Other interfaces such as RPC use different constants with similar meanings (for example, RPC_C_IMP_LEVEL_IMPERSONATE).
If the client doesn’t set an impersonation level, Windows chooses the SecurityImpersonation level by default. The CreateFile function also accepts SECURITY_EFFECTIVE_ONLY and SECURITY_CONTEXT_TRACKING as modifiers for the impersonation setting:
§ SECURITY_EFFECTIVE_ONLY prevents a server from enabling or disabling a client’s privileges or groups while the server is impersonating.
§ SECURITY_CONTEXT_TRACKING specifies that any changes a client makes to its security context are reflected in a server that is impersonating it. If this option isn’t specified, the server adopts the context of the client at the time of the impersonation and doesn’t receive any changes. This option is honored only when the client and server processes are on the same system.
To prevent spoofing scenarios in which a low integrity process could create a user interface that captured user credentials and then used LogonUser to obtain that user’s token, a special integrity policy applies to impersonation scenarios: a thread cannot impersonate a token of higher integrity than its own. For example, a low-integrity application cannot spoof a dialog box that queries administrative credentials and then attempt to launch a process at a higher privilege level. The integrity-mechanism policy for impersonation access tokens is that the integrity level of the access token that is returned by LsaLogonUser must be no higher than the integrity level of the calling process.
Restricted Tokens
A restricted token is created from a primary or impersonation token using the CreateRestrictedToken function. The restricted token is a copy of the token it’s derived from, with the following possible modifications:
§ Privileges can be removed from the token’s privilege array.
§ SIDs in the token can be marked as deny-only. These SIDs remove access to any resources for which the SID’s access is denied by using a matching access-denied ACE that would otherwise be overridden by an ACE granting access to a group containing the SID earlier in the security descriptor.
§ SIDs in the token can be marked as restricted. These SIDs are subject to a second pass of the access-check algorithm, which will parse only the restricted SIDs in the token. The results of both the first pass and the second pass must grant access to the resource or no access is granted to the object.
Restricted tokens are useful when an application wants to impersonate a client at a reduced security level, primarily for safety reasons when running untrusted code. For example, the restricted token can have the shutdown-system privilege removed from it to prevent code executed in the restricted token’s security context from rebooting the system.
Filtered Admin Token
As you saw earlier, restricted tokens are also used by UAC to create the filtered admin token that all user applications will inherit. A filtered admin token has the following characteristics:
§ The integrity level is set to medium.
§ The administrator and administrator-like SIDs mentioned previously are marked as deny-only to prevent a security hole if the group was removed altogether. For example, if a file had an access control list (ACL) that denied the Administrators group all access but granted some access to another group the user belongs to, the user would be granted access if the Administrators group was absent from the token, which would give the standard user version of the user’s identity more access than the user’s administrator identity.
§ All privileges are stripped except Change Notify, Shutdown, Undock, Increase Working Set, and Time Zone.
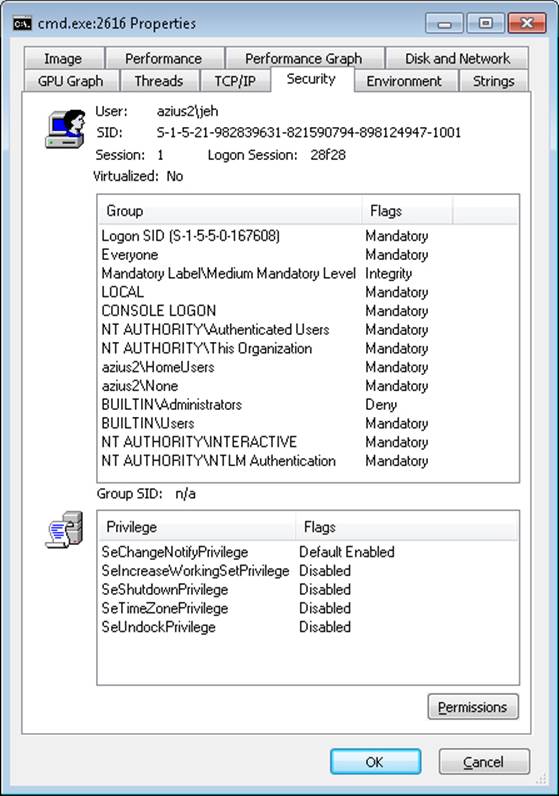
EXPERIMENT: LOOKING AT FILTERED ADMIN TOKENS
You can make Explorer launch a process with either the standard user token or the administrator token by following these steps on a Windows machine with UAC enabled:
1. Log on to an account that’s a member of the Administrators group.
2. Click Start, Programs, Accessories, Command Prompt, right-click on the shortcut, and then select Run As Administrator. You will see a command prompt with the word Administrator in the title bar.
3. Now repeat the process, but simply click on the shortcut—this will launch a second command prompt without administrative privileges.
4. Run Process Explorer, and view the Security tab in the Properties dialog boxes for the two command prompt processes you launched. Note that the standard user token contains a deny-only SID and a Medium Mandatory Label, and that it has only a couple of privileges. The properties on the right in the following screen shot are from a command prompt running with an administrator token, and the properties on the left are from one running with the filtered administrative token:
Virtual Service Accounts
Windows provides a specialized type of account known as a virtual service account (or simply virtual account) to improve the security isolation and access control of Windows services with minimal administrative effort. (See Chapter 4 for more information on Windows services.) Without this mechanism, Windows services must run either under one of the accounts defined by Windows for its built-in services (such as Local Service or Network Service) or under a regular domain account. The accounts such as Local Service are shared by many existing services and so offer limited granularity for privilege and access control; furthermore, they cannot be managed across the domain. Domain accounts require periodic password changes for security, and the availability of services during a password change cycle might be affected. Furthermore, for best isolation, each service should run under its own account, but with ordinary accounts this multiplies the management effort.
With virtual service accounts, each service runs under its own account with its own security ID. The name of the account is always “NT SERVICE\” followed by the internal name of the service. Virtual service accounts can appear in access control lists and can be associated with privileges via Group Policy like any other account name. They cannot, however, be created or deleted through the usual account management tools, nor assigned to groups.
Windows automatically sets and periodically changes the password of the virtual service account. Similar to the “Local System and other service accounts” account, there is a password, but the password is unknown to the system administrators
EXPERIMENT: USING VIRTUAL SERVICE ACCOUNTS
You can create a service that runs under a virtual service account by using the Sc (service control) tool by following these steps:
1. In an Administrator command prompt, use the create command of the command-line tool Sc (service control) to create a service and a virtual account in which it will run. This example uses the “srvany” service from an earlier Windows Resource Kit:
2. C:\Windows\system32>sc create srvany obj= "NT SERVICE\srvany" binPath= "d:\a\
3. test\srvany.exe"
[SC] CreateService SUCCESS
4. The previous command created the service (in the registry and also in the service controller manager’s internal list) and also created the virtual service account. Now Run the Services MMC snap-in (services.msc), select the new service, and look at the Log On tab in the Properties dialog.
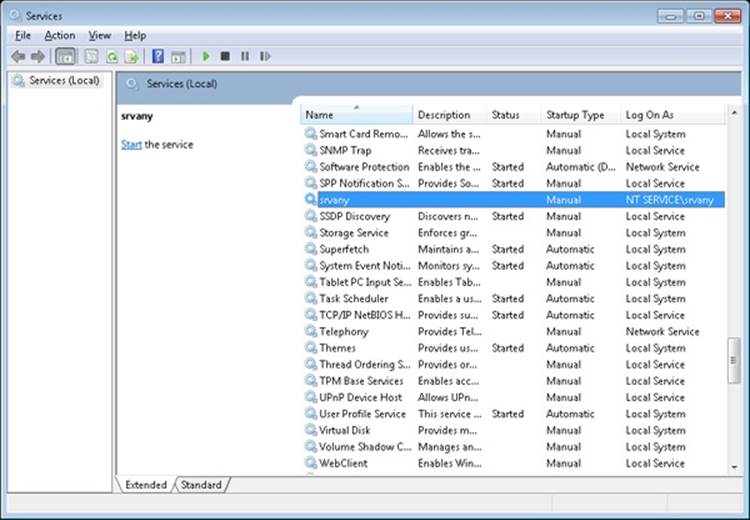
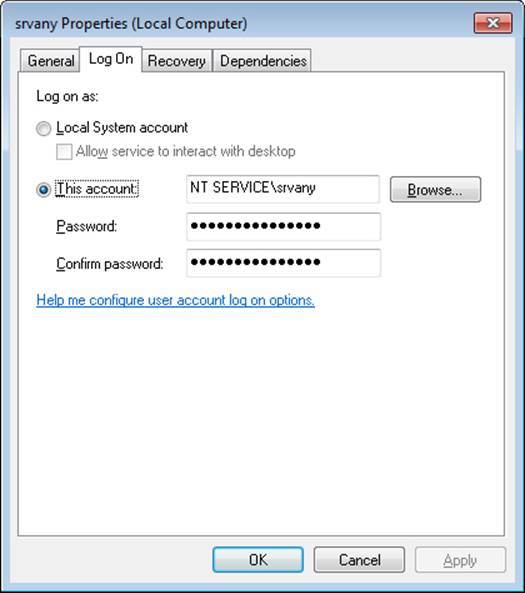
5. You can also use the service properties dialog to create a virtual service account for an existing service. To do so, change the account name to “NT SERVICE\servicename and clear both password fields. Note, however, that existing services might not run correctly under a virtual service account, because that account might not have access to files or other resources needed by the service.
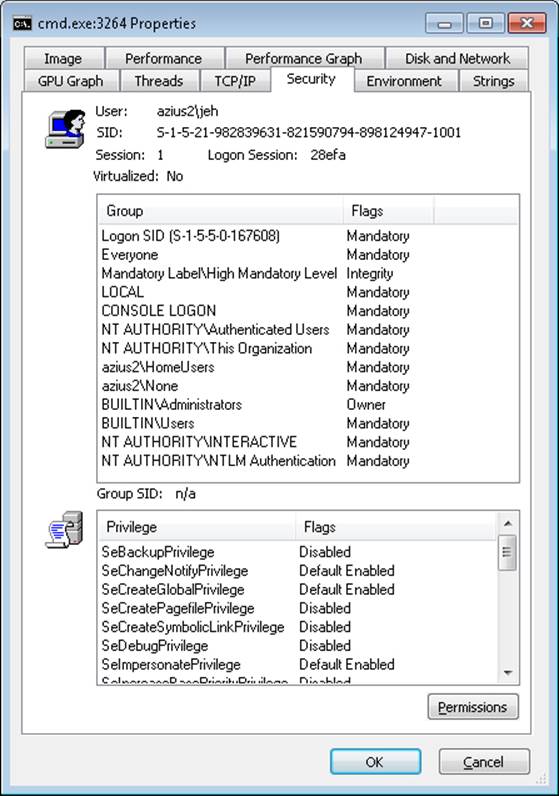
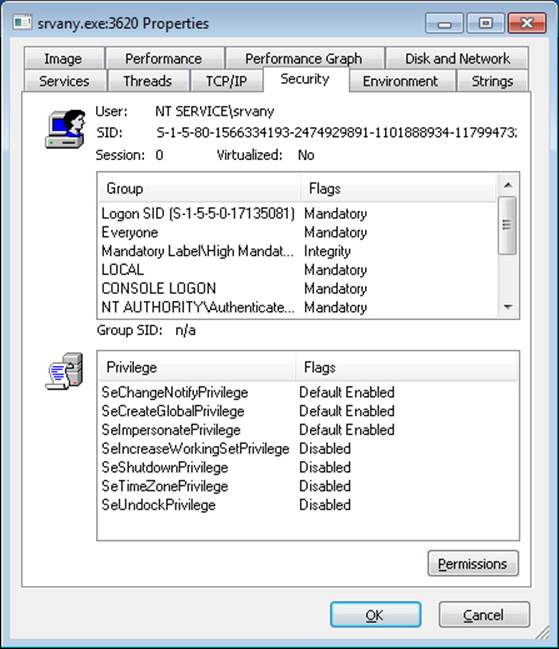
6. If you run Process Explorer and view the Security tab in the Properties dialog boxes for a service that uses a virtual account, you can observe the virtual account name and its security ID (SID).
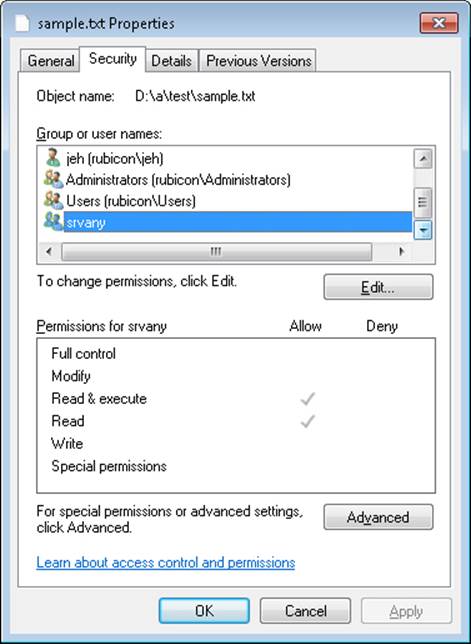
7. The virtual service account can appear in an access control entry for any object (such as a file) the service needs to access. If you open the Properties dialog’s Security tab for a file and create an ACL that references the virtual service account, you will find that the account name you typed (for example, NT SERVICE\srvany) is changed to simply the service name (srvany) by the Check Names function, and it appears in the access control list in this shortened form.
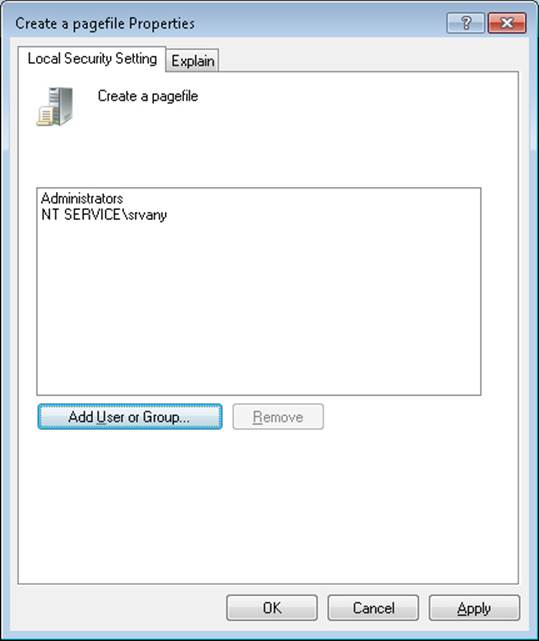
8. The virtual service account can be granted permissions (or user rights) via Group Policy. In this example, the virtual account for the srvany service has been granted the right to create a pagefile.
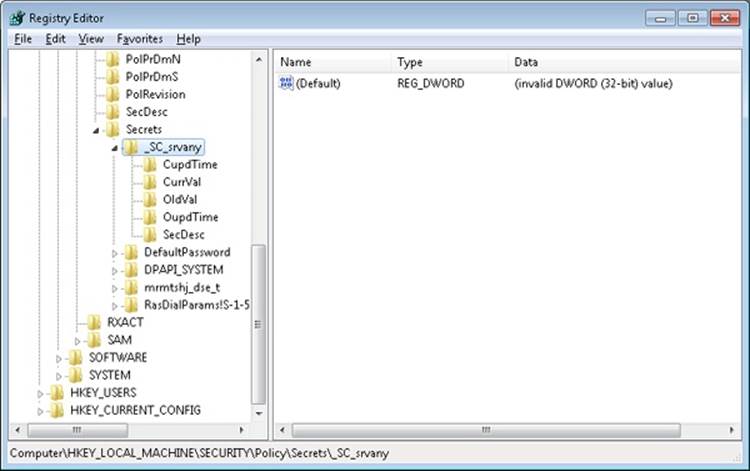
9. You won’t see the virtual service account in user administration tools like lusrmgr.msc because it is not stored in the SAM registry hive. However, if you examine the registry within the context of the built-in System account (as described previously), you will see evidence of the account in the HKLM\Security\Policy\Secrets key:
C:\>psexec –s –i –d c:\windows\regedit.exe
Security Descriptors and Access Control
Tokens, which identify a user’s credentials, are only part of the object security equation. Another part of the equation is the security information associated with an object, which specifies who can perform what actions on the object. The data structure for this information is called a security descriptor. A security descriptor consists of the following attributes:
§ Revision number. The version of the SRM security model used to create the descriptor.
§ Flags. Optional modifiers that define the behavior or characteristics of the descriptor. These flags are listed in Table 6-5.
§ Owner SID. The owner’s security ID.
§ Group SID. The security ID of the primary group for the object (used only by POSIX).
§ Discretionary access control list (DACL). Specifies who has what access to the object.
§ System access control list (SACL). Specifies which operations by which users should be logged in the security audit log and the explicit integrity level of an object.
Table 6-5. Security Descriptor Flags
|
Flag |
Meaning |
|
SE_OWNER_DEFAULTED |
Indicates a security descriptor with a default owner security identifier (SID). Use this bit to find all the objects that have default owner permissions set. |
|
SE_GROUP_DEFAULTED |
Indicates a security descriptor with a default group SID. Use this bit to find all the objects that have default group permissions set. |
|
SE_DACL_PRESENT |
Indicates a security descriptor that has a DACL. If this flag is not set, or if this flag is set and the DACL is NULL, the security descriptor allows full access to everyone. |
|
SE_DACL_DEFAULTED |
Indicates a security descriptor with a default DACL. For example, if an object creator does not specify a DACL, the object receives the default DACL from the access token of the creator. This flag can affect how the system treats the DACL, with respect to access control entry (ACE) inheritance. The system ignores this flag if the SE_DACL_PRESENT flag is not set. |
|
SE_SACL_PRESENT |
Indicates a security descriptor that has a system access control list (SACL). |
|
SE_SACL_DEFAULTED |
Indicates a security descriptor with a default SACL. For example, if an object creator does not specify an SACL, the object receives the default SACL from the access token of the creator. This flag can affect how the system treats the SACL with respect to ACE inheritance. The system ignores this flag if the SE_SACL_PRESENT flag is not set. |
|
SE_DACL_UNTRUSTED |
Indicates that the ACL pointed to by the DACL of the security descriptor was provided by an untrusted source. If this flag is set and a compound ACE is encountered, the system will substitute known valid SIDs for the server SIDs in the ACEs. |
|
SE_SERVER_SECURITY |
Requests that the provider for the object protected by the security descriptor should be a server ACL based on the input ACL, regardless of its source (explicit or defaulting). This is done by replacing all the GRANT ACEs with compound ACEs granting the current server access. This flag is meaningful only if the subject is impersonating. |
|
SE_DACL_AUTO_INHERIT_REQ |
Requests that the provider for the object protected by the security descriptor automatically propagate the DACL to existing child objects. If the provider supports automatic inheritance, the DACL is propagated to any existing child objects, and the SE_DACL_AUTO_INHERITED bit in the security descriptor of the parent and child objects is set. |
|
SE_SACL_AUTO_INHERIT_REQ |
Requests that the provider for the object protected by the security descriptor automatically propagate the SACL to existing child objects. If the provider supports automatic inheritance, the SACL is propagated to any existing child objects, and the SE_SACL_AUTO_INHERITED bit in the security descriptors of the parent object and child objects is set. |
|
SE_DACL_AUTO_INHERITED |
Indicates a security descriptor in which the DACL is set up to support automatic propagation of inheritable ACEs to existing child objects. The system sets this bit when it performs the automatic inheritance algorithm for the object and its existing child objects. |
|
SE_SACL_AUTO_INHERITED |
Indicates a security descriptor in which the SACL is set up to support automatic propagation of inheritable ACEs to existing child objects. The system sets this bit when it performs the automatic inheritance algorithm for the object and its existing child objects. |
|
SE_DACL_PROTECTED |
Prevents the DACL of a security descriptor from being modified by inheritable ACEs. |
|
SE_SACL_PROTECTED |
Prevents the SACL of a security descriptor from being modified by inheritable ACEs. |
|
SE_RM_CONTROL_VALID |
Indicates that the resource control manager bits in the security descriptor are valid. The resource control manager bits are 8 bits in the security descriptor structure that contains information specific to the resource manager accessing the structure. |
|
SE_SELF_RELATIVE |
Indicates a security descriptor in self-relative format, with all the security information in a contiguous block of memory. If this flag is not set, the security descriptor is in absolute format. |
An access control list (ACL) is made up of a header and zero or more access control entry (ACE) structures. There are two types of ACLs: DACLs and SACLs. In a DACL, each ACE contains a SID and an access mask (and a set of flags, explained shortly), which typically specifies the access rights (Read, Write, Delete, and so forth) that are granted or denied to the holder of the SID. There are nine types of ACEs that can appear in a DACL: access allowed, access denied, allowed object, denied object, allowed callback, denied callback, allowed object callback, denied-object callback, and conditional claims. As you would expect, the access-allowed ACE grants access to a user, and the access-denied ACE denies the access rights specified in the access mask. The callback ACEs are used by applications that make use of the AuthZ API (described later) to register a callback that AuthZ will call when it performs an access check involving this ACE.
The difference between allowed object and access allowed, and between denied object and access denied, is that the object types are used only within Active Directory. ACEs of these types have a GUID (globally unique identifier) field that indicates that the ACE applies only to particular objects or subobjects (those that have GUID identifiers). In addition, another optional GUID indicates what type of child object will inherit the ACE when a child is created within an Active Directory container that has the ACE applied to it. (A GUID is a 128-bit identifier guaranteed to be universally unique.) The conditional claims ACE is stored in a *-callback type ACE structure and is described in the section on the AuthZ APIs.
The accumulation of access rights granted by individual ACEs forms the set of access rights granted by an ACL. If no DACL is present (a null DACL) in a security descriptor, everyone has full access to the object. If the DACL is empty (that is, it has zero ACEs), no user has access to the object.
The ACEs used in DACLs also have a set of flags that control and specify characteristics of the ACE related to inheritance. Some object namespaces have containers and objects. A container can hold other container objects and leaf objects, which are its child objects. Examples of containers are directories in the file system namespace and keys in the registry namespace. Certain flags in an ACE control how the ACE propagates to child objects of the container associated with the ACE. Table 6-6, reproduced in part from the Windows SDK, lists the inheritance rules for ACE flags.
Table 6-6. Inheritance Rules for ACE Flags
|
Flag |
Inheritance Rule |
|
CONTAINER_INHERIT_ACE |
Child objects that are containers, such as directories, inherit the ACE as an effective ACE. The inherited ACE is inheritable unless the NO_PROPAGATE_INHERIT_ACE bit flag is also set. |
|
INHERIT_ONLY_ACE |
This flag indicates an inherit-only ACE that doesn’t control access to the object it’s attached to. If this flag is not set, the ACE controls access to the object to which it is attached. |
|
INHERITED_ACE |
This flag indicates that the ACE was inherited. The system sets this bit when it propagates an inheritable ACE to a child object. |
|
NO_PROPAGATE_INHERIT_ACE |
If the ACE is inherited by a child object, the system clears the OBJECT_INHERIT_ACE and CONTAINER_INHERIT_ACE flags in the inherited ACE. This action prevents the ACE from being inherited by subsequent generations of objects. |
|
OBJECT_INHERIT_ACE |
Noncontainer child objects inherit the ACE as an effective ACE. For child objects that are containers, the ACE is inherited as an inherit-only ACE unless the NO_PROPAGATE_INHERIT_ACE bit flag is also set. |
A SACL contains two types of ACEs, system audit ACEs and system audit-object ACEs. These ACEs specify which operations performed on the object by specific users or groups should be audited. Audit information is stored in the system Audit Log. Both successful and unsuccessful attempts can be audited. Like their DACL object-specific ACE cousins, system audit-object ACEs specify a GUID indicating the types of objects or subobjects that the ACE applies to and an optional GUID that controls propagation of the ACE to particular child object types. If a SACL is null, no auditing takes place on the object. (Security auditing is described later in this chapter.) The inheritance flags that apply to DACL ACEs also apply to system audit and system audit-object ACEs.
Figure 6-5 is a simplified picture of a file object and its DACL.
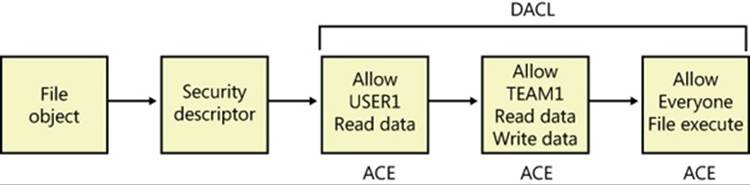
Figure 6-5. Discretionary access control list (DACL)
As shown in Figure 6-5, the first ACE allows USER1 to query the file. The second ACE allows members of the group TEAM1 to have read and write access to the file, and the third ACE grants all other users (Everyone) execute access.
EXPERIMENT: VIEWING A SECURITY DESCRIPTOR
Most executive subsystems rely on the object manager’s default security functionality to manage security descriptors for their objects. The object manager’s default security functions use the security descriptor pointer to store security descriptors for such objects. For example, the process manager uses default security, so the object manager stores process and thread security descriptors in the object headers of process and thread objects, respectively. The security descriptor pointer of events, mutexes, and semaphores also store their security descriptors. You can use live kernel debugging to view the security descriptors of these objects once you locate their object header, as outlined in the following steps. (Note that both Process Explorer and AccessChk can also show security descriptors for processes.)
1. Start the kernel debugger.
2. Type !process 0 0 explorer.exe to obtain process information about Explorer:
3. lkd> !process 0 0 explorer.exe
4. PROCESS 85a3e030 SessionId: 1 Cid: 0aa4 Peb: 7ffd4000 ParentCid: 0a84
5. DirBase: 0f419000 ObjectTable: 952cdd18 HandleCount: 1046.
Image: explorer.exe
6. Type !object with the address following the word PROCESS in the output of the previous command as the argument to show the object data structure:
7. lkd> !object 85a3e030
8. Object: 85a3e030 Type: (842339e0) Process
9. ObjectHeader: 85a3e018 (new version)
HandleCount: 8 PointerCount: 497
10. Type dt _OBJECT_HEADER and the address of the object header field from the previous command’s output to show the object header data structure, including the security descriptor pointer value:
11.lkd> dt _OBJECT_HEADER 85a3e018
12.nt!_OBJECT_HEADER
13. +0x000 PointerCount : 0n497
14. +0x004 HandleCount : 0n8
15. +0x004 NextToFree : 0x00000008 Void
16. +0x008 Lock : _EX_PUSH_LOCK
17. +0x00c TypeIndex : 0x7 ''
18. +0x00d TraceFlags : 0 ''
19. +0x00e InfoMask : 0x8 ''
20. +0x00f Flags : 0 ''
21. +0x010 ObjectCreateInfo : 0x8577e940 _OBJECT_CREATE_INFORMATION
22. +0x010 QuotaBlockCharged : 0x8577e940 Void
23. +0x014 SecurityDescriptor : 0x97ed0b94 Void
+0x018 Body : _QUAD
24. Finally, use the debugger’s !sd command to dump the security descriptor. The security descriptor pointer in the object header uses some of the low-order bits as flags, and these must be zeroed before following the pointer. On 32-bit systems there are three flag bits, so use & –8 with the security descriptor address displayed in the object header structure, as follows. On 64-bit systems there are four flag bits, so you use & –10 instead.
25.lkd> !sd 0x97ed0b94 & -8
26.->Revision: 0x1
27.->Sbz1 : 0x0
28.->Control : 0x8814
29. SE_DACL_PRESENT
30. SE_SACL_PRESENT
31. SE_SACL_AUTO_INHERITED
32. SE_SELF_RELATIVE
33.->Owner : S-1-5-21-1488595123-1430011218-1163345924-1000
34.->Group : S-1-5-21-1488595123-1430011218-1163345924-513
35.->Dacl :
36.->Dacl : ->AclRevision: 0x2
37.->Dacl : ->Sbz1 : 0x0
38.->Dacl : ->AclSize : 0x5c
39.->Dacl : ->AceCount : 0x3
40.->Dacl : ->Sbz2 : 0x0
41.->Dacl : ->Ace[0]: ->AceType: ACCESS_ALLOWED_ACE_TYPE
42.->Dacl : ->Ace[0]: ->AceFlags: 0x0
43.->Dacl : ->Ace[0]: ->AceSize: 0x24
44.->Dacl : ->Ace[0]: ->Mask : 0x001fffff
45.->Dacl : ->Ace[0]: ->SID: S-1-5-21-1488595123-1430011218-1163345924-1000
46.
47.->Dacl : ->Ace[1]: ->AceType: ACCESS_ALLOWED_ACE_TYPE
48.->Dacl : ->Ace[1]: ->AceFlags: 0x0
49.->Dacl : ->Ace[1]: ->AceSize: 0x14
50.->Dacl : ->Ace[1]: ->Mask : 0x001fffff
51.->Dacl : ->Ace[1]: ->SID: S-1-5-18
52.
53.->Dacl : ->Ace[2]: ->AceType: ACCESS_ALLOWED_ACE_TYPE
54.->Dacl : ->Ace[2]: ->AceFlags: 0x0
55.->Dacl : ->Ace[2]: ->AceSize: 0x1c
56.->Dacl : ->Ace[2]: ->Mask : 0x00121411
57.->Dacl : ->Ace[2]: ->SID: S-1-5-5-0-178173
58.
59.->Sacl :
60.->Sacl : ->AclRevision: 0x2
61.->Sacl : ->Sbz1 : 0x0
62.->Sacl : ->AclSize : 0x1c
63.->Sacl : ->AceCount : 0x1
64.->Sacl : ->Sbz2 : 0x0
65.->Sacl : ->Ace[0]: ->AceType: SYSTEM_MANDATORY_LABEL_ACE_TYPE
66.->Sacl : ->Ace[0]: ->AceFlags: 0x0
67.->Sacl : ->Ace[0]: ->AceSize: 0x14
68.->Sacl : ->Ace[0]: ->Mask : 0x00000003
->Sacl : ->Ace[0]: ->SID: S-1-16-8192
The security descriptor contains three access-allowed ACEs: one for the current user (S-1-5-21-1488595123-1430011218-1163345924-1000), one for the System account (S-1-5-18), and the last for the Logon SID (S-1-5-5-0-178173). The system access control list has one entry (S-1-16-8192) labeling the process as medium integrity level.
ACL Assignment
To determine which DACL to assign to a new object, the security system uses the first applicable rule of the following four assignment rules:
1. If a caller explicitly provides a security descriptor when creating the object, the security system applies it to the object. If the object has a name and resides in a container object (for example, a named event object in the \BaseNamedObjects object manager namespace directory), the system merges any inheritable ACEs (ACEs that might propagate from the object’s container) into the DACL unless the security descriptor has the SE_DACL_PROTECTED flag set, which prevents inheritance.
2. If a caller doesn’t supply a security descriptor and the object has a name, the security system looks at the security descriptor in the container in which the new object name is stored. Some of the object directory’s ACEs might be marked as inheritable, meaning that they should be applied to new objects created in the object directory. If any of these inheritable ACEs are present, the security system forms them into an ACL, which it attaches to the new object. (Separate flags indicate ACEs that should be inherited only by container objects rather than by objects that aren’t containers.)
3. If no security descriptor is specified and the object doesn’t inherit any ACEs, the security system retrieves the default DACL from the caller’s access token and applies it to the new object. Several subsystems on Windows have hard-coded DACLs that they assign on object creation (for example, services, LSA, and SAM objects).
4. If there is no specified descriptor, no inherited ACEs, and no default DACL, the system creates the object with no DACL, which allows everyone (all users and groups) full access to the object. This rule is the same as the third rule, in which a token contains a null default DACL.
The rules the system uses when assigning a SACL to a new object are similar to those used for DACL assignment, with some exceptions. The first is that inherited system audit ACEs don’t propagate to objects with security descriptors marked with the SE_SACL_PROTECTED flag (similar to the SE_DACL_PROTECTED flag, which protects DACLs). Second, if there are no specified security audit ACEs and there is no inherited SACL, no SACL is applied to the object. This behavior is different from that used to apply default DACLs because tokens don’t have a default SACL.
When a new security descriptor containing inheritable ACEs is applied to a container, the system automatically propagates the inheritable ACEs to the security descriptors of child objects. (Note that a security descriptor’s DACL doesn’t accept inherited DACL ACEs if its SE_DACL_PROTECTED flag is enabled, and its SACL doesn’t inherit SACL ACEs if the descriptor has the SE_SACL_PROTECTED flag set.) The order in which inheritable ACEs are merged with an existing child object’s security descriptor is such that any ACEs that were explicitly applied to the ACL are kept ahead of ACEs that the object inherits. The system uses the following rules for propagating inheritable ACEs:
§ If a child object with no DACL inherits an ACE, the result is a child object with a DACL containing only the inherited ACE.
§ If a child object with an empty DACL inherits an ACE, the result is a child object with a DACL containing only the inherited ACE.
§ For objects in Active Directory only, if an inheritable ACE is removed from a parent object, automatic inheritance removes any copies of the ACE inherited by child objects.
§ For objects in Active Directory only, if automatic inheritance results in the removal of all ACEs from a child object’s DACL, the child object has an empty DACL rather than no DACL.
As you’ll soon discover, the order of ACEs in an ACL is an important aspect of the Windows security model.
NOTE
Inheritance is generally not directly supported by the object stores, such as file systems, the registry, or Active Directory. Windows APIs that support inheritance, including SetEntriesInAcl, do so by invoking appropriate functions within the security inheritance support DLL (%SystemRoot%\System32\Ntmarta.dll) that know how to traverse those object stores.
Determining Access
Two methods are used for determining access to an object:
§ The mandatory integrity check, which determines whether the integrity level of the caller is high enough to access the resource, based on the resource’s own integrity level and its mandatory policy.
§ The discretionary access check, which determines the access that a specific user account has to an object.
When a process tries to open an object, the integrity check takes place before the standard Windows DACL check in the kernel’s SeAccessCheck function because it is faster to execute and can quickly eliminate the need to perform the full discretionary access check. Given the default integrity policies in its access token (TOKEN_MANDATORY_NO_WRITE_UP and TOKEN_MANDATORY_NEW_PROCESS_MIN, described previously), a process can open an object for write access if its integrity level is equal to or higher than the object’s integrity level and the DACL also grants the process the accesses it desires. For example, a low-integrity-level process cannot open a medium-integrity-level process for write access, even if the DACL grants the process write access.
With the default integrity policies, processes can open any object—with the exception of process, thread, and token objects—for read access as long as the object’s DACL grants them read access. That means a process running at low integrity level can open any files accessible to the user account in which it’s running. Protected Mode Internet Explorer uses integrity levels to help prevent malware that infects it from modifying user account settings, but it does not stop malware from reading the user’s documents.
Recall that process and thread objects are exceptions because their integrity policy also includes No-Read-Up. That means a process integrity level must be equal to or higher than the integrity level of the process or thread it wants to open, and the DACL must grant it the accesses it wants for an attempt to open it to succeed. Assuming the DACLs allow the desired access, Figure 6-6 shows the types of access that the processes running at medium or low have to other processes and objects.
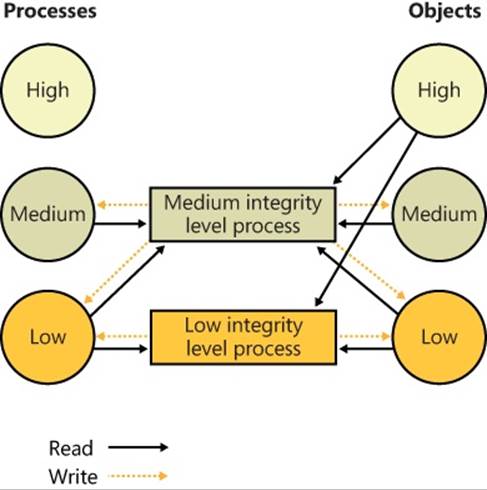
Figure 6-6. Access to processes versus objects for medium and low integrity level processes
USER INTERFACE PRIVILEGE ISOLATION
The Windows messaging subsystem also honors integrity levels to implement User Interface Privilege Isolation (UIPI). The subsystem does this by preventing a process from sending window messages to the windows owned by a process having a higher integrity level, with the following informational messages being exceptions:
§ WM_NULL
§ WM_MOVE
§ WM_SIZE
§ WM_GETTEXT
§ WM_GETTEXTLENGTH
§ WM_GETHOTKEY
§ WM_GETICON
§ WM_RENDERFORMAT
§ WM_DRAWCLIPBOARD
§ WM_CHANGECBCHAIN
§ WM_THEMECHANGED
This use of integrity levels prevents standard user processes from driving input into the windows of elevated processes or from performing a shatter attack (such as sending the process malformed messages that trigger internal buffer overflows, which can lead to the execution of code at the elevated process’ privilege level). UIPI also blocks window hooks from affecting the windows of higher integrity level processes so that a standard user process can’t log the keystrokes the user types into an administrative application, for example. Journal hooks are also blocked in the same way to prevent lower integrity level processes from monitoring the behavior of higher integrity level processes.
Processes can choose to allow additional messages to pass the guard by calling the ChangeWindowMessageEx API. This function is typically used to add messages required by custom controls to communicate outside native common controls in Windows. An older API, ChangeWindowMessageFilter performs a similar function, but it is per-process rather than per-window. WithChangeWindowMessageFilter it is possible for two custom controls inside the same process to be using the same internal window messages, which could lead to one control’s potentially malicious window message to be allowed through, simply because it happens to be a query-only message for the other custom control.
Because accessibility applications such as the On-Screen Keyboard (Osk.exe) are subject to UIPI’s restrictions (which would require the accessibility application to be executed for each kind of visible integrity-level process on the desktop), these processes can enable UI Access. This flag can be present in the manifest file of the image and will run the process at a slightly higher integrity level than medium (between 0x2000 and 0x3000) if launched from a standard user account, or at high integrity level if launched from an administrator account. Note that in the second case, an elevation request won’t actually be displayed. For a process to set this flag, its image must also be signed and in one of several secure locations, including %SystemRoot% and %ProgramFiles%.
After the integrity check is complete, and assuming the mandatory policy allows access to the object based on the caller’s integrity, one of two algorithms is used for the discretionary check to an object, which will determine the final outcome of the access check:
§ Determine the maximum access allowed to the object, a form of which is exported to user mode with the Windows GetEffectiveRightsFromAcl function. This is also used when a program specifies a desired access of MAXIMUM_ALLOWED, which is what the legacy APIs that don’t have a desired access parameter use.
§ Determine whether a specific desired access is allowed, which can be done with the Windows AccessCheck function or the AccessCheckByType function.
The first algorithm examines the entries in the DACL as follows:
1. If the object has no DACL (a null DACL), the object has no protection and the security system grants all access.
2. If the caller has the take-ownership privilege, the security system grants write-owner access before examining the DACL. (Take-ownership privilege and write-owner access are explained in a moment.)
3. If the caller is the owner of the object, the system looks for an OWNER_RIGHTS SID and uses that SID as the SID for the next steps. Otherwise, read-control and write-DACL access rights are granted.
4. For each access-denied ACE that contains a SID that matches one in the caller’s access token, the ACE’s access mask is removed from the granted-access mask.
5. For each access-allowed ACE that contains a SID that matches one in the caller’s access token, the ACE’s access mask is added to the granted-access mask being computed, unless that access has already been denied.
When all the entries in the DACL have been examined, the computed granted-access mask is returned to the caller as the maximum allowed access to the object. This mask represents the total set of access types that the caller will be able to successfully request when opening the object.
The preceding description applies only to the kernel-mode form of the algorithm. The Windows version implemented by GetEffectiveRightsFromAcl differs in that it doesn’t perform step 2, and it considers a single user or group SID rather than an access token.
OWNER RIGHTS
Because owners of an object can normally override the security of an object by always being granted read-control and write-DACL rights, a specialized method of controlling this behavior is exposed by Windows: the Owner Rights SID.
The Owner Rights SID exists for two main reasons: improving service hardening in the operating system, and allowing more flexibility for specific usage scenarios. For example, suppose an administrator wants to allow users to create files and folders but not to modify the ACLs on those objects. (Users could inadvertently or maliciously grant access to those files or folders to unwanted accounts.) By using an inheritable Owner Rights SID, the users can be prevented from editing or even viewing the ACL on the objects they create. A second usage scenario relates to group changes. Suppose an employee has been part of some confidential or sensitive group, has created several files while a member of that group, and has now been removed from the group for business reasons. Because that employee is still a user, he could continue accessing the sensitive files.
As mentioned, Windows also uses the Owner Rights SID to improve service hardening. Whenever a service creates an object at run time, the Owner SID associated with that object is the account the service is running in (such as local system or local service) and not the actual service SID. This means that any other service in the same account would have access to the object by being an owner. The Owner Rights SID prevents that unwanted behavior.
The second algorithm is used to determine whether a specific access request can be granted, based on the caller’s access token. Each open function in the Windows API that deals with securable objects has a parameter that specifies the desired access mask, which is the last component of the security equation. To determine whether the caller has access, the following steps are performed:
1. If the object has no DACL (a null DACL), the object has no protection and the security system grants the desired access.
2. If the caller has the take-ownership privilege, the security system grants write-owner access if requested and then examines the DACL. However, if write-owner access was the only access requested by a caller with take-ownership privilege, the security system grants that access and never examines the DACL.
3. If the caller is the owner of the object, the system looks for an OWNER_RIGHTS SID and uses that SID as the SID for the next steps. Otherwise, read-control and write-DACL access rights are granted. If these rights were the only access rights that the caller requested, access is granted without examining the DACL
4. Each ACE in the DACL is examined from first to last. An ACE is processed if one of the following conditions is satisfied:
a. The ACE is an access-deny ACE, and the SID in the ACE matches an enabled SID (SIDs can be enabled or disabled) or a deny-only SID in the caller’s access token.
b. The ACE is an access-allowed ACE, and the SID in the ACE matches an enabled SID in the caller’s token that isn’t of type deny-only.
c. It is the second pass through the descriptor for restricted-SID checks, and the SID in the ACE matches a restricted SID in the caller’s access token.
d. The ACE isn’t marked as inherit-only.
5. If it is an access-allowed ACE, the rights in the access mask in the ACE that were requested are granted; if all the requested access rights have been granted, the access check succeeds. If it is an access-denied ACE and any of the requested access rights are in the denied-access rights, access is denied to the object.
6. If the end of the DACL is reached and some of the requested access rights still haven’t been granted, access is denied.
7. If all accesses are granted but the caller’s access token has at least one restricted SID, the system rescans the DACL’s ACEs looking for ACEs with access-mask matches for the accesses the user is requesting and a match of the ACE’s SID with any of the caller’s restricted SIDs. Only if both scans of the DACL grant the requested access rights is the user granted access to the object.
The behavior of both access-validation algorithms depends on the relative ordering of allow and deny ACEs. Consider an object with only two ACEs, where one ACE specifies that a certain user is allowed full access to an object and the other ACE denies the user access. If the allow ACE precedes the deny ACE, the user can obtain full access to the object, but if the order is reversed, the user cannot gain any access to the object.
Several Windows functions, such as SetSecurityInfo and SetNamedSecurityInfo, apply ACEs in the preferred order of explicit deny ACEs preceding explicit allow ACEs. Note that the security editor dialog boxes with which you edit permissions on NTFS files and registry keys, for example, use these functions. SetSecurityInfo and SetNamedSecurityInfo also apply ACE inheritance rules to the security descriptor on which they are applied.
Figure 6-7 shows an example access validation demonstrating the importance of ACE ordering. In the example, access is denied a user wanting to open a file even though an ACE in the object’s DACL grants the access because the ACE denying the user access (by virtue of the user’s membership in the Writers group) precedes the ACE granting access.
As we stated earlier, because it wouldn’t be efficient for the security system to process the DACL every time a process uses a handle, the SRM makes this access check only when a handle is opened, not each time the handle is used. Thus, once a process successfully opens a handle, the security system can’t revoke the access rights that have been granted, even if the object’s DACL changes. Also keep in mind that because kernel-mode code uses pointers rather than handles to access objects, the access check isn’t performed when the operating system uses objects. In other words, the Windows executive trusts itself (and all loaded drivers) in a security sense.
The fact that an object’s owner is always granted write-DACL access to an object means that users can never be prevented from accessing the objects they own. If, for some reason, an object had an empty DACL (no access), the owner would still be able to open the object with write-DACL access and then apply a new DACL with the desired access permissions.
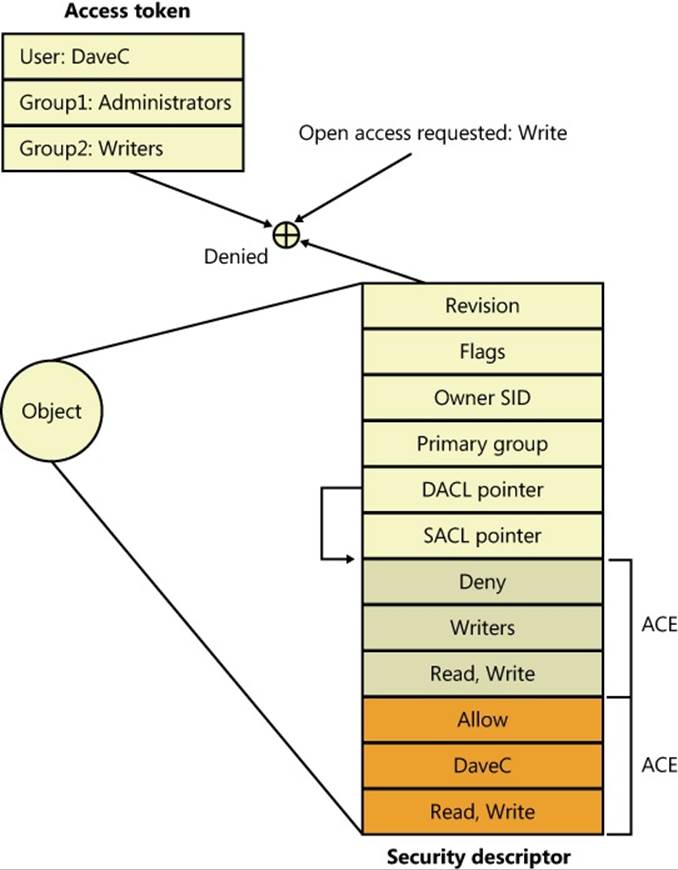
Figure 6-7. Access validation example
A WARNING REGARDING THE GUI SECURITY EDITORS
When you use the GUI permissions editors to modify security settings on a file, a registry, or an Active Directory object, or on another securable object, the main security dialog box shows you a potentially misleading view of the security that’s applied to the object. If you allow Full Control to the Everyone group and deny the Administrator group Full Control, the list might lead you to believe that the Everyone group access-allowed ACE precedes the Administrator deny ACE because that’s the order in which they appear. However, as we’ve said, the editors place deny ACEs before allow ACEs when they apply the ACL to the object.
The Permissions tab of the Advanced Security Settings dialog box shows the order of ACEs in the DACL. However, even this dialog box can be confusing because a complex DACL can have deny ACEs for various accesses followed by allow ACEs for other access types.
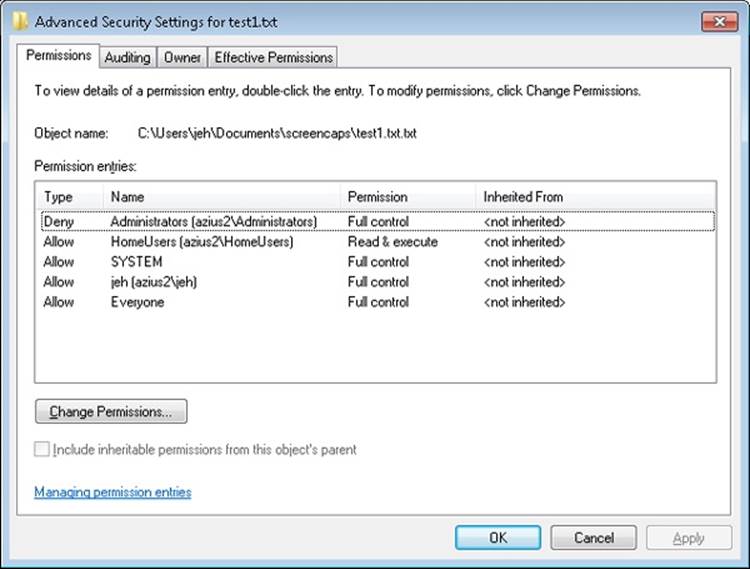
The only definitive way to know what accesses a particular user or group will have to an object (other than having that user or a member of the group try to access the object) is to use the Effective Permissions tab of the dialog box that is displayed when you click the Advanced button in the Properties dialog box. Enter the name of the user or group you want to check, and the dialog box shows you what permissions they are allowed for the object.
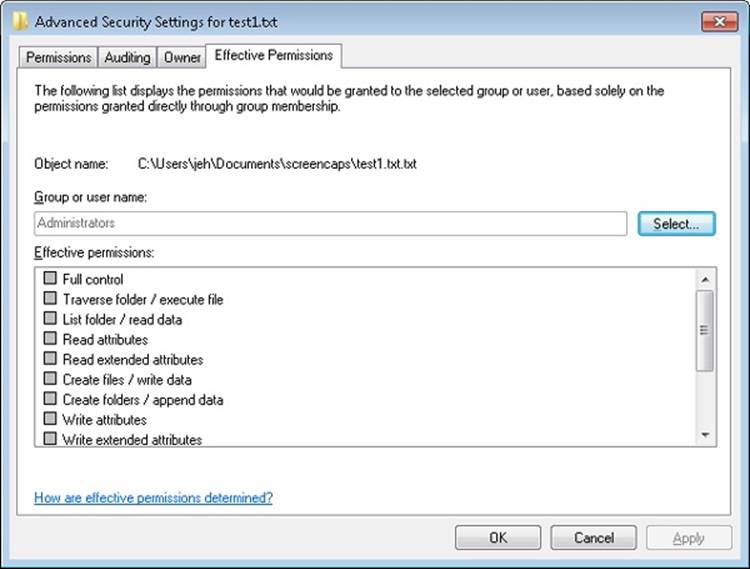
The AuthZ API
The AuthZ Windows API provides authorization functions and implement the same security model as the security reference monitor, but it implements the model totally in user mode in the %SystemRoot%\System32\Authz.dll library. This gives applications that want to protect their own private objects, such as database tables, the ability to leverage the Windows security model without incurring the cost of user mode to kernel mode transitions that they would make if they relied on the security reference monitor.
The AuthZ API uses standard security descriptor data structures, SIDs, and privileges. Instead of using tokens to represent clients, AuthZ uses AUTHZ_CLIENT_CONTEXT. AuthZ includes user-mode equivalents of all access-check and Windows security functions—for example,AuthzAccessCheck is the AuthZ version of the AccessCheck Windows API that uses the SeAccessCheck security reference monitor function.
Another advantage available to applications that use AuthZ is that they can direct AuthZ to cache the results of security checks to improve subsequent checks that use the same client context and security descriptor. AuthZ is fully documented in the Windows SDK.
The discretionary access control security mechanisms described previously have been part of the Windows NT family since the beginning, and they work well enough in a static, controlled environment. This type of access checking, using a security ID (SID) and security group membership, is known as identity-based access control (IBAC), and it requires that the security system knows the identity of every possible accessor when the DACL is placed in an object’s security descriptor.
Windows includes support for Claims Based Access Control (CBAC), where access is granted not based upon the accessor’s identity or group membership, but upon arbitrary attributes assigned to the accessor and stored in the accessor’s access token. Attributes are supplied by an attribute provider, such as AppLocker. The CBAC mechanism provides many benefits, including the ability to create a DACL for a user whose identity is not yet known or dynamically-calculated user attributes. The CBAC ACE (also known as a conditional ACE) is stored in a *-callback ACE structure, which is essentially private to AuthZ and is ignored by the system SeAccessCheck API. The kernel-mode routine SeSrpAccessCheck does not understand conditional ACEs, so only applications calling the AuthZ APIs can make use of CBAC. The only system component that makes use of CBAC is AppLocker, for setting attributes such as path, or publisher. Third-party applications can make use of CBAC by taking advantage of the CBAC AuthZ APIs.
Using CBAC security checks allows powerful management policies, such as the following:
§ Run only applications approved by the corporate IT department.
§ Allow only approved applications to access your Microsoft Outlook contacts or calendar.
§ Allow only people on a particular building’s floor to access printers on that floor.
§ Allow access to an intranet website only to full-time employees (as opposed to contractors).
Attributes can be referenced in what is known as a conditional ACE, where the presence, absence, or value of one or more attributes is checked. An attribute name can contain any alphanumeric Unicode characters, as well as “:/._”. The value of an attribute can be one of the following: 64-bit integer, Unicode string, byte string, or array.
Conditional ACEs
The format of SDDL (Security Descriptor Definition Language) strings has been expanded to support ACEs with conditional expressions. The new format of an SDDL string is this: AceType;AceFlags;Rights;ObjectGuid;InheritObjectGuid;AccountSid;(ConditionalExpression).
The AceType for a conditional ACE is either XA (for SDDL_CALLBACK_ACCESS_ALLOWED) or XD (for SDDL_CALLBACK_ACCESS_DENIED). Note that ACEs with conditional expressions are used for claims-type authorization (specifically, the AuthZ APIs and AppLocker) and are not recognized by the object manager or file systems.
A conditional expression can include any of the elements shown in Table 6-7.
Table 6-7. Acceptable Elements for a Conditional Expression
|
Expression Element |
Description |
|
AttributeName |
Tests whether the specified attribute has a nonzero value. |
|
exists AttributeName |
Tests whether the specified attribute exists in the client context. |
|
AttributeName Operator Value |
Returns the result of the specified operation. The following operators are defined for use in conditional expressions to test the values of attributes. All of these are binary operators (as opposed to unary) and are used in the form AttributeName Operator Value. Operators: Contains any_of , ==, !=, <, <=, >, >= |
|
ConditionalExpression||ConditionalExpression |
Tests whether either of the specified conditional expressions is true. |
|
ConditionalExpression && ConditionalExpression |
Tests whether both of the specified conditional expressions are true. |
|
!(ConditionalExpression) |
The inverse of a conditional expression. |
|
Member_of{SidArray} |
Tests whether the SID_AND_ATTRIBUTES array of the client context contains all of the security identifiers (SIDs) in the comma-separated list specified by SidArray. |
A conditional ACE can contain any number of conditions, and it is either ignored if the resultant evaluation of the condition is false or applied if the result is true. A conditional ACE can be added to an object using the AddConditionalAce API and checked using the AuthzAccessCheckAPI.
A conditional ACE could specify that access to certain data records within a program should be granted only to a user who meets the following criteria:
§ Holds the Role attribute, with a value of Architect, Program Manager, or Development Lead, and the Division attribute with a value of Windows
§ Whose ManagementChain attribute contains the value John Smith
§ Whose CommissionType attribute is Officer and whose PayGrade attribute is greater than 6 (that is, the rank of General Officer in the US military)
Windows does not include tools to view or edit conditional ACEs.
Account Rights and Privileges
Many operations performed by processes as they execute cannot be authorized through object access protection because they do not involve interaction with a particular object. For example, the ability to bypass security checks when opening files for backup is an attribute of an account, not of a particular object. Windows uses both privileges and account rights to allow a system administrator to control what accounts can perform security-related operations.
A privilege is the right of an account to perform a particular system-related operation, such as shutting down the computer or changing the system time. An account right grants or denies the account to which it’s assigned the ability to perform a particular type of logon, such as a local logon or interactive logon, to a computer.
A system administrator assigns privileges to groups and accounts using tools such as the Active Directory Users and Groups MMC snap-in for domain accounts or the Local Security Policy Editor (%SystemRoot%\System32\secpol.msc). You access the Local Security Policy Editor in the Administrative Tools folder of the Control Panel or the Start menu (if you’ve configured your Start menu to contain an Administrative Tools link). Figure 6-8 shows the User Rights Assignment configuration in the Local Security Policy Editor, which displays the complete list of privileges and account rights available on Windows. Note that the tool makes no distinction between privileges and account rights. However, you can differentiate between them because any user right that does not contain the words log on is an account privilege.

Figure 6-8. Local Security Policy Editor user rights assignment
Account Rights
Account rights are not enforced by the security reference monitor, nor are they stored in tokens. The function responsible for logon is LsaLogonUser. Winlogon, for example, calls the LogonUser API when a user logs on interactively to a computer, and LogonUser callsLsaLogonUser. LogonUser takes a parameter that indicates the type of logon being performed, which includes interactive, network, batch, service, and Terminal Server client.
In response to logon requests, the Local Security Authority (LSA) retrieves account rights assigned to a user from the LSA policy database at the time that a user attempts to log on to the system. LSA checks the logon type against the account rights assigned to the user account logging on and denies the logon if the account does not have the right that permits the logon type or it has the right that denies the logon type. Table 6-8 lists the user rights defined by Windows.
Windows applications can add and remove user rights from an account by using the LsaAddAccountRights and LsaRemoveAccountRights functions, and they can determine what rights are assigned to an account with LsaEnumerateAccountRights.
Table 6-8. Account Rights
|
User Right |
Role |
|
Deny logon locally, Allow logon locally |
Used for interactive logons that originate on the local machine |
|
Deny logon over the network, Allow logon over the network |
Used for logons that originate from a remote machine |
|
Deny logon through Terminal Services, Allow logon through Terminal Services |
Used for logons through a Terminal Server client |
|
Deny logon as a service, Allow logon as a service |
Used by the service control manager when starting a service in a particular user account |
|
Deny logon as a batch job, Allow logon as a batch job |
Used when performing a logon of type batch |
Privileges
The number of privileges defined by the operating system has grown over time. Unlike user rights, which are enforced in one place by the LSA, different privileges are defined by different components and enforced by those components. For example, the debug privilege, which allows a process to bypass security checks when opening a handle to another process with the OpenProcess Windows API, is checked for by the process manager. Table 6-9 is a full list of privileges, and it describes how and when system components check for them.
When a component wants to check a token to see whether a privilege is present, it uses the PrivilegeCheck or LsaEnumerateAccountRights APIs if running in user mode and SeSinglePrivilegeCheck or SePrivilegeCheck if running in kernel mode. The privilege-related APIs are not account-right aware, but the account-right APIs are privilege-aware.
Unlike account rights, privileges can be enabled and disabled. For a privilege check to succeed, the privilege must be in the specified token and it must be enabled. The idea behind this scheme is that privileges should be enabled only when their use is required so that a process cannot inadvertently perform a privileged security operation.
EXPERIMENT: SEEING A PRIVILEGE GET ENABLED
By following these steps, you can see that the Date and Time Control Panel applet enables the SeTimeZonePrivilege privilege in response to you using its interface to change the time zone of the computer:
1. Run Process Explorer, and set the refresh rate to Paused.
2. Open the Date And Time item by right-clicking on the clock in the system tray region of the taskbar, and then select Adjust Date/Time. A new Rundll32 process will appear with a green highlight when you force a refresh with F5.
3. Hover the mouse over the Rundll32 process, and verify that the target contains the text “Time Date Control Panel Applet” as well as a path to Timedate.cpl. The presence of this argument tells Rundll32, which is a Control Panel DLL hosting process, to load the DLL that implements the user interface that enables you to change the time and date.
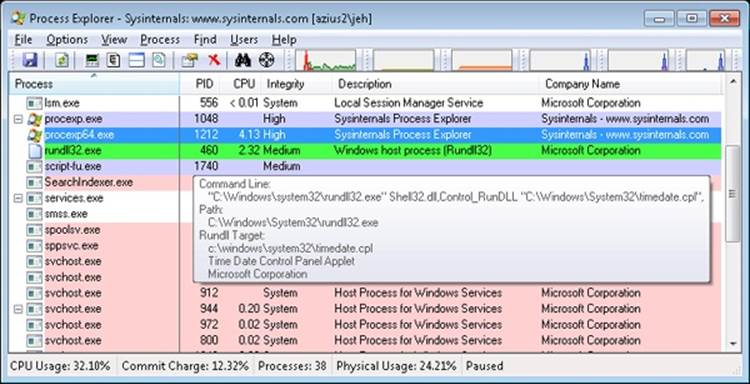
4. View the Security tab of the process Properties dialog box for your Rundll32 process. You should see that the SeTimeZonePrivilege privilege is disabled.
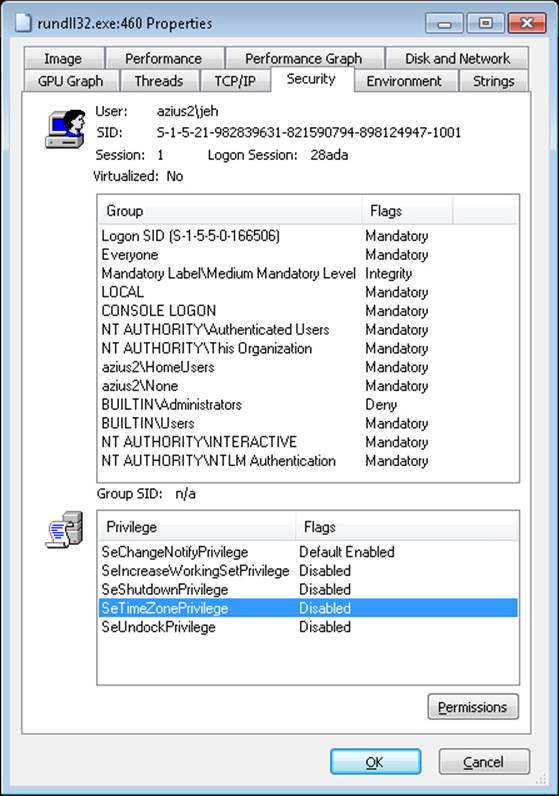
5. Now click the Change Time Zone button in the Control Panel item, close the process Properties dialog box, and then open it again. On the Security tab, you should now see that the SeTimeZonePrivilege privilege is enabled.
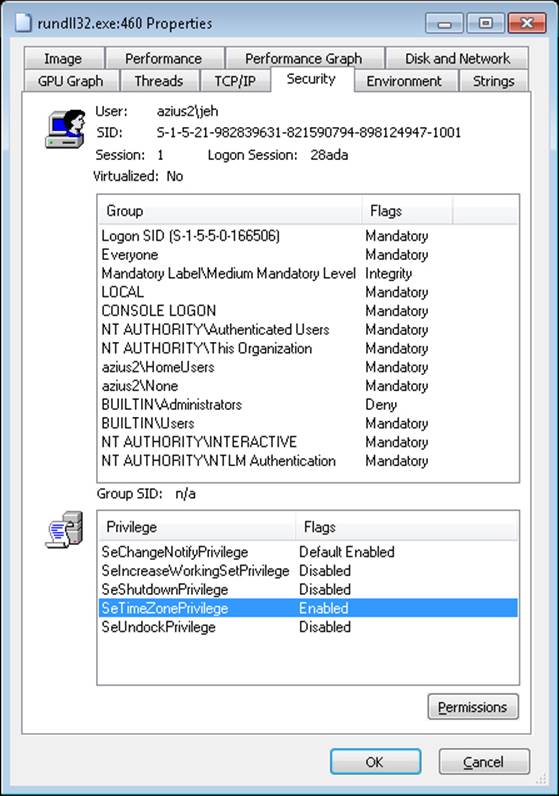
Table 6-9. Privileges
|
Privilege |
User Right |
Privilege Usage |
|
SeAssignPrimaryTokenPrivilege |
Replace a process-level token |
Checked for by various components, such as NtSetInformationJob, that set a process’ token. |
|
SeAuditPrivilege |
Generate security audits |
Required to generate events for the Security event log with the ReportEvent API. |
|
SeBackupPrivilege |
Back up files and directories |
Causes NTFS to grant the following access to any file or directory, regardless of the security descriptor that’s present: READ_CONTROL, ACCESS_SYSTEM_SECURITY, FILE_GENERIC_READ, FILE_TRAVERSE Note that when opening a file for backup, the caller must specify the FILE_FLAG_BACKUP_SEMANTICS flag. Also allows corresponding access to registry keys when using RegSaveKey. |
|
SeChangeNotifyPrivilege |
Bypass traverse checking |
Used by NTFS to avoid checking permissions on intermediate directories of a multilevel directory lookup. Also used by file systems when applications register for notification of changes to the file system structure. |
|
SeCreateGlobalPrivilege |
Create global objects |
Required for a process to create section and symbolic link objects in the directories of the object manager namespace that are assigned to a different session than the caller. |
|
SeCreatePagefilePrivilege |
Create a pagefile |
Checked for by NtCreatePagingFile, which is the function used to create a new paging file. |
|
SeCreatePermanentPrivilege |
Create permanent shared objects |
Checked for by the object manager when creating a permanent object (one that doesn’t get deallocated when there are no more references to it). |
|
SeCreateSymbolicLinkPrivilege |
Create symbolic links |
Checked for by NTFS when creating symbolic links on the file system with the CreateSymbolicLink API. |
|
SeCreateTokenPrivilege |
Create a token object |
NtCreateToken, the function that creates a token object, checks for this privilege. |
|
SeDebugPrivilege |
Debug programs |
If the caller has this privilege enabled, the process manager allows access to any process or thread using NtOpenProcess or NtOpenThread, regardless of the process’ or thread’s security descriptor (except for protected processes). |
|
SeEnableDelegationPrivilege |
Enable computer and user accounts to be trusted for delegation |
Used by Active Directory services to delegate authenticated credentials. |
|
SeImpersonatePrivilege |
Impersonate a client after authentication |
The process manager checks for this when a thread wants to use a token for impersonation and the token represents a different user than that of the thread’s process token. |
|
SeIncreaseBasePriorityPrivilege |
Increase scheduling priority |
Checked for by the process manager and is required to raise the priority of a process. |
|
SeIncreaseQuotaPrivilege |
Adjust memory quotas for a process |
Enforced when changing a process’ working set thresholds, a process’ paged and nonpaged pool quotas, and a process’ CPU rate quota. |
|
SeIncreaseWorkingSetPrivilege |
Increase a process working set |
Required to call SetProcessWorkingSetSize to increase the minimum working set. This indirectly allows the process to lock up to the minimum working set of memory using VirtualLock. |
|
SeLoadDriverPrivilege |
Load and unload device drivers |
Checked for by the NtLoadDriver and NtUnloadDriver driver functions. |
|
SeLockMemoryPrivilege |
Lock pages in memory |
Checked for by NtLockVirtualMemory, the kernel implementation of VirtualLock. |
|
SeMachineAccountPrivilege |
Add workstations to the domain |
Checked for by the Security Accounts Manager on a domain controller when creating a machine account in a domain. |
|
SeManageVolumePrivilege |
Perform volume maintenance tasks |
Enforced by file system drivers during a volume open operation, which is required to perform disk checking and defragmenting activities. |
|
SeProfileSingleProcessPrivilege |
Profile single process |
Checked by Superfetch and the prefetcher when requesting information for an individual process through the NtQuerySystemInformation API. |
|
SeRelabelPrivilege |
Modify an object label |
Checked for by the SRM when raising the integrity level of an object owned by another user, or when attempting to raise the integrity level of an object higher than that of the caller’s token. |
|
SeRemoteShutdownPrivilege |
Force shutdown from a remote system |
Winlogon checks that remote callers of the InitiateSystemShutdown function have this privilege. |
|
SeRestorePrivilege |
Restore files and directories |
This privilege causes NTFS to grant the following access to any file or directory, regardless of the security descriptor that’s present: WRITE_DAC WRITE_OWNER ACCESS_SYSTEM_SECURITY FILE_GENERIC_WRITE FILE_ADD_FILE FILE_ADD_SUBDIRECTORY DELETE Note that when opening a file for restore, the caller must specify the FILE_FLAG_BACKUP_SEMANTICS flag. Allows corresponding access to registry keys when using RegSaveKey. |
|
SeSecurityPrivilege |
Manage auditing and security log |
Required to access the SACL of a security descriptor, and to read and clear the security event log. |
|
SeShutdownPrivilege |
Shut down the system |
This privilege is checked for by NtShutdownSystem and NtRaiseHardError, which presents a system error dialog box on the interactive console. |
|
SeSyncAgentPrivilege |
Synchronize directory service data |
Required to use the LDAP directory synchronization services. It allows the holder to read all objects and properties in the directory, regardless of the protection on the objects and properties. |
|
SeSystemEnvironmentPrivilege |
Modify firmware environment variables |
Required by NtSetSystemEnvironmentValue and NtQuerySystemEnvironmentValue to modify and read firmware environment variables using the hardware abstraction layer (HAL). |
|
SeSystemProfilePrivilege |
Profile system performance |
Checked for by NtCreateProfile, the function used to perform profiling of the system. This is used by the Kernprof tool, for example. |
|
SeSystemtimePrivilege |
Change the system time |
Required to change the time or date. |
|
SeTakeOwnershipPrivilege |
Take ownership of files and other objects |
Required to take ownership of an object without being granted discretionary access. |
|
SeTcbPrivilege |
Act as part of the operating system |
Checked for by the security reference monitor when the session ID is set in a token, by the Plug and Play manager for Plug and Play event creation and management, by BroadcastSystemMessageEx when called with BSM_ALLDESKTOPS, byLsaRegisterLogonProcess, and when specifying an application as a VDM with NtSetInformationProcess. |
|
SeTimeZonePrivilege |
Change the time zone |
Required to change the time zone. |
|
SeTrustedCredManAccessPrivilege |
Access credential manager as a trusted caller |
Checked by the credential manager to verify that it should trust the caller with credential information that can be queried in plain text. It is granted only to Winlogon by default. |
|
SeUndockPrivilege |
Remove computer from a docking station |
Checked for by the user-mode Plug and Play manager when either a computer undock is initiated or a device eject request is made. |
|
SeUnsolicitedInputPrivilege |
Receive unsolicited data from a terminal device |
This privilege isn’t currently used by Windows. |
EXPERIMENT: THE BYPASS TRAVERSE CHECKING PRIVILEGE
If you are a systems administrator, you must be aware of the Bypass Traverse Checking privilege (internally called SeNotifyPrivilege) and its implications. This experiment demonstrates that not understanding its behavior can lead to improperly applied security.
1. Create a folder and, within that folder, a new text file with some sample text.
2. Navigate in Explorer to the new file, and go to the Security tab of its Properties dialog box. Click the Advanced button, and clear the check box that controls inheritance. Select Copy when you are prompted as to whether you want to remove or copy inherited permissions.
3. Next, modify the security of the new folder so that your account does not have any access to the folder. Do this by selecting your account and selecting all the Deny boxes in the permissions list.
4. Run Notepad, and browse using the File, Open dialog box to the new directory. You should be denied access to the directory.
5. In the File Name field of the Open dialog box, type the full path of the new file. The file should open.
If your account does not have the Bypass Traverse Checking privilege, NTFS performs an access check on each directory of the path to a file when you try to open a file, which results in you being denied access to the file in this example.
Super Privileges
Several privileges are so powerful that a user to which they are assigned is effectively a “super user” who has full control over a computer. These privileges can be used in an infinite number of ways to gain unauthorized access to otherwise off-limit resources and to perform unauthorized operations. However, we’ll focus on using the privilege to execute code that grants the user privileges not assigned to the user, with the knowledge that this capability can be leveraged to perform any operation on the local machine that the user desires.
This section lists the privileges and discusses the ways that they can be exploited. Other privileges, such as Lock Pages In Physical Memory, can be exploited for denial-of-service attacks on a system, but these are not discussed. Note that on systems with UAC enabled, these privileges will be granted only to applications running at high integrity level or higher, even if the account possesses them:
§ Debug programs. A user with this privilege can open any process on the system (except for a Protected Process) without regard to the security descriptor present on the process. The user could implement a program that opens the LSASS process, for example, copy executable code into its address space, and then inject a thread with the CreateRemoteThread Windows API to execute the injected code in a more-privileged security context. The code could grant the user additional privileges and group memberships.
§ Take ownership. This privilege allows a holder to take ownership of any securable object (even protected processes and threads) by writing his own SID into the owner field of the object’s security descriptor. Recall that an owner is always granted permission to read and modify the DACL of the security descriptor, so a process with this privilege could modify the DACL to grant itself full access to the object and then close and reopen the object with full access. This would allow the owner to see sensitive data and to even replace system files that execute as part of normal system operation, such as LSASS, with his own programs that grant a user elevated privileges.
§ Restore files and directories. A user assigned this privilege can replace any file on the system with her own. She could exploit this power by replacing system files as described in the preceding paragraph.
§ Load and unload device drivers. A malicious user could use this privilege to load a device driver into the system. Device drivers are considered trusted parts of the operating system that can execute within it with System account credentials, so a driver could launch privileged programs that assign the user other rights.
§ Create a token object. This privilege can be used in the obvious way to generate tokens that represent arbitrary user accounts with arbitrary group membership and privilege assignment.
§ Act as part of operating system. LsaRegisterLogonProcess, the function a process calls to establish a trusted connection to LSASS, checks for this privilege. A malicious user with this privilege can establish a trusted-LSASS connection and then execute LsaLogonUser, a function used to create new logon sessions. LsaLogonUser requires a valid user name and password and accepts an optional list of SIDs that it adds to the initial token created for a new logon session. The user could therefore use her own user name and password to create a new logon session that includes the SIDs of more privileged groups or users in the resulting token.
Note that the use of an elevated privilege does not extend past the machine boundary to the network, because any interaction with another computer requires authentication with a domain controller and validation of domain passwords. Domain passwords are not stored on a computer either in plain text or encrypted form, so they are not accessible to malicious code.
Access Tokens of Processes and Threads
Figure 6-9 brings together the concepts covered so far in this chapter by illustrating the basic process and thread security structures. In the figure, notice that the process object and the thread objects have ACLs, as do the access token objects themselves. Also in this figure, thread 2 and thread 3 each have an impersonation token, whereas thread 1 uses the default process access token.
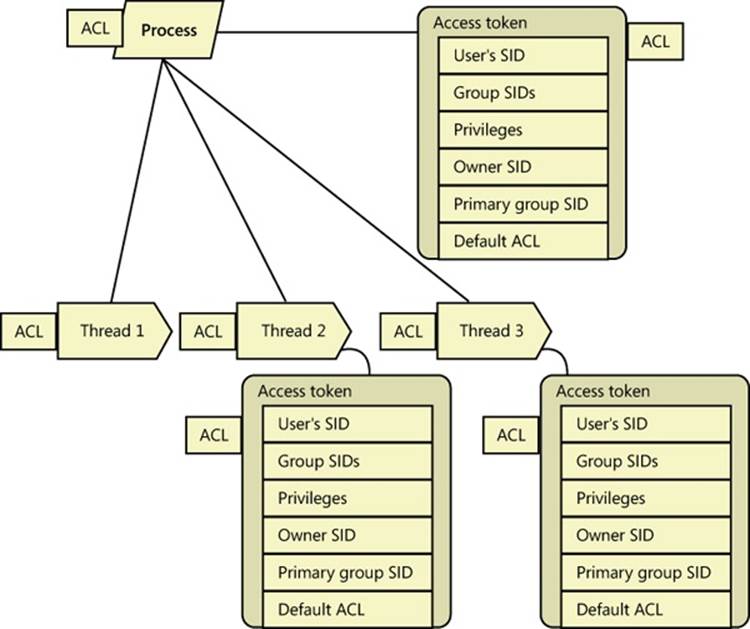
Figure 6-9. Process and thread security structures
Security Auditing
The object manager can generate audit events as a result of an access check, and Windows functions available to user applications can generate them directly. Kernel-mode code is always allowed to generate an audit event. Two privileges, SeSecurityPrivilege and SeAuditPrivilege, relate to auditing. A process must have the SeSecurityPrivilege privilege to manage the security Event Log and to view or set an object’s SACL. Processes that call audit system services, however, must have the SeAuditPrivilege privilege to successfully generate an audit record.
The audit policy of the local system controls the decision to audit a particular type of security event. The audit policy, also called the local security policy, is one part of the security policy LSASS maintains on the local system, and it is configured with the Local Security Policy Editor as shown in Figure 6-10.
The audit policy configuration (both the basic settings under Local Policies and the Advanced Audit Policy Configuration to be described later) is stored in the registry as a bitmapped value in the key HKEY_LOCAL_MACHINE\SECURITY\Policy\PolAdtEv.
Figure 6-10. Local Security Policy Editor audit policy configuration
LSASS sends messages to the SRM to inform it of the auditing policy at system initialization time and when the policy changes. LSASS is responsible for receiving audit records generated based on the audit events from the SRM, editing the records, and sending them to the Event Logger. LSASS (instead of the SRM) sends these records because it adds pertinent details, such as the information needed to more completely identify the process that is being audited.
The SRM sends audit records via its ALPC connection to LSASS. The Event Logger then writes the audit record to the security Event Log. In addition to audit records the SRM passes, both LSASS and the SAM generate audit records that LSASS sends directly to the Event Logger, and the AuthZ APIs allow for applications to generate application-defined audits. Figure 6-11 depicts this overall flow.
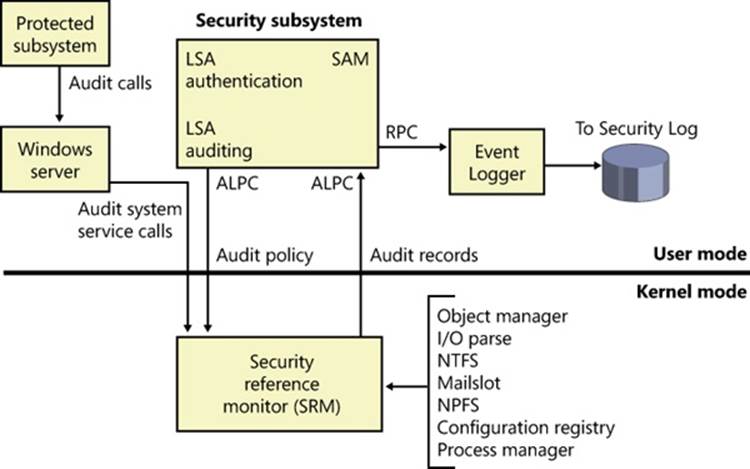
Figure 6-11. Flow of security audit records
Audit records are put on a queue to be sent to the LSA as they are received—they are not submitted in batches. The audit records are moved from the SRM to the security subsystem in one of two ways. If the audit record is small (less than the maximum ALPC message size), it is sent as an ALPC message. The audit records are copied from the address space of the SRM to the address space of the LSASS process. If the audit record is large, the SRM uses shared memory to make the message available to LSASS and simply passes a pointer in an ALPC message.
Object Access Auditing
An important use of the auditing mechanism in many environments is to maintain a log of accesses to secured objects, files in particular. To do this, the Audit Object Access policy must be enabled, and there must be audit ACEs in System Access Control Lists that enable auditing for the objects in question.
When an accessor attempts to open a handle to an object, the security reference monitor first determines whether the attempt is allowed or denied. If object access auditing is enabled, the SRM then scans the System ACL of the object. There are two types of audit ACEs, access allowed and access denied. An audit ACE must match any of the security IDs held by the accessor, it must match any of the access methods requested, and its type (access allowed or access denied) must match the result of the access check in order to generate an object access audit record.
Object access audit records include not just the fact of access allowed or denied, but also the reason for the success or failure. This “reason for access” reporting generally takes the form of an access control entry, specified in SDDL (Security Descriptor Definition Language), in the audit record. This allows for a diagnosis of scenarios in which an object to which you believe access should be denied is being permitted, or vice versa, by identifying the specific access control entry that caused the attempted access to succeed or fail.
As can be seen in Figure 6-10, object access auditing is disabled by default (as are all other auditing policies).
EXPERIMENT: OBJECT ACCESS AUDITING
You can demonstrate object access auditing by following these steps:
1. In Explorer, navigate to a file to which you would normally have access. In its Properties dialog box, click on the Security tab and then select the Advanced settings. Click on the Auditing tab, and click through the administrative privileges warning. The resulting dialog box allows you to add auditing of access control entries to the file’s System Access Control List.
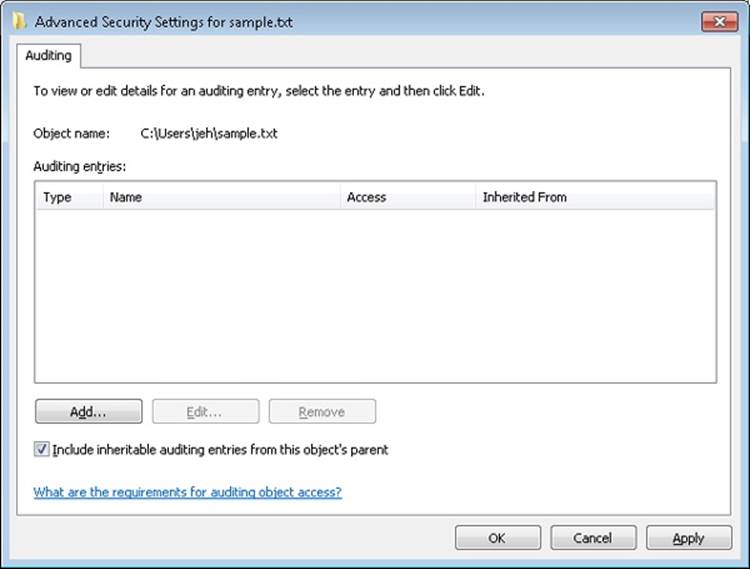
2. Click the Add button. In the resulting Select User Or Group dialog box, enter your own user name or a group to which you belong, such as Everyone, and click Check Names and then OK. This presents a dialog box for creating an Auditing Access Control Entry for this user or group for this file.
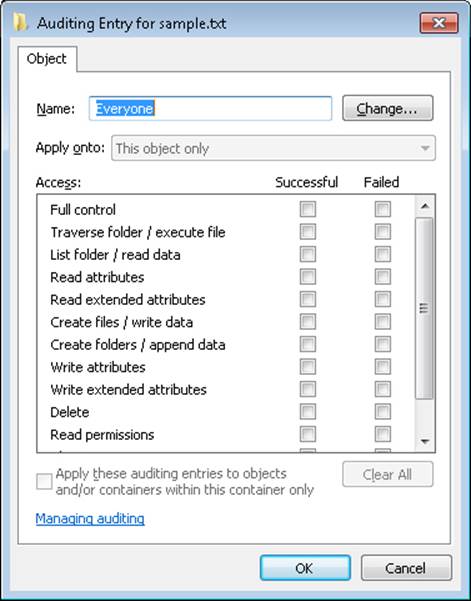
3. In the Successful column, select Full control (which will cause all of the other access methods to be selected as well). Click OK four times to close the file Properties dialog box.
4. In Explorer, double-click on the file to open it with its associated program.
5. In Event Viewer, navigate to the Security log. Note that there is no entry for access to the file. This is because the audit policy for object access is not yet configured.
6. In the Local Security Policy Editor, navigate to Local Policies, Audit Policy. Double-click on Audit Object Access, and then click Success to enable auditing of successful access to files.
7. In Event Viewer, click Action, Refresh. Note that the changes to audit policy resulted in audit records.
8. In Explorer, double-click on the file to open it again.
9. In Event Viewer, click Action, Refresh. Note that several file access audit records are now present.
Find one of the file access audit records for Event ID 4656, This shows up as “a handle to an object was requested.” Scroll down in the text box to find the Access Reasons section. The following example shows that two access methods, READ_CONTROL and ReadAttributes, were requested. The former was granted because the accessor was the owner of the file, and the latter was granted because of the indicated Access Control Entry. The ACE includes the SID of the user who attempted the access and includes the designation A:FA, indicating that this SID is Allowed (A) all file access methods (FA) to the file.
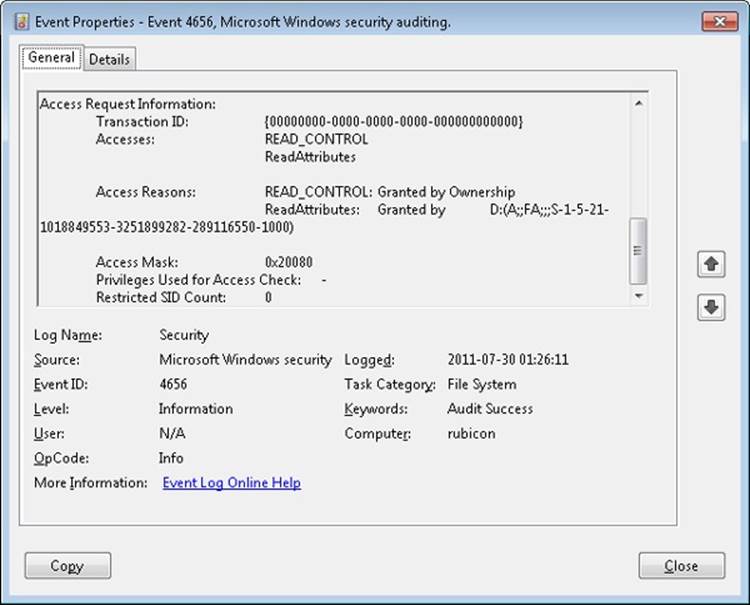
Global Audit Policy
In addition to object-access ACEs on individual objects, a global audit policy can be defined for the system that enables object access auditing for all file system objects, for all registry keys, or for both. A security auditor can therefore be certain that the desired auditing will be performed, without having to set or examine SACLs on all of the individual objects of interest.
An administrator can set or query the global audit policy via the AuditPol command with the /resourceSACL option. This can also be done with a program calling the AuditSetGlobalSacl and AuditQueryGlobalSacl APIs. As with changes to objects’ SACLs, changing these global SACLs requires SeSecurityPrivilege.
EXPERIMENT: SETTING GLOBAL AUDIT POLICY
You can use the AuditPol command to enable global audit policy.
1. If not already done in the previous experiment, in the Local Security Policy Editor, navigate to the Audit Policy settings (as shown in Figure 6-10), double-click Audit Object Access, and enable auditing for both success and failure. Note that on most systems, SACLs specifying object access auditing are uncommon, so few if any object access audit records will be produced at this point.
2. In an elevated command prompt window, enter the following command:
C:\> auditpol /resourceSACL
This will produce a summary of the commands for setting and querying global audit policy.
3. In the same elevated command prompt window, enter the following commands:
4. C:\> auditpol /resourceSACL /type:File /view
C:\> auditpol /resourceSACL /type:Key /view
On a typical system, each of these commands will report that no Global SACL exists for the respective resource type. (Note that the keywords “File” and “Key” are case-sensitive.)
5. In the same elevated command prompt window, enter the following command:
C:\> auditpol /resourceSACL /set /type:File /user:yourusername /success /failure /access:FW
This will set a global audit policy such that all attempts to open files for write access (FW) by the indicated user will result in audit records, whether the open attempts succeed or fail. The user name can be a specific user name on the system, a group such as Everyone, a domain-qualified user name such as domainname\username, or a SID.
6. While running under the user name indicated, use Explorer or other tools to open a file. Then look at the security log in the system Event Log to find the audit records.
7. At the end of the experiment, use the auditpol command to remove the global SACL you created in step 4, as follows:
C:\> auditpol /resourceSACL /remove /type:File /user:yourusername
The global audit policy is stored in the registry as a pair of system access control lists in HKEY_LOCAL_MACHINE\SECURITY\Policy\GlobalSaclNameFile and HKEY_LOCAL_MACHINE\SECURITY\Policy\GlobalSaclNameKey. These keys can be examined by running Regedit.exe under the System account, as described earlier in the Security System Components section. These keys will not exist until the corresponding global SACLs have been set at least once.
The global audit policy cannot be overridden by SACLs on objects, but object-specific SACLs can allow for additional auditing. For example, global audit policy could require auditing of read access by all users to all files, but SACLs on individual files could add auditing of write access to those files by specific users or by more specific user groups.
Global audit policy can also be configured via the Local Security Policy Editor in the Advanced Audit Policy settings, described in the next subsection.
Advanced Audit Policy Settings
In addition to the Audit Policy settings described previously, the Local Security Policy Editor offers a much more fine-grained set of audit controls under the Advanced Audit Policy Configuration heading, as shown in Figure 6-12.
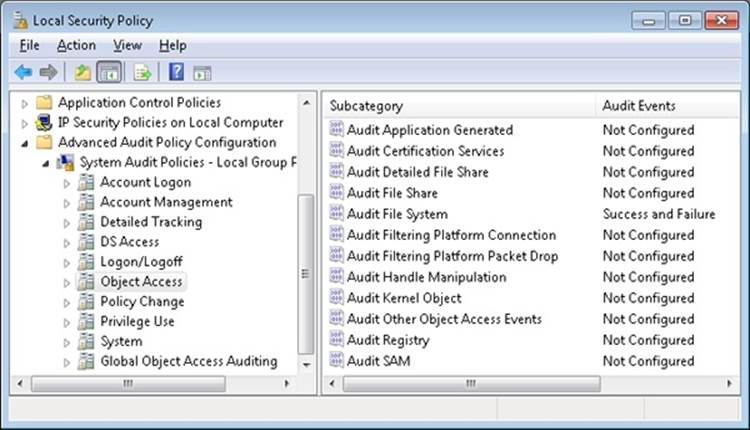
Figure 6-12. Local Security Policy Editor Advanced Audit Policy Configuration settings
Each of the nine audit policy settings under Local Policies, as illustrated previously in Figure 6-10, maps to a group of settings here that provide more detailed control. For example, while the Audit Object Access settings under Local Policies allow access to all objects to be audited, the settings here allow auditing of access to various types of objects to be controlled individually. Enabling one of the audit policy settings under Local Policies implicitly enables all of the corresponding advanced audit policy events, but if finer control over the contents of the audit log is desired, the advanced settings can be set individually. The standard settings then become a product of the advanced settings; however, this is not visible in the Local Security Policy Editor. Attempts to specify audit settings by using both the basic and the advanced options can cause unexpected results.
The Global Object Access Auditing option under the Advanced Audit Policy Configuration item can be used to configure the Global SACLs described in the previous section, using a graphical interface identical to that seen in Explorer or the Registry Editor for security descriptors in the file system or the registry.
Logon
Interactive logon (as opposed to network logon) occurs through the interaction of the logon process (Winlogon), the logon user interface process (LogonUI) and its credential providers, LSASS, one or more authentication packages, and the SAM or Active Directory. Authentication packages are DLLs that perform authentication checks. Kerberos is the Windows authentication package for interactive logon to a domain, and MSV1_0 is the Windows authentication package for interactive logon to a local computer, for domain logons to trusted pre–Windows 2000 domains, and for times when no domain controller is accessible.
Winlogon is a trusted process responsible for managing security-related user interactions. It coordinates logon, starts the user’s first process at logon, handles logoff, and manages various other operations relevant to security, including launching LogonUI for entering passwords at logon, changing passwords, and locking and unlocking the workstation. The Winlogon process must ensure that operations relevant to security aren’t visible to any other active processes. For example, Winlogon guarantees that an untrusted process can’t get control of the desktop during one of these operations and thus gain access to the password.
Winlogon relies on the credential providers installed on the system to obtain a user’s account name or password. Credential providers are COM objects located inside DLLs. The default providers are %SystemRoot%\System32\authui.dll and %SystemRoot%\System32\SmartcardCredentialProvider.dll, which support both password and smartcard PIN authentication. Allowing other credential providers to be installed allows Windows to use different user-identification mechanisms. For example, a third party might supply a credential provider that uses a thumbprint recognition device to identify users and extract their passwords from an encrypted database.
To protect Winlogon’s address space from bugs in credential providers that might cause the Winlogon process to crash (which, in turn, will result in a system crash, because Winlogon is considered a critical system process), a separate process, LogonUI.exe, is used to actually load the credential providers and display the Windows logon interface to users. This process is started on demand whenever Winlogon needs to present a user interface to the user, and it exits after the action has finished. It also allows Winlogon to simply restart a new LogonUI process should it crash for any reason.
Winlogon is the only process that intercepts logon requests from the keyboard, which are sent through an RPC message from Win32k.sys. Winlogon immediately launches the LogonUI application to display the user interface for logon. After obtaining a user name and password from credential providers, Winlogon calls LSASS to authenticate the user attempting to log on. If the user is authenticated, the logon process activates a logon shell on behalf of that user. The interaction between the components involved in logon is illustrated in Figure 6-13.
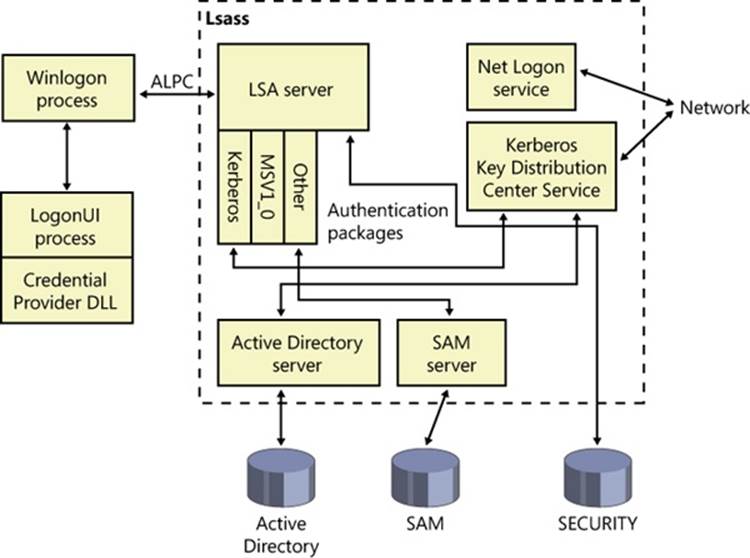
Figure 6-13. Components involved in logon
In addition to supporting alternative credential providers, LogonUI can load additional network provider DLLs that need to perform secondary authentication. This capability allows multiple network providers to gather identification and authentication information all at one time during normal logon. A user logging on to a Windows system might simultaneously be authenticated on a UNIX server. That user would then be able to access resources of the UNIX server from the Windows machine without requiring additional authentication. Such a capability is known as one form of single sign-on.
Winlogon Initialization
During system initialization, before any user applications are active, Winlogon performs the following steps to ensure that it controls the workstation once the system is ready for user interaction:
1. Creates and opens an interactive window station (for example, \Sessions\1\Windows\WindowStations\WinSta0 in the object manager namespace) to represent the keyboard, mouse, and monitor. Winlogon creates a security descriptor for the station that has one and only one ACE containing only the System SID. This unique security descriptor ensures that no other process can access the workstation unless explicitly allowed by Winlogon.
2. Creates and opens two desktops: an application desktop (\Sessions\1\Windows\WinSta0\Default, also known as the interactive desktop) and a Winlogon desktop (\Sessions\1\Windows\WinSta0\Winlogon, also known as the secure desktop). The security on the Winlogon desktop is created so that only Winlogon can access that desktop. The other desktop allows both Winlogon and users to access it. This arrangement means that any time the Winlogon desktop is active, no other process has access to any active code or data associated with the desktop. Windows uses this feature to protect the secure operations that involve passwords and locking and unlocking the desktop.
3. Before anyone logs on to a computer, the visible desktop is Winlogon’s. After a user logs on, pressing Ctrl+Alt+Delete switches the desktop from Default to Winlogon and launches LogonUI. (This explains why all the windows on your interactive desktop seem to disappear when you press Ctrl+Alt+Delete, and then return when you dismiss the Windows Security dialog box.) Thus, the SAS always brings up a secure desktop controlled by Winlogon.
4. Establishes an ALPC connection with LSASS’s LsaAuthenticationPort. This connection will be used for exchanging information during logon, logoff, and password operations and is made by calling LsaRegisterLogonProcess.
5. Registers the Winlogon RPC message server, which listens for SAS, logoff, and workstation lock notifications from Win32k. This measure prevents Trojan horse programs from gaining control of the screen when the SAS is entered.
NOTE
The Wininit process performs steps similar to steps 1 and 2 to allow legacy interactive services running on session 0 to display windows, but it does not perform any other steps because session 0 is not available for user logon. (See Chapter 3 for more information on Wininit and session isolation.)
HOW SAS IS IMPLEMENTED
The SAS is secure because no application can intercept the Ctrl+Alt+Delete keystroke combination or prevent Winlogon from receiving it. Win32k.sys reserves the Ctrl+Alt+Delete key combination so that whenever the Windows input system (implemented in the raw input thread in Win32k) sees the combination, it sends an RPC message to Winlogon’s message server, which listens for such notifications. The keystrokes that map to a registered hot key are otherwise not sent to any process other than the one that registered it, and only the thread that registered a hot key can unregister it, so a Trojan horse application cannot deregister Winlogon’s ownership of the SAS.
A Windows function, SetWindowsHook, enables an application to install a hook procedure that’s invoked every time a keystroke is pressed, even before hot keys are processed, and it allows the hook to squash keystrokes. However, the Windows hot key processing code contains a special case for Ctrl+Alt+Delete that disables hooks so that the keystroke sequence can’t be intercepted. In addition, if the interactive desktop is locked, only hot keys owned by Winlogon are processed.
Once the Winlogon desktop is created during initialization, it becomes the active desktop. When the Winlogon desktop is active, it is always locked. Winlogon unlocks its desktop only to switch to the application desktop or the screen-saver desktop. (Only the Winlogon process can lock or unlock a desktop.)
User Logon Steps
Logon begins when a user presses the SAS (Ctrl+Alt+Delete). After the SAS is pressed, Winlogon starts LogonUI, which calls the credential providers to obtain a user name and password. Winlogon also creates a unique local logon SID for this user that it assigns to this instance of the desktop (keyboard, screen, and mouse). Winlogon passes this SID to LSASS as part of the LsaLogonUser call. If the user is successfully logged on, this SID will be included in the logon process token—a step that protects access to the desktop. For example, another logon to the same account but on a different system will be unable to write to the first machine’s desktop because this second logon won’t be in the first logon’s desktop token.
When the user name and password have been entered, Winlogon retrieves a handle to a package by calling the LSASS function LsaLookupAuthenticationPackage. Authentication packages are listed in the registry under HKLM\SYSTEM\CurrentControlSet\Control\Lsa. Winlogon passes logon information to the authentication package via LsaLogonUser. Once a package authenticates a user, Winlogon continues the logon process for that user. If none of the authentication packages indicates a successful logon, the logon process is aborted.
Windows uses two standard authentication packages for interactive logons: Kerberos and MSV1_0. The default authentication package on a stand-alone Windows system is MSV1_0 (%SystemRoot%\System32\Msv1_0.dll), an authentication package that implements LAN Manager 2 protocol. LSASS also uses MSV1_0 on domain-member computers to authenticate to pre–Windows 2000 domains and computers that can’t locate a domain controller for authentication. (Computers that are disconnected from the network fall into this latter category.) The Kerberos authentication package, %SystemRoot%\System32\Kerberos.dll, is used on computers that are members of Windows domains. The Windows Kerberos package, with the cooperation of Kerberos services running on a domain controller, supports the Kerberos protocol. This protocol is based on Internet RFC 1510. (Visit the Internet Engineering Task Force [IETF] website, www.ietf.org, for detailed information on the Kerberos standard.)
The MSV1_0 authentication package takes the user name and a hashed version of the password and sends a request to the local SAM to retrieve the account information, which includes the hashed password, the groups to which the user belongs, and any account restrictions. MSV1_0 first checks the account restrictions, such as hours or type of accesses allowed. If the user can’t log on because of the restrictions in the SAM database, the logon call fails and MSV1_0 returns a failure status to the LSA.
MSV1_0 then compares the hashed password and user name to that obtained from the SAM. In the case of a cached domain logon, MSV1_0 accesses the cached information by using LSASS functions that store and retrieve “secrets” from the LSA database (the SECURITY hive of the registry). If the information matches, MSV1_0 generates a LUID for the logon session and creates the logon session by calling LSASS, associating this unique identifier with the session and passing the information needed to ultimately create an access token for the user. (Recall that an access token includes the user’s SID, group SIDs, and assigned privileges.)
NOTE
MSV1_0 does not cache a user’s entire password hash in the registry because that would enable someone with physical access to the system to easily compromise a user’s domain account and gain access to encrypted files and to network resources the user is authorized to access. Instead, it caches half of the hash. The cached half-hash is sufficient to verify that a user’s password is correct, but it isn’t sufficient to gain access to EFS keys and to authenticate as the user on a domain because these actions require the full hash.
If MSV1_0 needs to authenticate using a remote system, as when a user logs on to a trusted pre–Windows 2000 domain, MSV1_0 uses the Netlogon service to communicate with an instance of Netlogon on the remote system. Netlogon on the remote system interacts with the MSV1_0 authentication package on that system, passing back authentication results to the system on which the logon is being performed.
The basic control flow for Kerberos authentication is the same as the flow for MSV1_0. However, in most cases, domain logons are performed from member workstations or servers (rather than on a domain controller), so the authentication package must communicate across the network as part of the authentication process. The package does so by communicating via the Kerberos TCP/IP port (port 88) with the Kerberos service on a domain controller. The Kerberos Key Distribution Center service (%SystemRoot%\System32\Kdcsvc.dll), which implements the Kerberos authentication protocol, runs in the LSASS process on domain controllers.
After validating hashed user name and password information with Active Directory’s user account objects (using the Active Directory server %SystemRoot%\System32\Ntdsa.dll), Kdcsvc returns domain credentials to LSASS, which returns the result of the authentication and the user’s domain logon credentials (if the logon was successful) across the network to the system where the logon is taking place.
NOTE
This description of Kerberos authentication is highly simplified, but it highlights the roles of the various components involved. Although the Kerberos authentication protocol plays a key role in distributed domain security in Windows, its details are outside the scope of this book.
After a logon has been authenticated, LSASS looks in the local policy database for the user’s allowed access, including interactive, network, batch, or service process. If the requested logon doesn’t match the allowed access, the logon attempt will be terminated. LSASS deletes the newly created logon session by cleaning up any of its data structures and then returns failure to Winlogon, which in turn displays an appropriate message to the user. If the requested access is allowed, LSASS adds the appropriate additional security IDs (such as Everyone, Interactive, and the like). It then checks its policy database for any granted privileges for all the SIDs for this user and adds these privileges to the user’s access token.
When LSASS has accumulated all the necessary information, it calls the executive to create the access token. The executive creates a primary access token for an interactive or service logon and an impersonation token for a network logon. After the access token is successfully created, LSASS duplicates the token, creating a handle that can be passed to Winlogon, and closes its own handle. If necessary, the logon operation is audited. At this point, LSASS returns success to Winlogon along with a handle to the access token, the LUID for the logon session, and the profile information, if any, that the authentication package returned.
EXPERIMENT: LISTING ACTIVE LOGON SESSIONS
As long as at least one token exists with a given logon session LUID, Windows considers the logon session to be active. You can use the LogonSessions tool from Sysinternals, which uses the LsaEnumerateLogonSessions function (documented in the Windows SDK) to list the active logon sessions:
C:\>logonsessions
Logonsesions v1.21
Copyright (C) 2004-2010 Bryce Cogswell and Mark Russinovich
Sysinternals - wwww.sysinternals.com
[0] Logon session 00000000:000003e7:
User name: KERNELS\LAPT8$
Auth package: NTLM
Logon type: (none)
Session: 0
Sid: S-1-5-18
Logon time: 2012-01-16 22:03:38
Logon server:
DNS Domain:
UPN:
[1] Logon session 00000000:0000cf19:
User name:
Auth package: NTLM
Logon type: (none)
Session: 0
Sid: (none)
Logon time: 2012-01-16 22:03:38
Logon server:
DNS Domain:
UPN:
[2] Logon session 00000000:000003e4:
User name: KERNELS\LAPT8$
Auth package: Negotiate
Logon type: Service
Session: 0
Sid: S-1-5-20
Logon time: 2012-01-16 22:03:40
Logon server:
DNS Domain:
UPN:
[3] Logon session 00000000:000003e5:
User name: NT AUTHORITY\LOCAL SERVICE
Auth package: Negotiate
Logon type: Service
Session: 0
Sid: S-1-5-19
Logon time: 2012-01-16 22:03:40
Logon server:
DNS Domain:
UPN:
[4] Logon session 00000000:00021ed2:
User name: NT AUTHORITY\ANONYMOUS LOGON
Auth package: NTLM
Logon type: Network
Session: 0
Sid: S-1-5-7
Logon time: 2012-01-16 22:03:46
Logon server:
DNS Domain:
UPN:
[5] Logon session 00000000:000882c2:
User name: LAPT8\jeh
Auth package: NTLM
Logon type: Interactive
Session: 1
Sid: S-1-5-21-1488595123-1430011218-1163345924-1000
Logon time: 2012-01-17 01:34:46
Logon server: LAPT8
DNS Domain:
UPN:
[6] Logon session 00000000:000882e3:
User name: LAPT8\jeh
Auth package: NTLM
Logon type: Interactive
Session: 1
Sid: S-1-5-21-1488595123-1430011218-1163345924-1000
Logon time: 2012-01-17 01:34:46
Logon server: LAPT8
DNS Domain:
UPN:
Information reported for a session includes the SID and name of the user associated with the session, as well as the session’s authentication package and logon time. Note that the Negotiate authentication package, seen in logon session 2 in the preceding output, will attempt to authenticate via Kerberos or NTLM, depending on which is most appropriate for the authentication request.
The LUID for a session is displayed on the “Logon Session” line of each session block, and using the Handle utility (also from Sysinternals), you can find the tokens that represent a particular logon session. For example, to find the tokens for logon session 5 in the example output just shown, you could enter this command:
C:\Windows\system32>handle -a 882c2
Handle v3.46
Copyright (C) 1997-2011 Mark Russinovich
Sysinternals - www.sysinternals.com
System pid: 4 type: Directory D60: \Sessions\0\DosDevices\00000000-000882c2
winlogon.exe pid: 440 type: Event DC:
\BaseNamedObjects\00000000000882c2_WlballoonSmartCardUnlockNotificationEventName
winlogon.exe pid: 440 type: Event E4:
\BaseNamedObjects\00000000000882c2_WlballoonKerberosNotificationEventName
winlogon.exe pid: 440 type: Event 1D4:
\BaseNamedObjects\00000000000882c2_WlballoonAlternateCredsNotificationEventName
lsass.exe pid: 492 type: Token 508: LAPT8\jeh:882c2
lsass.exe pid: 492 type: Token 634: LAPT8\jeh:882c2
svchost.exe pid: 892 type: Token 7C4: LAPT8\jeh:882c2
svchost.exe pid: 960 type: Token E70: LAPT8\jeh:882c2
svchost.exe pid: 960 type: Token 1034: LAPT8\jeh:882c2
svchost.exe pid: 960 type: Token 1194: LAPT8\jeh:882c2
svchost.exe pid: 960 type: Token 1384: LAPT8\jeh:882c2
Winlogon then looks in the registry at the value HKLM\SOFTWARE\Microsoft\Windows NT\Current Version\Winlogon\Userinit and creates a process to run whatever the value of that string is. (This value can be several .EXEs separated by commas.) The default value is Userinit.exe, which loads the user profile and then creates a process to run whatever the value of HKCU\SOFTWARE\Microsoft\Windows NT\Current Version\Winlogon\Shell is, if that value exists. That value does not exist by default. If it doesn’t exist, Userinit.exe does the same for HKLM\SOFTWARE\Microsoft\Windows NT\Current Version\Winlogon\Shell, which defaults to Explorer.exe. Userinit then exits (which is why Explorer.exe shows up as having no parent when examined in Process Explorer). For more information on the steps followed during the user logon process, see Chapter 13, “Startup and Shutdown,” in Part 2.
Assured Authentication
A fundamental problem with password-based authentication is that passwords can be revealed, or stolen, and used by malicious third parties. New in Windows 7 and Windows Server 2008/R2 is a mechanism that tracks the authentication strength of how a user authenticated with the system, which allows objects to be protected from access if a user did not authenticate securely. (Smartcard authentication is considered to be a stronger form of authentication than password authentication.)
On systems that are joined to a domain, the domain administrator can specify a mapping between an Object Identifier (OID), which is a unique numeric string representing a specific object type, on a certificate used for authenticating a user (such as on a smartcard or hardware security token) and a Security ID (SID) that is placed into the user’s access token when the user successfully authenticates with the system. An ACE in a DACL on an object can specify such a SID be part of a user’s token in order for the user to gain access to the object. Technically, this is known as a group claim. In other words, the user is claiming membership in a particular group, which is allowed certain access rights on specific objects, with the claim based upon the authentication mechanism. This feature is not enabled by default, and it must be configured by the domain administrator in a domain with certificate-based authentication.
Assured Authentication builds upon existing Windows security features in a way that provides a great deal of flexibility to IT administrators and anyone concerned with enterprise IT security. The enterprise decides which OIDs to embed in the certificates it uses for authenticating users and the mapping of particular OIDs to Active Directory universal groups (SIDs). A user’s group membership can be used to identify whether a certificate was used during the logon operation. Different certificates can have different issuance policies and, thus, different levels of security, which can be used to protect highly sensitive objects (such as files or anything else that might have a security descriptor).
Authentication protocols (APs) retrieve OIDs from certificates during certificate-based authentication. These OIDs must be mapped to SIDs, which are in turn processed during group membership expansion, and placed in the access token. The mapping of OID to universal group is specified in Active Directory.
As an example, an organization might have several certificate issuance policies with the names Contractor, Full Time Employee, and Senior Management, which map to the universal groups Contractor-Users, FTE-Users, and SM-Users, respectively. A user named Abby has a smartcard with a certificate issued using the Senior Management issuance policy, and when she logs in using her smartcard, she receives an additional group membership (which is represented by a SID in her access token) indicating that she is a member of the SM-Users group. Permissions can be set on objects (using an ACL) such that only members of the FTE-Users or SM-Users group (identified by their SIDs within an ACE) are granted access. If Abby logs in using her smartcard, she can access those objects, but if she logs in with just her user name and password (without the smartcard), she cannot access those objects because she will not have either the FTE-Users or SM-Users group in her access token. A user named Toby who logs in with a smartcard that has a certificate issued using the Contractor issuance policy would not be able to access an object that has an ACE requiring FTE-Users or SM-Users group membership.
Biometric Framework for User Authentication
Windows provides a standardized mechanism for supporting certain types of biometric devices—specifically, fingerprint scanners—to support user identification via a fingerprint swipe. Like many other such frameworks, the Windows Biometric Framework was developed to isolate the various functions involved in supporting such devices, so as to minimize the code required to implement a new device.
The primary components of the Windows Biometric Framework are shown in Figure 6-14. Except as noted in the following list, all of these components are supplied by Windows:
§ The Windows Biometric Service (%SystemRoot%\System32\Wbiosrvc.dll. This provides the process execution environment in which one or more biometric service providers can execute.
§ The Windows Biometric API. This allows existing Windows components such as WinLogon and LoginUI to access the biometric service. Third-party applications have access to the biometric API and can use the biometric scanner for functions other than logging in to Windows. An example of a function in this API is WinBioEnumServiceProviders. The Biometric API is exposed by %SystemRoot%\System32\Winbio.dll.
§ The Fingerprint Biometric Service Provider. This wraps the functions of biometric-type-specific adapters so as to present a common interface, independent of the type of biometric, to the Windows Biometric Service. In the future, additional types of biometrics, such as retinal scans or voiceprint analyzers, might be supported by additional Biometric Service Providers. The Biometric Service Provider in turn uses three adapters, which are user-mode DLLs:
§ The sensor adapter exposes the data-capture functionality of the scanner. The sensor adapter will usually use Windows I/O calls to access the scanner hardware. Windows provides a sensor adapter that can be used with simple sensors, those for which a Windows Biometric Device Interface (WBDI) driver exists. For more complex sensors, the sensor adapter is written by the sensor vendor.
§ The engine adapter exposes processing and comparison functionality specific to the scanner’s raw data format and other features. The actual processing and comparison might be performed within the engine adapter DLL, or the DLL might communicate with some other module. The engine adapter is always provided by the sensor vendor.
§ The storage adapter exposes a set of secure storage functions. These are used to store and retrieve templates against which scanned biometric data is matched by the engine adapter. Windows provides a storage adapter using Windows cryptography services and standard disk file storage. A sensor vendor might provide a different storage adapter.
§ The Windows Biometric Driver Interface. This is a set of interface definitions (IRP major function codes, DeviceIoControl codes, and so forth) to which any driver for a biometric scanner device must conform if it is to be compatible with the Windows Biometric Service. WBDI is described in the Windows Driver Kit documentation. The Windows Driver Kit includes a sample WBDI driver.
§ The functional device driver for the actual biometric scanner device. This exposes the WBDI at its upper edge, and it usually uses the services of a lower-level bus driver, such as the USB bus driver, to access the scanner device. It can be a User-Mode Driver Framework (UMDF) driver, a Kernel-Mode Driver Framework (KMDF) driver, or a Windows Driver Model (WDM) driver. This driver is always provided by the sensor vendor. Microsoft recommends the use of UMDF and a USB hardware interface for the scanner.
Figure 6-14. Windows Biometric Framework components and architecture
A typical sequence of operations to support logging in via a fingerprint scan might be as follows:
1. After initialization, the sensor adapter receives from the service provider a request for capture data. The sensor adapter in turn sends a DeviceIoControl request with the IOCTL_BIOMETRIC_CAPTURE_DATA control code to the WBDI driver for the fingerprint scanner device.
2. The WBDI driver puts the scanner into capture mode and queues the IOCTL_BIOMETRIC_CAPTURE_DATA request until a fingerprint scan occurs.
3. A prospective user swipes a finger across the scanner. The WBDI driver receives notification of this, obtains the raw scan data from the sensor, and returns this data to the sensor driver in a buffer associated with the IOCTL_BIOMETRIC_CAPTURE_DATA request.
4. The sensor adapter provides the data to the Fingerprint Biometric Service Provider, which in turn passes the data to the engine adapter.
5. The engine adapter processes the raw data into a form compatible with its template storage.
6. The Fingerprint Biometric Service Provider uses the storage adapter to obtain templates and corresponding security IDs from secure storage. It invokes the engine adapter to compare each template to the processed scan data. The engine adapter returns a status indicating whether it’s a match or not a match.
7. If a match is found, the Biometric Service notifies WinLogon, via a credential provider DLL, of a successful login and passes it the security ID of the identified user. This notification is sent via an Advanced Local Procedure Call message, providing a path that cannot be spoofed
User Account Control and Virtualization
UAC is meant to enable users to run with standard user rights, as opposed to administrative rights. Without administrative rights, users cannot accidentally (or deliberately) modify system settings, malware can’t normally alter system security settings or disable antivirus software, and users can’t compromise the sensitive information of other users on shared computers. Running with standard user rights can thus mitigate the impact of malware and protect sensitive data on shared computers.
UAC had to address several problems to make it practical for a user to run with a standard user account. First, because the Windows usage model has been one of assumed administrative rights, software developers assumed their programs would run with those rights and so could access and modify any file, registry key, or operating system setting. The second problem UAC had to address was that users sometimes need administrative rights to perform such operations as installing software, changing the system time, and opening ports in the firewall.
The UAC solution to these problems is to run most applications with standard user rights, even though the user is logged in to an account with administrative rights; but at the same time, UAC makes it possible for standard users to access administrative rights when they need them—whether for legacy applications that require them or for changing certain system settings.
As described previously, UAC accomplishes this by creating a filtered admin token as well as the normal admin token when a user logs in to an administrative account. All processes created under the user’s session will normally have the filtered admin token in effect so that applications that can run with standard user rights will do so. However, the administrative user can run a program or perform other functions that require full administrator rights by performing UAC Elevation.
Windows also allows certain tasks that were previously considered reserved for administrators to be performed by standard users, enhancing the usability of the standard user environment. For example, Group Policy settings exist that can enable standard users to install printer and other device drivers approved by IT administrators and to install ActiveX controls from administrator-approved sites.
Finally, when software developers test in the UAC environment, they are encouraged to develop applications that can run without administrative rights. Fundamentally, nonadministrative programs should not need to run with Administrator privileges; programs that often require Administrator privileges are typically legacy programs using old APIs or techniques, and they should be updated.
Together, these changes obviate the need for users to run with administrative rights all the time.
File System and Registry Virtualization
Although some software legitimately requires administrative rights, many programs needlessly store user data in system-global locations. When an application executes, it can be running in different user accounts, and it should therefore store user-specific data in the per-user %AppData% directory and save per-user settings in the user’s registry profile under HKEY_CURRENT_USER\Software. Standard user accounts don’t have write access to the %ProgramFiles% directory or HKEY_LOCAL_MACHINE\Software, but because most Windows systems are single-user and most users have been administrators until UAC was implemented, applications that incorrectly saved user data and settings to these locations worked anyway.
Windows enables these legacy applications to run in standard user accounts through the help of file system and registry namespace virtualization. When an application modifies a system-global location in the file system or registry and that operation fails because access is denied, Windows redirects the operation to a per-user area. When the application reads from a system-global location, Windows first checks for data in the per-user area and, if none is found, permits the read attempt from the global location.
Windows will always enable this type of virtualization unless
§ The application is 64-bit. Because virtualization is purely an application-compatibility technology meant to help legacy applications, it is enabled only for 32-bit applications. The world of 64-bit applications is relatively new and developers should follow the development guidelines for creating standard user-compatible applications.
§ The application is already running with administrative rights. In this case, there is no need for any virtualization.
§ The operation came from a kernel-mode caller.
§ The operation is being performed while the caller is impersonating. For example, any operations not originating from a process classified as legacy according to this definition, including network file-sharing accesses, are not virtualized.
§ The executable image for the process has a UAC-compatible manifest (specifying a requestedExecutionLevel setting, described in the next section).
§ The administrator does not have write access to the file or registry key. This exception exists to enforce backward compatibility, because the legacy application would have failed before UAC was implemented even if the application was run with administrative rights.
§ Services are never virtualized.
You can see the virtualization status (as discussed previously, the process’ virtualization status is stored as a flag in its token) of a process by adding the UAC Virtualization column to Task Manager’s Processes page, as shown in Figure 6-15. Most Windows components—including the Desktop Window Manager (Dwm.exe), the Client Server Run-Time Subsystem (Csrss.exe), and Explorer—have virtualization disabled because they have a UAC-compatible manifest or are running with administrative rights and so do not allow virtualization. Internet Explorer (Iexplore.exe) has virtualization enabled because it can host multiple ActiveX controls and scripts and must assume that they were not written to operate correctly with standard user rights.
In addition to file system and registry virtualization, some applications require additional help to run correctly with standard user rights. For example, an application that tests the account in which it’s running for membership in the Administrators group might otherwise work, but it won’t run if it’s not in that group. Windows defines a number of application-compatibility shims to enable such applications to work anyway. The shims most commonly applied to legacy applications for operation with standard user rights are shown in Table 6-10. Note that, if required, virtualization can be completely disabled for a system using a local security policy setting.
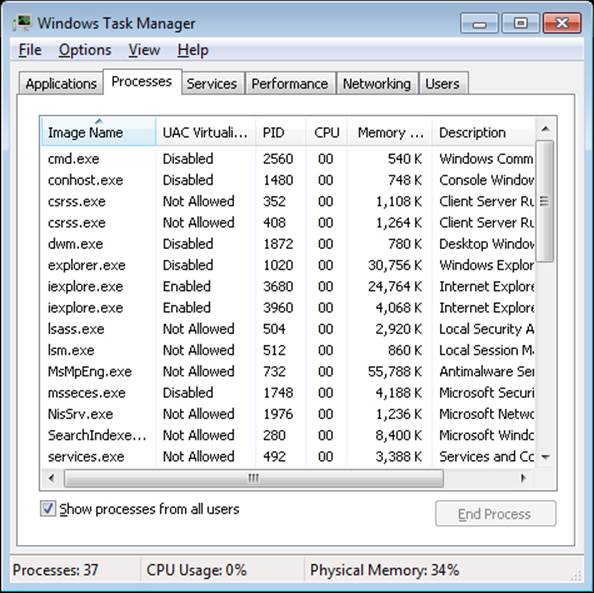
Figure 6-15. Using Task Manager to view virtualization status
Table 6-10. UAC Virtualization Shims
|
Flag |
Meaning |
|
ElevateCreateProcess |
Changes CreateProcess to handle ERROR_ELEVATION_REQUIRED errors by calling the application information service to prompt for elevation |
|
ForceAdminAccess |
Spoofs queries of Administrator group membership |
|
VirtualizeDeleteFile |
Spoofs successful deletion of global files and directories |
|
LocalMappedObject |
Forces global section objects into the user’s namespace |
|
VirtualizeHKCRLite |
Redirects global registration of COM objects to a per-user location |
|
VirtualizeRegisterTypeLib |
Converts per-machine typelib registrations to per-user registrations |
File Virtualization
The file system locations that are virtualized for legacy processes are %ProgramFiles%, %ProgramData%, and %SystemRoot%, excluding some specific subdirectories. However, any file with an executable extension—including .exe, .bat, .scr, .vbs, and others—is excluded from virtualization. This means that programs that update themselves from a standard user account fail instead of creating private versions of their executables that aren’t visible to an administrator running a global updater.
NOTE
To add additional extensions to the exception list, enter them in the HKEY_LOCAL_MACHINE\System\CurrentControlSet\Services\Luafv\Parameters\ExcludedExtensionsAdd registry key and reboot. Use a multistring type to delimit multiple extensions, and do not include a leading dot in the extension name.
Modifications to virtualized directories by legacy processes are redirected to the user’s virtual root directory, %LocalAppData%\VirtualStore. The Local component of the path highlights the fact that virtualized files don’t roam with the rest of the profile when the account has a roaming profile. If you navigate in Explorer to a directory containing virtualized files, Explorer displays a button labeled Compatibility Files in its toolbar, as shown in Figure 6-16. Clicking the button takes you to the corresponding VirtualStore subdirectory to show you the virtualized files.
Figure 6-16. Virtualized files are displayed here
The UAC File Virtualization Filter Driver (%SystemRoot%\System32\Drivers\Luafv.sys) implements file system virtualization. Because this is a file system filter driver, it sees all local file system operations, but it implements functionality only for operations from legacy processes. As shown in Figure 6-17, the filter driver changes the target file path for a legacy process that creates a file in a system-global location but does not for a nonvirtualized process with standard user rights. Default permissions on the \Windows directory deny access to the application written with UAC support, but the legacy process acts as though the operation succeeds, when it really created the file in a location fully accessible by the user.
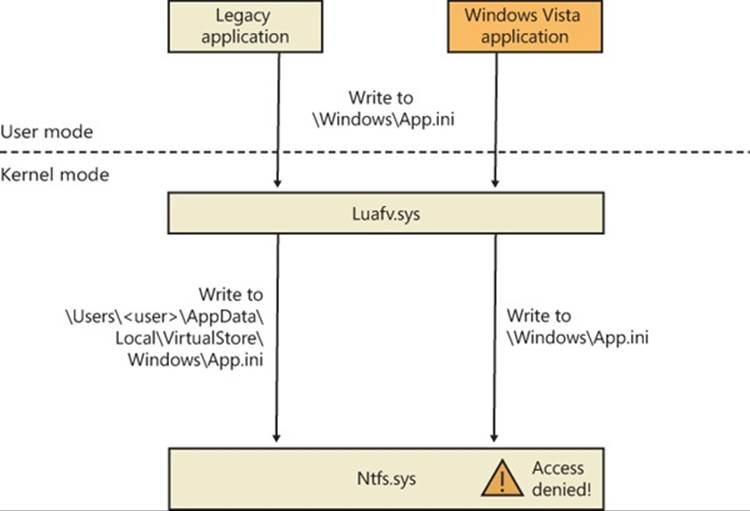
Figure 6-17. UAC File Virtualization Filter Driver operation
EXPERIMENT: FILE VIRTUALIZATION BEHAVIOR
In this experiment, we will enable and disable virtualization on the command prompt and see several behaviors to demonstrate UAC file virtualization:
1. Open a nonelevated command prompt (you must have UAC enabled for this to work), and enable virtualization for it. You can change the virtualization status of a process by selecting UAC Virtualization from the shortcut menu that appears when you right-click the process in Task Manager.
2. Navigate to the C:\Windows directory, and use the following command to write a file:
echo hello-1 > test.txt
3. Now list the contents of the directory:
dir test.txt
You’ll see that the file appears.
4. Now disable virtualization by right-clicking on the process on the Processes page in Task Manager and deselecting UAC Virtualization, and then list the directory as in step 3. Notice that the file is gone. However, a directory listing of the VirtualStore directory will reveal the file:
dir %LOCALAPPDATA%\VirtualStore\Windows\test.txt
5. Enable virtualization again for this process.
6. To take a look at a more complex scenario, create a new command prompt window, but elevate it this time, and then repeat steps 2 and 3 using the string “hello-2”.
7. Examine the text inside these files by using the following command in both command prompts:
echo test.txt
The following two screen shots show the expected output.
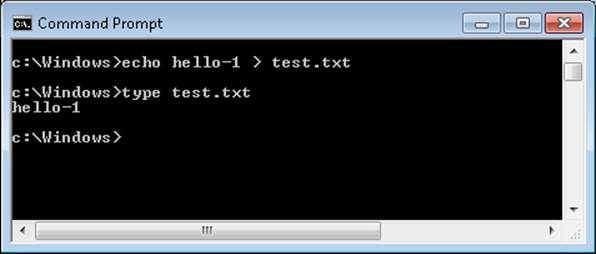
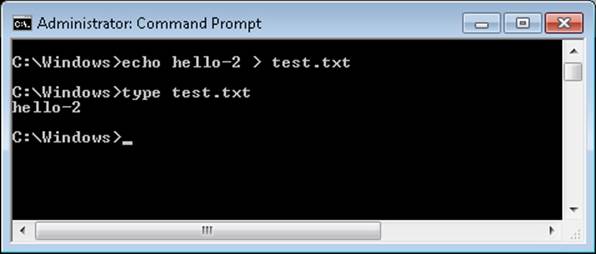
8. Finally, from your elevated command prompt, delete the test.txt file:
del test.txt
9. Repeat step 6 of the experiment. Notice that the elevated command prompt cannot find the file anymore, while the standard user command prompt shows the old contents of the file again. This demonstrates the failover mechanism described earlier—read operations will look in the per-user virtual store location first, but if the file doesn’t exist, read access to the system location will be granted.
Registry Virtualization
Registry virtualization is implemented slightly differently from file system virtualization. Virtualized registry keys include most of the HKEY_LOCAL_MACHINE\Software branch, but there are numerous exceptions, such as the following:
§ HKLM\Software\Microsoft\Windows
§ HKLM\Software\Microsoft\Windows NT
§ HKLM\Software\Classes
Only keys that are commonly modified by legacy applications, but that don’t introduce compatibility or interoperability problems, are virtualized. Windows redirects modifications of virtualized keys by a legacy application to a user’s registry virtual root at HKEY_ CURRENT_USER\Software\Classes\VirtualStore. The key is located in the user’s Classes hive, %LocalAppData%\Microsoft\Windows\UsrClass.dat, which, like any other virtualized file data, does not roam with a roaming user profile. Instead of maintaining a fixed list of virtualized locations as Windows does for the file system, the virtualization status of a key is stored as a combination of flags, shown in Table 6-11.
Table 6-11. Registry Virtualization Flags
|
Flag |
Meaning |
|
REG_KEY_DONT_VIRTUALIZE |
Specifies whether virtualization is enabled for this key. If the flag is set, virtualization is disabled. |
|
REG_KEY_DONT_SILENT_FAIL |
If the REG_KEY_DONT_VIRTUALIZE flag is set (virtualization is disabled), this key specifies that a legacy application that would be denied access performing an operation on the key is instead granted MAXIMUM_ALLOWED rights to the key (any access the account is granted), instead of the rights the application requested. If this flag is set, it implicitly disables virtualization as well. |
|
REG_KEY_RECURSE_FLAG |
Determines whether the virtualization flags will propagate to the child keys (subkeys) of this key. |
You can use the Reg.exe utility included in Windows, with the flags option, to display the current virtualization state for a key or to set it. In Figure 6-18, note that the HKLM\Software key is fully virtualized, but the Windows subkey (and all its children) have only silent failure enabled.
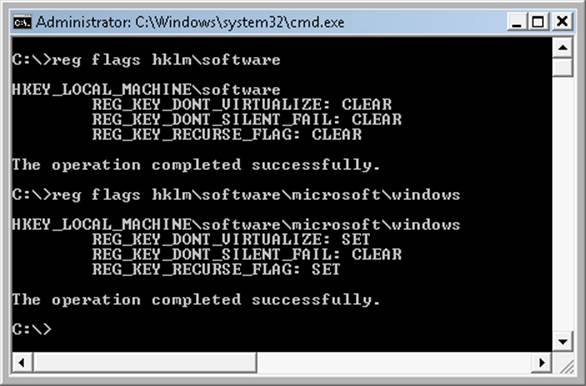
Figure 6-18. UAC registry virtualization flags on the Software and Windows keys
Unlike file virtualization, which uses a filter driver, registry virtualization is implemented in the configuration manager. (See Chapter 4 for more information on the registry and the configuration manager.) As with file system virtualization, a legacy process creating a subkey of a virtualized key is redirected to the user’s registry virtual root, but a UAC-compatible process is denied access by default permissions. This is shown in Figure 6-19.

Figure 6-19. UAC registry virtualization operation
Elevation
Even if users run only programs that are compatible with standard user rights, some operations still require administrative rights. For example, the vast majority of software installations require administrative rights to create directories and registry keys in system-global locations or to install services or device drivers. Modifying system-global Windows and application settings also requires administrative rights, as does the parental controls feature. It would be possible to perform most of these operations by switching to a dedicated administrator account, but the inconvenience of doing so would likely result in most users remaining in the administrator account to perform their daily tasks, most of which do not require administrative rights.
It’s important to be aware that UAC elevations are conveniences and not security boundaries. A security boundary requires that security policy dictate what can pass through the boundary. User accounts are an example of a security boundary in Windows, because one user can’t access the data belonging to another user without having that user’s permission.
Because elevations aren’t security boundaries, there’s no guarantee that malware running on a system with standard user rights can’t compromise an elevated process to gain administrative rights. For example, elevation dialog boxes only identify the executable that will be elevated; they say nothing about what it will do when it executes.
Running with Administrator Rights
Windows includes enhanced “run as” functionality so that standard users can conveniently launch processes with administrative rights. This functionality requires giving applications a way to identify operations for which the system can obtain administrative rights on behalf of the application, as necessary. (We’ll say more on this topic shortly.)
To enable users acting as system administrators to run with standard user rights but not have to enter user names and passwords every time they want to access administrative rights, Windows makes use of a mechanism called Admin Approval Mode (AAM). This feature creates two identities for the user at logon: one with standard user rights and another with administrative rights. Since every user on a Windows system is either a standard user or acting for the most part as a standard user in AAM, developers must assume that all Windows users are standard users, which will result in more programs working with standard user rights without virtualization or shims.
Granting administrative rights to a process is called elevation. When elevation is performed by a standard user account (or by a user who is part of an administrative group but not the actual Administrators group), it’s referred to as an over-the-shoulder (OTS) elevation because it requires the entry of credentials for an account that’s a member of the Administrators group, something that’s usually completed by a user typing over the shoulder of a standard user. An elevation performed by an AAM user is called a consent elevation because the user simply has to approve the assignment of his administrative rights.
Stand-alone systems, which are typically home computers, and domain-joined systems treat AAM access by remote users differently because domain-connected computers can use domain administrative groups in their resource permissions. When a user accesses a stand-alone computer’s file share, Windows requests the remote user’s standard user identity, but on domain-joined systems, Windows honors all the user’s domain group memberships by requesting the user’s administrative identity. Executing an image that requests administrative rights causes the application information service (AIS, contained in %SystemRoot%\System32\Appinfo.dll), which runs inside a service host process (%SystemRoot%\System32\Svchost.exe), to launch Consent.exe (%SystemRoot%\System32\Consent.exe). Consent captures a bitmap of the screen, applies a fade effect to it, switches to a desktop that’s accessible only to the local system account (the secure desktop), paints the bitmap as the background, and displays an elevation dialog box that contains information about the executable. Displaying this dialog box on a separate desktop prevents any application present in the user’s account from modifying the appearance of the dialog box.
If an image is a Windows component digitally signed by Microsoft and the image is in the Windows system directory, the dialog box displays a blue stripe across the top, as shown at the top of Figure 6-20, with a blue and gold shield at the left end of the stripe. If the image is signed by someone other than Microsoft, or if it is signed by Microsoft but resides in a directory tree other than the Windows directory tree, the shield becomes solid blue with a question mark over it. If the image is unsigned, the shield background and the stripe both become orange, the shield has an exclamation point over it, and the prompt stresses the unknown origin of the image. The elevation dialog box shows the image’s icon, description, and publisher for digitally signed images, but it shows only the file name and “Unknown publisher” for unsigned images. This difference makes it harder for malware to mimic the appearance of legitimate software. The Details button at the bottom of the dialog box expands it to show the command line that will be passed to the executable if it launches.
Figure 6-20. AAC UAC elevation dialog boxes based on image signature
The OTS consent dialog box, shown in Figure 6-21, is similar, but prompts for administrator credentials. It will list any accounts with administrator rights.
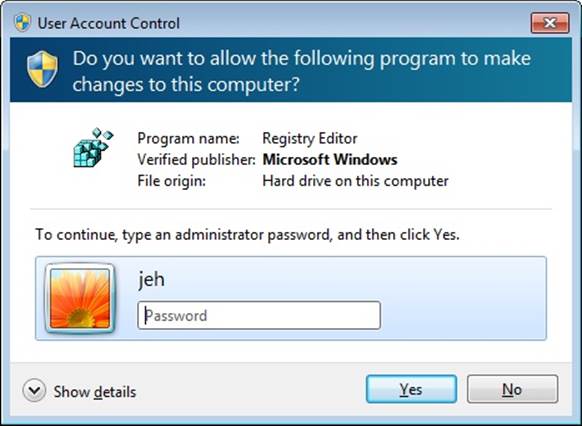
Figure 6-21. OTS consent dialog box
If a user declines an elevation, Windows returns an access-denied error to the process that initiated the launch. When a user agrees to an elevation by either entering administrator credentials or clicking Continue, AIS calls CreateProcessAsUser to launch the process with the appropriate administrative identity. Although AIS is technically the parent of the elevated process, AIS uses new support in the CreateProcessAsUser API that sets the process’ parent process ID to that of the process that originally launched it. (See Chapter 5, for more information on processes and this mechanism.) That’s why elevated processes don’t appear as children of the AIS service-hosting process in tools such as Process Explorer that show process trees. Figure 6-22 shows the operations involved in launching an elevated process from a standard user account.
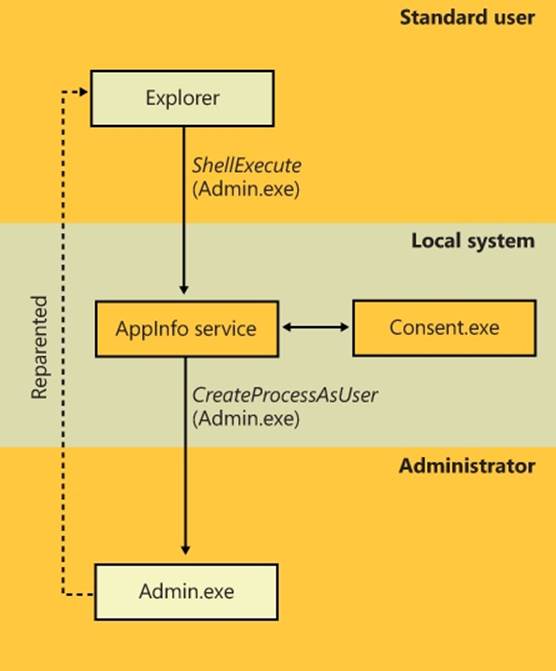
Figure 6-22. Launching an administrative application as a standard user
Requesting Administrative Rights
There are a number of ways the system and applications identify a need for administrative rights. One that shows up in the Explorer user interface is the Run As Administrator context menu command and shortcut option. These items also include a blue and gold shield icon that should be placed next to any button or menu item that will result in an elevation of rights when it is selected. Choosing the Run As Administrator command causes Explorer to call the ShellExecute API with the “runas” verb.
The vast majority of installation programs require administrative rights, so the image loader, which initiates the launch of an executable, includes installer-detection code to identify likely legacy installers. Some of the heuristics it uses are as simple as detecting internal version information or whether the image has the words setup, install, or update in its file name. More sophisticated means of detection involve scanning for byte sequences in the executable that are common to third-party installation wrapper utilities. The image loader also calls the application compatibility library to see if the target executable requires administrator rights. The library looks in the application compatibility database to see whether the executable has the RequireAdministrator or RunAsInvoker compatibility flag associated with it.
The most common way for an executable to request administrative rights is for it to include a requestedExecutionLevel tag in its application manifest file. The element’s level attribute can have one of the three values shown in Table 6-12.
Table 6-12. Requested Elevation Levels
|
Elevation Level |
Meaning |
Usage |
|
As Invoker |
No need for administrative rights; never ask for elevation. |
Typical user applications that don’t need administrative privileges—for example, Notepad. |
|
Highest Available |
Request approval for highest rights available. If the user is logged on as a standard user, the process will be launched as invoker; otherwise, an AAM elevation prompt will appear, and the process will run with full administrative rights. |
Applications that can function without full administrative rights but expect users to want full access if it’s easily accessible. For example, the Registry Editor, Microsoft Management Console, and the Event Viewer use this level. |
|
Require Administrator |
Always request administrative rights—an OTS elevation dialog box prompt will be shown for standard users; otherwise, AAM. |
Applications that require administrative rights to work, such as the Firewall Settings editor, which affects systemwide security. |
The presence of the trustInfo element in a manifest (which you can see in the excerpted string dump of eventvwr.exe discussed next) denotes an executable that was written with support for UAC and the requestedExecutionLevel element nests within it. The uiAccess attribute is where accessibility applications can use the UIPI bypass functionality mentioned earlier.
C:\>strings c:\Windows\System32\eventvwr.exe
...
<trustInfo xmlns="urn:schemas-microsoft-com:asm.v3">
<security>
<requestedPrivileges>
<requestedExecutionLevel
level="highestAvailable"
uiAccess="false"
/>
</requestedPrivileges>
</security>
</trustInfo>
<asmv3:application>
<asmv3:windowsSettings xmlns="http://schemas.microsoft.com/SMI/2005/WindowsSettings">
<autoElevate>true</autoElevate>
</asmv3:windowsSettings>
</asmv3:application>
...
An easier way to determine the values specified by an executable is to view its manifest with the Sysinternals Sigcheck utility, like this:
sigcheck –m <executable>
EXPERIMENT: USING APPLICATION-COMPATIBILITY FLAGS
In this experiment, we will use an application-compatibility flag to run the Registry Editor as a standard user process. This will bypass the RequireAdministrator manifest flag and force virtualization on Regedit.exe, allowing you to make changes to the virtualized registry directly.
1. Navigate to your %SystemRoot% directory, and copy the Regedit.exe file to another path on your system (such as C:\ or your Desktop folder).
2. Go to the HKLM\Software\Microsoft\Windows NT\CurrentVersion\AppCompatFlags\Layers registry key, and create a new string value whose name is the path where you copied Regedit.exe, such as c:\regedit.exe
3. Set the value of this key to RUNASINVOKER.
4. Now start Regedit.exe from its location. (Be sure to close any running copies of the Registry Editor first.) You will not see the typical AAM dialog box, and Regedit.exe will now run with standard user rights. You will also be subject to the virtualized view of the registry, meaning you can now see what legacy applications see when accessing the registry.
Auto-Elevation
In the default configuration (see the next section for information on changing this), most Windows executables and control panel applets do not result in elevation prompts for administrative users, even if they need administrative rights to run. This is because of a mechanism called auto-elevation. Auto-elevation is intended to preclude administrative users from seeing elevation prompts for most of their work; the programs will automatically run under the user’s full administrative token.
Auto-elevation has several requirements. The executable in question must be considered as a Windows executable. This means it must be signed by the Windows publisher (not just by Microsoft), and it must be in one of several directories considered secure: %SystemRoot%\System32 and most of its subdirectories, %Systemroot%\Ehome, and a small number of directories under %ProgramFiles%—for example, those containing Windows Defender and Windows Journal.
There are additional requirements, depending on the type of executable.
.exe files other than Mmc.exe auto-elevate if they are requested via an autoElevate element in their manifest. The string dump of EventVwr.exe in the previous section illustrates this.
Windows also includes a short internal list of executables that are auto-elevated without the autoElevate element. Two examples are Spinstall.exe, the service pack installer, and Pkgmgr.exe, the package manager. They are handled this way because they are also supplied external to Windows 7; they must be able to run on earlier versions of Windows where the autoExecute element in their manifest might cause an error. These executables must still meet the signing and directory requirements for Windows executables as described previously.
Mmc.exe is treated as a special case, because whether it should auto-elevate or not depends on which system management snap-ins it is to load. Mmc.exe is normally invoked with a command line specifying an .msc file, which in turn specifies which snap-ins are to be loaded. When Mmc.exe is run from a protected administrator account (one running with the limited administrator token), it asks Windows for administrative rights. Windows validates that Mmc.exe is a Windows executable and then checks the .msc. The .msc must also pass the tests for a Windows executable, and furthermore must be on an internal list of auto-elevate .msc’s. This list includes nearly all .msc files in Windows.
Finally, COM objects can request administrative rights within their registry key. To do so requires a subkey named Elevation with a REG_DWORD value named Enabled, having a value of 1. Both the COM object and its instantiating executable must meet the Windows executable requirements, though the executable need not have requested auto-elevation.
Controlling UAC Behavior
UAC can be modified via the dialog box shown in Figure 6-23. This dialog box is available under Control Panel, Action Center, Change User Account Control Settings. Figure 6-23 shows the control in its default position for Windows 7.
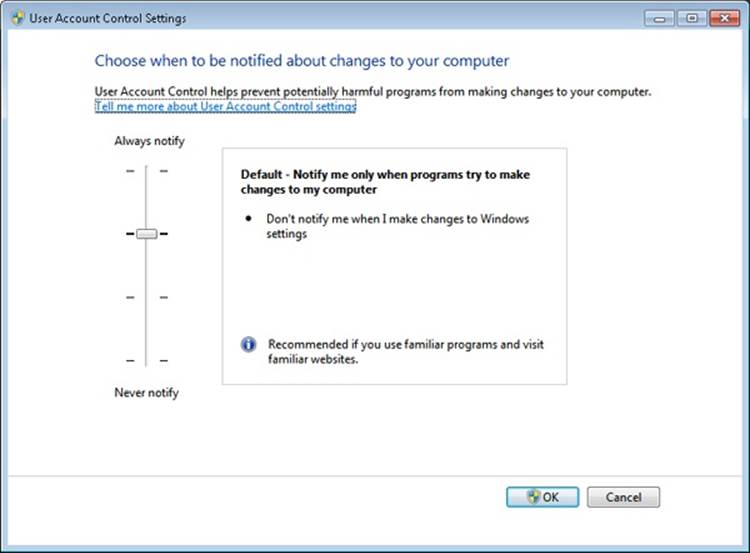
Figure 6-23. User Account Control settings
The four possible settings have the effects described in Table 6-13.
Table 6-13. User Account Control Options
|
Slider Position |
When administrative user not running with administrative rights... |
Remarks |
|
|
...attempts to change Windows settings, for example, use certain Control Panel applets |
...attempts to install software, or run a program whose manifest calls for elevation, or uses Run As Administrator |
||
|
Highest position (“Always notify”) |
UAC elevation prompt appears on the secure desktop |
UAC elevation prompt appears on the secure desktop |
This was the Windows Vista behavior |
|
Second position |
UAC elevation occurs automatically with no prompt or notification |
UAC elevation prompt appears on the secure desktop |
Windows 7 default setting |
|
Third position |
UAC elevation occurs automatically with no prompt or notification |
UAC elevation prompt appears on the user’s normal desktop |
Not recommended |
|
Lowest position (“Never notify”) |
UAC is turned off for administrative users |
UAC is turned off for administrative users |
Not recommended. |
The third position is not recommended because the UAC elevation prompt appears not on the secure desktop but on the normal user’s desktop. This could allow a malicious program running in the same session to change the appearance of the prompt. It is intended for use only in systems where the video subsystem takes a long time to dim the desktop or is otherwise unsuitable for the usual UAC display.
The lowest position is strongly discouraged because it turns UAC off completely as far as administrative accounts are concerned. All processes run by a user with an administrative account will be run with the user’s full administrative rights in effect; there is no filtered admin token. Registry and file system virtualization are disabled as well for these accounts, and the Protected mode of Internet Explorer is disabled. However, virtualization is still in effect for nonadministrative accounts, and nonadministrative accounts will still see an OTS elevation prompt when they attempt to change Windows settings, run a program that requires elevation, or use the Run As Administrator context menu option in Explorer.
The UAC setting is stored in four values in the registry under HKEY_LOCAL_MACHINE\SOFTWARE\Microsoft\Windows\CurrentVersion\Policies\System, as shown in Table 6-14. ConsentPromptBehaviorAdmin controls the UAC elevation prompt for administrators running with a filtered admin token, and ConsentPromptBehaviorUser controls the UAC prompt for users other than administrators.
Table 6-14. User Account Control Registry Values
|
Slider Position |
ConsentPrompt BehaviorAdmin |
ConsentPrompt BehaviorUser |
EnableLUA |
PromptOnSecureDesktop |
|
Highest position (“Always notify”) |
2 (display AAC UAC elevation prompt) |
3 (display OTS UAC elevation prompt) |
1 (enabled) |
1 (enabled) |
|
Second position |
5 (display AAC UAC elevation prompt, except for changes to Windows settings) |
3 |
1 |
1 |
|
Third position |
5 |
3 |
1 |
0 (disabled; UAC prompt appears on user’s normal desktop) |
|
Lowest position (“Never notify”) |
0 |
3 |
0 (disabled. Logins to administrative accounts do not create a restricted admin access token) |
0 |
Application Identification (AppID)
Historically, security decisions in Windows have been based upon a user’s identity (in the form of the user’s SID and group membership), but a growing number of security components (AppLocker, firewall, antivirus, antimalware, Rights Management Services, and others) need to make security decisions based upon what code is to be run. In the past, each of these security components used their own proprietary method for identifying applications, which led to inconsistent and overly-complicated policy authoring. The purpose of AppID is to bring consistency to how the security components recognize applications by providing a single set of APIs and data structures.
NOTE
This is not the same as the AppID used by DCOM/COM+ applications, where a GUID represents a process that is shared by multiple CLSIDs, nor is it the AppID used by Windows Live applications.
Just as a user is identified when she logs in, an application is identified just before it is started by generating the main program’s AppID. An AppID can be generated from any of the following attributes of the application: Fields within a code-signing certificate embedded within the file allow for different combinations of publisher name, product name, file name, and version. APPID://FQBN is a Fully Qualified Binary Name, and it is a string in the following form: {Publisher\Product\Filename,Version}. The Publisher name is the Subject field of the x.509 certificate used to sign the code, using the following fields: O = Organization, L = Locality, S = State or Province, and C = Country.
File hash. There are several methods that can be used for hashing. The default is APPID://SHA256HASH. However, for backward compatibility with SRP and most x.509 certificates, SHA-1 (APPID://SHA1HASH) is still supported. APPID://SHA256HASH specifies the SHA-256 hash of the file.
The partial or complete path to the file. APPID://Path specifies a path with optional wildcard characters (“*”).
NOTE
An AppID does not serve as a means for certifying the quality or security of an application. An AppID is simply a way of identifying an application so that administrators can reference the application in security policy decisions.
The AppID is stored in the process’s access token, allowing any security component to make authorization decisions based upon a single, consistent identification. AppLocker uses conditional ACEs (described earlier) for specifying whether a particular program is allowed to be run by the user.
When an AppID is created for a signed file, the certificate from the file is cached and verified to a trusted root certificate. The certificate path is re-verified daily to ensure the certificate path remains valid. Certificate caching and verification are recorded in the system event log. SeeFigure 6-24.
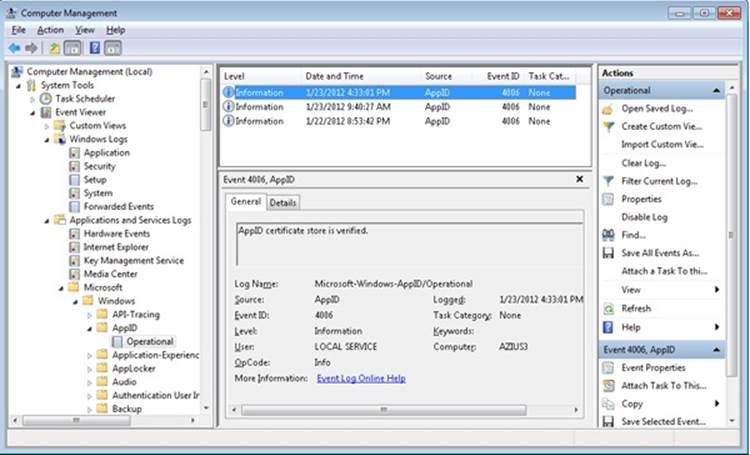
Figure 6-24. Event Viewer showing AppID service verifying signature of a program.
AppLocker
New to Windows 7 and Windows Server 2008/R2 (Enterprise and Ultimate editions) is a feature known as AppLocker, which allows an administrator to lockdown a system to prevent unauthorized programs from being run. Windows XP introduced Software Restriction Policies (SRP), which was the first step toward this capability, but SRP suffered from being difficult to manage, and it couldn’t be applied to specific users or groups. (All users were affected by SRP rules.) AppLocker is a replacement for SRP, and yet coexists alongside SRP, with AppLocker’s rules being stored separately from SRP’s rules. If both AppLocker and SRP rules are in the same Group Policy object (GPO), only the AppLocker rules will be applied. Another feature that makes AppLocker superior to SRP is AppLocker’s auditing mode, which allows an administrator to create an AppLocker policy and examine the results (stored in the system event log) to determine whether the policy will perform as expected—without actually performing the restrictions. AppLocker auditing mode can be used to monitor which applications are being used by one, or more, users on a system.
AppLocker allows an administrator to restrict the following types of files from being run:
§ Executable images (.EXE and .COM)
§ Dynamic-Link Libraries (.DLL and .OCX)
§ Microsoft Software Installer (.MSI and .MSP) for both install and uninstall
§ Scripts
§ Windows PowerShell (.PS1)
§ Batch (.BAT and .CMD)
§ VisualBasic Script (.VBS)
§ Java Script (.JS)
AppLocker provides a simple GUI rule-based mechanism, which is very similar to network firewall rules, for determining which applications or scripts are allowed to be run by specific users and groups, using conditional ACEs and AppID attributes. There are two types of rules in AppLocker:
§ Allow the specified files to run, denying everything else.
§ Deny the specified files from being run, allowing everything else. “Deny” rules take precedence over “allow” rules.
Each rule can also have a list of exceptions to exclude files from the rule. Using an exception, you could create a rule to “Allow everything in the C:\Windows or C:\Program Files directories to be run, except the built-in games.”
AppLocker rules can be associated with a specific user or group. This allows an administrator to support compliance requirements by validating and enforcing which users can run specific applications. For example, you can create a rule to “Allow users in the Finance security group to run the finance line-of-business applications.” This blocks everyone who is not in the Finance security group from running finance applications (including administrators) but still provides access for those that have a business need to run the applications. Another useful rule would be to prevent users in the Receptionists group from installing or running unapproved software.
AppLocker rules depend upon conditional ACEs and attributes defined by AppID. Rules can be created using the following criteria:
§ Fields within a code-signing certificate embedded within the file, allowing for different combinations of publisher name, product name, file name, and version. For example, a rule could be created to “Allow all versions greater than 9.0 of Contoso Reader to run” or “Allow anyone in the graphics group to run the installer or application from Contoso for GraphicsShop as long as the version is 14.*”. For example, the following SDDL string denies execute access to any signed programs published by Contoso for the user account RestrictedUser (identified by the user’s SID):
§ D:(XD;;FX;;;S-1-5-21-3392373855-1129761602-2459801163-1028;((Exists APPID://FQBN)
§ && ((APPID://FQBN) >= ({"O=CONTOSO, INCORPORATED, L=REDMOND,
S=CWASHINGTON, C=US\*\*",0}))))
§ Directory path, allowing only files within a particular directory tree to run. This can also be used to identify specific files. For example, the following SDDL string denies execute access to the programs in the directory C:\Tools for the user account RestrictedUser (identified by the user’s SID):
§ D:(XD;;FX;;;S-1-5-21-3392373855-1129761602-2459801163-1028;(APPID://PATH
Contains "%OSDRIVE%\TOOLS\*"))
§ File hash. Using a hash will also detect if a file has been modified and prevent it from running, which can also be a weakness if files are changed frequently, because the hash rule will need to be updated frequently. File hashes are often used for scripts because few scripts are signed. For example, this SDDL string denies execute access to programs with the specified hash values for the user account RestrictedUser (identified by the user’s SID):
§ D:(XD;;FX;;;S-1-5-21-3392373855-1129761602-2459801163-1028;(APPID://SHA256HASH
§ Any_of {#7a334d2b99d48448eedd308dfca63b8a3b7b44044496ee2f8e236f5997f1b647,
#2a782f76cb94ece307dc52c338f02edbbfdca83906674e35c682724a8a92a76b}))
AppLocker rules can be defined on the local machine using the Security Policy MMC snap-in (%SystemRoot%\System32\secpol.msc) or a Windows PowerShell script, or they can be pushed to machines within a domain using group policy. AppLocker rules are stored in multiple locations within the registry:
§ HKLM\Software\Policies\Microsoft\Windows\SrpV2. This key is also mirrored to HKLM\SOFTWARE\Wow6432Node\Policies\Microsoft\Windows\SrpV2. The rules are stored in XML format.
§ HKLM\SYSTEM\CurrentControlSet\Control\Srp\Gp\Exe. The rules are stored as SDDL and a binary ACE.
§ HKEY_CURRENT_USER\Software\Microsoft\Windows\CurrentVersion\Group Policy Objects\{GUID}Machine\Software\Policies\Microsoft\Windows\SrpV2. AppLocker policy pushed down from a domain as part of a Group Policy Object (GPO) are stored here in XML format.
Certificates for files that have been run are cached in the registry under the key HKLM\SYSTEM\CurrentControlSet\Control\AppID\CertStore. AppLocker also builds a certificate chain (stored in HKLM\SYSTEM\CurrentControlSet\Control\AppID\CertChainStore) from the certificate found in a file back to a trusted root certificate. See Figure 6-25.
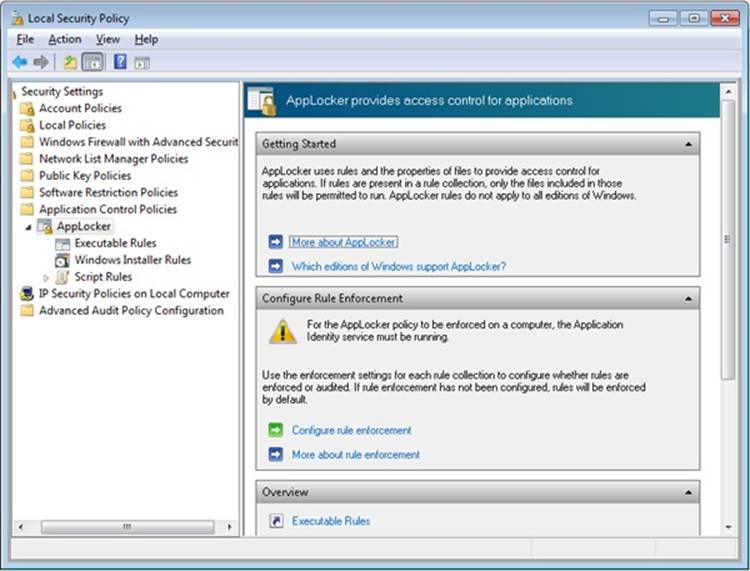
Figure 6-25. AppLocker configuration page in Local Security Policy
There are also AppLocker-specific PowerShell commands (also known as cmdlets) to enable deployment and testing via scripting. Figure 6-26 demonstrates using PowerShell commands to determine which files in a directory tree have been signed, saving the current AppLocker policy in an XML file, and displaying which executable files in a directory tree could be run by a user named RestrictedUser.
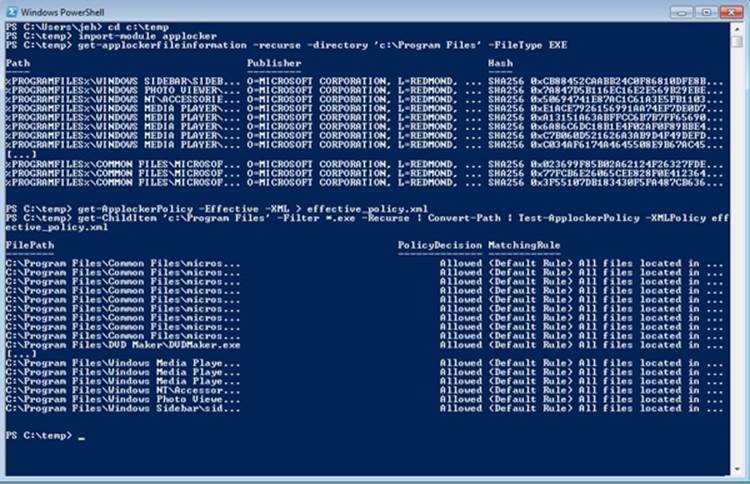
Figure 6-26. Powershell cmdlets used to examine executables for signatures, save AppLocker policies in an XML file, and test the ability of a user to run the executables
The AppID and SRP services co-exist in the same binary (%SystemRoot%\System32\AppIdSvc.dll), which runs within an SvcHost process. The service requests a registry change notification to monitor any changes under that key, which is written by either a GPO or the AppLocker UI in the Local Security Policy MMC snap-in. When a change is detected, the AppID service triggers a user-mode task (%SystemRoot%\System32\AppIdPolicyConverter.exe), which reads the new XML rules and translates them into binary format ACEs and SDDL strings, which are understandable by both the user-mode and kernel-mode AppID and AppLocker components. The task stores the translated rules under HKLM\SYSTEM\CurrentControlSet\Control\Srp\Gp. This key is writable only by SYSTEM and Administrators, and it is marked read-only for authenticated users. Both user-mode and kernel-mode AppID components read the translated rules from the registry directly. The service also monitors the local machine trusted root certificate store, and it invokes a user-mode task (%SystemRoot%\System32\AppIdCertStoreCheck.exe) to reverify the certificates at least once per day and whenever there is a change to the certificate store. The AppID kernel-mode driver (%SystemRoot%\System32\drivers\AppId.sys) is notified about rule changes by the AppID service through an APPID_POLICY_CHANGED DeviceIoControl request. See Figure 6-27.
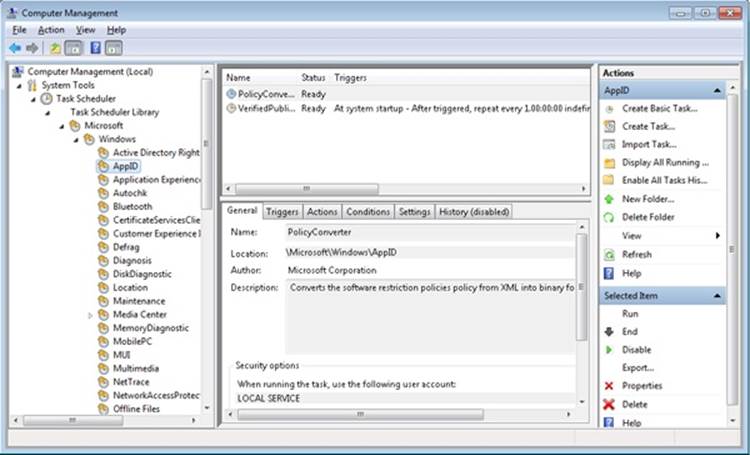
Figure 6-27. Scheduled task that runs every day to convert software restriction policies stored in XML to binary format
An administrator can track which applications are being allowed or denied by looking at the system Event Log using the event viewer (once AppLocker has been configured and the service started). See Figure 6-28.
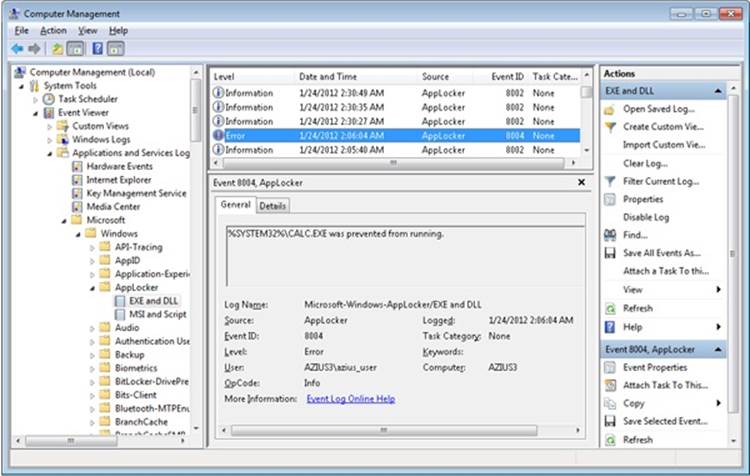
Figure 6-28. Event Viewer showing AppLocker allowing and denying access to various applications. Event ID 8004 is “denied”; 8002 is “allowed.”
The implementations of AppID, AppLocker, and SRP are somewhat blurred and violate strict layering, with various logical components co-existing within the same executables, and the naming is not as consistent as one would like.
The AppID service runs as LocalService so that it has access to the Trusted Root Certificate Store on the system. This also enables it to perform certificate verification. The AppID service is responsible for the following:
§ Verification of publisher certificates
§ Adding new certificates to the cache
§ Detecting AppLocker rule updates, and notifying the AppID driver
The AppID driver performs the majority of the AppLocker functionality and relies upon communication (via DeviceIoControl requests) from the AppID service, so its device object is protected by an ACL, granting access only to the NT SERVICE\AppIDSvc, NT SERVICE\LOCAL SERVICE and BUILTIN\Administrators groups. Thus, the driver cannot be spoofed by malware.
When the AppID driver is first loaded, it requests a process creation callback (CreateProcessNotifyEx) by calling PsSetCreateProcessNotifyRoutineEx. When the CreateProcessNotifyEx routine is called, it is passed a PPS_CREATE_NOTIFY_INFO structure (describing the process being created). It then gathers the AppID attributes that identify the executable image and writes them to the process’ access token. Then it calls the undocumented routine SeSrpAccessCheck, which examines the process token and the conditional ACE AppLocker rules, and determines whether the process should be allowed to run. If the process should not be allowed to run, the driver writes STATUS_ACCESS_DISABLED_BY_POLICY_OTHER to the Status field of the PPS_CREATE_NOTIFY_INFO structure, which causes the process creation to be canceled (and sets the process’ final completion status).
To perform DLL restriction, the image loader will send a DeviceIoControl request to the AppID driver whenever it loads a DLL into a process. The driver then checks the DLL’s identity against the AppLocker conditional ACEs, just like it would for an executable.
NOTE
Performing these checks for every DLL load is time consuming and might be noticeable to end users. For this reason, DLL rules are normally disabled, and they must be specifically enabled via the Advanced tab in the AppLocker properties page in the Local Security Policy snap-in.
The scripting engines and the MSI installer have been modified to call the user-mode SRP APIs whenever they open a file, to check whether a file is allowed to be opened. The user-mode SRP APIs call the AuthZ APIs to perform the conditional ACE access check.
Software Restriction Policies
Windows also contains a user-mode mechanism called Software Restriction Policies that enables administrators to control what images and scripts execute on their systems. The Software Restriction Policies node of the Local Security Policy Editor, shown in Figure 6-29, serves as the management interface for a machine’s code execution policies, although per-user policies are also possible using domain group policies.
Several global policy settings appear beneath the Software Restriction Policies node:
§ The Enforcement policy configures whether restriction policies apply to libraries, such as DLLs, and whether policies apply to users only or to administrators as well.
§ The Designated File Types policy records the extensions for files that are considered executable code.
§ Trusted Publishers control who can select which certificate publishers are trusted.
Figure 6-29. Software Restriction Policy configuration
When configuring a policy for a particular script or image, an administrator can direct the system to recognize it using its path, its hash, its Internet Zone (as defined by Internet Explorer), or its cryptographic certificate, and she can specify whether it is associated with the Disallowed or Unrestricted security policy.
Enforcement of Software Restriction Policies takes place within various components where files are treated as containing executable code. Some of these components are listed here:
§ The user-mode Windows CreateProcess function in %SystemRoot%\System32\Kernel32.dll enforces it for executable images.
§ The DLL loading code of Ntdll (%SystemRoot%\System32\Ntdll.dll) enforces it for DLLs.
§ The Windows command prompt (%SystemRoot%\System32\Cmd.exe) enforces it for batch file execution.
§ Windows Scripting Host components that start scripts—%SystemRoot%\System32\Cscript.exe (for command-line scripts), %SystemRoot%\System32\Wscript.exe (for UI scripts), and %SystemRoot%\System32\Scrobj.dll (for script objects)—enforce it for script execution.
Each of these components determines whether the restriction policies are enabled by reading the registry value HKEY_LOCAL_MACHINE\Software\Microsoft\Policies\Windows\Safer\CodeIdentifiers\TransparentEnabled, which if set to 1 indicates that policies are in effect. Then it determines whether the code it’s about to execute matches one of the rules specified in a subkey of the CodeIdentifiers key and, if so, whether or not the execution should be allowed. If there is no match, the default policy, as specified in the DefaultLevel value of the CodeIdentifiers key, determines whether the execution is allowed.
Software Restriction Policies are a powerful tool for preventing the unauthorized access of code and scripts, but only if properly applied. Unless the default policy is set to disallow execution, a user can make minor changes to an image that’s been marked as disallowed so that he can bypass the rule and execute it. For example, a user can change an innocuous byte of a process image so that a hash rule fails to recognize it, or copy a file to a different location to avoid a path-based rule.
EXPERIMENT: WATCHING SOFTWARE RESTRICTION POLICY ENFORCEMENT
You can indirectly see Software Restriction Policies being enforced by watching accesses to the registry when you attempt to execute an image that you’ve disallowed.
1. Run secpol.msc to open the Local Security Policy Editor, and navigate to the Software Restriction Policies node.
2. Choose Create New Policies from the context menu if no policies are defined.
3. Create a path-based disallow restriction policy for %SystemRoot%\System32\Notepad.exe.
4. Run Process Monitor, and set an include filter for Safer. (See Chapter 4 for a description of Process Monitor.)
5. Open a command prompt, and run Notepad from the prompt.
Your attempt to run Notepad should result in a message telling you that you cannot execute the specified program, and Process Monitor should show the command prompt (cmd.exe) querying the local machine restriction policies.
Conclusion
Windows provides an extensive array of security functions that meet the key requirements of both government agencies and commercial installations. In this chapter, we’ve taken a brief tour of the internal components that are the basis of these security features. In the next chapter, we’ll look at the I/O system.
All materials on the site are licensed Creative Commons Attribution-Sharealike 3.0 Unported CC BY-SA 3.0 & GNU Free Documentation License (GFDL)
If you are the copyright holder of any material contained on our site and intend to remove it, please contact our site administrator for approval.
© 2016-2026 All site design rights belong to S.Y.A.