Office 2016 For Seniors For Dummies (2016)
Part IV
Outlook
 For a guide to organizing your mail in Outlook, visit www.dummies.com/extras/office2016forseniors.
Part V
PowerPoint
 For five great PowerPoint tricks, visit www.dummies.com/extras/office2016forseniors.
Chapter 14
Getting Started with PowerPoint
Get ready to . . .
![]() Explore the PowerPoint Interface
Explore the PowerPoint Interface
![]() Work with PowerPoint Files
Work with PowerPoint Files
![]() Understand PowerPoint Views
Understand PowerPoint Views
![]() Create New Slides
Create New Slides
![]() Use Slide Placeholders
Use Slide Placeholders
![]() Turn Text AutoFit Off or On
Turn Text AutoFit Off or On
![]() Change Slide Layouts
Change Slide Layouts
![]() Move or Resize Slide Content
Move or Resize Slide Content
![]() Manually Place Text on a Slide
Manually Place Text on a Slide
![]() Navigate and Select Text
Navigate and Select Text
![]() Select Content
Select Content
PowerPoint is best known for creating business presentations — slide shows, if you will — but it’s actually a much more versatile tool. PowerPoint is a great tool for almost any situation where you need to convey a visual message. For example
· An overview of an organization or club for new members
· Posters and signs with large lettering, such as Please Help Yourself or Sign In Here
· A photo tribute for an anniversary celebration or memorial service
· Lyrics for a group sing-along
· Information about meeting rooms and activities at a seminar
This chapter offers you some basics for working with PowerPoint, including how to use slide layouts and content placeholders that make it easy to create all these types of materials and more.
Explore the PowerPoint Interface
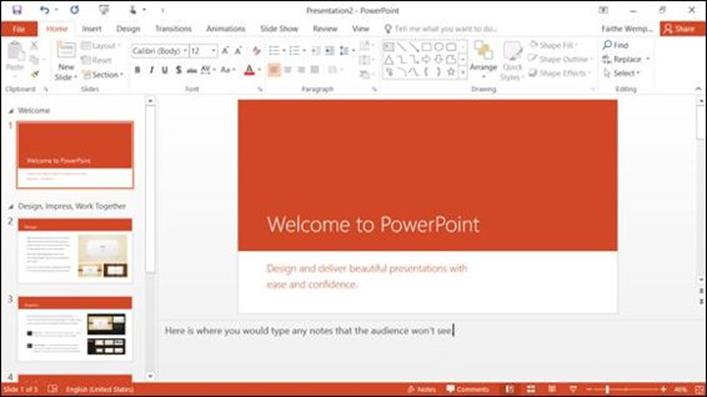
In PowerPoint, you work with slides and presentations rather than documents (as in Word) or worksheets (as in Excel). A slide is an individual page of the presentation. The term page isn’t a perfect descriptor, though, because PowerPoint slides are designed to be displayed on a computer screen or with a projector rather than printed. A presentation is a collection of one or more slides saved in a single data file.
At a big-picture level, PowerPoint’s interface is very similar to that in Word and Excel: It has a Ribbon, an Office button, and a status bar. The default view of the presentation, called Normal view, consists of three panes, as shown in Figure 14-1.
· The navigation pane is the bar along the left side. Thumbnail images of the slides appear here.
 Outline view is just like Normal view except it shows a text outline instead of thumbnails in the navigation pane. To change views, use the View tab.
· The Slide pane in the middle shows the active slide in a large, editable pane. Here’s where you do most of your work on each slide.
· The Notes pane runs along the bottom of the screen. Here you can type any notes to yourself about the active slide. These notes don’t show onscreen when you display the presentation, and don’t print (unless you explicitly choose to print them). By default the Notes pane is minimized, but you can drag upward from the bottom of the Slide pane to bring it into view, as shown in Figure 14-1.
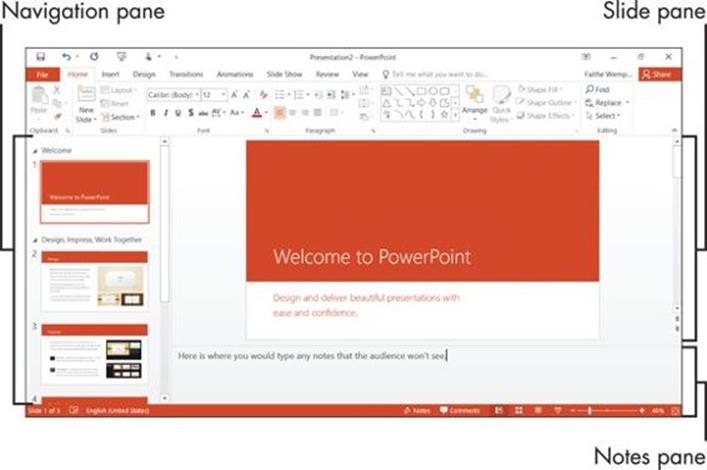
Figure 14-1
Work with PowerPoint Files
When you start PowerPoint, the Start screen appears, just like it does in Word and Excel. Press Esc or click the Blank Presentation button to start a new presentation with a single slide in it. You can work with this presentation, and then save it in any of these ways, the same as in Word and Excel:
· Choose File ⇒ Save.
· Press Ctrl+S.
· Click the Save icon on the Quick Access toolbar.
Or, if you prefer, you can open an existing presentation file, just like in other Office applications:
· Choose File ⇒ Open.
· Press Ctrl+O.
· Choose File ⇒ Open and then choose one of the recently opened files on the right side of the File menu.
You can also start PowerPoint and open an existing file at the same time by double-clicking the filename from any location in File Explorer (such as This PC or Documents).
Understand PowerPoint Views
Like other Office applications, PowerPoint provides several different views for you to work with. Each view is useful for a different set of activities. Normal view (refer to Figure 14-1) — the default — is the most commonly used view. You can choose between the other views in either of these ways:
· Click one of the View buttons in the bottom-right corner of the PowerPoint window. (Not all the views are represented there.)
· On the View tab, click a button for the view you want.
Figure 14-2 shows Slide Sorter view, and also points out the two places where you can switch views.
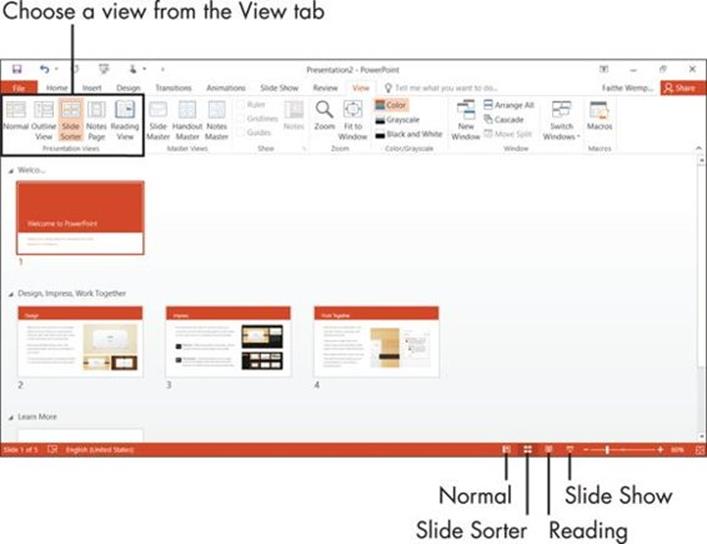
Figure 14-2
Table 14-1 summarizes the available views and tells what each view is good for. I show you many of these views in more detail later, when I discuss how to do activities that these views are well suited for.
Table 14-1 PowerPoint Views
|
View |
How to Select |
Useful For |
|
Normal |
Click the button in the bottom-right corner; or choose View ⇒ Normal |
Editing slide content of any kind |
|
Outline |
Choose View ⇒ Outline View |
Viewing and editing text in slide placeholders |
|
Slide Sorter |
Click the button in the bottom-right corner; or choose View ⇒ Slide Sorter |
Viewing all slides in the presentation at a glance, rearranging slide order |
|
Notes Page |
Choose View ⇒ Notes Page |
Editing the speaker notes for each slide |
|
Reading View |
Click the button in the bottom-right corner; or choose View ⇒ Reading View |
Showing a presentation in a window |
|
Slide Show |
Click the button in the bottom-right corner; or choose Slide Show ⇒ From Beginning, or Slide Show ⇒ From Current Slide |
Showing the presentation full-screen |
|
Slide Master |
Choose View ⇒ Slide Master |
Making global changes that affect all slides in the presentation |
|
Handout Master |
Choose View ⇒ Handout Master |
Making changes that affect the design of the handouts you print |
|
Notes Master |
Choose View ⇒ Notes Master |
Making changes that affect the design of the speaker note pages you print |
Create New Slides
Each new presentation begins with one slide in it: a title slide. You can easily add more slides to the presentation in any of these ways:
· Select the slide that the new slide should come after and then choose Home ⇒ New Slide.
· In the navigation pane in Normal view click the slide that the new slide should come after, and then press Enter.
· In the navigation pane in Outline view, click at the beginning of the title of the slide that the new one should come before, and then press Enter.
When you add a new slide in any of these ways, you get the Title and Content layout. This is the default slide layout for all slides in the presentation except the first one. (The first slide’s default layout is Title Slide.) The next section covers slide layouts in more detail.
If you want a different slide layout when inserting a new slide, click the down arrow under the Home ⇒ New Slide button. A palette appears showing various layouts. Click the one you want. See Figure 14-3.
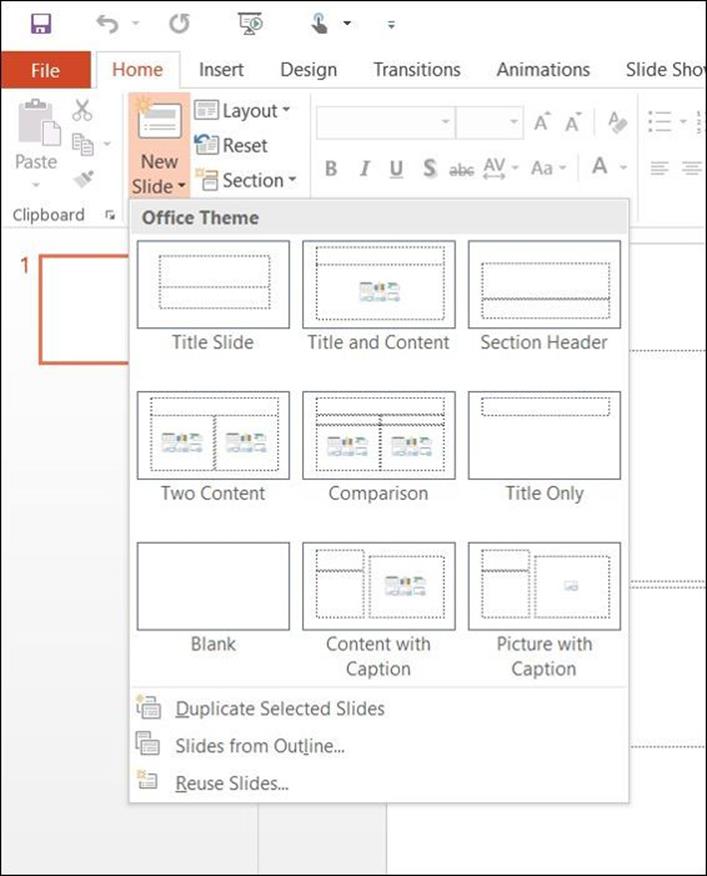
Figure 14-3
 To duplicate an existing slide, including all its content, select it and then choose Duplicate Selected Slides from the New Slide button’s menu.
Use Slide Placeholders
A slide layout is a combination of one or more content placeholders. For example, the default slide layout — Title and Content — has two boxes: a text box at the top for the slide’s title, and one multipurpose content placeholder in the middle that can be used for text, a graphic, or any of several other content types. See Figure 14-4.
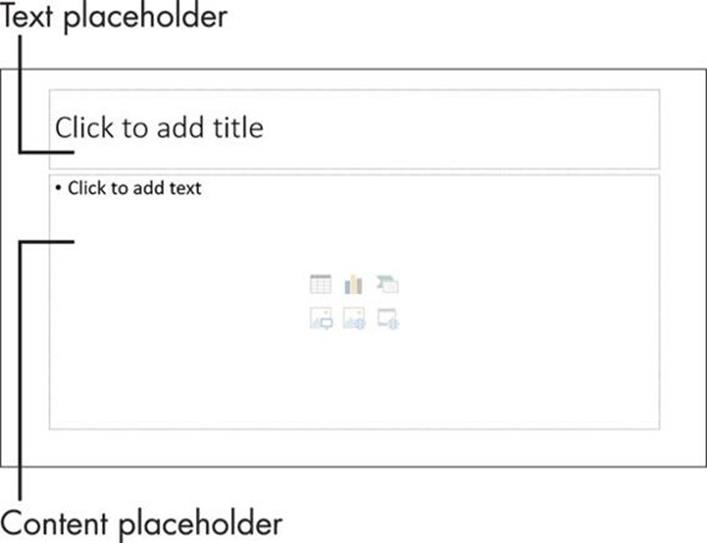
Figure 14-4
Some placeholders are specifically for text. For example, the placeholder for each slide’s title is text-only. Click in such a placeholder and type the text you want. A content placeholder, such as the large placeholder on the default layout, can hold any one type of content: text, table, chart, SmartArt graphic, picture, clip art, or media clip (video or sound). Later chapters explain some of these other types of content in more detail.
To add text to a content placeholder, click the Click to Add Text area and type what you want. To add any other type of content, click the icon in the placeholder for the type you want. These are identified in Figure 14-5.
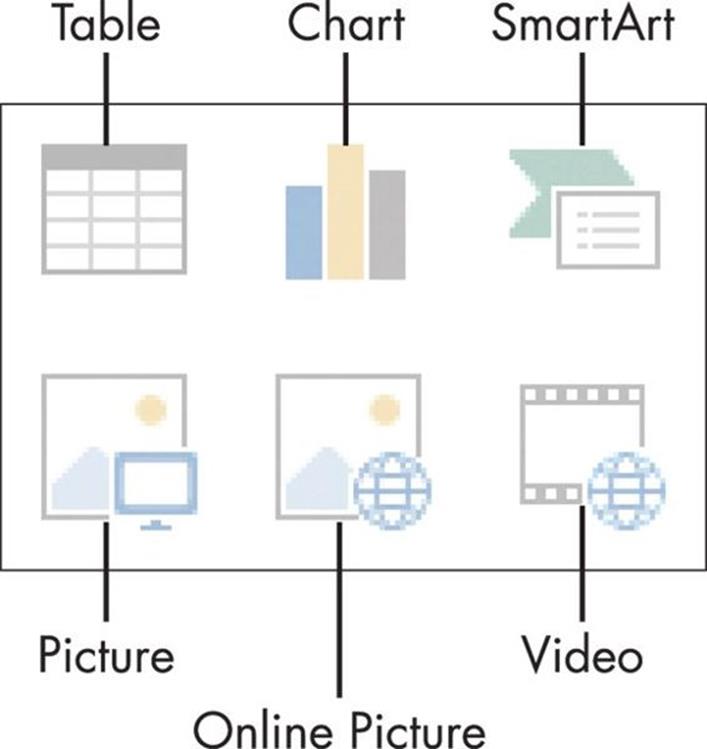
Figure 14-5
Use placeholders whenever possible rather than manually placing content on a slide. If you change the presentation’s design (covered in Chapter 15), any content in placeholders is automatically shifted and reformatted to match the new design.
Turn Text AutoFit Off or On
If you type more text than will fit in that text box (especially common for a slide title, for example), the text automatically shrinks itself as much as is needed to allow it to fit. This feature — AutoFit — is turned on by default. AutoFit is very useful because it prevents text from being truncated.
Sometimes, however, you might not want text to AutoFit. For example, it might be important to you that all the titles on your slides be exactly the same font size, for consistency.
To control whether AutoFit is in effect in a particular text placeholder, follow these steps:
1. Right-click the text box and choose Format Shape from the menu that appears.
2. In the Format Shape task pane that appears, click Text Options, and then click the Textbox icon.
3. In the AutoFit section, select the Do Not AutoFit radio button. See Figure 14-6.
4. Close the task pane.
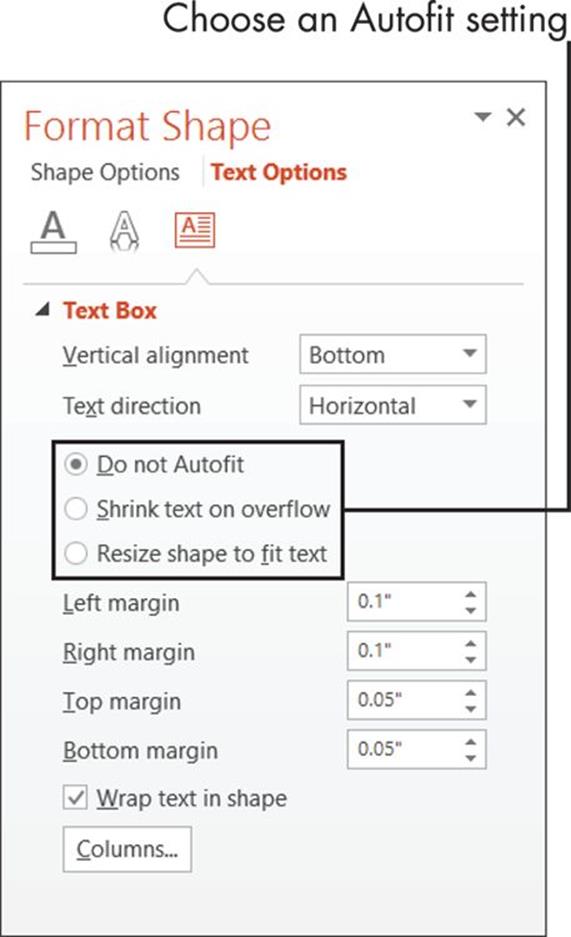
Figure 14-6
If you don’t want to use AutoFit at all, you can turn it off at a global level. To do so, do the following:
1. Choose File ⇒ Options.
2. Click Proofing (on the left).
3. Click the AutoCorrect Options button. The AutoCorrect dialog box opens.
4. Click the AutoFormat as You Type tab.
5. In the Apply as You Type section (see Figure 14-7), clear the following check boxes:
· AutoFit Title Text to Placeholder
· AutoFit Body Text to Placeholder
6. Click OK.
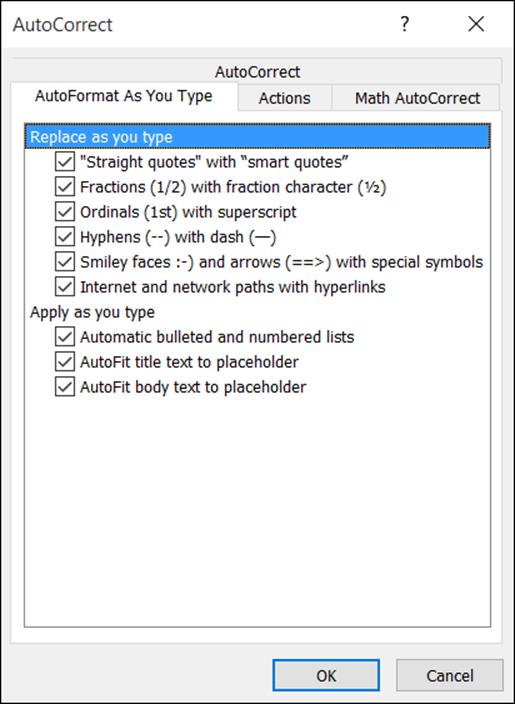
Figure 14-7
Change Slide Layouts
The Title and Content layout is very versatile. You can place any one type of content on the slide, in addition to a text title. Sometimes, though, you might want something different: for example, two different content types on the same slide (like a bulleted list on one half and a picture on the other) or just a title with an empty space underneath it (for manually inserted content).
To change a slide’s layout, follow these steps:
1. Select the slide for which you want to change the layout.
2. Choose Home ⇒ Layout. A palette of the available layouts appears.
3. Click the layout you want.
Move or Resize Slide Content
Each placeholder box on a slide is a separate object. It can be moved or resized freely.
To resize a box, select it and then drag a selection handle. A selection handle is a circle or square on the border of the box. Each box has eight selection handles: one in each corner, and one on each side. To maintain the height-width proportion for the box — its aspect ratio — hold down the Shift key while you drag one of the corner selection handles.
To move a placeholder box, position the mouse pointer over the border of the box, but not over a selection handle. The mouse pointer changes to a four-headed arrow. Click and drag the box to a new location.
If you resize the placeholder(s) on a slide and then apply a different layout or design to the slide, everything snaps back to the default size and location. So make sure you have the right layout and design chosen before you spend a lot of time resizing or moving placeholders.
If you want to move or resize a certain placeholder on every slide in your presentation, do so from Slide Master view (covered in Chapter 15). That way, you can make the change to the layout’s template, and the change is applied automatically to every slide that uses that layout.
Manually Place Text on a Slide
Whenever possible, you should use the layout placeholders to insert slide content. However, sometimes you might not be able to find a layout that’s exactly what you want. For example, maybe you want to add a caption or note next to a picture, or you want to create a collage of text snippets arranged randomly on a slide.
The text in such a text box doesn’t appear in Outline view, and doesn’t export when you save the presentation as an outline, so use this type of text box sparingly.
Here’s how to create a manual text box on a slide:
1. Display the slide.
2. Choose Insert ⇒ Text Box. The mouse pointer turns into a vertical line.
3. Click where you want the text to appear, and then start typing.
Manually placed text boxes behave somewhat differently from placeholder text boxes.
· The text box widens as you type. The text doesn’t automatically wrap to the next line. You can press Enter to create a new paragraph, or press Shift+Enter for a line break within the same paragraph.
· Manually placed text boxes aren’t resizable. The box resizes itself to fit whatever text is inside it.
If you want a manual text box to behave more like a placeholder, adjust its AutoFit setting:
1. Right-click the text box and choose Format Shape from the menu that appears.
2. Click Text Box.
3. In the AutoFit section, select one of these options:
· Do Not AutoFit: Turns off all AutoFit properties, which allows you to manually resize the text box. Text doesn’t resize if it doesn’t fit in the box.
· Shrink Text on Overflow: Turns on AutoFit. You can manually resize the text box. Text resizes if it doesn’t all fit in the box.
Navigate and Select Text
As in Word and Excel, you might find using keyboard shortcuts more convenient than using the scroll bar (shown in Chapter 1).
The function of some PowerPoint keyboard shortcuts depends on whether you’re editing in a text box or navigating in a presentation.
Table 14-2 lists the most common navigation shortcuts in PowerPoint.
Table 14-2 Navigation Keyboard Shortcuts
|
Press This |
PowerPoint Text Box |
PowerPoint Presentation |
|
Up arrow (↑) |
One line up |
Previous slide |
|
Down arrow (↓) |
One line down |
Previous slide |
|
Right arrow (→) |
One character to the right |
Next slide |
|
Left arrow (←) |
One character to the left |
Previous slide |
|
Tab |
Next tab stop |
Next placeholder box on this slide |
|
Shift+Tab |
Next tab stop |
Previous placeholder box on this slide |
|
Ctrl+arrow key |
→ or ←: one word to the left or right;↑ or ↓: one paragraph up or down |
→ or ←: one word to the left or right;↑ or ↓: one paragraph up or down |
|
Home |
Beginning of the line |
First slide |
|
End |
End of the line |
Last slide |
|
Ctrl+Home |
Beginning of the text box |
First slide |
|
Ctrl+End |
End of the text box |
Last slide |
|
Page Down |
Next slide |
Next slide |
|
Ctrl+Page Down |
Next slide |
Next slide |
|
Ctrl+Page Up |
Previous slide |
Previous slide |
Select Content
To select text in PowerPoint, you can either
· Drag the mouse pointer across it (holding down the left mouse button)
or
· Click where you want to start and then hold down Shift as you press the arrow keys to extend the selection.
When text is selected, its background changes color. The color depends on the color scheme in use; with the default color scheme, it’s light blue.
Table 14-3 shows keyboard shortcuts to help you select text.
Table 14-3 Keyboard Text Selection Shortcuts
|
Press This |
PowerPoint Extends Selection This Much |
|
Shift+← or → |
One character in arrow direction |
|
Shift+↑ or ↓ |
One line in arrow direction |
|
Ctrl+Shift+← |
The end of the word |
|
Ctrl+Shift+→ |
The beginning of the word |
|
Ctrl+Shift↓ |
The end of the current paragraph (if in a text box) |
|
Ctrl+Shift+↑ |
The beginning of the current paragraph (if in a text box) |
|
Ctrl+Shift+End |
The end of the current text box (if in a text box) |
|
Ctrl+Shift+Home |
The beginning of the current text box (if in a text box) |
|
Ctrl+A |
All slides |
All materials on the site are licensed Creative Commons Attribution-Sharealike 3.0 Unported CC BY-SA 3.0 & GNU Free Documentation License (GFDL)
If you are the copyright holder of any material contained on our site and intend to remove it, please contact our site administrator for approval.
© 2016-2026 All site design rights belong to S.Y.A.